Jewelry Finishing Quality Inspection and Common Defect Analysis
Introduction:
Jewelry finishing is a critical process that involves trimming, fastening, welding, and rough surface processing of jewelry blanks made by casting or stamping using manual techniques and equipment.

Table of Contents
Section I: Jewelry Finishing Quality Inspection content
The purpose of Jewelry finishing is to maintain and restore the original shape. Poor Jewelry finishing of jewelry blanks will directly affect the final quality of the jewelry. The overall quality requirements of the Jewelry finishing process mainly include the following aspects:
(1) The jewelry blank after Jewelry finishing should be the same as the original samples, with beautiful and generous shape, fine artistry, clear and smooth lines, and neat decorative inlays.
(2) The surface of the jewelry blank after the Jewelry finishing should be bright and clean, and the jewelry castings must be thoroughly sanded without leaving any dead angles or sharp marks.
(3)Welding of each part should be firm, without loose welding, missed welding, sand holes, burrs, hooks, cracks, and other defects
(4) The fineness mark, material mark, and factory name mark of the jewelry must be clear and visible.
Different types of jewelry have unique finishing requirements. For example, rings require the setting and ring shank to be coordinated and unified, with a round shank shape and no missed prongs.
Earrings need to be symmetrical, consistent in size, and equal in length. The earring clip should hold the earpin tightly.
The chain of a necklace or bracelet should be connected straight, with flexible connections between chain links. The chain clasp should be easy to wear but not come off without pressing the button. The pendant bail should be of appropriate size. The welding part of a brooch should be applicable in length.
To facilitate the work of QC staff, the factory quality inspection department should specify precise requirements. Taking rings and pendants as an example.
here are the inspection contents, requirements, and methods
Table 7-1 Rings Jewelry finishing inspection content, requirements, and methods.
| Item | Content | Inspection method | Requirements |
|---|---|---|---|
| Dimensions | HongKong /Japan/Taiwan | Ring size scale | Corresponding size line position of Ringsize and ring size scale,±1/5 |
| Untied States | Ring size scale | Corresponding size line position of Ring size and ring size scale, ±1/4 | |
| Europe | Ring size scale | Corresponding size line position of Ring size and ring size scale, ±1/4 | |
| Shape | Real product shape | Visual | Follow the shape of the order pattern |
| Apperance | Inay | Visual | Matches the shape of the jewelry sample, no skewness from any direction |
| Burr, inter layer | Visual | Clean and smooth, not scratchable | |
| Metal crippled | 10x magnifying glass | Cannot see sand holes, metal withered, metal slag, etc., the metal surface should be smooth | |
| Strip | Visual | The caged back is intact, smooth, and does not scratch the hand | |
| Welding position | Visual | The welding position should be clear, and the joint position should not be visible | |
| Active position | Visual | The active position should swing flexibly, and when shaken, it should naturally hang vertically | |
| Ring shank bottom | Visual inspection, measurement with calipers | The size and thickness of the Ring shank bottom should be uniform, and the required angles must be maintained |
Table 7-2 Pendant Jewelry finishing inspection content, requirements, and methods.
| Item | Content | Inspection method | Requirements |
|---|---|---|---|
| Shape | Real product shape | Visual | Follow the shape of the order pattern |
| Apperance | Inay | Visual | Matches the jewelry sample in shape, no skewness from any direction |
| Burr, inter-layer | Visual | Clean and smooth, not scratchable | |
| Metal crippled | 10x magnifying glass | No sand holes, metal withered, metal slag, etc., metal surface should be smooth and flat | |
| Strip | Visual | caged back intact, smooth without rough edges, does not scratch hands | |
| Solid joint | Visual | Clear welding position, hanging straight, the pendant buckle head and hanging ring should be in the center, not tilted | |
| Action Position | Visual | The movable position should swing flexibly, and should naturally hang vertically when shaken | |
| Pendant buckle head | Visual | Matches the jewelry sample in size, hangs properly, chain hole allows smooth threading |
Section II : Common Defects of Jewelry Finishing
Different categories of jewelry have both standard and some unique aspects in jewelry finishing operations. Correspondingly, in terms of jewelry finishing defects, there are common and category-specific issues.
1.Common Defects of Jewelry finishing in various products
These defects can be encountered in various types of jewelry, mainly referring to issues related to the quality of the metal surface.
1.1. Filing defects
In the Jewelry finishing process, a large number of tools, such as steel files and sandpaper, are used to process the surface of the workpiece. The processing effect is directly related to the skill, carefulness, and assessment methods of the operators. When the processing is not done well, filing defects are prone to occur, such as sanding not enough, excessive sanding, and uneven sanding.
[Case 7 -1] Filing is not enough, as shown in Figure 7- 1.

Analysis:
After the Jewelry is finished, there are still rough surfaces in some areas in the initial state, or rough processing traces from other surface processes remain. Such Jewelry surface conditions cannot be removed by filing and must be repolished by sanding.
[Case 7-2] filing too much, as shown in Figure 7-2.

Analysis:
When analyzing jewelry finishing, some parts of the workpiece are filed too much, causing these parts to be out of shape and defects to appear. After this problem occurs, the only way to repair it is through welding.
[Case 7-3] sanding is not smooth, as shown in Figure 7-3.

Analysis:
The workpiece, after the jewelry is finished, looks comfortable, without surface undulations, uneven edges, etc. The caged back, in this case, has wavy edges, and the lines are not smooth.
[Case 7-4] collapse on the jewelry workpiece, as shown in Figure 7-4.

Analysis:
Lost parts defects after jewelry is finished are more common at the edges of the product. The cause may be that the original version or the casting itself had this defect, which could not be removed even after Jewelry finishing, or it may be caused by collisions or excessive engraving during Jewelry finishing and jewelry cleaning processes.
[Case 7-5] Asymmetric size width of edges, as shown in Figure 7-5.

Analysis:
This type of defect often occurs in the Jewelry finishing process, manifesting as inconsistencies in width between two corresponding metal edges (or different parts of the same metal edge) that should be consistent in width. The root cause of this problem lies in the wax injection process of the casting process, caused by displacement of the wax pattern. When different widths of edges occur, this method should be used in the Jewelry finishing stage to smooth both sides, and if necessary, a combination of filing and welding should be used for repair.
1.2. Metal Material Defects
These defects refer to poor metal content, which are not generated in the Jewelry finishing stage but are brought about by previous processes.
[Case 7-6] Jewelry presents apparent collapse on the surface, as shown in Figure 7-6.

Analysis:
The analysis of such defects is formed on the cast blank and is difficult to remove even after the jewelry is finished. It often appears as scattered freckle-like or dendritic shapes, seriously affecting the surface quality of the workpiece. To repair such defects in the Jewelry finishing stage, it is generally necessary to solidify the collapsed part with a sand hole stick or dig out a layer of the collapsed part with a machine needle and then build up to the required size on the surface, which belongs to a difficult-to-repair category of defects. To completely solve such problems, it is necessary to start from the source and strictly control it in the casting stage.
[Case 7-7] After the Jewelry is finished, sand holes are exposed in a certain part of the jewelry, as shown in Figure 7-7.
Analysis:
This sand hole defect was not generated during the jewelry finishing stage but was produced during the casting process. Some sand holes are directly exposed on the surface of the casting, while others are hidden below the skin and are exposed after the jewelry is finished.
[Case 7-8] After jewelry finishes the jewelry workpiece, burrs remain, as shown in Figure 7-8.

Analysis:
When burrs appear on the cast or are stamped blank, they must be cleaned up during Jewelry finishing. However, sometimes burrs are challenging to handle at a dead end, leading to incomplete sanding and residue. In addition to strengthening the inspection of jewelry finishing workpieces, the source lies in how to reduce the generation of burrs in the casting process.
[Case 7-9] Cracks appeared during the finishing of the jewelry, as shown in Figures 7-9.

Analysis:
Analysis reveals the presence of microcracks or penetrating cracks in certain parts of Jewelry during Jewelry finishing. The causes of cracks are multifaceted, such as excessive brittleness of jewelry materials, excessive casting thermal stress, and significant impact and mechanical stress during Jewelry finishing.
1.3. Welding Defects
Jewelry often requires welding during jewelry finishing to assemble components, repair defects, etc. The main welding methods used are laser welding and flame brazing. Improper welding operations can easily lead to defects such as welding sand holes, incomplete penetration, and weak welding.
[Case 7-10] Welding sand holes appear at the welding site of jewelry, as shown in Figure 7-10

Analysis:
In this case, the jewelry uses laser welding to repair the metal edge. Laser welding belongs to pulse spot welding, where the welding wire is stacked up point by point, and then the welding area is sanded flat. If the welding scars are not tightly stacked together, holes may appear after sanding.
[Case 7-11] The welding material did not penetrate the inside of the weld seam during welding, causing incomplete fusion, as shown in Figure 7-11.

Analysis:
In this case, the jewelry uses flame welding to connect the components to the jewelry body. Flame welding uses brazing material to melt and infiltrate under flame heating. If the welding position is not adequately treated with oxides or impurities, or if the penetration of the welding material is poor, hindering the infiltration of the solder, it will result in the presence of incomplete fusion between the base material and the base material in the weld joint, known as incomplete fusion.
[Case 7-12] The goods were melted during welding, as shown in Figure 7-12.

Analysis:
Sufficient temperature is required when welding jewelry pieces to melt the solder. However, when the temperature is too high, there is a possibility of burning the jewelry sample, melting the metal near the weld, or flowing some delicate parts of the jewelry sample, and even the entire piece may melt. Therefore, strict control of the heating temperature is required during welding.
2. Classification of Jewelry finishing defects for various types of jewelry
In addition to common jewelry finishing issues, different categories of jewelry often exhibit corresponding jewelry finishing defects.
2.1. jewelry finishing defects of Bracelets and necklaces
For bracelets, necklaces, and jewelry blanks, it is necessary to correct the shape of the workpiece blanks to meet the design requirements, then connect the links, go through processes such as filing, connecting and assembling, welding, sanding, etc., to assemble a perfect piece of jewelry. It is required that the connection between links is compact and close-fitting, the combination is flexible, the distance is uniform, the overall chain is balanced, and there should be no unevenness in height. The following are some common defects in bracelets and necklaces during Jewelry finishing.
[Case 7-13] Inconsistent sizes of fastening rings, as shown in Figure 7-13.

Analysis:
Different chain links are connected by fastening rings. It is required that the sizes of the fastening rings are uniform, which can not only achieve a good appearance effect but also make the chain relatively straight. In this case, sme fastening rings are too large, which reduces the quality level of the bracelet.
【Case 7-14】The fastening lines between chain links are too long, as shown in Figure 7-14.

Analysis:
For the side-connected chain, the fastening lines should not exceed the welding area too much. Otherwise, it will significantly affect the appearance. In this case, the connected wire is too long, and the excess connected wire should be cut off and then welded during Jewelry finishing.
【Case 7-15】The tightness between the links of different chains is inconsistent, as shown in Figure 7-15.

Analysis:
Bracelets and necklaces generally have multiple links in different chains, and the connection between the links of different chains should maintain a consistent tightness to make the entire chain smooth. There should be no situations where the chain will reverse when it is too loose and cannot rotate flexibly when it is too tight.
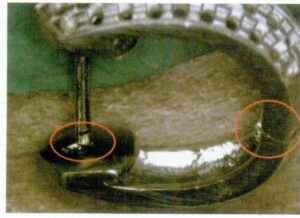
【Case 7-16】The welding position is weak, as shown in Figure 7-16.

Analysis:
The welding between the chain links should be firm, and the amount of welding material should be adequately controlled. Excessive amounts can cause welding tumors, while too little can lead to weak welding positions, posing a risk of fracture.
[Case 7-17] incomplete fusion welding, as shown in Figure 7-17.

Analysis:
Soldering deficiency, detachment welding, and situations where the welding material cannot penetrate the welding site are commonly known as incomplete fusion soldering. The reasons include various aspects such as improper treatment of the welding position, incomplete removal of oxides or impurities hindering the penetration of the solder, poor wettability and penetrability of the solder material, incorrect welding operation methods, and excessive heating of the solder material leading to severe oxidation.
【Case 7-18】Welded to be unmovable, as shown in Figure 7-18.

Analysis:
During welding, the solder has seeped into the gaps between adjacent chain links, causing them to be welded together and unable to move independently, affecting the appearance and wearability. The main reasons for this problem include improper placement of solder, excessive solder amount, flux applied to the connecting gap, etc.
【Case 7-19】The connected rings are not welded properly, as shown in Figure 7-19.

Analysis:
To keep a chain smooth, it is first required that the connecting positions of each part be in order. In this case, the connected rings between the bracelet links are connected, and one of the connected rings is obviously skewed, making it difficult for the chain to remain straight after welding.
【Case 7-20】Deformation of the bottom of the chain link socket, as shown in Figure 7-20.

Analysis:
In this case, the setting mouth of the chain link has elongated Deformation, which will affect the setting operation. Before the bracelet assembly, observe whether the blank has Deformation. If there is a Deformation, choose the appropriate tool to correct it.
【Case 7-21】The length of the chain does not meet the requirements.

Analysis:
For easy wearing, most bracelets and necklaces have length requirements. The length of a bracelet is generally 6.5 inches. 7 inches, the acceptable size deviation during the inspection is ±1/4; the length of the bracelet is generally 16.5 inches or 17 inches, and the acceptable size deviation during the inspection is ±1/2 inch. The required length of this bracelet is 7 inches, and the actual length is 7.8 inches, exceeding the maximum allowable tolerance.
2.2. Jewelry finishing defects of Rings
Jewelry finishing of rings generally involves processes such as filing casting sprue marks, shaping, assembling fittings, welding, filing, sanding, and polishing. In these operations, in addition to common jewelry finishing issues, there are often jewelry finishing issues specific to rings, as shown below.
[Case 7-22] The ring shank is not smooth, as shown in Figure 7-22.

Analysis:
When analyzing the jewelry finishing of rings, it is required to sand the ring shank round and smooth, fit the ring size scale over the ring, and ensure no obvious gap is visible to the naked eye.
【Case 7 – 23】The innercircle of the ring is not rounded enough, as shown in Figure 7 – 23.

Analysis:
For comfortable wearing, many rings require a rounded inner ring shank. In this case, some parts of the inner shank of the ring are right-angled and should be sanded to a rounded edge.
[Case 7-24] The ring shank bottom is too thin, as shown in Figure 7-24.

Analysis:
The original ring shank bottom thickness is 2mm. During Jewelry finishing, the ring size needs to be expanded, and the ring shank bottom is hammered and stretched too thin, affecting comfort when worn.
[Case 7-25] The ring size does not match, as shown in Figure 7-25.

Analysis:
There are specific requirements for the ring size. In this case, the ring size is required to be size 14, but it is actually only size 12. During Jewelry finishing, each ring size should be inspected, with a general tolerance range of ±1/4. If the ring size is slightly smaller, a ring gauge measuring rod and hammer can be used to enlarge it to the required size. If the difference is significant, the excess must be sawed off at the ring shank bottom, and an additional section must be added and securely welded. If the ring size is too large, the excess length needs to be sawed off at the ring shank bottom.
[Case 7-26] The ring caged back is deformed, as shown in Figure 7-26.

Analysis:
Many high-end rings require a caged back to enclose the inner ring shank of the ring. The caged back is usually made of hollow pieces with regular hollow patterns on top. During Jewelry finishing operations, problems often occur due to carelessness, improper operation, etc., leading to the Deformation of the caged back.
[Case 7-27] Ring claw deformation, as shown in Figure 7-27.

Analysis:
The claws of the ring should be symmetrical and not skewed. In this case, one claw is twisted outward, not aligned with the other claws. The claws should be corrected during Jewelry finishing.
[Case 7-28] The side of the male ring is out of shape, as shown in Figure 7-28.

Analysis:
Some men’s rings require the two sides to be very flat, forming a fixed angle. Proper tools and techniques should be used during filing and sanding to avoid damaging the overall angle of the jewelry.
[Case 7-29] Filing for casting sprue marks damaged the ring shank, as shown in Figure 7-29.

Analysis:
When finishing the ring in Jewelry finishing, the residual casting sprue marks of the workpiece should be filed off first. To improve production efficiency, most now use a casting sprue cutting machine instead of hand cutting. Due to the strong cutting force of the grinding wheel, if not controlled properly, it is easy to damage the workpiece during cutting. In this case, the casting sprue of the ring was cut too much and damaged the ring. When cutting, pay attention to observing the position of the casting sprue, determine the grinding angle of the ring, gently rotate the ring on the grinding wheel, and observe while cutting until it is basically smooth with the outer ring shank of the ring.
[Case 7-30] The head of the ring is not straight, as shown in Figure 7-30.

Analysis:
To reduce production difficulty, sometimes a product is divided into several parts for separate casting, and then these parts are assembled and welded together in the Jewelry finishing stage. In this case, the flower head and the ring are cast separately, and during assembly, the flower head is not centered, causing misalignment. To address such defects, during assembly, ensure proper alignment before welding; if necessary, simple positioning devices can be set on the original version, or a simple jig can be used during welding to assist in positioning.
2.3. Jewelry finishing defects of earrings
The Jewelry finishing of earrings needs to go through processes such as filing casting sprue marks, shaping, fastening ear pins, welding, boiling in water, filing surface, sanding, polishing, etc. In this process, special earring defects of Jewelry finishing are seen
[Case 7-31] The hinge position of the earring is too tight, and the ear pin cannot match the needle hole, as shown in Figure 7-31.
Analysis:
In the assembly method of earrings, one method is to open a hinge position in the middle of the earring to divide it into two halves, weld the ear pin at one end of the opening of one half, open an earrpin hole at the corresponding position of the other half, and lock it by opening and closing through the hinge position, and locking by the match of the ear pin and the ear pin hole. In this case, the hinge position is too tight, causing the ear pin to not enter the hole to match.
[Case 7-32] The ear needle is too long, as shown in Figure 7-32.

Analysis:
The length of the ear pin is mainly selected according to the shape of the earring, generally specified in the production work order, with a permissible deviation of ±0.5mm. When jewelry is finished, if careless, the wrong ear pin length may be used.
[Case 7-33] Earpin melted, as shown in Figure 7-33.

Analysis:
The ear needle is very thin compared to the body of the earring. When soldering the ear needle, special attention should be paid to controlling the size and strength of the flame. Otherwise, the earpin is easy to melt.
[Case 7-34] Earrings are asymmetrical, as shown in Figure 7-34.

Analysis:
As earrings are worn in pairs, symmetry is required on both sides, including shape and size. There are inconsistencies in the earrings in this case, which require further Jewelry finishing.
[Case 7-35] Earring opening deformation, as shown in Figure 7-35.

Analysis:
In this case, the required size of the earring opening is 8mm, but the size of the earring opening on the right side exceeds the specified requirement, resulting in asymmetry, and it needs to be modified.
[Case 7-36] The ear clip is too tight, affecting movement, as shown in Figure 7-36.

Analysis:
The ear clip is locked by the squeeze barrel and the earring body. It is required that the ear clip opens and closes smoothly, fully expanding when opened and closing securely when closed. The hinge barrel of the ear clip, in this case, needs further adjustment to achieve consistent tightness when opening and closing, accompanied by a “pop” sound.
[Case 7-37] The ear pin is not straight, as shown in Figure 7-37.

Analysis:
The ear pin, as part of the earring body, should be straight. In this case, the left ear pin has a noticeable bend, which should be adjusted and corrected during Jewelry finishing.
[Case 7-38] The ear clap piercing connection line is too long, as shown in Figure 7-38

Analysis:
The ear clap is connected to the earring body through a connecting wire. The length of the through wire should be level with both ends of the ear clap, not too long; otherwise, it will affect wearing.
2.4. Jewelry finishing defects of Pendants
The pendant is in conjunction with a chain. Its jewelry finishing process includes filing casting sprue marks, shape adjustment, soldering pendant bail, filing, sanding, polishing, etc. In addition to common jewelry finishing defects, special pendant defects of Jewelry finishing are as follows.
[Case 7-39] The pendant ring is not round, as shown in Figure 7-39.

Analysis:
he pendant jump ring is used to wear the pendant bail, requiring roundness to ensure that the bail is vertical in the center of the jump ring when hanging straight. The circle, in this case, is elliptical, which may be due to defects in the original version, incomplete repair of the broken wax mold, or jewelry finishing not correcting to be the circular jump ring.
[Case 7-40]The top hanging jump ring does not match the bail size, as shown in Figure 7-40.

Analysis:
The tip of the bail is welded after passing through the handing jump ring ring. The clasp should be able to stand upright and move freely inside the ring. However, in this case, the height inside the handing jump ring does not match the bail, and there is not enough space for the bail to stand upright.
[Case 7-41] The bail hole is too small to pass through the chain, as shown in Figure 7-41.

Analysis:
When the customer produces a necklace, the chain diameter is generally specified. When preparing the pendant bail, it must ensure that the chain can pass smoothly through the pendant bail hole. In this example, the pendant was incorrectly matched with the pendant bail during jewelry finishing, and a larger size model should be used.
[Case 7-42] The pendant is not hanging straight, as shown in Figure 7-42.

Analysis:
The pendant in this example is divided into two parts, connected through the middle setting, and the three components cannot hang in a straight line when combined. The reason is that there are mutual constraints in their matching, which need to be adjusted and aligned during finishing.
[Case 7-43] The pendant’s right angle position was filed as flat, as shown in Figure 7-43.

Analysis:
The corners of the pendant, in this case, are required to have corner positions, and during finishing and polishing, the left corner was sanded to have a corner position, but the right corner position was accidentally polished into a blunt position.
[Case 7-44] Pendant back perforation, as shown in Figure 7-44.

Analysis:
The defect of the pierced hole at the back of the pendant in this example was not caused by jewelry finishing but already appeared on the cast blank, and its formation may be related to the casting process, mold conditions, melting and pouring, etc. Although the pierced hole appears on the back of the pendant, it does not directly affect its appearance; instead, it should be welded and repaired during jewelry finishing.
[Case 7-45] The sizes of the decorative holes on the pendant are inconsistent, as shown in Figure 7-45.

Analysis:
There is a circle of decorative holes on the pendant, with uneven shapes and sizes. They must be trimmed during jewelry finishing to achieve uniform size consistency.
[Case 7-46] The pendant setting is incomplete, as shown in Figure 7-46.

Analysis:
A complete prong is the basis for ensuring the quality of the inlay. The incomplete prongs, in this case, are formed during the casting phase. Welding repair of the setting must be carried out during Jewelry finishing.
2.5. Jewelry finishing defects of Bangles
[Case 7-47] The tongue clasp box has broken edges, as shown in Figure 7-47.

Analysis:
For a bracelet with two halves that open and close, it generally needs to be locked and opened through a tongue clasp. The clasp box should be square and smooth, fitting tightly with the tongue. In this case, one side of the clasp box has a broken edge, causing it to not fit tightly with the tongue and requiring welding repair to fix the broken edge defect..
[Case 7-48] The tongue of the clasp is not locking securely, as shown in Figure 7-48.

Analysis:
In this case, the tongue spring lacks elasticity, resulting in the tongue not locking securely. When finishing jewelry, appropriate materials should be chosen to make the spring, giving it good elasticity. When the tongue is inserted into the clasp box, a crisp “click” sound should be heard, indicating a complete and secure fit between the tongue and the clasp box. Otherwise, re-adjustment should be done.
[Case 7-49] The tongue stopper is too tight, causing the tongue to break, as shown in Figure 7-49.

Analysis:
The tongue clasp is an opening and closing mechanism formed by the combination of the tongue and the clasp box. In this case, the size of the tongue is slightly larger, making it too tight with the clasp box. Each opening and closing action causes the tongue to deform and harden. After multiple openings and closings, the Deformation and hardening of the tongue reach the material’s limit, leading to breakage. Therefore, after making the tongue and box, adjustments should be made to ensure that the tongue and box fit each other perfectly for smooth operation.
[Case 7-50] The hinge position of the bracelet is welded to be unmovable, as shown in Figure 7-50.

Analysis:
The bangle with two halves opens and closes by rotating on a hinge. If the rotating bar is welded to the hinge, it cannot rotate normally, as in this case. To avoid this problem, during Jewelry finishing, the hinge position should be corrected, the connection between the rotating bar and the bangle hinge, spot welding to firmly weld the contact position of the rotating bar and the bangle hinge, and be careful to prevent welding material from penetrating the rotating bar. Toothpaste can be applied to the rotating Barto to prevent it from being welded.
[Case 7-51] The bracelet rotating bar is detached, as shown in Figure 7-51.

Analysis:
The bracelet rotates through the rotating bar and hinge positions. After the rotating bar is inserted into the hinge position, both ends need to be filed flat, and welding is applied to the end of the rotating bar to make it smooth with the bracelet body. In this case, the welding of the pivot head is not firm, and detachment occurred during the sanding of the weld scar.
[Case 7-52] The side Security Latch of the bracelet is too loose, as shown in Figure 7-52

Analysis:
The purpose of the side Security Latch on the bracelet is to make the connection of the two parts more compact and prevent detachment. The tightness of the side Security Latch should be appropriate. When it is too loose, it cannot “tighten” effectively, so it should be easy to open and close with a little force when fastening.
[Case 7-53] The inner circle of the bracelet is not round, as shown in Figure 7-53.

Analysis:
To ensure the appearance and ease of wearing, the bracelet requires a smooth inner circle. During jewelry finishing, the shape of the bracelet needs to be corrected by fitting the bracelet on a copper bracelet rod after closing it, pressing it by hand to completely fit the bracelet with the copper bracelet scale, forming a standard bracelet shape of suitable size.
[Case 7-54] The sanding is too much, as shown in Figure 7-54.

Analysis:
Bracelet jewelry finishing requires smoothness and no abrupt thickness changes. In this case, excessive filing in certain areas of the bracelet resulted in thinning of those areas.
[Case 7-55] The bottom cover has an irregular hollow shape, as shown in Figure 7-55.

Analysis:
In order to reduce the weight of metal and highlight the gemstone effect, sometimes a bottom hole is opened in the bracelet, requiring its shape to be round. When problems such as deformities and uneven edges occur, they should be trimmed to the required shape through Jewelry finishing.


