JewelCAD ile 3D Takı Modelleri Nasıl Yapılır?
JewelCAD'i Anlamak, Temel Malzeme Efektlerini ve Takı Efektlerini Göstermek
Giriş:
JewelCAD kullanarak çarpıcı mücevher tasarımları oluşturmak için ne gerekir? Bu kılavuz, yazılımı anlamaktan malzeme efektlerinde ustalaşmaya ve ayrıntılı mücevher modelleri oluşturmaya kadar her şeyi kapsıyor. Yüzük, kolye ucu ve daha fazlasını tasarlamak için adım adım talimatlarla fikirlerinizi nasıl hayata geçireceğinizi öğrenin. JewelCAD'in mücevher tasarımcıları, stüdyoları ve markaları için neden olmazsa olmaz bir araç olduğunu keşfedin.
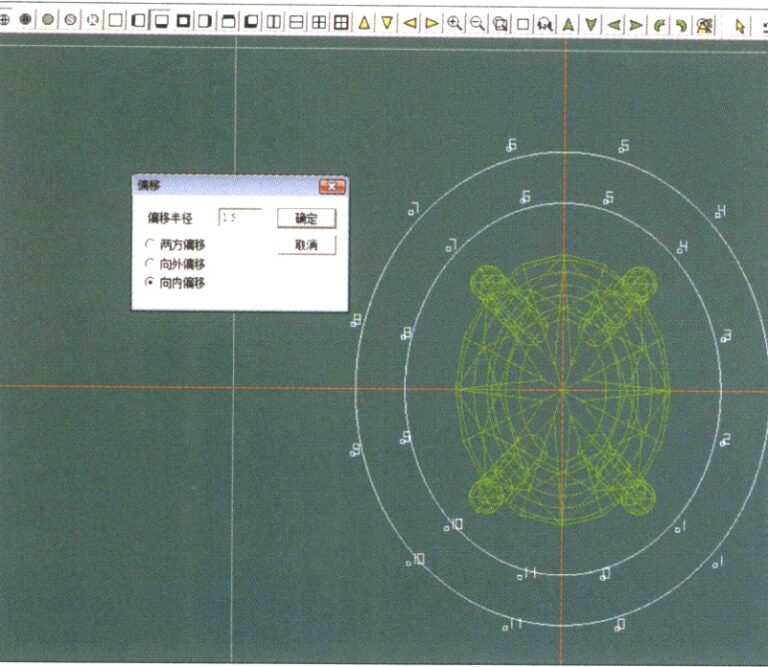
Pırlanta Torna Ayar Yüzük
İçindekiler
Bölüm I JewelCAD'i Anlamak
JewelCAD, 1990 yılında bir Hong Kong CAD/CAM şirketi tarafından başarıyla geliştirilen, özellikle mücevherat için bilgisayar destekli bir tasarım sistemi yazılımıdır. On yılı aşkın bir geliştirme ve iyileştirme sürecinden sonra JewelCAD, sınırlı işlevli bir çizim yazılımından Avrupa, Amerika ve Asya'daki başlıca mücevher üretim alanlarında yaygın olarak benimsenen güçlü, istikrarlı, son derece uzmanlaşmış ve verimli, profesyonel bir mücevher tasarım/üretim yazılımına dönüşmüştür.
Kuyumculuk endüstrisinde üretim ve işleme otomasyonu verimliliği önemli ölçüde artırırken, JewelCAD modern kuyumculuk tasarımına uygundur ve mevcut ticari uygulamalarda yaygın olarak kullanılmaktadır. Eşsiz modelleme konseptleri ve araçları, mücevher tasarımcılarının kolayca üç boyutlu mücevher nesneleri oluşturmasına olanak tanır ve ayrıca CNC ve RP hızlı prototipleme ile mükemmel bir şekilde entegre olarak onu geniş geliştirme olanaklarına sahip modern bir mücevher tasarım yazılımı haline getirir. Profesyonel bir takı tasarım yazılımı olarak JewelCAD, üç boyutlu takı modelleri oluşturmada diğer 3D yazılımlara göre açık avantajlara sahiptir ve bu avantajlar aşağıdaki faydalarda yansıtılmaktadır.
(1) Kullanımı kolay, basit ve öğrenmesi kolay.
(2) Eğriler ve karmaşık şekiller çizmek için çok uygun olan esnek çizim araçlarına sahiptir.
(3) Karmaşık tasarımları esnek bir şekilde oluşturan veya değiştiren güçlü yüzey modelleme araçlarına sahiptir.
(4) Oluşturma hızı hızlıdır; ayrıca çeşitli tasarım efekt görüntülerini karşılaştırabilirsiniz. Efekt görüntülerinin kalitesi yüksektir ve simülasyon güçlüdür. Bu birüç boyutlu etkiyi gözlemlemek için döndürmeyi sağlar ve sezgisel olarak nihai ürün etkisini yansıtır.
(5) Çalışması son derece verimlidir ve değişen mücevher stilleri için uygundur.
(6) Zengin bir profesyonel veritabanı ve çeşitli düzenleme araçları, mücevherlerin kombinasyonunu ve yeniden tasarlanmasını kolaylaştırarak işlemleri daha rahat ve verimli hale getirir.
(7) Boolean işlemlerinin ilkelerini yazılımda uygulamak, serbest durumda olan yüzeyleri kolayca birleştirebilir.
(8) Tasarımda altının ağırlığı, miktarı ve boyutu doğrudan hesaplanabilir.
(9) Tasarım fikirlerini görselleştirmek ve verimliliği artırmak için bir veritabanı oluşturabilir.
(10) JewelCAD ile çizilen grafikler daha net ve daha tutarlıdır, net olmayan yazı veya düşük çizim kalitesinden kaynaklanan hata olasılığını azaltır. Doğrudan kağıtsız görüntü çıktısı alabilir, zamandan, emekten ve paradan tasarruf sağlar.
Bölüm II Temel Malzeme Etkilerini Göstermek için JewelCAD Kullanımı
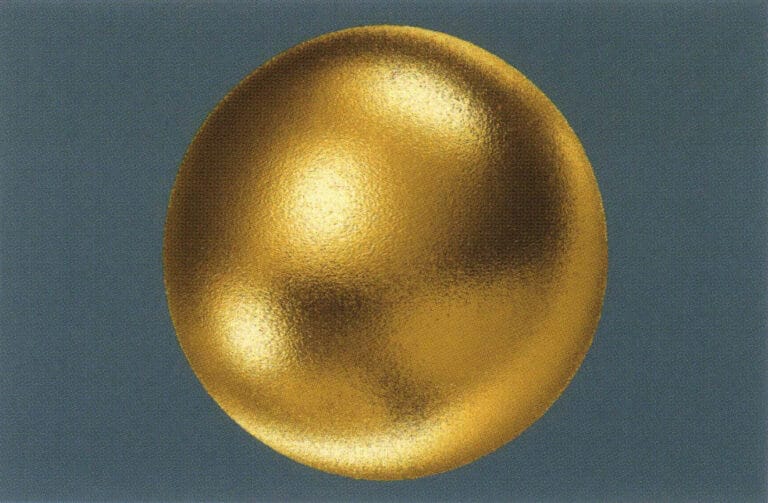
1. Kumlama Bitiş Etkisi
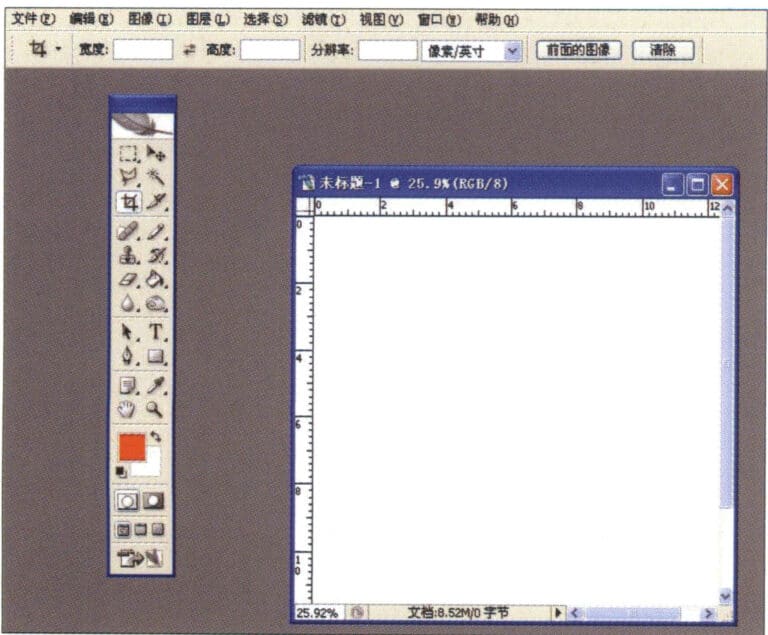
1. Photoshop'ta 300 piksel/inç çözünürlükte yeni bir dosya oluşturun
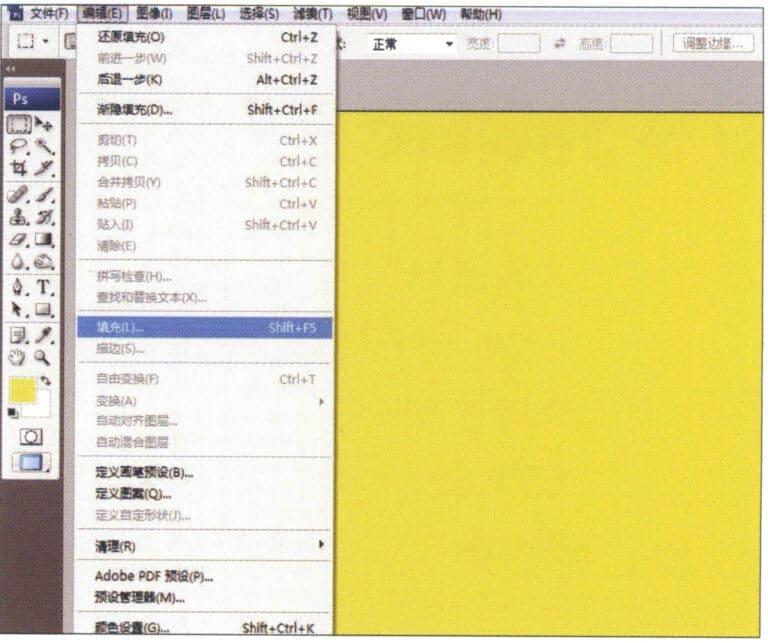
2. Select "Edit" > "Fill" from the menu bar, and set the foreground color to yellow

3. Select "Filter" from the menu bar > "Mottled" > "Add Mottled"
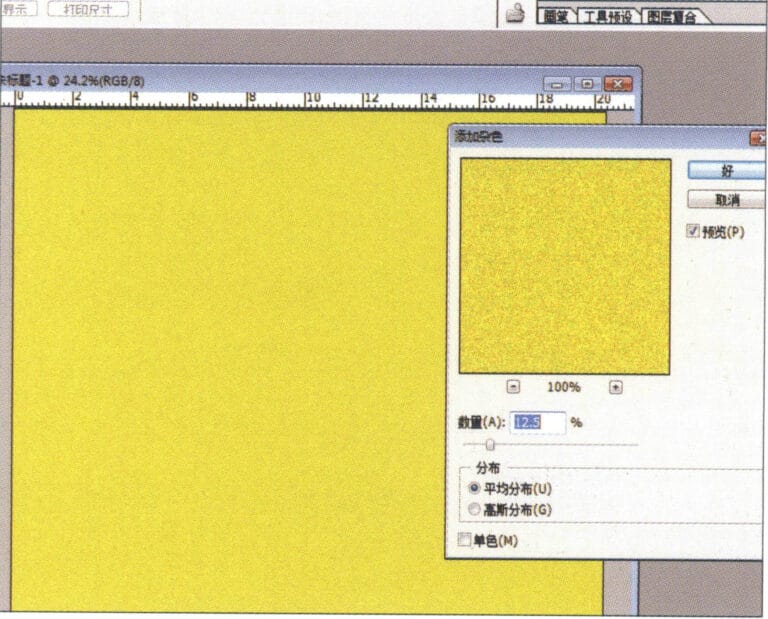
4. "Benekli Ekle" iletişim kutusuna girin, ilgili değerleri girin ve onaylayın
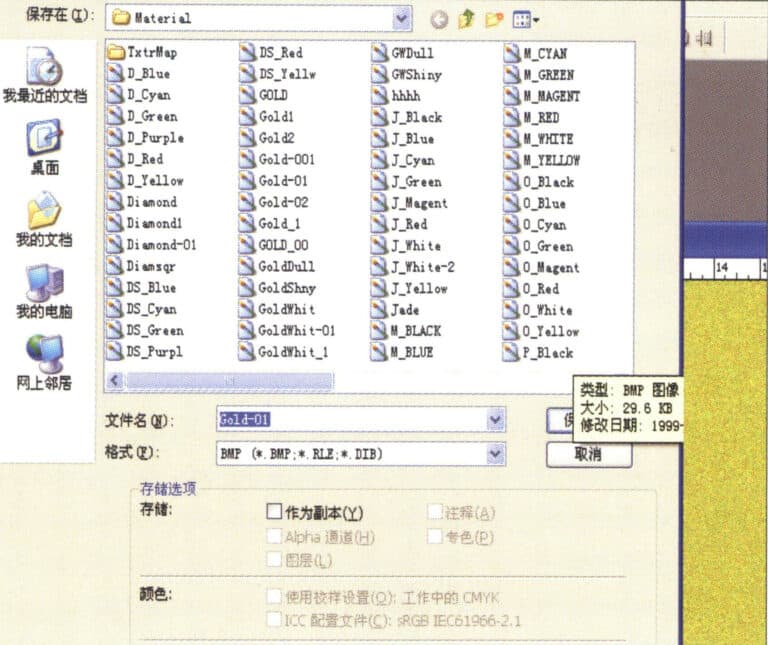
5. Store the document in the "JewelCAD" > "Material" folder, saved in "BMP" format

6. Create a new file in JewelCAD, select "Surface" > "Spherical Surface" from the menu bar
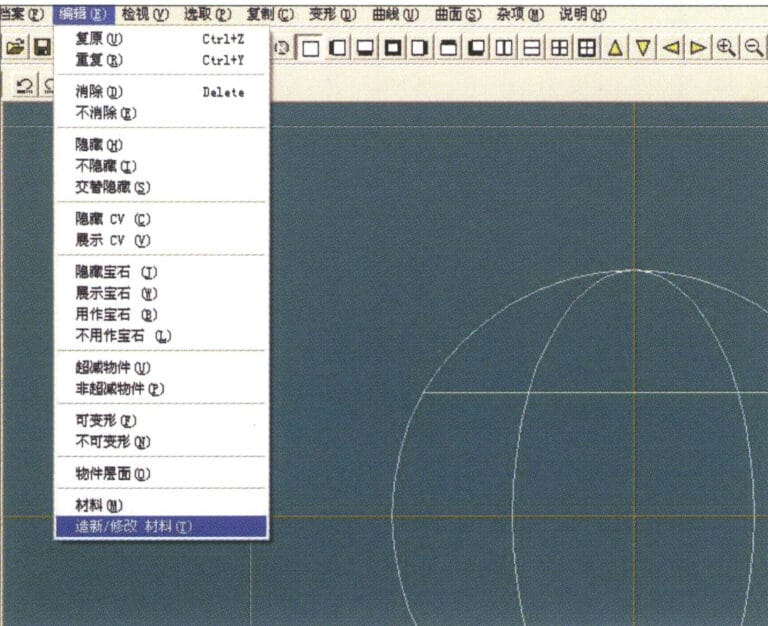
7. Select "Edit" > "Create/Modify Material" from the menu bar
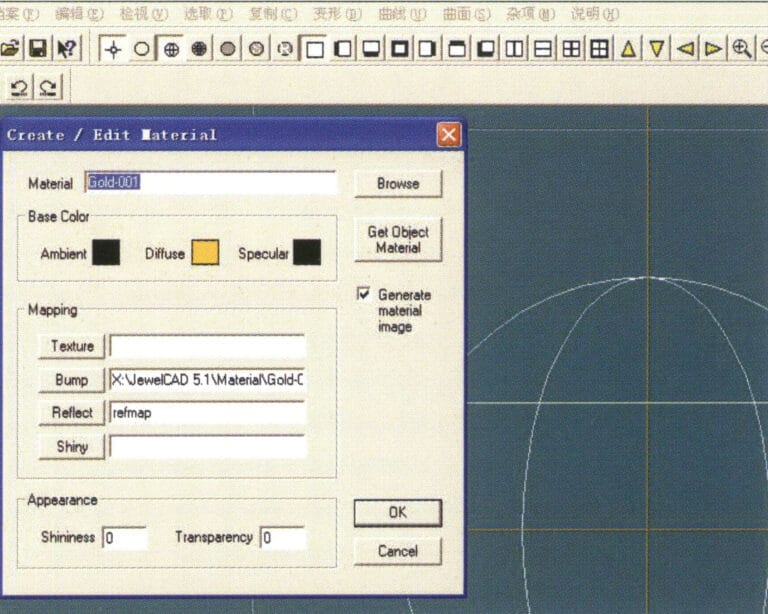
8. "Malzeme Oluştur/Değiştir" iletişim kutusuna girin, ilgili değerleri girin ve onaylayın
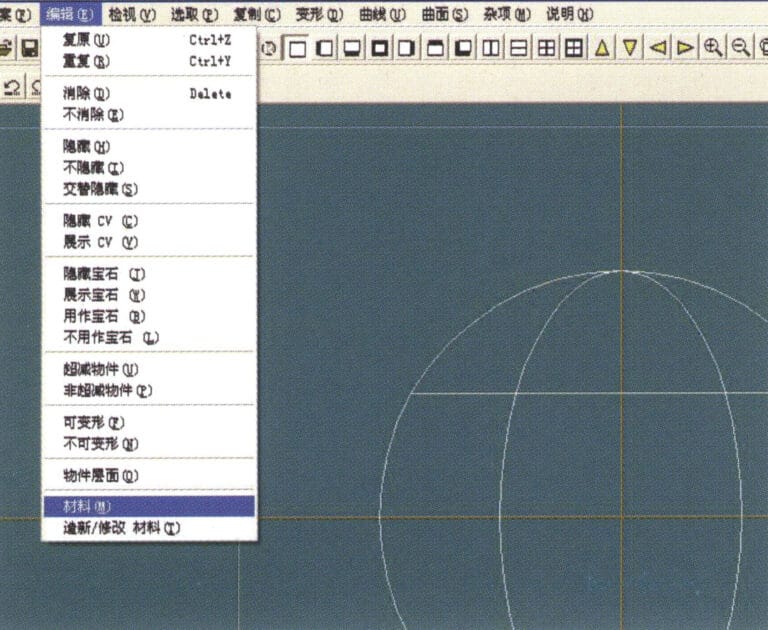
9. Select "Edit" > "Materials" from the menu bar
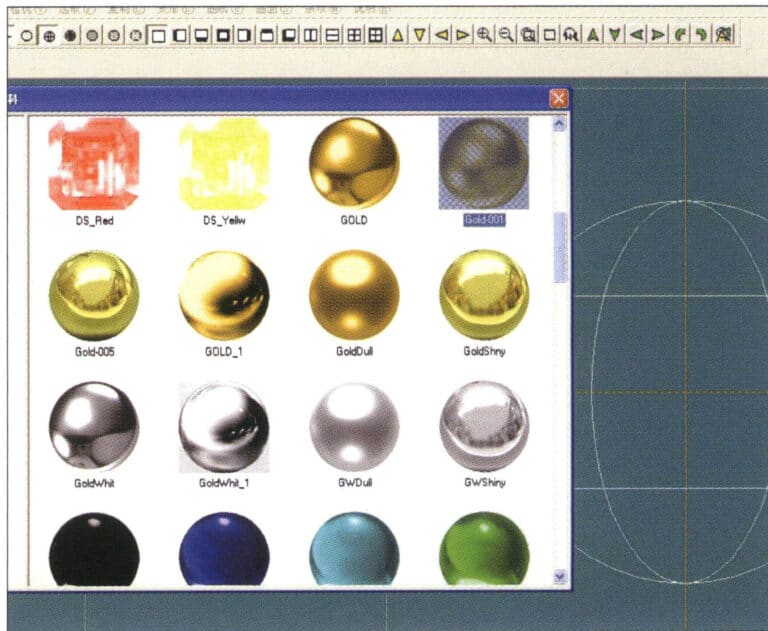
10. "Malzemeler" iletişim kutusuna girin, malzemeyi seçin ve onaylayın
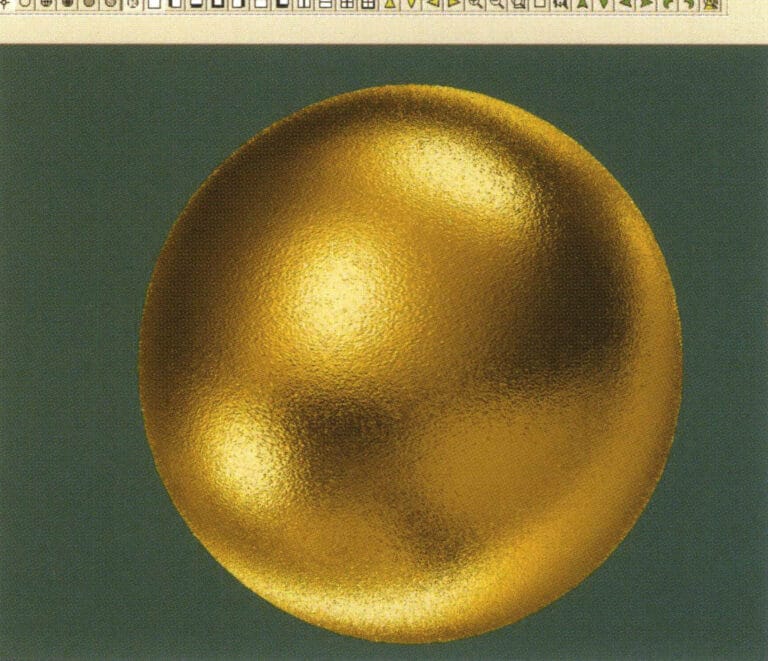
11. Select "View" > "Shadow Map" from the menu bar to inspect the shadow effects.
12. Select "File" > "Save File" from the menu bar to save the document
2. Fırçalama Etkisi
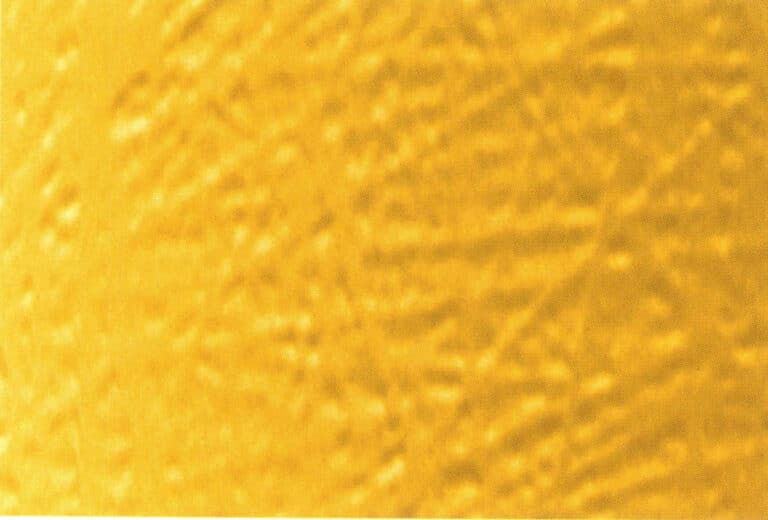

1. Scan a texture file in Photoshop with a resolution of 300 pixels/inch, and select "Filter" > "Blur" > "Motion Blur" from the menu bar to apply the blur effect
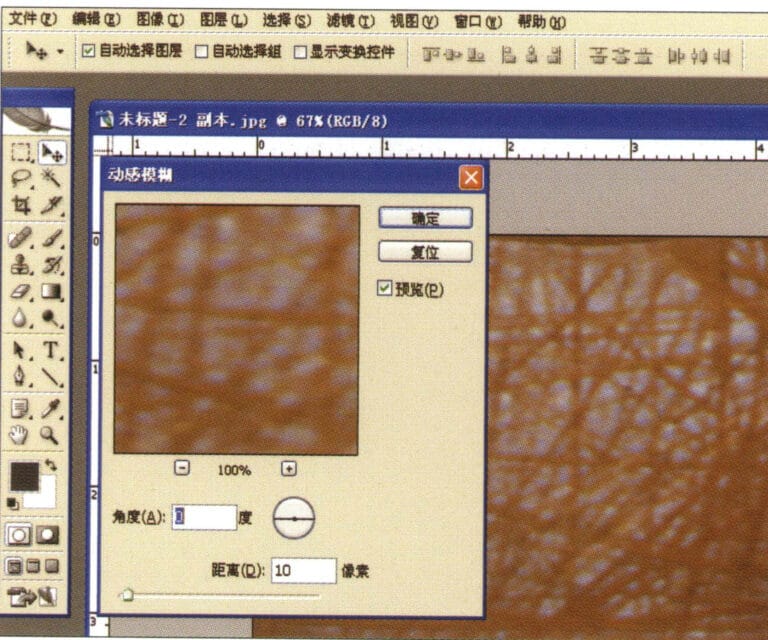
2. "Hareket Bulanıklığı" iletişim kutusuna girin, ilgili değerleri girin ve onaylayın
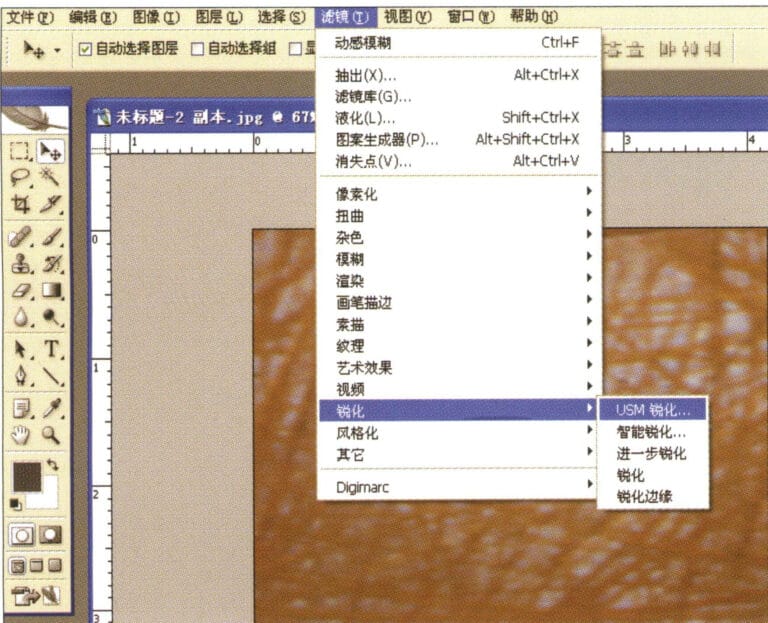
3. Select "Filter" > "Sharpen" > "USM Sharpening" from the menu bar
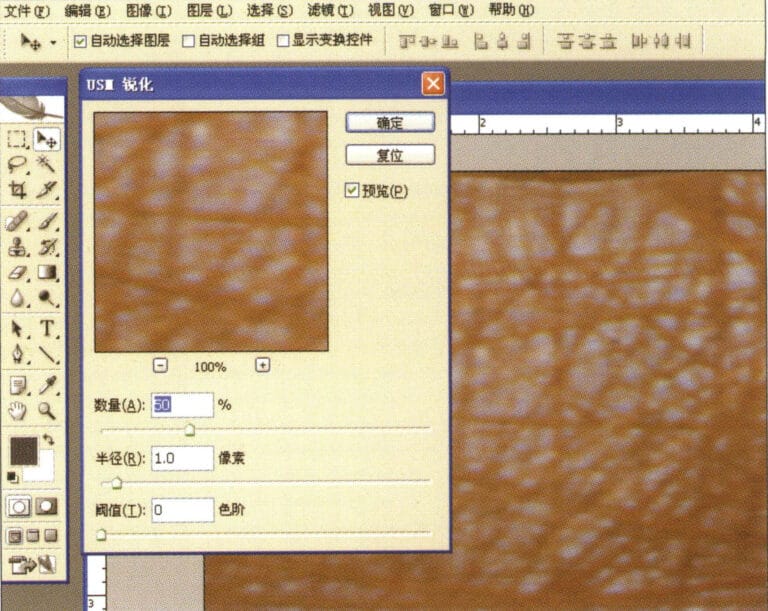
4. "USM Sharpening" iletişim kutusuna girin, ilgili değerleri girin ve onaylayın
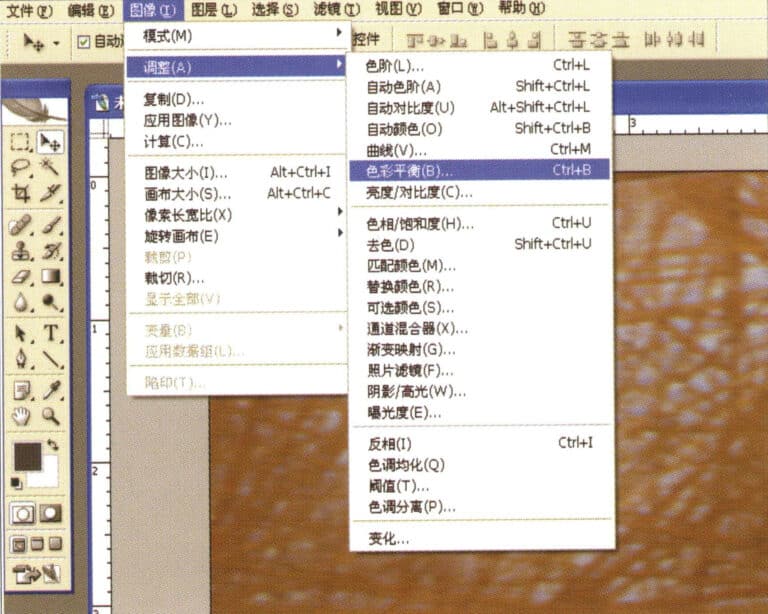
5. Select "Image" > "Adjustments" > "Color Balance" from the menu bar
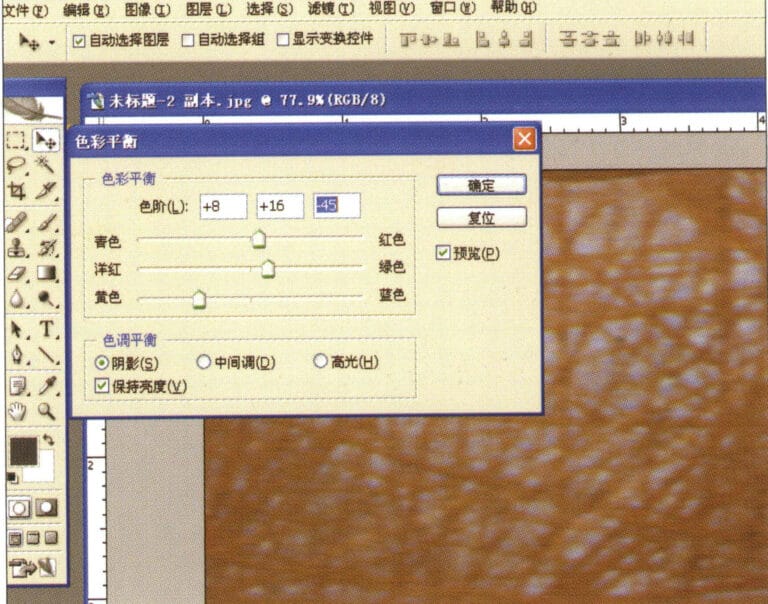
6. "Renk Dengesi" iletişim kutusuna girin, ilgili değerleri girin ve onaylayın
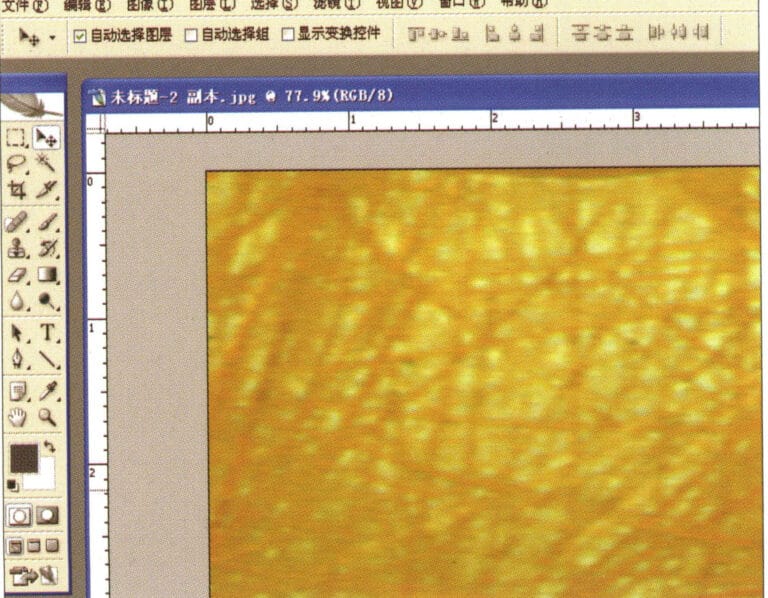
7. Renk dengesi görüntülendikten sonra etki diyagramı
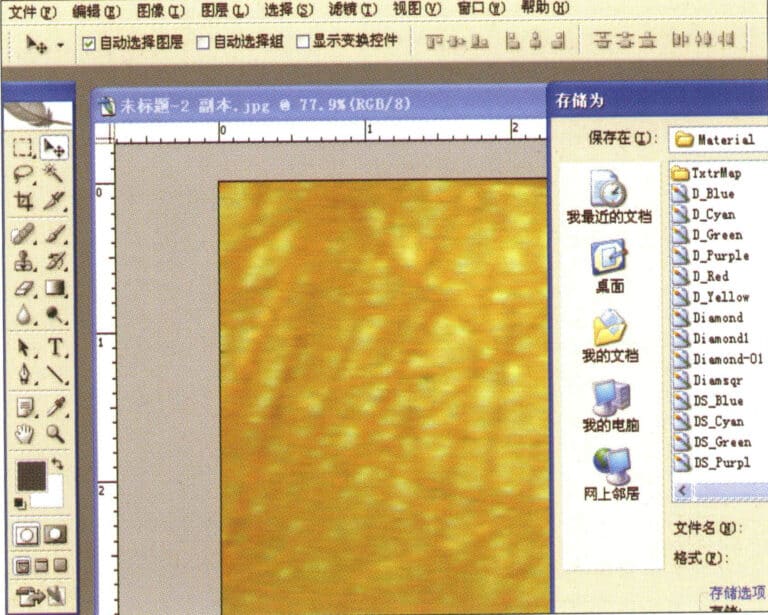
8. Store the document in the "JewelCAD" > "Material" folder, saved in "BMP" format
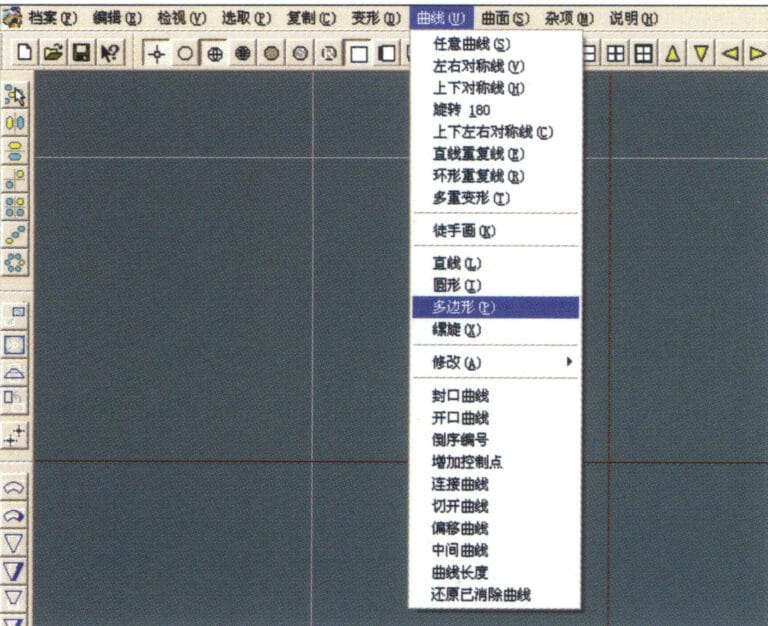
9. In JewelCAD, create a new file, select "Curve" > "Polygon" from the menu bar
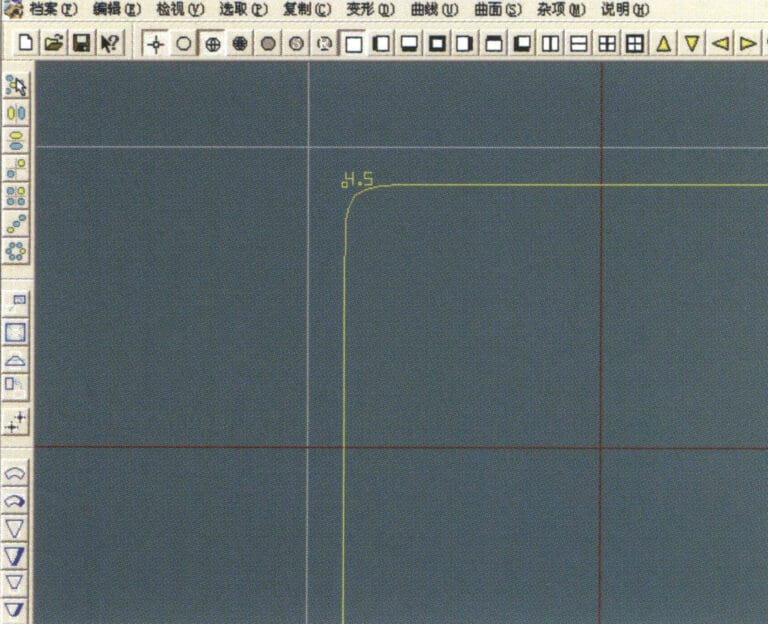
10. Kare çizmek için "çokgen" kullanın
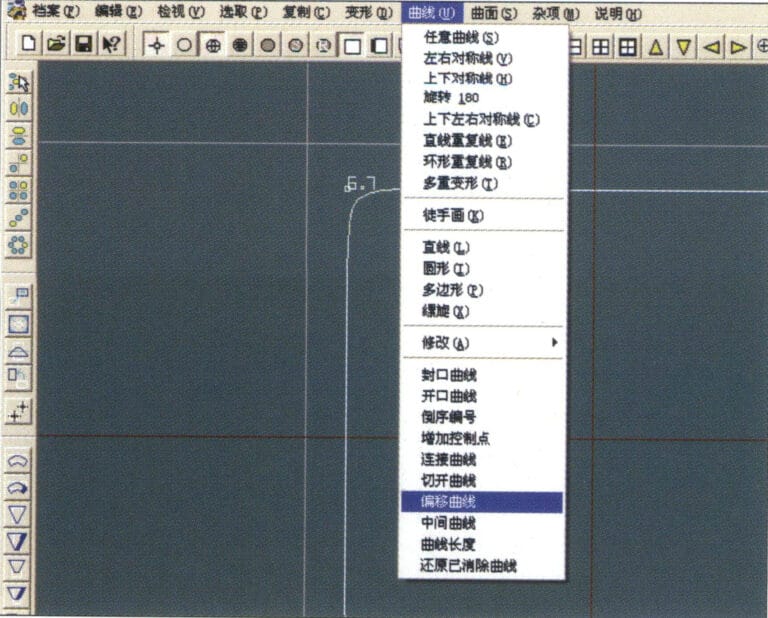
11. Select "Curve" > "Offset Curve" from the menu bar
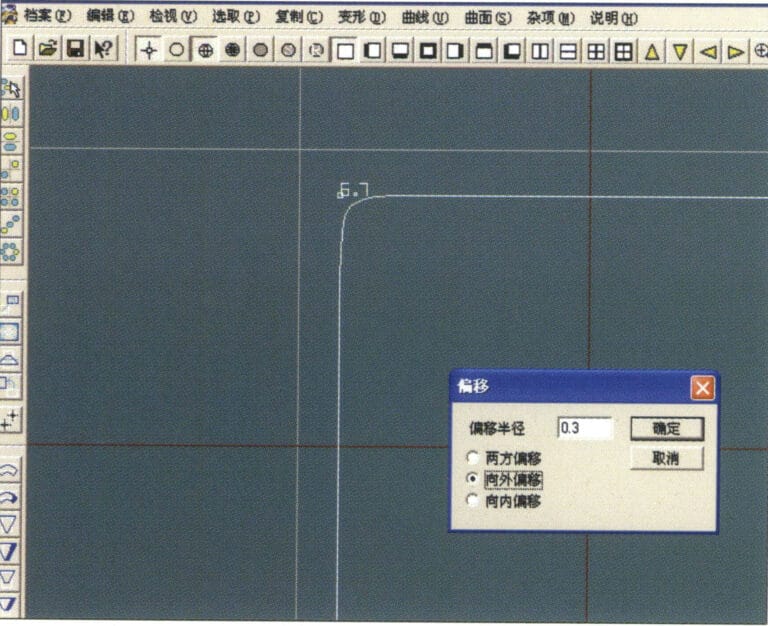
12. "Ofset Eğrisi" iletişim kutusuna girin, ilgili değerleri girin ve onaylayın
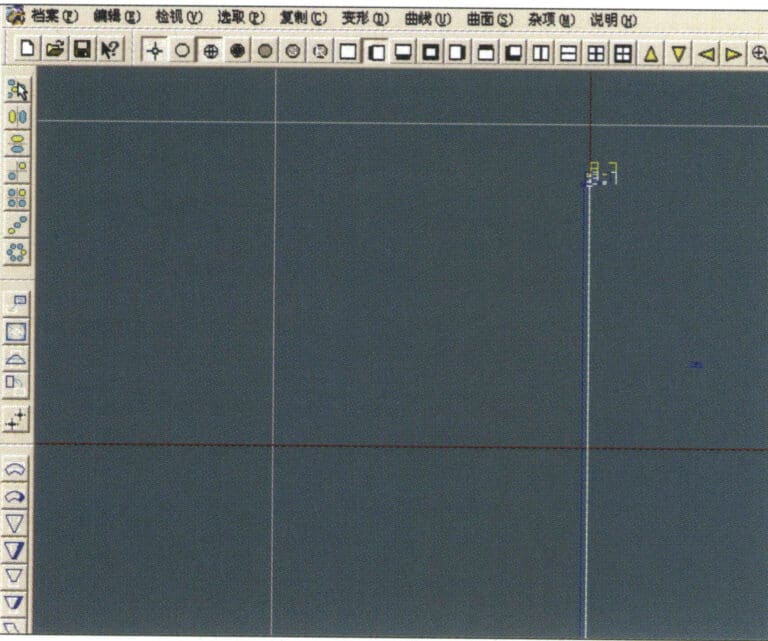
13. Ofset eğrisi görüntülendikten sonra etki diyagramı
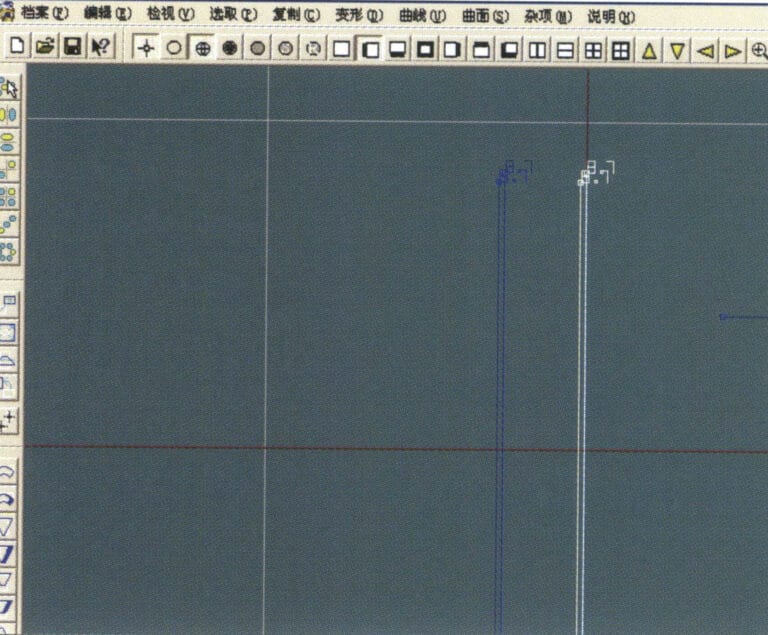
14. Select "Deformation" > "Move" from the menu bar to move the selected curve
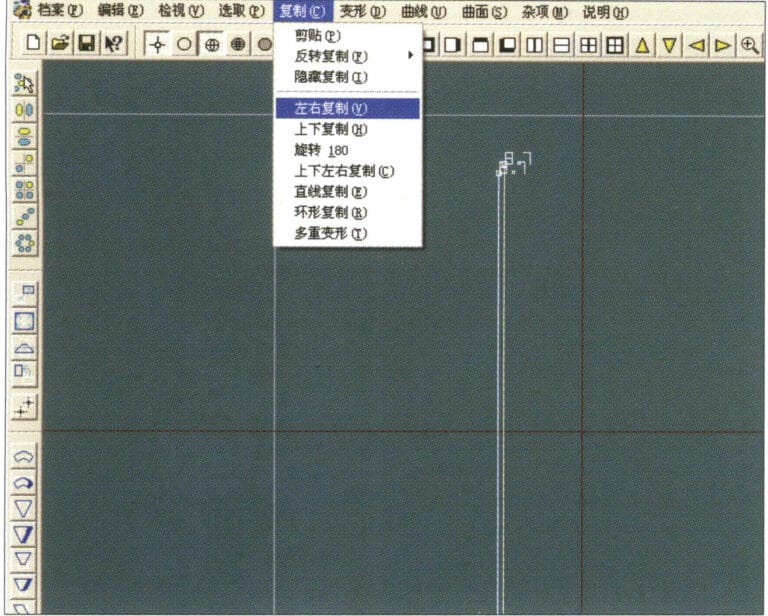
15. Select "Copy" > "Copy Left and Right" from the menu bar to copy the selected curve to the left and right
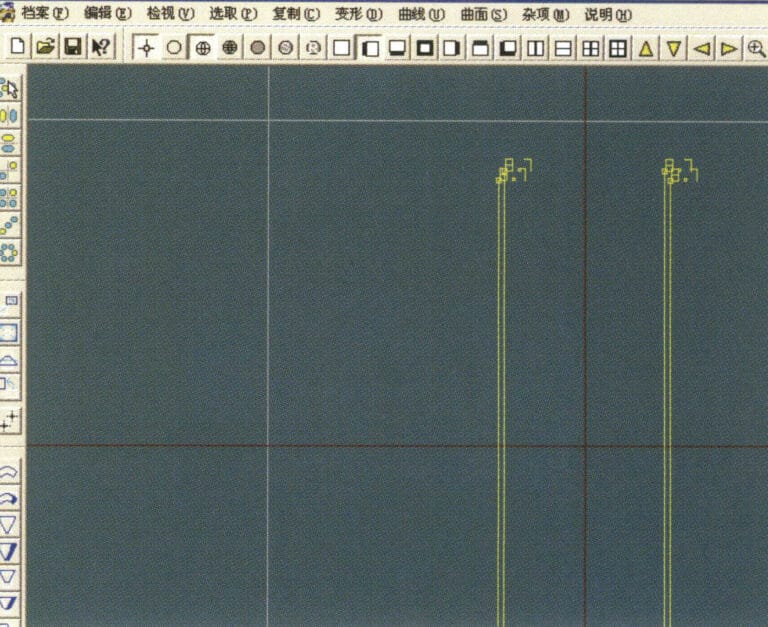
16. Sol ve sağ çoğaltmadan sonra efekt görüntülerini görüntüleyin
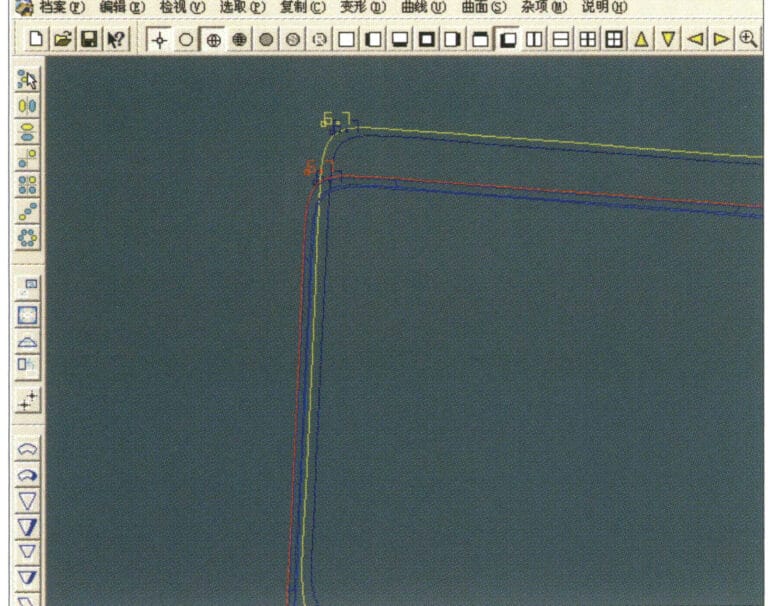
17. Select "Surface" > "Curve Surface Connection" from the menu bar, and double-click the first and second curves/surfaces in a clockwise direction with the left mouse button to create a curve surface connection
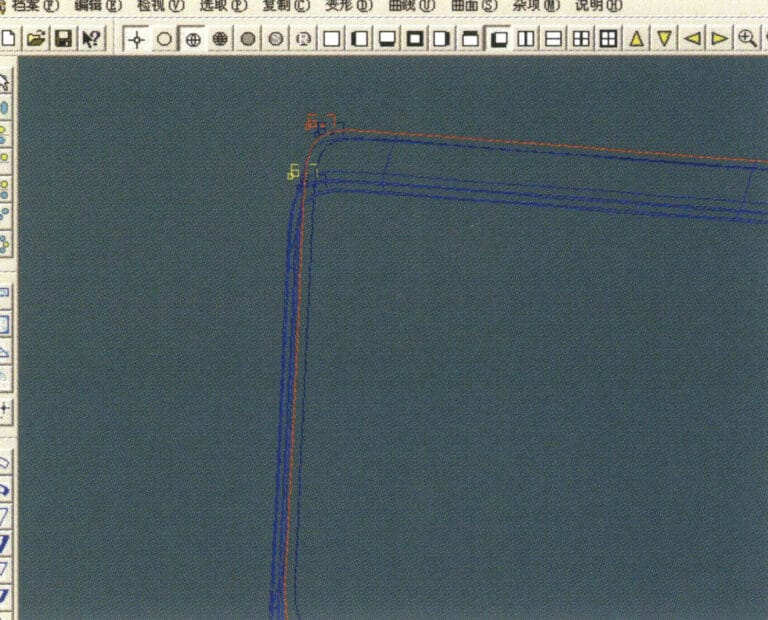
18. Saat yönünde, bir çizgi-yüzey bağlantısı oluşturmak için üçüncü eğriye/yüzeye farenin sol tuşuyla çift tıklayın
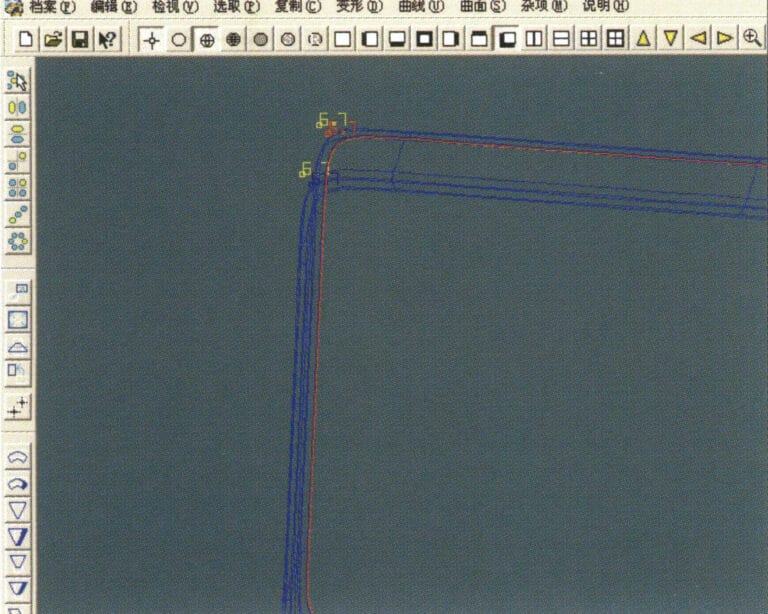
19. Saat yönünde devam edin; bir çizgi-yüzey bağlantısı oluşturmak için dördüncü eğriye/yüzeye farenin sol tuşuyla çift tıklayın

20. Select "View" > "Shadow Map" from the menu bar to inspect the shadow effects
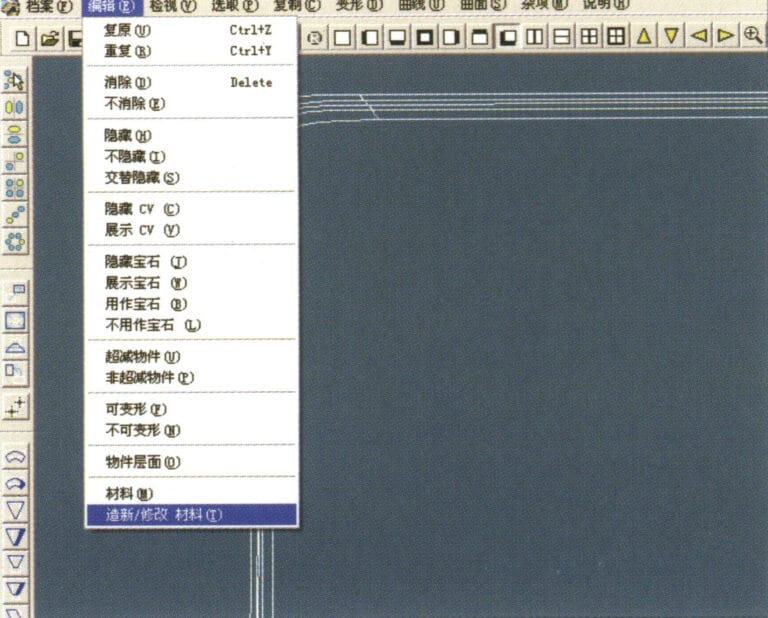
21. Select "Edit" > "Create/Modify Material" from the menu bar
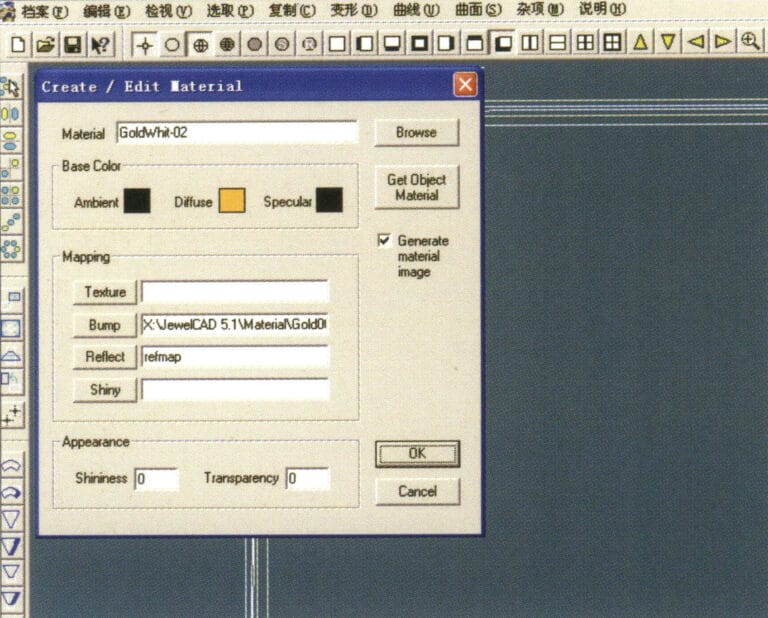
22. "Malzeme Oluştur/Değiştir" iletişim kutusuna girin, ilgili değerleri girin ve onaylayın
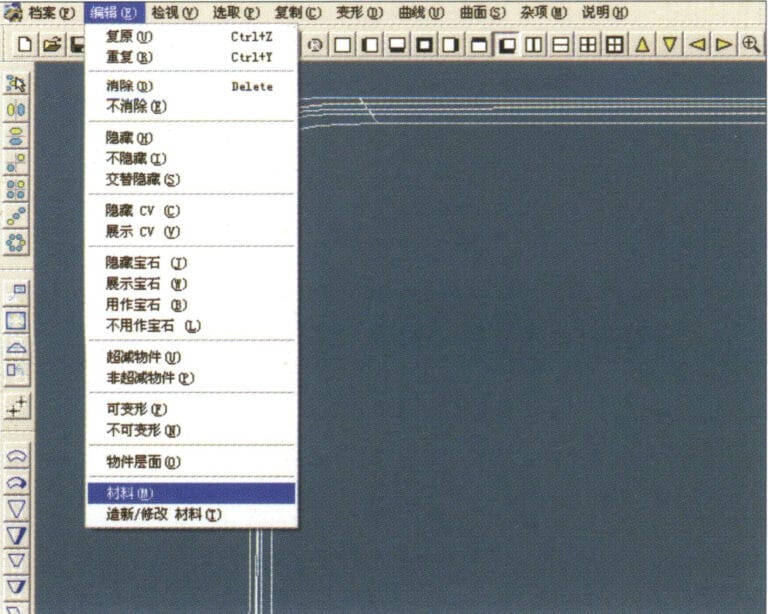
23. Select "Edit" > "Materials" from the menu bar
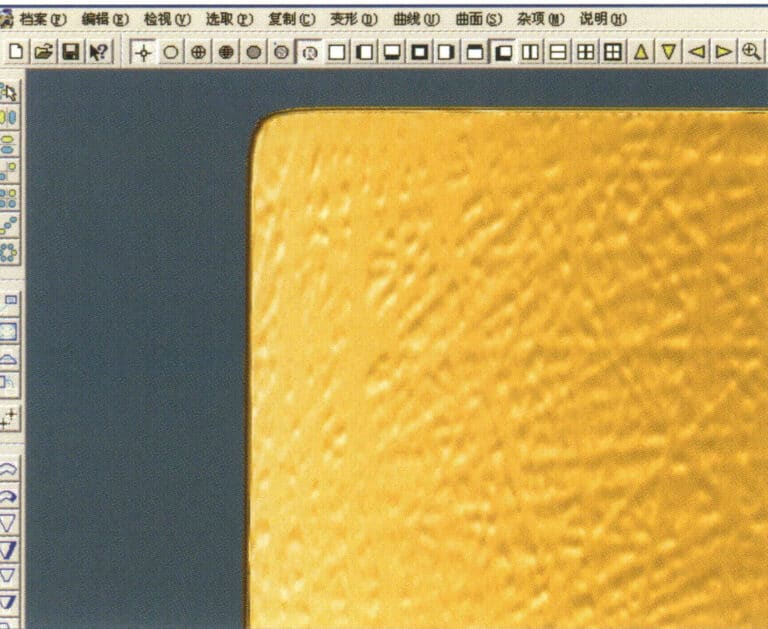
24. Select "View" > "Shadow Map" on the menu bar to view the light and shadow effects 25. Select "File" > "Save File" on the menu bar to save the file
3. Kabuk Doku Kaplama
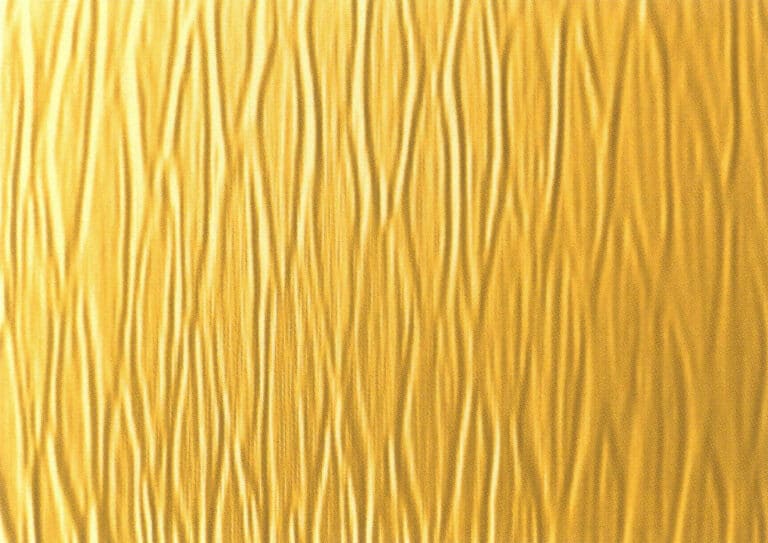

1. Bir doku dosyasını 300 piksel/inç çözünürlükle Photoshop'a tarayın
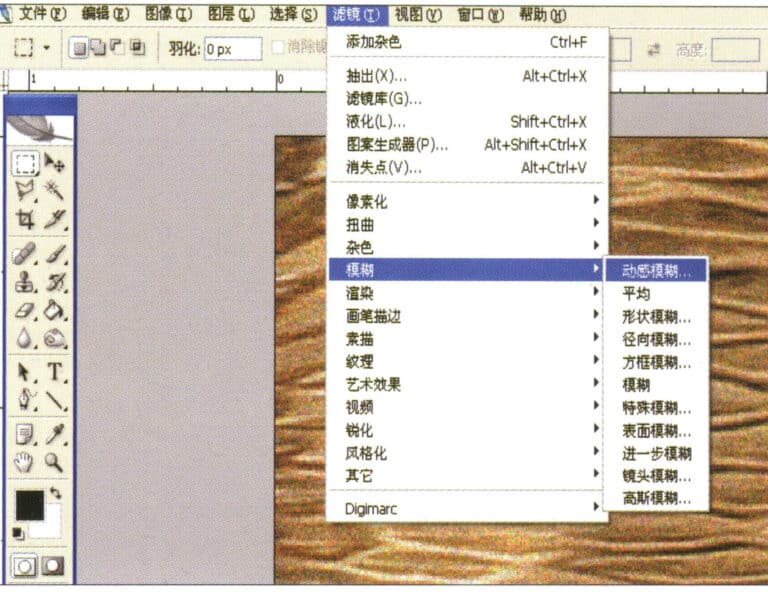
2. Select "Filter" > "Blur" > "Motion Blur" from the menu bar
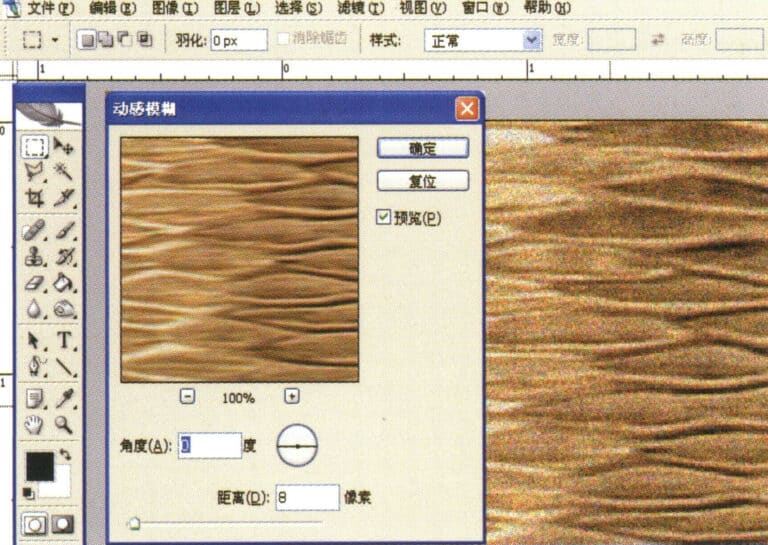
3. "Hareket Bulanıklığı" iletişim kutusuna girin, ilgili değerleri girin ve onaylayın
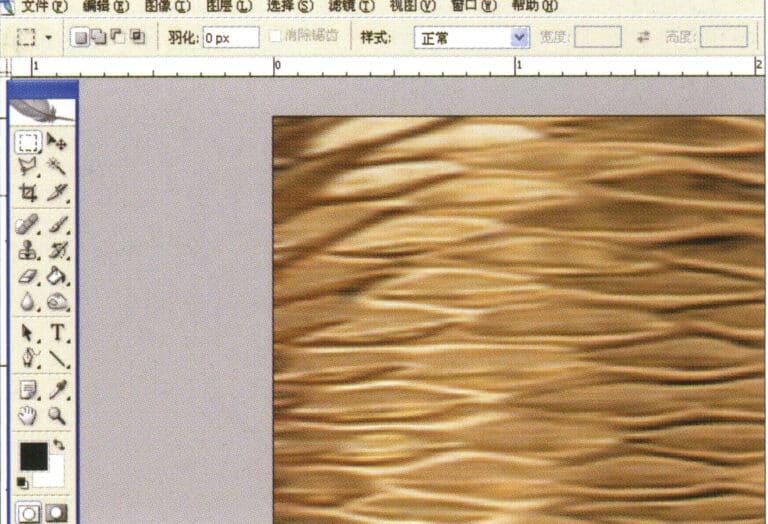
4. Hareket bulanıklaştırmadan sonra efekt görüntüsünü görüntüleyin
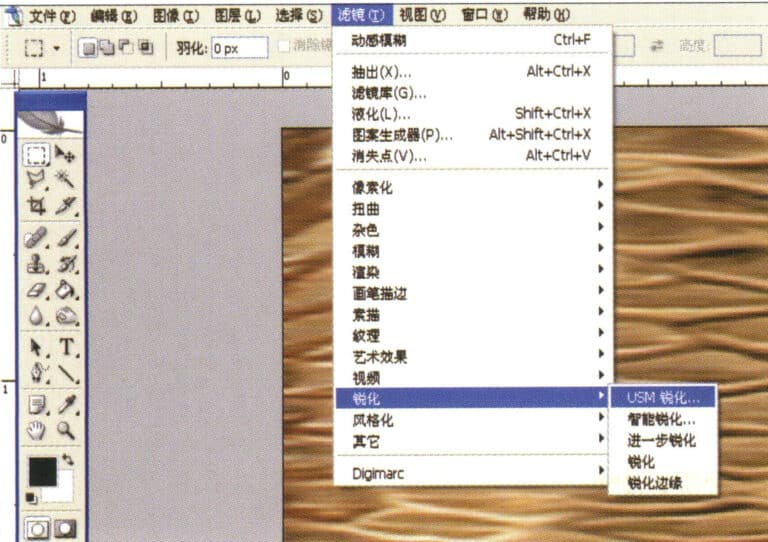
5. Select "Filter" > "Sharpen" > "USM Sharpening" from the menu bar
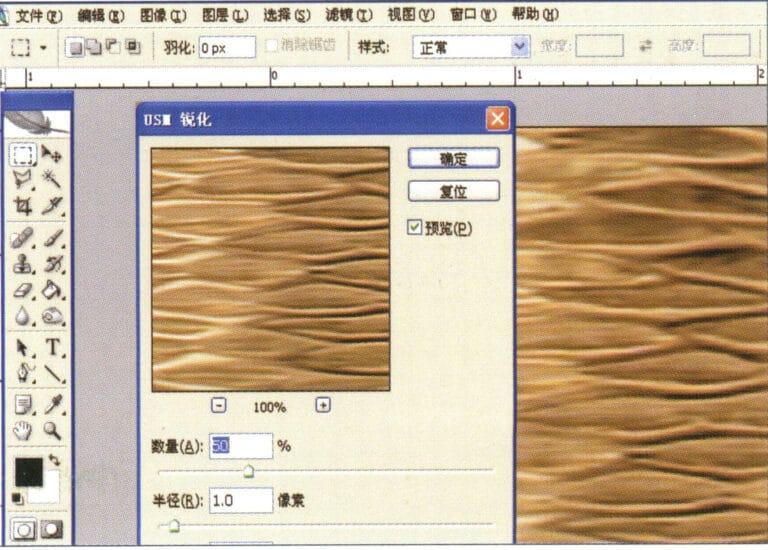
6. "USM Sharpening" iletişim kutusuna girin, ilgili değerleri girin ve onaylayın
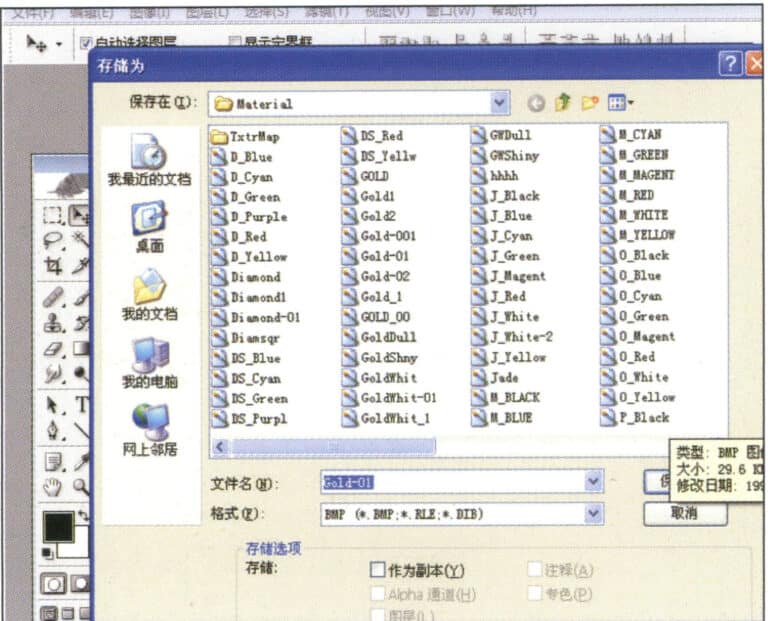
7. Store the document in the "JewelCAD" > "Material" folder and save it in "BMP" format
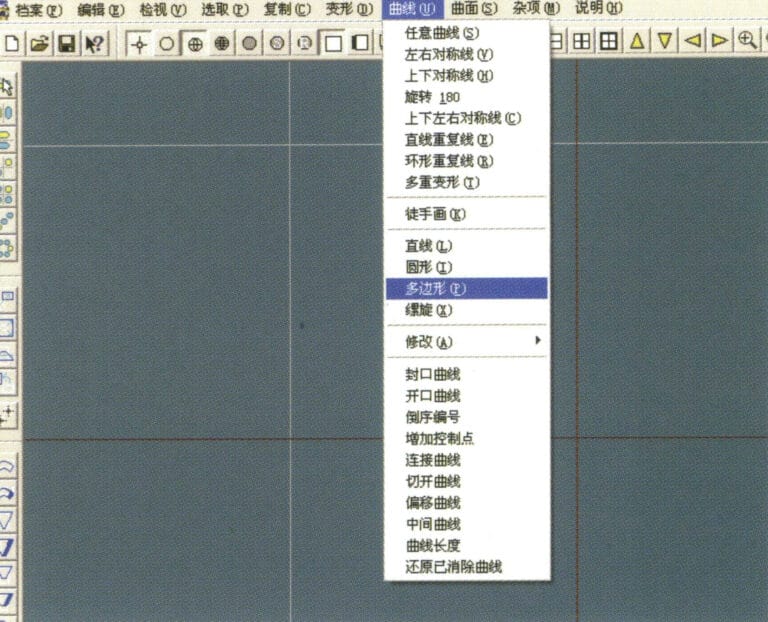
8. In JewelCAD, create a new file, select "Curve" > "Polygon" from the menu bar
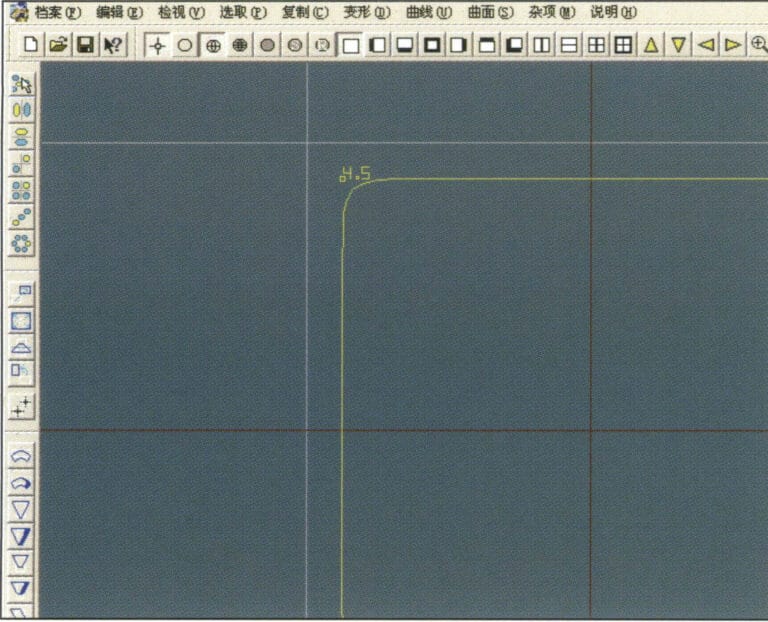
9. Kare çizmek için "çokgen" kullanın
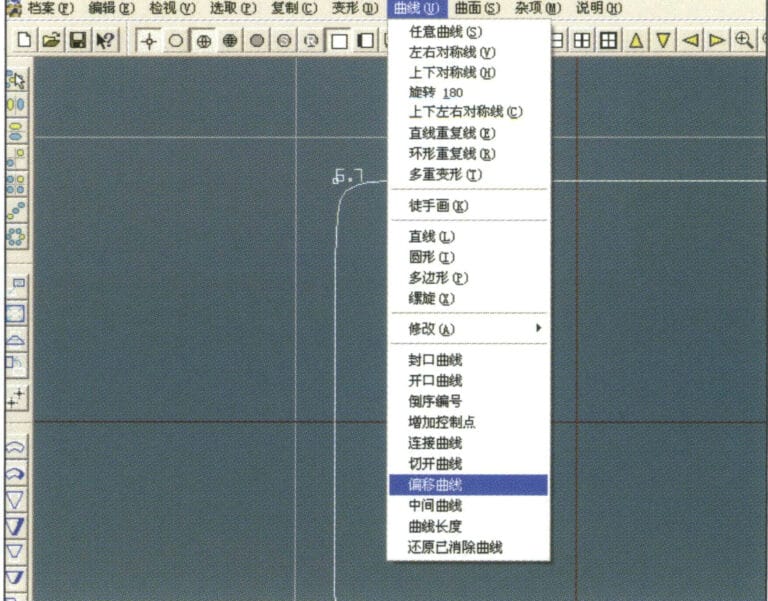
10. Select "Curve" > "Offset Curve" from the menu bar
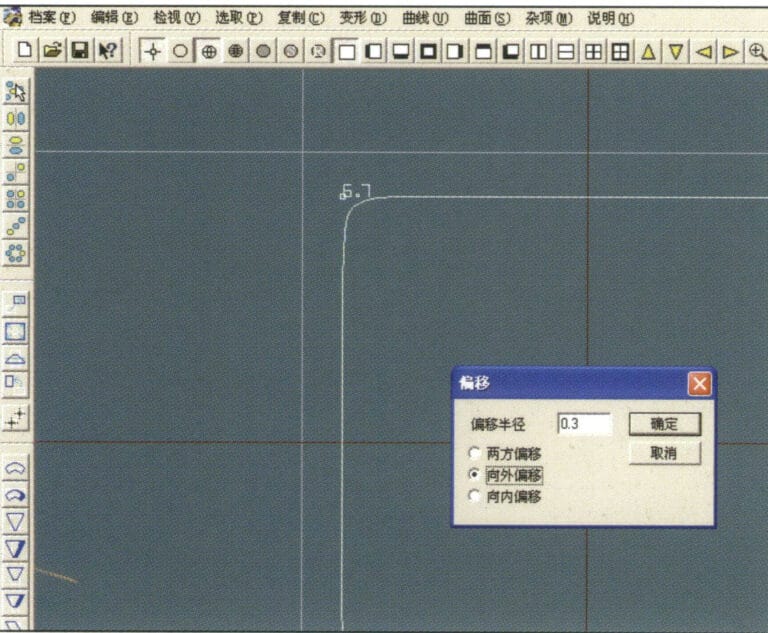
11. "Ofset Eğrisi" iletişim kutusuna girin, ilgili değerleri girin ve onaylayın
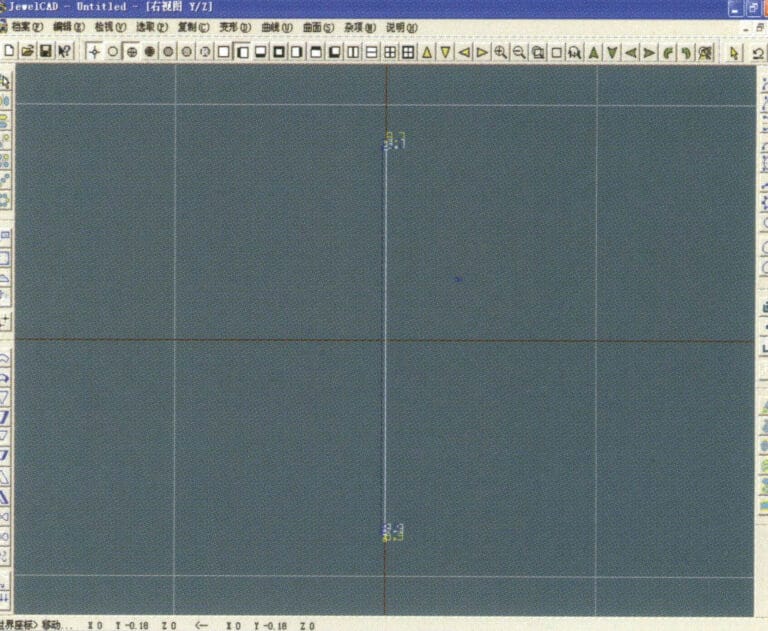
12. Ofset eğrisi görüntülendikten sonra etki diyagramı
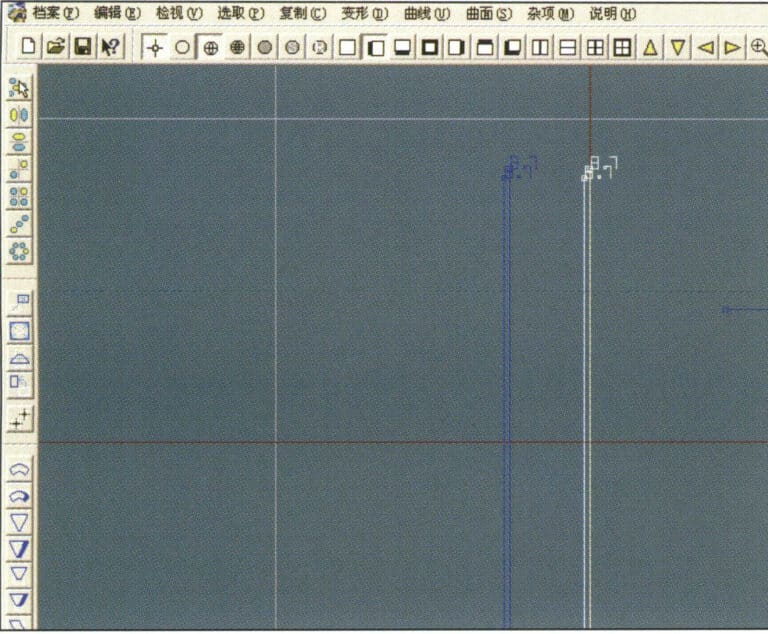
13. Select "Deformation" > "Move" from the menu bar to move the selected curve
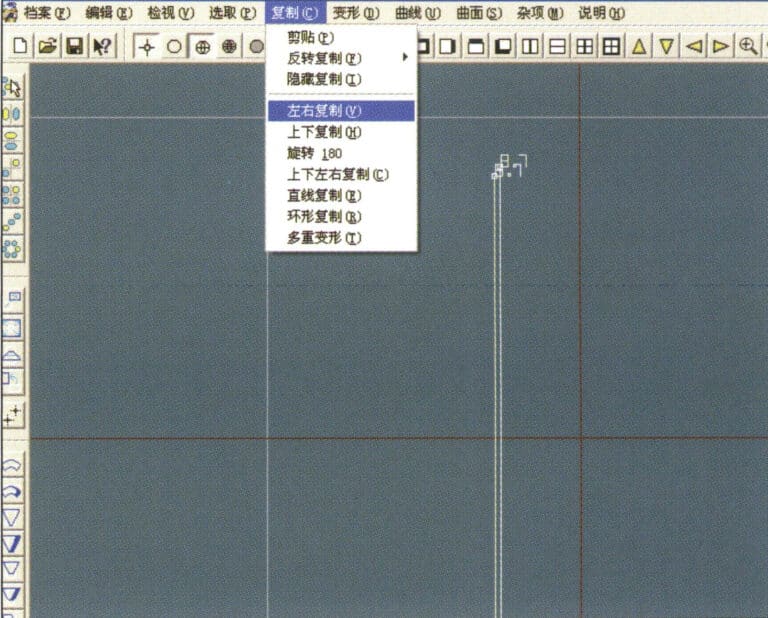
14. Select "Copy" > "Copy Left and Right" from the menu bar to copy the selected curve to the left and right
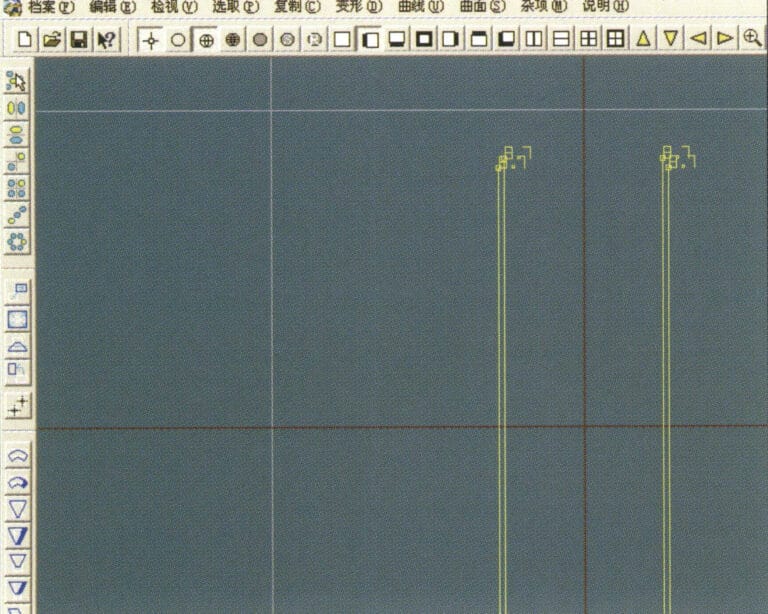
15. Sol ve sağ kopyalamadan sonra efekt görüntülerini görüntüleyin
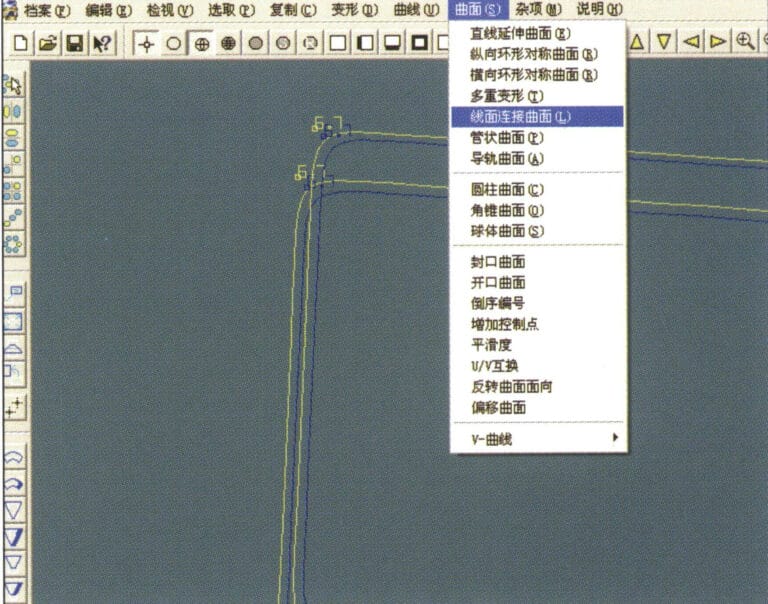
16. Select "Surface" > "Line-Surface Connection Surface" from the menu bar, and select the curve/surface to create a line-surface connection surface
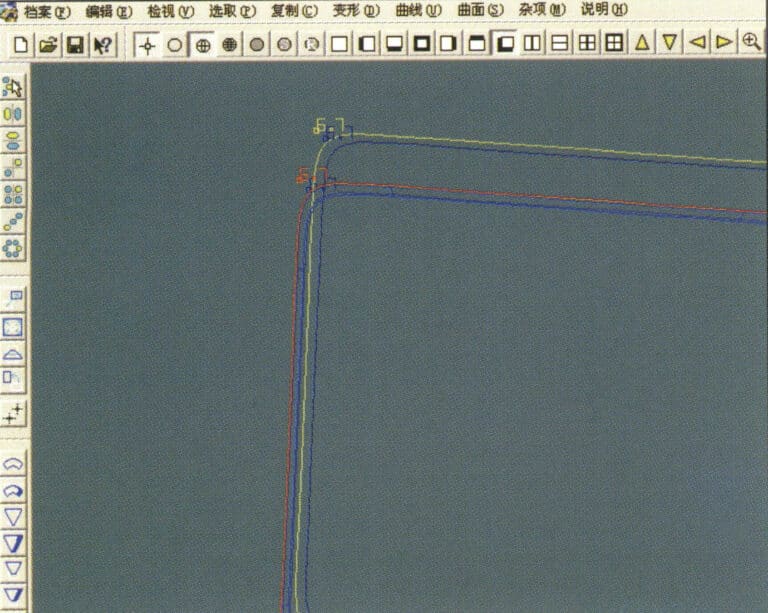
17. Select the menu bar "Surface" > "Curve Surface Connection," and double-click the first and second curves/surfaces with the left mouse button in a clockwise direction to create a curve surface connection
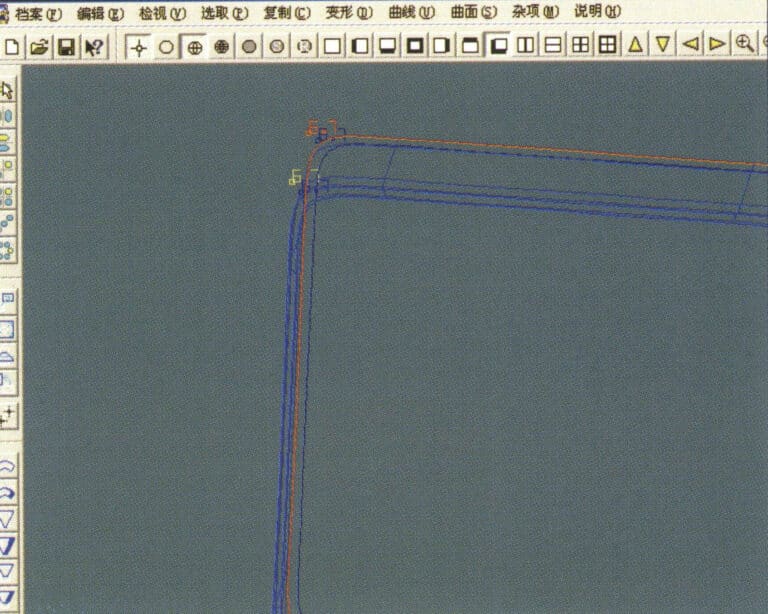
18. Saat yönünde, bir çizgi-yüzey bağlantısı oluşturmak için üçüncü eğriye/yüzeye farenin sol tuşuyla çift tıklayın
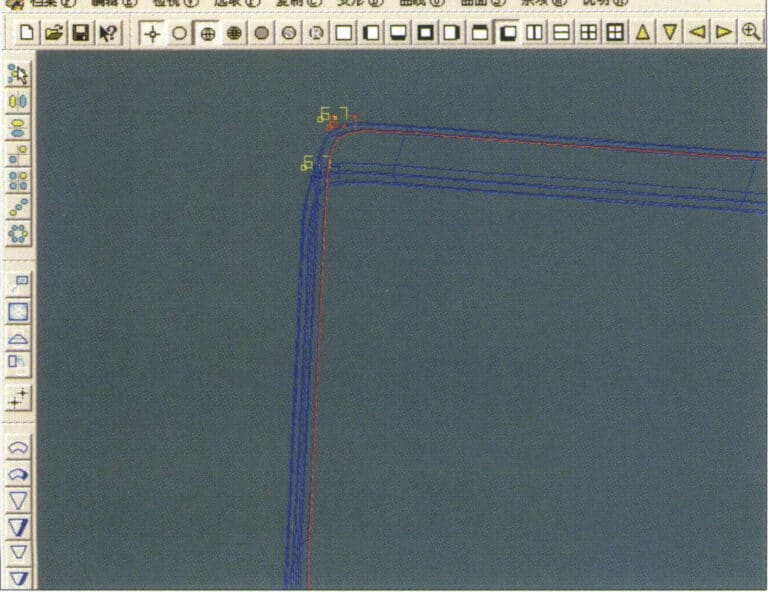
19. Saat yönünde devam edin; bir çizgi-yüzey bağlantısı oluşturmak için dördüncü eğriye/yüzeye farenin sol tuşuyla çift tıklayın
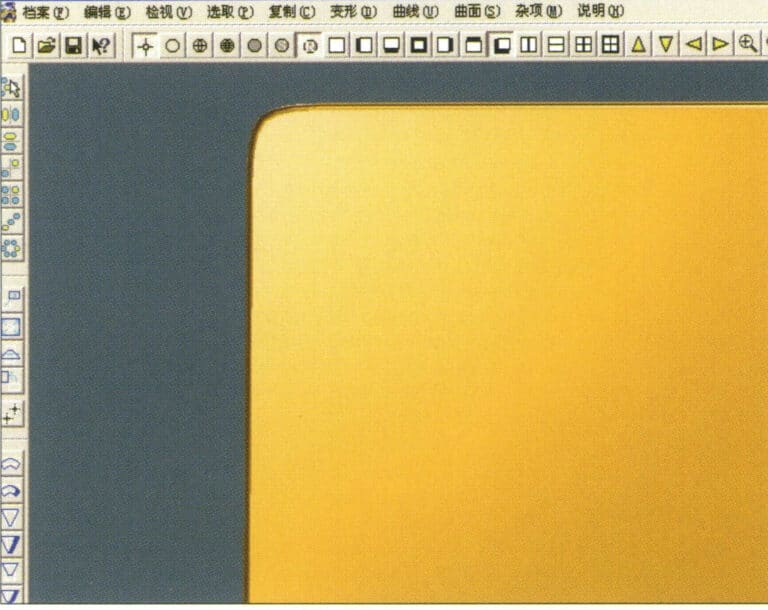
20. Select "View" > "Shadow Map" from the menu bar to inspect the shadow effects
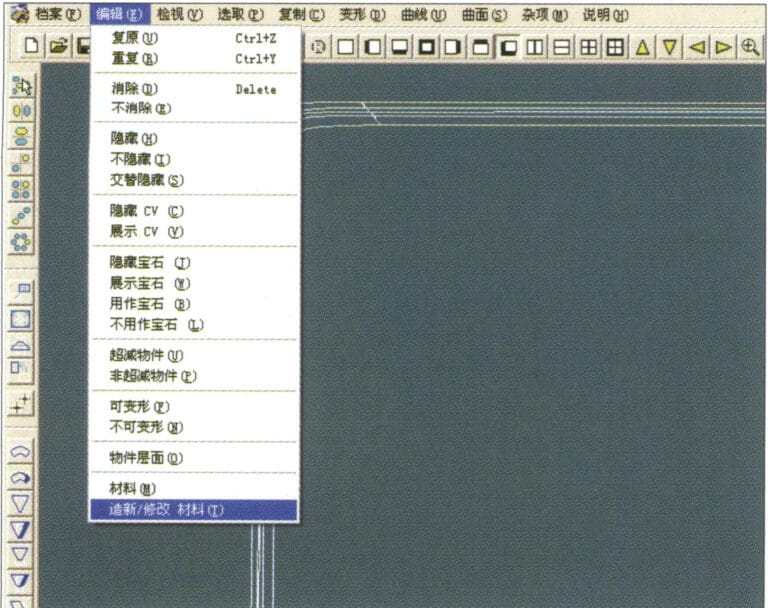
21. Select "Edit" > "Create/Modify Material" from the menu bar
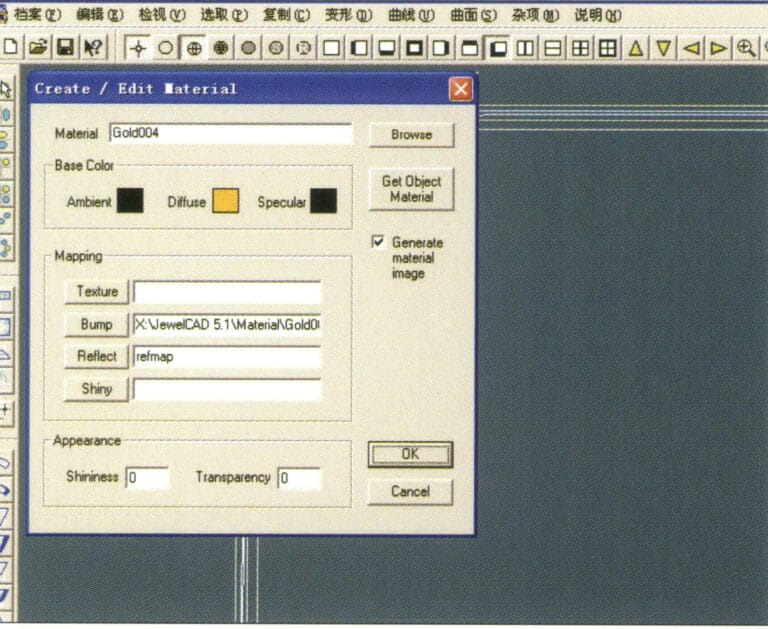
22. "Malzeme Oluştur/Değiştir" iletişim kutusuna girin, ilgili değerleri girin ve onaylayın
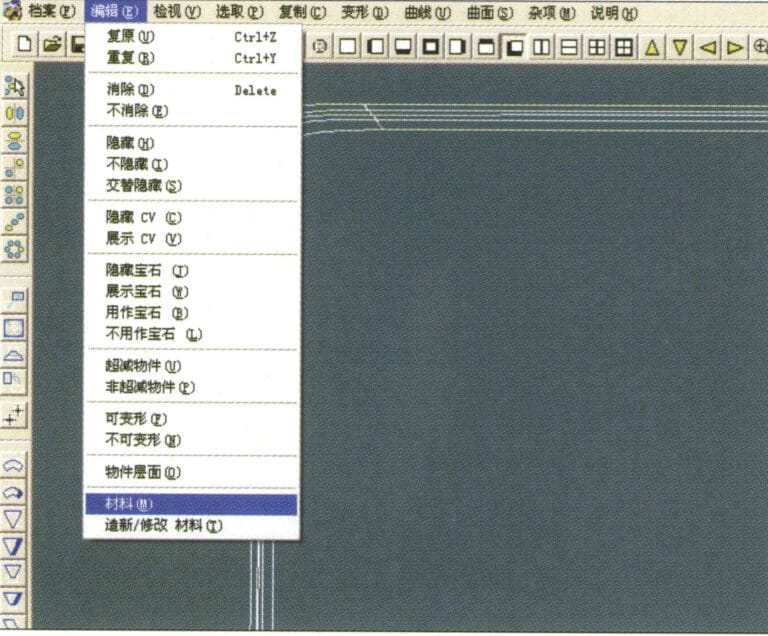
23. Select “Edit” > “Material” in the menu bar
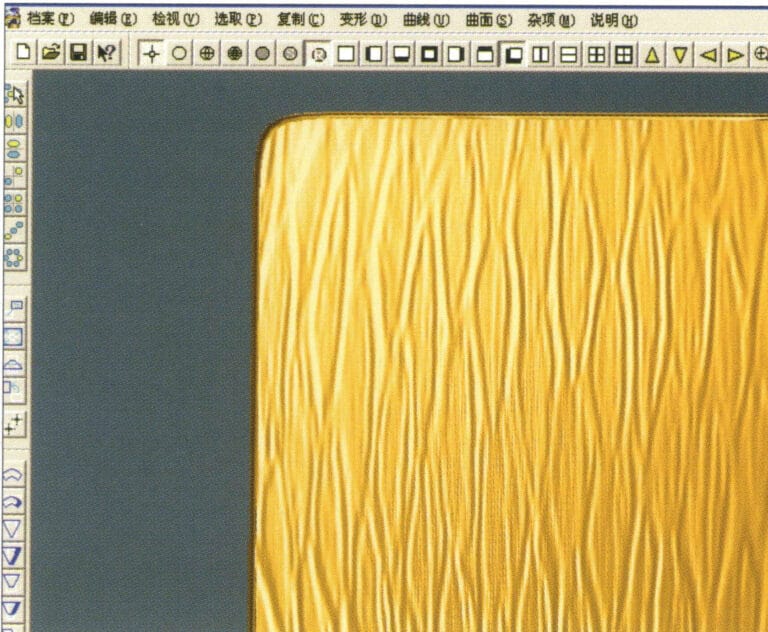
24. Select "View" > "Shadow Map" from the menu bar to examine the shadow effects
25. Select "File" > "Save As" from the menu bar to save the file
4. Motorla Tornalanmış Kaplama
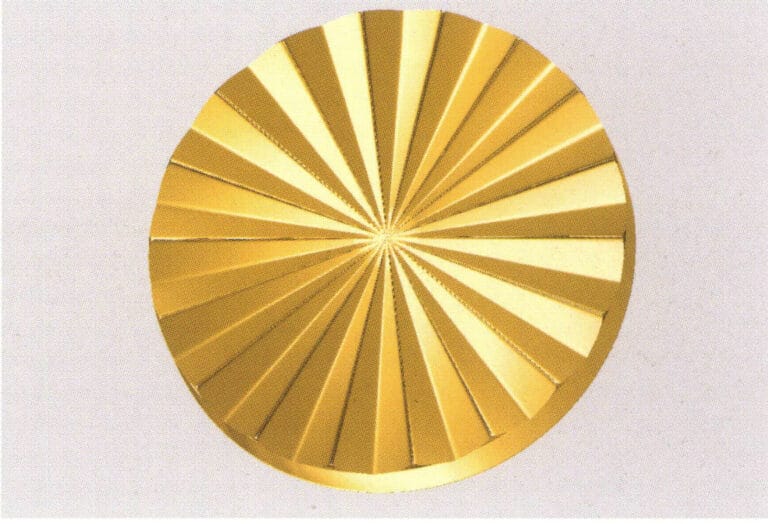

1. Create a new file in JewelCAD, select "Curve" > "Circular Curve" from the menu bar, enter the relevant values in the "Circular Curve" dialog box, and confirm
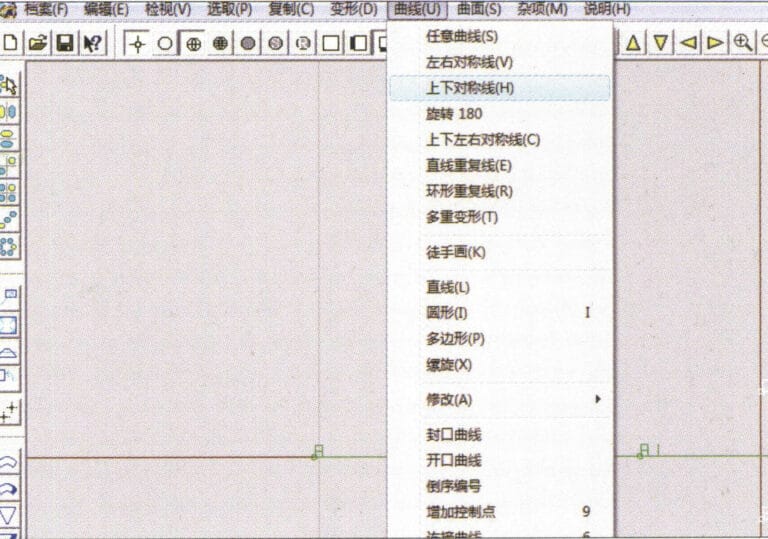
2. Select "Curve" > "Left-Right Symmetry Line" from the menu bar to draw a section
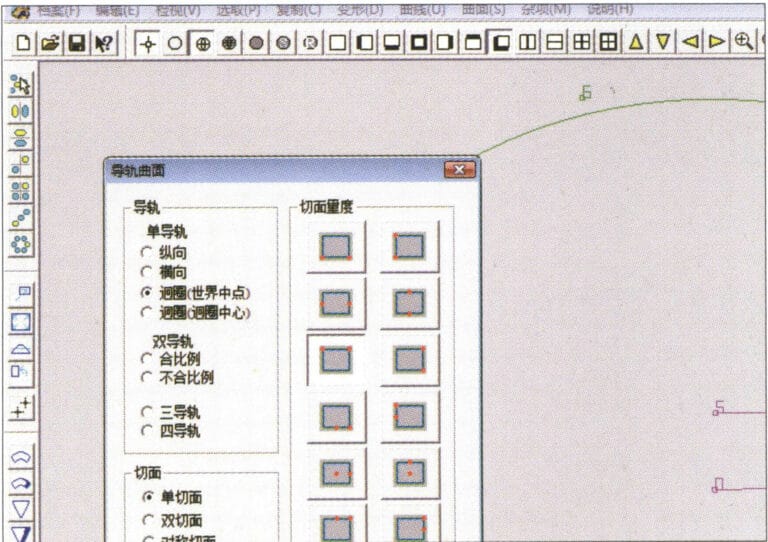
3. Select "Surface" > "Rail Surface" from the menu bar, enter "Rail Surface," select the relevant options and confirm; left-click on a curve as the section of the rail surface; left-click on another curve as the "Rail" > "Finish."

4. Select “View” > “Shadow Map” on the menu bar to view the light and shadow effects
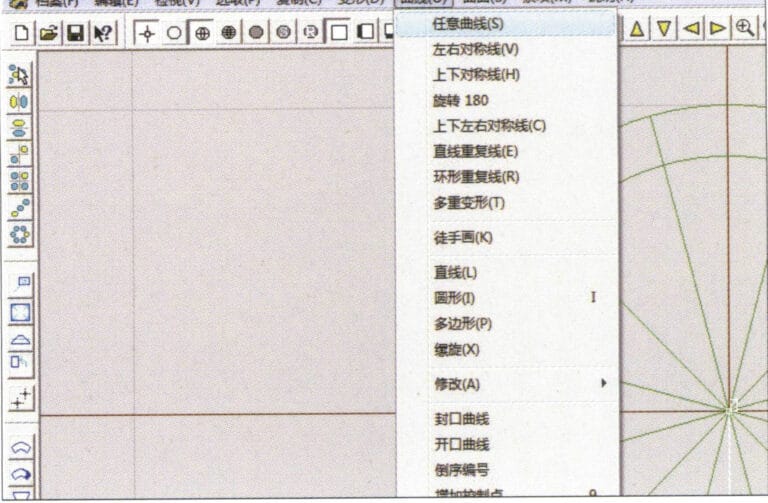
5. Select "Curve" > "Freefrom Curve" from the menu bar
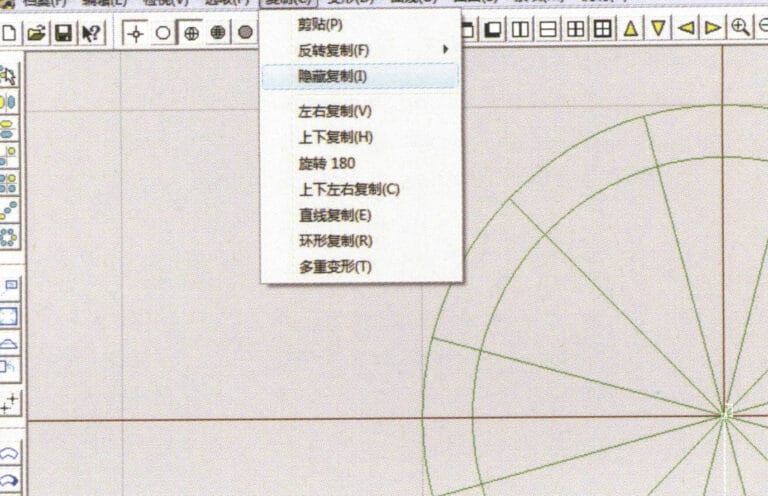
6. Select "Copy" > "Hide Copy" from the menu bar
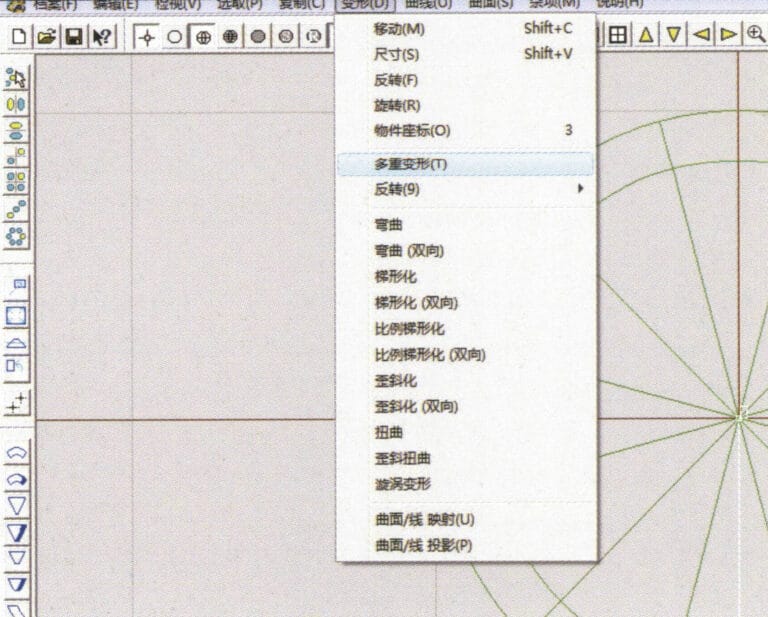
7. Select "Deformation" > "Multiple Deformation" from the menu bar
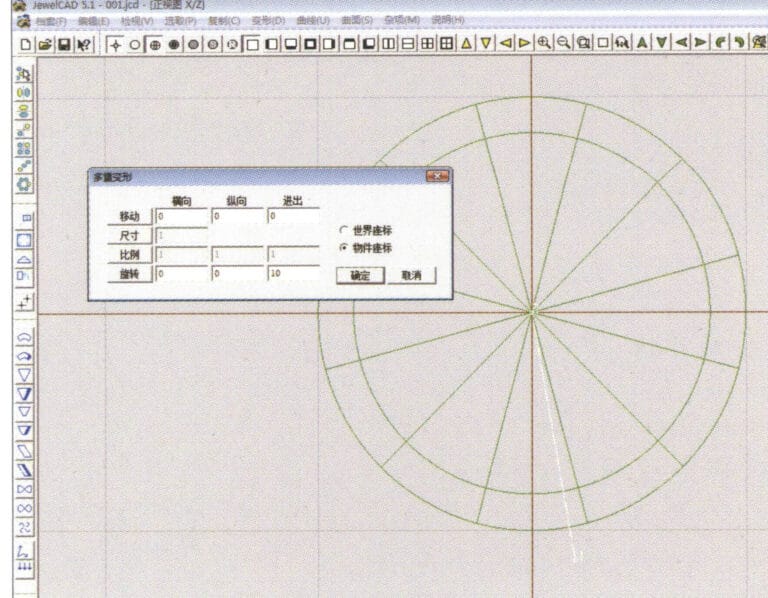
8. "Çoklu Deformasyon" iletişim kutusuna girin ve ilgili değerleri girin
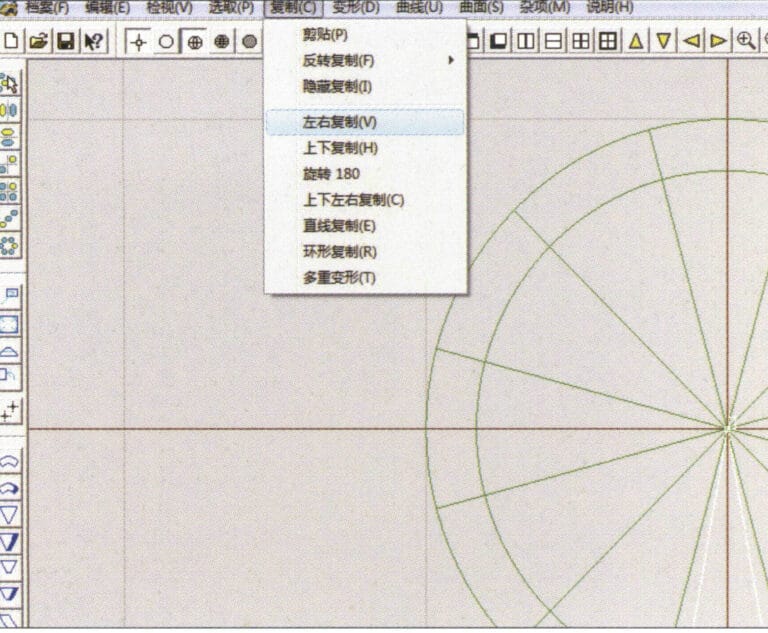
9. Select “Copy” > “Left/Right Copy” on the menu bar
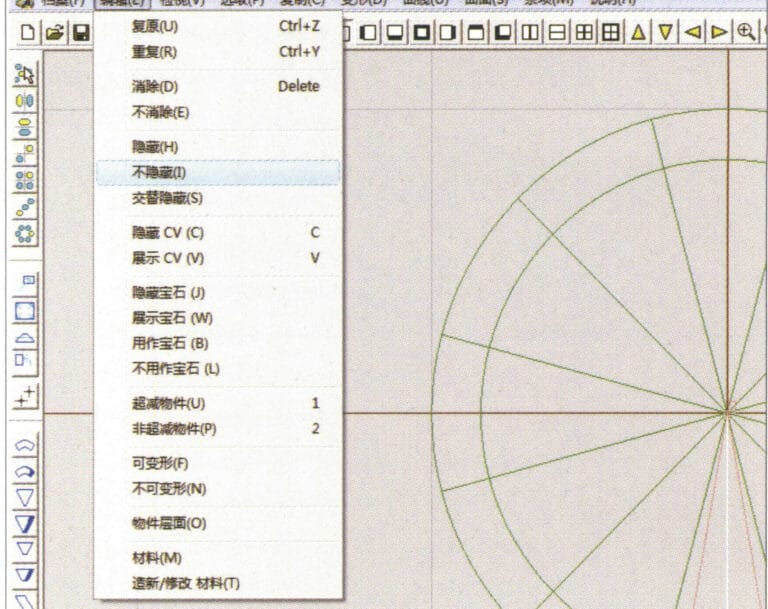
10. Select "Edit" > "Unhide" from the menu bar to display the hidden curves
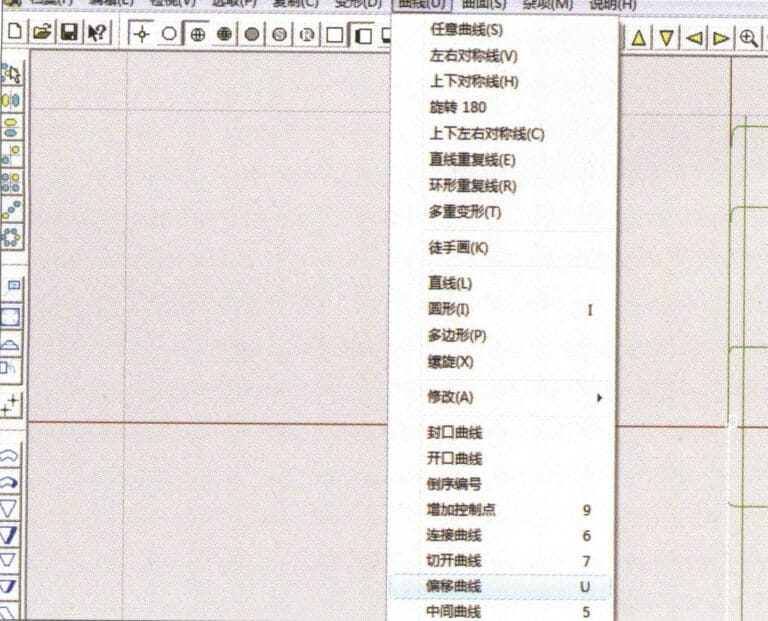
11. Select "Curve" > "Offset Curve" from the menu bar
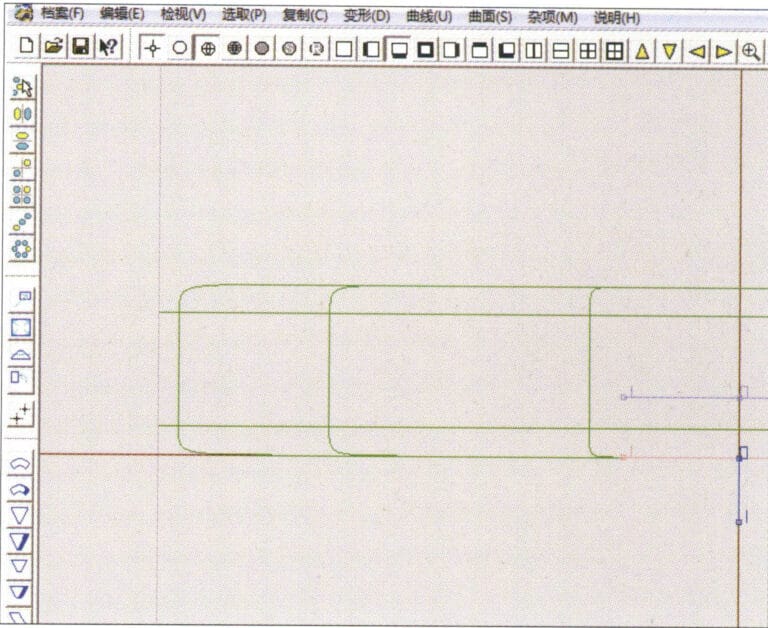
12. Select "Deformation" > "Move" from the menu bar to move the selected curve
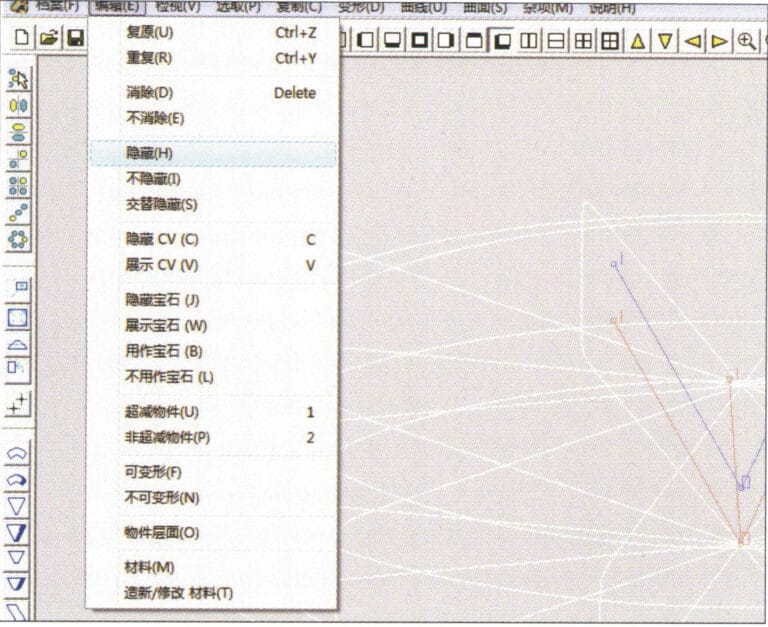
13. Select "Edit" > "Hide" from the menu bar to hide the circular surface
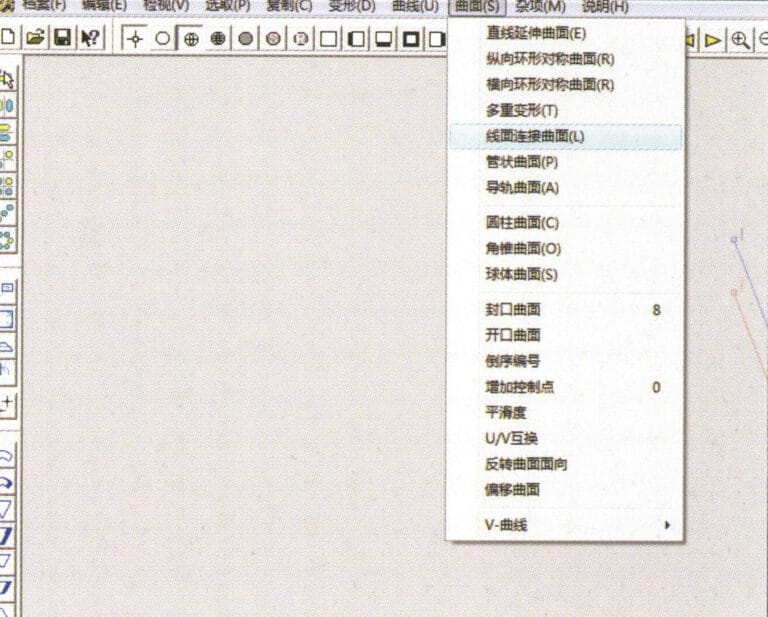
14. Select "Surface" > "Line Surface Connection Surface" from the menu bar

15. Çizgi-yüzey bağlantıları oluşturmak için eğrileri/yüzeyleri saat yönünde seçin, ardından menü çubuğundan seçin
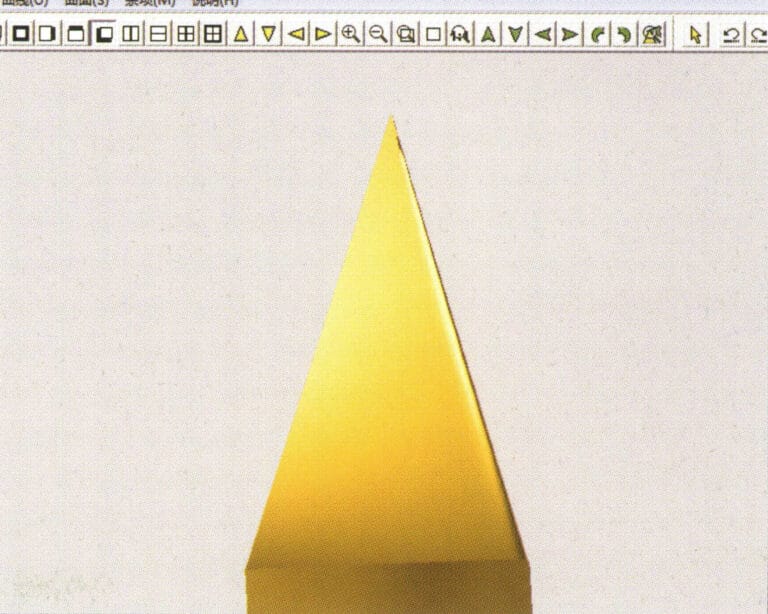
16. Select "View" > "Shadow Map" from the menu bar to inspect the shadow effects
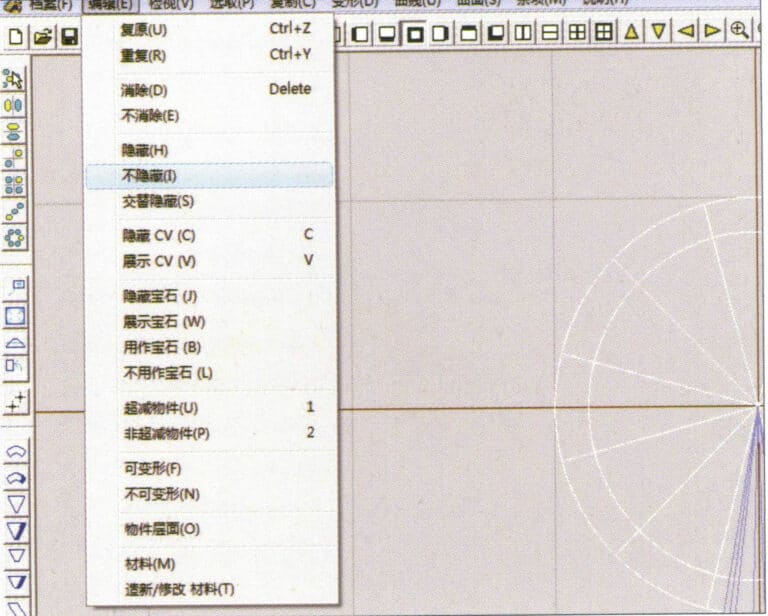
17. Select "Edit" > "Unhide" from the menu bar to display the hidden circular surfaces
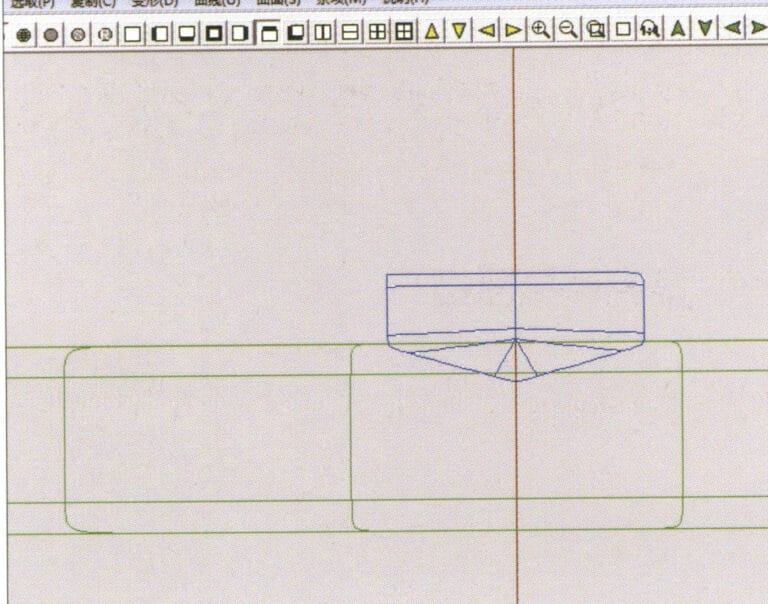
18. Select "Deformation" > "Move" from the menu bar to move the selected surface
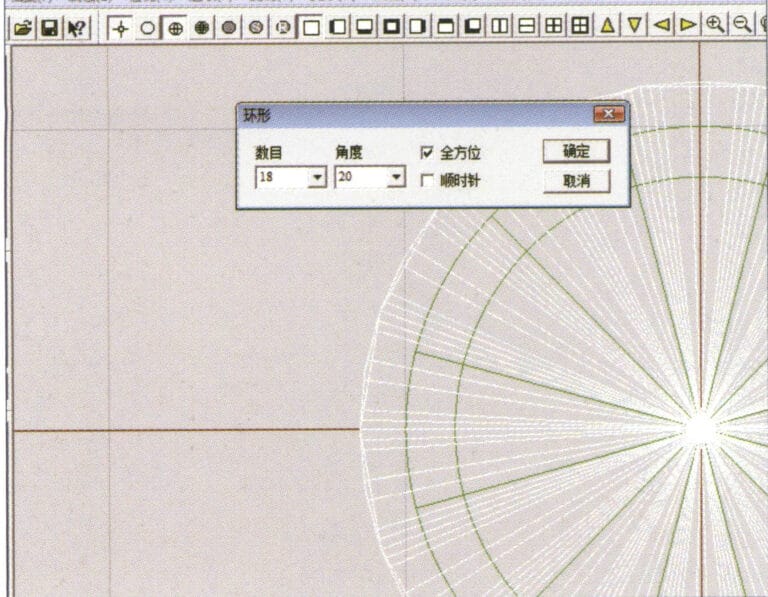
19. Select "Copy" > "Circular Copy" from the menu bar, enter the relevant values and confirm

20. Select “Miscellaneous” > “Boolean” > “Integrate” on the menu bar to integrate the selected surfaces.
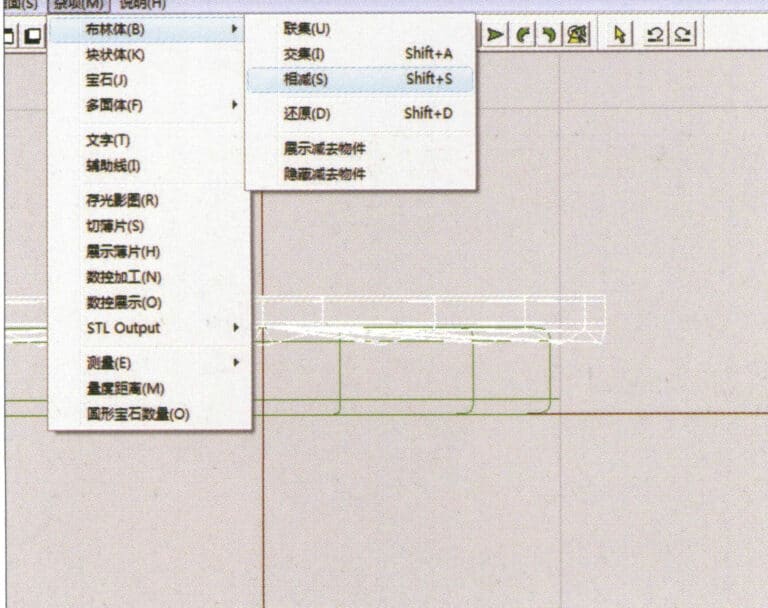
21. Select "Miscellaneous" > "Boolean" > "Subtract" from the menu bar to subtract the selected surface from the already united surface
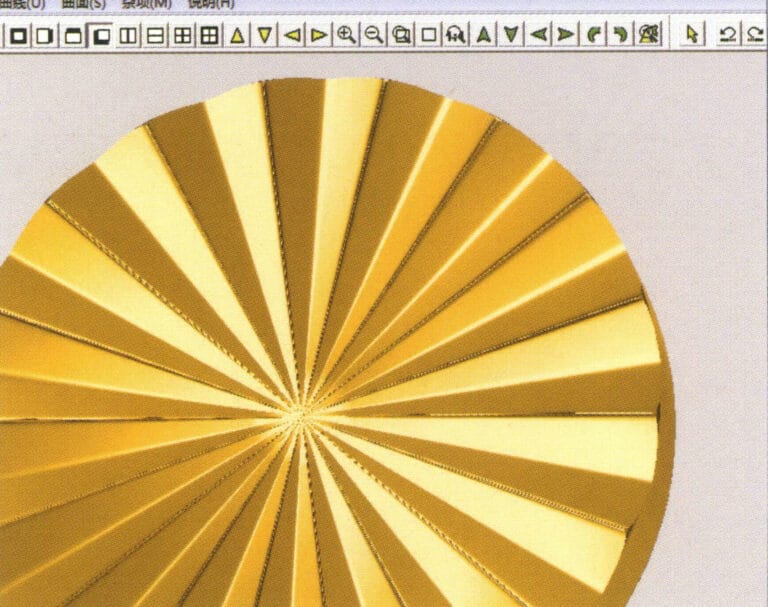
22. Select "View" > "Shadow Map" from the menu bar to inspect the shadow effects.
23. Select "File" > "Save File" from the menu bar to save the document
Bölüm III Takı Efektleri Oluşturmak için JewelCAD Kullanımı
1. Pırlanta Tornalı Ayar Yüzüğü
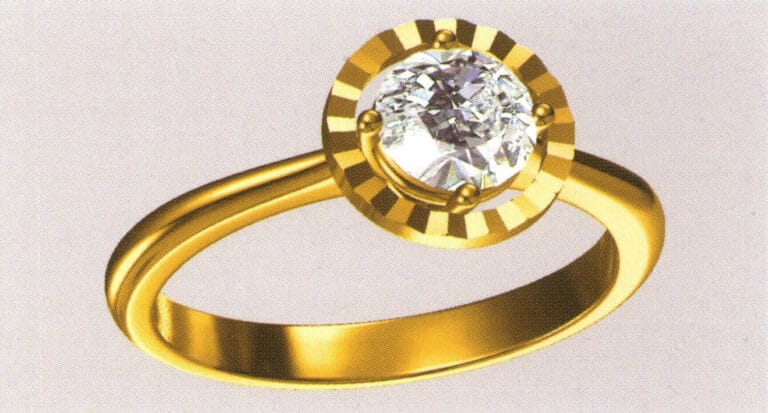
Üretim için adımlar aşağıdaki gibidir:
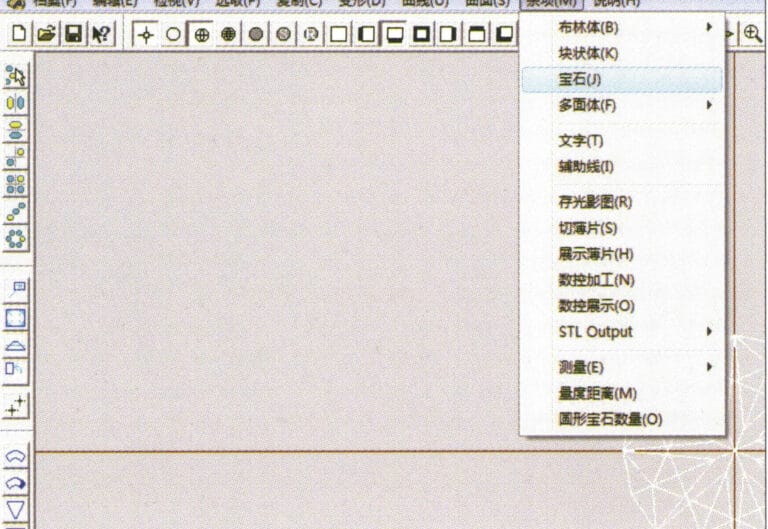
1. Create a new file in JewelCAD, select "Miscellaneous" > "Gem" from the menu bar

2. Select "Deformation" > "Multiple Deformation" from the menu bar
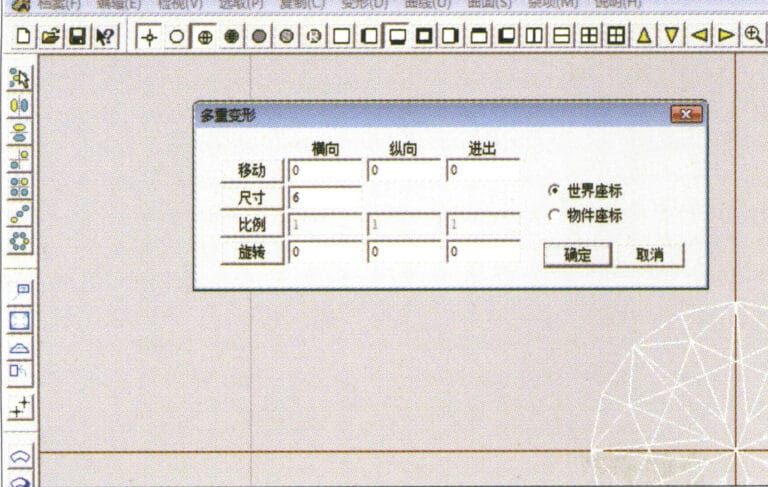
3. "Çoklu Deformasyon" iletişim kutusuna girin, ilgili değerleri girin ve onaylayın
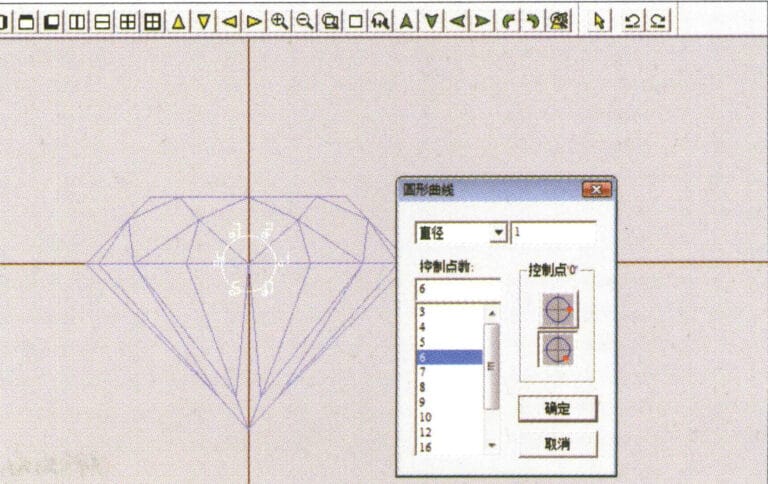
4. Select “Curve” > “Circular Curve” in the menu bar to enter the “Circular Curve” dialog box, enter the relevant values and confirm
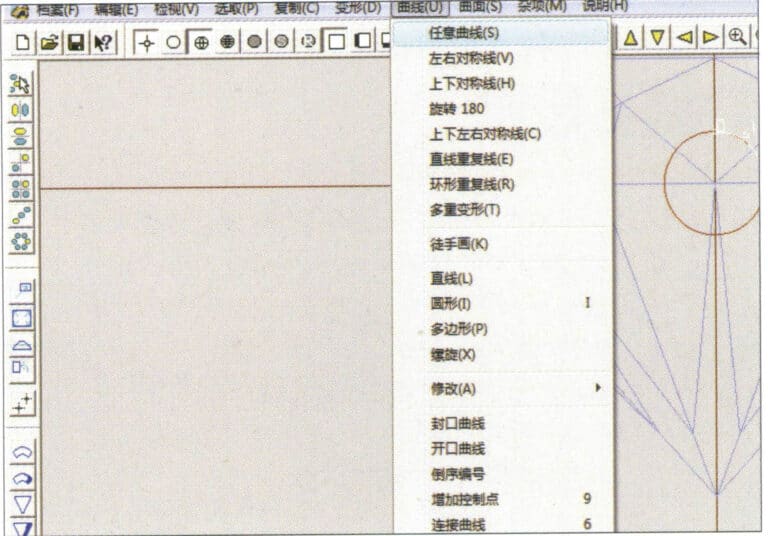
5. Select "Curve" > "Freeform Curve" from the menu bar to draw a claw-shaped guideline
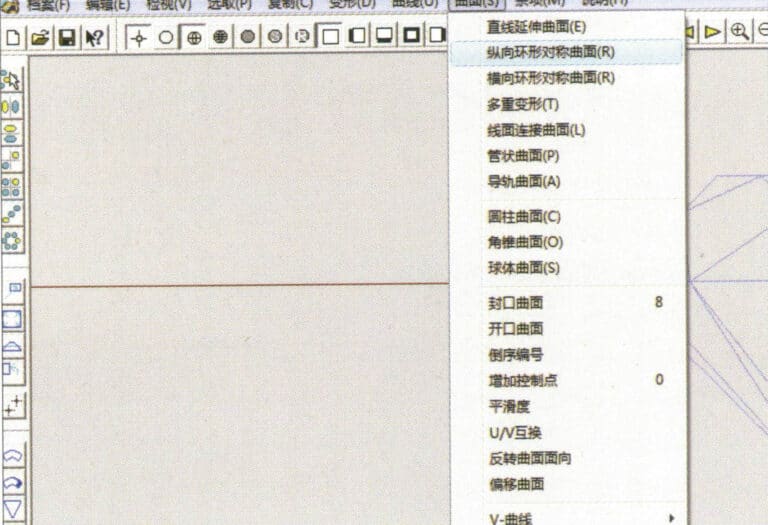
6. Select "Surface" > "Longitudinal Annular Symmetrical Surface" from the menu bar, and draw a claw shape
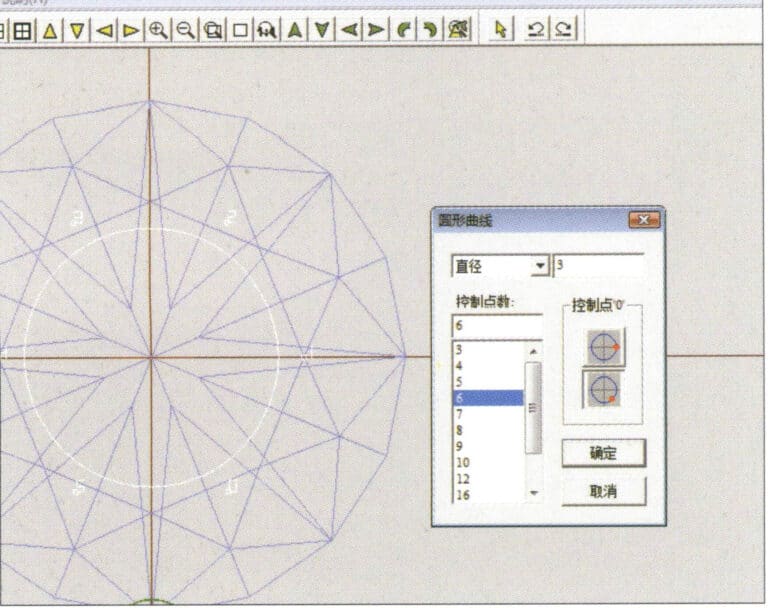
7. Select "Curve" > "Circular Curve" from the menu bar, enter the relevant values in the "Circular Curve" dialog box and confirm
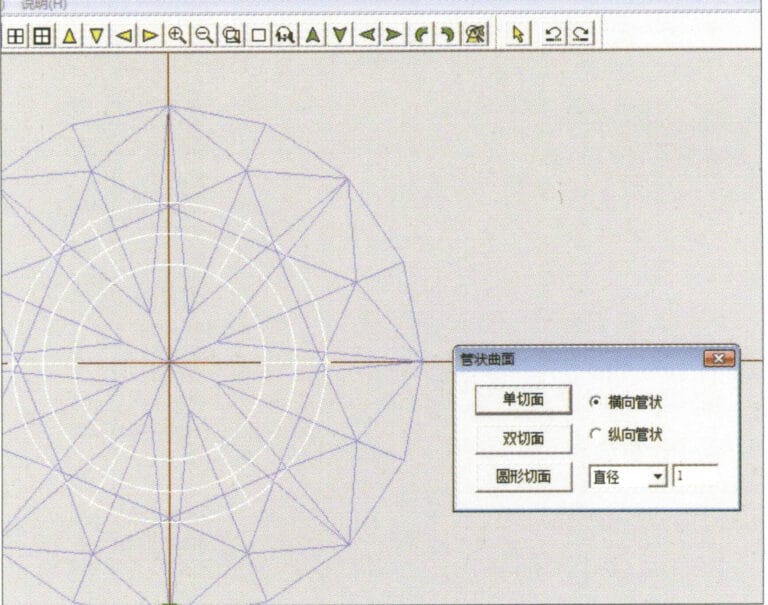
8. Select "Surface" > "Tubular Surface" from the menu bar, enter the relevant values and confirm
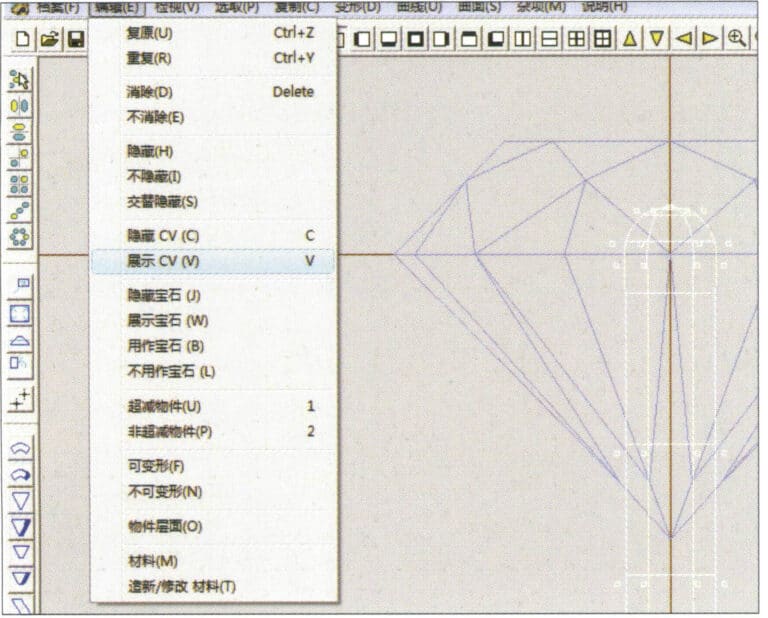
9. Select “Edit” > “Show CV” in the menu bar
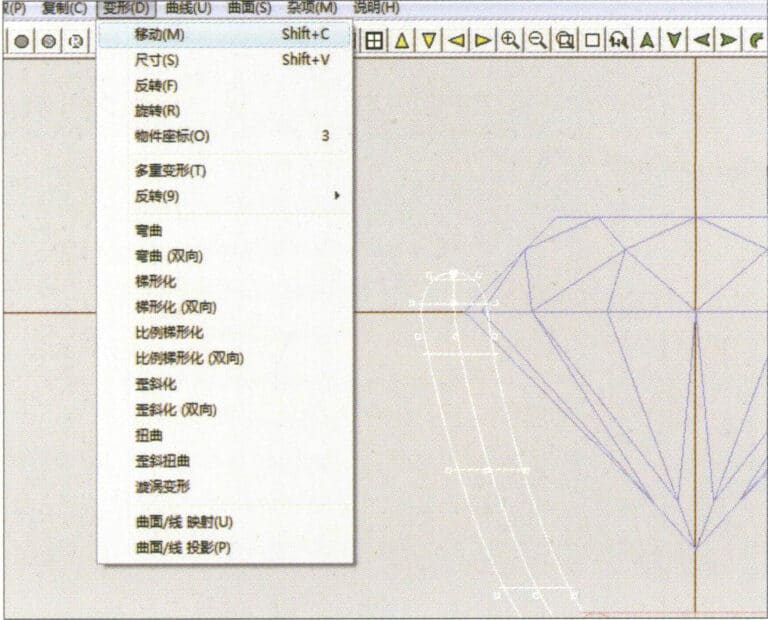
10. Select “Deformation” > “Move” in the menu bar to move the CV
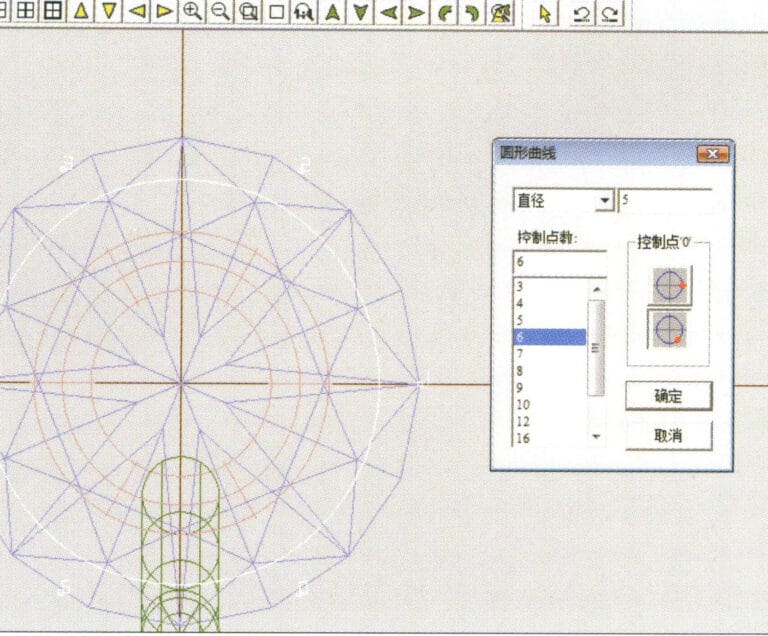
11. Select "Curve" > "Circular Curve" from the menu bar, enter the relevant values in the "Circular Curve" dialog box and confirm
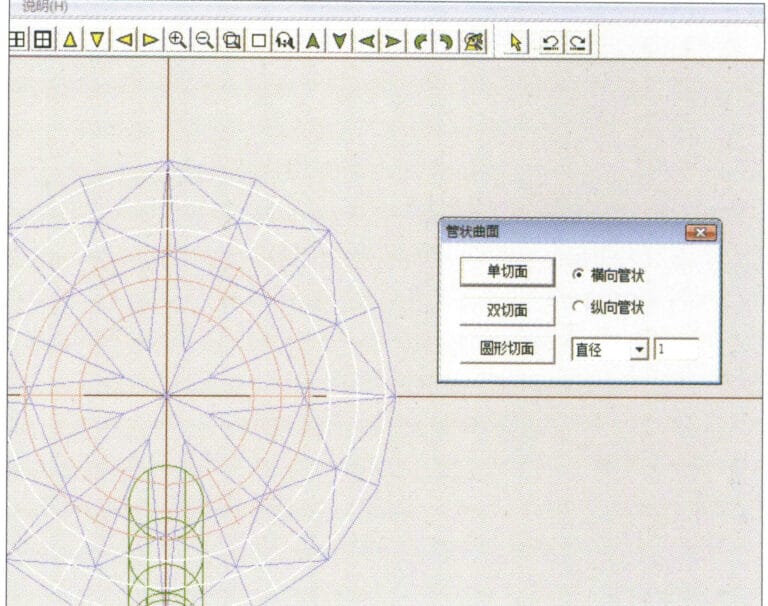
12. Select "Surface" > "Tubular Surface" from the menu bar, enter the relevant values and confirm
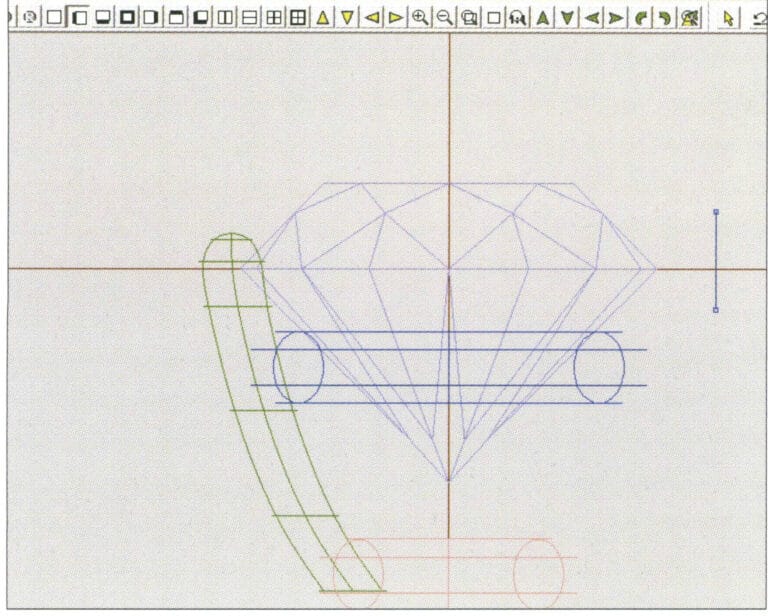
13. Select the menu bar "Edit" > "Move" to move the selected graphic

14. Select the completed claw shape, choose "Copy" > "Circular Copy" from the menu, enter the relevant values in the "Circular Copy" dialog box and confirm
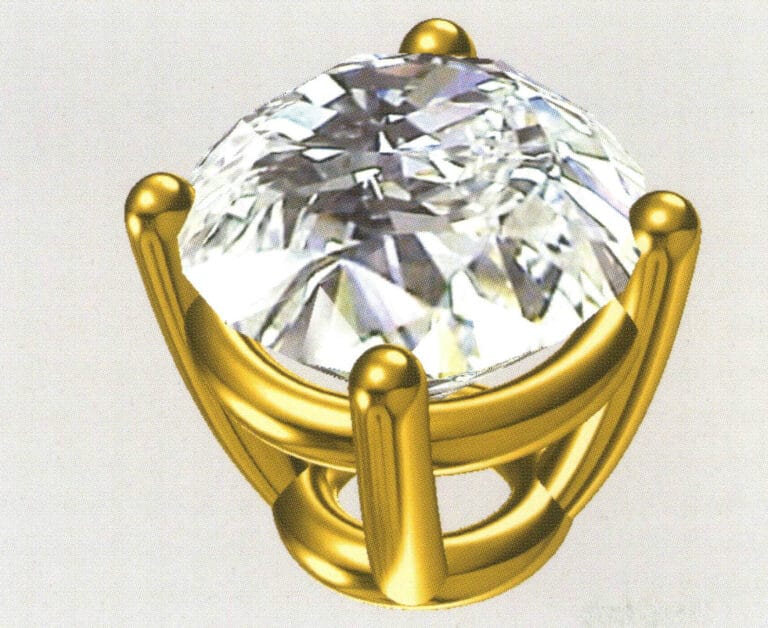
15. Select "View" > "Shadow Map" from the menu bar to inspect the shadow effects
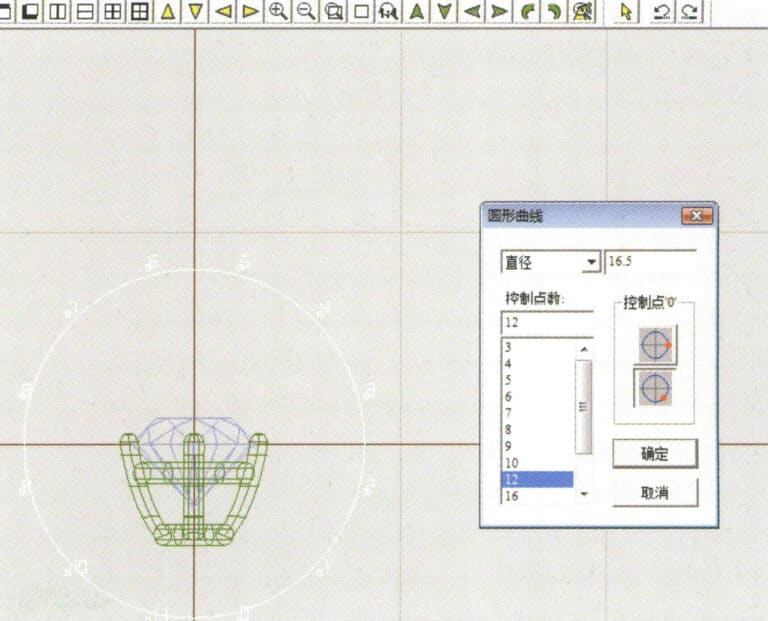
16. Select "Curve" > "Circular Curve" from the menu bar, enter the "Circular Curve" dialog box, and input the relevant values as the inner diameter of the ring shank
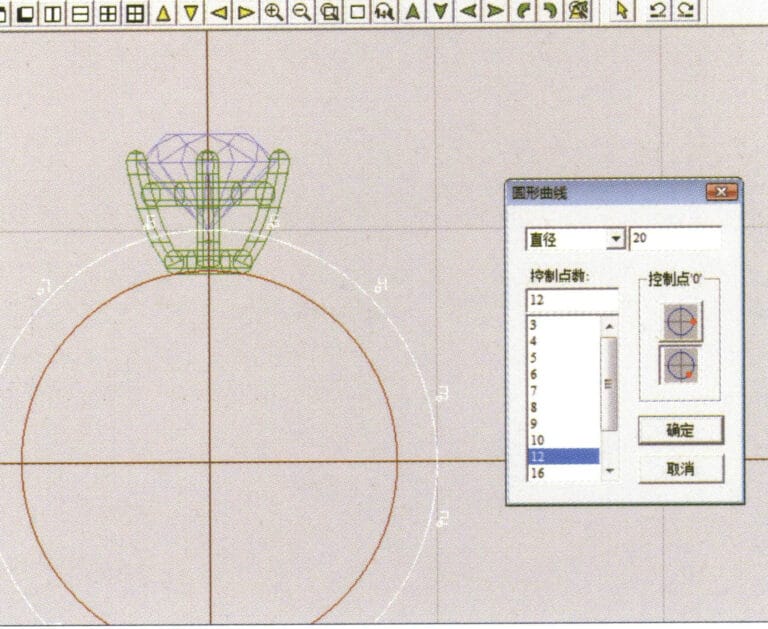
17. Select "Curve" > "Circular Curve" from the menu bar, enter the "Circular Curve" dialog box, and input the relevant values as the outer diameter of the ring shank

18. Select "Curve" > "Circular Curve" from the menu bar, enter the "Circular Curve" dialog box, and input the relevant values as the outer diameter of the engine-turned band
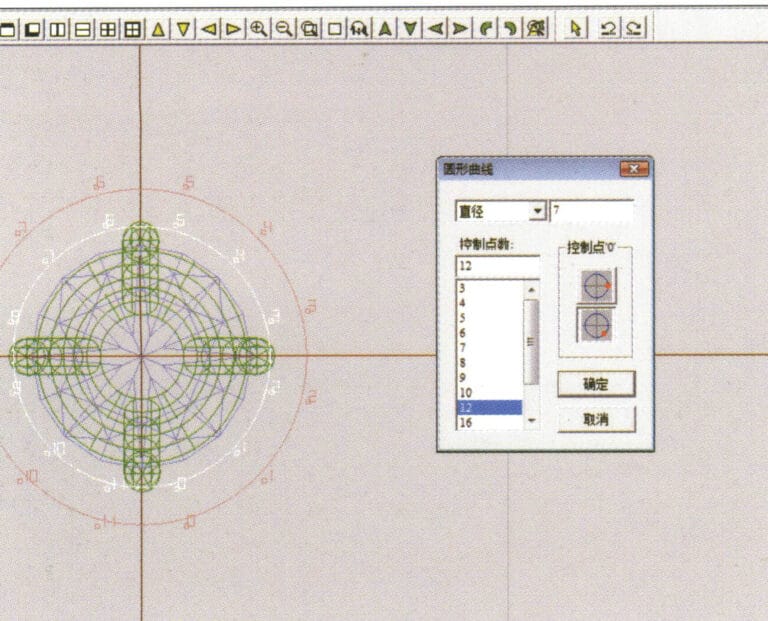
19. Select "Curve" > "Circular Curve" from the menu bar, enter the "Circular Curve" dialog box, and input the relevant values as the inner diameter of the engine-turned band
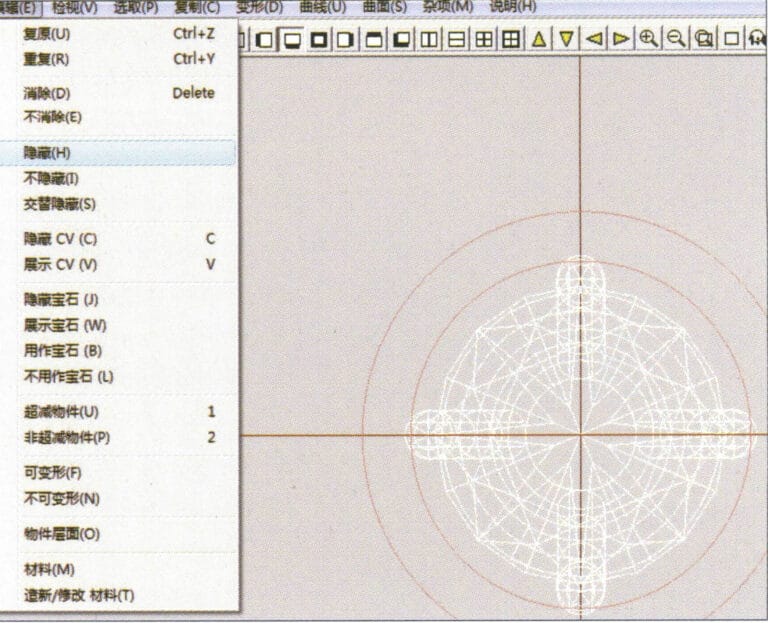
20. Select "Edit" > "Hide" from the menu bar to hide the completed gemstone inlay
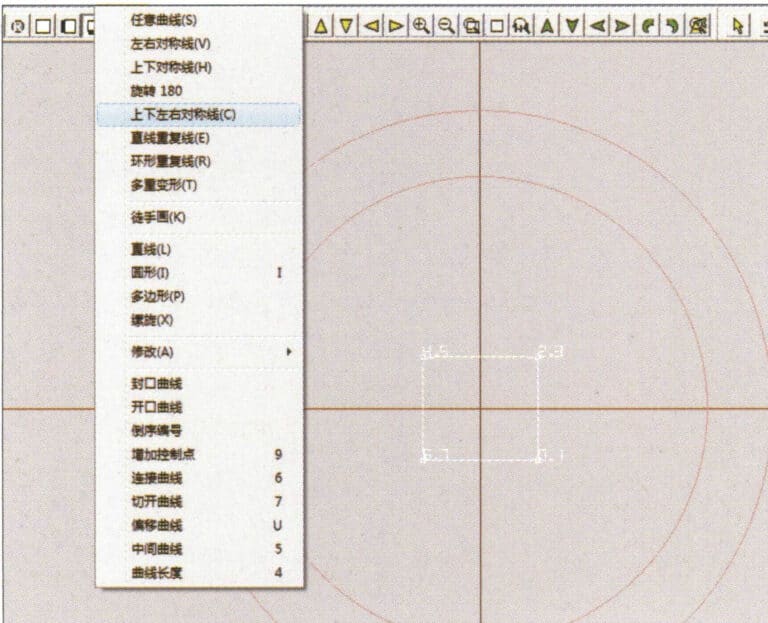
21. Select "Curve" > "Vertical and Horizontal Symmetry Line" from the menu bar
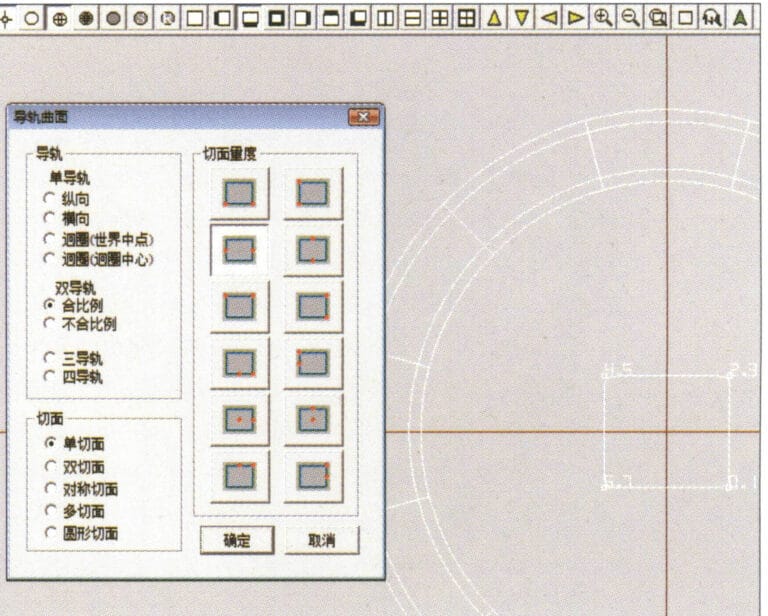
22. Select "Surface" > "Rail Surface" from the menu bar to enter the "Rail Surface" dialog box, select the relevant options and confirm
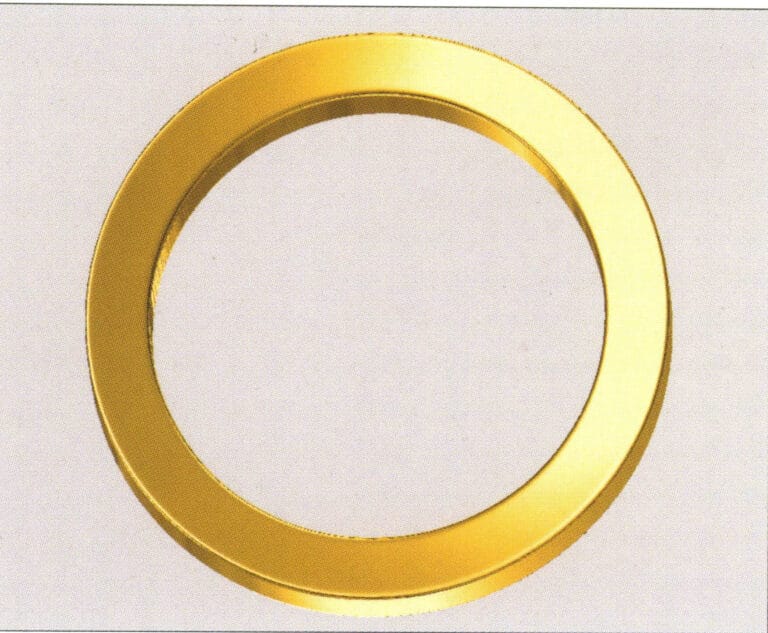
23. Select "View" > "Shadow Map" from the menu bar to inspect the shadow effects
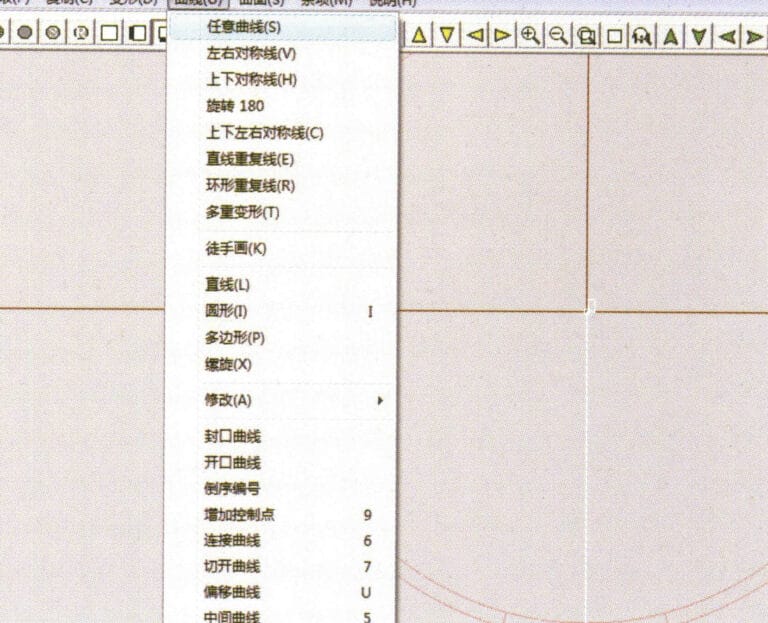
24. Select "Curve" > "Freeform Curve" from the menu bar to draw a guideline

25. Select "Copy" > "Hide Copy" from the menu bar to copy the already drawn auxiliary lines
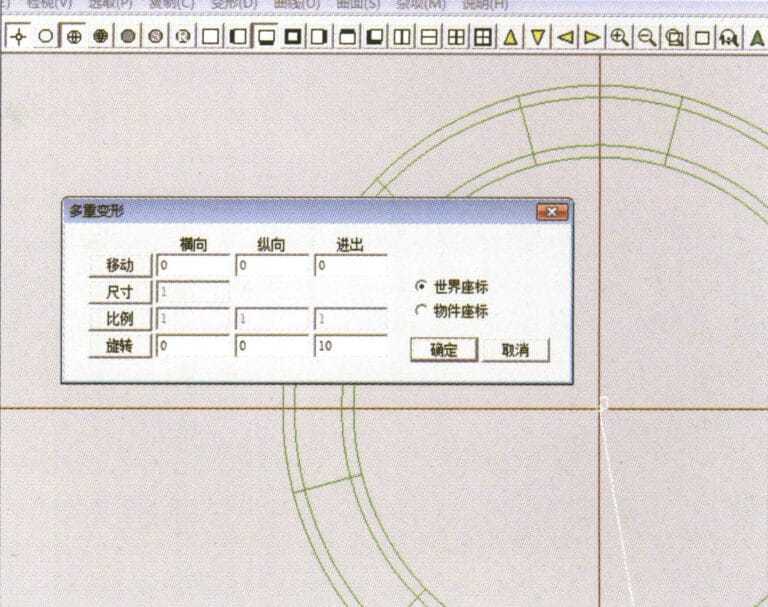
26. Select “Deformation” > “Multiple Deformation” in the menu bar to enter the “Multiple Deformation” dialog box, enter the relevant values and confirm
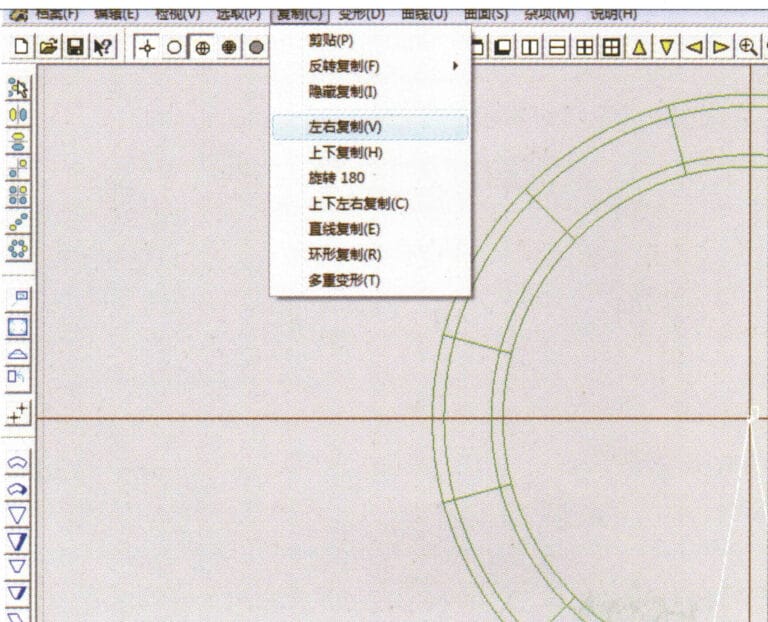
27. Select “Copy” > “Copy Up and Down” in the menu bar to copy the drawn auxiliary lines
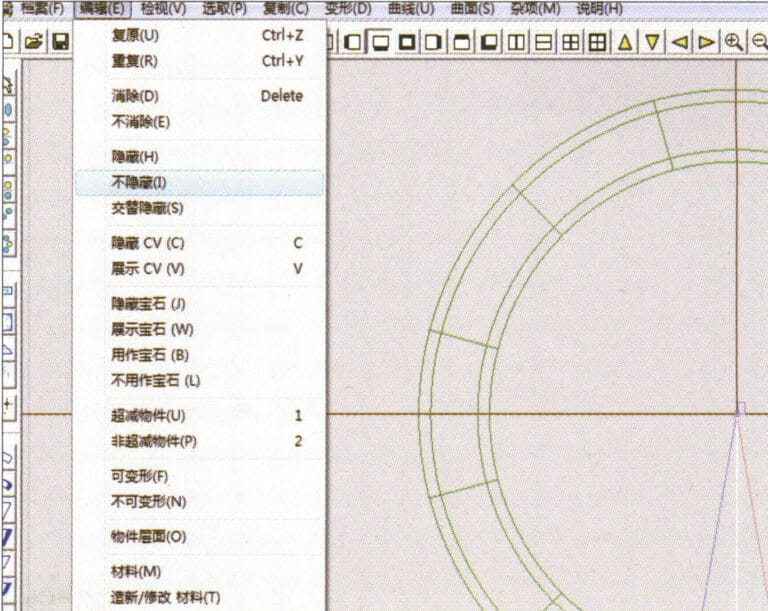
28. Select "Edit" > "Unhide" from the menu to display the hidden curves
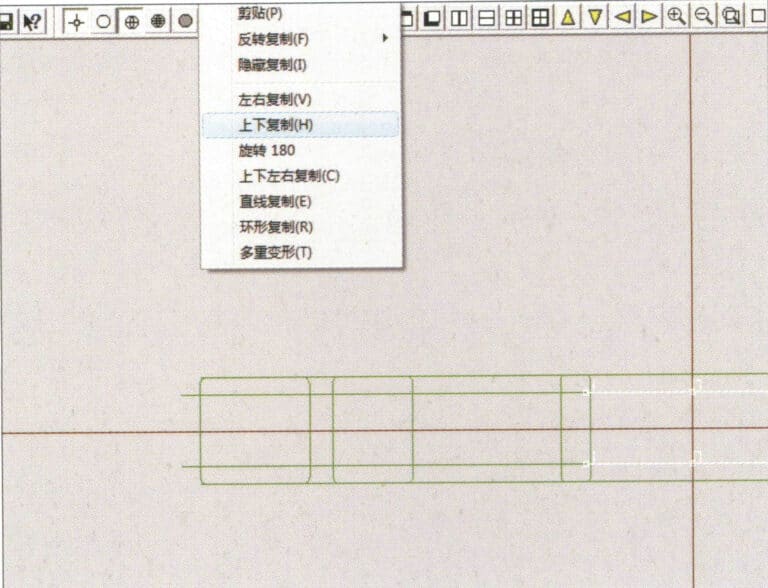
29. Select "Copy" > "Copy Up and Down" from the menu bar to copy the selected curve
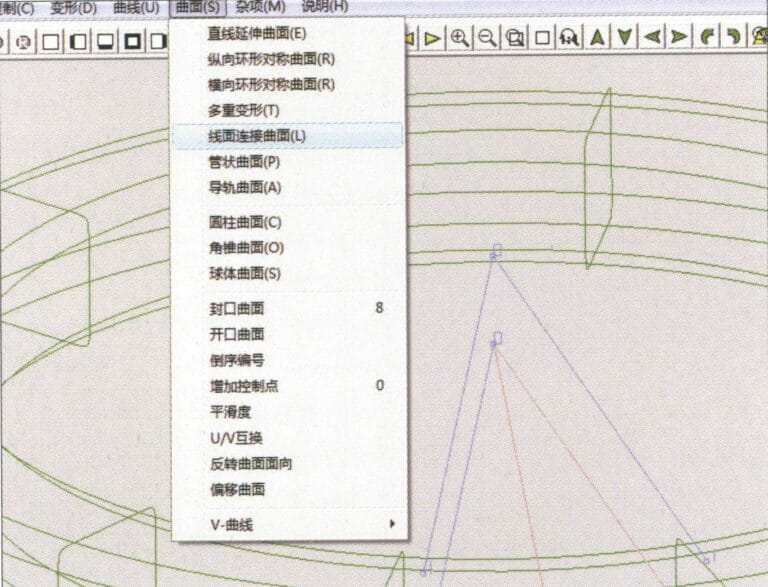
30. Select curves/surfaces in a clockwise direction to create line-surface connections, then select "Surface" > "Cap Surface" from the menu bar
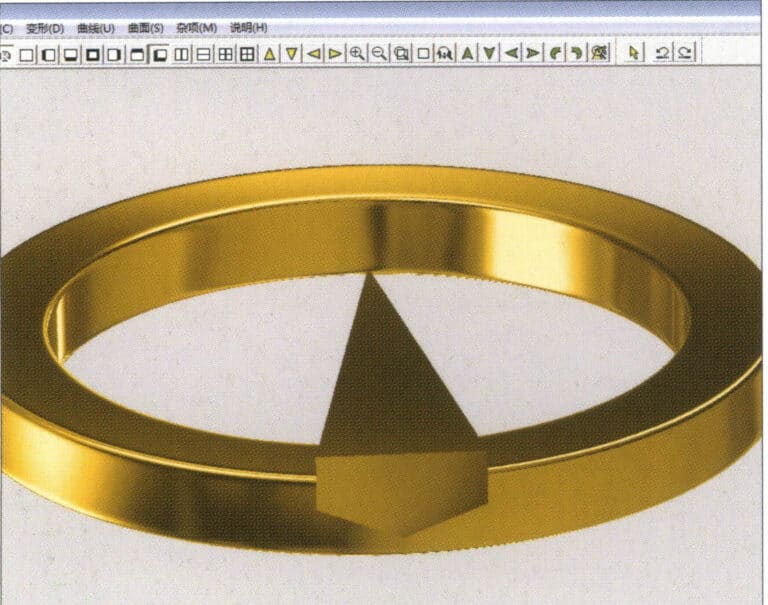
31. Select "View" > "Shadow Map" from the menu bar to inspect the shadow effects
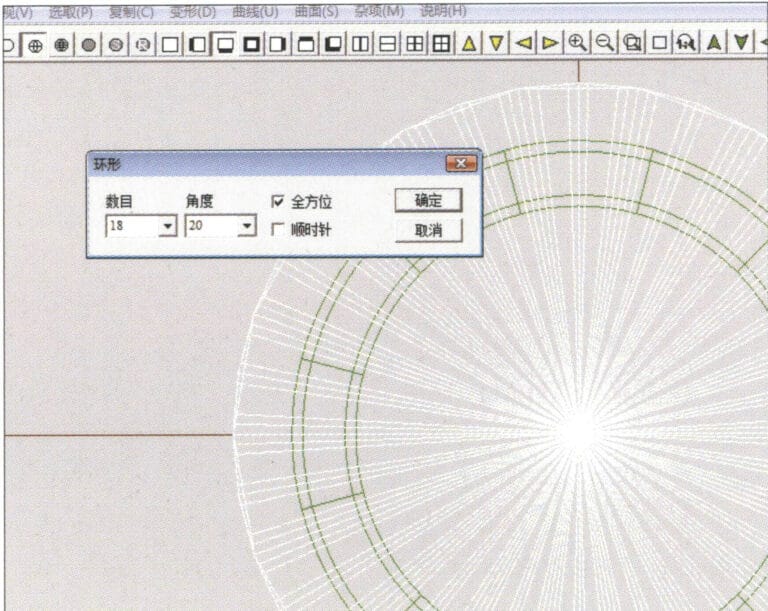
32. Select "Copy" > "Circular Copy" from the menu bar, enter the relevant values and confirm
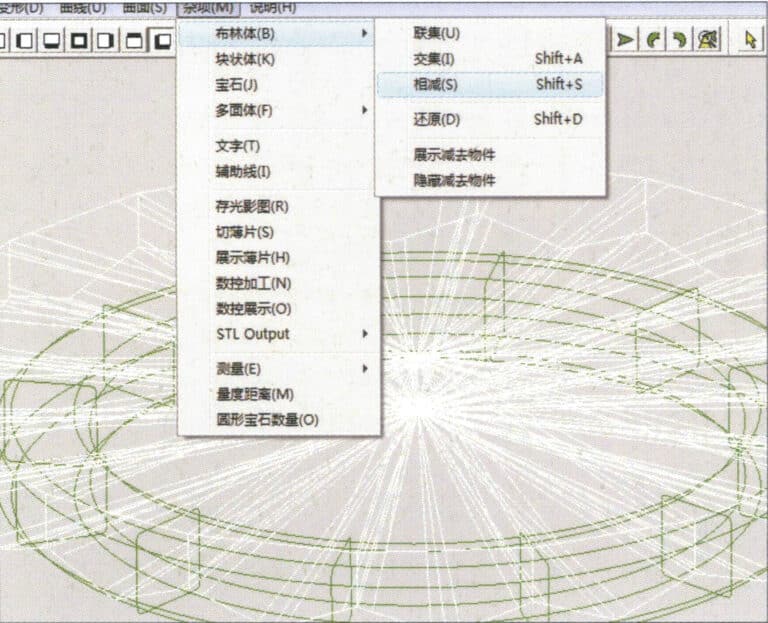
33. Select "Miscellaneous" > "Boolean" > "Subtract" from the menu bar to subtract the selected surface from the already united surface
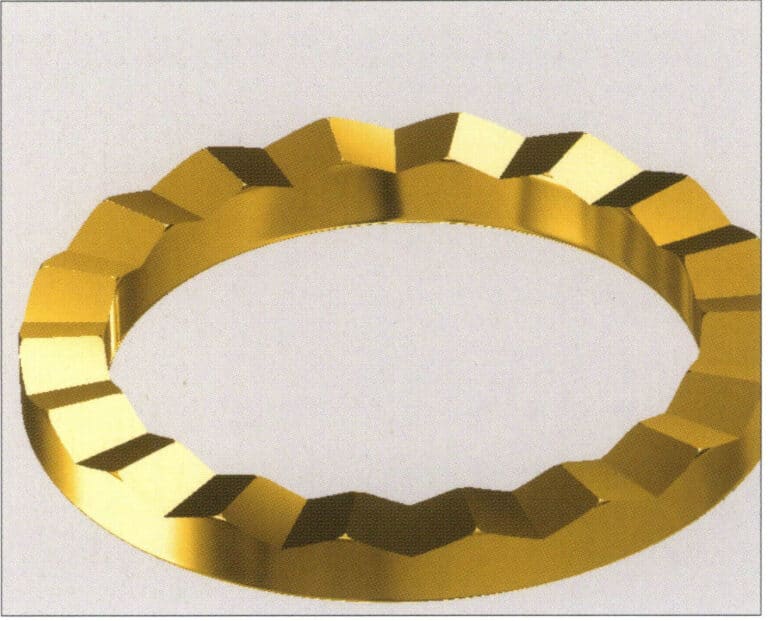
34. Select "View" > "Shadow Map" from the menu bar to inspect the shadow effects
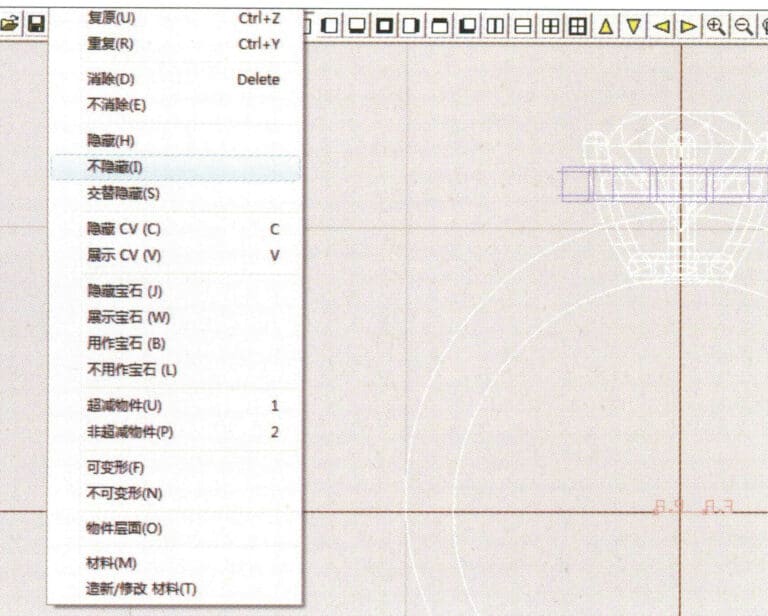
35. Select "Edit" > "Unhide" from the menu bar to display the hidden objects
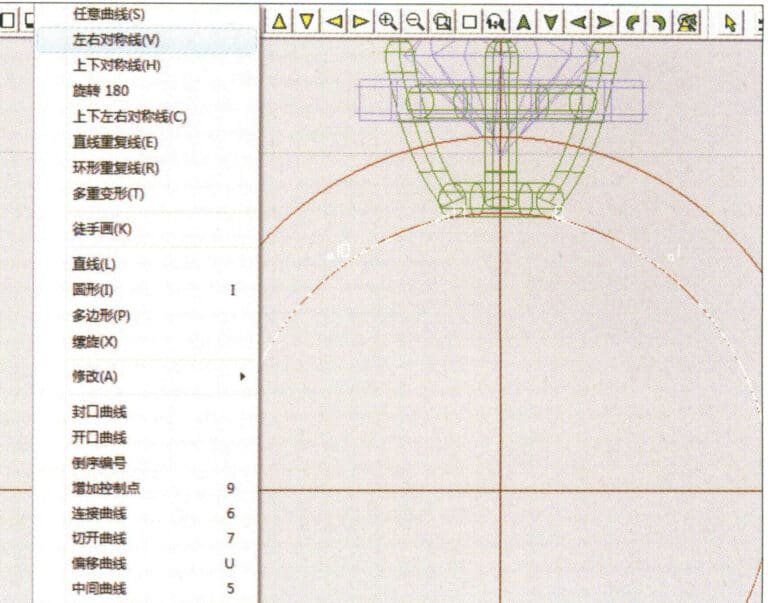
36. Select "Curve" > "Left-Right Symmetry Line" from the menu bar to draw the inner diameter of the ring wall
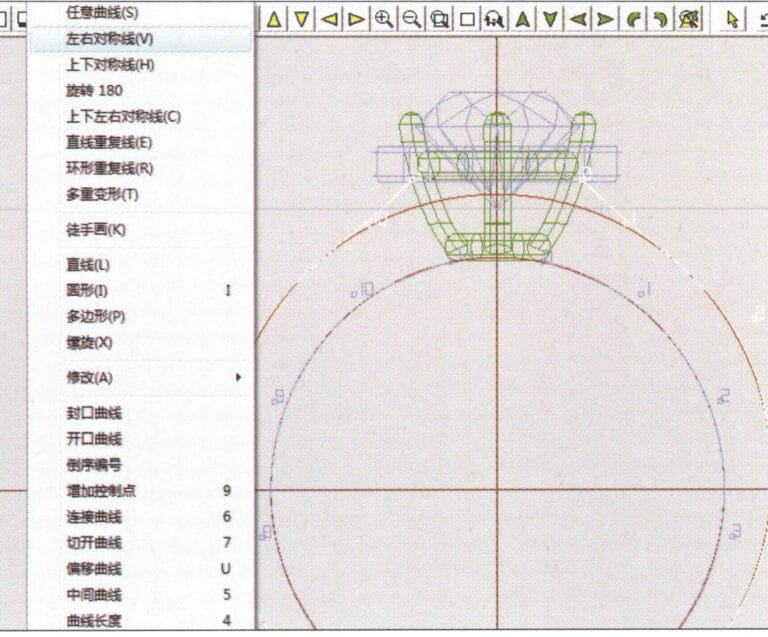
37. Select "Curve" > "Left-Right Symmetry Line" from the menu bar to draw the outer diameter of the ring wall
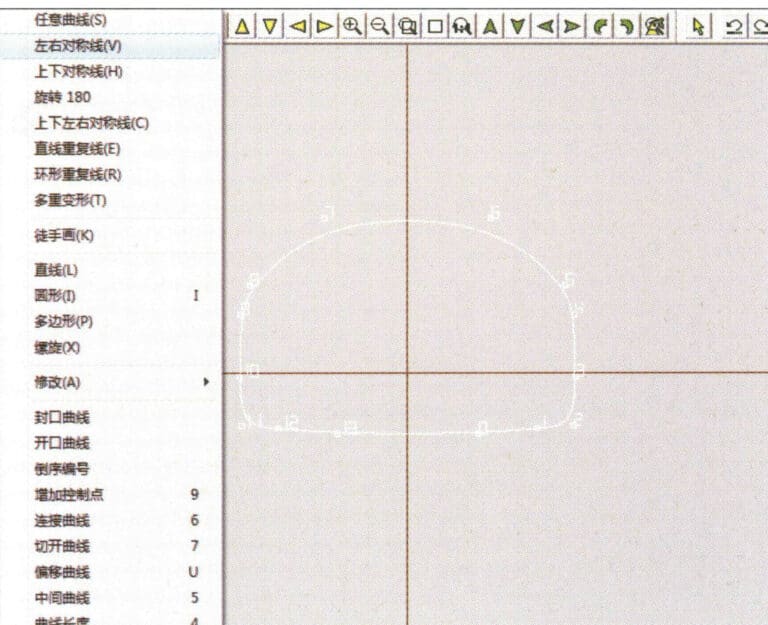
38. Select “Curve” > “Left-Right Symmetry Line” in the menu bar to draw a cutout of the ring shank
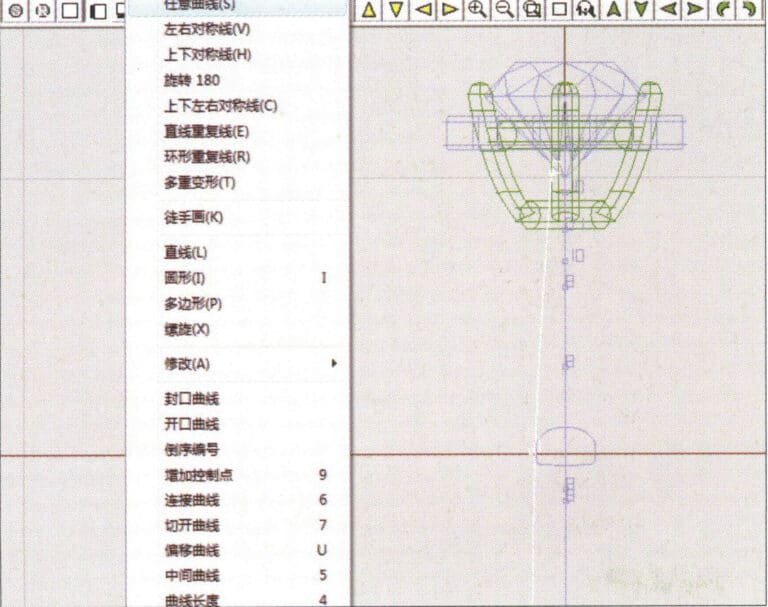
39. Select "Curve" > "Freeform Curve" from the menu bar to draw a guideline
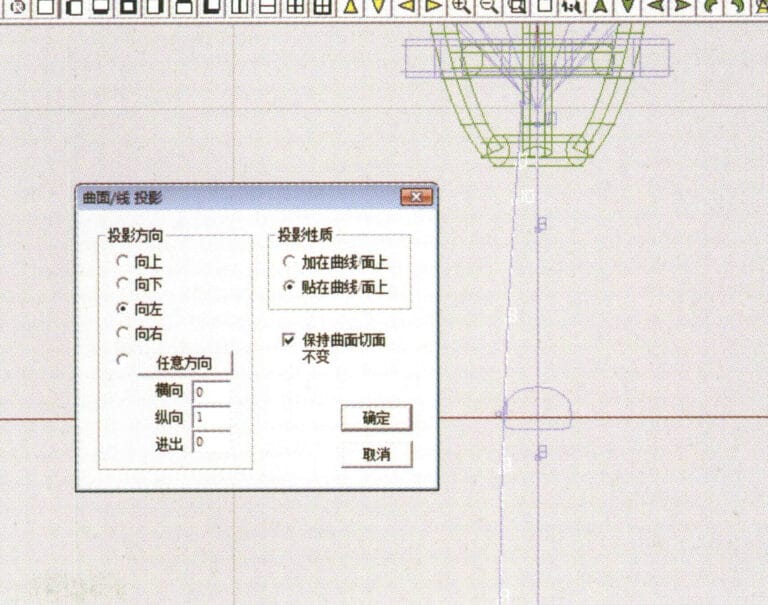
40. Select "Deformation" > "Surface/Line Projection" from the menu bar to enter the "Surface/Line Projection" dialog box, input the relevant values and confirm
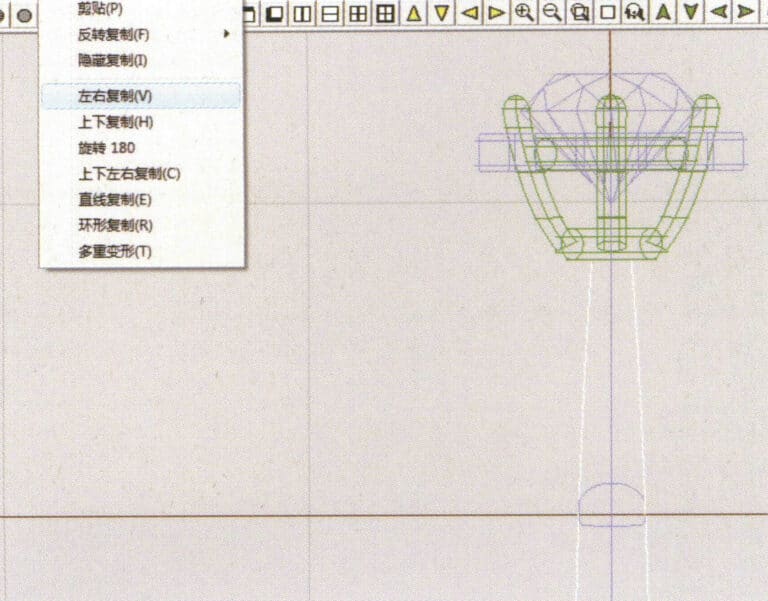
41. Select "Copy" > "Copy Left and Right" from the menu bar to copy the inner diameter of the ring shank
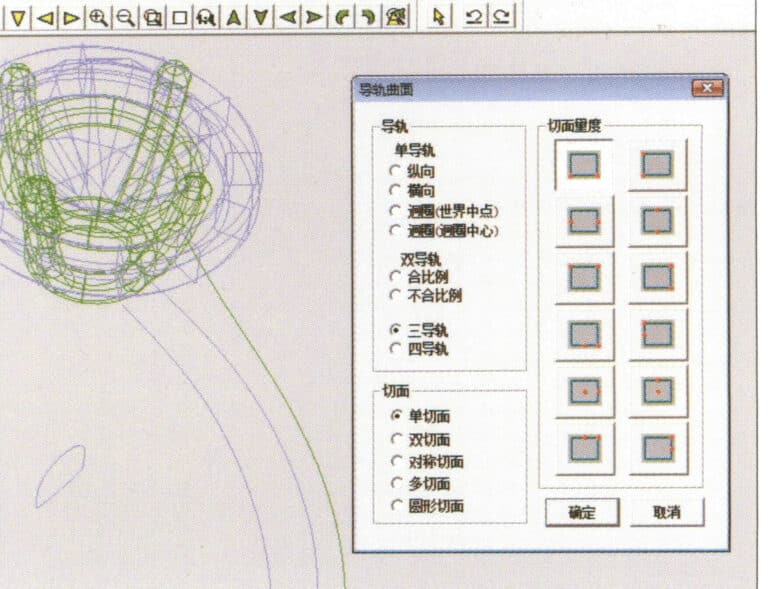
42. Select "Surface" > "Rail Surface" from the menu bar to enter the "Rail Surface" dialog box, select the relevant options and confirm
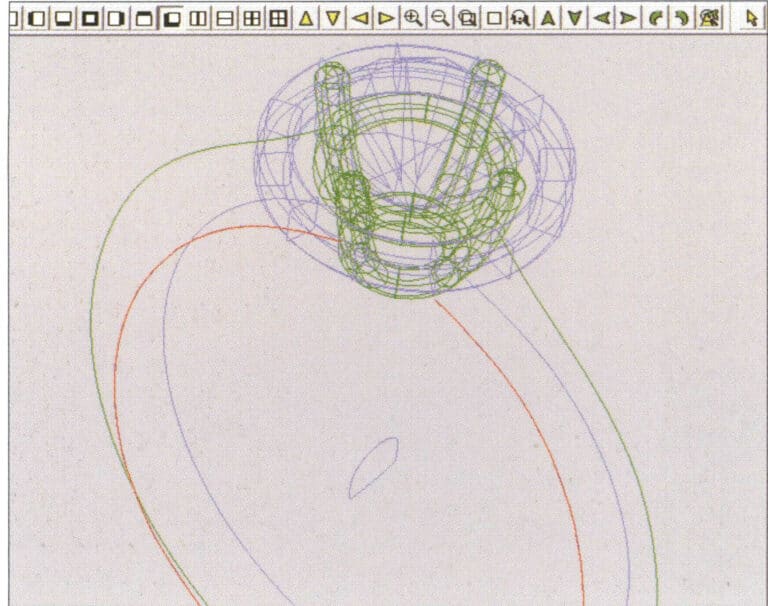
43. Sol kılavuz ray olarak bir eğri seçin ve ardından sağ kılavuz ray olarak bir eğri seçin

44. Üst kılavuz ray olarak bir eğri seçin
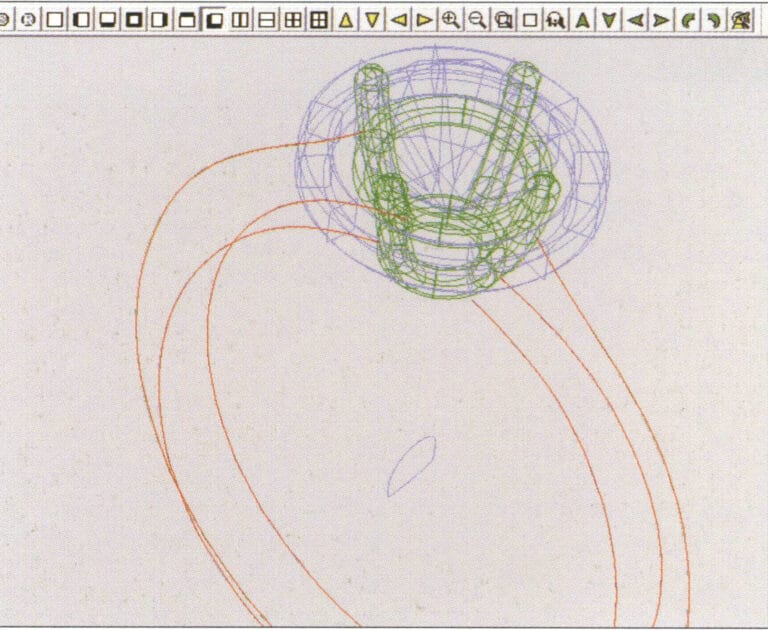
45. Kılavuz yüzeyin enine kesiti olarak bir eğri seçin.
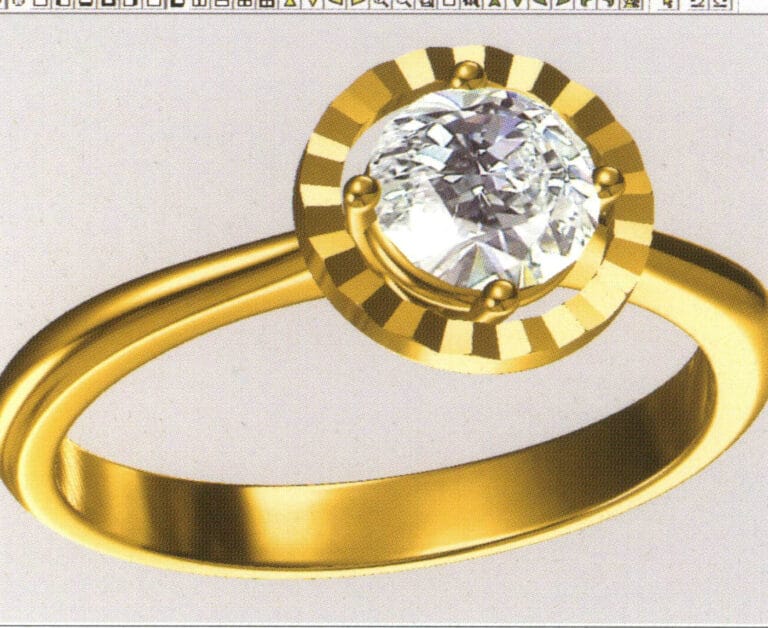
46. Select "View" > "Light and Shadow Map" from the menu bar to examine the light and shadow effects
47. Select "File" > "Save As" from the menu bar to save the file
Copywrite @ Sobling.Jewelry - Özel takı üreticisi, OEM ve ODM takı fabrikası
2. İnci Yüzük

Üretim için adımlar aşağıdaki gibidir:
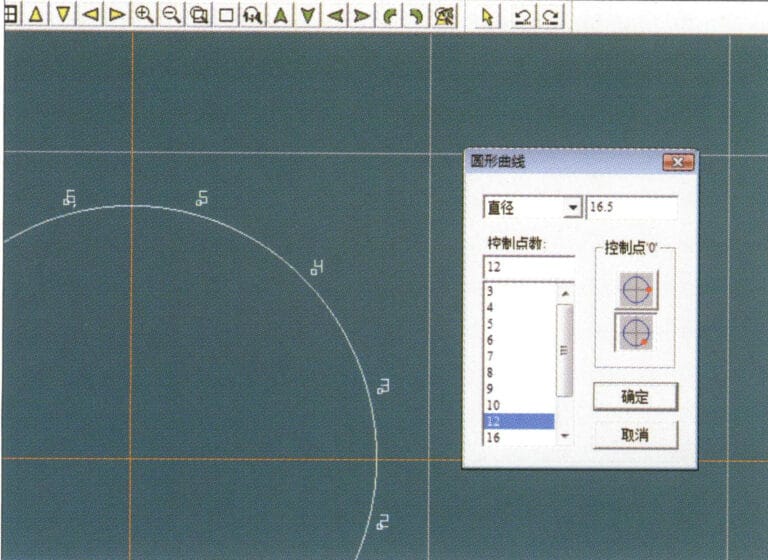
1. Create a new file in JewelCAD, select "Curve" > "Circular Curve" from the menu bar, enter the relevant values in the "Circular Curve" dialog box as the outer curve of the ring, and confirm
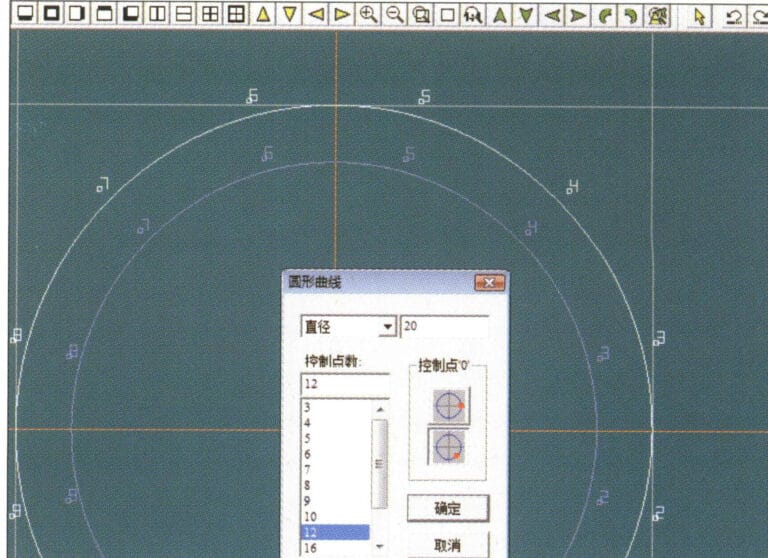
2. Select "Curve" > "Circular Curve" from the menu bar, enter the relevant values in the "Circular Curve" dialog box to set the inner curve of the ring, and confirm
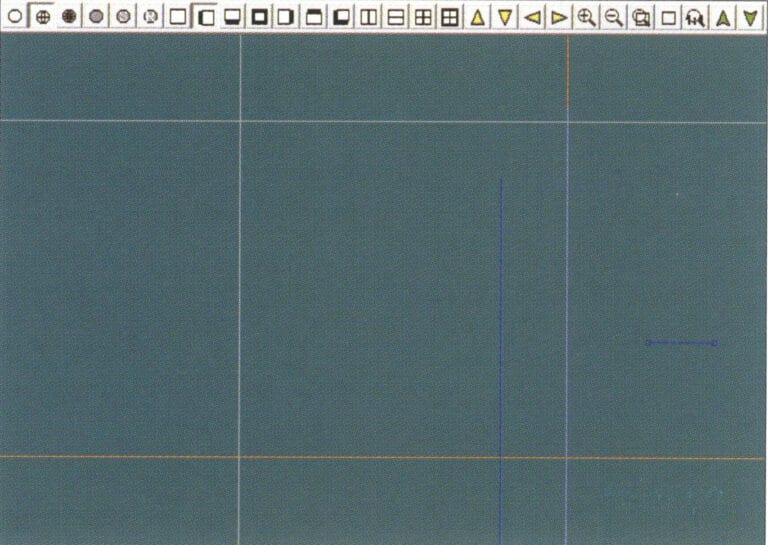
3. Select "Edit" > "Move" from the menu bar to move the selected inner curve of the ring
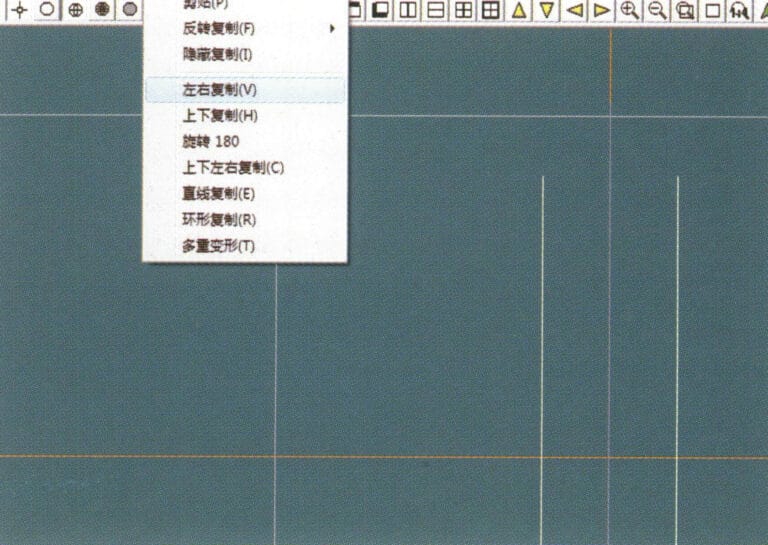
4. Select "Copy" > "Copy Left and Right" from the menu bar to copy the curve of the inner circle of the ring
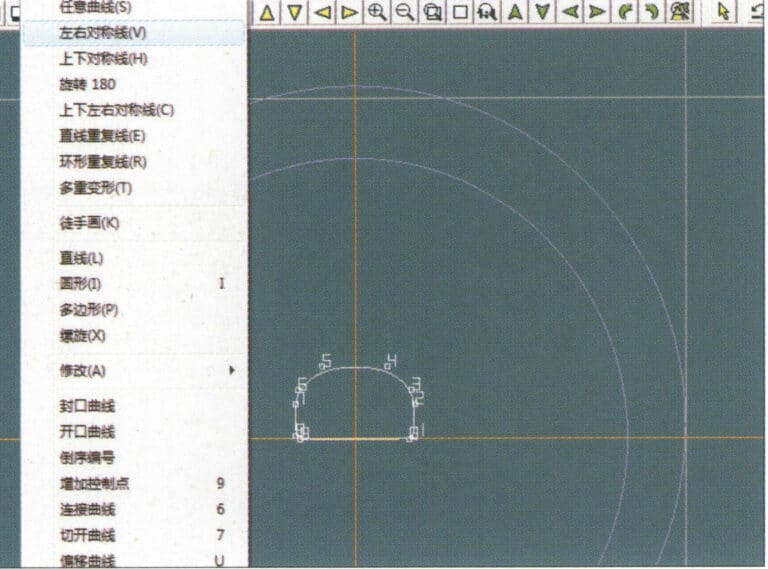
5. Select "Curve" > "Left-Right Symmetry Line" from the menu bar as the cross-section of the ring band
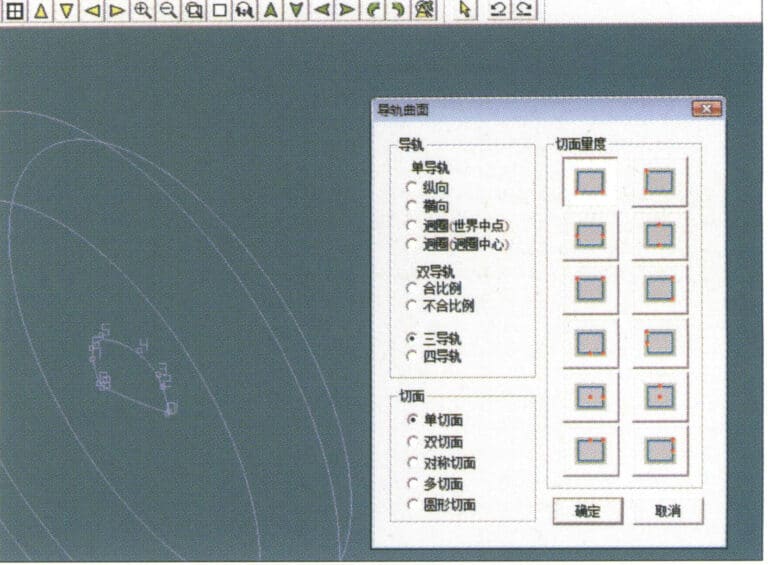
6. Select "Curved Surface" > "Guide Rail Surface" from the menu bar, enter the "Guide Rail Surface" dialog box, select the relevant options and confirm
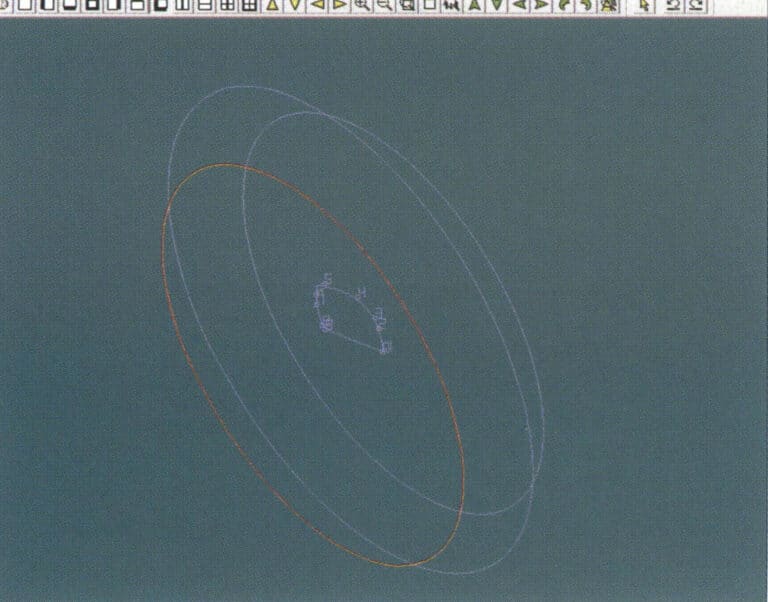
7. Doğru kılavuz ray olarak bir eğri seçin
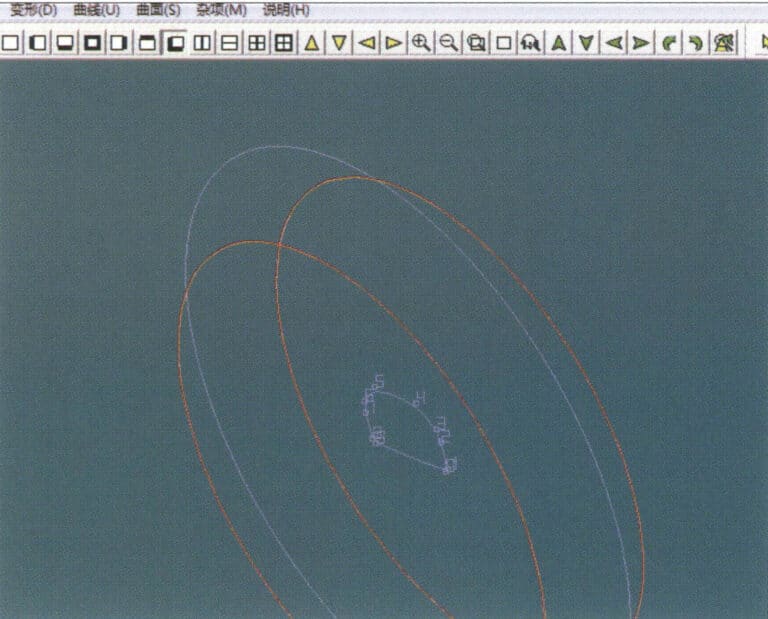
8. Üst kılavuz ray olarak bir eğri seçin
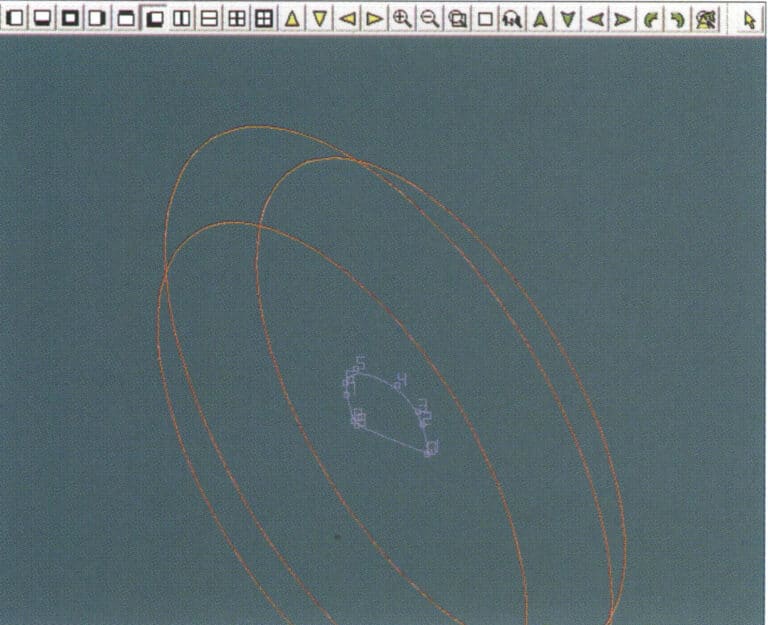
9. Halka bandının kesitini kılavuz eğri yüzeyinin kesiti olarak seçin
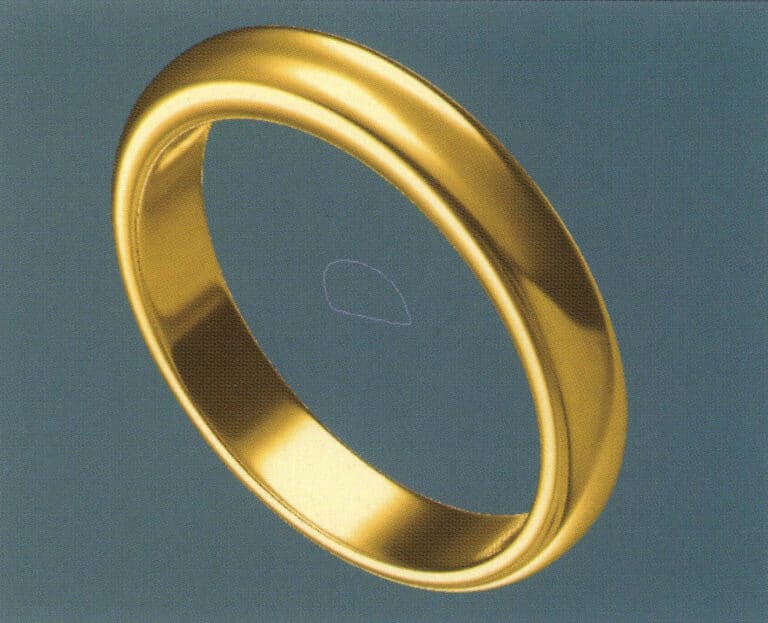
10. Select "View" > "Shadow Map" from the menu bar to inspect the shadow effects
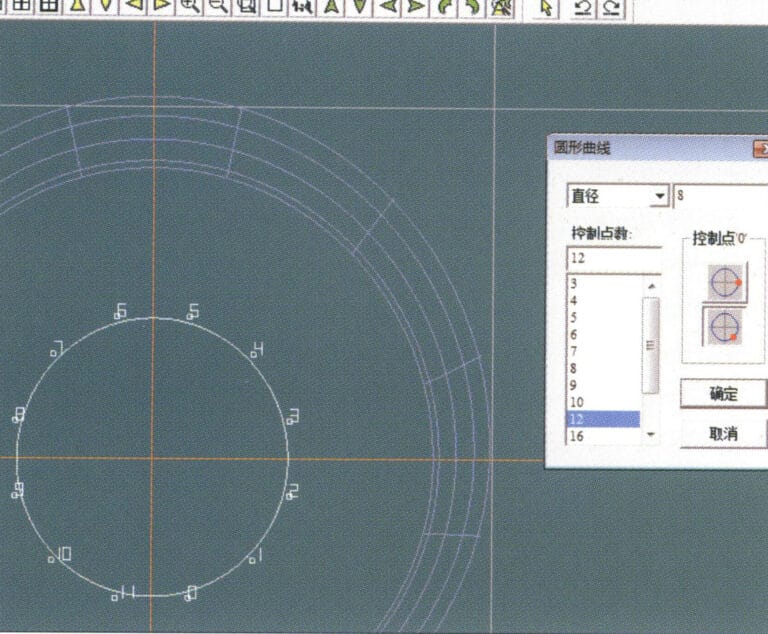
11. Select "Curve" > "Circular Curve" from the menu bar, enter the relevant values in the "Circular Curve" dialog box as auxiliary lines, and confirm
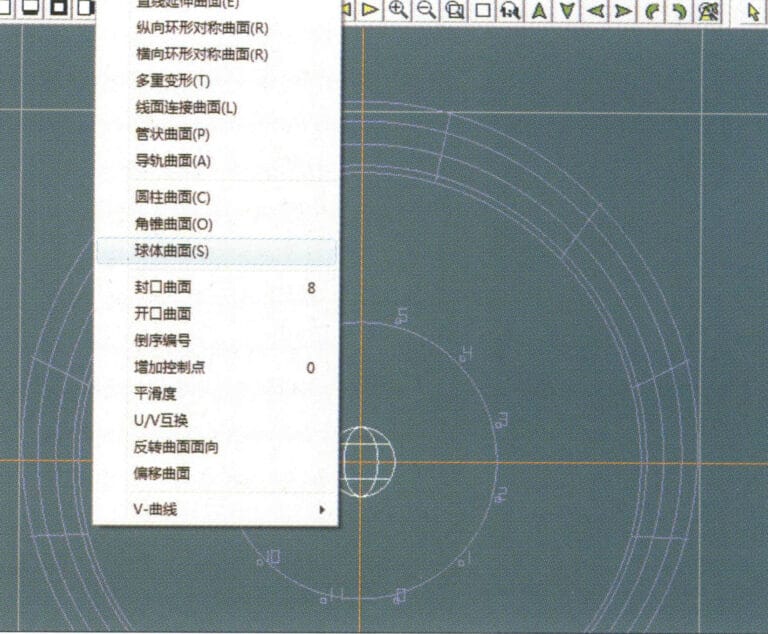
12. Select "Surface" > "Spherical Surface" from the menu bar
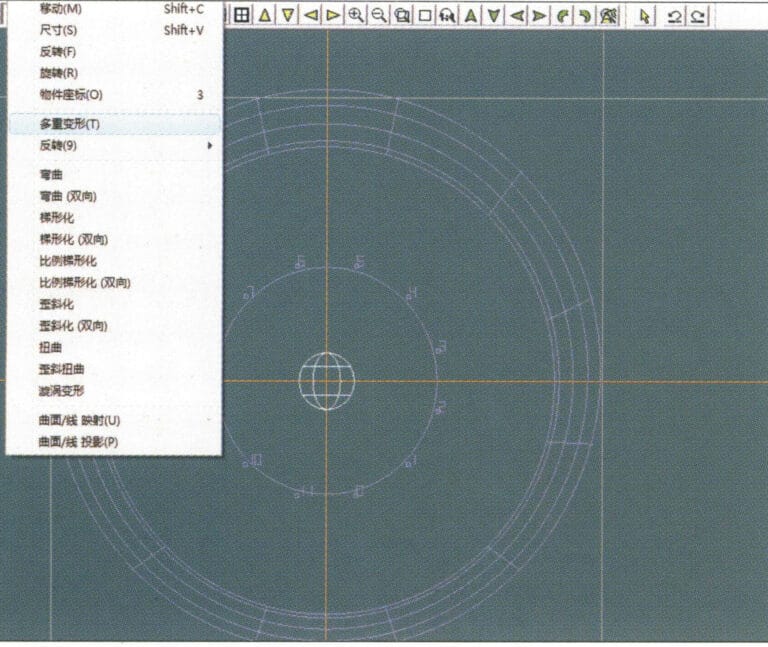
13. Select "Deformation" > "Multiple Deformation" from the menu bar to enlarge the sphere
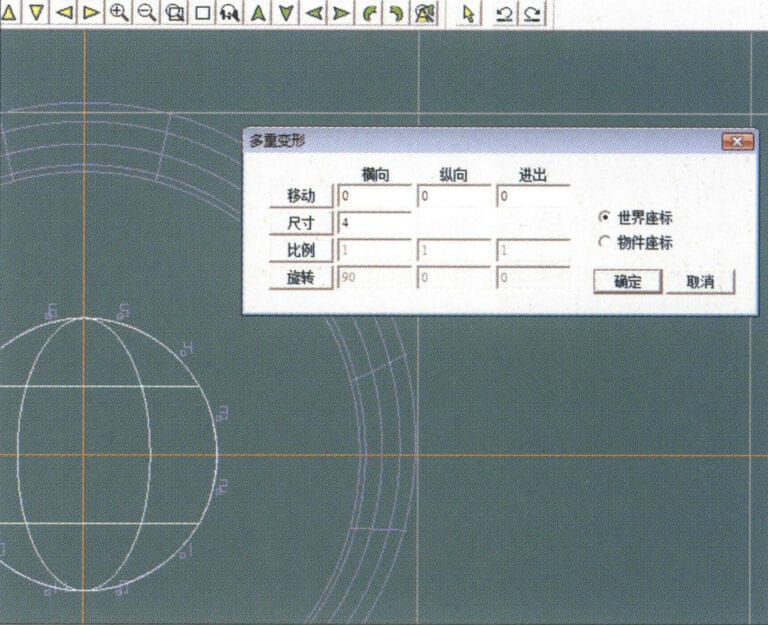
14. "Çoklu Deformasyon" iletişim kutusuna girin, küreyi kılavuzların genişliğine kadar büyütmek için ilgili değerleri girin ve onaylayın
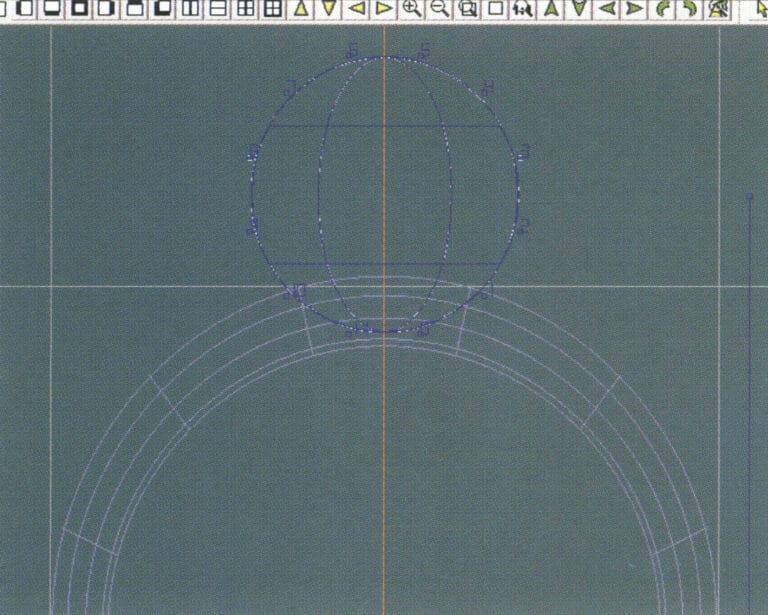
15. Select "Edit" > "Move" from the menu bar to move both the sphere and the auxiliary line simultaneously
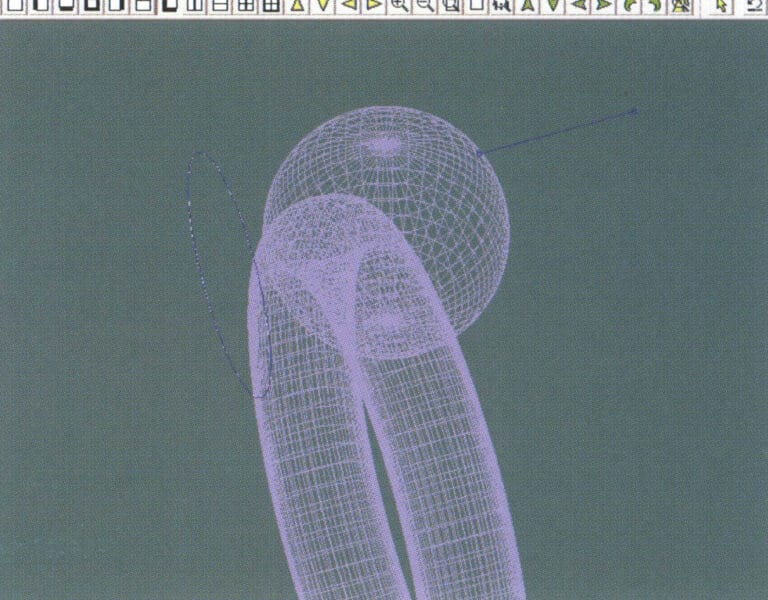
16. Select "Edit" > "Move" from the menu bar to remove the guidelines
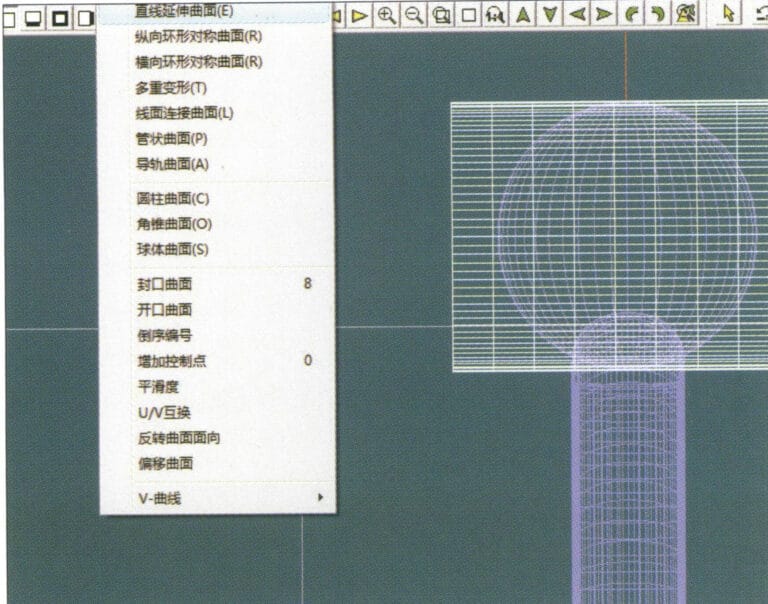
17. Select "Surface" > "Straight Line Extend Surface" from the menu bar to extend the auxiliary line into an auxiliary surface
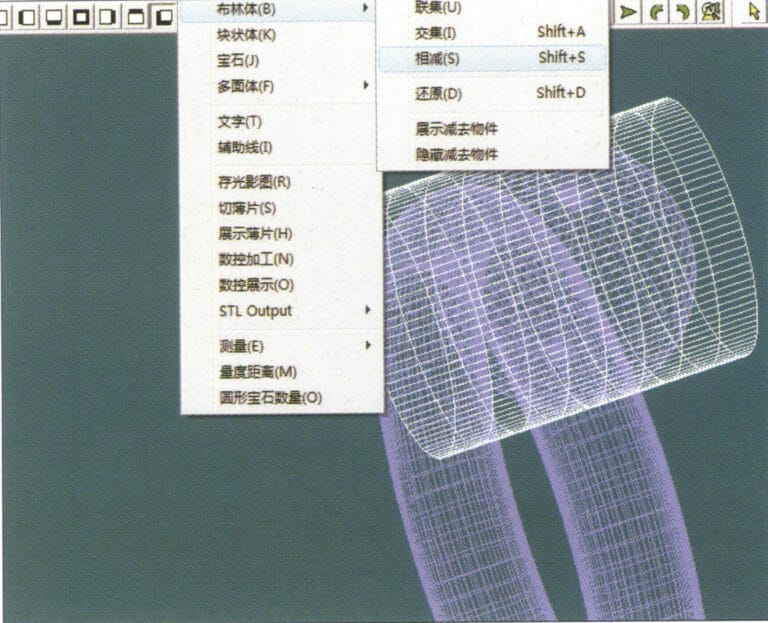
18. Select "Miscellaneous" > "Boolean" > "Subtract" from the menu bar to subtract the corresponding parts of the auxiliary surface ring
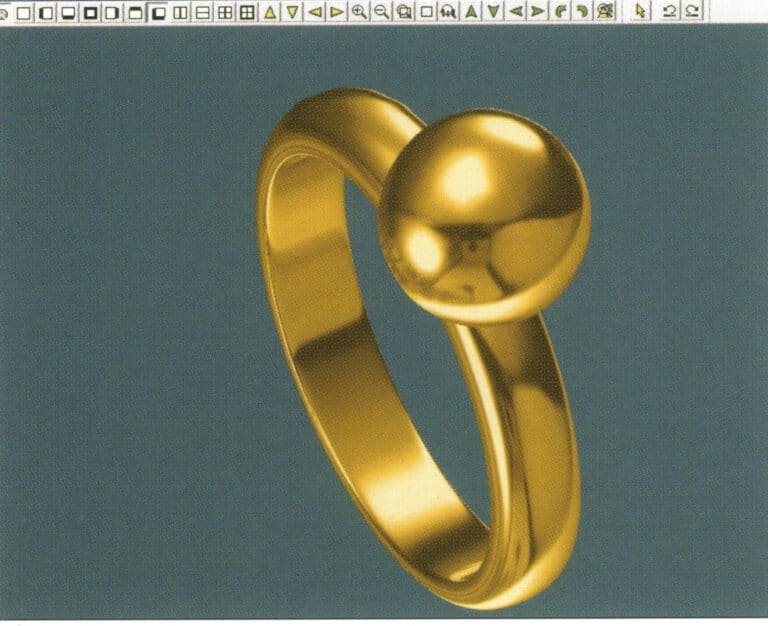
19. Select "View" > "Shadow Map" from the menu bar to inspect the shadow effects
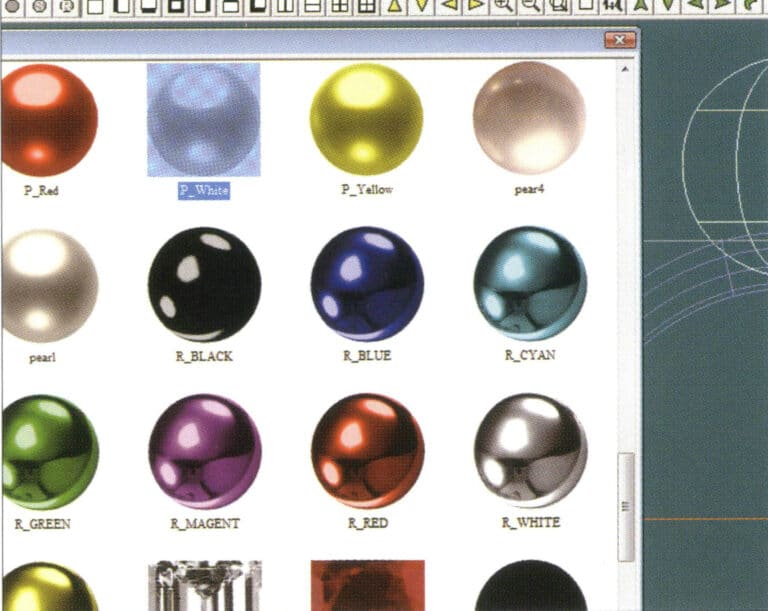
20. Select the sphere, go to the menu bar and choose "Edit" > "Materials", enter the "Materials" dialog box, select the white pearl material and confirm
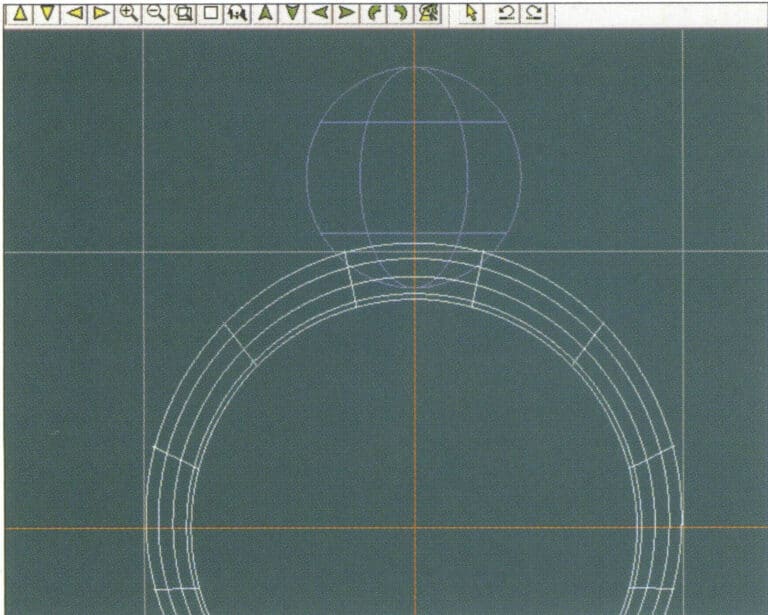
21. Select the ring band, then choose "Edit" > "Materials" from the menu bar
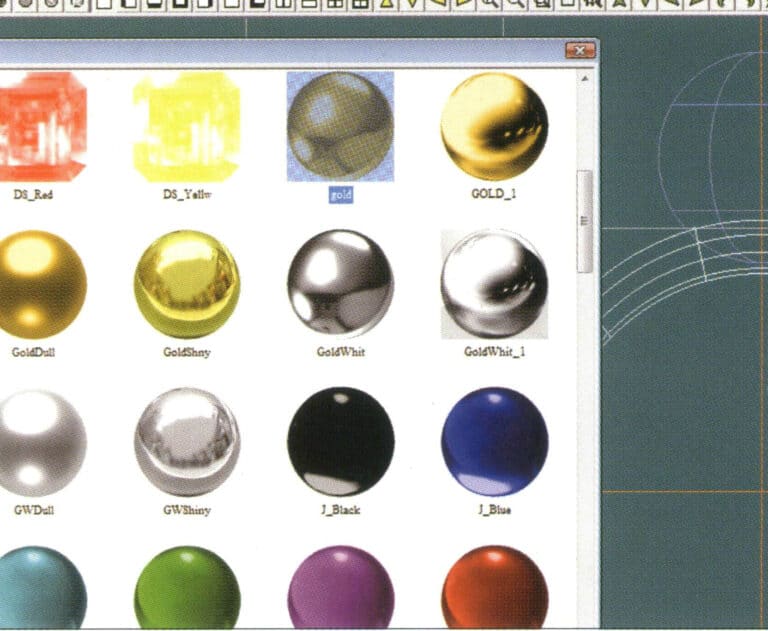
22. "Malzemeler" iletişim kutusuna girin, uygun malzemeyi seçin ve onaylayın
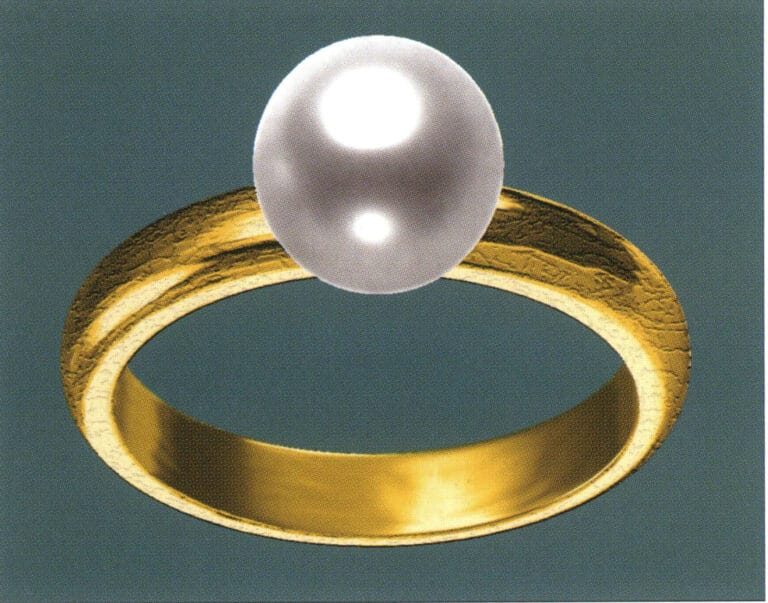
23. Select "View" > "Shadow Map" from the menu bar to examine the light and shadow effects
24. Select "File" > "Save As" from the menu bar to save the file
3. Pırlanta Aksanlı Siyah Altın Kolye

Üretim için adımlar aşağıdaki gibidir:
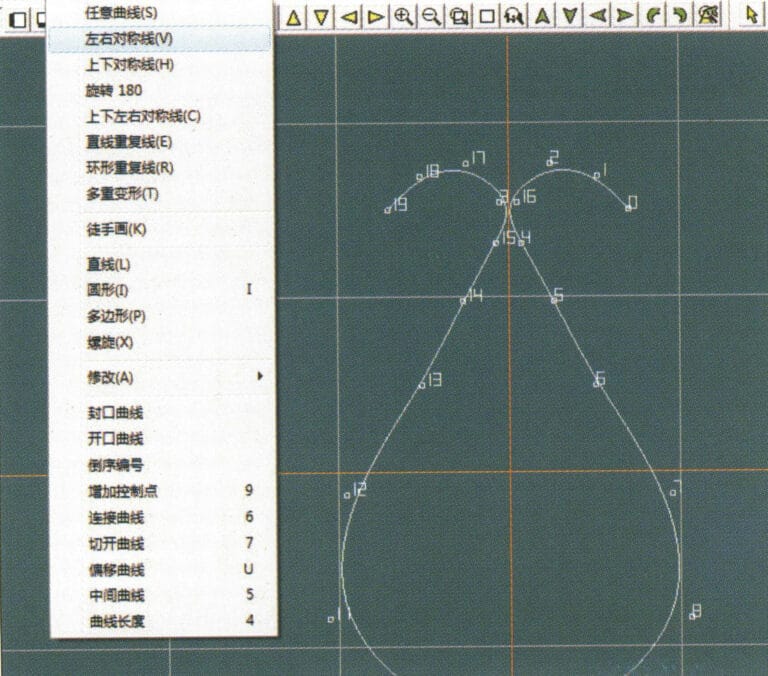
1. Create a new file in JewelCAD, select "Curve" > "Left-Right Symmetrical Line" from the menu bar, and draw the inner contour line of the pendant
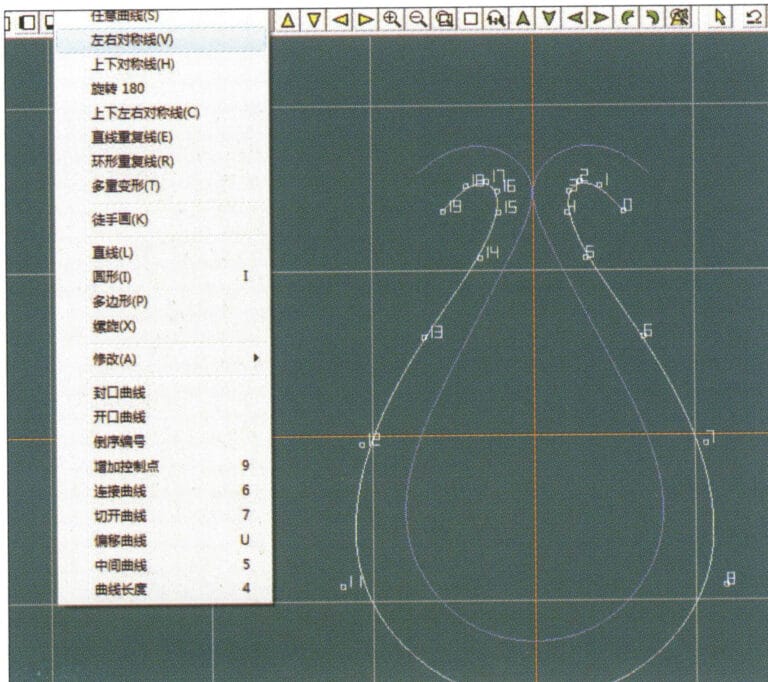
2. Select "Curve" > "Left-Right Symmetrical Line" from the menu bar to draw the outer contour line of the pendant (note that the control points of the inner contour line and the outer contour line should have the same direction and quantity).
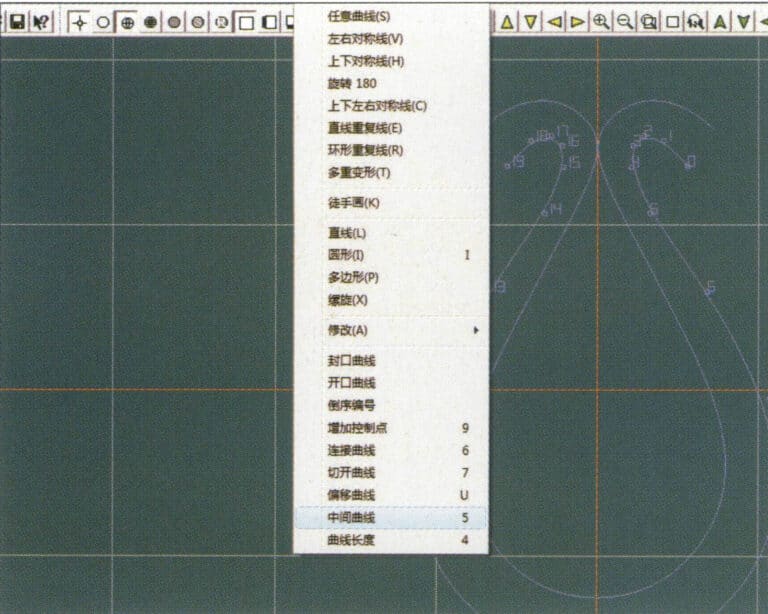
3. Select "Curve" > "Middle Curve" from the menu bar
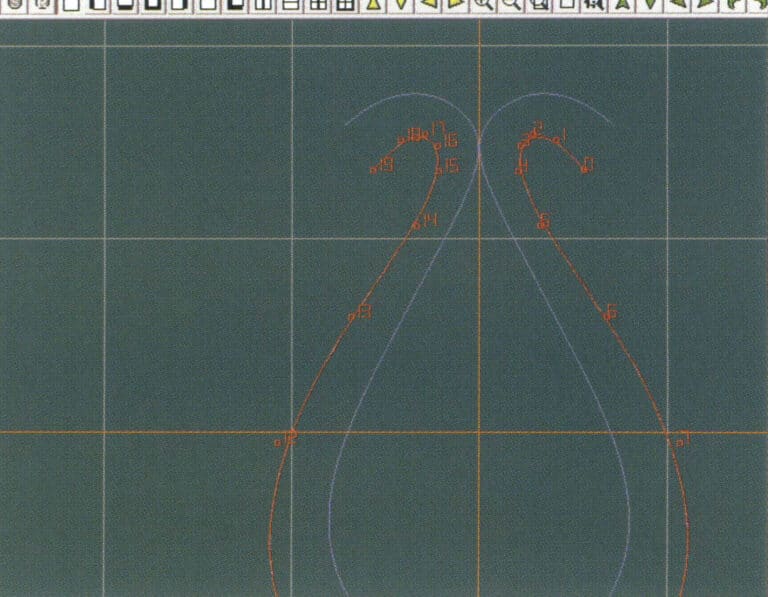
4. Orta eğriyi oluşturmak için iki eğri seçin. İlk olarak, dış kontur çizgisini seçin
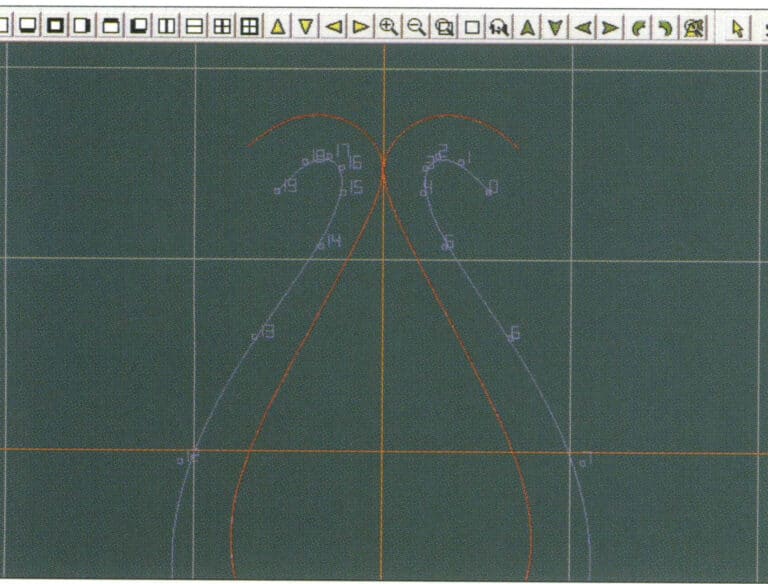
5. Orta eğriyi oluşturmak için iki eğri seçin, ardından iç kontur çizgisini seçin
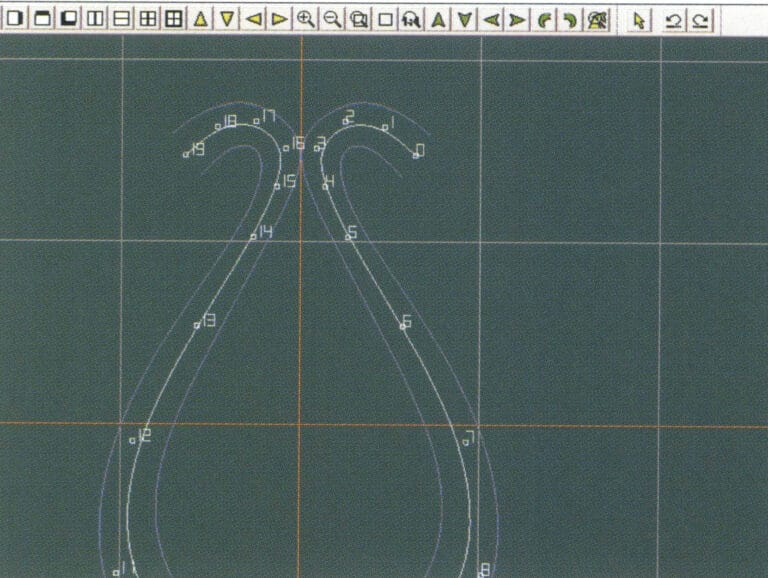
6. Önceden oluşturulmuş ara eğrileri görüntüleyin
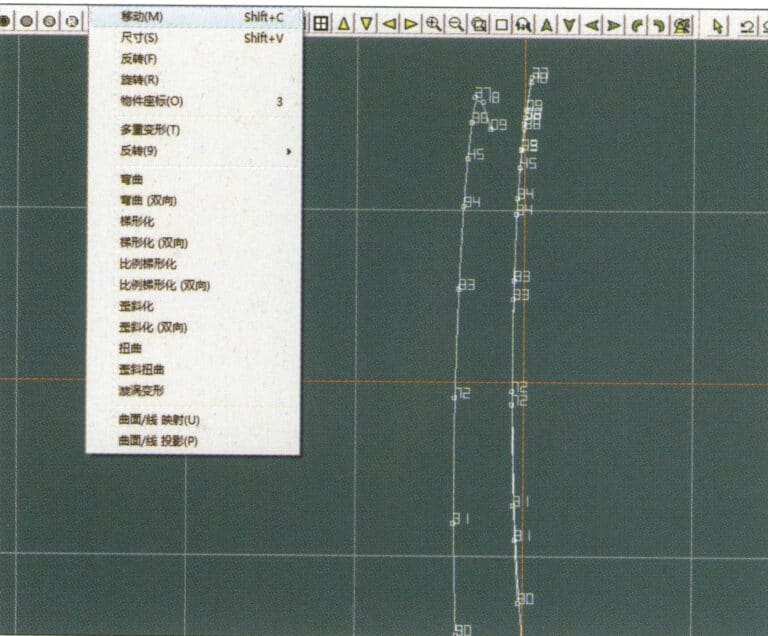
7. Select "Deformation" > "Move" from the menu bar to move the CV and the CV of the contour line
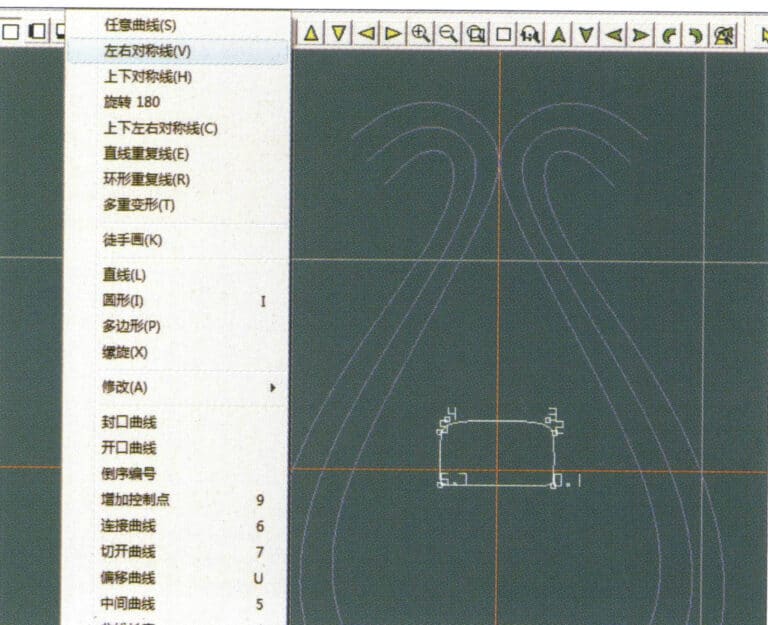
8. Select "Curve" > "Left-Right Symmetry Line" from the menu bar to create a cross-section
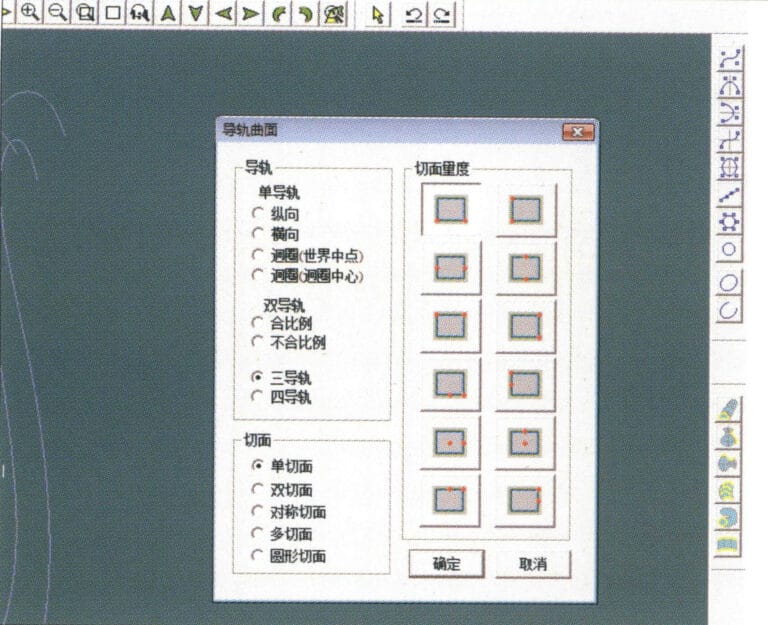
9. Select "Surface" > "Rail Surface" from the menu bar, enter the "Rail Surface" dialog box to select the relevant options, and confirm; select a curve as the left curve, starting from the left curve in a clockwise direction, left-click on the curve as the rail, and then select another curve as the section of the rail surface
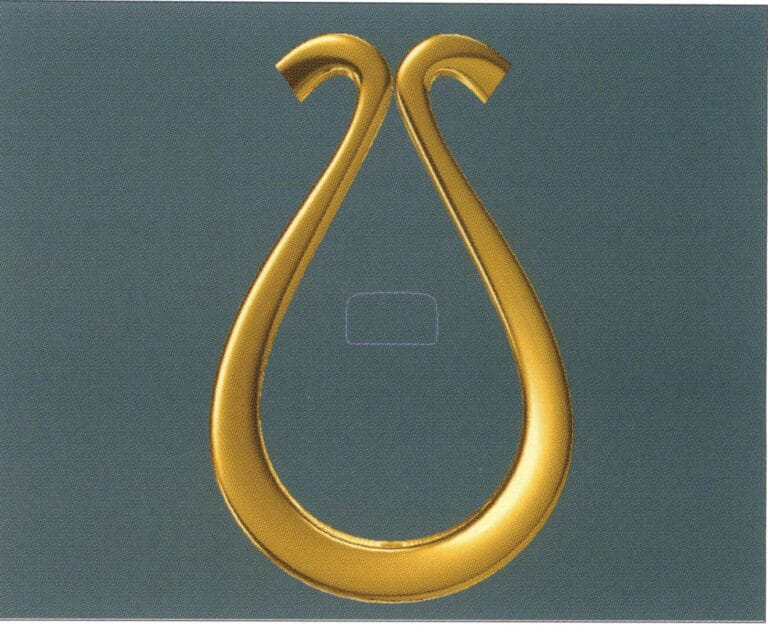
10. Select "View" > "Shadow Map" from the menu bar to inspect the shadow effects
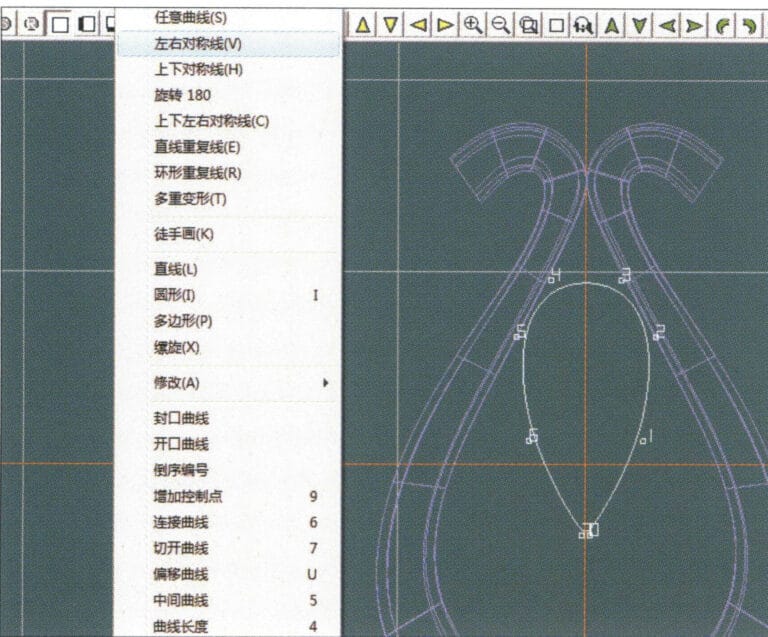
11. Select "Curve" > "Left-Right Symmetry Line" from the menu bar to draw the outer contour line of the seed-shaped toggle
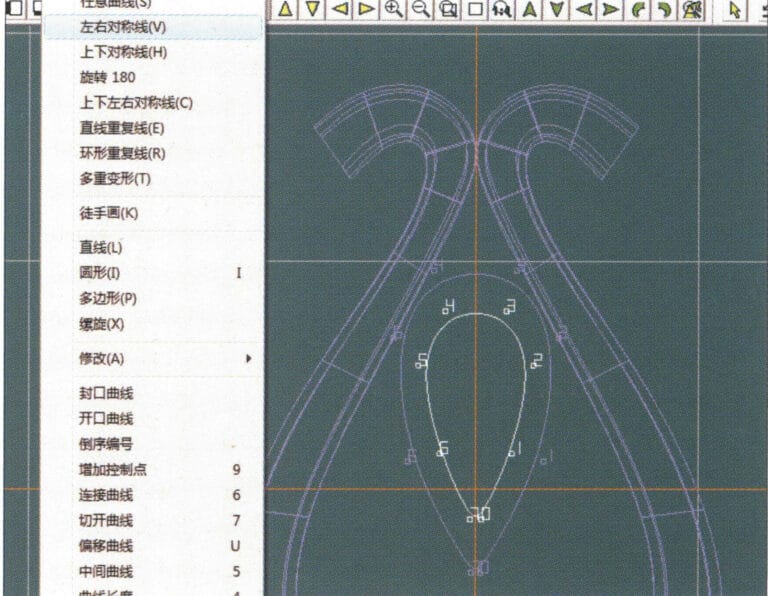
12. Select "Curve" > "Left-Right Symmetry Line" from the menu bar to draw the inner contour line of the seed-shaped toggle
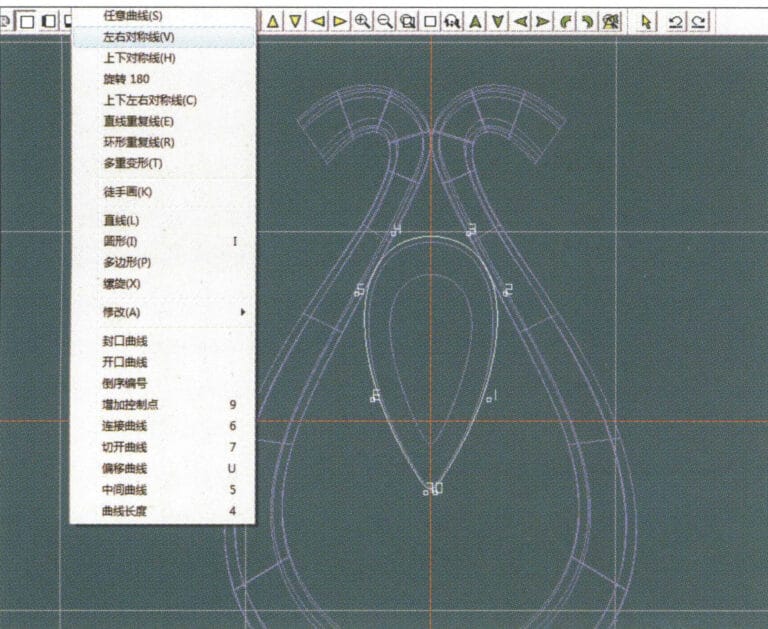
13. Select "Curve" > "Left-Right Symmetry Line" from the menu bar, and draw the lower dark line of the center of the seed-shaped toggle
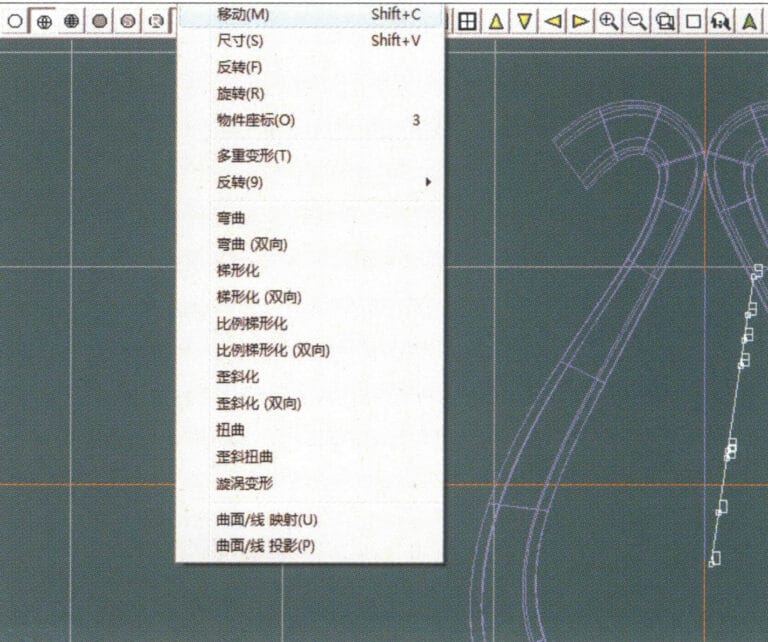
14. Select "Deformation" > "Move" from the menu bar to move the seed-shaped toggle CV
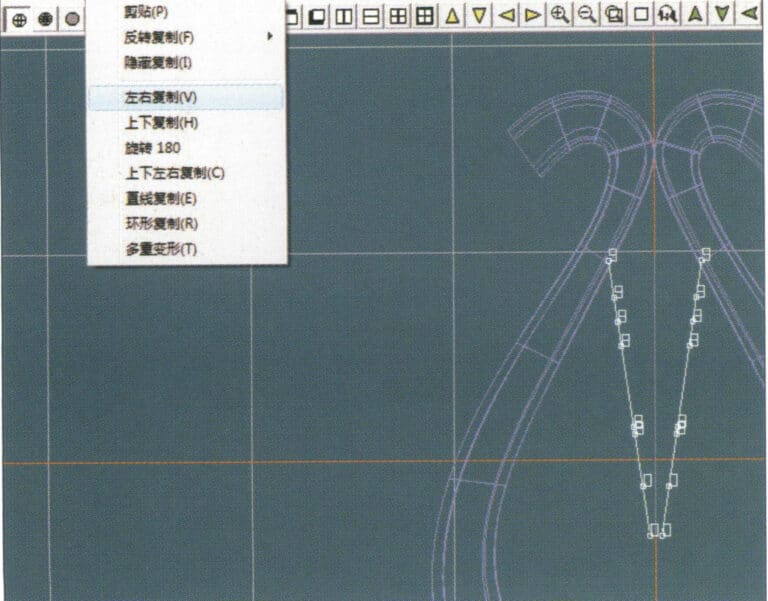
15. Select "Copy" > "Copy Left and Right" from the menu bar to copy the curve of the seed-shaped toggle
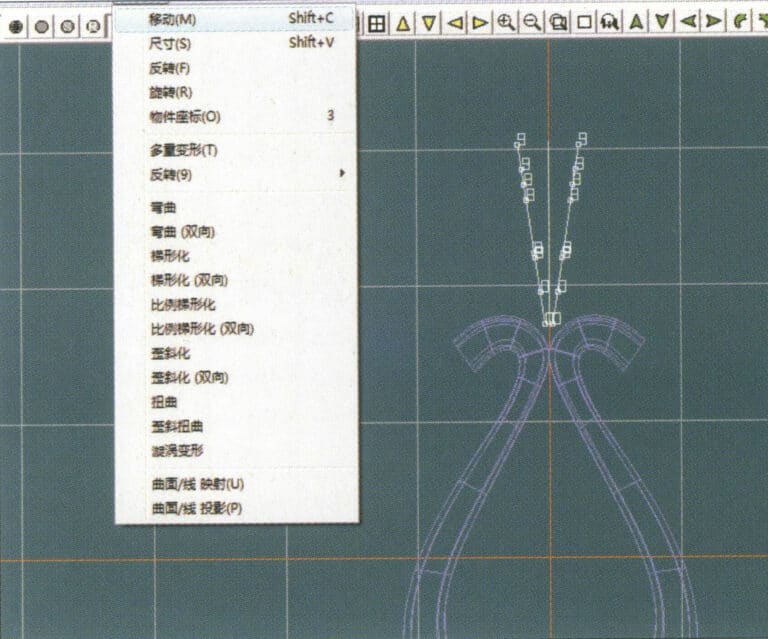
16. Select "Deformation" > "Move" from the menu bar to move the melon seed buckle curve
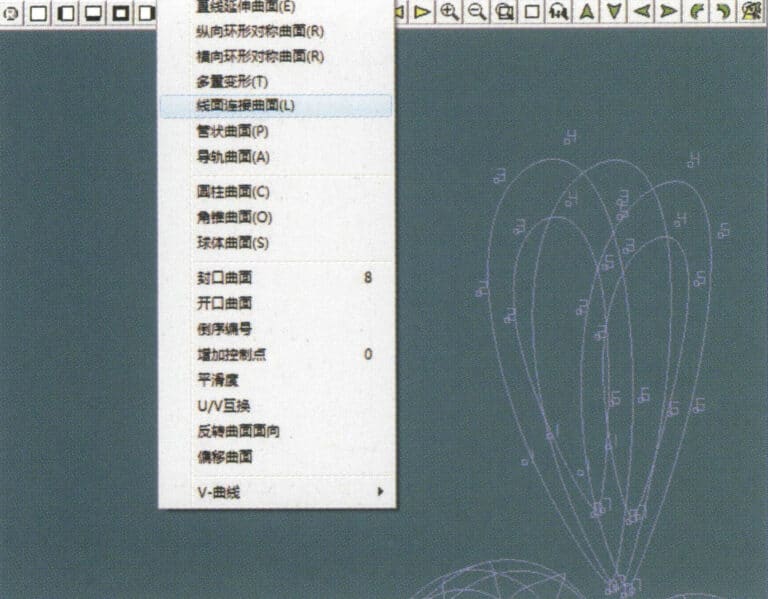
17. Select "Surface" > "Line-Surface Connection Surface" from the menu bar, and select the curve/surface in a clockwise direction to create a line-surface connection surface, then select "Curve" > "Closed Surface" from the menu bar
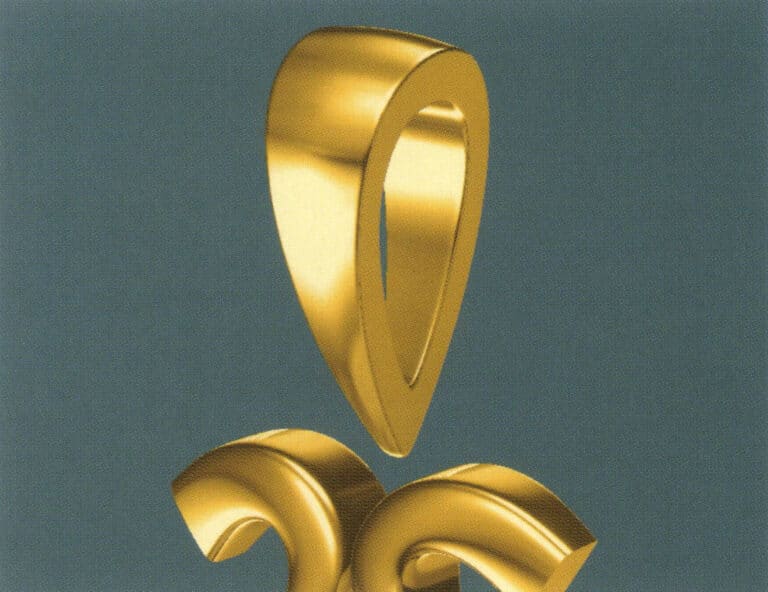
18. Select "View" > "Shadow Map" from the menu bar to examine the shadow effects
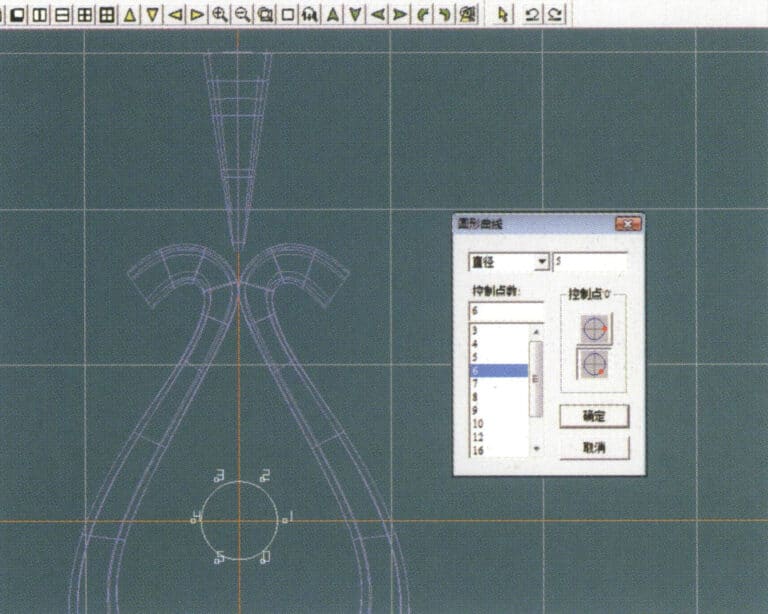
19. Select "Curve" > "Circular Curve" from the menu bar, enter the relevant values and confirm

20. Select "Surface" > "Tubular Surface" from the menu bar
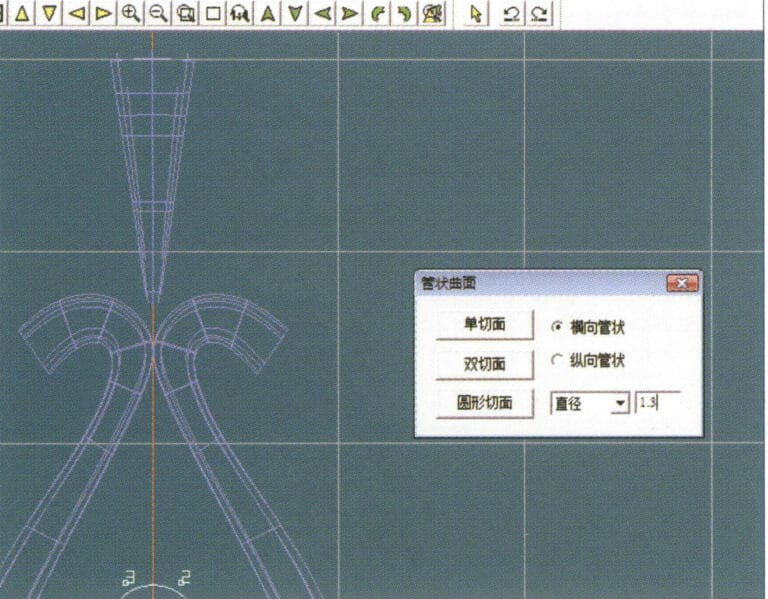
21. "Borulu Yüzey" iletişim kutusuna girin, ilgili değerleri girin, dairesel bölüme tıklayın ve onaylayın
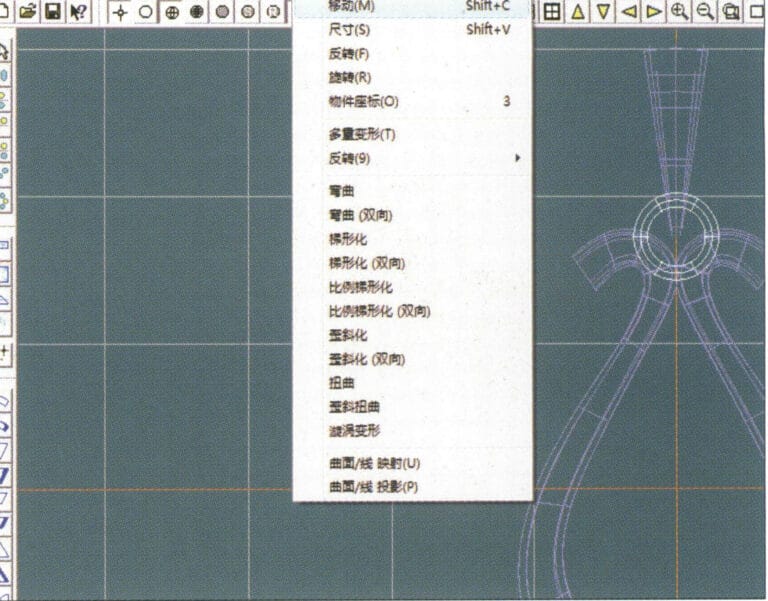
22. Select "Deformation" > "Move" from the menu bar to move the ring buckle

23. Select "File" > "Insert File" from the menu bar
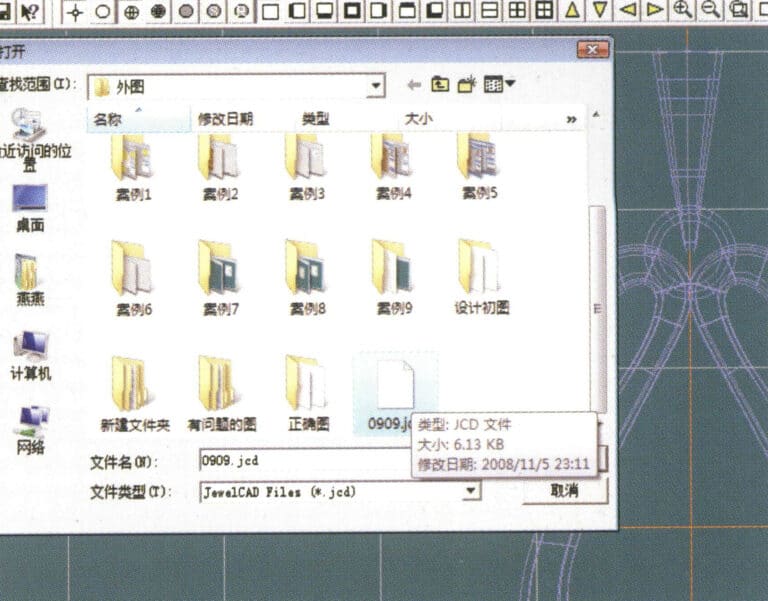
24. "Dosya Ekle" iletişim kutusuna girin, istediğiniz belgeyi seçin ve onaylayın
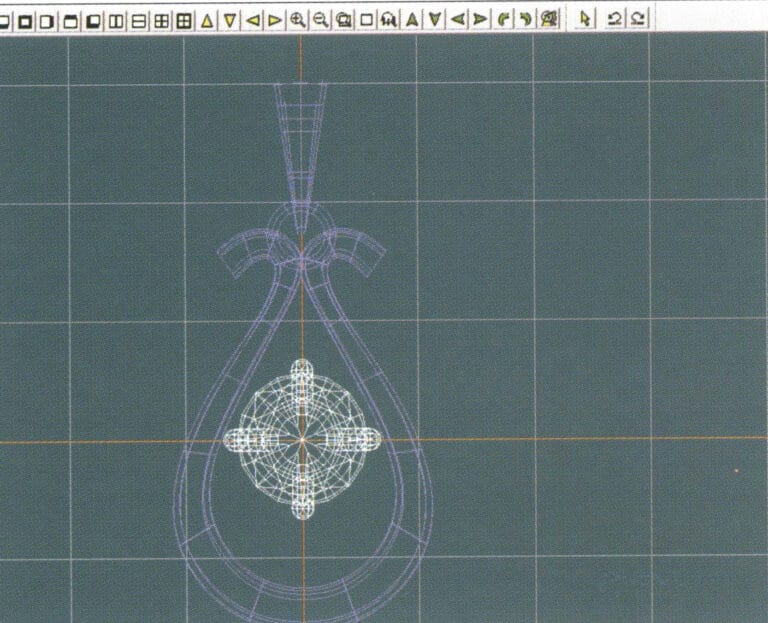
25. Eklenen dosyayı görüntüle - Gemstone
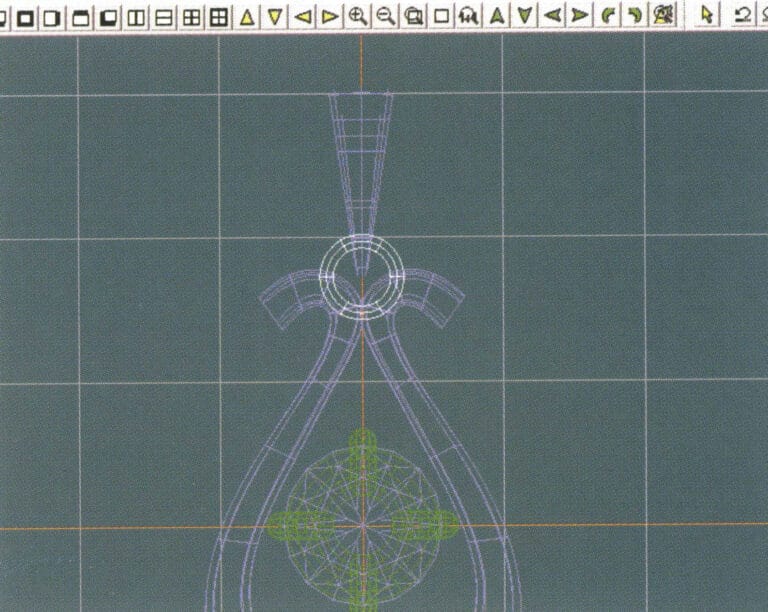
26. Select "Copy" > "Copy Up and Down" from the menu bar to copy the selected toggle
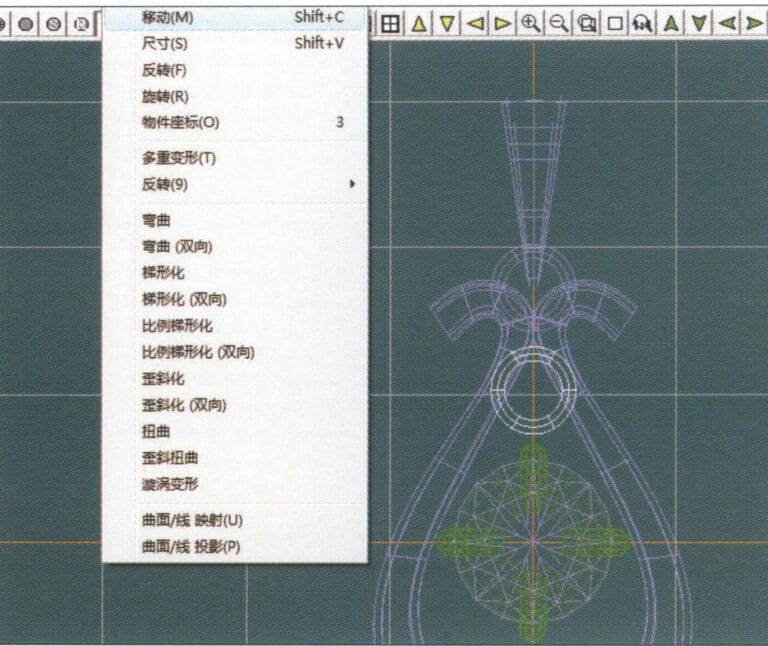
27. Select "Deformation" > "Move" from the menu bar to move the horizontal ring toggle
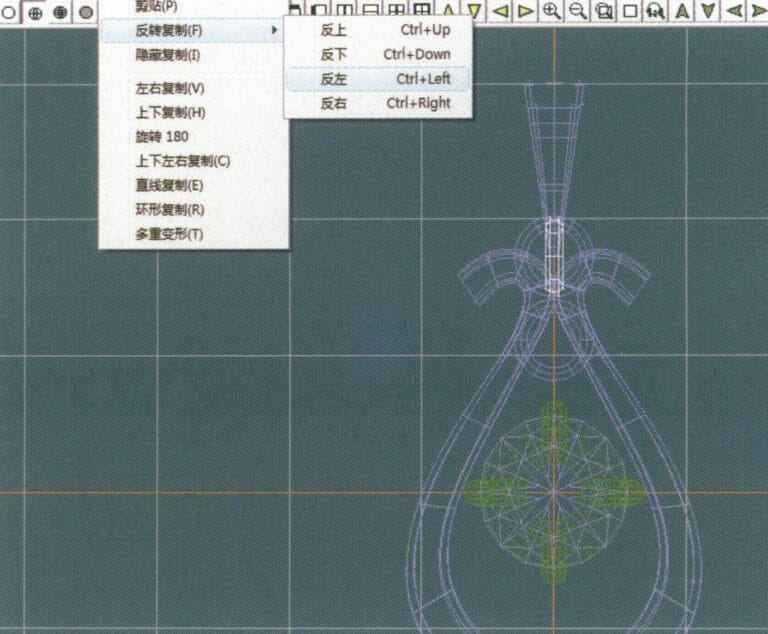
28. Select "Copy" > "Reverse Copy" > "Reverse Left" from the menu bar to create a vertical ring toggle
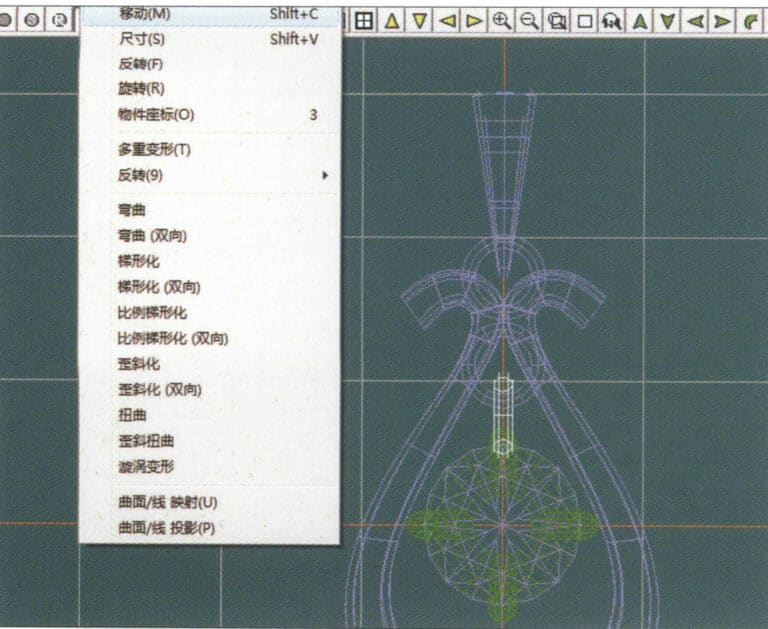
29. Select "Deformation" > "Move" from the menu bar to move the horizontal ring toggle
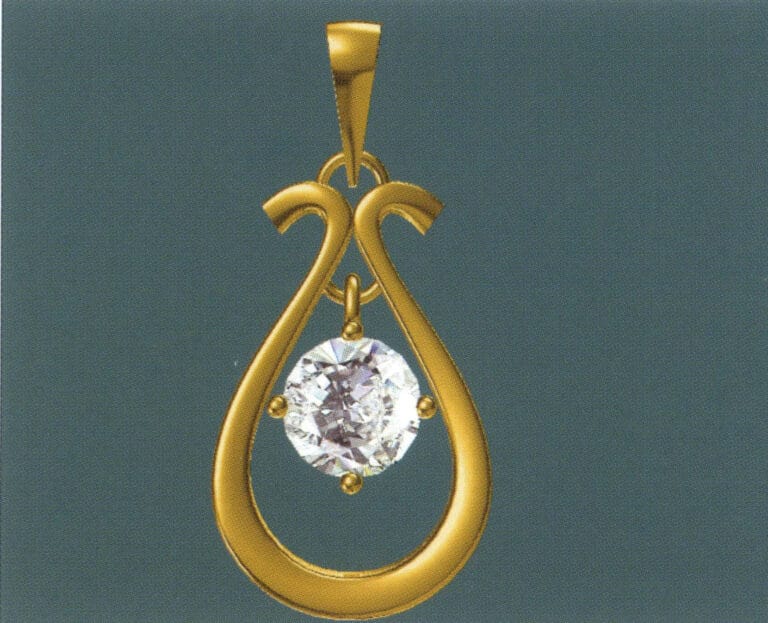
30. Select "View" > "Shadow Map" from the menu bar to examine the light and shadow effects
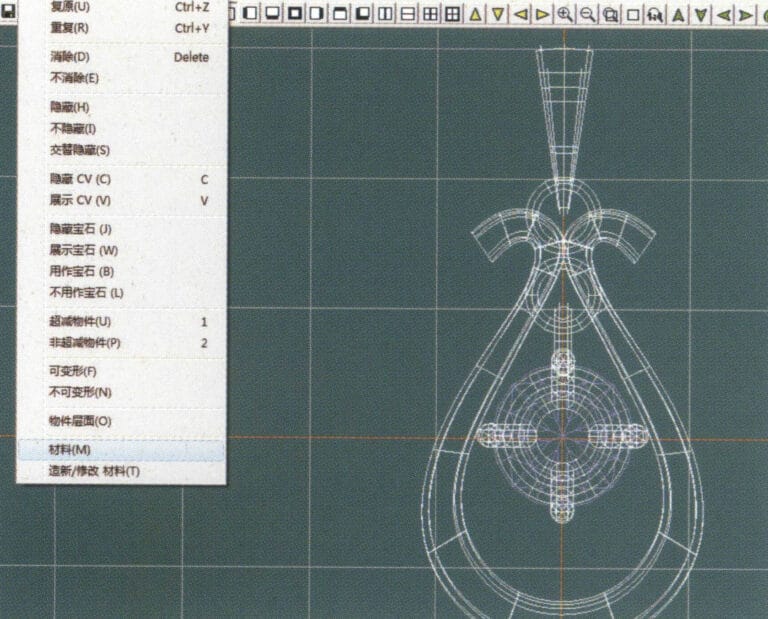
31. Select "Edit" > "Materials" from the menu bar to modify the materials of the selected object
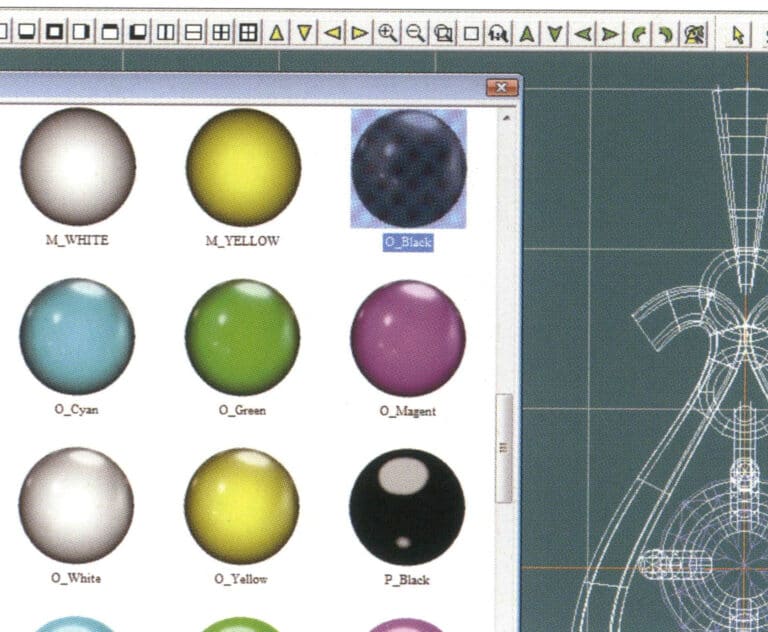
32. "Malzemeler" iletişim kutusuna girin, siyah altını seçin ve onaylayın
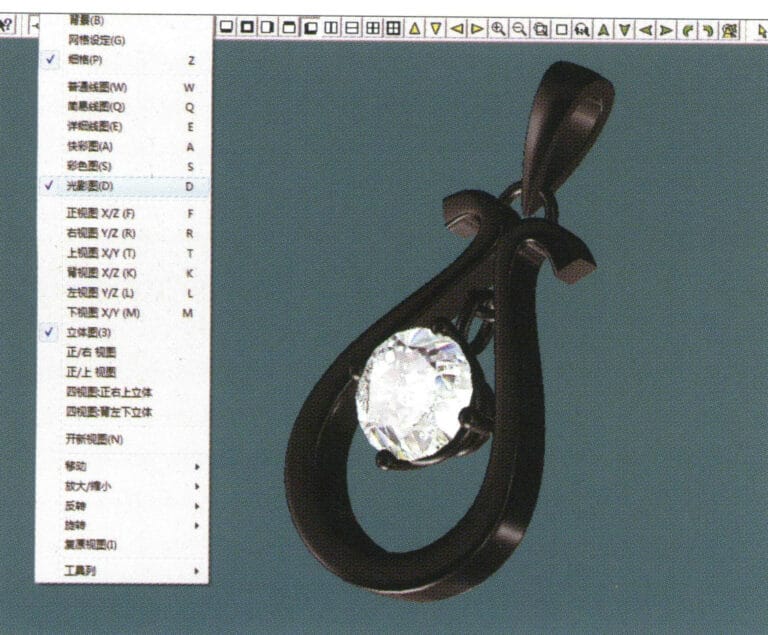
33. Select "View" > "Shadow Map" from the menu bar to inspect the shadow effects
34. Select "File" > "Save As" from the menu bar to save the file
4. Yakut Kolye
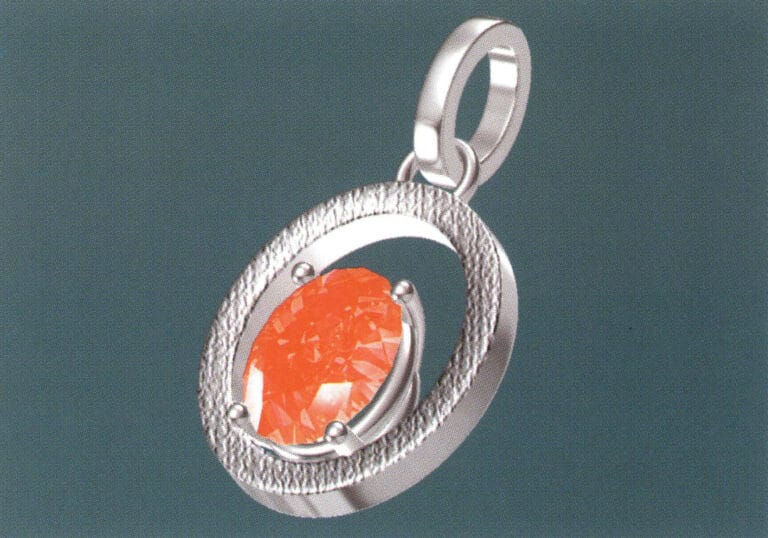
Üretim için adımlar aşağıdaki gibidir:
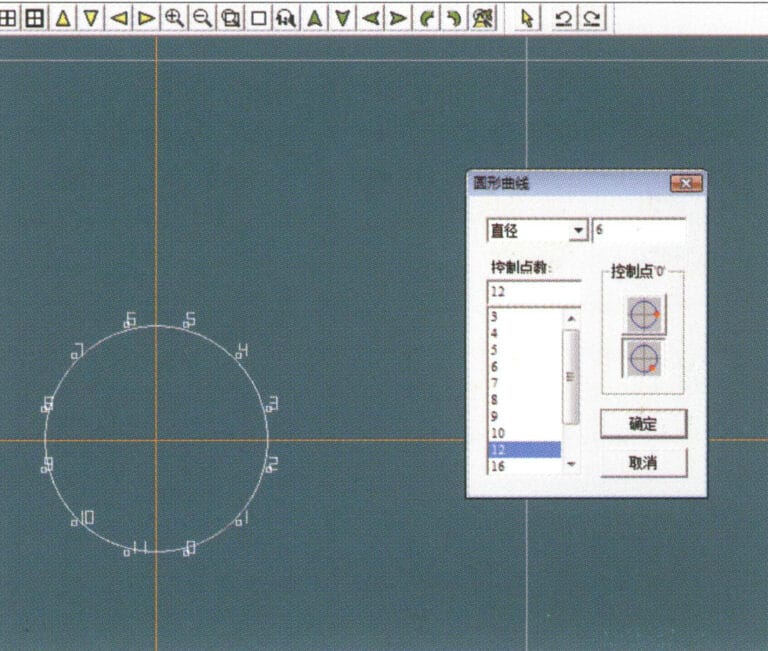
1. Create a new file in JewelCAD, select "Curve" > "Circular Curve" from the menu bar, enter the relevant values in the "Circular Curve" dialog box as the inner auxiliary line, and confirm

2. Select "Curve" > "Circular Curve" from the menu bar, enter the relevant values in the "Circular Curve" dialog box as the external auxiliary line, and confirm
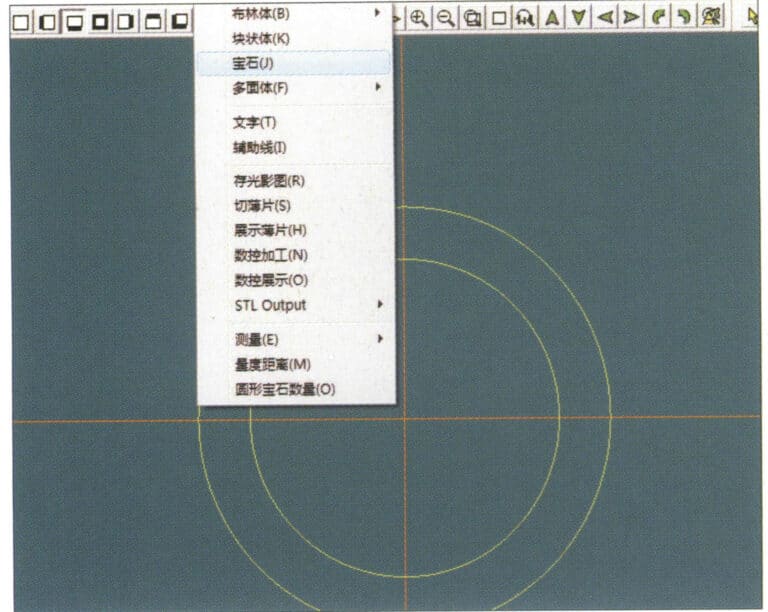
3. Select "Miscellaneous" > "Gemstones" from the menu bar
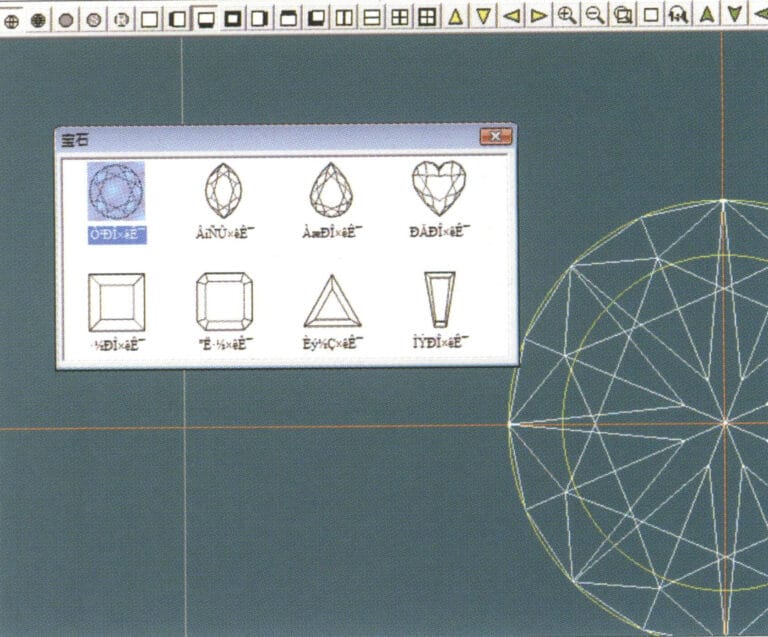
4. "Mücevher" iletişim kutusuna girin, ilgili mücevherleri seçin ve onaylayın
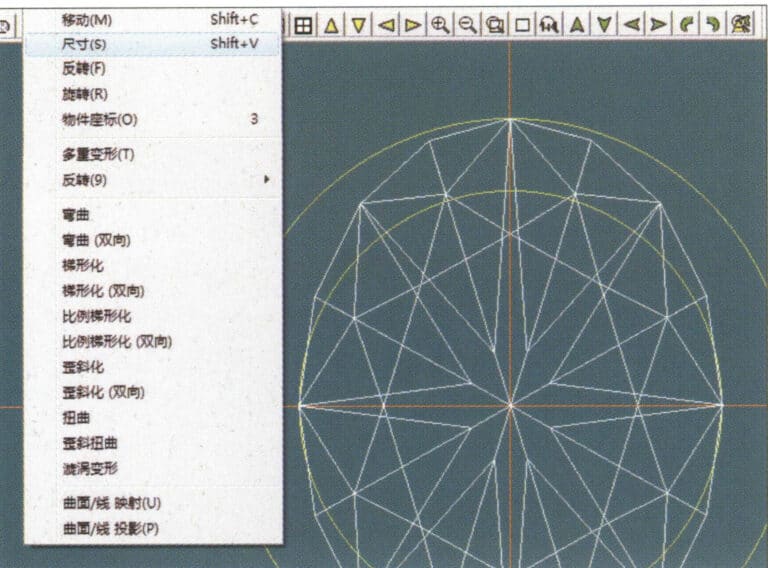
5. Select "Deformation" > "Size" from the menu bar to change the round gemstone into an oval gemstone
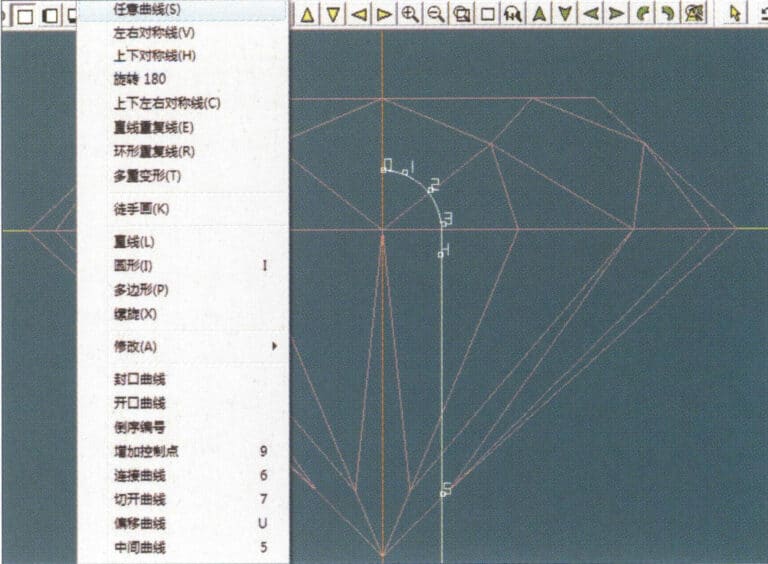
6. Select "Curve" > "Freeform Curve" from the menu bar to draw a claw-shaped guideline
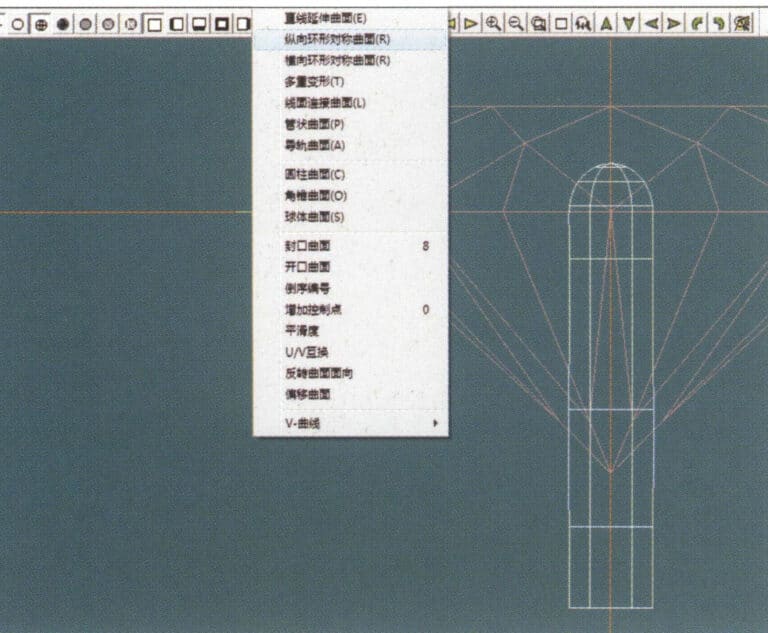
7. Select "Surface" > "Longitudinal Circular Symmetrical Surface" from the menu bar, and draw a claw shape
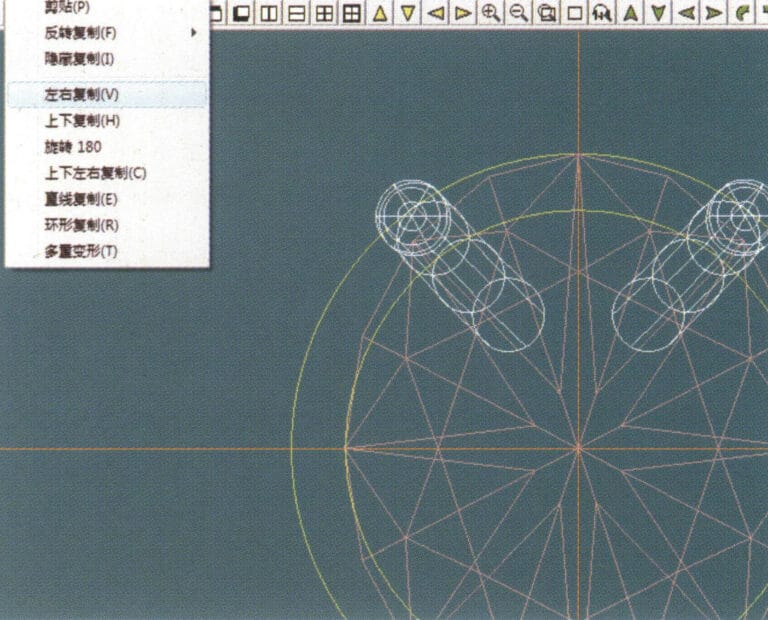
8. Select "Copy" > "Copy Left and Right" from the menu bar to copy the claw shape
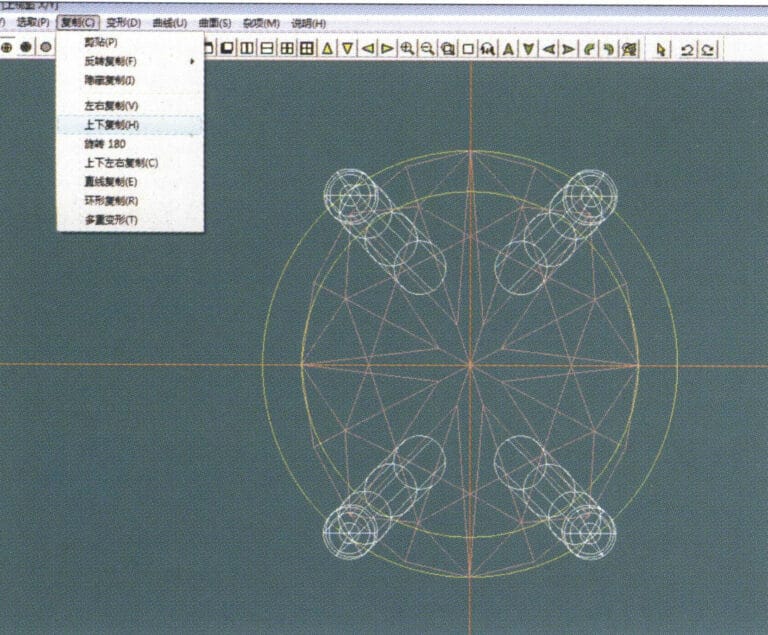
9. Select "Copy" > "Copy Up and Down" from the menu bar to copy the claw shape again
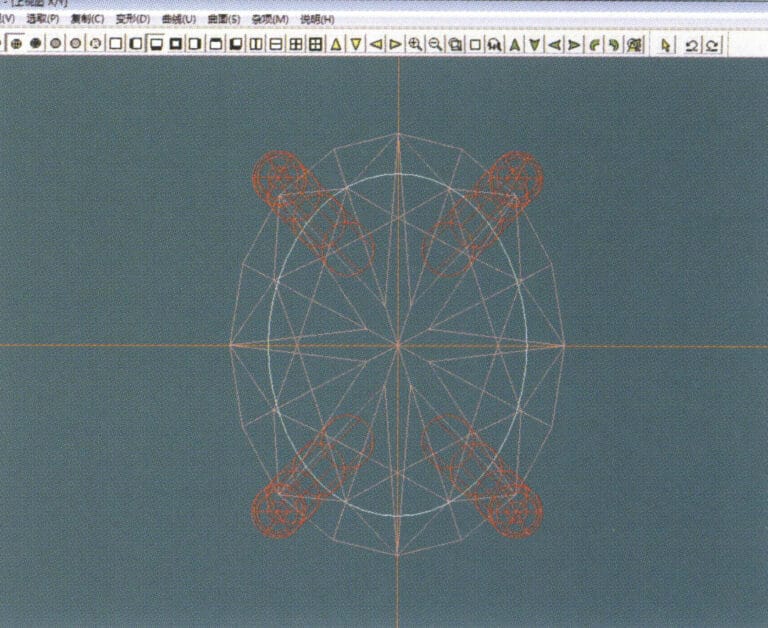
10. Select "Deformation" > "Size" from the menu bar to change the circular guideline to an elliptical guideline
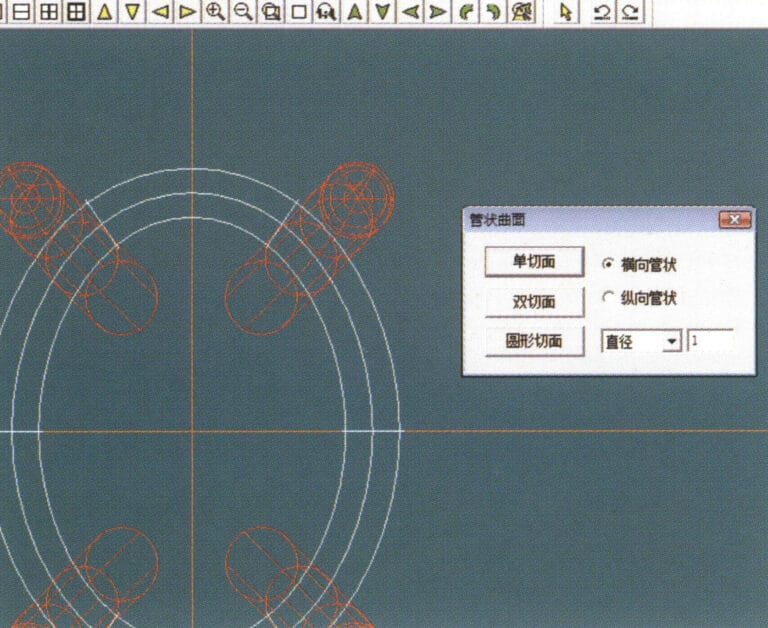
11. Select "Curved Surface" > "Tubular Surface" from the menu bar, enter the relevant values in the "Tubular Surface" dialog box and confirm
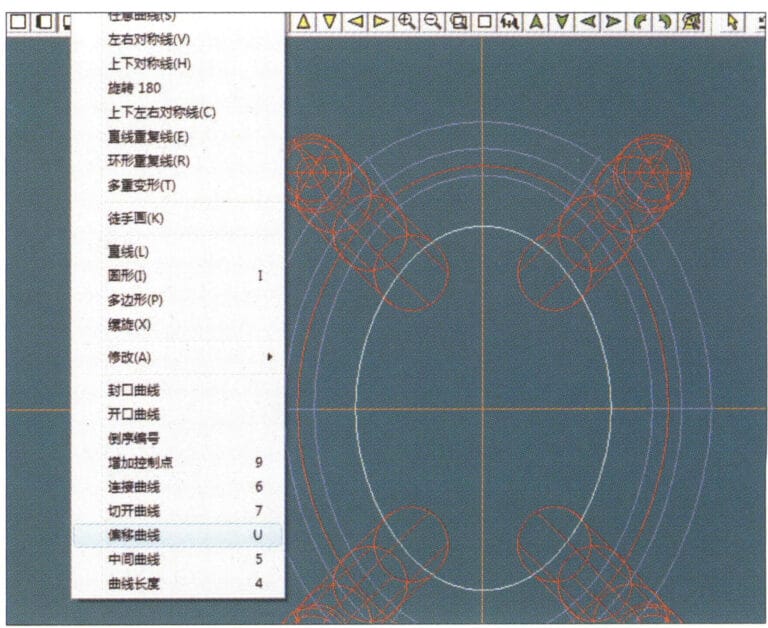
12. Select "Curve" > "Offset Curve" from the menu bar
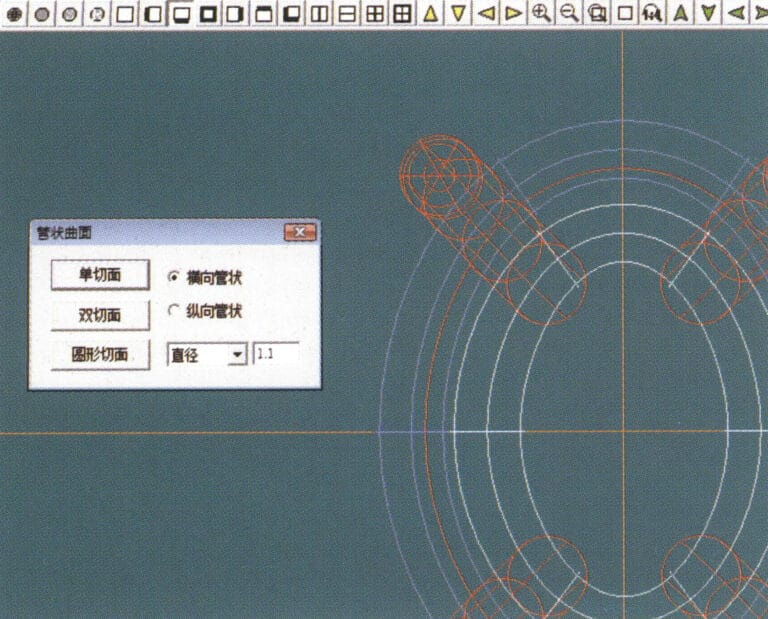
13. Select "Surface" > "Tubular Surface" from the menu bar, enter the relevant values and confirm
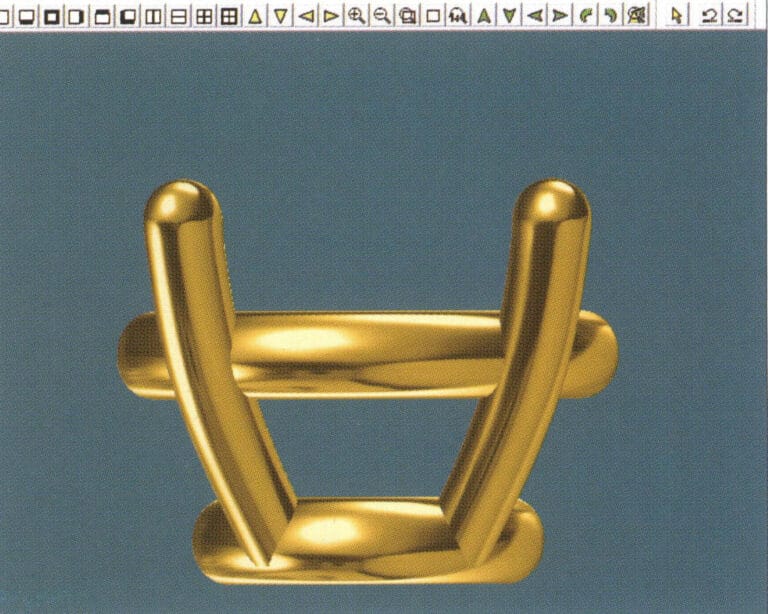
14. Select "View" > "Shadow Map" from the menu bar to examine the shadow effects and inspect the setting
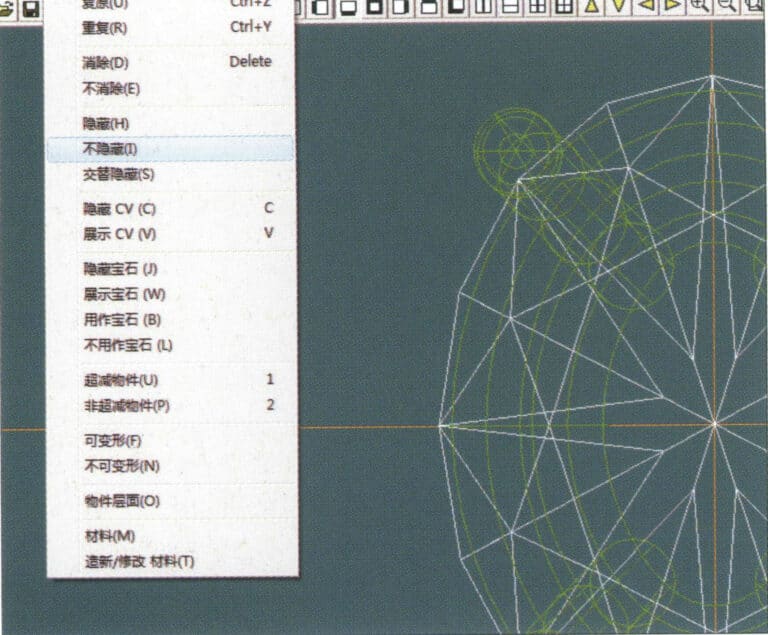
15. Select "Edit" > "Unhide" from the menu bar to display the hidden gems
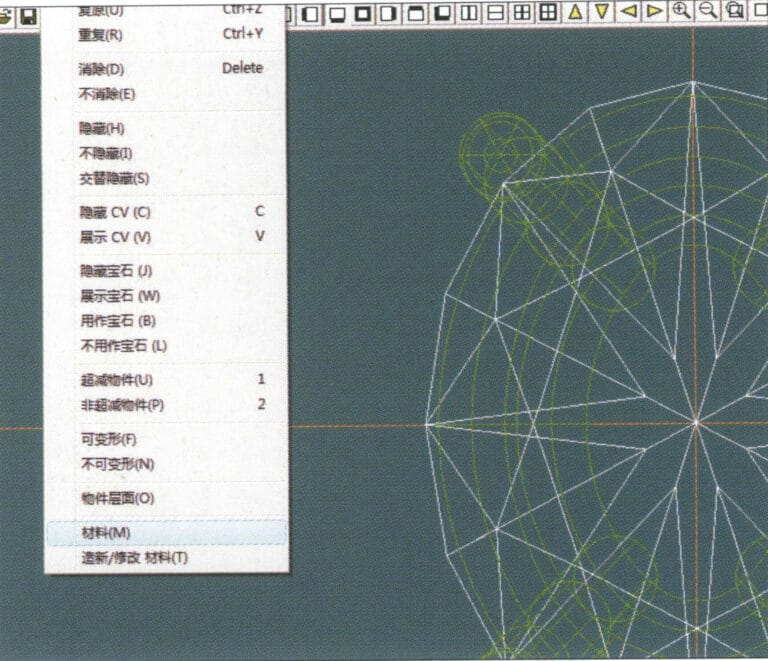
16. Select "Edit" > "Materials" from the menu bar
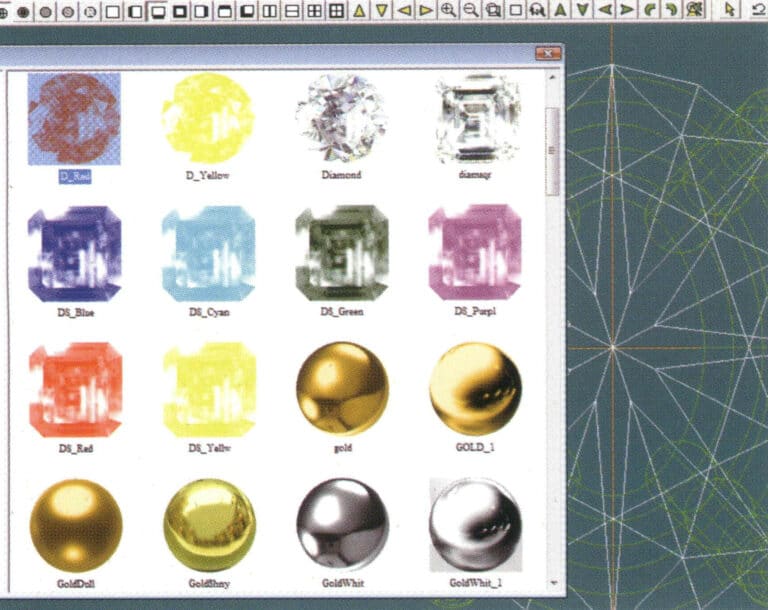
17. "Malzemeler" iletişim kutusuna girin, ruby'yi seçin ve onaylayın
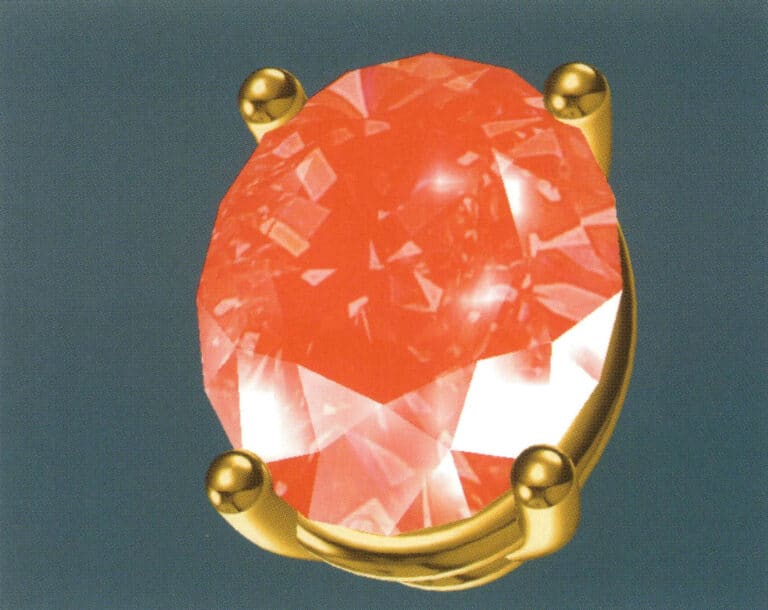
18. Select "View" > "Shadow Map" from the menu bar to examine the shadow effects
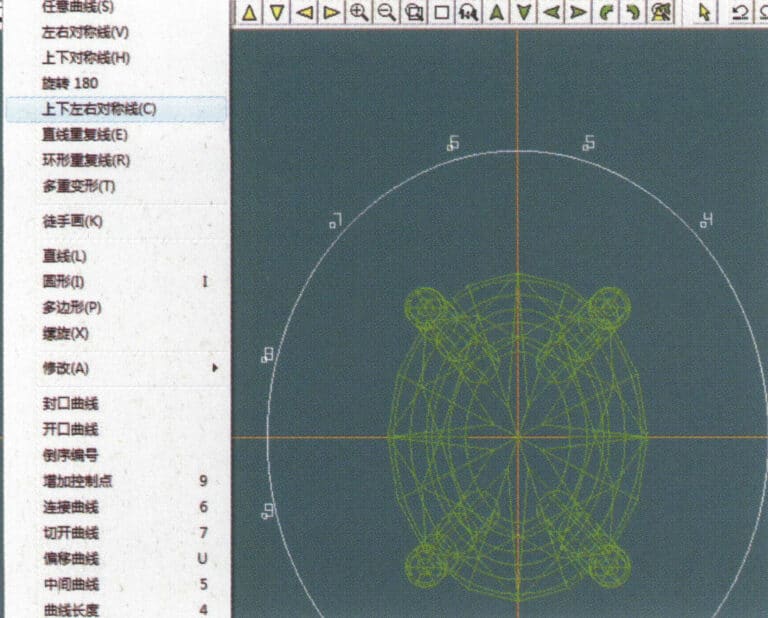
19. Select "Curve" > "Vertical and Horizontal Symmetry Line" from the menu bar as the auxiliary line for the outer circle
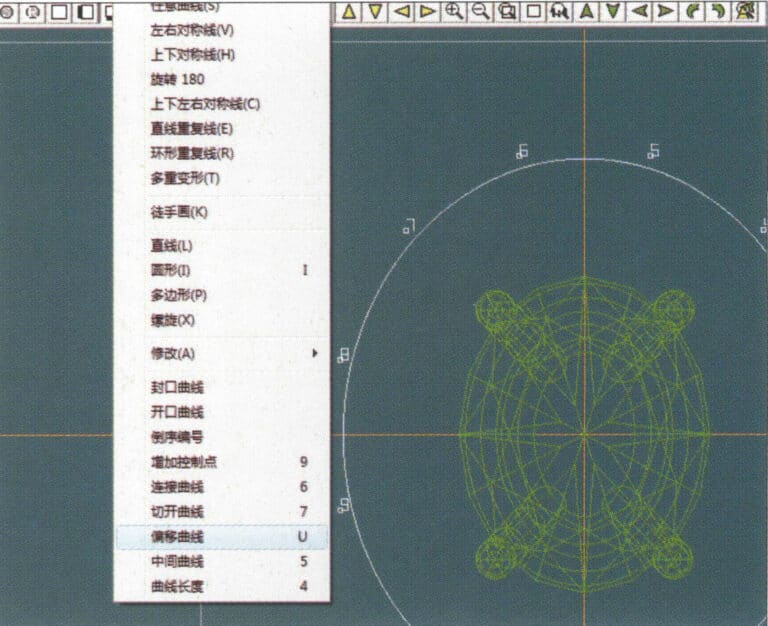
20. Select "Curve" > "Offset Curve" from the menu bar

21. "Ofset Eğrisi" iletişim kutusuna girin, ilgili değerleri iç daire için yardımcı çizgiler olarak girin ve onaylayın
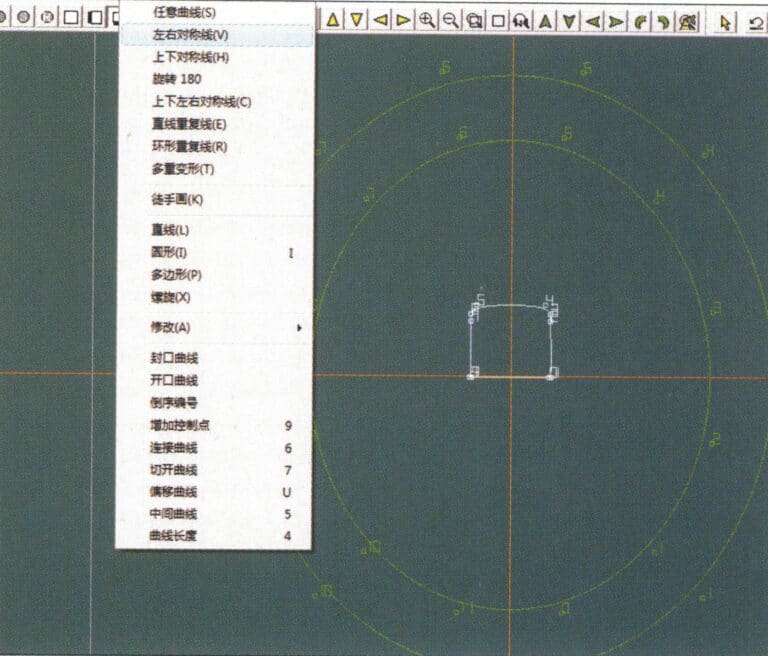
22. Select "Curve" > "Left-Right Symmetrical Line" from the menu bar as the cross-section of the coil
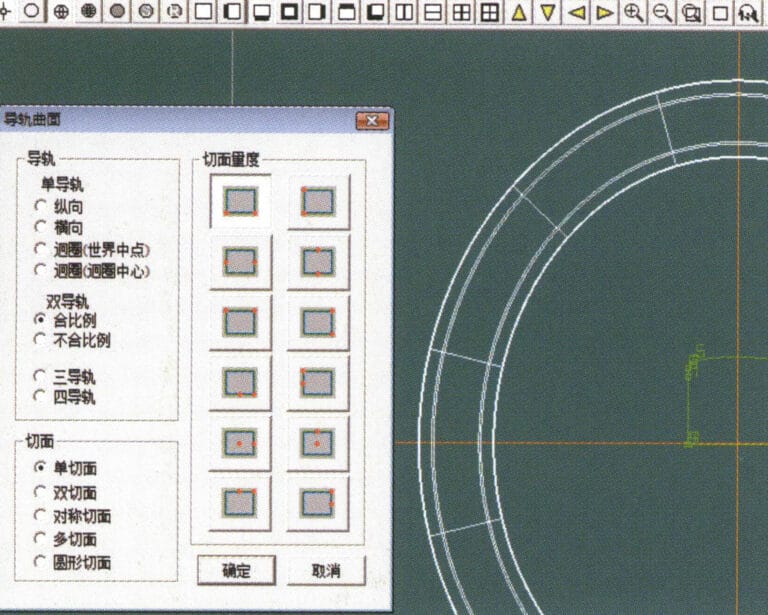
23. Select "Curved Surface" > "Rail Surface" from the menu bar to enter the "Rail Surface" dialog box, select the relevant options and confirm
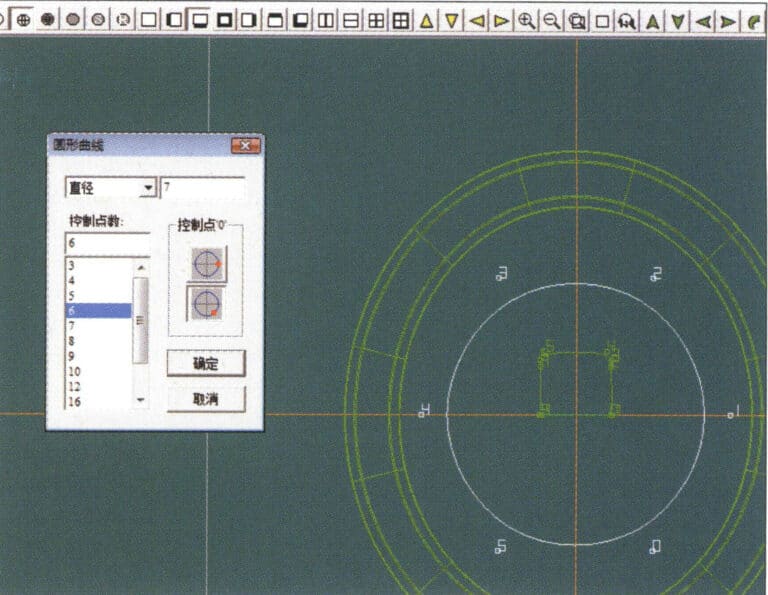
24. Select "Curve" > "Circular Curve" from the menu bar, enter the relevant values in the "Circular Curve" dialog box, and confirm; left-click on one curve as the left guide curve, click on another curve as the right guide rail, and then select the coil cross-section as the cross-section of the guide rail surface; once completed, it serves as the auxiliary line for the outer circle of the chain threading position
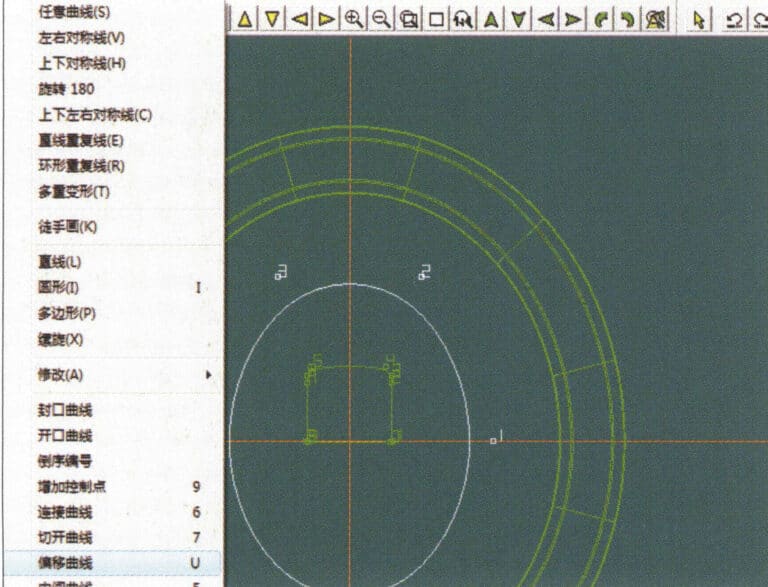
25. After completing the outer auxiliary lines for the chain position, select "Curve" > "Offset Curve" from the menu bar
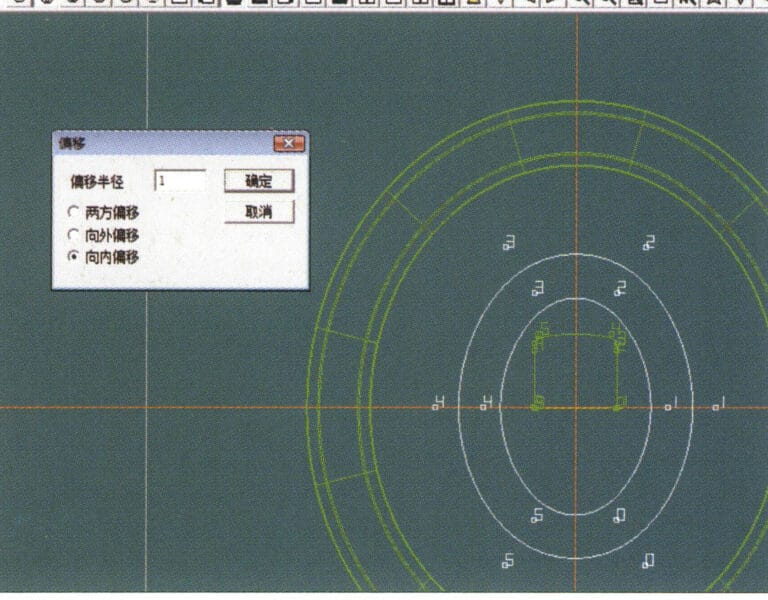
26. "Ofset Eğrisi" iletişim kutusuna girin, ilgili değerleri girin ve onaylayın
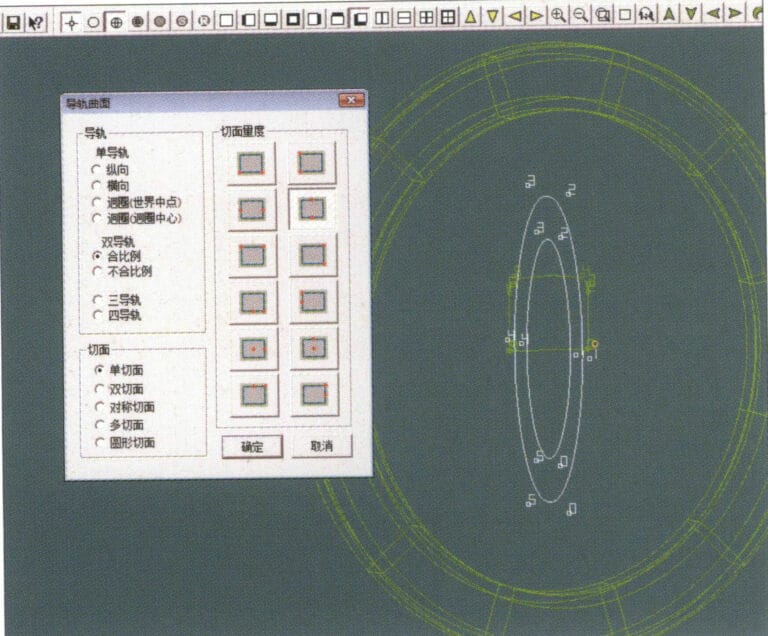
27. Select "Surface" > "Rail Surface" from the menu bar to enter the "Rail Surface" dialog box, select the relevant options and confirm, left-click on a curve to set it as the left rail curve, click on another curve to set it as the right rail, and then select the coil cross-section as the cross-section of the rail surface
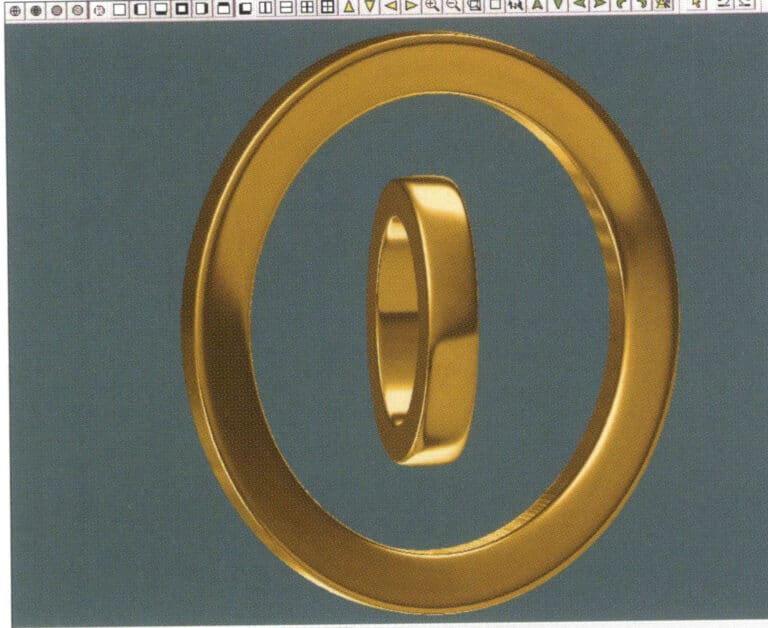
28. Select "View" > "Shadow Map" from the menu bar to inspect the shadow effects
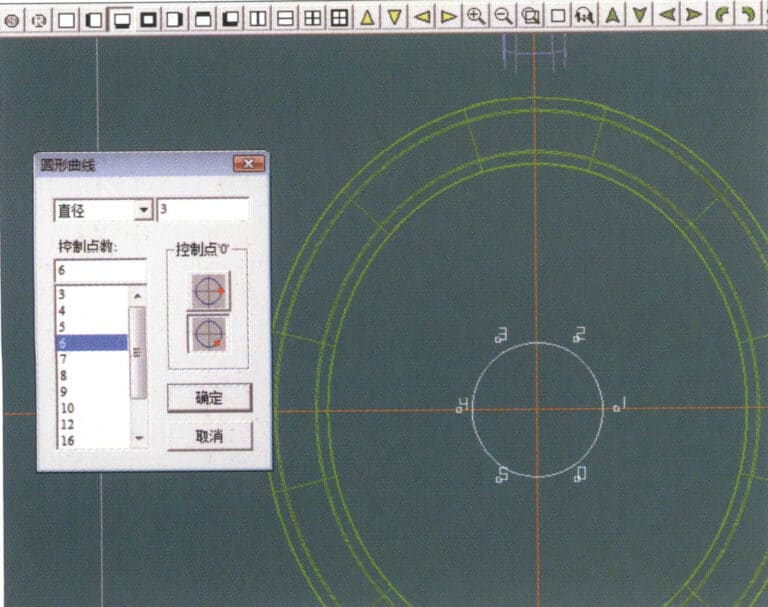
29. Select "Curve" > "Circular Curve" from the menu bar, enter the relevant values and confirm
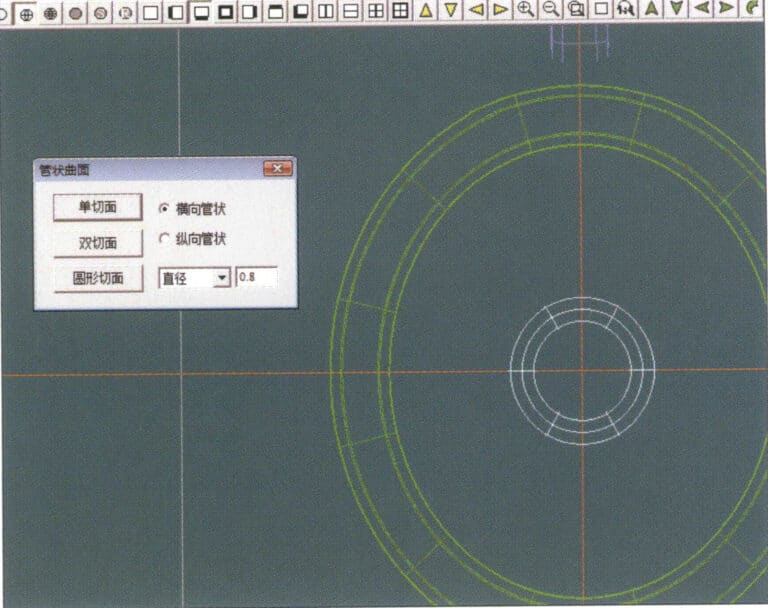
30. Select "Curved Surface" > "Tubular Surface" from the menu bar, enter the relevant values and confirm
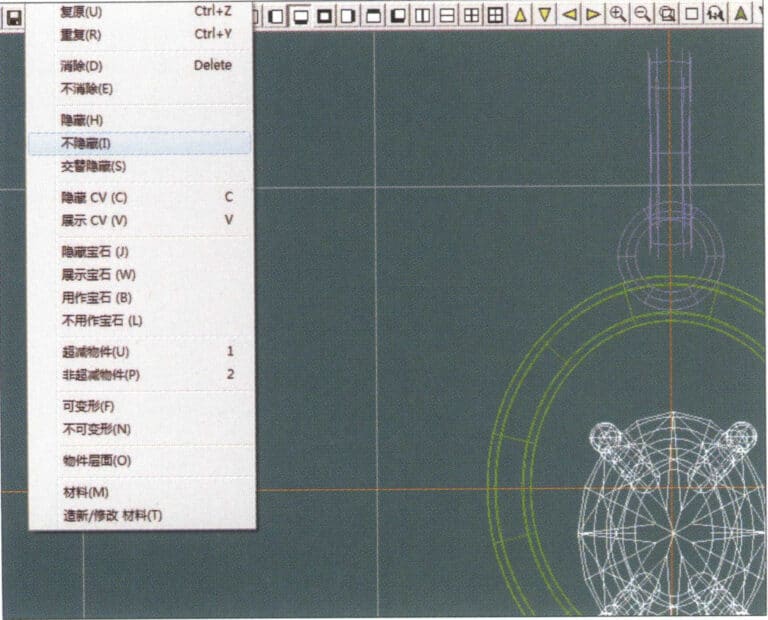
31. Select "Edit" > "Unhide" from the menu bar to display the hidden objects
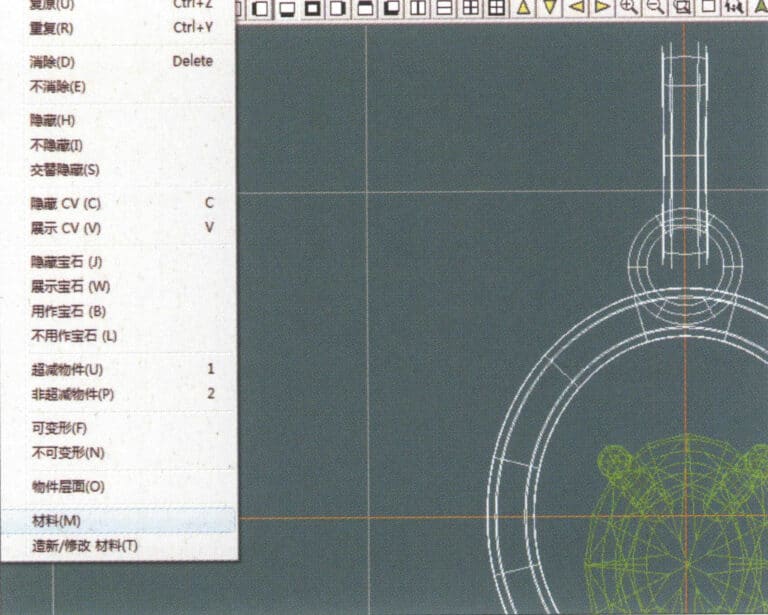
32. Select "Edit" > "Materials" from the menu bar
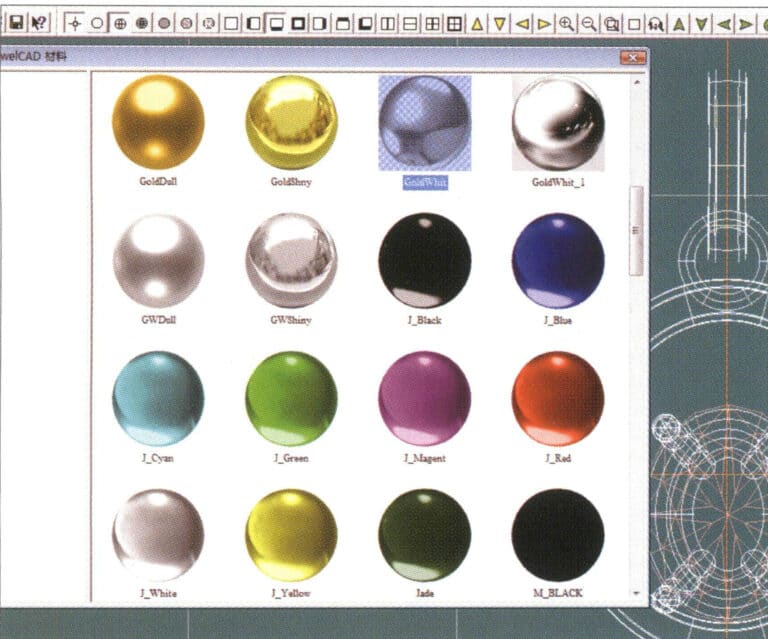
33. "Malzemeler" iletişim kutusuna girin, ilgili malzemeleri seçin ve onaylayın
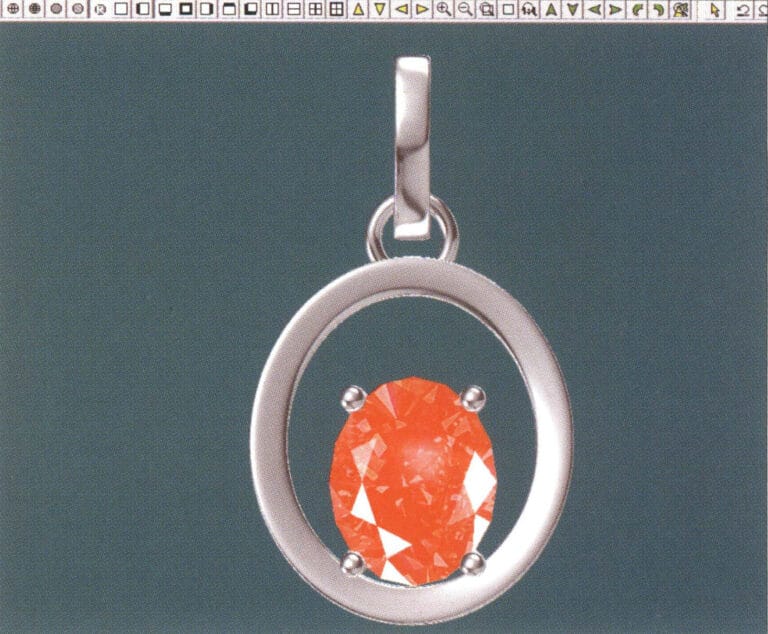
34. Select "View" > "Shadow Map" from the menu bar to inspect the shadow effects
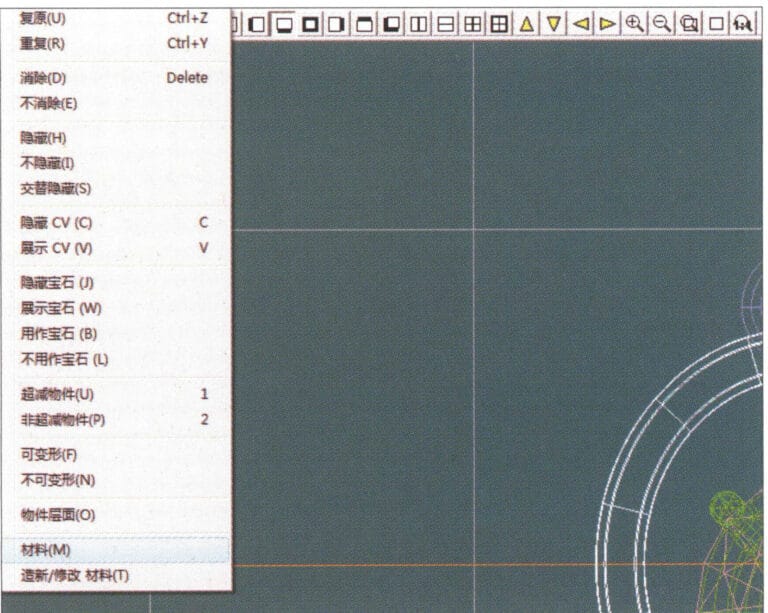
35. Select "Edit" > "Materials" from the menu bar
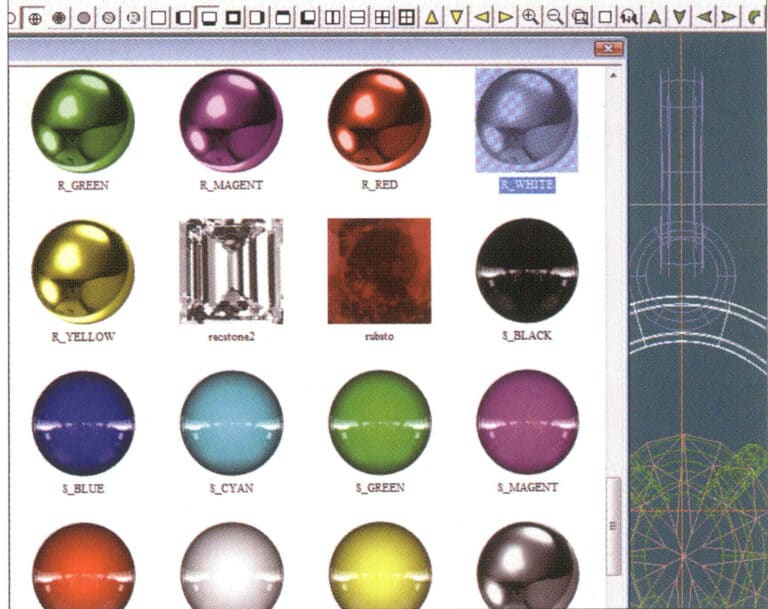
36. "Malzemeler" iletişim kutusuna girin, ilgili doku malzemelerini seçin ve onaylayın
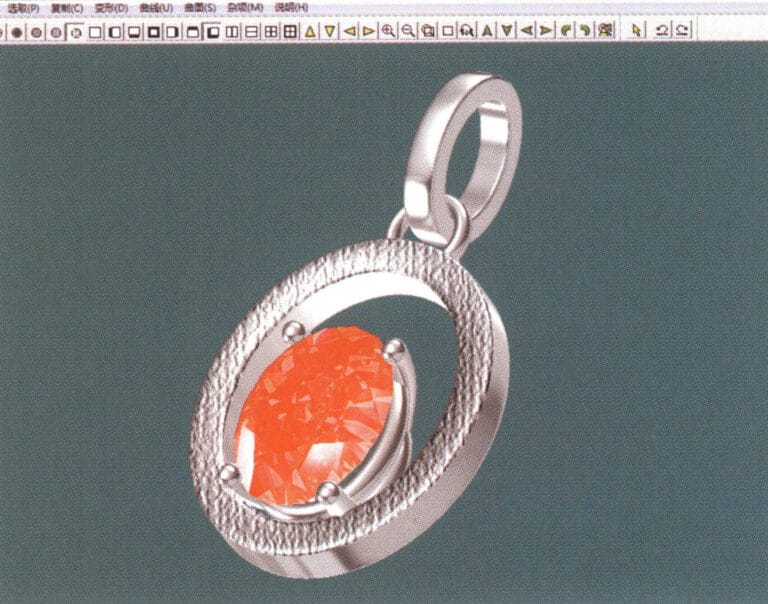
37. Select "View" > "Shadow Map" from the menu bar to inspect the shadow effects
38. Select "File" > "Save As" from the menu bar to save the file


