Kuinka tehdä 3D-korumalleja JewelCADin avulla?
JewelCADin ymmärtäminen, perusmateriaalitehosteiden ja korutehosteiden esittäminen
Johdanto:
Mitä vaaditaan upeiden korumallien luomiseen JewelCADin avulla? Tämä opas kattaa kaiken ohjelmiston ymmärtämisestä materiaalitehosteiden hallintaan ja yksityiskohtaisten korumallien luomiseen. Opi toteuttamaan ideasi vaiheittaisten ohjeiden avulla sormusten, riipusten ja muiden korujen suunnitteluun. Tutustu siihen, miksi JewelCAD on välttämätön työkalu korusuunnittelijoille, studioille ja tuotemerkeille, jotka haluavat parantaa ammattitaitoaan.
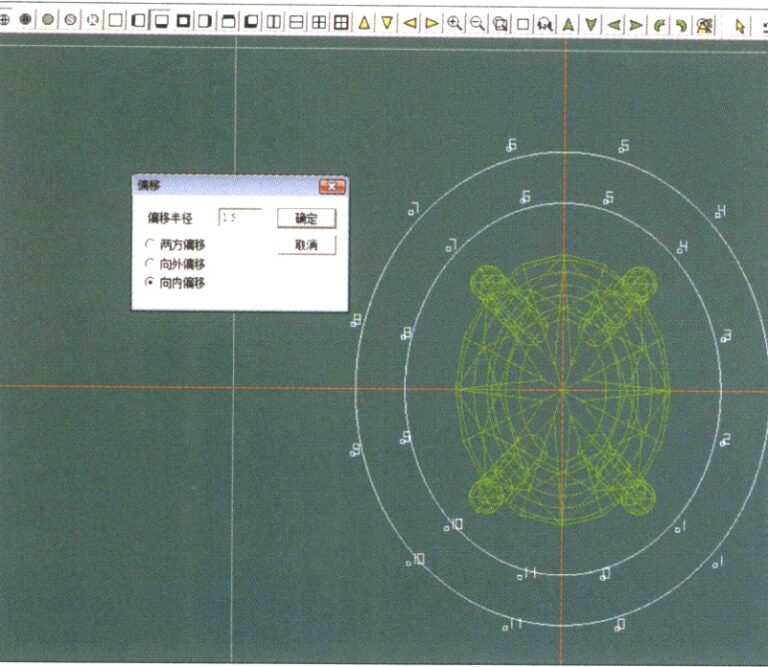
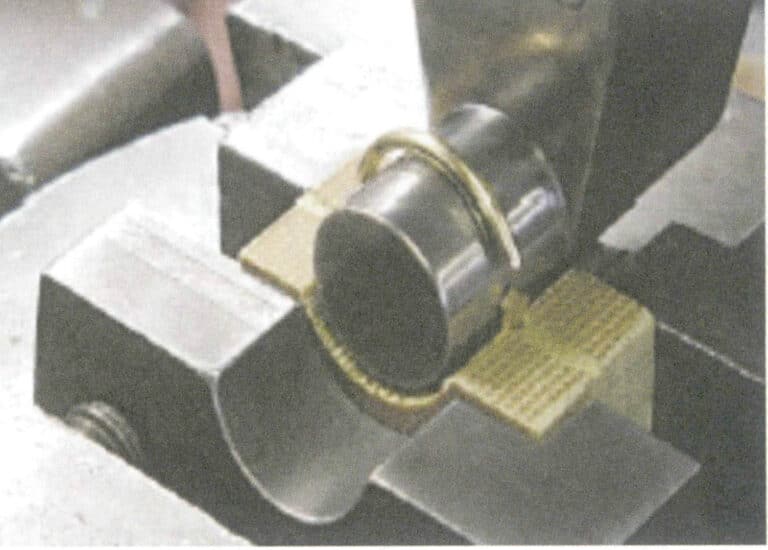
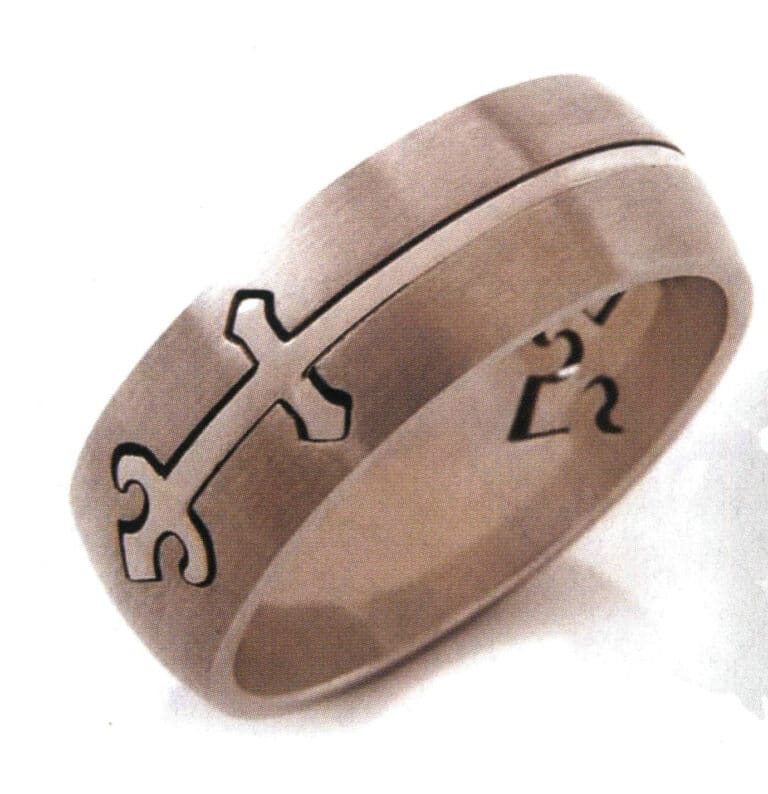
Timantti-sorvattu sormus
Sisällysluettelo
Jakso I JewelCADin ymmärtäminen
JewelCAD on tietokoneavusteinen suunnittelujärjestelmäohjelmisto erityisesti koruja varten, jonka hongkongilainen CAD/CAM-yritys kehitti menestyksekkäästi vuonna 1990. Yli kymmenen vuoden kehitystyön ja parantamisen jälkeen JewelCAD on kehittynyt rajoitetun toiminnon piirustusohjelmistosta tehokkaaksi, vakaaksi, erittäin erikoistuneeksi ja tehokkaaksi, ammattimaiseksi korujen suunnittelu- ja valmistusohjelmistoksi, joka on laajalti hyväksytty suurimmilla korujen tuotantoalueilla Euroopassa, Amerikassa ja Aasiassa.
Tuotannon ja jalostuksen automatisointi koruteollisuudessa on parantanut merkittävästi tehokkuutta, mutta JewelCAD vastaa nykyaikaista korusuunnittelua ja on laajalti levinnyt nykyisiin kaupallisiin sovelluksiin. Sen ainutlaatuisten mallinnuskonseptien ja -työkalujen avulla korusuunnittelijat voivat helposti luoda kolmiulotteisia koruesineitä, ja se integroituu myös täydellisesti CNC- ja RP-pikaprototyyppien kanssa, mikä tekee siitä modernin korusuunnitteluohjelmiston, jolla on laajat kehitysnäkymät. Ammattimaisena korusuunnitteluohjelmistona JewelCADillä on selviä etuja muihin 3D-ohjelmistoihin verrattuna korujen kolmiulotteisten mallien luomisessa, mikä näkyy seuraavissa eduissa.
(1) Helppo käyttää, yksinkertainen ja helppo oppia.
(2) Siinä on joustavat piirtotyökalut, jotka ovat erittäin käteviä käyrien ja monimutkaisten muotojen piirtämiseen.
(3) Siinä on tehokkaat pintamallinnustyökalut, joilla voidaan joustavasti luoda tai muokata monimutkaisia malleja.
(4) Renderöintinopeus on nopea; voit myös vertailla erilaisia suunnittelutehostekuvia. Tehostekuvien laatu on korkea, ja simulointi on vahva. Se onsallii pyörittämisen havainnoida kolmiulotteista vaikutusta, mikä heijastaa intuitiivisesti lopputuotteen vaikutusta.
(5) Sen toiminta on erittäin tehokasta ja sopii muuttuviin korutyyleihin.
(6) Runsas ammattimainen tietokanta ja erilaiset muokkaustyökalut helpottavat korujen yhdistämistä ja uudelleensuunnittelua, mikä tekee toiminnoista helpompia ja tehokkaampia.
(7) Soveltamalla Boolen operaatioiden periaatteita ohjelmistoissa voidaan helposti yhdistää vapaassa tilassa olevat pinnat.
(8) Suunnittelussa kullan paino, määrä ja koko voidaan laskea suoraan.
(9) Voi rakentaa tietokannan suunnitteluideoiden visualisoimiseksi ja tehokkuuden parantamiseksi.
(10) JewelCADillä piirretty grafiikka on selkeämpää ja johdonmukaisempaa, mikä vähentää epäselvästä kirjoituksesta tai huonosta piirustuksen laadusta johtuvien virheiden todennäköisyyttä. Sillä voidaan suoraan tulostaa paperittomia kuvia, mikä säästää aikaa, vaivaa ja rahaa.
Jakso II JewelCADin käyttäminen materiaalien perusvaikutusten esittämiseen
1. Hiekkapuhalluksen viimeistelyvaikutus
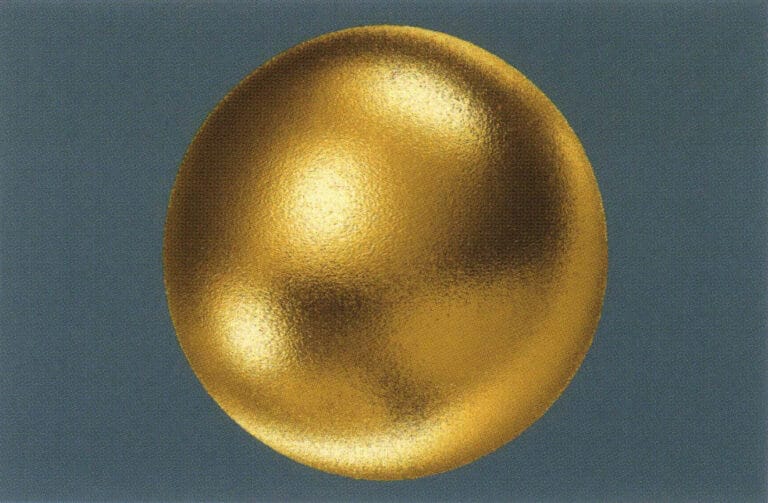
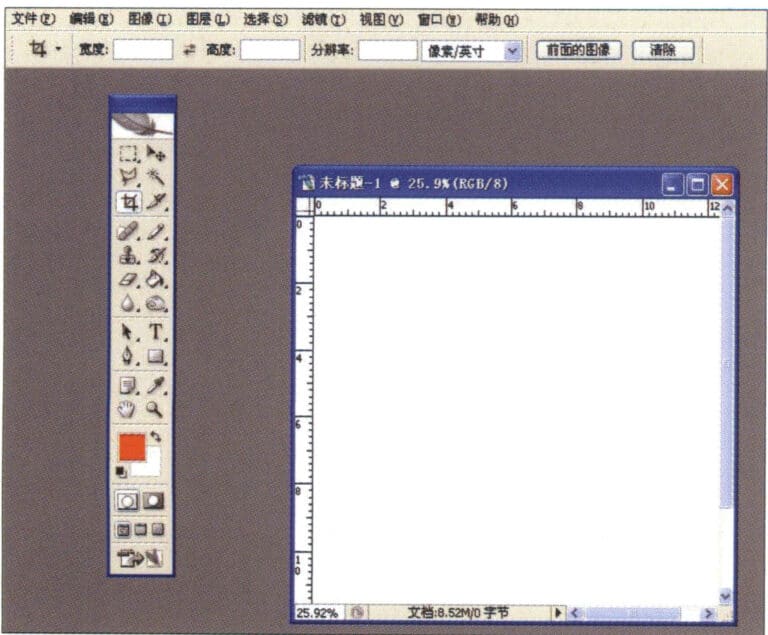
1. Luo Photoshopissa uusi tiedosto, jonka resoluutio on 300 pikseliä/tuuma.
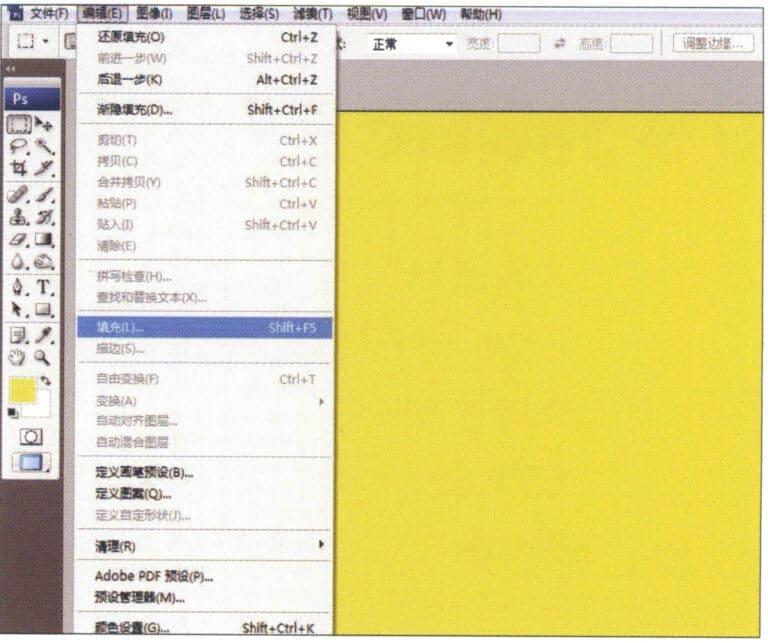
2. Select "Edit" > "Fill" from the menu bar, and set the foreground color to yellow

3. Select "Filter" from the menu bar > "Mottled" > "Add Mottled"
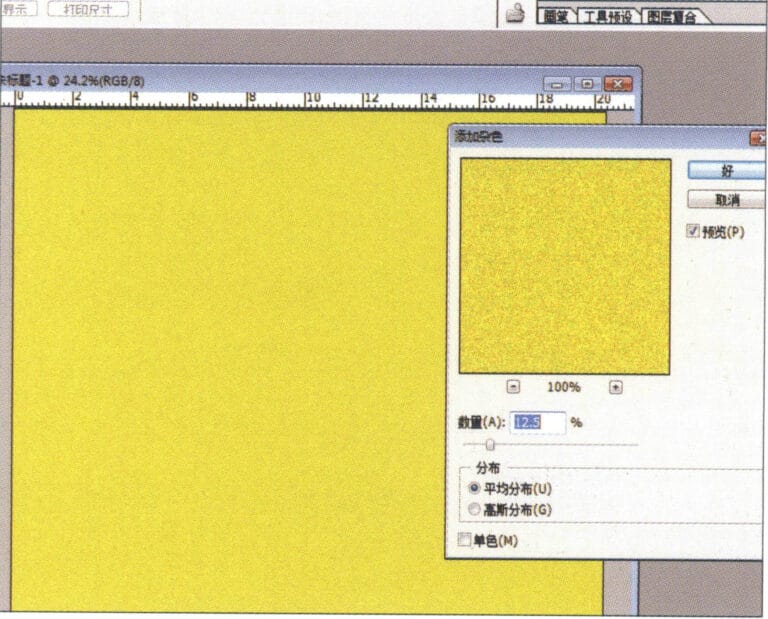
4. Siirry "Add Mottled" -valintaikkunaan, syötä tarvittavat arvot ja vahvista.
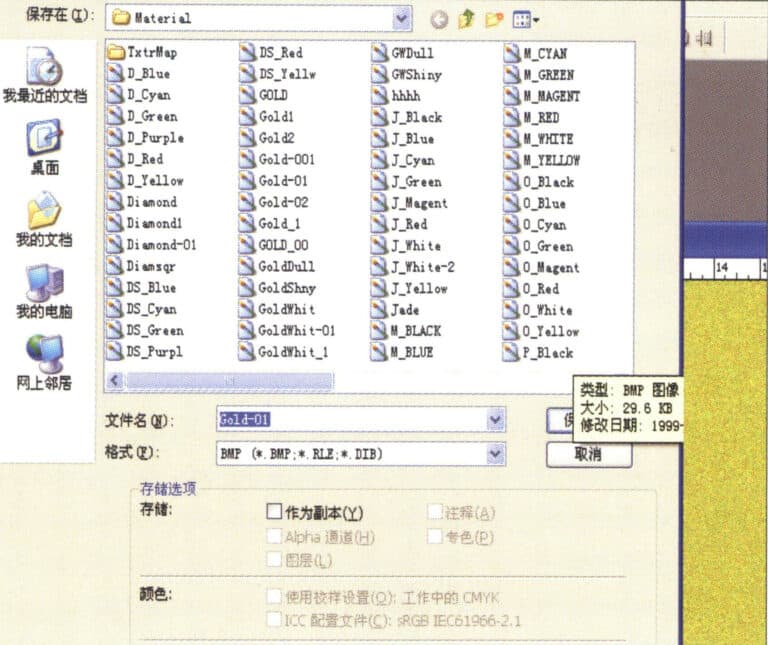
5. Store the document in the "JewelCAD" > "Material" folder, saved in "BMP" format

6. Create a new file in JewelCAD, select "Surface" > "Spherical Surface" from the menu bar
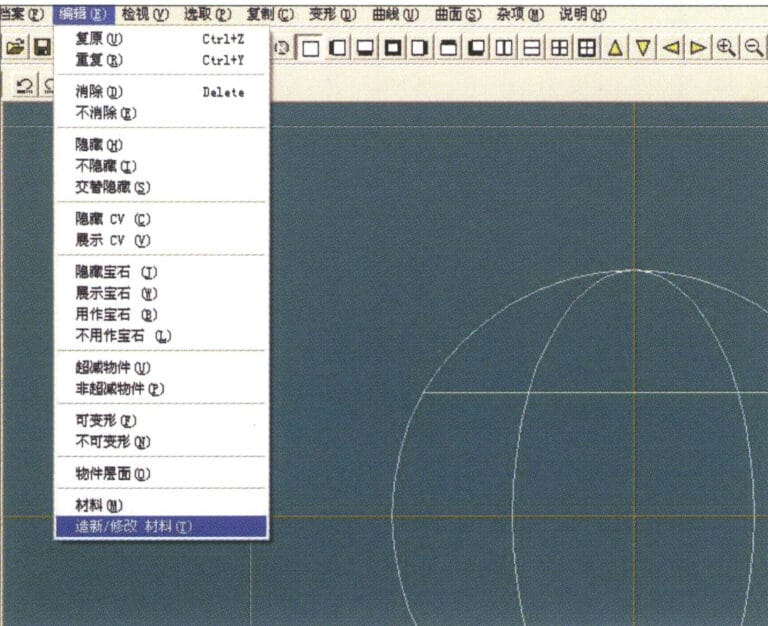
7. Select "Edit" > "Create/Modify Material" from the menu bar
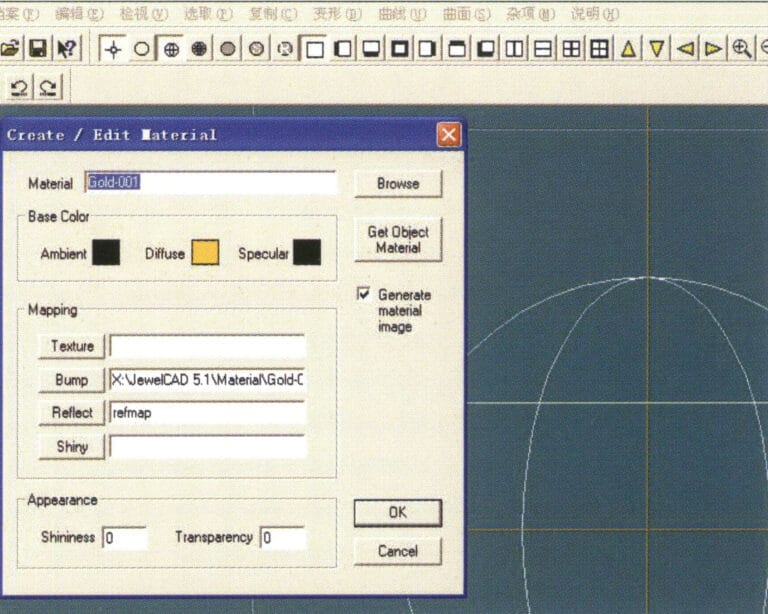
8. Siirry "Create/Modify Material" -valintaikkunaan, syötä tarvittavat arvot ja vahvista.
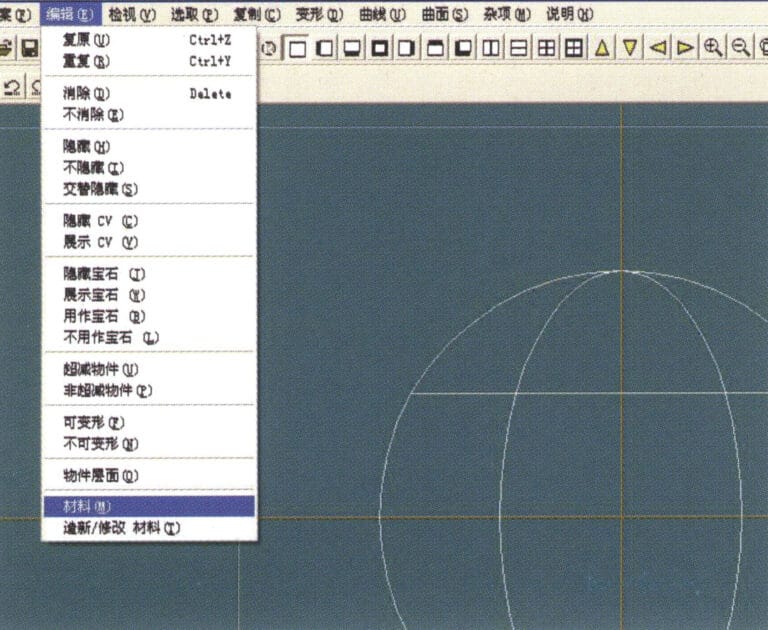
9. Select "Edit" > "Materials" from the menu bar
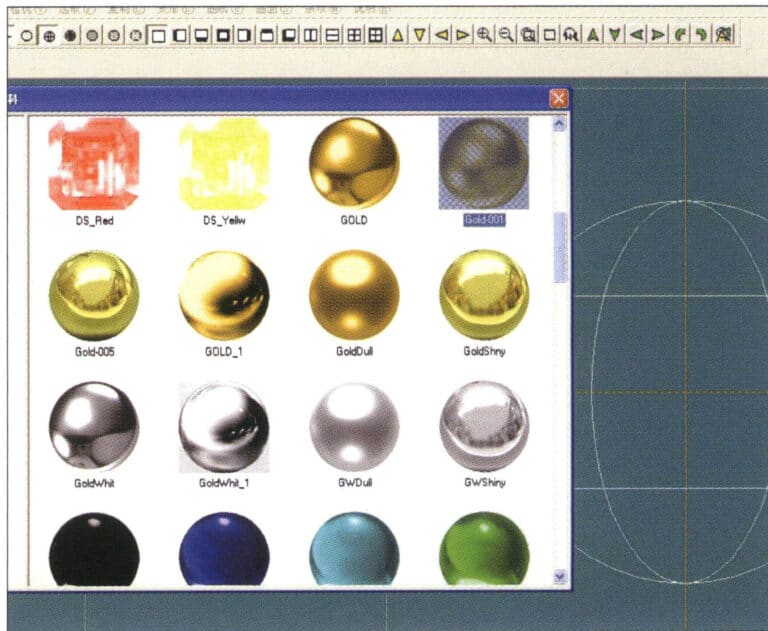
10. Siirry "Materiaalit"-valintaikkunaan, valitse materiaali ja vahvista.
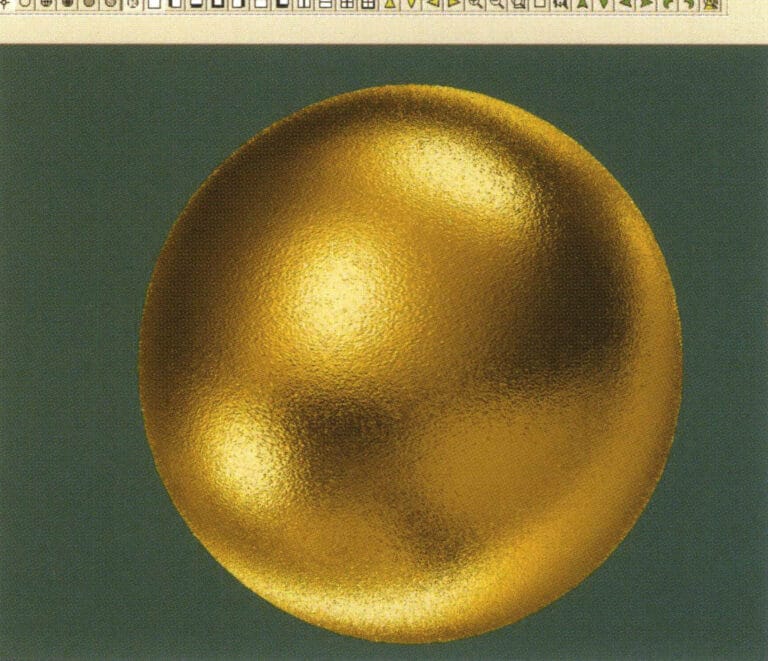
11. Select "View" > "Shadow Map" from the menu bar to inspect the shadow effects.
12. Select "File" > "Save File" from the menu bar to save the document
2. Harjausvaikutus
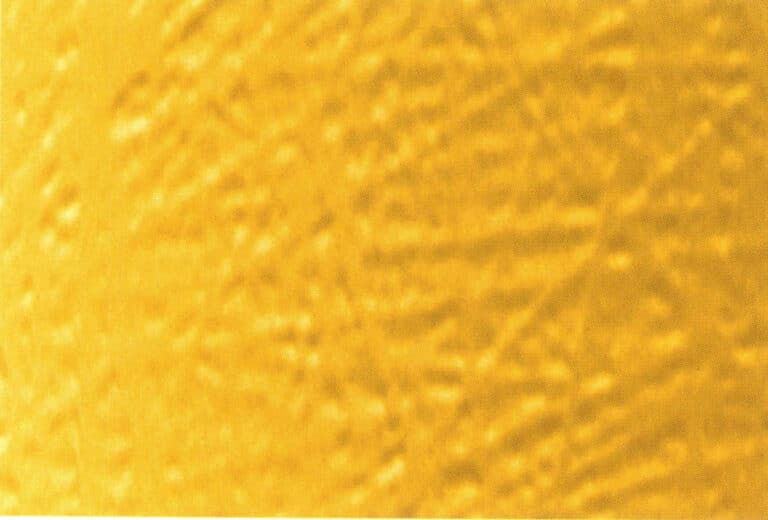

1. Scan a texture file in Photoshop with a resolution of 300 pixels/inch, and select "Filter" > "Blur" > "Motion Blur" from the menu bar to apply the blur effect
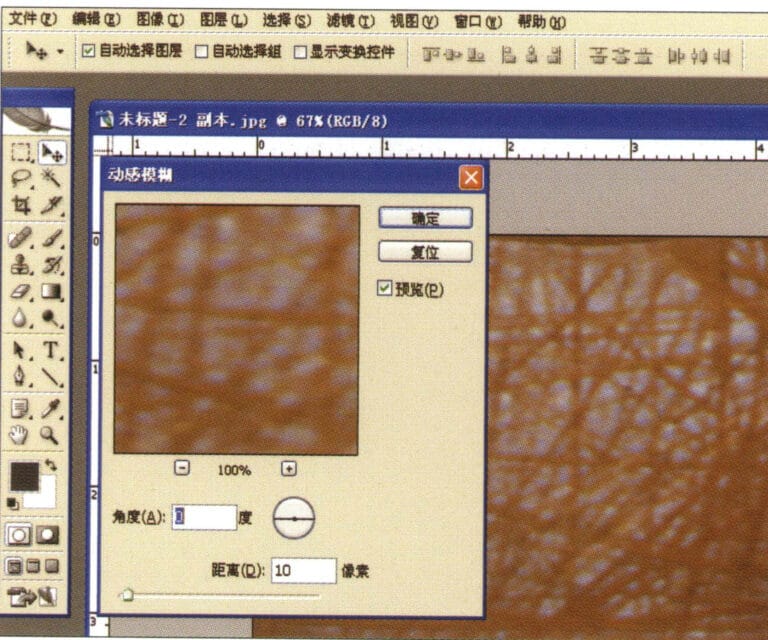
2. Siirry "Motion Blur" -valintaikkunaan, syötä tarvittavat arvot ja vahvista.
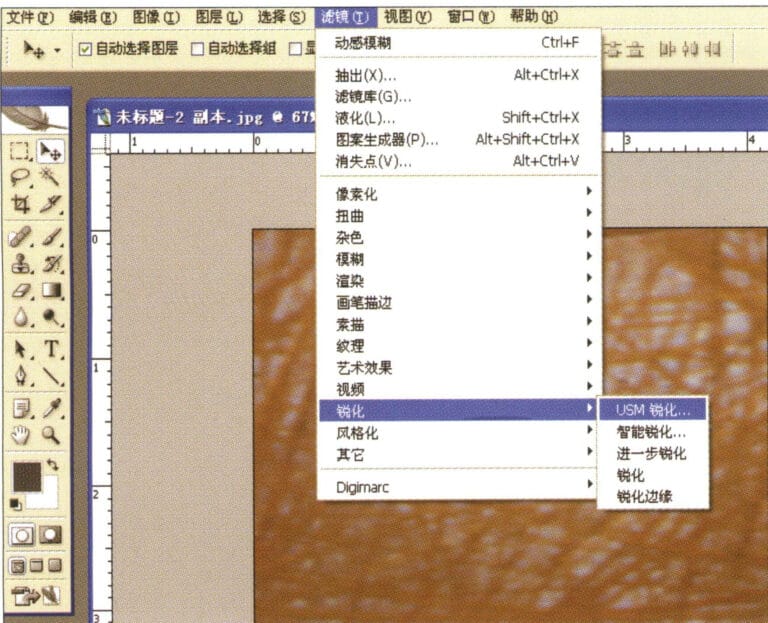
3. Select "Filter" > "Sharpen" > "USM Sharpening" from the menu bar
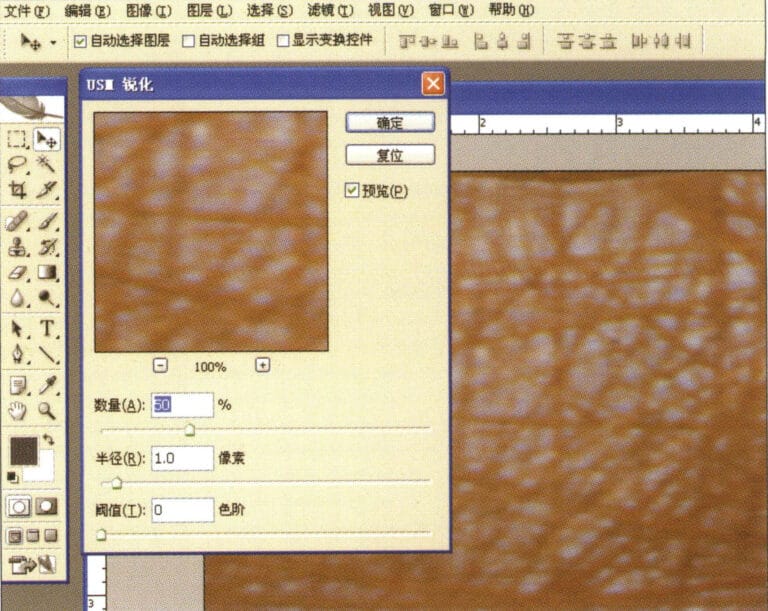
4. Siirry "USM Sharpening" -valintaikkunaan, syötä tarvittavat arvot ja vahvista.
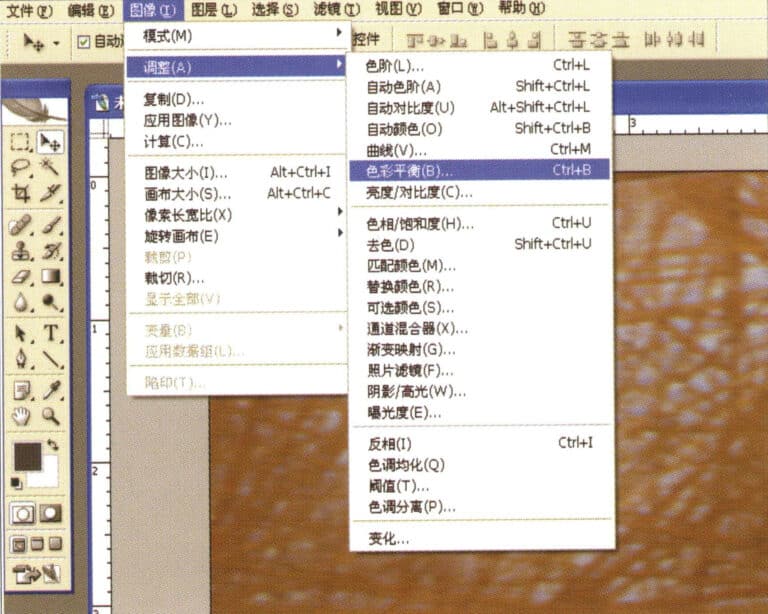
5. Select "Image" > "Adjustments" > "Color Balance" from the menu bar
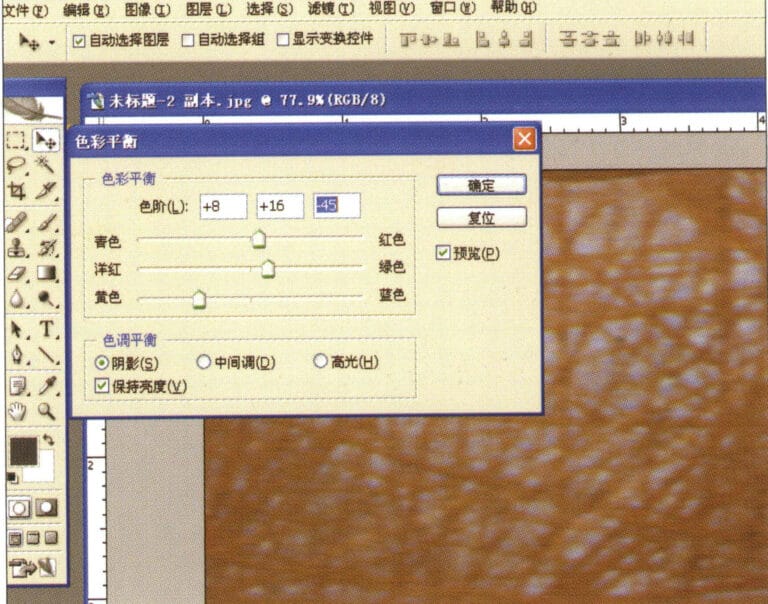
6. Siirry "Väritasapaino"-valintaikkunaan, syötä tarvittavat arvot ja vahvista.
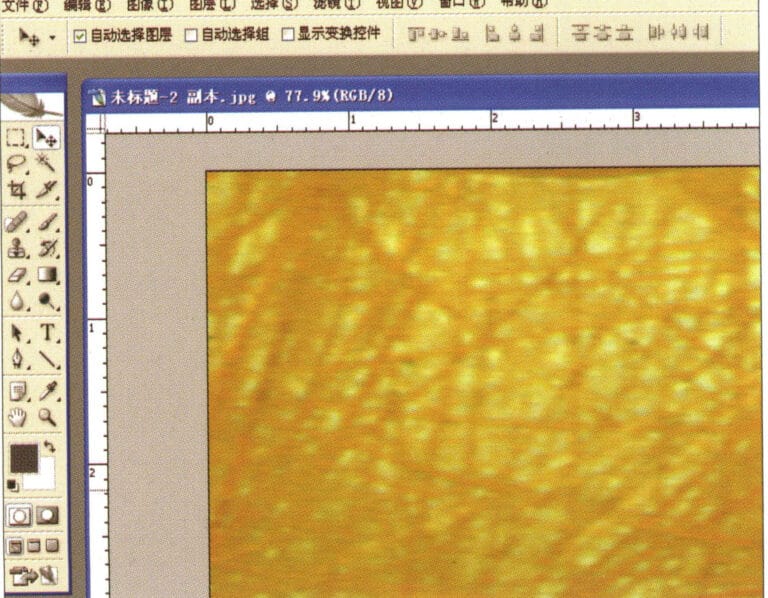
7. Vaikutuskaavio väritasapainon näyttämisen jälkeen
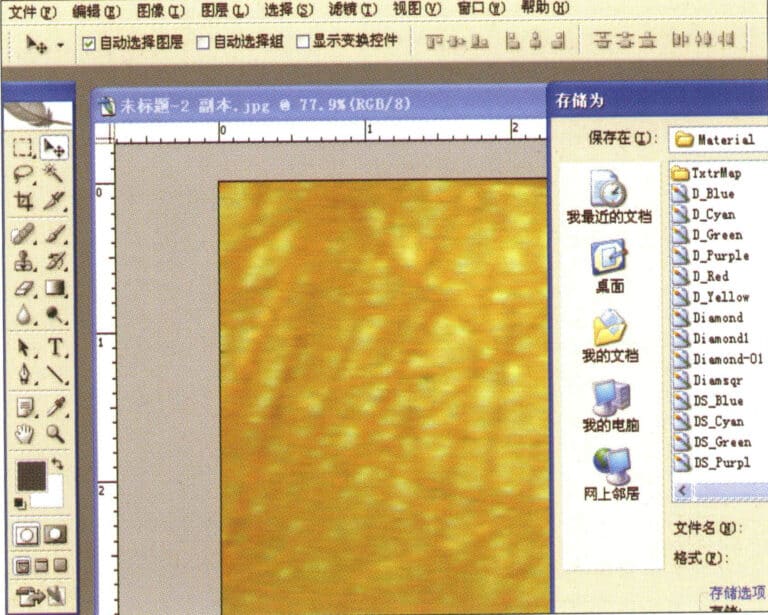
8. Store the document in the "JewelCAD" > "Material" folder, saved in "BMP" format
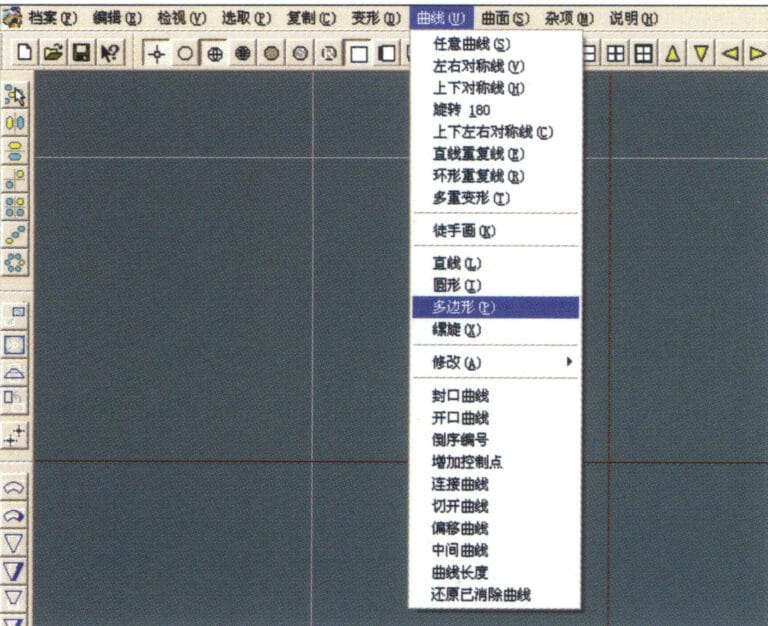
9. In JewelCAD, create a new file, select "Curve" > "Polygon" from the menu bar
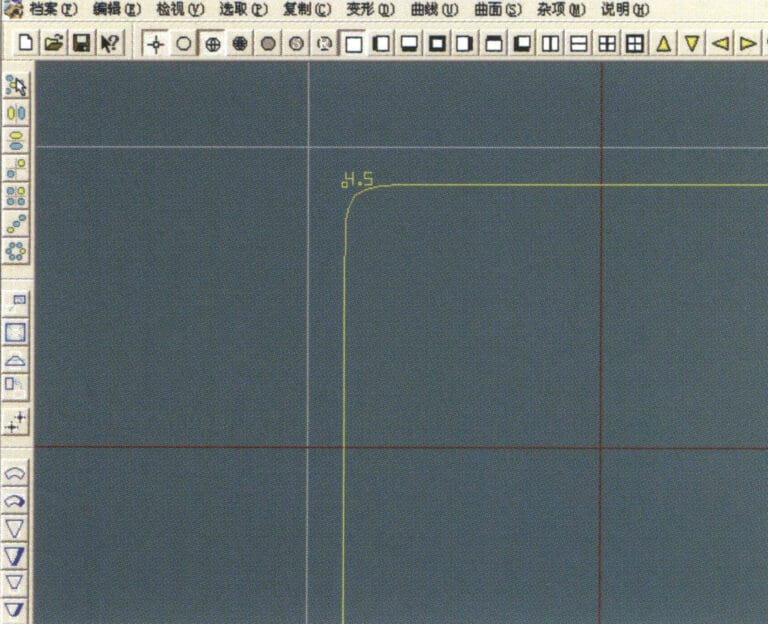
10. Käytä "monikulmio" piirtääksesi neliön.
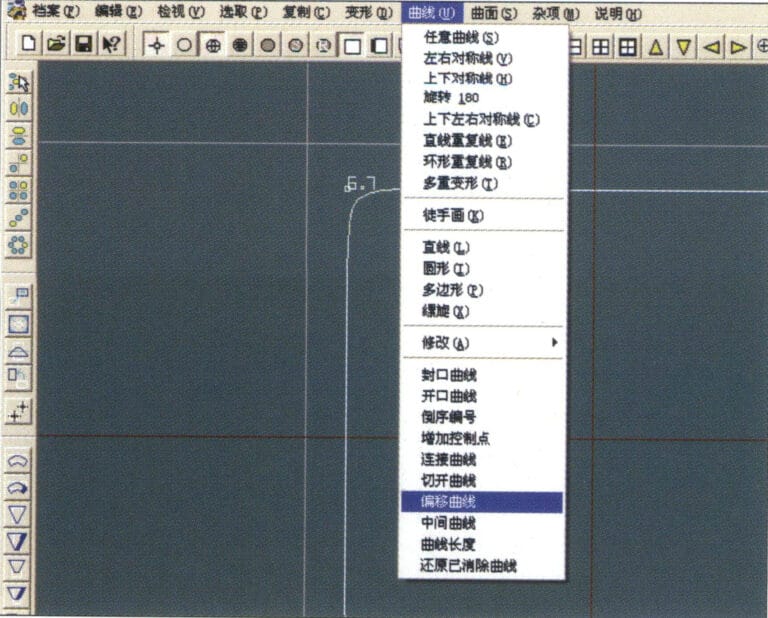
11. Select "Curve" > "Offset Curve" from the menu bar
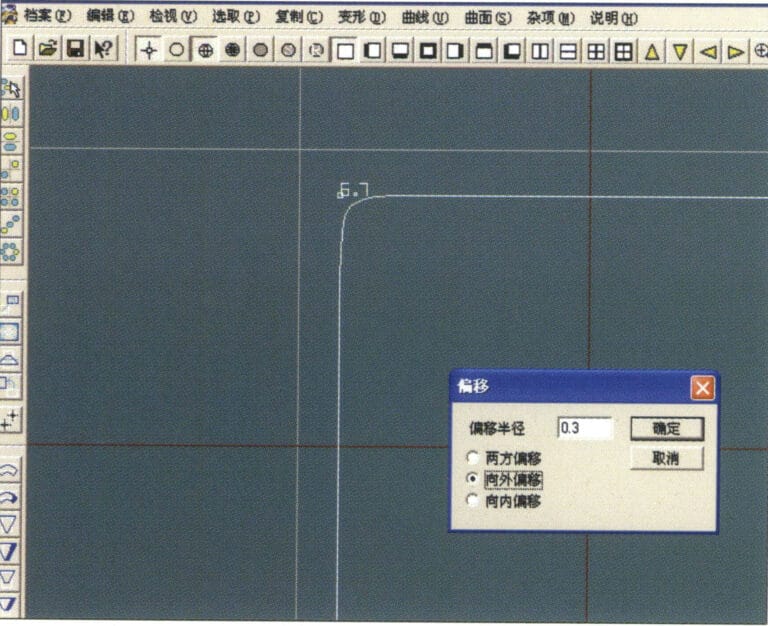
12. Siirry "Offset Curve" -valintaikkunaan, syötä tarvittavat arvot ja vahvista.
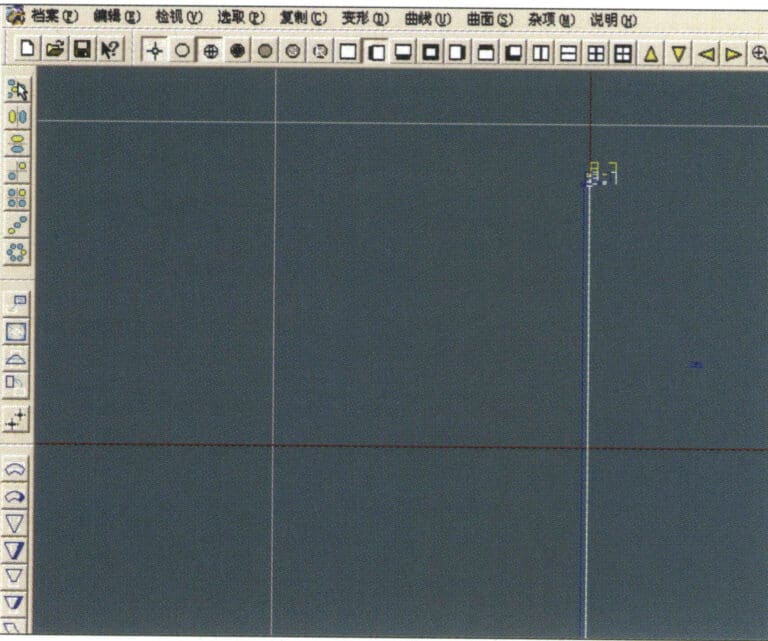
13. Vaikutuskaavio offset-käyrän näyttämisen jälkeen
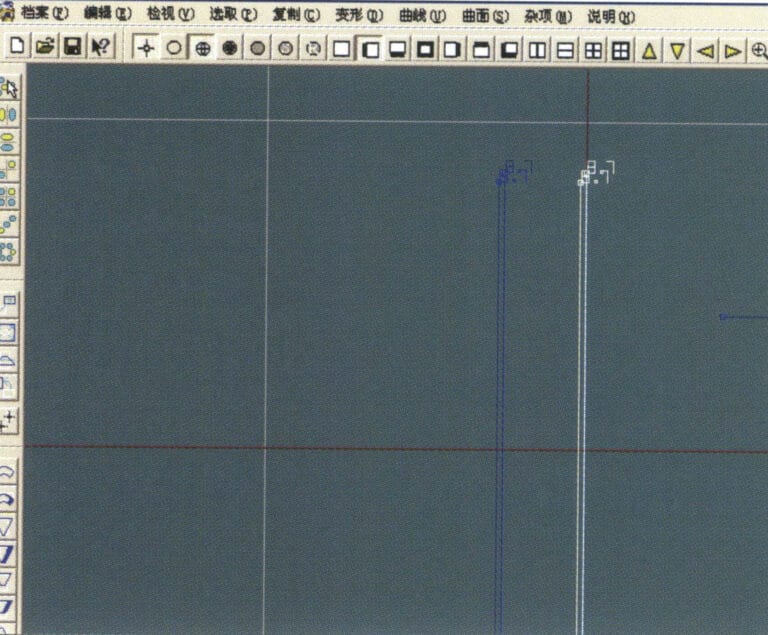
14. Select "Deformation" > "Move" from the menu bar to move the selected curve
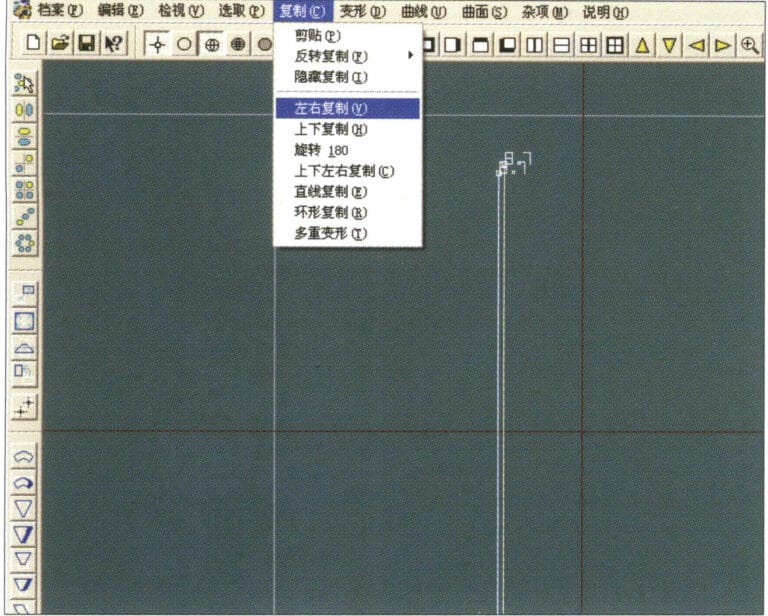
15. Select "Copy" > "Copy Left and Right" from the menu bar to copy the selected curve to the left and right
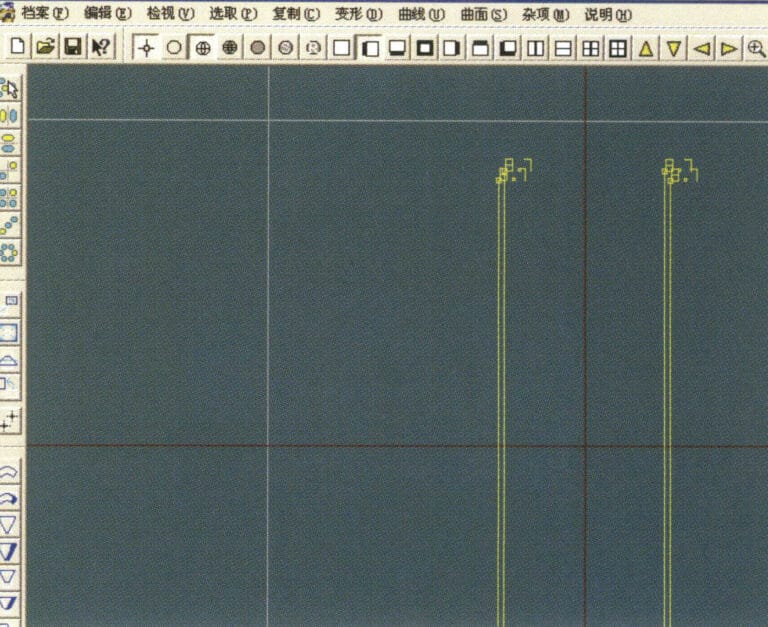
16. Näytä tehostekuvat vasemman ja oikean kopioinnin jälkeen.
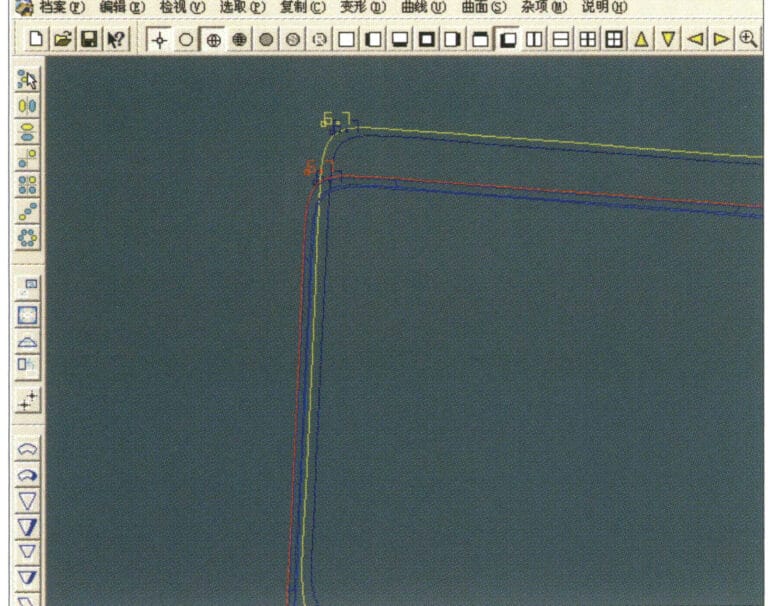
17. Select "Surface" > "Curve Surface Connection" from the menu bar, and double-click the first and second curves/surfaces in a clockwise direction with the left mouse button to create a curve surface connection
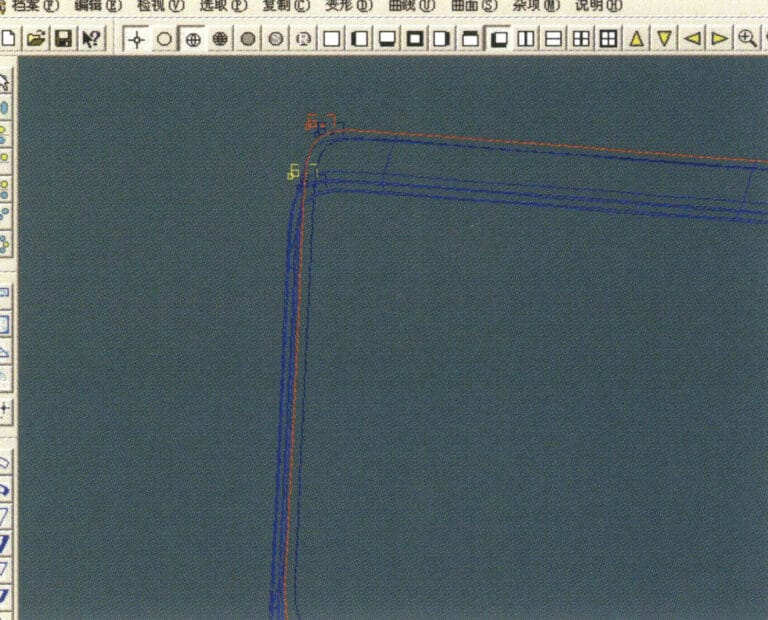
18. Kaksoisnapsauta kolmatta käyrää/pintaa hiiren vasemmalla painikkeella myötäpäivään luodaksesi viiva-pinta-yhteyden.
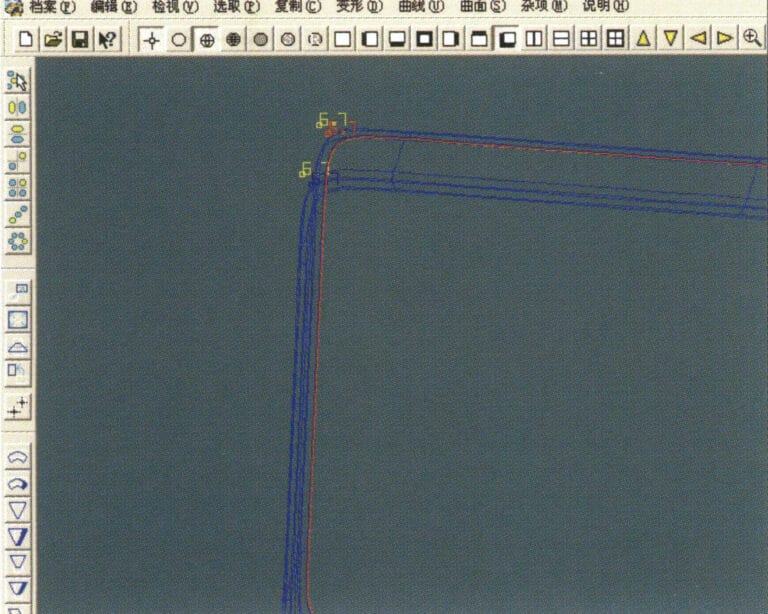
19. Jatka myötäpäivään; kaksoisnapsauta neljättä käyrää/pintaa hiiren vasemmalla painikkeella luodaksesi viiva-pinta-yhteyden.

20. Select "View" > "Shadow Map" from the menu bar to inspect the shadow effects
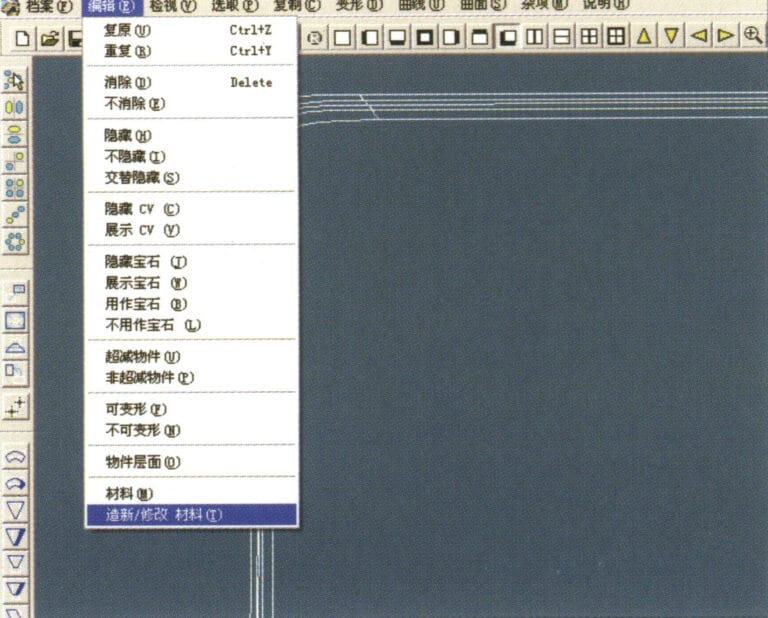
21. Select "Edit" > "Create/Modify Material" from the menu bar
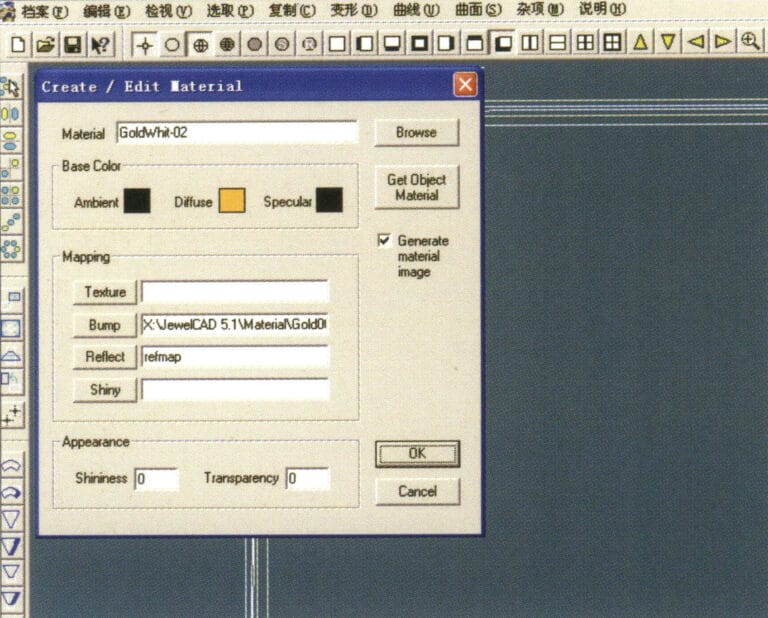
22. Siirry "Create/Modify Material" -valintaikkunaan, syötä tarvittavat arvot ja vahvista.
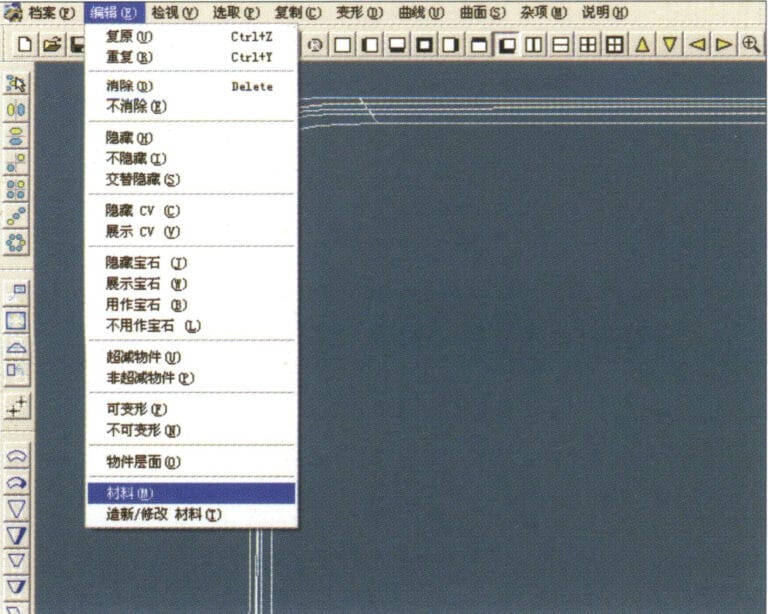
23. Select "Edit" > "Materials" from the menu bar
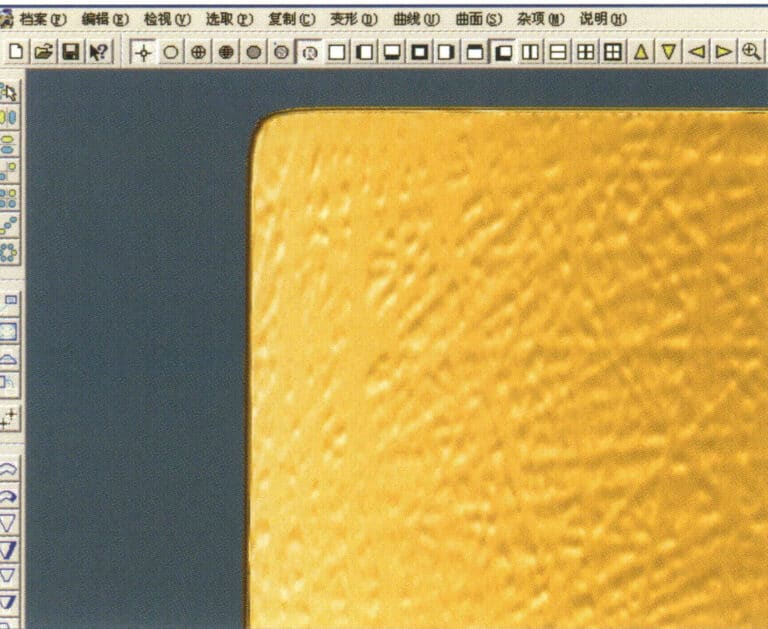
24. Select "View" > "Shadow Map" on the menu bar to view the light and shadow effects 25. Select "File" > "Save File" on the menu bar to save the file
3. Bark Texture Finish
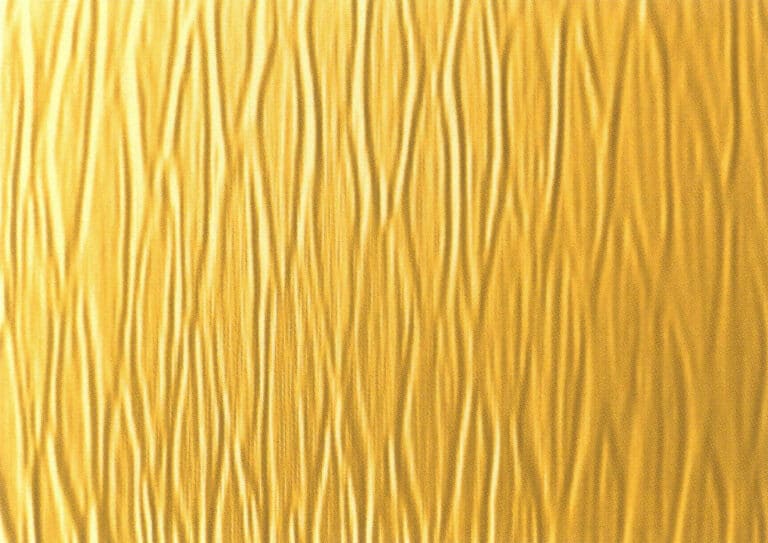

1. Skannaa tekstuuritiedosto Photoshopiin resoluutiolla 300 pikseliä/tuuma.
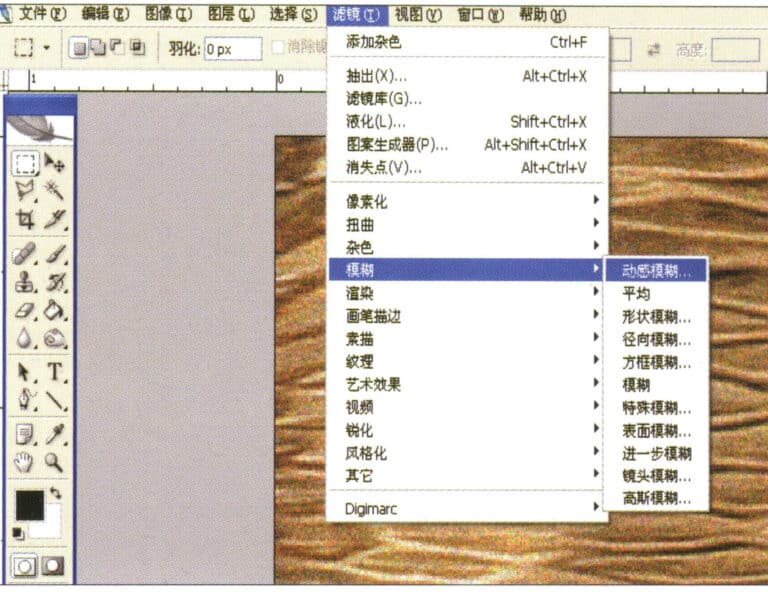
2. Select "Filter" > "Blur" > "Motion Blur" from the menu bar
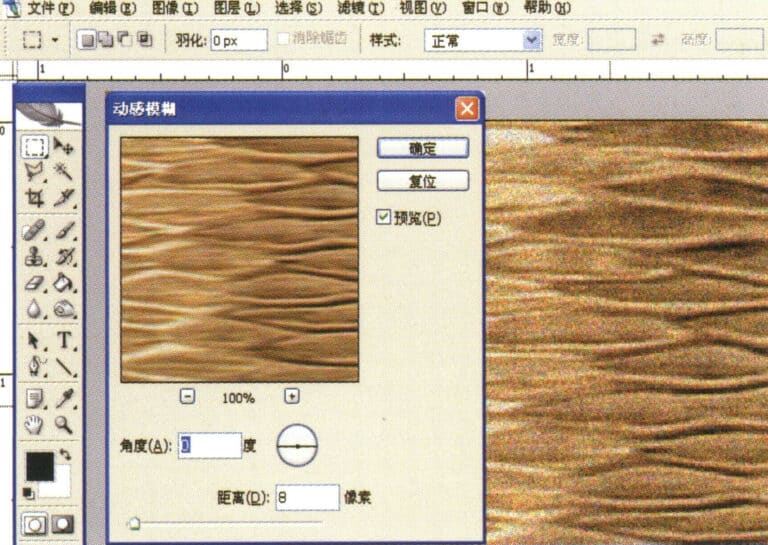
3. Siirry "Motion Blur" -valintaikkunaan, syötä tarvittavat arvot ja vahvista.
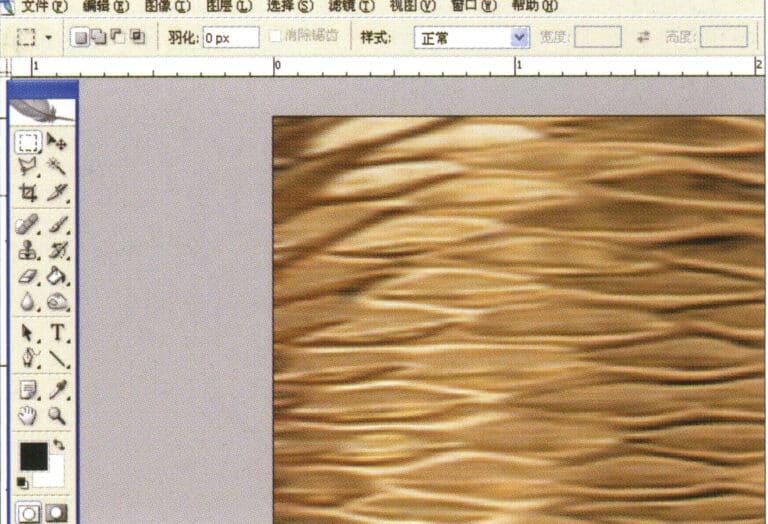
4. Näytä kuva liikesumennuksen jälkeen
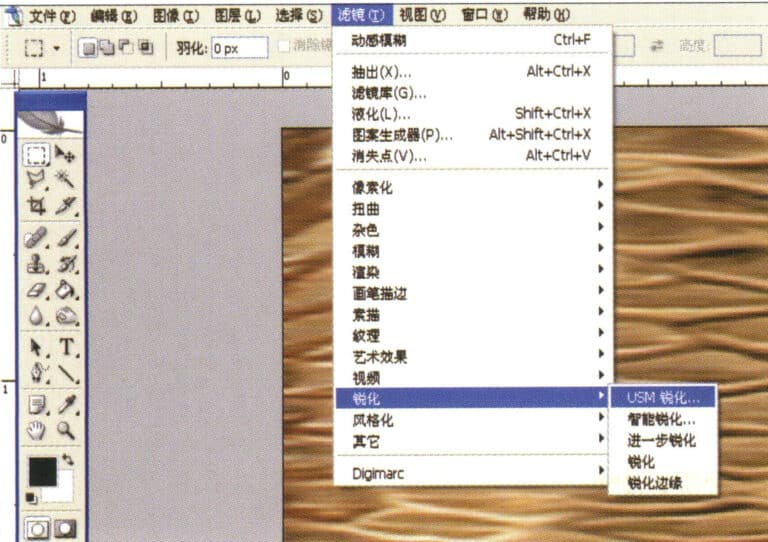
5. Select "Filter" > "Sharpen" > "USM Sharpening" from the menu bar
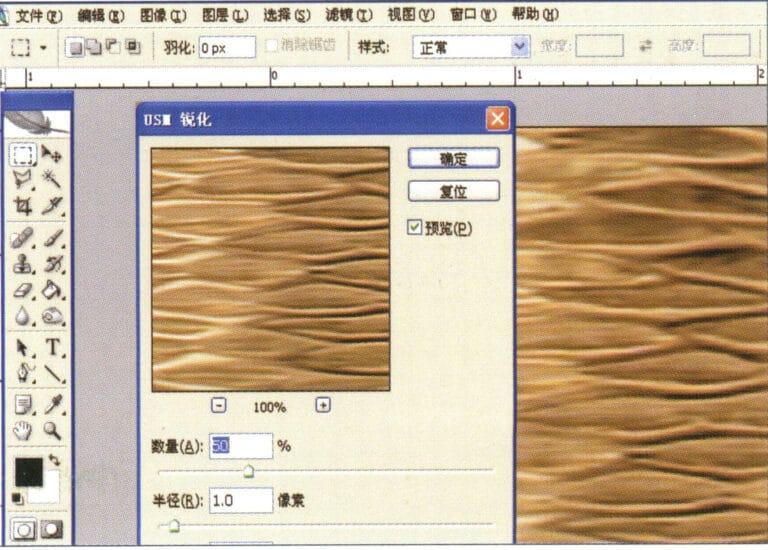
6. Siirry "USM Sharpening" -valintaikkunaan, syötä tarvittavat arvot ja vahvista.
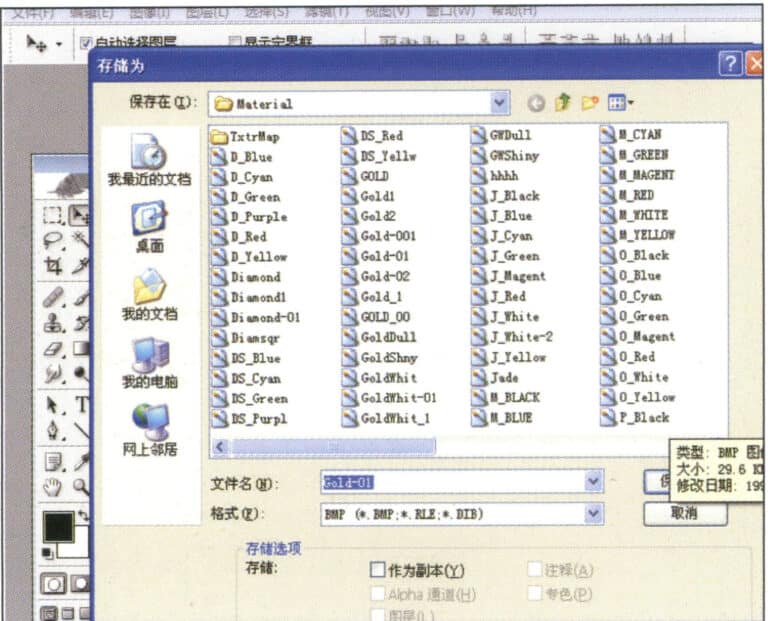
7. Store the document in the "JewelCAD" > "Material" folder and save it in "BMP" format
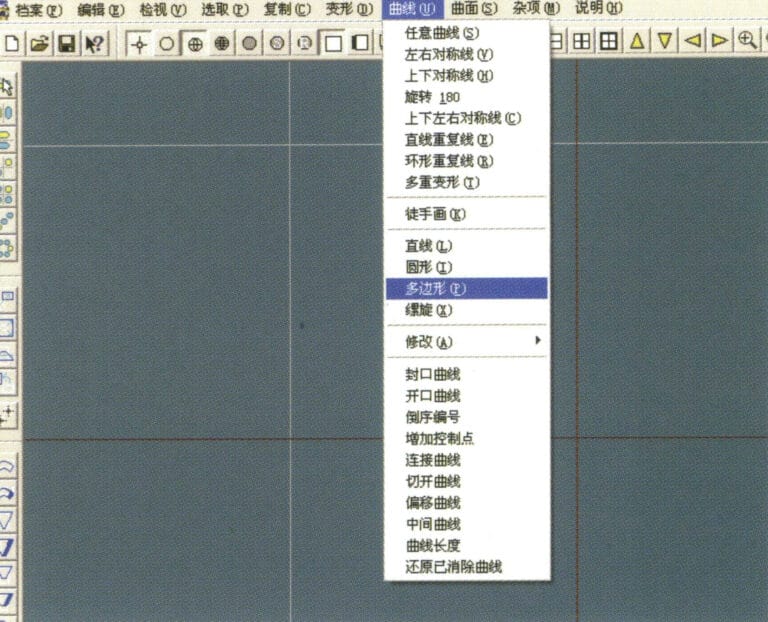
8. In JewelCAD, create a new file, select "Curve" > "Polygon" from the menu bar
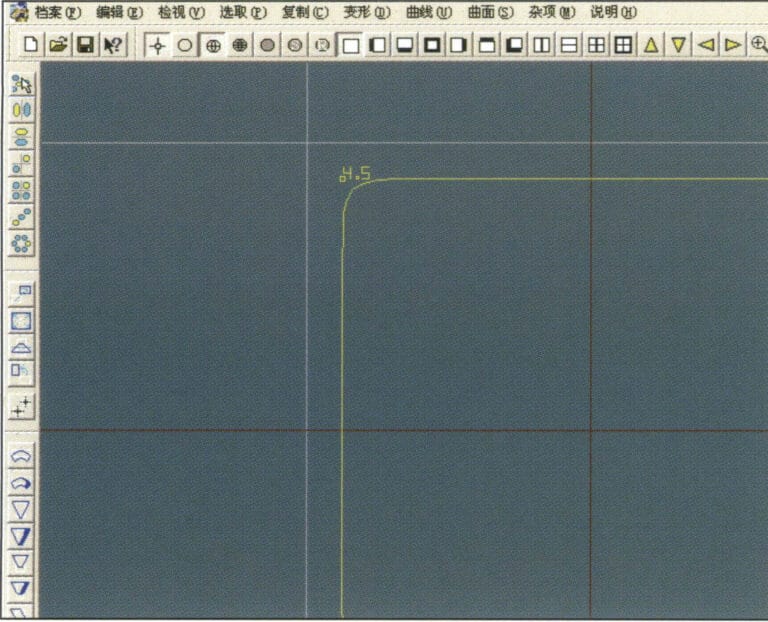
9. Käytä "monikulmio" piirtääksesi neliön.
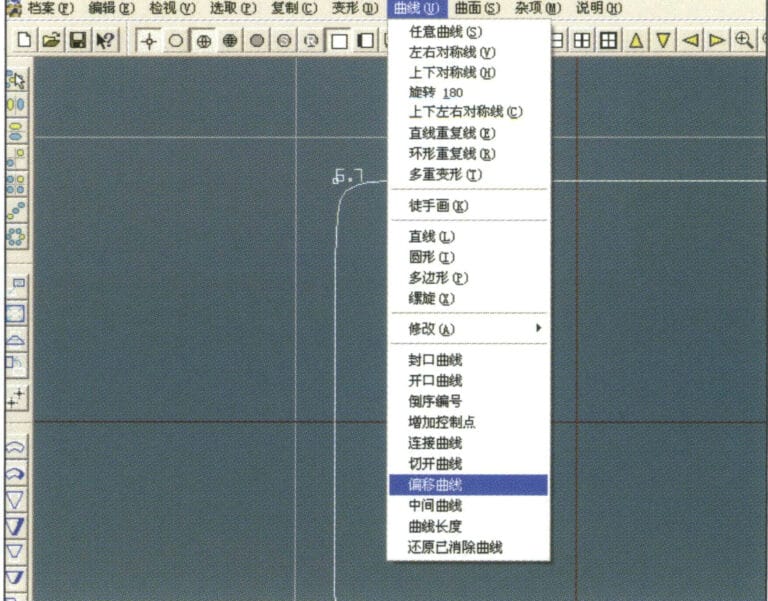
10. Select "Curve" > "Offset Curve" from the menu bar
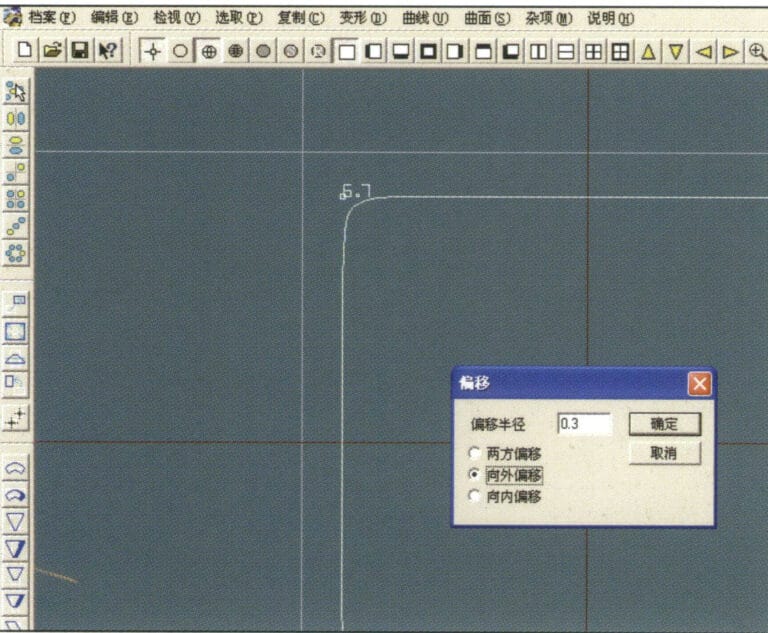
11. Siirry "Offset Curve" -valintaikkunaan, syötä tarvittavat arvot ja vahvista.
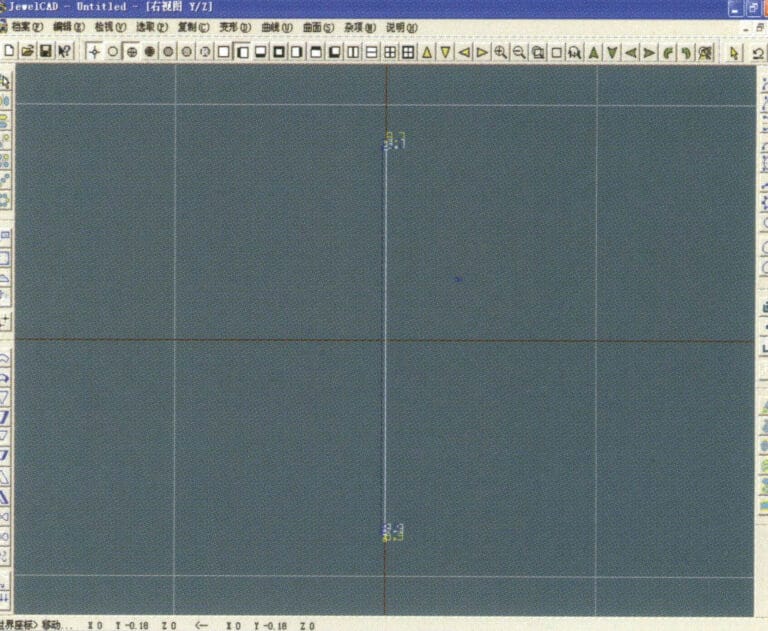
12. Vaikutuskaavio offset-käyrän näyttämisen jälkeen
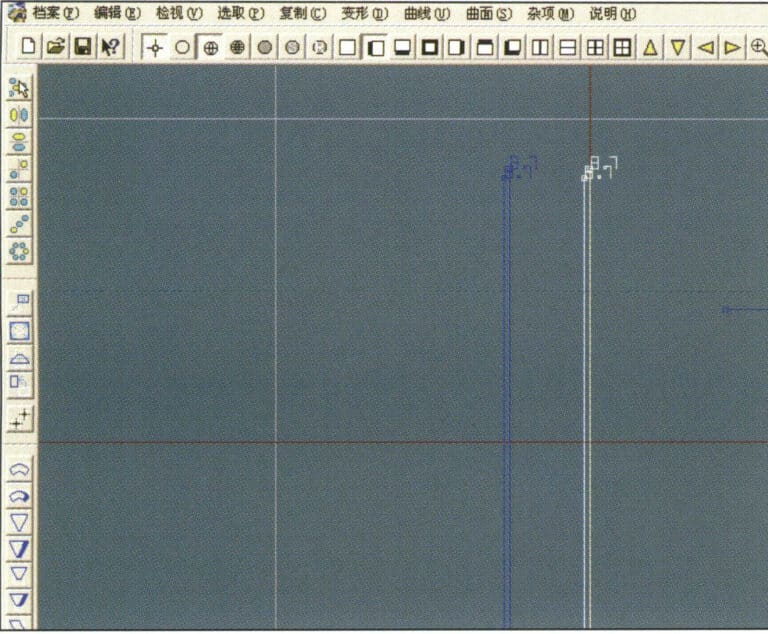
13. Select "Deformation" > "Move" from the menu bar to move the selected curve
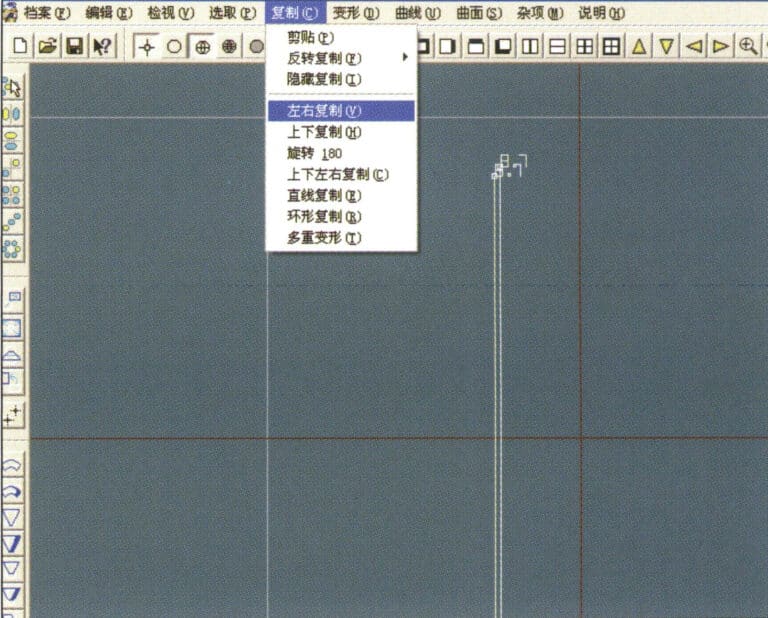
14. Select "Copy" > "Copy Left and Right" from the menu bar to copy the selected curve to the left and right
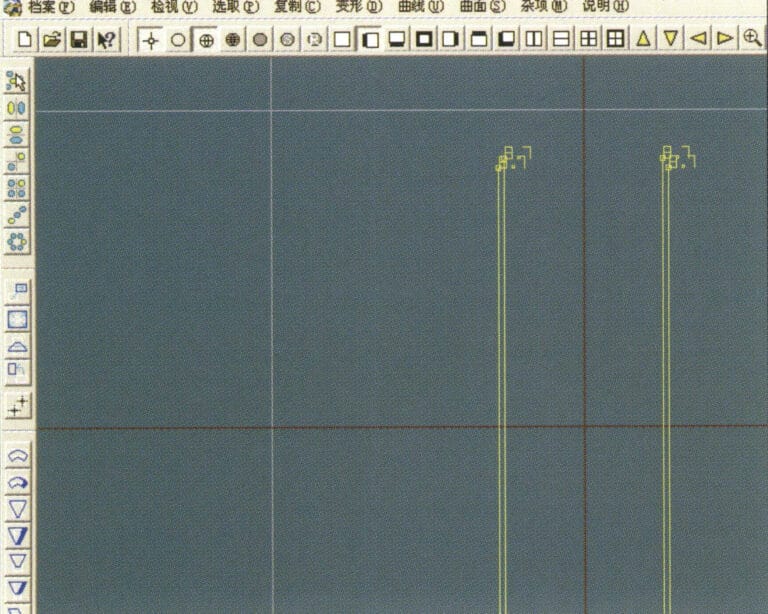
15. Näytä tehostekuvat vasemman ja oikean puolen kopioinnin jälkeen.
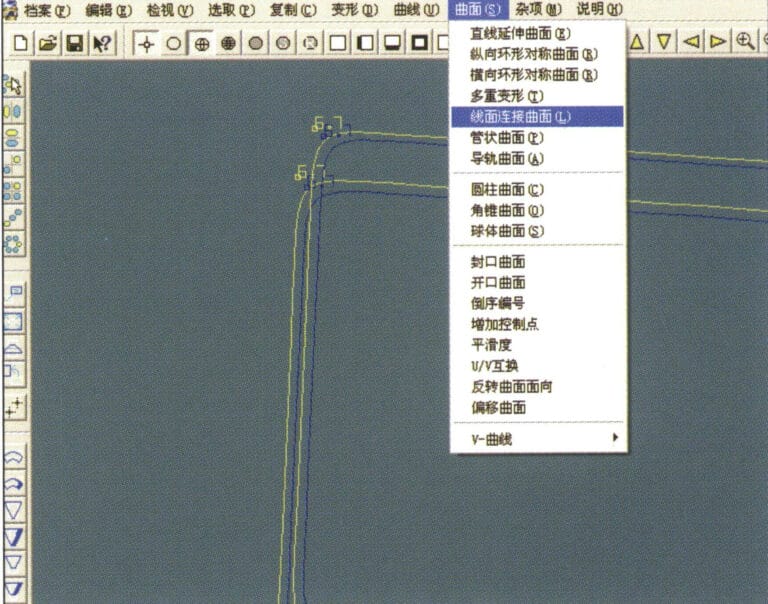
16. Select "Surface" > "Line-Surface Connection Surface" from the menu bar, and select the curve/surface to create a line-surface connection surface
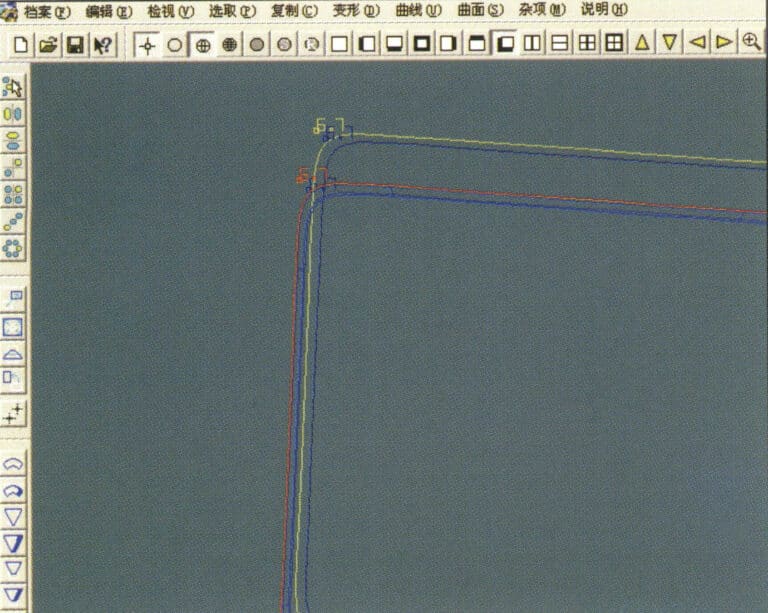
17. Select the menu bar "Surface" > "Curve Surface Connection," and double-click the first and second curves/surfaces with the left mouse button in a clockwise direction to create a curve surface connection
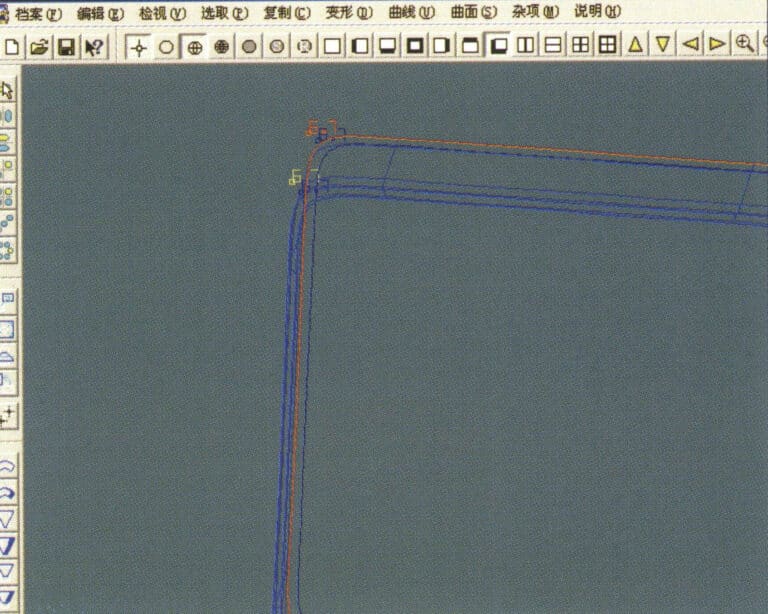
18. Kaksoisnapsauta kolmatta käyrää/pintaa hiiren vasemmalla painikkeella myötäpäivään luodaksesi viiva-pinta-yhteyden.
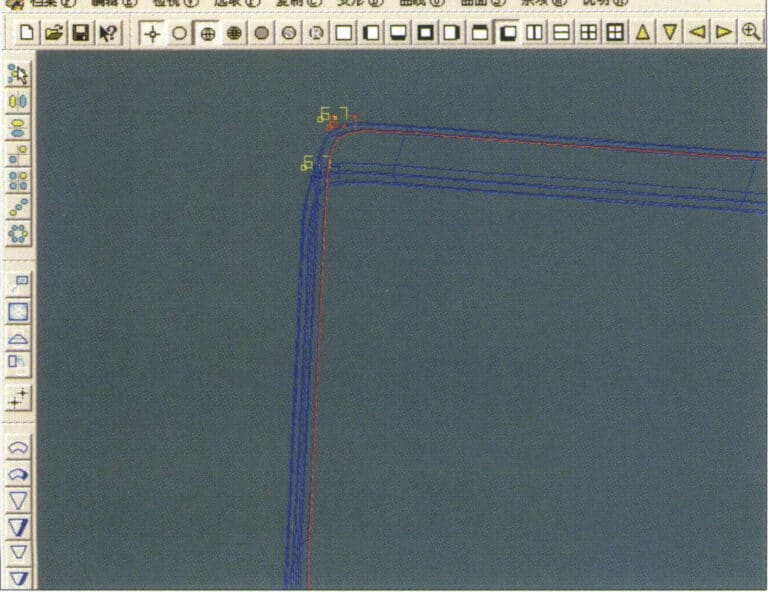
19. Jatka myötäpäivään; kaksoisnapsauta neljättä käyrää/pintaa hiiren vasemmalla painikkeella luodaksesi viiva-pinta-yhteyden.
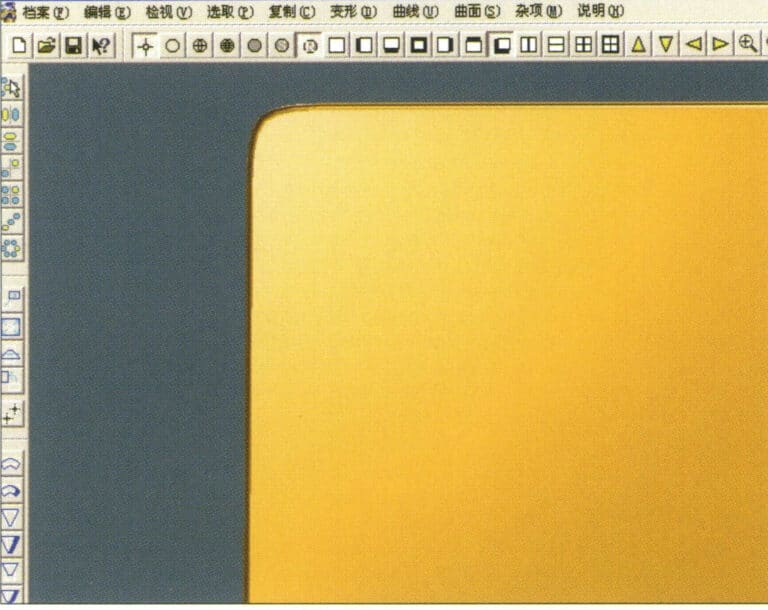
20. Select "View" > "Shadow Map" from the menu bar to inspect the shadow effects
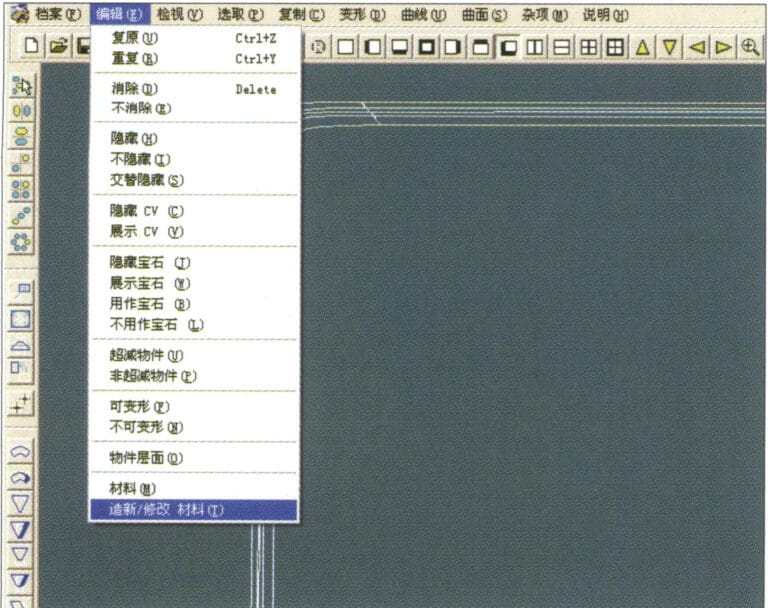
21. Select "Edit" > "Create/Modify Material" from the menu bar
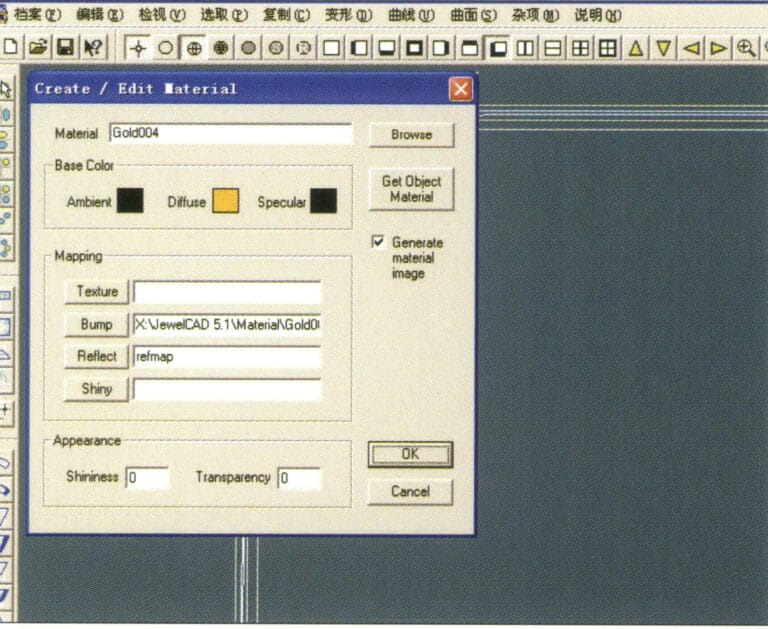
22. Siirry "Create/Modify Material" -valintaikkunaan, syötä tarvittavat arvot ja vahvista.
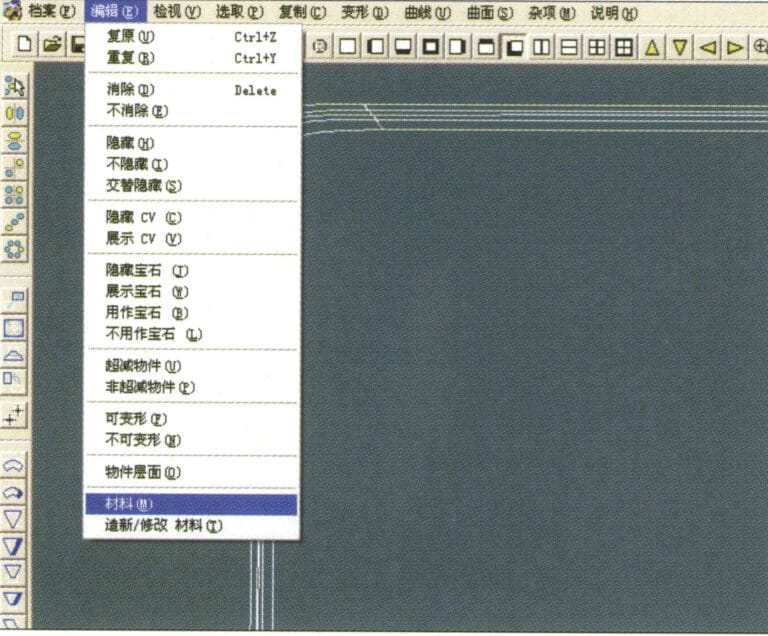
23. Select “Edit” > “Material” in the menu bar
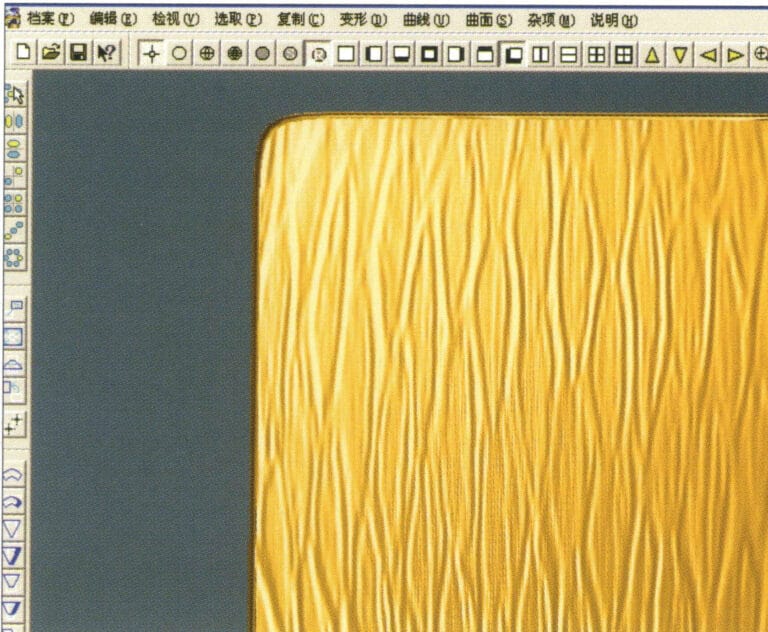
24. Select "View" > "Shadow Map" from the menu bar to examine the shadow effects
25. Select "File" > "Save As" from the menu bar to save the file
4. Koneistettu viimeistely
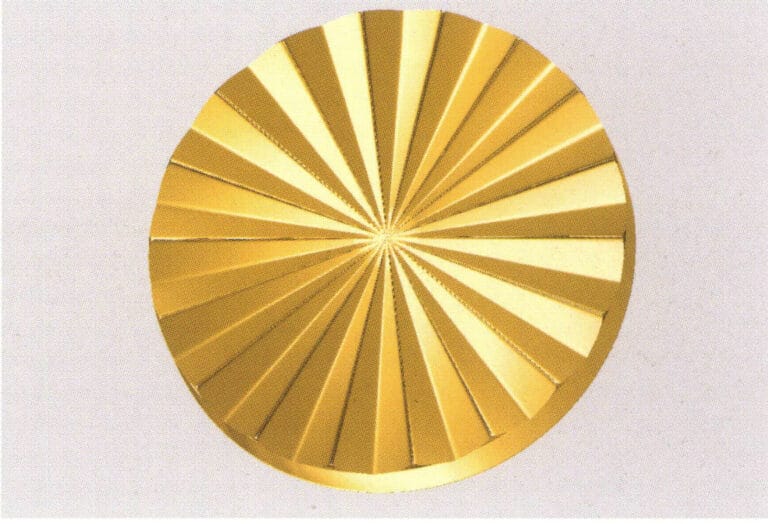

1. Create a new file in JewelCAD, select "Curve" > "Circular Curve" from the menu bar, enter the relevant values in the "Circular Curve" dialog box, and confirm
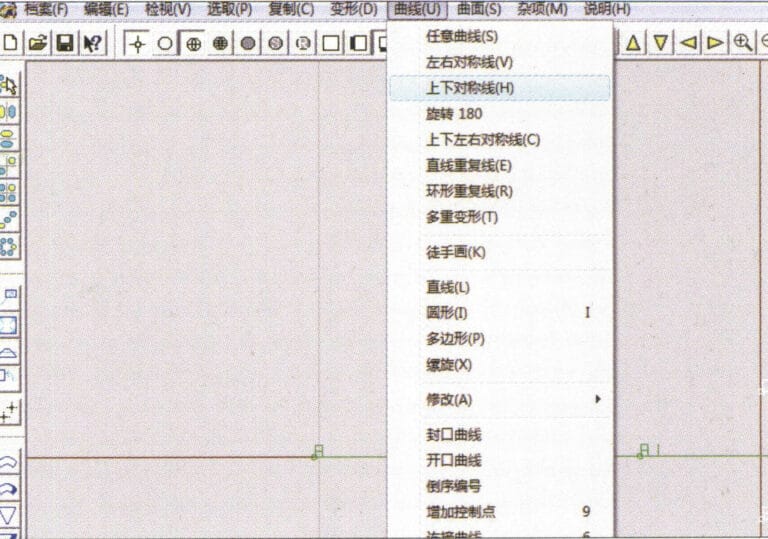
2. Select "Curve" > "Left-Right Symmetry Line" from the menu bar to draw a section
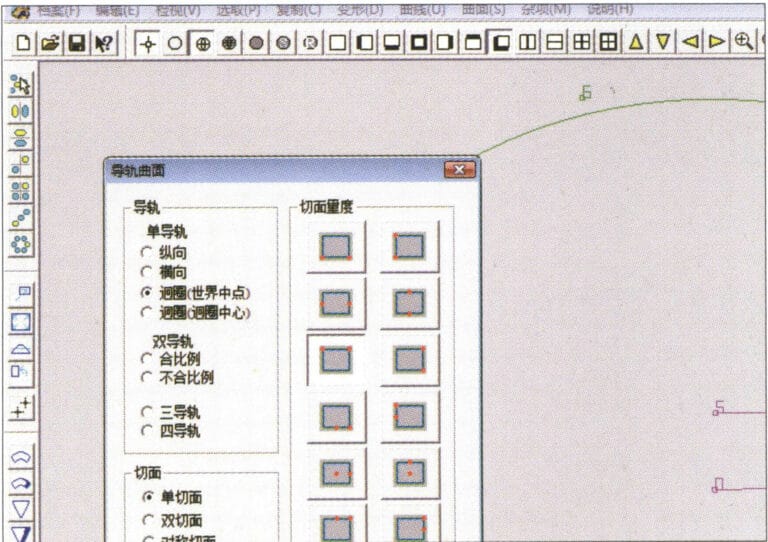
3. Select "Surface" > "Rail Surface" from the menu bar, enter "Rail Surface," select the relevant options and confirm; left-click on a curve as the section of the rail surface; left-click on another curve as the "Rail" > "Finish."

4. Select “View” > “Shadow Map” on the menu bar to view the light and shadow effects
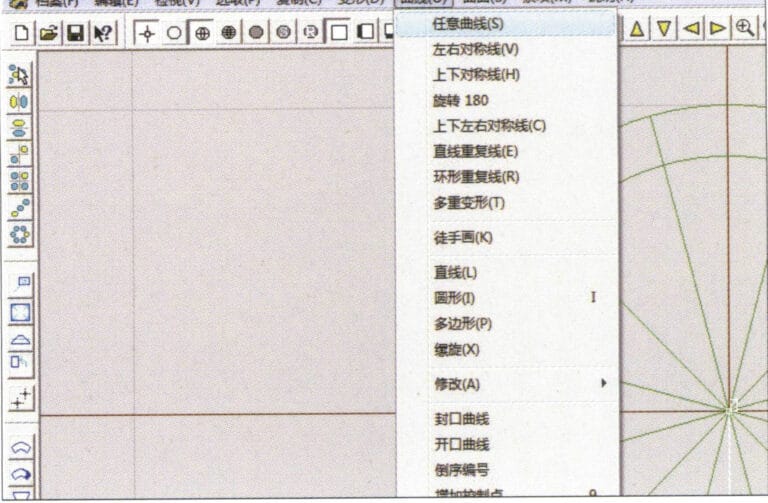
5. Select "Curve" > "Freefrom Curve" from the menu bar
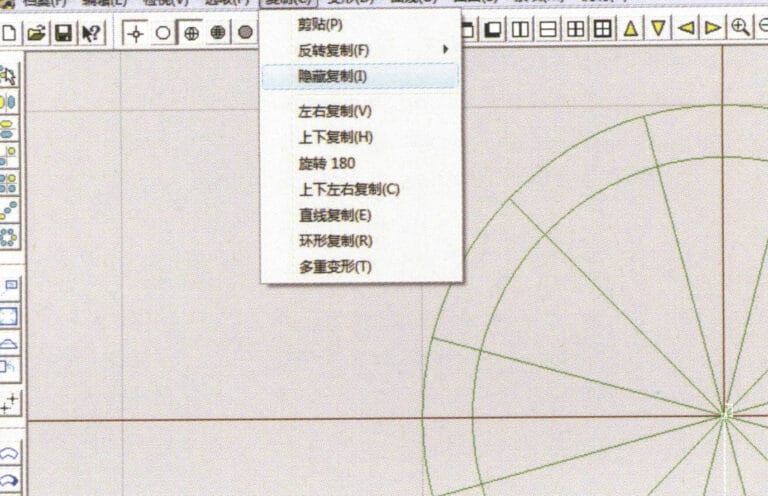
6. Select "Copy" > "Hide Copy" from the menu bar
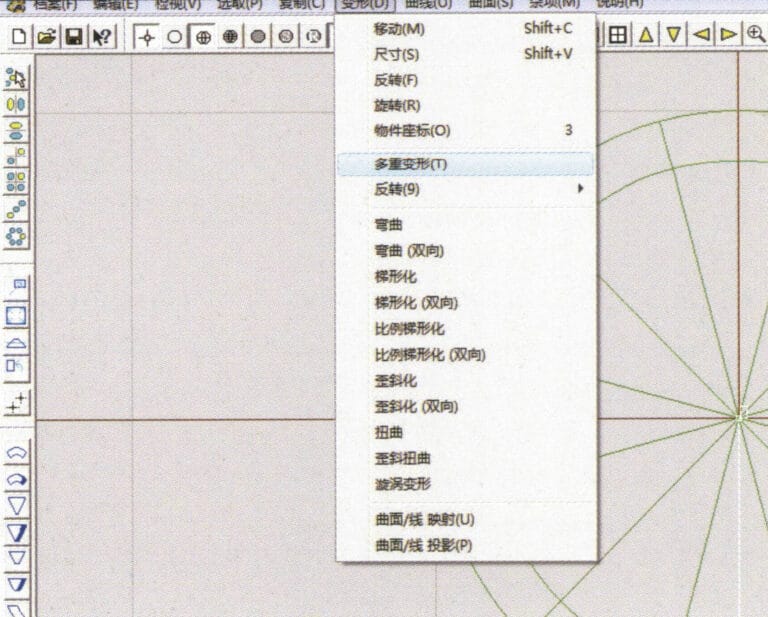
7. Select "Deformation" > "Multiple Deformation" from the menu bar
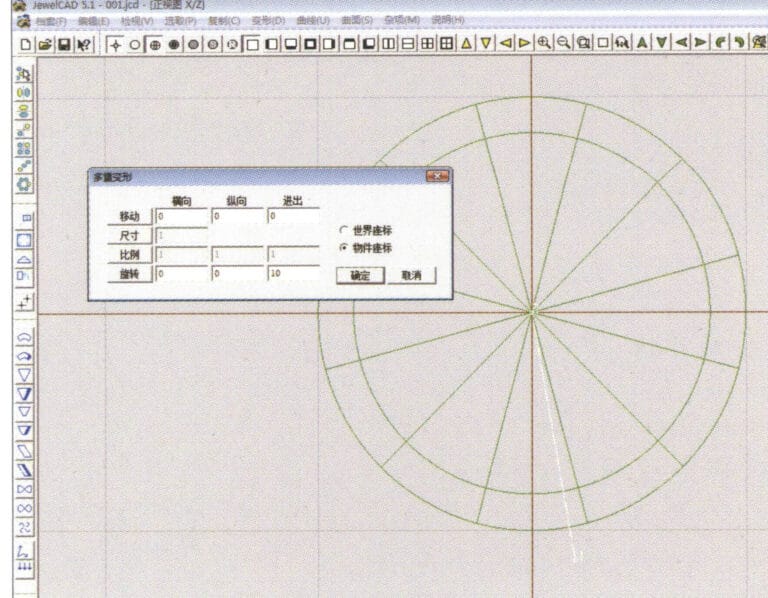
8. Siirry "Multiple Deformation" -valintaikkunaan ja syötä tarvittavat arvot.
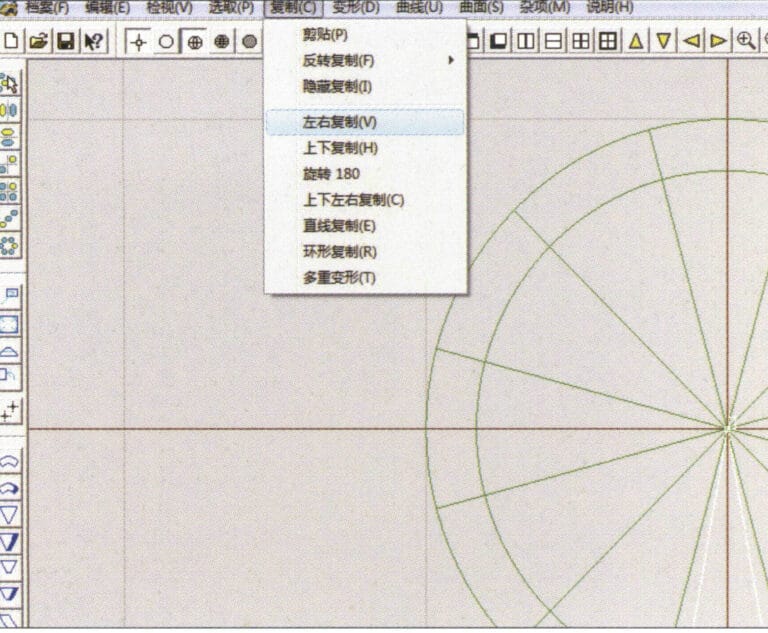
9. Select “Copy” > “Left/Right Copy” on the menu bar
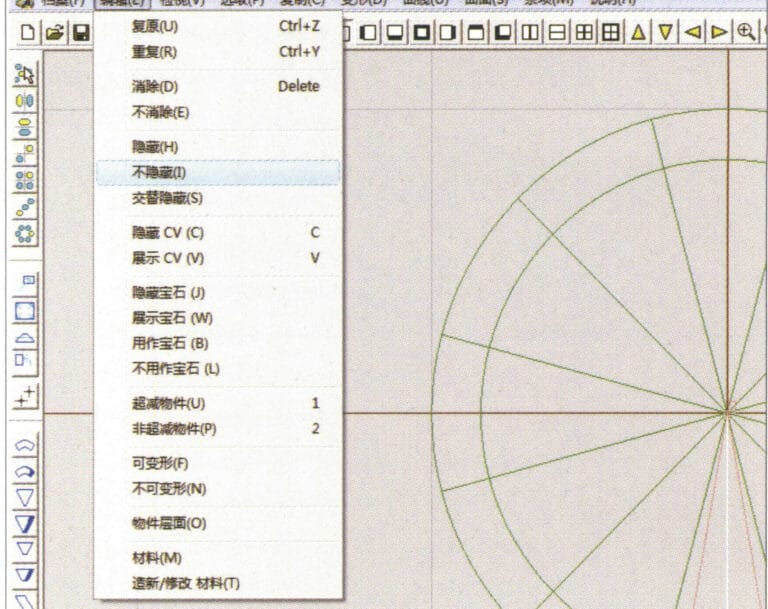
10. Select "Edit" > "Unhide" from the menu bar to display the hidden curves
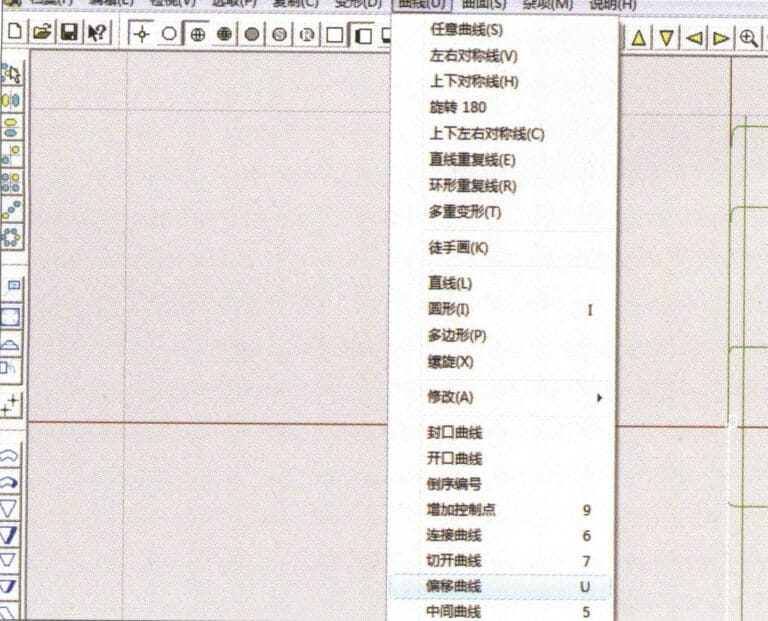
11. Select "Curve" > "Offset Curve" from the menu bar
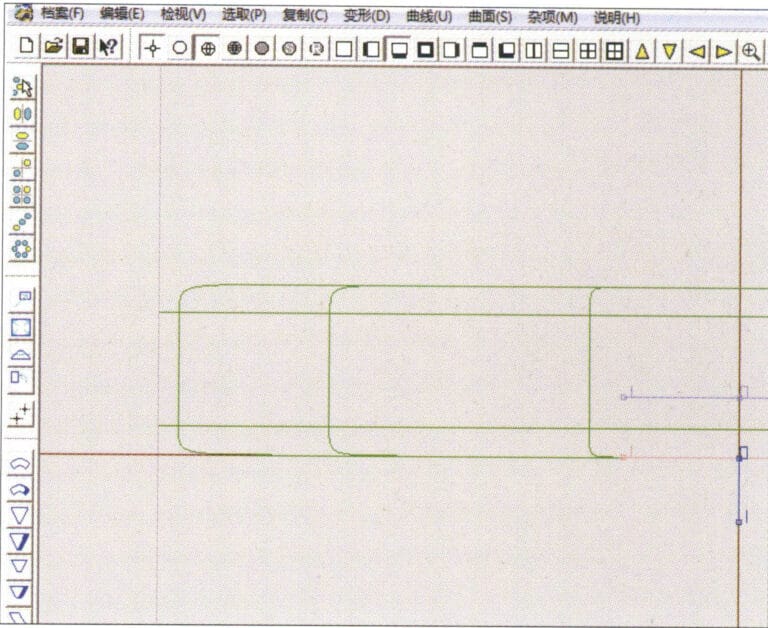
12. Select "Deformation" > "Move" from the menu bar to move the selected curve
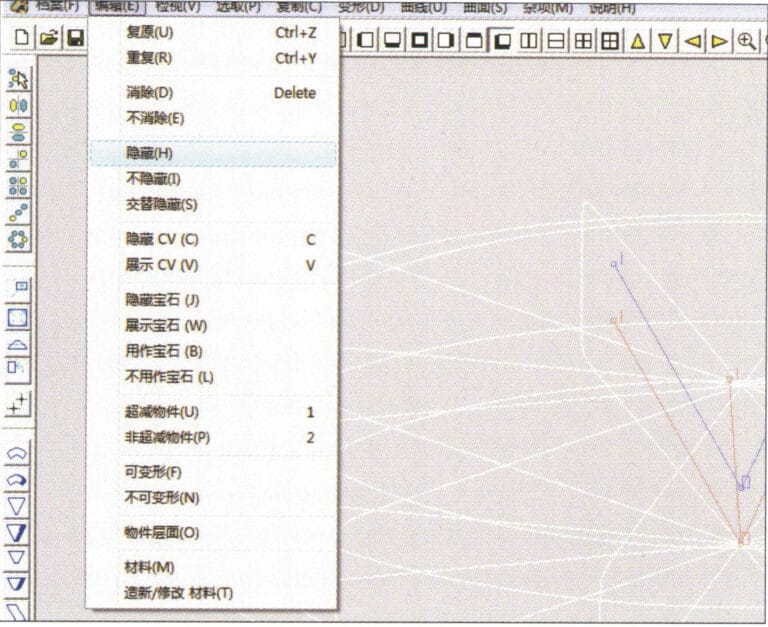
13. Select "Edit" > "Hide" from the menu bar to hide the circular surface
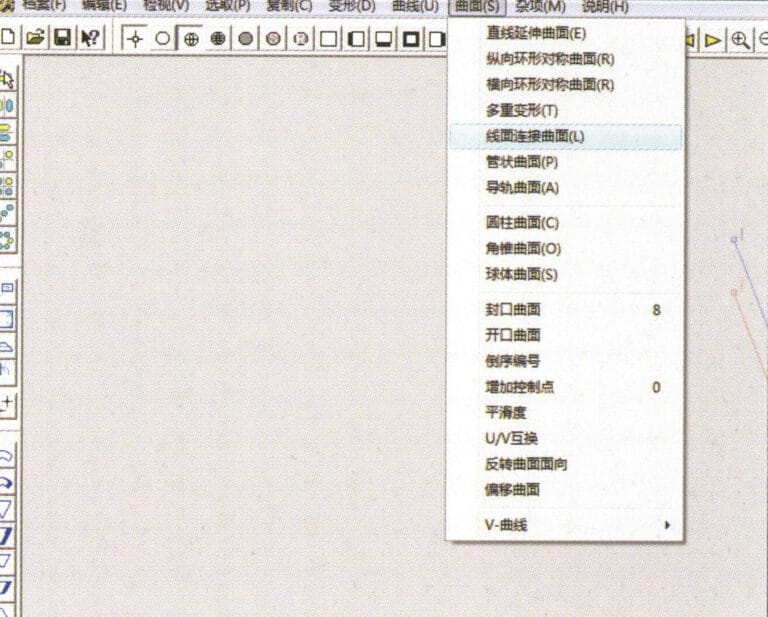
14. Select "Surface" > "Line Surface Connection Surface" from the menu bar

15. Valitse käyrät/pinnat myötäpäivään luodaksesi viiva-pinta-liitoksia ja valitse sitten valikkoriviltä seuraavat vaihtoehdot
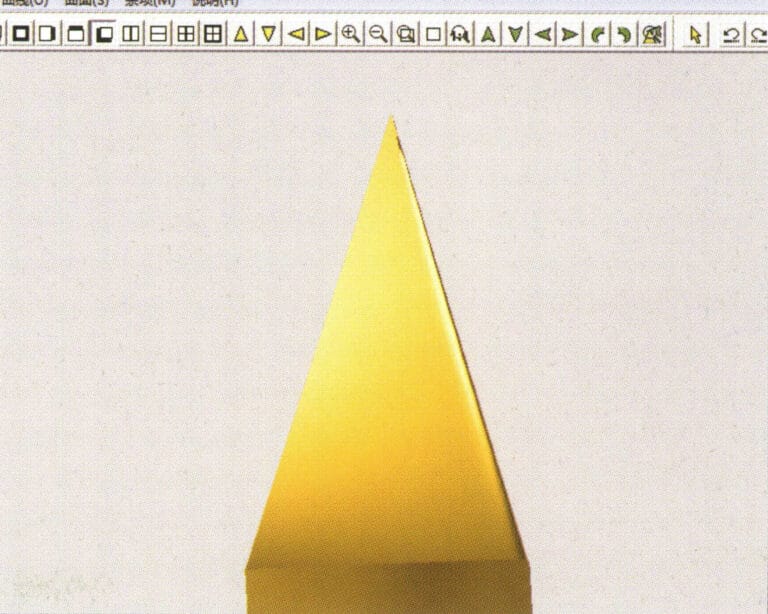
16. Select "View" > "Shadow Map" from the menu bar to inspect the shadow effects
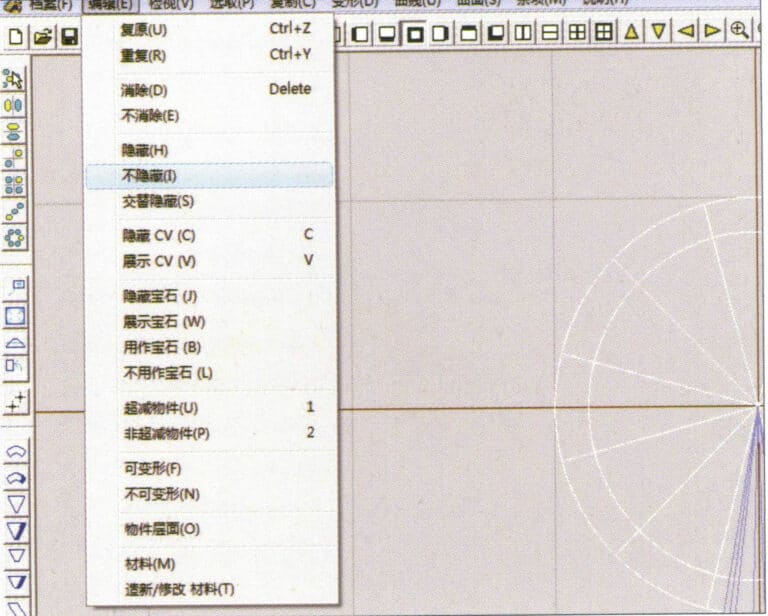
17. Select "Edit" > "Unhide" from the menu bar to display the hidden circular surfaces
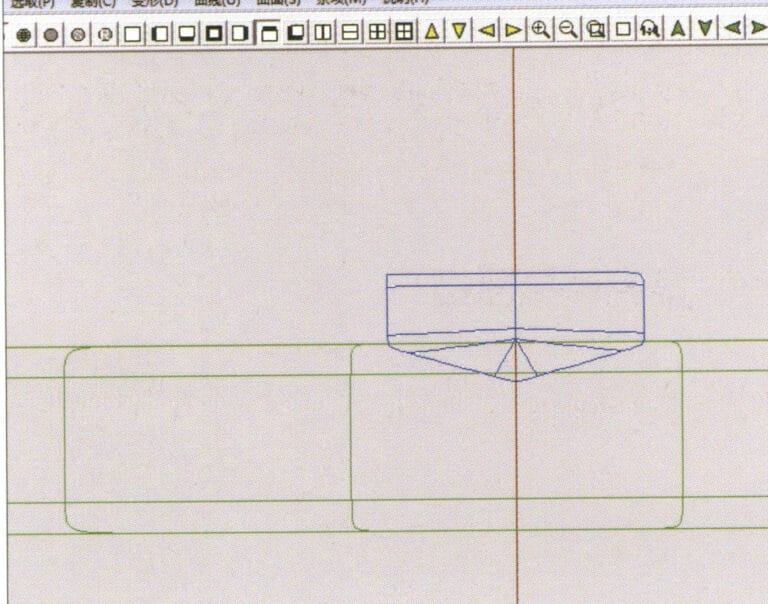
18. Select "Deformation" > "Move" from the menu bar to move the selected surface
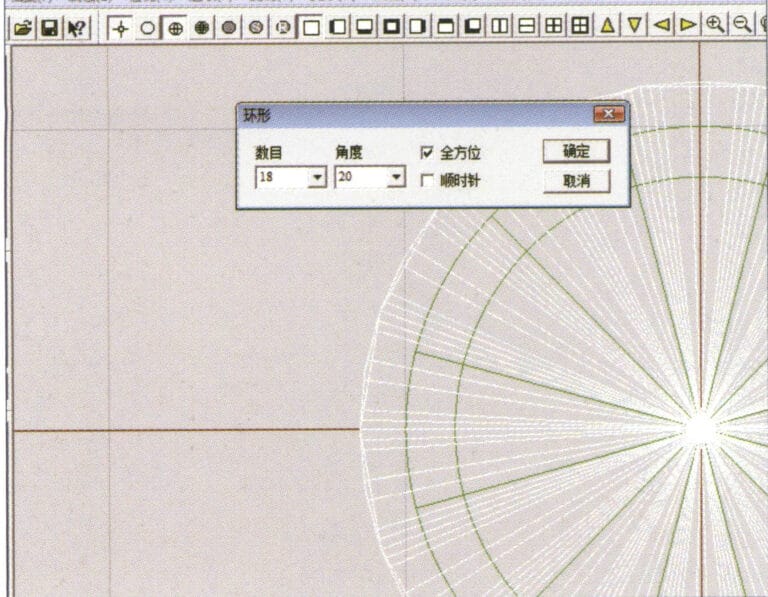
19. Select "Copy" > "Circular Copy" from the menu bar, enter the relevant values and confirm

20. Select “Miscellaneous” > “Boolean” > “Integrate” on the menu bar to integrate the selected surfaces.
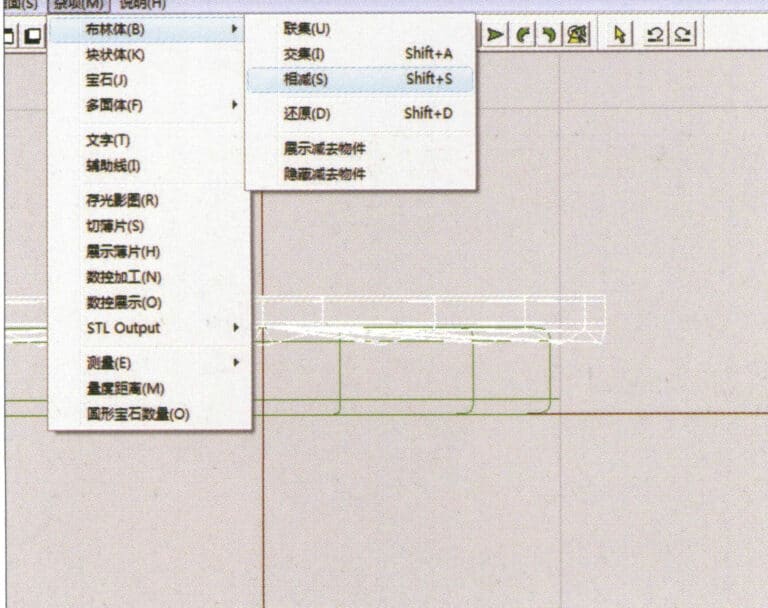
21. Select "Miscellaneous" > "Boolean" > "Subtract" from the menu bar to subtract the selected surface from the already united surface
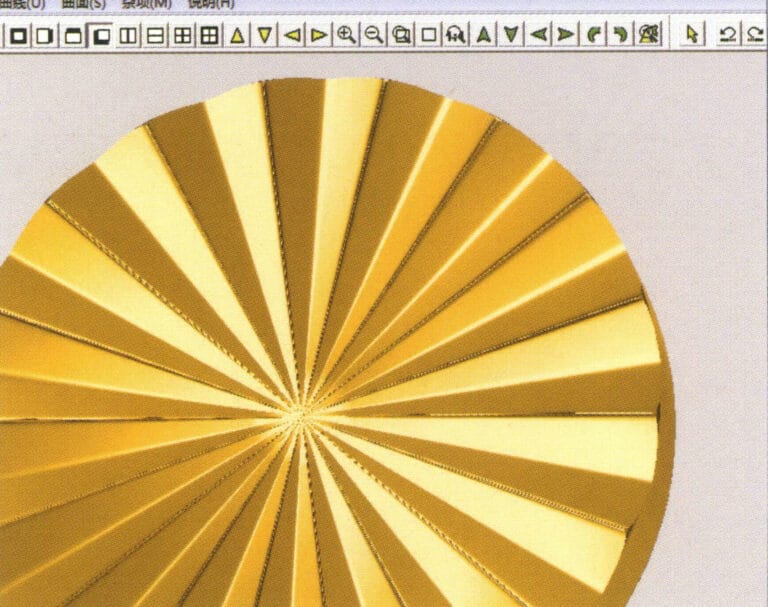
22. Select "View" > "Shadow Map" from the menu bar to inspect the shadow effects.
23. Select "File" > "Save File" from the menu bar to save the document
Jakso III JewelCADin käyttäminen korutehosteiden luomiseen
1. Timantilla sorvattu sormus
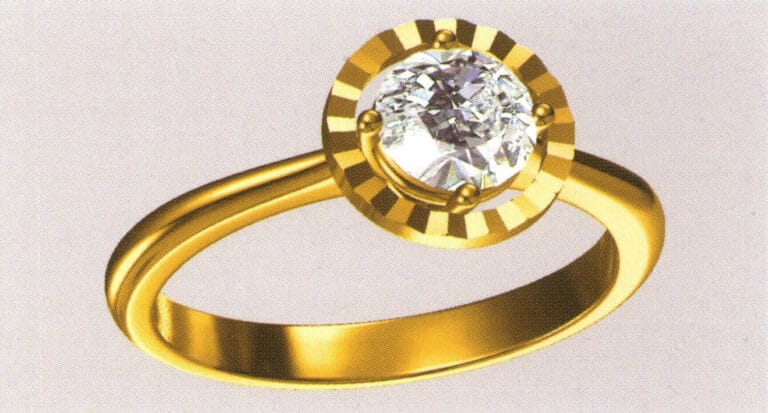
Tuotannon vaiheet ovat seuraavat:
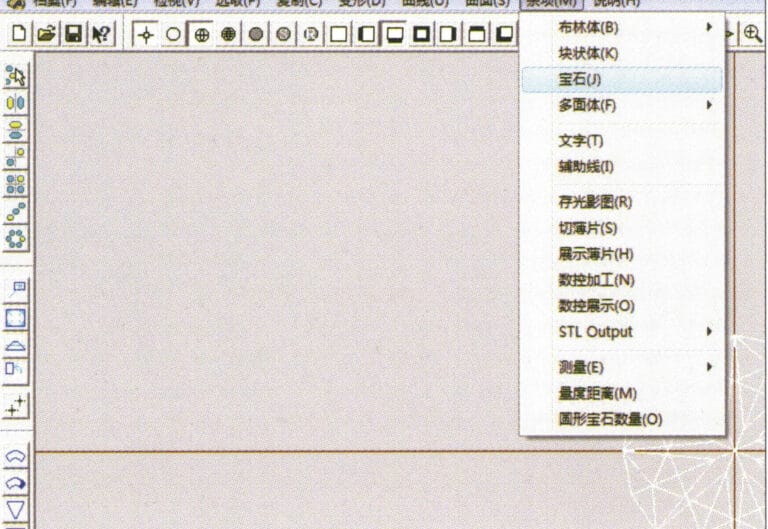
1. Create a new file in JewelCAD, select "Miscellaneous" > "Gem" from the menu bar

2. Select "Deformation" > "Multiple Deformation" from the menu bar
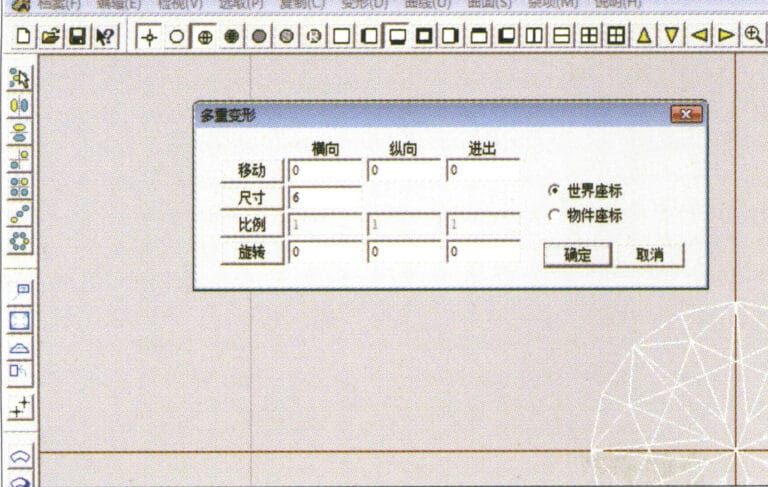
3. Siirry "Multiple Deformation" -valintaikkunaan, syötä tarvittavat arvot ja vahvista.
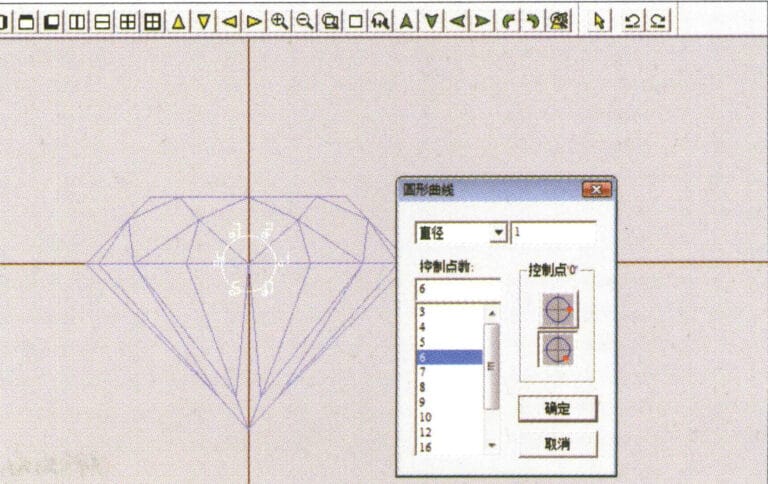
4. Select “Curve” > “Circular Curve” in the menu bar to enter the “Circular Curve” dialog box, enter the relevant values and confirm
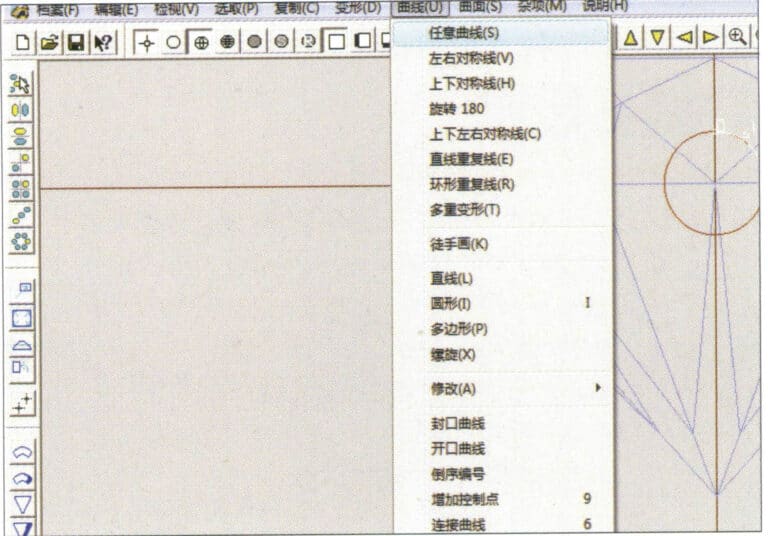
5. Select "Curve" > "Freeform Curve" from the menu bar to draw a claw-shaped guideline
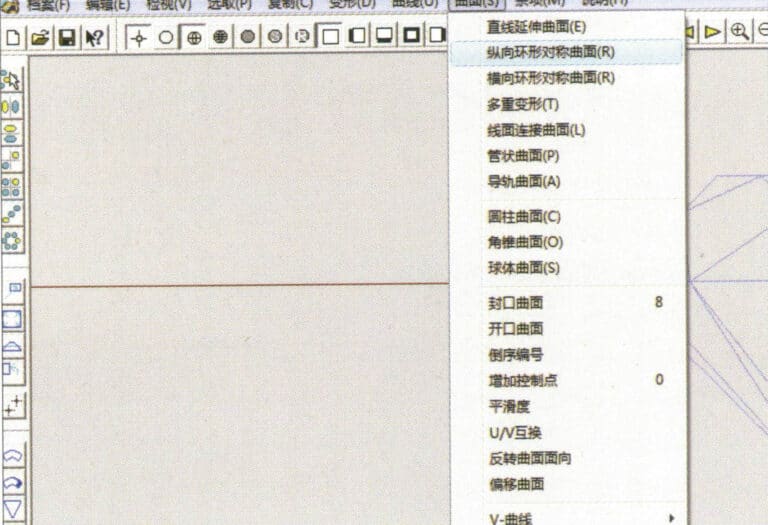
6. Select "Surface" > "Longitudinal Annular Symmetrical Surface" from the menu bar, and draw a claw shape
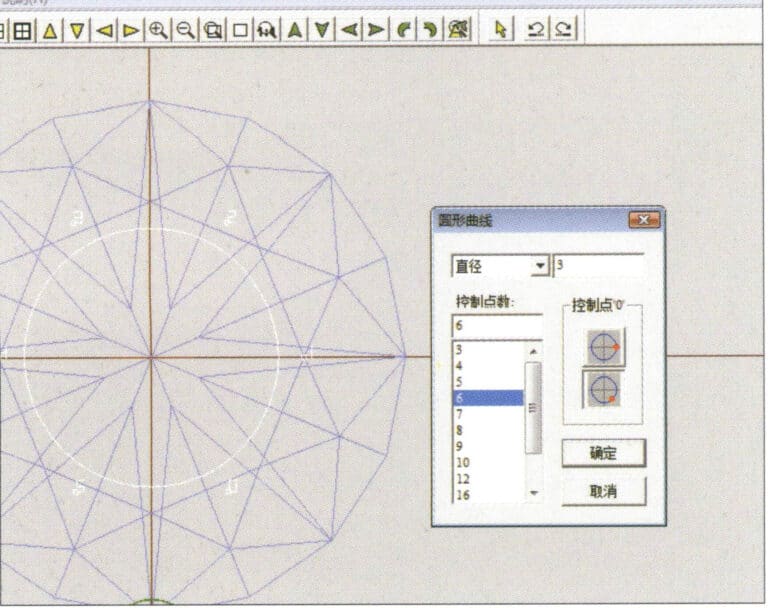
7. Select "Curve" > "Circular Curve" from the menu bar, enter the relevant values in the "Circular Curve" dialog box and confirm
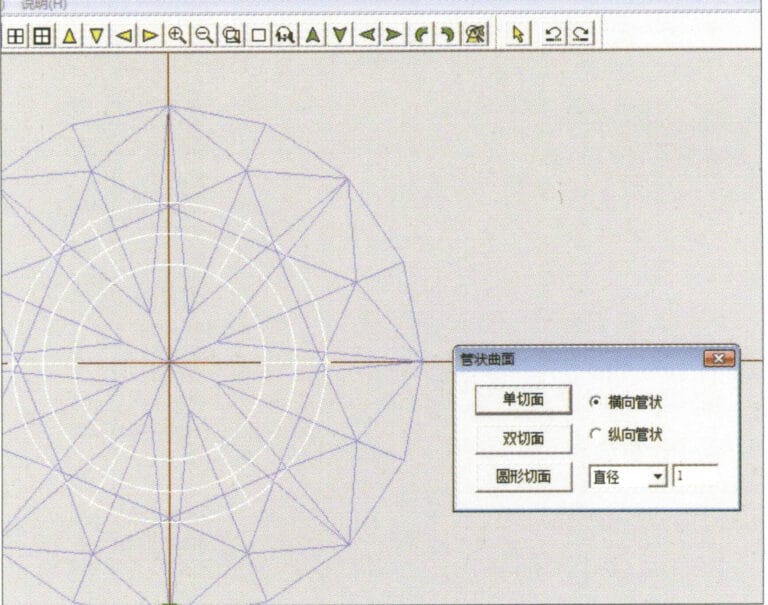
8. Select "Surface" > "Tubular Surface" from the menu bar, enter the relevant values and confirm
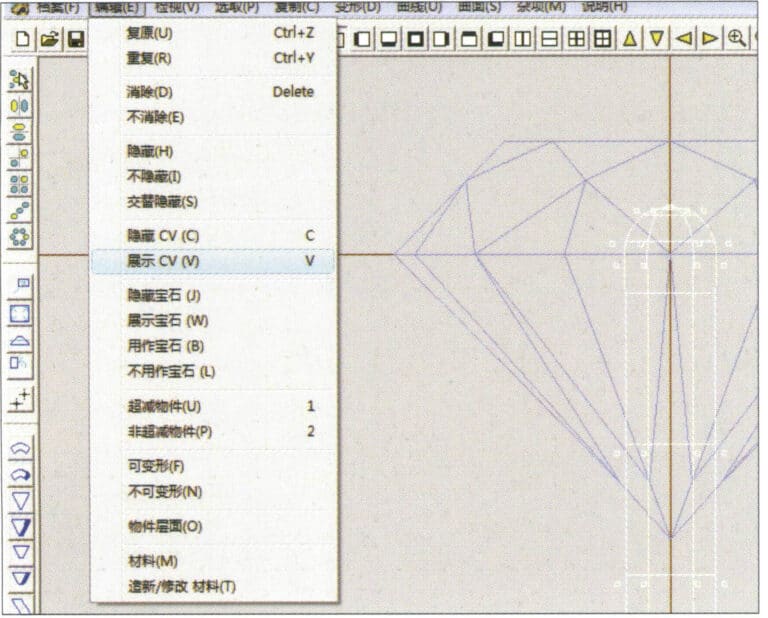
9. Select “Edit” > “Show CV” in the menu bar
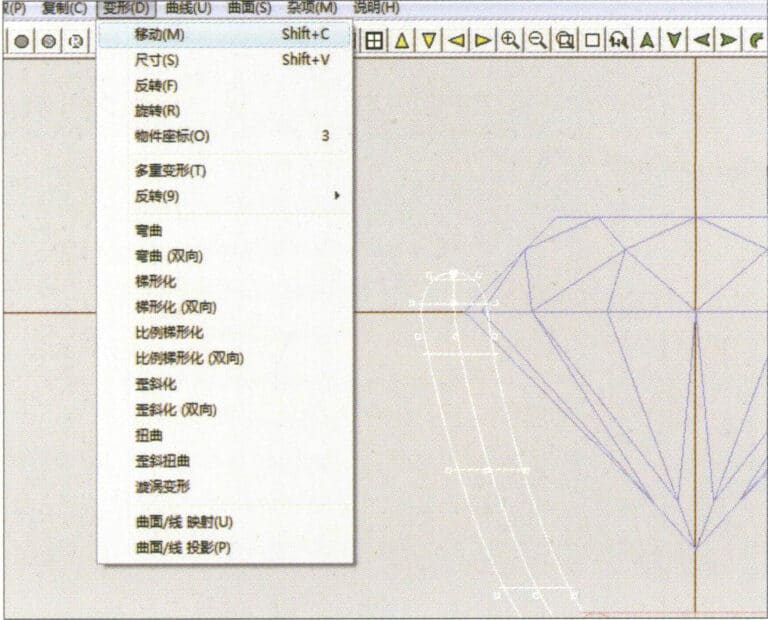
10. Select “Deformation” > “Move” in the menu bar to move the CV
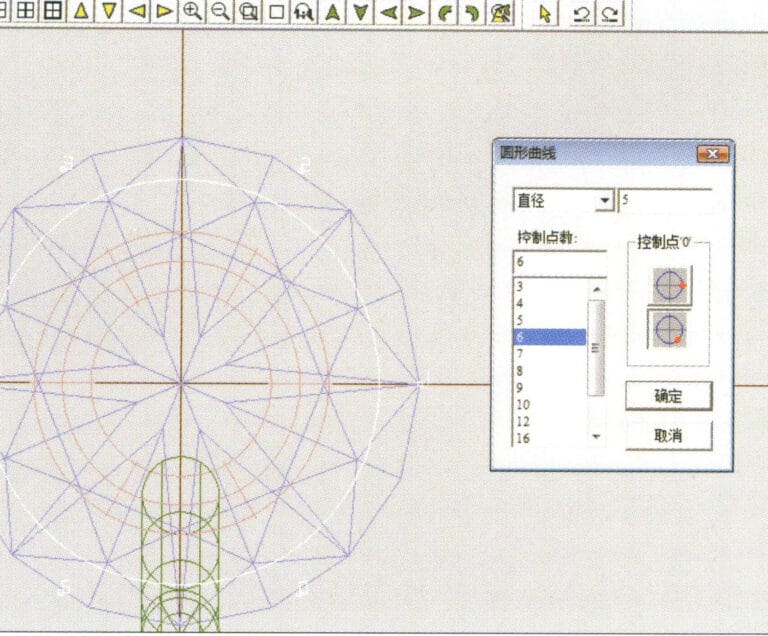
11. Select "Curve" > "Circular Curve" from the menu bar, enter the relevant values in the "Circular Curve" dialog box and confirm
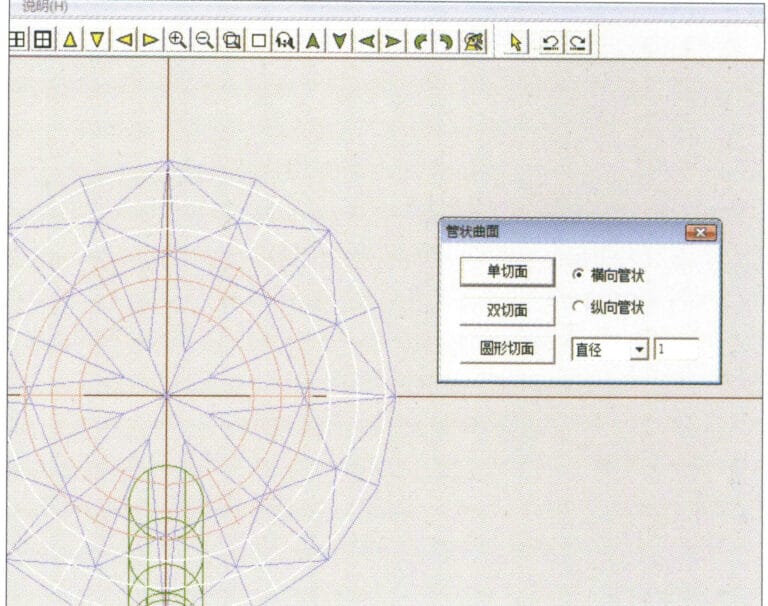
12. Select "Surface" > "Tubular Surface" from the menu bar, enter the relevant values and confirm
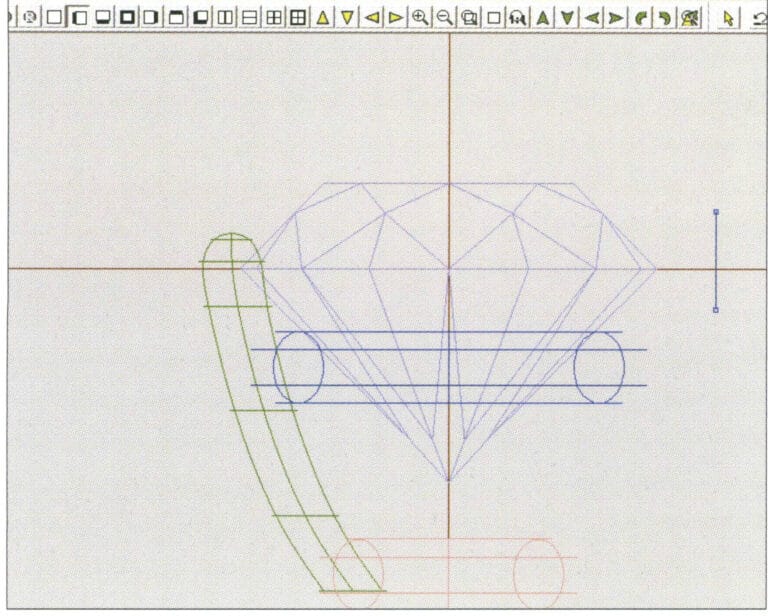
13. Select the menu bar "Edit" > "Move" to move the selected graphic

14. Select the completed claw shape, choose "Copy" > "Circular Copy" from the menu, enter the relevant values in the "Circular Copy" dialog box and confirm
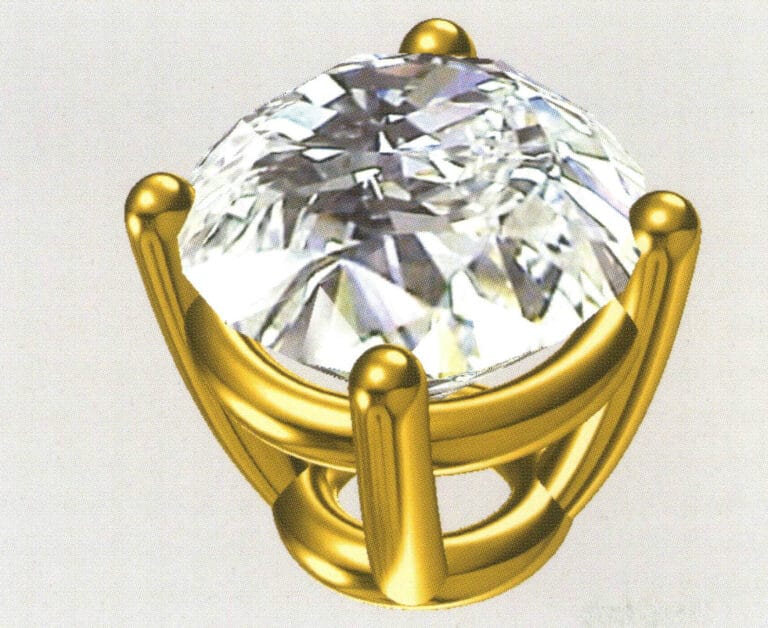
15. Select "View" > "Shadow Map" from the menu bar to inspect the shadow effects
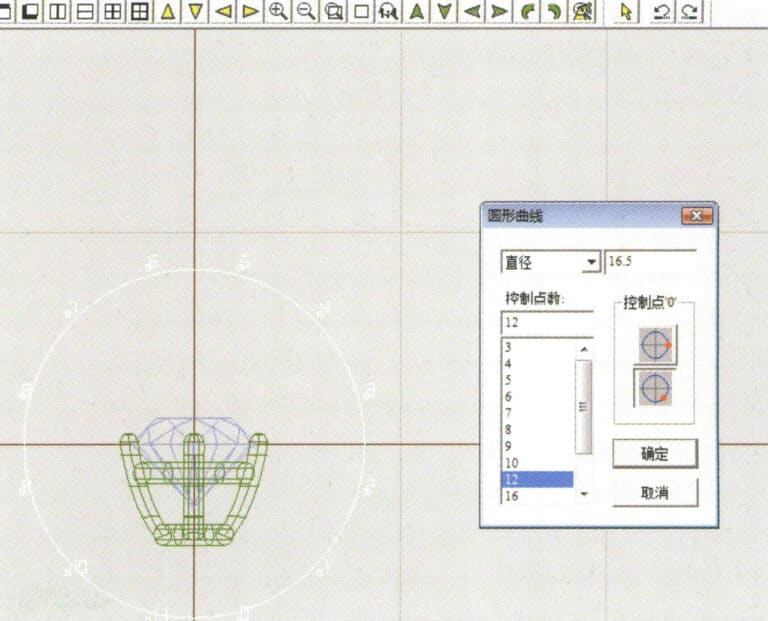
16. Select "Curve" > "Circular Curve" from the menu bar, enter the "Circular Curve" dialog box, and input the relevant values as the inner diameter of the ring shank
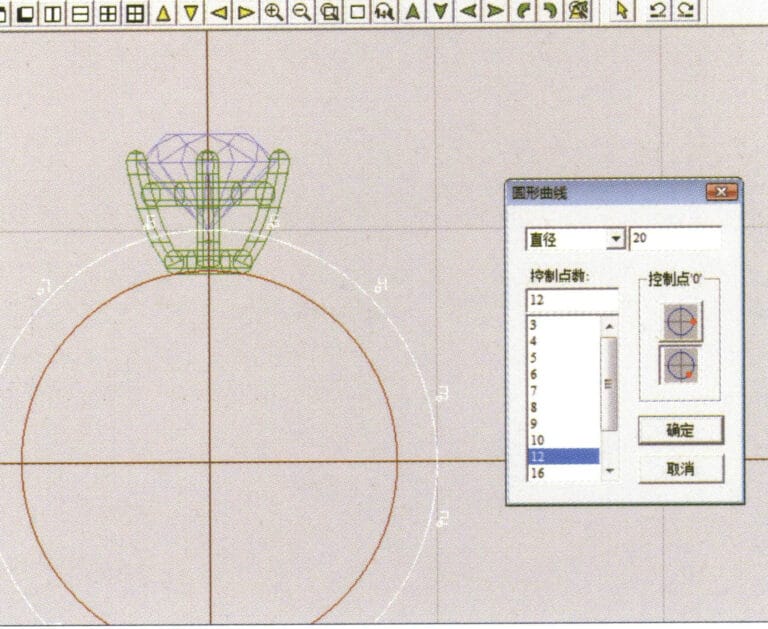
17. Select "Curve" > "Circular Curve" from the menu bar, enter the "Circular Curve" dialog box, and input the relevant values as the outer diameter of the ring shank

18. Select "Curve" > "Circular Curve" from the menu bar, enter the "Circular Curve" dialog box, and input the relevant values as the outer diameter of the engine-turned band
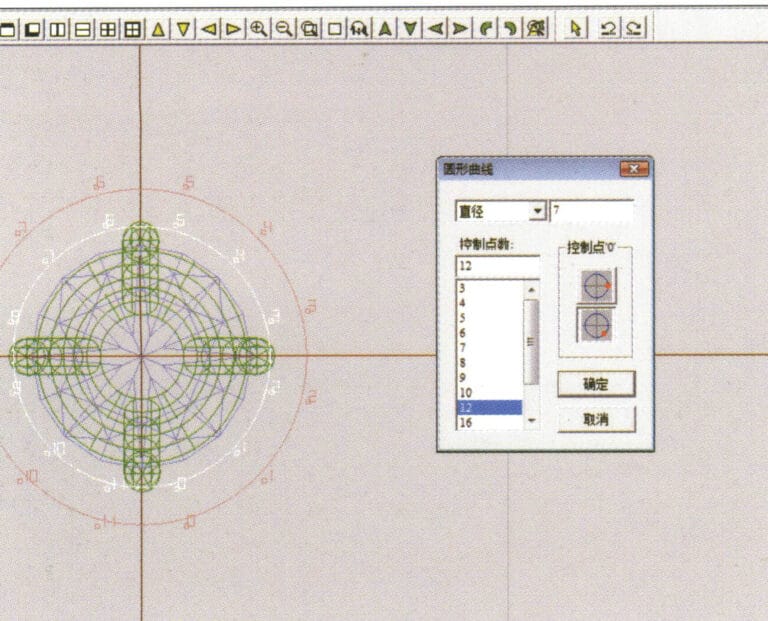
19. Select "Curve" > "Circular Curve" from the menu bar, enter the "Circular Curve" dialog box, and input the relevant values as the inner diameter of the engine-turned band
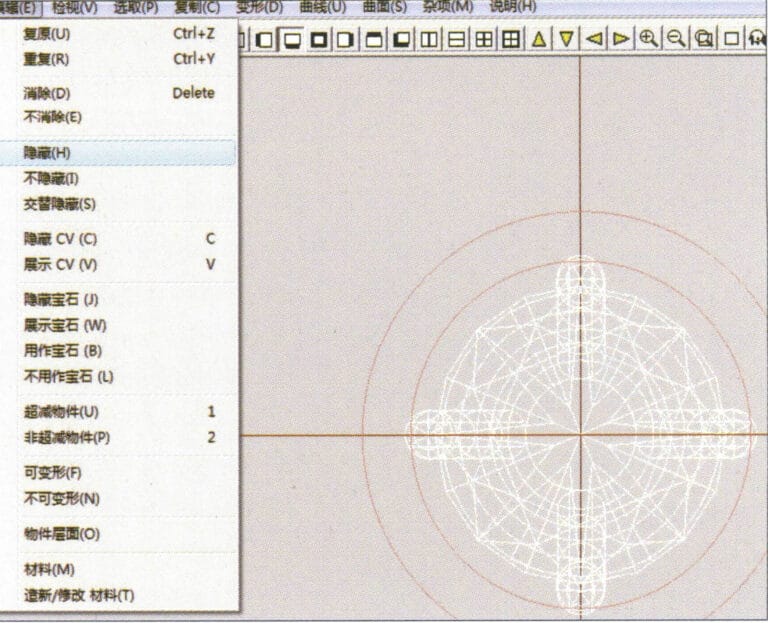
20. Select "Edit" > "Hide" from the menu bar to hide the completed gemstone inlay
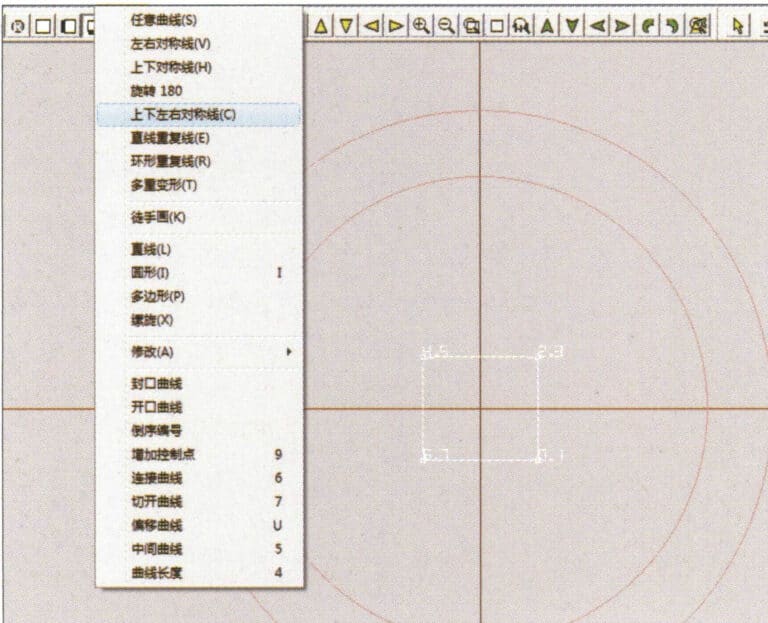
21. Select "Curve" > "Vertical and Horizontal Symmetry Line" from the menu bar
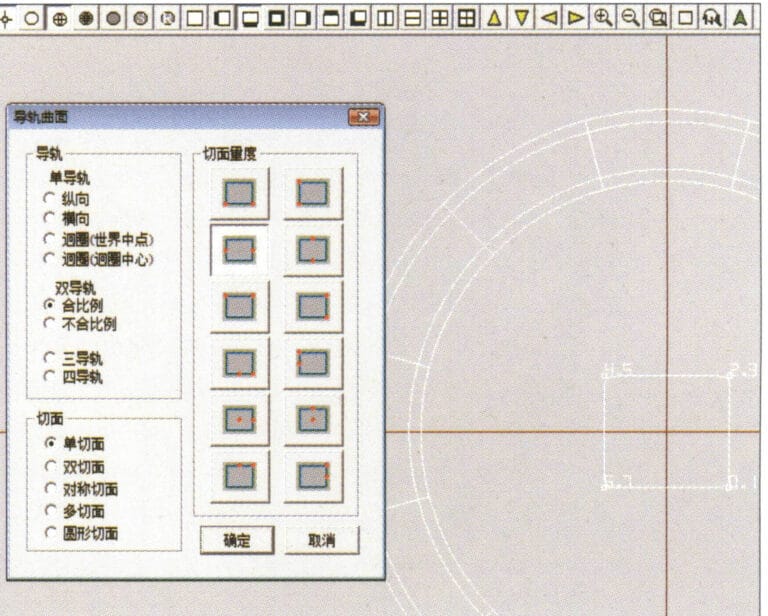
22. Select "Surface" > "Rail Surface" from the menu bar to enter the "Rail Surface" dialog box, select the relevant options and confirm
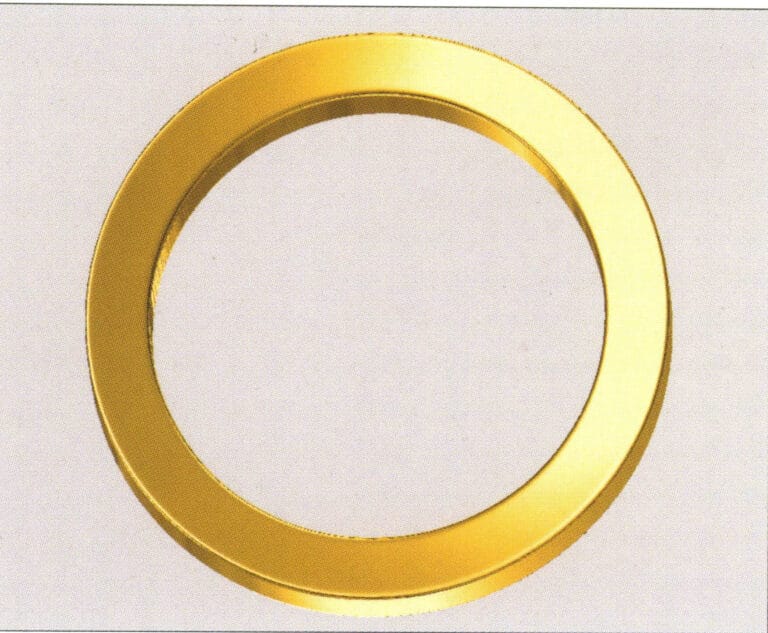
23. Select "View" > "Shadow Map" from the menu bar to inspect the shadow effects
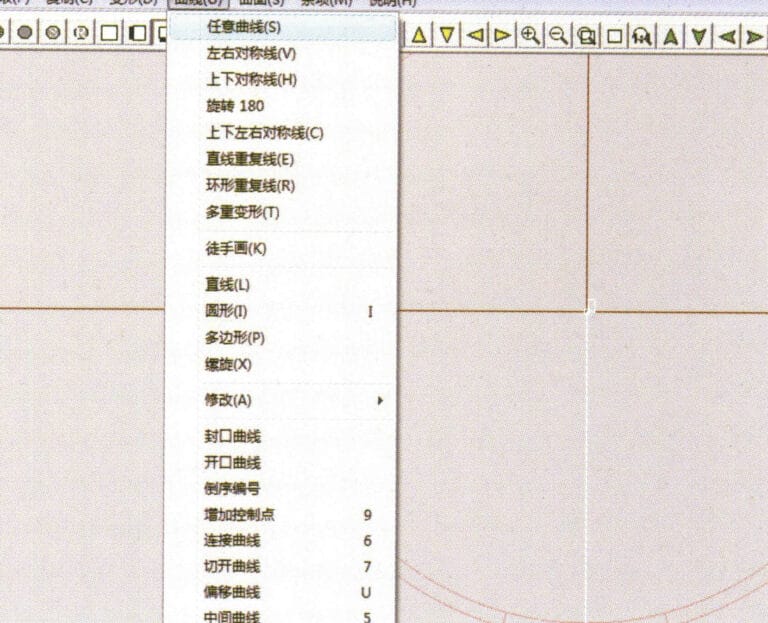
24. Select "Curve" > "Freeform Curve" from the menu bar to draw a guideline

25. Select "Copy" > "Hide Copy" from the menu bar to copy the already drawn auxiliary lines
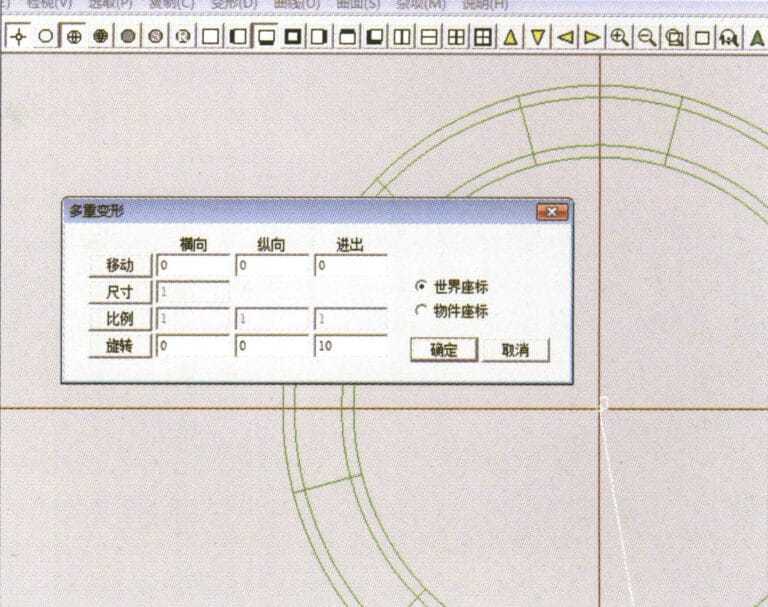
26. Select “Deformation” > “Multiple Deformation” in the menu bar to enter the “Multiple Deformation” dialog box, enter the relevant values and confirm
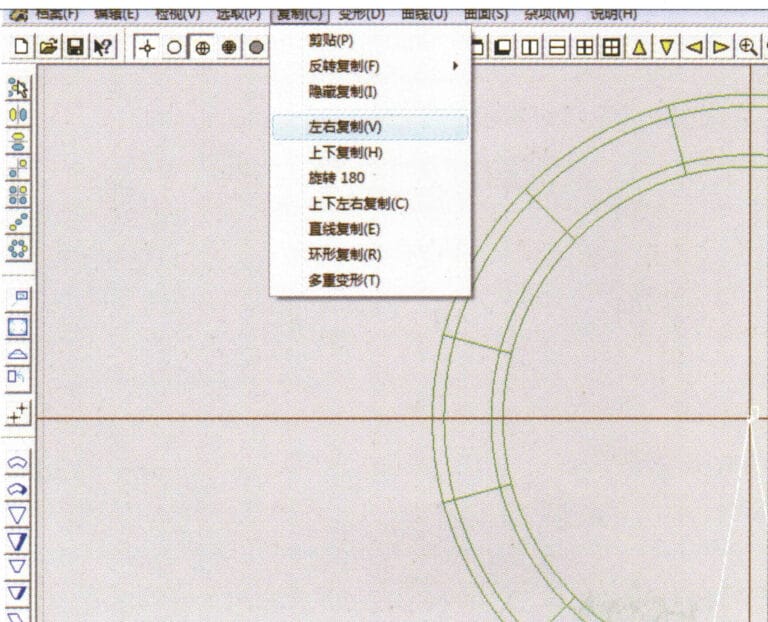
27. Select “Copy” > “Copy Up and Down” in the menu bar to copy the drawn auxiliary lines
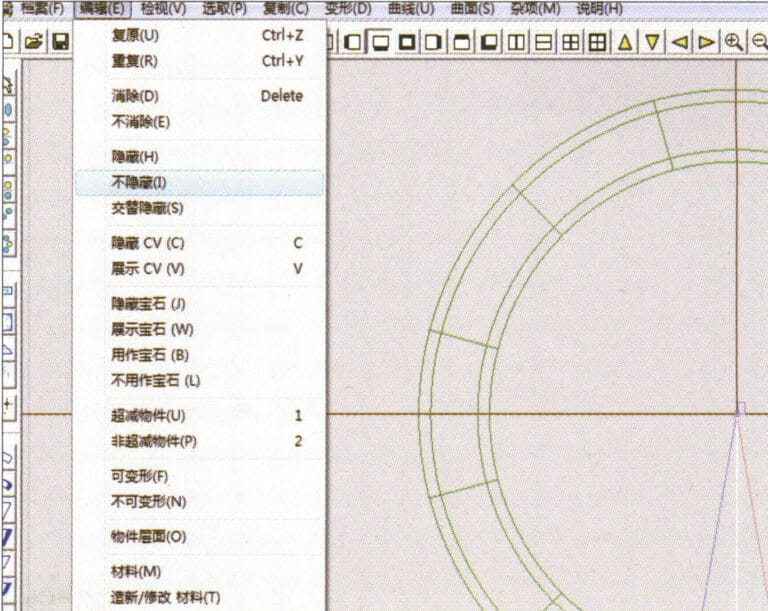
28. Select "Edit" > "Unhide" from the menu to display the hidden curves
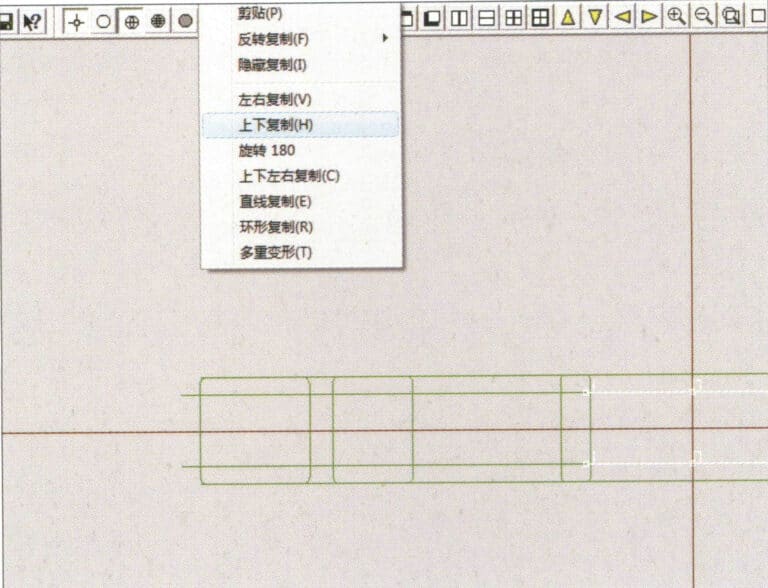
29. Select "Copy" > "Copy Up and Down" from the menu bar to copy the selected curve
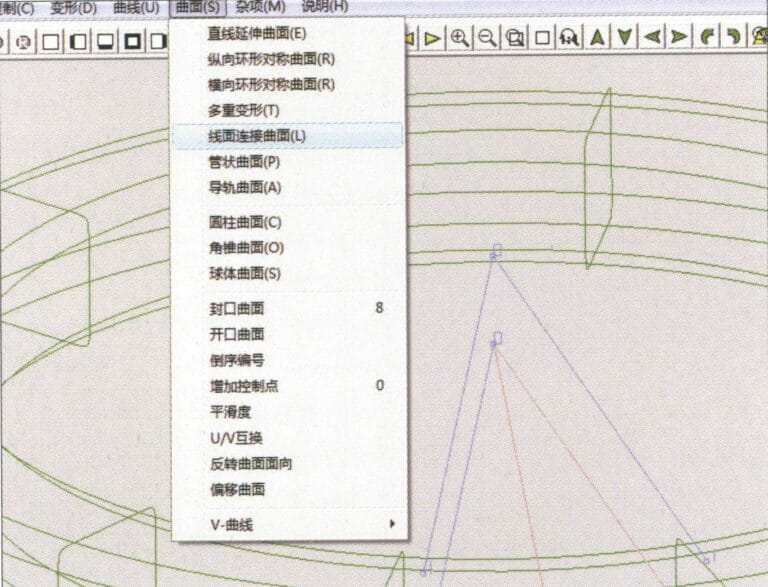
30. Select curves/surfaces in a clockwise direction to create line-surface connections, then select "Surface" > "Cap Surface" from the menu bar
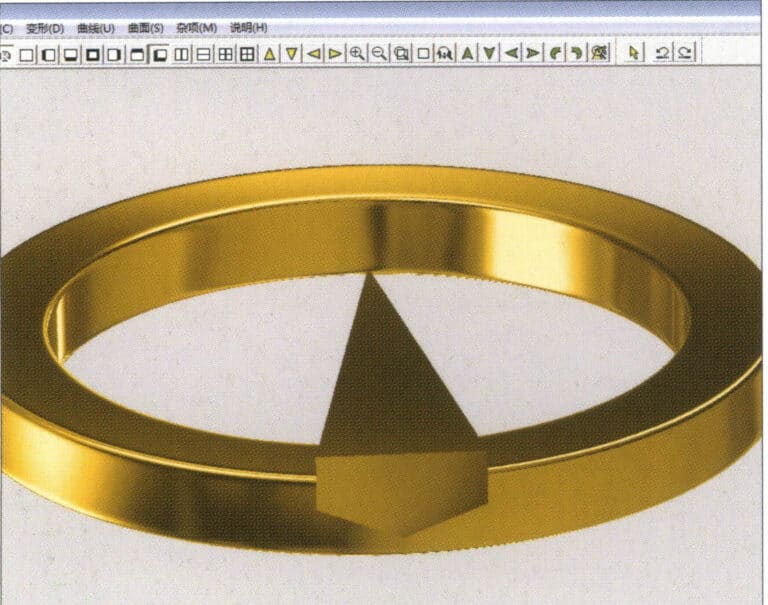
31. Select "View" > "Shadow Map" from the menu bar to inspect the shadow effects
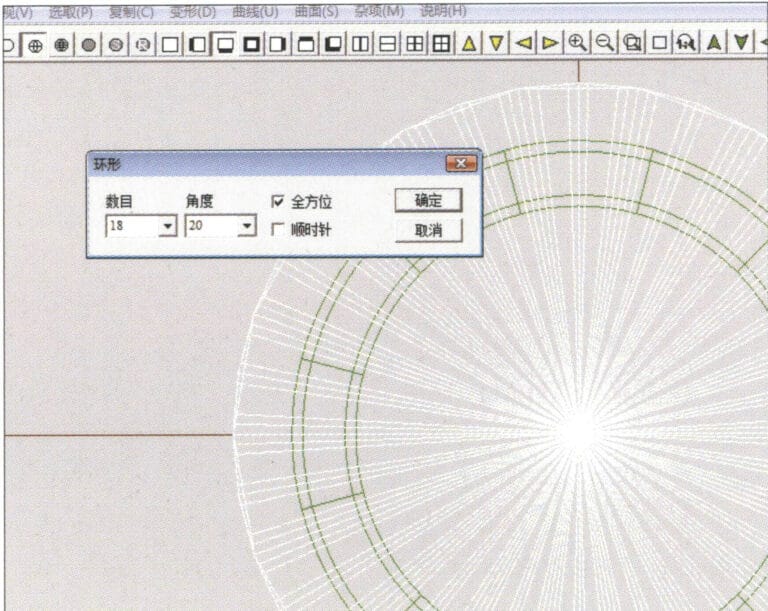
32. Select "Copy" > "Circular Copy" from the menu bar, enter the relevant values and confirm
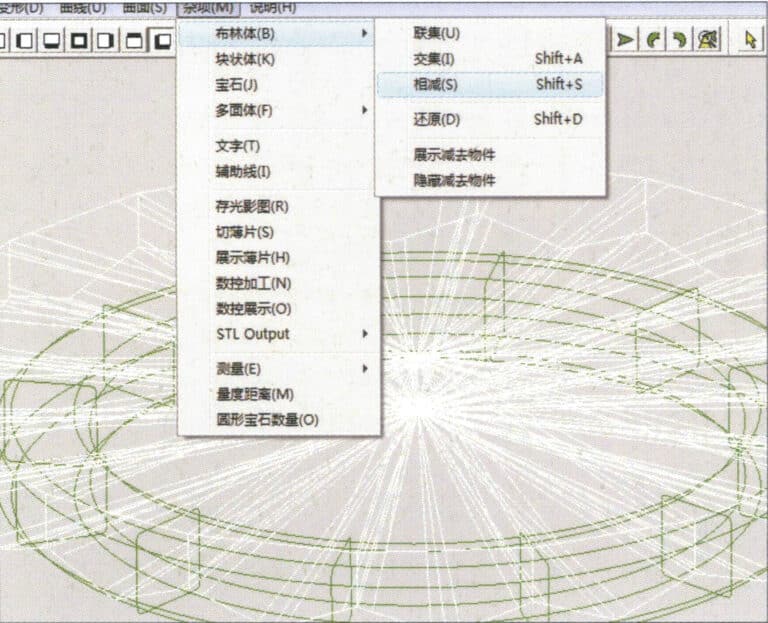
33. Select "Miscellaneous" > "Boolean" > "Subtract" from the menu bar to subtract the selected surface from the already united surface
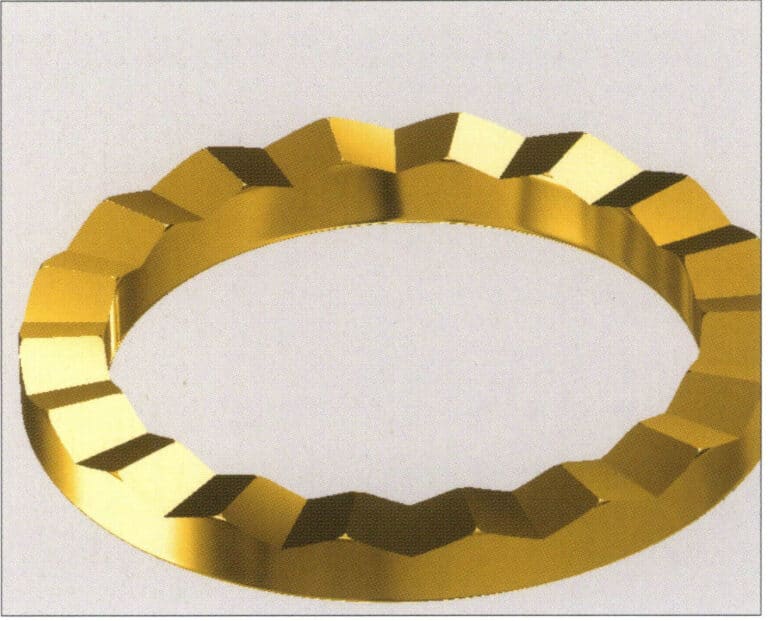
34. Select "View" > "Shadow Map" from the menu bar to inspect the shadow effects
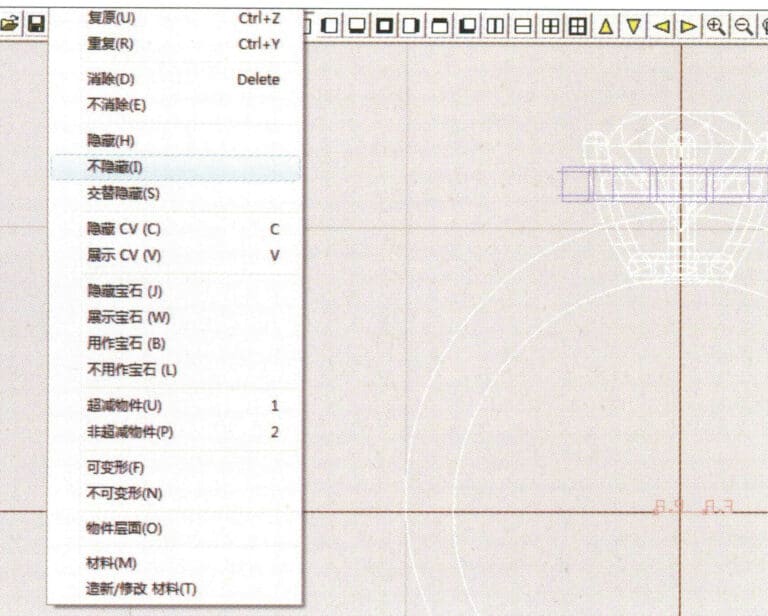
35. Select "Edit" > "Unhide" from the menu bar to display the hidden objects
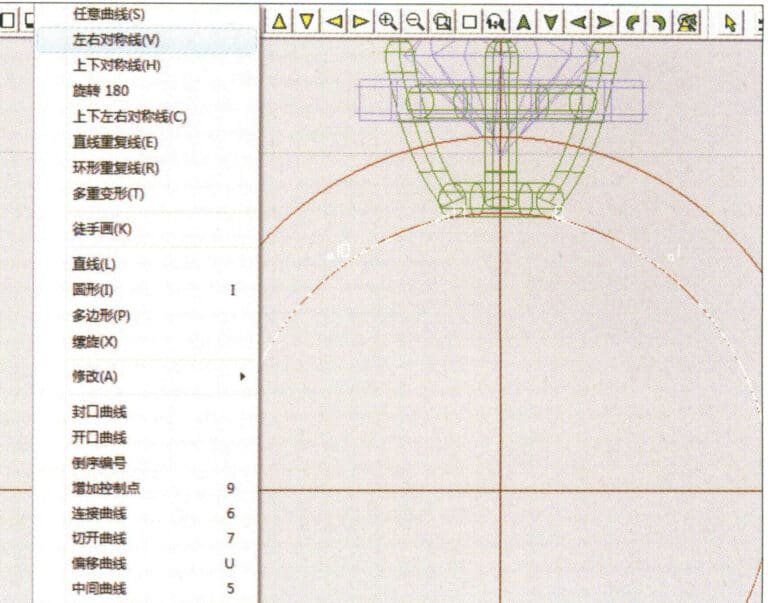
36. Select "Curve" > "Left-Right Symmetry Line" from the menu bar to draw the inner diameter of the ring wall
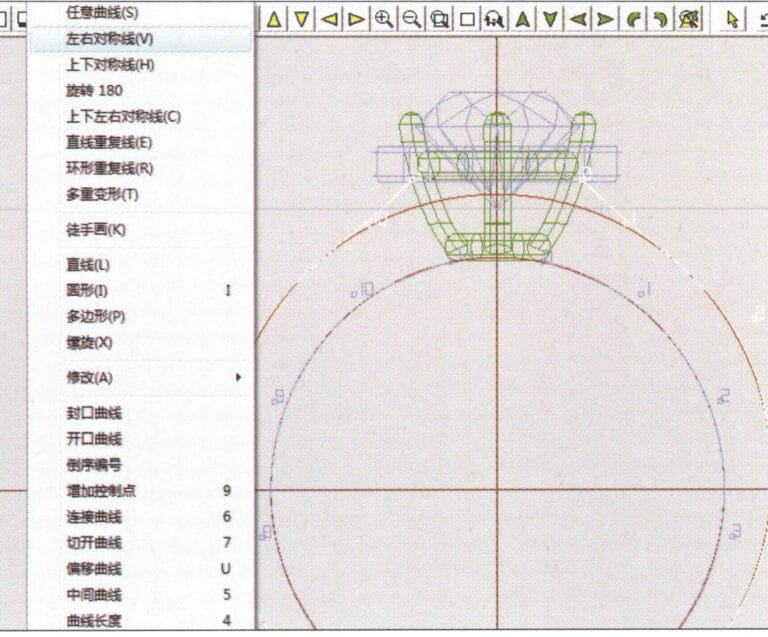
37. Select "Curve" > "Left-Right Symmetry Line" from the menu bar to draw the outer diameter of the ring wall
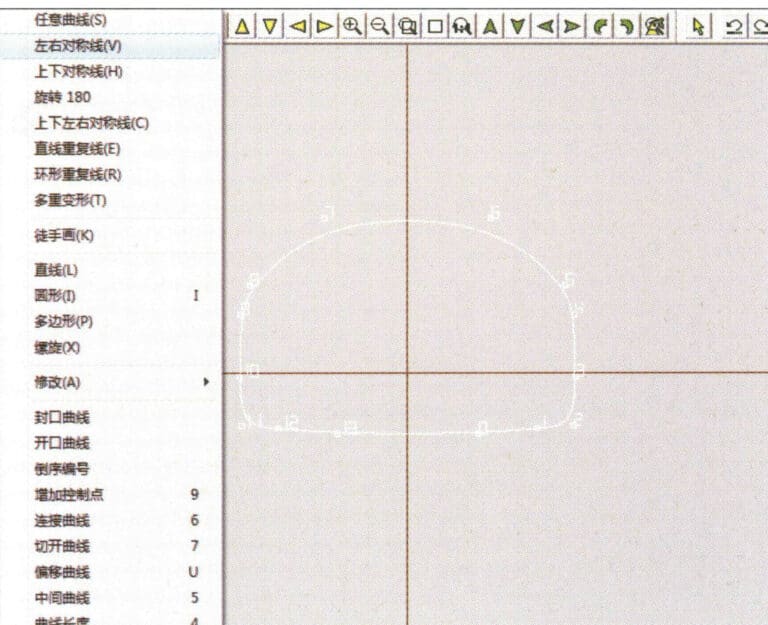
38. Select “Curve” > “Left-Right Symmetry Line” in the menu bar to draw a cutout of the ring shank
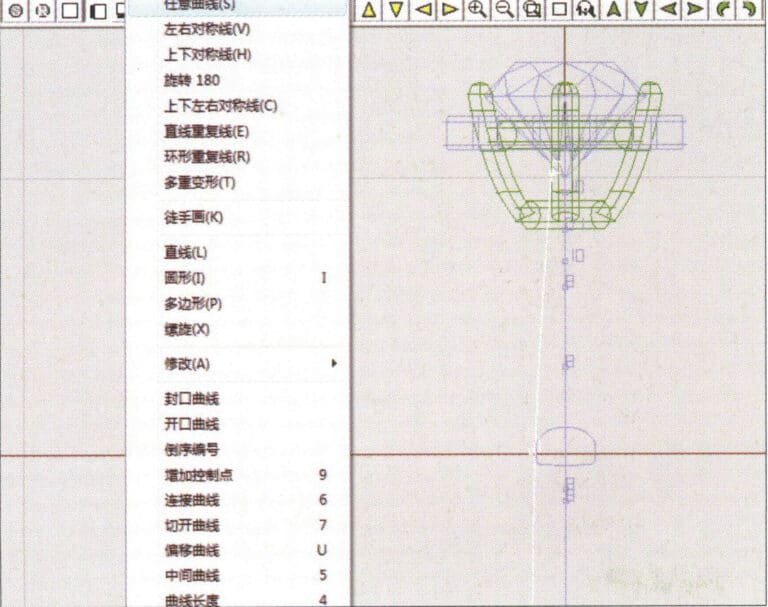
39. Select "Curve" > "Freeform Curve" from the menu bar to draw a guideline
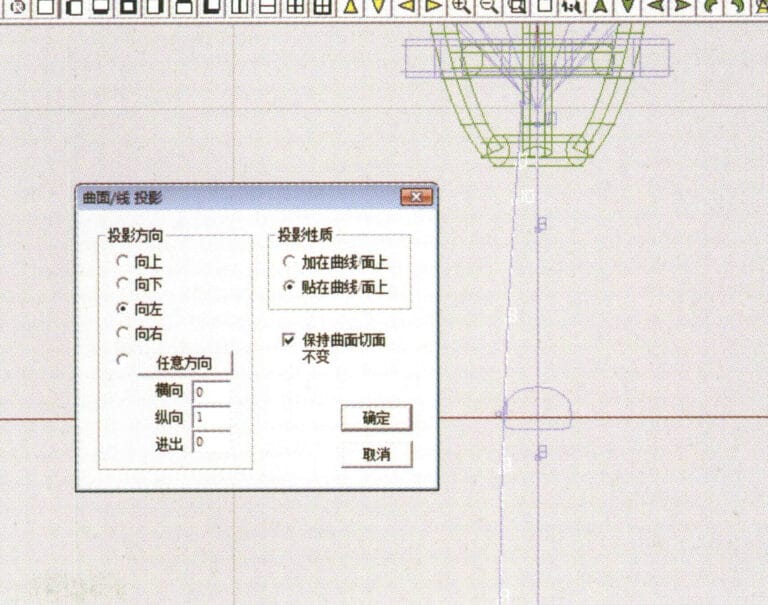
40. Select "Deformation" > "Surface/Line Projection" from the menu bar to enter the "Surface/Line Projection" dialog box, input the relevant values and confirm
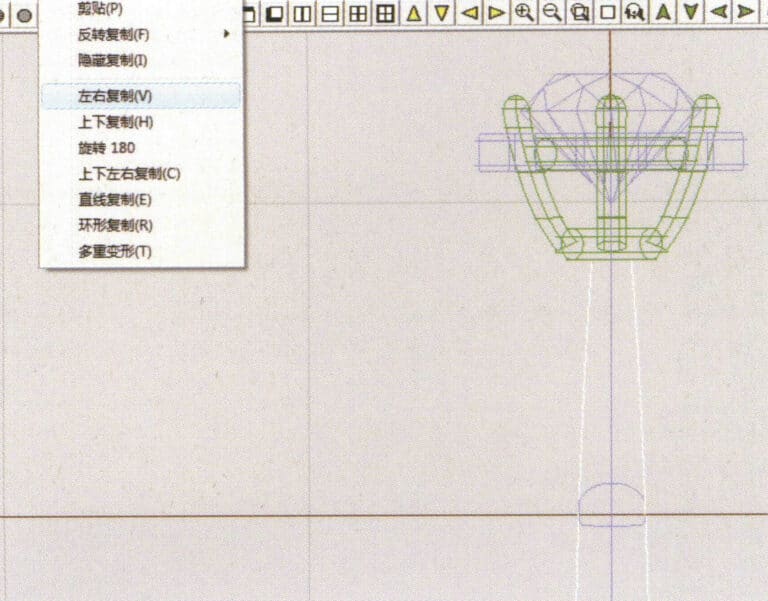
41. Select "Copy" > "Copy Left and Right" from the menu bar to copy the inner diameter of the ring shank
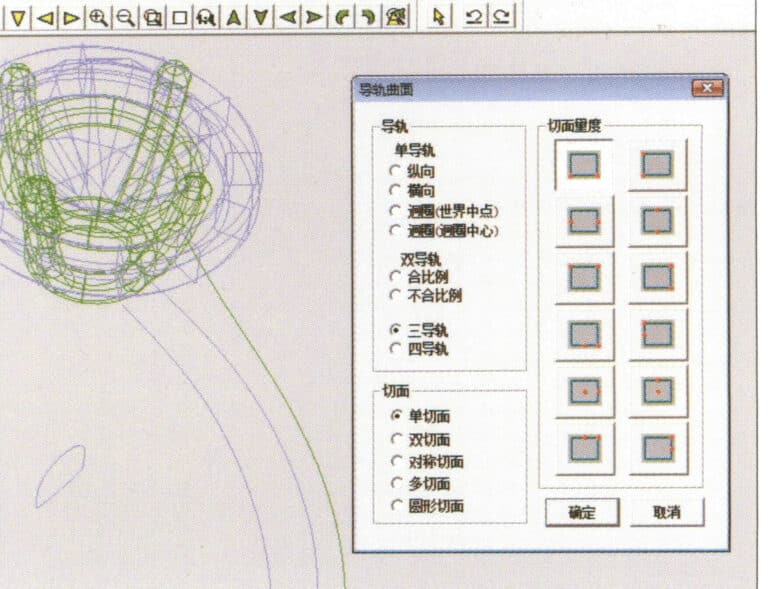
42. Select "Surface" > "Rail Surface" from the menu bar to enter the "Rail Surface" dialog box, select the relevant options and confirm
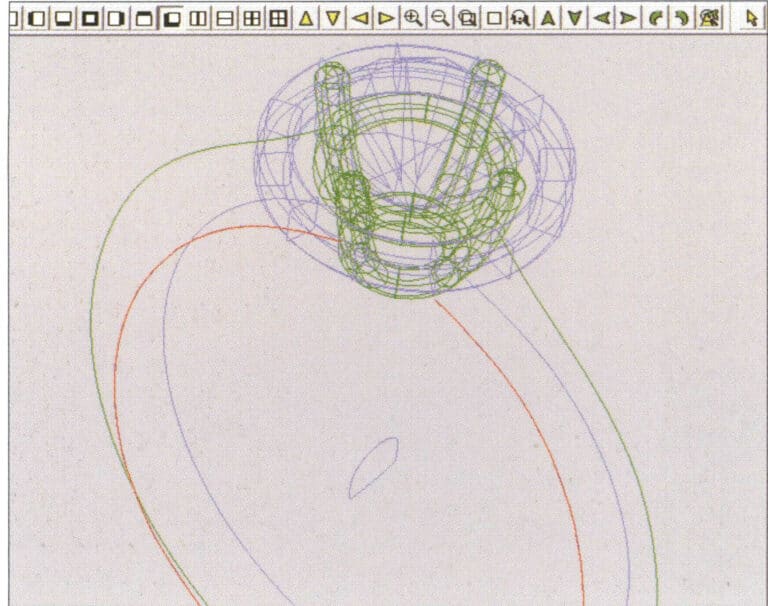
43. Valitse käyrä vasemmanpuoleiseksi ohjauskiskoksi ja valitse sitten käyrä oikeanpuoleiseksi ohjauskiskoksi.

44. Valitse käyrä ylemmäksi ohjauskiskoksi
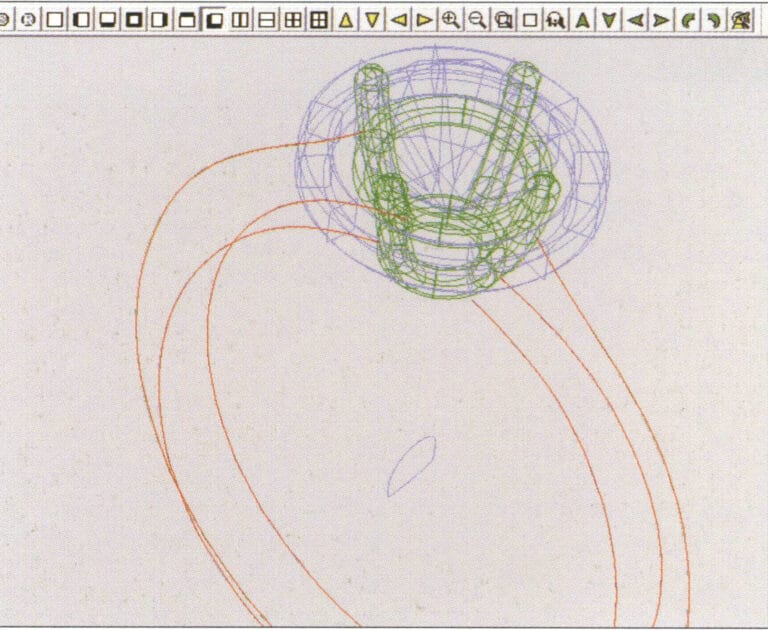
45. Valitse ohjauspinnan poikkileikkaukseksi käyrä.
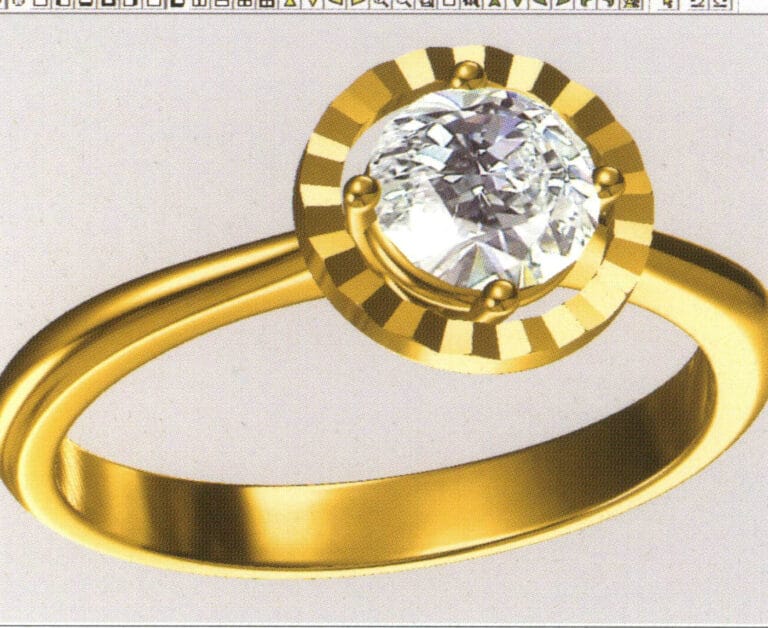
46. Select "View" > "Light and Shadow Map" from the menu bar to examine the light and shadow effects
47. Select "File" > "Save As" from the menu bar to save the file
Copywrite @ Sobling.Jewelry - Custom korujen valmistaja, OEM ja ODM korut tehdas
2. Helmisormus

Tuotannon vaiheet ovat seuraavat:
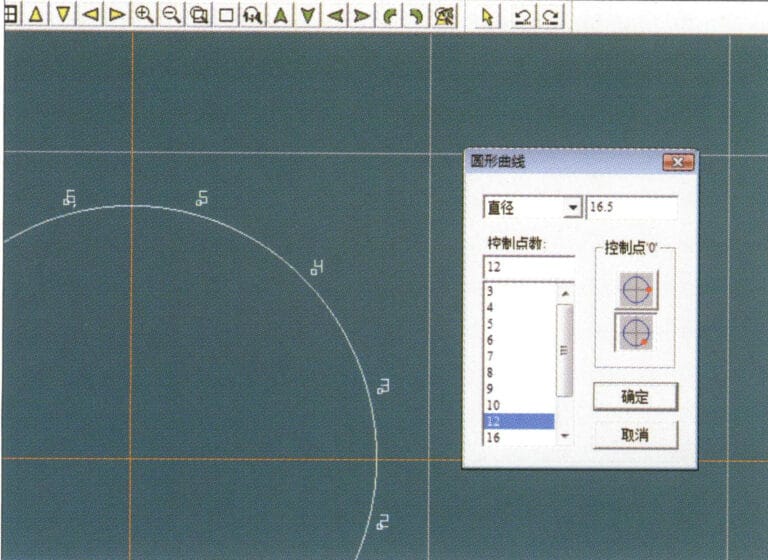
1. Create a new file in JewelCAD, select "Curve" > "Circular Curve" from the menu bar, enter the relevant values in the "Circular Curve" dialog box as the outer curve of the ring, and confirm
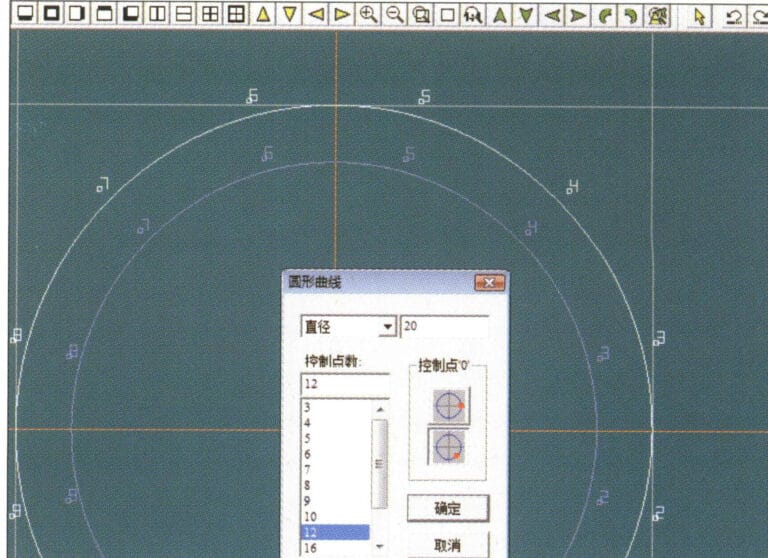
2. Select "Curve" > "Circular Curve" from the menu bar, enter the relevant values in the "Circular Curve" dialog box to set the inner curve of the ring, and confirm
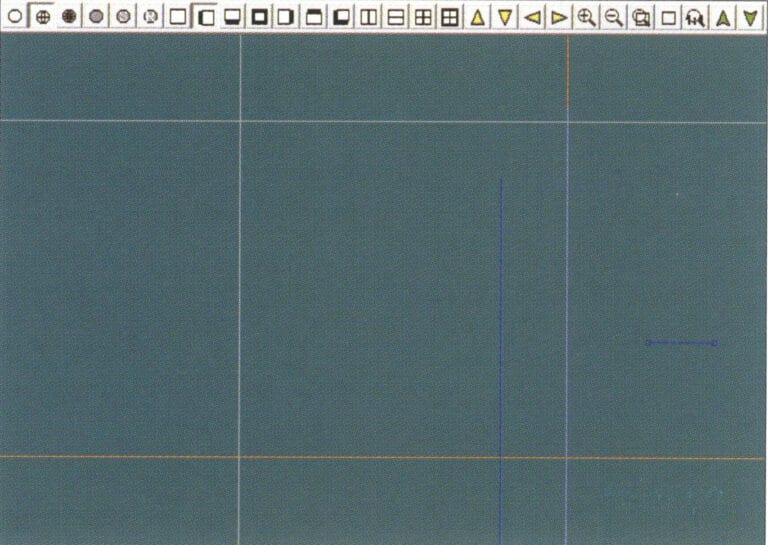
3. Select "Edit" > "Move" from the menu bar to move the selected inner curve of the ring
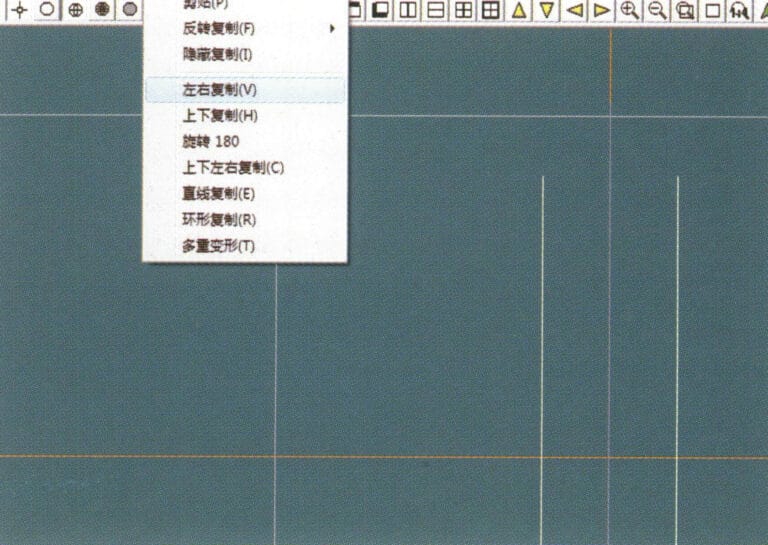
4. Select "Copy" > "Copy Left and Right" from the menu bar to copy the curve of the inner circle of the ring
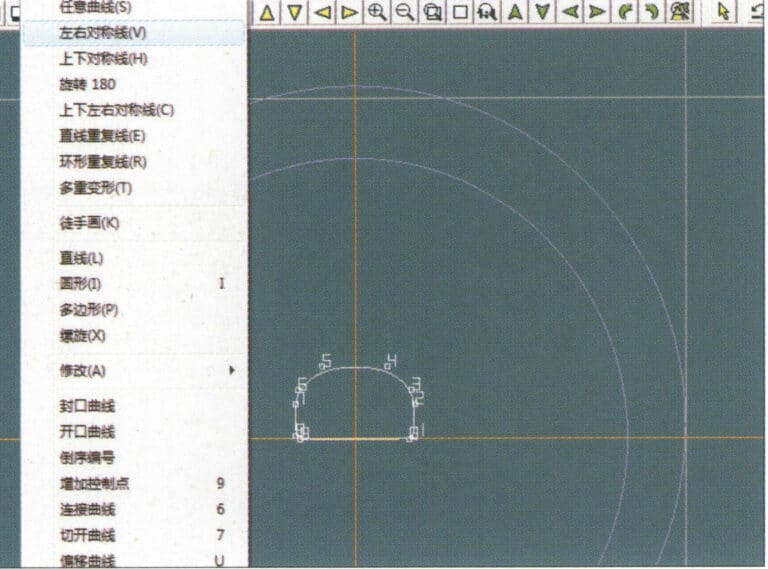
5. Select "Curve" > "Left-Right Symmetry Line" from the menu bar as the cross-section of the ring band
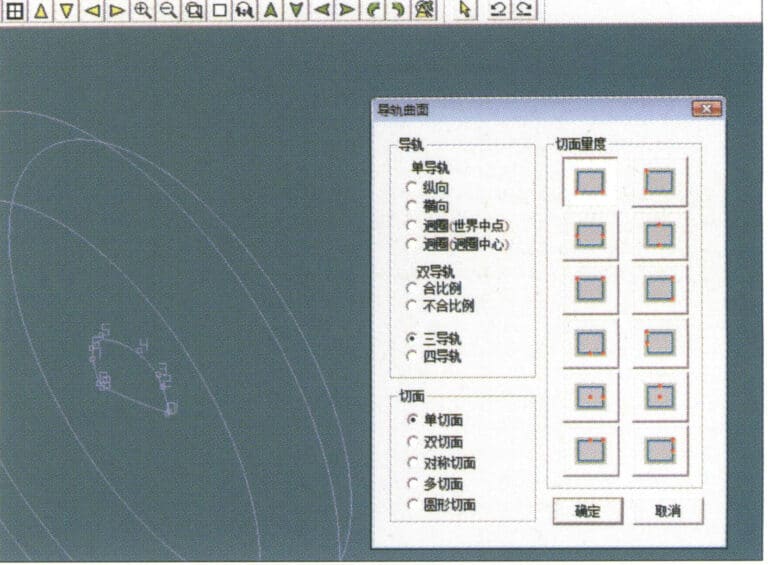
6. Select "Curved Surface" > "Guide Rail Surface" from the menu bar, enter the "Guide Rail Surface" dialog box, select the relevant options and confirm
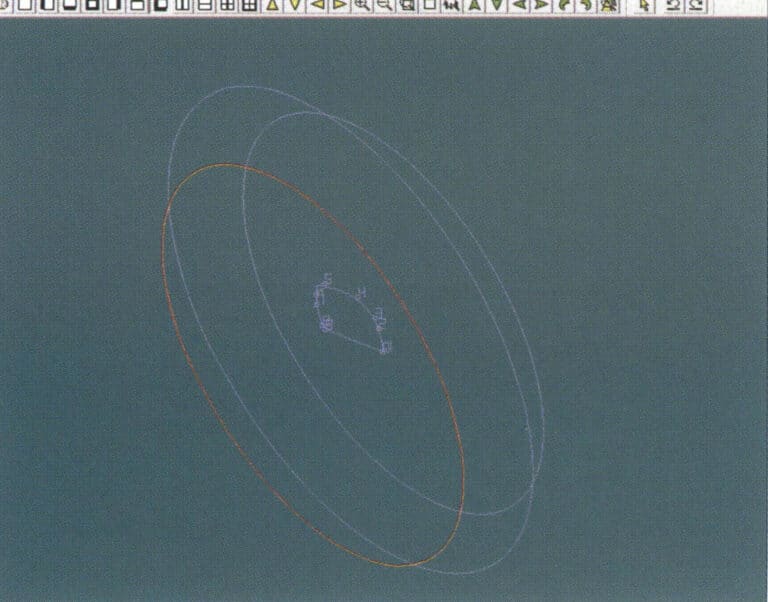
7. Valitse käyrä oikeaksi ohjauskiskoksi
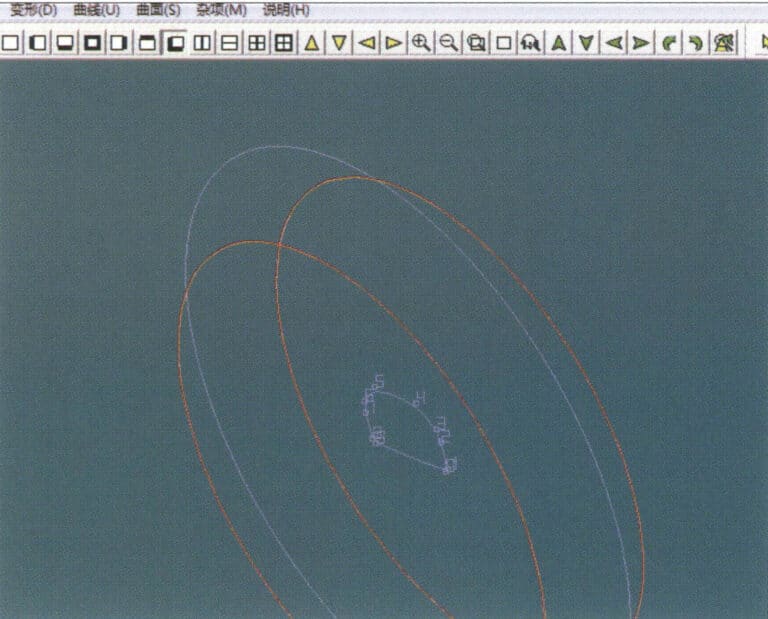
8. Valitse käyrä ylemmäksi ohjauskiskoksi
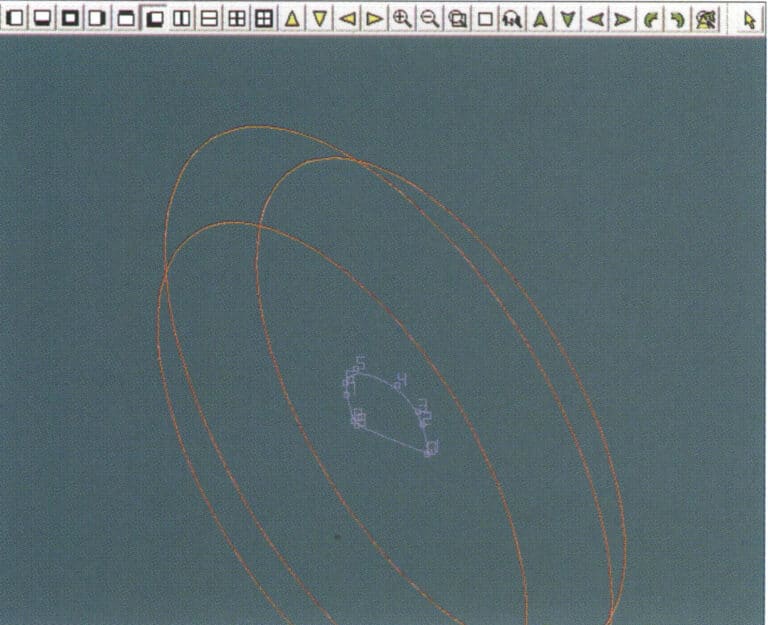
9. Valitse rengasnauhan poikkileikkaus ohjauskäyrän pinnan poikkileikkaukseksi.
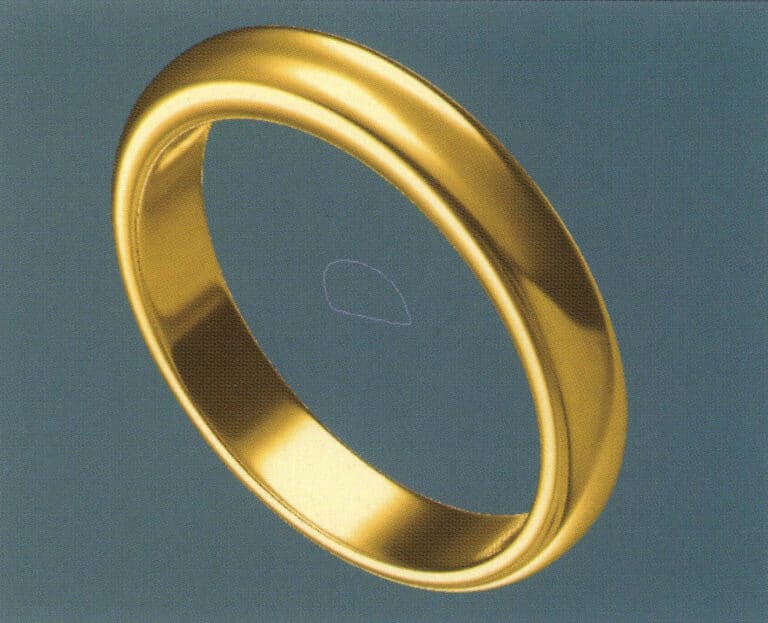
10. Select "View" > "Shadow Map" from the menu bar to inspect the shadow effects
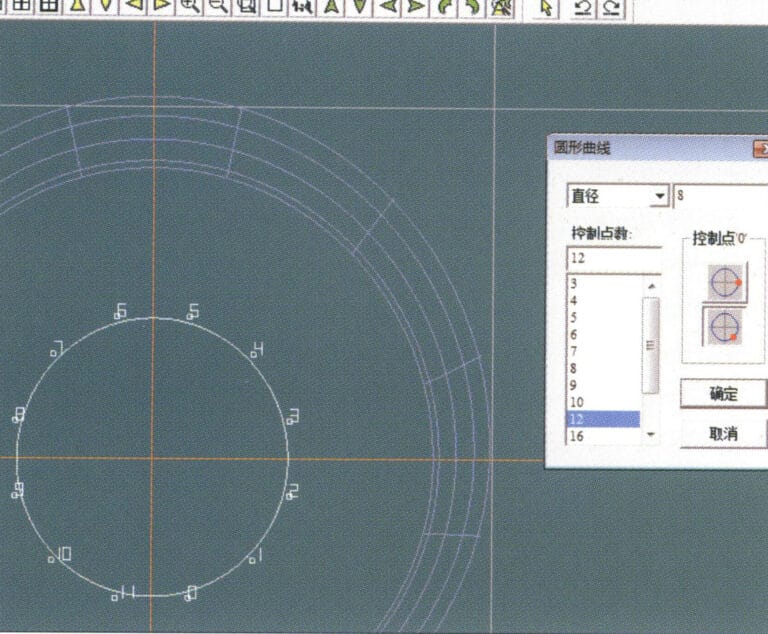
11. Select "Curve" > "Circular Curve" from the menu bar, enter the relevant values in the "Circular Curve" dialog box as auxiliary lines, and confirm
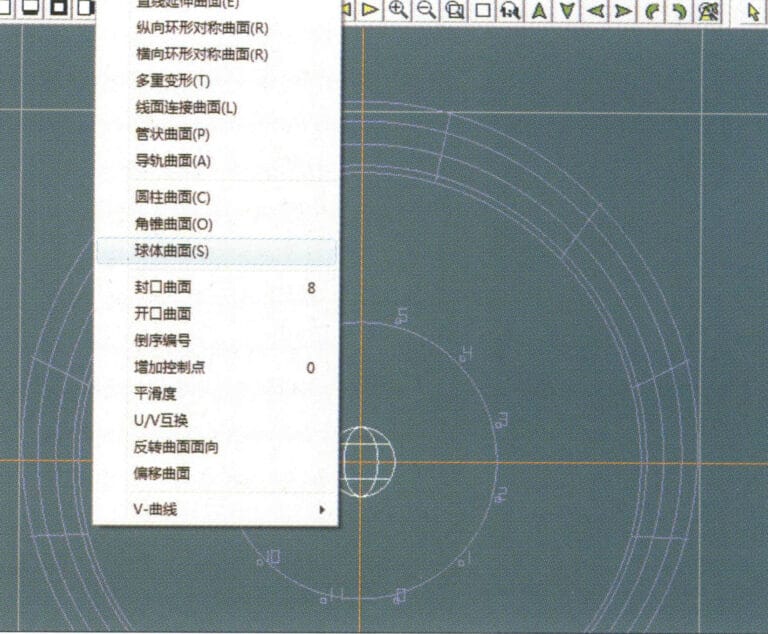
12. Select "Surface" > "Spherical Surface" from the menu bar
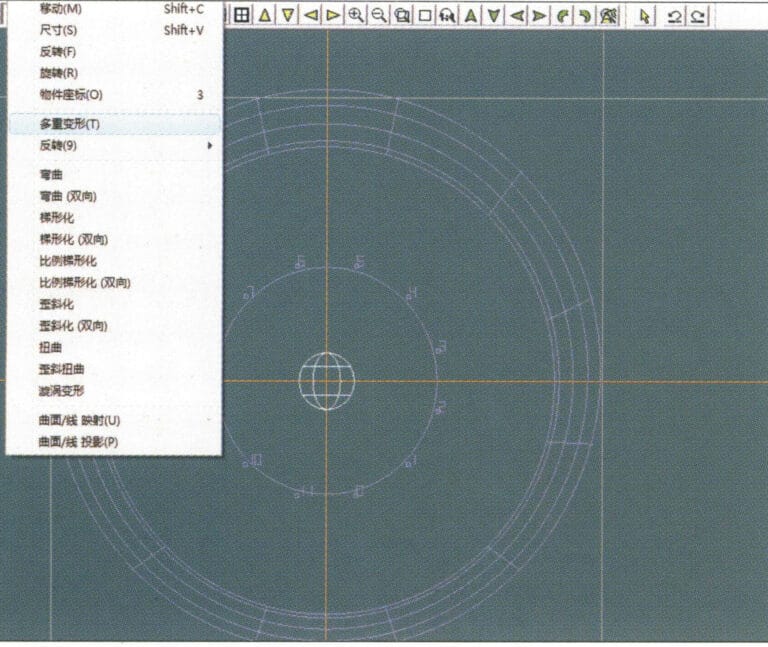
13. Select "Deformation" > "Multiple Deformation" from the menu bar to enlarge the sphere
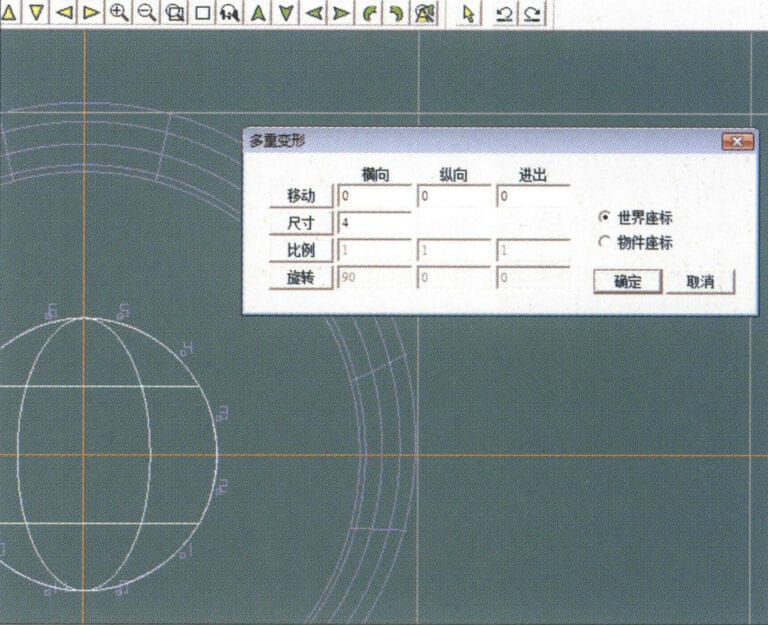
14. Siirry "Multiple Deformation" -valintaikkunaan, syötä vastaavat arvot pallon suurentamiseksi suuntaviivojen leveyteen ja vahvista.
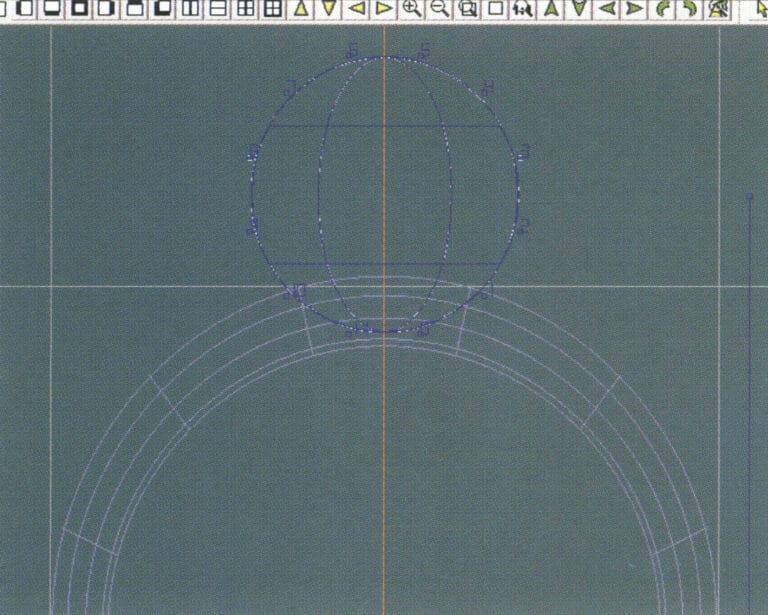
15. Select "Edit" > "Move" from the menu bar to move both the sphere and the auxiliary line simultaneously
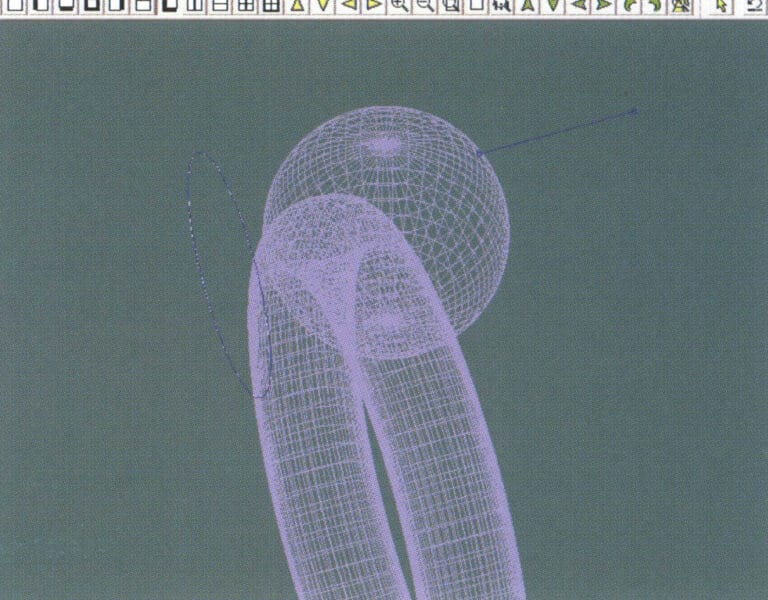
16. Select "Edit" > "Move" from the menu bar to remove the guidelines
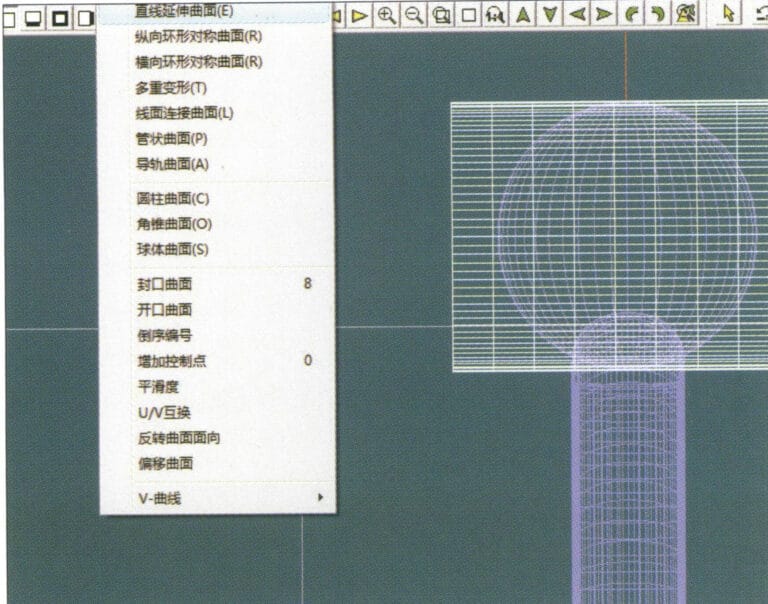
17. Select "Surface" > "Straight Line Extend Surface" from the menu bar to extend the auxiliary line into an auxiliary surface
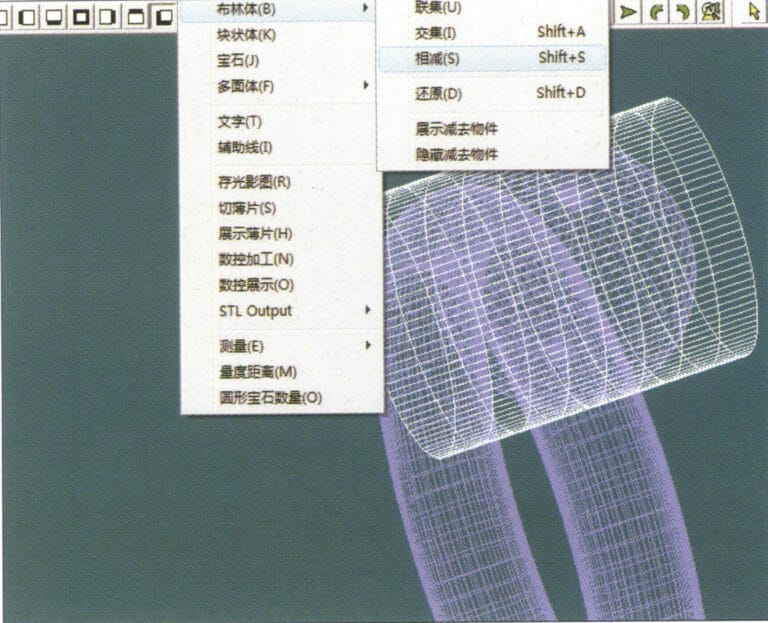
18. Select "Miscellaneous" > "Boolean" > "Subtract" from the menu bar to subtract the corresponding parts of the auxiliary surface ring
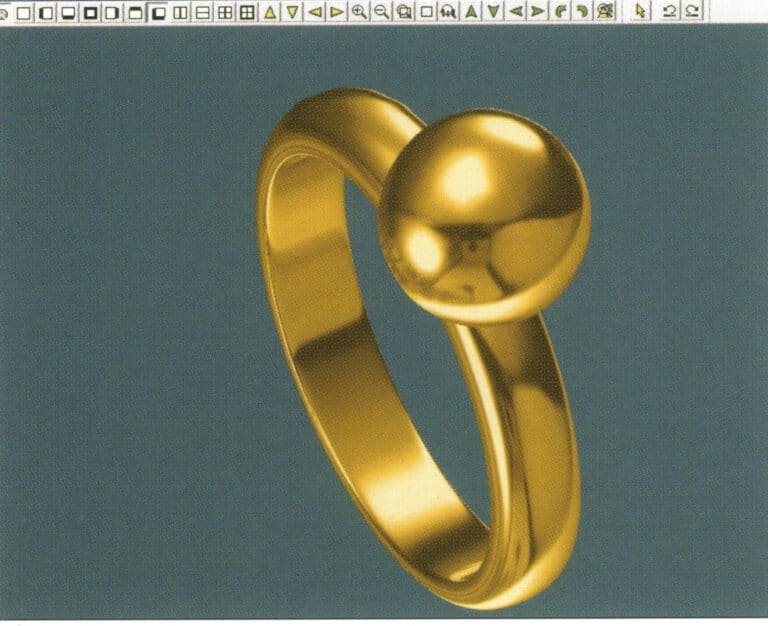
19. Select "View" > "Shadow Map" from the menu bar to inspect the shadow effects
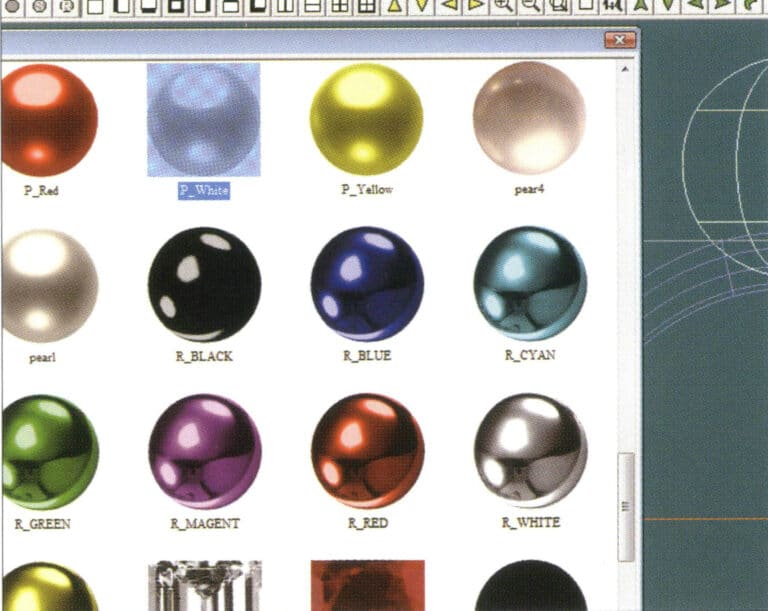
20. Select the sphere, go to the menu bar and choose "Edit" > "Materials", enter the "Materials" dialog box, select the white pearl material and confirm
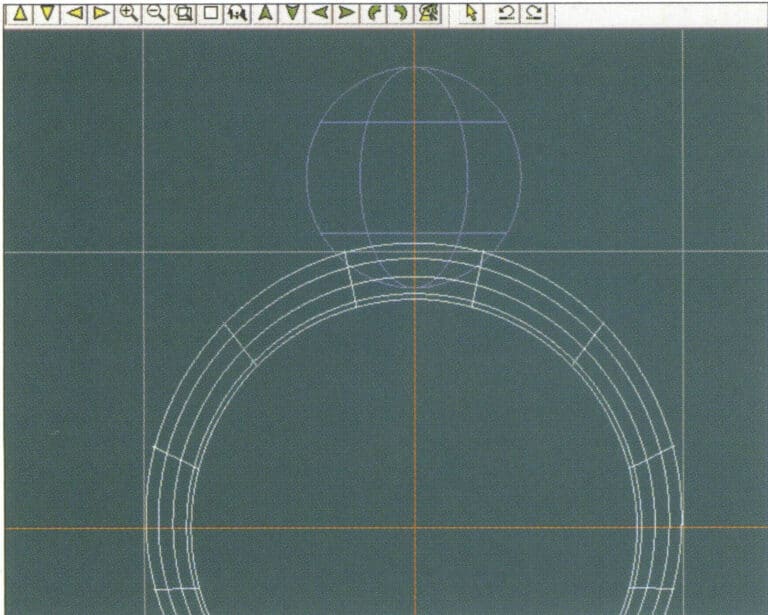
21. Select the ring band, then choose "Edit" > "Materials" from the menu bar
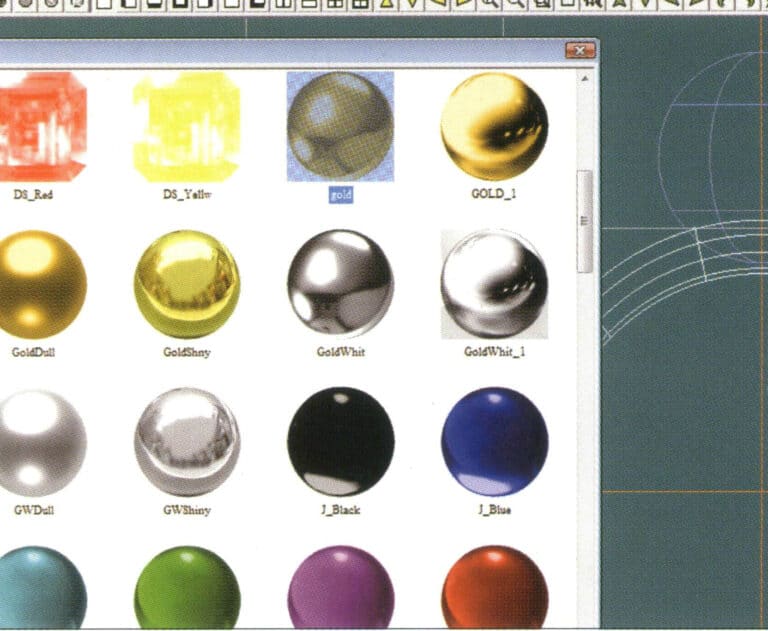
22. Siirry "Materiaalit"-valintaikkunaan, valitse sopiva materiaali ja vahvista.
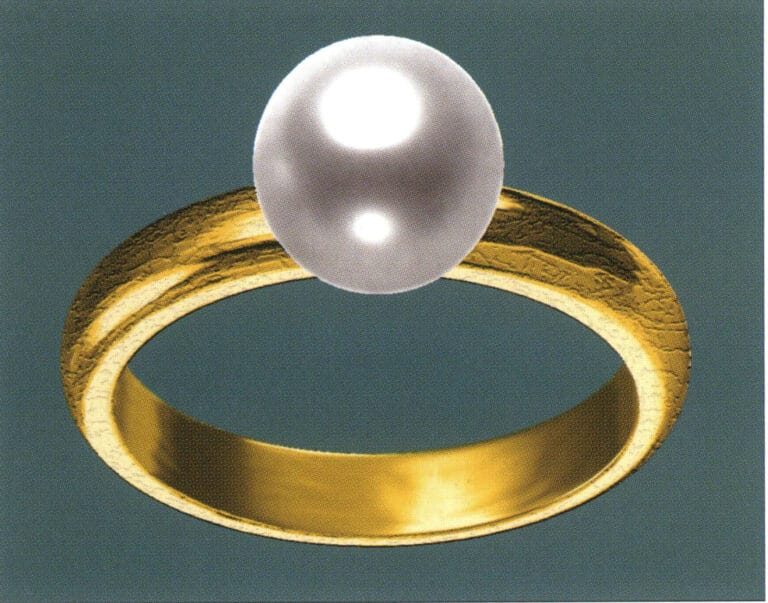
23. Select "View" > "Shadow Map" from the menu bar to examine the light and shadow effects
24. Select "File" > "Save As" from the menu bar to save the file
3. Musta kultainen riipus timanttikoristeilla

Tuotannon vaiheet ovat seuraavat:
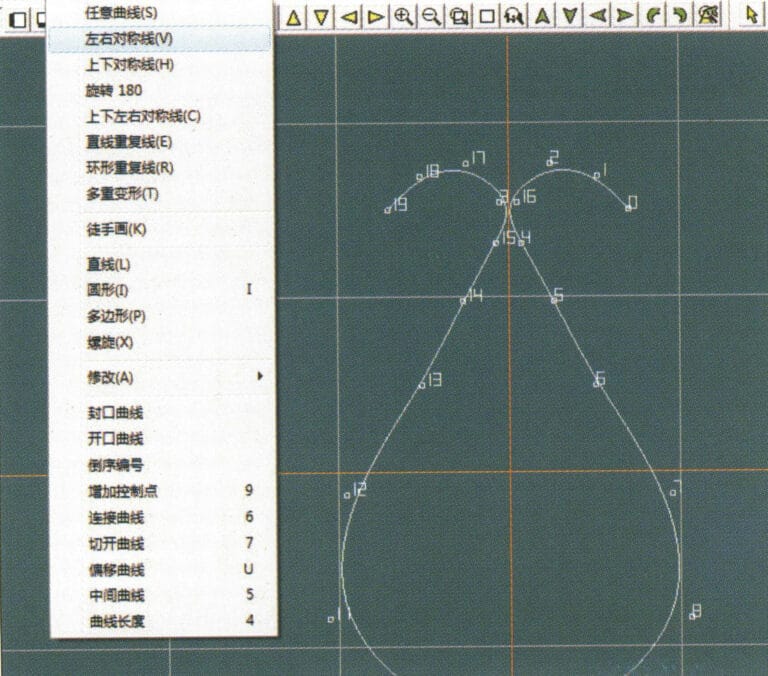
1. Create a new file in JewelCAD, select "Curve" > "Left-Right Symmetrical Line" from the menu bar, and draw the inner contour line of the pendant
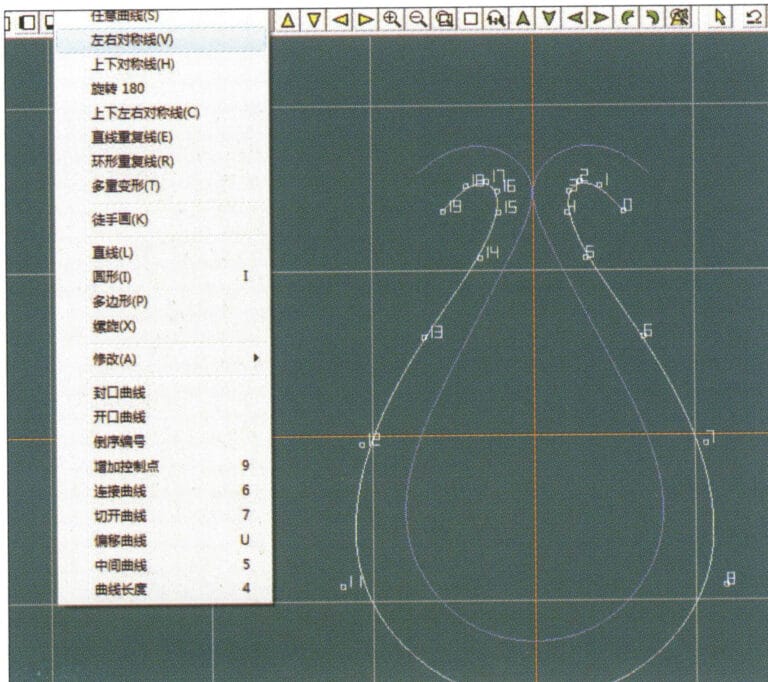
2. Select "Curve" > "Left-Right Symmetrical Line" from the menu bar to draw the outer contour line of the pendant (note that the control points of the inner contour line and the outer contour line should have the same direction and quantity).
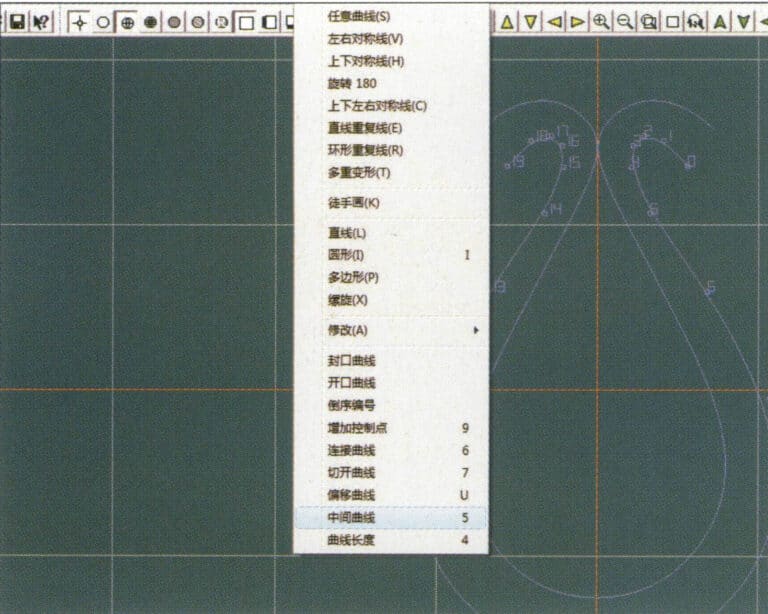
3. Select "Curve" > "Middle Curve" from the menu bar
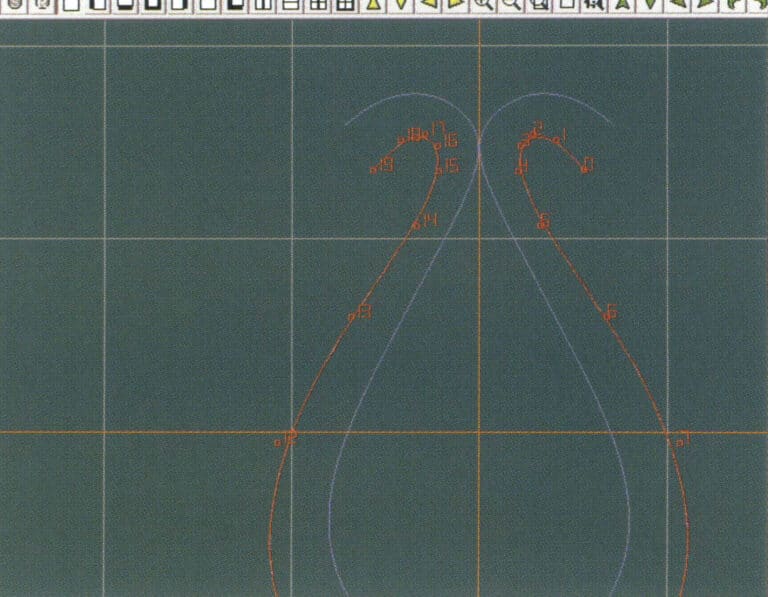
4. Valitse kaksi käyrää keskimmäisen käyrän luomiseksi. Valitse ensin ulompi ääriviiva
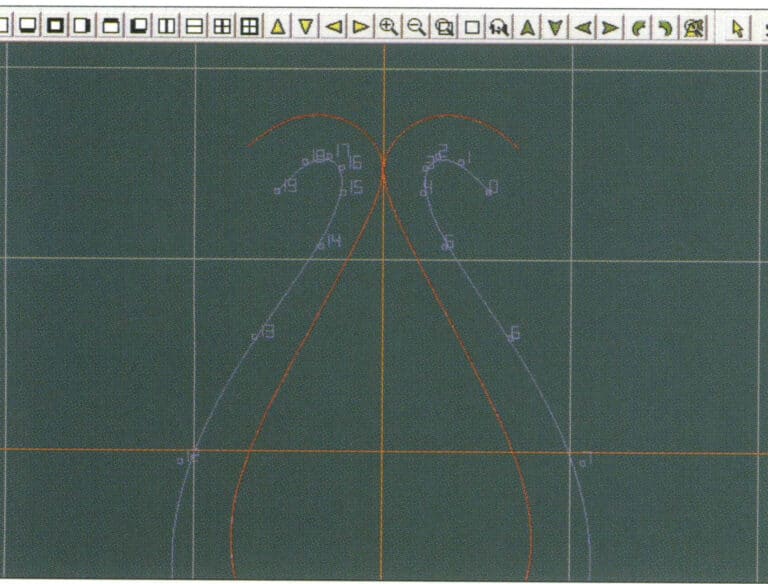
5. Valitse kaksi käyrää luodaksesi keskimmäisen käyrän ja valitse sitten sisempi ääriviiva.
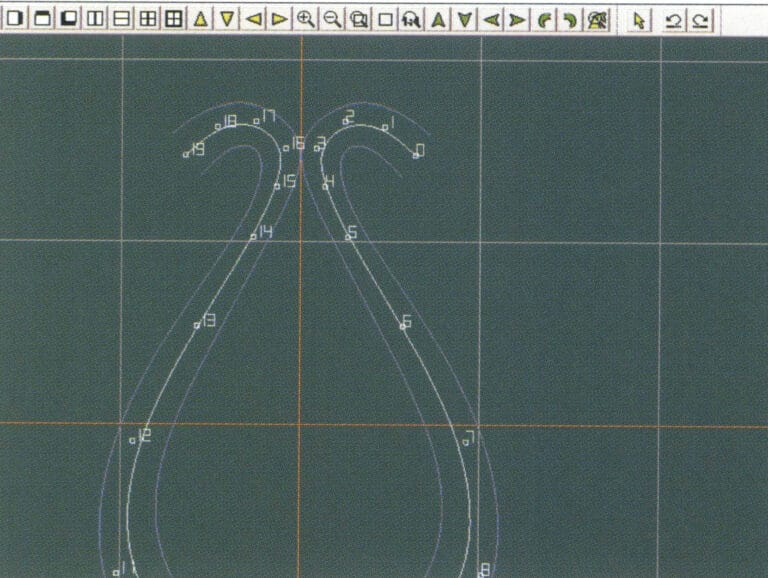
6. Tarkastele jo luotuja välikäyriä
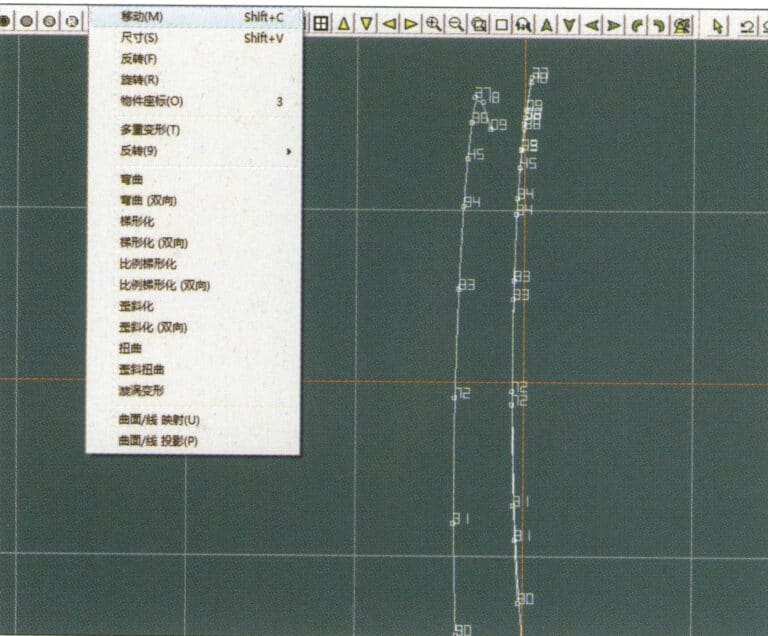
7. Select "Deformation" > "Move" from the menu bar to move the CV and the CV of the contour line
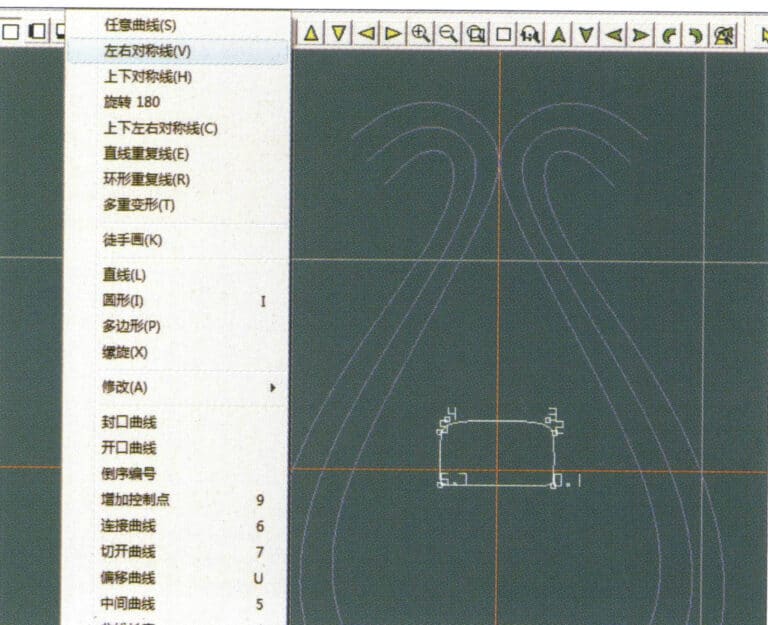
8. Select "Curve" > "Left-Right Symmetry Line" from the menu bar to create a cross-section
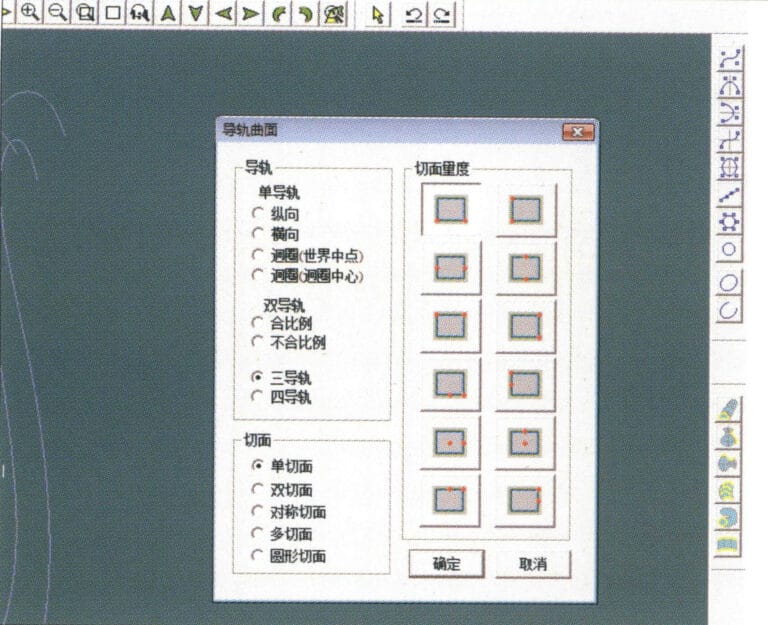
9. Select "Surface" > "Rail Surface" from the menu bar, enter the "Rail Surface" dialog box to select the relevant options, and confirm; select a curve as the left curve, starting from the left curve in a clockwise direction, left-click on the curve as the rail, and then select another curve as the section of the rail surface
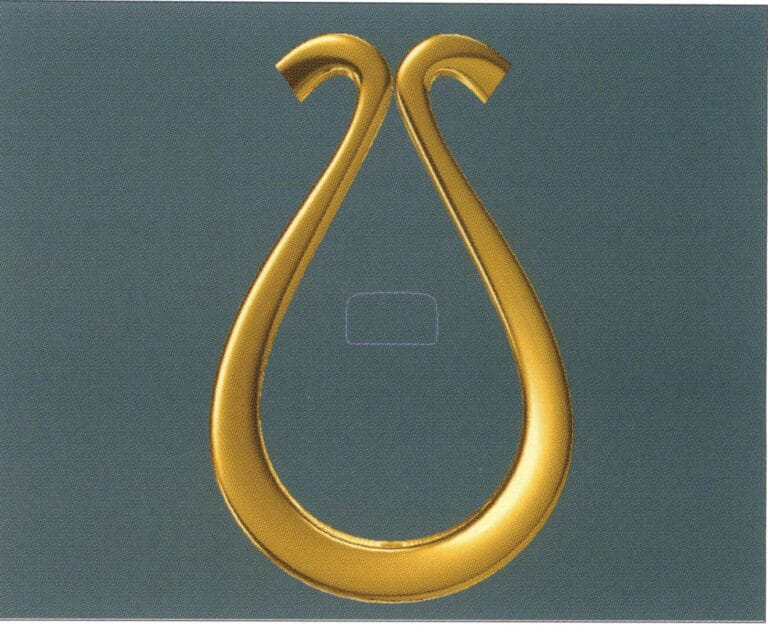
10. Select "View" > "Shadow Map" from the menu bar to inspect the shadow effects
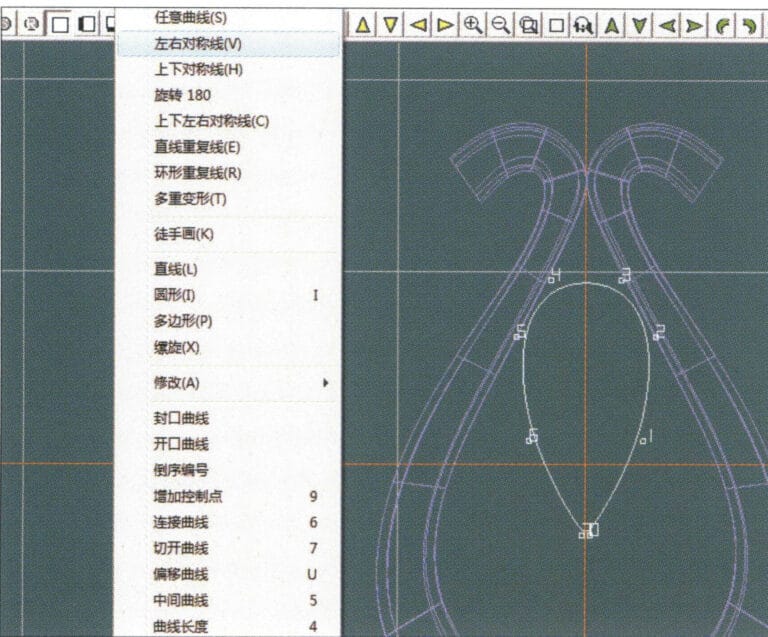
11. Select "Curve" > "Left-Right Symmetry Line" from the menu bar to draw the outer contour line of the seed-shaped toggle
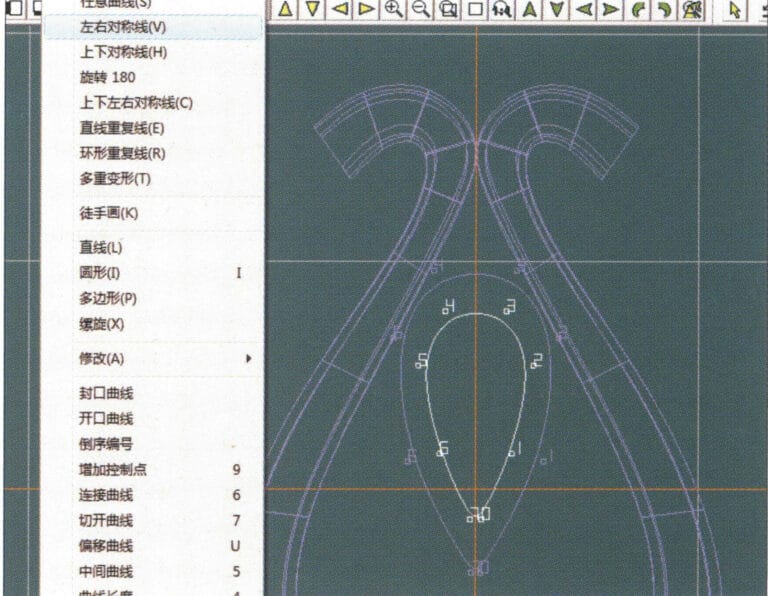
12. Select "Curve" > "Left-Right Symmetry Line" from the menu bar to draw the inner contour line of the seed-shaped toggle
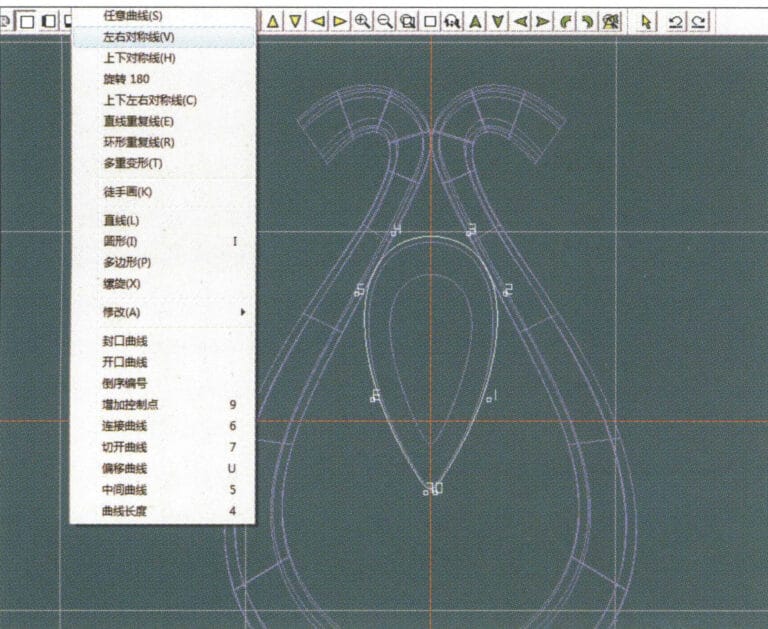
13. Select "Curve" > "Left-Right Symmetry Line" from the menu bar, and draw the lower dark line of the center of the seed-shaped toggle
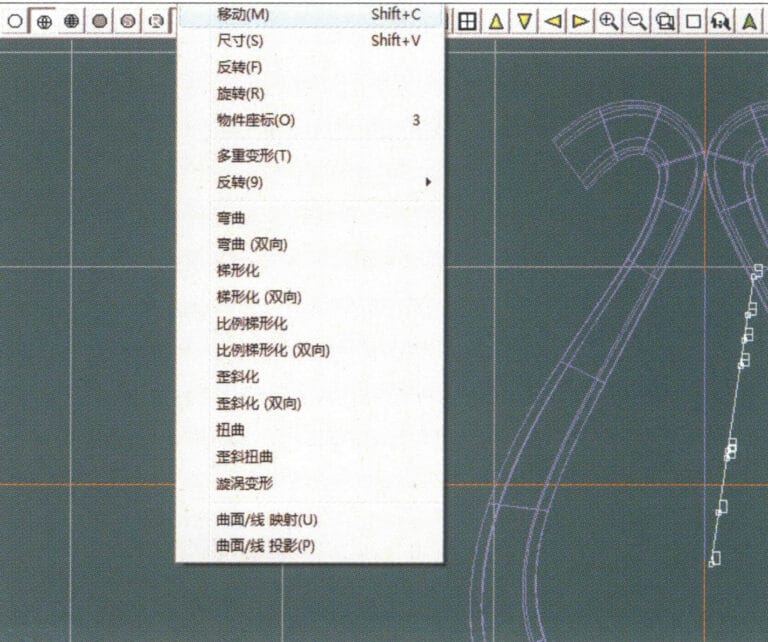
14. Select "Deformation" > "Move" from the menu bar to move the seed-shaped toggle CV
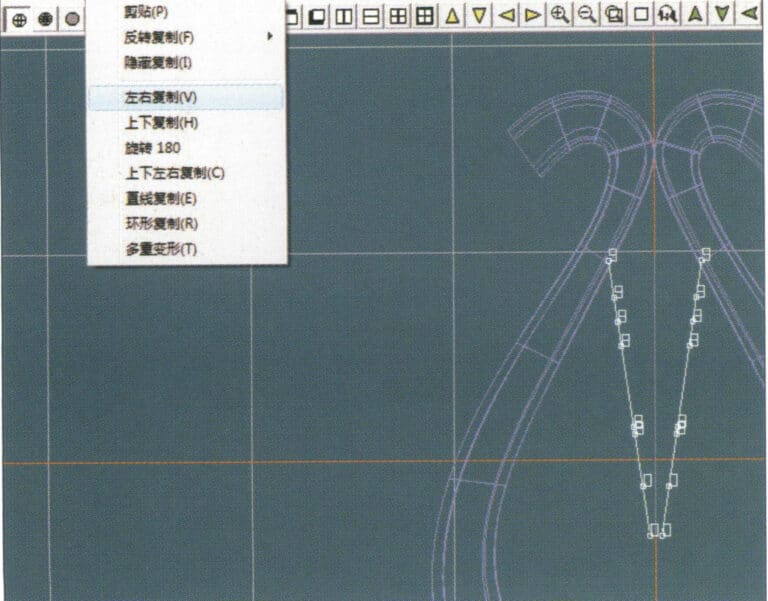
15. Select "Copy" > "Copy Left and Right" from the menu bar to copy the curve of the seed-shaped toggle
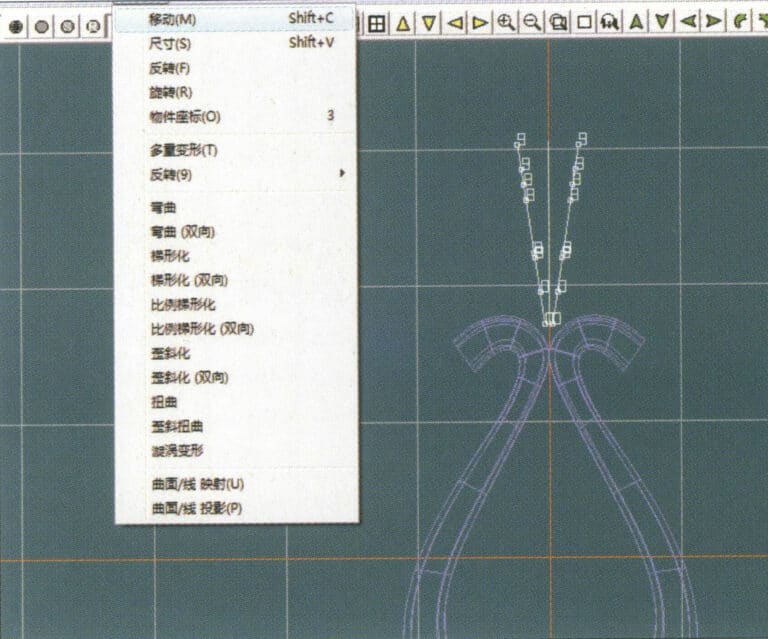
16. Select "Deformation" > "Move" from the menu bar to move the melon seed buckle curve
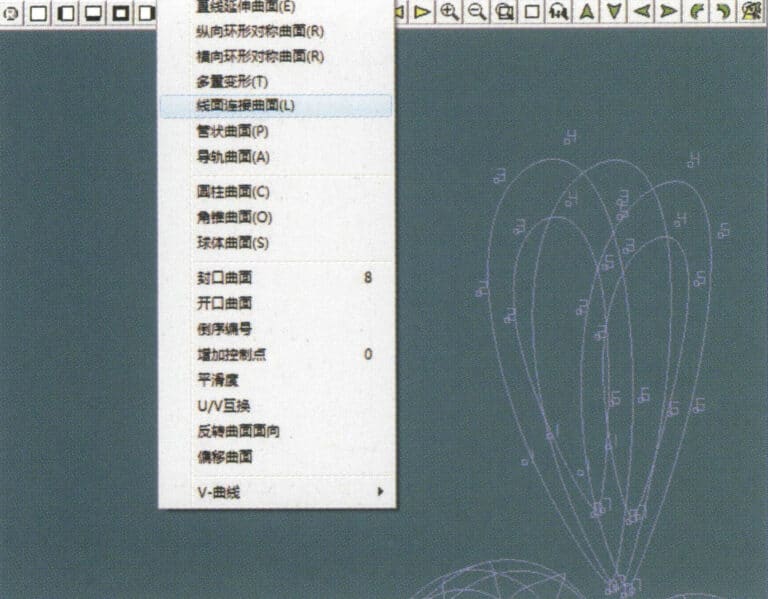
17. Select "Surface" > "Line-Surface Connection Surface" from the menu bar, and select the curve/surface in a clockwise direction to create a line-surface connection surface, then select "Curve" > "Closed Surface" from the menu bar
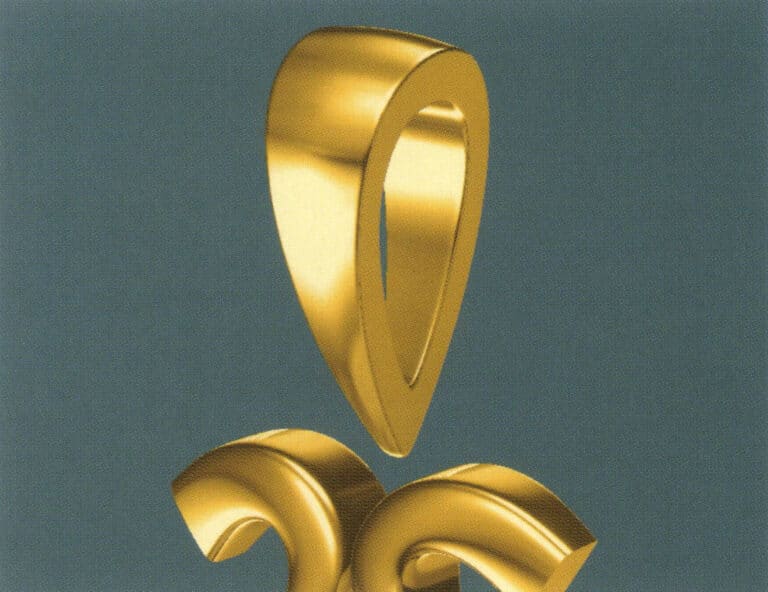
18. Select "View" > "Shadow Map" from the menu bar to examine the shadow effects
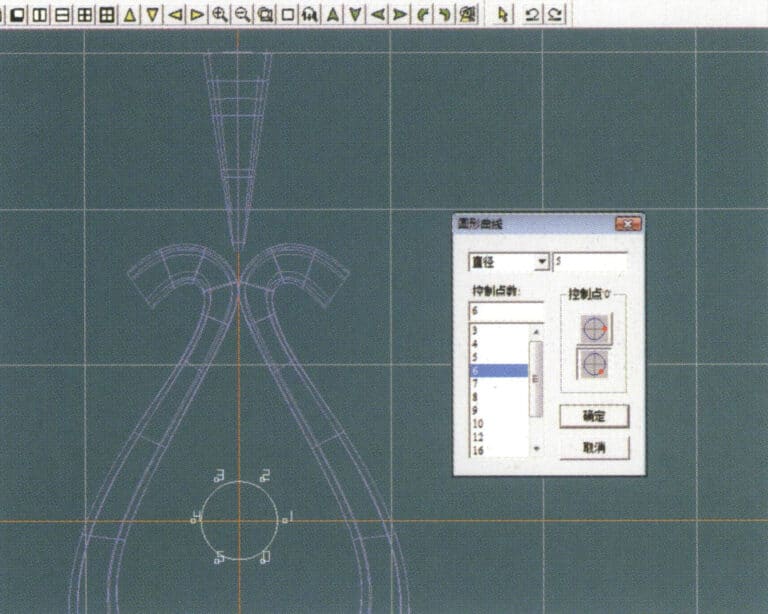
19. Select "Curve" > "Circular Curve" from the menu bar, enter the relevant values and confirm

20. Select "Surface" > "Tubular Surface" from the menu bar
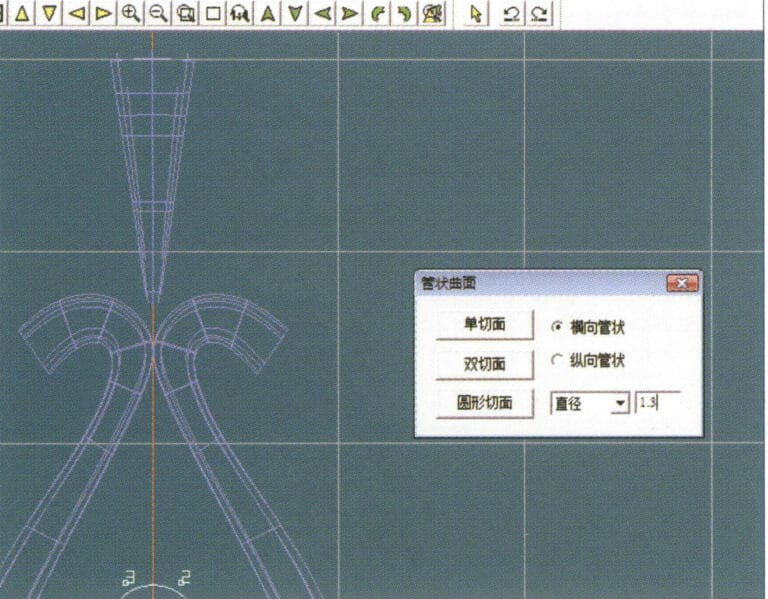
21. Siirry "Putkimainen pinta" -valintaikkunaan, syötä asiaankuuluvat arvot, napsauta ympyrän muotoista osaa ja vahvista.
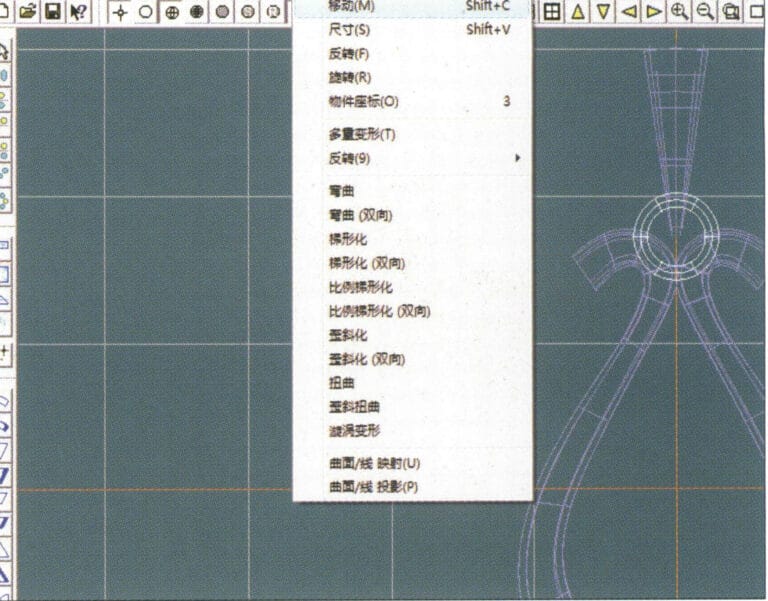
22. Select "Deformation" > "Move" from the menu bar to move the ring buckle

23. Select "File" > "Insert File" from the menu bar
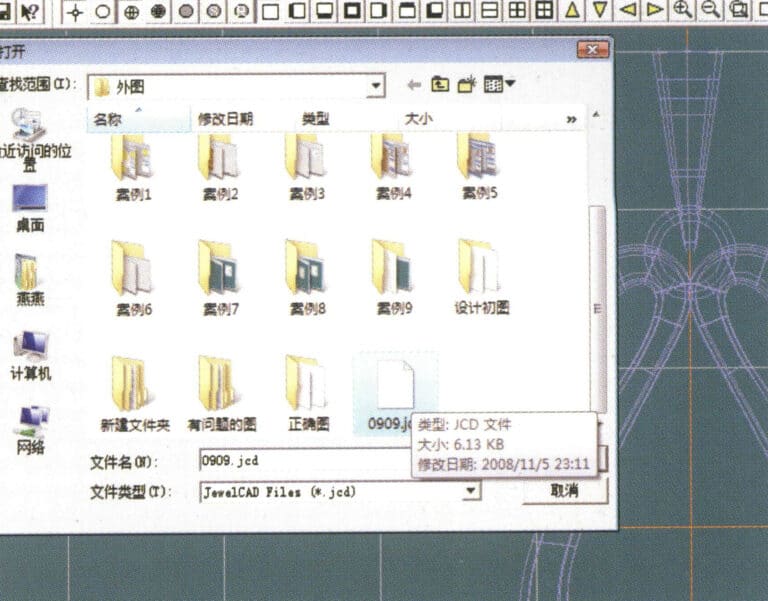
24. Siirry "Lisää tiedosto" -valintaikkunaan, valitse haluamasi asiakirja ja vahvista.
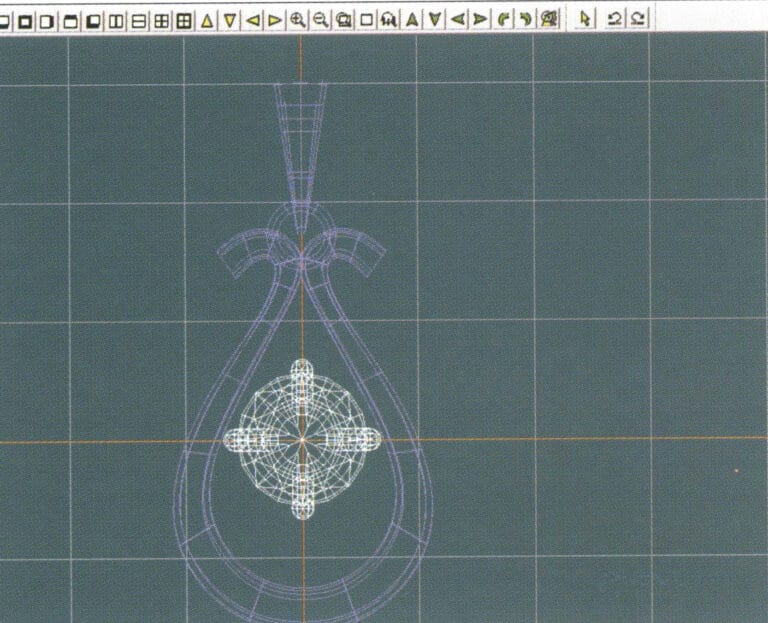
25. Näytä lisätty tiedosto - Gemstone
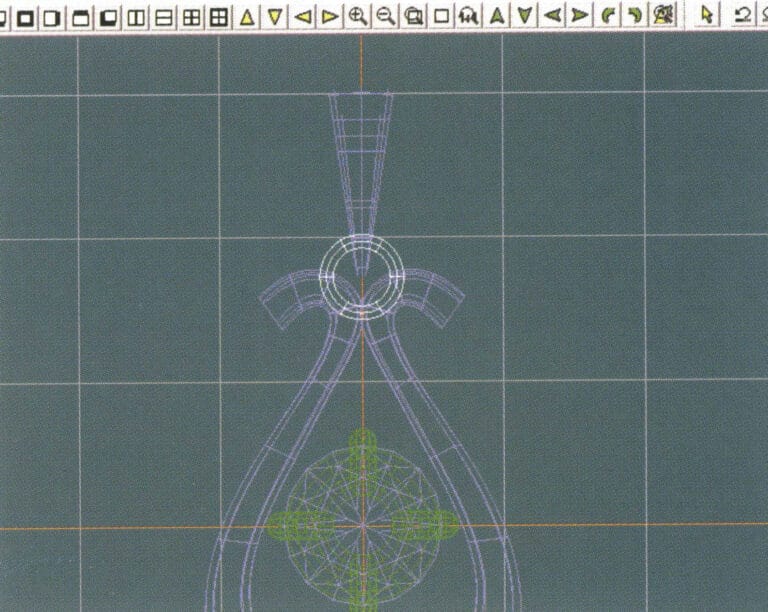
26. Select "Copy" > "Copy Up and Down" from the menu bar to copy the selected toggle
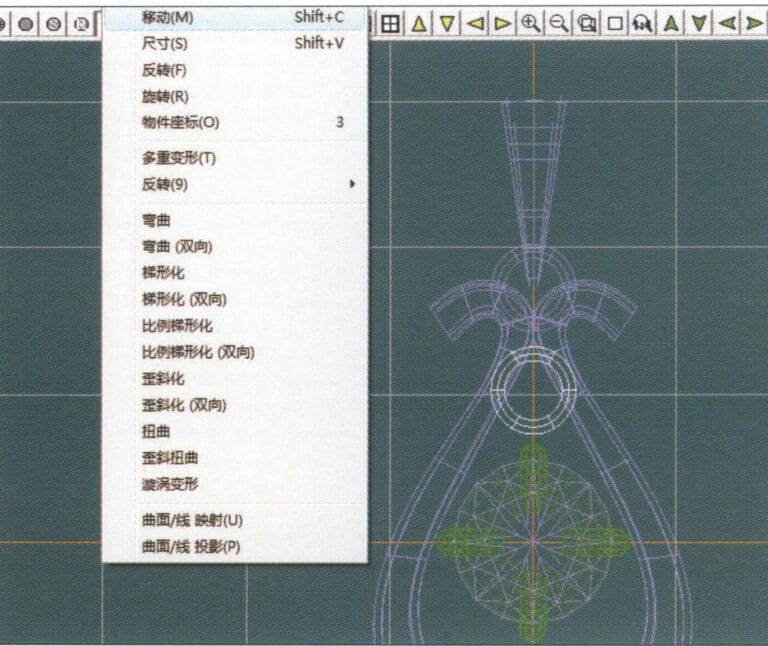
27. Select "Deformation" > "Move" from the menu bar to move the horizontal ring toggle
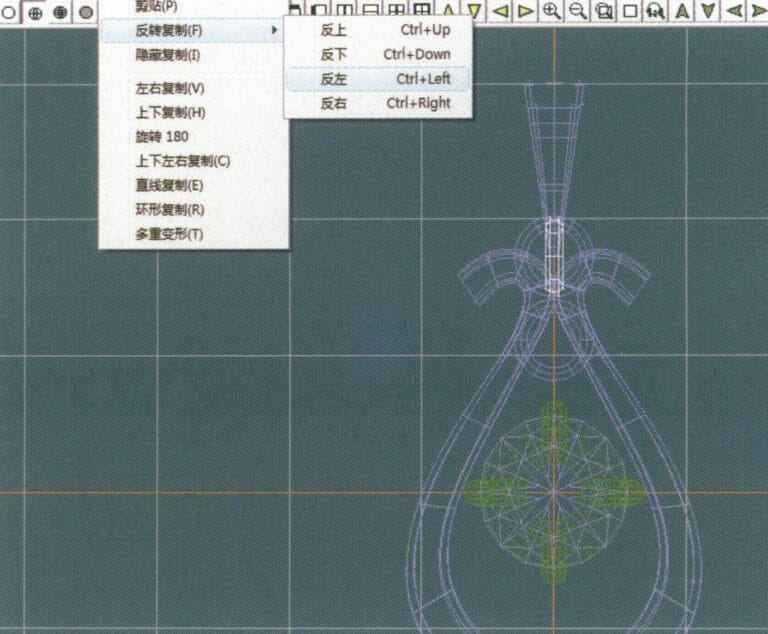
28. Select "Copy" > "Reverse Copy" > "Reverse Left" from the menu bar to create a vertical ring toggle
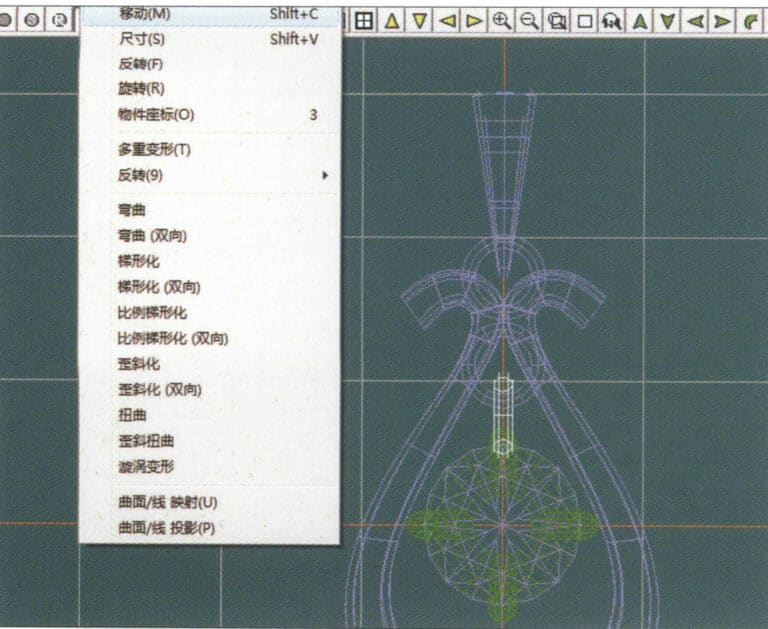
29. Select "Deformation" > "Move" from the menu bar to move the horizontal ring toggle
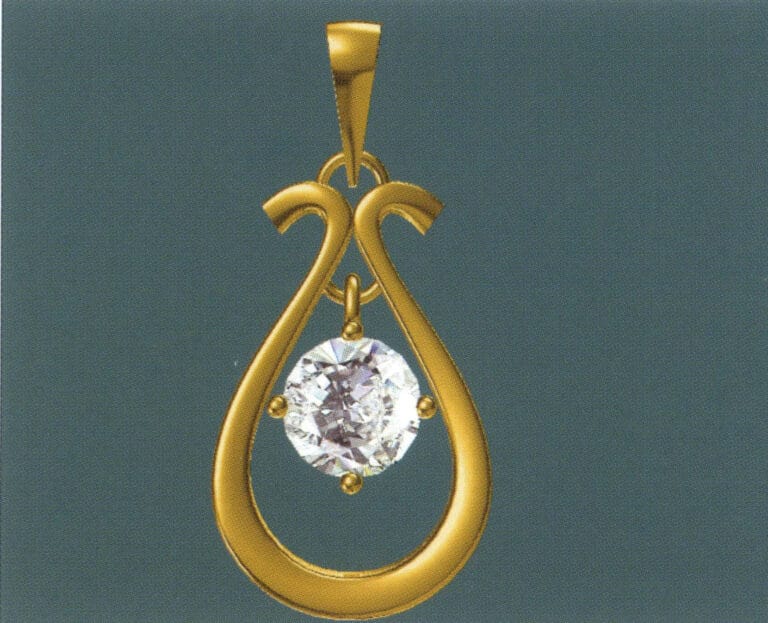
30. Select "View" > "Shadow Map" from the menu bar to examine the light and shadow effects
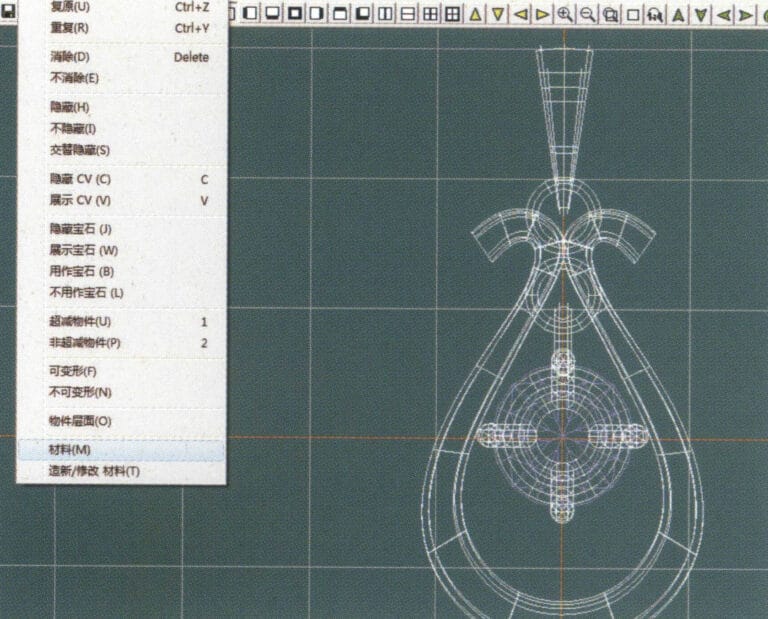
31. Select "Edit" > "Materials" from the menu bar to modify the materials of the selected object
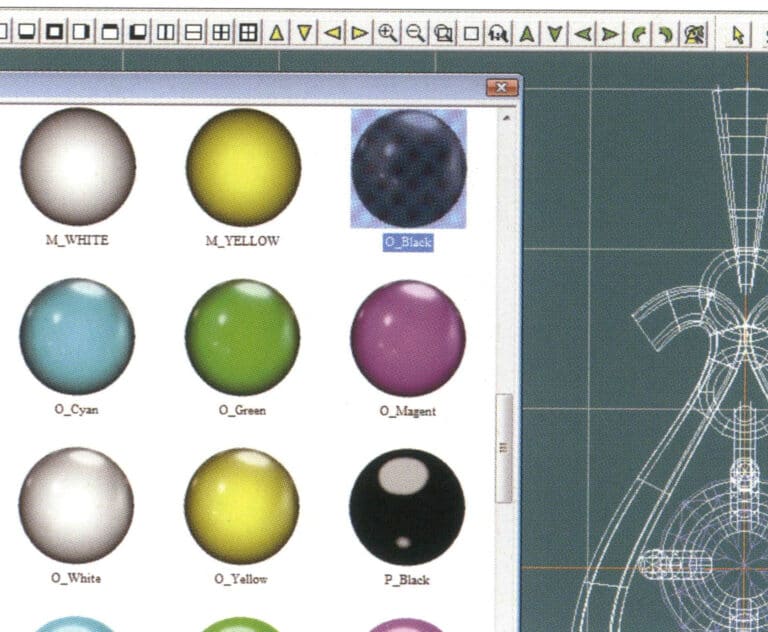
32. Siirry "Materiaalit"-valintaikkunaan, valitse musta kulta ja vahvista.
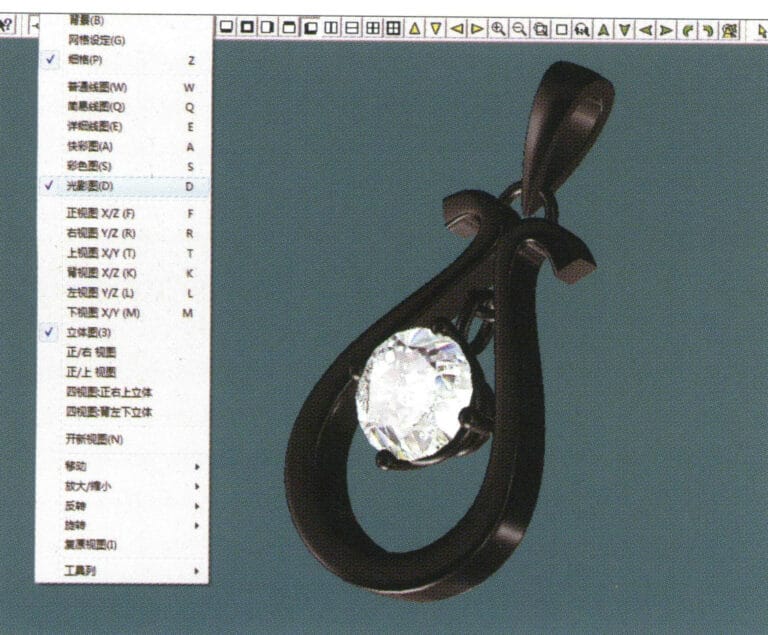
33. Select "View" > "Shadow Map" from the menu bar to inspect the shadow effects
34. Select "File" > "Save As" from the menu bar to save the file
4. Rubiini riipus
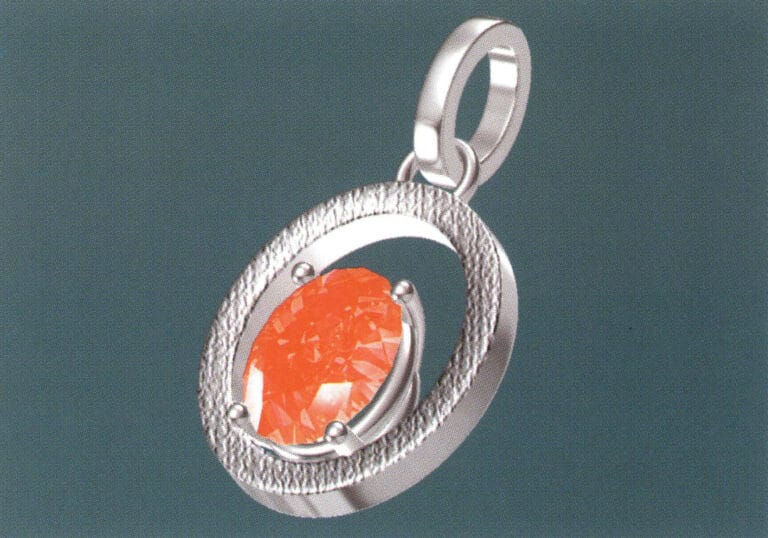
Tuotannon vaiheet ovat seuraavat:
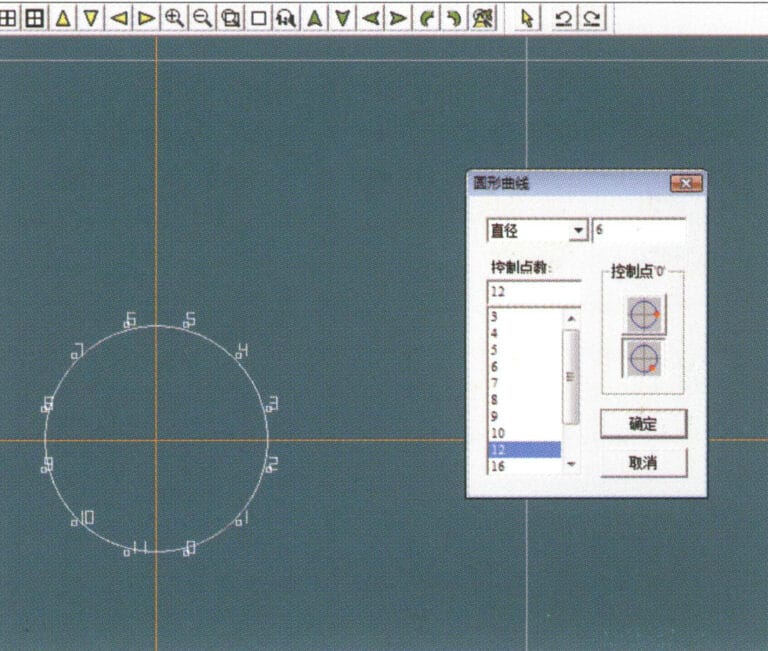
1. Create a new file in JewelCAD, select "Curve" > "Circular Curve" from the menu bar, enter the relevant values in the "Circular Curve" dialog box as the inner auxiliary line, and confirm

2. Select "Curve" > "Circular Curve" from the menu bar, enter the relevant values in the "Circular Curve" dialog box as the external auxiliary line, and confirm
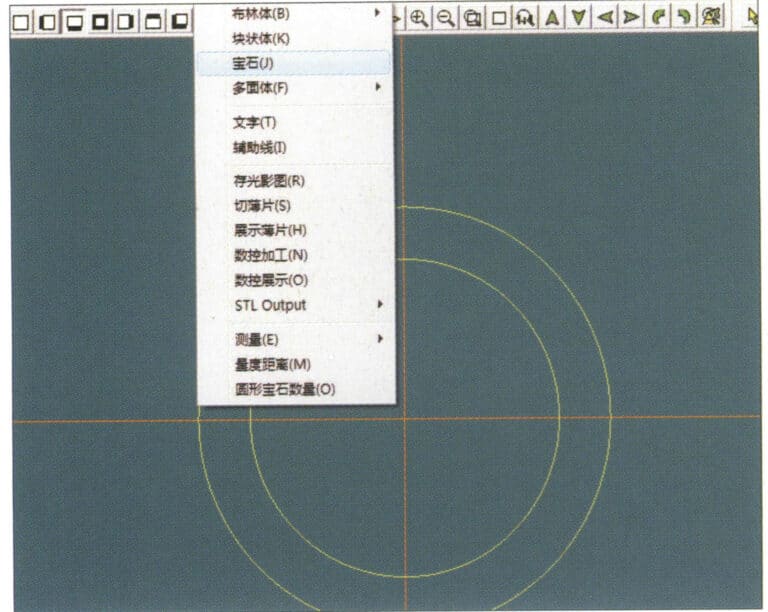
3. Select "Miscellaneous" > "Gemstones" from the menu bar
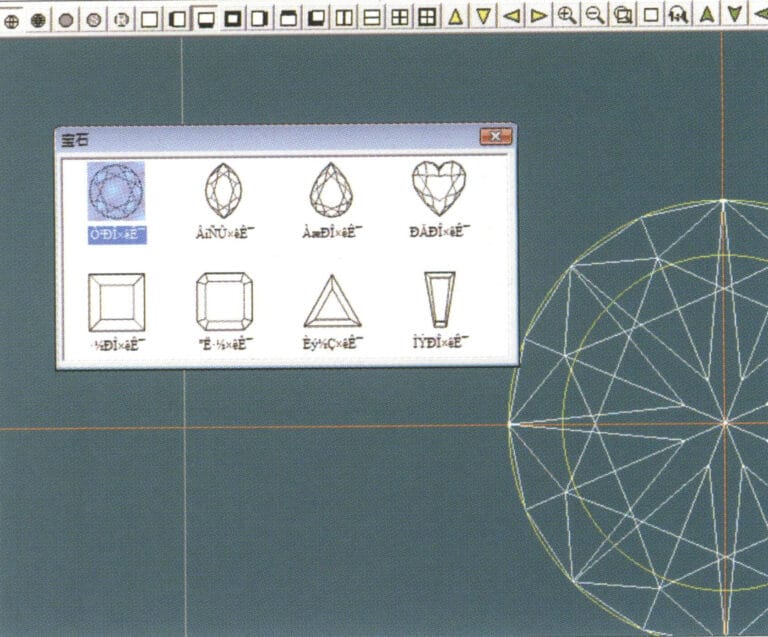
4. Siirry "Jalokivi"-valintaikkunaan, valitse tarvittavat jalokivet ja vahvista.
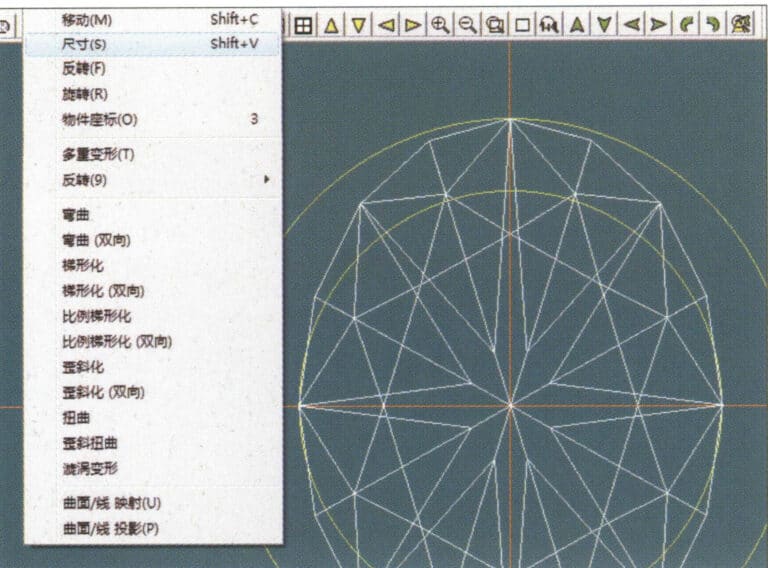
5. Select "Deformation" > "Size" from the menu bar to change the round gemstone into an oval gemstone
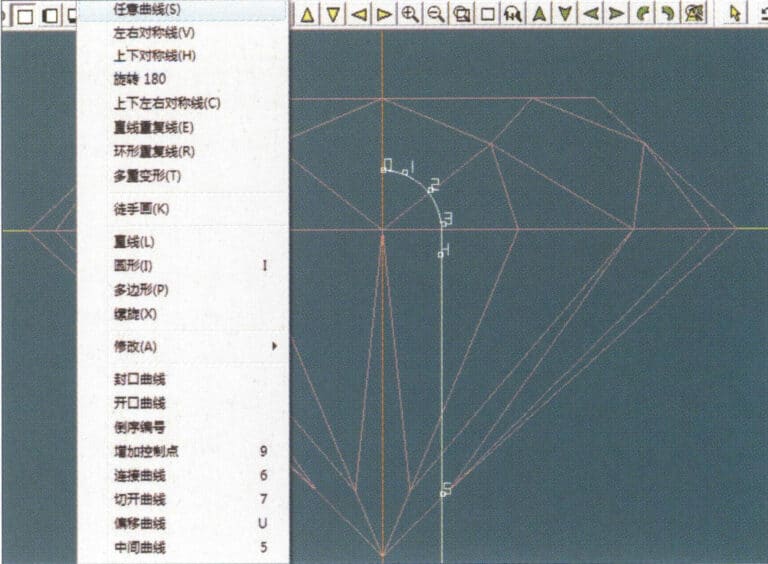
6. Select "Curve" > "Freeform Curve" from the menu bar to draw a claw-shaped guideline
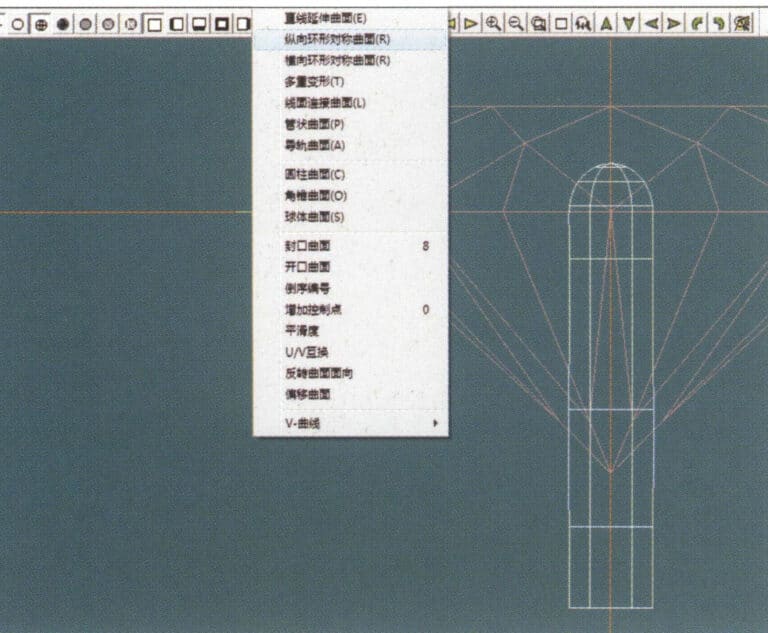
7. Select "Surface" > "Longitudinal Circular Symmetrical Surface" from the menu bar, and draw a claw shape
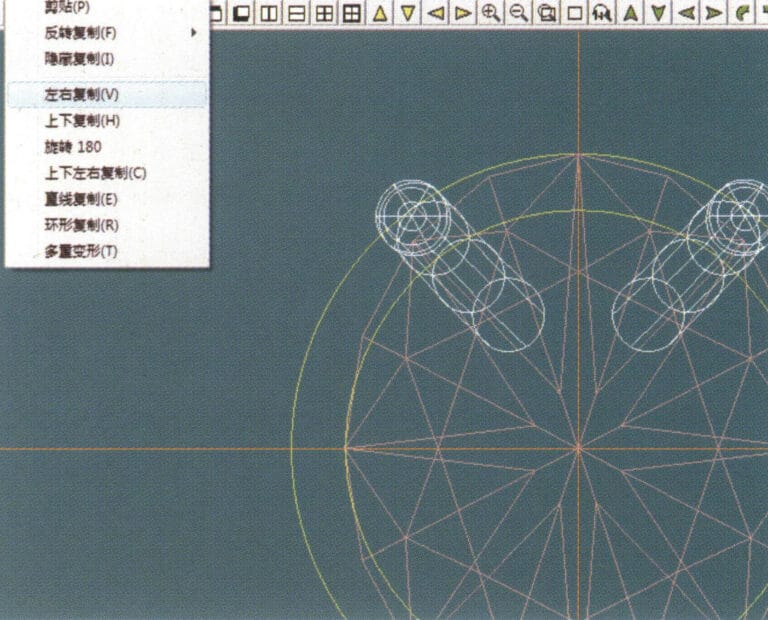
8. Select "Copy" > "Copy Left and Right" from the menu bar to copy the claw shape
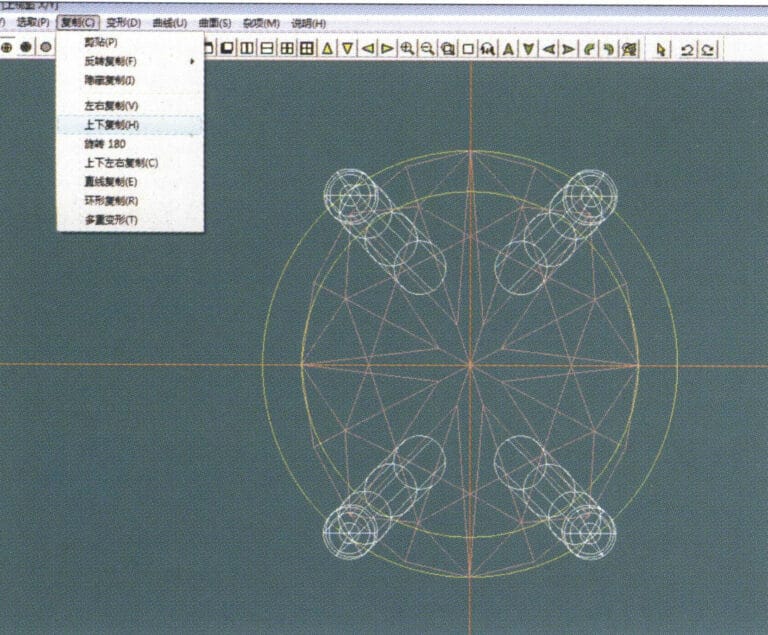
9. Select "Copy" > "Copy Up and Down" from the menu bar to copy the claw shape again
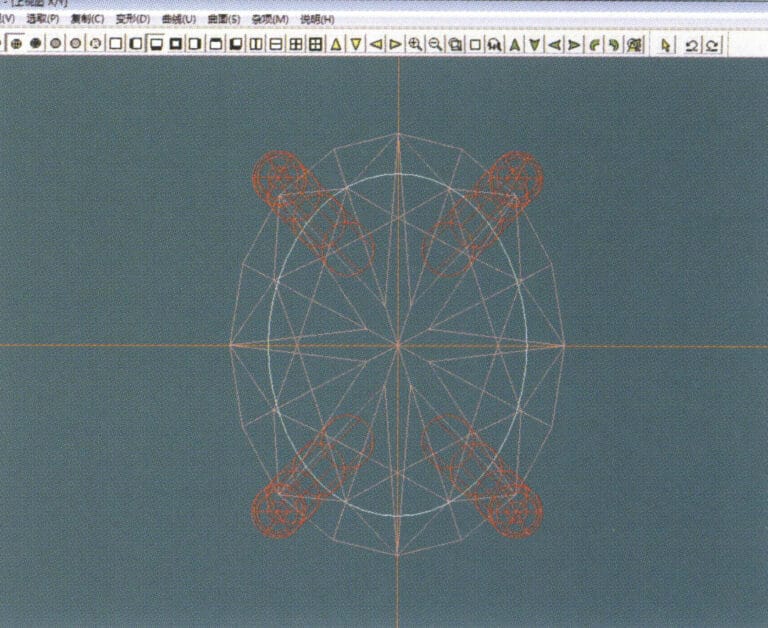
10. Select "Deformation" > "Size" from the menu bar to change the circular guideline to an elliptical guideline
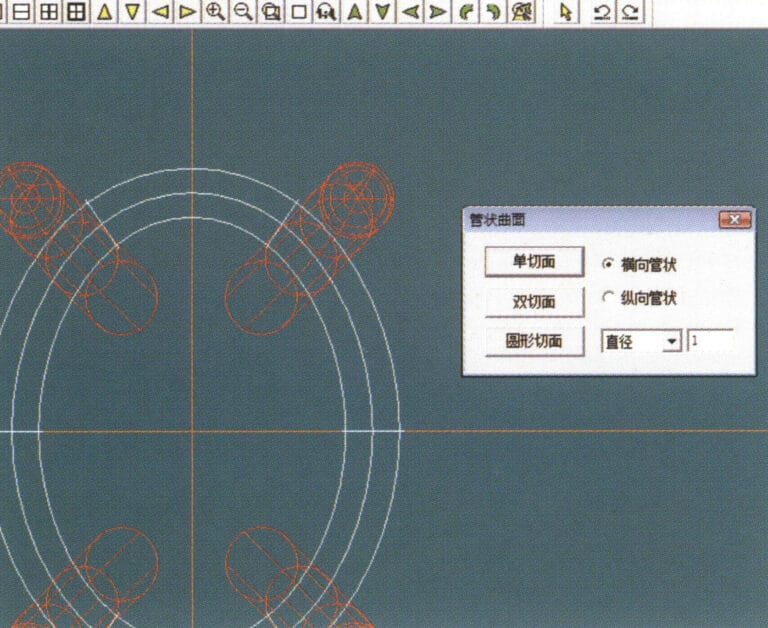
11. Select "Curved Surface" > "Tubular Surface" from the menu bar, enter the relevant values in the "Tubular Surface" dialog box and confirm
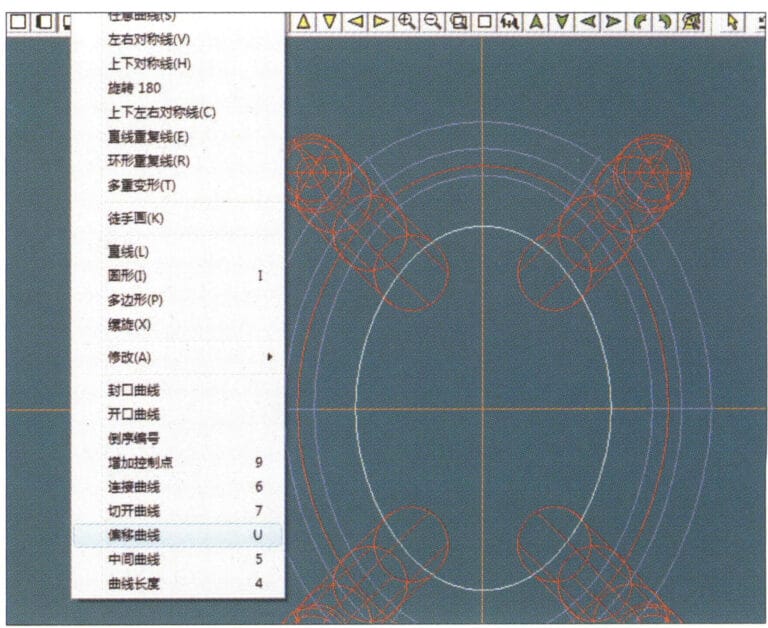
12. Select "Curve" > "Offset Curve" from the menu bar
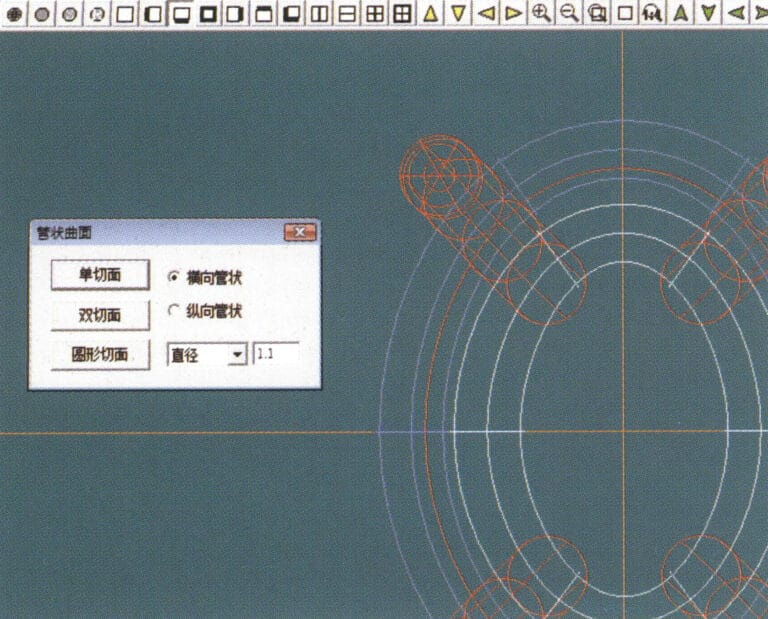
13. Select "Surface" > "Tubular Surface" from the menu bar, enter the relevant values and confirm
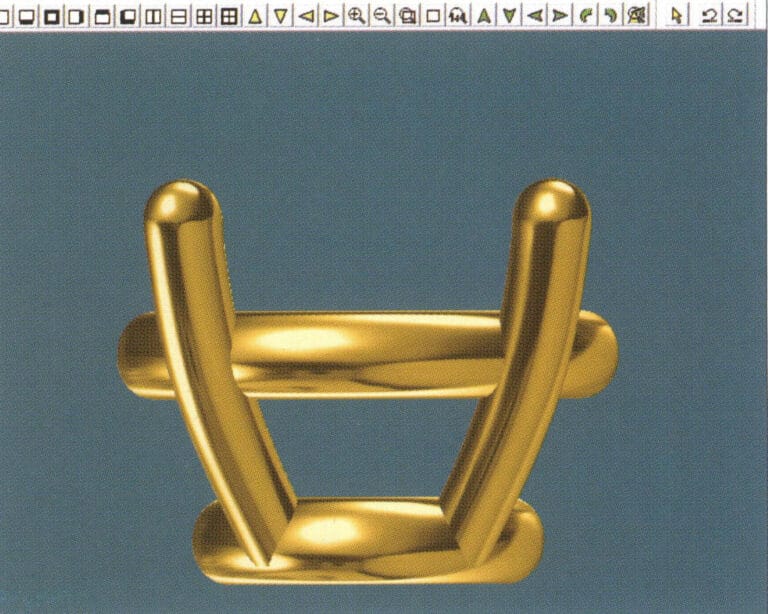
14. Select "View" > "Shadow Map" from the menu bar to examine the shadow effects and inspect the setting
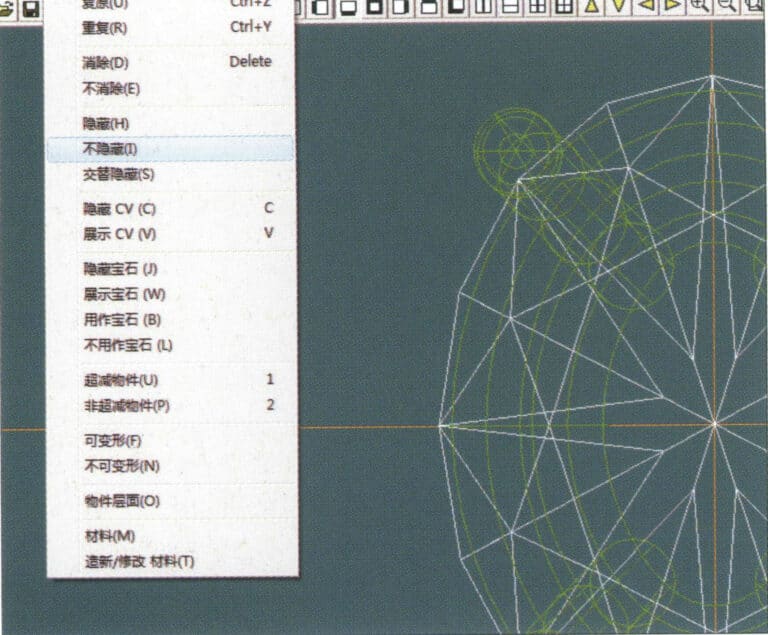
15. Select "Edit" > "Unhide" from the menu bar to display the hidden gems
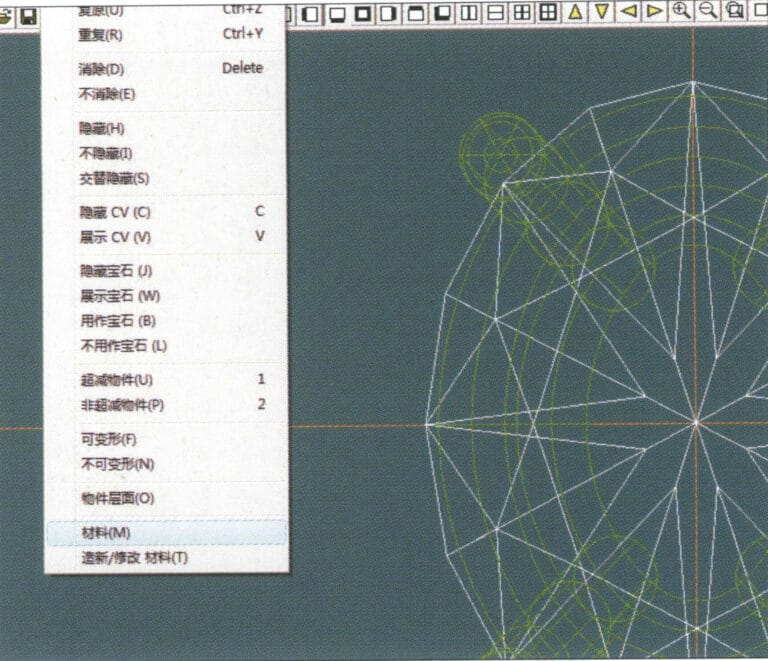
16. Select "Edit" > "Materials" from the menu bar
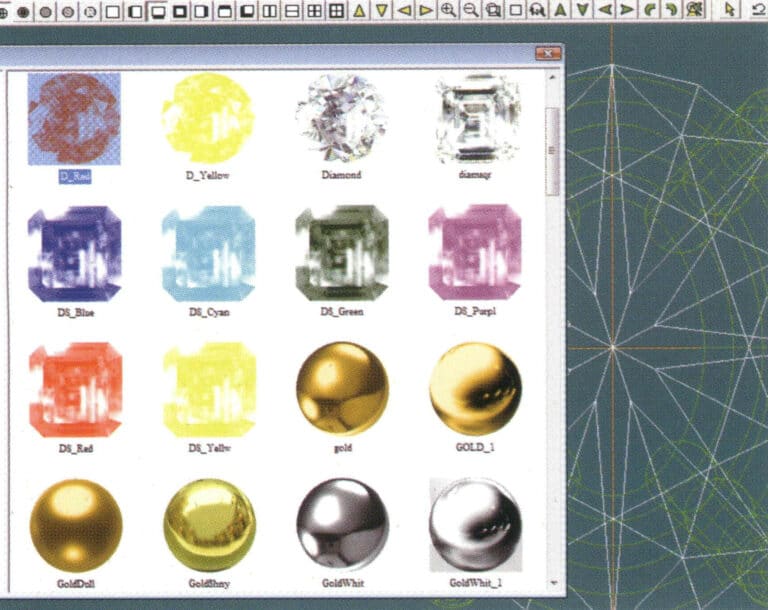
17. Siirry "Materiaalit"-valintaikkunaan, valitse ruby ja vahvista.
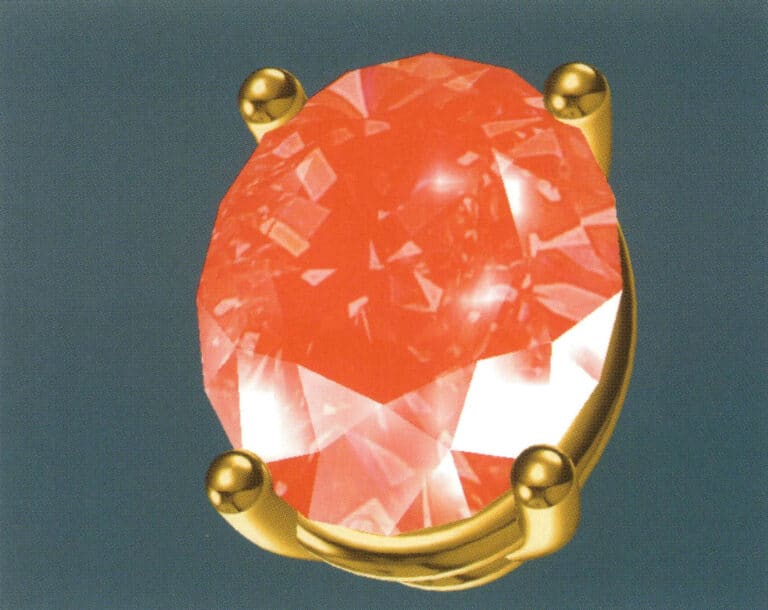
18. Select "View" > "Shadow Map" from the menu bar to examine the shadow effects
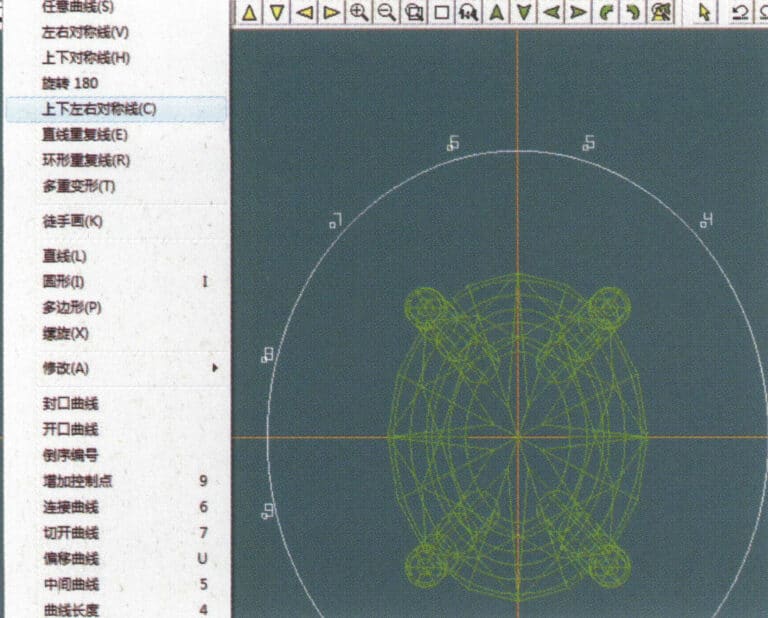
19. Select "Curve" > "Vertical and Horizontal Symmetry Line" from the menu bar as the auxiliary line for the outer circle
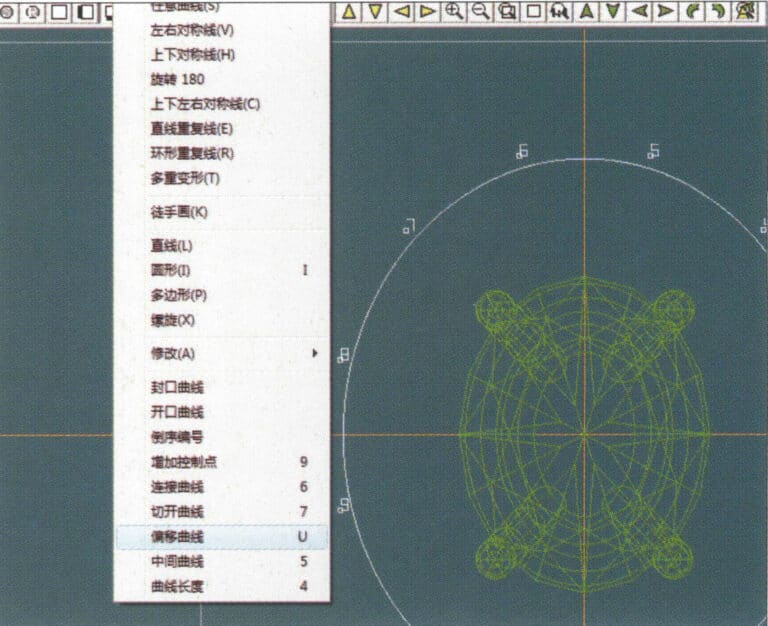
20. Select "Curve" > "Offset Curve" from the menu bar

21. Siirry "Offset Curve" -valintaikkunaan, syötä asiaankuuluvat arvot sisäympyrän apuviivoiksi ja vahvista.
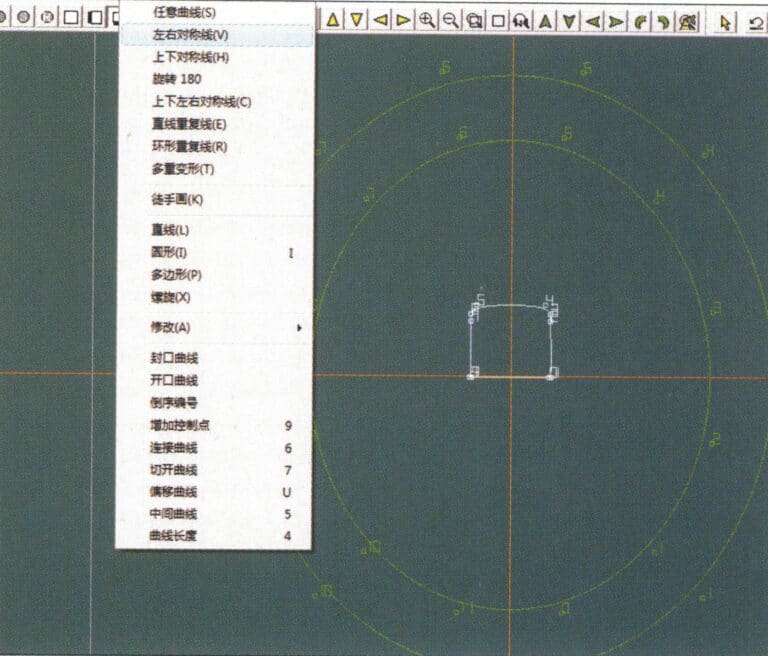
22. Select "Curve" > "Left-Right Symmetrical Line" from the menu bar as the cross-section of the coil
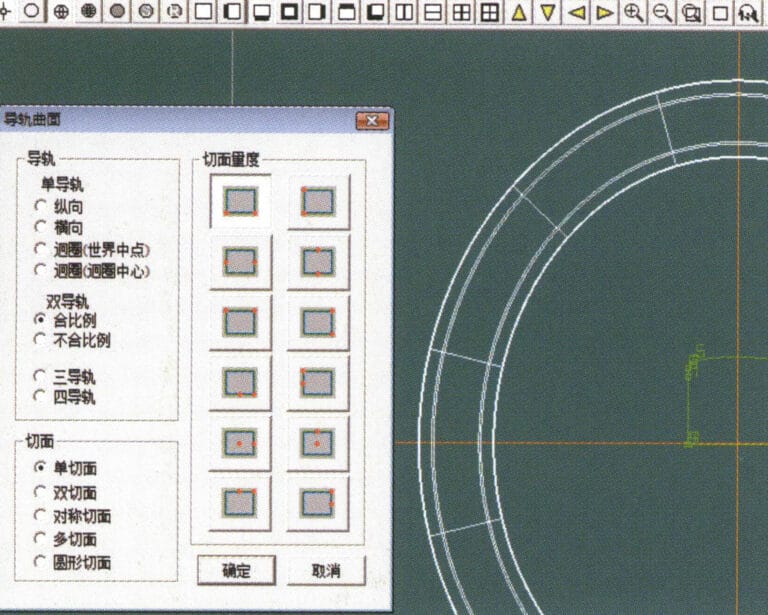
23. Select "Curved Surface" > "Rail Surface" from the menu bar to enter the "Rail Surface" dialog box, select the relevant options and confirm
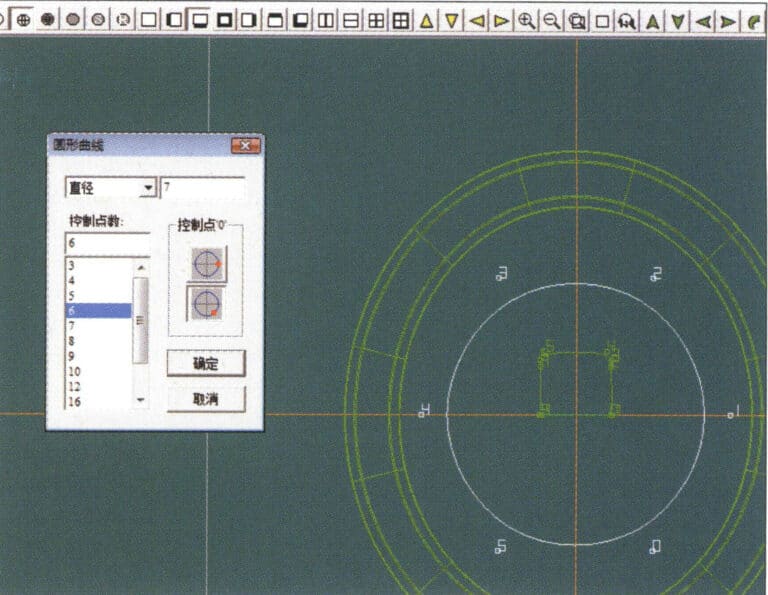
24. Select "Curve" > "Circular Curve" from the menu bar, enter the relevant values in the "Circular Curve" dialog box, and confirm; left-click on one curve as the left guide curve, click on another curve as the right guide rail, and then select the coil cross-section as the cross-section of the guide rail surface; once completed, it serves as the auxiliary line for the outer circle of the chain threading position
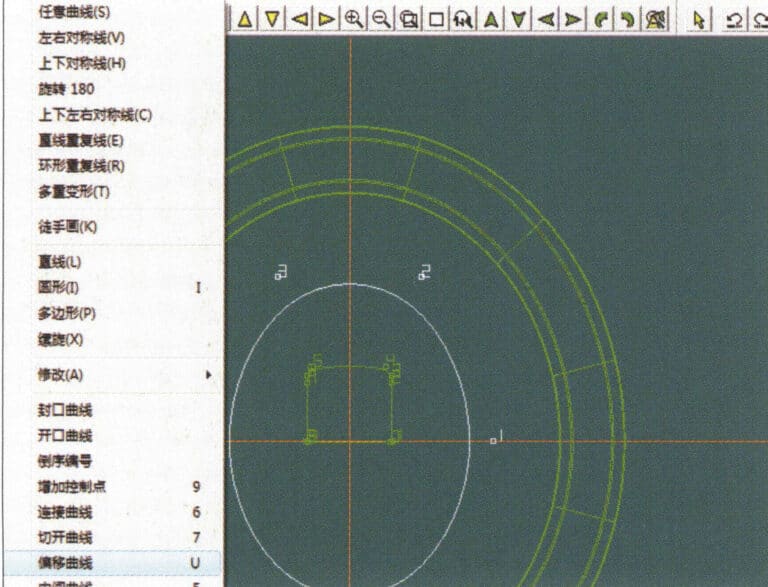
25. After completing the outer auxiliary lines for the chain position, select "Curve" > "Offset Curve" from the menu bar
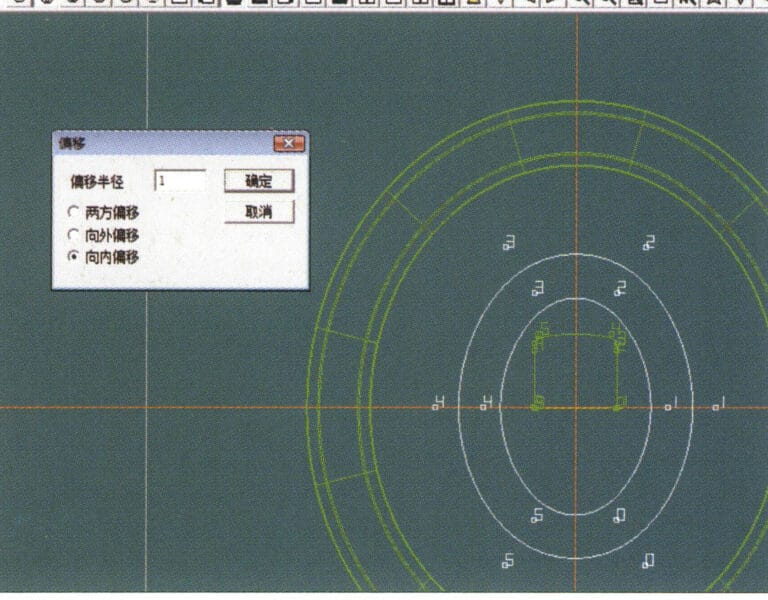
26. Siirry "Offset Curve" -valintaikkunaan, syötä tarvittavat arvot ja vahvista.
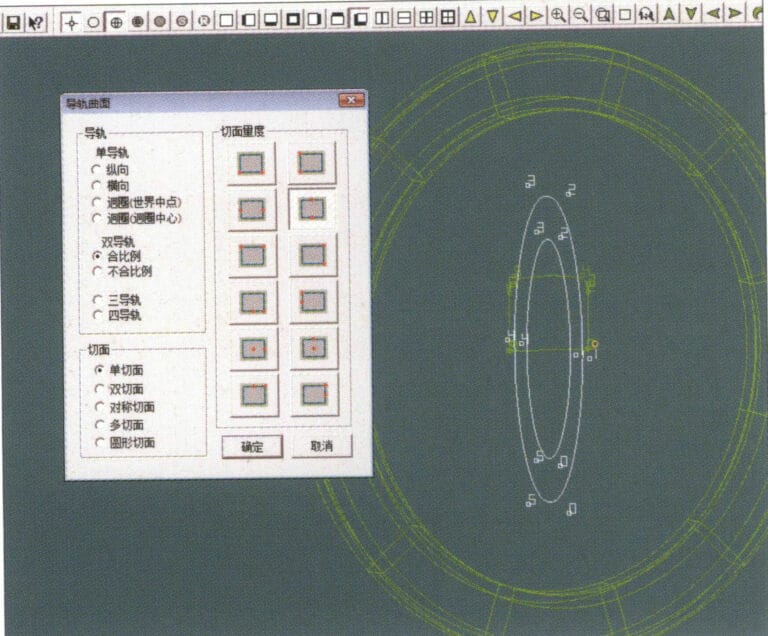
27. Select "Surface" > "Rail Surface" from the menu bar to enter the "Rail Surface" dialog box, select the relevant options and confirm, left-click on a curve to set it as the left rail curve, click on another curve to set it as the right rail, and then select the coil cross-section as the cross-section of the rail surface
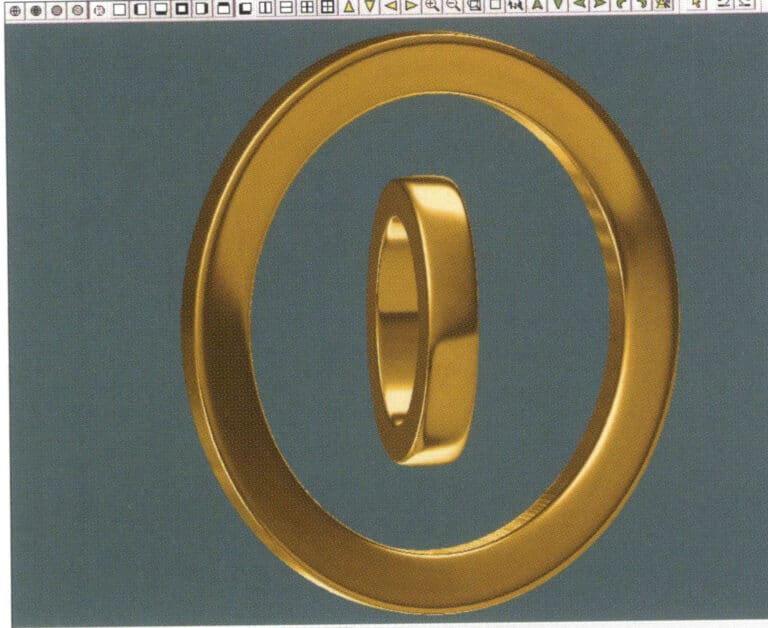
28. Select "View" > "Shadow Map" from the menu bar to inspect the shadow effects
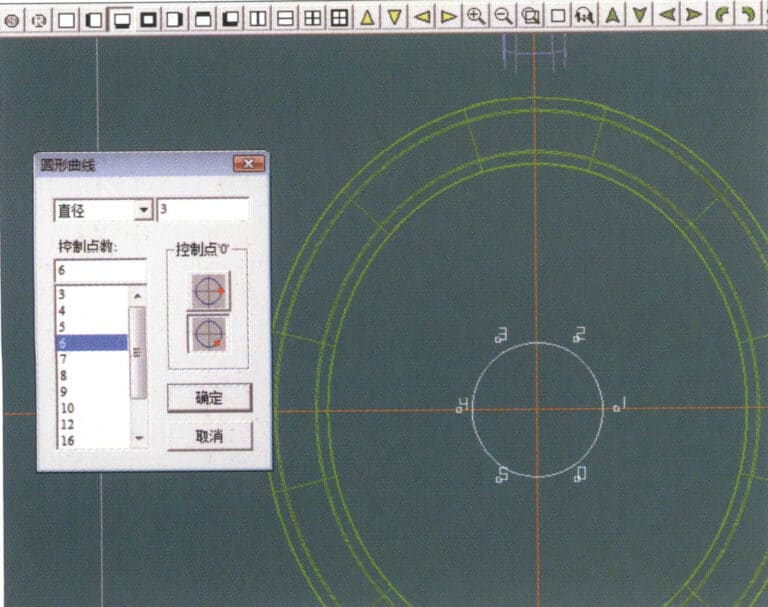
29. Select "Curve" > "Circular Curve" from the menu bar, enter the relevant values and confirm
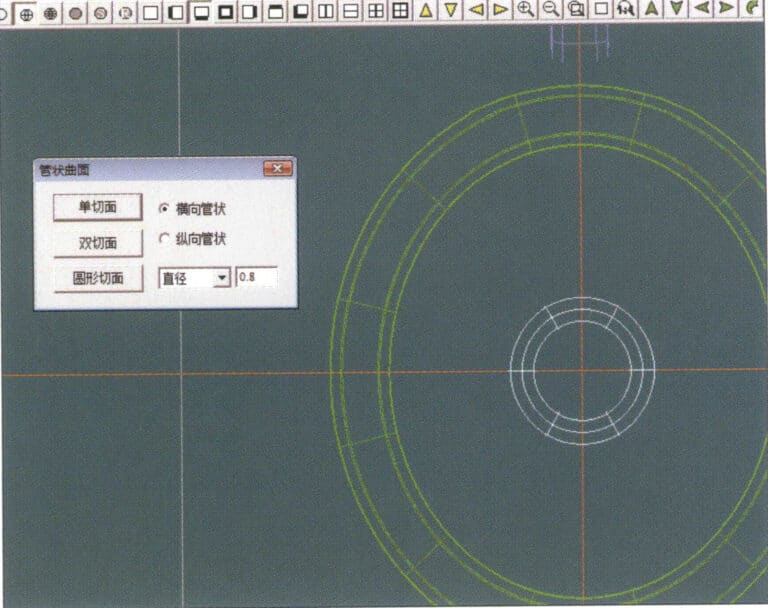
30. Select "Curved Surface" > "Tubular Surface" from the menu bar, enter the relevant values and confirm
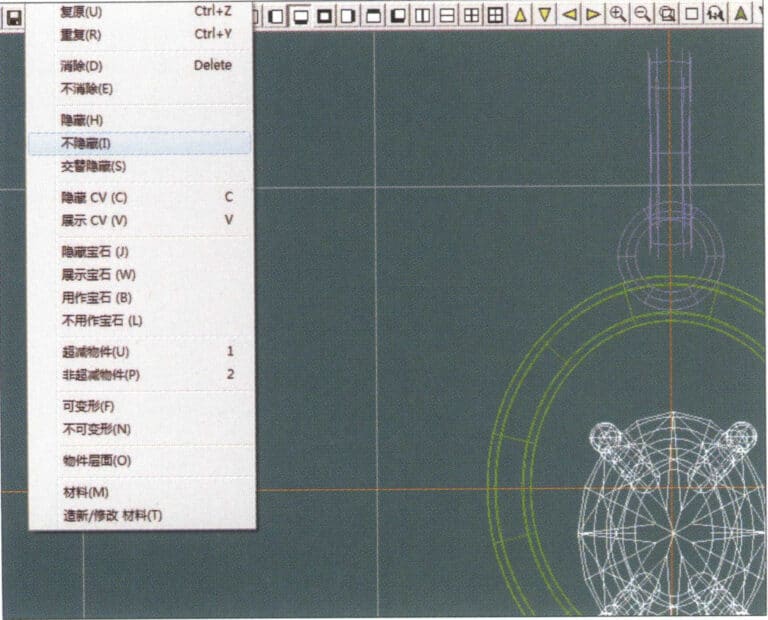
31. Select "Edit" > "Unhide" from the menu bar to display the hidden objects
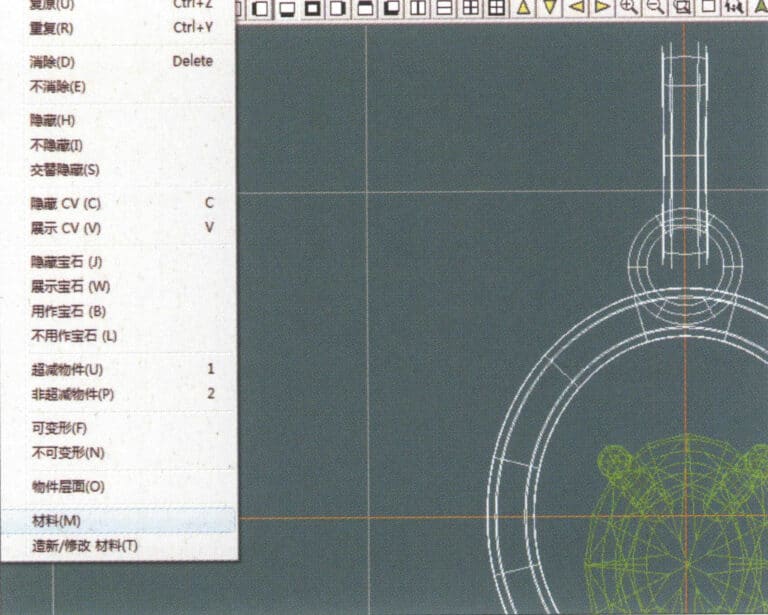
32. Select "Edit" > "Materials" from the menu bar
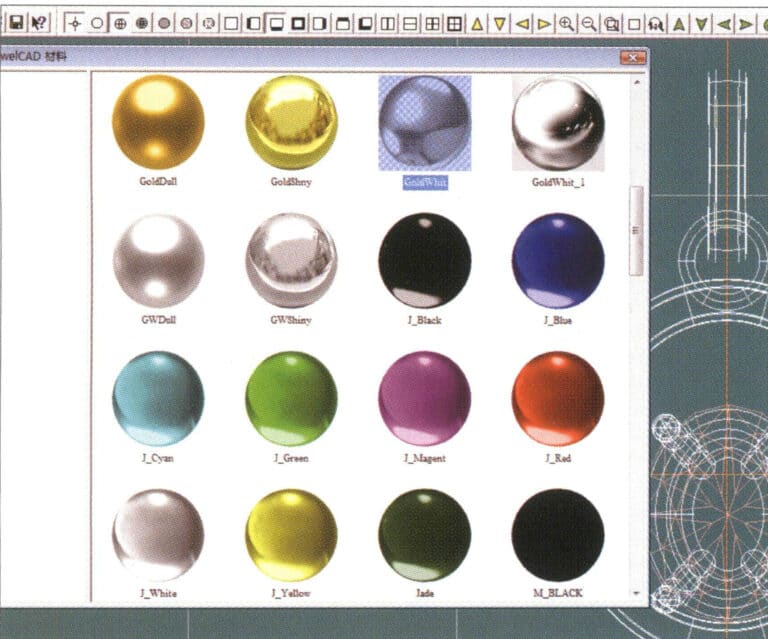
33. Siirry "Materiaalit"-valintaikkunaan, valitse tarvittavat materiaalit ja vahvista.
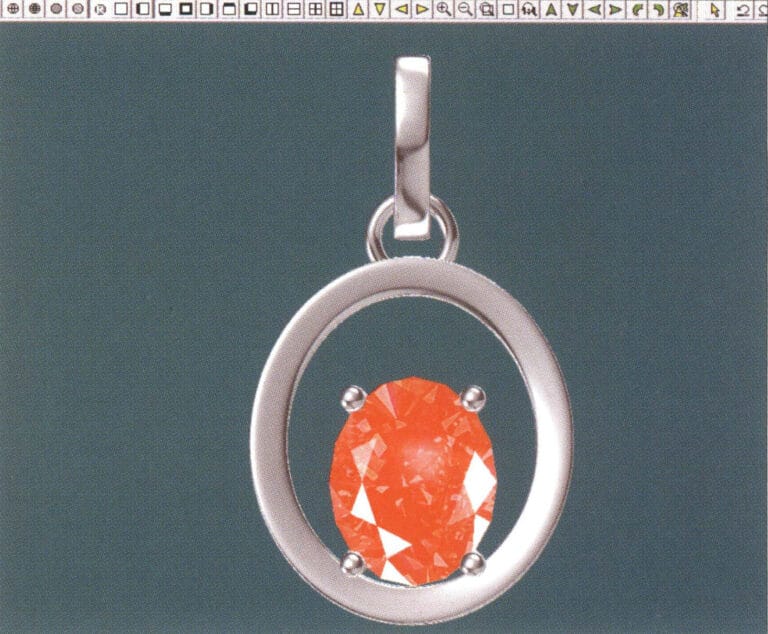
34. Select "View" > "Shadow Map" from the menu bar to inspect the shadow effects
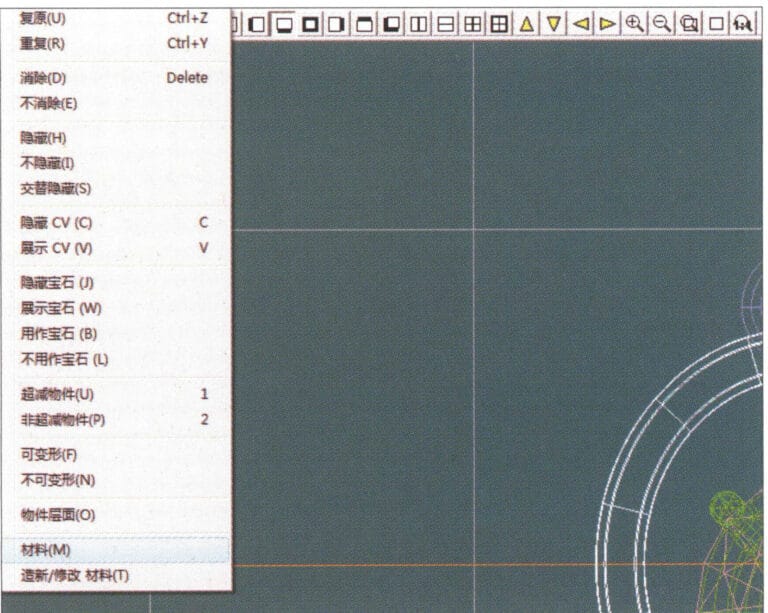
35. Select "Edit" > "Materials" from the menu bar
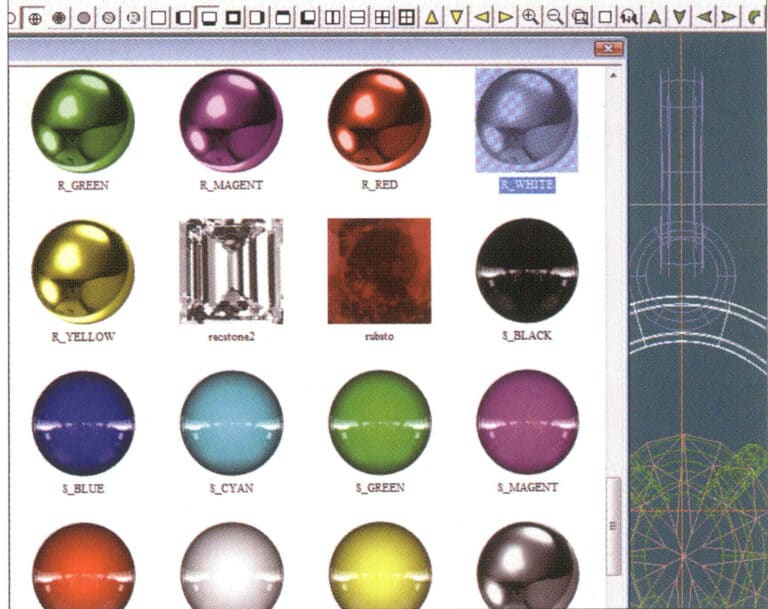
36. Siirry "Materiaalit"-valintaikkunaan, valitse tarvittavat tekstuurimateriaalit ja vahvista.
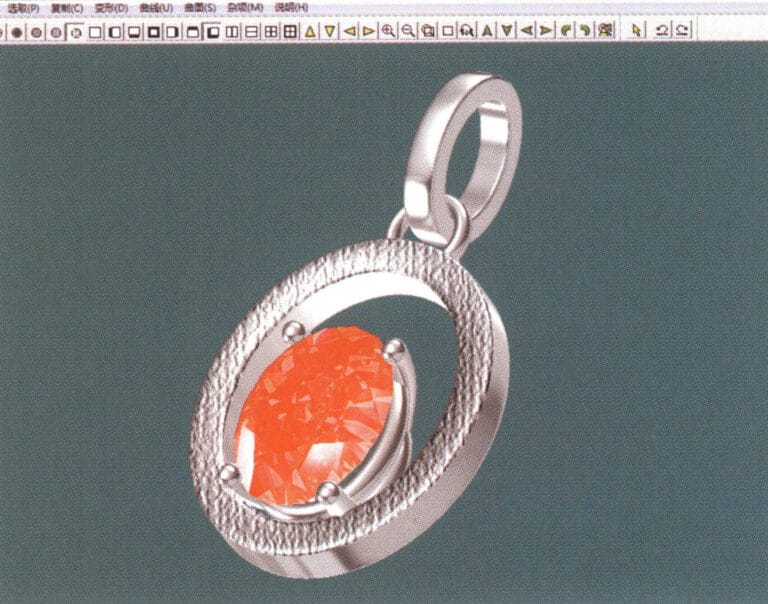
37. Select "View" > "Shadow Map" from the menu bar to inspect the shadow effects
38. Select "File" > "Save As" from the menu bar to save the file


