JewelCAD로 3D 주얼리 모델을 만드는 방법?
JewelCAD 이해, 기본 재질 효과 및 보석 효과 표현하기
소개:
JewelCAD를 사용하여 멋진 주얼리 디자인을 만들려면 무엇이 필요할까요? 이 가이드는 소프트웨어 이해부터 머티리얼 효과 마스터하기, 세부적인 주얼리 모델 제작까지 모든 것을 다룹니다. 반지, 펜던트 등을 디자인하는 단계별 지침을 통해 아이디어를 실현하는 방법을 알아보세요. 주얼리 디자이너, 스튜디오, 브랜드가 기술을 향상시키고자 할 때 JewelCAD가 필수 도구인 이유를 알아보세요.
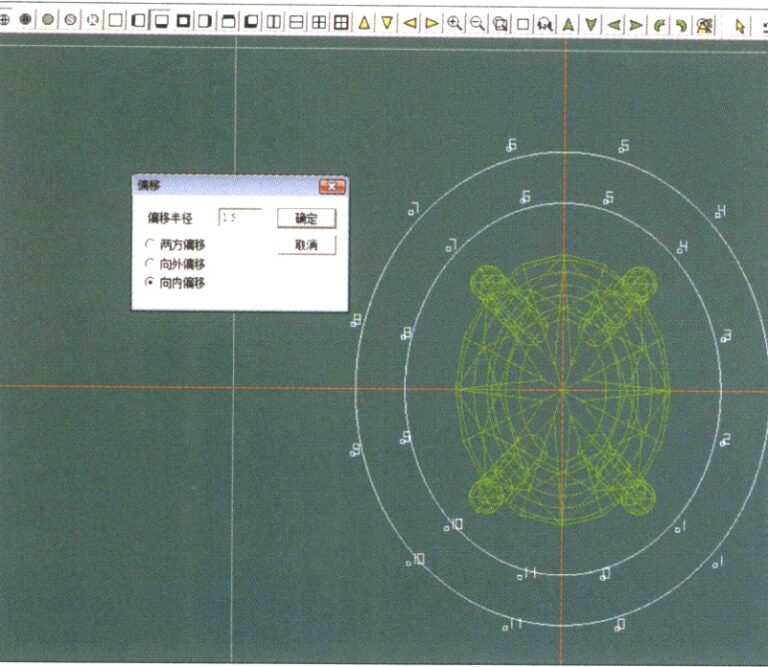
다이아몬드 회전 세팅 링
목차
섹션 I JewelCAD의 이해
JewelCAD는 1990년 홍콩의 CAD/CAM 회사에서 성공적으로 개발한 주얼리 전용 컴퓨터 지원 설계 시스템 소프트웨어입니다. 10년이 넘는 개발과 개선 과정을 거쳐, JewelCAD는 제한된 기능의 도면 소프트웨어에서 강력하고 안정적이며 고도로 전문화되고 효율적인 전문 주얼리 디자인/제조 소프트웨어로 발전하여 유럽, 미국 및 아시아의 주요 주얼리 생산 분야에서 널리 채택되고 있습니다.
주얼리 산업의 생산 및 가공 자동화로 효율성이 크게 향상되었지만, JewelCAD는 현대 주얼리 디자인에 적합하며 현재 상용 애플리케이션에 널리 보급되어 있습니다. 고유한 모델링 개념과 도구를 통해 주얼리 디자이너는 3차원 주얼리 개체를 쉽게 만들 수 있으며, CNC 및 RP 래피드 프로토타이핑과 완벽하게 통합되어 광범위한 발전 가능성을 지닌 현대적인 주얼리 디자인 소프트웨어로 자리 잡았습니다. 전문 주얼리 디자인 소프트웨어로서 JewelCAD는 주얼리의 3차원 모델을 만드는 데 있어 다른 3D 소프트웨어에 비해 분명한 장점이 있으며, 이는 다음과 같은 이점에 반영되어 있습니다.
(1) 조작이 쉽고 간단하며 배우기 쉽습니다.
(2) 유연한 그리기 도구가 있어 곡선이나 복잡한 모양을 그리는 데 매우 편리합니다.
(3) 복잡한 디자인을 유연하게 생성하거나 수정할 수 있는 강력한 표면 모델링 도구가 있습니다.
(4) 렌더링 속도가 빠르며 다양한 디자인 효과 이미지를 비교할 수도 있습니다. 효과 이미지의 품질이 높고 시뮬레이션이 강력합니다. It a로 회전하여 입체적인 효과를 관찰하고 최종 제품 효과를 직관적으로 반영합니다.
(5) 작동이 매우 효율적이며 주얼리 스타일 변경에 적합합니다.
(6) 풍부한 전문 데이터베이스와 다양한 편집 도구를 통해 보석의 조합과 재디자인이 용이해져 작업이 더욱 편리하고 효율적입니다.
(7) 소프트웨어에서 부울 연산 원리를 적용하면 자유 상태인 서페이스를 쉽게 결합할 수 있습니다.
(8) 디자인에서 금의 무게, 수량, 크기를 직접 계산할 수 있습니다.
(9) 데이터베이스를 구축하여 디자인 아이디어를 시각화하고 효율성을 개선할 수 있습니다.
(10) JewelCAD로 그린 그래픽은 더 선명하고 일관성이 있어 불분명한 글씨나 도면 품질 저하로 인한 오류 발생 가능성이 줄어듭니다. 종이 없는 이미지를 직접 출력할 수 있어 시간, 노력, 비용을 절약할 수 있습니다.
섹션 II JewelCAD를 사용하여 기본 머티리얼 효과 표현하기
1. 샌드블라스팅 마감 효과
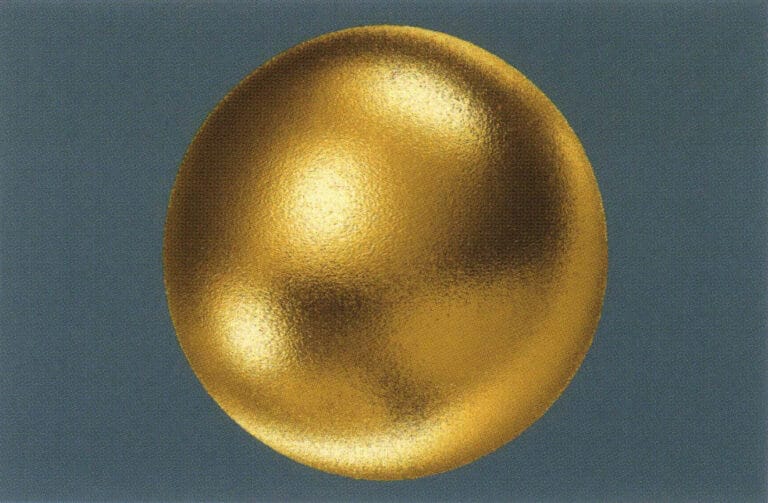
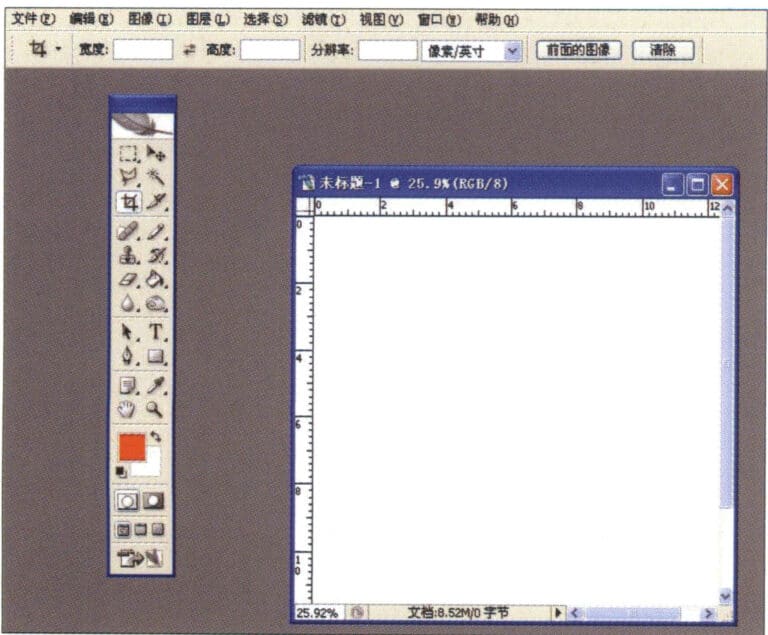
1. 포토샵에서 300픽셀/인치의 해상도로 새 파일을 만듭니다.
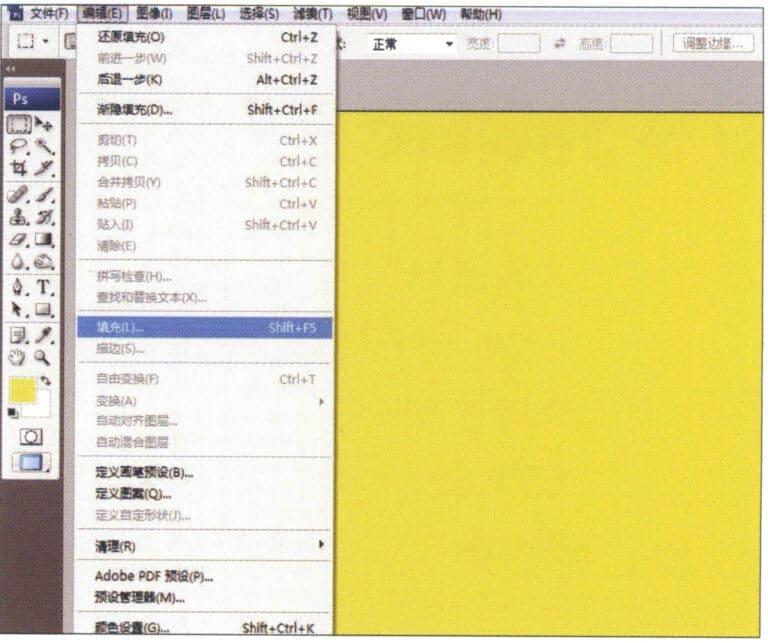
2. Select "Edit" > "Fill" from the menu bar, and set the foreground color to yellow

3. Select "Filter" from the menu bar > "Mottled" > "Add Mottled"
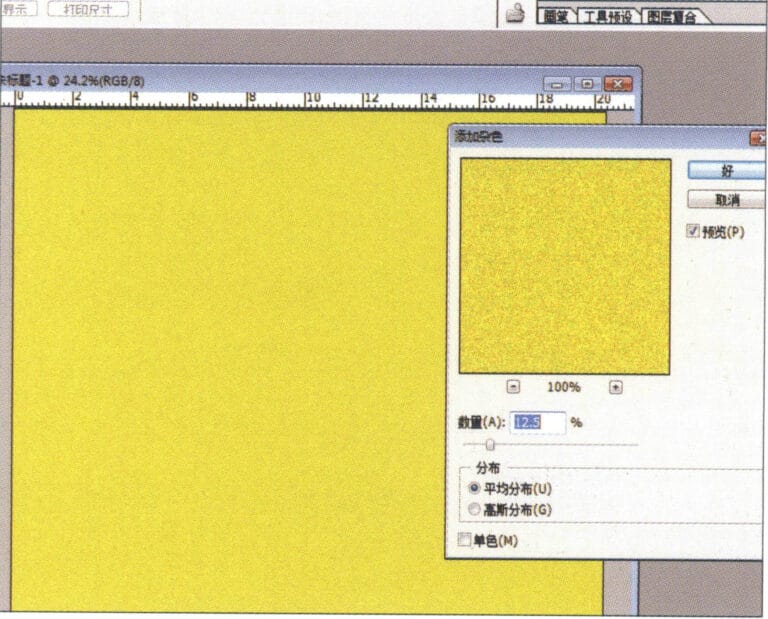
4. "얼룩덜룩 추가" 대화 상자를 입력하고 관련 값을 입력한 후 확인합니다.
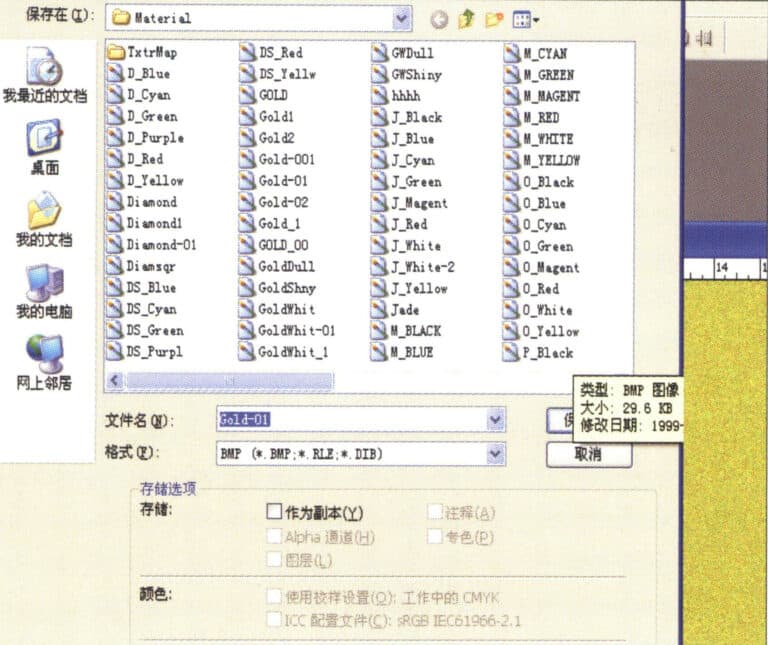
5. Store the document in the "JewelCAD" > "Material" folder, saved in "BMP" format

6. Create a new file in JewelCAD, select "Surface" > "Spherical Surface" from the menu bar
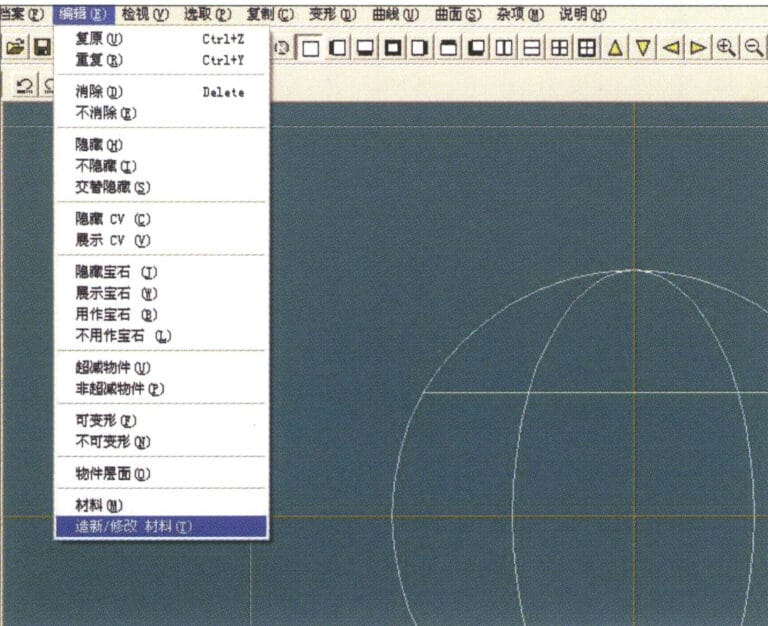
7. Select "Edit" > "Create/Modify Material" from the menu bar
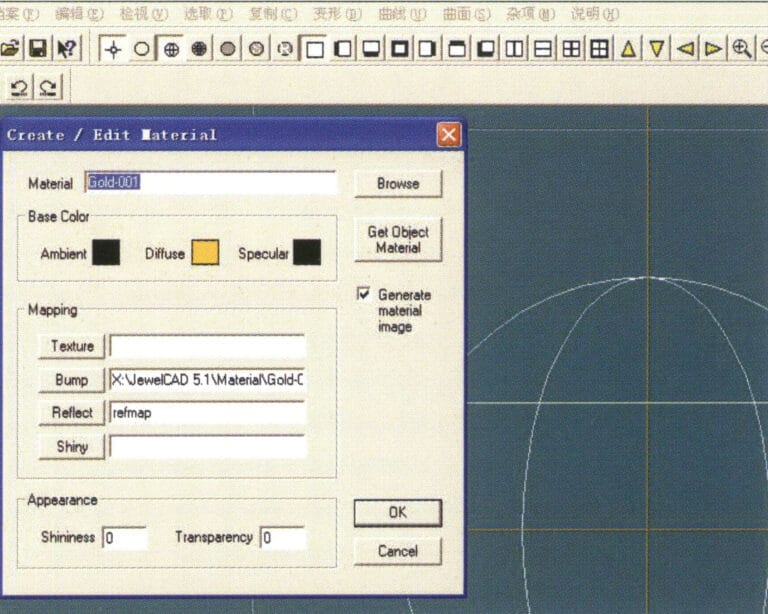
8. "머티리얼 생성/수정" 대화 상자로 들어가 관련 값을 입력하고 확인합니다.
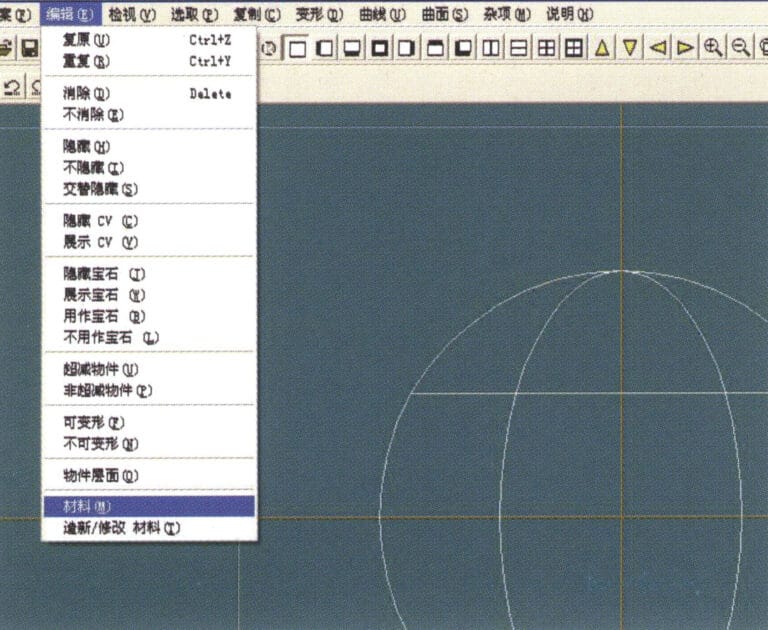
9. Select "Edit" > "Materials" from the menu bar
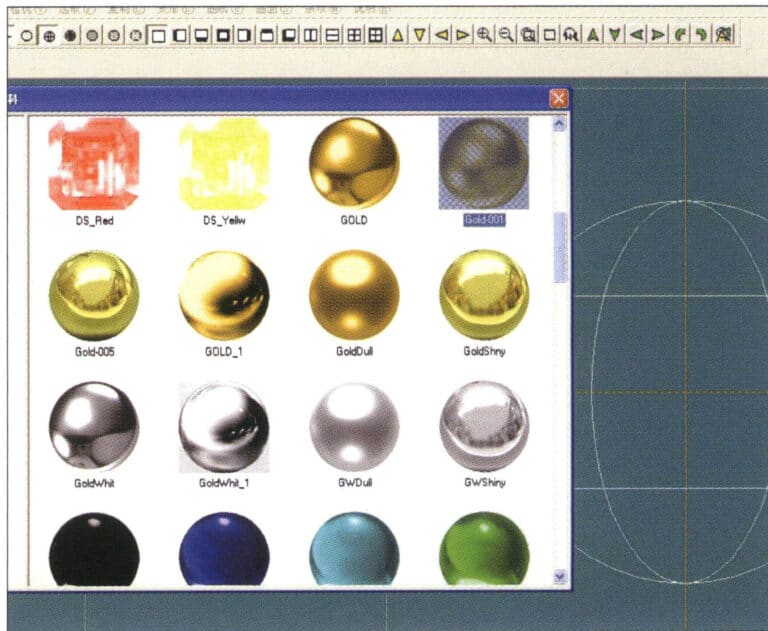
10. '자료' 대화 상자로 들어가 자료를 선택하고 확인합니다.
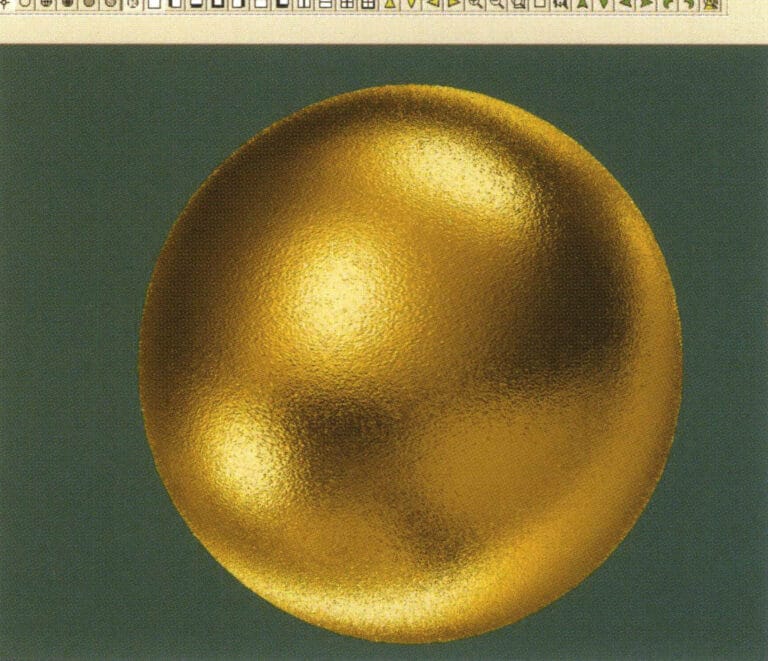
11. Select "View" > "Shadow Map" from the menu bar to inspect the shadow effects.
12. Select "File" > "Save File" from the menu bar to save the document
2. 브러싱 효과
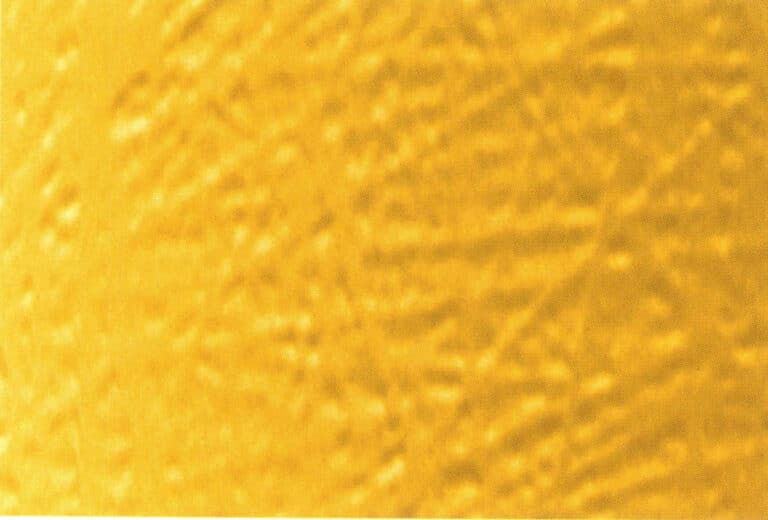

1. Scan a texture file in Photoshop with a resolution of 300 pixels/inch, and select "Filter" > "Blur" > "Motion Blur" from the menu bar to apply the blur effect
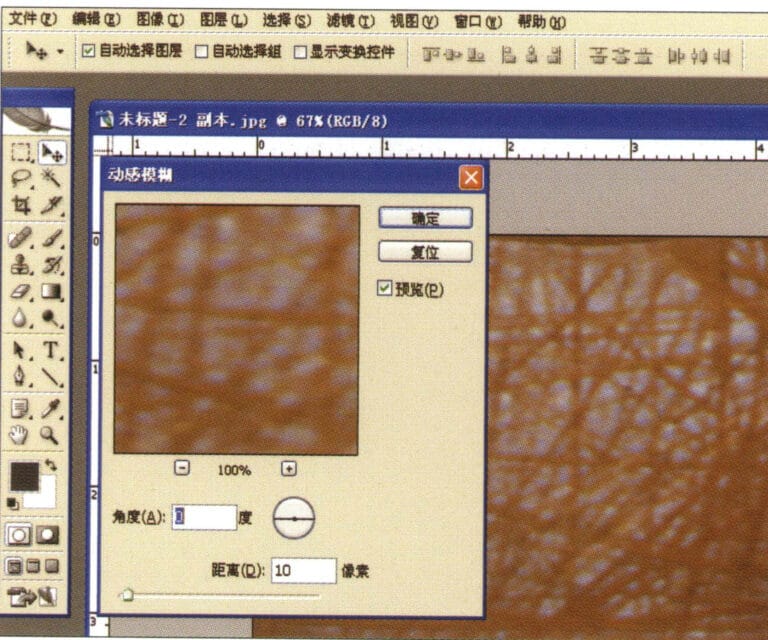
2. '모션 블러' 대화 상자로 들어가 관련 값을 입력한 후 확인합니다.
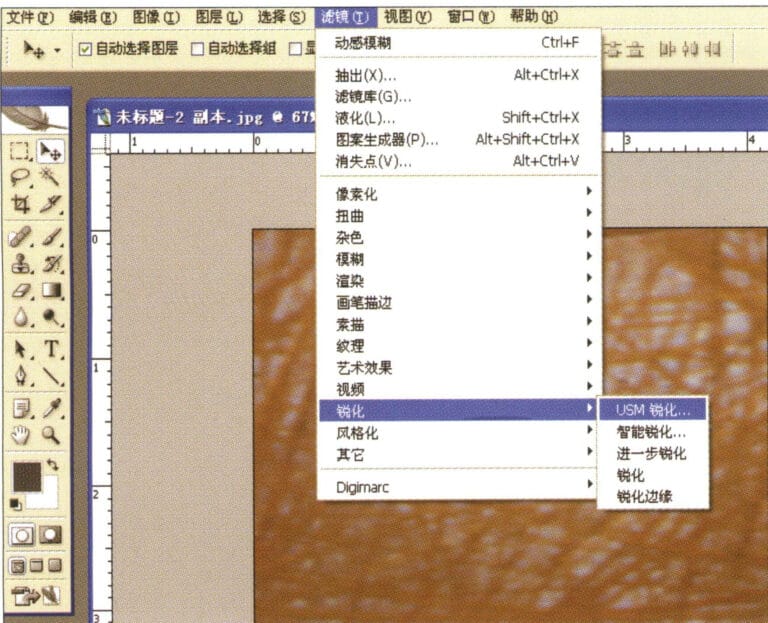
3. Select "Filter" > "Sharpen" > "USM Sharpening" from the menu bar
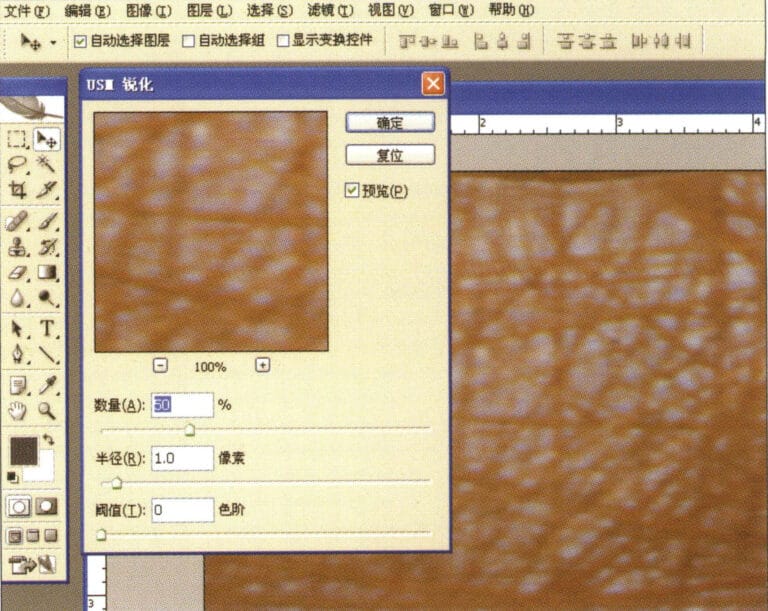
4. "USM 선명하게 하기" 대화 상자로 들어가서 관련 값을 입력하고 확인합니다.
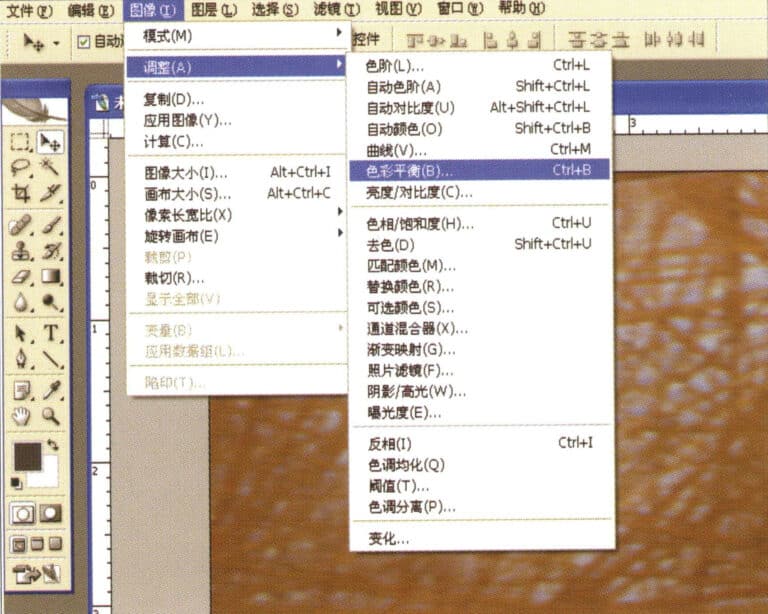
5. Select "Image" > "Adjustments" > "Color Balance" from the menu bar
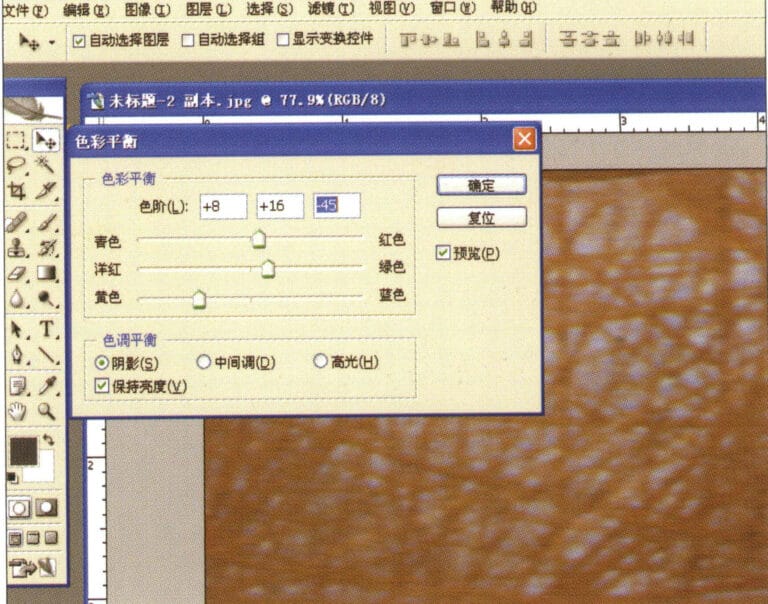
6. "색상 균형" 대화 상자로 들어가서 관련 값을 입력하고 확인합니다.
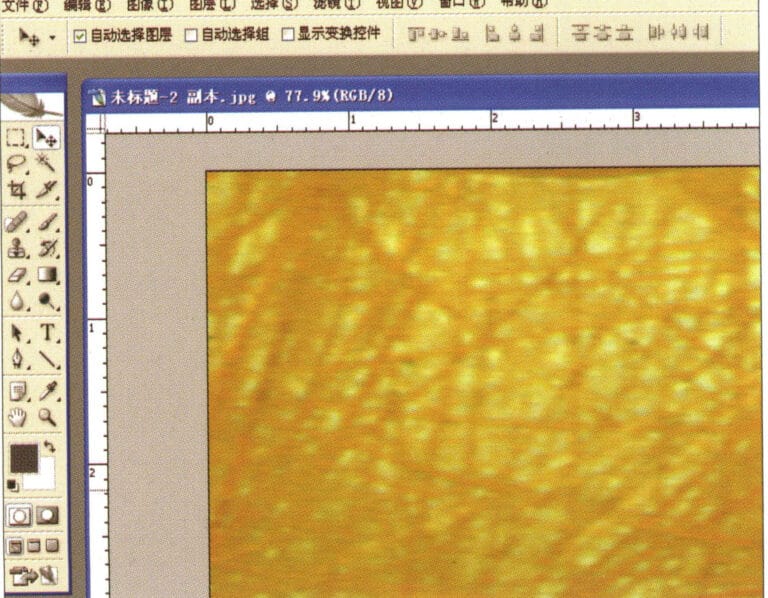
7. 컬러 밸런스 표시 후 효과 다이어그램
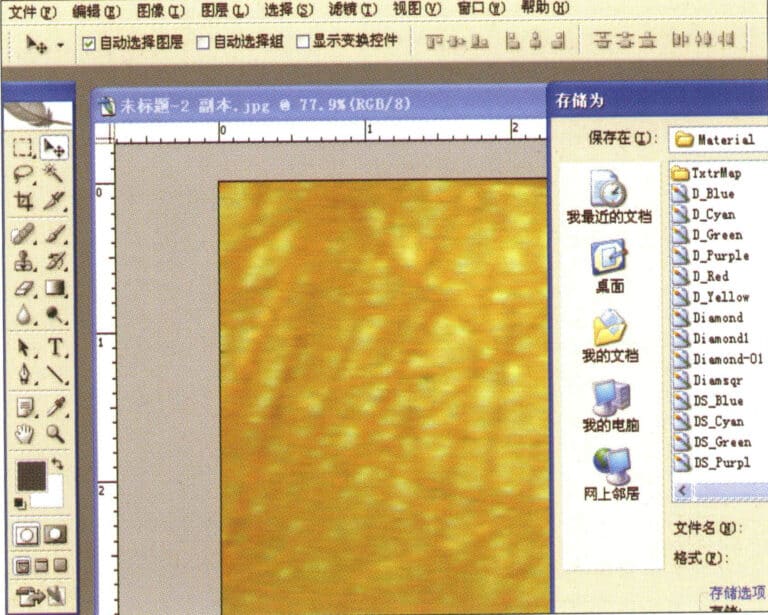
8. Store the document in the "JewelCAD" > "Material" folder, saved in "BMP" format
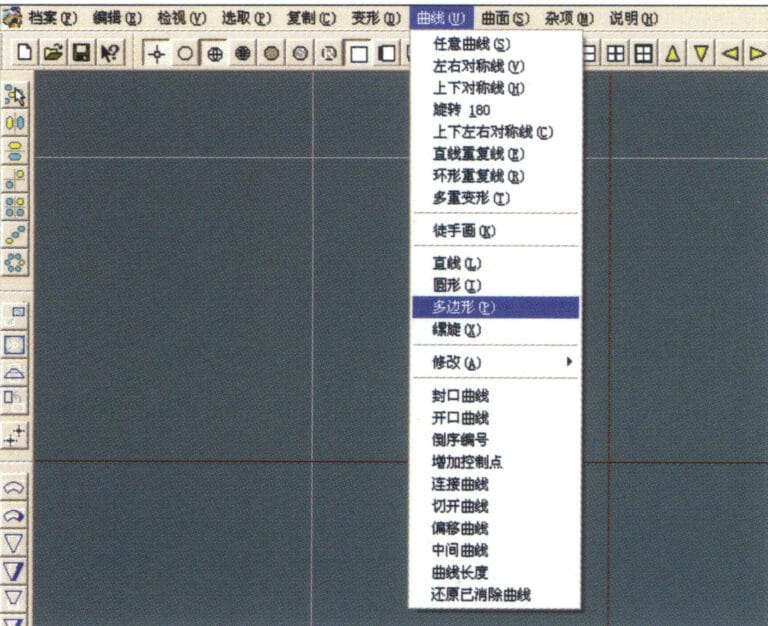
9. In JewelCAD, create a new file, select "Curve" > "Polygon" from the menu bar
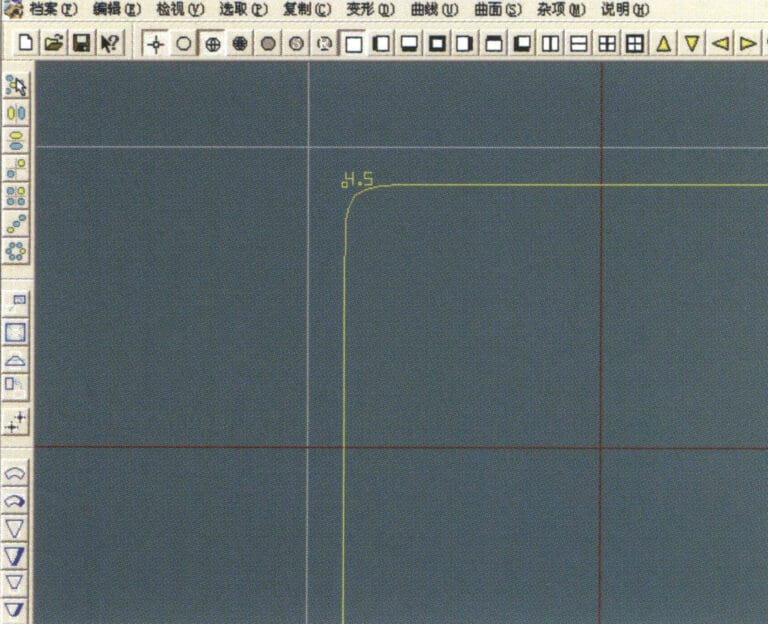
10. '다각형'을 사용하여 정사각형 그리기
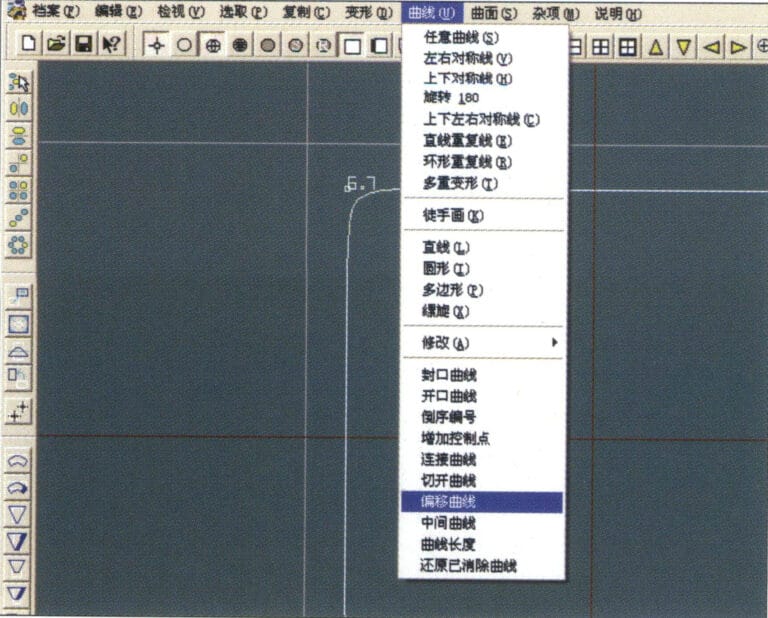
11. Select "Curve" > "Offset Curve" from the menu bar
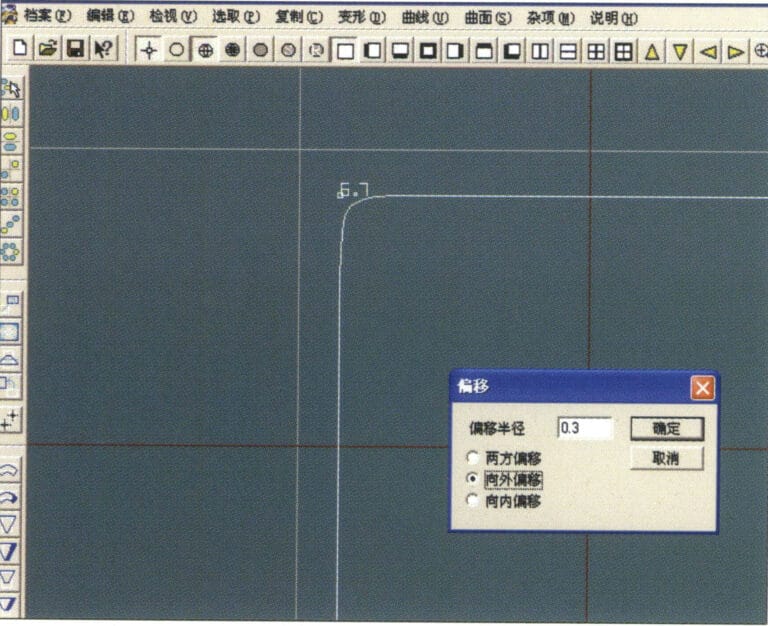
12. '오프셋 커브' 대화 상자를 입력하고 관련 값을 입력한 후 확인합니다.
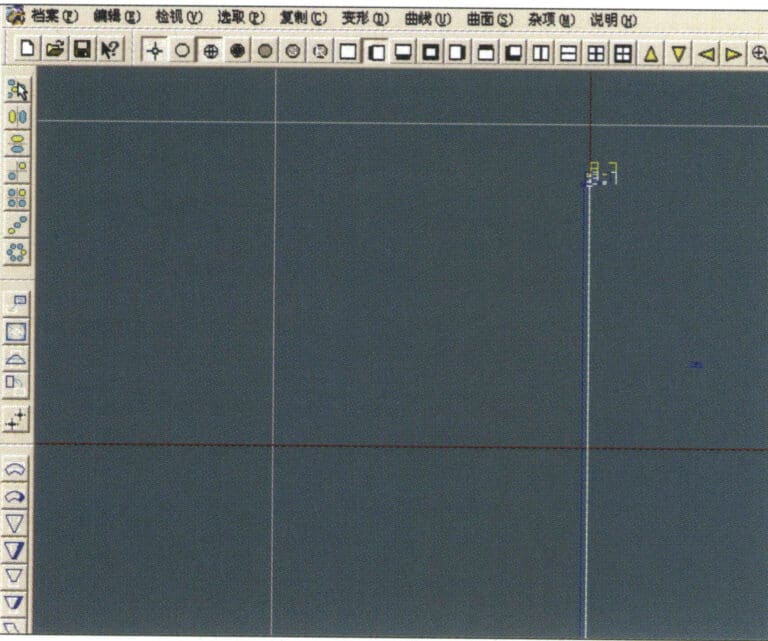
13. 오프셋 커브 표시 후 효과 다이어그램
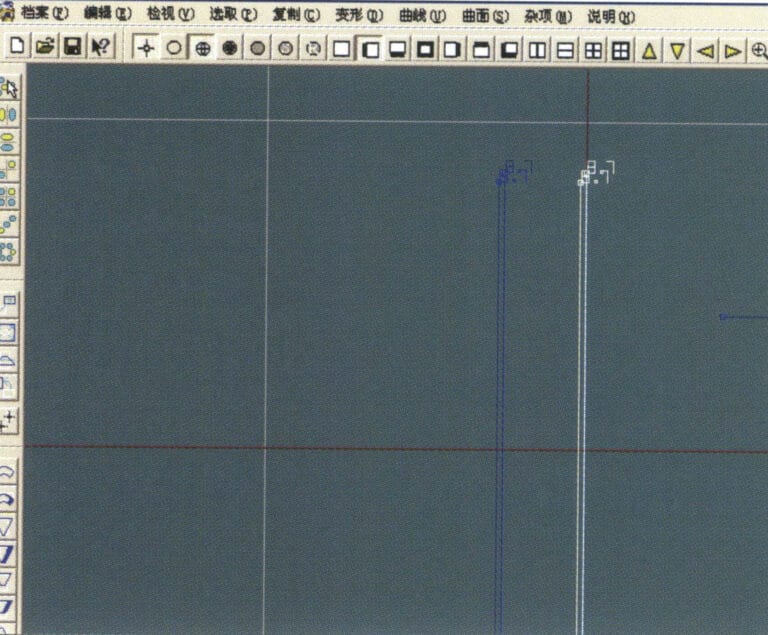
14. Select "Deformation" > "Move" from the menu bar to move the selected curve
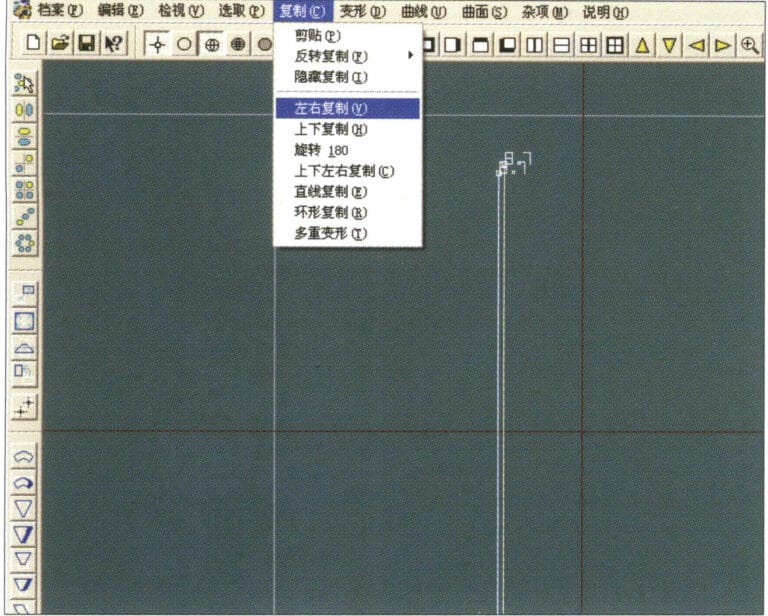
15. Select "Copy" > "Copy Left and Right" from the menu bar to copy the selected curve to the left and right
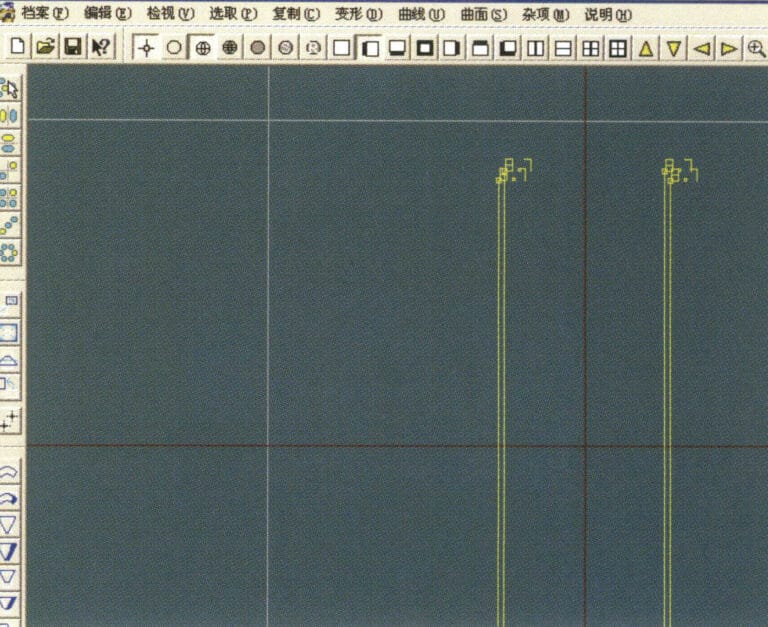
16. 왼쪽 및 오른쪽 복제 후 효과 이미지 표시
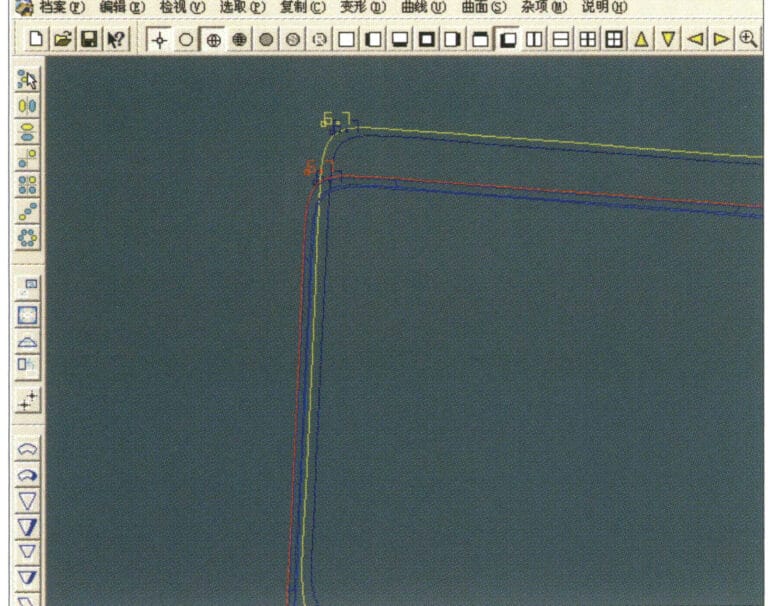
17. Select "Surface" > "Curve Surface Connection" from the menu bar, and double-click the first and second curves/surfaces in a clockwise direction with the left mouse button to create a curve surface connection
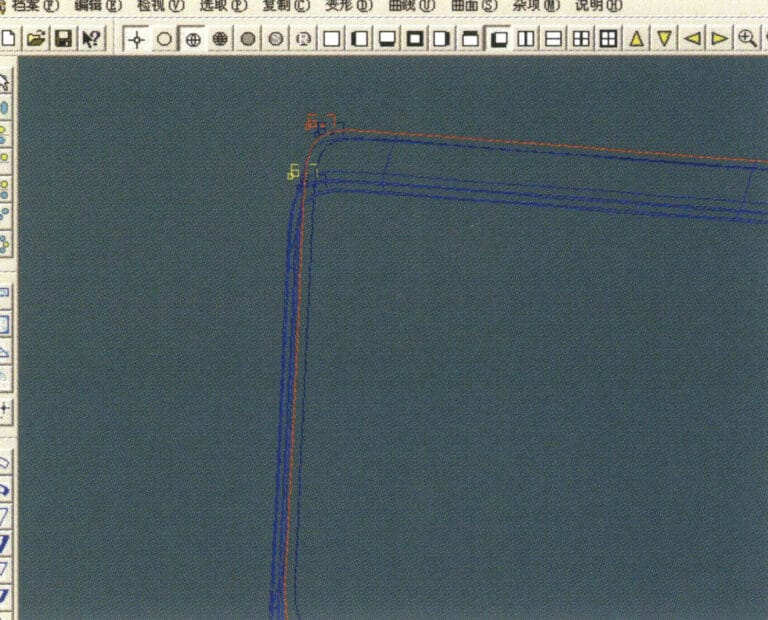
18. 시계 방향으로 왼쪽 마우스 버튼으로 세 번째 커브/서피스를 두 번 클릭하여 선-서피스 연결을 만듭니다.
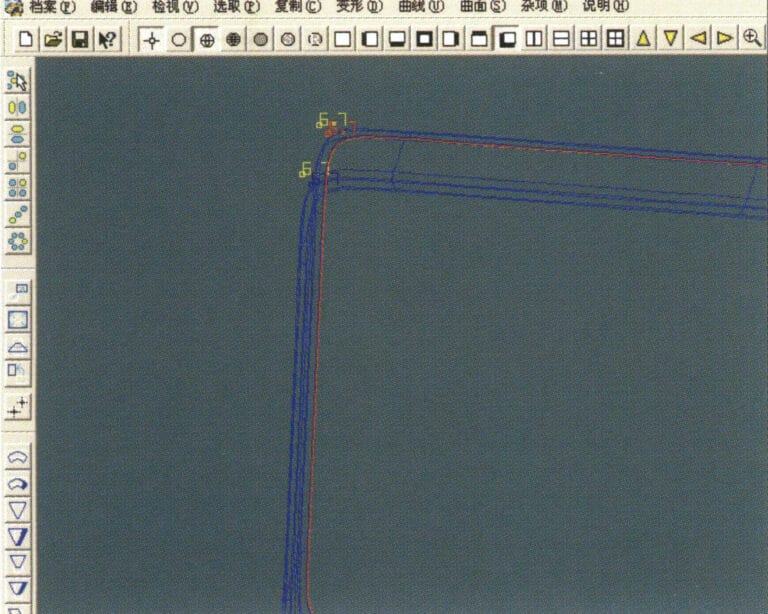
19. 시계 방향으로 계속하고 네 번째 커브/서페이스를 마우스 왼쪽 버튼으로 두 번 클릭하여 선-서페이스 연결을 만듭니다.

20. Select "View" > "Shadow Map" from the menu bar to inspect the shadow effects
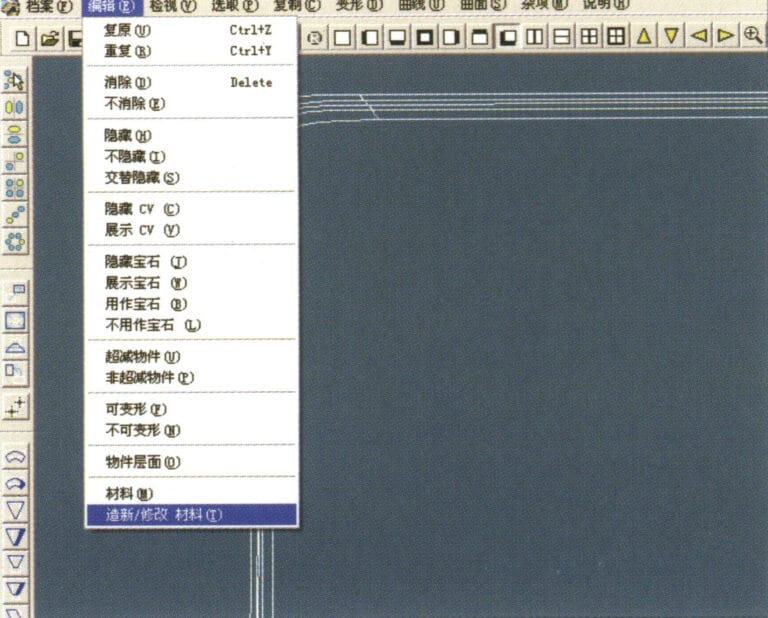
21. Select "Edit" > "Create/Modify Material" from the menu bar
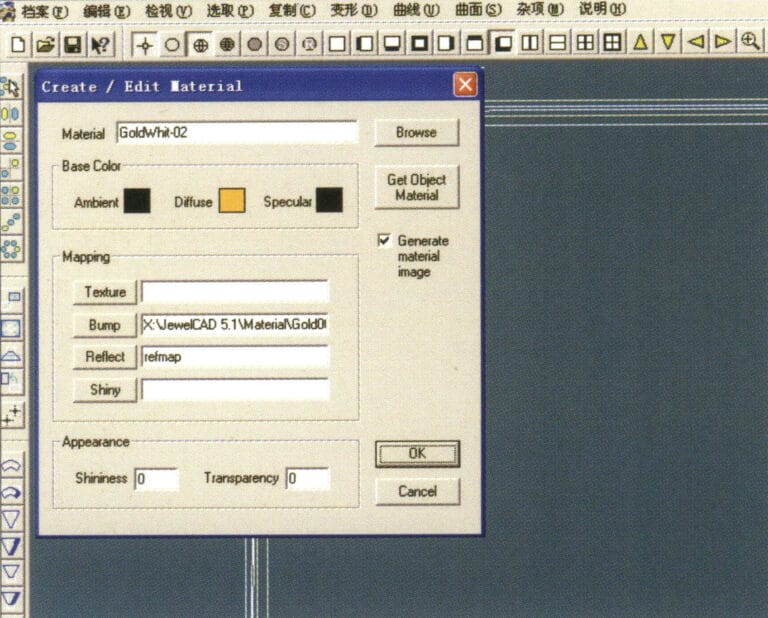
22. "자료 생성/수정" 대화 상자로 들어가 관련 값을 입력하고 확인합니다.
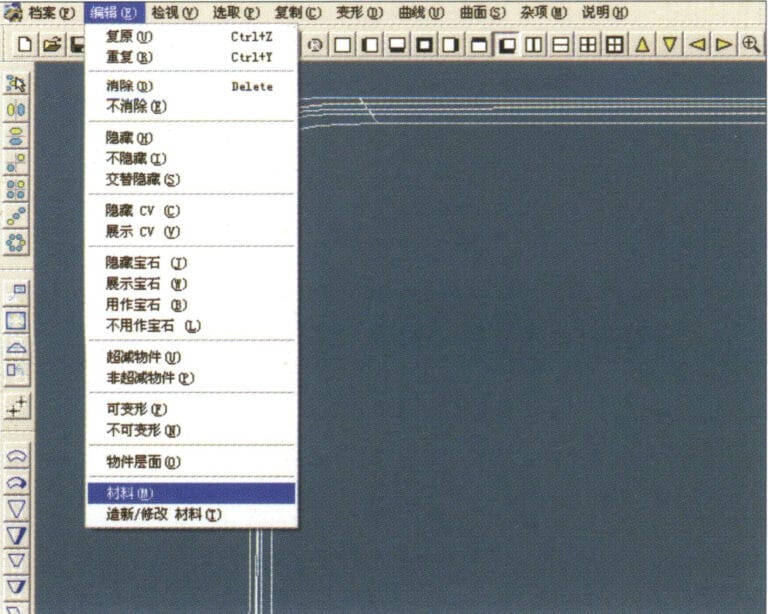
23. Select "Edit" > "Materials" from the menu bar
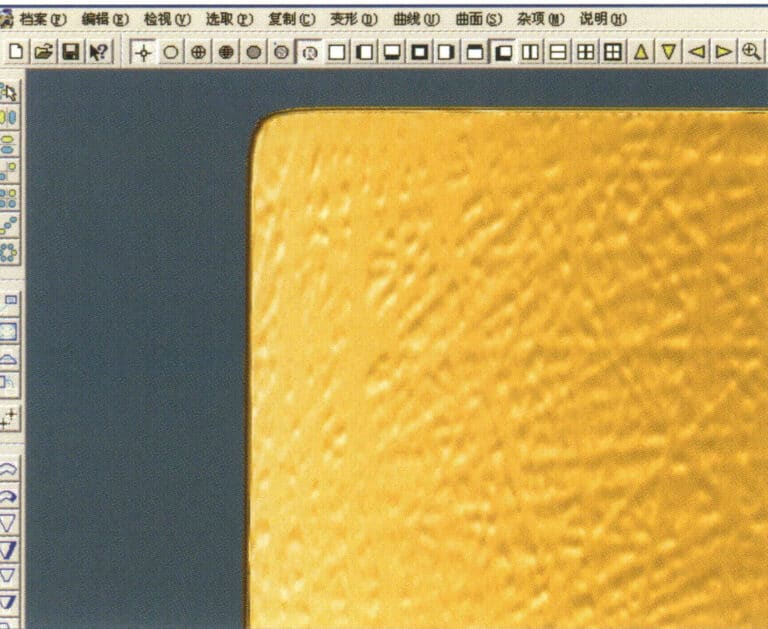
24. Select "View" > "Shadow Map" on the menu bar to view the light and shadow effects 25. Select "File" > "Save File" on the menu bar to save the file
3. 나무껍질 텍스처 마감
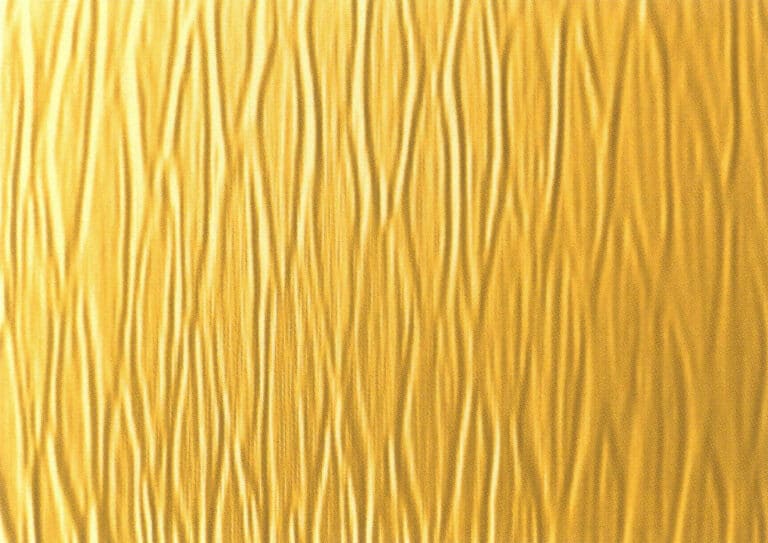

1. 텍스처 파일을 300픽셀/인치의 해상도로 포토샵으로 스캔합니다.
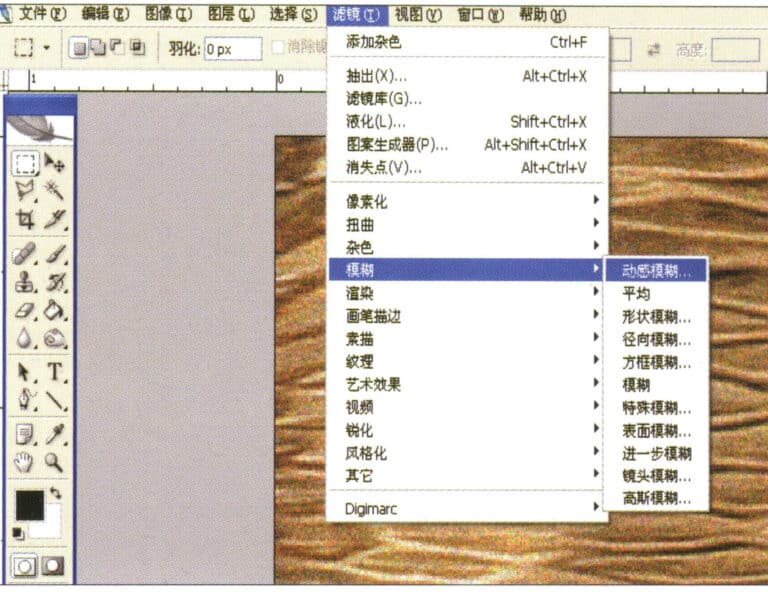
2. Select "Filter" > "Blur" > "Motion Blur" from the menu bar
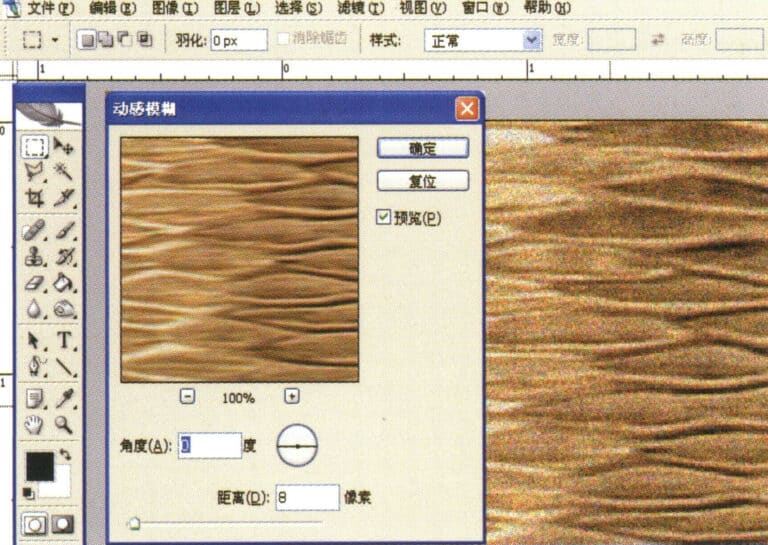
3. '모션 블러' 대화 상자로 들어가 관련 값을 입력한 후 확인합니다.
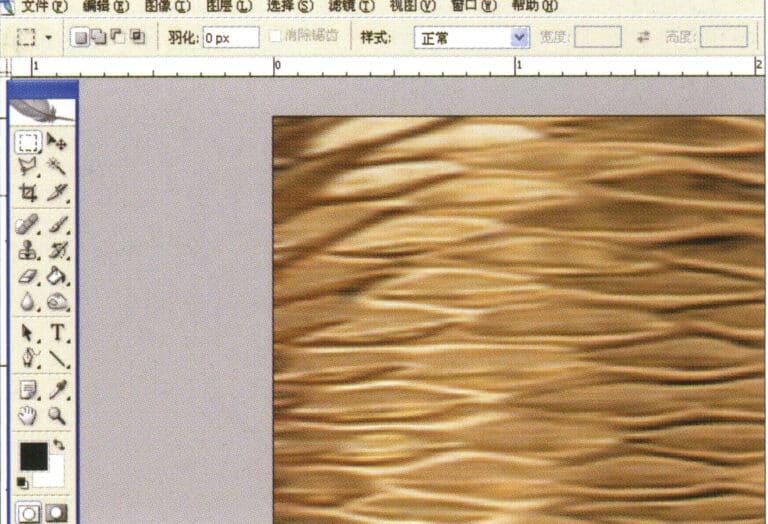
4. 모션 블러 후 효과 이미지 표시
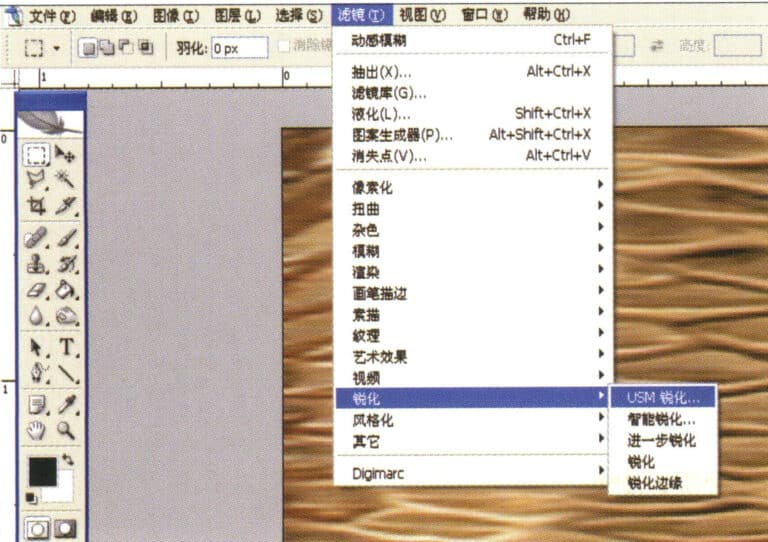
5. Select "Filter" > "Sharpen" > "USM Sharpening" from the menu bar
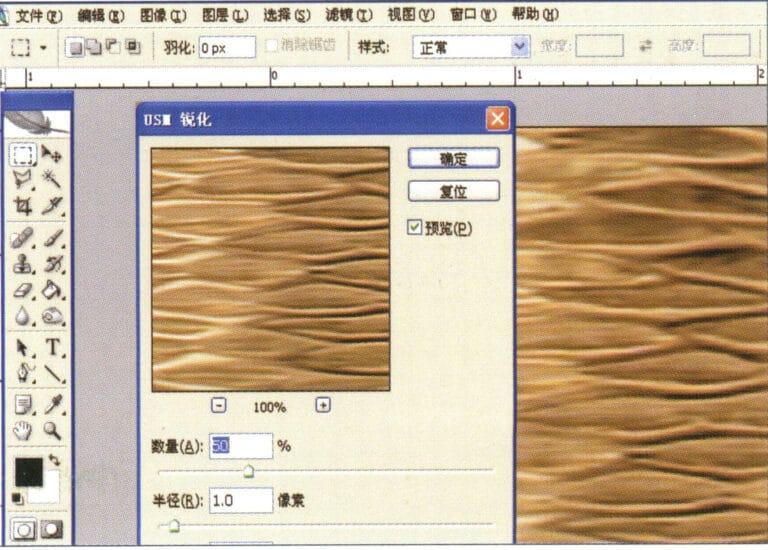
6. "USM 선명하게 하기" 대화 상자로 들어가서 관련 값을 입력하고 확인합니다.
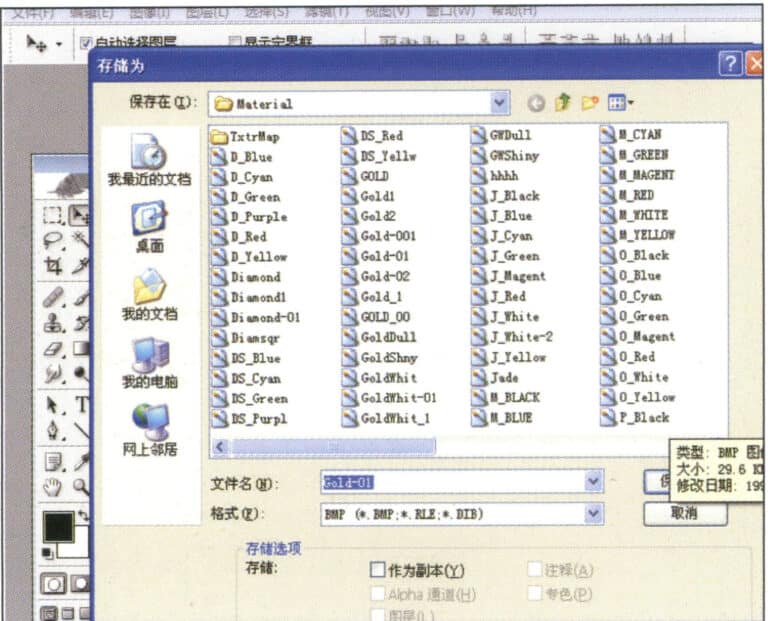
7. Store the document in the "JewelCAD" > "Material" folder and save it in "BMP" format
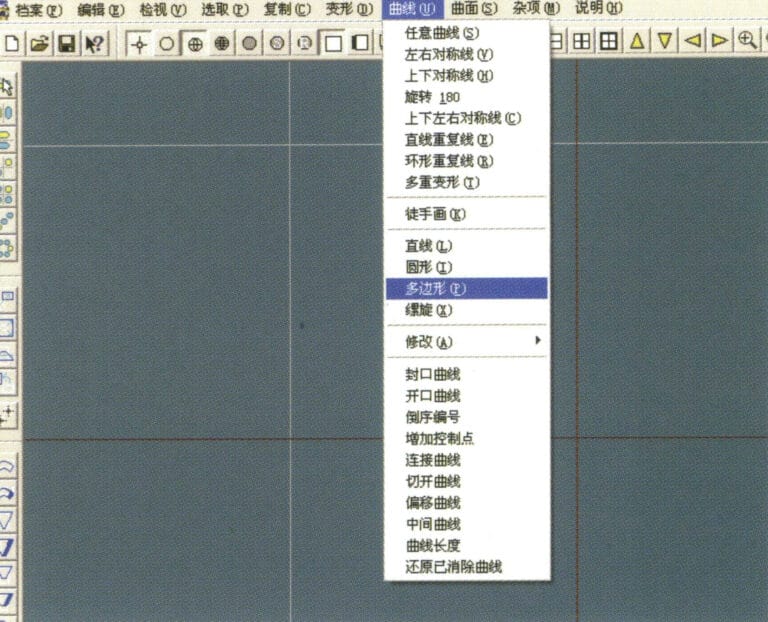
8. In JewelCAD, create a new file, select "Curve" > "Polygon" from the menu bar
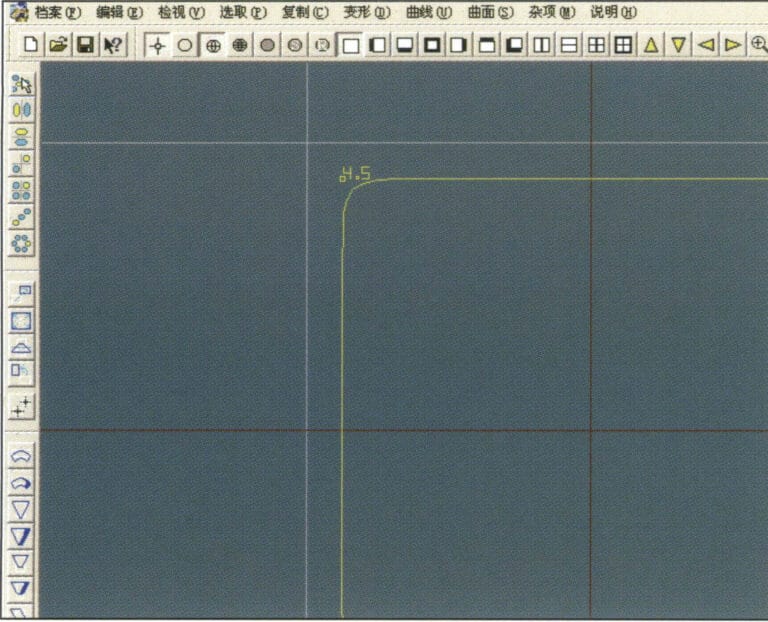
9. '다각형'을 사용하여 정사각형 그리기
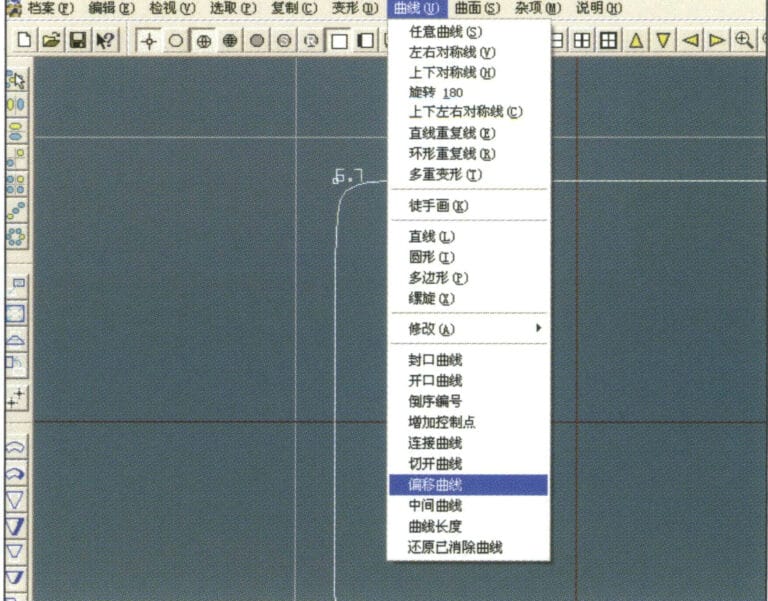
10. Select "Curve" > "Offset Curve" from the menu bar
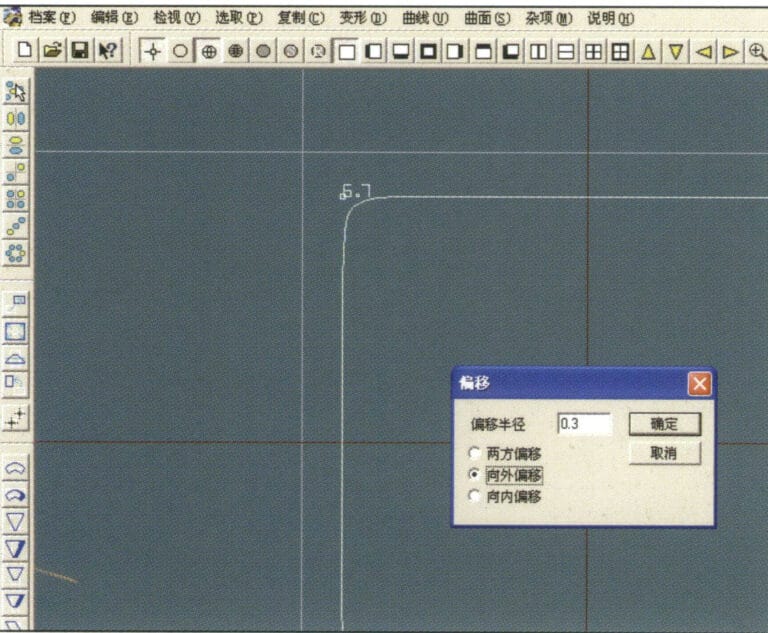
11. "오프셋 커브" 대화 상자를 입력하고 관련 값을 입력한 후 확인합니다.
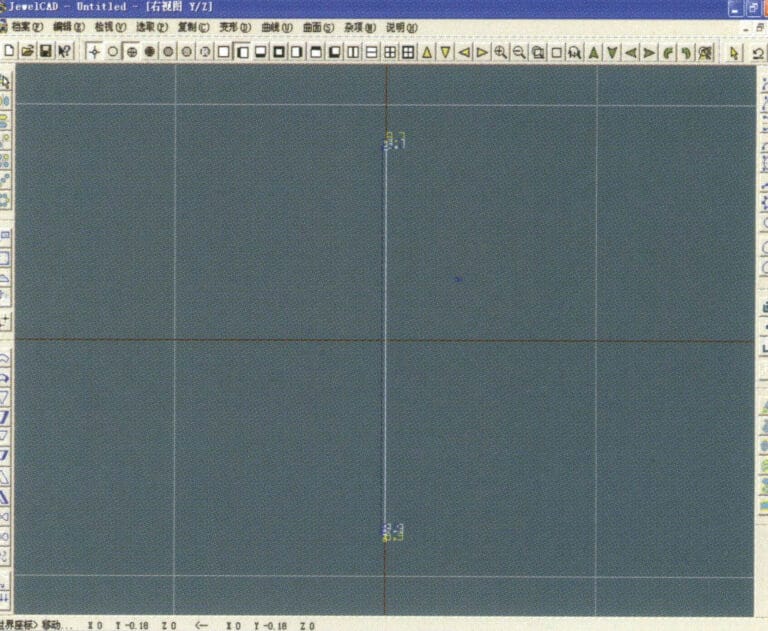
12. 오프셋 커브 표시 후 효과 다이어그램
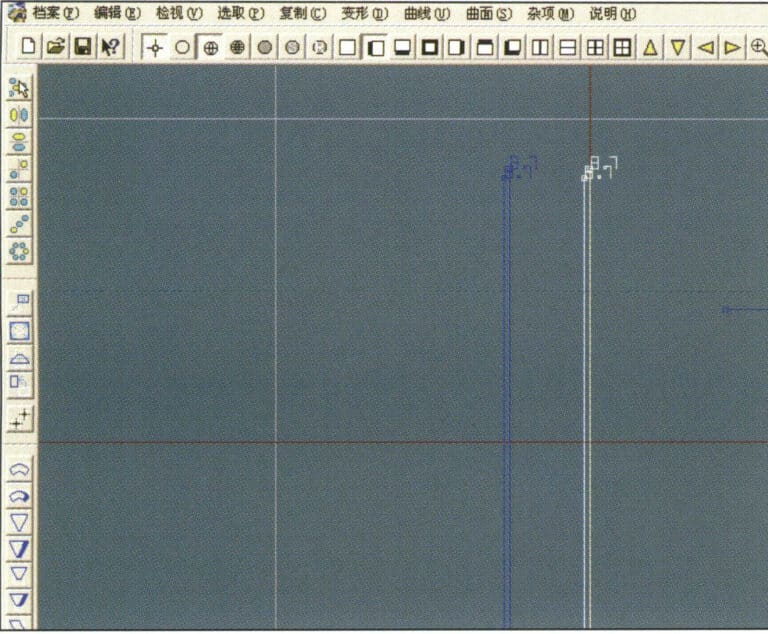
13. Select "Deformation" > "Move" from the menu bar to move the selected curve
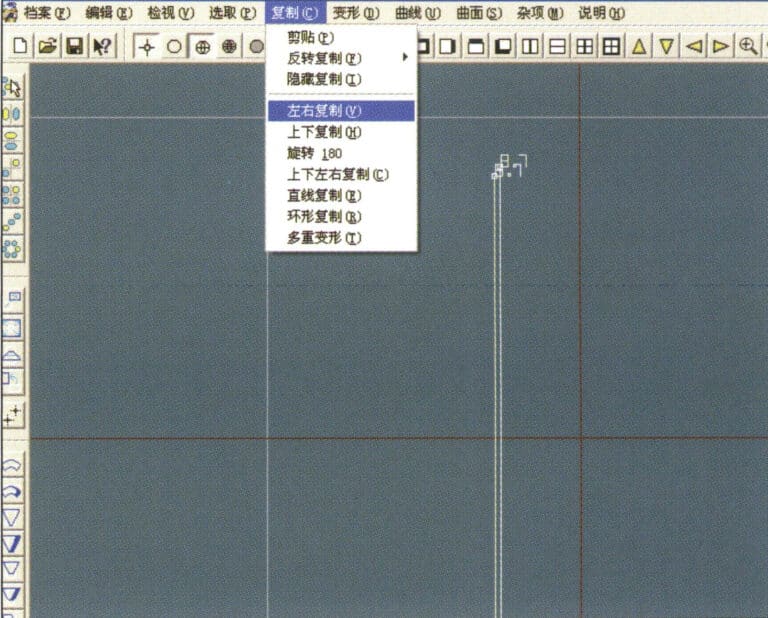
14. Select "Copy" > "Copy Left and Right" from the menu bar to copy the selected curve to the left and right
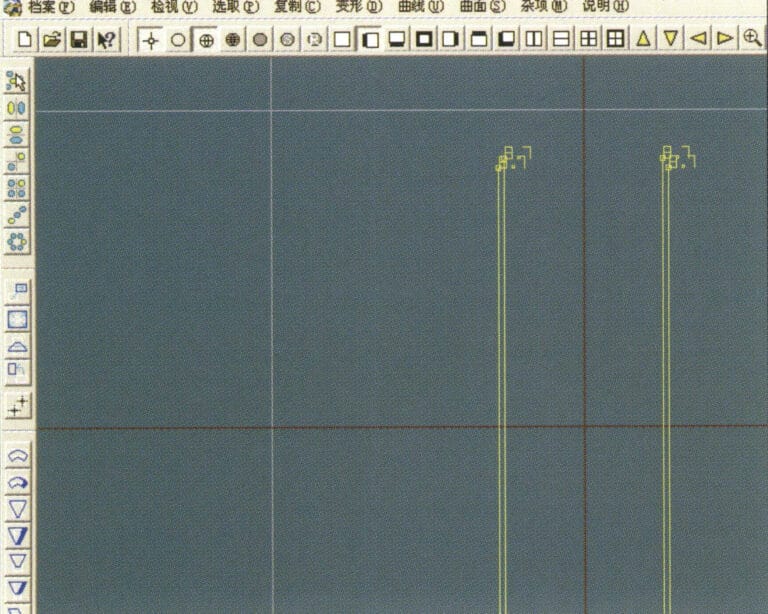
15. 왼쪽 및 오른쪽 복사 후 효과 이미지 표시하기
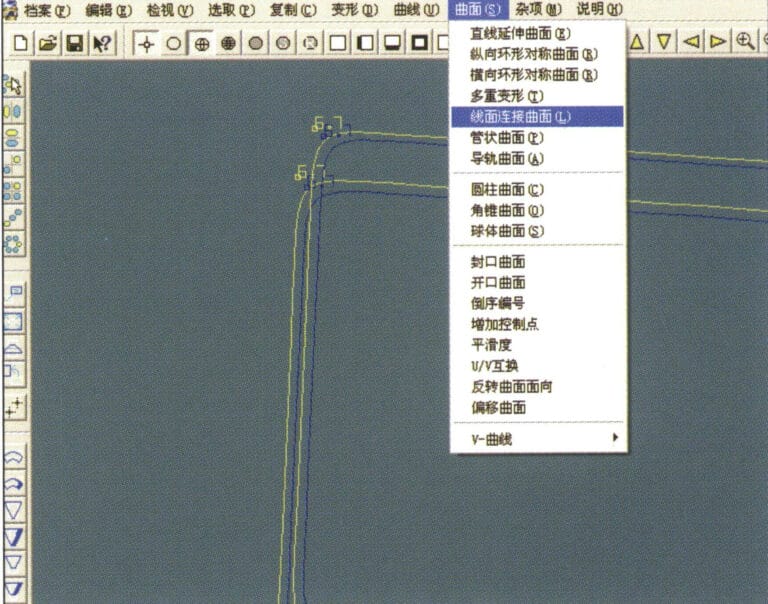
16. Select "Surface" > "Line-Surface Connection Surface" from the menu bar, and select the curve/surface to create a line-surface connection surface
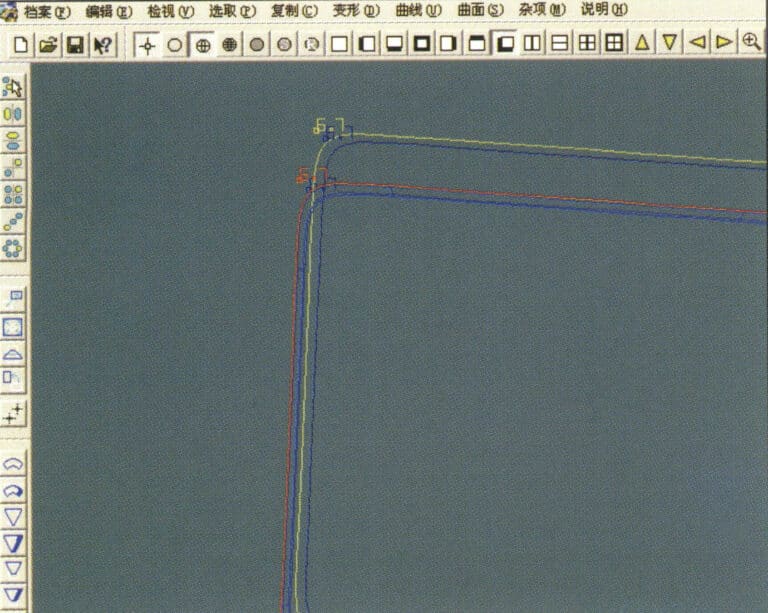
17. Select the menu bar "Surface" > "Curve Surface Connection," and double-click the first and second curves/surfaces with the left mouse button in a clockwise direction to create a curve surface connection
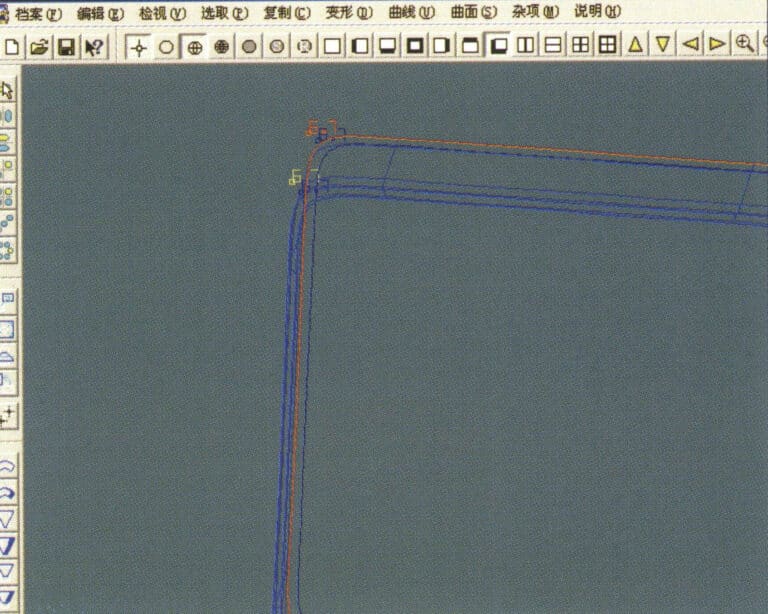
18. 시계 방향으로 왼쪽 마우스 버튼으로 세 번째 커브/서피스를 두 번 클릭하여 선-서피스 연결을 만듭니다.
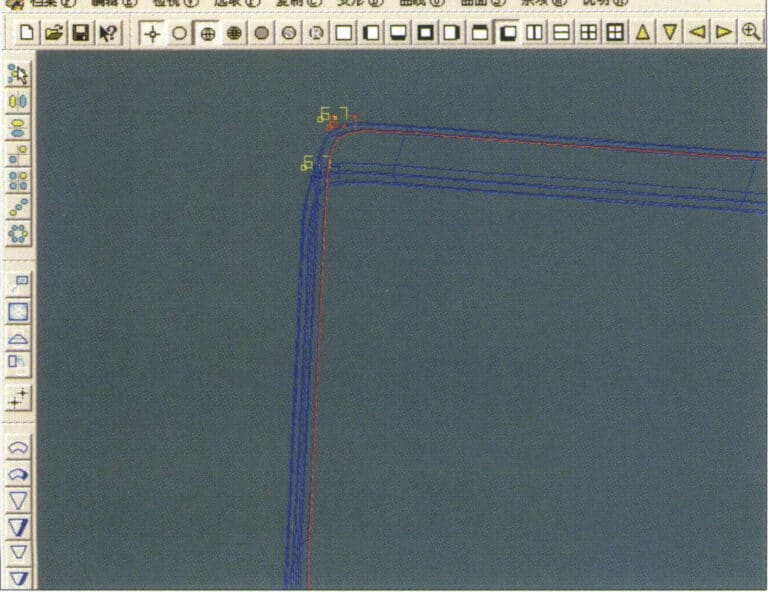
19. 시계 방향으로 계속하고 네 번째 커브/서페이스를 마우스 왼쪽 버튼으로 두 번 클릭하여 선-서페이스 연결을 만듭니다.
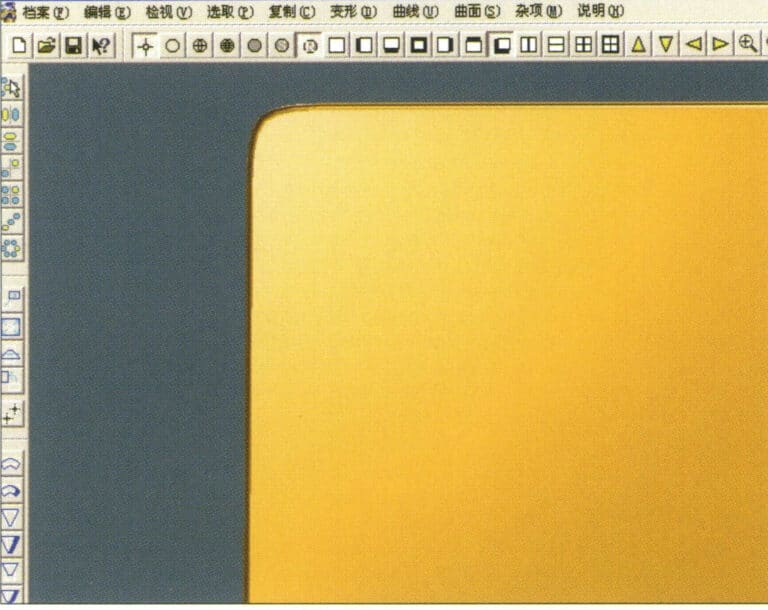
20. Select "View" > "Shadow Map" from the menu bar to inspect the shadow effects
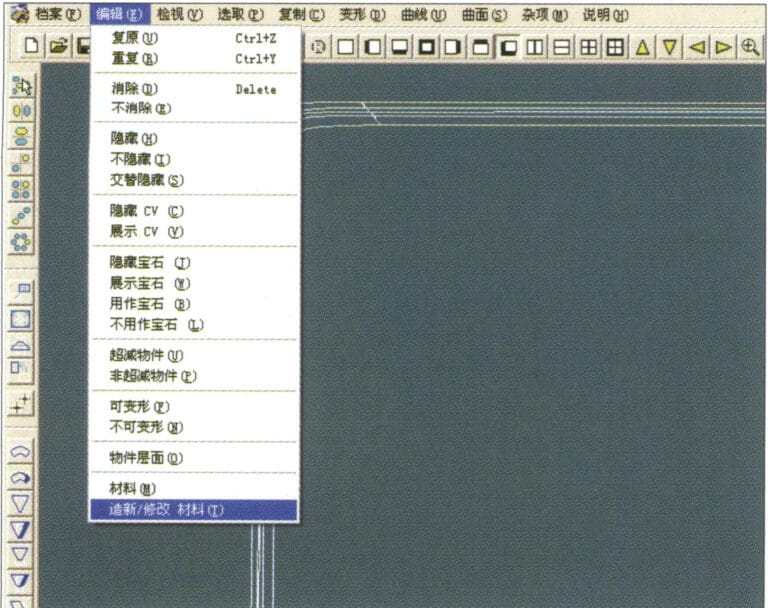
21. Select "Edit" > "Create/Modify Material" from the menu bar
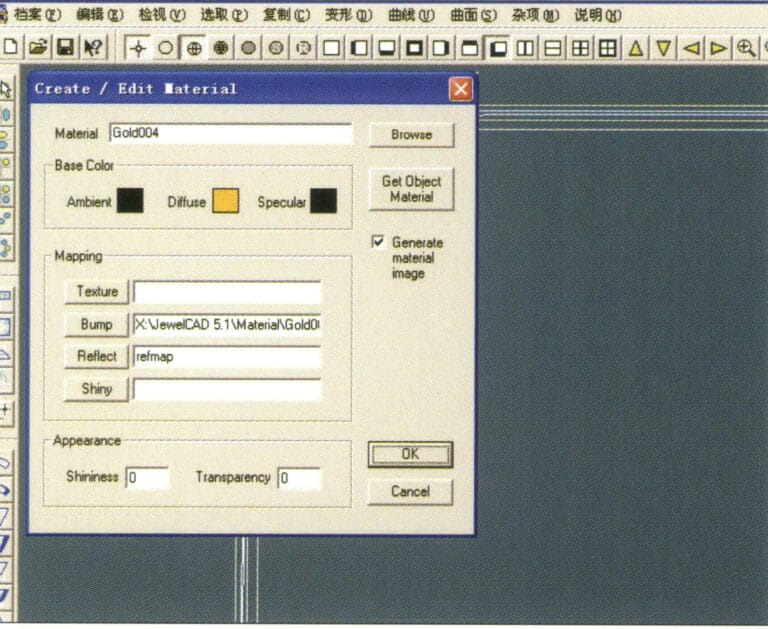
22. "자료 생성/수정" 대화 상자로 들어가 관련 값을 입력하고 확인합니다.
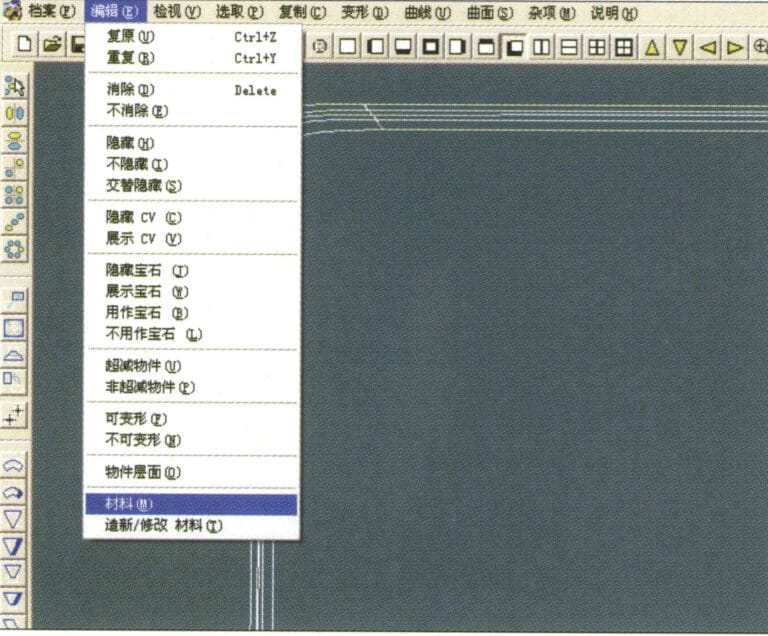
23. Select “Edit” > “Material” in the menu bar
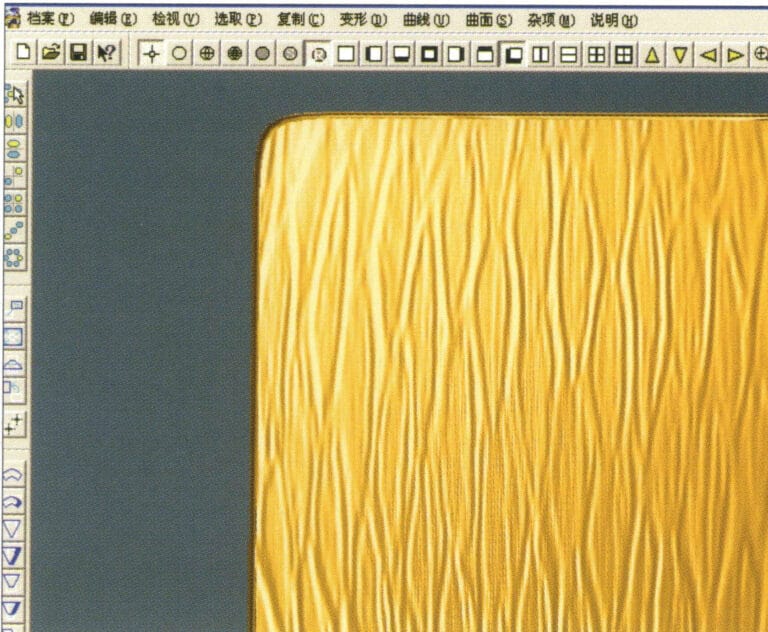
24. Select "View" > "Shadow Map" from the menu bar to examine the shadow effects
25. Select "File" > "Save As" from the menu bar to save the file
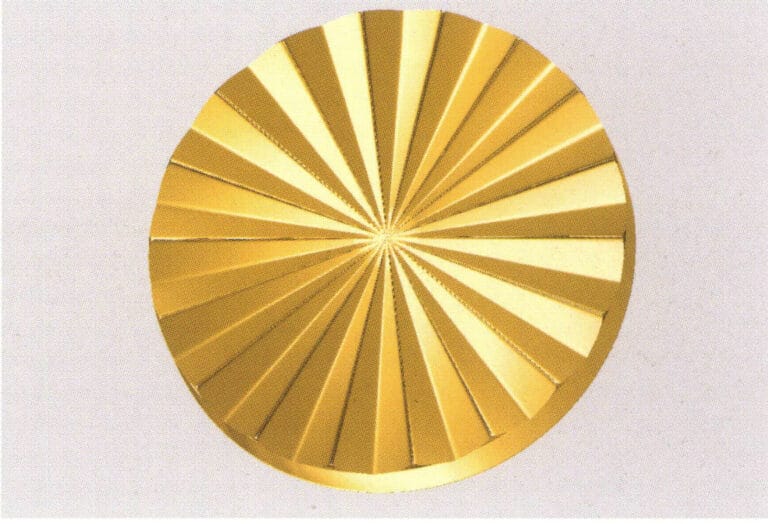
4. 엔진 회전 마감

1. Create a new file in JewelCAD, select "Curve" > "Circular Curve" from the menu bar, enter the relevant values in the "Circular Curve" dialog box, and confirm
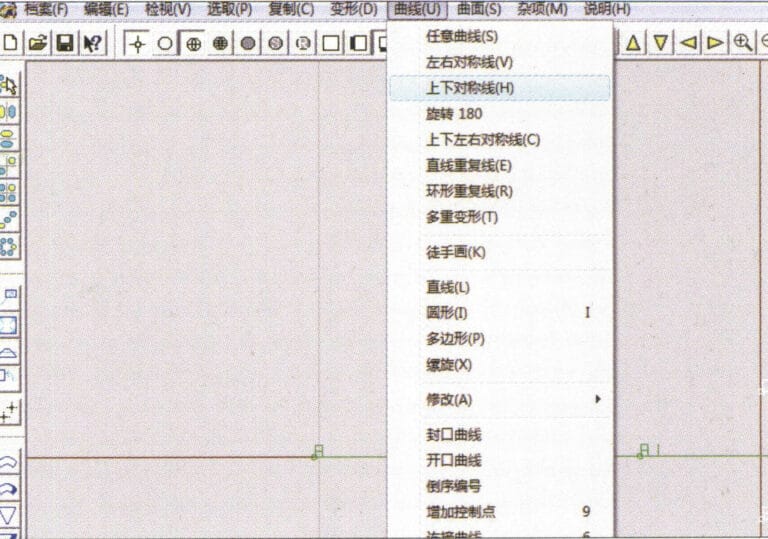
2. Select "Curve" > "Left-Right Symmetry Line" from the menu bar to draw a section
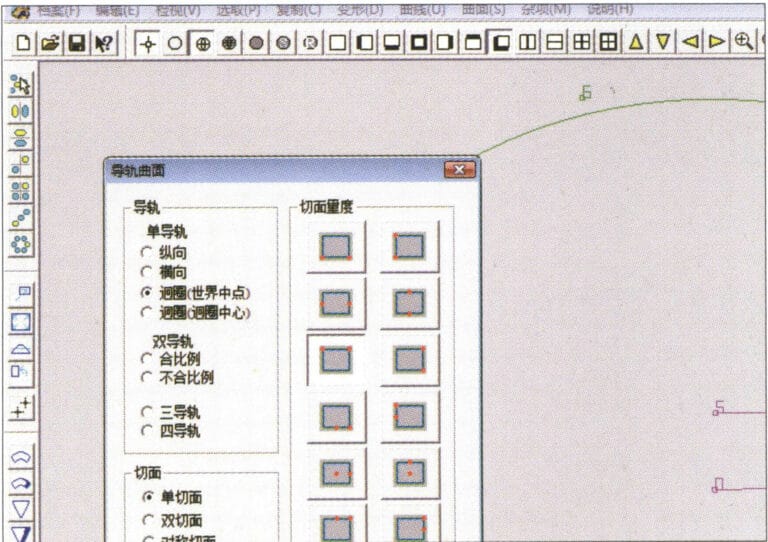
3. Select "Surface" > "Rail Surface" from the menu bar, enter "Rail Surface," select the relevant options and confirm; left-click on a curve as the section of the rail surface; left-click on another curve as the "Rail" > "Finish."

4. Select “View” > “Shadow Map” on the menu bar to view the light and shadow effects
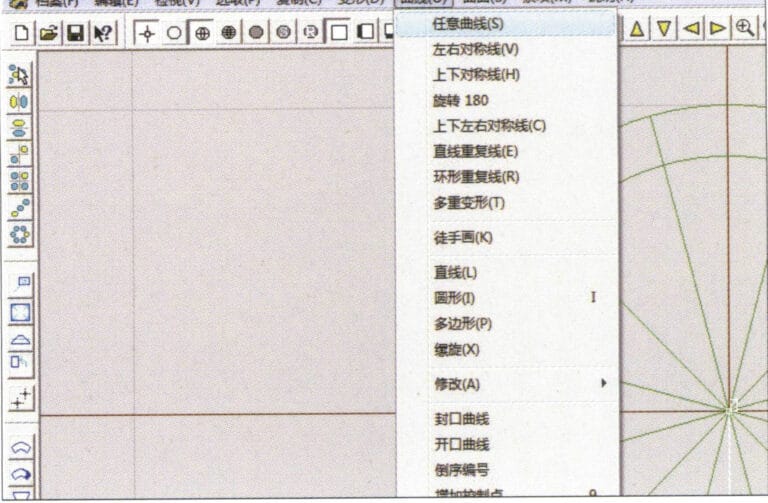
5. Select "Curve" > "Freefrom Curve" from the menu bar
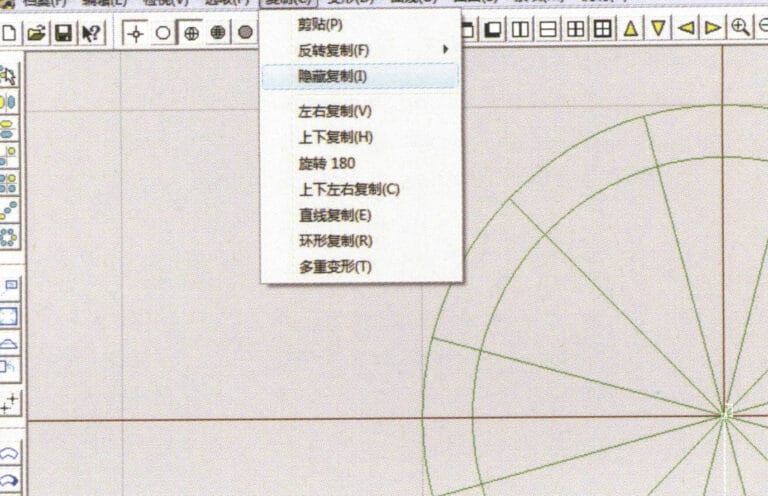
6. Select "Copy" > "Hide Copy" from the menu bar
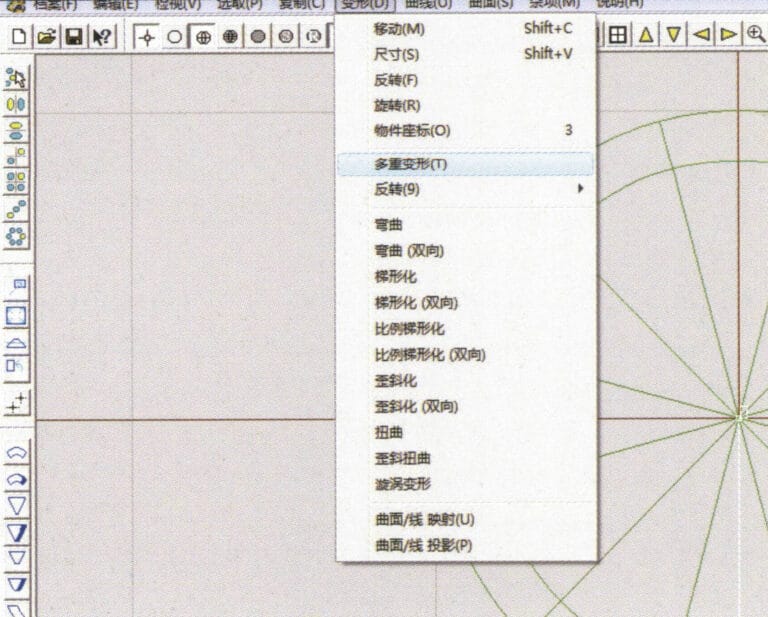
7. Select "Deformation" > "Multiple Deformation" from the menu bar
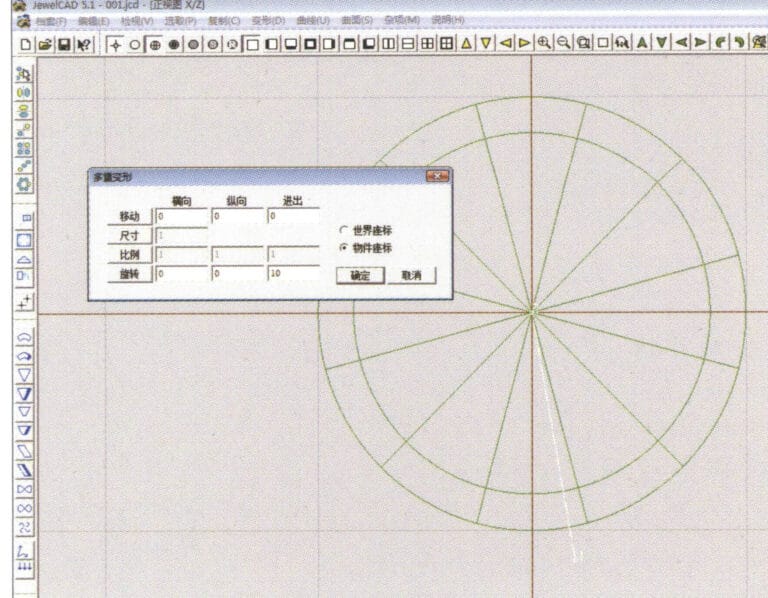
8. '다중 변형' 대화 상자로 들어가 관련 값을 입력합니다.
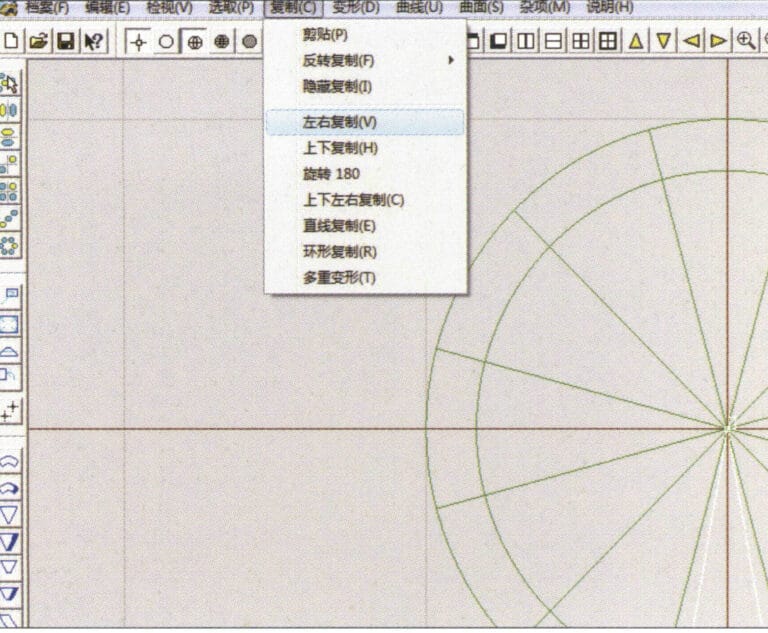
9. Select “Copy” > “Left/Right Copy” on the menu bar
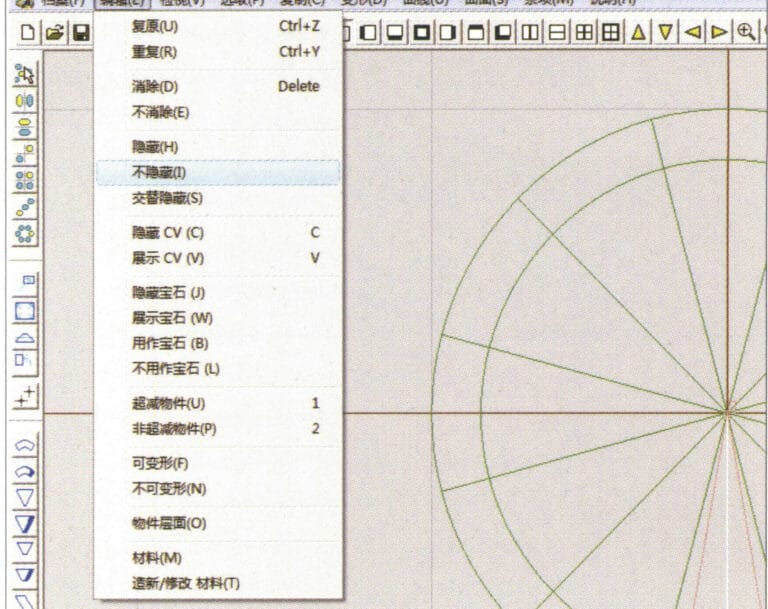
10. Select "Edit" > "Unhide" from the menu bar to display the hidden curves
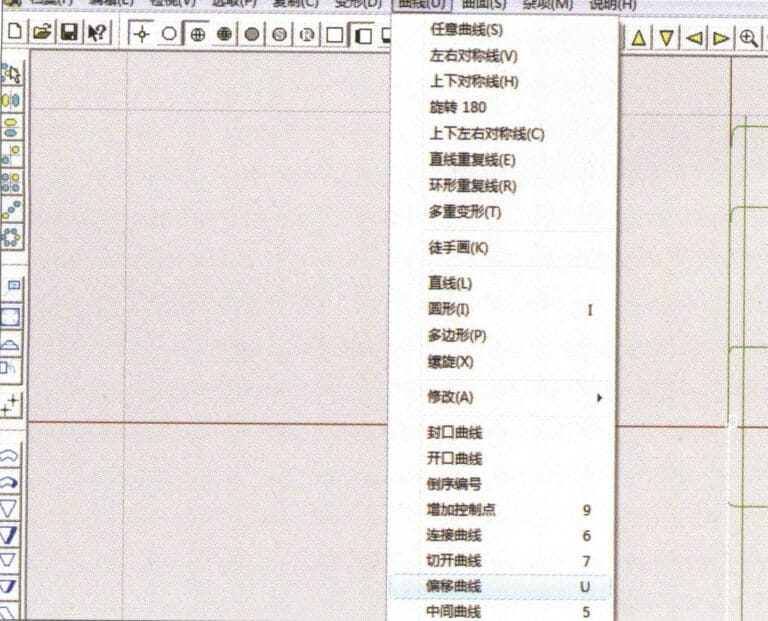
11. Select "Curve" > "Offset Curve" from the menu bar
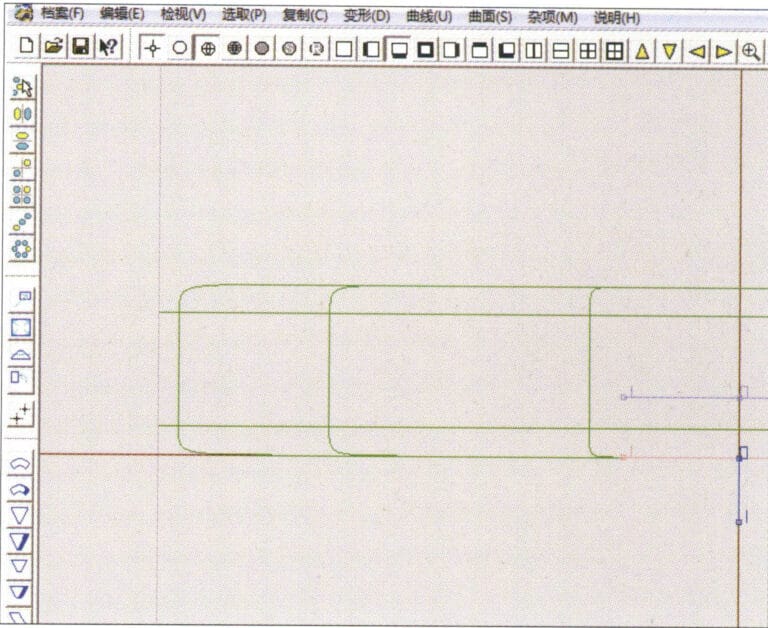
12. Select "Deformation" > "Move" from the menu bar to move the selected curve
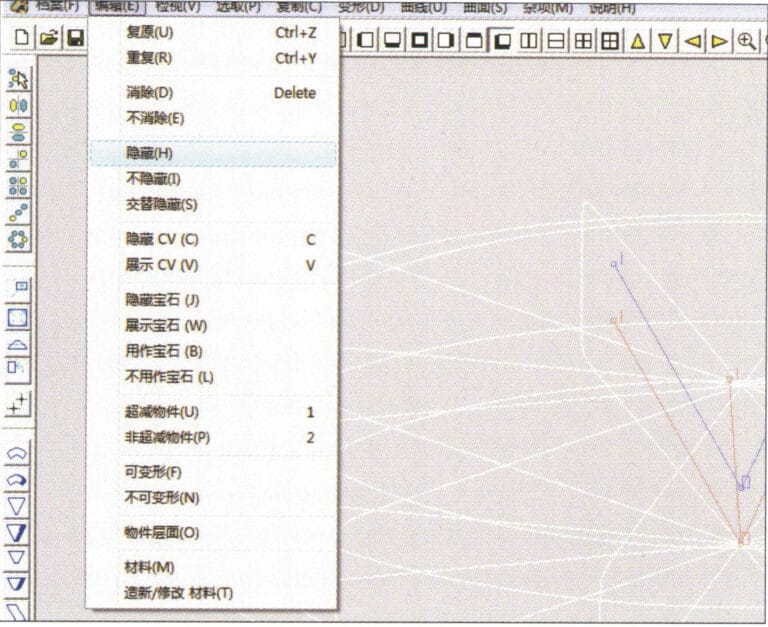
13. Select "Edit" > "Hide" from the menu bar to hide the circular surface
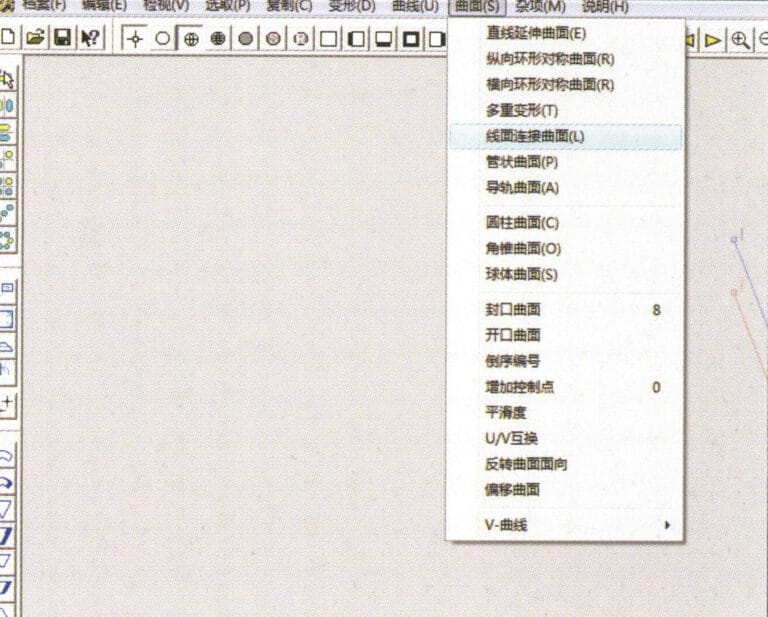
14. Select "Surface" > "Line Surface Connection Surface" from the menu bar

15. 시계 방향으로 커브/서페이스를 선택하여 선-서페이스 연결을 만든 다음 메뉴 모음에서 다음을 선택합니다.
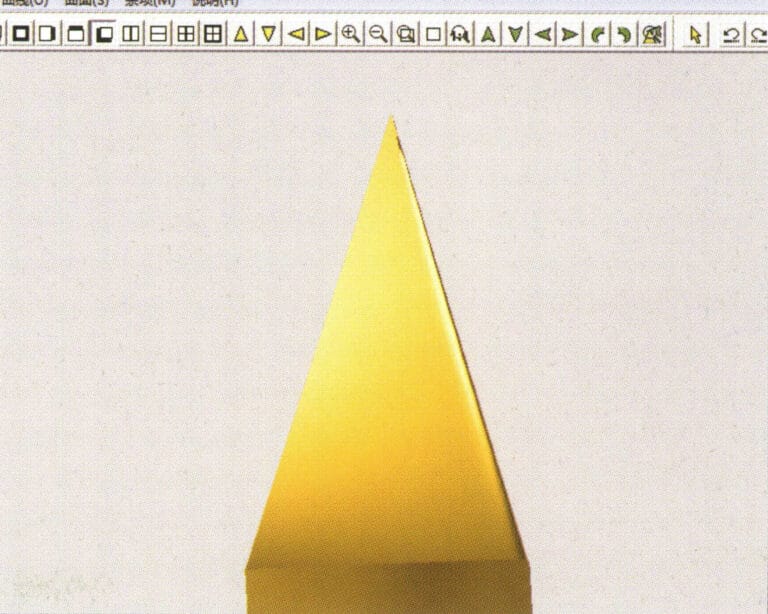
16. Select "View" > "Shadow Map" from the menu bar to inspect the shadow effects
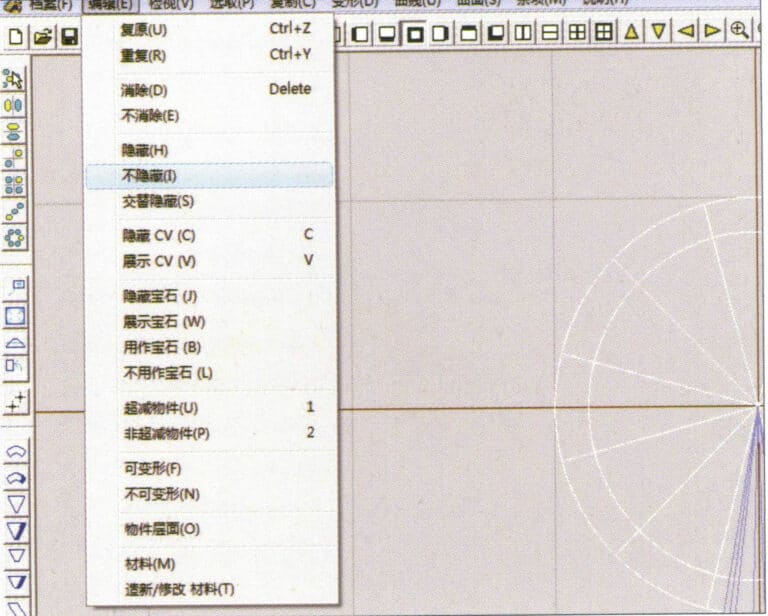
17. Select "Edit" > "Unhide" from the menu bar to display the hidden circular surfaces
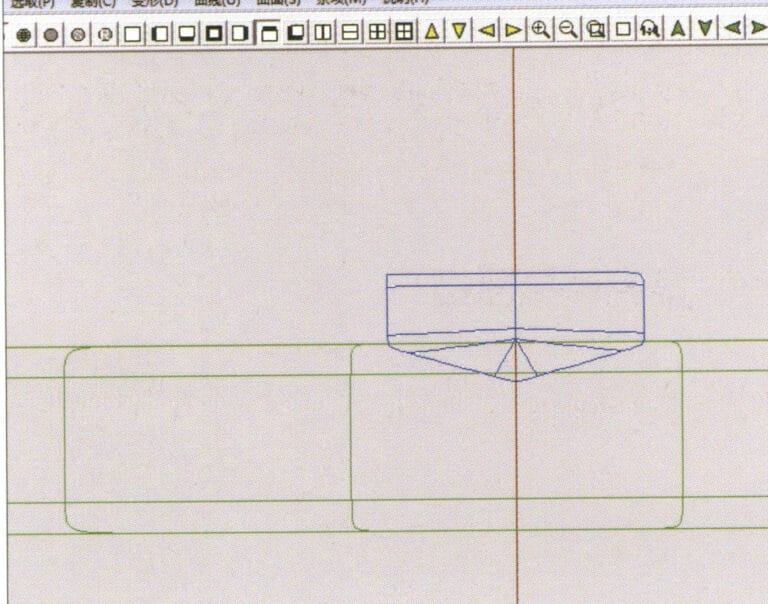
18. Select "Deformation" > "Move" from the menu bar to move the selected surface
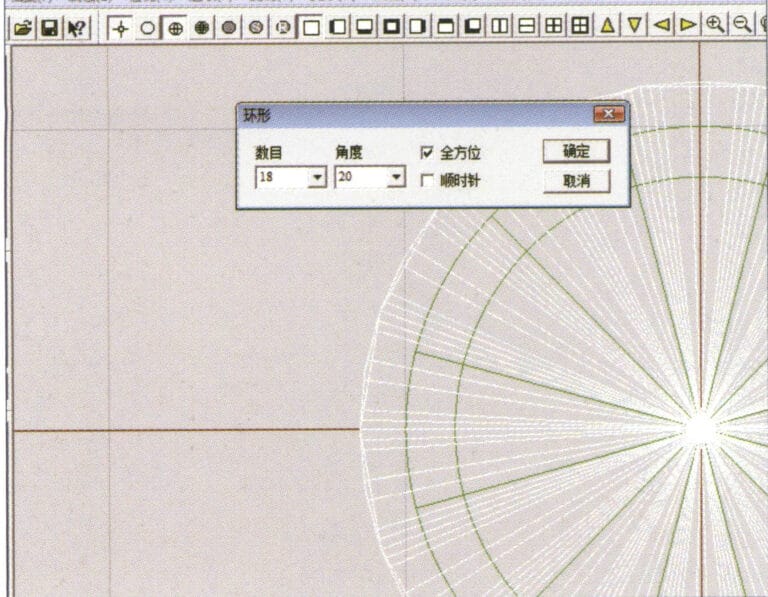
19. Select "Copy" > "Circular Copy" from the menu bar, enter the relevant values and confirm

20. Select “Miscellaneous” > “Boolean” > “Integrate” on the menu bar to integrate the selected surfaces.
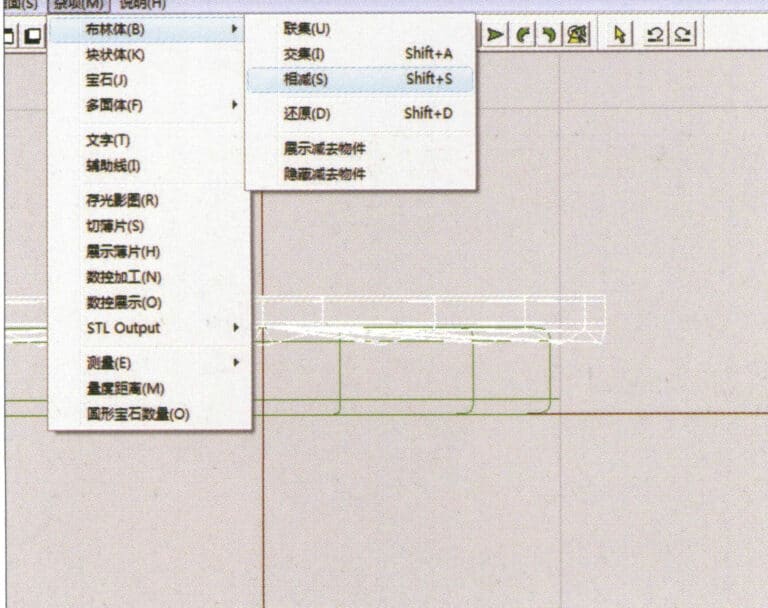
21. Select "Miscellaneous" > "Boolean" > "Subtract" from the menu bar to subtract the selected surface from the already united surface
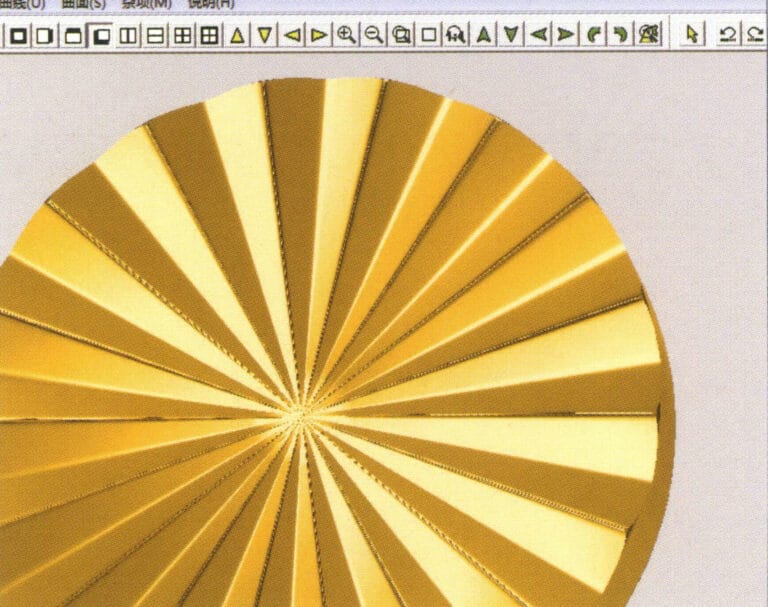
22. Select "View" > "Shadow Map" from the menu bar to inspect the shadow effects.
23. Select "File" > "Save File" from the menu bar to save the document
섹션 III JewelCAD를 사용하여 보석 효과 만들기
1. 다이아몬드 회전 세팅 링
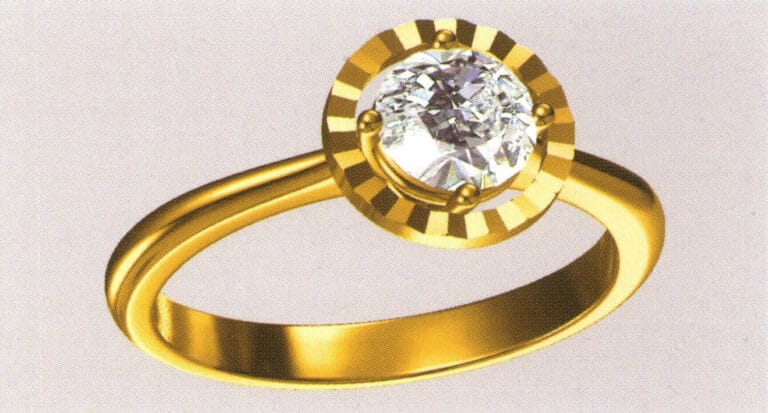
제작 단계는 다음과 같습니다:
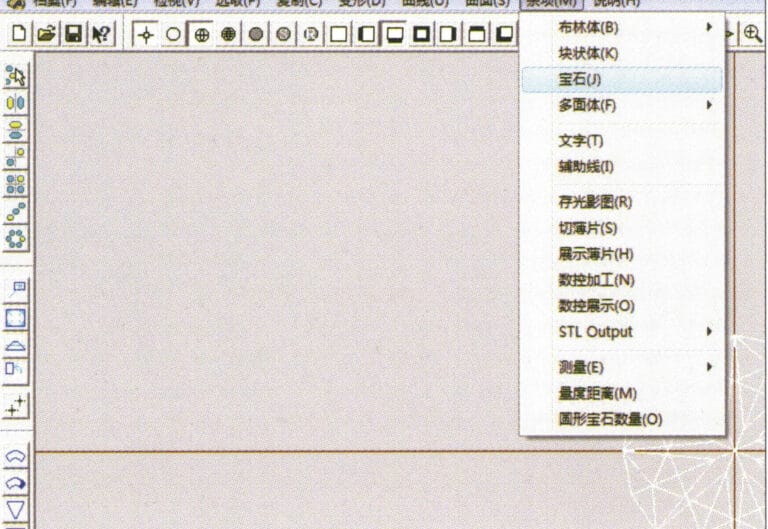
1. Create a new file in JewelCAD, select "Miscellaneous" > "Gem" from the menu bar

2. Select "Deformation" > "Multiple Deformation" from the menu bar
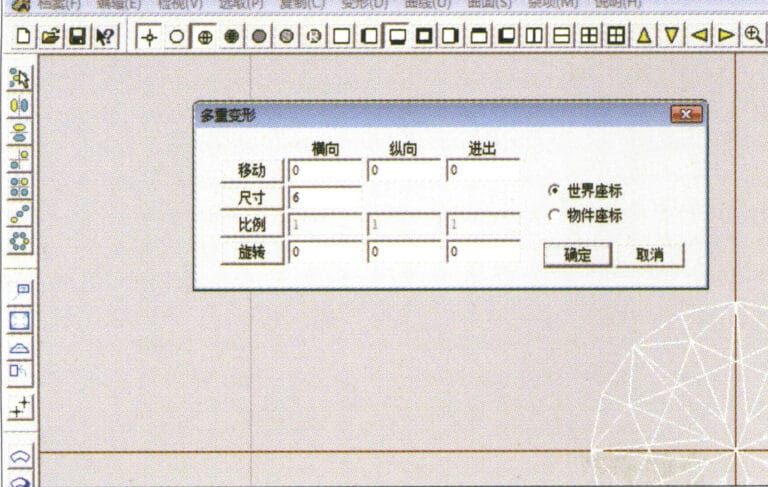
3. '다중 변형' 대화 상자로 들어가 관련 값을 입력하고 확인합니다.
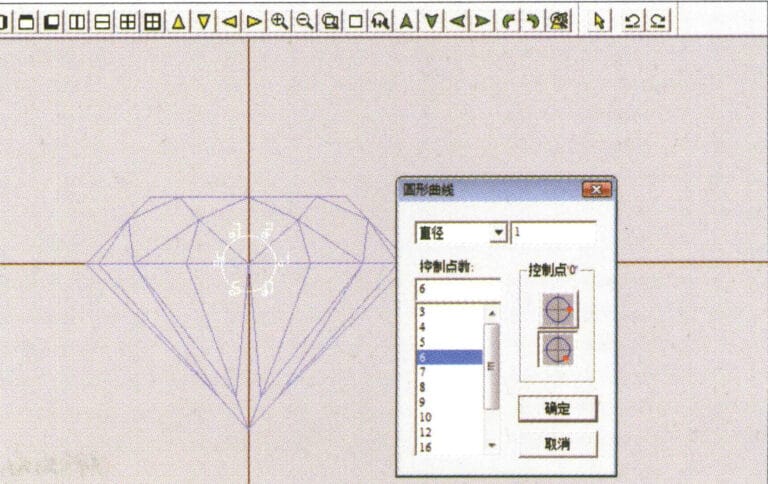
4. Select “Curve” > “Circular Curve” in the menu bar to enter the “Circular Curve” dialog box, enter the relevant values and confirm
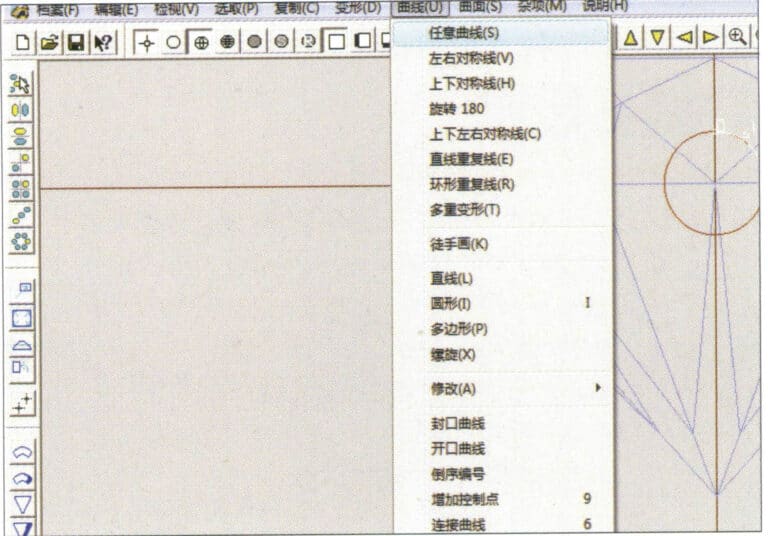
5. Select "Curve" > "Freeform Curve" from the menu bar to draw a claw-shaped guideline
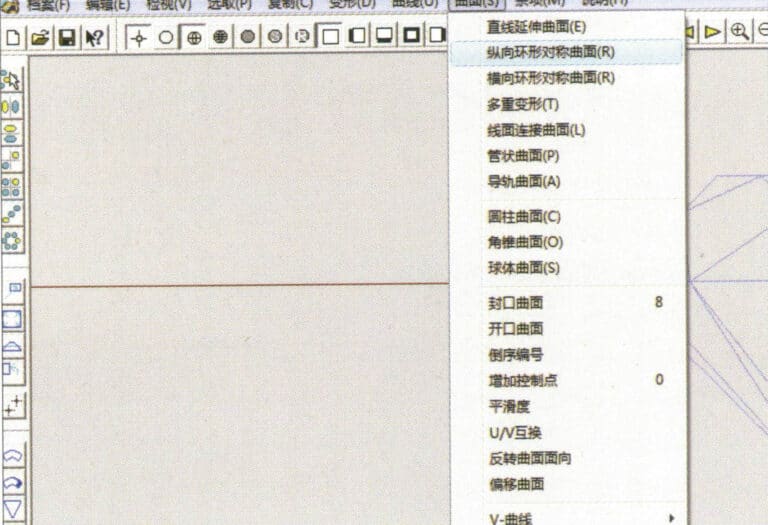
6. Select "Surface" > "Longitudinal Annular Symmetrical Surface" from the menu bar, and draw a claw shape
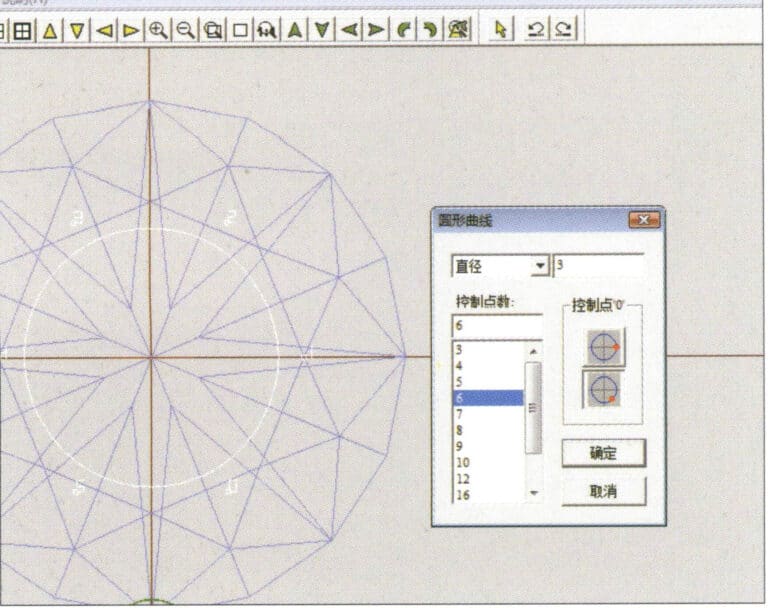
7. Select "Curve" > "Circular Curve" from the menu bar, enter the relevant values in the "Circular Curve" dialog box and confirm
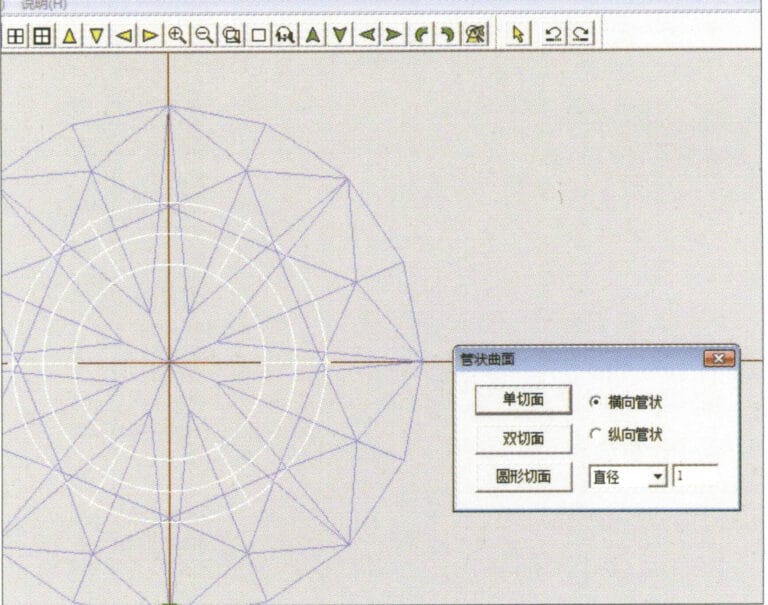
8. Select "Surface" > "Tubular Surface" from the menu bar, enter the relevant values and confirm
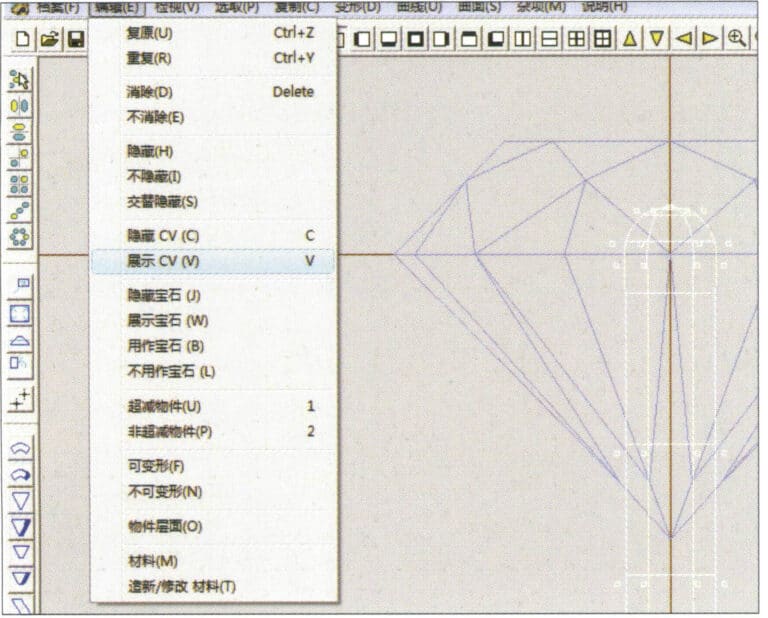
9. Select “Edit” > “Show CV” in the menu bar
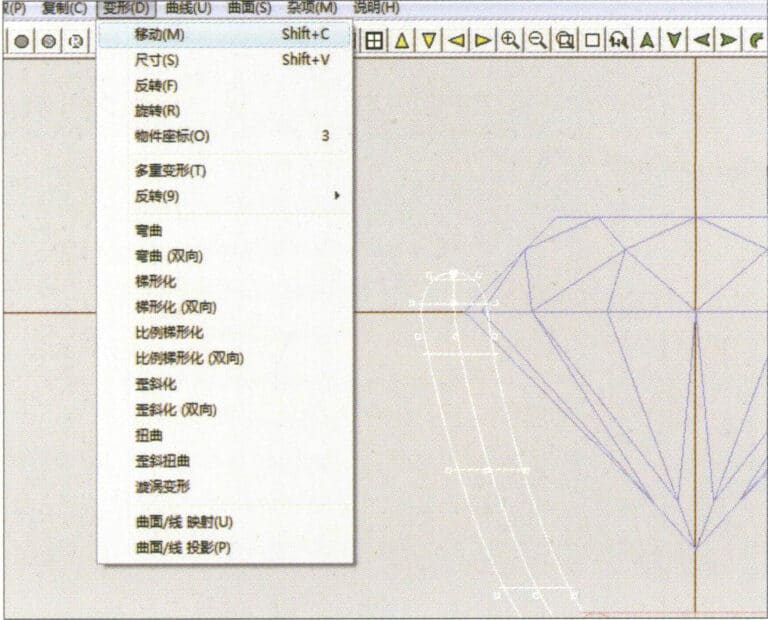
10. Select “Deformation” > “Move” in the menu bar to move the CV
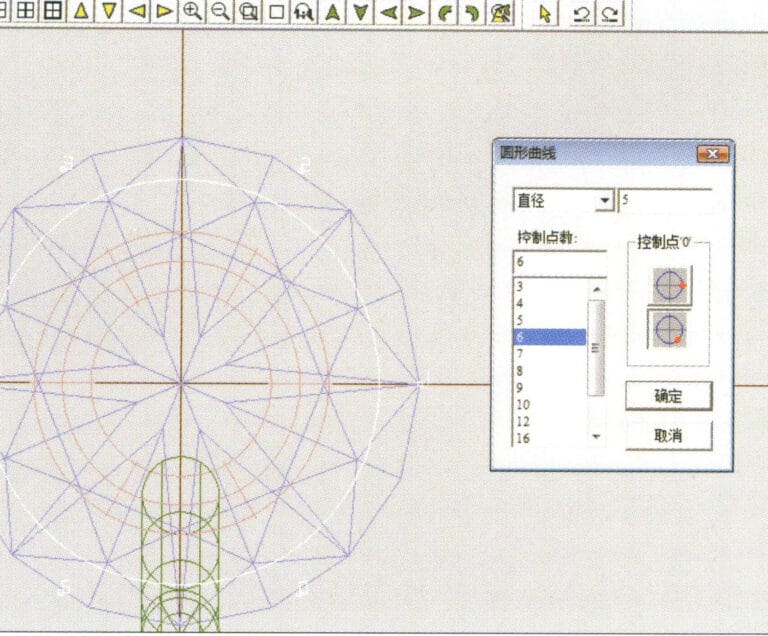
11. Select "Curve" > "Circular Curve" from the menu bar, enter the relevant values in the "Circular Curve" dialog box and confirm
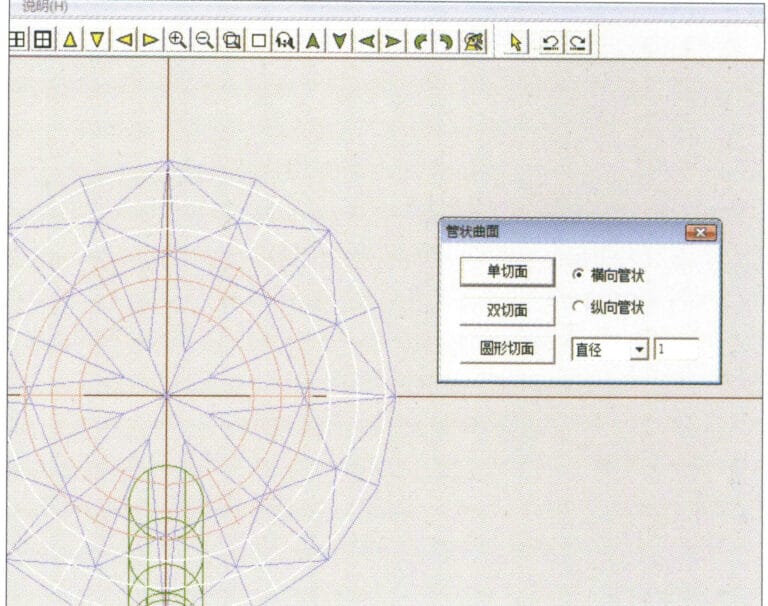
12. Select "Surface" > "Tubular Surface" from the menu bar, enter the relevant values and confirm
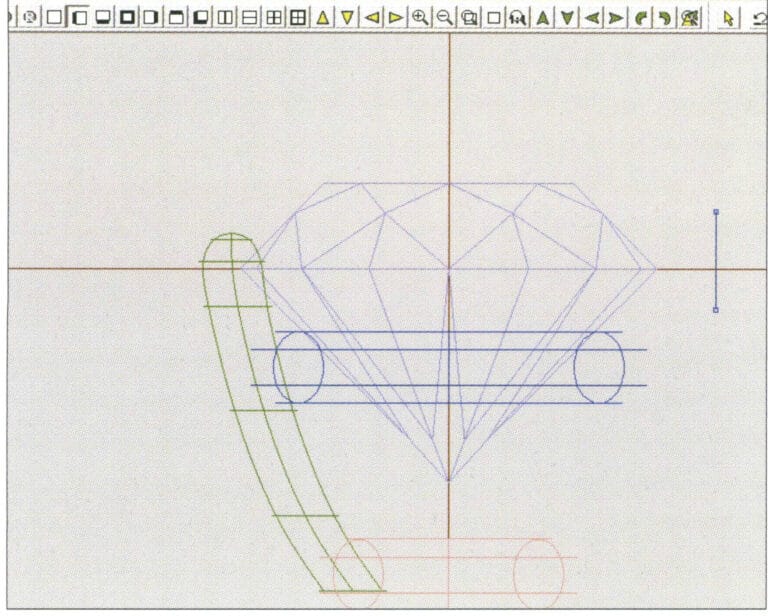
13. Select the menu bar "Edit" > "Move" to move the selected graphic

14. Select the completed claw shape, choose "Copy" > "Circular Copy" from the menu, enter the relevant values in the "Circular Copy" dialog box and confirm
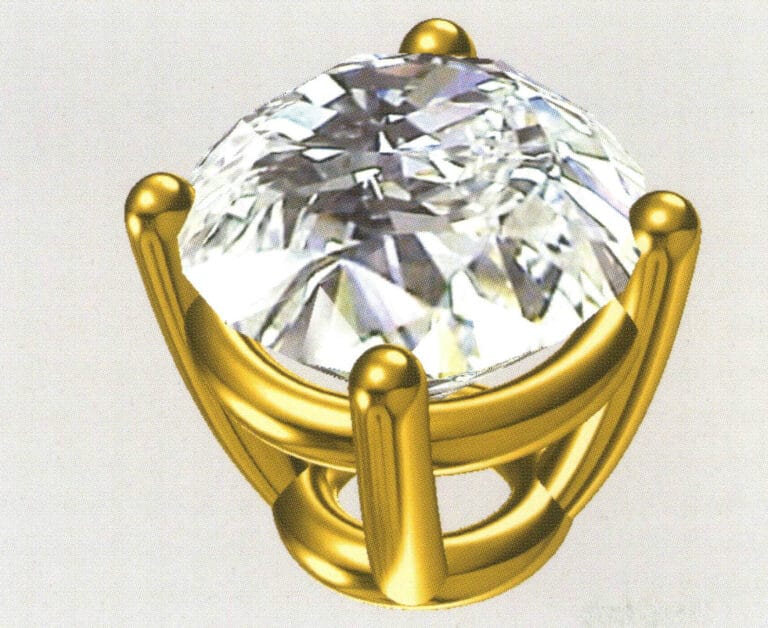
15. Select "View" > "Shadow Map" from the menu bar to inspect the shadow effects
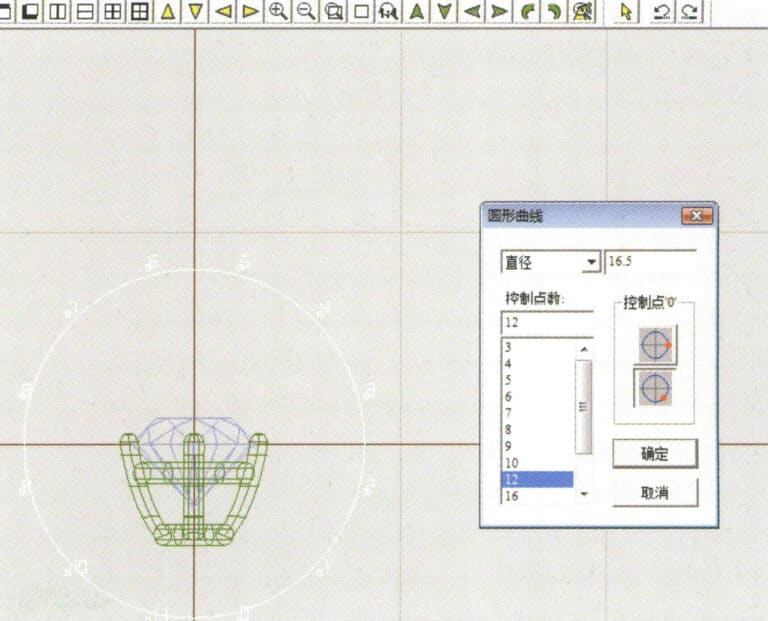
16. Select "Curve" > "Circular Curve" from the menu bar, enter the "Circular Curve" dialog box, and input the relevant values as the inner diameter of the ring shank
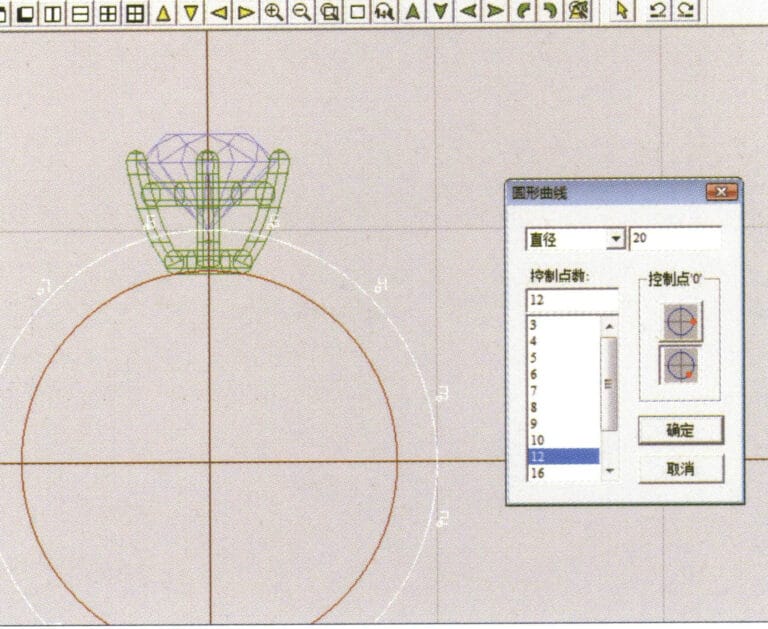
17. Select "Curve" > "Circular Curve" from the menu bar, enter the "Circular Curve" dialog box, and input the relevant values as the outer diameter of the ring shank

18. Select "Curve" > "Circular Curve" from the menu bar, enter the "Circular Curve" dialog box, and input the relevant values as the outer diameter of the engine-turned band
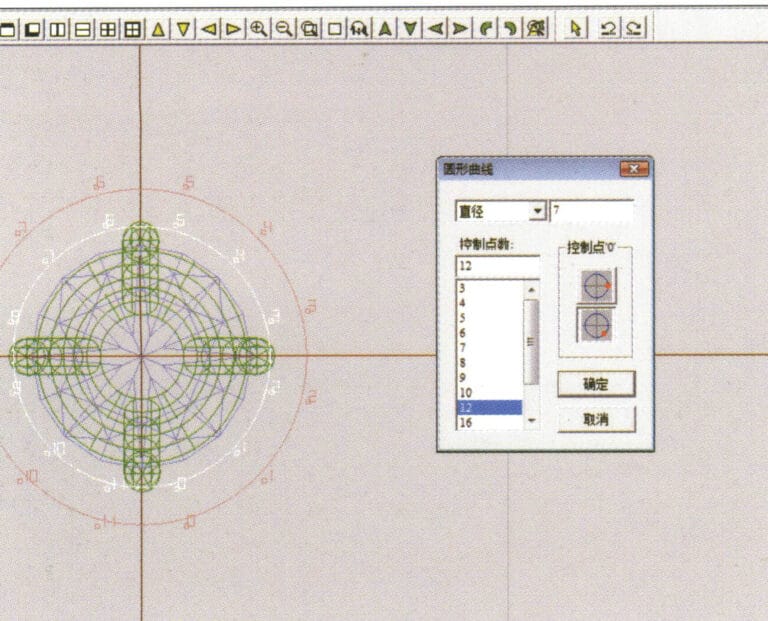
19. Select "Curve" > "Circular Curve" from the menu bar, enter the "Circular Curve" dialog box, and input the relevant values as the inner diameter of the engine-turned band
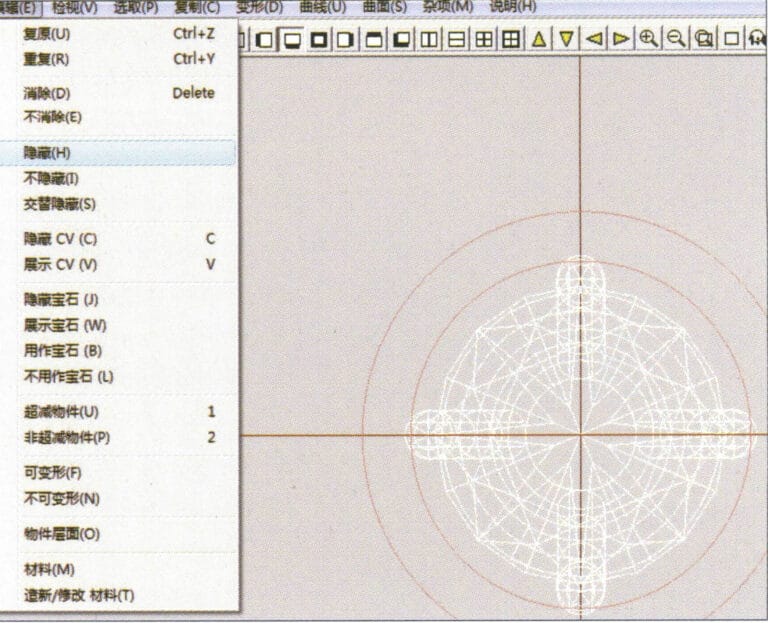
20. Select "Edit" > "Hide" from the menu bar to hide the completed gemstone inlay
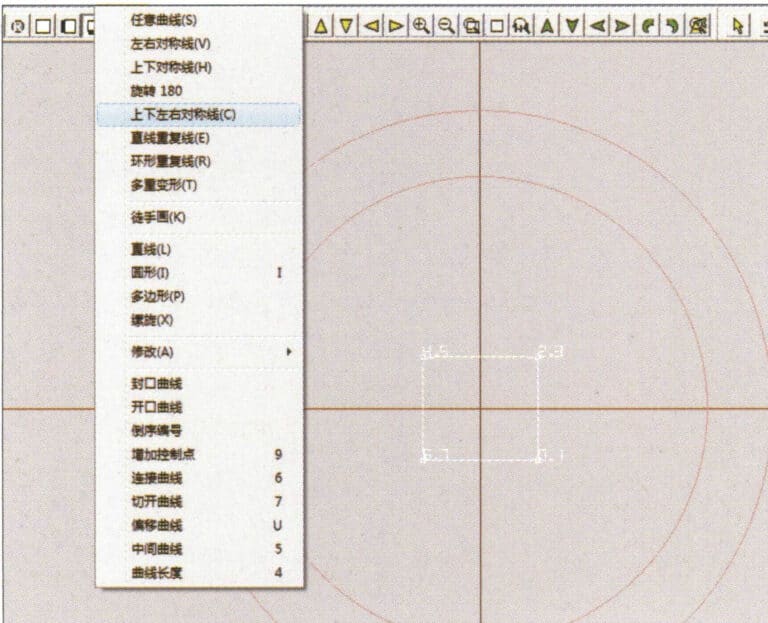
21. Select "Curve" > "Vertical and Horizontal Symmetry Line" from the menu bar
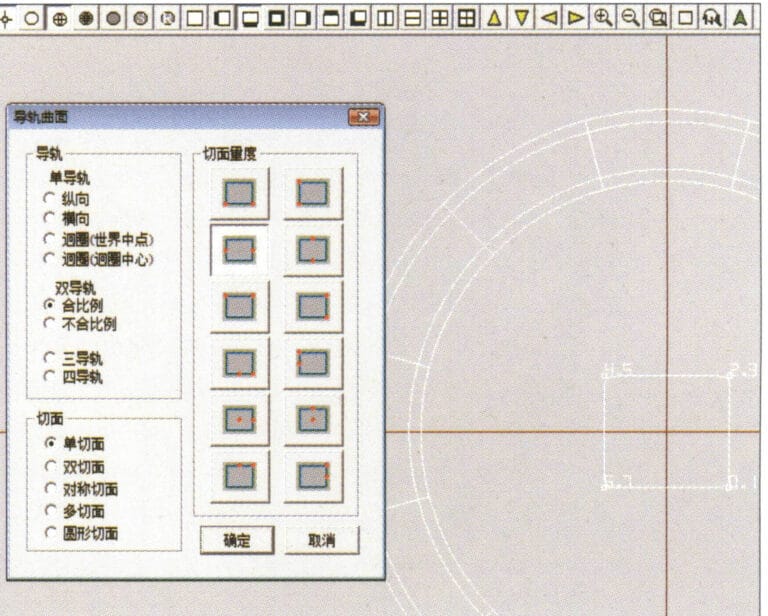
22. Select "Surface" > "Rail Surface" from the menu bar to enter the "Rail Surface" dialog box, select the relevant options and confirm
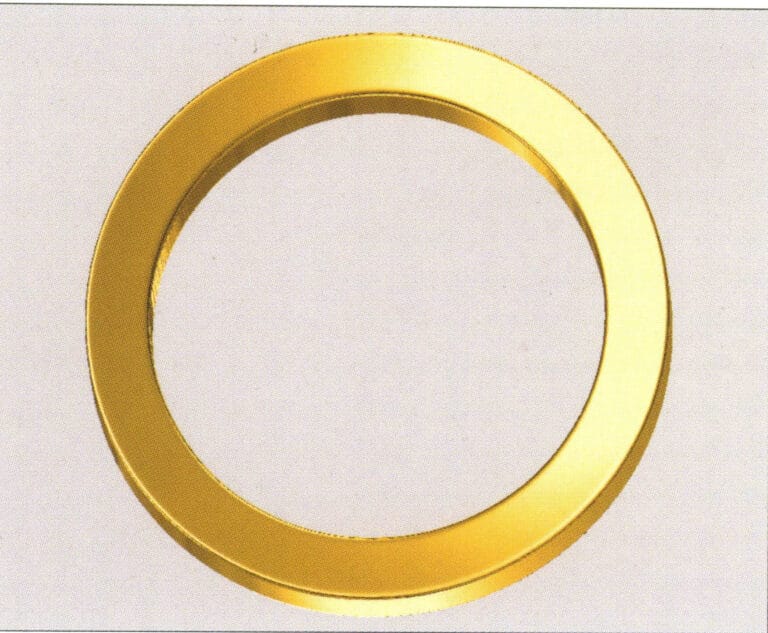
23. Select "View" > "Shadow Map" from the menu bar to inspect the shadow effects
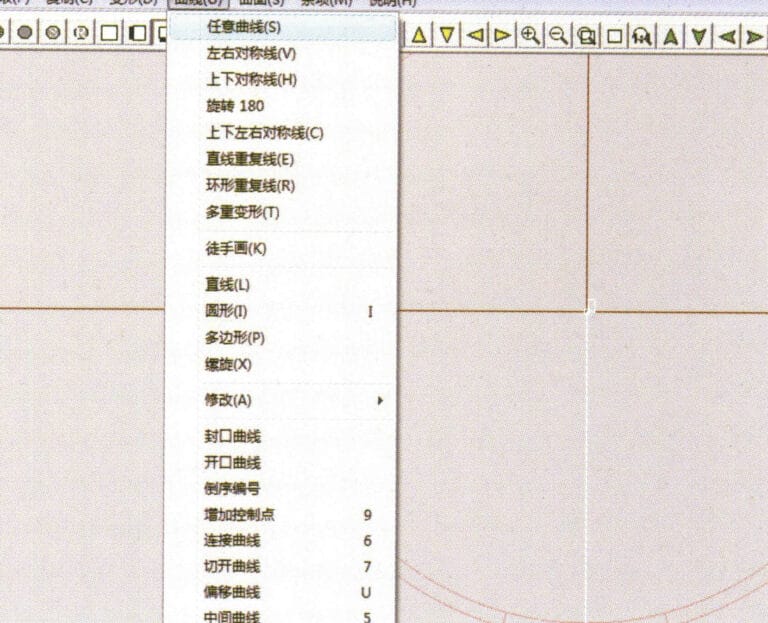
24. Select "Curve" > "Freeform Curve" from the menu bar to draw a guideline

25. Select "Copy" > "Hide Copy" from the menu bar to copy the already drawn auxiliary lines
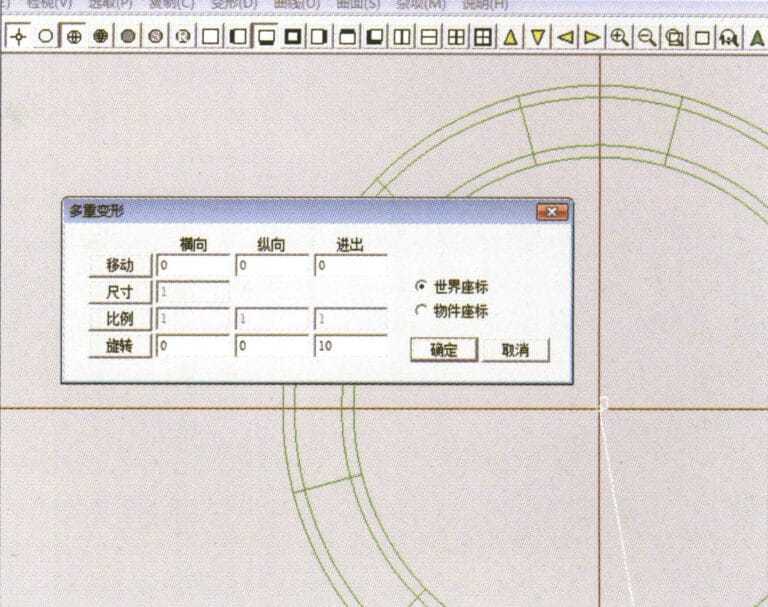
26. Select “Deformation” > “Multiple Deformation” in the menu bar to enter the “Multiple Deformation” dialog box, enter the relevant values and confirm
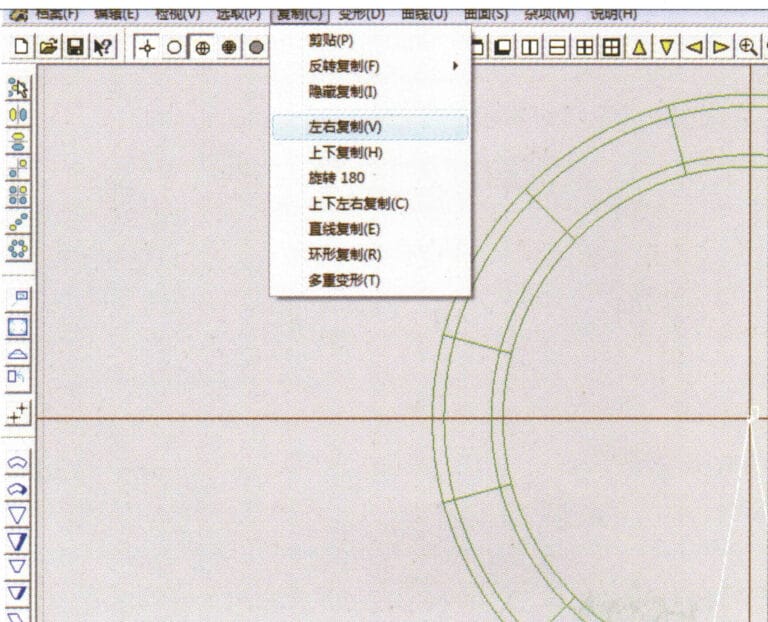
27. Select “Copy” > “Copy Up and Down” in the menu bar to copy the drawn auxiliary lines
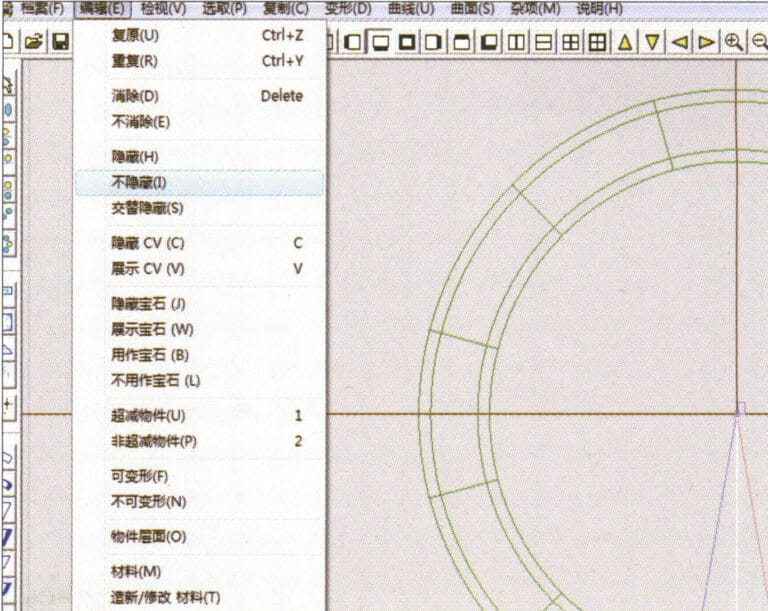
28. Select "Edit" > "Unhide" from the menu to display the hidden curves
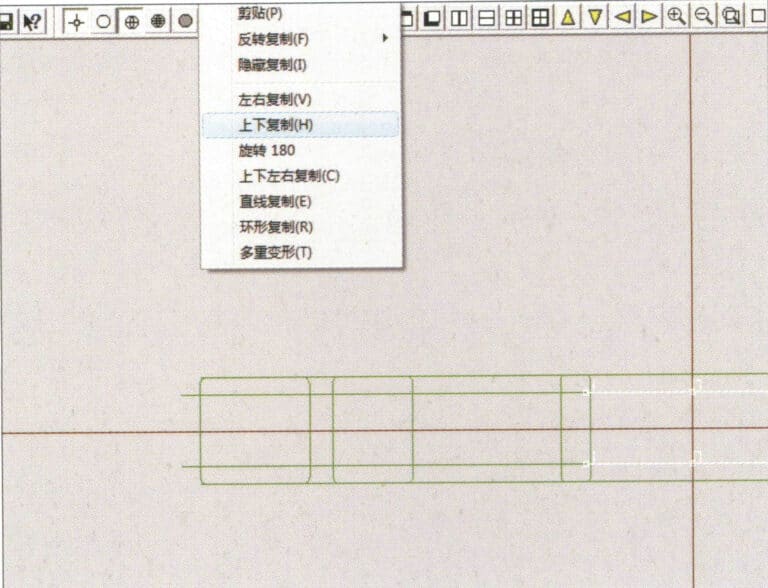
29. Select "Copy" > "Copy Up and Down" from the menu bar to copy the selected curve
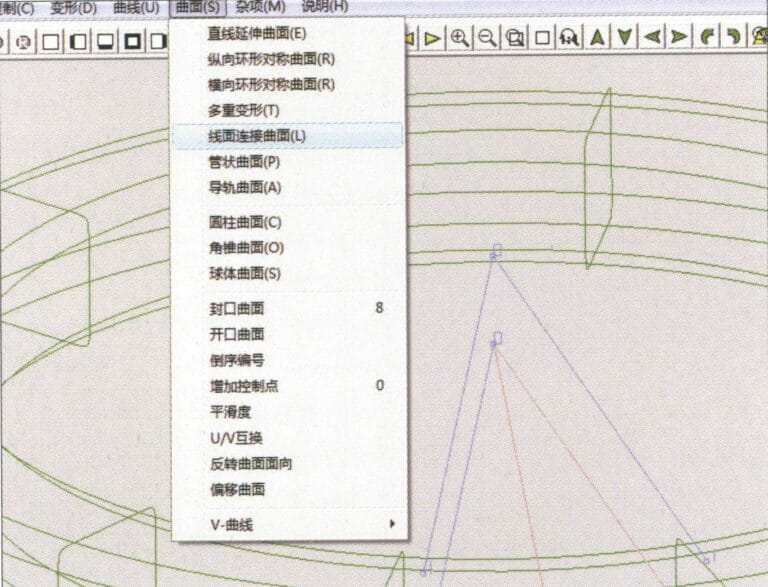
30. Select curves/surfaces in a clockwise direction to create line-surface connections, then select "Surface" > "Cap Surface" from the menu bar
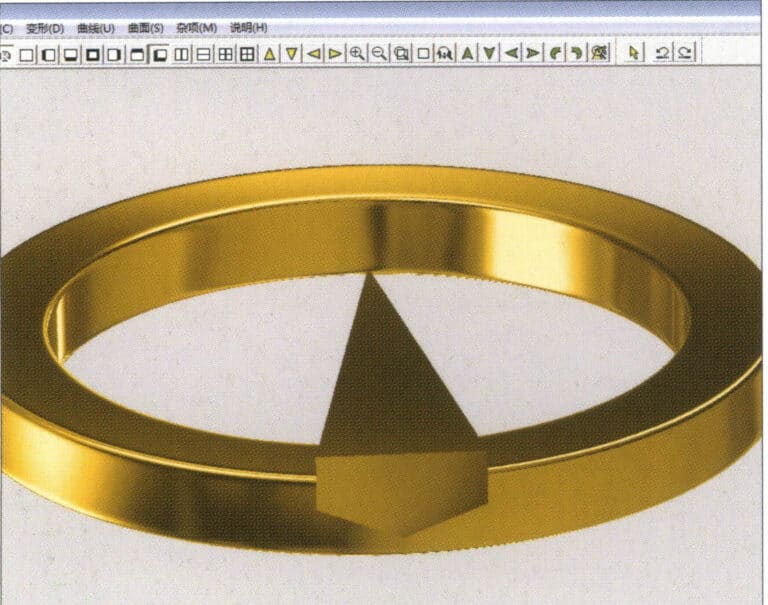
31. Select "View" > "Shadow Map" from the menu bar to inspect the shadow effects
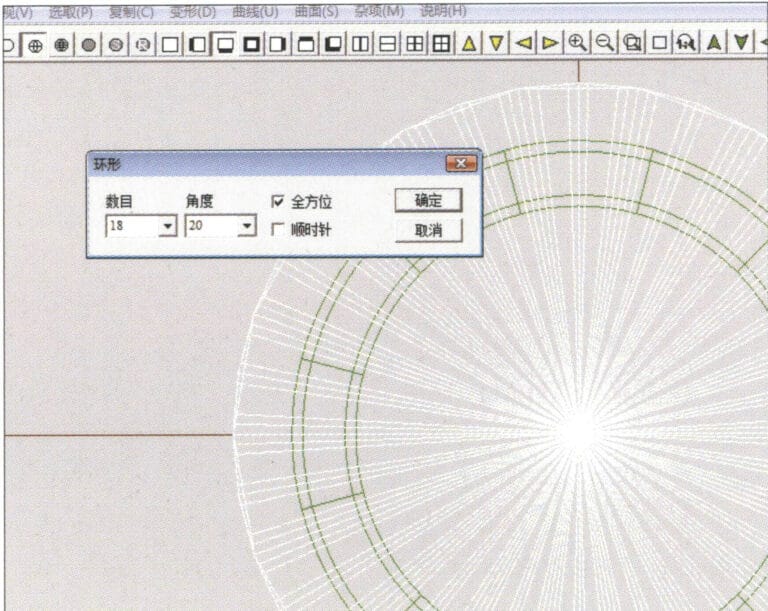
32. Select "Copy" > "Circular Copy" from the menu bar, enter the relevant values and confirm
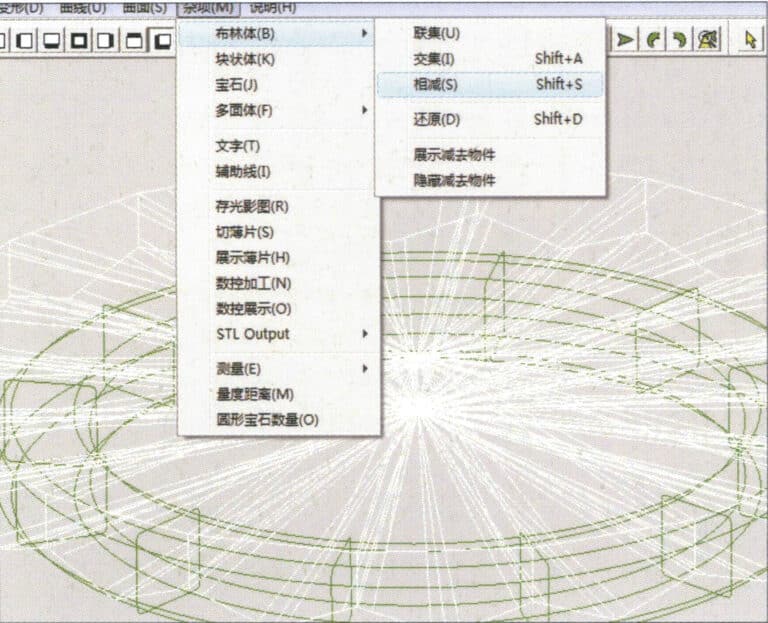
33. Select "Miscellaneous" > "Boolean" > "Subtract" from the menu bar to subtract the selected surface from the already united surface
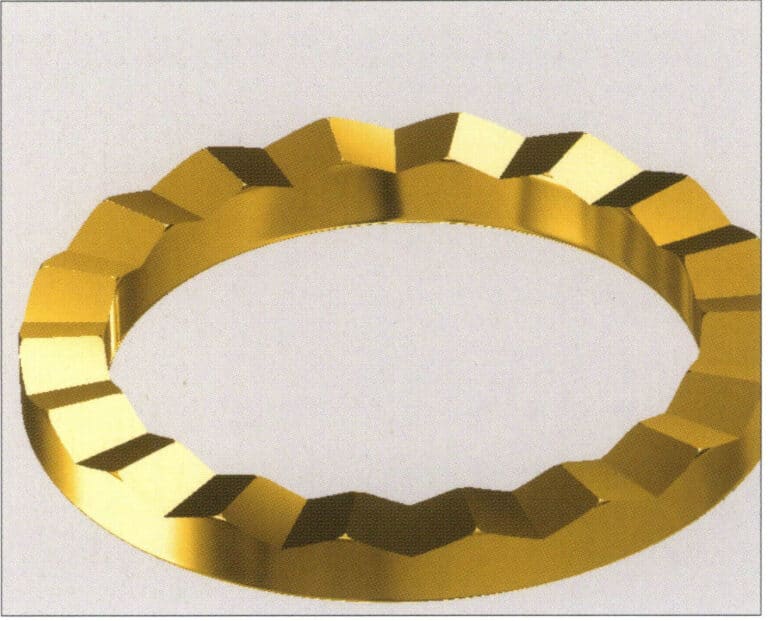
34. Select "View" > "Shadow Map" from the menu bar to inspect the shadow effects
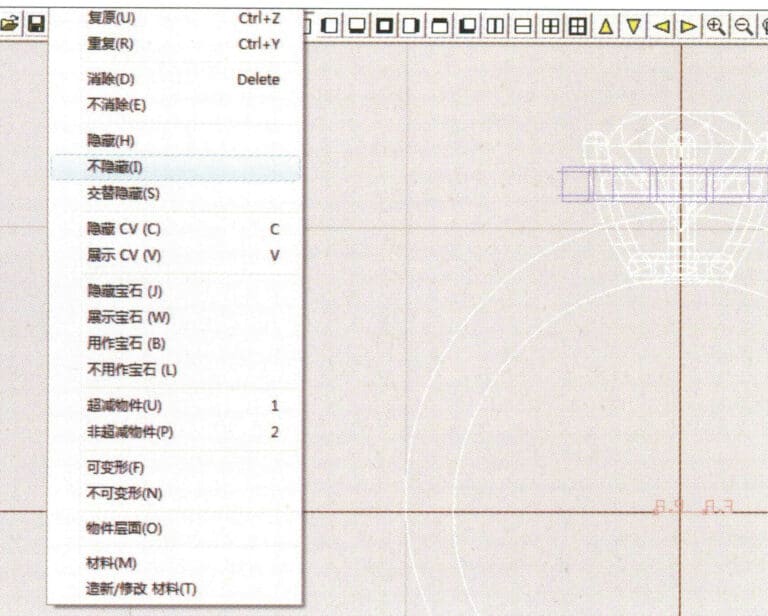
35. Select "Edit" > "Unhide" from the menu bar to display the hidden objects
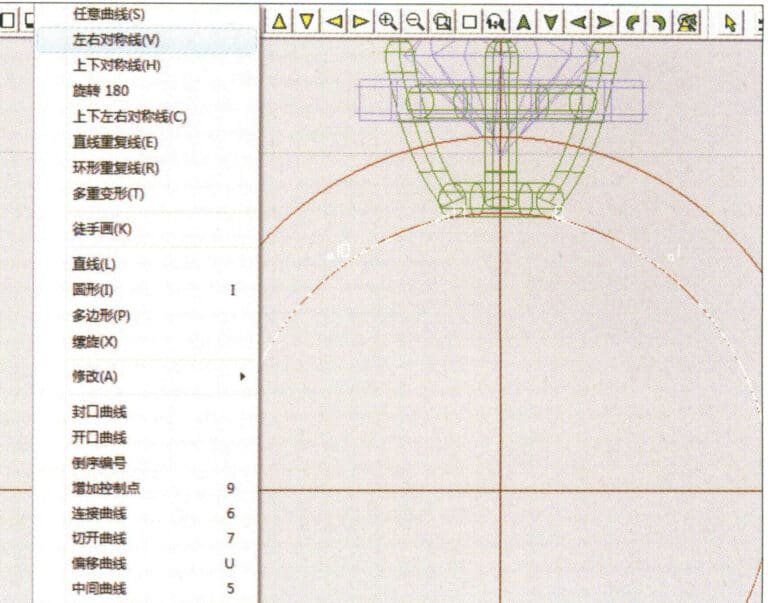
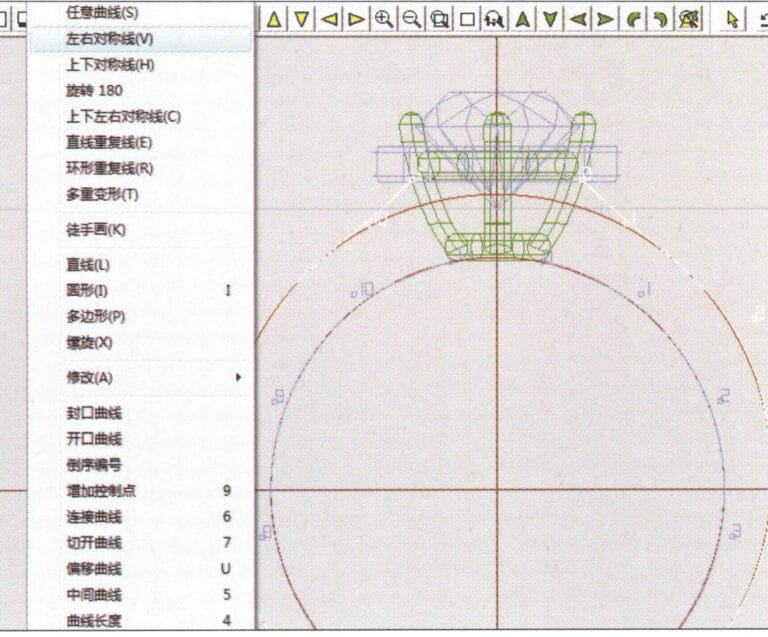
36. Select "Curve" > "Left-Right Symmetry Line" from the menu bar to draw the inner diameter of the ring wall
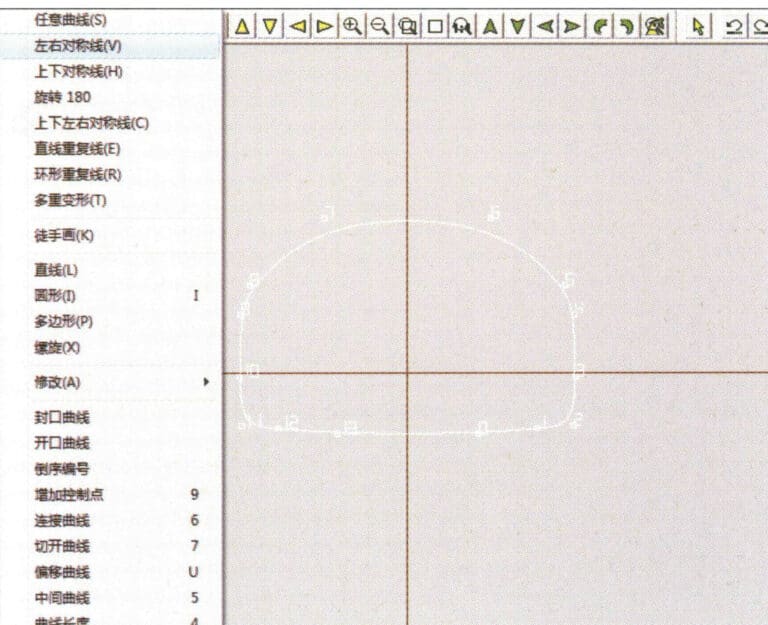
37. Select "Curve" > "Left-Right Symmetry Line" from the menu bar to draw the outer diameter of the ring wall
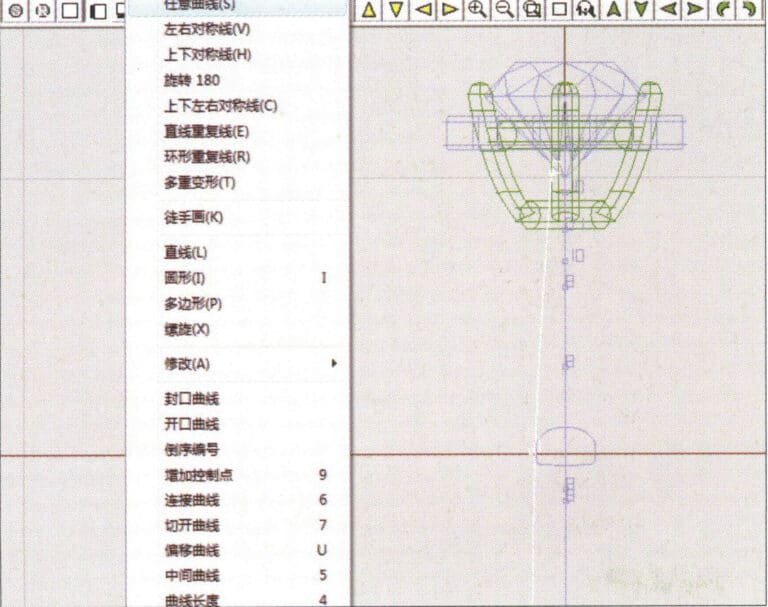
38. Select “Curve” > “Left-Right Symmetry Line” in the menu bar to draw a cutout of the ring shank
39. Select "Curve" > "Freeform Curve" from the menu bar to draw a guideline
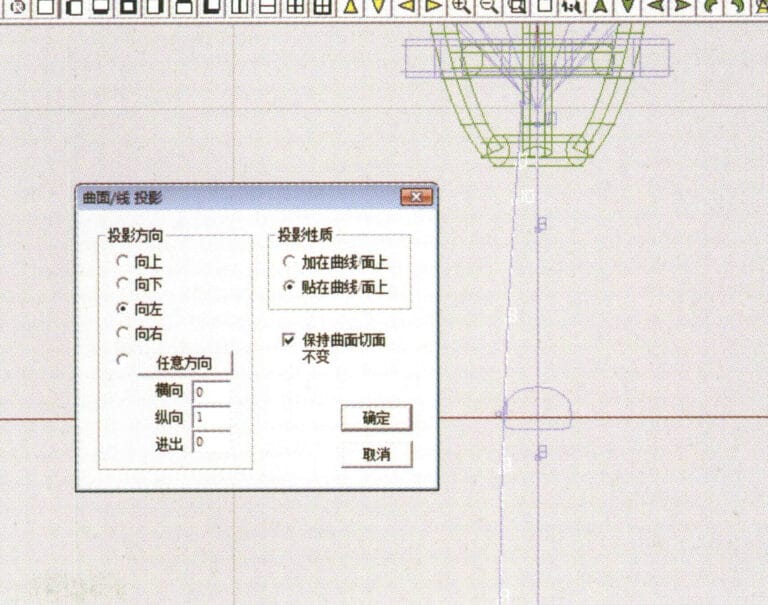
40. Select "Deformation" > "Surface/Line Projection" from the menu bar to enter the "Surface/Line Projection" dialog box, input the relevant values and confirm
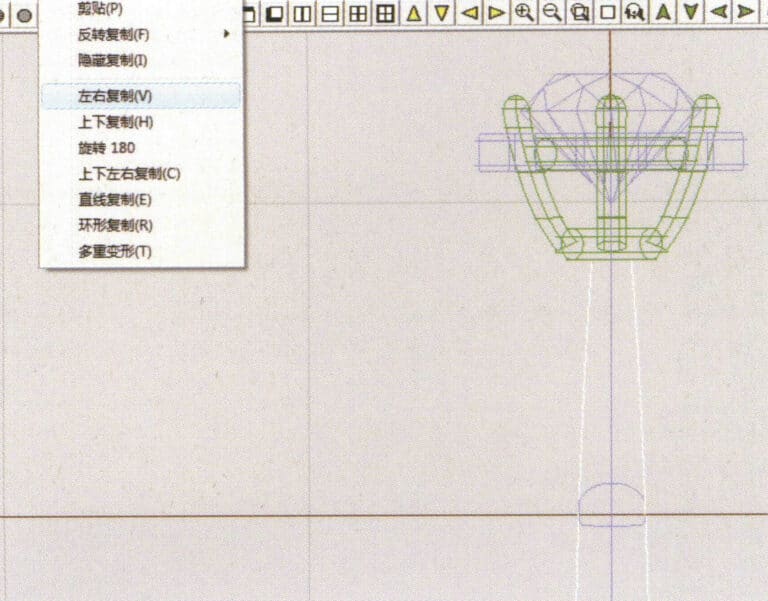
41. Select "Copy" > "Copy Left and Right" from the menu bar to copy the inner diameter of the ring shank
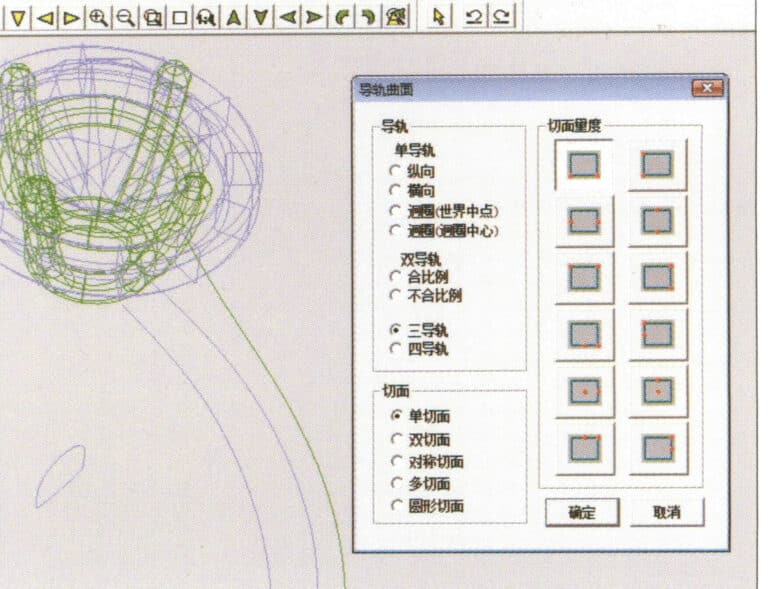
42. Select "Surface" > "Rail Surface" from the menu bar to enter the "Rail Surface" dialog box, select the relevant options and confirm
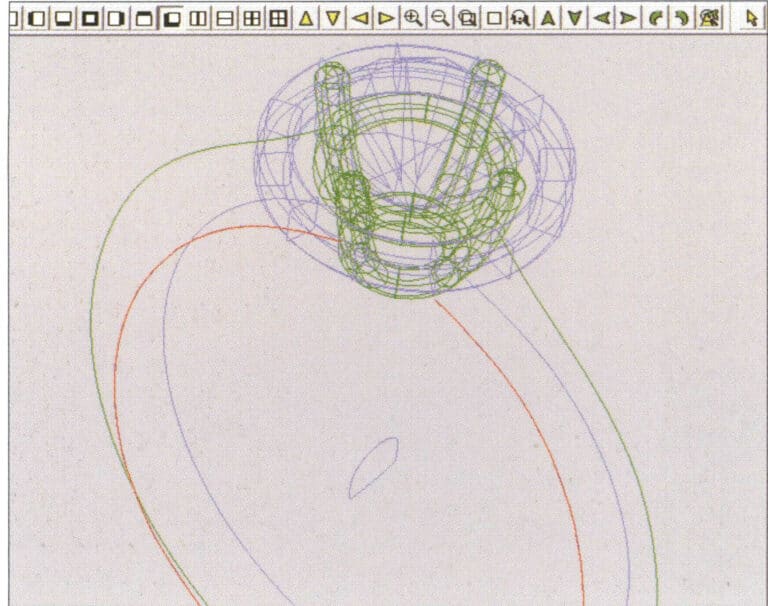
43. 커브를 왼쪽 안내선 레일로 선택한 다음 커브를 오른쪽 안내선 레일로 선택합니다.

44. 커브를 상단 가이드 레일로 선택합니다.
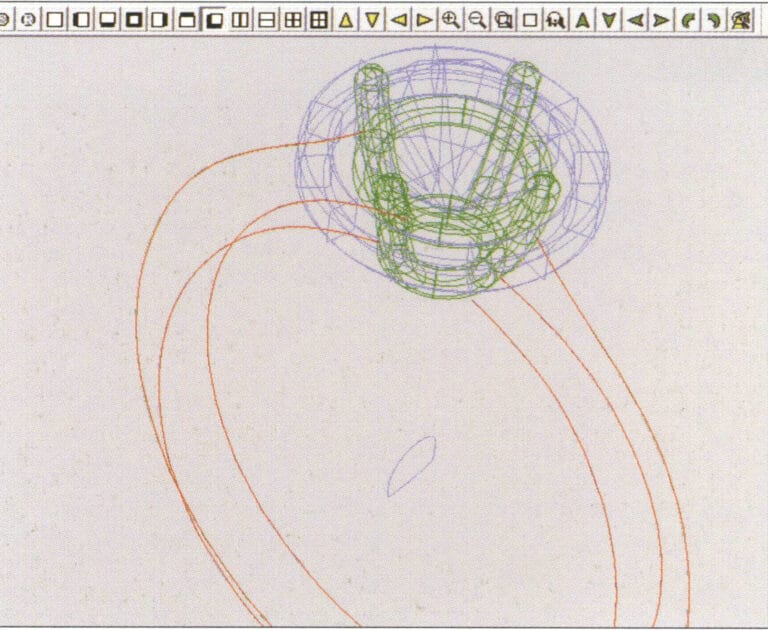
45. 가이드 표면의 단면으로 커브를 선택합니다.
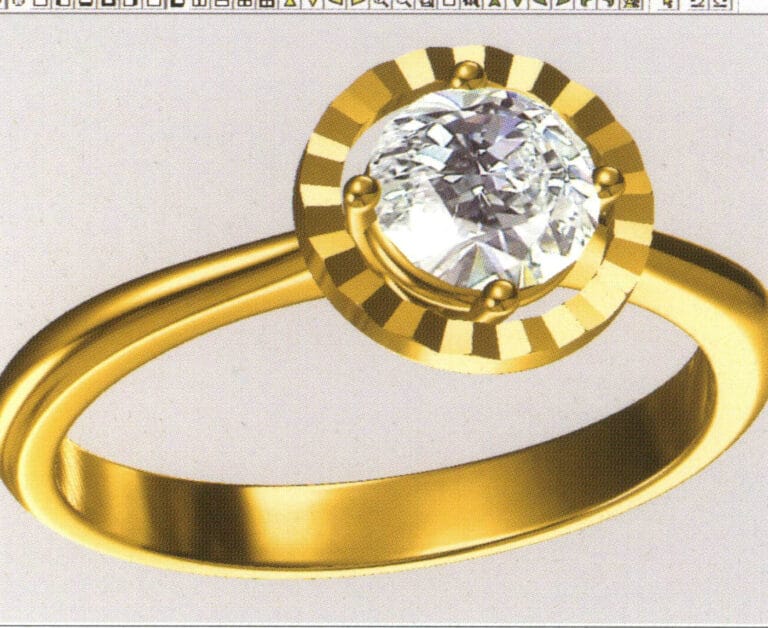
46. Select "View" > "Light and Shadow Map" from the menu bar to examine the light and shadow effects
47. Select "File" > "Save As" from the menu bar to save the file
카피라이팅 @ 소블링.쥬얼리 - Sobling. 맞춤형 주얼리 제조업체, OEM 및 ODM 주얼리 공장
2. 진주 반지

제작 단계는 다음과 같습니다:
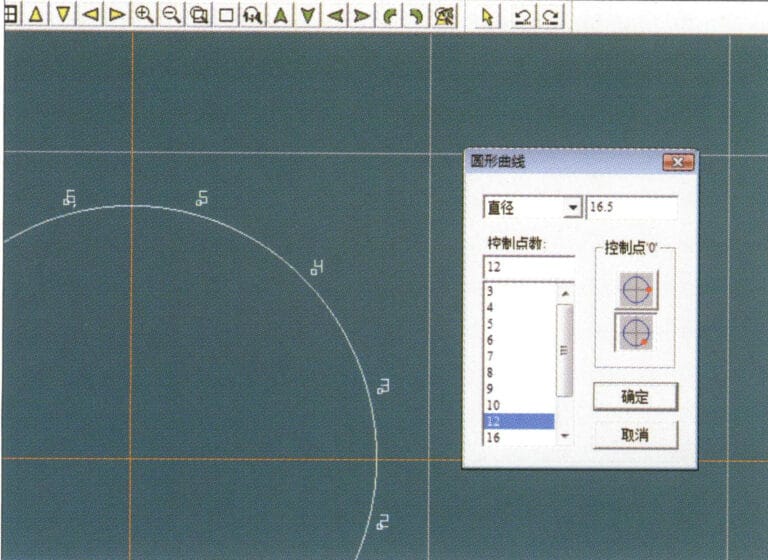
1. Create a new file in JewelCAD, select "Curve" > "Circular Curve" from the menu bar, enter the relevant values in the "Circular Curve" dialog box as the outer curve of the ring, and confirm
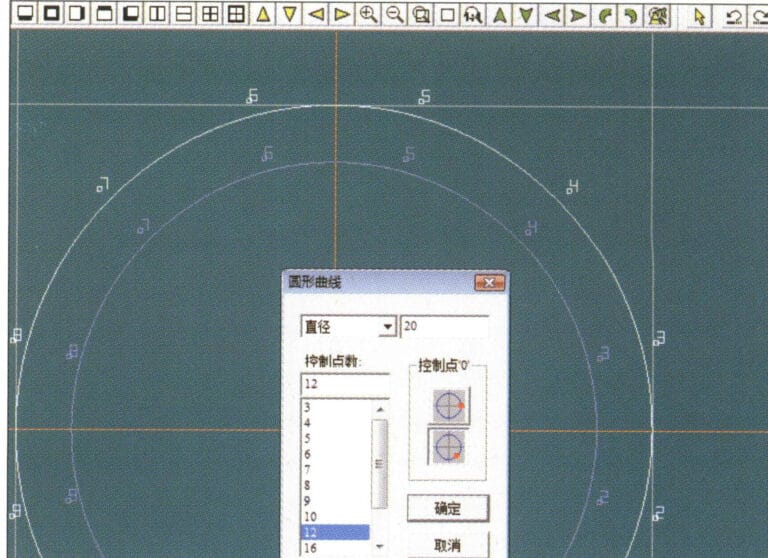
2. Select "Curve" > "Circular Curve" from the menu bar, enter the relevant values in the "Circular Curve" dialog box to set the inner curve of the ring, and confirm
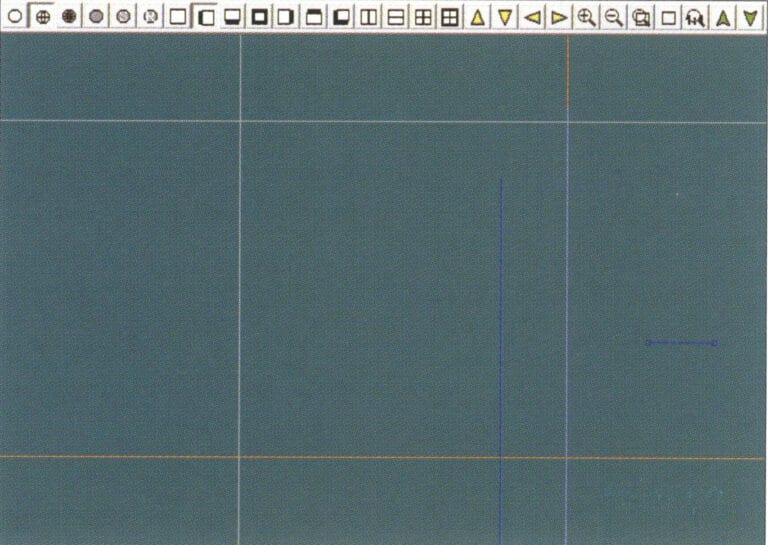
3. Select "Edit" > "Move" from the menu bar to move the selected inner curve of the ring
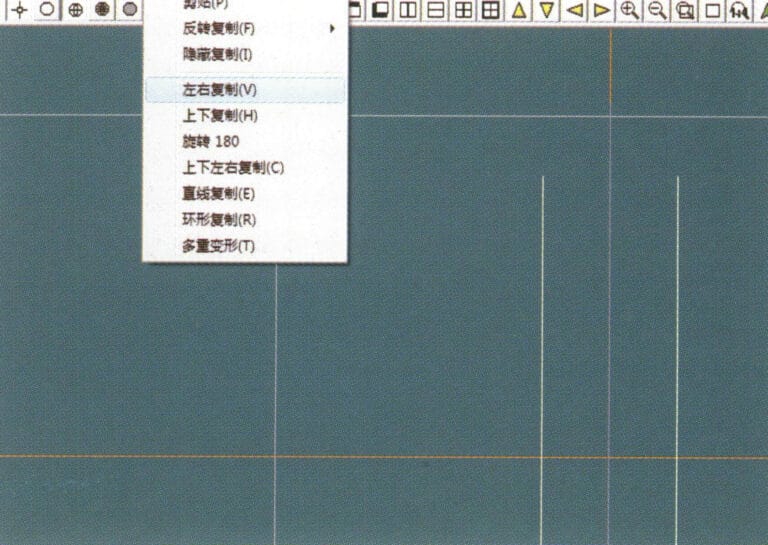
4. Select "Copy" > "Copy Left and Right" from the menu bar to copy the curve of the inner circle of the ring
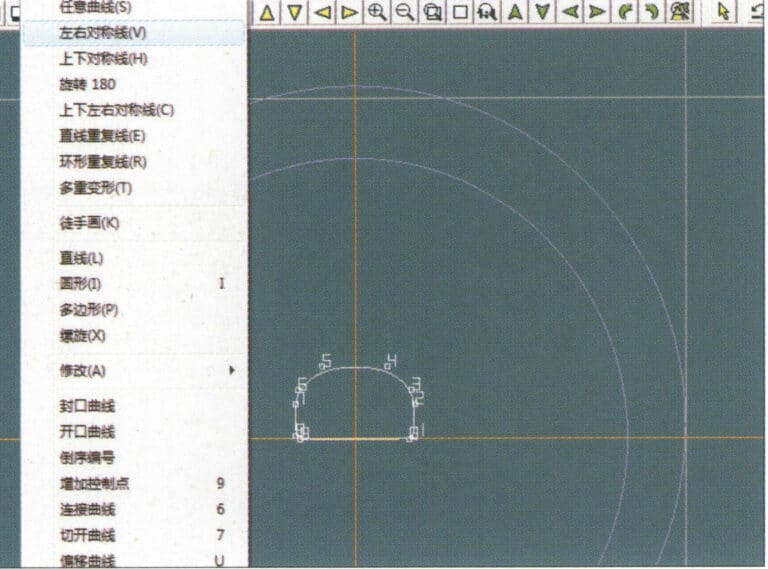
5. Select "Curve" > "Left-Right Symmetry Line" from the menu bar as the cross-section of the ring band
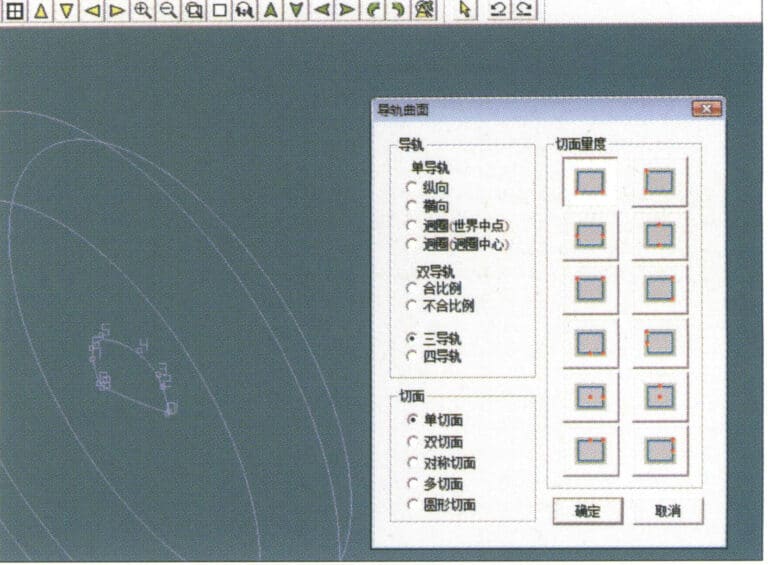
6. Select "Curved Surface" > "Guide Rail Surface" from the menu bar, enter the "Guide Rail Surface" dialog box, select the relevant options and confirm
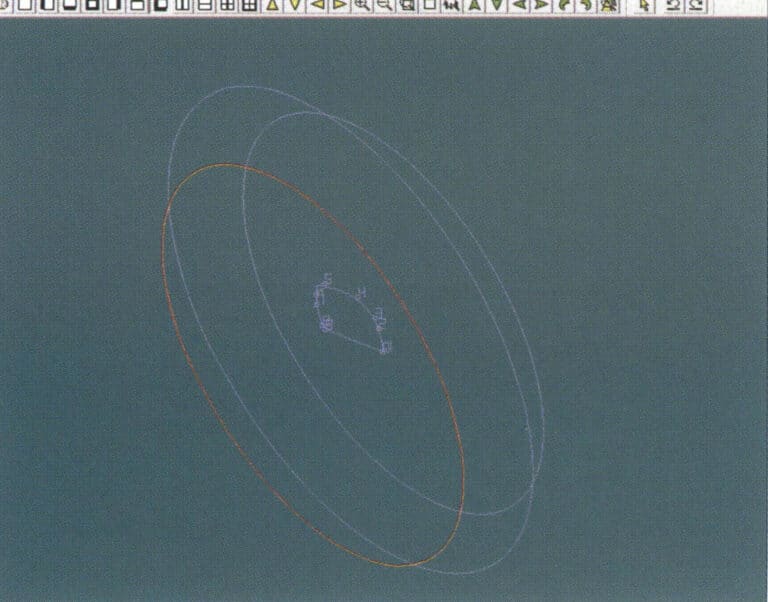
7. 올바른 가이드 레일로 커브를 선택합니다.
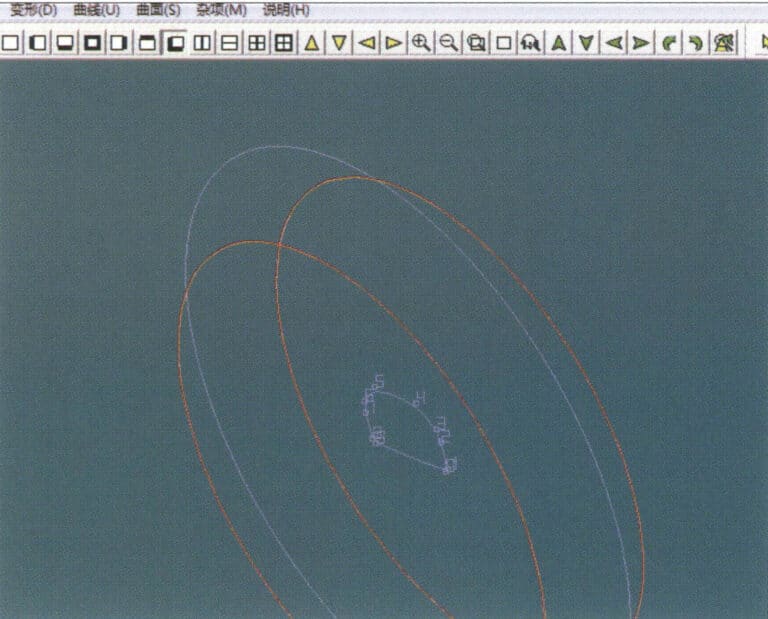
8. 커브를 상단 가이드 레일로 선택합니다.
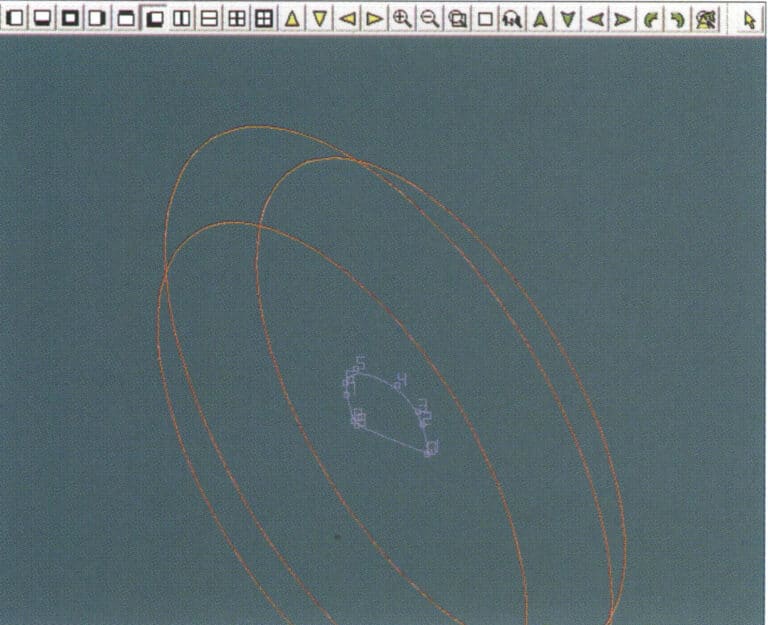
9. 링 밴드의 단면을 가이드 커브 표면의 단면으로 선택합니다.
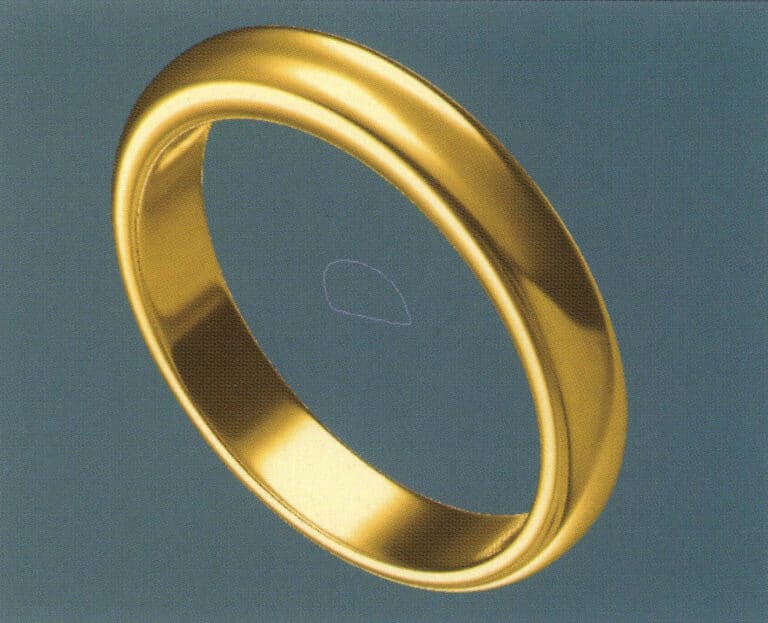
10. Select "View" > "Shadow Map" from the menu bar to inspect the shadow effects
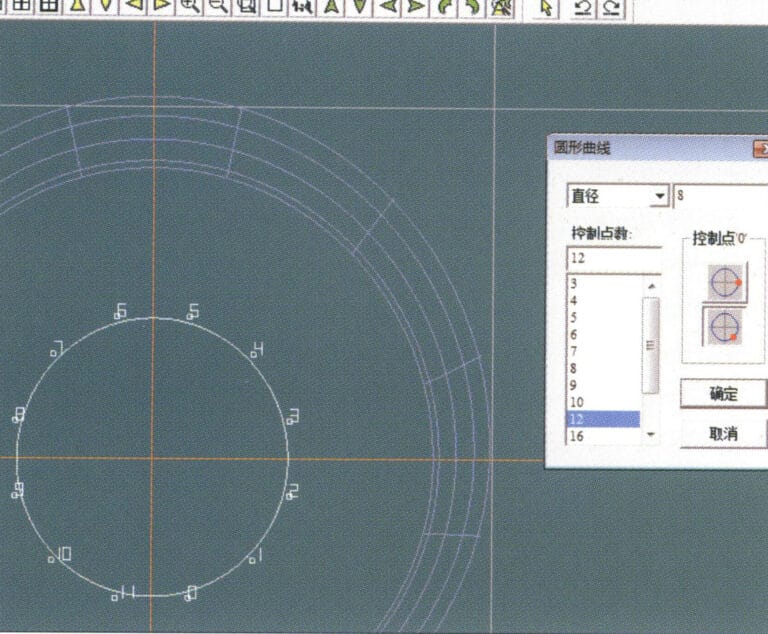
11. Select "Curve" > "Circular Curve" from the menu bar, enter the relevant values in the "Circular Curve" dialog box as auxiliary lines, and confirm
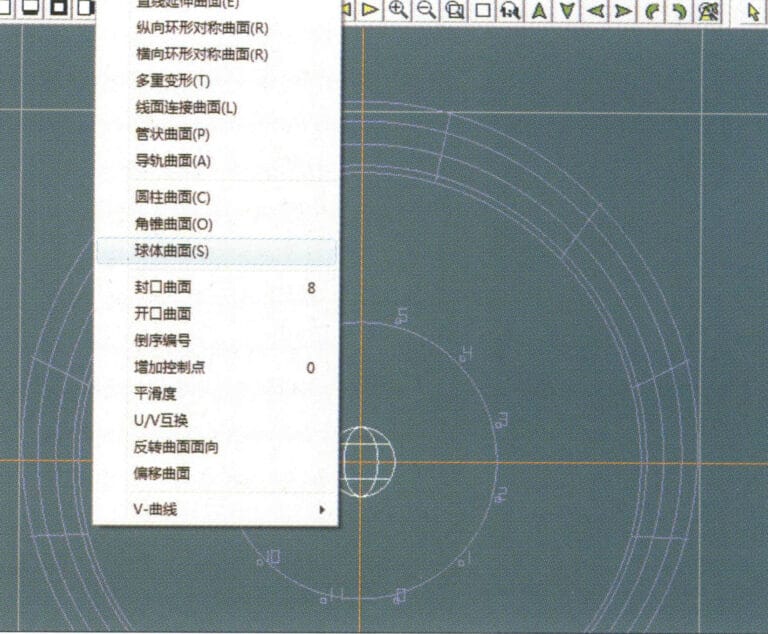
12. Select "Surface" > "Spherical Surface" from the menu bar
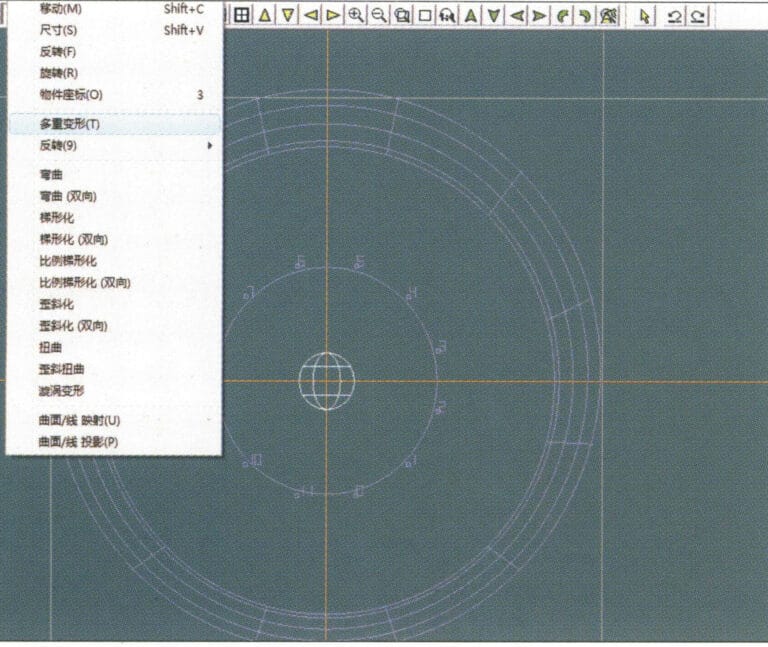
13. Select "Deformation" > "Multiple Deformation" from the menu bar to enlarge the sphere
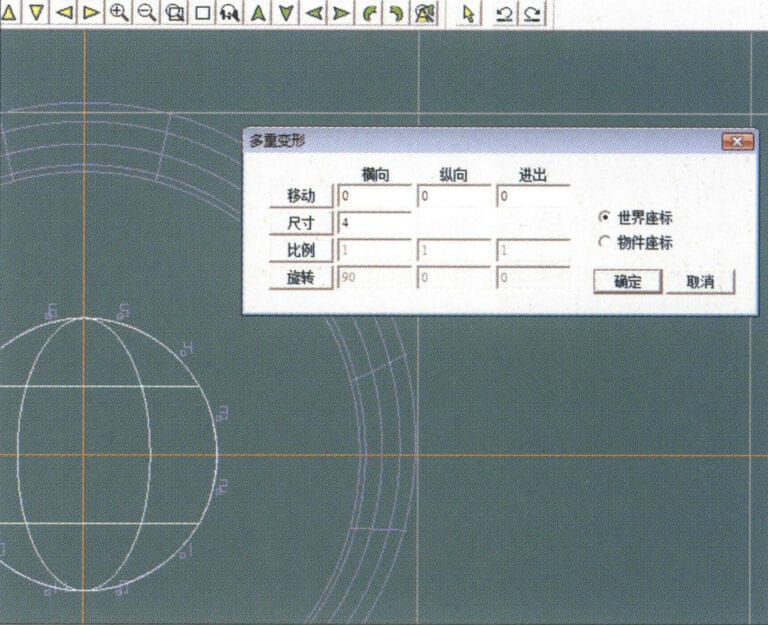
14. '다중 변형' 대화 상자로 들어가 해당 값을 입력하여 구를 가이드라인 너비만큼 확대한 후 확인합니다.
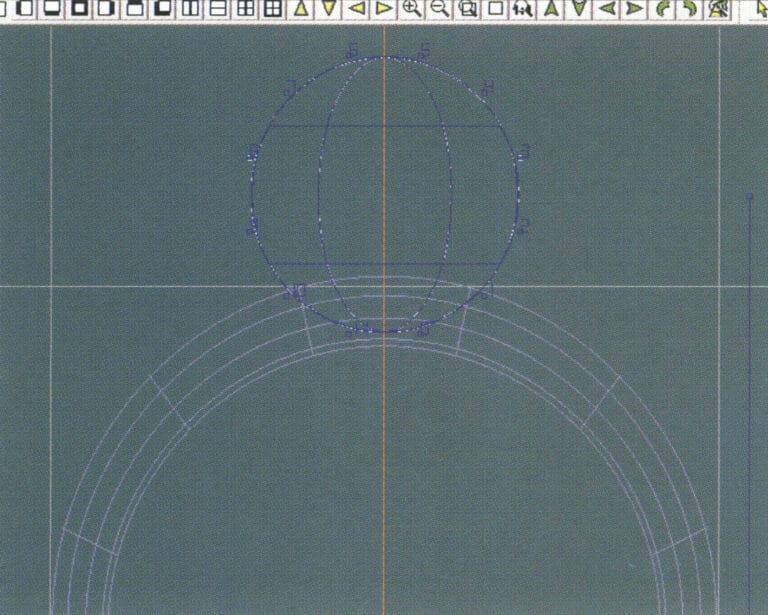
15. Select "Edit" > "Move" from the menu bar to move both the sphere and the auxiliary line simultaneously
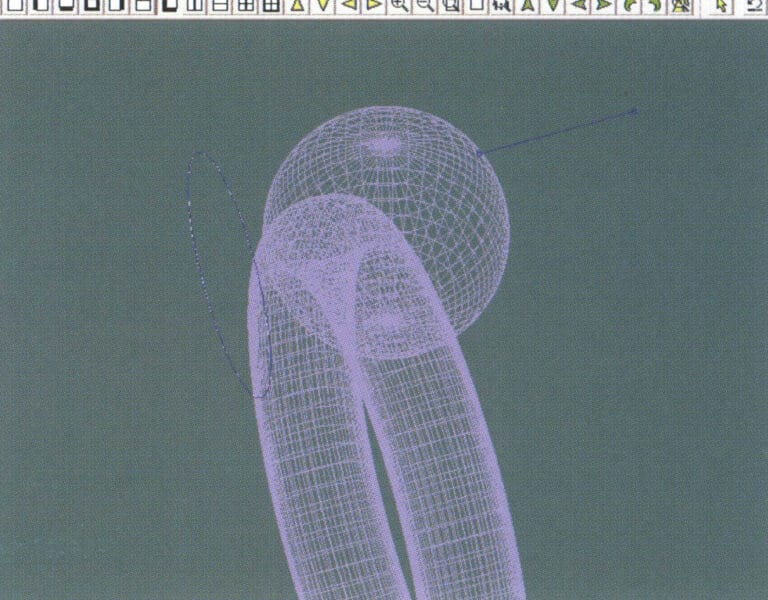
16. Select "Edit" > "Move" from the menu bar to remove the guidelines
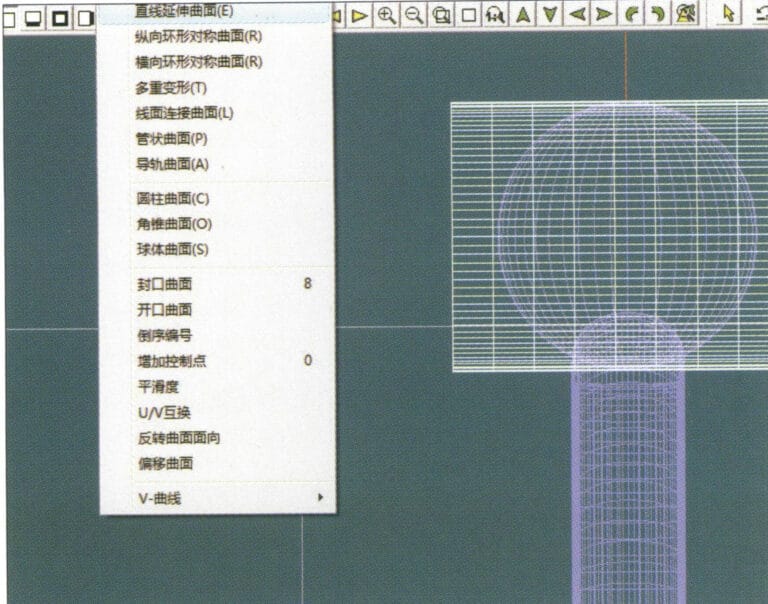
17. Select "Surface" > "Straight Line Extend Surface" from the menu bar to extend the auxiliary line into an auxiliary surface
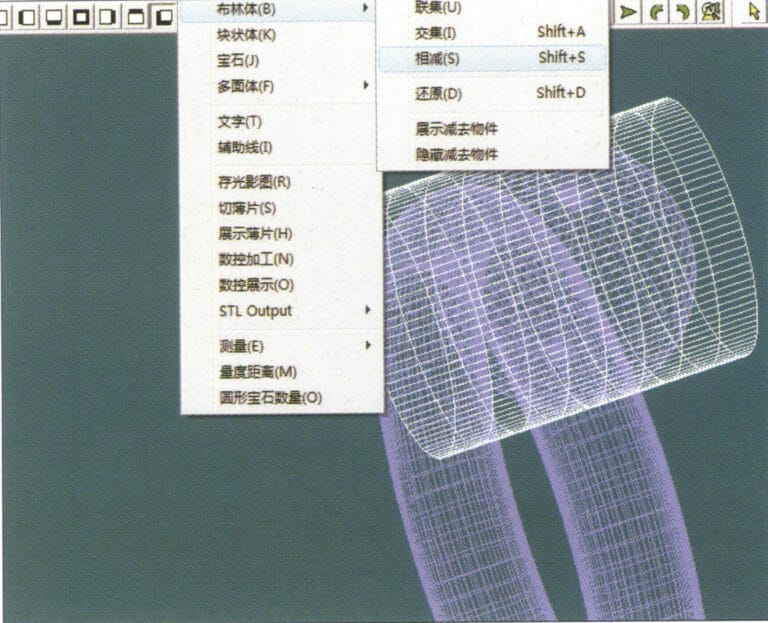
18. Select "Miscellaneous" > "Boolean" > "Subtract" from the menu bar to subtract the corresponding parts of the auxiliary surface ring
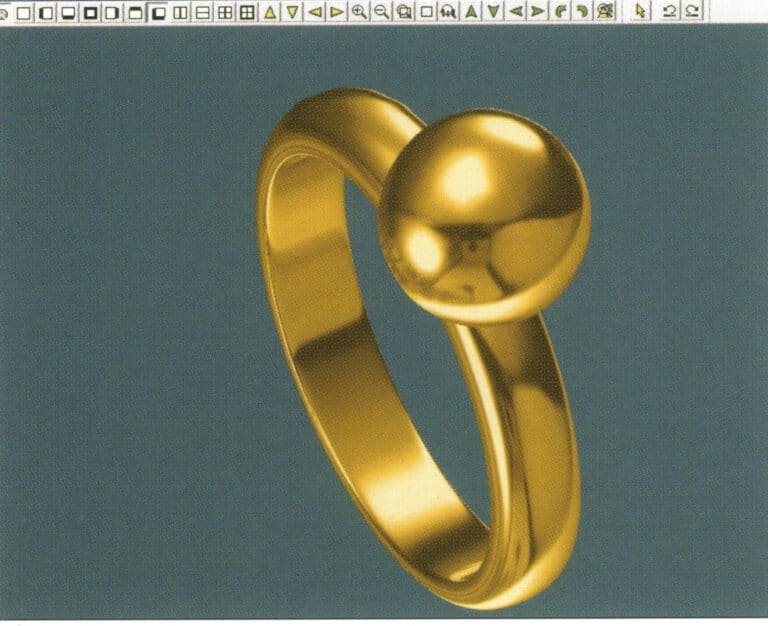
19. Select "View" > "Shadow Map" from the menu bar to inspect the shadow effects
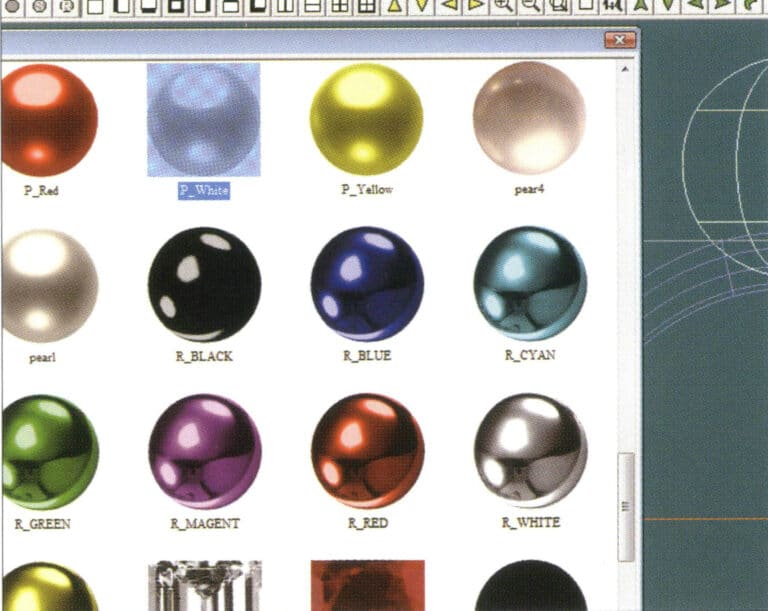
20. Select the sphere, go to the menu bar and choose "Edit" > "Materials", enter the "Materials" dialog box, select the white pearl material and confirm
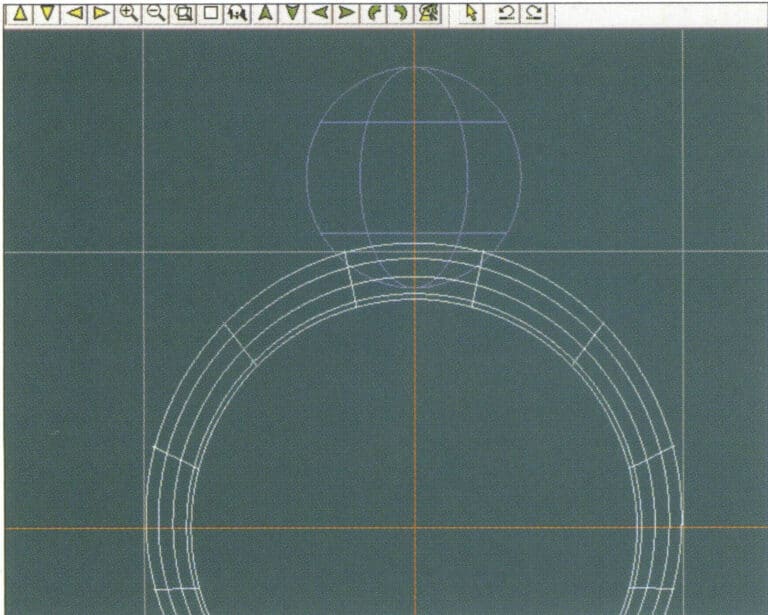
21. Select the ring band, then choose "Edit" > "Materials" from the menu bar
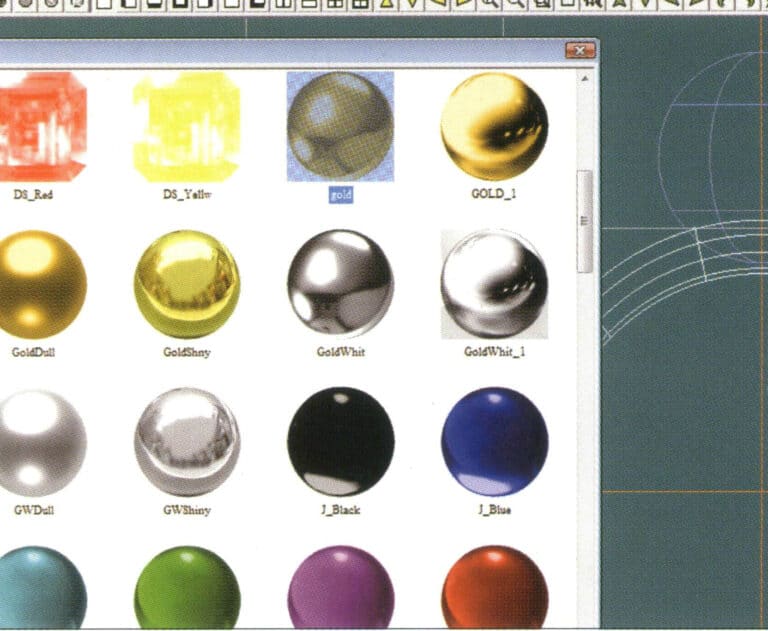
22. '자료' 대화 상자로 들어가서 적절한 자료를 선택하고 다음을 확인합니다.
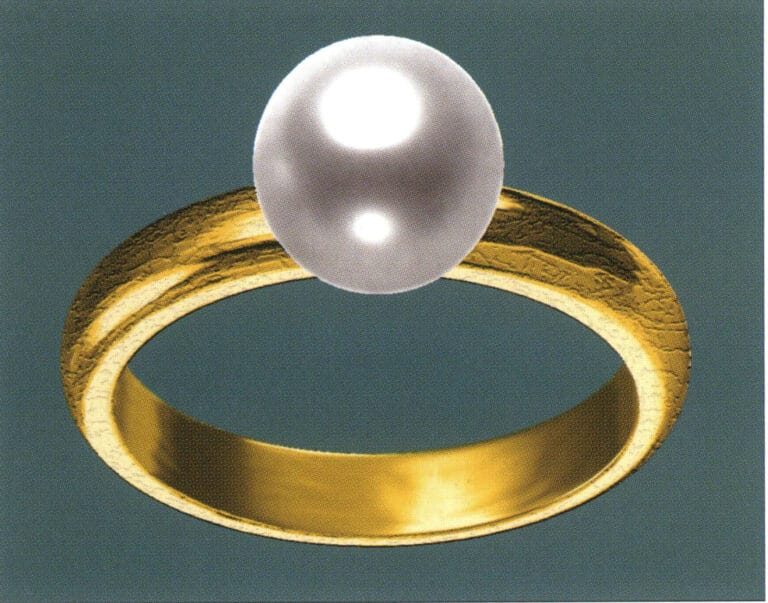
23. Select "View" > "Shadow Map" from the menu bar to examine the light and shadow effects
24. Select "File" > "Save As" from the menu bar to save the file
3. 다이아몬드로 포인트를 준 블랙 골드 펜던트

제작 단계는 다음과 같습니다:
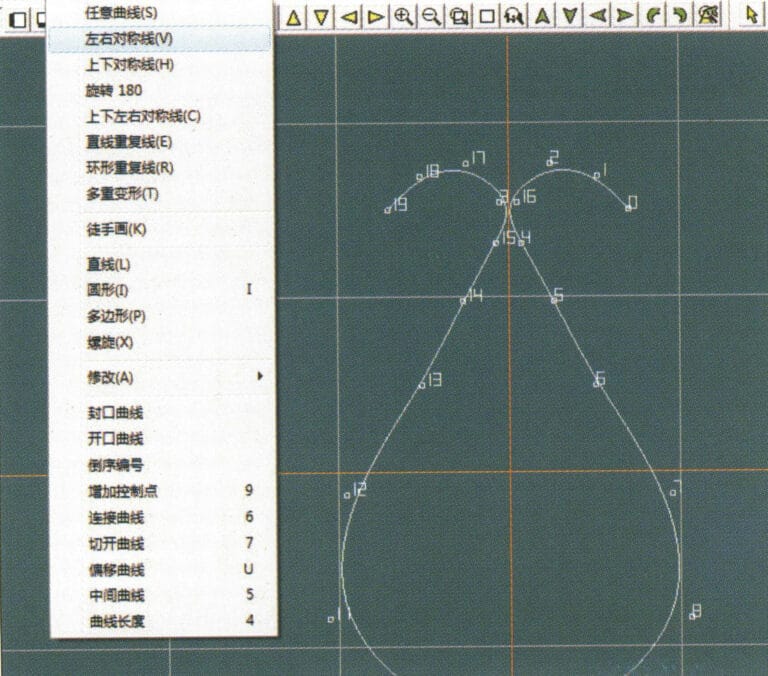
1. Create a new file in JewelCAD, select "Curve" > "Left-Right Symmetrical Line" from the menu bar, and draw the inner contour line of the pendant
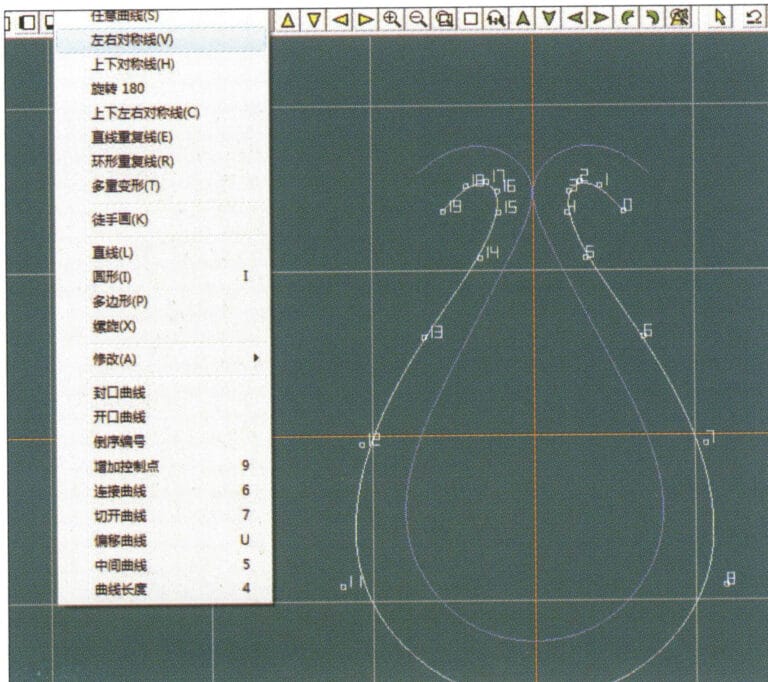
2. Select "Curve" > "Left-Right Symmetrical Line" from the menu bar to draw the outer contour line of the pendant (note that the control points of the inner contour line and the outer contour line should have the same direction and quantity).
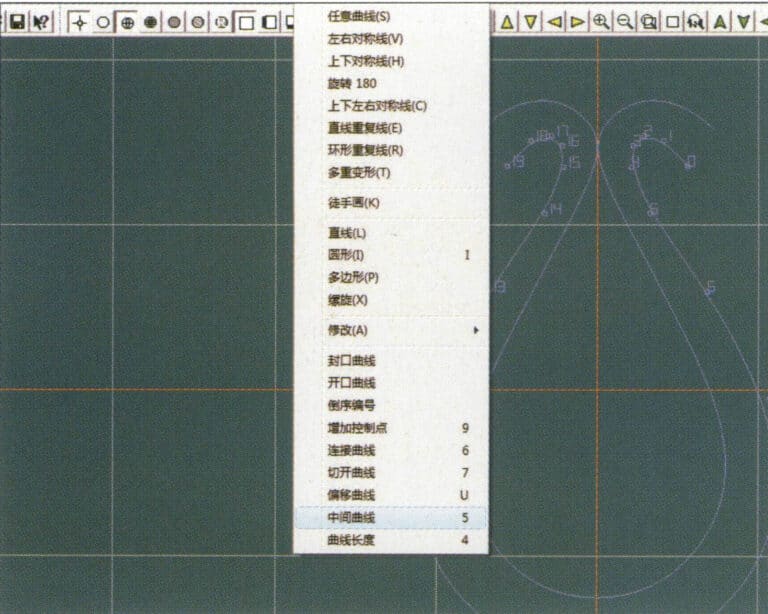
3. Select "Curve" > "Middle Curve" from the menu bar
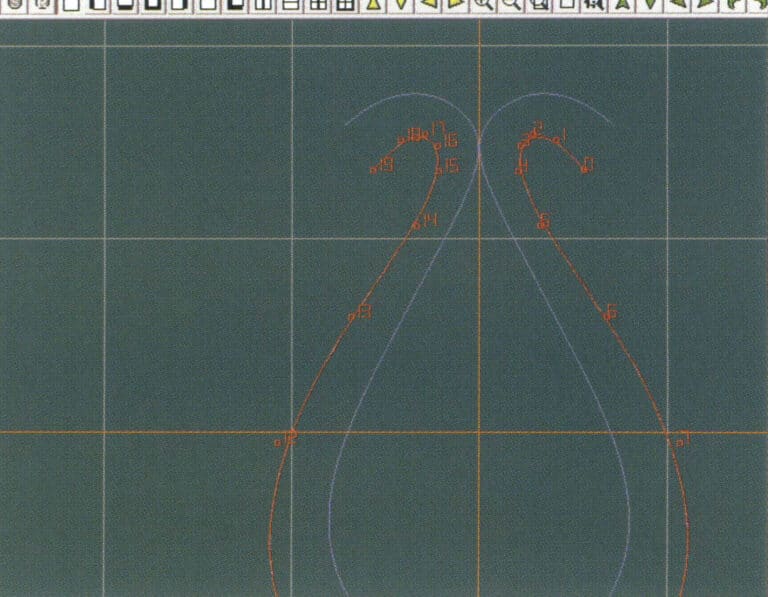
4. 두 개의 커브를 선택하여 중간 커브를 만듭니다. 먼저 외부 윤곽선을 선택합니다.
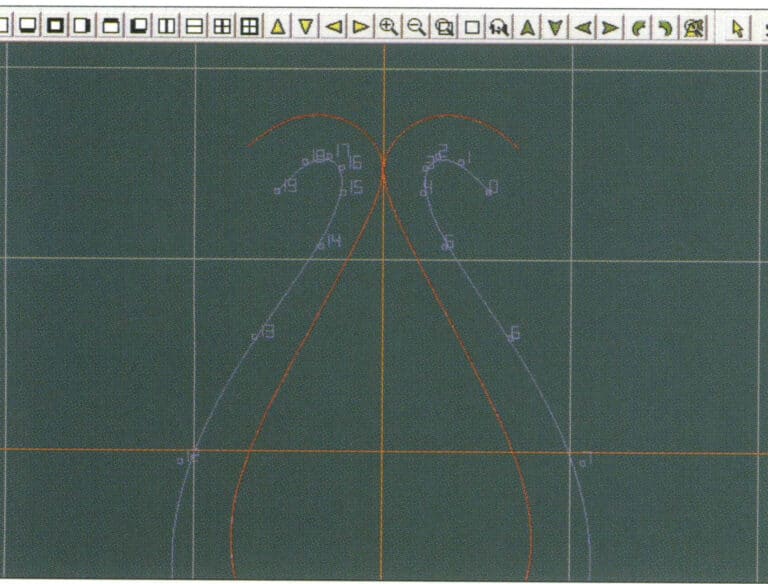
5. 두 개의 커브를 선택하여 중간 커브를 만든 다음 내부 윤곽선을 선택합니다.
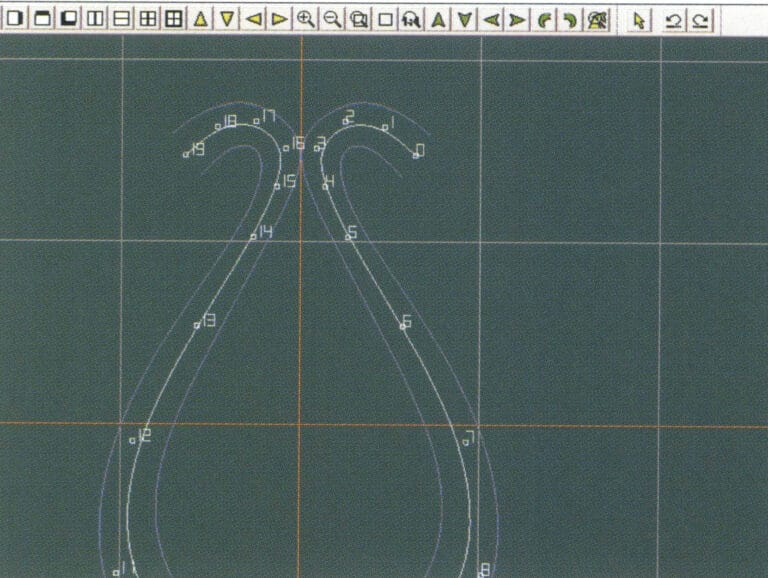
6. 이미 생성된 중간 커브 보기
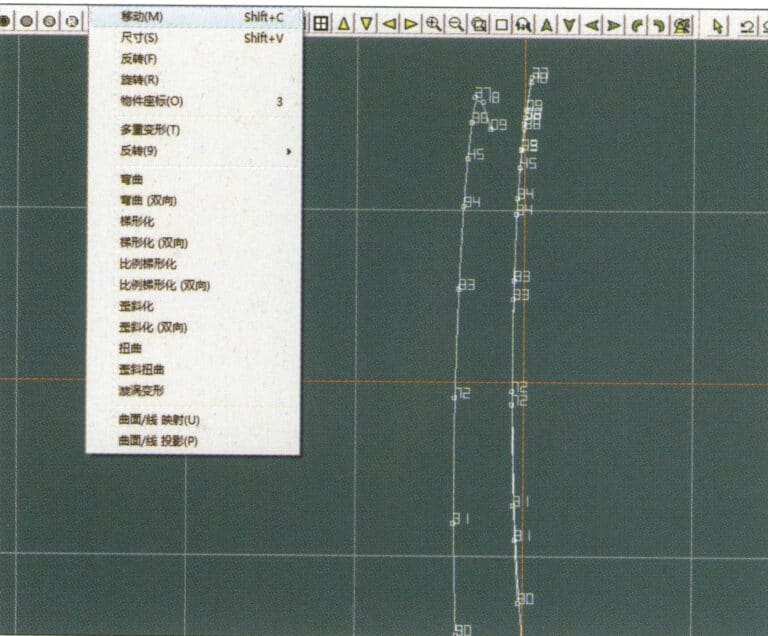
7. Select "Deformation" > "Move" from the menu bar to move the CV and the CV of the contour line
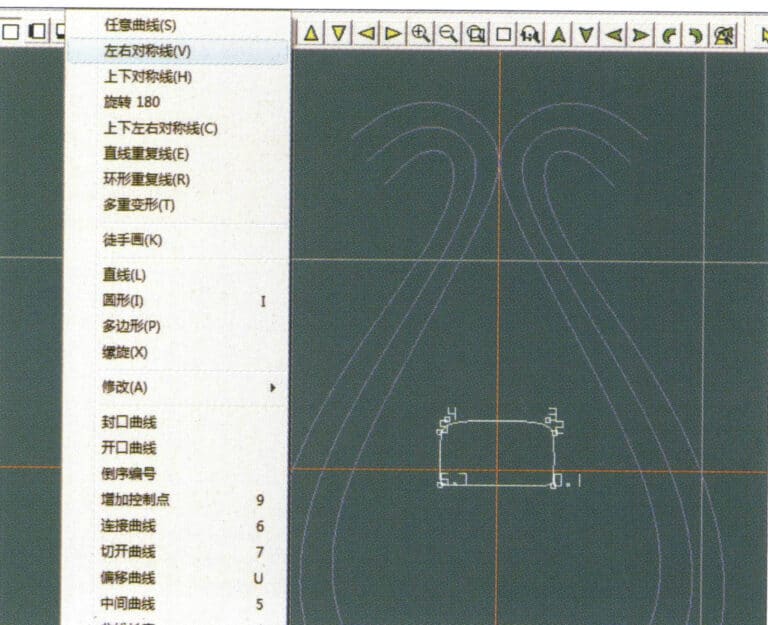
8. Select "Curve" > "Left-Right Symmetry Line" from the menu bar to create a cross-section
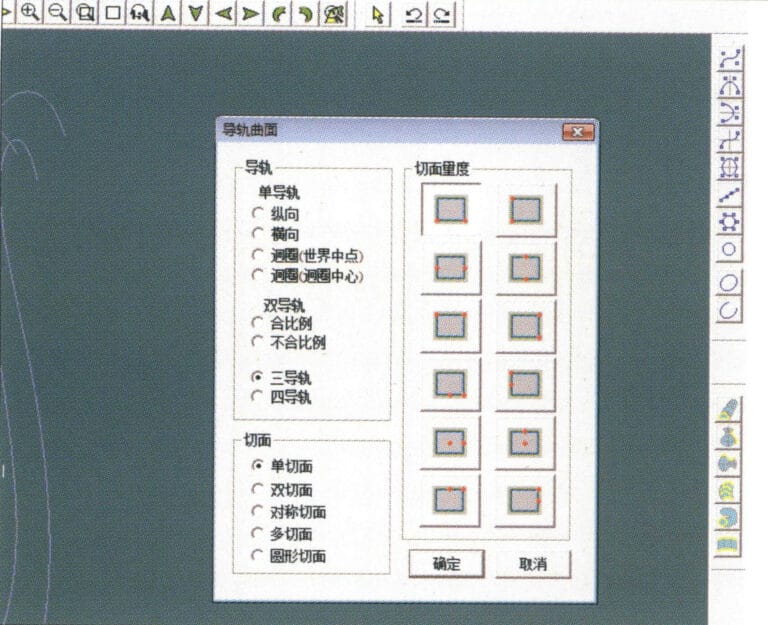
9. Select "Surface" > "Rail Surface" from the menu bar, enter the "Rail Surface" dialog box to select the relevant options, and confirm; select a curve as the left curve, starting from the left curve in a clockwise direction, left-click on the curve as the rail, and then select another curve as the section of the rail surface
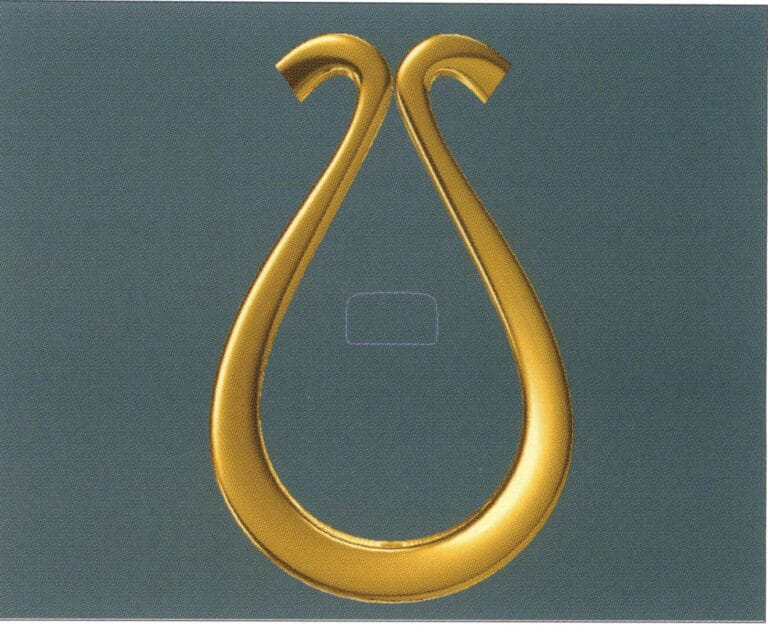
10. Select "View" > "Shadow Map" from the menu bar to inspect the shadow effects
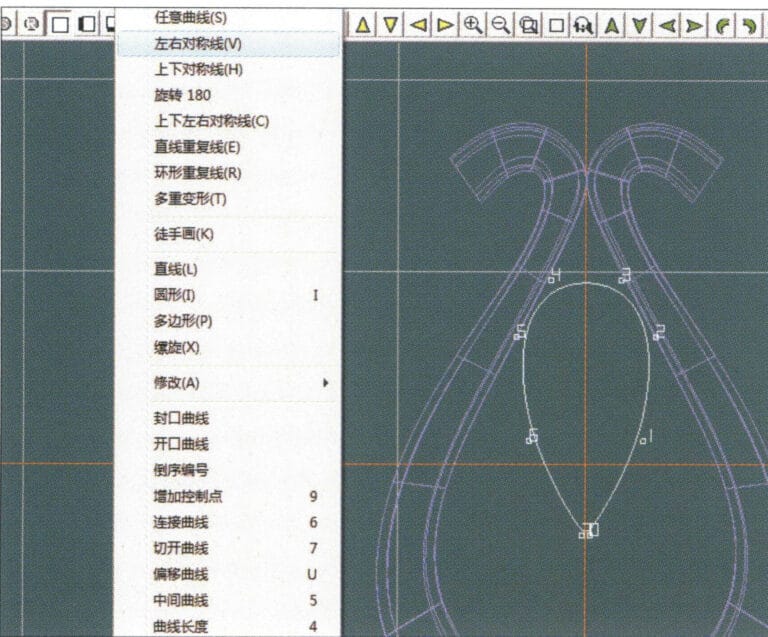
11. Select "Curve" > "Left-Right Symmetry Line" from the menu bar to draw the outer contour line of the seed-shaped toggle
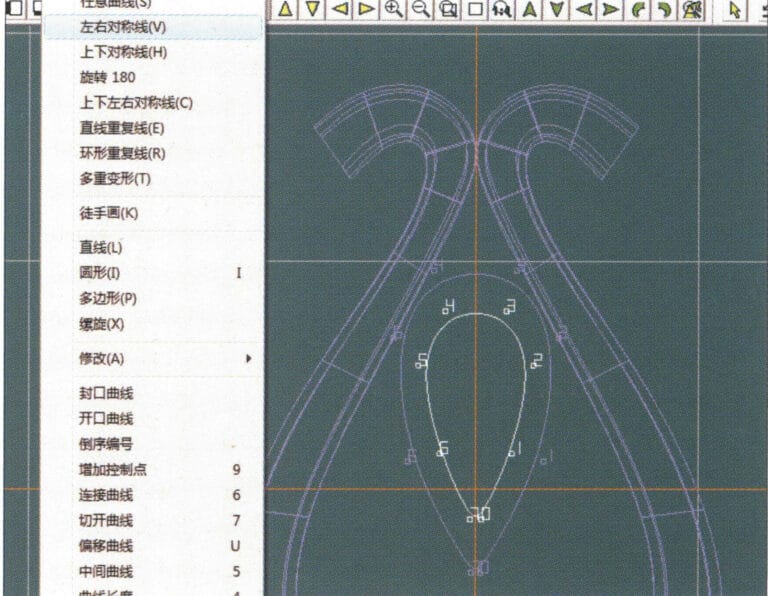
12. Select "Curve" > "Left-Right Symmetry Line" from the menu bar to draw the inner contour line of the seed-shaped toggle
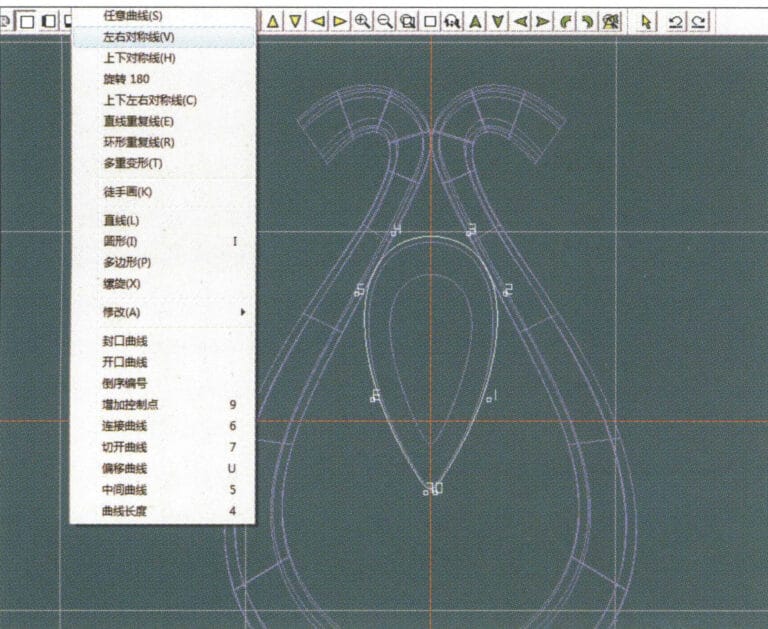
13. Select "Curve" > "Left-Right Symmetry Line" from the menu bar, and draw the lower dark line of the center of the seed-shaped toggle
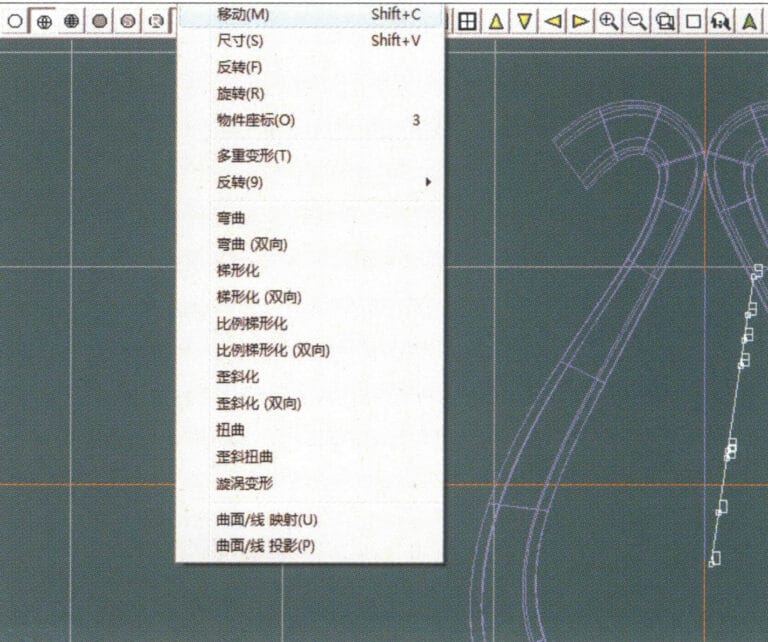
14. Select "Deformation" > "Move" from the menu bar to move the seed-shaped toggle CV
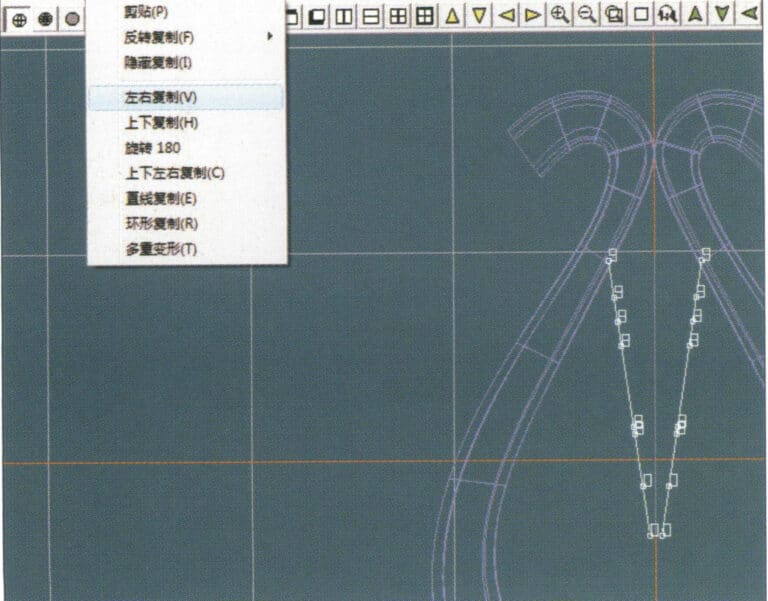
15. Select "Copy" > "Copy Left and Right" from the menu bar to copy the curve of the seed-shaped toggle
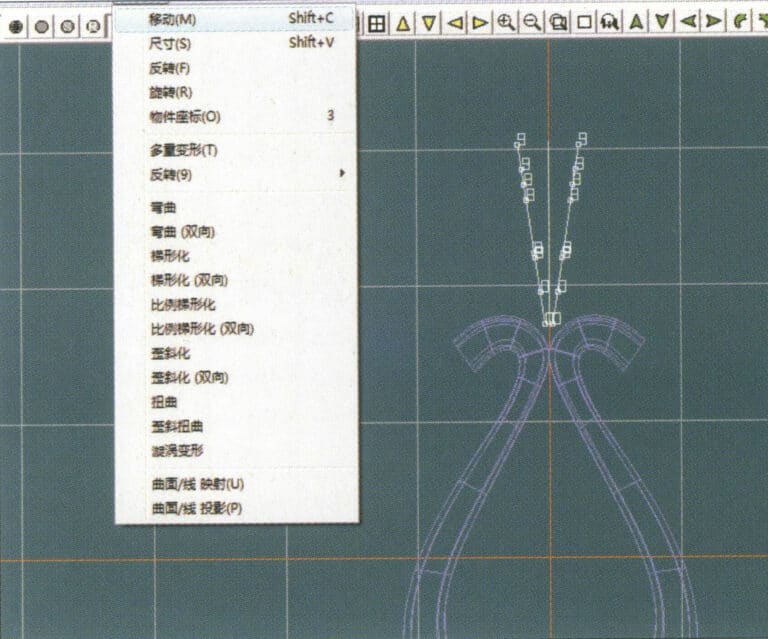
16. Select "Deformation" > "Move" from the menu bar to move the melon seed buckle curve
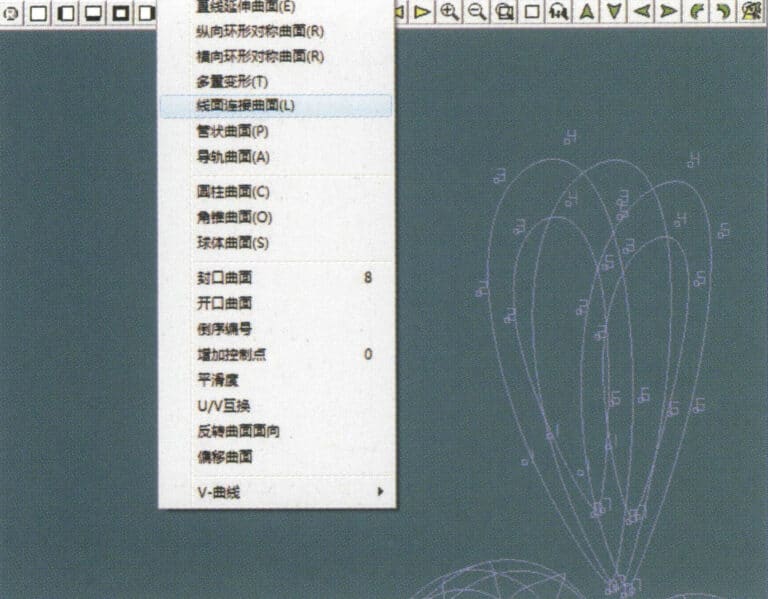
17. Select "Surface" > "Line-Surface Connection Surface" from the menu bar, and select the curve/surface in a clockwise direction to create a line-surface connection surface, then select "Curve" > "Closed Surface" from the menu bar
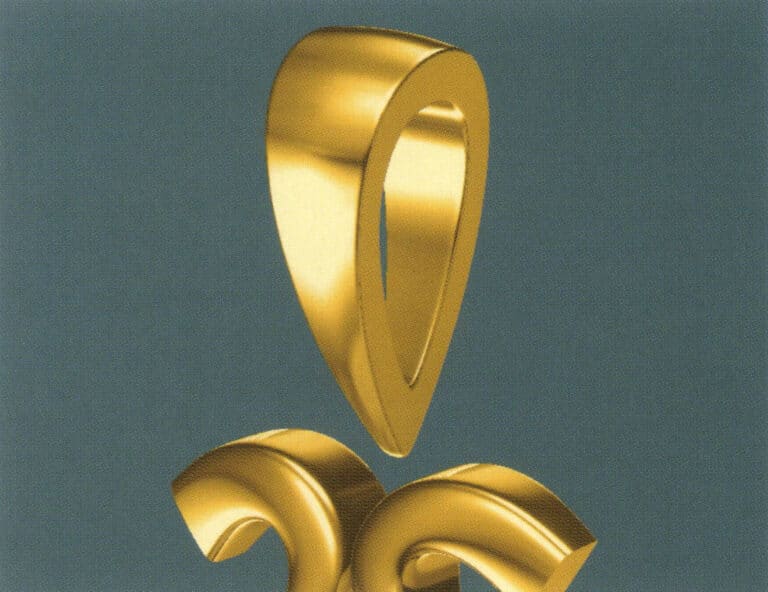
18. Select "View" > "Shadow Map" from the menu bar to examine the shadow effects
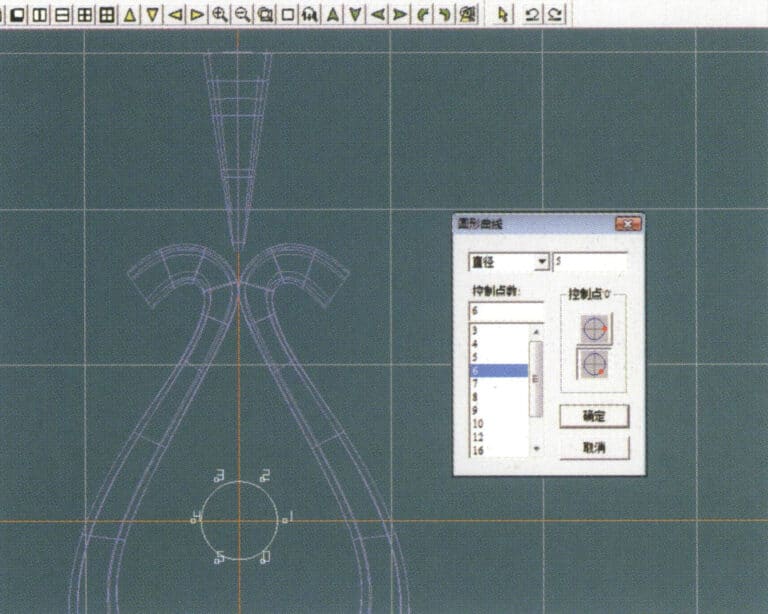
19. Select "Curve" > "Circular Curve" from the menu bar, enter the relevant values and confirm

20. Select "Surface" > "Tubular Surface" from the menu bar
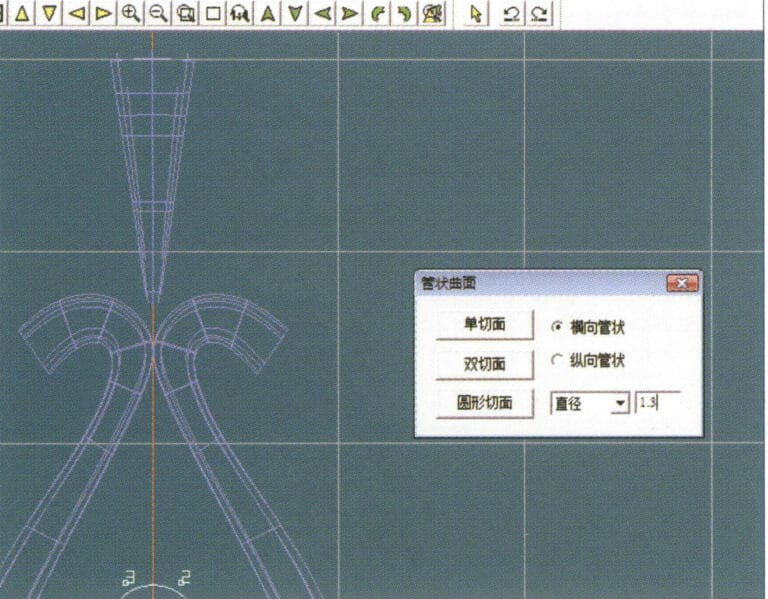
21. '튜브형 표면' 대화 상자로 들어가 관련 값을 입력하고 원형 섹션을 클릭한 후 확인합니다.
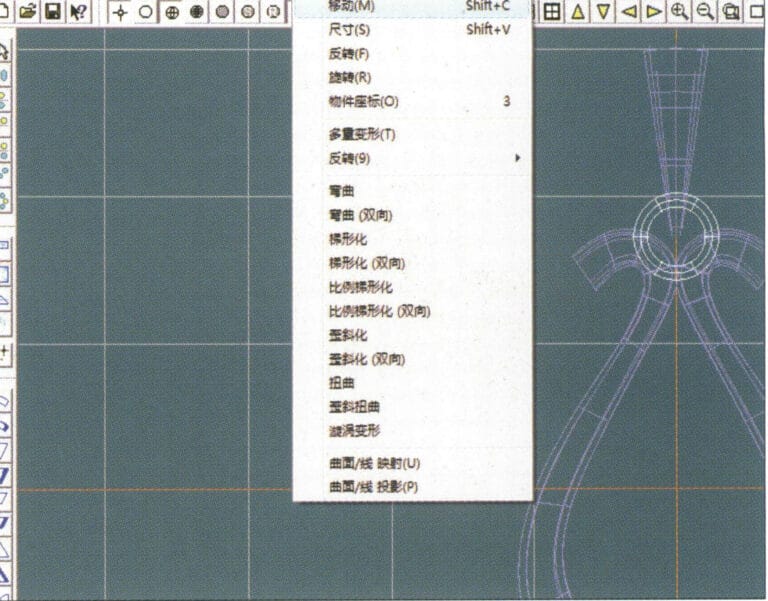
22. Select "Deformation" > "Move" from the menu bar to move the ring buckle

23. Select "File" > "Insert File" from the menu bar
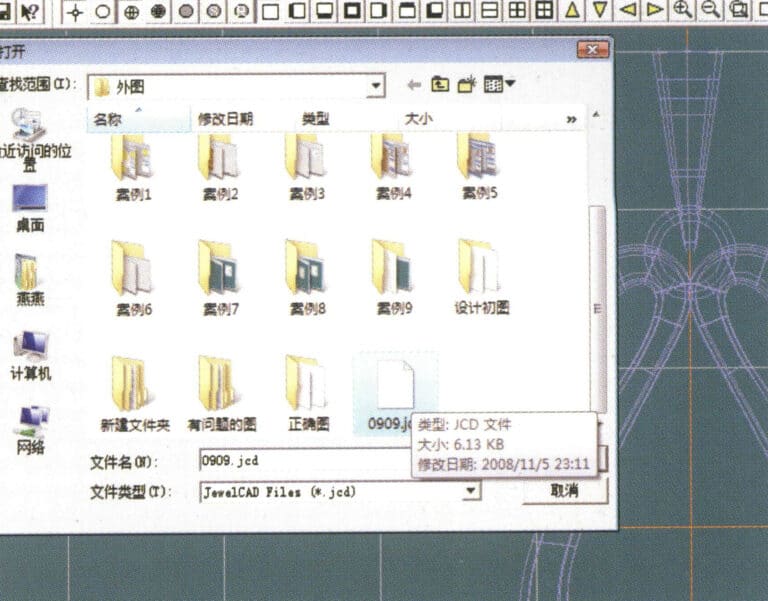
24. '파일 삽입' 대화 상자로 들어가 원하는 문서를 선택하고 확인합니다.
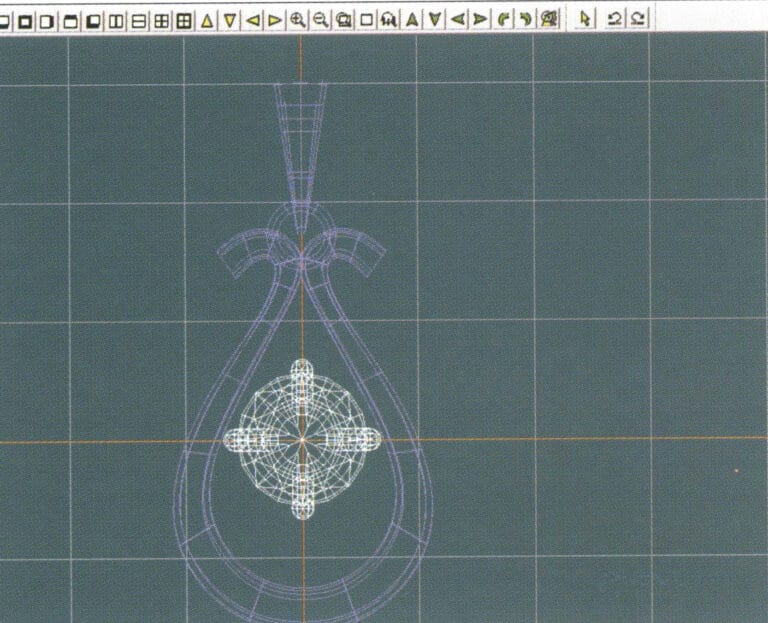
25. 삽입된 파일 보기 - 보석
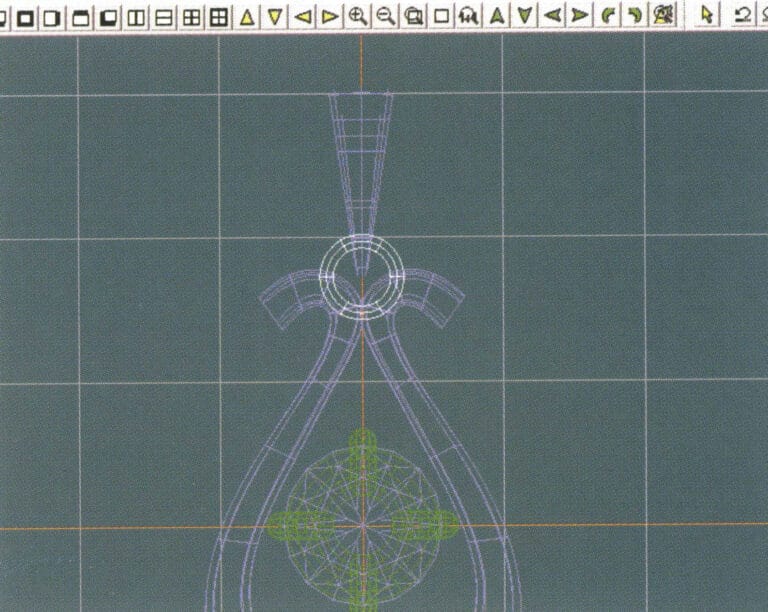
26. Select "Copy" > "Copy Up and Down" from the menu bar to copy the selected toggle
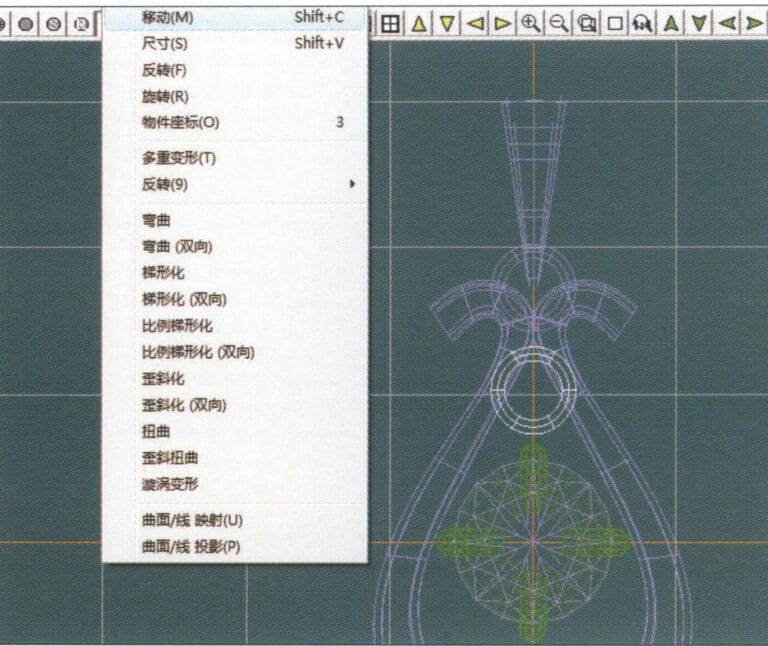
27. Select "Deformation" > "Move" from the menu bar to move the horizontal ring toggle
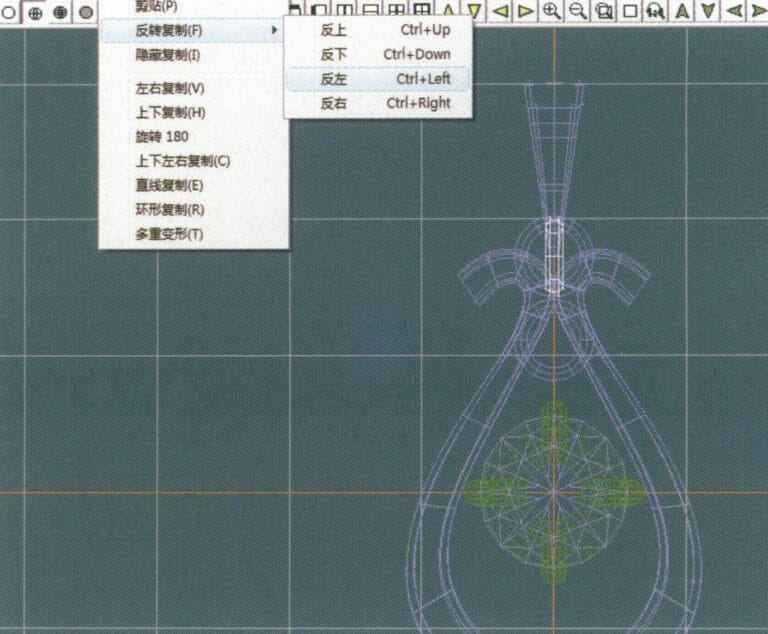
28. Select "Copy" > "Reverse Copy" > "Reverse Left" from the menu bar to create a vertical ring toggle
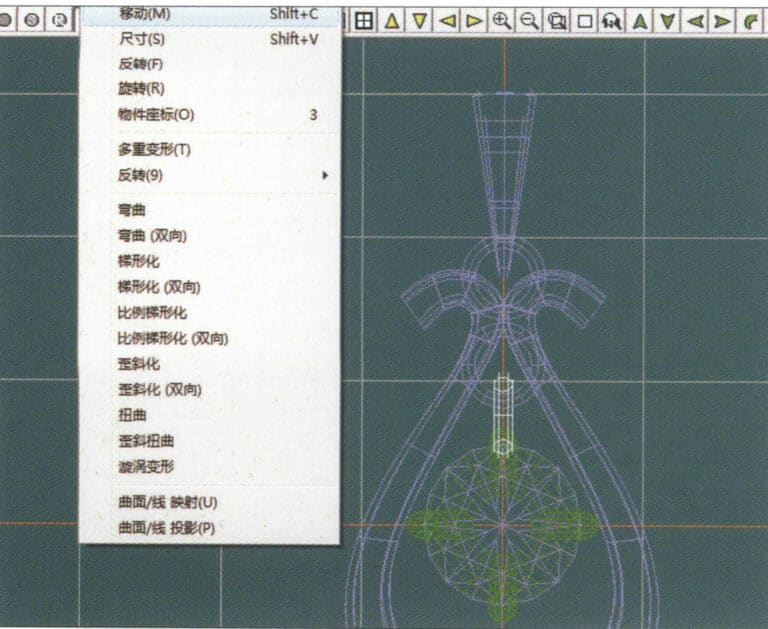
29. Select "Deformation" > "Move" from the menu bar to move the horizontal ring toggle
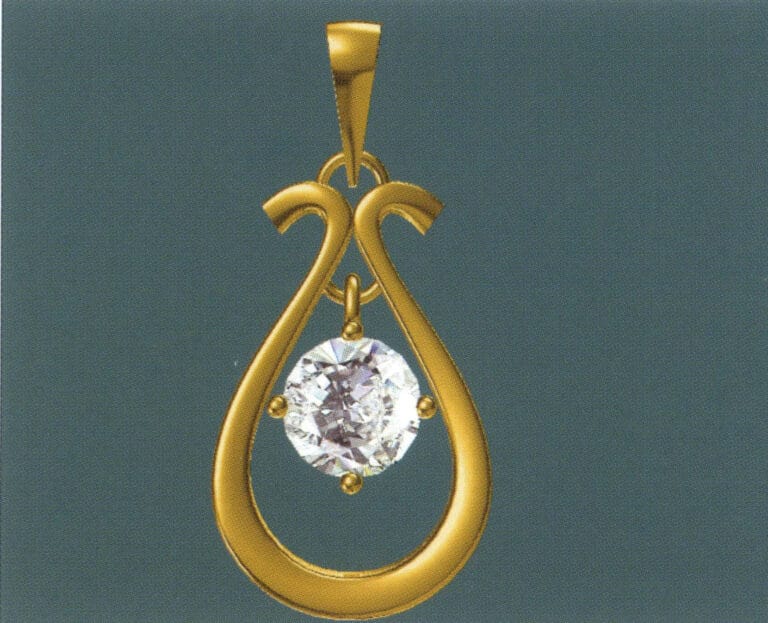
30. Select "View" > "Shadow Map" from the menu bar to examine the light and shadow effects
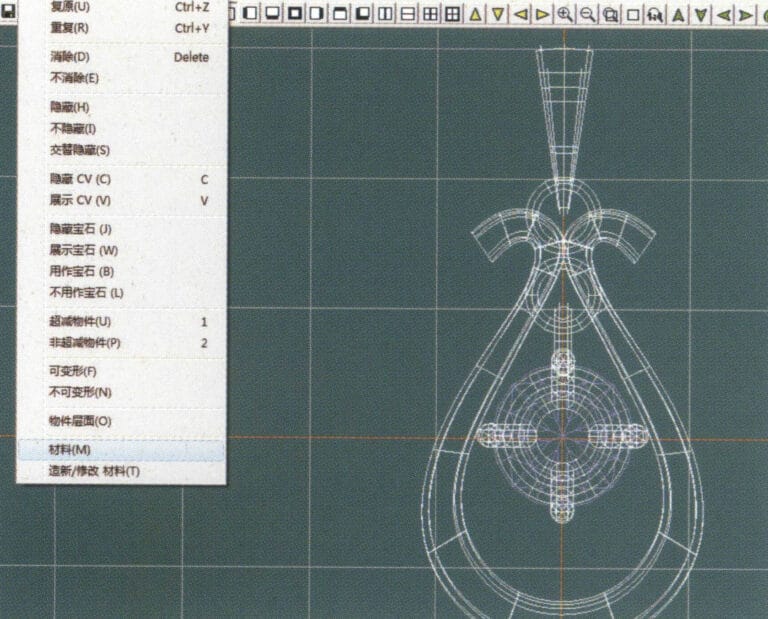
31. Select "Edit" > "Materials" from the menu bar to modify the materials of the selected object
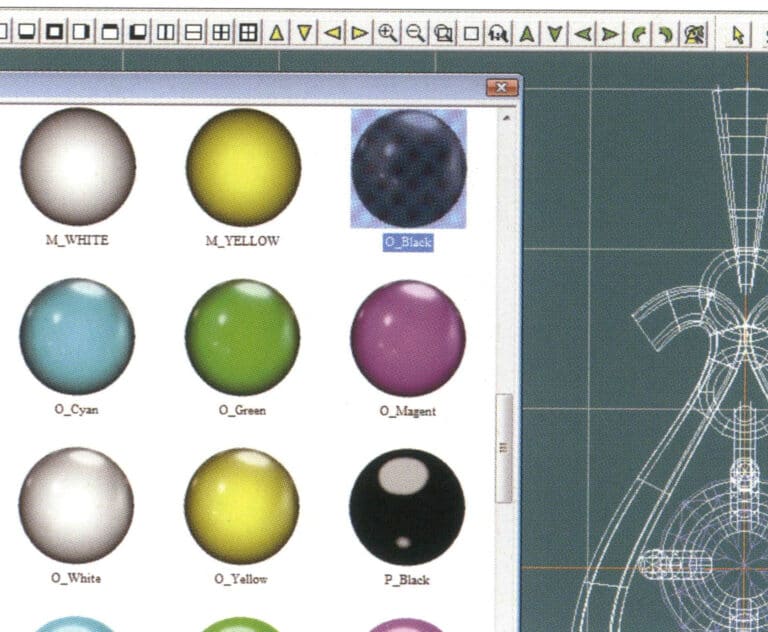
32. '재료' 대화 상자로 들어가서 블랙 골드를 선택하고 확인합니다.
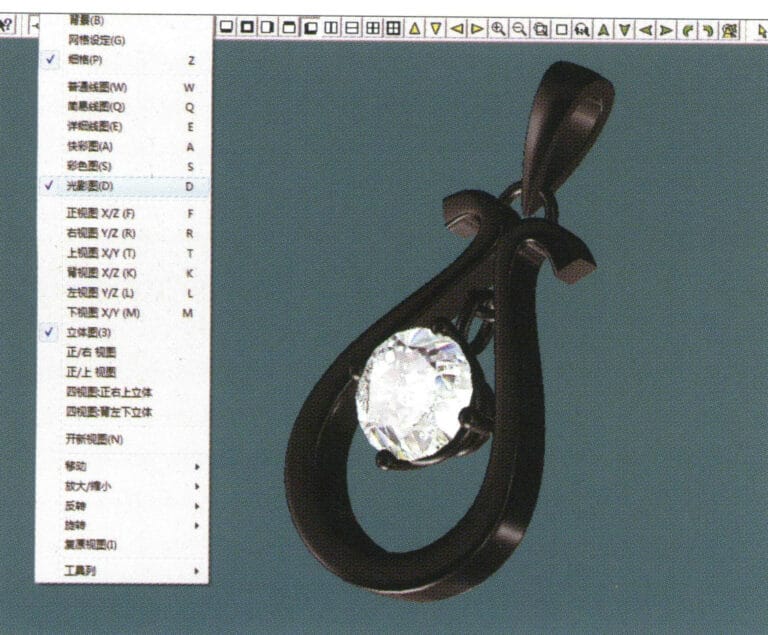
33. Select "View" > "Shadow Map" from the menu bar to inspect the shadow effects
34. Select "File" > "Save As" from the menu bar to save the file
4. 루비 펜던트
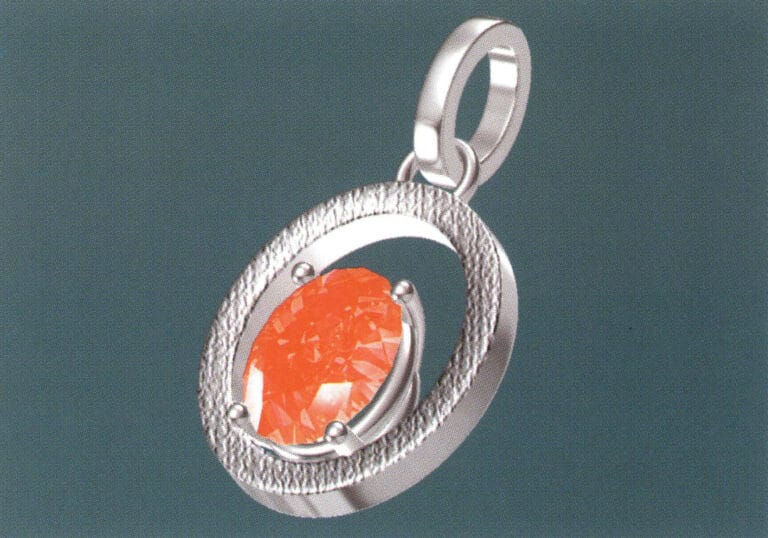
제작 단계는 다음과 같습니다:
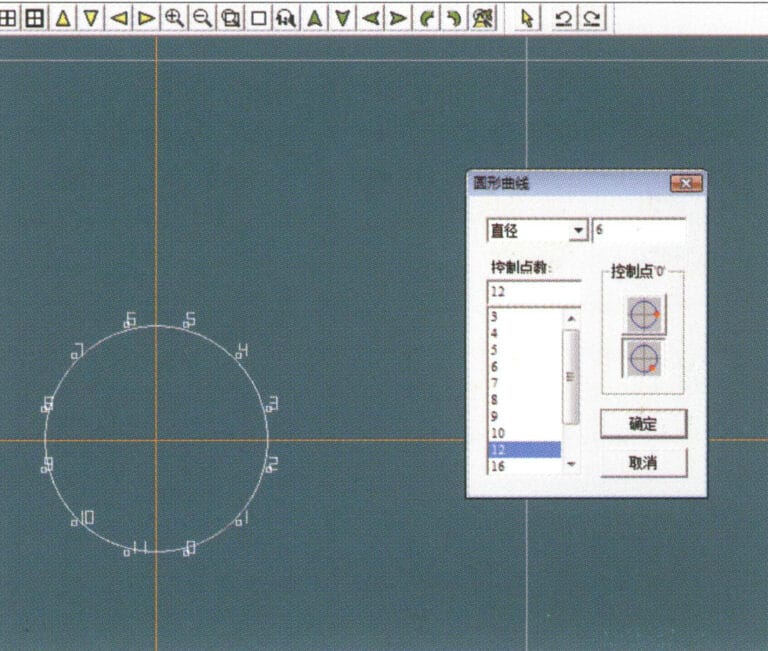
1. Create a new file in JewelCAD, select "Curve" > "Circular Curve" from the menu bar, enter the relevant values in the "Circular Curve" dialog box as the inner auxiliary line, and confirm

2. Select "Curve" > "Circular Curve" from the menu bar, enter the relevant values in the "Circular Curve" dialog box as the external auxiliary line, and confirm
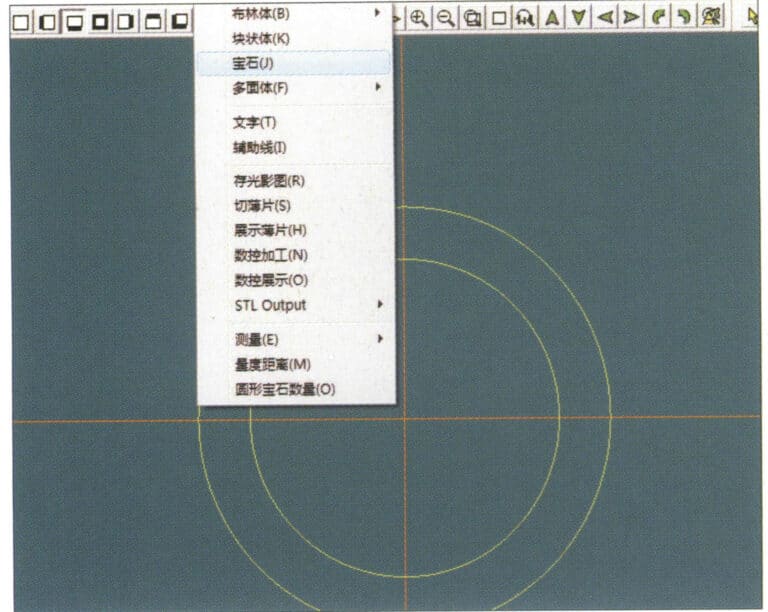
3. Select "Miscellaneous" > "Gemstones" from the menu bar
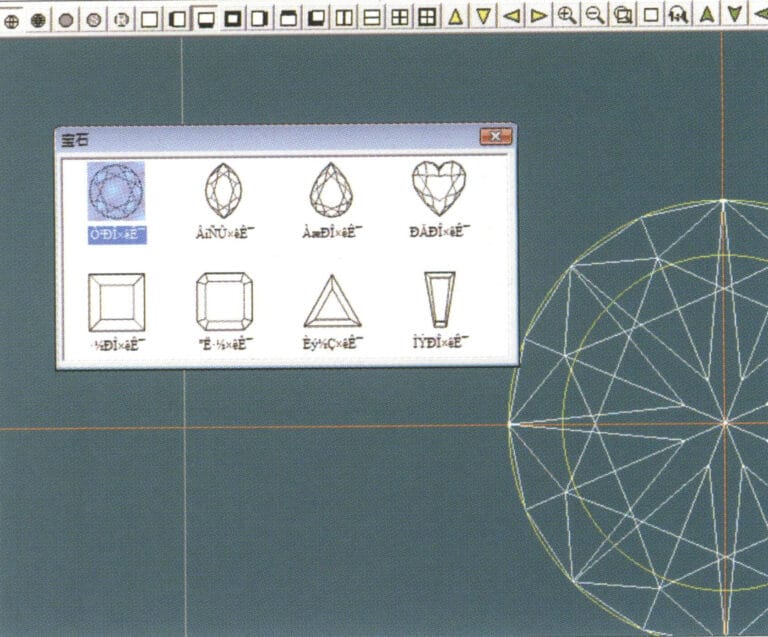
4. "보석" 대화 상자로 들어가서 관련 보석을 선택하고 확인합니다.
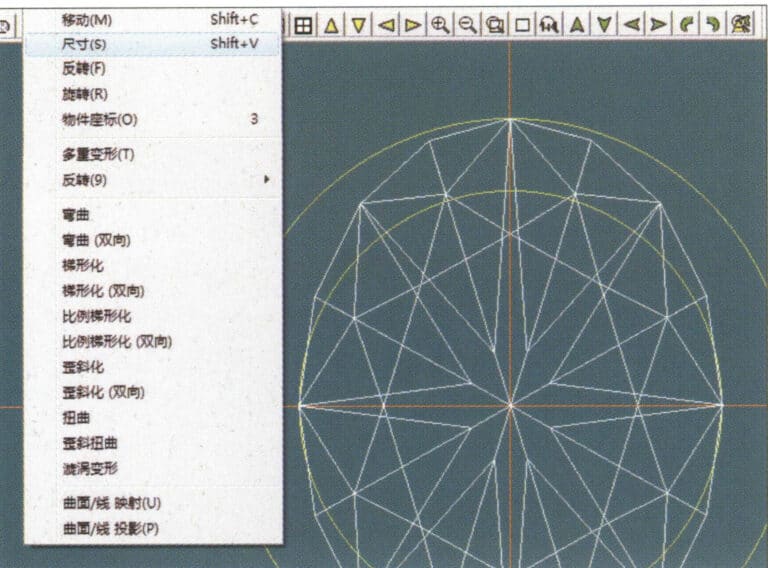
5. Select "Deformation" > "Size" from the menu bar to change the round gemstone into an oval gemstone
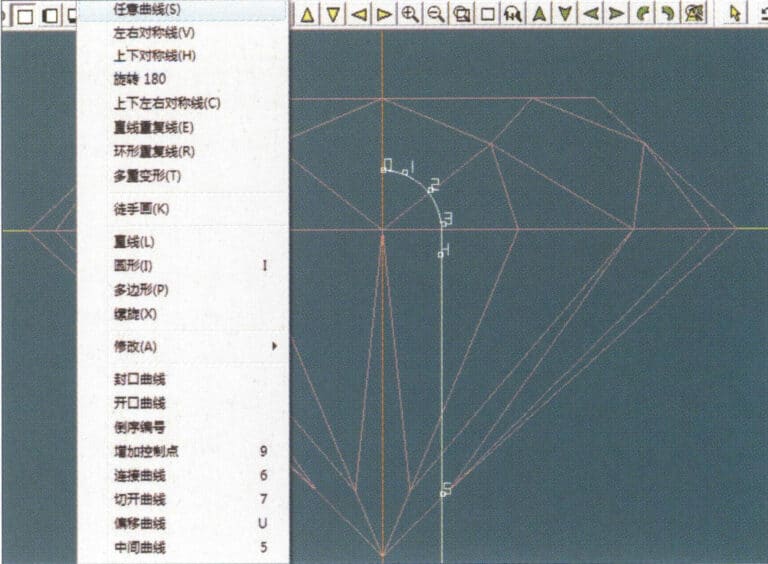
6. Select "Curve" > "Freeform Curve" from the menu bar to draw a claw-shaped guideline
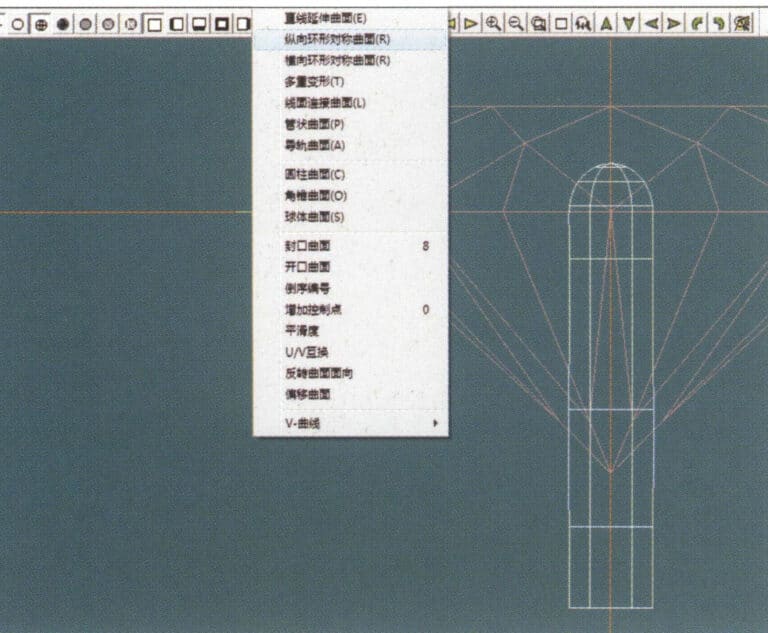
7. Select "Surface" > "Longitudinal Circular Symmetrical Surface" from the menu bar, and draw a claw shape
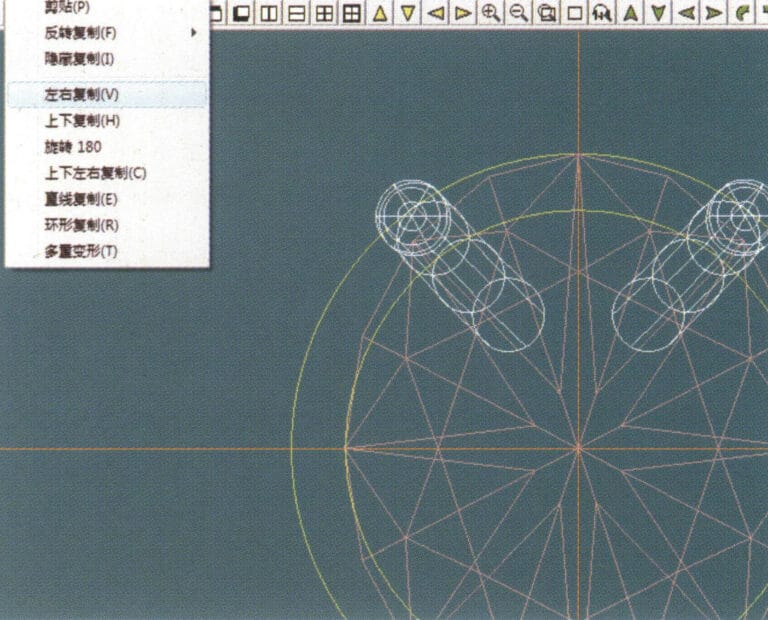
8. Select "Copy" > "Copy Left and Right" from the menu bar to copy the claw shape
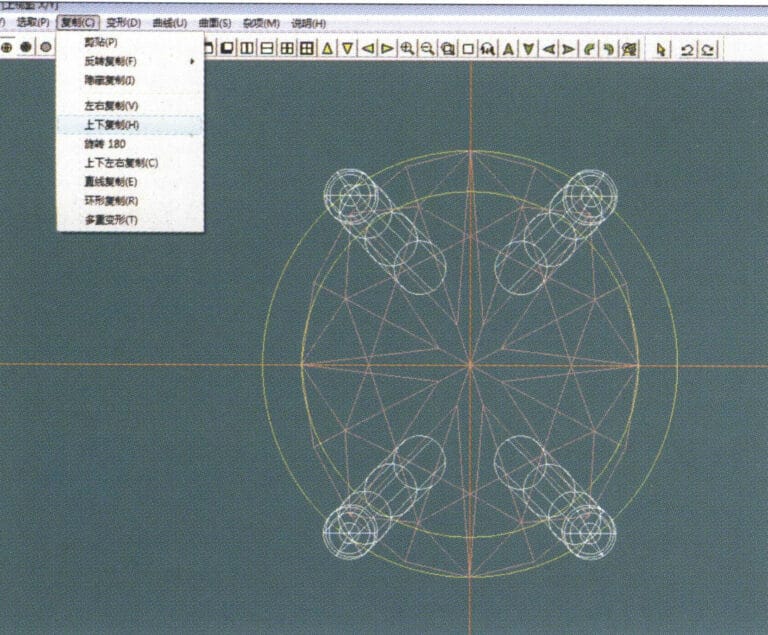
9. Select "Copy" > "Copy Up and Down" from the menu bar to copy the claw shape again
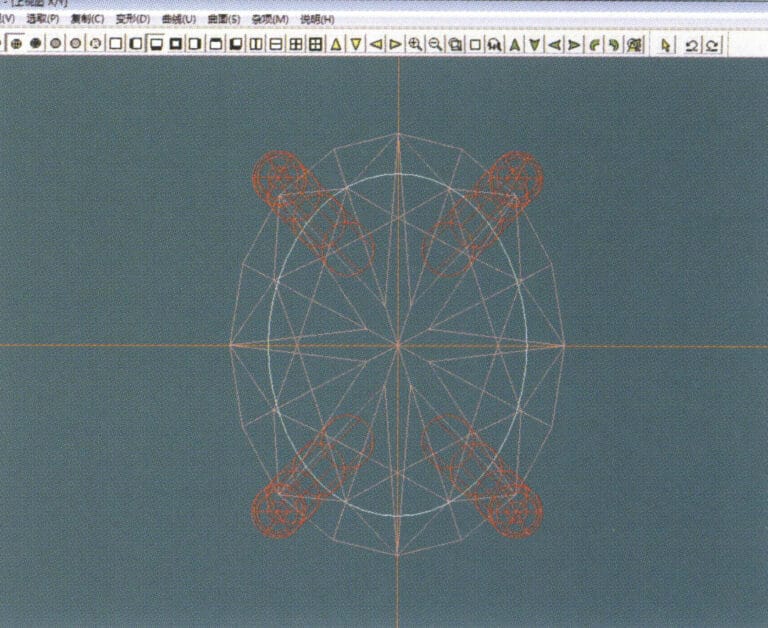
10. Select "Deformation" > "Size" from the menu bar to change the circular guideline to an elliptical guideline
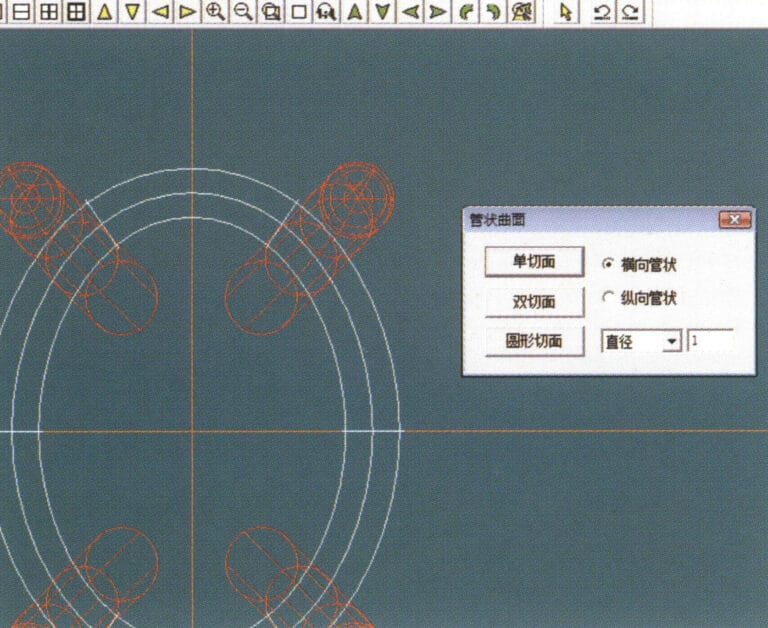
11. Select "Curved Surface" > "Tubular Surface" from the menu bar, enter the relevant values in the "Tubular Surface" dialog box and confirm
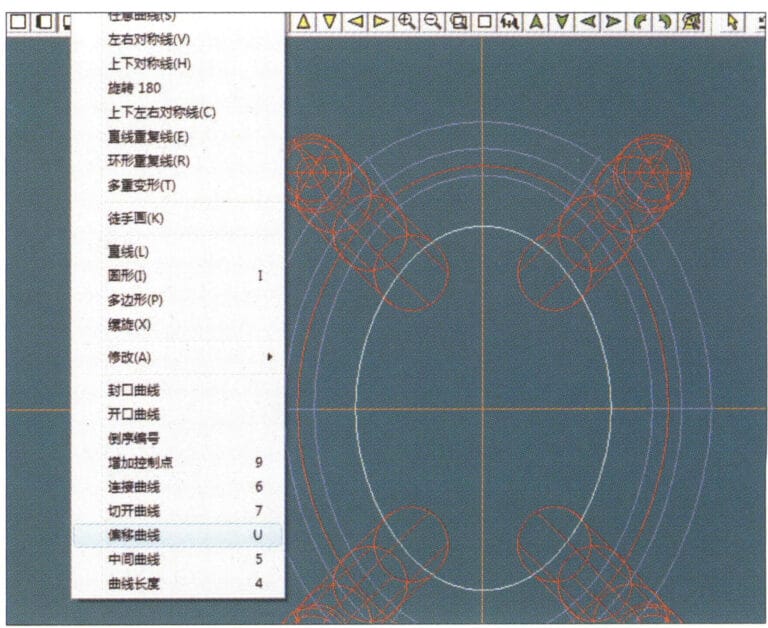
12. Select "Curve" > "Offset Curve" from the menu bar
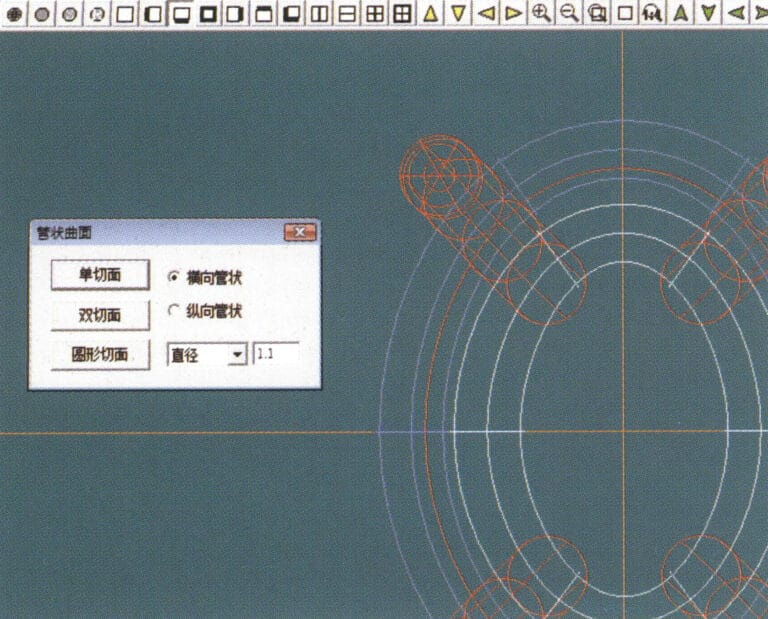
13. Select "Surface" > "Tubular Surface" from the menu bar, enter the relevant values and confirm
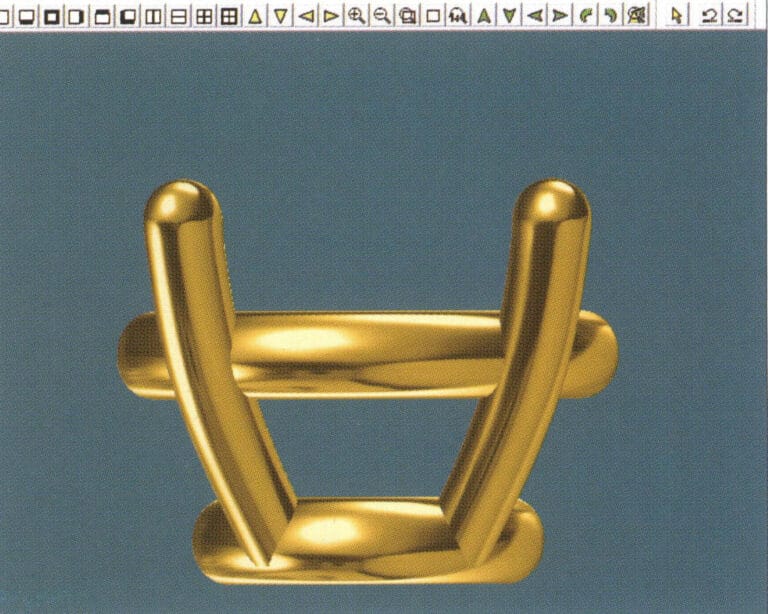
14. Select "View" > "Shadow Map" from the menu bar to examine the shadow effects and inspect the setting
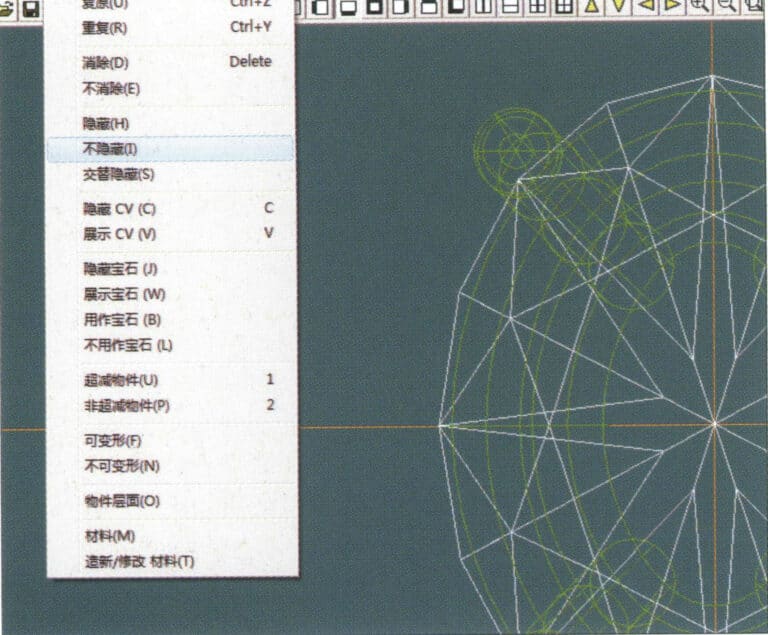
15. Select "Edit" > "Unhide" from the menu bar to display the hidden gems
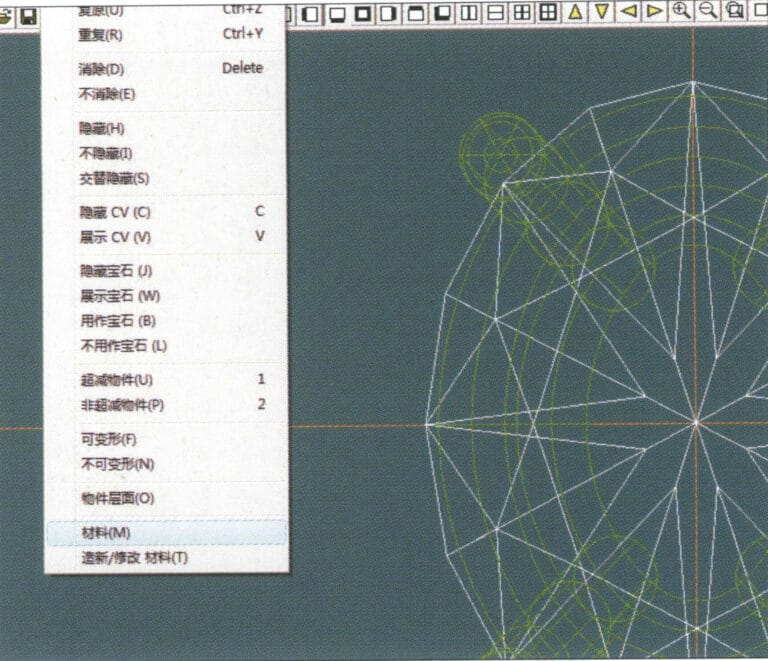
16. Select "Edit" > "Materials" from the menu bar
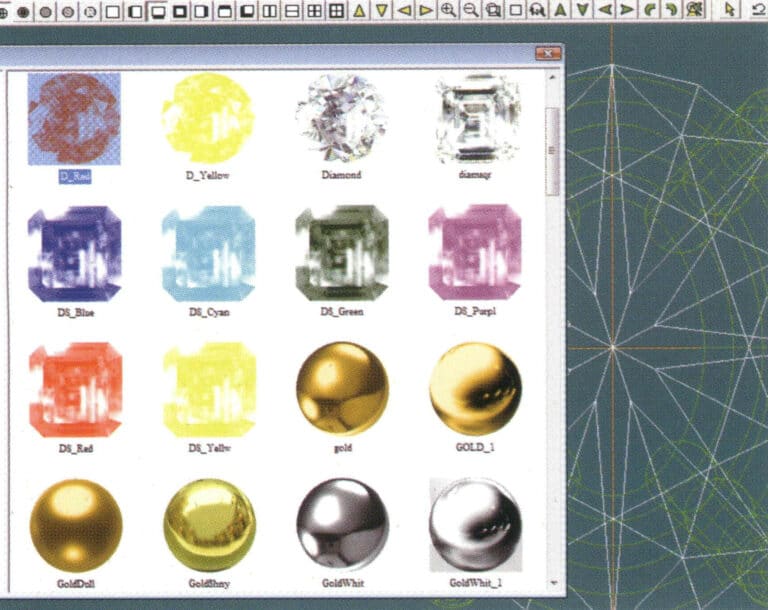
17. '자료' 대화 상자로 들어가서 루비를 선택한 후 확인합니다.
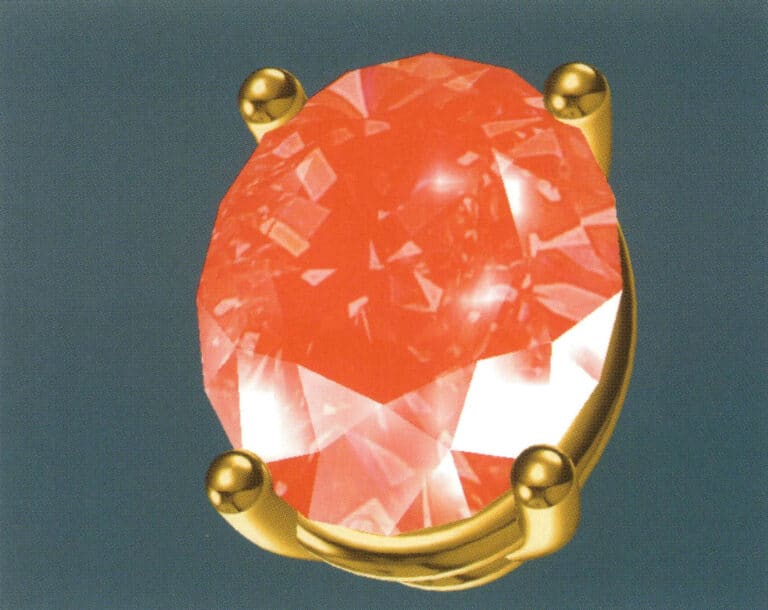
18. Select "View" > "Shadow Map" from the menu bar to examine the shadow effects
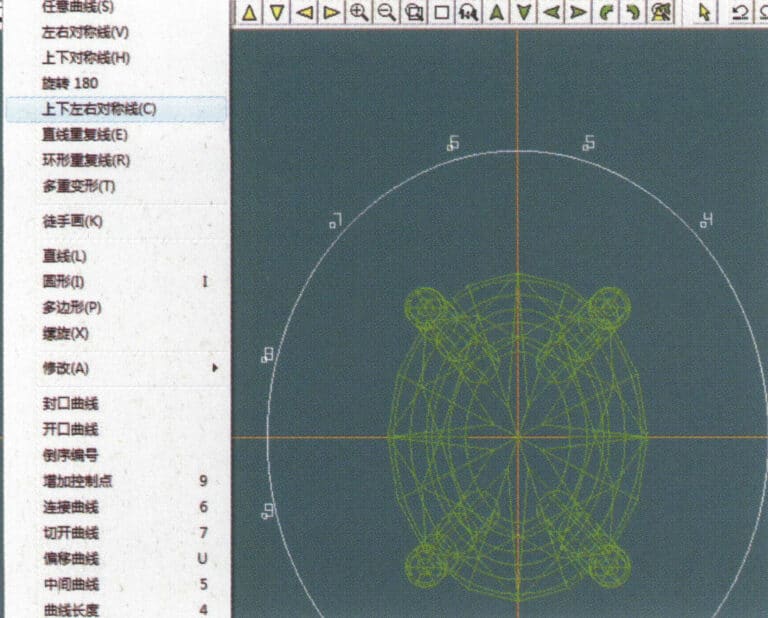
19. Select "Curve" > "Vertical and Horizontal Symmetry Line" from the menu bar as the auxiliary line for the outer circle
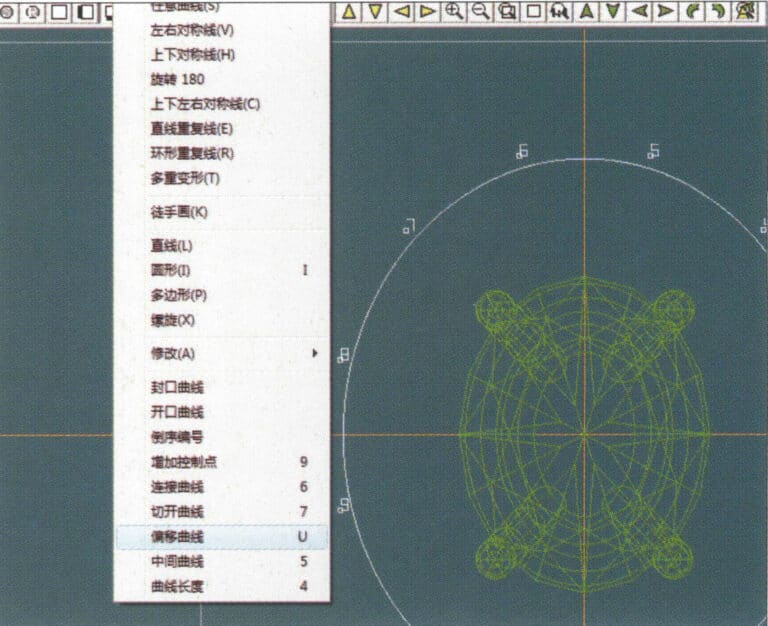
20. Select "Curve" > "Offset Curve" from the menu bar

21. "오프셋 커브" 대화 상자로 들어가서 내부 원의 보조 라인으로 관련 값을 입력한 후 확인합니다.
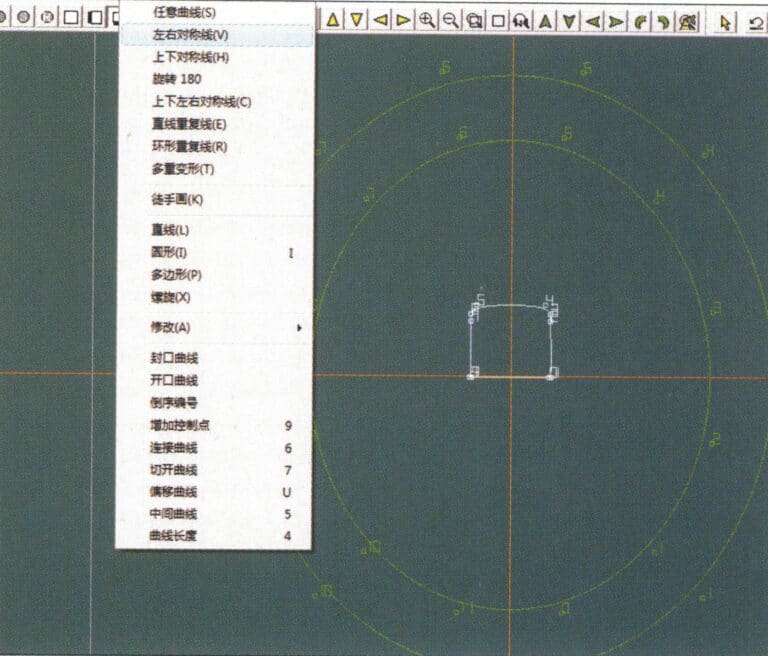
22. Select "Curve" > "Left-Right Symmetrical Line" from the menu bar as the cross-section of the coil
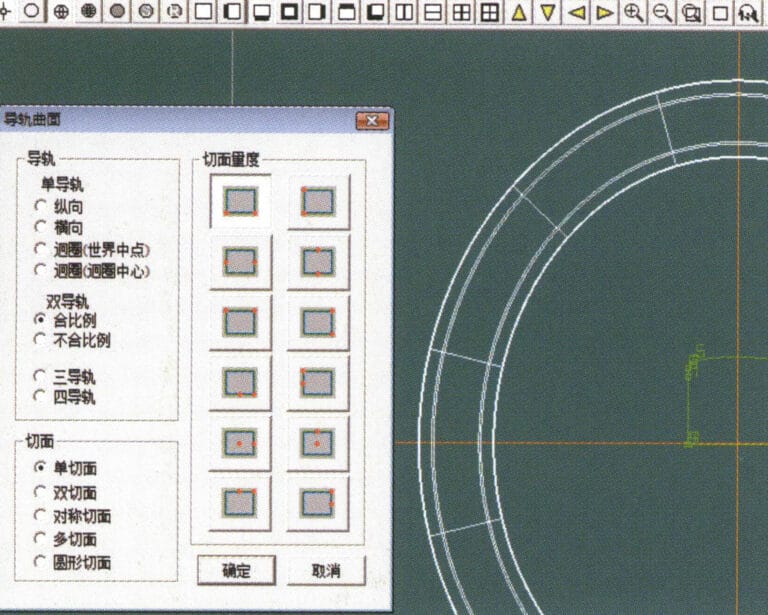
23. Select "Curved Surface" > "Rail Surface" from the menu bar to enter the "Rail Surface" dialog box, select the relevant options and confirm
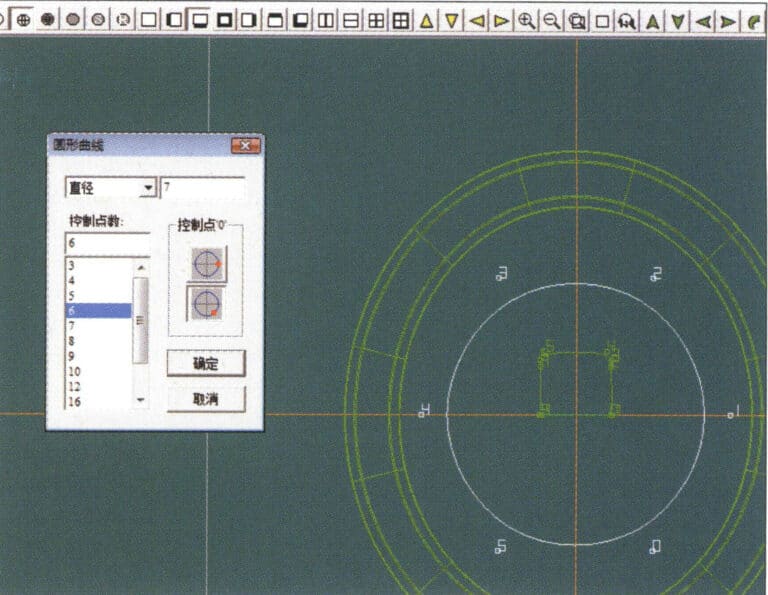
24. Select "Curve" > "Circular Curve" from the menu bar, enter the relevant values in the "Circular Curve" dialog box, and confirm; left-click on one curve as the left guide curve, click on another curve as the right guide rail, and then select the coil cross-section as the cross-section of the guide rail surface; once completed, it serves as the auxiliary line for the outer circle of the chain threading position
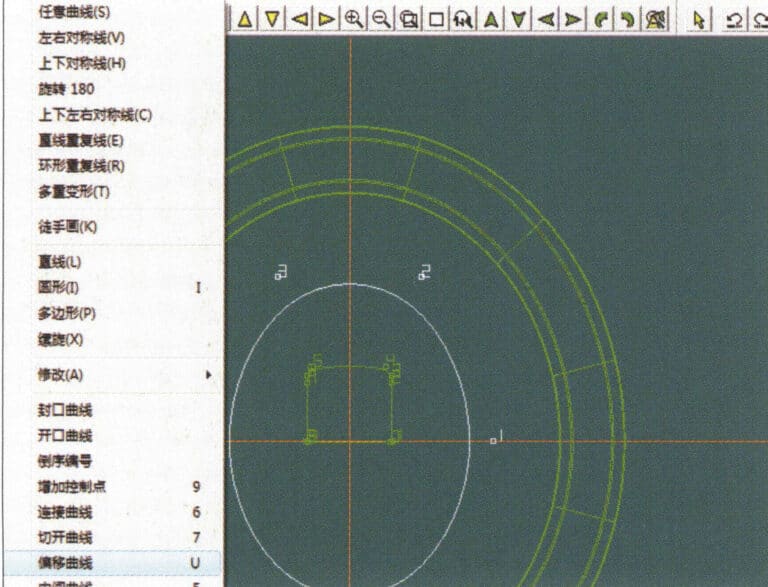
25. After completing the outer auxiliary lines for the chain position, select "Curve" > "Offset Curve" from the menu bar
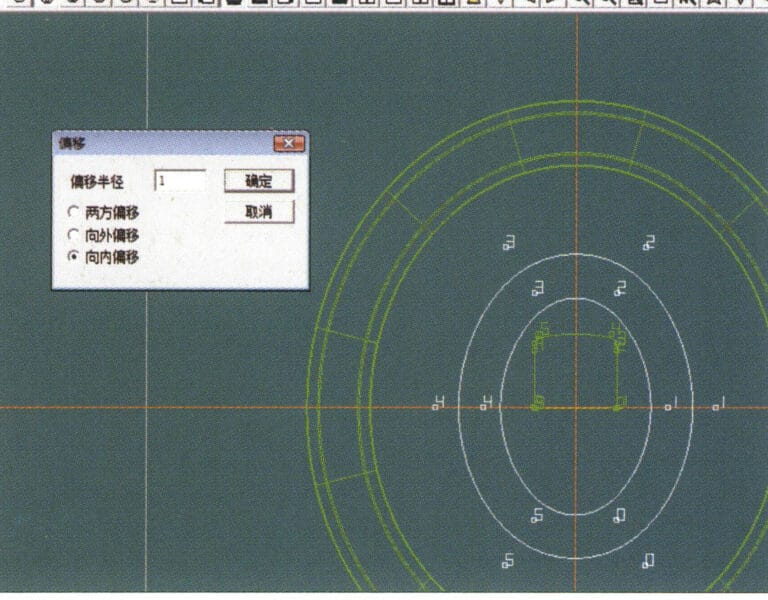
26. '오프셋 커브' 대화 상자를 입력하고 관련 값을 입력한 후 확인합니다.
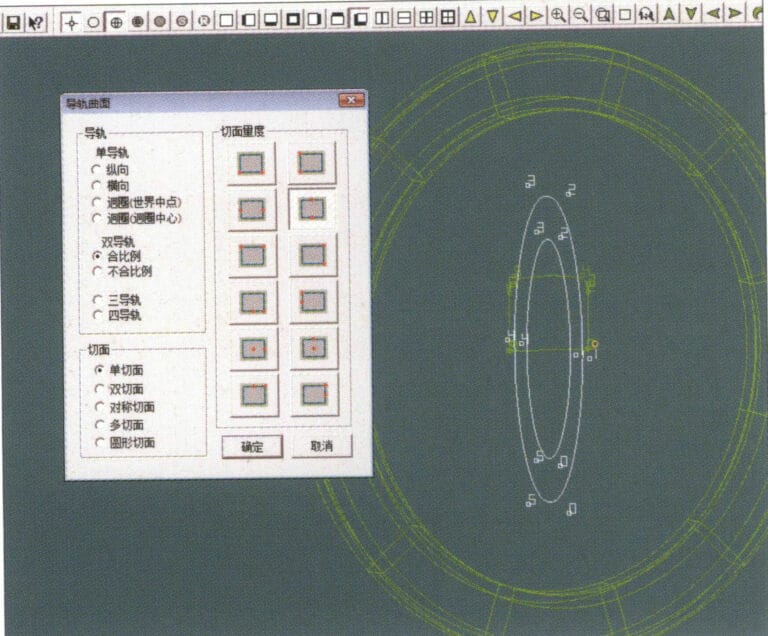
27. Select "Surface" > "Rail Surface" from the menu bar to enter the "Rail Surface" dialog box, select the relevant options and confirm, left-click on a curve to set it as the left rail curve, click on another curve to set it as the right rail, and then select the coil cross-section as the cross-section of the rail surface
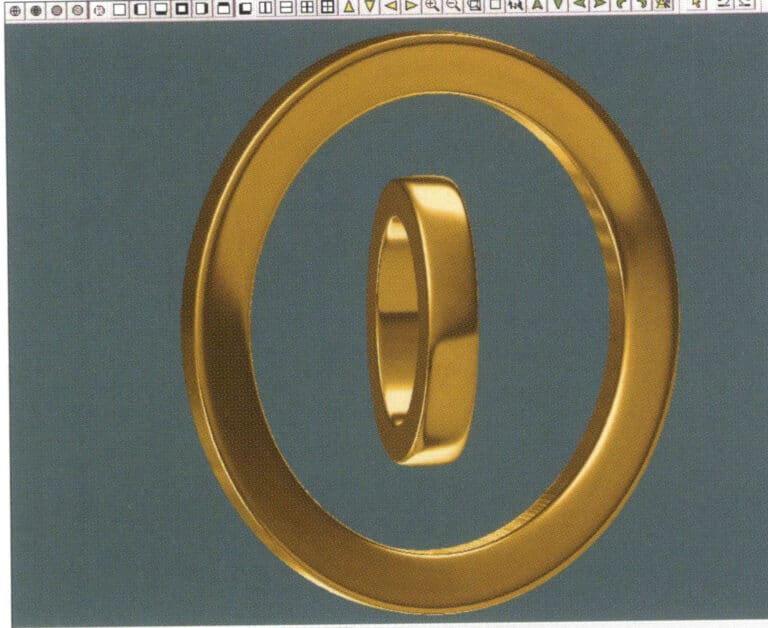
28. Select "View" > "Shadow Map" from the menu bar to inspect the shadow effects
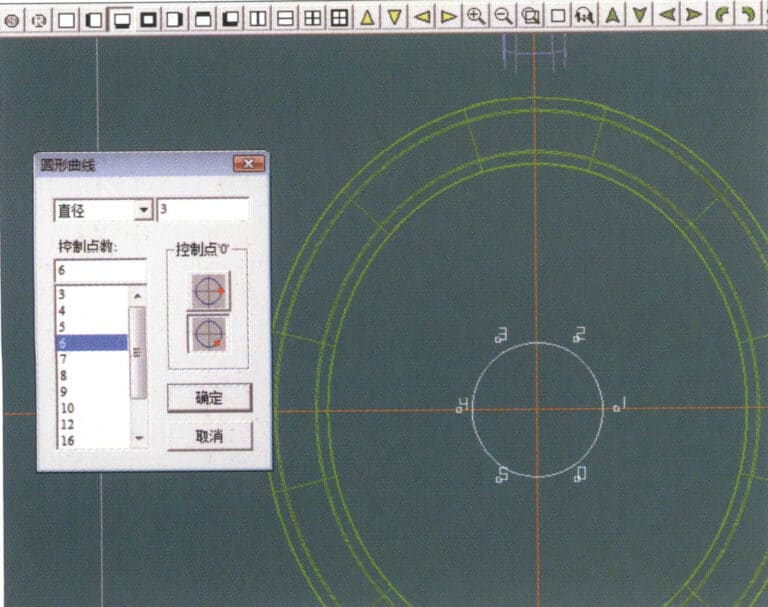
29. Select "Curve" > "Circular Curve" from the menu bar, enter the relevant values and confirm
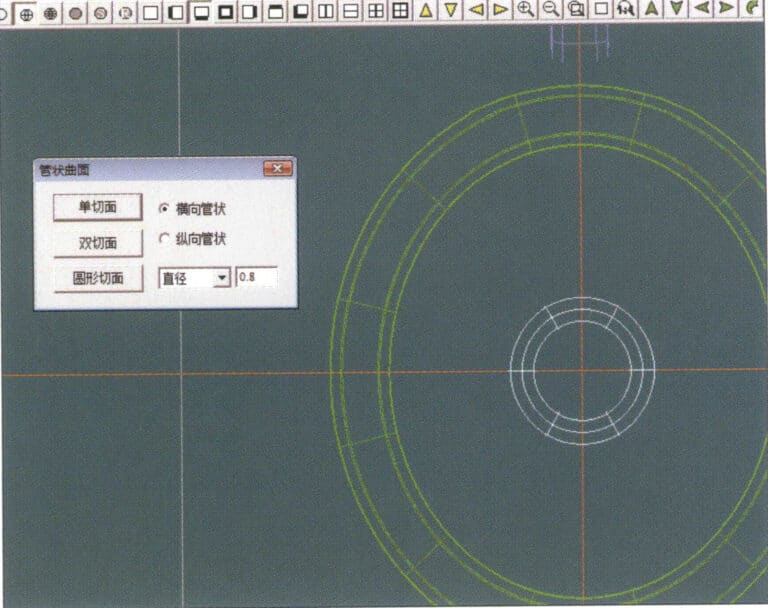
30. Select "Curved Surface" > "Tubular Surface" from the menu bar, enter the relevant values and confirm
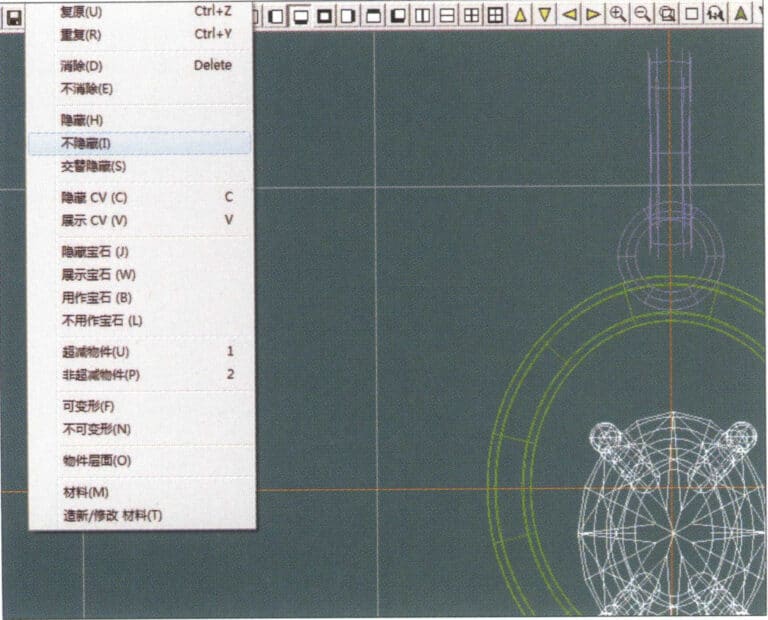
31. Select "Edit" > "Unhide" from the menu bar to display the hidden objects
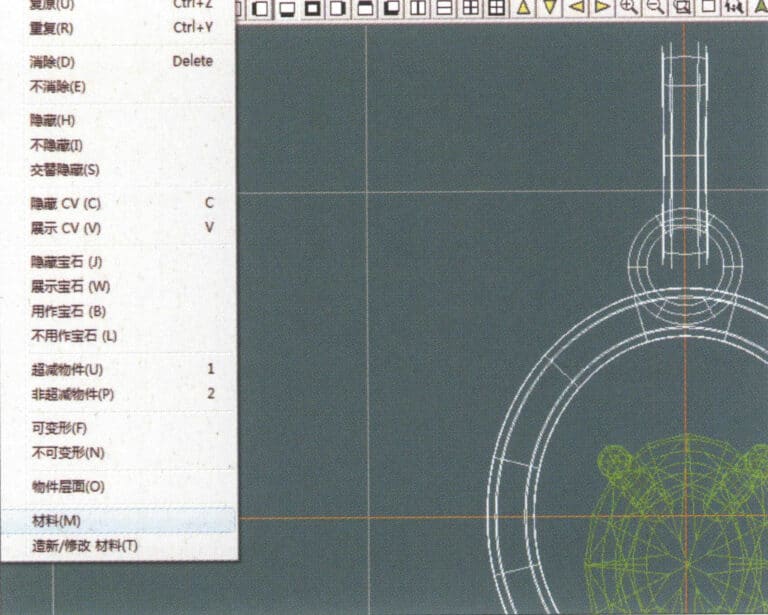
32. Select "Edit" > "Materials" from the menu bar
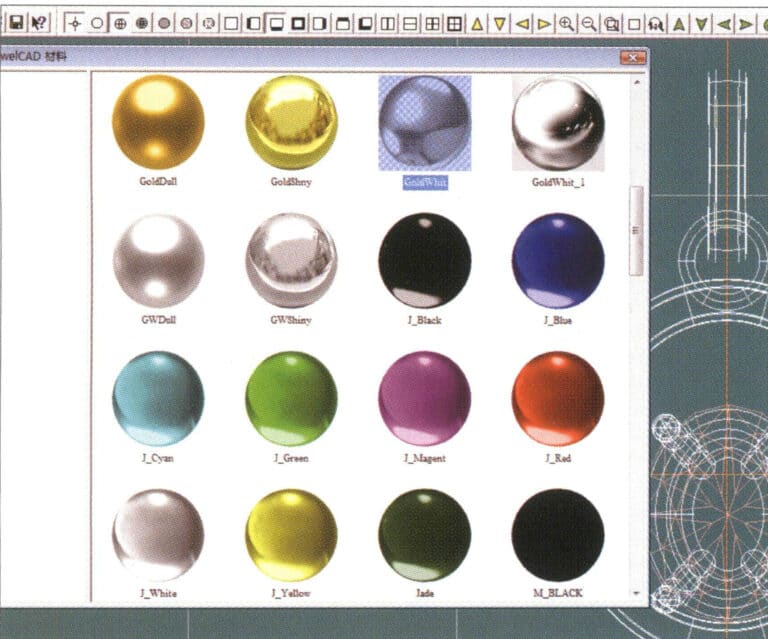
33. '자료' 대화 상자로 들어가서 관련 자료를 선택하고 다음을 확인합니다.
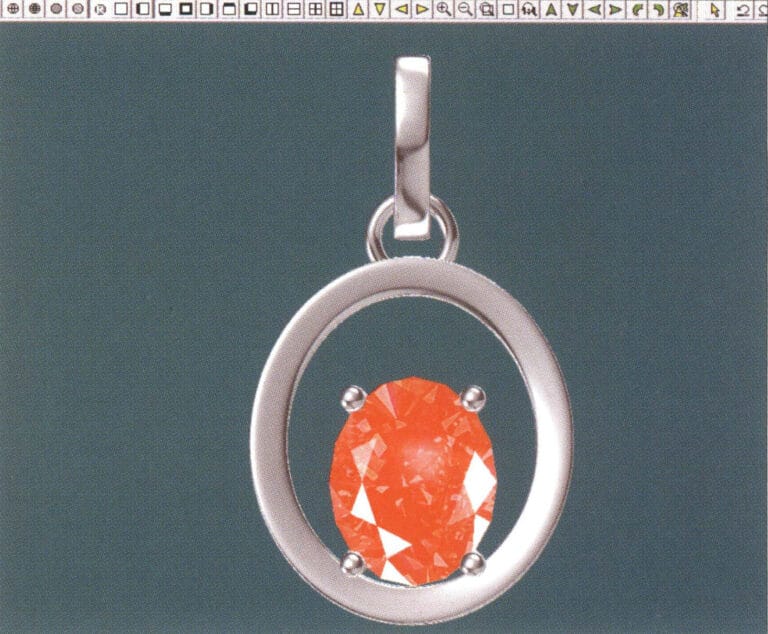
34. Select "View" > "Shadow Map" from the menu bar to inspect the shadow effects
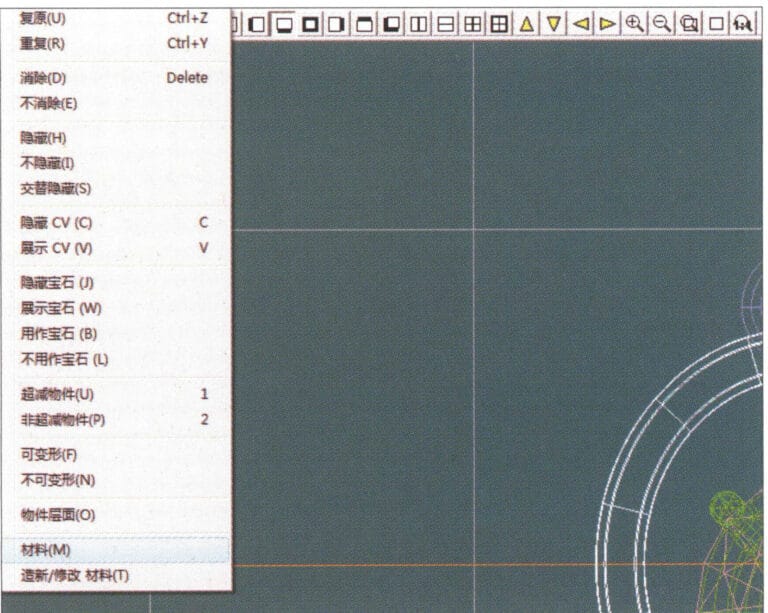
35. Select "Edit" > "Materials" from the menu bar
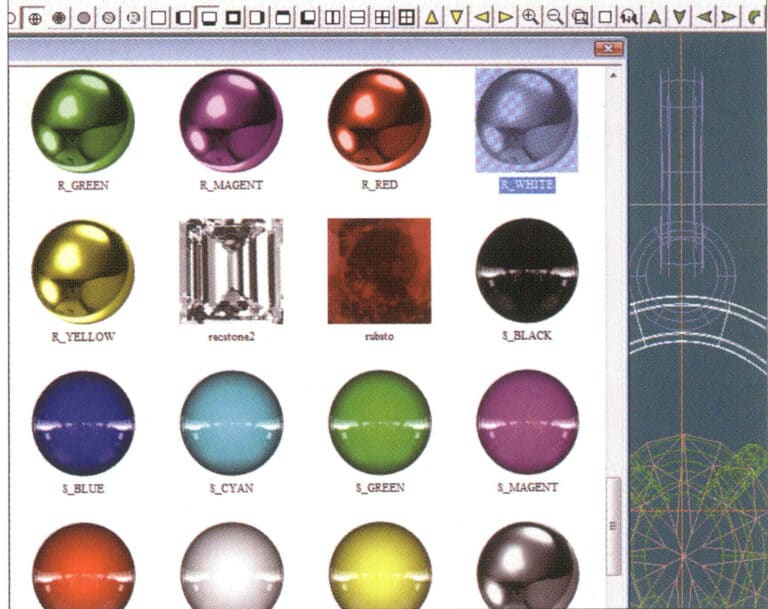
36. "재질" 대화 상자로 들어가서 관련 텍스처 재질을 선택하고 다음을 확인합니다.
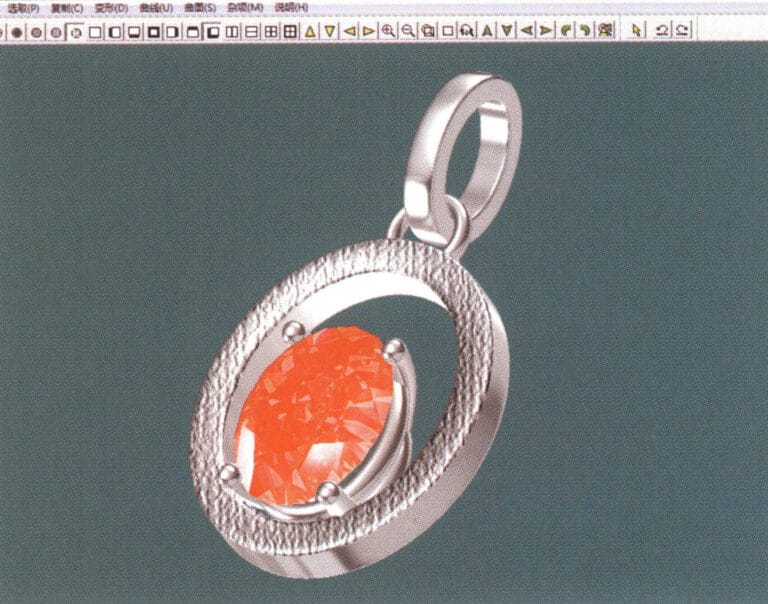
37. Select "View" > "Shadow Map" from the menu bar to inspect the shadow effects
38. Select "File" > "Save As" from the menu bar to save the file


