JewelCADで3Dジュエリーモデルを作るには?
JewelCADを理解し、基本的なマテリアル効果とジュエリー効果を表現する
はじめに
JewelCADを使用して魅力的なジュエリーデザインを作成するには何が必要でしょうか?このガイドでは、ソフトウェアの理解からマテリアル効果の習得、詳細なジュエリーモデルの作成まで、すべてをカバーします。リングやペンダントなどをデザインするためのステップバイステップの手順で、アイデアに命を吹き込む方法を学びましょう。JewelCADがジュエリーデザイナー、スタジオ、ブランドにとって必携のツールである理由をご覧ください。
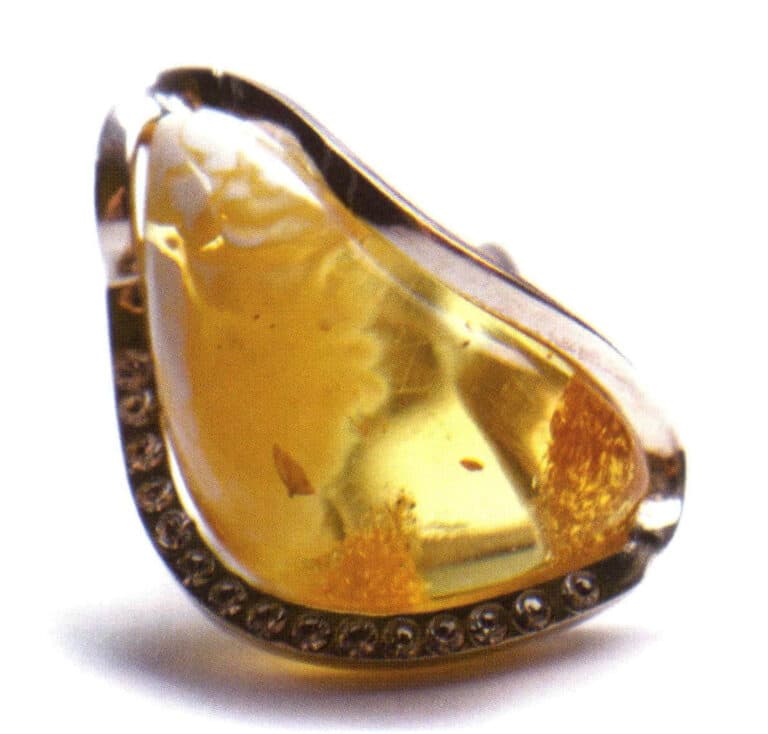
ダイヤモンド・セッティング・リング
目次
セクション I JewelCADを理解する
JewelCADは、1990年に香港のCAD/CAM会社が開発に成功したジュエリー専用のコンピュータ支援設計システムソフトウェアです。10年以上にわたる開発と改良の結果、JewelCADは限られた機能のドローソフトウェアから、強力で安定した、高度に専門化された、効率的でプロフェッショナルなジュエリーデザイン/製造ソフトウェアへと進化し、ヨーロッパ、アメリカ、アジアの主要なジュエリー生産地域で広く採用されています。
ジュエリー産業における生産と加工の自動化が効率を大幅に向上させる一方で、JewelCADは現代のジュエリーデザインにマッチし、現在の商用アプリケーションに広く普及しています。そのユニークなモデリングコンセプトとツールにより、ジュエリーデザイナーは簡単に3次元のジュエリーオブジェクトを作成することができ、またCNCやRPラピッドプロトタイピングとも完璧に統合され、幅広い発展が期待できる最新のジュエリーデザインソフトウェアとなっています。プロフェッショナルなジュエリーデザインソフトウェアとして、JewelCADはジュエリーの3次元モデル作成において他の3Dソフトウェアと比較して明確な利点があり、それは以下の利点に反映されています。
(1) 操作が簡単で、シンプルで、習得しやすい。
(2) 柔軟な描画ツールを備えており、曲線や複雑な形状を描くのに非常に便利です。
(3)強力なサーフェスモデリングツールを備え、複雑なデザインも柔軟に作成・修正できる。
(4)レンダリング速度が速く、様々なデザイン効果イメージを比較することもできる。効果イメージの品質が高く、シミュレーションが強力です。または、回転しながら立体的な効果を観察できるようにし、最終的な製品の効果を直感的に反映させる。
(5)その操作は非常に効率的であり、ジュエリーのスタイルを変更するのに適しています。
(6) 豊富な専門データベースと様々な編集ツールにより、ジュエリーの組み合わせやデザインの変更が容易になり、操作がより便利で効率的になります。
(7) ソフトウェアにブール演算の原理を応用すれば、自由な状態にあるサーフェスを簡単に一体化できる。
(8)設計では、金の重量、量、サイズを直接計算することができる。
(9)デザインのアイデアを可視化し、効率を向上させるためのデータベースを構築できる。
(10)JewelCADで描かれた図形は、より鮮明で一貫性があり、不鮮明な文字や描画品質の低さによるミスの可能性が低くなります。ペーパーレスで直接出力できるので、時間、労力、コストを節約できます。
セクション II JewelCADを使って基本的な材料効果を表現する
1.サンドブラスト仕上げの効果
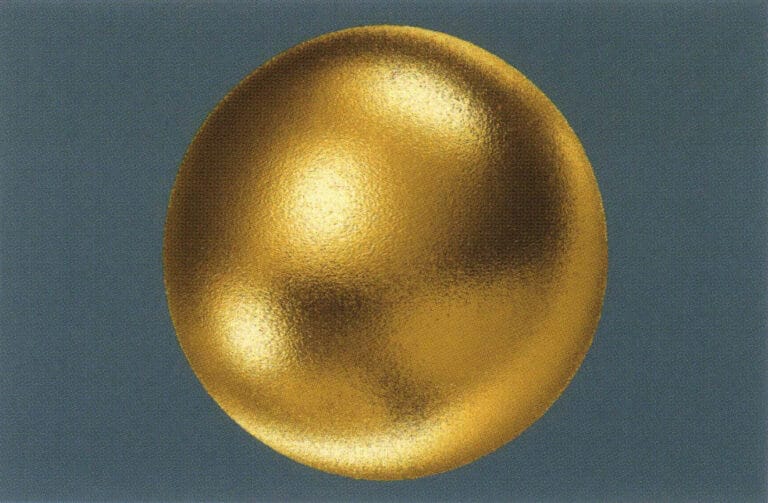
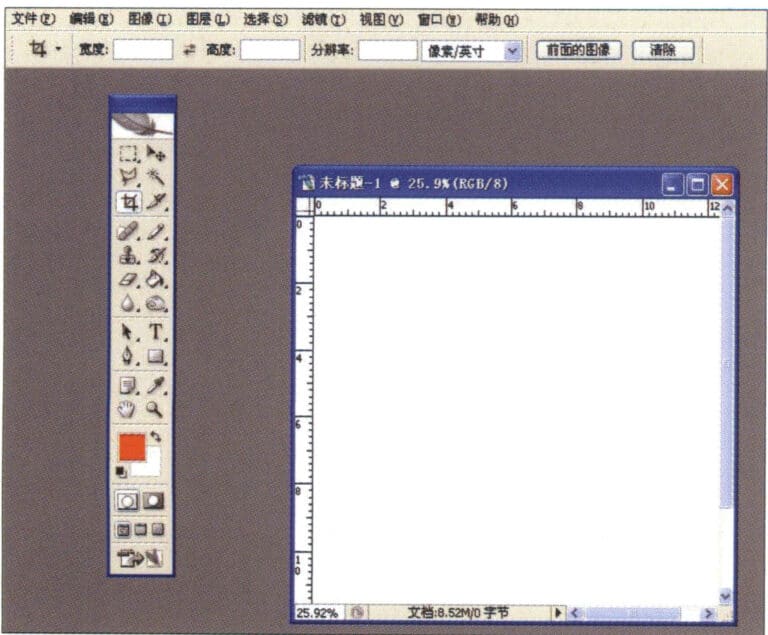
1.Photoshopで解像度300ピクセル/インチで新規ファイルを作成する。
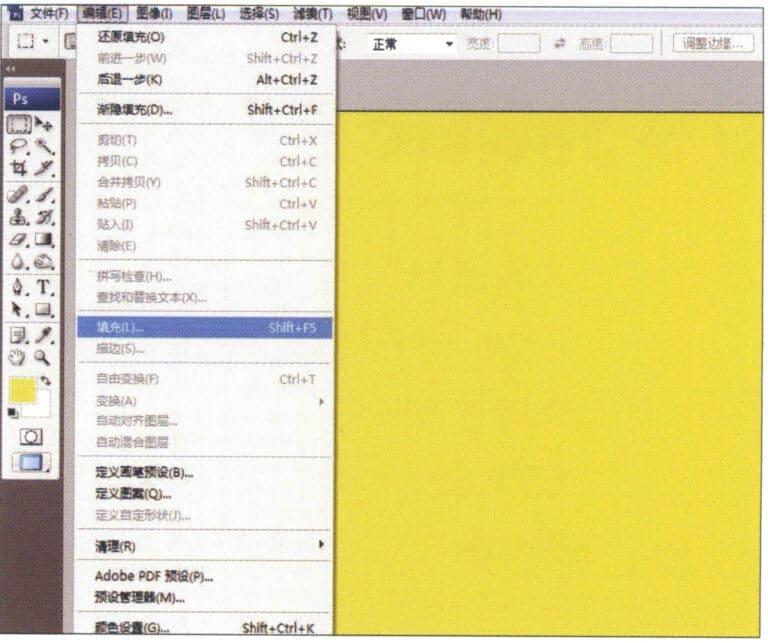
2. Select "Edit" > "Fill" from the menu bar, and set the foreground color to yellow

3. Select "Filter" from the menu bar > "Mottled" > "Add Mottled"
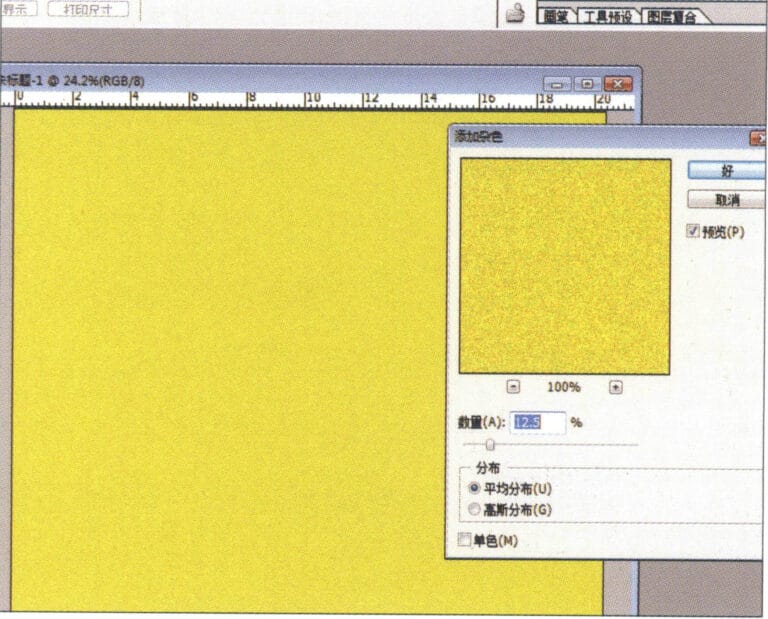
4.Add Mottled "ダイアログボックスに入り、関連する値を入力し、確定する。
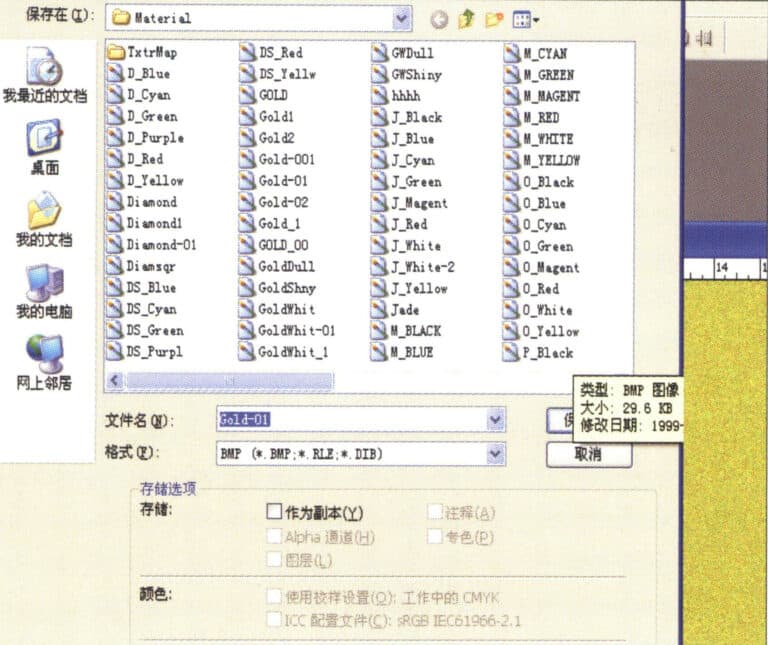
5. Store the document in the "JewelCAD" > "Material" folder, saved in "BMP" format

6. Create a new file in JewelCAD, select "Surface" > "Spherical Surface" from the menu bar
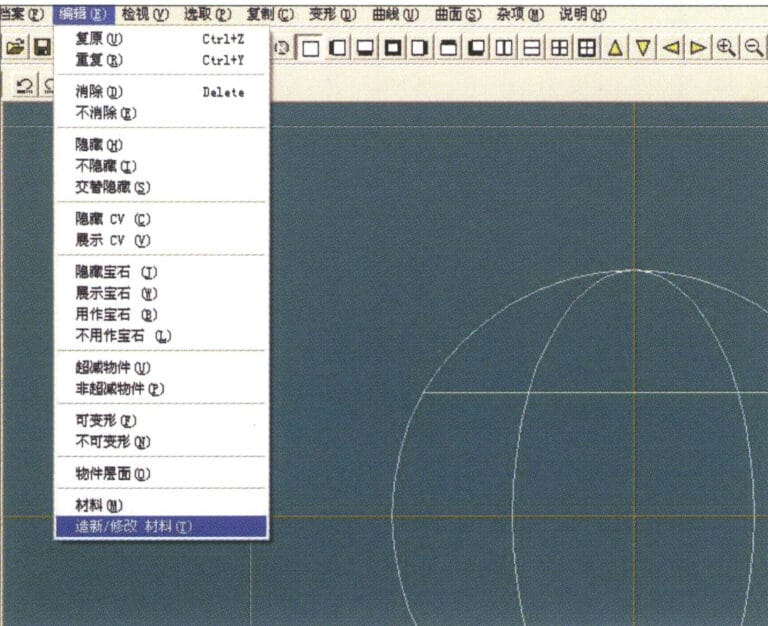
7. Select "Edit" > "Create/Modify Material" from the menu bar
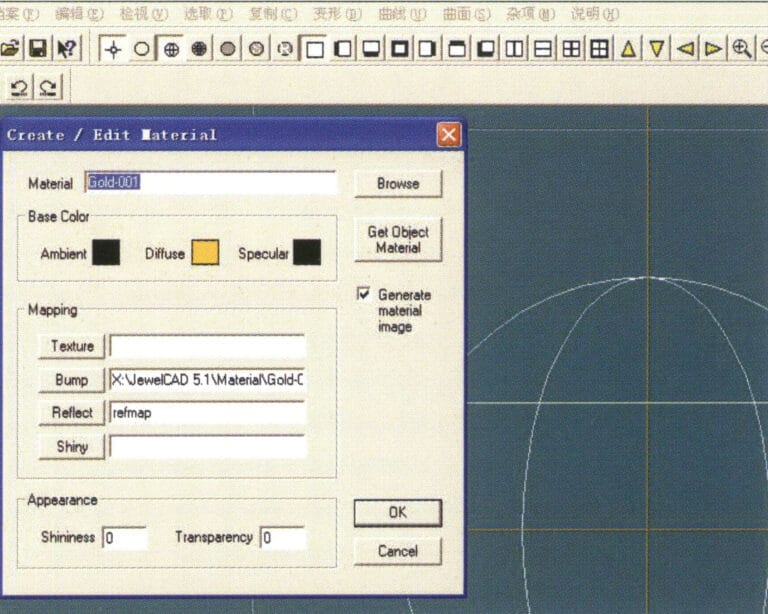
8.材料の作成/変更」ダイアログボックスに入り、関連する値を入力して確定します。
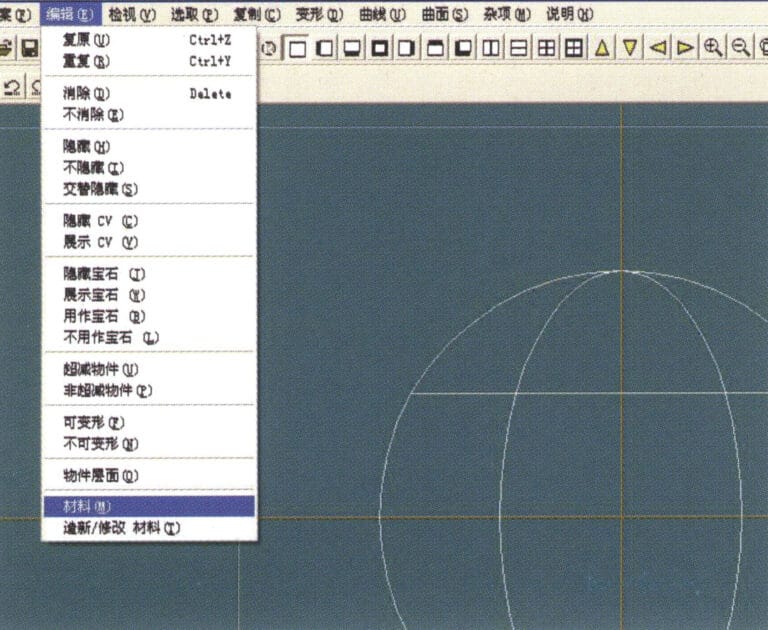
9. Select "Edit" > "Materials" from the menu bar
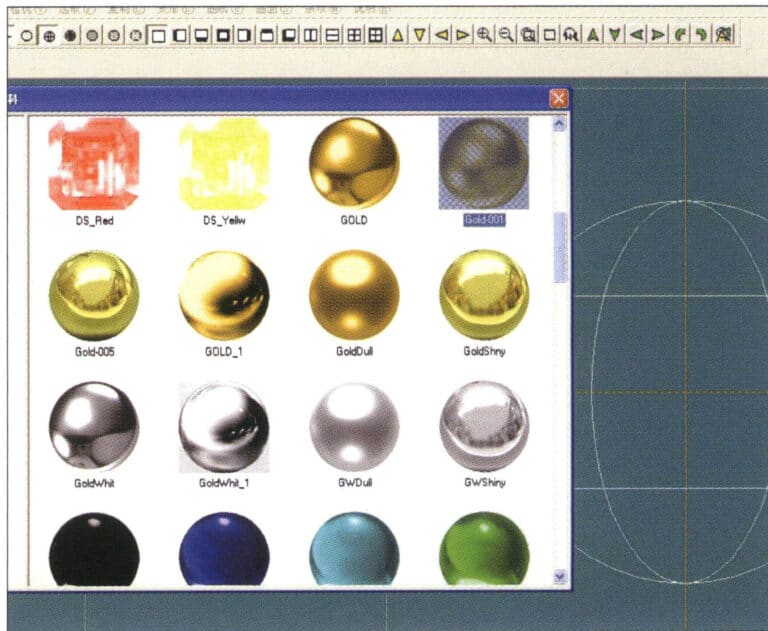
10.材料」ダイアログボックスに入り、材料を選択して確定します。
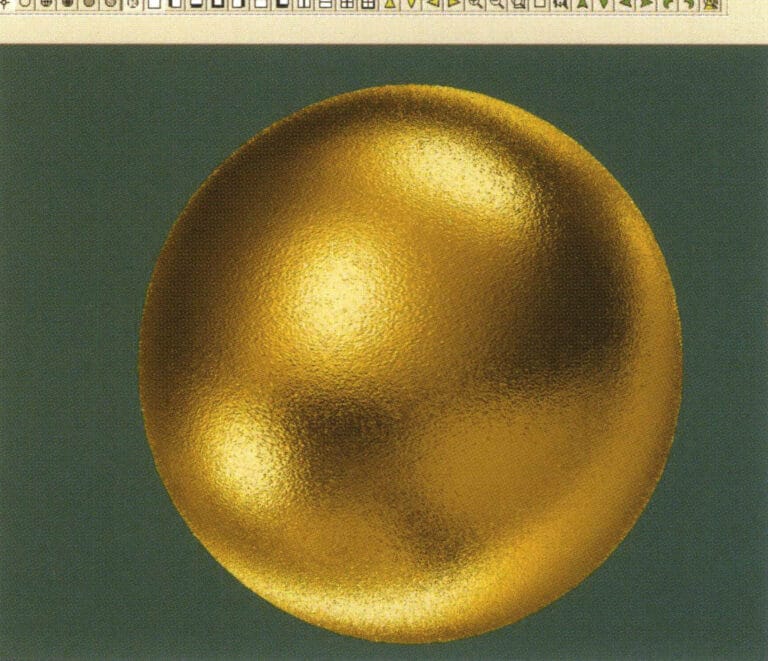
11. Select "View" > "Shadow Map" from the menu bar to inspect the shadow effects.
12. Select "File" > "Save File" from the menu bar to save the document
2.ブラッシング効果
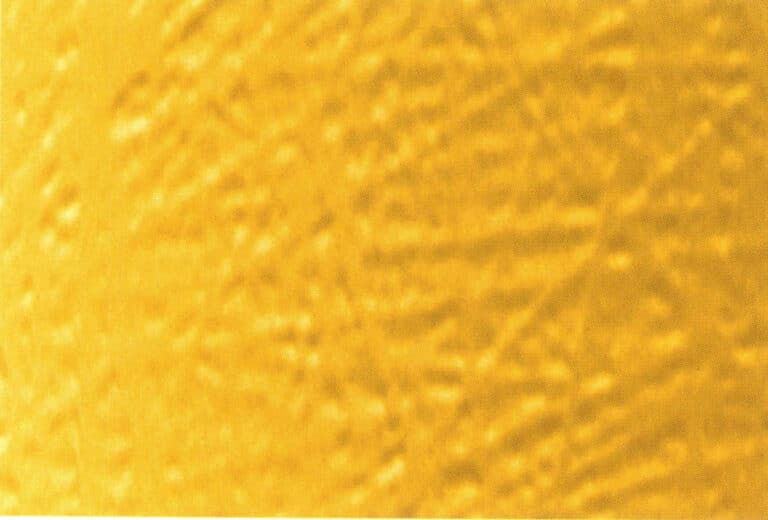

1. Scan a texture file in Photoshop with a resolution of 300 pixels/inch, and select "Filter" > "Blur" > "Motion Blur" from the menu bar to apply the blur effect
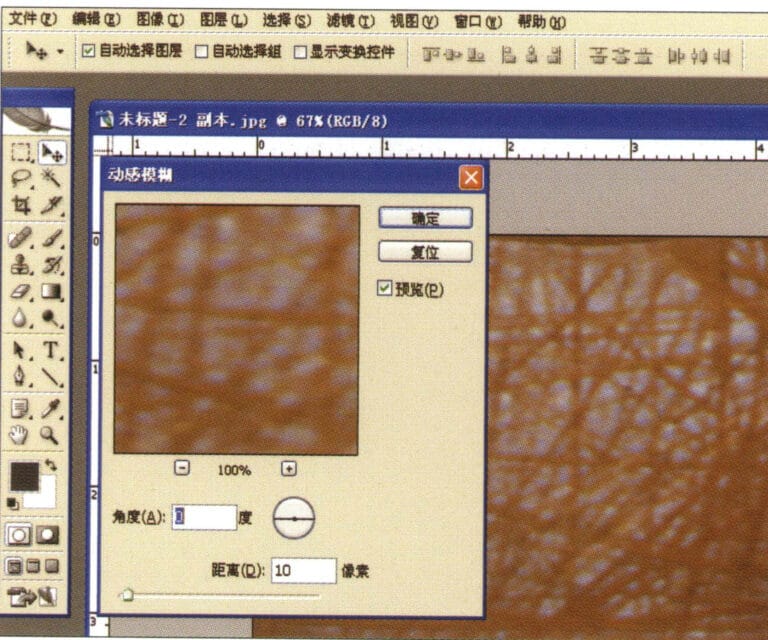
2.Motion Blur "ダイアログボックスに入り、関連する値を入力して確定します。
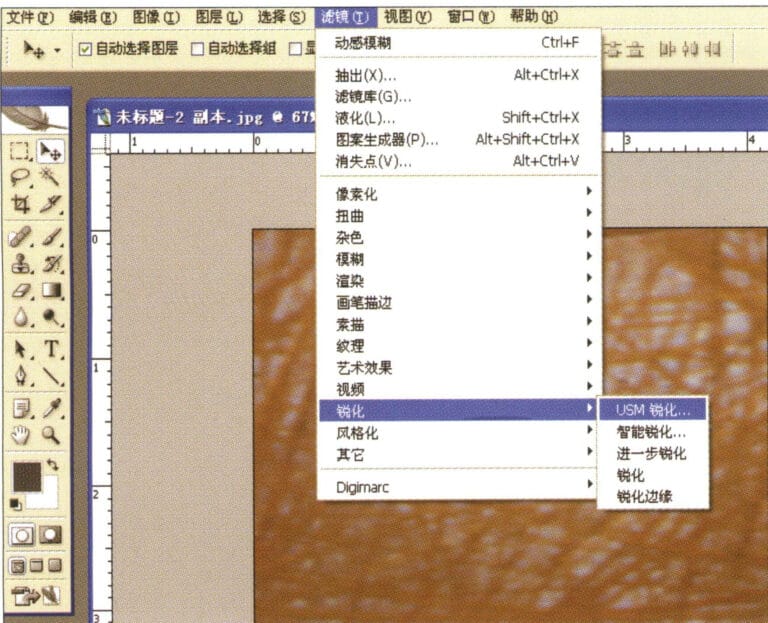
3. Select "Filter" > "Sharpen" > "USM Sharpening" from the menu bar
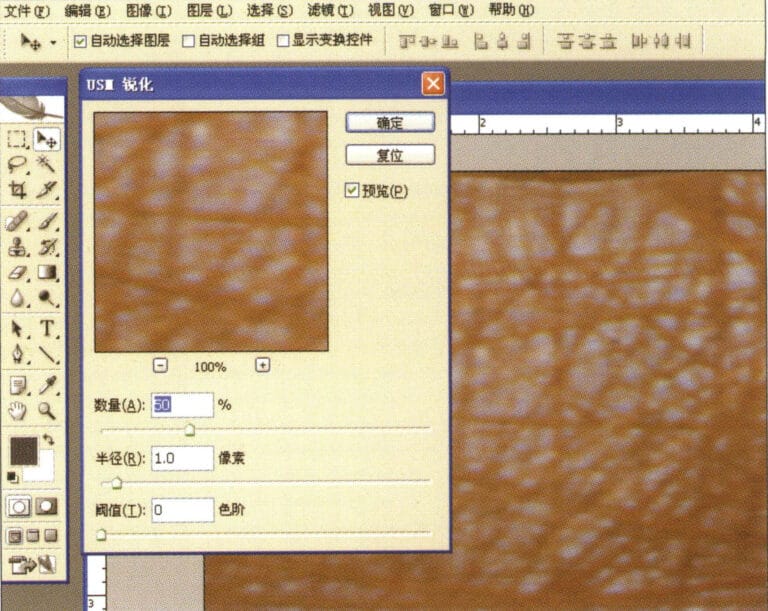
4.USM Sharpening "ダイアログボックスに入り、関連する値を入力して確定します。
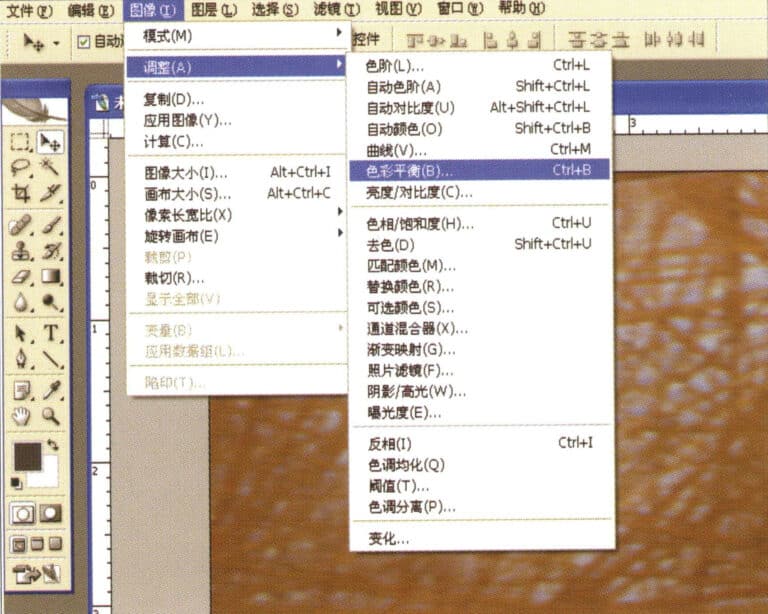
5. Select "Image" > "Adjustments" > "Color Balance" from the menu bar
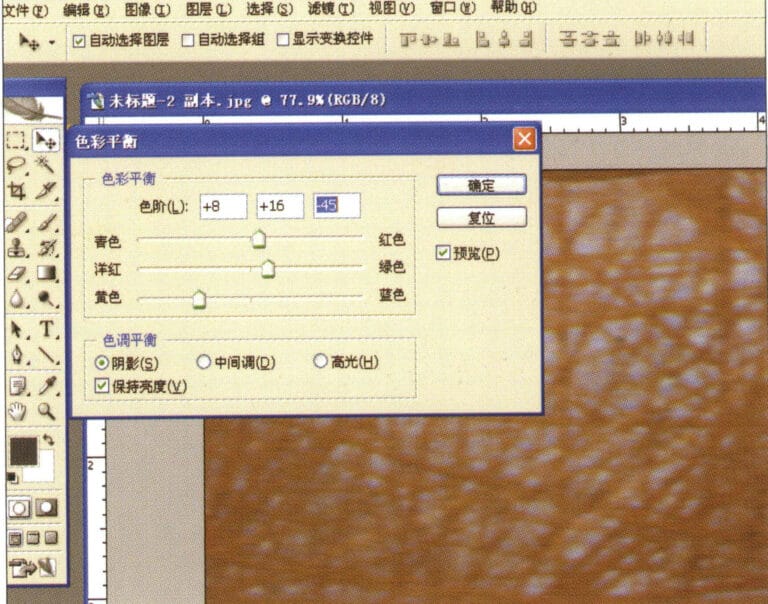
6.カラーバランス」ダイアログボックスに入り、関連する値を入力し、確定します。
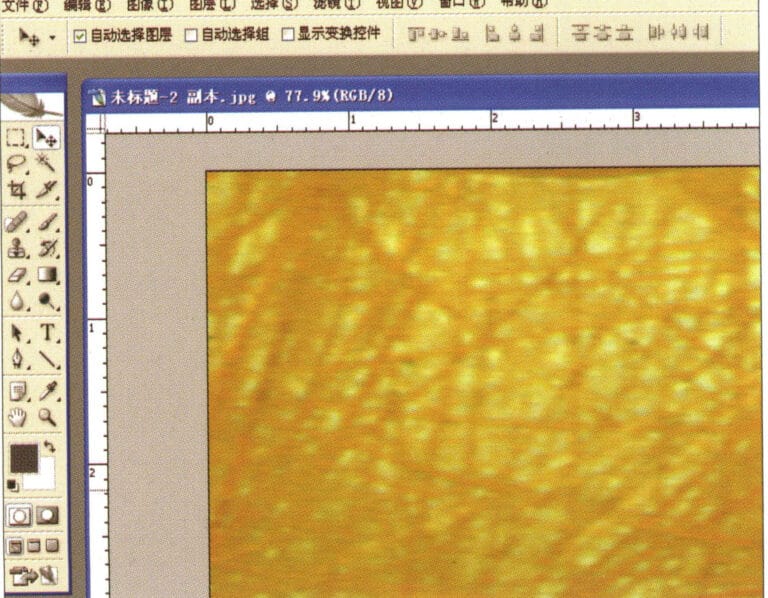
7.カラーバランス表示後の効果図
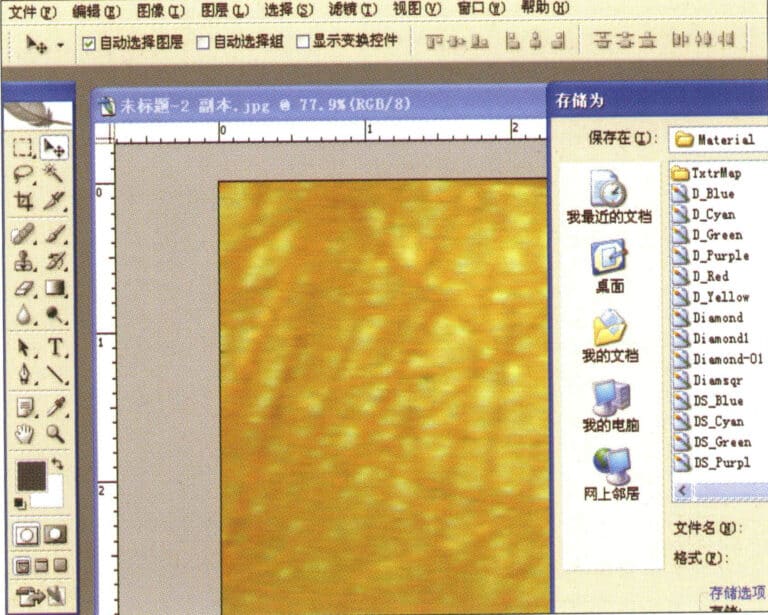
8. Store the document in the "JewelCAD" > "Material" folder, saved in "BMP" format
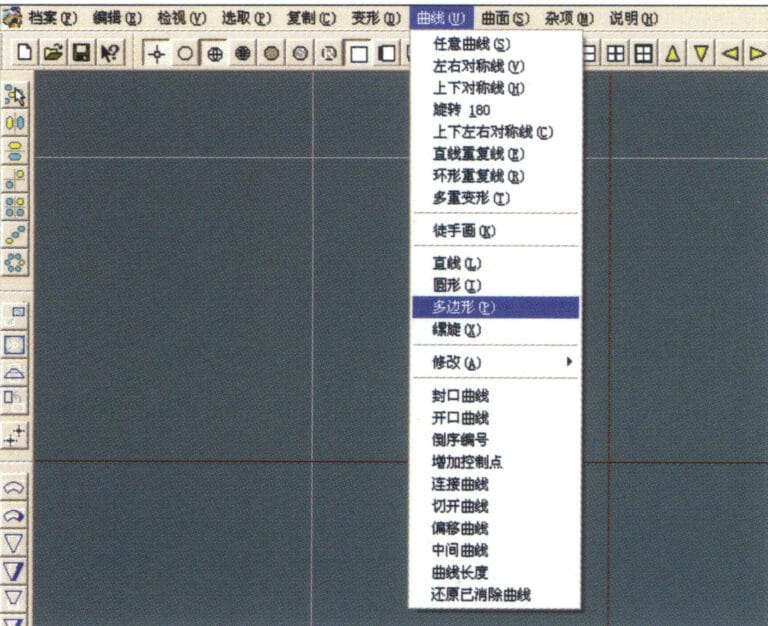
9. In JewelCAD, create a new file, select "Curve" > "Polygon" from the menu bar
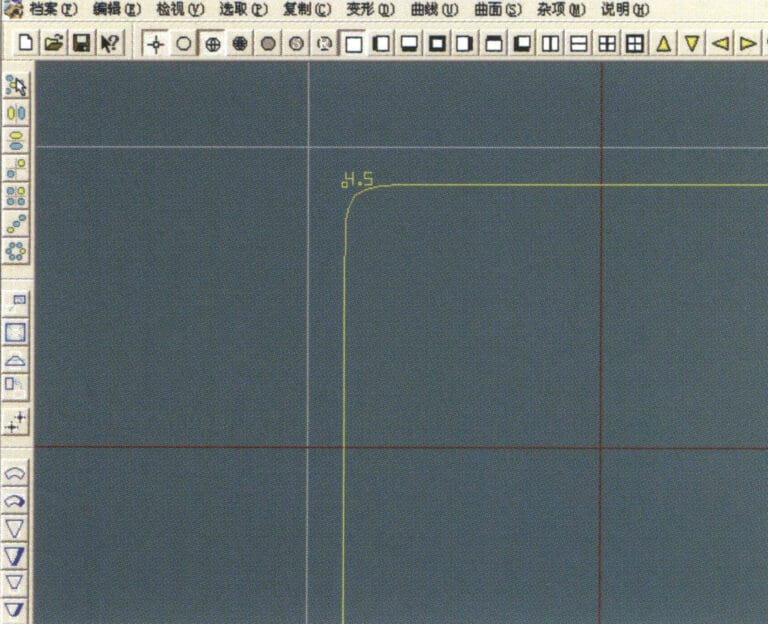
10.多角形」を使って正方形を描く
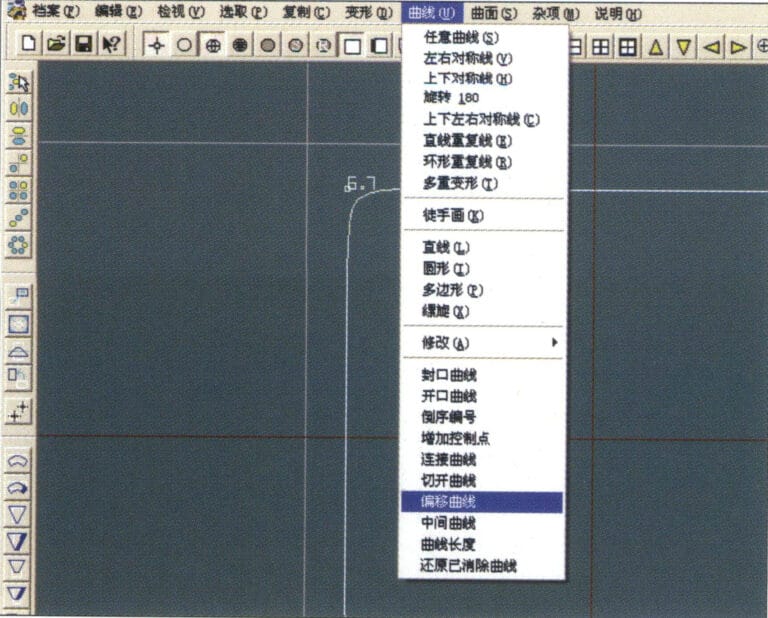
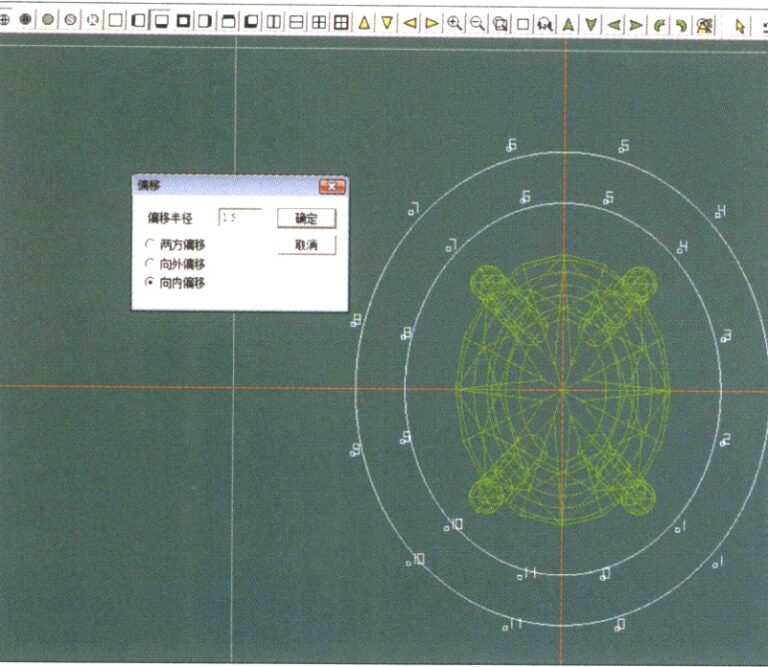
11. Select "Curve" > "Offset Curve" from the menu bar
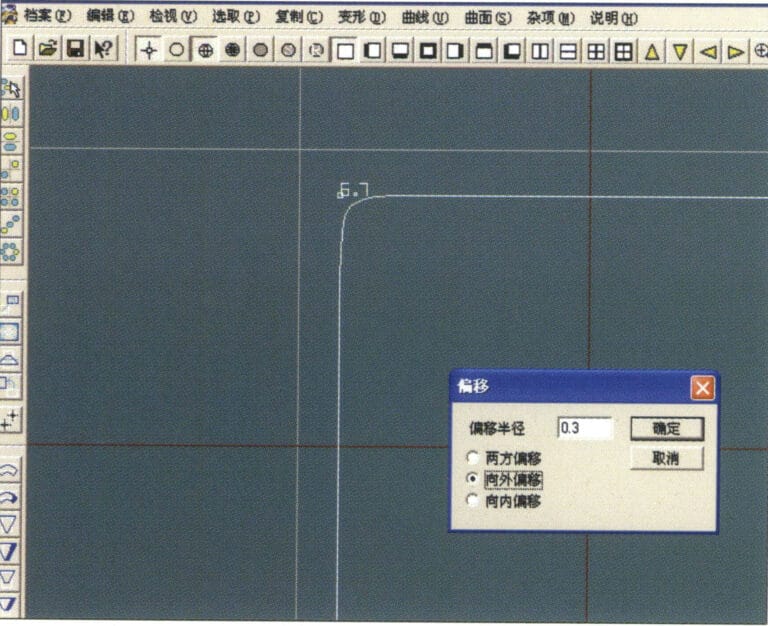
12.Offset Curve "ダイアログボックスに入り、関連する値を入力し、確定する。
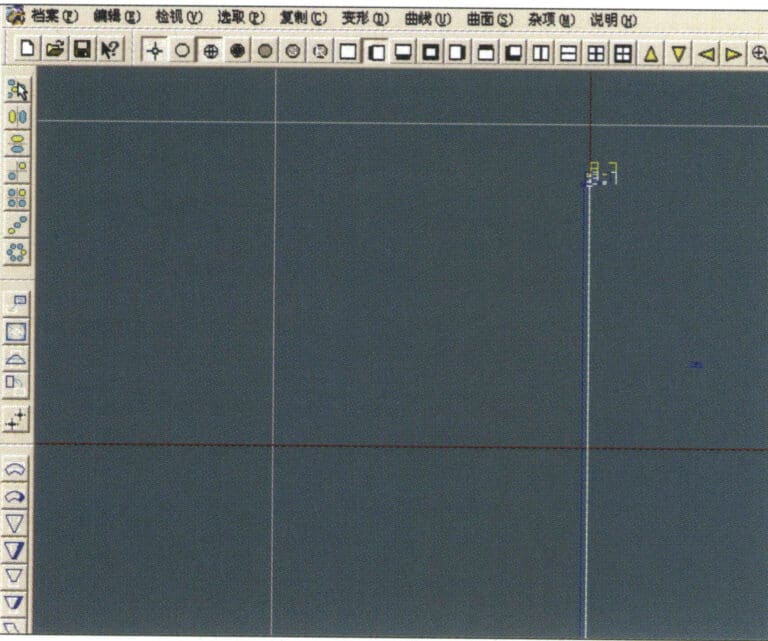
13.オフセットカーブ表示後の効果図
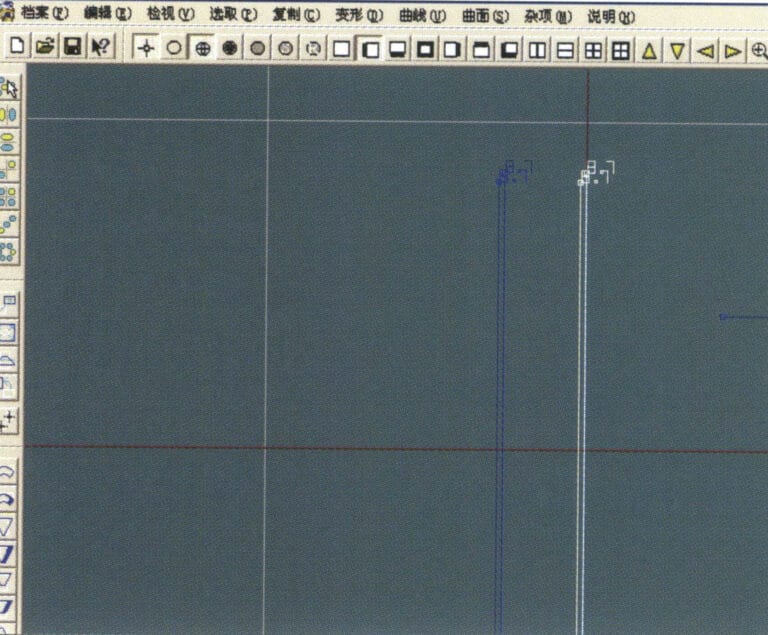
14. Select "Deformation" > "Move" from the menu bar to move the selected curve
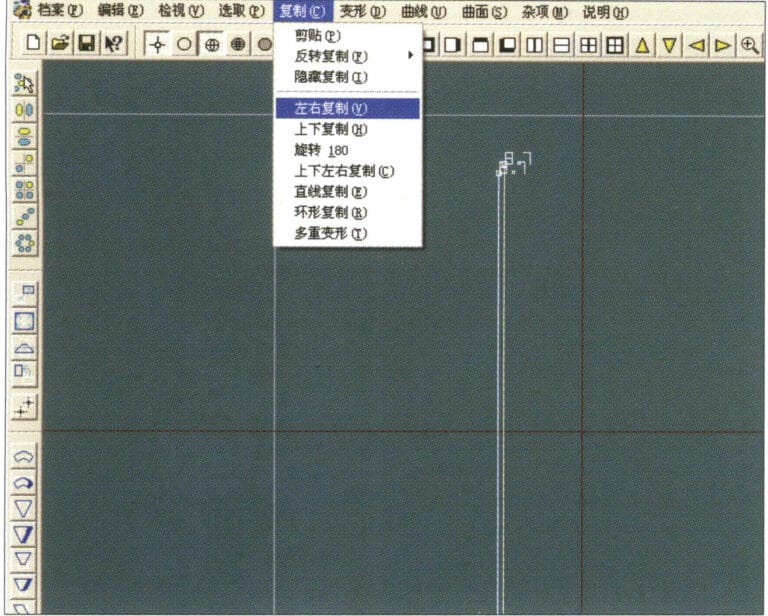
15. Select "Copy" > "Copy Left and Right" from the menu bar to copy the selected curve to the left and right
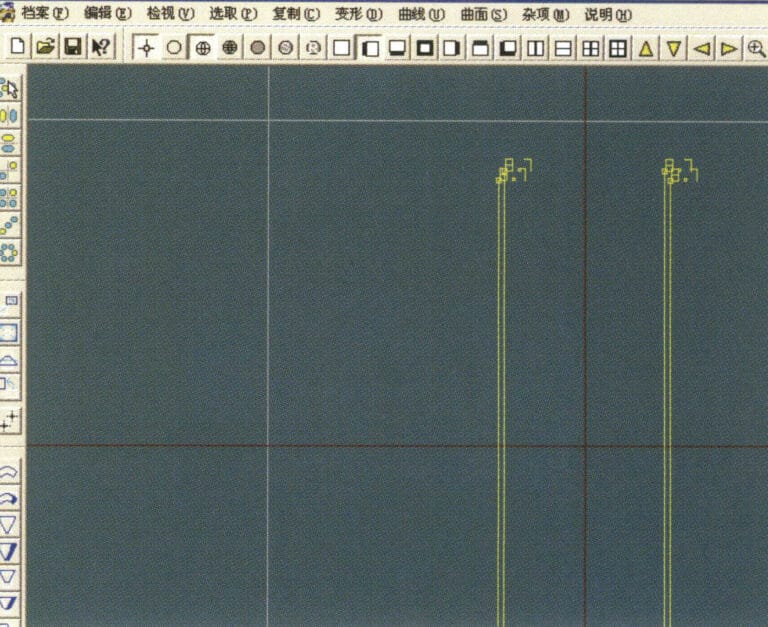
16.左右複製後の効果画像を表示する
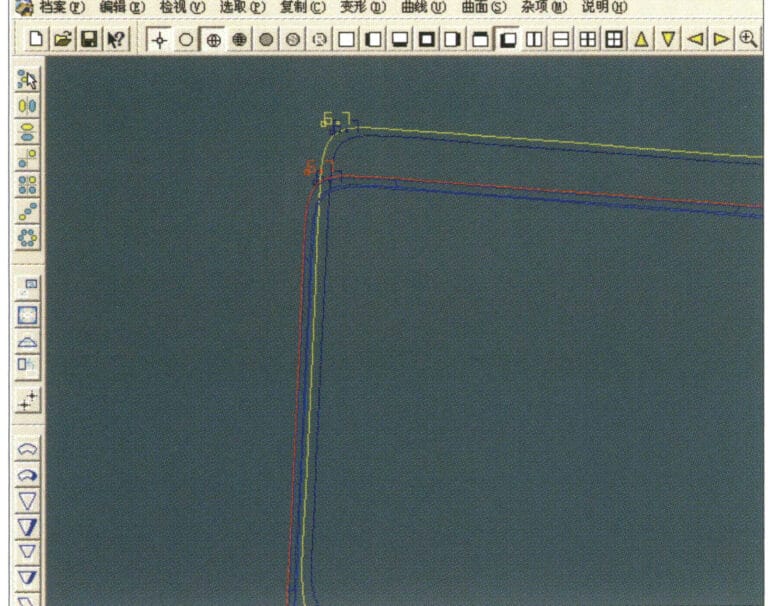
17. Select "Surface" > "Curve Surface Connection" from the menu bar, and double-click the first and second curves/surfaces in a clockwise direction with the left mouse button to create a curve surface connection
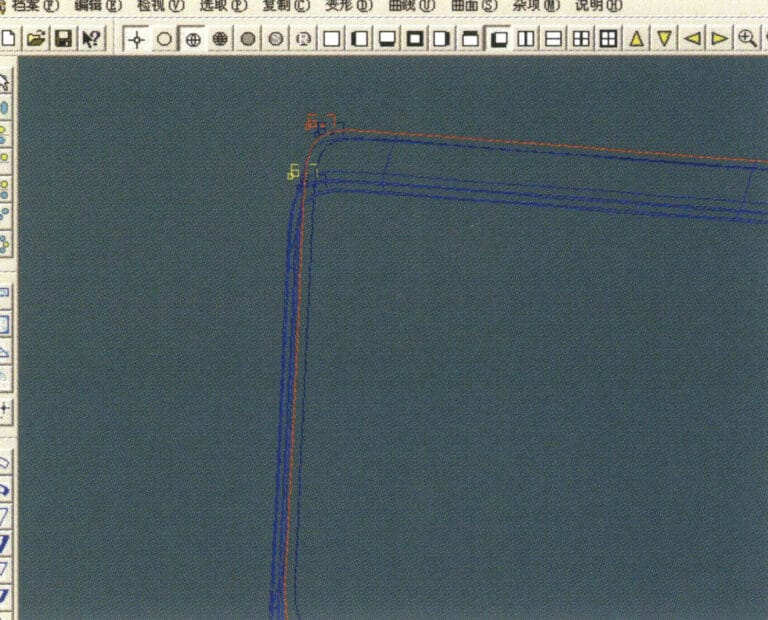
18.時計回りに、3つ目の曲線/曲面をマウスの左ボタンでダブルクリックし、線と面の接続を作成する。
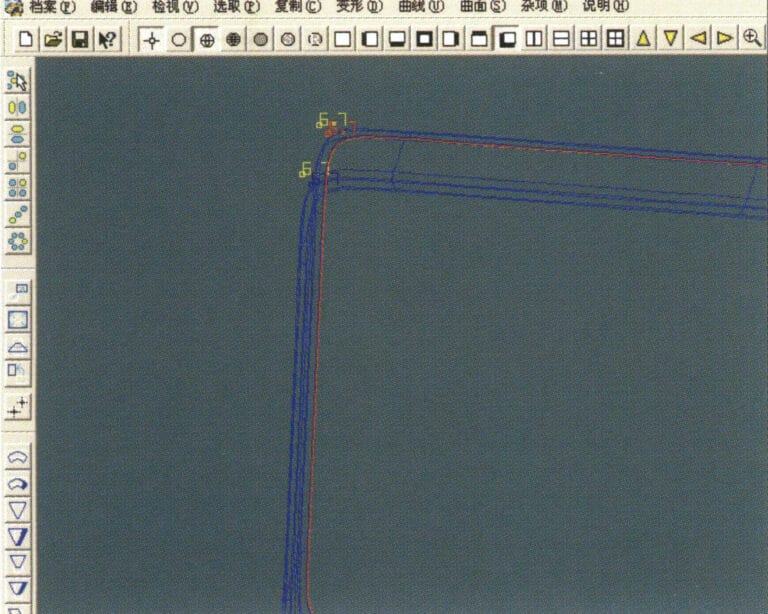
19.4つ目の曲線/曲面をマウスの左ボタンでダブルクリックし、線と面の接続を作成します。

20. Select "View" > "Shadow Map" from the menu bar to inspect the shadow effects
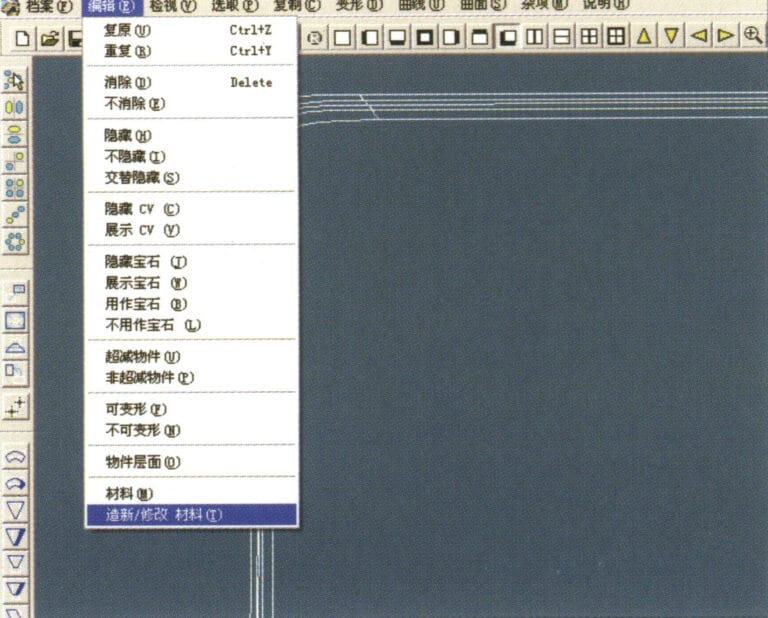
21. Select "Edit" > "Create/Modify Material" from the menu bar
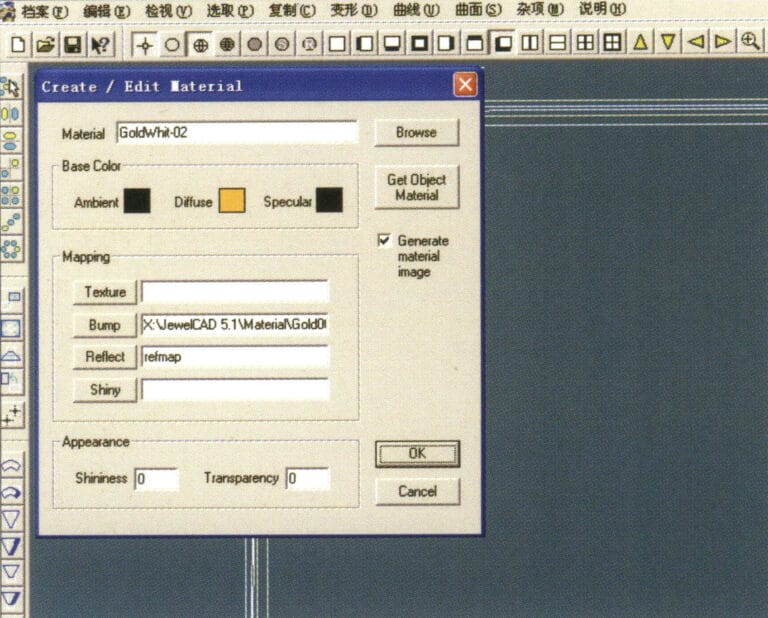
22.材料の作成/変更」ダイアログボックスに入り、該当する値を入力して確定します。
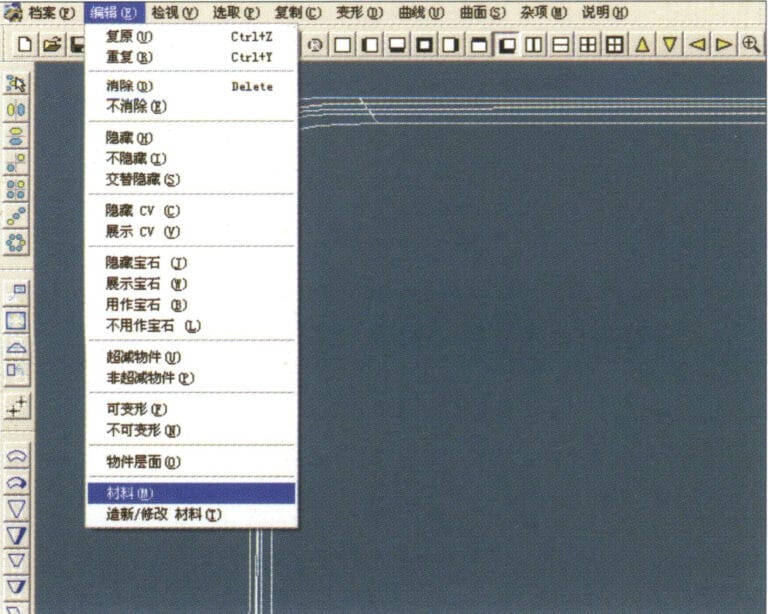
23. Select "Edit" > "Materials" from the menu bar
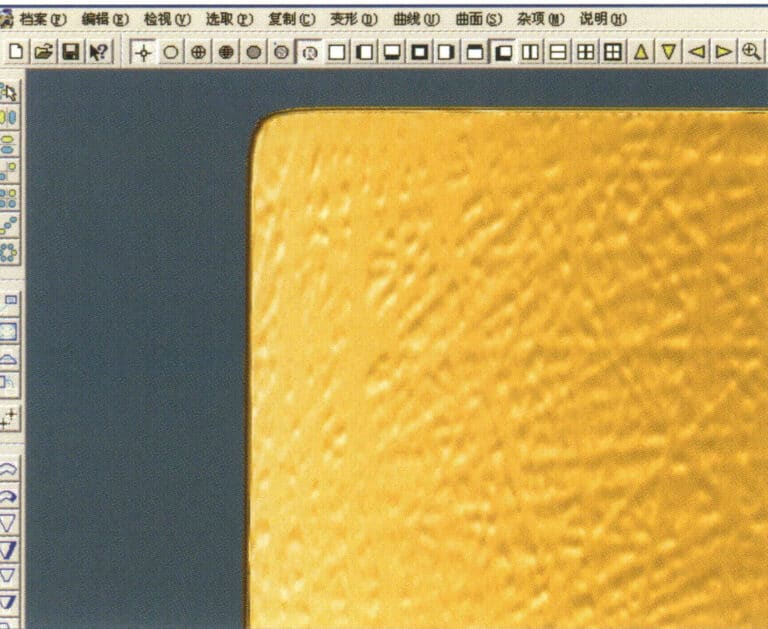
24. Select "View" > "Shadow Map" on the menu bar to view the light and shadow effects 25. Select "File" > "Save File" on the menu bar to save the file
3.樹皮テクスチャー仕上げ
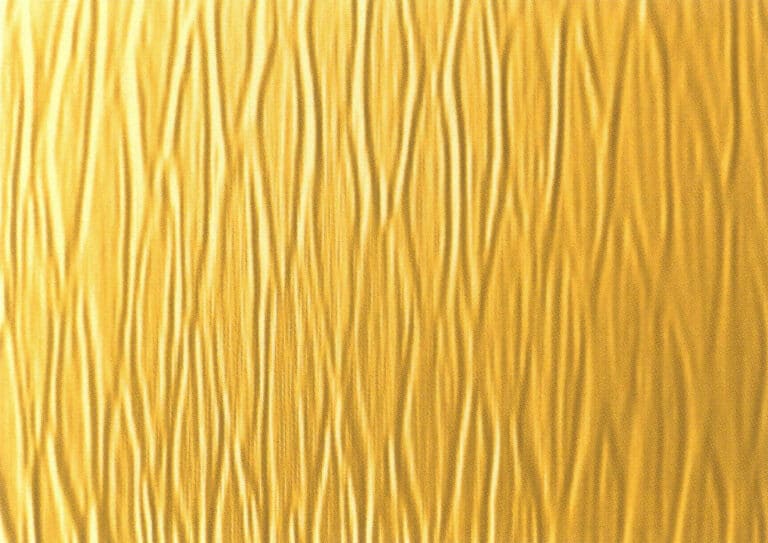

1.300ピクセル/インチの解像度でPhotoshopにテクスチャファイルをスキャンする。
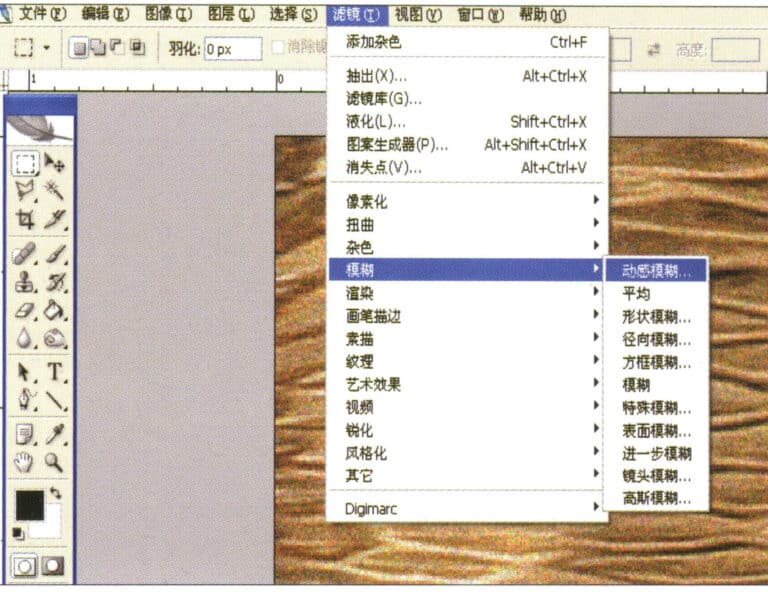
2. Select "Filter" > "Blur" > "Motion Blur" from the menu bar
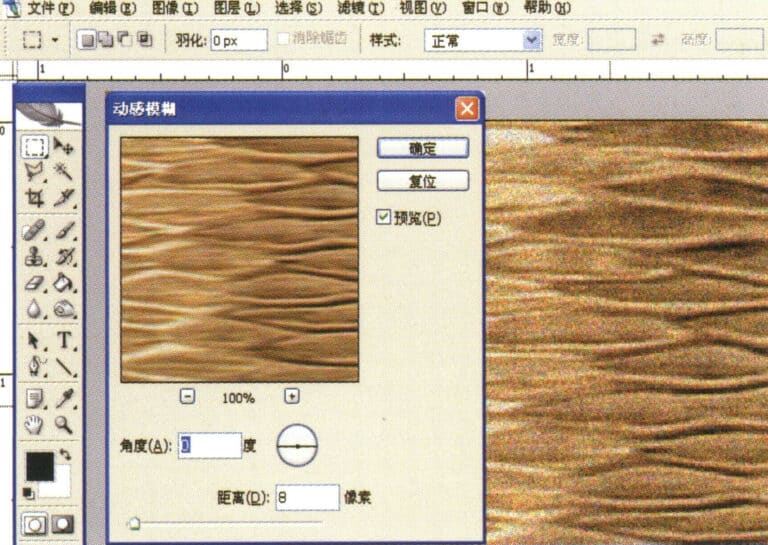
3.Motion Blur "ダイアログボックスに入り、関連する値を入力して確定します。
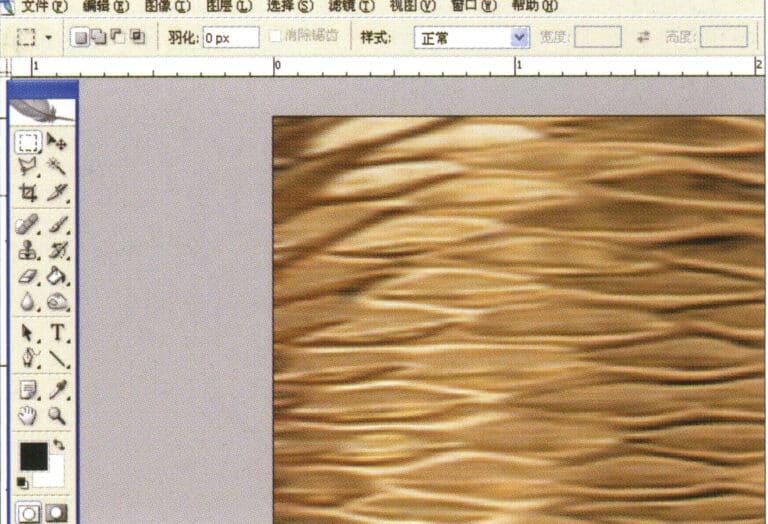
4.モーションブラー後のエフェクト画像を表示する
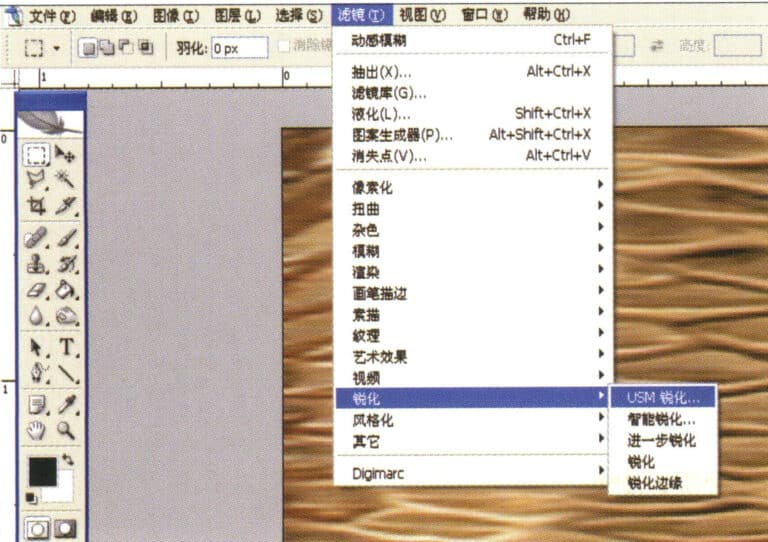
5. Select "Filter" > "Sharpen" > "USM Sharpening" from the menu bar
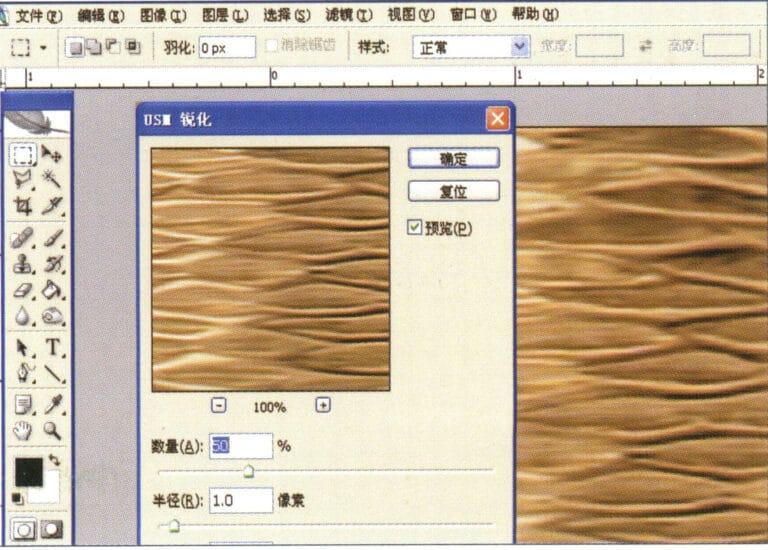
6.USM Sharpening "ダイアログボックスに入り、関連する値を入力して確定します。
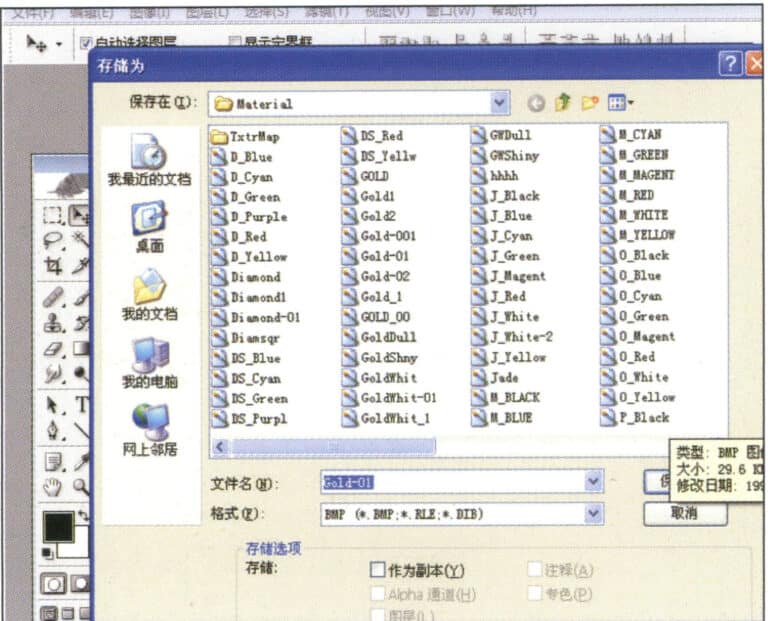
7. Store the document in the "JewelCAD" > "Material" folder and save it in "BMP" format
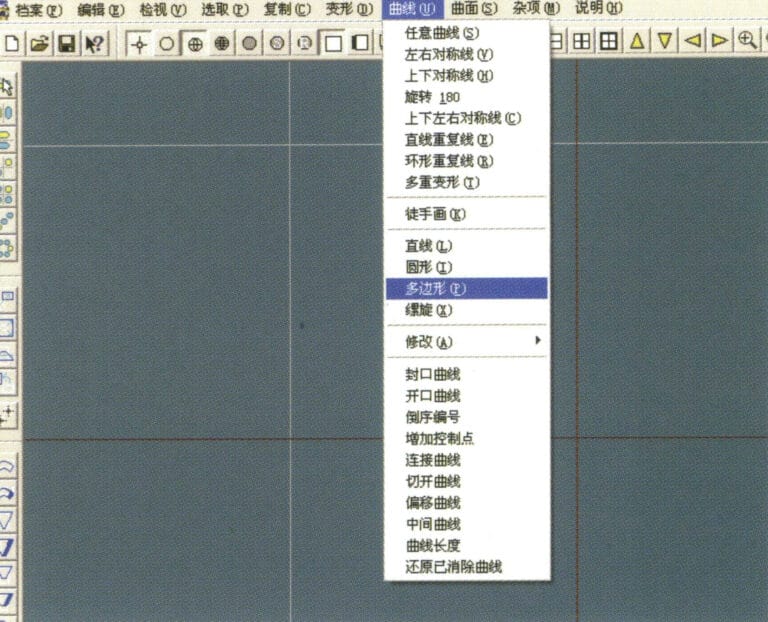
8. In JewelCAD, create a new file, select "Curve" > "Polygon" from the menu bar
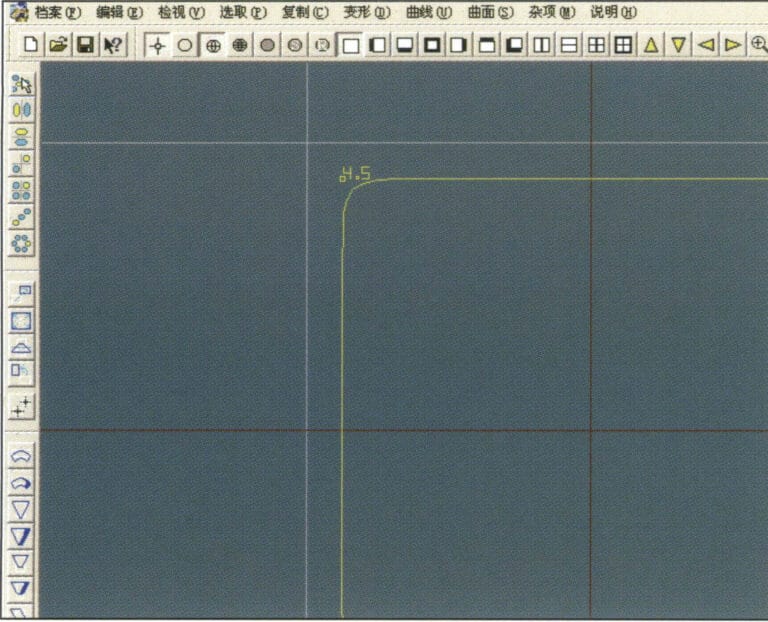
9.多角形」を使って正方形を描く
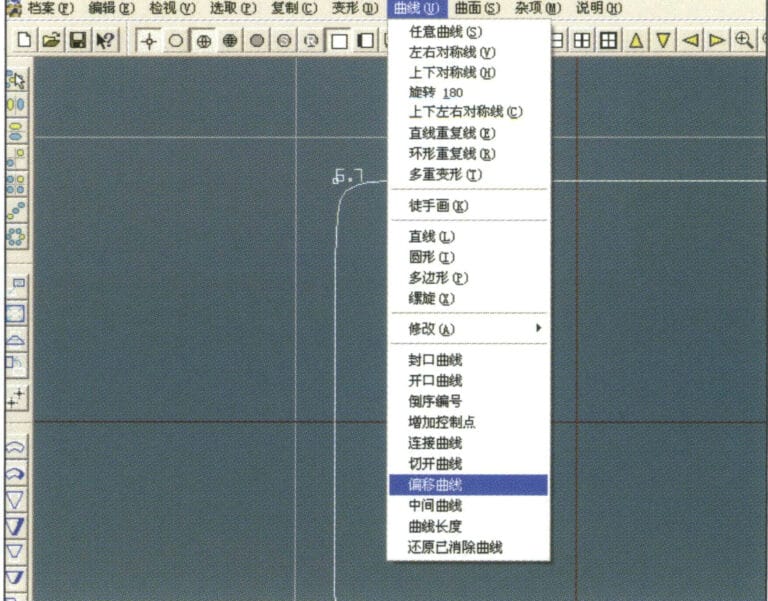
10. Select "Curve" > "Offset Curve" from the menu bar
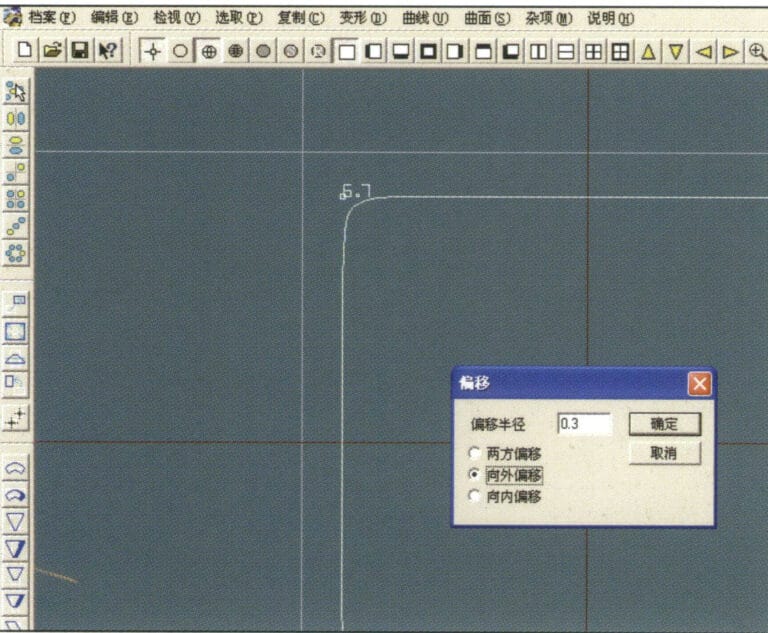
11.Offset Curve "ダイアログボックスに入り、関連する値を入力し、確定する。
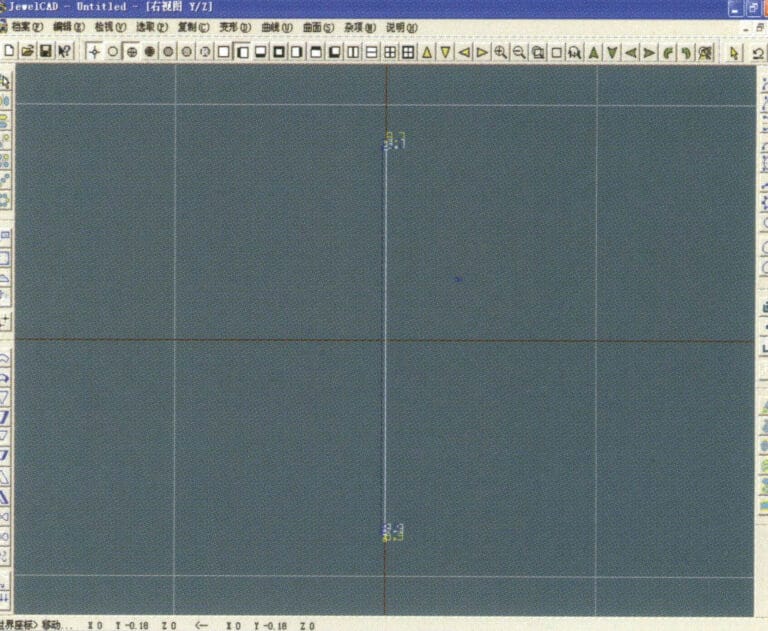
12.オフセットカーブ表示後の効果図
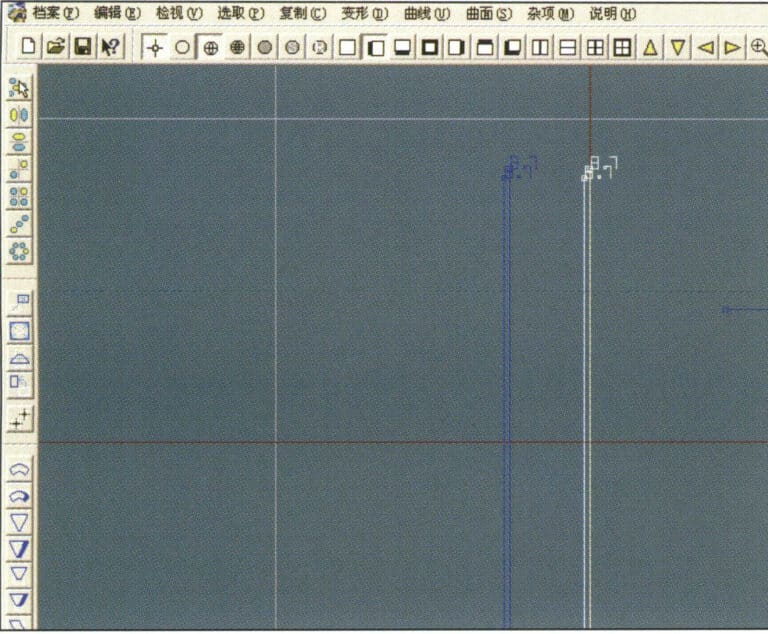
13. Select "Deformation" > "Move" from the menu bar to move the selected curve
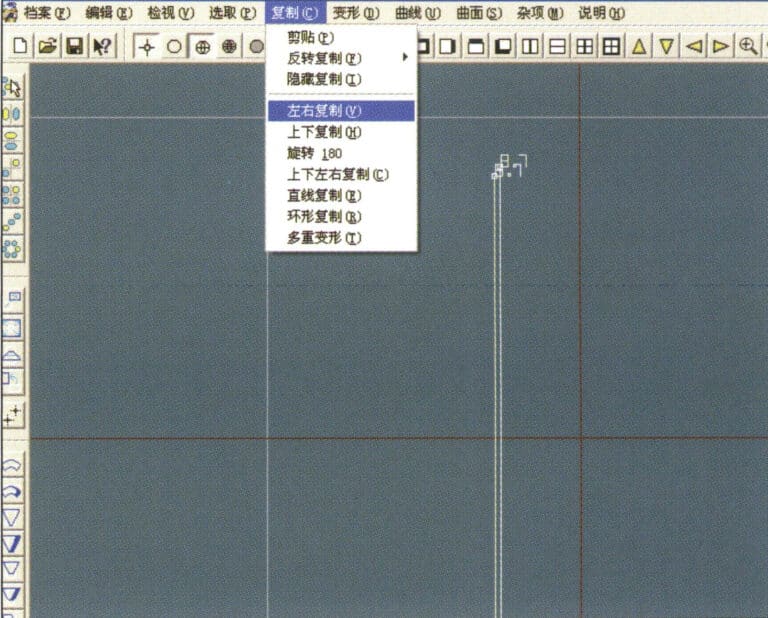
14. Select "Copy" > "Copy Left and Right" from the menu bar to copy the selected curve to the left and right
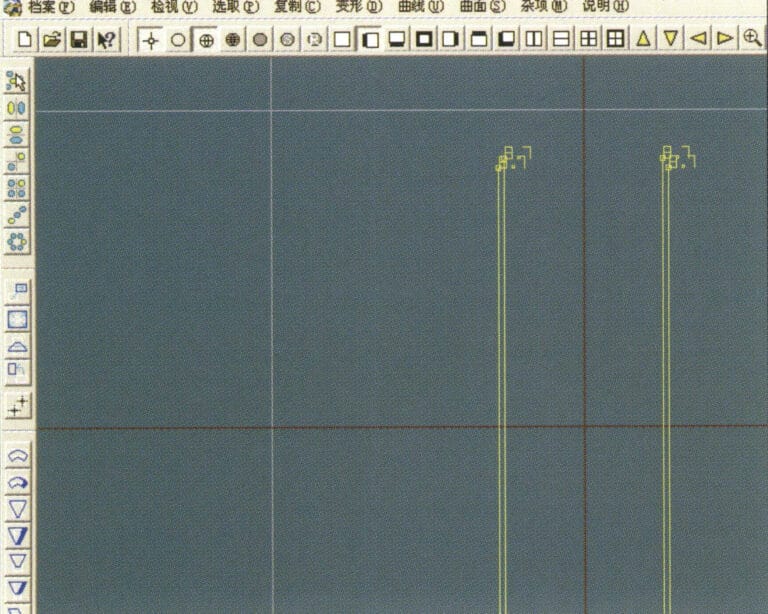
15.左右コピー後のエフェクト画像を表示する
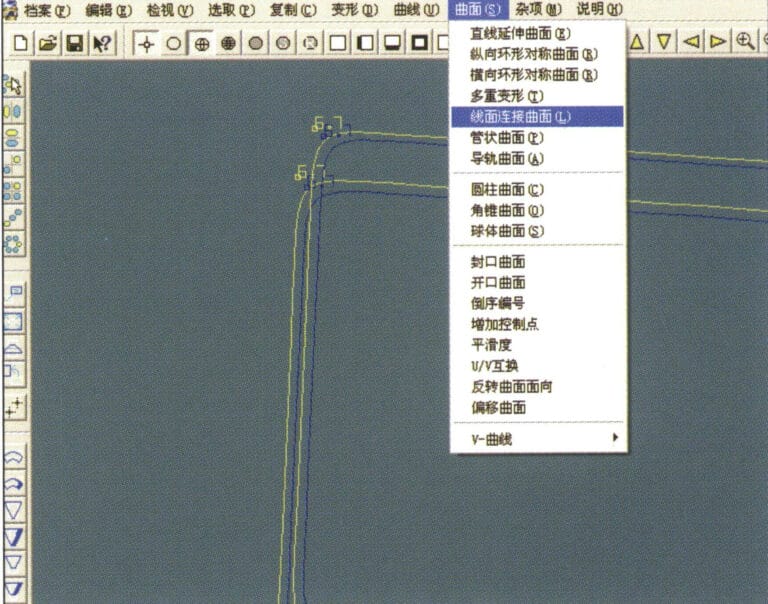
16. Select "Surface" > "Line-Surface Connection Surface" from the menu bar, and select the curve/surface to create a line-surface connection surface
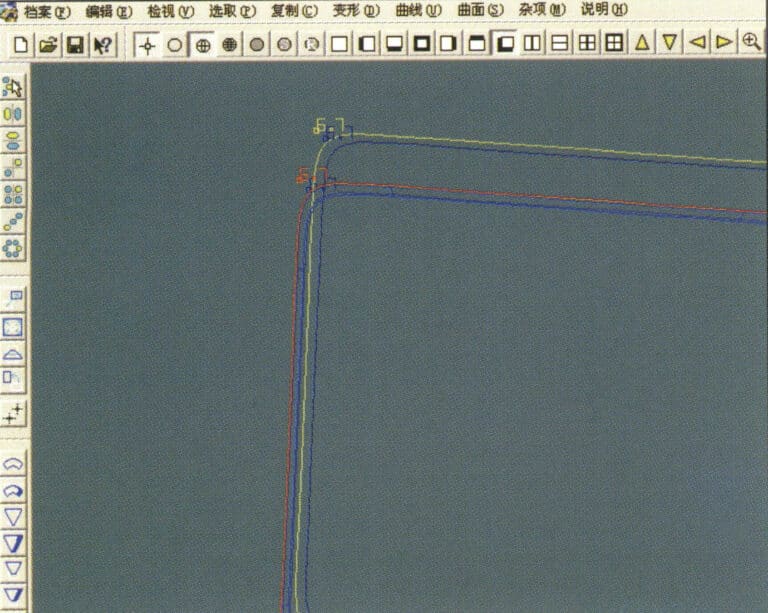
17. Select the menu bar "Surface" > "Curve Surface Connection," and double-click the first and second curves/surfaces with the left mouse button in a clockwise direction to create a curve surface connection
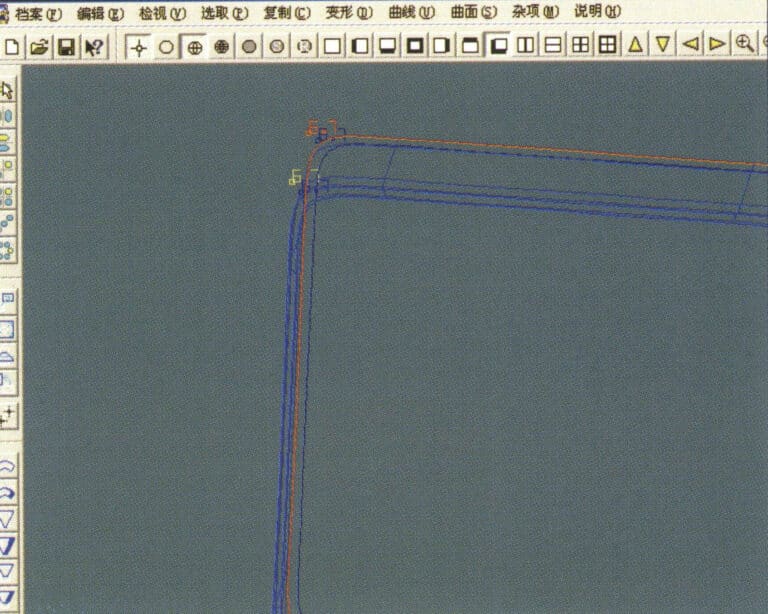
18.時計回りに、3つ目の曲線/曲面をマウスの左ボタンでダブルクリックし、線と面の接続を作成する。
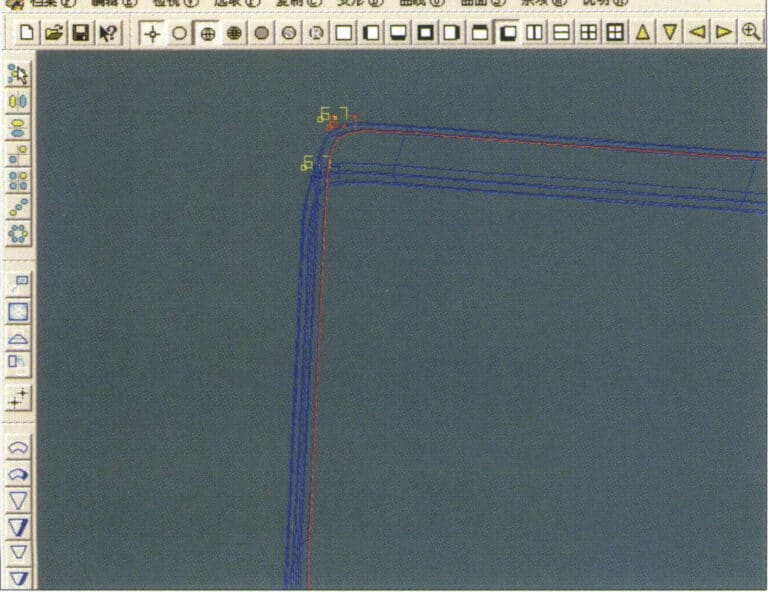
19.4つ目の曲線/曲面をマウスの左ボタンでダブルクリックし、線と面の接続を作成します。
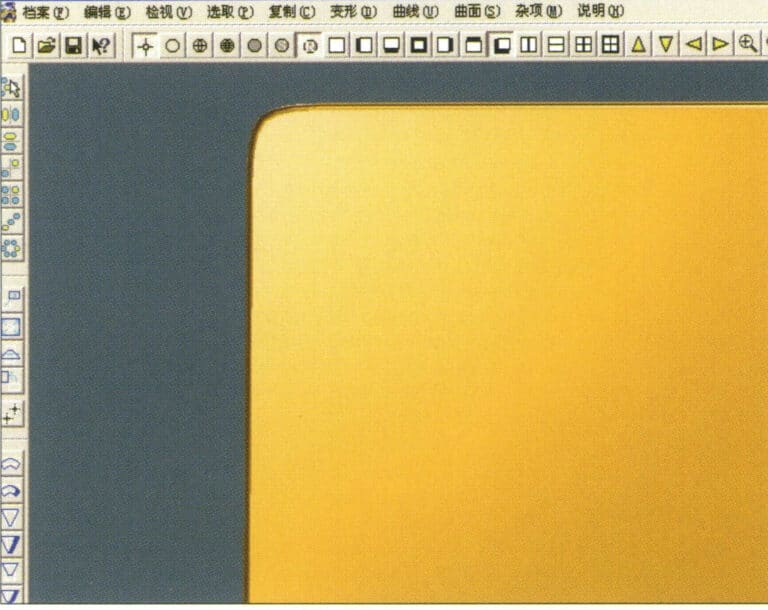
20. Select "View" > "Shadow Map" from the menu bar to inspect the shadow effects
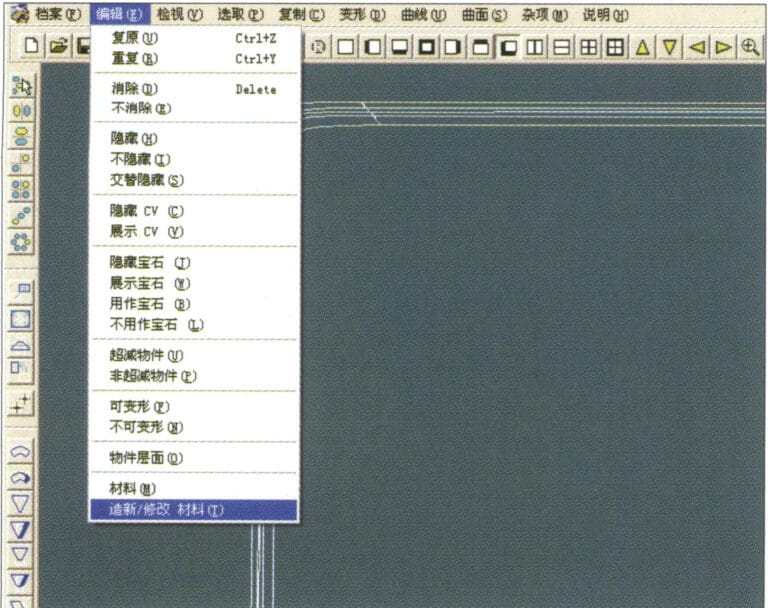
21. Select "Edit" > "Create/Modify Material" from the menu bar
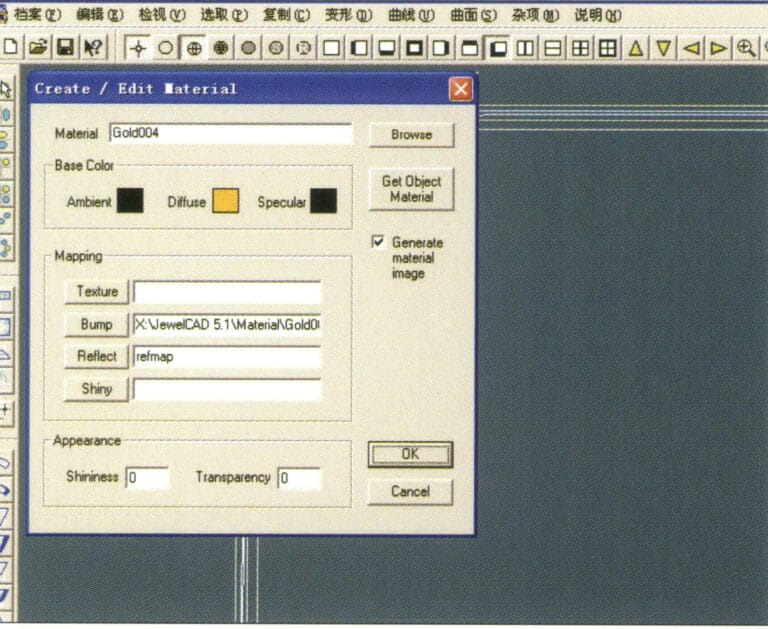
22.材料の作成/変更」ダイアログボックスに入り、該当する値を入力して確定します。
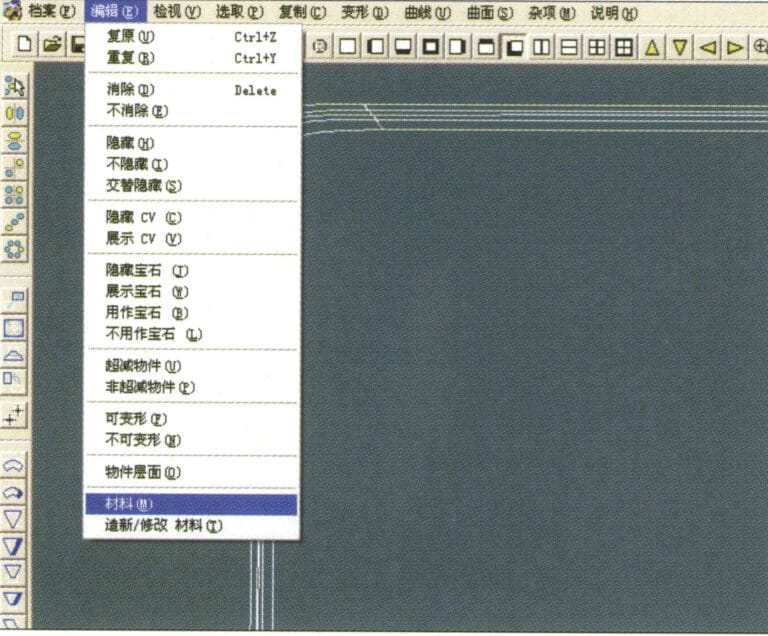
23. Select “Edit” > “Material” in the menu bar
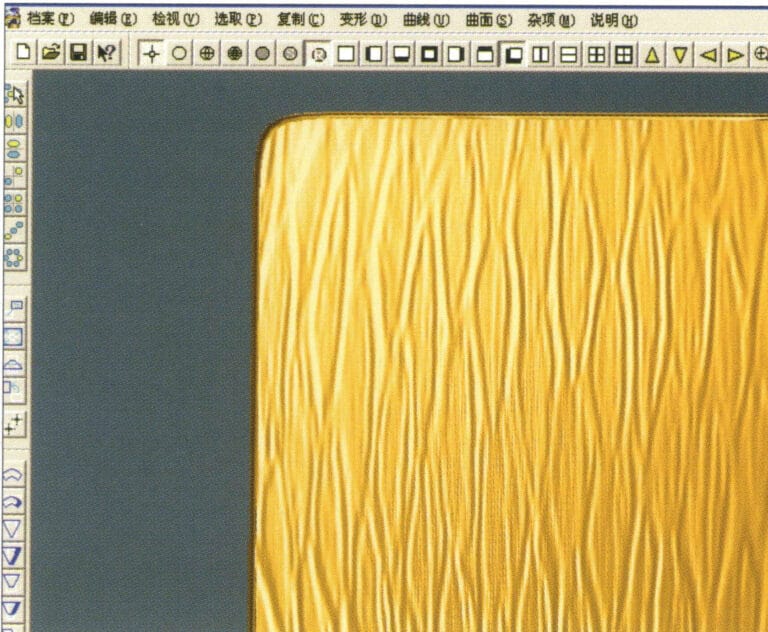
24. Select "View" > "Shadow Map" from the menu bar to examine the shadow effects
25. Select "File" > "Save As" from the menu bar to save the file
4.エンジンターンド仕上げ
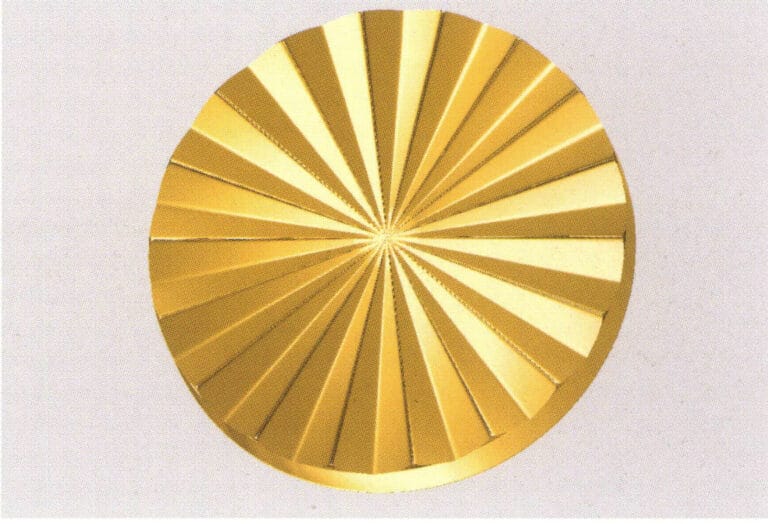

1. Create a new file in JewelCAD, select "Curve" > "Circular Curve" from the menu bar, enter the relevant values in the "Circular Curve" dialog box, and confirm
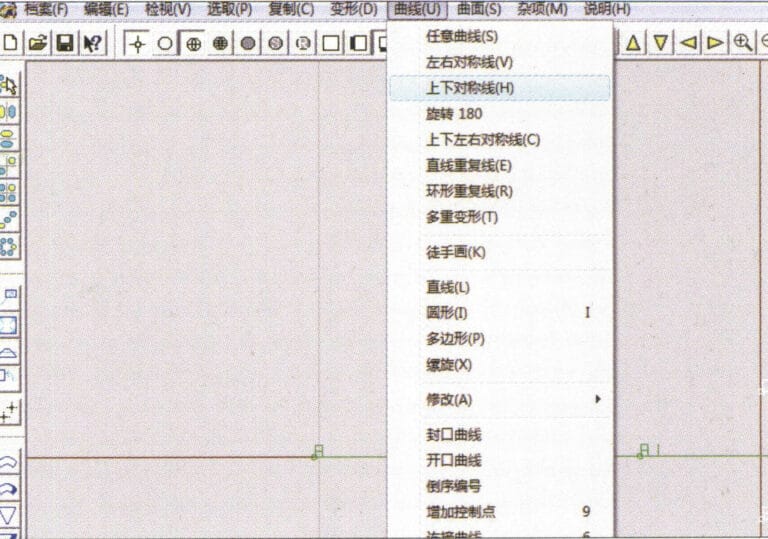
2. Select "Curve" > "Left-Right Symmetry Line" from the menu bar to draw a section
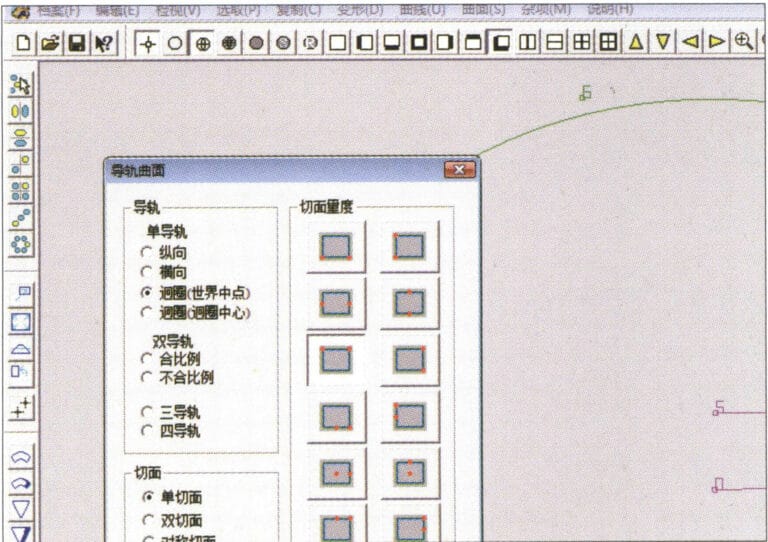
3. Select "Surface" > "Rail Surface" from the menu bar, enter "Rail Surface," select the relevant options and confirm; left-click on a curve as the section of the rail surface; left-click on another curve as the "Rail" > "Finish."

4. Select “View” > “Shadow Map” on the menu bar to view the light and shadow effects
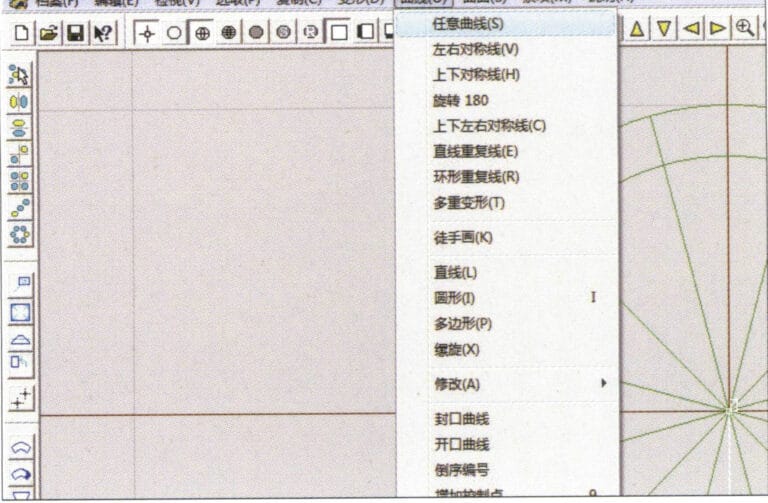
5. Select "Curve" > "Freefrom Curve" from the menu bar
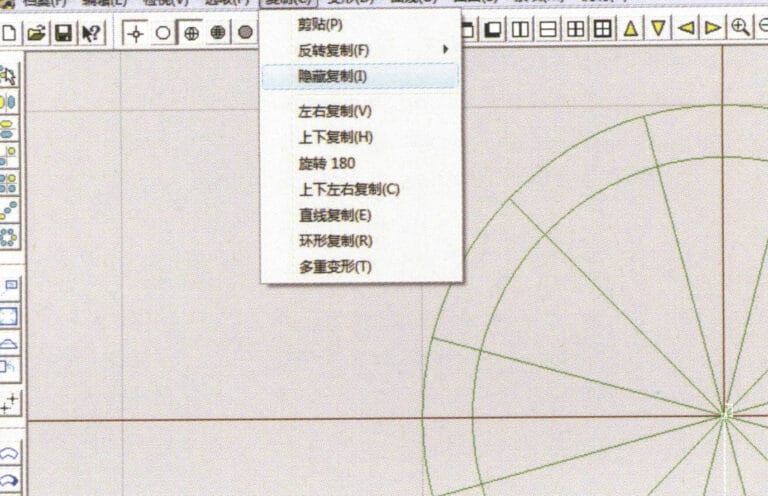
6. Select "Copy" > "Hide Copy" from the menu bar
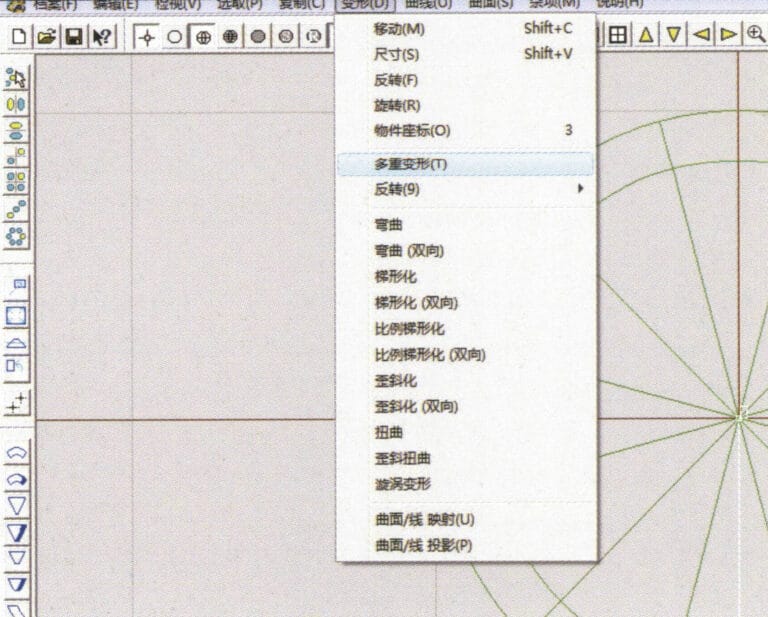
7. Select "Deformation" > "Multiple Deformation" from the menu bar
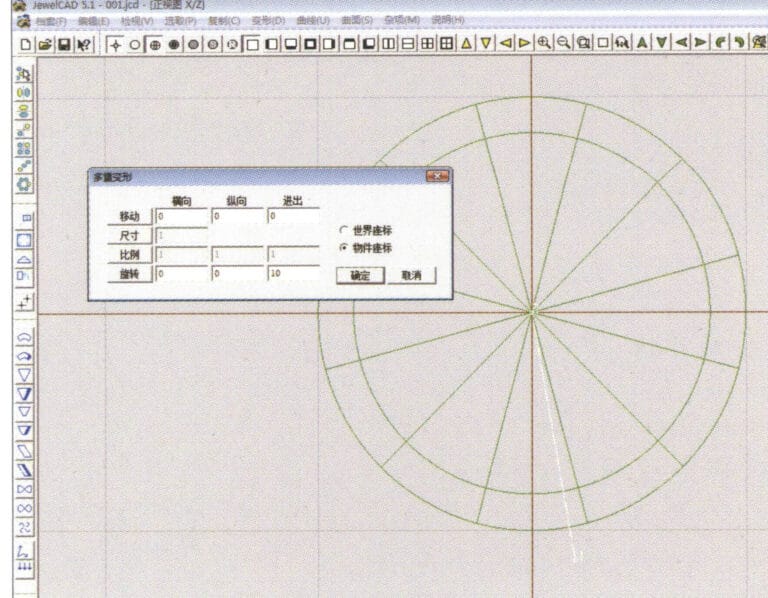
8.Multiple Deformation "ダイアログボックスに入り、関連する値を入力する。
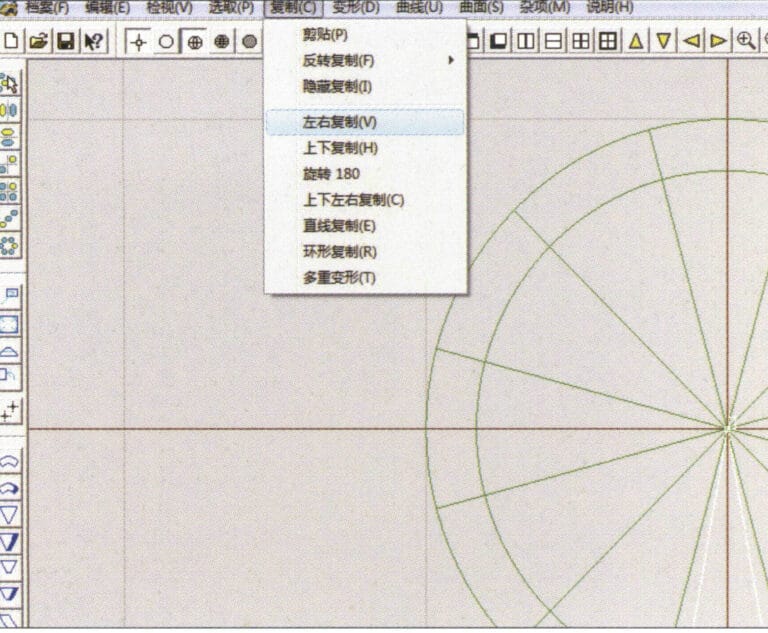
9. Select “Copy” > “Left/Right Copy” on the menu bar
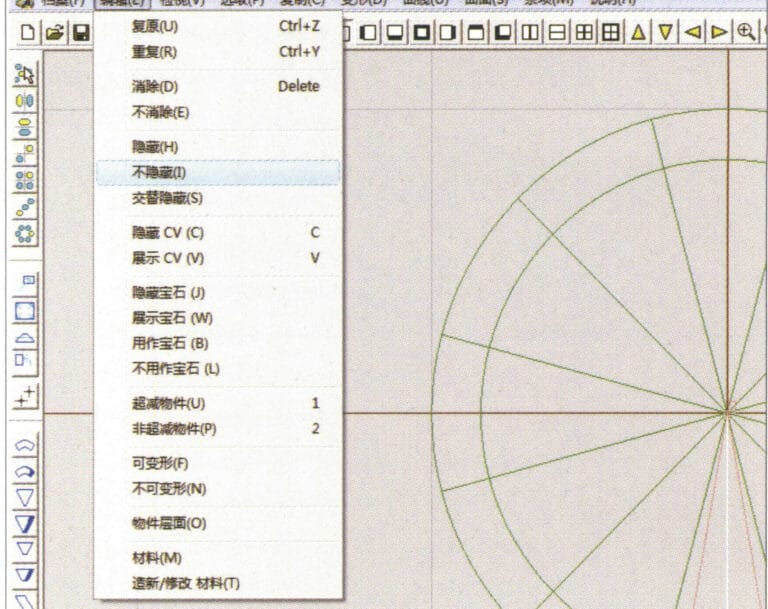
10. Select "Edit" > "Unhide" from the menu bar to display the hidden curves
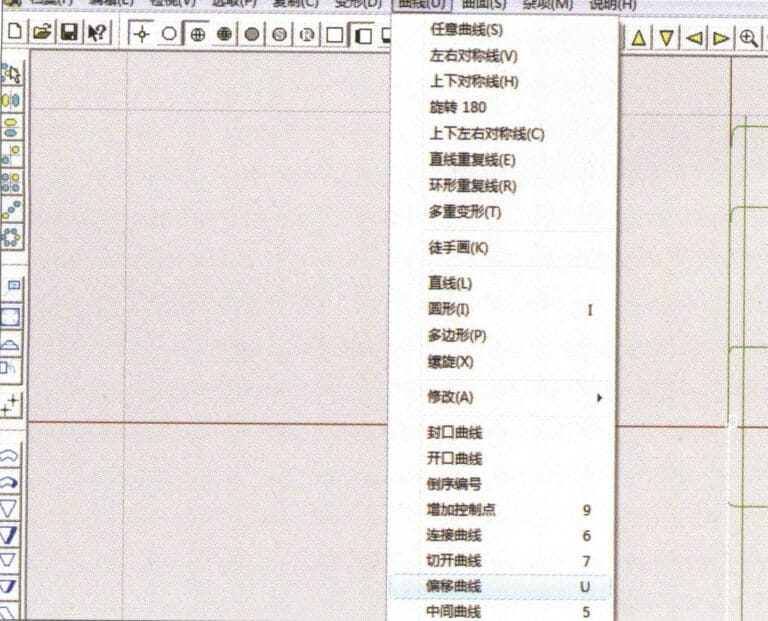
11. Select "Curve" > "Offset Curve" from the menu bar
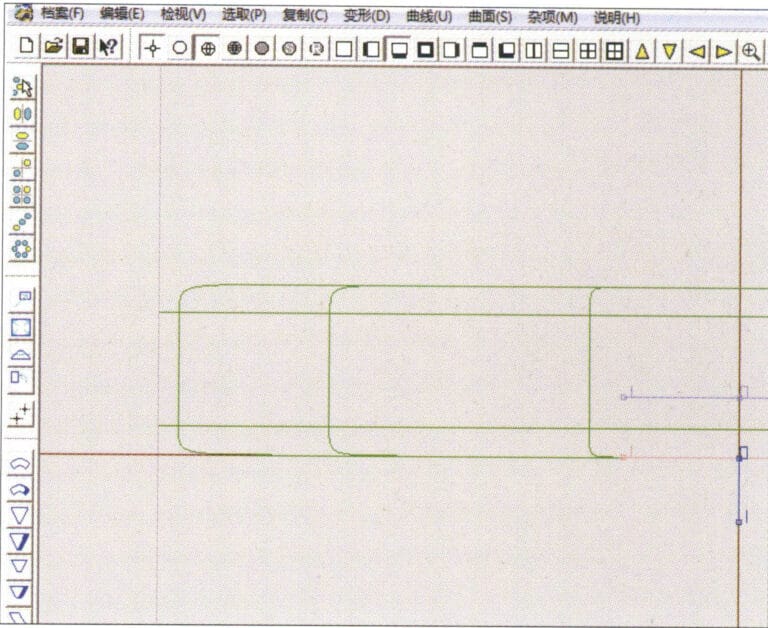
12. Select "Deformation" > "Move" from the menu bar to move the selected curve
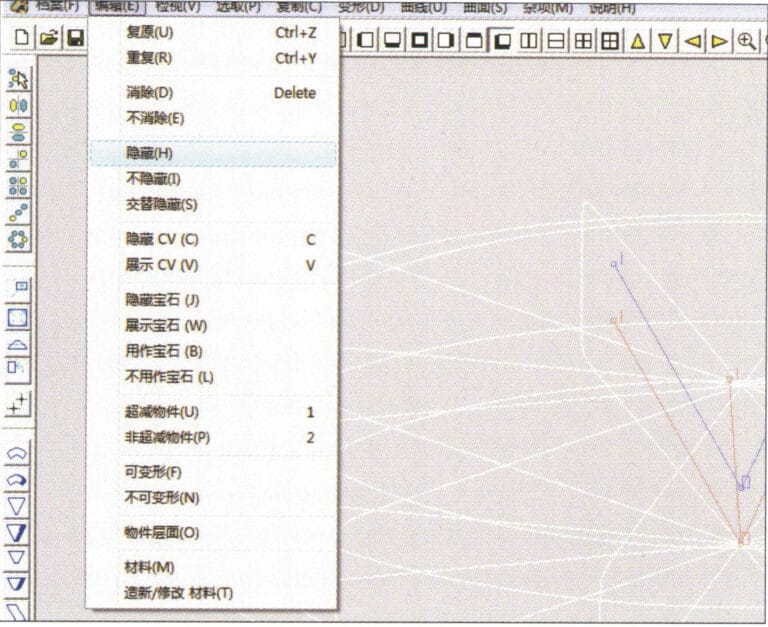
13. Select "Edit" > "Hide" from the menu bar to hide the circular surface
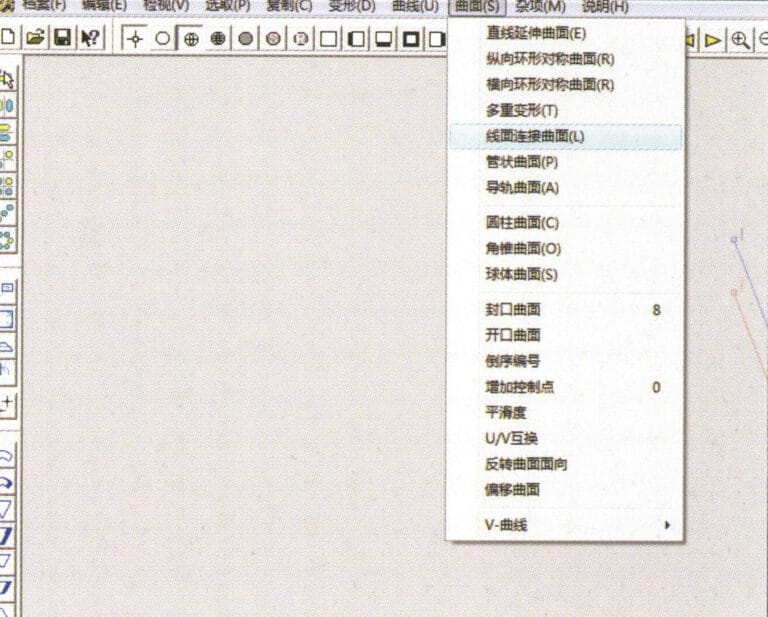
14. Select "Surface" > "Line Surface Connection Surface" from the menu bar

15.曲線/サーフェスを時計回りに選択し、線と面の接続を作成します。
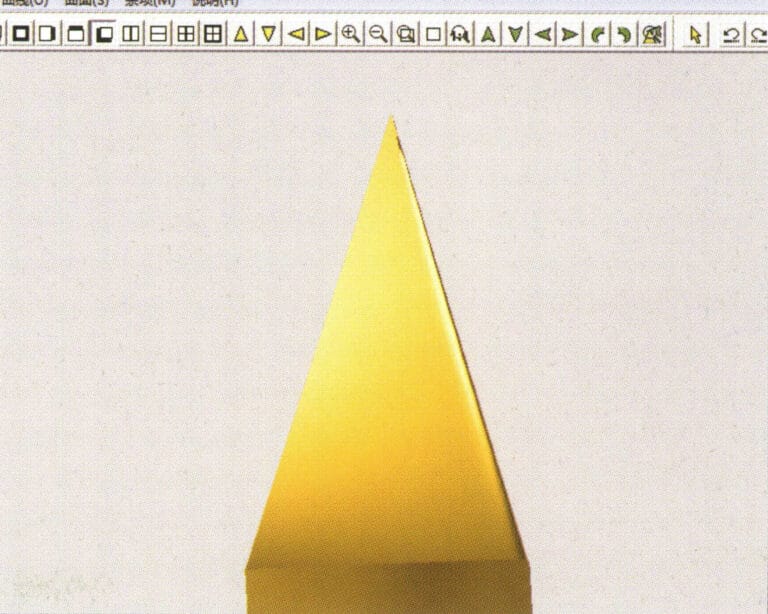
16. Select "View" > "Shadow Map" from the menu bar to inspect the shadow effects
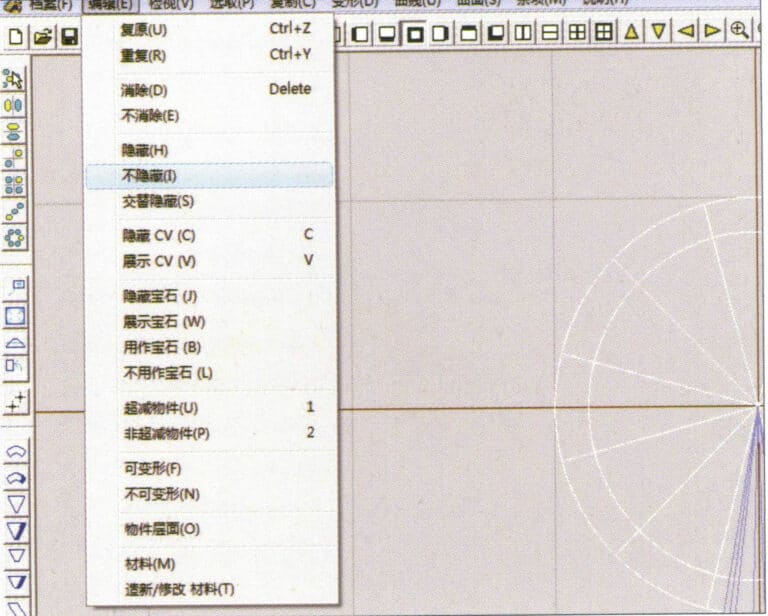
17. Select "Edit" > "Unhide" from the menu bar to display the hidden circular surfaces
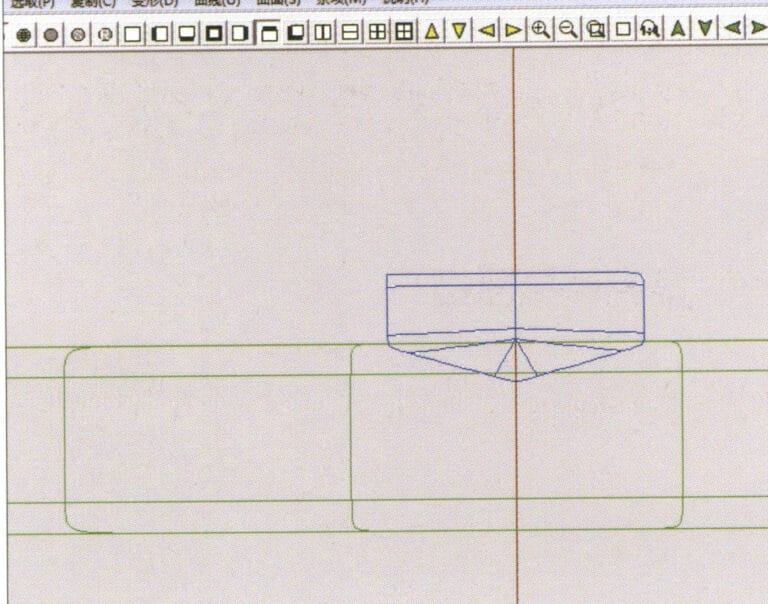
18. Select "Deformation" > "Move" from the menu bar to move the selected surface
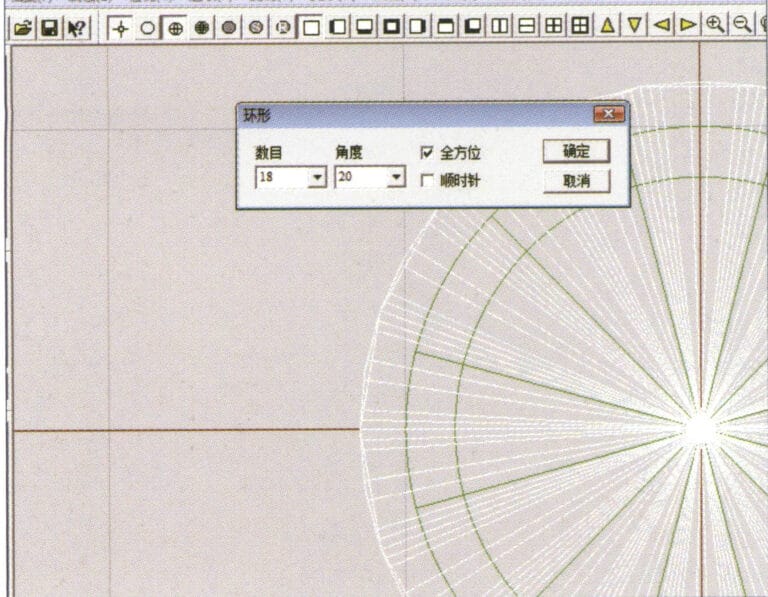
19. Select "Copy" > "Circular Copy" from the menu bar, enter the relevant values and confirm

20. Select “Miscellaneous” > “Boolean” > “Integrate” on the menu bar to integrate the selected surfaces.
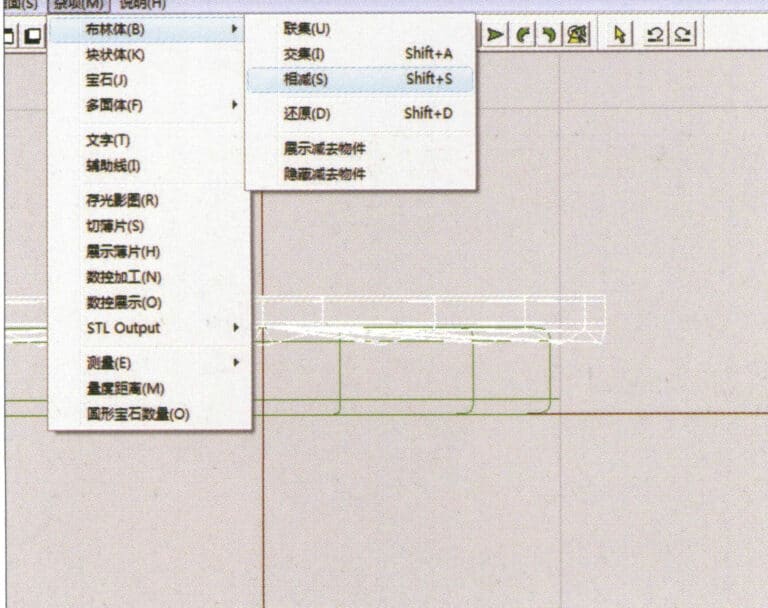
21. Select "Miscellaneous" > "Boolean" > "Subtract" from the menu bar to subtract the selected surface from the already united surface
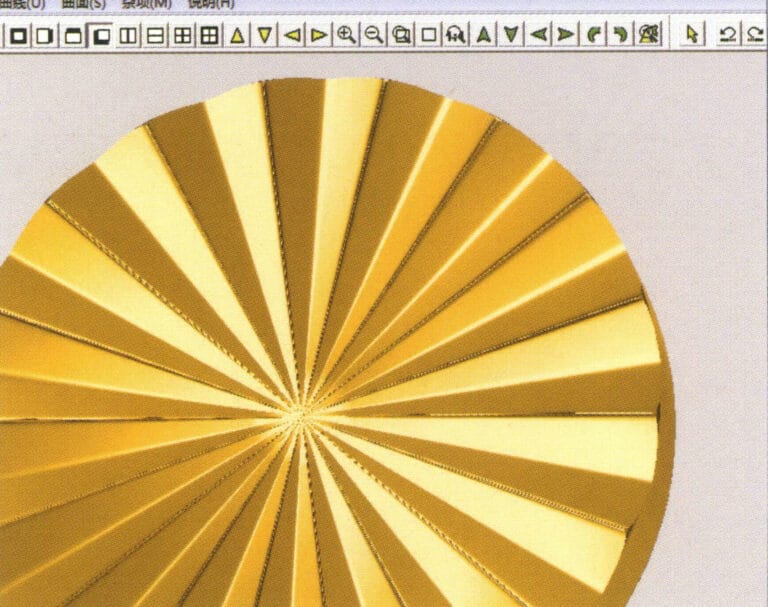
22. Select "View" > "Shadow Map" from the menu bar to inspect the shadow effects.
23. Select "File" > "Save File" from the menu bar to save the document
Section III JewelCADを使ってジュエリー・エフェクトを作る
1.ダイヤモンド・セッティング・リング
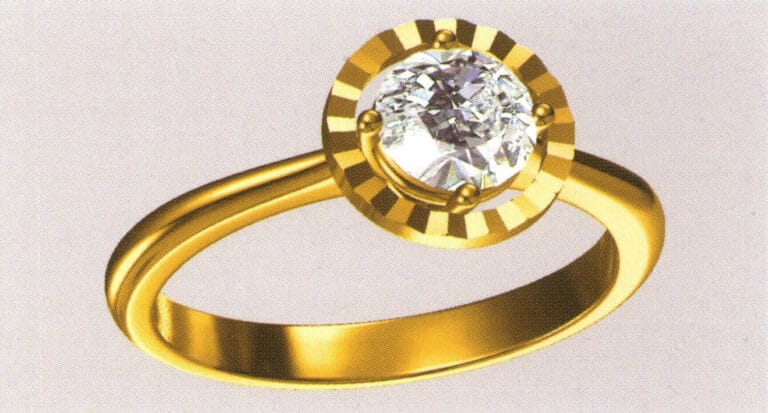
製造の手順は以下の通りである:
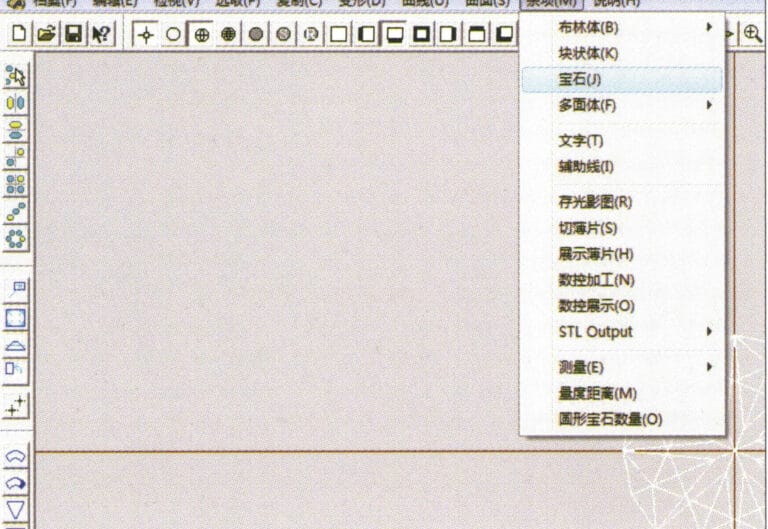
1. Create a new file in JewelCAD, select "Miscellaneous" > "Gem" from the menu bar

2. Select "Deformation" > "Multiple Deformation" from the menu bar
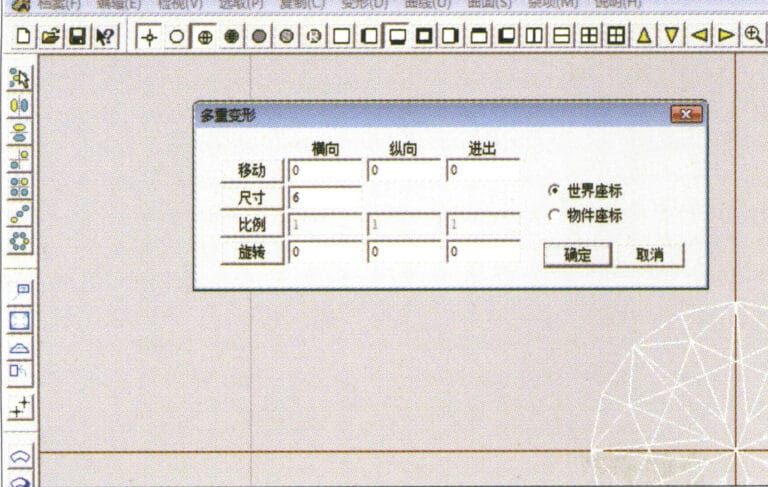
3.Multiple Deformation "ダイアログボックスに入り、関連する値を入力し、確定する。
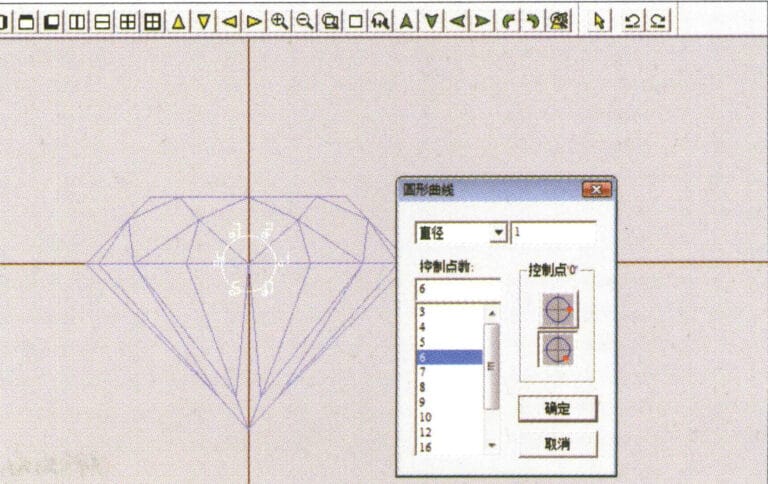
4. Select “Curve” > “Circular Curve” in the menu bar to enter the “Circular Curve” dialog box, enter the relevant values and confirm
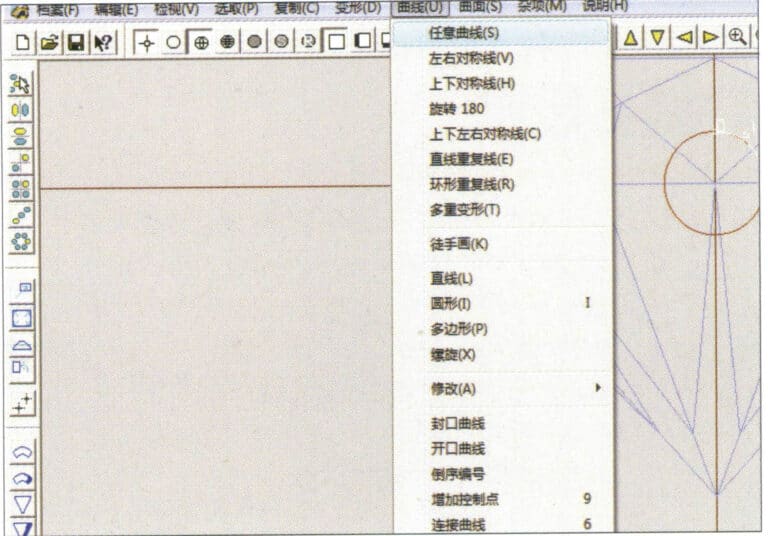
5. Select "Curve" > "Freeform Curve" from the menu bar to draw a claw-shaped guideline
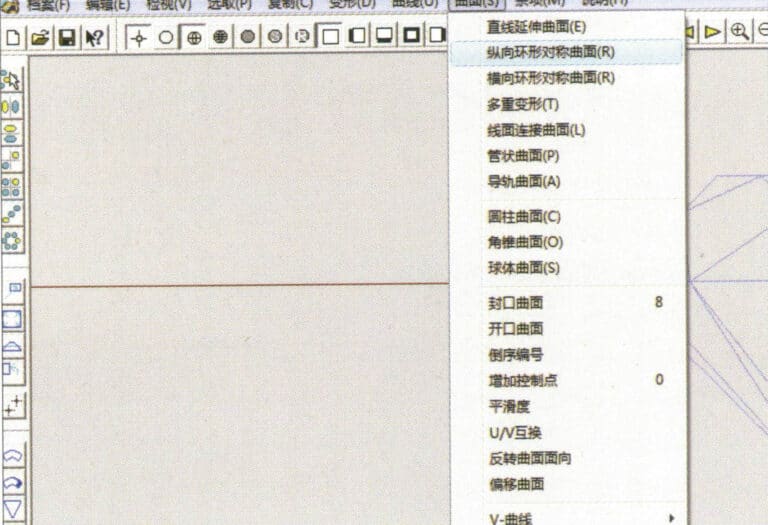
6. Select "Surface" > "Longitudinal Annular Symmetrical Surface" from the menu bar, and draw a claw shape
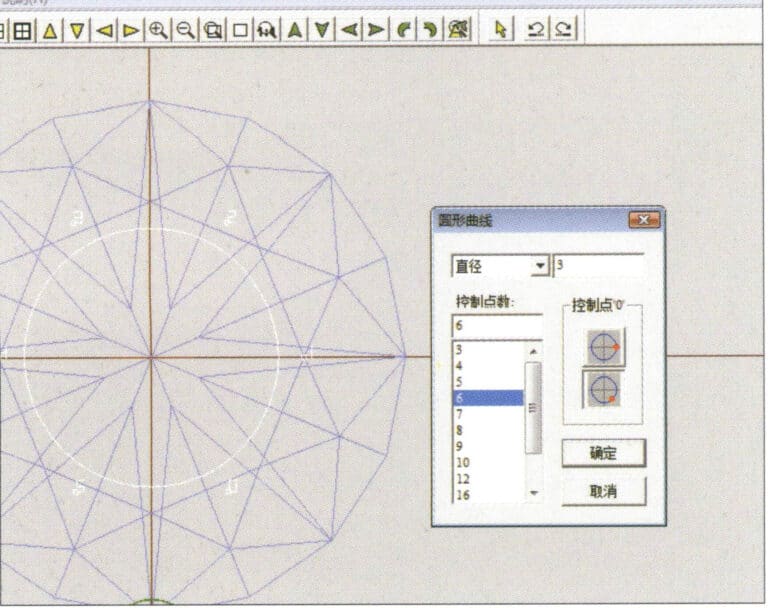
7. Select "Curve" > "Circular Curve" from the menu bar, enter the relevant values in the "Circular Curve" dialog box and confirm
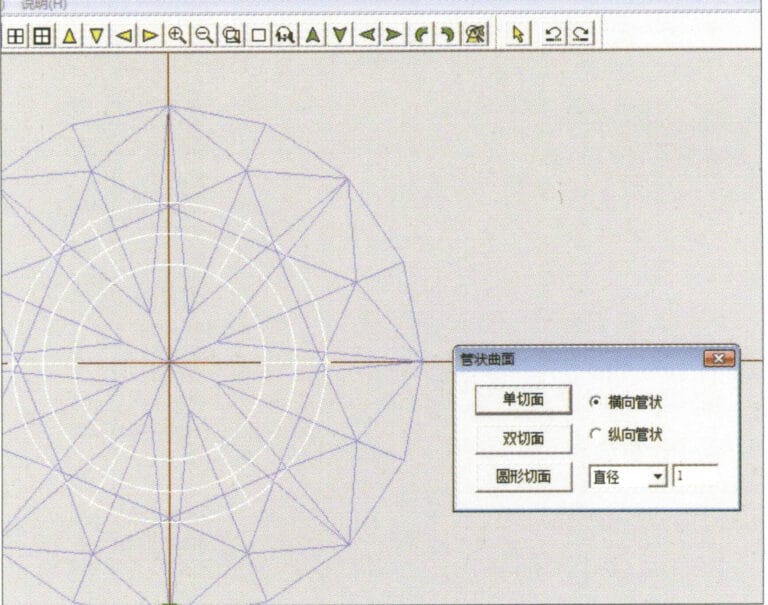
8. Select "Surface" > "Tubular Surface" from the menu bar, enter the relevant values and confirm
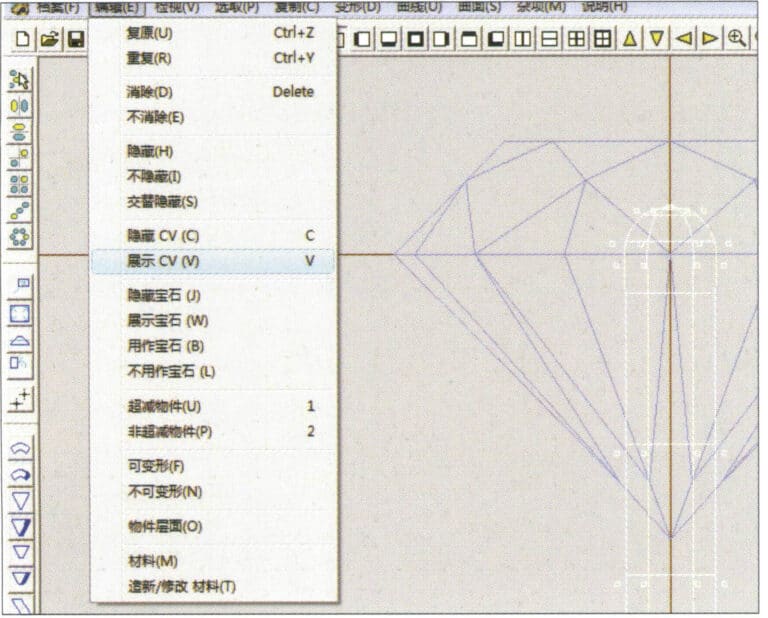
9. Select “Edit” > “Show CV” in the menu bar
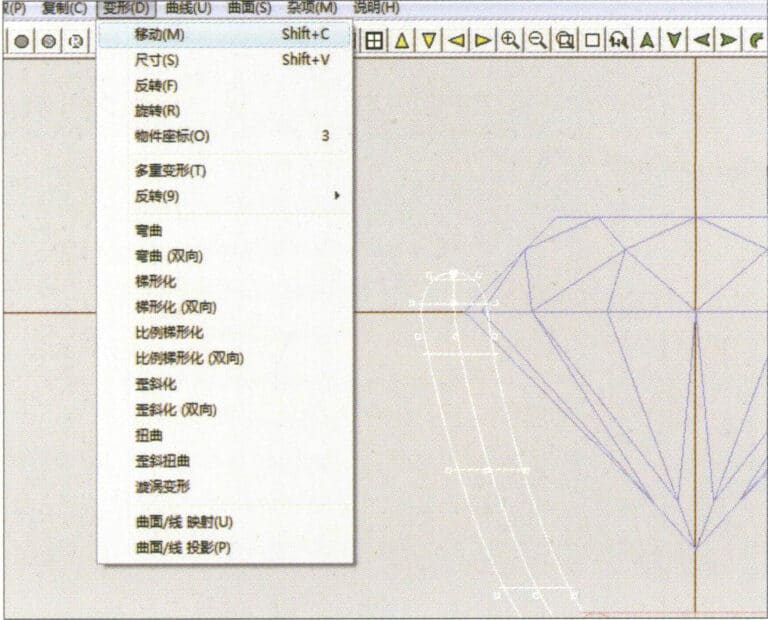
10. Select “Deformation” > “Move” in the menu bar to move the CV
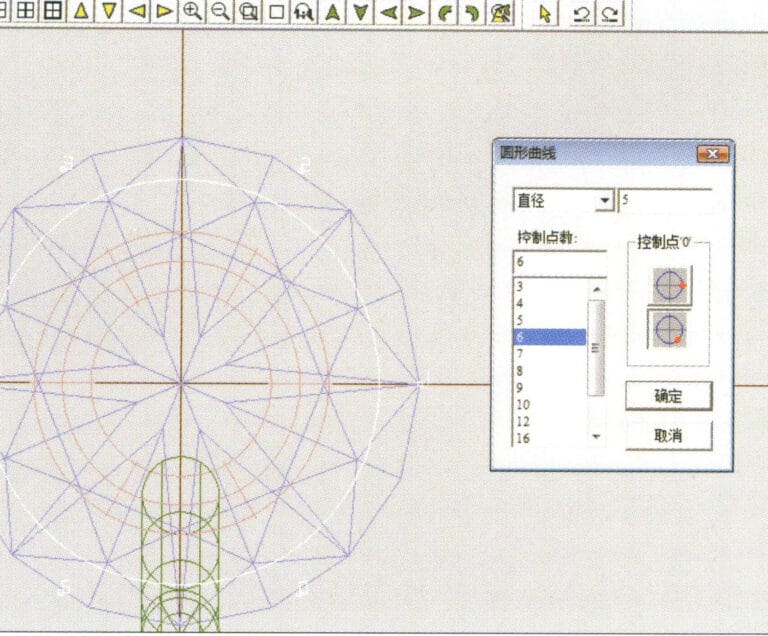
11. Select "Curve" > "Circular Curve" from the menu bar, enter the relevant values in the "Circular Curve" dialog box and confirm
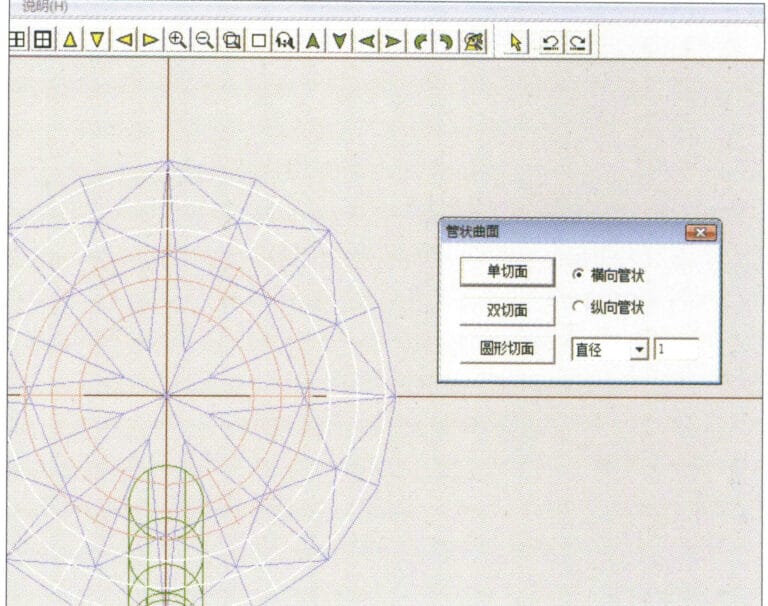
12. Select "Surface" > "Tubular Surface" from the menu bar, enter the relevant values and confirm
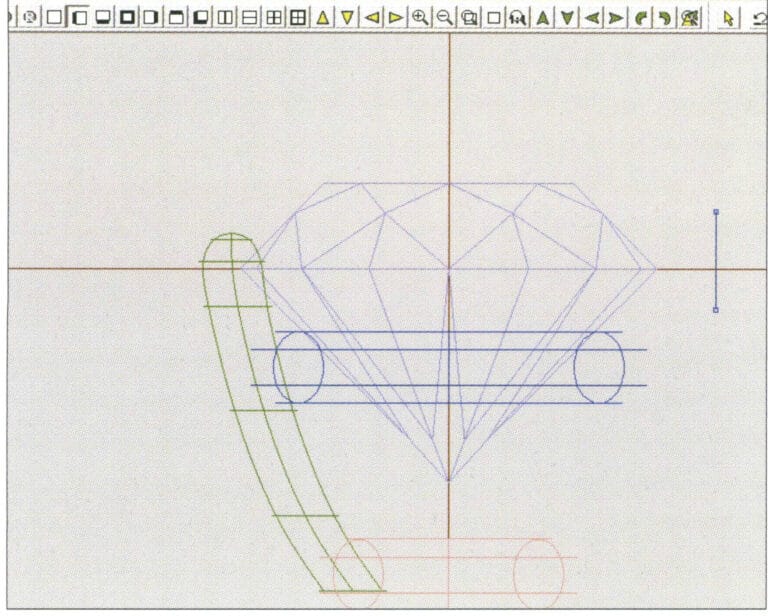
13. Select the menu bar "Edit" > "Move" to move the selected graphic

14. Select the completed claw shape, choose "Copy" > "Circular Copy" from the menu, enter the relevant values in the "Circular Copy" dialog box and confirm
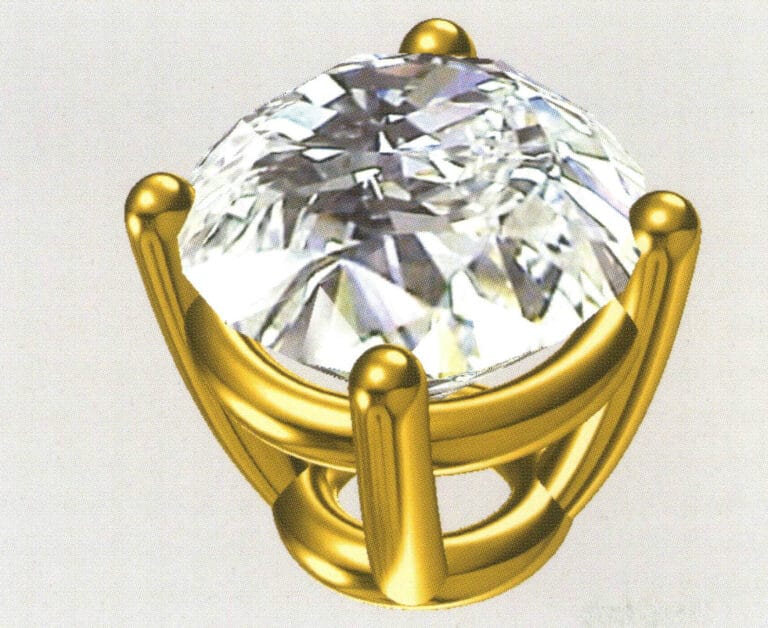
15. Select "View" > "Shadow Map" from the menu bar to inspect the shadow effects
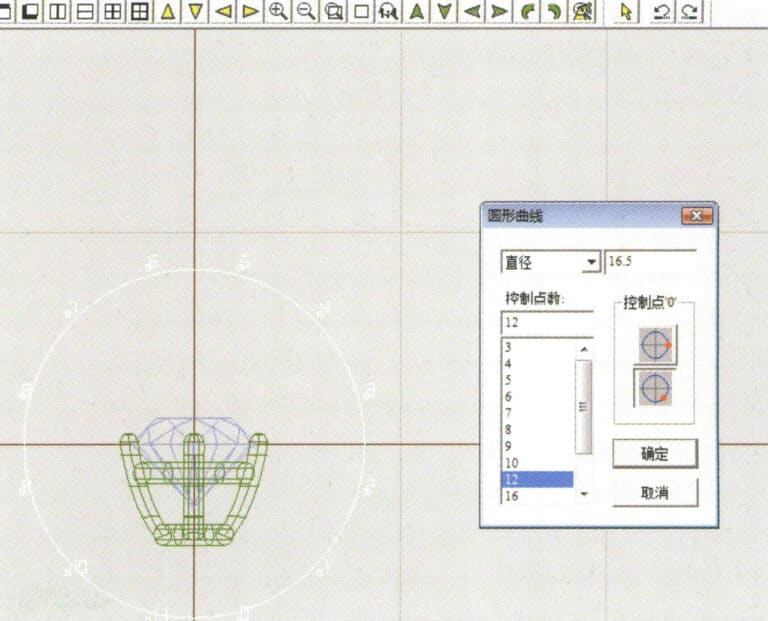
16. Select "Curve" > "Circular Curve" from the menu bar, enter the "Circular Curve" dialog box, and input the relevant values as the inner diameter of the ring shank
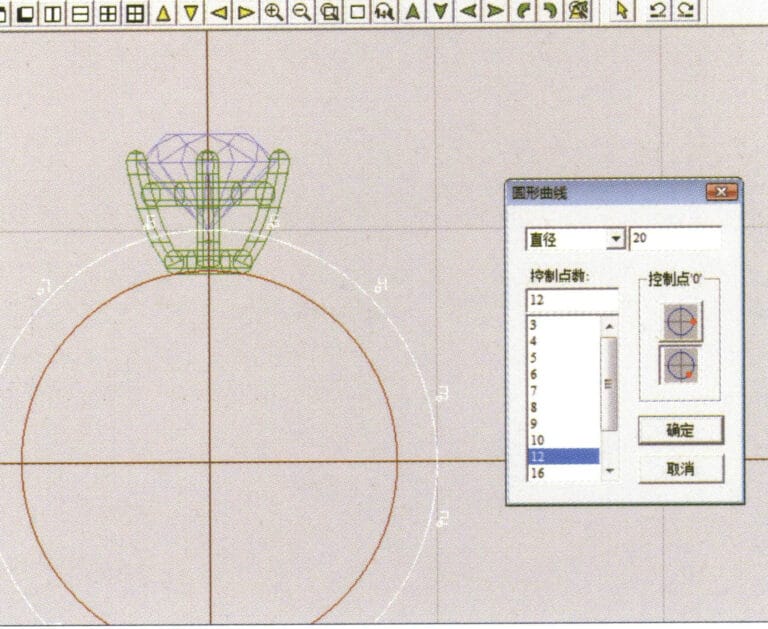
17. Select "Curve" > "Circular Curve" from the menu bar, enter the "Circular Curve" dialog box, and input the relevant values as the outer diameter of the ring shank

18. Select "Curve" > "Circular Curve" from the menu bar, enter the "Circular Curve" dialog box, and input the relevant values as the outer diameter of the engine-turned band
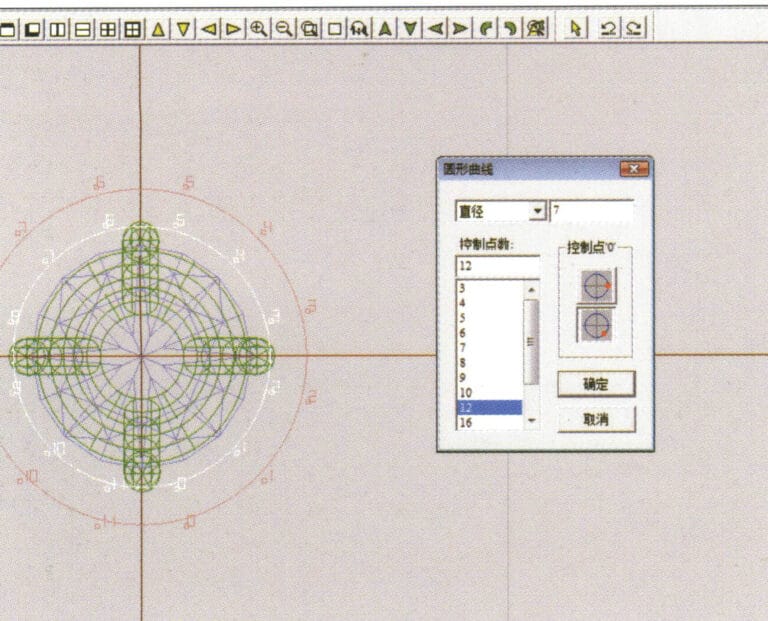
19. Select "Curve" > "Circular Curve" from the menu bar, enter the "Circular Curve" dialog box, and input the relevant values as the inner diameter of the engine-turned band
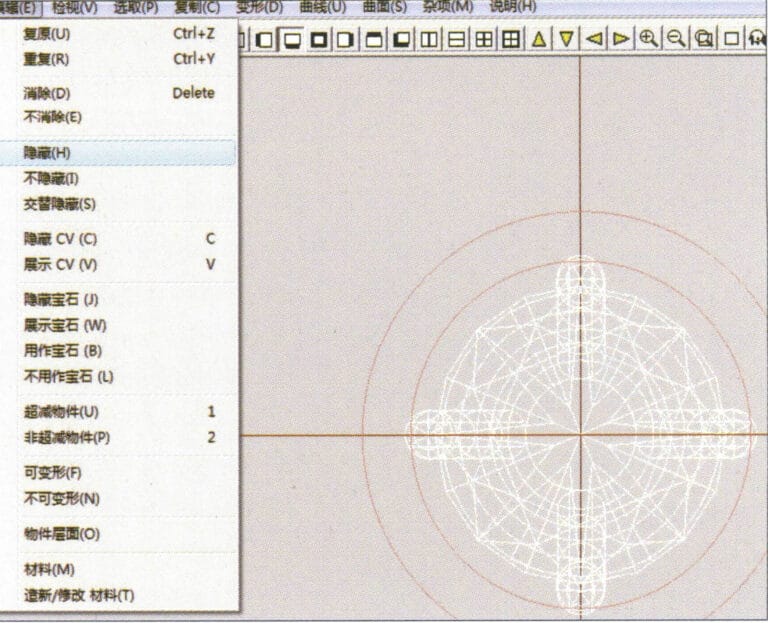
20. Select "Edit" > "Hide" from the menu bar to hide the completed gemstone inlay
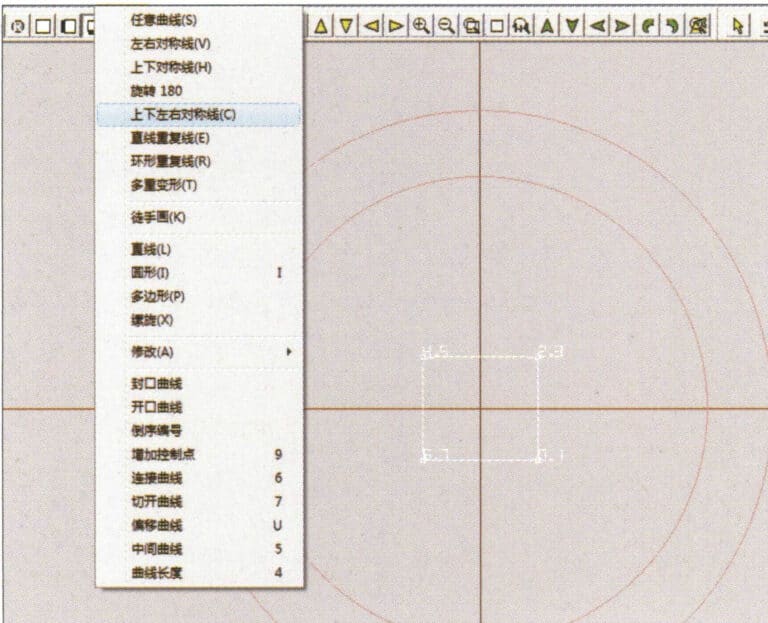
21. Select "Curve" > "Vertical and Horizontal Symmetry Line" from the menu bar
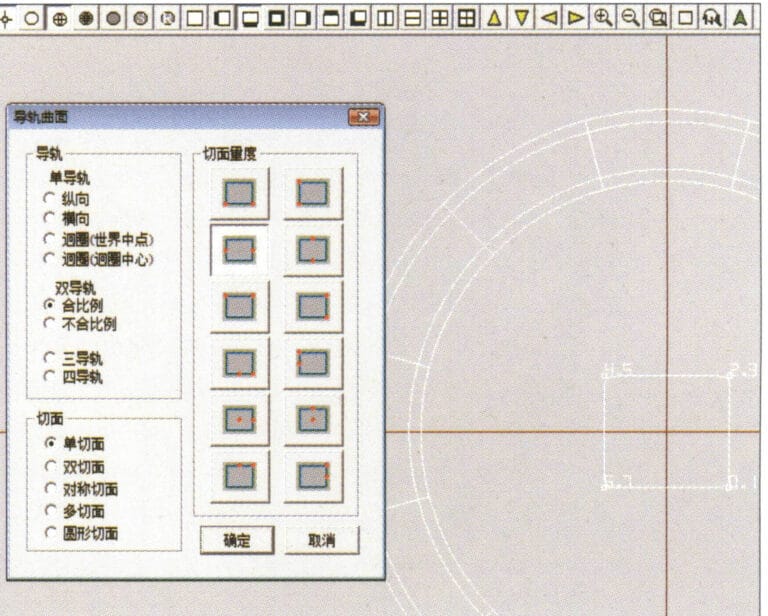
22. Select "Surface" > "Rail Surface" from the menu bar to enter the "Rail Surface" dialog box, select the relevant options and confirm
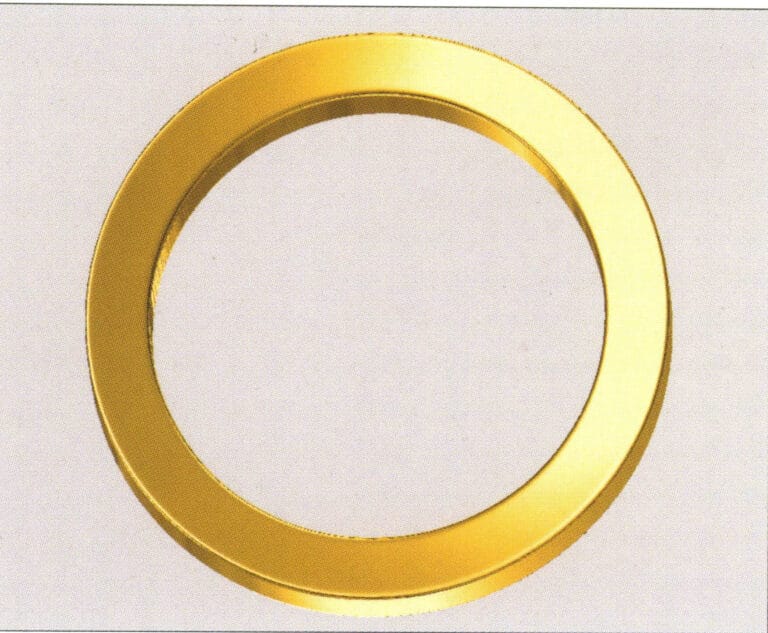
23. Select "View" > "Shadow Map" from the menu bar to inspect the shadow effects
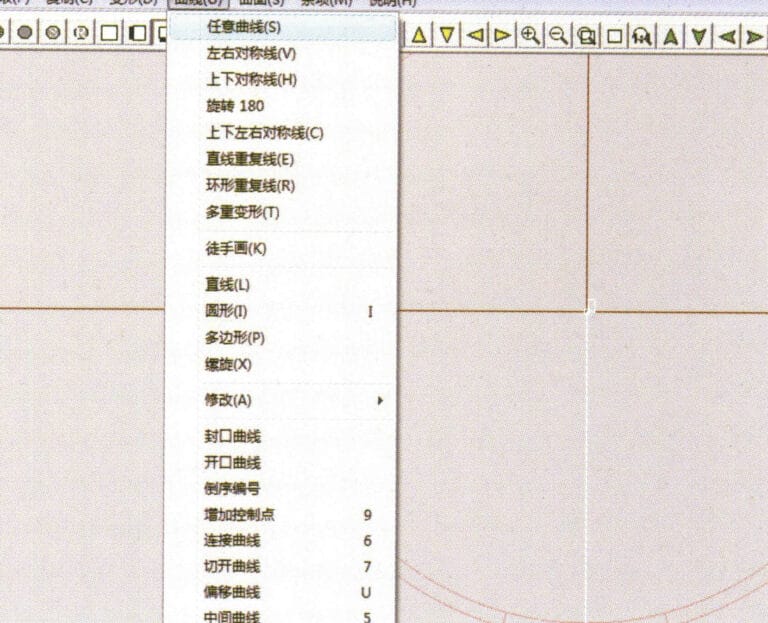
24. Select "Curve" > "Freeform Curve" from the menu bar to draw a guideline

25. Select "Copy" > "Hide Copy" from the menu bar to copy the already drawn auxiliary lines
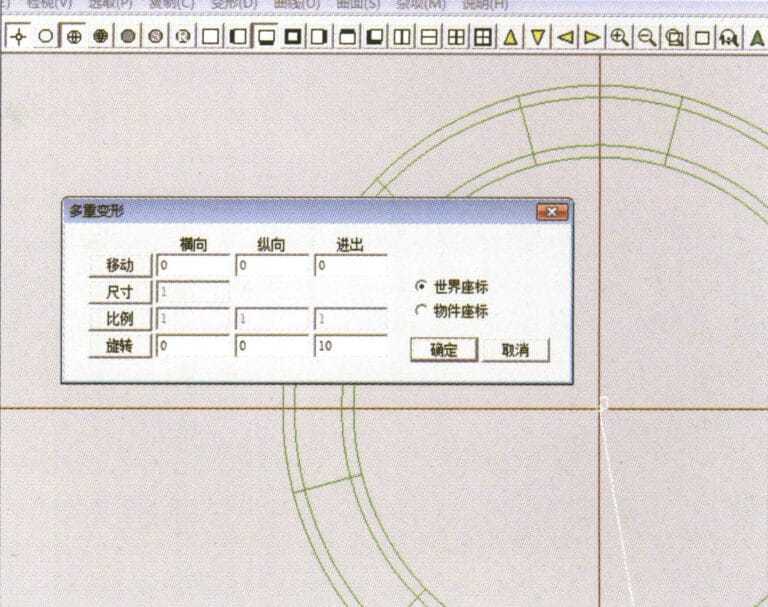
26. Select “Deformation” > “Multiple Deformation” in the menu bar to enter the “Multiple Deformation” dialog box, enter the relevant values and confirm
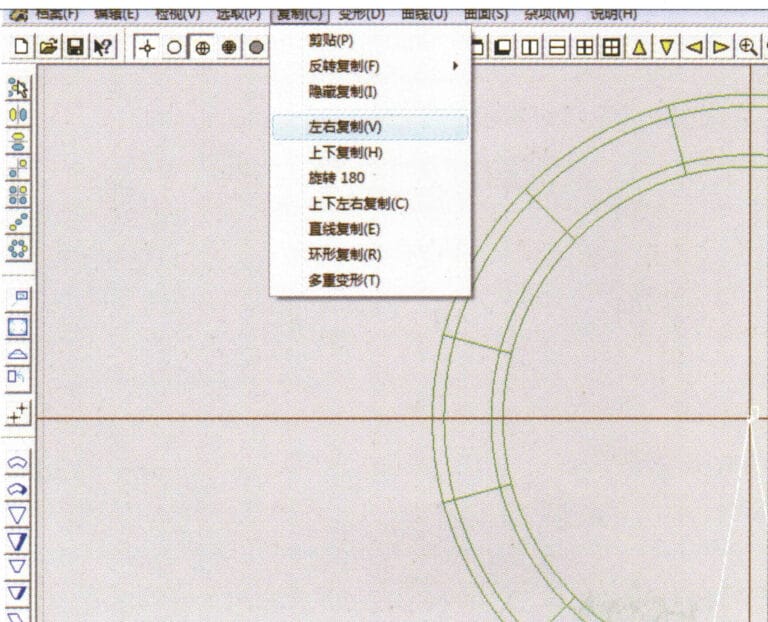
27. Select “Copy” > “Copy Up and Down” in the menu bar to copy the drawn auxiliary lines
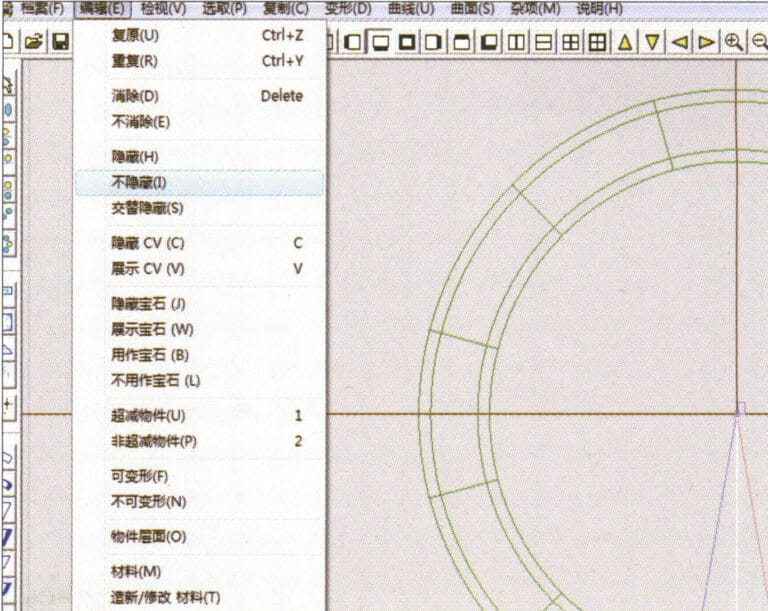
28. Select "Edit" > "Unhide" from the menu to display the hidden curves
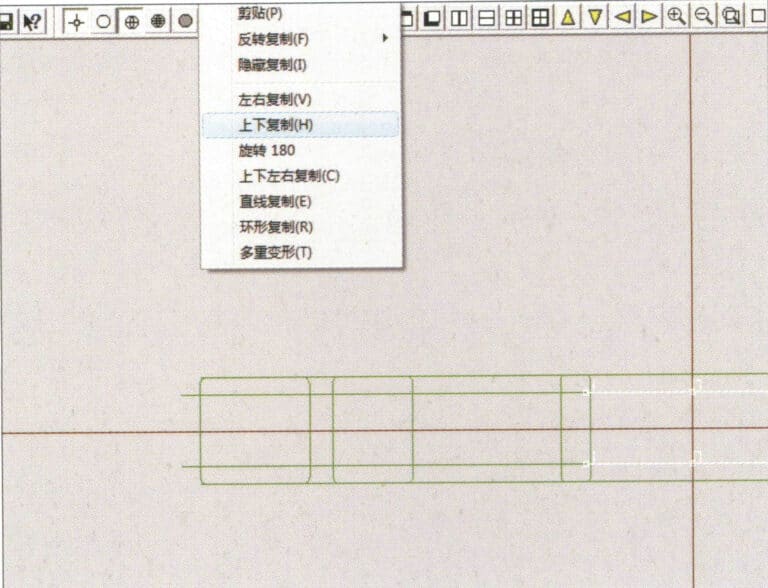
29. Select "Copy" > "Copy Up and Down" from the menu bar to copy the selected curve
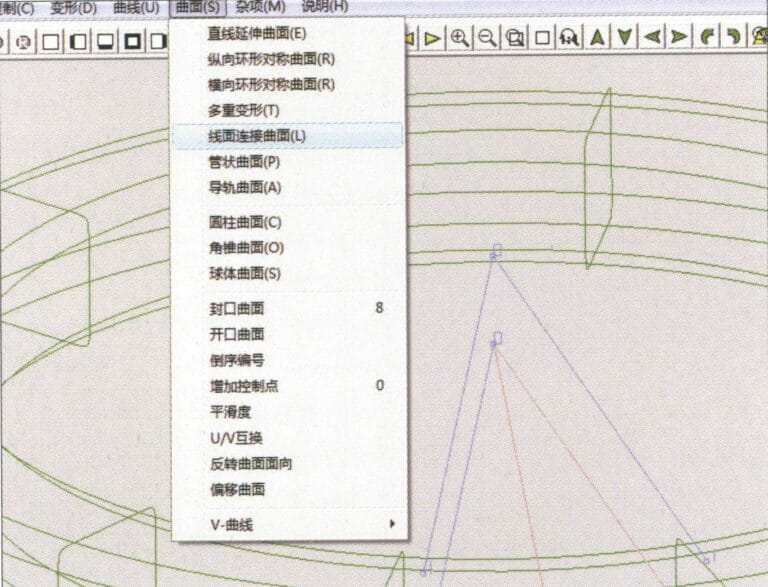
30. Select curves/surfaces in a clockwise direction to create line-surface connections, then select "Surface" > "Cap Surface" from the menu bar
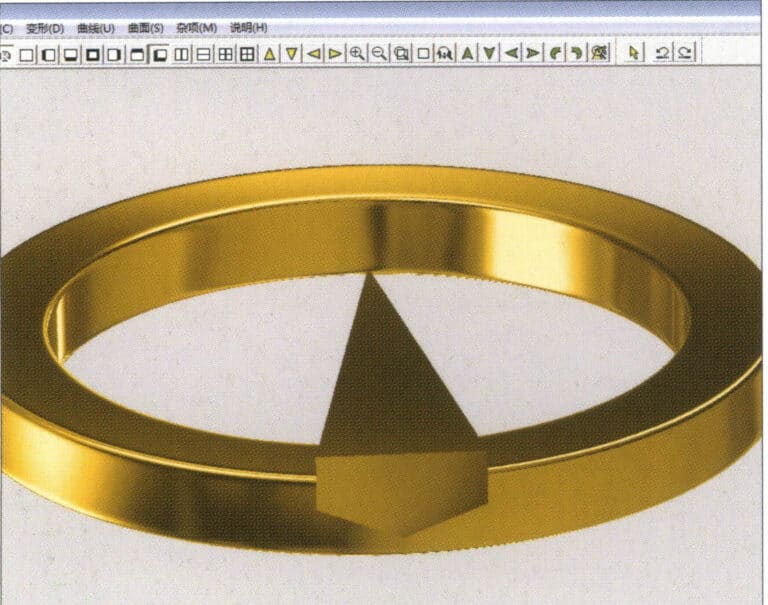
31. Select "View" > "Shadow Map" from the menu bar to inspect the shadow effects
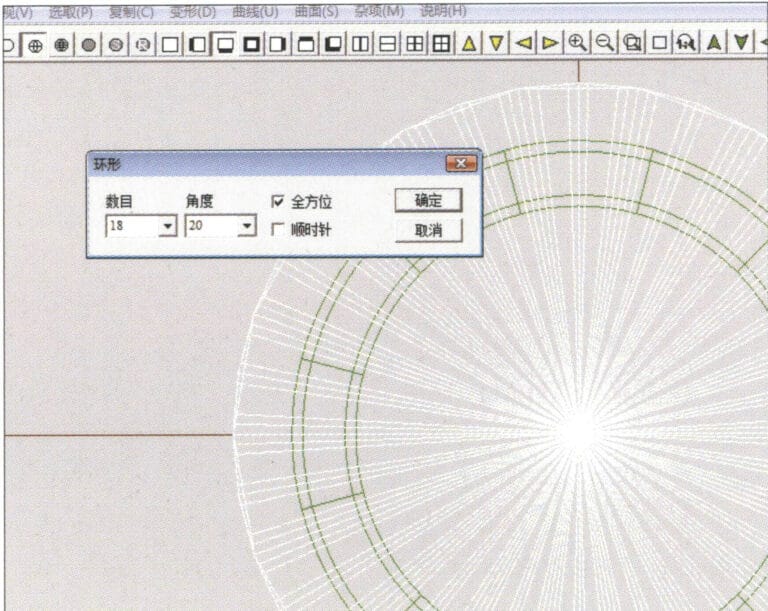
32. Select "Copy" > "Circular Copy" from the menu bar, enter the relevant values and confirm
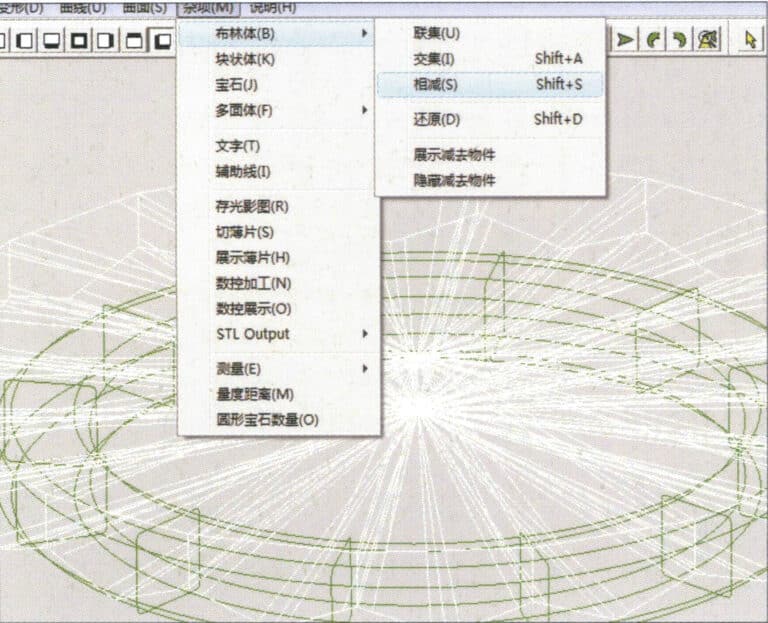
33. Select "Miscellaneous" > "Boolean" > "Subtract" from the menu bar to subtract the selected surface from the already united surface
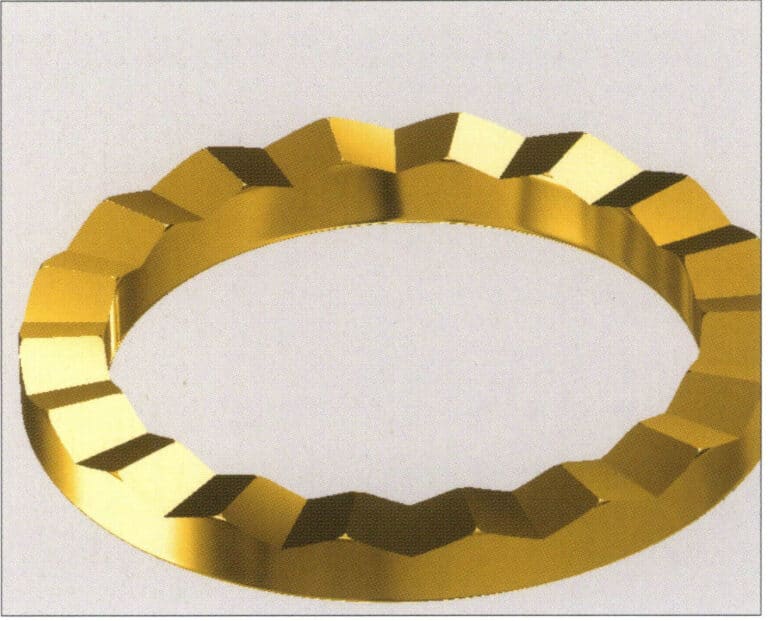
34. Select "View" > "Shadow Map" from the menu bar to inspect the shadow effects
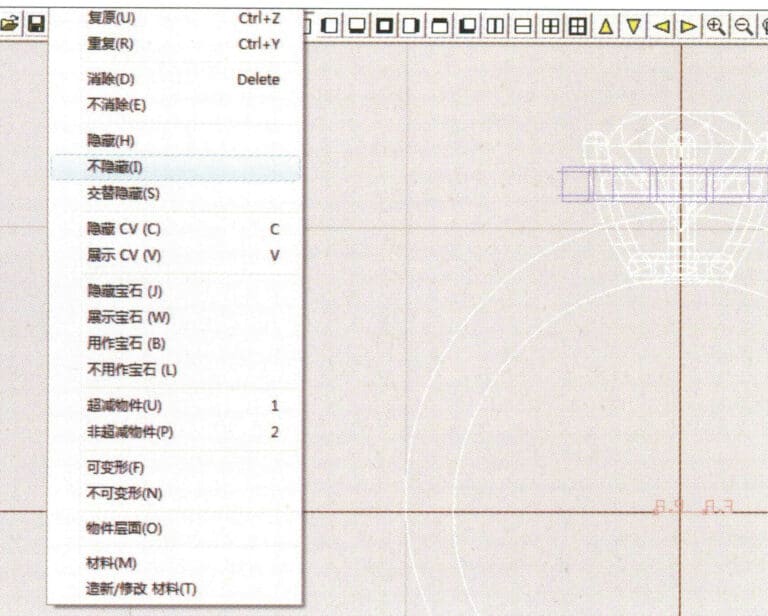
35. Select "Edit" > "Unhide" from the menu bar to display the hidden objects
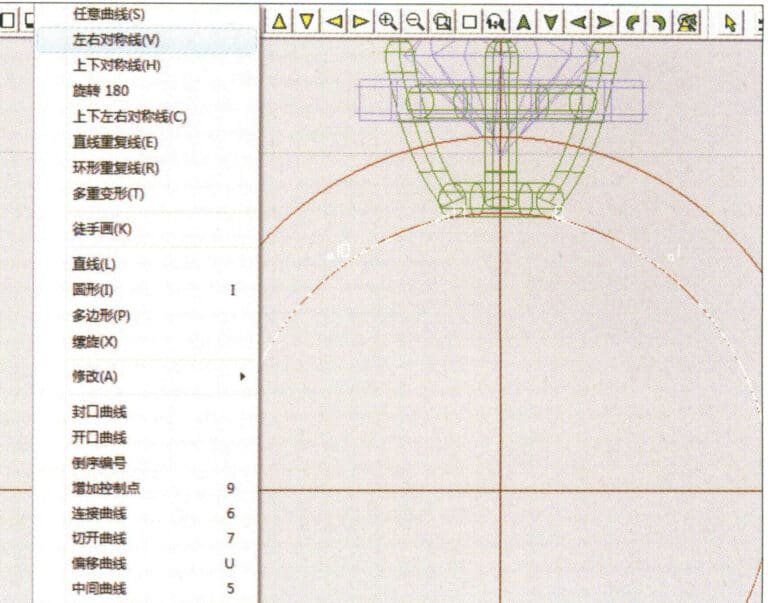
36. Select "Curve" > "Left-Right Symmetry Line" from the menu bar to draw the inner diameter of the ring wall
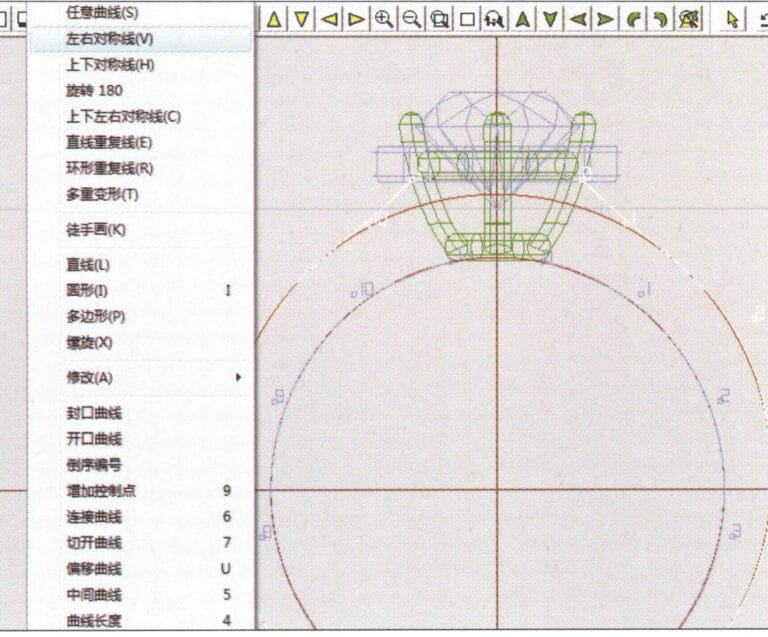
37. Select "Curve" > "Left-Right Symmetry Line" from the menu bar to draw the outer diameter of the ring wall
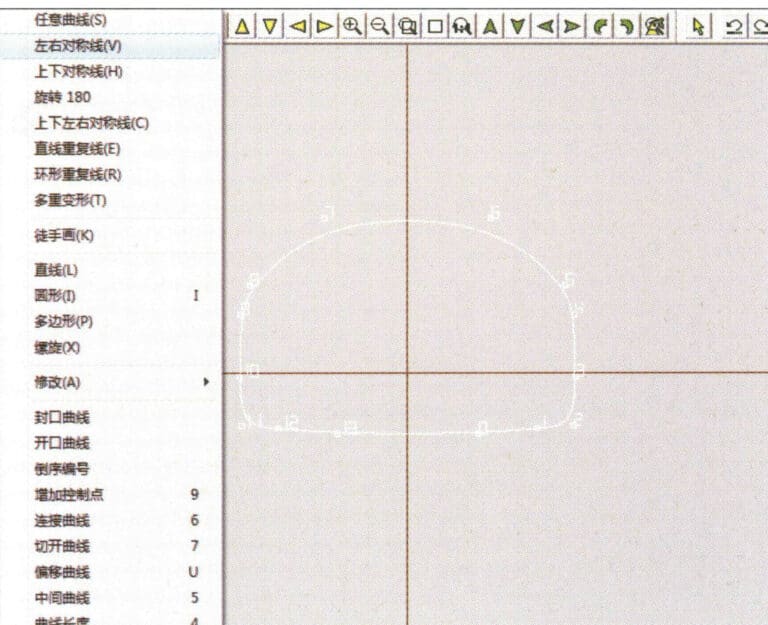
38. Select “Curve” > “Left-Right Symmetry Line” in the menu bar to draw a cutout of the ring shank
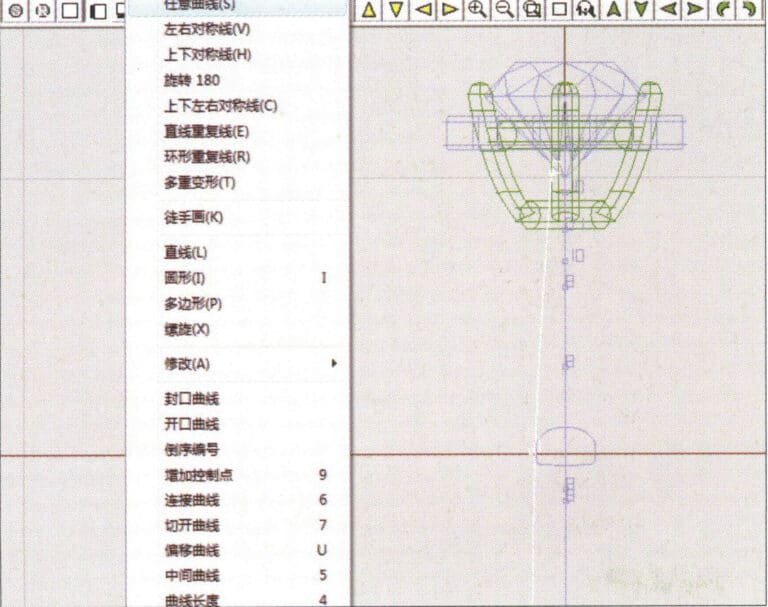
39. Select "Curve" > "Freeform Curve" from the menu bar to draw a guideline
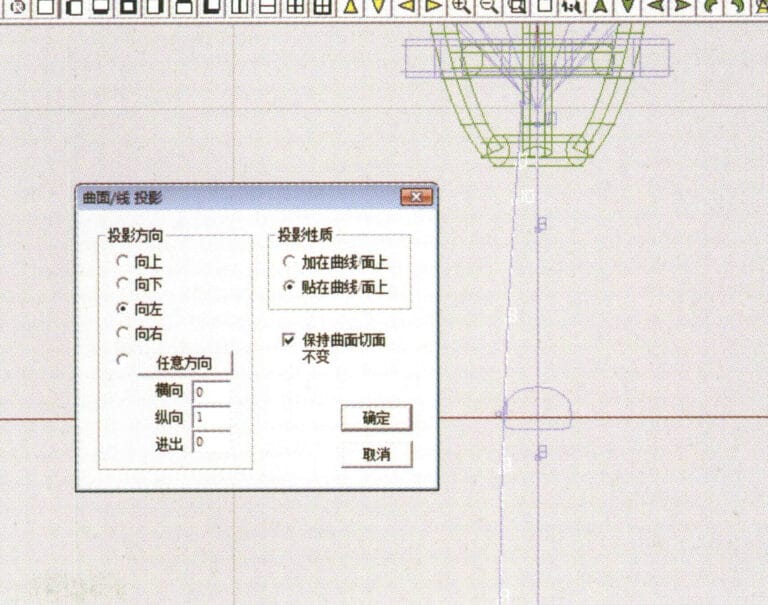
40. Select "Deformation" > "Surface/Line Projection" from the menu bar to enter the "Surface/Line Projection" dialog box, input the relevant values and confirm
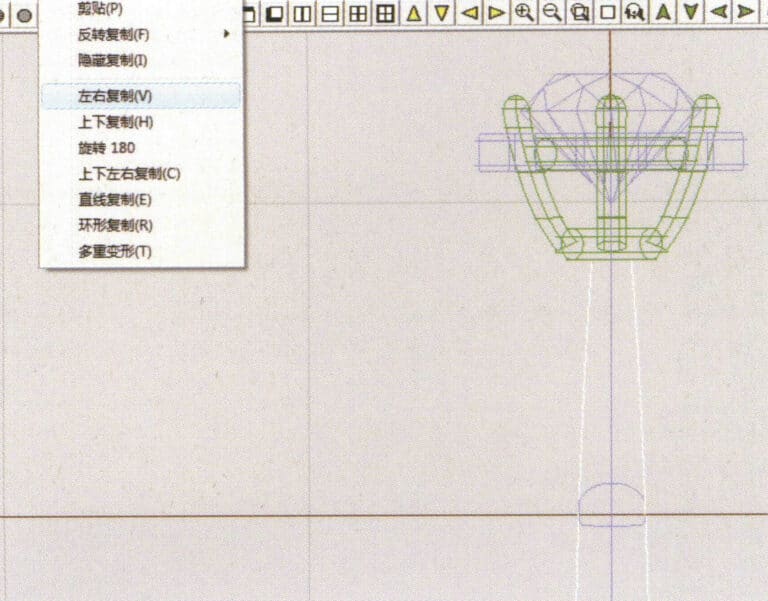
41. Select "Copy" > "Copy Left and Right" from the menu bar to copy the inner diameter of the ring shank
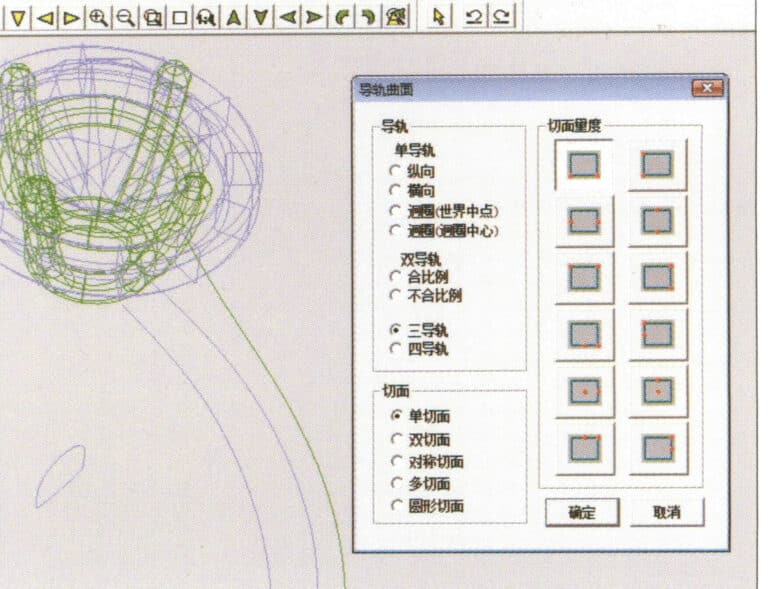
42. Select "Surface" > "Rail Surface" from the menu bar to enter the "Rail Surface" dialog box, select the relevant options and confirm
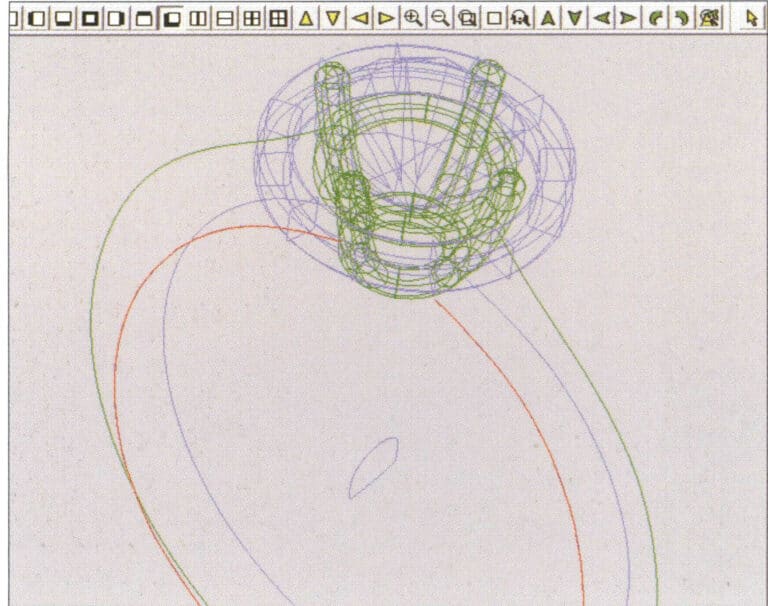
43.左ガイドレールにカーブを選択し、右ガイドレールにカーブを選択する。

44.上ガイドレールとして曲線を選択する
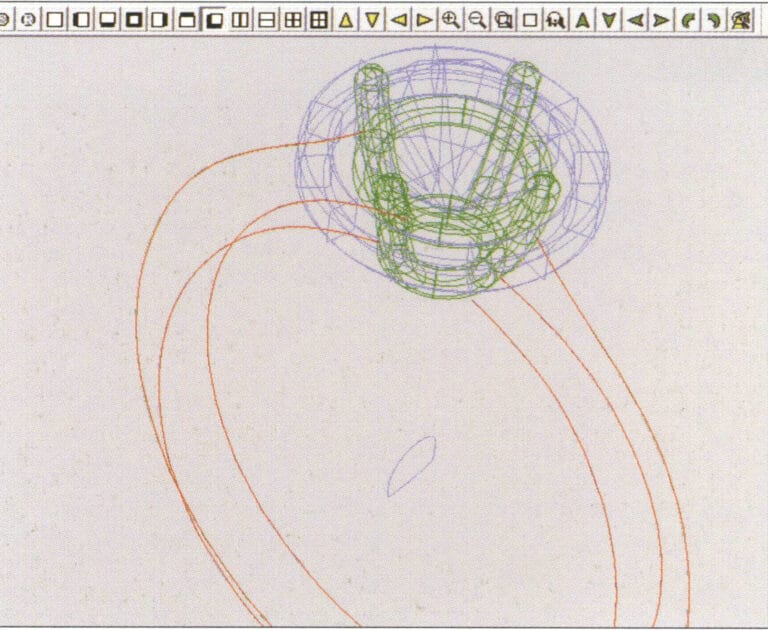
45.ガイド面の断面として曲線を選択する。
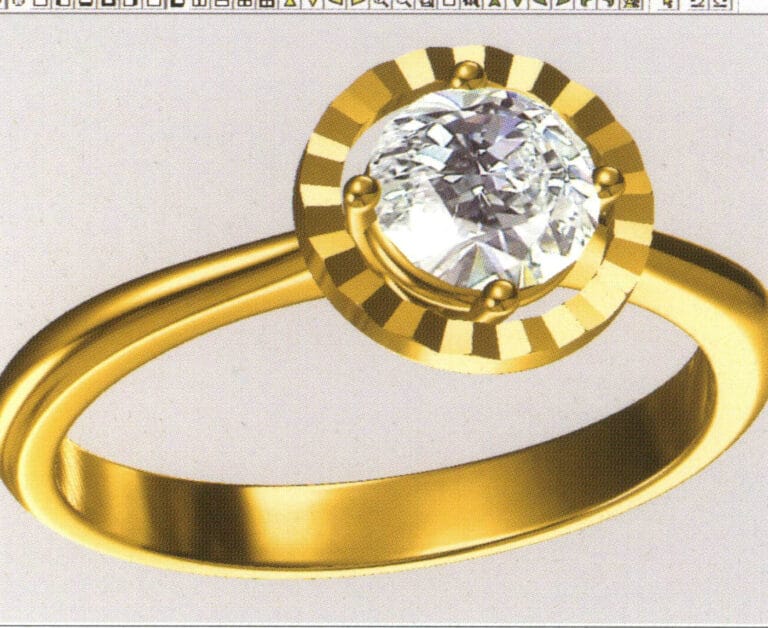
46. Select "View" > "Light and Shadow Map" from the menu bar to examine the light and shadow effects
47. Select "File" > "Save As" from the menu bar to save the file
コピーライト @ Sobling.Jewelry - ジュエリー カスタムジュエリーメーカー、OEMおよびODMジュエリー工場
2.パールリング

製造の手順は以下の通りである:
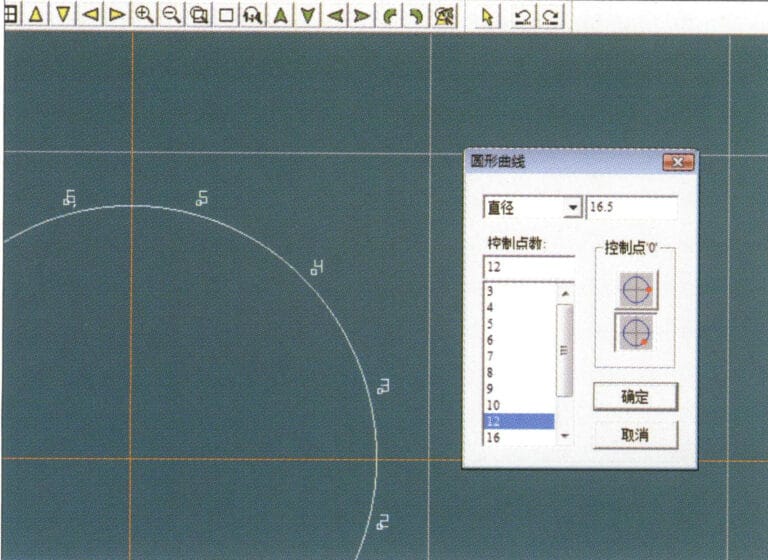
1. Create a new file in JewelCAD, select "Curve" > "Circular Curve" from the menu bar, enter the relevant values in the "Circular Curve" dialog box as the outer curve of the ring, and confirm
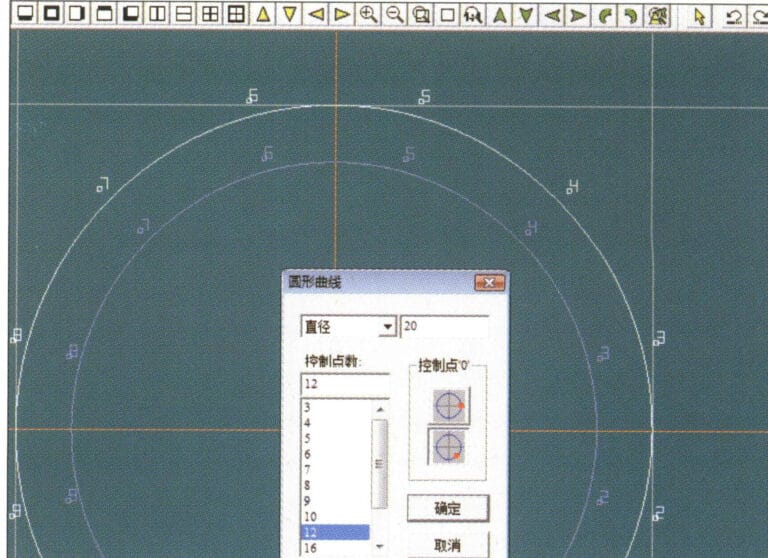
2. Select "Curve" > "Circular Curve" from the menu bar, enter the relevant values in the "Circular Curve" dialog box to set the inner curve of the ring, and confirm
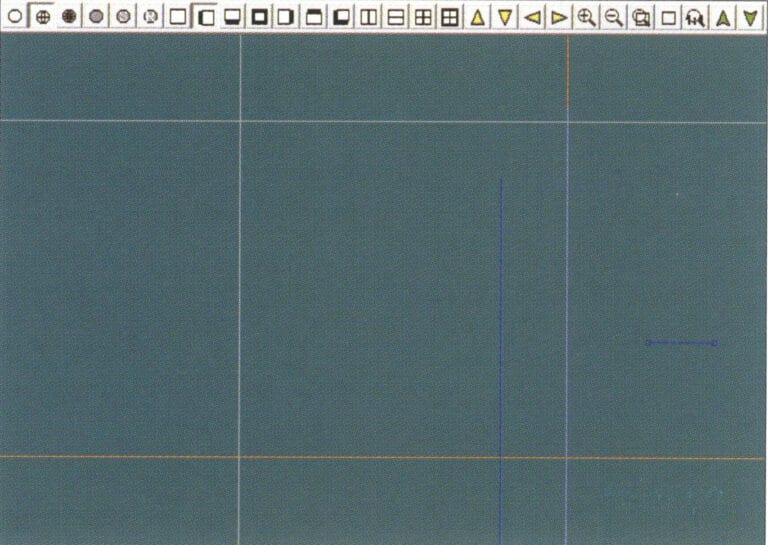
3. Select "Edit" > "Move" from the menu bar to move the selected inner curve of the ring
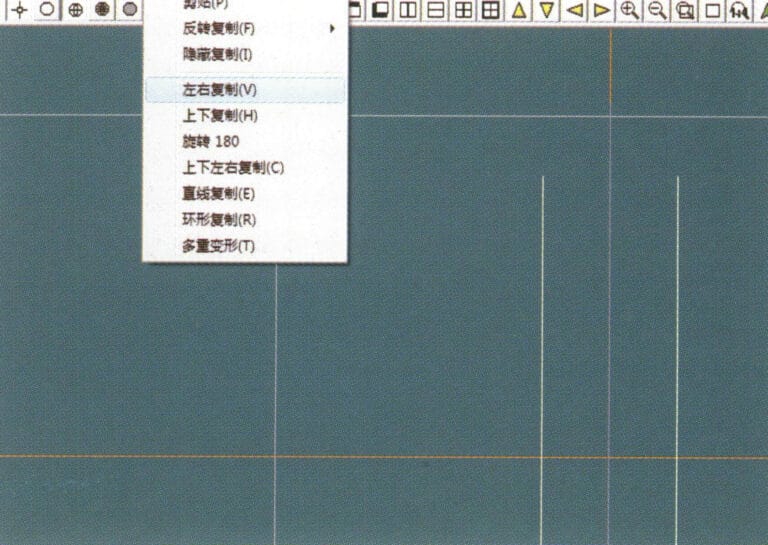
4. Select "Copy" > "Copy Left and Right" from the menu bar to copy the curve of the inner circle of the ring
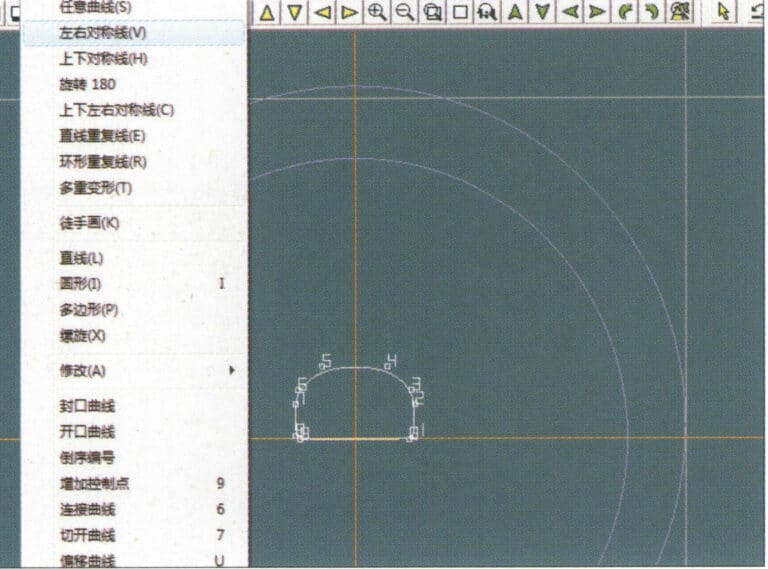
5. Select "Curve" > "Left-Right Symmetry Line" from the menu bar as the cross-section of the ring band
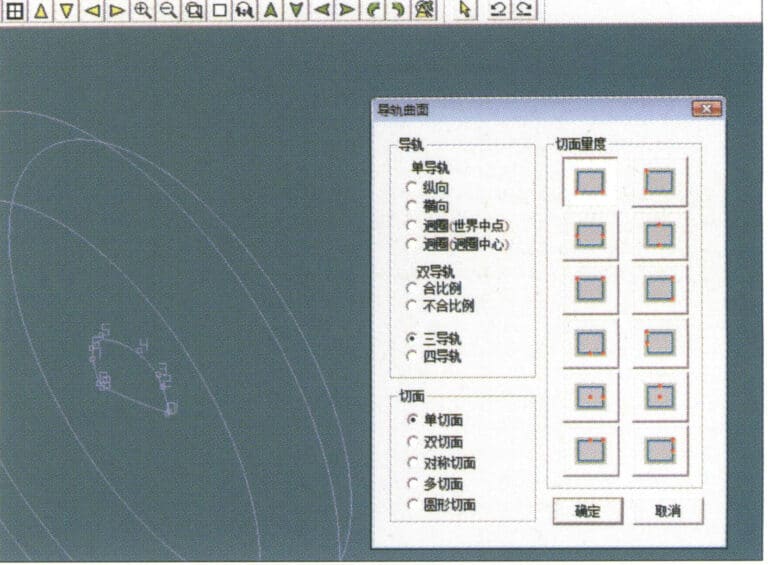
6. Select "Curved Surface" > "Guide Rail Surface" from the menu bar, enter the "Guide Rail Surface" dialog box, select the relevant options and confirm
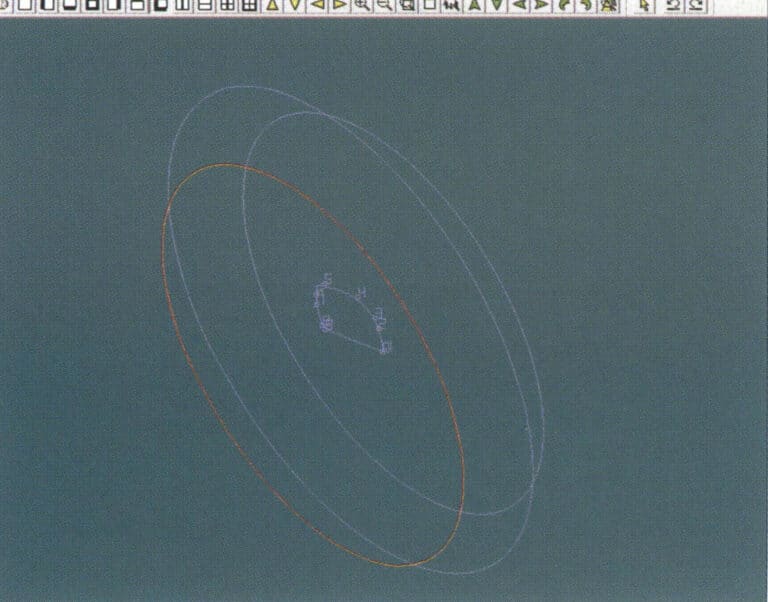
7.正しいガイドレールとしてカーブを選ぶ
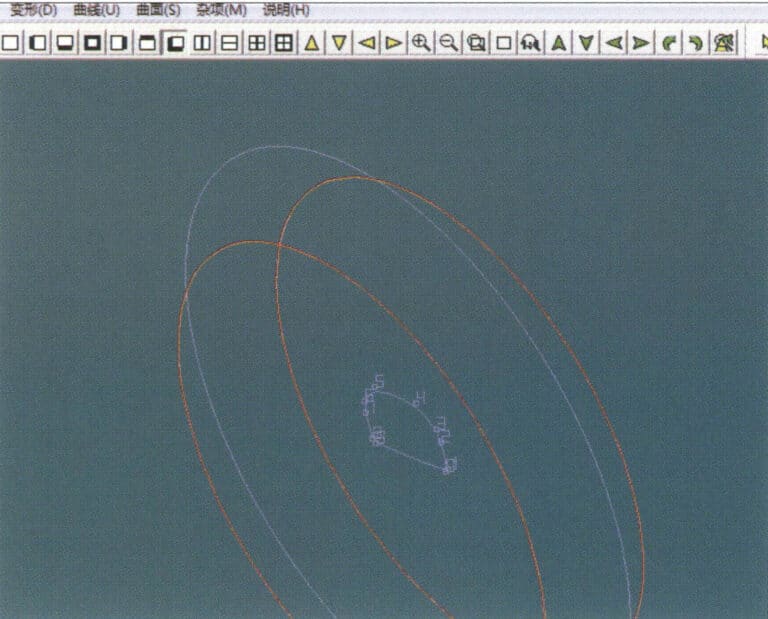
8.上部ガイドレールとして曲線を選択する。
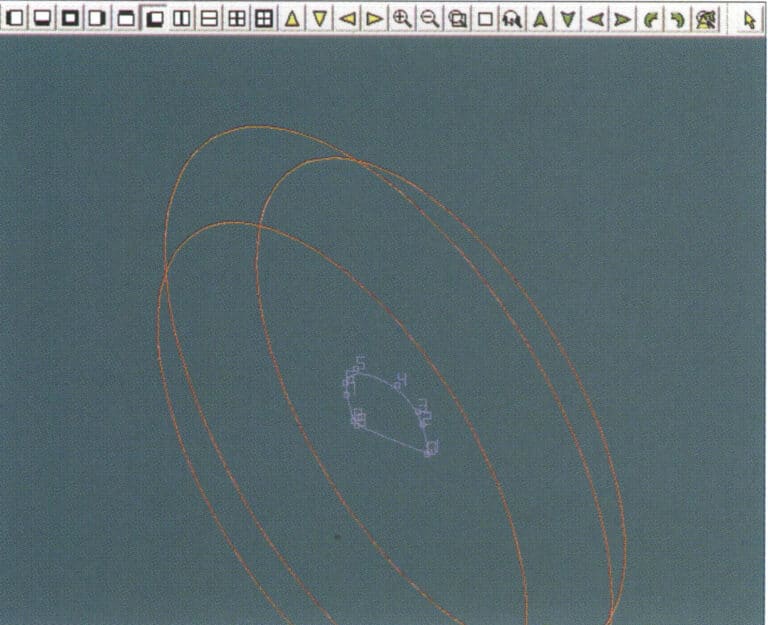
9.リングバンドの断面をガイド曲面の断面として選択する。
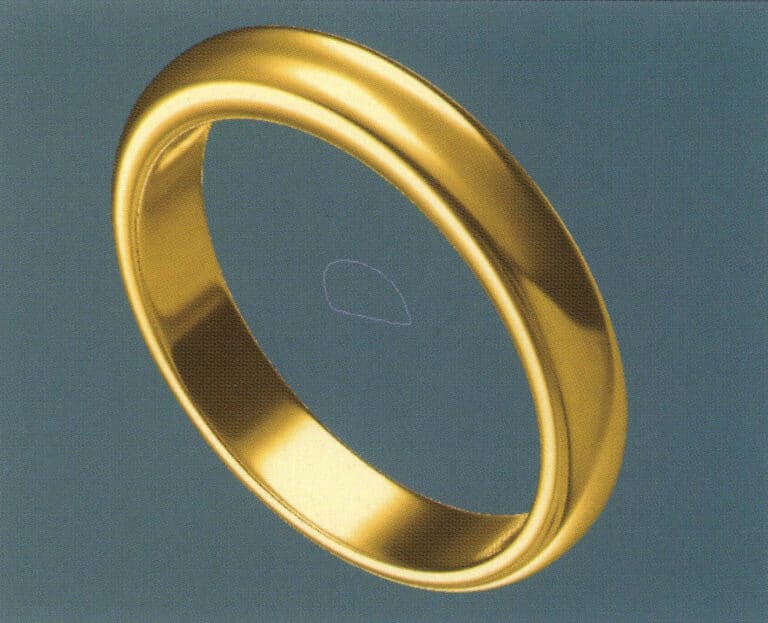
10. Select "View" > "Shadow Map" from the menu bar to inspect the shadow effects
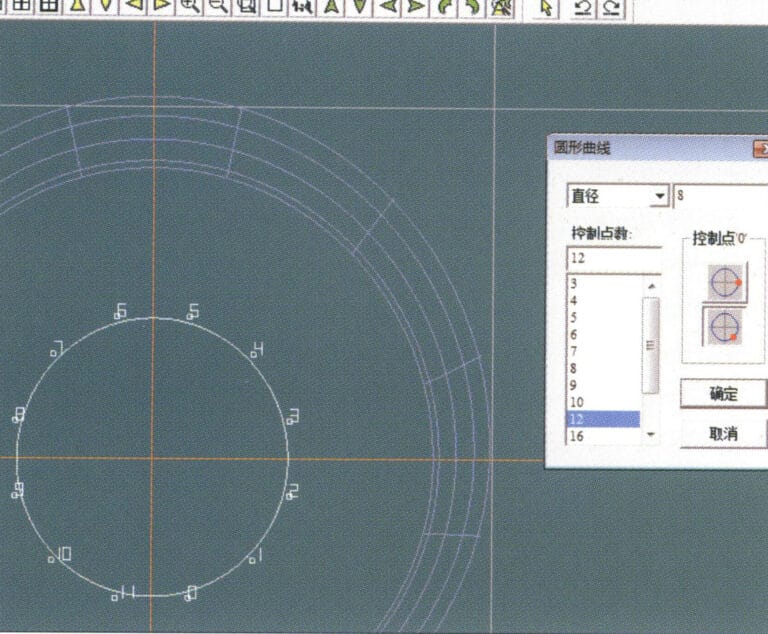
11. Select "Curve" > "Circular Curve" from the menu bar, enter the relevant values in the "Circular Curve" dialog box as auxiliary lines, and confirm
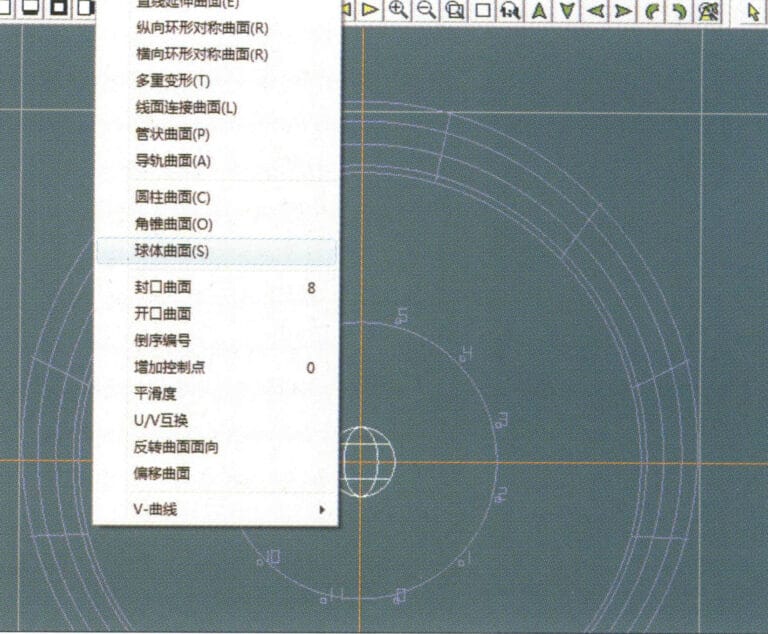
12. Select "Surface" > "Spherical Surface" from the menu bar
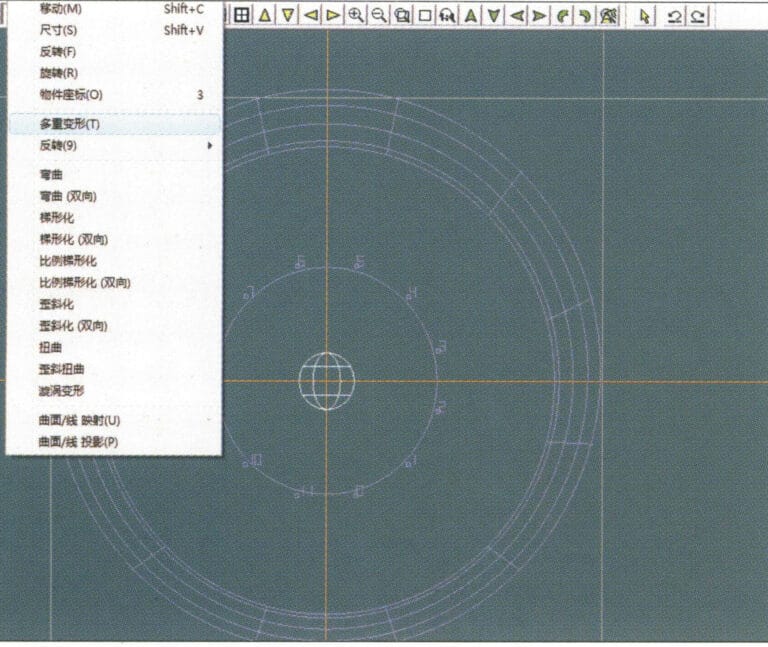
13. Select "Deformation" > "Multiple Deformation" from the menu bar to enlarge the sphere
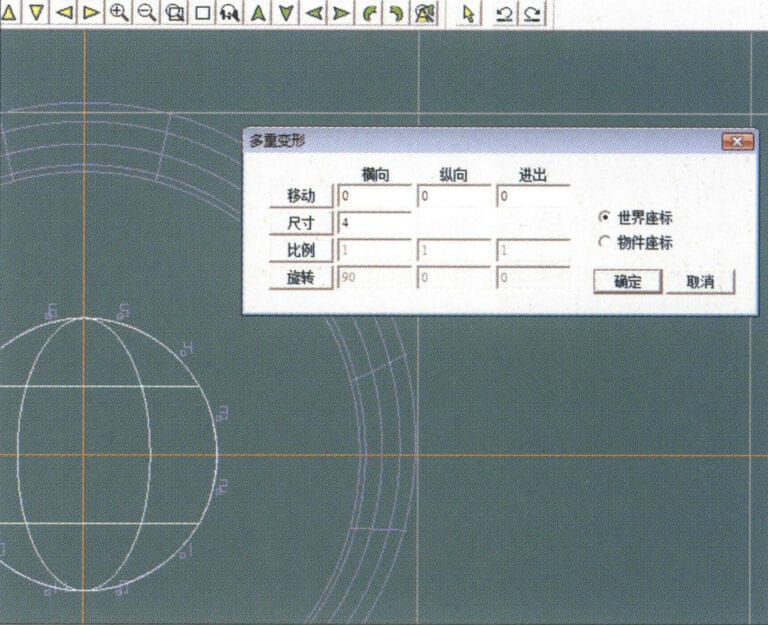
14.多重変形」ダイアログボックスに入り、球体をガイドラインの幅に拡大するための対応する値を入力し、確定する。
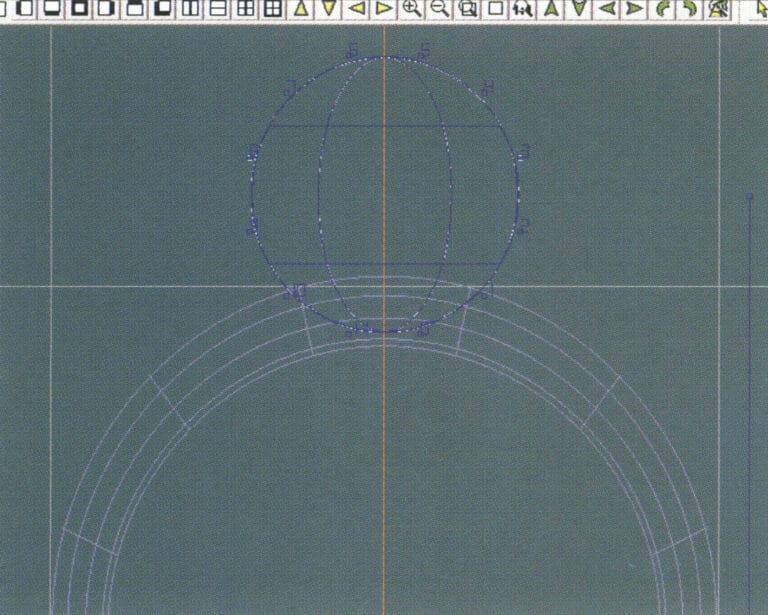
15. Select "Edit" > "Move" from the menu bar to move both the sphere and the auxiliary line simultaneously
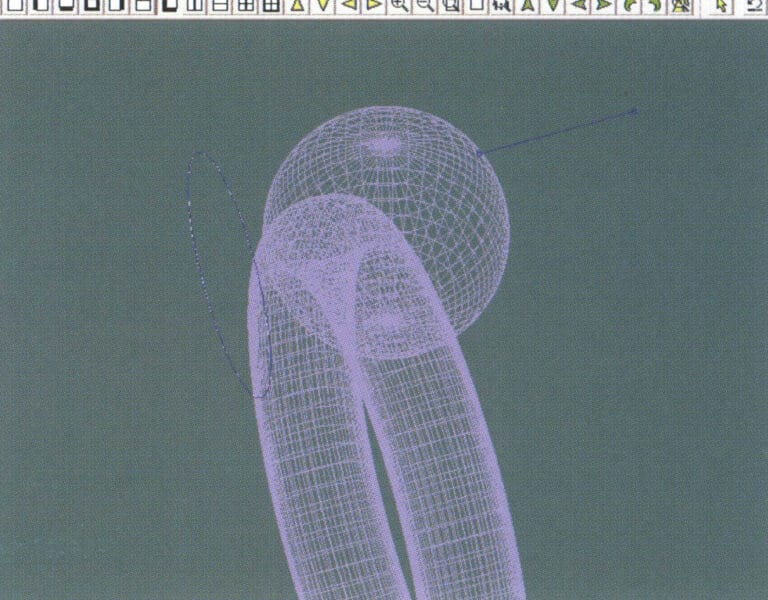
16. Select "Edit" > "Move" from the menu bar to remove the guidelines
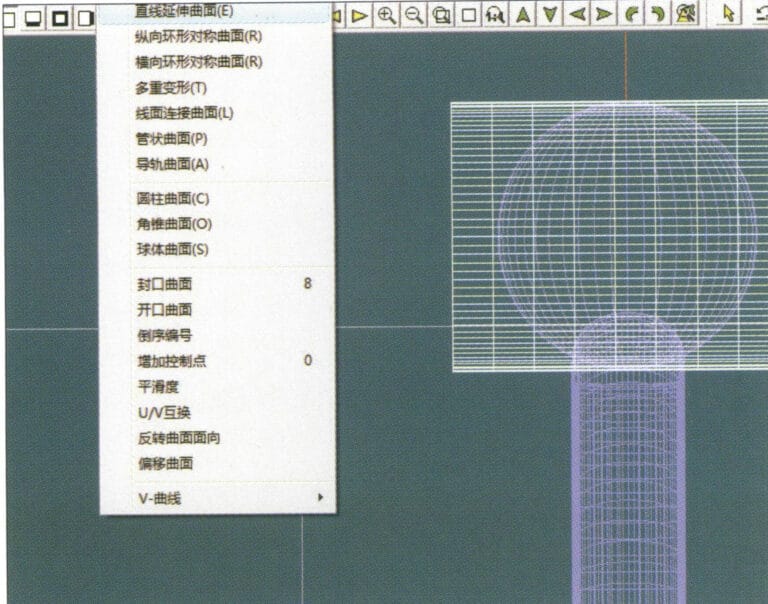
17. Select "Surface" > "Straight Line Extend Surface" from the menu bar to extend the auxiliary line into an auxiliary surface
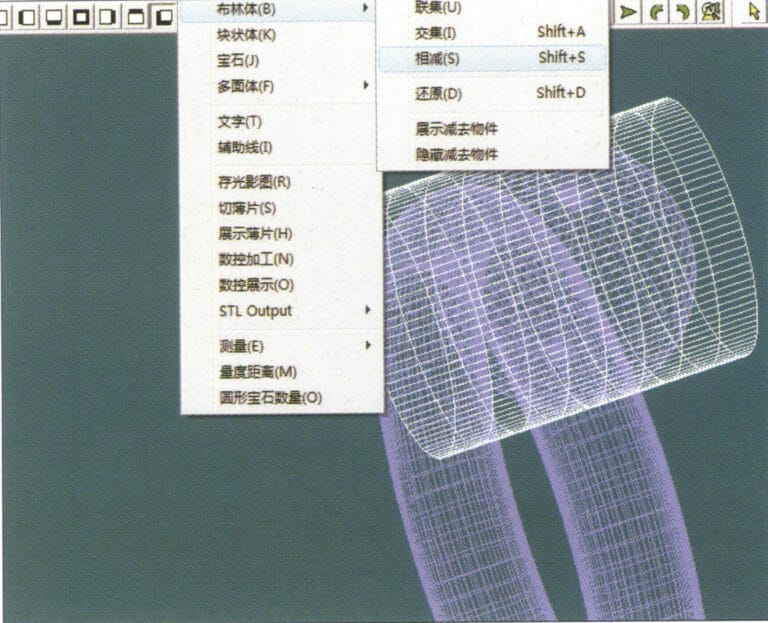
18. Select "Miscellaneous" > "Boolean" > "Subtract" from the menu bar to subtract the corresponding parts of the auxiliary surface ring
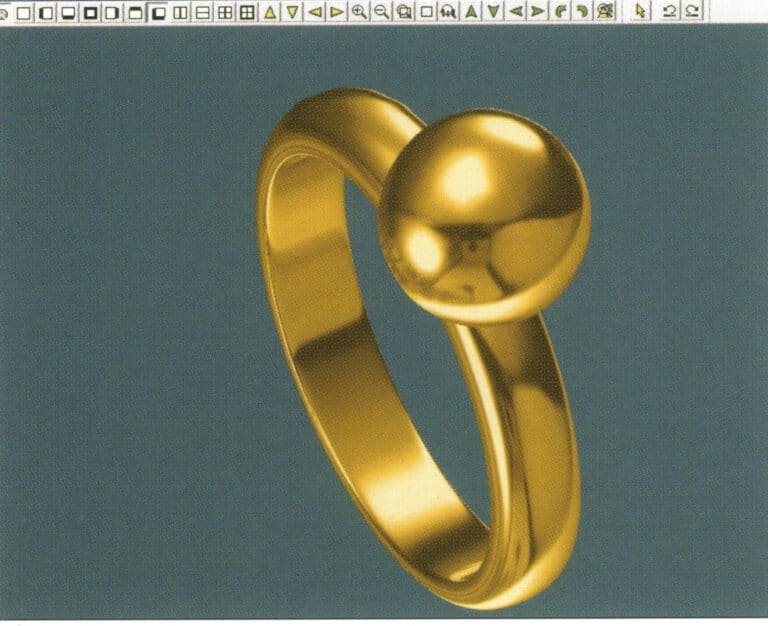
19. Select "View" > "Shadow Map" from the menu bar to inspect the shadow effects
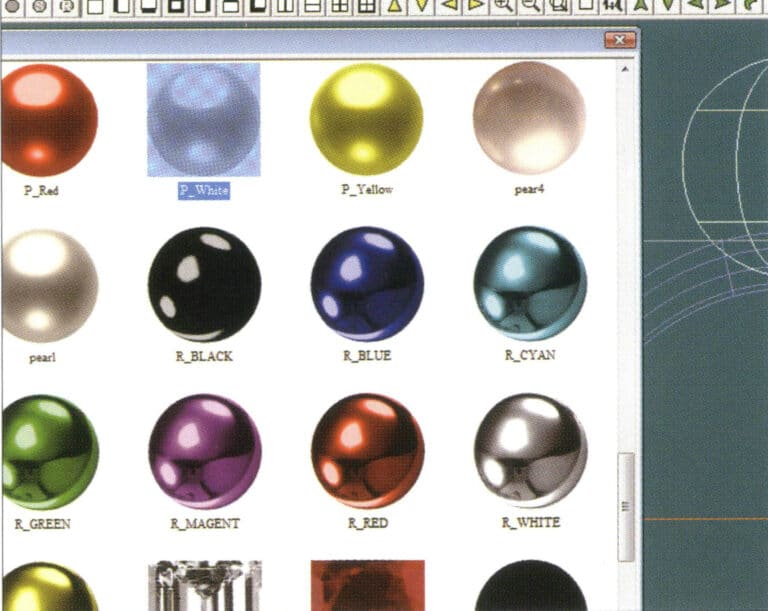
20. Select the sphere, go to the menu bar and choose "Edit" > "Materials", enter the "Materials" dialog box, select the white pearl material and confirm
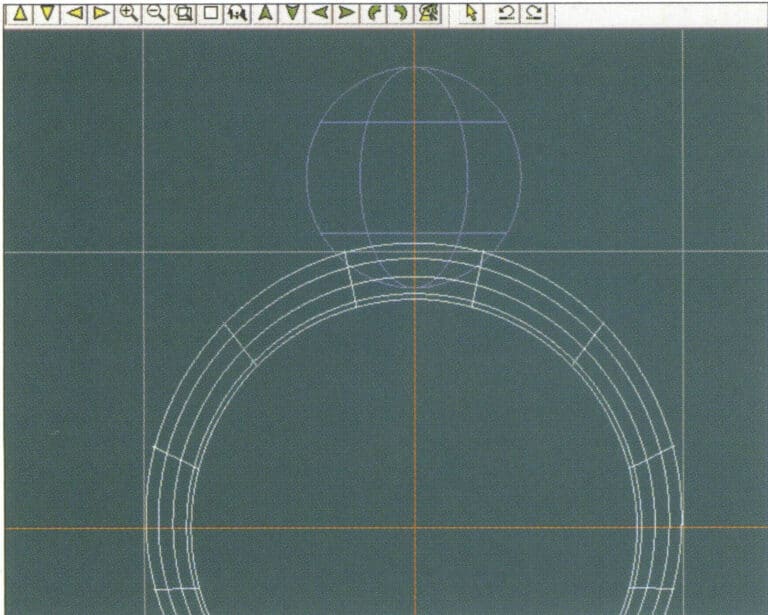
21. Select the ring band, then choose "Edit" > "Materials" from the menu bar
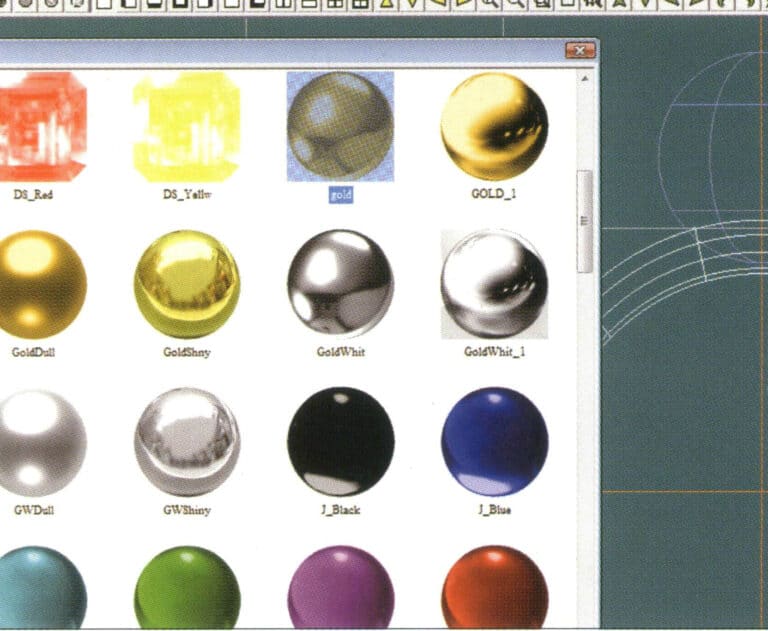
22.材料」ダイアログボックスに入り、適切な材料を選択し、確定する。
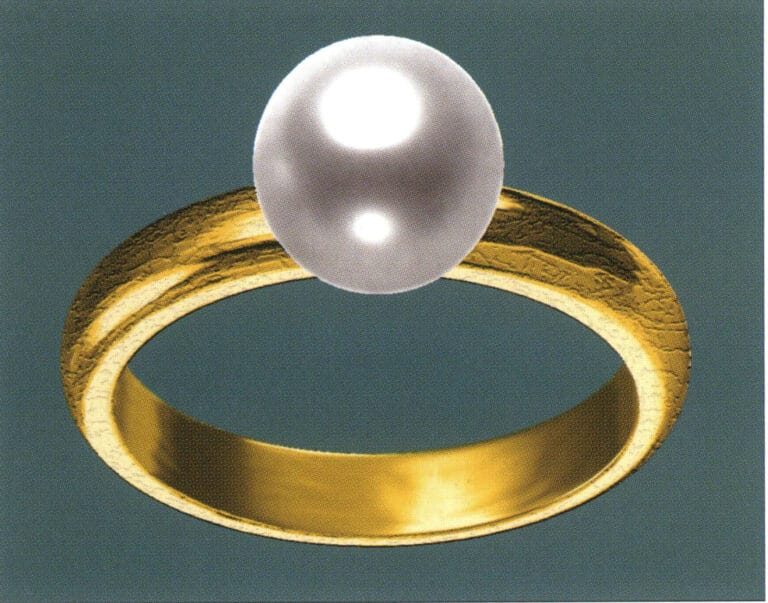
23. Select "View" > "Shadow Map" from the menu bar to examine the light and shadow effects
24. Select "File" > "Save As" from the menu bar to save the file
3.ダイヤモンド・アクセント ブラック・ゴールド・ペンダント

製造の手順は以下の通りである:
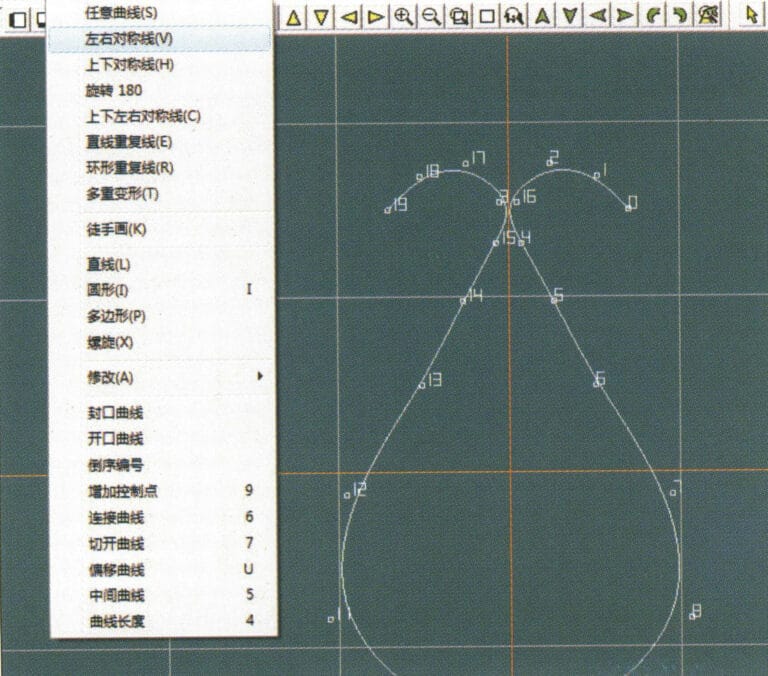
1. Create a new file in JewelCAD, select "Curve" > "Left-Right Symmetrical Line" from the menu bar, and draw the inner contour line of the pendant
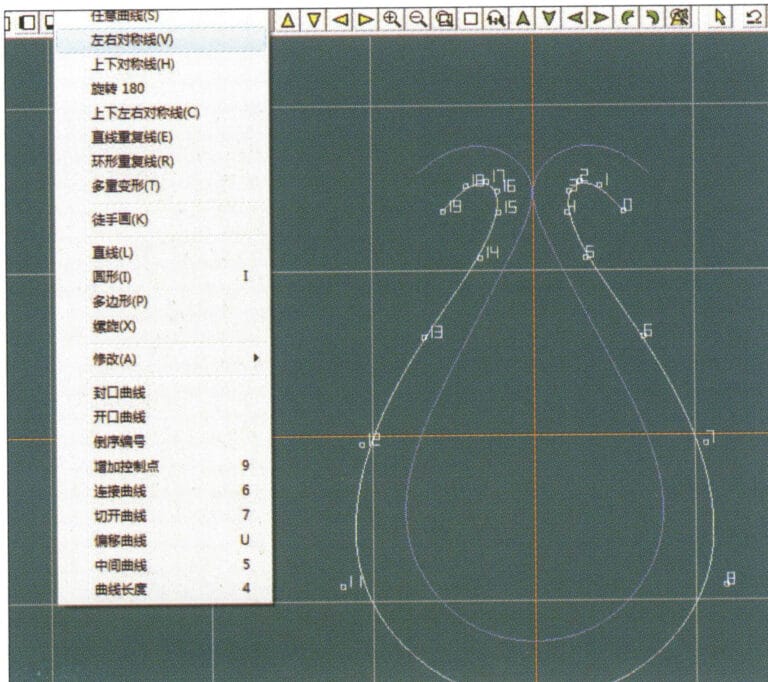
2. Select "Curve" > "Left-Right Symmetrical Line" from the menu bar to draw the outer contour line of the pendant (note that the control points of the inner contour line and the outer contour line should have the same direction and quantity).
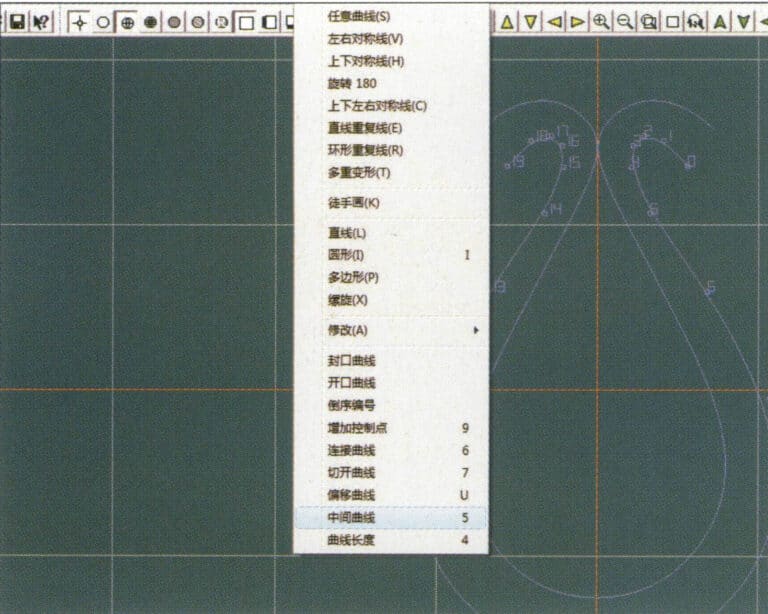
3. Select "Curve" > "Middle Curve" from the menu bar
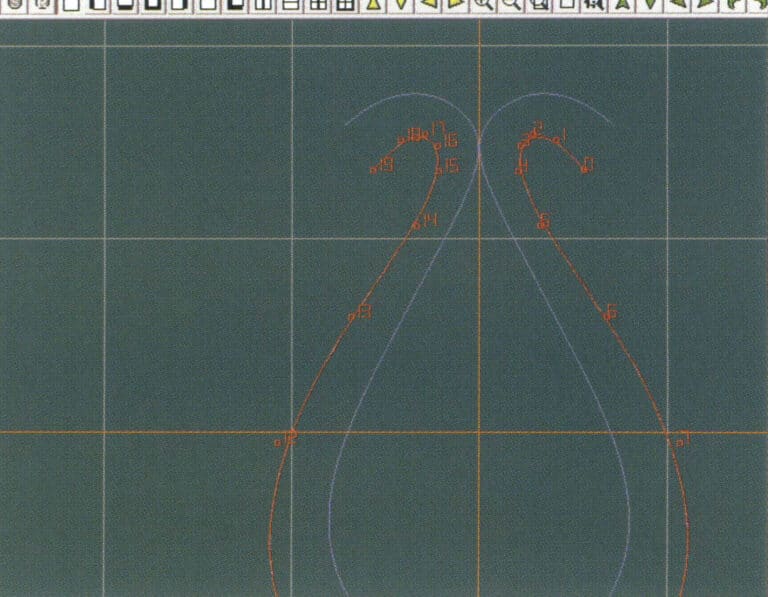
4.真ん中のカーブを作るために2つのカーブを選択する。まず、外側の輪郭線を選択する。
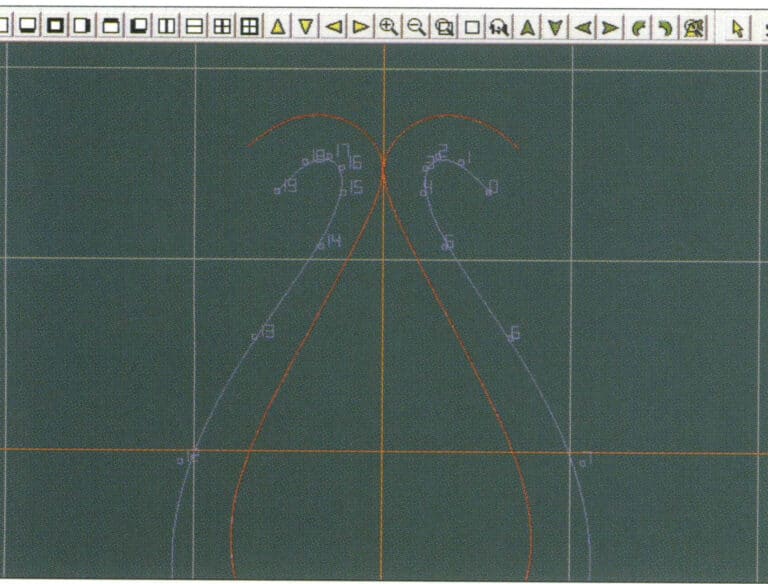
5.2つの曲線を選択して中央の曲線を作成し、内側の輪郭線を選択します。
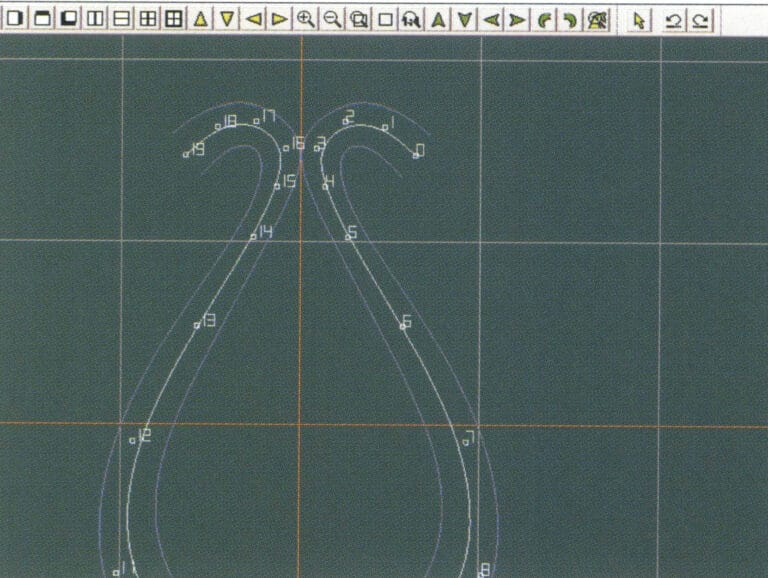
6.作成済みの中間曲線を見る
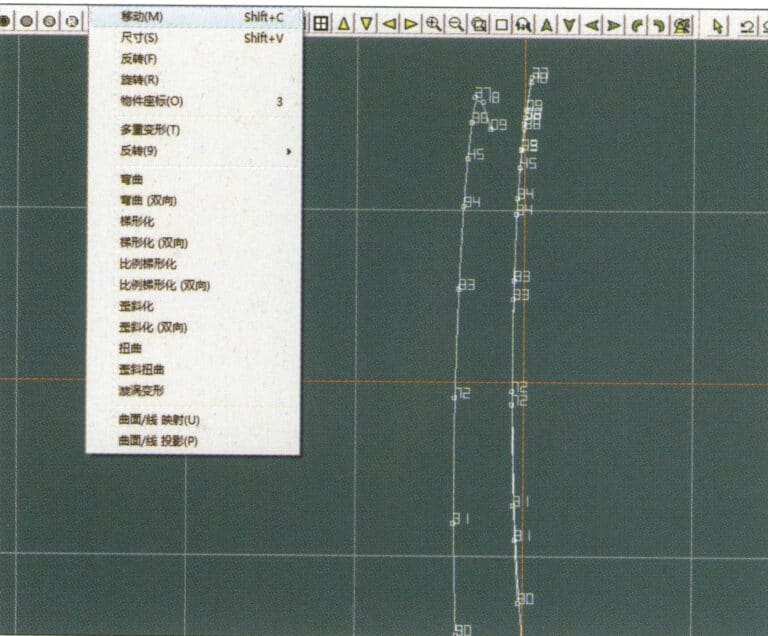
7. Select "Deformation" > "Move" from the menu bar to move the CV and the CV of the contour line
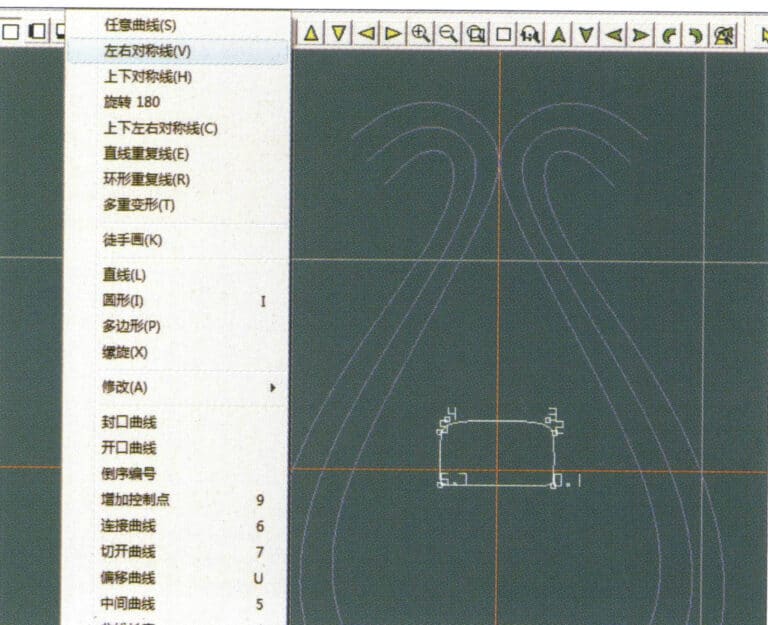
8. Select "Curve" > "Left-Right Symmetry Line" from the menu bar to create a cross-section
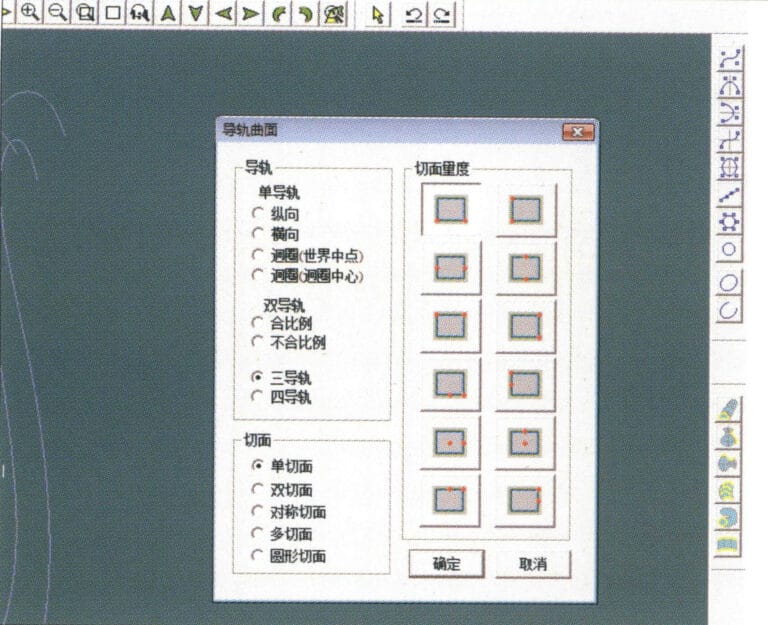
9. Select "Surface" > "Rail Surface" from the menu bar, enter the "Rail Surface" dialog box to select the relevant options, and confirm; select a curve as the left curve, starting from the left curve in a clockwise direction, left-click on the curve as the rail, and then select another curve as the section of the rail surface
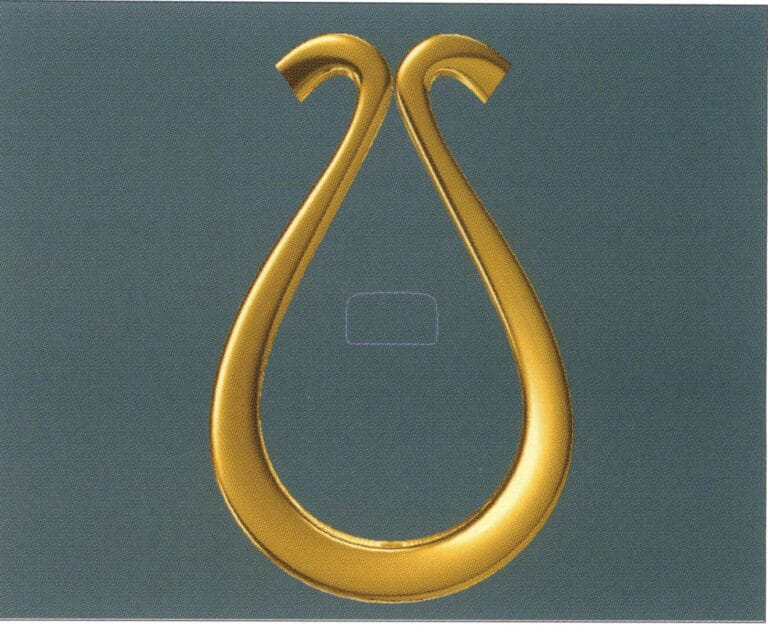
10. Select "View" > "Shadow Map" from the menu bar to inspect the shadow effects
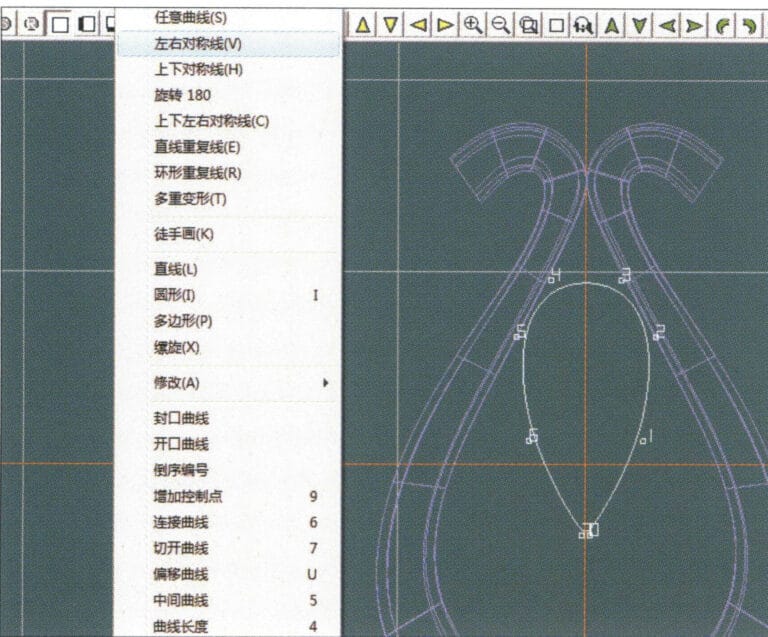
11. Select "Curve" > "Left-Right Symmetry Line" from the menu bar to draw the outer contour line of the seed-shaped toggle
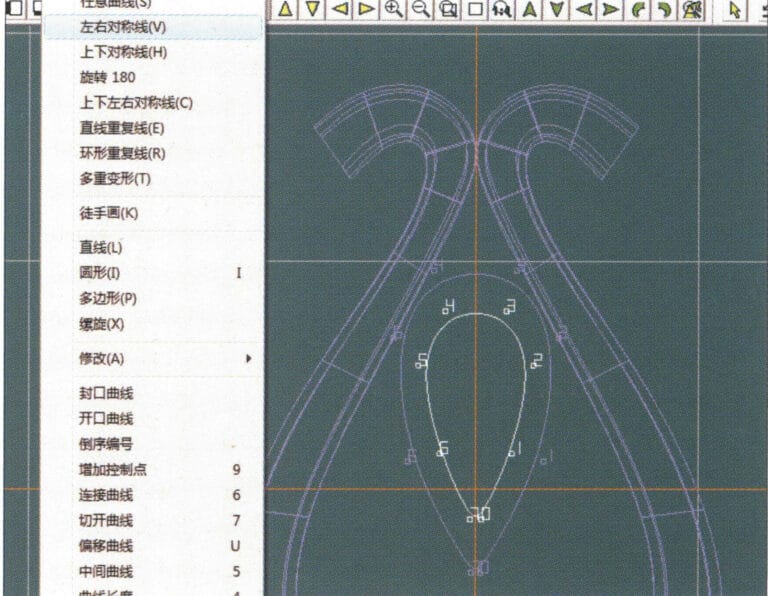
12. Select "Curve" > "Left-Right Symmetry Line" from the menu bar to draw the inner contour line of the seed-shaped toggle
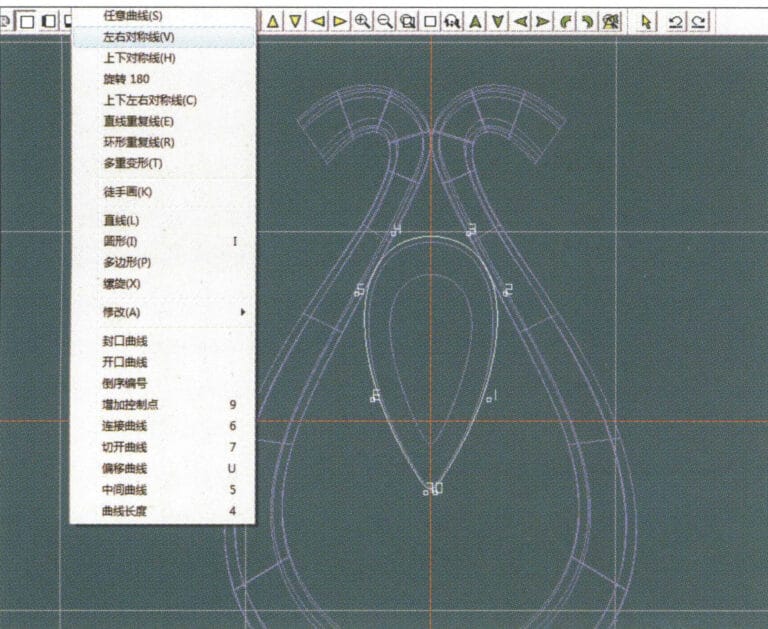
13. Select "Curve" > "Left-Right Symmetry Line" from the menu bar, and draw the lower dark line of the center of the seed-shaped toggle
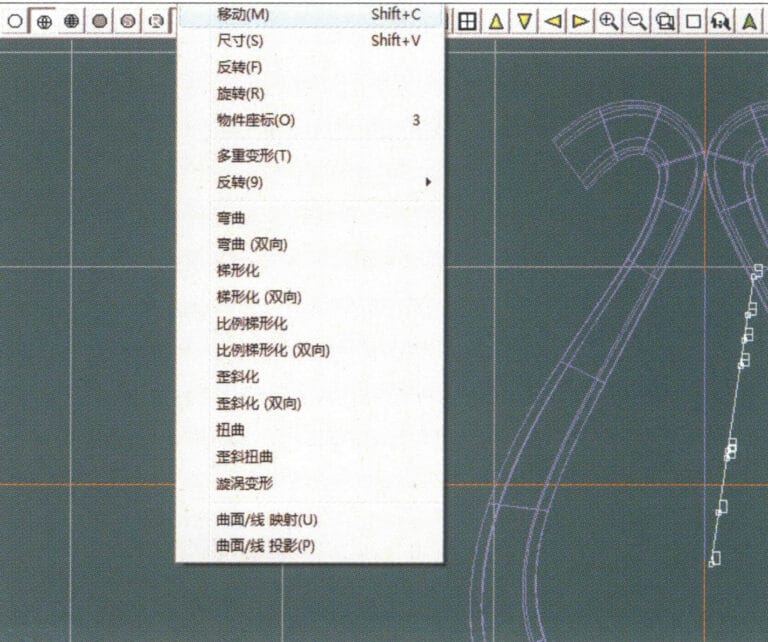
14. Select "Deformation" > "Move" from the menu bar to move the seed-shaped toggle CV
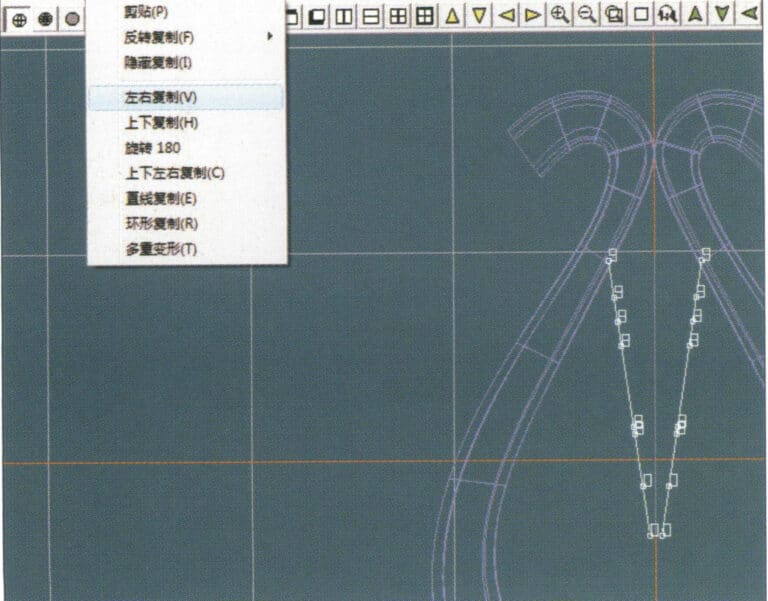
15. Select "Copy" > "Copy Left and Right" from the menu bar to copy the curve of the seed-shaped toggle
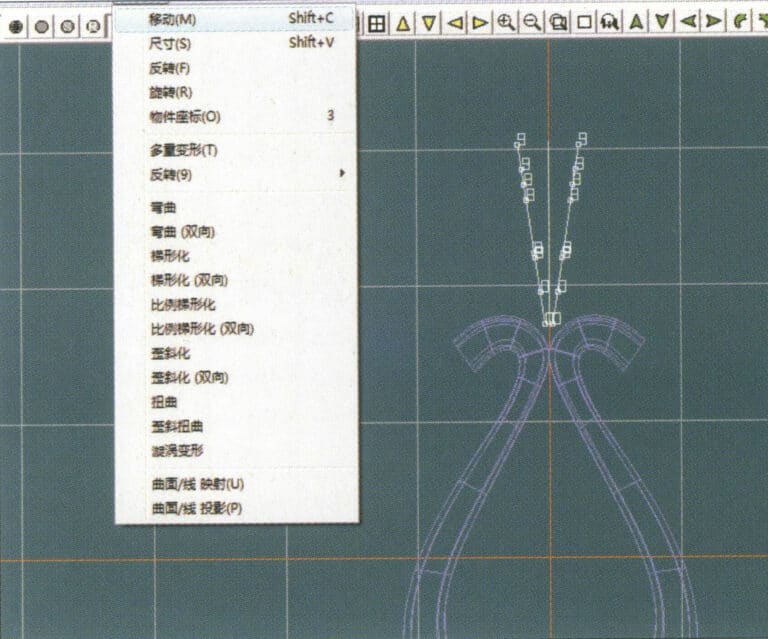
16. Select "Deformation" > "Move" from the menu bar to move the melon seed buckle curve
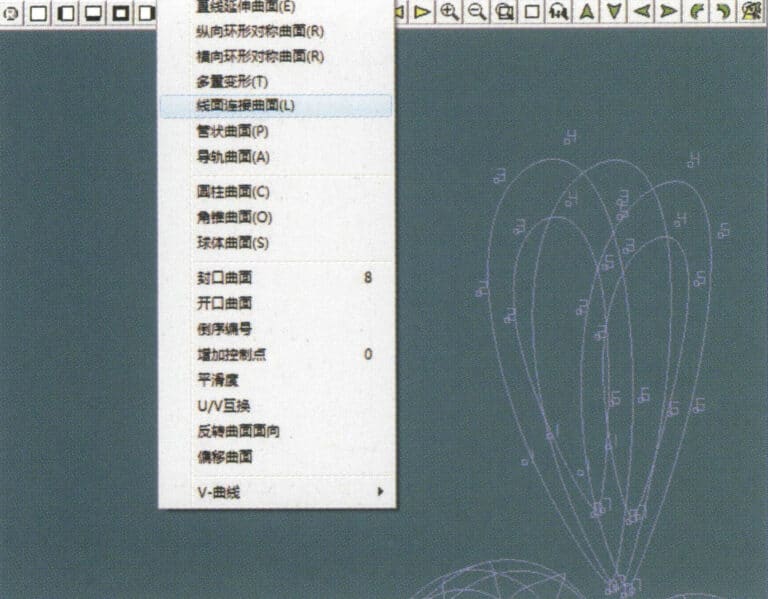
17. Select "Surface" > "Line-Surface Connection Surface" from the menu bar, and select the curve/surface in a clockwise direction to create a line-surface connection surface, then select "Curve" > "Closed Surface" from the menu bar
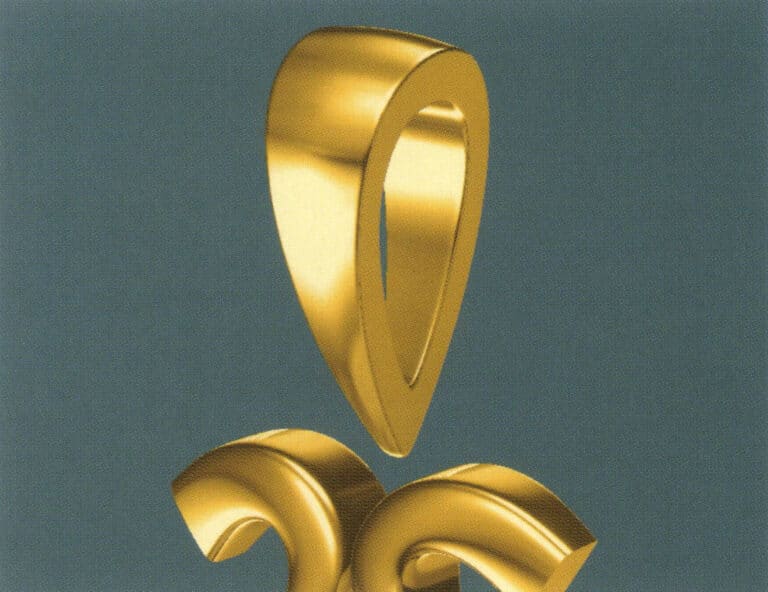
18. Select "View" > "Shadow Map" from the menu bar to examine the shadow effects
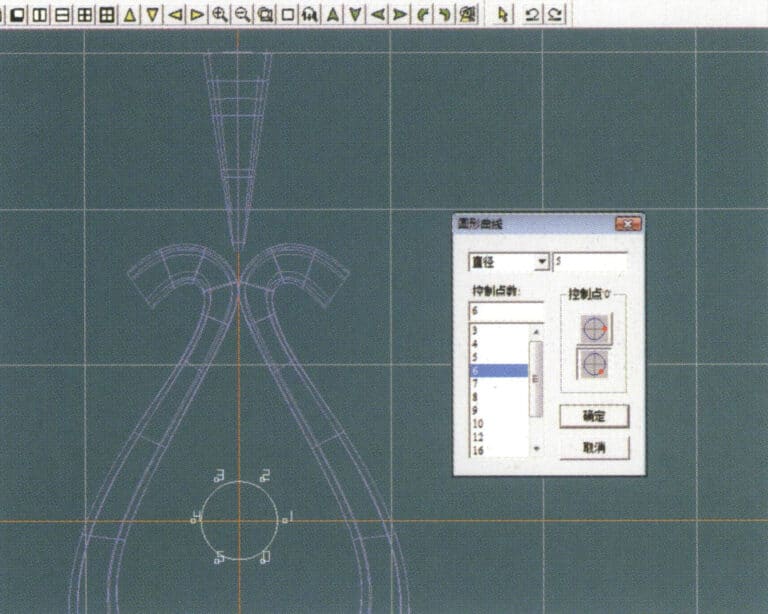
19. Select "Curve" > "Circular Curve" from the menu bar, enter the relevant values and confirm

20. Select "Surface" > "Tubular Surface" from the menu bar
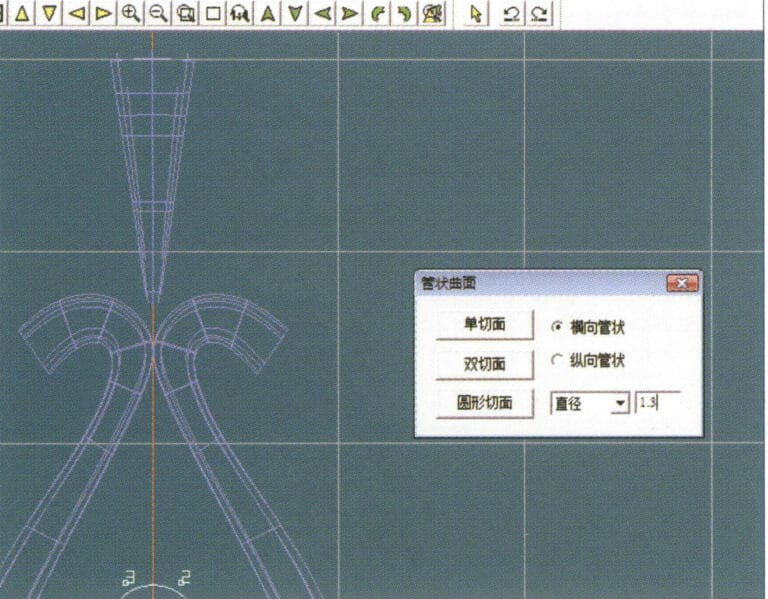
21.Tubular Surface "ダイアログ・ボックスに入り、関連する値を入力し、円形部分をクリックして確定する。
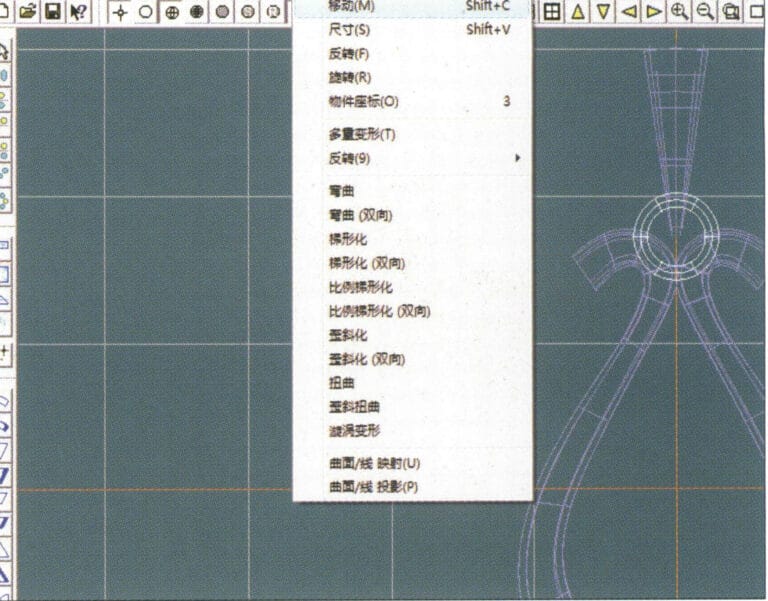
22. Select "Deformation" > "Move" from the menu bar to move the ring buckle

23. Select "File" > "Insert File" from the menu bar
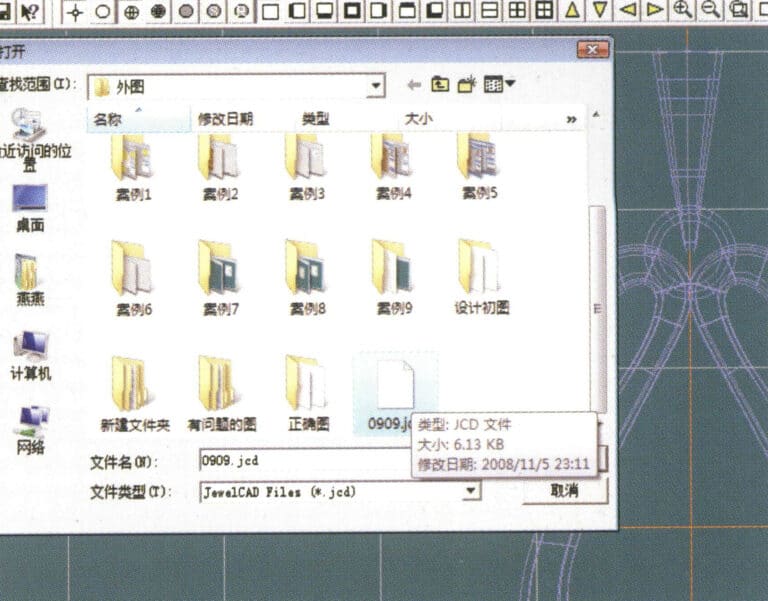
24.ファイルの挿入」ダイアログボックスに入り、必要なドキュメントを選択して確定します。
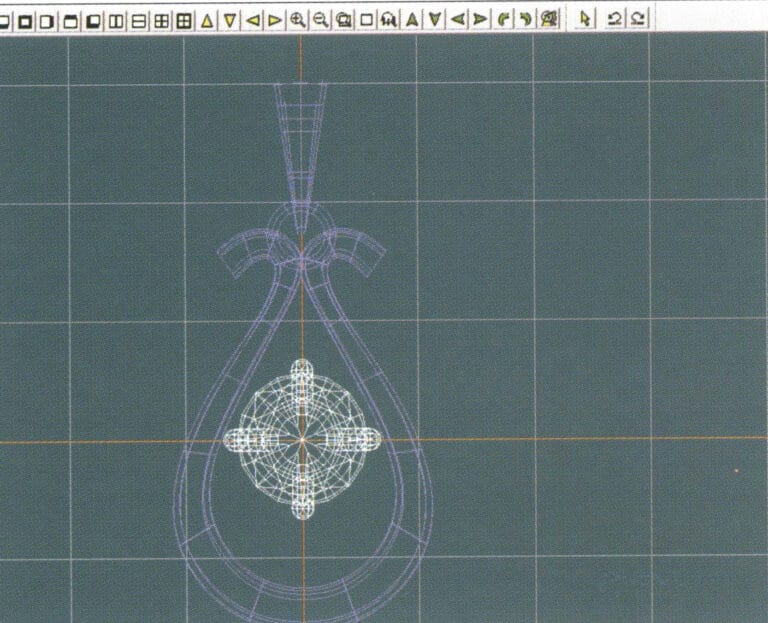
25.挿入されたファイルを見る - Gemstone
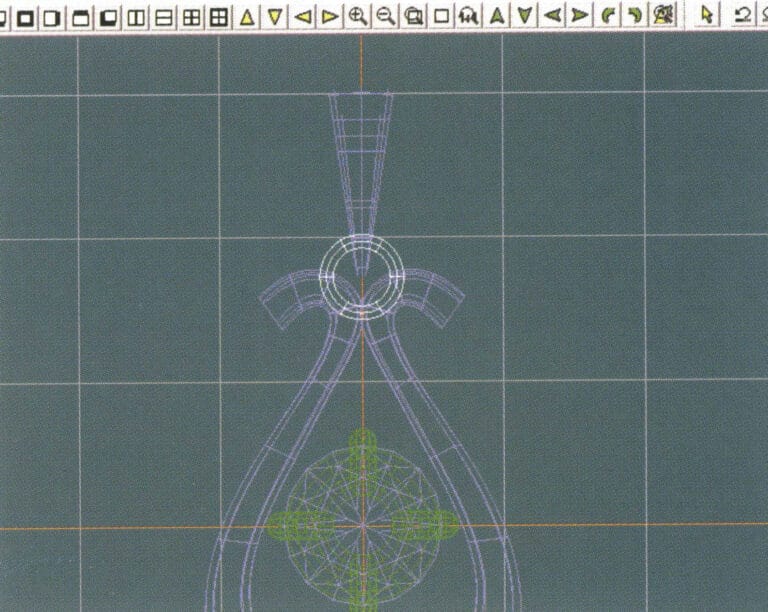
26. Select "Copy" > "Copy Up and Down" from the menu bar to copy the selected toggle
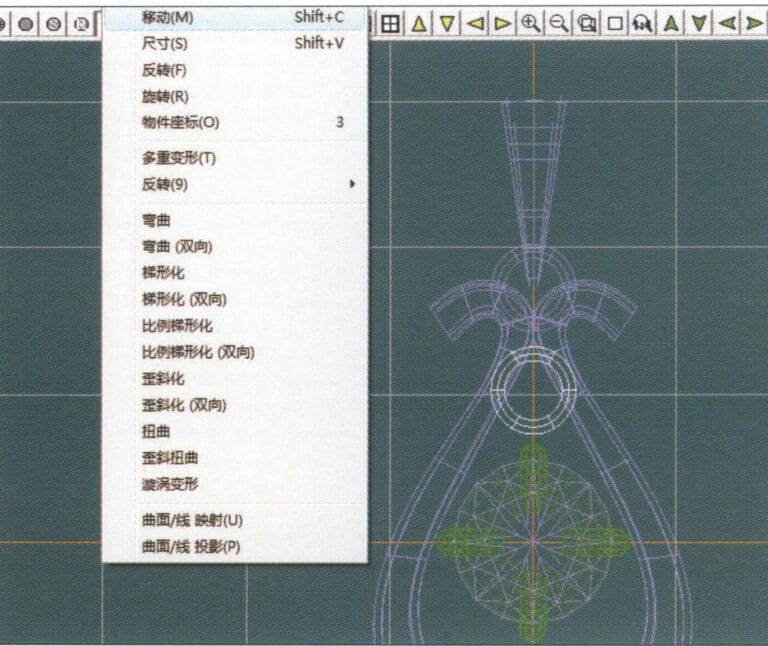
27. Select "Deformation" > "Move" from the menu bar to move the horizontal ring toggle
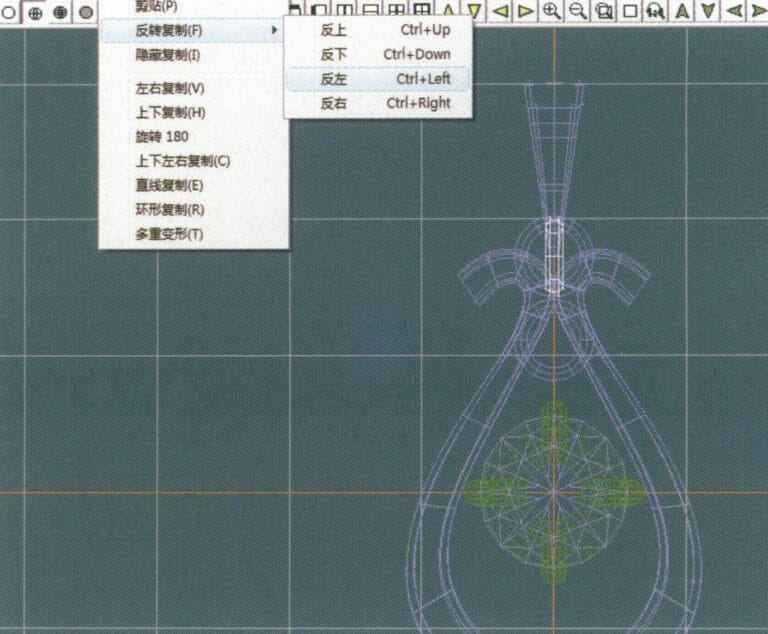
28. Select "Copy" > "Reverse Copy" > "Reverse Left" from the menu bar to create a vertical ring toggle
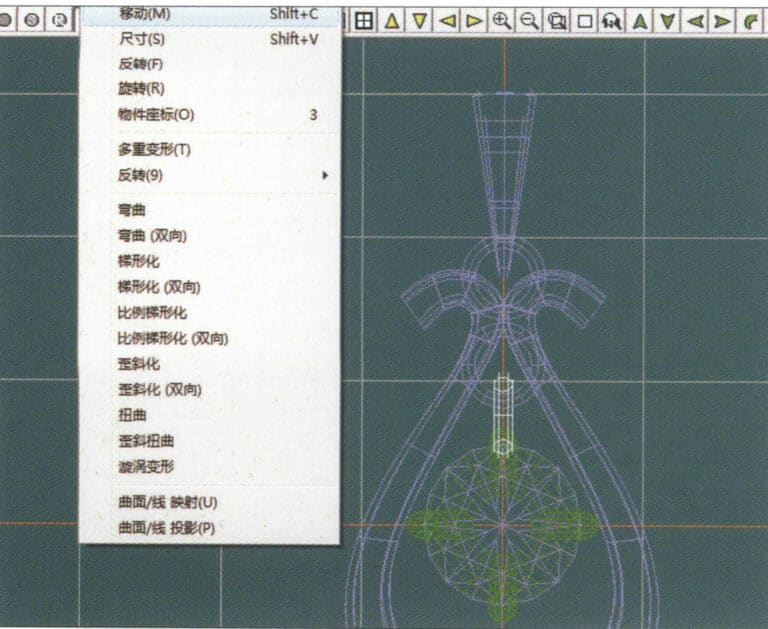
29. Select "Deformation" > "Move" from the menu bar to move the horizontal ring toggle
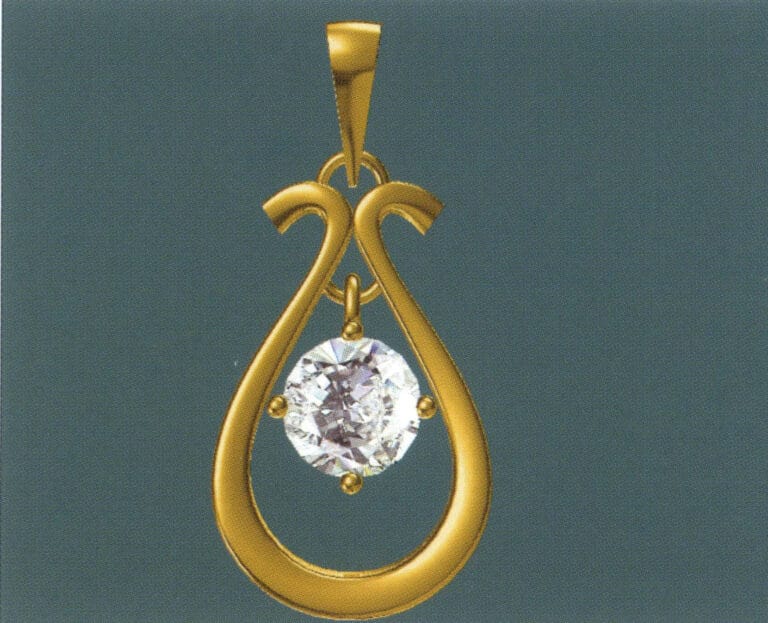
30. Select "View" > "Shadow Map" from the menu bar to examine the light and shadow effects
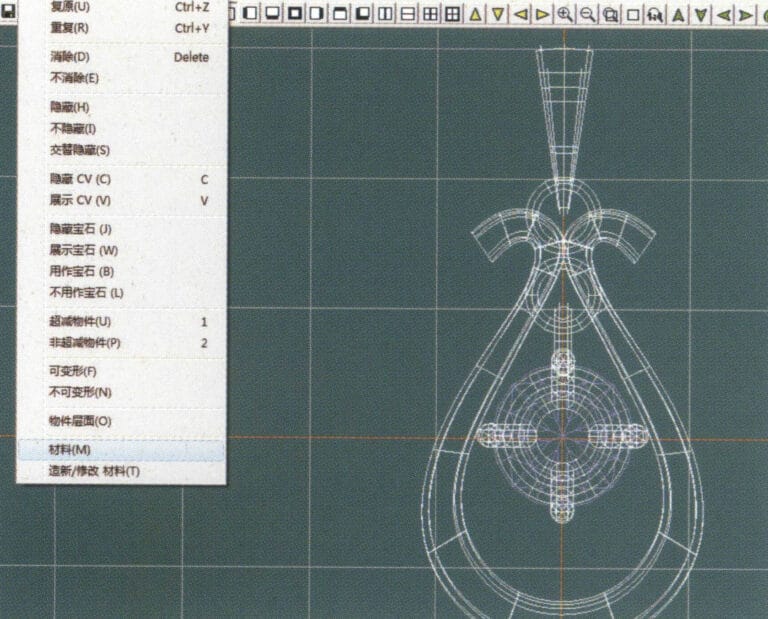
31. Select "Edit" > "Materials" from the menu bar to modify the materials of the selected object
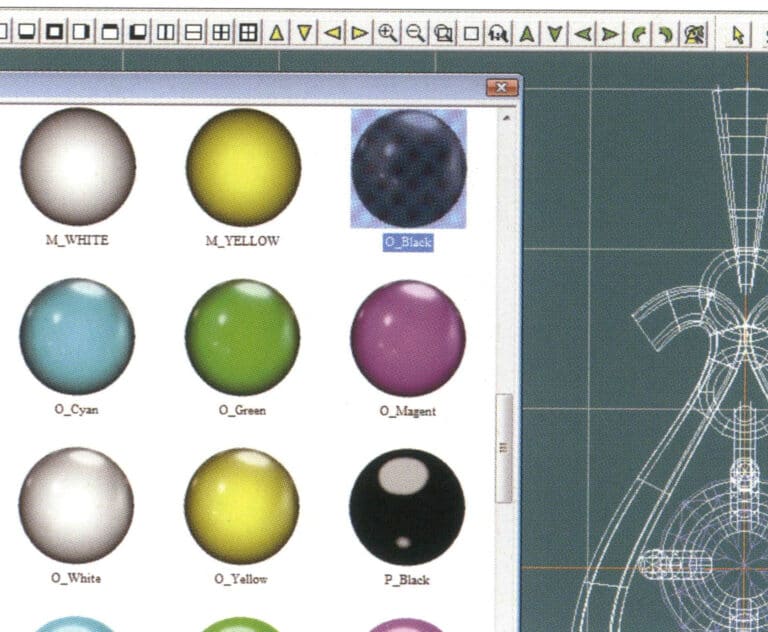
32.マテリアル」ダイアログボックスに入り、ブラックゴールドを選択して確定する。
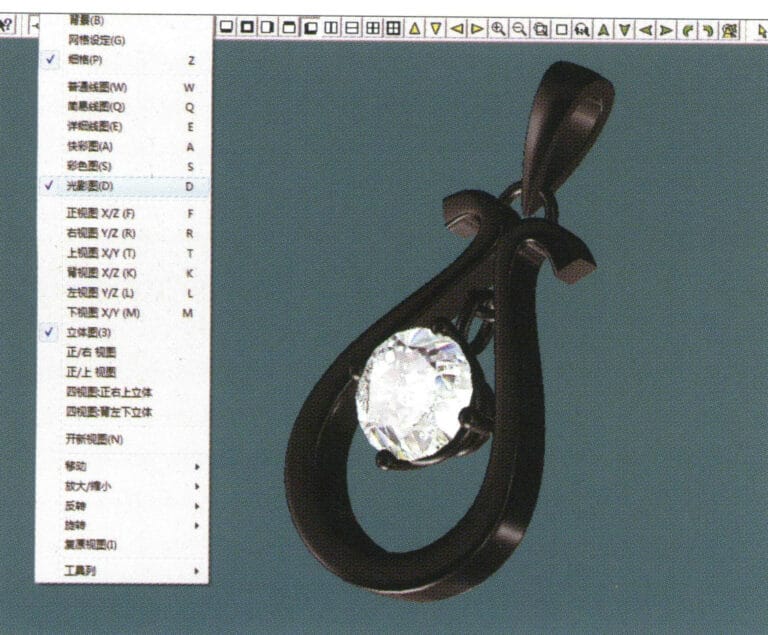
33. Select "View" > "Shadow Map" from the menu bar to inspect the shadow effects
34. Select "File" > "Save As" from the menu bar to save the file
4.ルビー・ペンダント
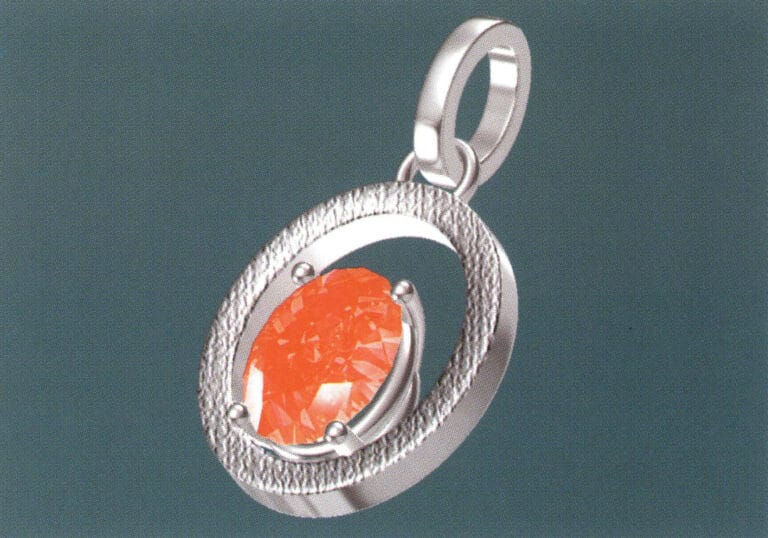
製造の手順は以下の通りである:
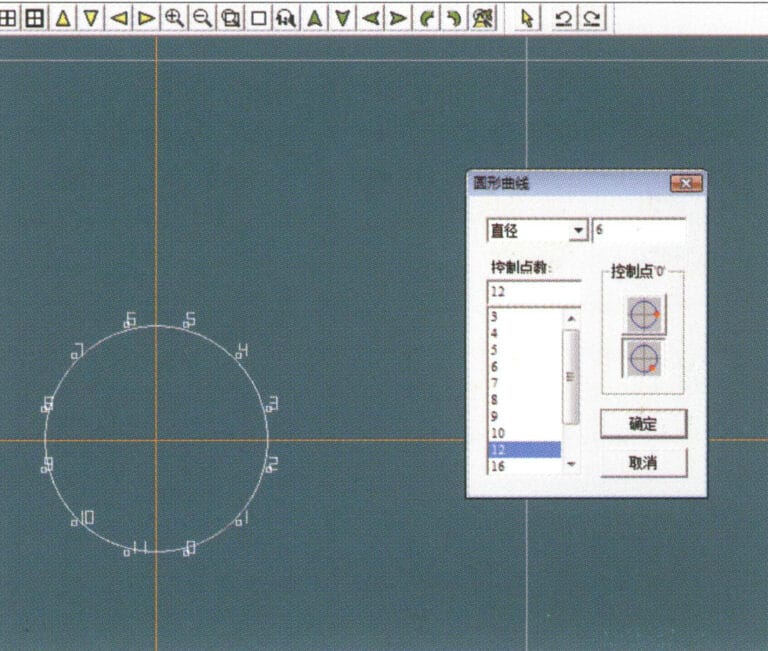
1. Create a new file in JewelCAD, select "Curve" > "Circular Curve" from the menu bar, enter the relevant values in the "Circular Curve" dialog box as the inner auxiliary line, and confirm

2. Select "Curve" > "Circular Curve" from the menu bar, enter the relevant values in the "Circular Curve" dialog box as the external auxiliary line, and confirm
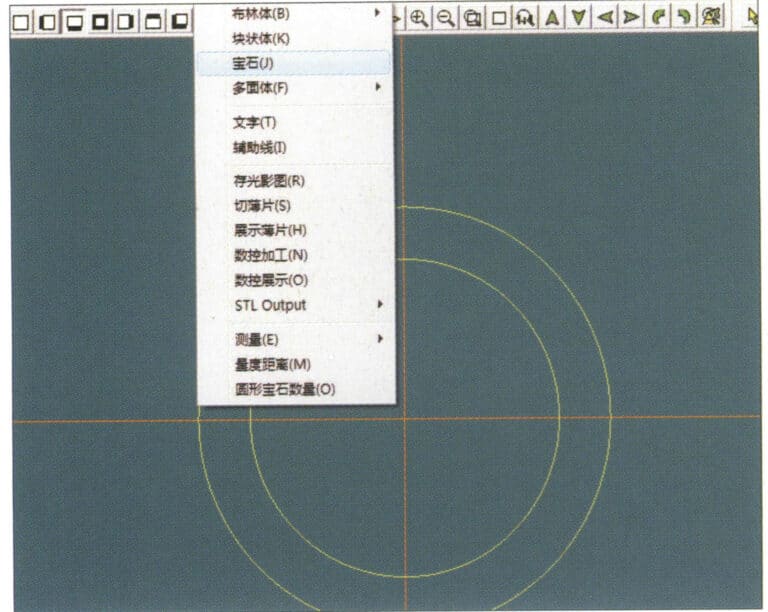
3. Select "Miscellaneous" > "Gemstones" from the menu bar
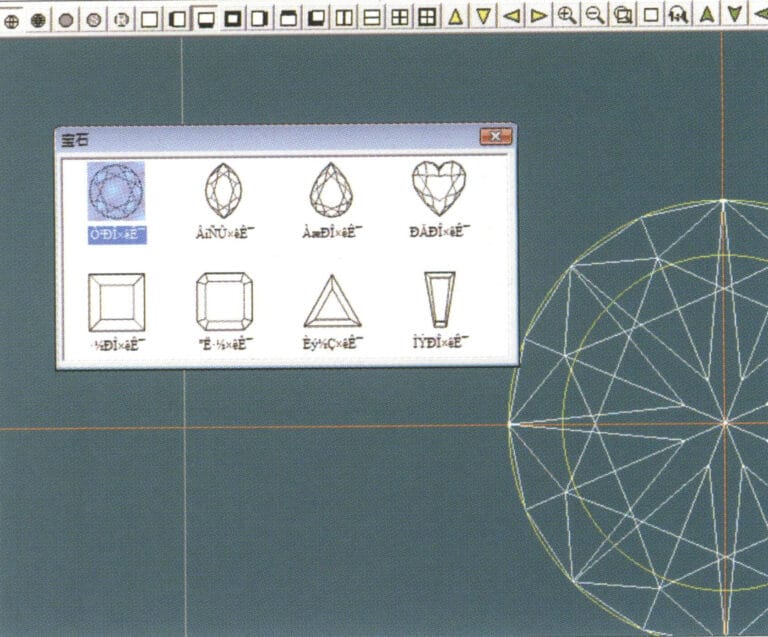
4.Gem "ダイアログボックスに入り、該当する宝石を選択して確定する。
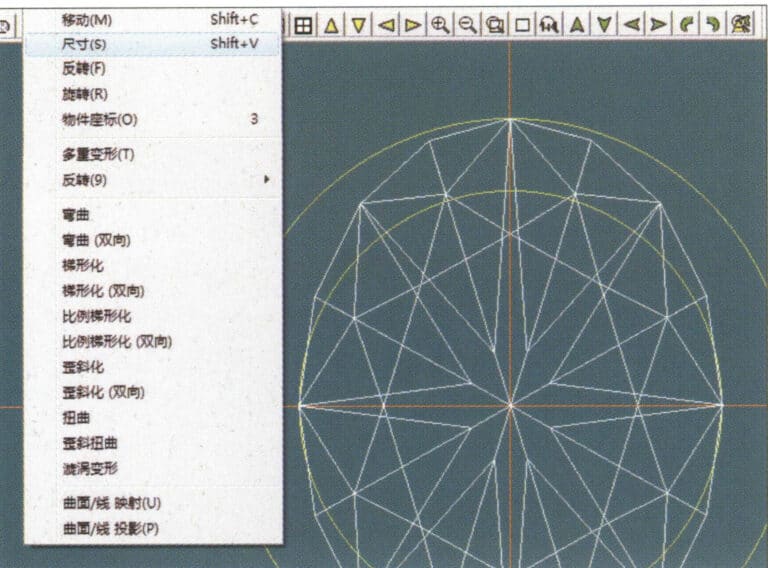
5. Select "Deformation" > "Size" from the menu bar to change the round gemstone into an oval gemstone
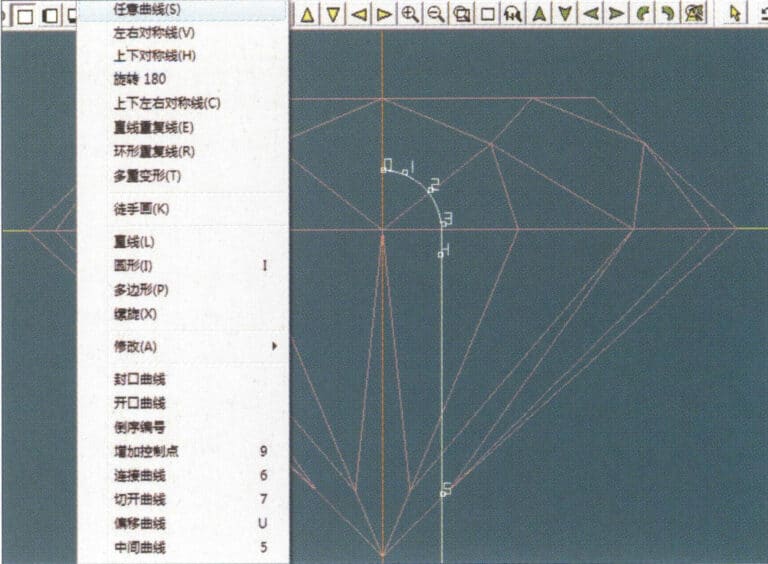
6. Select "Curve" > "Freeform Curve" from the menu bar to draw a claw-shaped guideline
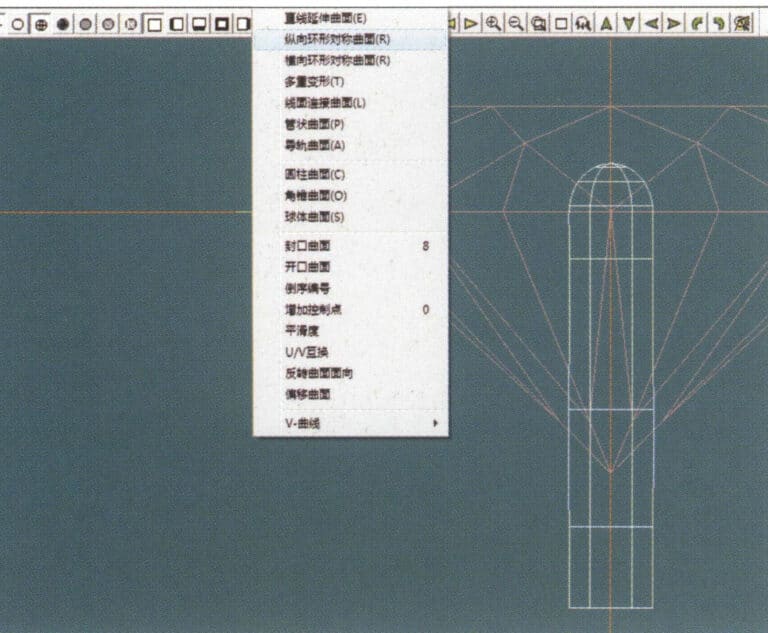
7. Select "Surface" > "Longitudinal Circular Symmetrical Surface" from the menu bar, and draw a claw shape
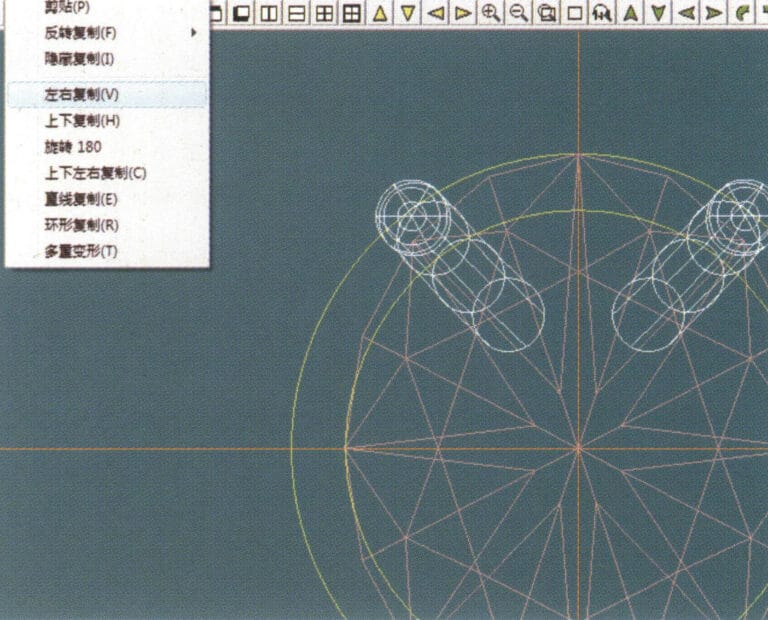
8. Select "Copy" > "Copy Left and Right" from the menu bar to copy the claw shape
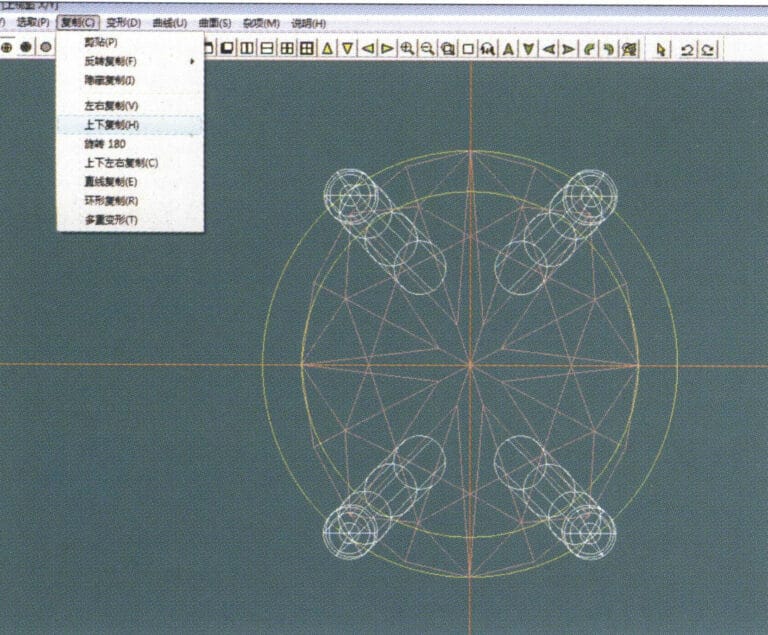
9. Select "Copy" > "Copy Up and Down" from the menu bar to copy the claw shape again
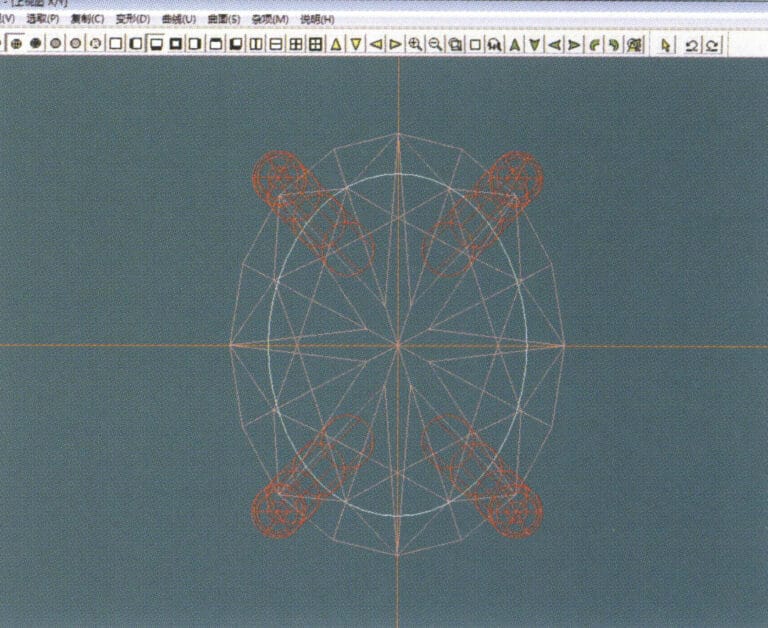
10. Select "Deformation" > "Size" from the menu bar to change the circular guideline to an elliptical guideline
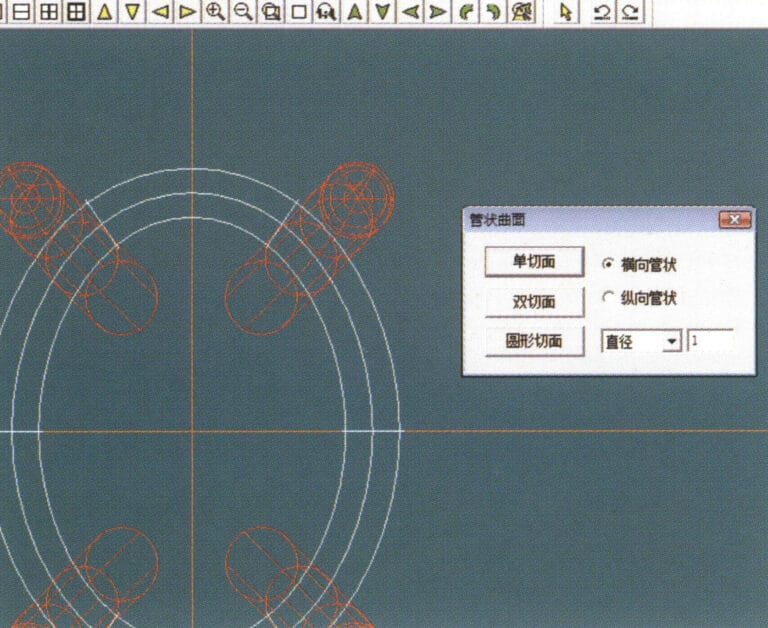
11. Select "Curved Surface" > "Tubular Surface" from the menu bar, enter the relevant values in the "Tubular Surface" dialog box and confirm
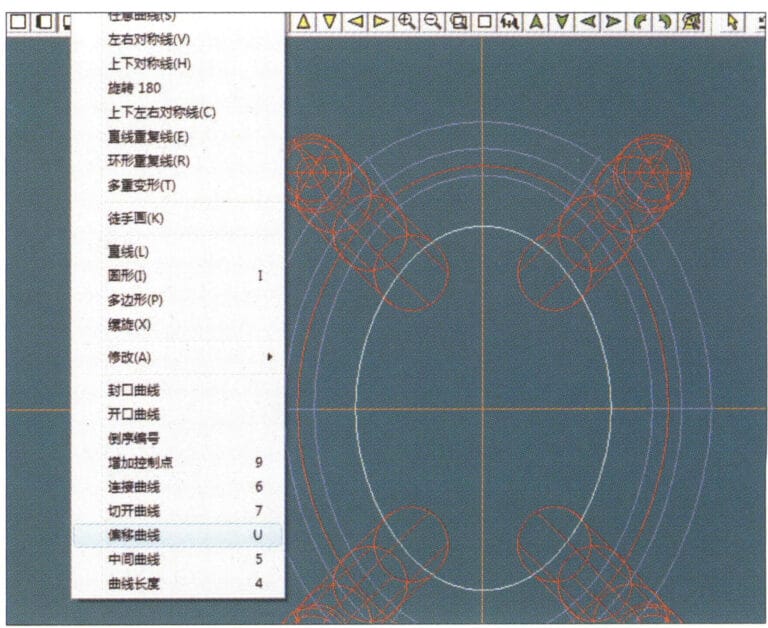
12. Select "Curve" > "Offset Curve" from the menu bar
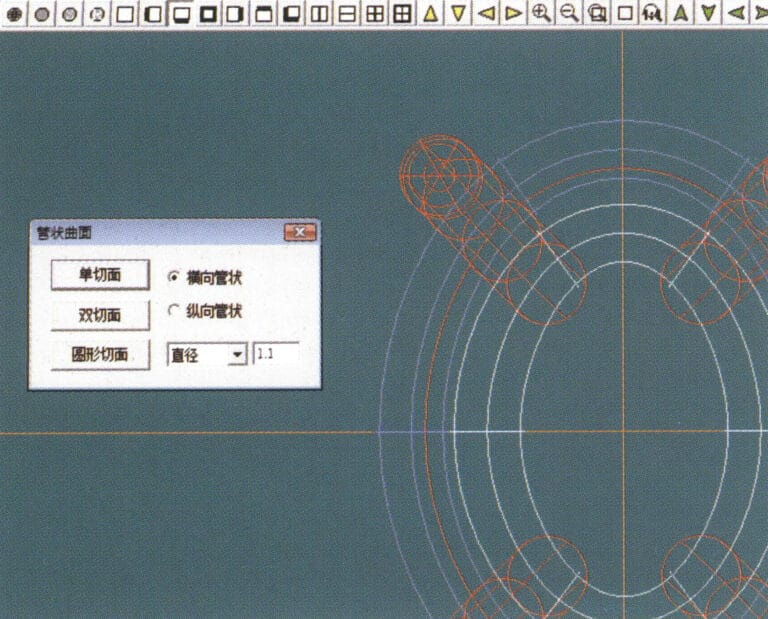
13. Select "Surface" > "Tubular Surface" from the menu bar, enter the relevant values and confirm
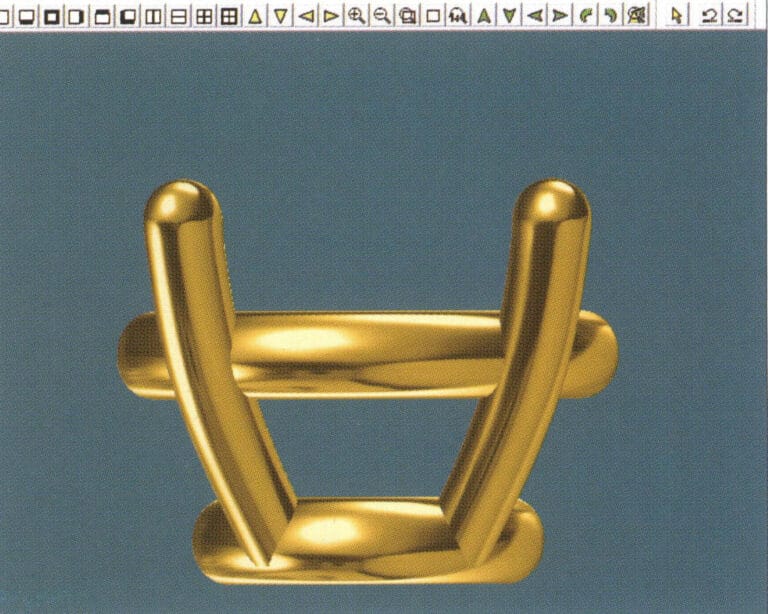
14. Select "View" > "Shadow Map" from the menu bar to examine the shadow effects and inspect the setting
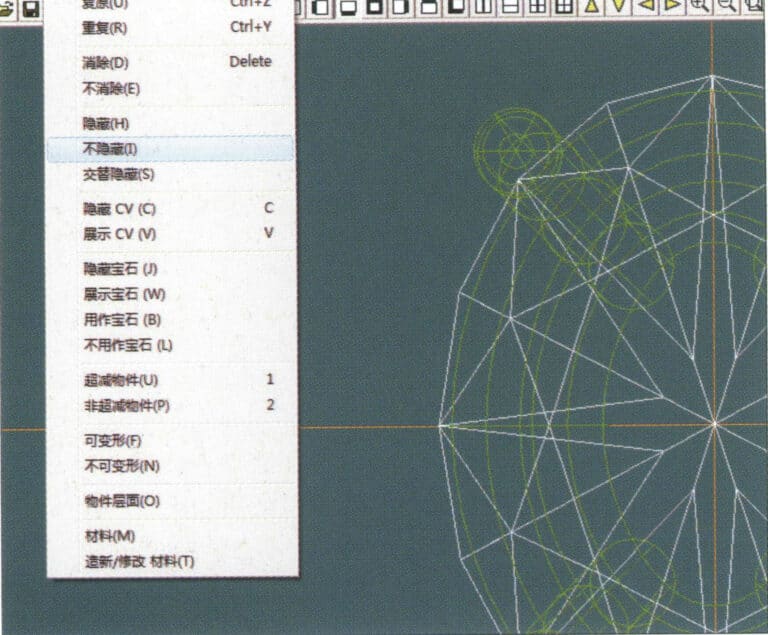
15. Select "Edit" > "Unhide" from the menu bar to display the hidden gems
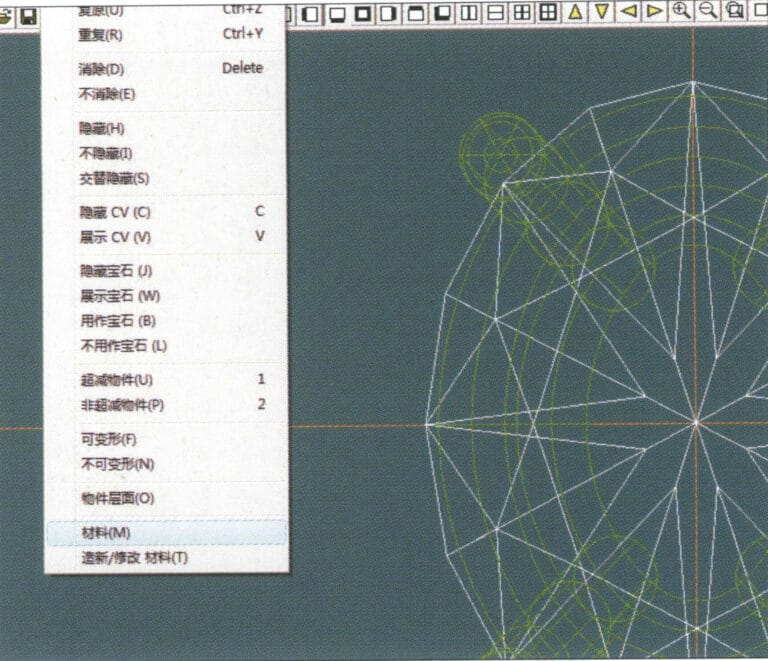
16. Select "Edit" > "Materials" from the menu bar
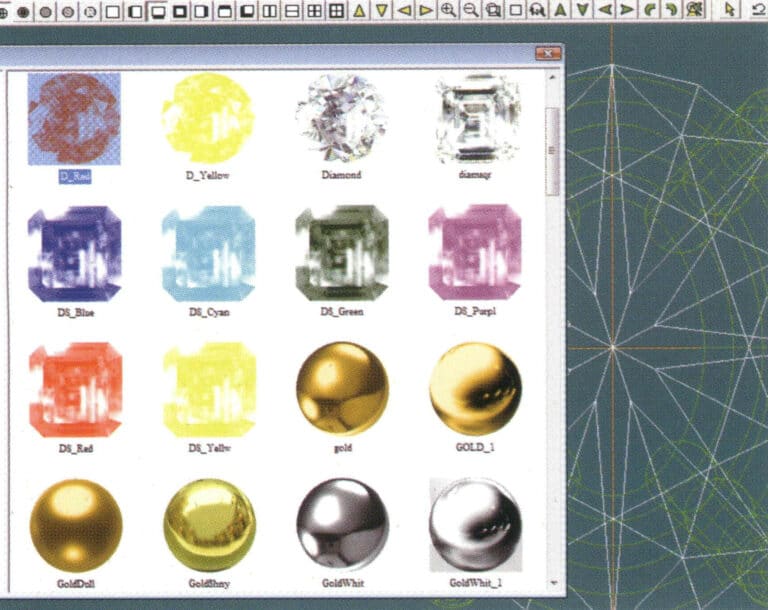
17.Material "ダイアログボックスに入り、ルビーを選択し、確認する。
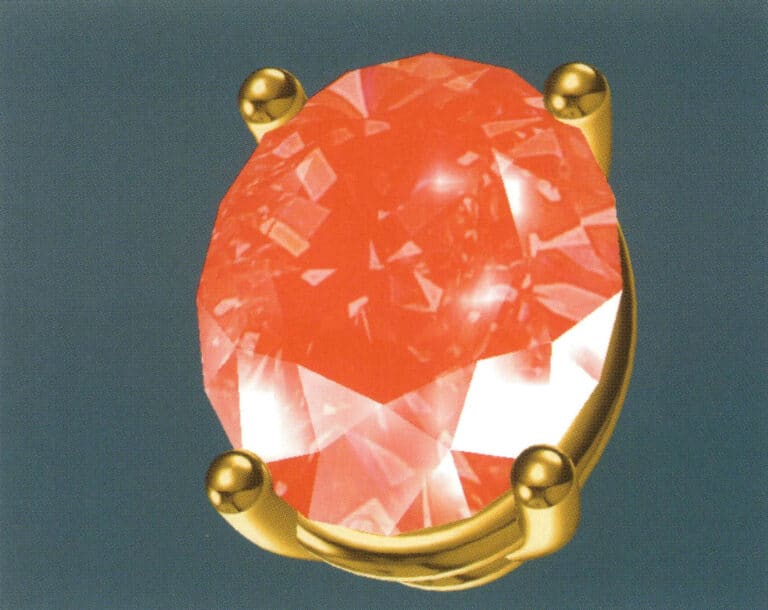
18. Select "View" > "Shadow Map" from the menu bar to examine the shadow effects
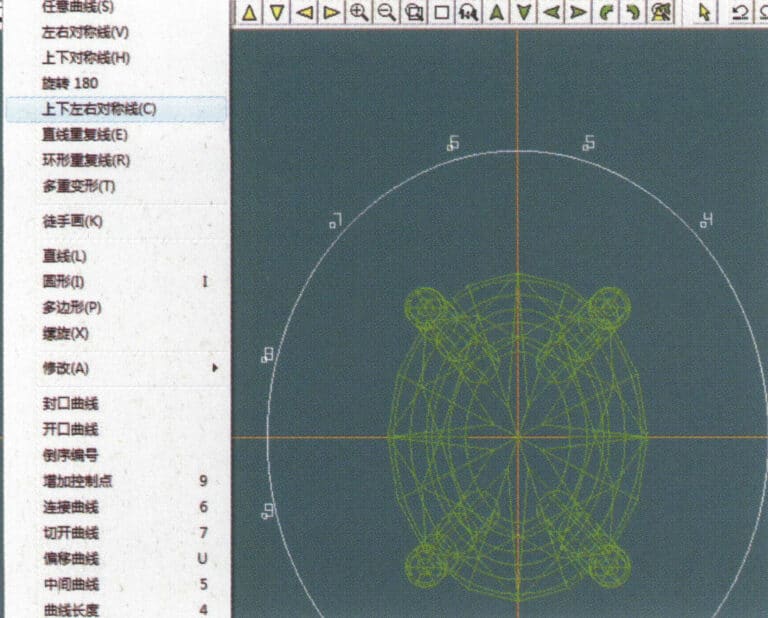
19. Select "Curve" > "Vertical and Horizontal Symmetry Line" from the menu bar as the auxiliary line for the outer circle
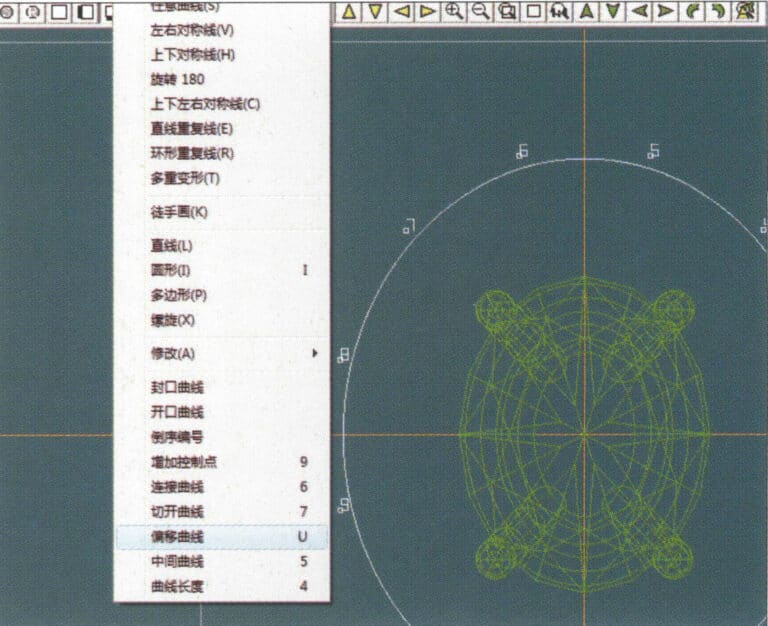
20. Select "Curve" > "Offset Curve" from the menu bar

21.オフセット曲線」ダイアログボックスに入り、内円の補助線として該当する値を入力し、確定する。
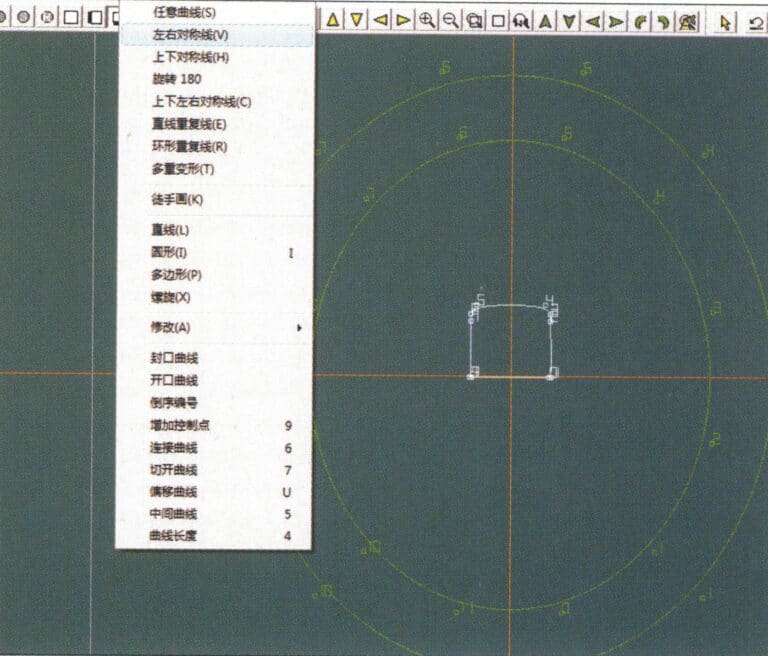
22. Select "Curve" > "Left-Right Symmetrical Line" from the menu bar as the cross-section of the coil
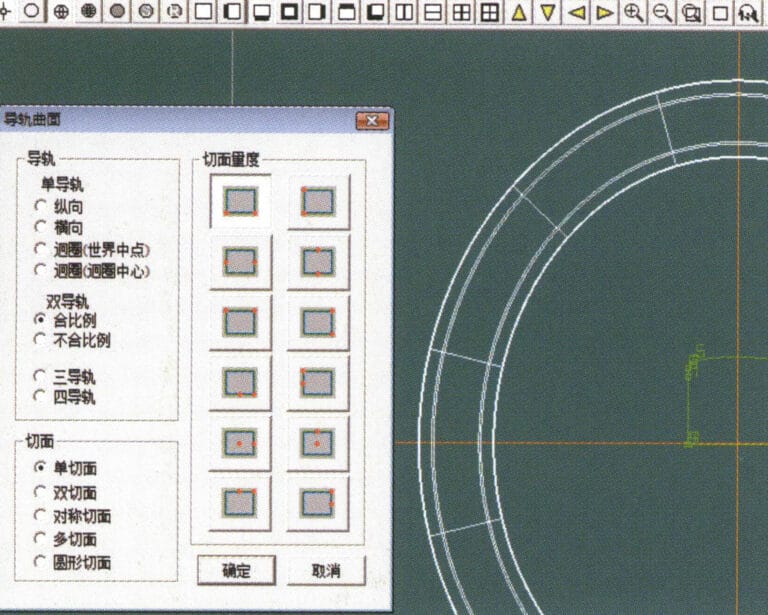
23. Select "Curved Surface" > "Rail Surface" from the menu bar to enter the "Rail Surface" dialog box, select the relevant options and confirm
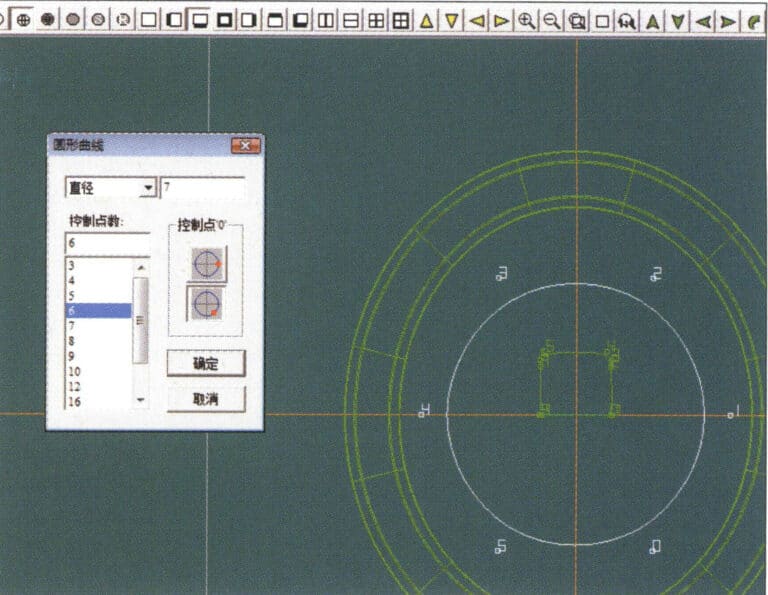
24. Select "Curve" > "Circular Curve" from the menu bar, enter the relevant values in the "Circular Curve" dialog box, and confirm; left-click on one curve as the left guide curve, click on another curve as the right guide rail, and then select the coil cross-section as the cross-section of the guide rail surface; once completed, it serves as the auxiliary line for the outer circle of the chain threading position
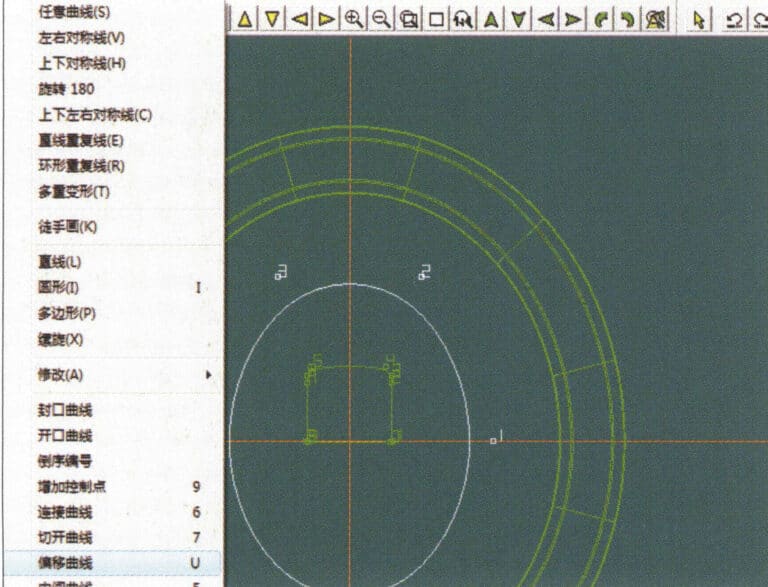
25. After completing the outer auxiliary lines for the chain position, select "Curve" > "Offset Curve" from the menu bar
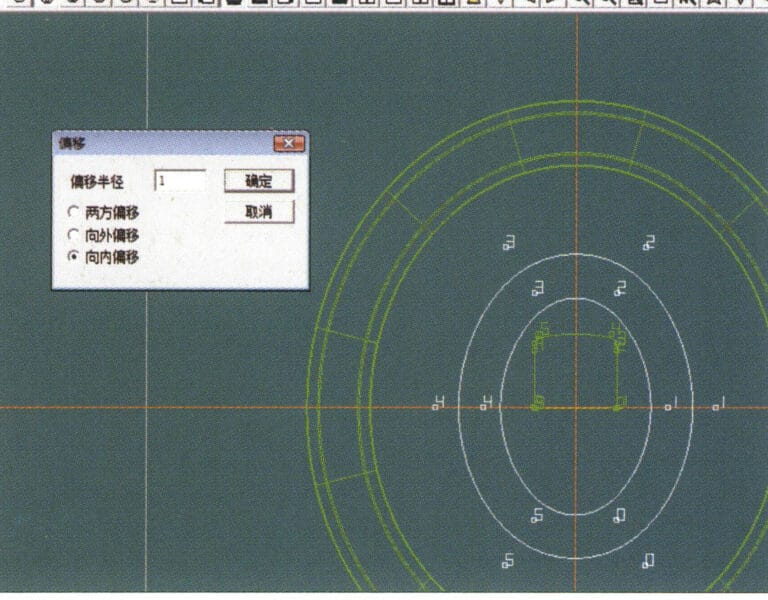
26.Offset Curve "ダイアログボックスに入り、関連する値を入力し、確定する。
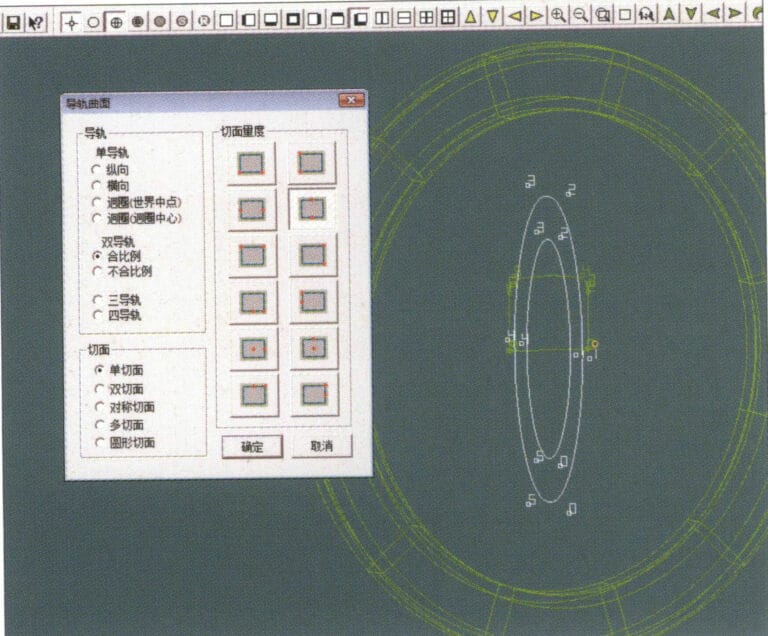
27. Select "Surface" > "Rail Surface" from the menu bar to enter the "Rail Surface" dialog box, select the relevant options and confirm, left-click on a curve to set it as the left rail curve, click on another curve to set it as the right rail, and then select the coil cross-section as the cross-section of the rail surface
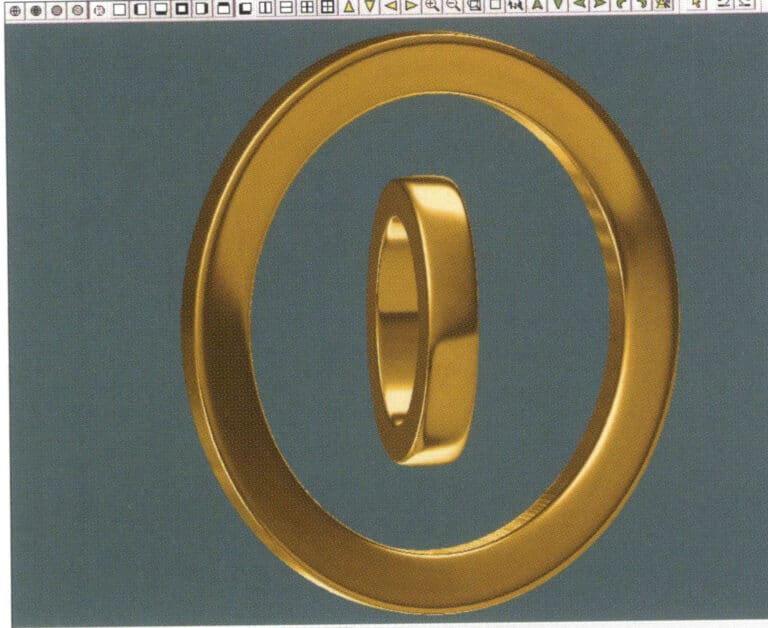
28. Select "View" > "Shadow Map" from the menu bar to inspect the shadow effects
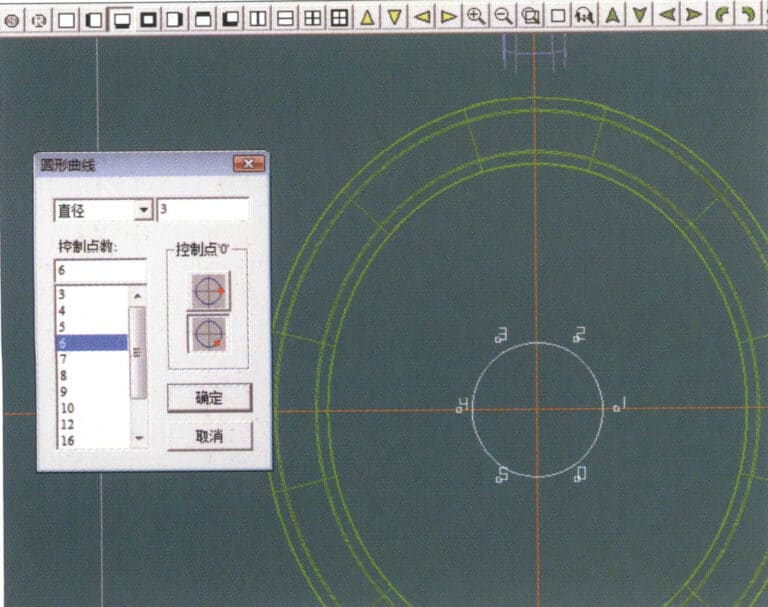
29. Select "Curve" > "Circular Curve" from the menu bar, enter the relevant values and confirm
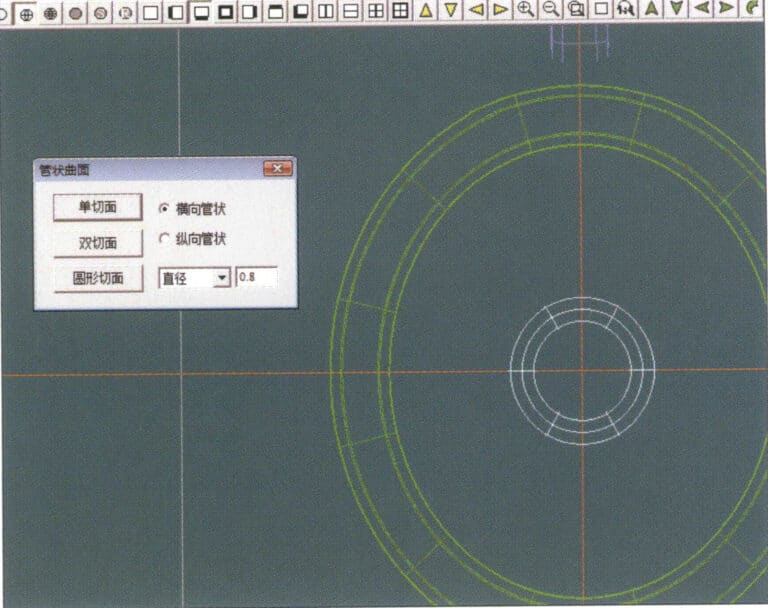
30. Select "Curved Surface" > "Tubular Surface" from the menu bar, enter the relevant values and confirm
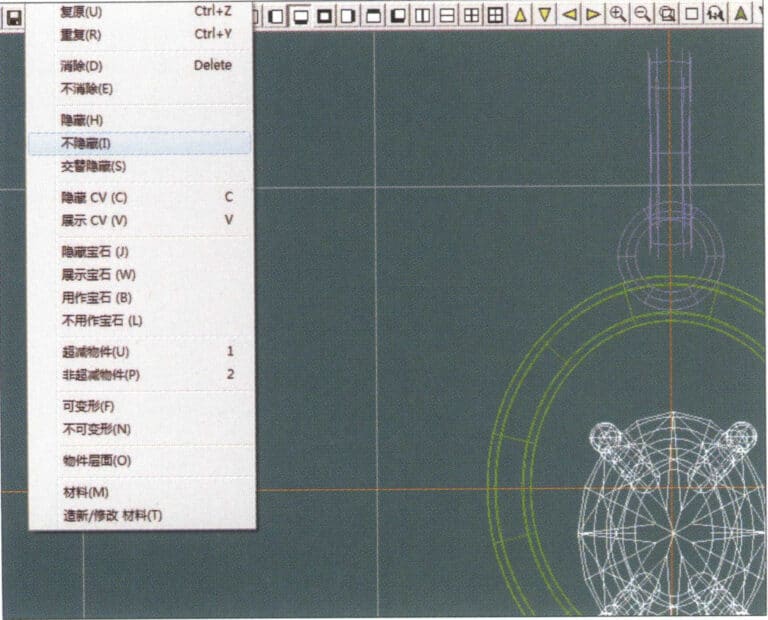
31. Select "Edit" > "Unhide" from the menu bar to display the hidden objects
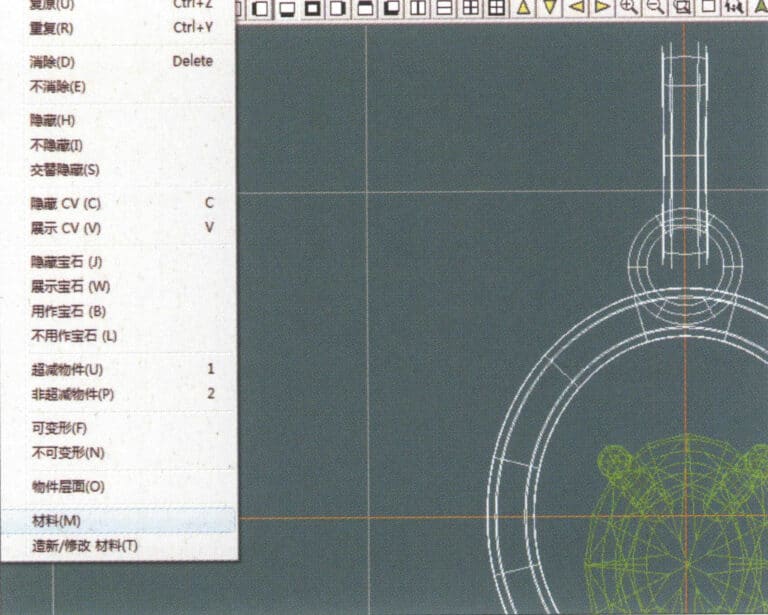
32. Select "Edit" > "Materials" from the menu bar
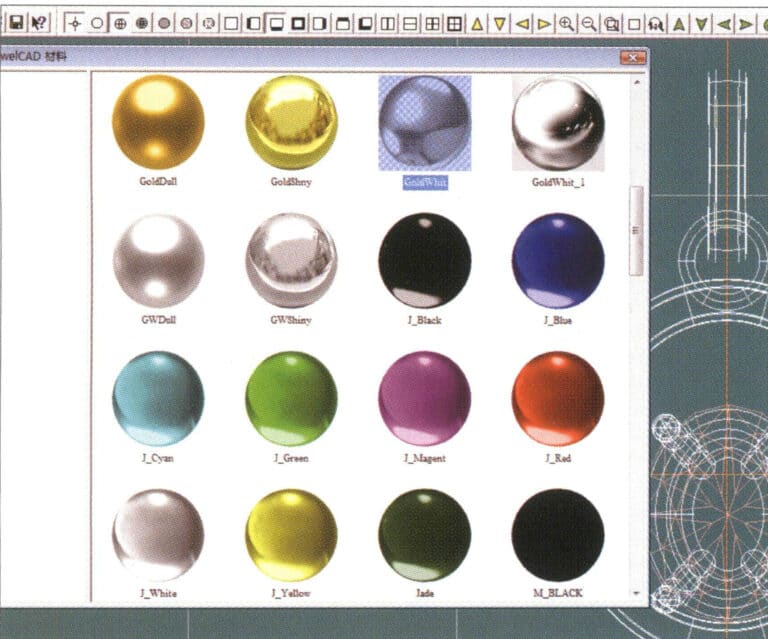
33.材料」ダイアログボックスに入り、該当する材料を選択し、確定する。
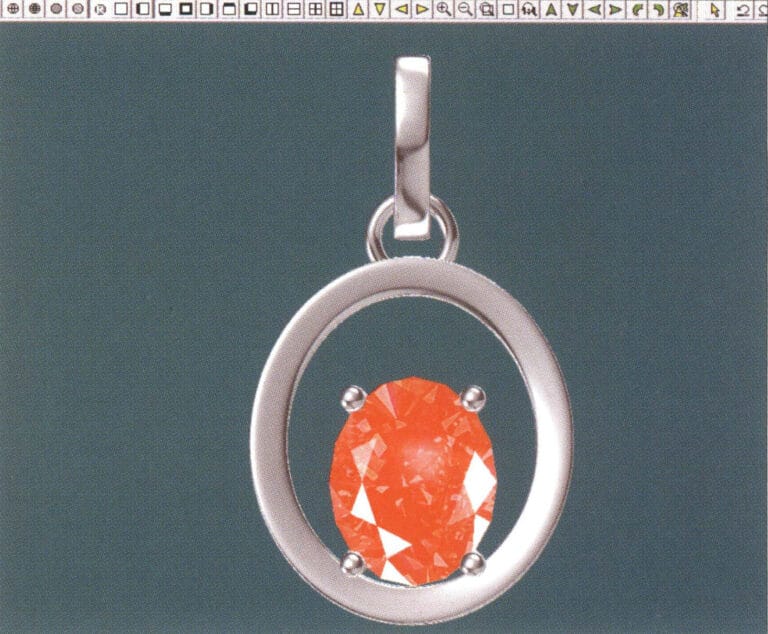
34. Select "View" > "Shadow Map" from the menu bar to inspect the shadow effects
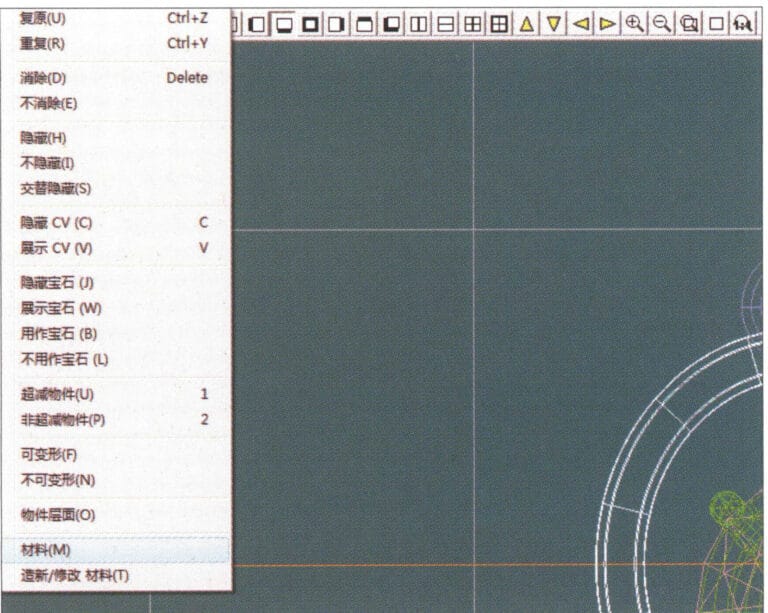
35. Select "Edit" > "Materials" from the menu bar
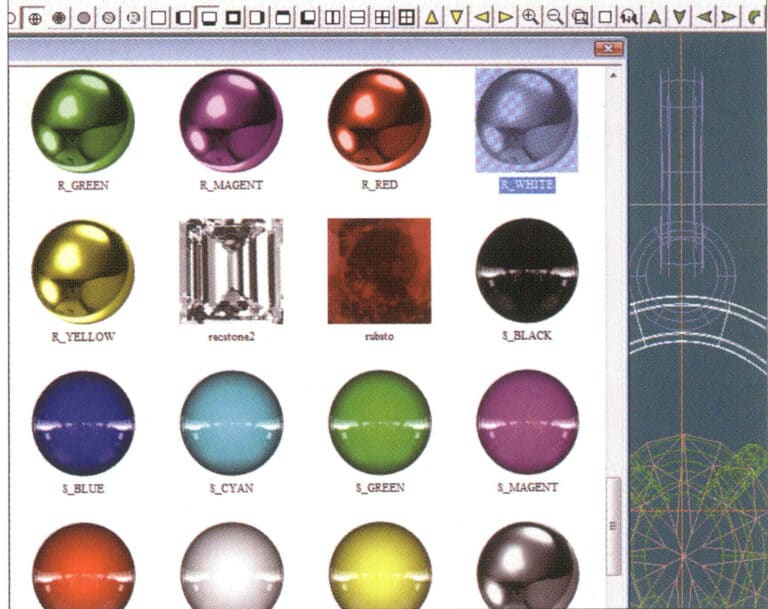
36.マテリアル」ダイアログボックスに入り、該当するテクスチャーマテリアルを選択して確定します。
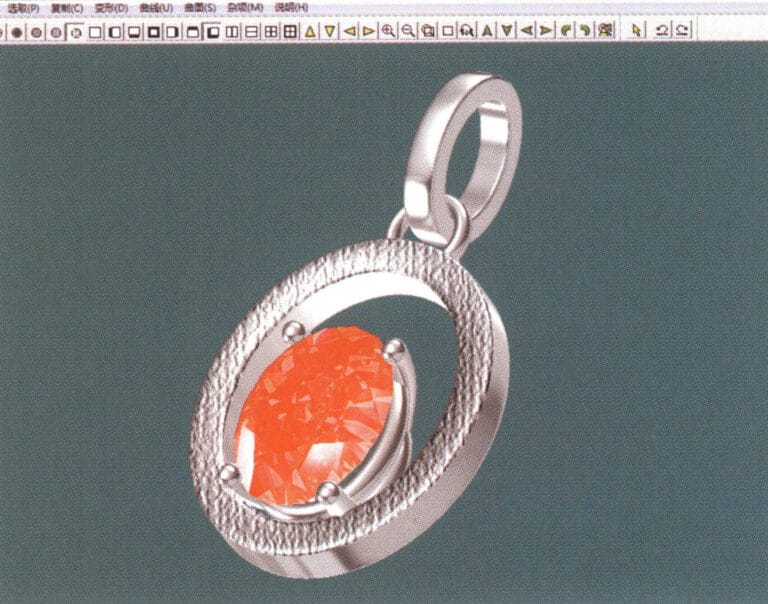
37. Select "View" > "Shadow Map" from the menu bar to inspect the shadow effects
38. Select "File" > "Save As" from the menu bar to save the file


