Hogyan kell csinálni ékszer befejező folyamat?
Mastering Jewelry Finishing: Techniques and Equipment Guide
The jewelry finishing process involves assembling, fitting, welding, and rough surface processing of defective jewelry pieces from lost-wax casting (mold pouring) using manual techniques and equipment.
The tools used in the jewelry finishing process are diverse, with commonly used tools including welding tools, flex shaft grinder, ring mandrel, pit iron, hand measuring tools, calipers, various files (coarse, fine, round, flat, triangular), various types of machine bur, saw bows, saw blades, scissors, flat-nose pliers, hammers, welding clamps, welding flux, tweezers, sandpaper, sanding sticks, and various stamps.
Commonly used equipment includes a tablet press, water welding machine, laser welding machine, tunnel furnace, etc.
In the jewelry-making process, jewelry finishing is a very important procedure, and the quality of the mold for jewelry castings will directly affect the quality of the final jewelry product. Technicians engaged in jewelry finishing must master the following skills to produce qualified and exquisite jewelry inlays.
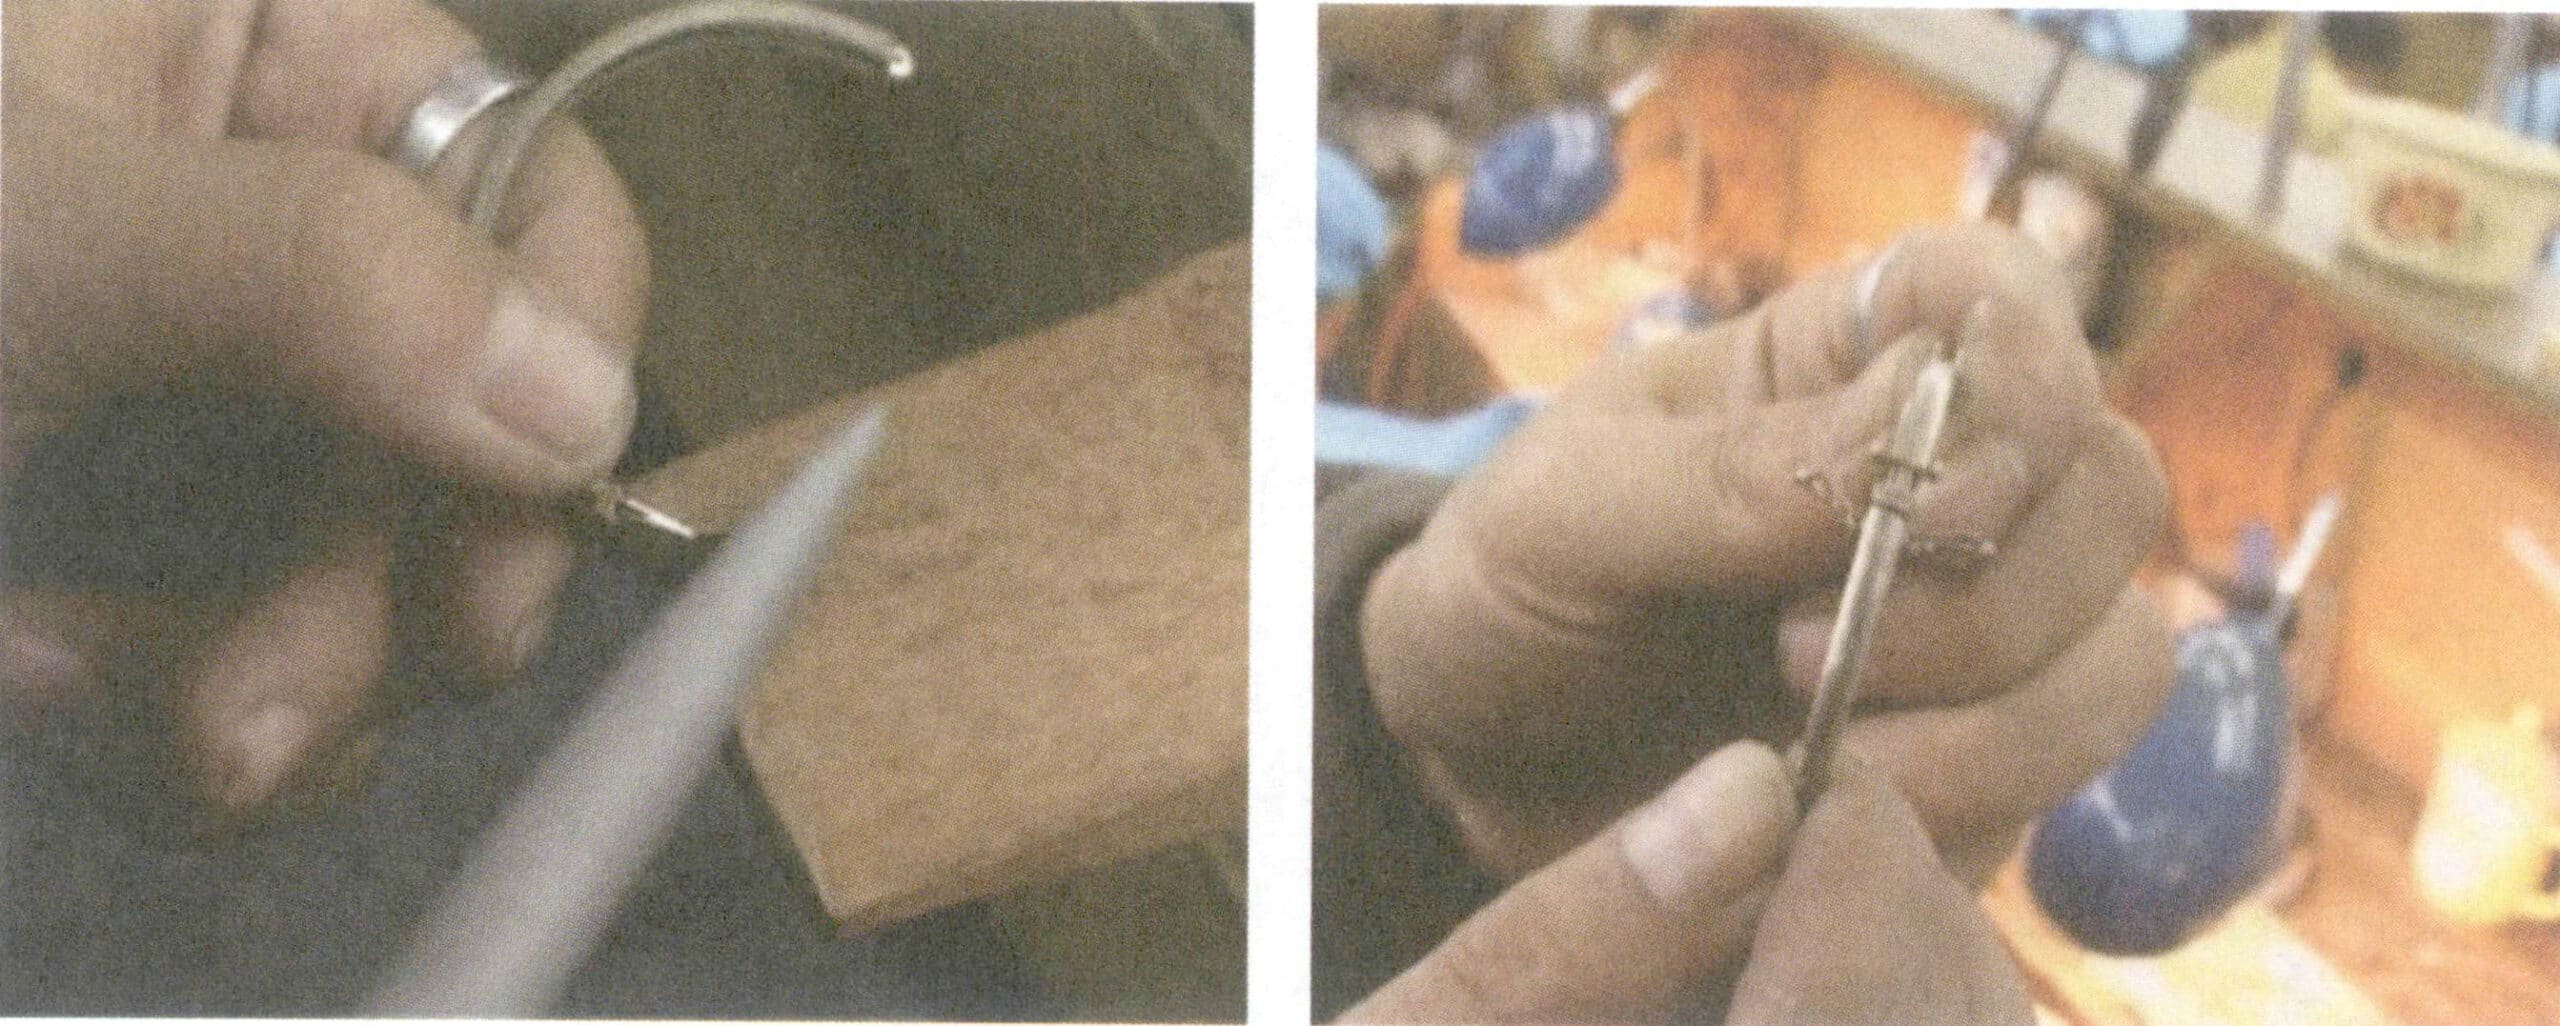
(1) The flex shaft grinder is one of the most commonly used tools in the jewelry finishing process. First, one must be proficient in using the flex shaft grinder and be able to select various types of machine bur according to the operational purpose and requirements. Secondly, one must understand the structure of the flex shaft grinder and be skilled in the replacement and maintenance of key components such as the motor, axis, flex shaft grinder handpieces, and speed pedal; and be able to proficiently use the flex shaft grinder to complete operations such as grinding, drilling, polishing, and finishing.
(2) The saw bow is commonly used in jewelry finishing. For example, the sprue line left on jewelry castings needs to be sawed off with the jeweler’s saw; if you want to enlarge or reduce the ring’s opening, the jeweler’s saw is also required. During the jewelry finishing process, one should master the use of the jeweler’s saw skillfully, being able to see various patterns and geometric shapes freely on metal sheets.
Basic Skills – Sawing Technique Video
Basic Skills – Filing Technique Video
Basic Skills – Welding Technique Video
(5) The use of hammers (including iron, rubber, etc.) during molding is also very frequent. Using a hammer seems simple, but if one is not skilled in jewelry processing, it is easy to leave marks on the surface of the jewelry workpiece, which can greatly affect subsequent processing (such as grinding, polishing, etc.). The ring size is slightly small and needs to be placed on a ring mandrel and expanded with a hammer; this requires gently tapping with the hammer and not applying too much force. Otherwise, the ring shank may break. Mastering the force of the hammer is one of the basic skills that must be grasped in the molding process.
(6) Having a certain aesthetic ability is also one of the essential requirements for engaging in the molding process. If the jewelry produced after molding is crooked and has a pockmarked surface, it will severely affect the quality of the jewelry.
In summary, the molding process is one of the most important skills in jewelry making.
Tartalomjegyzék
SECTION I Molding Processes for Different Types of Jewelry
1. The molding process of chain jewelry
For defective pieces of chain jewelry (including bracelets, necklaces, etc.), it is usually necessary to correct the shape of the defective piece to meet design requirements, then connect the chain links, and go through processes such as filing, assembling, welding, sanding, and finishing to combine them into a perfect piece of jewelry. The molding process of chain jewelry includes the following steps.
1.1 Shaping
Shaping is the process of correcting the shape of the chain jewelry blank according to design requirements.
The main tools used are flat-nose pliers, tweezers, iron plates, rubber hammers, small knives, ring sticks, etc.
Key points of the operation process:
Observe the deformation of the defective parts and select the correction tools. Use flat-nose pliers to correct the deformed jewelry workpiece (Figure 4-1), or place the jewelry workpiece on an iron plate and use a rubber hammer. Apply force evenly when clamping and hammering to prevent the jewelry workpiece from deforming in the opposite direction.

1.2 Sprue
Filing the sprue means grinding it on each defective chain jewelry piece to make it flat.
The main tools used are file, round-nose pliers, flat-nose pliers, etc.
Key points of the operation process:
Hold the blank with the left hand or clamp it with flat-nose pliers, then support it against the workbench, and use the file with the right hand to fill the sprue flat (Figure 4-2). When using the file, generally use the flat surface of the file (sometimes, depending on the condition of the defective part, choose to use a different part of the file). Be careful when filing the sprue; apply even force to prevent wear on other parts of the jewelry workpiece.

1.3 Connect and assemble Chain
Assemble the chain means connecting each link/Segment of the chain jewelry to form a preliminary shape.
The main tools used are flat-nose pliers, cutting pliers, round-nose pliers, etc.
Key points of the operation process:
There are five common methods for linking chains: loop link, middle link, bottom link, side link, and hinge link. The method for linking necklaces usually uses the side link. The method for linking bracelets usually uses the bottom and hinge links. Below, we will focus on the bottom and hinge link methods.
- Bottom link. First, straighten the linking tongue and test whether the link can pass through the corresponding connection hole. If the hole is small, use a teeth bur to enlarge the connection hole until it fits. Use flat-nose pliers to slightly bend the link tongue and insert it into the connection hole of the corresponding blank. the connection points between the chain links should be compact and fit closely, with flexible combinations and uniform distances. The overall chain body should be balanced without ups and downs (Figure 4-3).
- Hinge link. Choose a metal wire of the same color as the damaged part according to the size of the hinge hole, and assemble each damaged part as required. Pass the line through the hinge hole, and then use bur-nose pliers to link it. After linking, ensure that the chain body is not bent and does not show any ups and downs (Figure 4-4).

Figure 4-3 Bottom link chain

Figure 4-4 Dropped Line Hook Chain
Linking Chain Video
1.4 Welding Forming
Welding forming refers to welding the connected chain links to secure the joints.
The main tools used are welding tools, welding clamps, tweezers, welding flux, welding tiles, cutting pliers, etc.
Key points of the operation process:
Use cutting pliers to cut the metal welding piece (material) into thin strips or a small section, then use a torch to melt it into spherical particles on the welding tile. Dip the connected chain into borax water (borax + alcohol), ignite the torch, and aim it at the weld joint, then use a small wooden stick to apply a bit of borax at the weld joint. Use tweezers to pick up the melted metal welding, lightly dip it in borax, and move it to the weld joint (Figure 4-5). Use the torch to melt the metal welding at the weld joint, securing the weld.
When welding, the same content and color of solder should be selected. The welded chain links should be able to move flexibly between each other, and there should be no unmovable welding, false welds, or incomplete welds. Re-welding is required if false welds, incomplete welds, or dead unmovable welding links.

Welding Chain Video
1.5 Manual processing of tongue clasps
The production of tongue clasp can be divided into machine processing and manual processing. The machine-processed tongue clasp can be welded after filing the sprue. Welding can then be performed to finalize the necklace. The manually processed tongue clasp must be made from raw materials by hand.
The main tools used are file, cutting pliers, bow saw, saw blade, caliper, flat-nose pliers, etc.
Key points of the operation process:
Select suitable metal springs, shape the chosen metal springs with a file or cutting pliers according to the size of the chain, and measure the length of the tongue clasp box with calipers to determine the length of tongue of clasp. Bend the spring at the appropriate position with flat-nose pliers to make it like duck tongue shape, and weld a button at the end of the shorter side of the tongue clasp (Figure 4-6).

Necklace processing of tongue clasps Video
1.6 Clasp Adjustment
Adjustment means trimming the tongue clasp and the box to fit tightly together and open/close smoothly.
The main tools used are flex shaft grinder, welding tools, files, bow saw, saw blade, flat-nose pliers, tweezers, teeth bur, welding tile, cutting pliers, etc.
Key points of the operation process:
Install the teeth bur on the flex shaft grinder handpieces, step on the switch, and use the teeth bur to sweep away the burrs and metal beads inside the tongue box, making the tongue box square and smooth. Insert the tongue into the tongue box, check the fitting between the two (Figure 4-7), determine the areas that need repair, and make adjustments. After adjusting and fitting the tongue and the tongue box, use the teeth bur to create a small groove 1mm from the opening and create a small groove at the spring part of tongue, ensuring the two small grooves interlock. After interlocking, there should be no gaps, and the joint should be tight.
Pass a metal wire through the side of the tongue’s end, and use pliers to bend the metal wire into a square coil, securing it to the latch column on the side of the tongue box. Then, burn a small piece of metal wire with a torch to form a bead and weld this bead at the opening of the metal ring. Secure the metal wire ring and use round-nose pliers to compress its center, shaping the metal wire ring into an number “8” shape, referred to as the number “8” shape (Figure 4-8). Adjust the number “8” shape to ensure it is appropriately tight.

Figure 4-7 The number “8” shape of secure latch

Figure 4-8 Processing the number “8” shape of secure latch
1.7 Alum Water boiling
After welding jewelry pieces, a black-gray substance forms on the surface. This can be mostly removed through the alum water boiling process, which helps clean the impurities on the surface of the jewelry workpiece.
The main tools used are welding tools, tweezers, welding tiles, an ceramic pot, a lighter, etc.
Key points of the operation process:
Place the jewelry workpiece into a pot with alum and place the pot on the welding tile. Step on the air pump, ignite the torch and direct the flame to the lower end of the alum pot to heat until the alum water boils. Use tweezers to turn the jewelry workpiece and remove the black substance from it. Then, take the jewelry workpiece out of the alum water pot and wash it with clean water. Otherwise, white alum will adhere to the surface after the jewelry workpiece dries.
1.8 Chain grinding
The process of Chain grinding involves removing rough burrs, interlayer flash, and metal beads from the surface of the jewelry workpiece, repairing corners to make the surface shape smooth and even, and ensuring flexible rotation.
The main tools used are a file, flex shaft grinder, teeth bur, ball bur, etc.
Key points of the operation process:
Use a file to smooth out the rough areas on the surface of the jewelry workpiece and remove burrs. Then, attach the teeth bur to the flex shaft grinder to clean the interlayer, flash, metal beads, and areas the file cannot reach. The bottom of the jewelry workpiece should be cleaned with a ball bur to meet the process requirements.
During the chain grinding process, the overall angle of the jewelry workpiece must not be damaged. If sand holes appear, a sand hole rod should be attached to the flex shaft grinder handpiece to remove the sand holes (see Figure 4-9). Then, the jewelry workpiece should be properly secured again.

1.9 Sanding
The purpose of sanding is to remove the filing marks on the jewelry workpiece, making the surface smoother and more refined.
The main tools used are a flex shaft grinder, sanding disc, sanding stick, sanding tip, needle style sandpaper , sanding wood bar, etc.
Key points of the operation process:
Use 400 # sandpaper to make sanding sticks, tips, sanding discs, needle style sandpaper, sanding wood bar, etc. Choose the appropriate tool based on the different positions of the jewelry workpiece, and sand each part of the jewelry workpiece to a smooth finish (Figure 4-10). Do not damage the jewelry workpiece’s patterns, lines, or overall angles when sanding. If sand marks appear on the jewelry workpiece, they should be filled in before sanding.

Sanding Video
Chain Jewelry Molding Video
2. The jewelry finishing process of bangle
2.1 Filing the sprue (the molding process method for chain-type jewelry)
2.2 Parts Assembling
Parts Assembling means connecting the various components of the bangle according to design requirements to form a preliminary shape.
The main tools used are flat-nose pliers, cutting pliers, round-nose pliers, bow saws, saw blades, flex shaft grinder, welding tools, etc.
Key points of the operation process:
Choose the metal pin based on the bangle’s hinge tube hole size. Assemble the bangle as required, ensuring the tube holes are aligned. Pass the chosen metal pin through the tube (Figure 4-11) and use cutting pliers to trim any excess connecting metal pin, leaving the metal pin slightly exposed at both ends of the tube. Adjust the connection points of the bangle accessories to ensure they rotate smoothly.
When there are metal beads or burrs inside the bangle hinge tube that obstruct the metal pin, a tiny bur can be installed on the flex shaft grinder to sweep them away. If the metal pin ends are fixed by welding, the metal pin should be flush with both ends of the tube; if the metal pin ends are fixed with prongs, the metal pin ends should be slightly longer.

2.3 Handcrafted Tongue clasp Making (Same Chain Jewelry Mold Craft Method)
Karkötő Processing of Tongue Clasp Video
2.4 Welding
Welding is the process of securely combining the various components of the formed bangle.
The main tools used are cutting pliers, flat-nose pliers, welding tools, welding tiles, welding clamps, files, etc.
Key points of the operation process:
step on the foot pedal of the air pump, ignite the torch, and firmly weld the metal pin at both ends of the tube. Choose the K gold base plate according to the size of the bangle tube, soften it with the torch, bend it along the curve of the bangle hinge tube with flat-nose pliers, trim it with a file, then weld the base plate to the bottom of the tongue box, and weld the tongue to the bangle as required.
The color and content of the metal weld must match the jewelry workpiece, and there should be no false welding or fake welding phenomena.
2.5 Shaping
Shaping is to corrects the bangle’s shape, making it oval and suitable in size.
The main tools used are a bangle mandrel and a rubber hammer.
Key points of the operation process:
Insert the bangle’s tongue into the tongue box, then place the bangle on the bangle mandrel. Align the position of the bangle and gently tap the bangle body with the rubber hammer to ensure a tight fit with no gaps (Figure 4-12). When tapping with the hammer, the force should not be too strong. Otherwise, it may deform the bangle hinge tube or leave marks on its surface.

Bracelet Shaping Video
2.6 Clasp Adjustment (Same as Chain Jewelry Craft Method, Figure 4-13)
2.7 Boiling Alum Water (Same as Chain Jewelry Craft Method)
2.8 Bangle grinding
Bangle grinding involves removing the rough burrs, metal beads, and interlayer flash edges from the bangle, making its surface smoother and more streamlined.
The main tools used are a flex shaft grinder, teeth bur, ball bur, file, sandpaper stick, etc.
Key points of the operation process:
Install the teeth bur on the flex shaft grinder, use the teeth bur to sweep away the burrs and metal beads inside the tongue box, and make the box shape square. Use the teeth bur to clean the dead corners and spare edges of the bangle, making these areas smooth. Install the ball bur on the flex shaft grinder and grind the bottom (Figure 4-14). Use a sliding file to smooth out the burrs and rough areas on the bangle, ensuring a smooth shape (Figure 4-15). Install the sanding stick on the flex shaft grinder to grind t the sand holes that appears on the bangle.
When filing, special attention must be paid to avoid grinding the jewelry workpiece into defects or causing the jewelry workpiece to break.

Figure 4-14 Grinding the bottom

Figure 4-15 File (metalworking and woodworking)
Bangle grinding Video
2.9 Sanding (same as chain jewelry mold processing method)
After Sanding, color blasting treatment is required if there are still spots on the jewelry workpiece.
3. The jewelry finishing process of the ring
3.1 Shaping
Shaping is the process of using certain techniques to make the inner shank of the ring round and standardized.
The main tools used are a ring mandrel and a hammer
Key points of the operation process:
Place the ring onto the ring mandrel and position the ring correctly. Strike the end of the ring mandrel with a hammer to create vibrations, checking if the ring shank is round. If the ring’s inner shank does not match the ring mandrel, lightly tap the sprue position of the ring with a hammer to make it fit (Figure 4-16). If the ring size is too small, use the ring mandrel to expand the ring size until it is appropriate. Be careful to avoid striking the decorative head of the ring with the hammer, and do not apply excessive force when expanding the size, as this may cause the ring to be scrapped due to oversizing.

3.2 File Sprue
The sprue filing is to grind the sprue mark on the ring blanks to make it smooth.
The main tools used are coarse files, flat files, half-round files, triangular files, etc.
Key points of the operation process:
First, use a coarse file to file the sprue smoothly, then use a flat file to adjust the size of the ring shank’s edges to make it smooth.
3.3 Engraving
Engraving is engrave letters or marks on the appropriate parts of the jewelry workpiece, indicating characteristics such as content, carat weight, and size.
The main tools used are a hammer, letters stamp, fire torch, sealing wax platform, etc.
Key points of the operation process:
Prepare the letters stamp according to the requirements, fix the jewelry workpiece on the sealing wax groove, and use sealing wax for fixation if necessary. Press the letters stamp onto the typing mark area and strike the top of the stamp with a hammer to leave a clear letter mark on the jewelry workpiece (Figure 4-17).
The force should be kept even when striking the letters stamp with a hammer. The letters stamp should not move to avoid overlapping and unclear letter marks.

3.4 Inlayed Accessories
Inlayed Accessories refers to welding different colored accessories at appropriate positions on the jewelry workpiece to serve as decoration.
The main tools used are welding tools, welding tiles, welding clamps, tweezers, cutting pliers, files, and flat-nose pliers.
Key points of the operation process:
Use cutting pliers to trim the sprue on the inlayed accessories and file the sprue to smooth. Carefully place the inlayed accessories in the designated position with tweezers and arrange it as required. If there are mismatched areas, adjust the jewelry workpiece with flat-nose pliers, then weld the inlayed accessories firmly (Figure 4-18).
The inlayed accessories should be smooth, and after welding, check for false welds, missed welds, and weak welds. K gold and silver ring accessories can be manually welded with welding tools. Platinum ring accessories require a higher temperature and must be welded with a water welder.

Inlayed Accessories Video
3.5 Ring grinding
Holding the ring means processing the surface of each part of the ring to make it smooth.
The main tools used are a file, flex shaft grinder, teeth bur, ball bur, sanding stick, sandpaper, etc.
Key points of the operation process:
Use a flat file to file the inner/outer/side of the ring shank separately, making the surface smooth and free of burrs, with a streamline shape (Figure 4-19). Install the teeth bur on the flex shaft grinder to sweep over areas that cannot be filed, removing any burrs and metal beads present on the ring. Then, the ball bur is installed on the flex shaft grinder to grind the bottom of the ring. Install the sand narrow stick on the flex shaft grinder to grind and remove the sand holes.
The jewelry workpiece’s overall angle and surface lines and patterns must be protected during the filing and grinding process. The half round side of the file is mainly used for filing the ring’s inner shank or arc surface. Weld repairs are required if the jewelry workpiece has large sand pits (Figure 4-20).

Figure 4-19 Filing the ring

Figure 4-20 Welded large sand pits
Ring grinding Video
3.6 Alum water boiling (same method for chain-type jewelry finishing, Figure 4-21)

Alum water boiling Video
3.7 Sanding
Sanding is used to remove the marks left on the surface of the jewelry workpiece when using files, teeth bur, and ball bur, making the surface of the jewelry workpiece smoother.
The main tools used are a flex shaft grinder, sandpaper stick, sandpaper disc/tip/needle, sandpaper wood bar, and rubber wheel.
Key points of the operation process:
Use 400 #sandpaper to make sanding sticks, sanding discs, and other polishing tools, and sand each part of the jewelry workpiece to make the surface smoother (Figure 4-22). Sandpaper wood bar is mainly used for sanding the flat surfaces of the jewelry workpiece. If the jewelry workpiece is platinum, sand it once with 1200# sandpaper, and then use a rubber wheel to polish the shiny surface of the jewelry workpiece.
Before sanding, check if the jewelry workpiece has defects such as sand pits, broken claws, or cracks. Repairs must be made before sanding if any of the above defects exist.

3.8 Hairbrush polishing
Hairbrush polishing means that the prong and claw positions should be polished to a shine before setting the stone. It is difficult to polish these areas after the stone is set in rings with prongs and claw settings.
The main tools used are a flex shaft grinder and a hairbrush.
Key points of the operation process:
Step on the switch, rotate the hair brush, make the green polishing wax contact the hair brush, and coat the hair brush with wax. Hold the jewelry workpiece tightly with both hands, press the prong and claw positions against the hair brush, and polish the jewelry workpiece’s prong and claw positions to shine through the hair brush (Figure 4-23). The new hair brush should be lightly burned with fire before use to avoid uneven bristles, and the jewelry workpiece must undergo wax removal treatment after being hair brushed.

Ring Molding Video
4. Brooch (Shirt Pin)
4.1 Shaping (same as the jewelry finishing process for chain-type jewelry)
4.2 Filing the sprue (same as the jewelry finishing process for chain-type jewelry)
4.3 Inlayed accessories (same as the jewelry finishing process for rings)
4.4 Welding pins parts
The main tools used are cutting pliers, welding tools, flat-nose pliers, tweezers, welding tiles, and welding clamps.
Key points of the operation process:
Use cutting pliers to cut a piece of metal wire suitable in color and diameter to make a brooch pin. First, straighten the metal wire, then one end of the wire is burned into a bead shape, and the bead is flattened with a hammer to a suitable degree and placed on the hinge. After making a small hole at the flattened part that aligns with the hinge, it is welded onto the hinge. The brooch pin is installed on the hinge tube of the brooch, and one end of the clasp pin is welded to the tube.
Measure the length of the metal wire, and weld the pin’s clasp to the designated position on the brooch (Figures 4-24 to 4-26). Adjust the clasp pin, sanding, and ensure its range of motion reaches 90℃ while being elastic and moving freely.

Figure 4-24 Installing the hinge

Figure 4-25 Welding brooch hinge position

Figure 4-26 Welding clasp part
Welding pins parts Video
4.5 Adjustment
The main tools used are flat-nose pliers, cutting pliers, and files.
Key points of the operation process:
measure the length of the pin, use cutting pliers to cut off the excess part, adjust the brooch and clasp to ensure they fit together smoothly, and use a file to sharpen the pin’s tail.
4.6 Boiling alum water (same method for chain-type jewelry molding)
4.7 Grinding the brooch (same method for chain-type jewelry molding)
4.8 Sanding (same method for chain-type jewelry molding)
4.9 Walnut powder polishing (see "Polishing Process" section)
5. Earrings and Pendants
The main tools used are cutting pliers, welding tools, welding tiles, tweezers, and flat-nose pliers.
Key points of the operation process:
filing the sprue, shaping, boil alum water, grinding, and sanding are the same as those for chains. Below, we mainly introduce the welding methods for earrings and ear pendants.
5.1 Welding ear pins
Place the earrings on the welding tile, and use cutting pliers to cut an appropriate length of metal wire of the same color as the ear-pin. Use a torch to melt the metal part for welding, then hold the ear-pin with tweezers and spot weld it. After that, take a small amount of borax, place the ear pin at the welding position of the earring, and weld it securely (Figure 4-27).
The ear pin must be welded straight; it should not be skewed. The flame should not be too strong during welding to avoid melting the ear-pin, making it shorter, or ruining it. After welding the ear-pin, adjust it so it and the earring can fit together smoothly.

Welding ear pins Video
5.2 Welding the teardrop bail
Clip the teardrop bail onto the jump ring and use flat-nose pliers to crimp the open jump ring. Place the pendant on the welding plate and weld the opening securely (Figure 4-28).

Welding the teardrop bail Video
Pendant Molding Video
SECTION II Mechanical Polishing Technology
The competition in the jewelry processing industry is extremely fierce today. The profit margin for companies from processing fees is much smaller than in the past, forcing companies to strengthen management and develop and adopt new processes and technologies to reduce production costs, thereby increasing their competitiveness. Since jewelry pieces have high surface quality requirements, the manufacturing costs are largely caused by the need for a smooth surface. Traditional manual polishing techniques are inefficient, have high labor costs, and result in significant metal loss, making it increasingly difficult to meet the demands of modern jewelry production.
Mechanical polishing technology has been applied in the industry for over ten years. The traditional polishing equipment includes single-barrel vibrators, hexagonal drums, and vibrators. The friction between the jewelry workpiece and the medium allows for the treatment of the surface and edges of the jewelry workpiece. Compared to manual operation, using machines for grinding and polishing has many advantages. In recent years, mechanical polishing technology has advanced rapidly, and many advanced polishing devices are increasingly being introduced into the jewelry processing industry to replace traditional manual polishing.
1. Advantages of Mechanical Polishing
(1) Improve production efficiency by using modern polishing equipment to process batches of jewelry pieces simultaneously, reducing jewelry finishing time and the number of operators.
(2) Mechanical polishing gives jewelry workpieces a higher surface brightness and can achieve consistent quality.
(3) Mechanical polishing reduces metal loss.
(4) Some jewelry with special structures can only be effectively cleaned in certain areas with the help of modern mechanical polishing technology.
2. Common types of polishing machines used in jewelry making.
2.1 Vibratory Polisher
The vibratory polisher (Figure 4-29) generally has a larger capacity and requires more abrasives but operates at a slower speed with a longer cycle. It is very suitable for polishing chain products and is often used with steel balls. Due to the lack of wastewater discharge during operation and the continuous impact, achieving a mirror-like finish on other jewelry products is difficult.

2.2 Magnetic polishing machine
Magnetic polishing machine (Figure 4-30) used in conjunction with other polishing machines, the results are very good, although the surface is often indented, but very bright even in the pit. However, it should be noted that this process must be done before grinding and polishing, otherwise it will leave indentations on the prepared surface.

2.3 Drum Polisher
The roller polishing machine (Figure 4-31) is the most traditional polishing equipment and can handle a variety of jewelry pieces. The biggest disadvantage is that there is no outlet for waste water during operation, and all kinds of wastes from grinding are left inside the cylinder. Hexagonal cylinder of continuous rotation and shock, a small part of the waste material is pressed into the surface of the jewelry workpiece (dust, friction agent, casting powder residues, etc.), leaving the surface of the stains cannot be removed by polishing.

2.4 Dipping polishing machine
Dipping polishing machine (Figure 4-32) large volume, one-time output is high, the jewelry workpiece loss is small; but consume abrasive, polishing liquid more, long working cycle. Suitable for all jewelry workpiece polishing.

Copywrite @ Sobling.Jewelry - Egyedi ékszergyártó, OEM és ODM ékszergyár
2.5 Turntable Polishing Machine
With the rotary polishing machine (Figure 4-33), which has a newly developed gap system, it is possible to achieve the smooth grinding and high-brightness polishing of manual polishing. Its chassis is a rotating disk inside a container, the top of the container is open, the walls of the container do not rotate, and the gap between the container and the disk can be less than 0.05mm, making it possible to use the finest walnut shell particles.

2.6 Drag polishing machine
The dragging polisher is shown in Figure 4-34. This surface polishing technology was introduced to the jewelry industry in 1992 and differs significantly from previous methods. During operation, the jewelry workpiece is dragged over walnut shell particles, while the walnut shell particles do not move. Each jewelry workpiece has its support position, and the surfaces of the jewelry workpieces do not come into contact, thus preventing surface damage. Compared to traditional polishing methods, it creates greater relative motion and stronger processing force, significantly reducing processing time. It has great advantages for heavy jewelry workpieces. The dragging polishing method is particularly suitable for heavy rings, clasps, and watch cases and is also applicable to many other jewelry workpieces that can be suspended on fixed supports.

Several typical polishing machine performances and characteristics are shown in Table 4-1.
Table 4-1 Comparison of Performance and Characteristics of Different Types of Polishers
| Machine Type | Expanding polishing medium | Csiszolóközeg | Előnyök | Hátrányok | Suitable jewelry workpiece |
|---|---|---|---|---|---|
| Vibratory Polisher | Faforgács, porcelándarabok, dióhéj részecskék, kukoricaliszt, acélgolyók | Ceramics, plastics | Olcsó, nagy tételek, bélyegzett alkatrészek | Long processing time, low pressure, has indentations, poor smoothness effect, cannot achieve ideal results with dry processing | Small chain, machine chain |
| Magnetic polishing machine | Steel needles | none | Bright surface, short processing time | Not smooth, has dents, steel needle will prick the surface, brightness is insufficient | Gold silk pearl, inner wall of jewelry |
| Tumbling Polishing Machine | Wooden cubes, wooden pins, walnut shell particles, jade rice flour, steel balls | Ceramic, plastic | Inexpensive | Long processing time, inconvenient processing, surface dust, surface compression | Különböző ékszerek |
| Rotary Table Polishing Machine | Dióhéj részecskék, porcelándarabok, műanyag | Ceramic, plastic | High efficiency, short processing time, machine completes 70% of the workload, fewer processes, jewelry is clean, easy to process, high surface quality | Can only handle non-heavy jewelry workpieces (up to 20g), cannot process gem seats on small chains | Most jewelry pieces, industrial products, watch cases |
| Drag Polishing Machine | Dióhéj részecskék | Dióhéj részecskék | Can polish large and heavy jewelry workpieces, no impact | Nincs nedves őrlés | Various jewelry pieces that can be fixed on a rack |
3. Polishing Treatment Methods
Polishing methods can be divided into two types: wet and dry.
3.1 Wet polishing
Ceramic, plastic polishing or steel medium are commonly used in wet polishing. Additionally, during wet processing, the friction medium and the jewelry workpiece are surrounded by the polishing liquid, which absorbs the material that has been ground away, keeping the jewelry workpiece surface clean and the grinding medium sharp. Therefore, the friction effect of wet processing is more pronounced than that of dry polishing. The main purposes of using polishing liquid are:
- Degreasing (e.g., oily jewelry workpieces).
- Preventing corrosion or oxidation.
- Brightening jewelry workpieces.
- Removing scale from heat-treated jewelry workpieces (e.g., acid solution).
- Forming a buffer between the jewelry workpiece and the medium to prevent the medium from cutting too deeply into the jewelry workpiece.
However, oxidation may sometimes occur when wet polishing on silver alloys, brass, and other jewelry workpieces. Oxidation causes stains and hardening on the jewelry workpiece surface, making it difficult to adjust during manual polishing. Therefore, it is important to control the polishing time.
3.2 Dry polishing
Dry polishing is a surface treatment that makes the jewelry workpiece smooth and shiny, often resulting in a finer surface than wet polishing. When a high gloss polished surface is required through dry polishing, the jewelry workpiece should be cleaned in an ultrasonic cleaning solution for 2-3 min to remove various dust left on the surface during grinding. Walnut shell particles are commonly used as the medium because their small particle size increases contact with the surface, achieving a better polishing effect. It should be noted that due to the small size of the polishing medium, the buffering effect between jewelry workpieces is reduced, making them prone to collision and surface damage. Therefore, using dry polishing, the number of jewelry workpieces processed once should be appropriately reduced. If the surface is not smooth after polishing, coarse walnut shell particles can be used for pre-polishing to improve it. For difficult-to-polish alloys (such as silver), a dry grinding intermediumte process can be set between wet and dry polishing to achieve better surface results. If the jewelry workpiece is made by pressing or stamping methods, dry grinding is sufficient to obtain a good surface.
4. The impact of polishing medium
4.1 The shape of the medium
Using polishing medium of different shapes results in different polishing effects. There are two typical shapes of medium: one is pyramid-shaped, and the other is conic shaped. conic shaped medium grind more finely than pyramid-shaped medium, making them particularly suitable for the inner sides of rings and holes. In contrast, pyramid-shaped medium have a stronger grinding effect and better shape the jewelry workpiece. Pyramid-shaped 50% and conic shaped 50% medium are often combined.
4.2 Density and degree of adhesion of the medium
The density of the medium and the degree of adhesion to the effect of friction will also have an impact. The higher the density, the heavier the medium, the better the effect; friction medium bonding the tighter, the weaker the friction effect. Bonding weak, rounded friction medium more easily broken, often caused by the self-sharpening effect; and bonding strong, medium self-sharpening effect is poor, its service life is long, but the grinding effect is small, tend to form orange peel surface.
4.3 Size of the medium
The appropriate size of the medium should be selected based on the structure of the jewelry workpiece. If the size is too large, the friction effect on the jewelry workpiece is intensified, making it difficult to polish small areas, resulting in a non-smooth surface and poor polishing effect; if the size is too small, the polishing efficiency is poor, and collisions between jewelry workpieces can easily damage the surface. A reasonable gradation of the size of the polishing medium is necessary to achieve a good polishing effect.
4.4 Material of the medium
Using different materials for polishing medium can significantly differ in polishing effects. It is necessary to determine the appropriate medium material based on the jewelry workpiece’s material and surface condition.
(1) Steel medium.
Steel medium polishing is based on surface hardening, where the jewelry workpiece surface is impacted without being worn away. The peaks on the surface are not removed but flattened, which can increase the surface density of the jewelry workpiece, making it denser. Heavy steel balls can make the jewelry workpiece surface flat. However, they can easily create dents or scratches on the jewelry workpiece surface. Additionally, as steel balls pass over the jewelry workpiece surface, they can cause the jewelry workpiece to heat up, leading to oxidation on the surface. Therefore, the polishing effect is not good; under a magnifying glass, the surface appears orange-peel-like, requiring further manual finishing to achieve good surface quality. This is especially evident for silver jewelry pieces, where even manual polishing can hardly remove the oxidized film after treatment.
(2) Ceramic friction medium.
Ceramic friction medium are commonly used in industry, such as for grinding hardened steel. Compared to plastic medium, ceramic medium is easier to manufacture, cheaper, and can be made into many shapes and sizes. The strong friction action of ceramic friction medium makes them more effective in hard and coarse alloys than commonly used fine-grinding plastic medium, which is also important for the jewelry processing industry. Due to their larger mass, they also have a strengthening effect on the jewelry workpiece surface.
If jewelry pieces are polished too heavily with dry polishing or if the surface is too hard, using ceramic polishing medium can yield better results. This is particularly applicable to brass jewelry, palladium jewelry, etc. Using ceramic polishing medium can increase the surface density while removing some material; the more ceramic polishing medium used, the stronger the polishing ability and the smoother the surface. However, removing the scratches left by friction during processing is difficult. Especially for silver jewelry workpieces, harmful effects can occur, as particles separated SiO2 from the ceramic may scratch the jewelry workpiece surface or become embedded, resulting in an uneven surface that loses its attractive luster. Therefore, avoiding using ceramic friction medium to polish silver jewelry workpieces is advisable.
(3) Plastic friction medium.
Plastic friction medium have a medium to pleasing grinding effect and are commonly used for pre-grinding metal and silver jewelry castings. They can also be used for fine grinding; soft and delicate plastic medium work very well on soft alloys of metal and silver. The most commonly used plastic friction medium are conical and pyramid-shaped.
(4) Walnut shell particles.
Walnut shell particles are relatively soft and have a fine polishing effect, and they are commonly used in the dry processing of jewelry workpieces. Various commonly used polishing medium are shown in Table 4-2.
Table 4-2 Types of Polishing Medium
| Wet Processing | Dry Processing | ||
|---|---|---|---|
| Grinding | Polírozás | Grinding | Polírozás |
| Ceramic Grain | Porcelain Grain | Walnut shell granules | Walnut shell granules |
| Plastic granules | Steel ball | Corn Grits | Corn Grits |
| Plastic granules | Steel ball | Wood Chips | Wood Chips |
| Plastic granules | Steel ball | Műanyag | Műanyag |
| Plastic granules | Steel ball | Egyéb | Egyéb |
SECTION III Mechanical Polishing Process
Due to the diverse and ever-changing shapes of jewelry workpieces, various factors such as the speed and duration of the machinery, the size and quantity of abrasives, the properties and volume of chemical solutions, and the sequence of different equipment in the polishing process will all affect the polishing quality of the jewelry workpieces when removing burrs, scratches, weld beads, oxidation, and other defects.
To better complete the polishing of jewelry workpieces, the work must be carried out according to a certain process.
1. Process Flow
1.1 Sorting and classify goods
Due to the different polishing process flows for different types of goods, the jewelry workpieces must be Sorted and classified before starting the polishing work. After determining the polishing process method, production can be arranged.
1.2 Key points of the polishing process for various types of goods
(1) K gold Goods.
It can be divided into two types:
- Jewelry workpieces with simple shapes, no obvious angles, no dense prongs, and large polished areas.
- Jewelry workpieces with more complex shapes, micro paved prongs, short claws, and large angles require shorter polishing times, and care should be taken to observe the polishing effect to prevent abrasion. Some men’s rings need to be sanding and grinding then do setting stones.
- Goods with small polished areas, such as small jewelry workpiece chains, earrings, pendants, etc.
(2) Platinum goods.
The time is shortened for goods with larger angles by steel balls polishing and Dipping polishing; some items, such as men’s rings, must be polished with a flex shaft grinder before setting stones.
(3) Silver goods.
After polishing with walnut powder, some items may no longer require a flex shaft grinder to polish (depending on the polishing effect of the jewelry workpiece).
(4) 24K gold goods.
Before polishing, the effect of the cast jewelry workpiece can be assessed to adjust individual polishing processes.
2. Cutting the sprue
Cutting the sprue means trimming the excess sprue lines from the jewelry workpiece, improving the efficiency of cutting the sprue, and reducing the metal loss during polishing.
2.1 Main tools used
Sprue cutting pliers
2.2 Key points of the operating process
(1) When cutting the sprue of pure metal and pure silver jewelry workpieces, the pliers should not be in close contact with the jewelry workpiece but should leave a slight distance; otherwise, they may cut into the jewelry workpiece.
(2) When cutting the sprue of K gold jewelry workpieces, the plier mouth must be pressed tightly against the jewelry workpiece.
(3) When cutting the sprue, the force applied with the pliers should be even, and twisting or slanting the force should be avoided to prevent deformation of the jewelry workpiece.
(4) Some jewelry workpieces have components like clasps and pins that can easily be confused with the sprue. Before cutting, it is essential to confirm that what is being cut is the sprue and not a part of the jewelry workpiece.
(5) When cutting the sprue, use your hand to block the jaws to prevent splashing.
Cutting the sprue Video
3. Steel disk grinding
Steel disk sanding involves removing the residual sprue marks left on the jewelry workpiece after cutting the sprue, reducing the workload for the next process. The characteristics include a fast speed and significant metal loss. It is suitable for various jewelry workpieces with sprues.
3.1 Main equipment used
Three-phase asynchronous motor, Steel disk
3.2 Key points of the operating process
First, adjust the flow rate of the cooling water. Generally, the droplet speed is 2-3 drops per seconds. Observe the position of the jewelry workpiece’s sprue to determine the grinding angle of the jewelry workpiece. After starting, use a discontinuous method closely following the steel disc (Figure 4-35). While grinding, observe as much as possible to keep the sprue level and avoid damaging the jewelry workpiece, especially paying attention to the hook, claw, and groove positions.
The K gold and platinum powder containers must be kept separate when grinding jewelry workpieces. After grinding finished, the metal powder and jewelry workpiece must be cleaned promptly, and hands need to be washed in the designated bucket, and the machine area should be cleaned thoroughly to minimize metal loss as much as possible.

Steel disk grinding Video
4. Emery wheel grinding
Emery wheel grinding is to grind again after steel disc grinding, to smooth and level the workpiece with a small sprue, eliminating the Sprue traces.
4.1 Main equipment used
Three-phase asynchronous motor, polishing grinding emery wheel, dust extractor.
4.2 Key points of the operating process
First, turn on the dust extraction machine and observe the external shape of the jewelry workpiece at the sprue. Start the motor to make the grinding wheel rotate. If the sprue is not flat and has square or semicircular shapes, appropriate tools (such as round, square, or semicircular files) should be used to create grooves on the grinding wheel that resemble the shape of the jewelry workpiece, ensuring smooth operation. Test with a jewelry workpiece and continuously adjust until the requirements are met before performing normal machining. When grinding the jewelry workpiece, gently rotate it on the grinding wheel (Figure 4-36) until the sprue and polished areas are smooth and the edges, corners, and surfaces are uniform and consistent, meeting the quality requirements of the jewelry workpiece. After grinding, promptly clean the workbench and wash your hands in a designated cleaning bucket to minimize metal loss as much as possible.

Emery wheel grinding Video
5. Shaping
Shaping refers to correcting deformed jewelry workpieces such as rings and cross-shaped pendants.
5.1 Main tools used
Ring mandrel, flat iron, bur-nose pliers, flat-nose pliers, rubber hammer, iron hammer.
5.2 Key points of the operating process
(1) Pendant.
Observe whether the edges of the pendant show any slanting. If so, use flat-nose pliers to straighten the jewelry workpiece. If the jewelry workpiece is relatively thick and hard, it can be placed on a flat iron and hammered flat with a rubber hammer (K gold and copper can use an iron hammer).
(2) Ring.
Press the ring into the ring mandrel and carefully check the space between the ring and the ring mandrel. If there are gaps, use a rubber mallet to tap and integrate; at the same time, press down with your hand to achieve a better effect. After removing the ring from the ring mandrel, place it on a flat surface to check for flatness. Areas that are not flat can be hammered flat (K gold and copper can use a metal hammer). When pressing the ring onto the ring mandrel, do not apply too much force; observe the ring to prevent the size from increasing.
Shaping Video
6. Coarse Polishing
Coarse polishing is the process of removing burrs and making the jewelry workpiece surface smoother through the friction generated by the relative motion between the polishing medium and the jewelry workpiece. It is commonly processed using equipment such as vibratory machines, tumblers, and dipping tanks, and their operational key points are as follows.
6.1 Key points of vibration polishing operation
Before polishing the jewelry workpiece, prepare the polishing liquid, with a ratio of polishing liquid to clean water of 1:50. Place the prepared polishing liquid in the water tank with a water pump. Add coarse conical gray-white stone particles 50% and coarse triangular gray-white stone particles 50% into the barrel of the vibration polishing machine. Turn on the power, turn on the pump, adjust the flow rate, generally 2-3 drops /s. Start the vibration machine, evenly distribute the jewelry workpieces, and the maximum workload should be determined based on the model of the vibration machine. Each working time is 2.5-6 hours, then stop the machine and remove the jewelry workpieces.
6.2 Key points of the dipping polishing operation
For the Dipping polishing machine, mix beads, coarse round beads, cylinders, the pointed columns, inclined columns, discs, etc., into the drum. The ratio of abrasives is round beads 50%, others 10%. The total amount accounts for about 1/3 of the drum’s total volume. Prepare the polishing solution in a ratio of 3 parts polishing powder to 1 part rust inhibitor, and add tap water to the drum until it just submerges the rotating shaft. The machine model determines the maximum amount of jewelry workpieces processed, and the polishing time is eight 8-12 hours. After finishing the work, cut off the power and remove the jewelry workpieces.
6.3 Key points of the drum polishing operation
For the drum polishing machine, the ratio of abrasives is the same as that for the sediment box polishing, accounting for about 1/3 of the total volume of the drum. Prepare the polishing liquid by mixing polishing powder and rust inhibitor in a ratio of 31, along with tap water added to the drum, accounting for about 2/3 of the total volume of the drum. The machine model determines the maximum total amount of jewelry workpieces to be processed, and the working time is 2-3 hours. After work is finished, turn off the power and remove the jewelry workpieces.
Dipping and Drum Polishing Video
7. Flying disc Grinding
Flying disc Grinding refers to the process of polishing the sides of rings or other flat jewelry workpieces to remove burrs and make the surfaces smoother. wood bar sandpaper and Flying disc Grinding are the same the purpose of in the jewelry sanding process, but flying disc Grinding is faster and more efficient, making it more suitable for rings.
7.1 Main equipment used
Polishing Flying disc, dust extraction machine.
7.2 Main materials
Sandpaper belts (280#, 320#, 400#), flying discs (hard, neutral, soft), sanding stone, polishing wax.
7.3 Key points of the operation process
Choose the polishing flying disc based on the jewelry workpiece’s condition, with the flying disc’s flat side facing down, and install it on the flying disc machine. Use sanding stone to grind off the burrs on the bottom surface of the flying disc , making the bottom surface smooth and free of sharp edges.
The key to operating the flying disc is to keep the movements smooth, maintain focus, and control the actions freely. In the process of flying disc craftsmanship, mastering the hand gestures and movements for the ring is fundamental, making the methods for flying disc of other types of jewelry workpieces become second nature and easily manageable. During the operation, finger cots should be worn, and hands should not touch the high-speed rotating line flying disc . The hands should grip the jewelry workpiece tightly to prevent the ring from out of the hand (Figure 4-37).

Flying disc Grinding Video
8. Magnetic Polishing
Magnetic polishing can polish the surface of jewelry workpieces to a bright finish. Fine abrasives can solve dead corners, such as recesses and grooves, that cannot be polished during rough polishing, making it suitable for polishing all jewelry workpieces.
8.1 Main equipment used
Magnetic polishing machine.
8.2 Main materials
Steel needles with 0.5mm and 0.3mm diameters, polishing powder, and detergent (agent).
8.3 Key points of the operation process
First, prepare the polishing liquid with polishing powder; the polishing powder and water can be mixed in a ratio of 3.5%. Then, place the steel needles (diameter 0.5mm and 0.3mm in a 4:1 ratio) into the container, weighing about 500g. The maximum amount of jewelry workpieces to be added each time is 500g. For K yellow, K white, and silver jewelry workpieces, use a speed of 1900r/min; for pure metal jewelry workpieces, use a speed of 850-1200r/min; for platinum jewelry workpieces, use a speed of 800r/min. Set the forward and reverse rotation time separately, generally changing direction every 5 minutes, with a total time of 20-30 min.
After adjusting the speed, press the ENTER key to confirm the speed; otherwise, the machine speed will continuously fluctuate, potentially damaging the machine. The equipment can operate continuously for 8 hours. If the jewelry workpieces in the container are too large or too many, or if the set forward and reverse rotation times are too frequent, it will cause the machine to stop working urgently. In such cases, immediately turn off the power, remove some jewelry workpieces, select the correct forward and reverse rotation times, and restart. At the end of each workday, clean the equipment to keep it dry and clean. When the color of the steel needles darkens, clean them with a neutral detergent. New and old steel needles should not be mixed, and the polishing liquid should be replaced when it turns brown.
Magnetic Polishing Video
9. Turntable Polishing
Before polishing the jewelry workpieces, prepare the polishing liquid, with a ratio of polishing liquid to clean water of 2%-5%, pour the prepared polishing liquid into the water tank, filling the container 8cm from the top. Turn on the power, switch on the main switch, and set the speed to gear 3, then turn on the sub-tank switch. Adjust the water pump flow to gear 10%, adjust the speed gear, evenly distribute the jewelry workpieces, with the maximum workload depending on the machine model, set a timer for automatic shutdown, turn off the sub-tank switch, and remove the jewelry workpieces.
The polishing liquid must be clean and continuously updated during the polishing process. When the foam generated in the barrel is insufficient, the polishing liquid should be increased. After each polishing of the jewelry workpiece, wash the vibrating barrel cavity with 1-2 cups of clean water, and the water must be automatically discharged while the machine is running to achieve the effect of cleaning the seams of the machine; it should not be poured out from the barrel opening. If the machine is still running continuously at the end of the workday, ensure that the polishing liquid in the water tank is sufficient to prevent it from drying out; otherwise, the jewelry workpiece will turn completely black. If this occurs, rinse with 1-2 cups of clean water. Regularly check the rotary polishing machine, observe the gap between the barrel and the scroll base (normal is 0.25-3mm ), and adjust it promptly (the dry polishing gap is 0.05mm).
10. Polishing walnut powder
Polishing walnut powder is the most refined polishing method in the polishing process. It can remove burrs from letters stamped, sand holes, and stone settings, making the surface of the jewelry workpiece brighter. It is suitable for the final polishing of various jewelry workpieces and is known as dry polishing.
10.1 Main equipment used
Rotary polishing machine, drag-type polishing machine.
10.2 Main materials
Walnut powder, polishing paste.
10.3 Key points of the operation process
(1) Rotary polishing machine.
Place walnut powder into the bucket, with a maximum addition amount up to the top edge at 8cm, and simultaneously add 1-2 spoonful’s of polishing paste. Start the machine, allowing the polishing paste to mix with the abrasive for 5 minutes; then, you can place the jewelry workpiece. The maximum amount of jewelry workpiece to be placed each time depends on the machine type and the jewelry workpiece size, and the time setting depends on the type of jewelry workpiece.
(2) Drag polishing machine.
Place walnut powder into the polishing machine’s material tank, with a maximum addition amount not exceeding the tank’s 1/2, and simultaneously add 4 teaspoons of polishing paste. The maximum amount of jewelry workpiece to be placed each time must not exceed the rated value of the equipment.
When placing the jewelry workpiece, it must be secured, and then the machine door should be closed. The polishing time is 5-10 hours (jewelry workpieces without sanding are polished for 10 hours, those with sanding for 5 hours), mainly depending on the surface roughness of the jewelry workpiece. Adjust the speed gear, setting gear nine as optimal. Polishing generally focuses on jewelry workpieces with obvious angles.
10.4 Issues to Pay Attention to During the Operation Process
(1) The walnut powder must be kept dry.
(2) During the polishing process, if the abrasive generates dust, polishing paste must be added at this time. About 500 g of walnut powder, take 2-3 spoons and mix it with it, then evenly sprinkle the mixture onto the abrasive during the polishing process, ensuring it is well mixed.
(3) When the bath rotary polishing machine runs continuously for too long, the equipment temperature will become too high, so when polishing the jewelry workpiece, try not to exceed 5 hours. If production is urgent, an electric fan must be added for cooling.
(4) When the abrasive wears down during use, it must be supplemented by adding a new abrasive while screening out the fine abrasives.
11. Wax Removal
Wax removal refers to cleaning the dirt remaining on the surface of the jewelry workpiece and related areas.
11.1 Main equipment used
Ultrasonic Cleaning Machine.
11.2 Key points of the operating process
Prepare the cleaning solution by mixing the wax remover and clean water in a ratio of 1:30; pour it into the ultrasonic cleaning machine’s water tank, maintaining a distance of 5cm between the top and the surface of the cleaning solution. Turn on the power switch, and after about 30 minutes, when the water temperature reaches 60℃, set the ultrasonic switch to the “on” position and place the jewelry workpiece (Figure 4-38). Continuously observe the jewelry workpiece, and once it is clean, remove it and turn off the ultrasonic cleaning machine.
As time goes by, the water in the tank decreases due to evaporation, so you can proportionally prepare the cleaning solution and add it as needed.

Wax Removal Video
Mechanical Polishing Video
SECTION IV Laser Welding Technology
LASER originally stands for Light Amplification by Stimulated Emission of Radiation, which is an acronym. The world’s first laser was born in 1960. Over the past 40 years, laser technology and applications have rapidly developed. Laser technology is a comprehensive technology involving multiple disciplines such as optics, mechanics, electronics, materials, and testing. Laser processing is the primary field of laser applications, and laser processing technology utilizes the interaction characteristics of laser beams with materials (including metals and non-metals) for cutting, welding, surface treatment, drilling, micro-machining, and as a light source for object recognition.
1. Introduction to Lasers
1.1 Main Characteristics of Laser
Lasers have four main characteristics: high brightness, high directionality, high monochromaticity, and high coherence.
(1) High Brightness of Laser.
The brightness of solid-state lasers can reach up to 1011 W/cm2 Sr. Moreover, a laser beam with high brightness can generate extremely high temperatures of thousands to tens of thousands of degrees near the focal point after being focused by a lens, making it suitable for processing almost all materials.
(2) High Directionality of Laser.
The high directionality of lasers allows them to effectively transmit over long distances while ensuring extremely high power density at the focus, both of which are important conditions for laser processing.
(3) High Monochromaticity of Laser.
Due to the extremely high monochromaticity of lasers, it ensures that the beam can be precisely focused at the focal point, achieving a very high power density.
(4) The high coherence of lasers.
Coherence mainly describes the phase relationship of different parts of the light wave. Due to the peculiar characteristics of lasers, they have found extremely wide applications in industrial processing.
1.2 Basic Components of Lasers
A laser is an actual device that produces laser output; it activates the working medium, generates stimulated amplification, and maintains stimulated radiation within the cavity to form continuous oscillation. The weak light initially produced by spontaneous radiation undergoes selective stimulated amplification, preferentially enhancing the light along the optical axis. The light intensity continues accumulating and increasing, and when it exceeds the threshold of cavity loss, part of the oscillating light can couple out to become laser light. Any laser consists of three basic parts: the working medium, the excitation system, and the optical resonator.
Industrial laser systems can be divided into four main categories based on power levels and classified into continuous wave and pulsed lasers based on the excitation method. A laser’s efficiency depends on the target material’s absorption, reflection, and reaction properties. Continuous-wave lasers are mainly used for printing, engraving, and welding, where the areas absorbing laser energy will heat up, melt, vaporize, or undergo chemical changes such as oxidation, resulting in interference or color changes in the visible light spectrum. By using CAD/CAM principles, the focal point can be precisely moved in the X— y coordinate system to create imprint patterns. Pulsed lasers are primarily used for welding, surface modification, and cutting, featuring higher pulse energy but with limitations on pulse frequency. Most industrial lasers are Class 4 and require safety precautions, while most lasers used in the jewelry industry are Class 1, equipped with built-in safety devices.
Currently, the main lasers used are YAG and CO2 lasers.
2. Laser Welding Process
Since introducing laser processing technology into the jewelry industry, it has been increasingly widely used. It is popular for its high speed, high precision, and convenience, gradually becoming an indispensable piece of equipment for jewelry processing enterprises.
2.1 Advantages of Laser Welding
Laser welding is the largest application of laser technology in the jewelry industry. Laser welding has many advantages compared to traditional flame + solder welding.
(1) The high speed of laser welding.
The main reason jewelry processing companies are keen to adopt laser technology is its speed. The higher the pulse frequency of the laser beam, the more times it acts on the metal. When lasers first appeared, the pulse frequency was generally 2Hz, which operated twice per second. Now, the pulse frequency of laser welding machines can generally reach 20-25 Hz, and machines with high pulses are more suitable for industrial applications. Some models of laser welding machines can even reach a pulse frequency of up to 70 Hz, but this is too fast for general operators. Therefore, some companies produce laser welding machines that limit the pulse frequency to a maximum of 30 Hz for ease of operation, which is still much faster than earlier models.
Of course, pulse speed is not equivalent to production speed. Although laser welding can be faster than flame welding, it can only weld one jewelry workpiece at a time. When operators weld jewelry workpieces, they generally hold them by hand or use clamps, one at a time, and most laser welding machines have relatively small workspaces, so they cannot handle many jewelry workpieces at once, which may increase production time. However, after adopting laser welding, the workload for cleaning jewelry workpieces is greatly reduced, and the saved working hours are enough to compensate for the time required for welding production. Laser welding can be performed under inert gas protection, leaving no burn marks on the product, so there is no need to add flux during welding, and no acid immersion treatment is required afterward. Therefore, overall, laser welding effectively improves welding production efficiency.
(2) Ensures the quality of welded jewelry workpieces.
Using laser welding can improve the quality of jewelry and reduce the defect rate. When using flame welding, due to annealing and softening, jewelry workpieces are prone to dents during polishing, which increases the defect rate. After adopting laser welding, the hardness is improved, and the number of dents is significantly reduced, thereby lowering the defect rate. For example, 14K alloy jewelry containing metal 58% and silver 42% experiences annealing when using flame welding, causing the overall hardness of the jewelry to drop from HV145 to about half. If dropped from waist height to the ground, it will dent; however, laser welding, due to concentrated heat, low power, and high speed, can be used, preventing annealing and resulting in higher strength of the jewelry workpiece. Additionally, since there is no overheating, the fit between welded components is also good. Furthermore, when using flame welding, sometimes even ifClamps are used to secure it, and certain weld points may open due to heat; however, even nearby weld points are unaffected by laser welding.
(3) New production processes can be developed.
Due to the application of this new technology in the jewelry industry, people are changing traditional ways of thinking about jewelry design and production. With the help of laser technology, it is possible to design and create some special structural styles that were difficult to achieve or guarantee quality in the past due to the limitations of traditional flame welding, brazing, or furnace heating bonding methods. Another benefit of laser heating at a specific point is that, compared to methods that melt a large area, laser welding can be performed in a very narrow welding area, making connecting different types of alloys easier. Therefore, the color or structure between two components can change abruptly without mixing; however, in ordinary furnace welding, colors tend to mix. The narrow working area of laser welding results in differences in wettability, connection integrity, and grain size in the heat-affected zone compared to traditional welding techniques.
(4) The content of jewelry does not change during laser welding.
Laser welding typically does not require filler metal; the laser can partially melt the jewelry workpiece and directly weld it, so there is no change in the color of the jewelry.
(5) It can effectively repair jewelry workpieces, improving their efficiency.
For example, repair the metal body near gemstones and clean it. It can also weld complex, heat-sensitive components as close as 0.2mm under ideal conditions, such as hinges, hooks, clasps, inlayed accessories, most gemstones, and even pearls and organic materials.
(6) Environmentally friendly.
Since laser welding does not require the use of solder and flux and does not require chemical solvents to clean the welded jewelry workpieces, it does not pollute the environment, and there is no waste disposal issue.
(7) Laser welding can also save metal materials.
Traditional flame welding generally requires a metal thickness of 0.2mm to accommodate losses during welding. In contrast, laser welding can reduce the thickness to 0.1mm, which significantly lightens the quality of jewelry by 35%-40%, which is very important for electroforming processes. Using lasers saves precious metal materials reduces solder costs, and eliminates the need to use different types of solder during multiple welds.
2.2 The process of laser welding
Laser welding consists of three typical stages. The first is the central welding, which connects the jewelry workpieces; the second stage is filling, using alloy wire as the filler to fill the gaps left by the initial welding; the third stage is smoothing the surface, where the welding points are laser-treated until the polishing and cleaning workload is minimized.
Three distinct impact zones are formed when the laser pulse strikes the metal surface, representing three concentric circles. The outermost circle is the heated metal, which is relatively hot but shows no significant change; the middle circle is the liquefied metal; at this point, the material itself becomes part of the filler and undergoes self-welding, allowing it to move and be shaped as needed; at the center of the three circles, the energy of the laser beam is most concentrated, vaporizing the metal, which means it is lost. Achieving a higher pulse frequency is easier in the filling and smoothing stages. The advantage of high-frequency models lies in their ability to control the speed of metal heating better.
Using automatic pulses provides great convenience for operations, allowing the metal beads to roll or form pits while keeping the metal in a liquid state, thus enabling shaping with shallow pulses. Sometimes, the filling stage can be skipped; some users only adopt the central welding and smoothing steps. If the jewelry workpieces can be designed to fit well, there is no need to fill in any additional material.
2.3 Common laser welding machines used in the jewelry industry
The laser welding machines used by jewelry processing companies have relatively low power, are designed for maximum safety, and have a compact and portable structure, allowing operators to sit comfortably beside the machine while operating it (Figure 4-39).

The operator must determine the excitation energy in early single-pulse laser welding machines. It is best if the excitation amount is just enough to complete the work; if it is insufficient, re-excitation is needed; if it is excessive, holes will be left on the jewelry workpiece. Using a new type of laser welding machine greatly reduces the probability of damaging the jewelry workpiece. Good welding results can be achieved using a low-heat light power device. The power can be low enough so that the excitation of a single pulse does not affect the metal. However, suppose a low-power device excites pulses at a high frequency. In that case, the metal will still slowly heat up, allowing the operator more control and freedom, which is very important, especially for thin-metal jewelry workpieces. For example, some electroformed jewelry is only 0.1mm thick. In the jewelry processing industry, when considering using lasers to connect accessories to electroformed pieces without completely burning through them, a low-power, high-speed laser device can meet this requirement, and the results are very stable.
A typical laser welding machine for jewelry can quickly, reliably, and accurately weld most metals and alloys, but efficiency largely depends on the properties of the target material. Connecting components or repairing castings can be completed under visual control through one or more laser pulses. Typically, a pulse lasts 1-20ms, Using a stereomicroscope and crosshairs allows for precise positioning of the welding area, and slight adjustments can be made to the jewelry workpiece’s position within the field of view of the stereomicroscope.
One characteristic of a good jewelry laser welding machine is the effective depth of focus of the beam. The multi-lens at the laser generator’s exit from the working area of the beam require a small focusing depth for marking lasers. For laser welding machines, if the working area beam is cylindrical, it is easier to use because the focal diameter does not change, and the depth of focus increases as the distance from the target to the exit lens increases. The overall welding energy can be controlled by adjusting individual laser pulses’ intensity, pulse length, and pulse frequency. The energy stability between pulses is also important, as it stabilizes optimized settings for a specific operation, predicting suitable welding parameters. The speed of the entire operation process largely depends on the time spent positioning the jewelry workpiece for each pulse. The working environment is usually atmospheric, but injecting air or inert gas into the working area can provide some cooling effect; additionally, inert gas can improve the welding quality of alloys. Many models are equipped with exhaust devices that can remove any gases generated in the workspace, and some laser welding machines use a footswitch with two operating pressures to control the laser pulse and airflow simultaneously. The duration of a single pulse is determined by the time the pedal is pressed, freeing the operator’s hands for positioning and holding the jewelry workpiece. Each pulse is only a small part of the total energy emitted by the laser generator, so external circulating water can effectively cool the system. Typical parameters of laser welding machines used in jewelry processing enterprises are shown in Table 4-3.
Table 4-3 Typical parameters for laser welding machines used in the jewelry manufacturing
| Dimensions of the welding machine, Length x Width x Height (mm) | (700 ~ 1350)x(250 ~ 550)x(650 ~ 860) |
|---|---|
| Quality (kg) | 85 ~ 150 |
| Power supply | 115 or (200 ~ 240 V) / (50 ~ 60 Hz) , single phase |
| Maximum average operating power (W) | 30 ~ 80 |
| Focus diameter (mm) | 0.2 ~ 2.0 |
| Pulse energy (J) | 0.05 ~ 80 |
| Peak pulse power (kW) | 4.5 ~ 10 |
| Pulse duration (ms) | 0.5 ~ 20 |
| Pulse frequency (Hz) | Single, 10 |
| Pulse voltage (v) | 200 ~ 400 |
2.4 The impact of alloy materials on laser welding effects
Laser welding has different effects on different alloys. Even with the same control parameters, the heat transferred during each welding pulse is the same. Still, the melting effect of each pulse depends on the proportion of surface energy absorption rather than reflection. The specific factors are as follows: ① Heat from room temperature to the melting point. ② Melting point (liquidus line). ③ Latent heat of fusion. ④ Thermal conductivity
Typical laser welding parameters for some commonly used jewelry materials are shown in Table 4-4.
Table 4-4 Typical laser welding parameters for some jewelry materials (according to John, 2001)
| Alloy Composition | Pulse Voltage (V) | Pulse Duration (ms) | Result |
|---|---|---|---|
| Pt Alloy | 200 ~ 300 | 1.5 ~ 10 | Excellent welding |
| 99.99 Au | 300 ~ 400 | 10 ~ 20 | Weld area becomes dark, high power required |
| 18KY | 250 ~ 300 | 2.5 ~ 10 | Excellent welding |
| 18KW | 250 ~ 280 | 1.7 ~ 5.0 | Excellent welding |
| 925 Silver/835 Silver | 300 ~ 400 | 7.0 ~ 20 | Weld area becomes dark, high power required |
| Titanium | 200 ~ 300 | 2.0 ~ 4.0 | Inert atmosphere recommended |
| Stainless Steel | 200 ~ 300 | 2.0 ~ 15 | Inert atmosphere recommended |
The parameter settings in Table 4-4 may need some adjustments for other jewelry alloy materials. Different materials have different thermal conductivity, melting temperatures, and crystallization latent heat, and these properties combined significantly affect the energy required for effective welding. Welding can only occur when the surface absorbs enough heat rather than reflecting it away. Therefore, the color and reflectivity of the jewelry workpiece surface are also important. However, combining high reflectivity and high thermal conductivity, such as with silver and high karat K gold, will help mark and blacken the target point, thereby effectively increasing the surface absorption fraction.
2.5 Laser welding of platinum alloys
The quality requirements for platinum alloy jewelry castings are relatively high. Some surface defects can be repaired initially, but small pinholes may only become apparent during polishing. Using a laser welder can reduce the cost of scrap re-casting.
Platinum’s extremely high melting point makes welding and cutting quite difficult. Using laser welding, high-intensity laser pulses can raise the temperature at the surface of a very small target area above the melting point of platinum, causing it to melt and fuse. Suppose the heat transfer to the jewelry workpiece can be limited. In that case, the hardness of most jewelry alloys in their heat-treated or cold-worked state can be maintained, which is particularly important for platinum jewelry alloys.
Most platinum group metals have high melting points but relatively low thermal conductivity (see Table 4-5). Therefore, the laser can deliver enough energy in each pulse to melt a small, focused area with only a small heat-affected zone. Except for palladium (melting point 1555℃ ), the response of other platinum group metal jewelry alloys to the settings of the laser welding machine is quite similar. In contrast, metal and silver alloys’ melting points are much lower than platinum’s, but their thermal conductivity is 5-7 times higher.
Table 4-5 Melting points and thermal conductivities of platinum alloys (according to John, 2001)
| Ötvözet | Thermal Conductivity | Melting Point (℃) | Ötvözet | Thermal Conductivity | Melting Point (℃) |
|---|---|---|---|---|---|
| 999Pt | 0.245 | 1773 | Pd | 0.240 | 1555 |
| 990Pt | 0.245 | 1773 | 5%Pd | 0.247 | 1765 |
| 5%Cu | 0.288 | 1745 | 10%Pd | 0.247 | 1755 |
| 5%Co | 0.223 | 1765 | 15%Pd | 0.247 | 1750 |
| 3%Co/7%Pd | 0.229 | 1740 | 5%Rh | 0.250 | 1820 |
| 5%Co/10%Pd | 0.220 | 1730 | 5%Ru | 0.255 | 1795 |
| 5%Ir | 0.245 | 1795 | 5%W | 0.267 | 1845 |
| 10%Ir | 0.242 | 1800 | Pure Au | 1.2 | 1063 |
| 15%Ir | 0.241 | 1800 | Pure Ag | 1.702 | 962 |
| 20%Ir | 0.237 | 1830 |
For platinum jewelry, the laser beam can get very close to sensitive gemstones, and generally, there is no need to remove the gemstones before welding repairs. Most components can be polished well before welding, or the components can be spot-welded first, then adjusted to the appropriate position, and finally laser-welded to improve the smoothness of the weld area. Almost all platinum alloys fall into this category of easily processed alloys. Still, for different types of alloys, it is necessary to make some small adjustments to the laser settings to achieve the best results for each alloy.
2.6 The Safety of Laser Welding
The radioactivity of laser products must comply with IEC safety standards, which include equipment categories, technical specifications, and usage guidelines. The purpose is to indicate the safety work level of laser radiation and classify lasers according to their hazard levels, using labels, symbols, and indications to provide users with safety information and take appropriate preventive measures, protecting operators from laser radiation with a wavelength of 200nm-1mm and warning relevant personnel within the laser radiation coverage area.
IEC standards define four common laser safety categories. Still, all jewelry laser welding machines are classified as Class 1, which are inherently safe or can be made safe through engineering design. Generally, necessary safety facilities are already set up inside the machine to ensure the safety of operators and nearby personnel.
Typical safety devices and measures are as follows.
(1) only the operator’s hands can enter the workspace during operation, and two interlock switches must be activated. The position of the interlock switches is conducive to safely and stably holding the jewelry workpiece, and the arms safely prevent any radiation from escaping the work area.
(2) Use a microscope to determine the best working position; this field of view can automatically limit the position of the control area.
(3) Using a special barrier, the field of view can be temporarily closed when the laser pulse is triggered, protecting the eyes from direct laser radiation (as well as some secondary radiation). Since this process occurs very quickly, the operator generally does not notice the disappearance of the field of view.
(4) The laser beam causes most materials to produce secondary radiation, including infrared and ultraviolet light, which can be observed through the laser protection window. The secondary radiation does not harm the eyes, but looking directly at the visible secondary radiation can cause headaches.
(5) The laser protection window is completely transparent for observing the operation process.
(6) In addition to direct safety, the adjustable seating of the laser welding machine for jewelry allows the body to stand upright and relax, which also helps prevent back and neck pain.
Of course, the operator’s hands are unprotected, and when attention is not focused, they may reach into the pulsed laser beam and suffer burns. At the power level of jewelry laser welding machines, one or two pulses on the fingers can cause short-term discomfort, and multiple pulses on the same spot may lead to deep burns, so care must be taken to avoid infection. Secondary scattering will only reach a sufficiently high intensity to burn the skin in very adverse situations. Under normal circumstances, the skin is exposed to low-level scattering at a wavelength of 1064nm, which is physiologically safe; infrared laser radiation is similar to ordinary thermal radiation.
Materials with high thermal conductivity are prone to heating up and burning fingers when subjected to repeated laser pulses. Care should be taken not to wear jewelry (rings, watches, bracelets) in the work area. This is because the laser beam will irradiate them, causing heat to transfer to the fingers, and it is very difficult to remove a rapidly heated ring in the light chamber quickly. Additionally, jewelry can reflect scattered light and even focus it, leading to skin burns
Laser Welding Video
3. Laser Marking Process
Laser surface marking technology, as one of the earlier used laser processing techniques, can be divided into surface marking and material conversion, according to how laser interacts with materials. It utilizes a shallow layer of the material’s surface to produce the desired mark through evaporation or ablation. Compared to traditional marking techniques, its advantages are mainly as follows.
(1) It uses computer control technology, making it easy to change the marking content.
(2) It employs laser processing methods, allowing for fine engraving, which meets the demands of modern high-efficiency and fast-paced production.
(3) It is adaptable to jewelry processing materials, capable of creating very fine marks on various materials’ surfaces, has excellent durability, and is without external forces acting on the jewelry workpiece, ensuring the original precision of the jewelry workpiece.
(4) The processing method is flexible and suitable for small-batch single-piece and large-scale industrial production needs.
(5) If there is no pollution source, it will not harm the environment.
Therefore, laser marking technology is important in improving product quality, production efficiency, and automation levels and reducing pollution and material consumption.
It isn’t easy to replicate and alter markings made with laser marking technology, which has a good anti-counterfeiting effect to a certain extent. Some jewelry pieces require very fine patterns or inscriptions, which cannot be met by traditional casting, stamping, and other processes, but laser surface marking technology can achieve this. The average output power of the laser source reaches 40 W, which can be used to mark micro-fine marks of 0.01mm, which can be achieved at high speed along a single path. An Nd:YAG laser with an XY scanning head is a typical laser system.
Laser Marking Video
4. Laser Engraving Technology
Laser engraving works in a continuous or repetitive pulsing manner, where the laser beam focuses on very small light spots (with a minimum diameter of less than 0.1mm), achieving a very high power density at the focal point. At this time, the heat input (converted from light energy) far exceeds the heat released, conducted, or diffused by the material, causing the material to be quickly heated to vaporization temperature, forming cavities through evaporation. The cavities continuously form narrow cuts as the beam moves linearly relative to the material. During the engraving process, auxiliary gases that are compatible with the material being cut should be added, as well as protective gases, to prevent chemical reactions with the surrounding air. Laser engraving can be seen as a linear extension of laser marking technology, and under suitable focusing conditions, certain lasers can achieve laser spots with a diameter of 30/um. Therefore, it is possible to engrave very small images with great accuracy, marking and inscribing within a small area of 1mm square, meeting the requirements for jewelry. The market demand for sexualization also has anti-counterfeiting functions. Laser engraving can be performed on flat or curved surfaces, with a depth of up to a few tenths of a millimeter. With advancements in laser technology, the power of laser engraving machines has become more powerful, allowing for engraving more types of metals. Metal (Au) has extremely high thermal conductivity, thus requiring a greater energy impact to melt the impact point. Due to power limitations, older 65W laser engraving machines cannot generate the heat required to engrave metal. In contrast, new laser engraving machines can reach 100W, easily solving this problem. Additionally, it features an automatic rotating platform on the X-Y-Z axis and a stepping program, allowing the operator to engrave 20-30 jewelry workpieces simultaneously by simply following the instructions, thus meeting the requirements for mass production.


