


How to Craft Wax Models Trees for Casting Gold, Silver, and Platinum Jewelry
The basic principles and operational skills for 3 typical tasks
Wax models tree making, also known as Wax models tree planting, involves welding the prepared wax molds onto a wax rod in layers according to specific requirements and arrangement order using a wax welder, ultimately resulting in a Wax models tree that resembles a large tree. Later, the wax tree is used for processes such as pouring gypsum. The basic requirement for planting a Wax models tree is that the wax molds must be arranged in an orderly, maintaining a certain gap while welding as many wax molds as possible onto the Wax models tree to meet mass production needs.
The Wax models tree consists of a pouring system and wax molds. The pouring system is a channel that introduces liquid metal into the mold’s cavity. Whether the pouring system is designed reasonably or not will significantly affect the mold’s filling, the castings’ quality, and the process’s yield. The pouring system generally includes components such as the tree head, tree core, and sprue; sometimes, vent lines are also set. The tree head acts as a pouring cup, used to receive the molten metal; the tree core is equivalent to a direct pouring channel and also serves the function of a riser; the channel connecting the tree core and the wax mold is called the sprue, which serves as an internal pouring channel and a riser channel. The sprue should be sufficiently thick, and the connection points with the wax mold and tree core should be smooth, without sharp angles or recesses. Multiple or auxiliary sprues should be set for wax molds with complex shapes. The length of the sprue should be appropriate, and its position is related to factors such as the structure of the casting, material, and pouring method. When planting the Wax models tree, the wax molds can be distributed on the tree core according to their shape, size, and type. The planted wax molds should not be too close to each other; otherwise, the gypsum mold wall in that area will be too thin and prone to cracking.
This project enables you to master the basic principles and operational skills of Wax models tree making for vacuum casting of gold and silver jewelry, centrifugal casting of gold and silver jewelry, and platinum jewelry through three typical and post-class extension tasks.
Wax mold structure
Table of Contents
Section I Making Wax models Trees for Vacuum Casting of Gold and Silver Jewelry
1. Background Knowledge
1.1 Sprue Modification
1.2 Sprue Design for Wax Setting Castings
1.3 Wax models Tree Production (Creating the Wax models Tree)
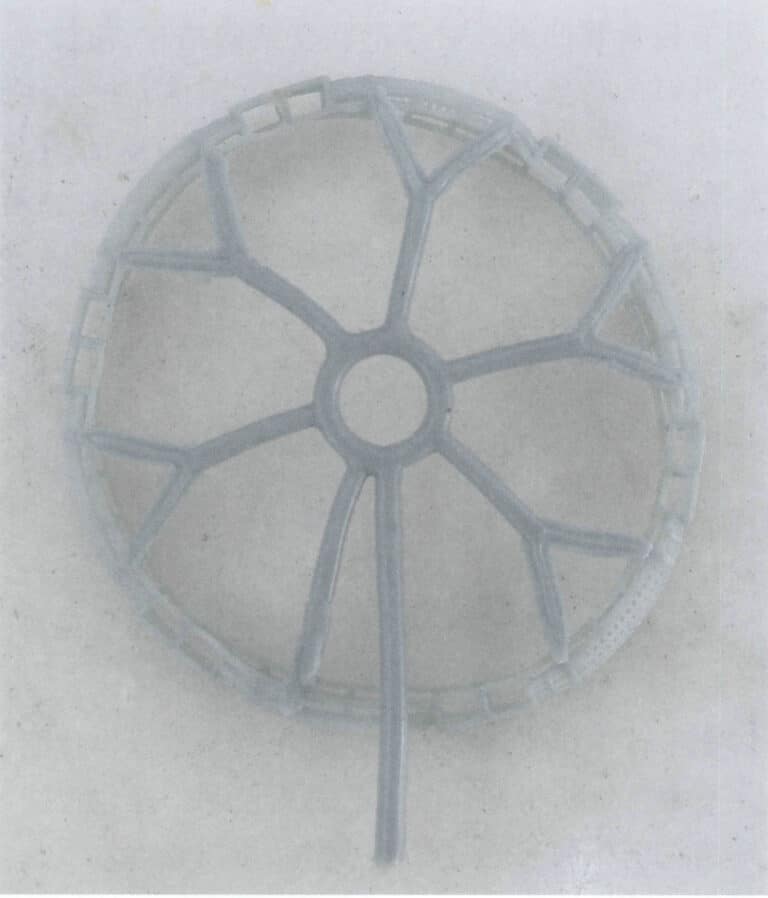
When planting a Wax models tree, inserting the wax core (i.e., the main sprue) into the rubber base is usually best. The wax core can be made using an aluminum alloy mold, as shown in Figure 4-2. The wax core is generally cylindrical, and the height of the steel dish can determine its length. The rubber base for planting the wax is equivalent to the tree’s roots; it can keep the Wax models tree upright for easier planting and serves to seal the next step of pouring the gypsum slurry, forming the pouring cup of the mold.
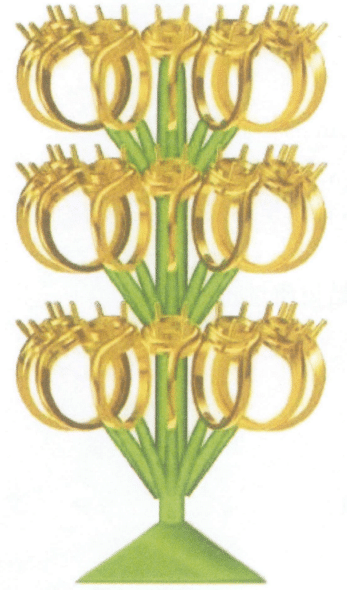
When planting the wax mold on the wax core, it is best to use a spiral method, as shown in Figure 4-3. First, compared to a chaotic or flat arrangement of planting, the spiral method is not only aesthetically pleasing and space-saving, allowing for more wax molds to be planted and reducing production costs, but it can also significantly speed up the process of cutting the castings from the cast tree, improving production efficiency. Additionally, it allows for a smoother filling of the molten metal and more uniform heat dissipation, avoiding excessively high local temperatures within the gypsum mold that could cause reactions between the molten metal and gypsum powder, leading to defects such as gas holes and sand holes. Finally, the spiral planting method allows more bubbles to escape when adding the gypsum slurry and vacuuming, reducing the likelihood of defects like bead formation in the castings.
Figure 4-2 Metal mold for aluminum alloy wax core
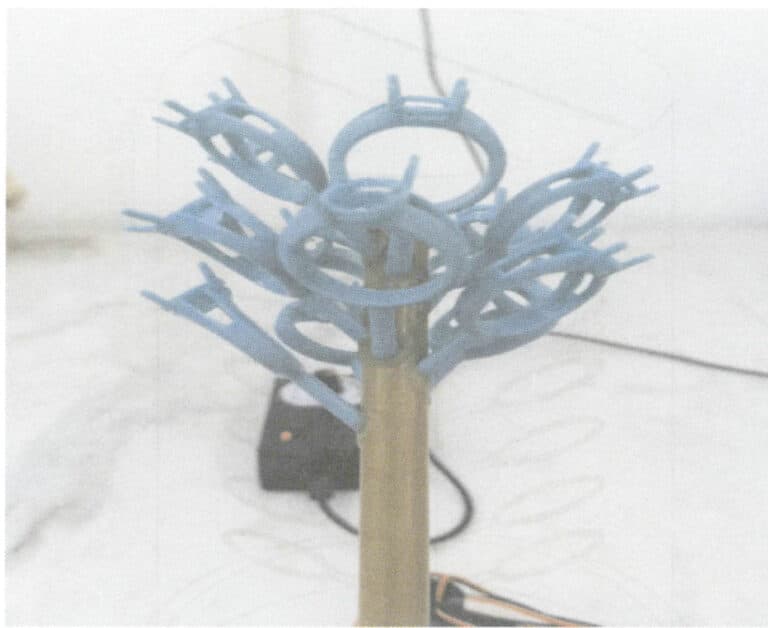
Figure 4-3 Wax molds arranged in a spiral method
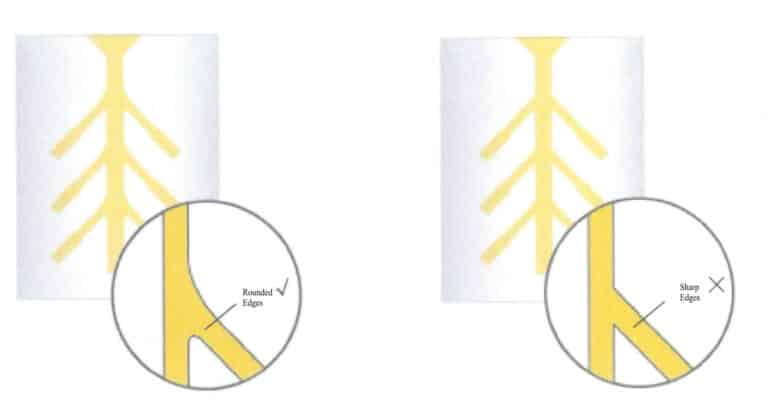
Figure 4-4 The angle between the wax core and the branch sprue
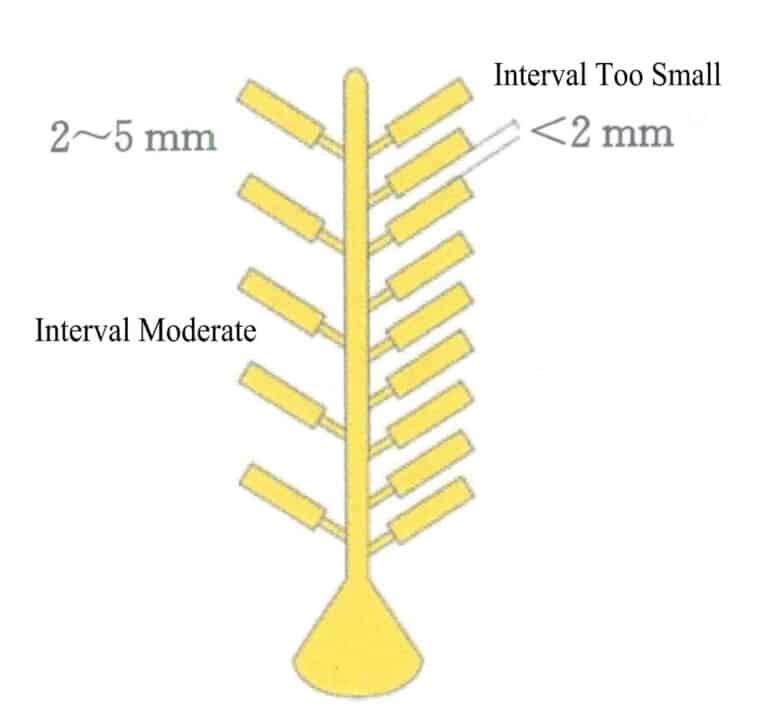
Figure 4-5 Distance between wax molds
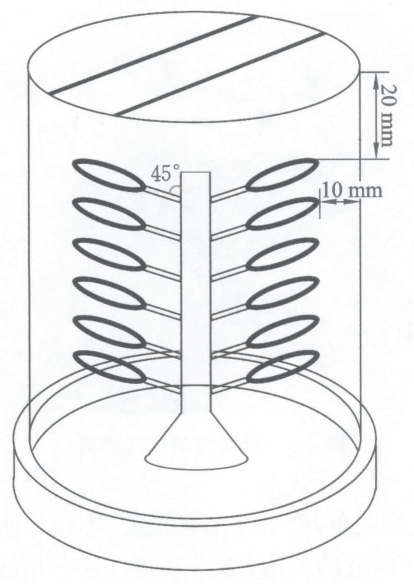
Figure 4-6 Position of the Wax models tree in the steel flask
1.4 Auxiliary Tools for Making Wax models Trees
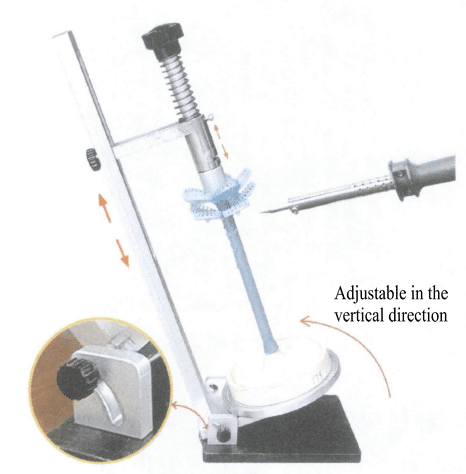
(1) Wax models Tree Planting Machine (Figure 4-7)
This device is easy to operate and has a high cost-performance ratio. The base disc and side rod are integrated and made of aluminum alloy with an adjustment device that allows for flexible multi-angle adjustment. The movable rod device can move up and down, and the base disc can rotate 360 ° freely.
(2) Rubber Base Turntable (Figure 4-8)
This tool has a simple structure and is easy to use, mainly used for fixing rubber bases. The turntable can rotate freely and is equipped with an adjustment device for multi-angle adjustment, allowing for flexible operation at various angles when planting Wax models trees.
(3) Wax Welder (Figure 4-9) or Electric Soldering Iron
The temperature of the wax welder can be adjusted with a fast heating speed and a temperature range from 50~200℃; it features a flexible wax welding pen, making the waxing operation smoother; the pen tip can be heated and cooled instantly through a foot controller.
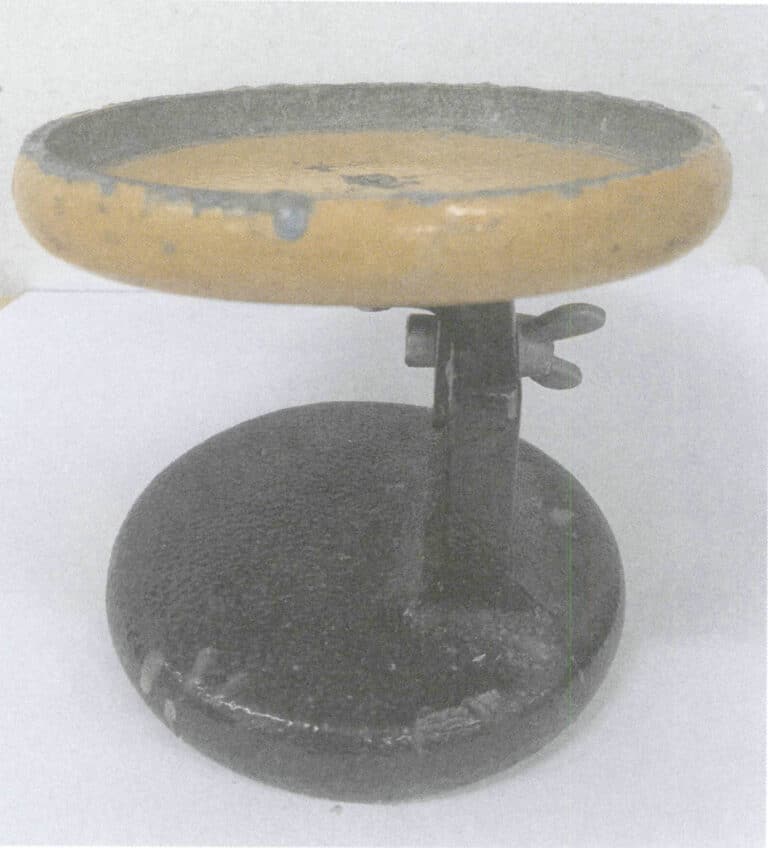
Figure 4-8 Rubber base turntable
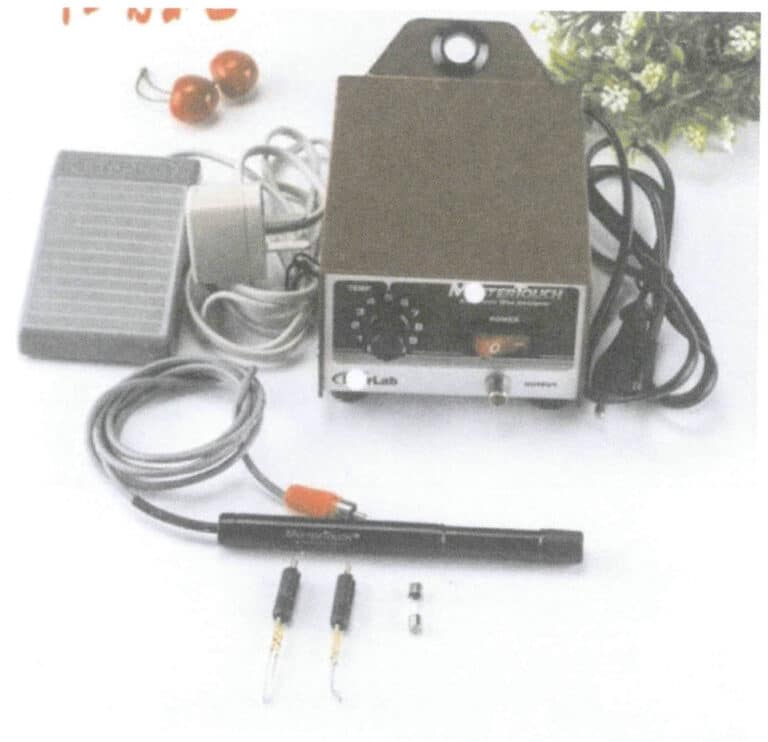
Figure 4-9 Wax welder
2. Task Implementation
(1) Preparation Work
Prepare the embedded men’s ring wax mold, a wax core with a diameter of 10 mm, an electric soldering iron, a rubber base with an inner diameter of 4 in, a rubber bottom turntable, or a Wax models tree planting machine. The length of the wax core can be selected according to the height of the steel flask, as shown in Figure 4-11.

(2) Planting the Wax models Tree
The wax mold must be planted on a circular rubber base, and the inner diameter of this rubber base should match the outer diameter of the steel flask. Generally, the inner diameters of rubber bases come in specifications of 3in, 3.5in, and 4in. There is a spherical concave protrusion at the center of the base, with a circular recess in the middle, the diameter of which is comparable to that of the wax core. The steps for planting the Wax models tree are as follows.
① The rubber base should first be weighed, marked, and recorded before planting the Wax models tree, as shown in Figure 4-12.
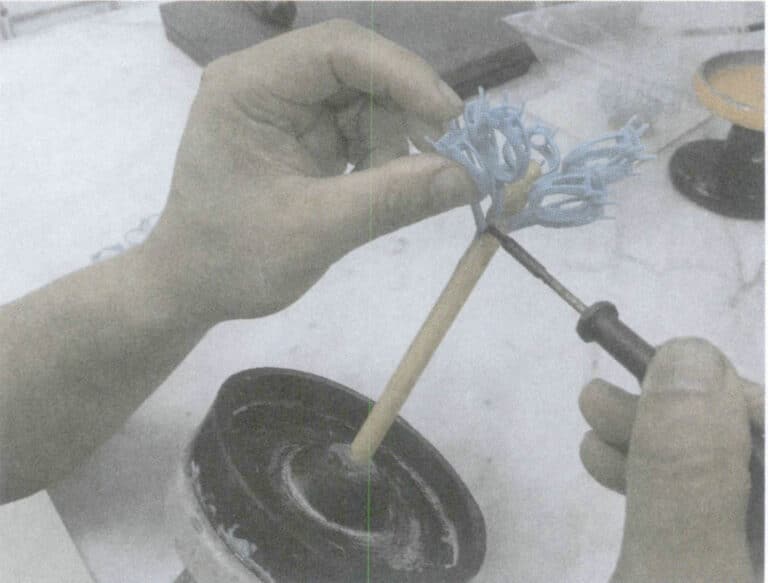
② Insert the wax core into the circular hole on the rubber base and fix it with a small amount of wax liquid. The rubber base can be operated with a Wax models tree-planting machine (or rubber base turntable) or propped up and tilted. Adjust the temperature of the electric soldering iron, use the soldering tip to make small holes in the wax core, quickly insert the wax mold sprue, keep the wax mold stable, and wait until the wax liquid slightly solidifies before releasing, as shown in Figure 4-13. At this time, the angle between the sprue and the wax core is 45°, and there should be at least a 2 mm gap between the wax molds.
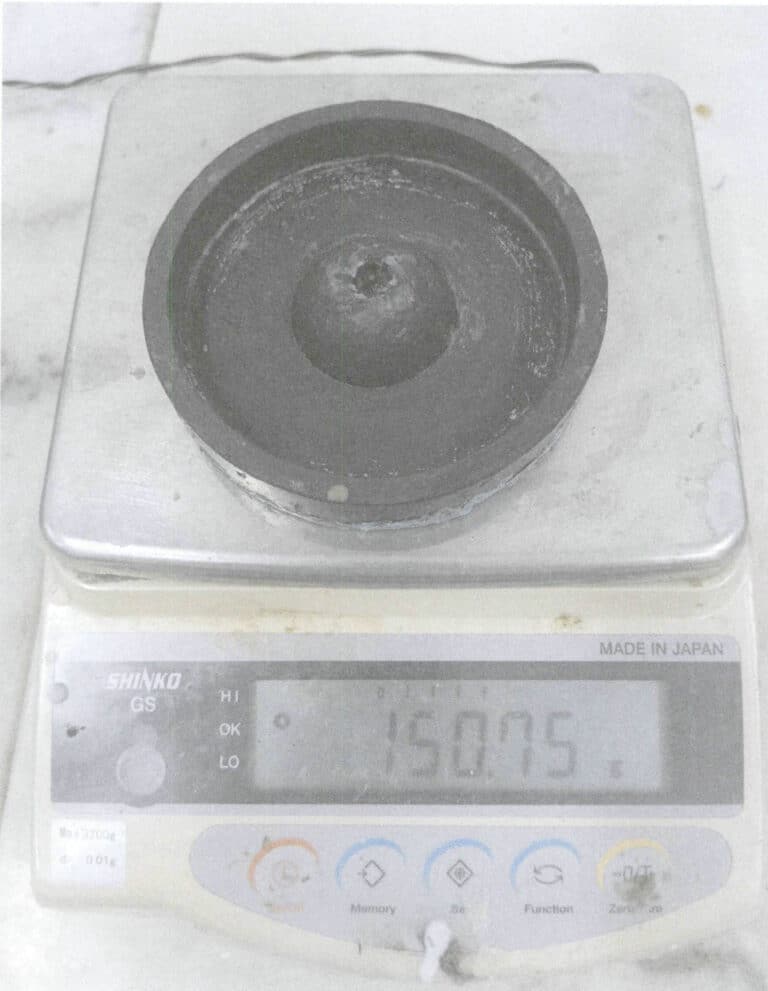
Figure 4-12 Weighing the rubber base
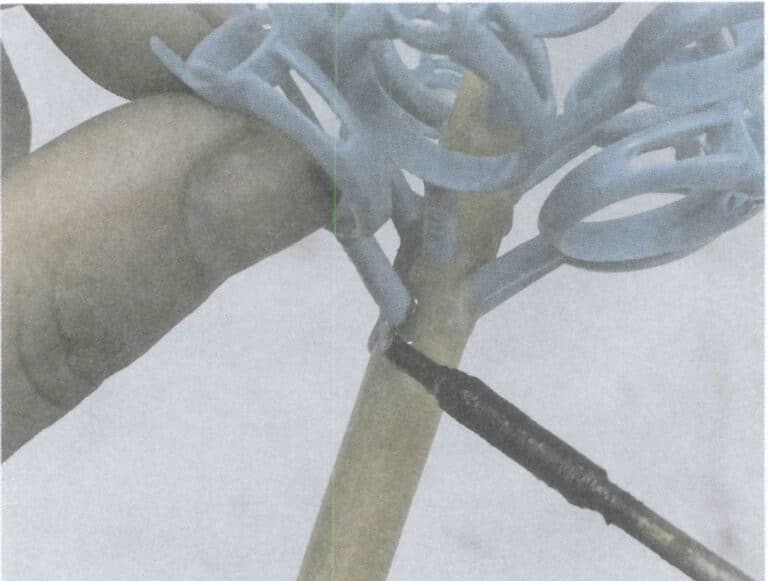
Figure 4-13 Planting a Wax models Tree
③ Weld the wax mold on the wax core layer by layer until the whole Wax models tree is completed, and finally, get a tree-like wax mold collection. When welding the wax mold, you can start from the bottom of the wax core (from bottom to top), as shown in Figure 4-14, or from the top of the wax core (from top to bottom), as shown in Figure 4-15. If the Wax models tree is operated skillfully, there is not much difference between the two methods. However, the method of starting from the upper part of the wax core (from top to bottom) is generally used because the biggest advantage of this method is that it prevents the melted wax from dripping down onto the welded wax molds, thus avoiding rework due to the dripping down of the wax.
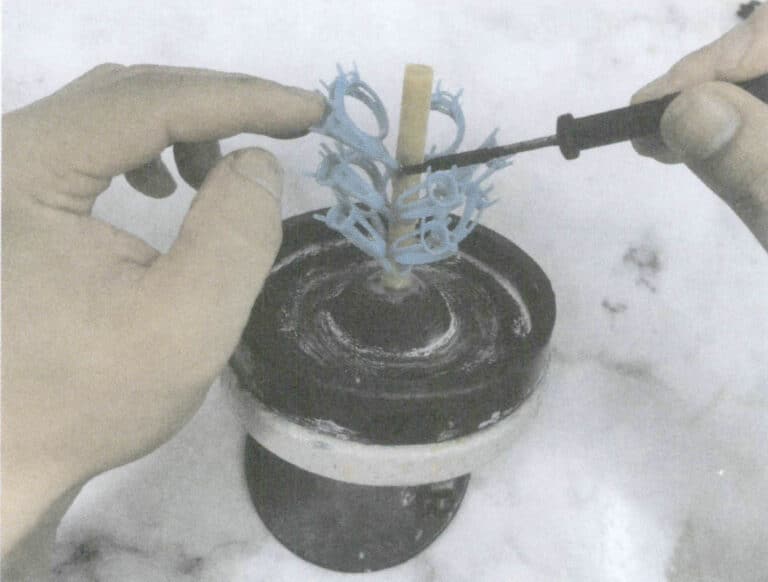
Figure 4-14 Planting a Wax models Tree from Bottom to Top
Figure 4-15 Planting a Wax models Tree from Top to Bottom
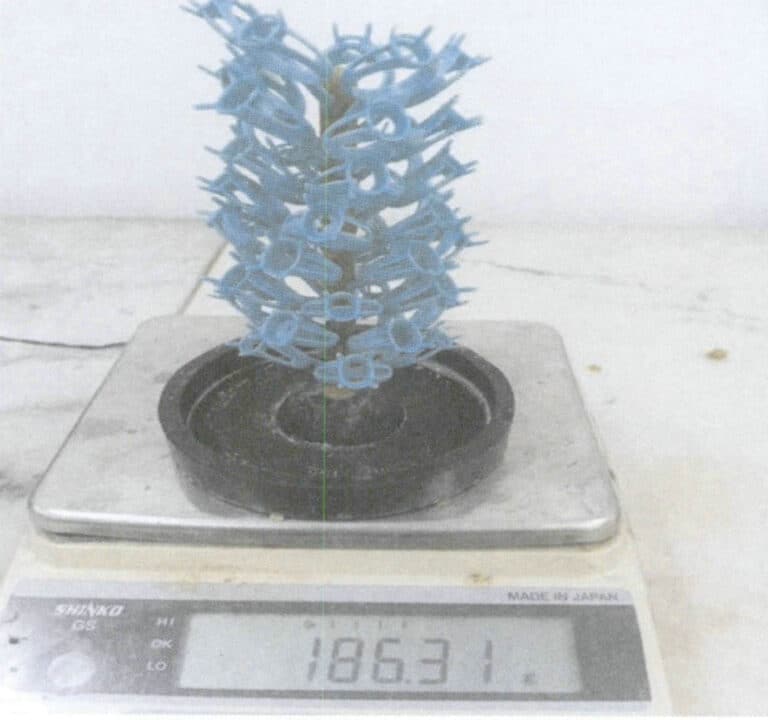
④ After planting the Wax models tree, perform a weighing again, as shown in Figure 4-16. The mass of the Wax models tree can be obtained by subtracting the results of the two weighings. The mass of the Wax models tree can be converted into the mass of metal based on the density ratio of paraffin wax to casting metal, which allows for an estimate of how much metal is needed for pouring. Typically, H65 brass: wax=8.5:1; silver: wax= 10.5:1; gold: wax= 15.5:1.
Copywrite @ Sobling.Jewelry — Custom jewelry manufacturer, OEM and ODM jewelry factory
Section II Making the Wax models Tree for Centrifugal Gold and Silver Jewelry Casting
1. Background Knowledge
1.1 Centrifugal Casting
Centrifugal casting is pouring molten metal into a rotating mold, where the molten metal fills the mold and solidifies under centrifugal force, as shown in Figure 4-17. The advantages and disadvantages of the centrifugal casting process are as follows.
(1) Advantages
During rotation, the liquid metal fills the mold under centrifugal force (Figure 4-18), with a fast filling speed and high production efficiency, making it particularly suitable for pouring small accessories, such as chains and earrings. Denser metals are pushed to the outer wall, while lighter gases and slag move freely to the surface, forming directional solidification from the outside in. Therefore, the shrinkage conditions are good, the casting structure is dense, and the mechanical properties are good.
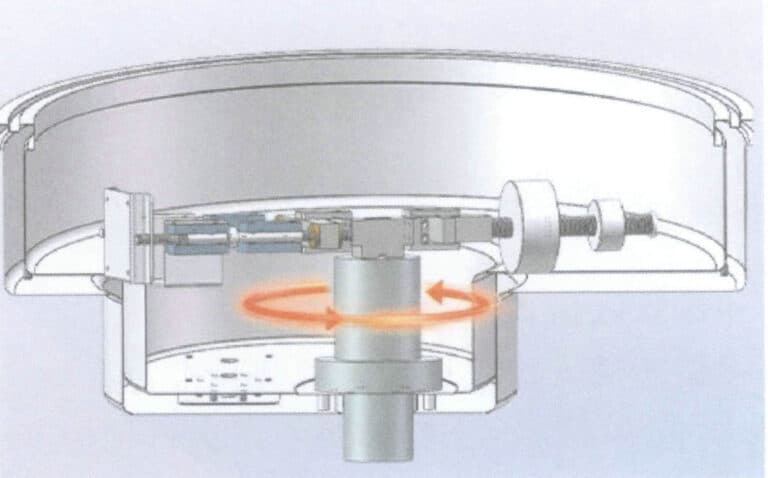
Figure 4-17 Centrifugal casting rotation method
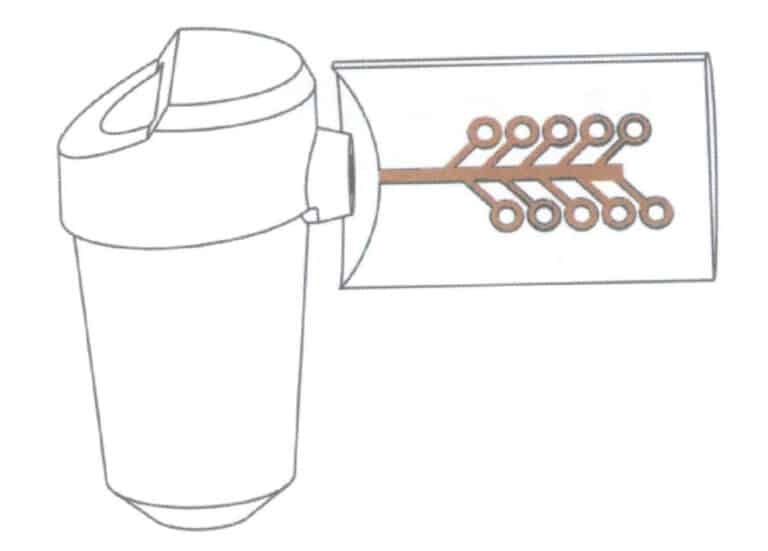
Figure 4-18 Centrifugal casting filling
(2) Disadvantages
Compared to static casting, traditional centrifugal casting has some disadvantages: due to the fast filling speed, the metal liquid experiences severe turbulence during pouring, increasing the likelihood of gas entrapment and the formation of pores; the speed of gas discharge within the mold cavity is relatively slow, resulting in high back pressure within the mold, which increases the probability of pore formation; when the filling capacity is too strong, the metal liquid exerts strong scouring on the mold wall, easily leading to mold cracking or peeling; additionally, slag may enter the mold cavity along with the metal liquid during pouring. The high filling pressure generated by centrifugal force determines that the maximum amount of metal that can be cast within a safe range of the centrifuge is less than that of a static casting machine. Furthermore, due to the larger size of the centrifugal casting chamber, inert gas melting is generally less commonly used.
1.2 Precautions for the Production of Wax models Trees Using Centrifugal Casting Methods
(1) The wax mold is inclined upwards and welded onto the wax core, generally with an angle of 45-60°between the wax mold and the wax core and a sprue length of 10 mm. Compared to the vacuum casting method, the angle between the wax core and the waterline is smaller when using the centrifugal casting method.
(2) The inclination angle can be smaller when the wax mold is small and has a complex structure. A smaller inclination angle is beneficial for the metal liquid to flow downwards, increasing the probability of successful casting (during pouring, the Wax models tree cavity is in an inverted state). When planting the Wax models tree, first weld the radial horizontal pouring channel, as shown in Figure 4-19. Then, vertically weld the wax mold onto the horizontal pouring channel to better accommodate the horizontal flow of the metal liquid, as shown in Figure 4-20.
(3) The wax mold is planted layer by layer in an orderly manner around the wax core from the top of the Wax models tree downwards. The wax molds must be arranged closely but not touching each other, maintaining a minimum distance of 3 mm. The minimum distance between the wax mold and the wax core is 8 mm, and the highest wax mold must be below the top of the steel flask.
Figure 4-19 Radial horizontal pouring channel
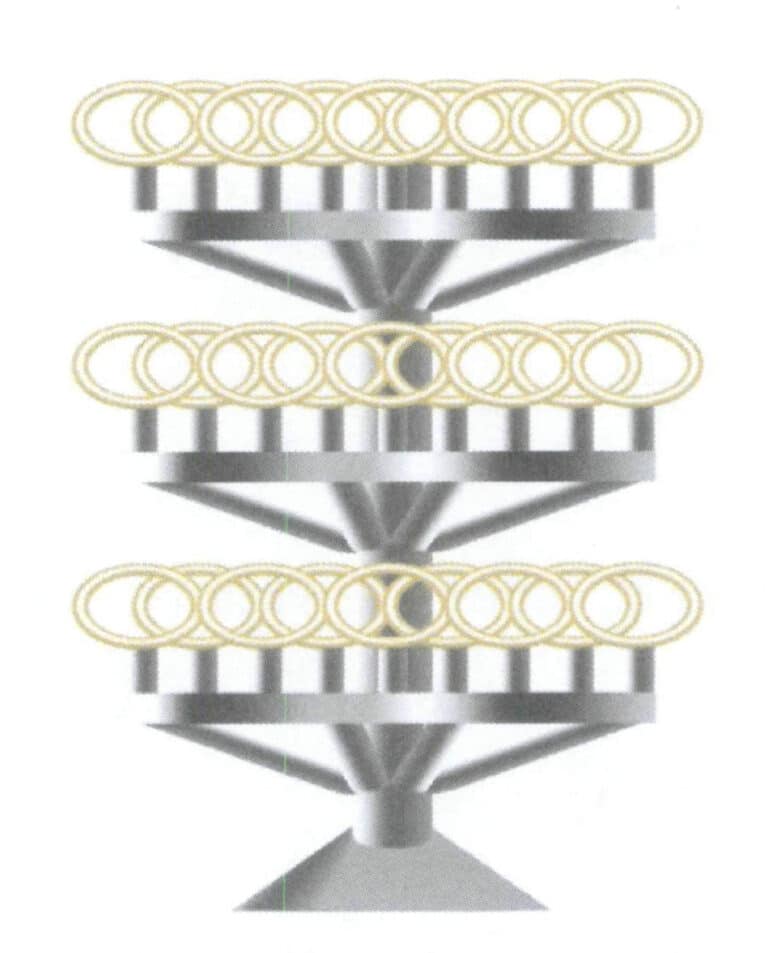
Figure 4-20 Centrifugal casting system
2. Task Implementation
To make a Wax models tree, this task uses a wax mold with an embedded pendant style and a rubber base with an inner diameter of 3.5 inches.
(1) Preparation Work
Prepare the pendant-style wax mold, a wax core with a diameter of 8 mm, a soldering iron, a rubber base with an inner core of 3.5 in, a glue base turntable, or a Wax models tree planting machine; the length of the wax core can be chosen based on the height of the steel flask.
(2) Planting the Wax models Tree
The wax mold must be planted on a circular rubber base, which has an inner diameter consistent with the outer diameter of the steel flask. The steps for planting the Wax models tree are as follows.
① the rubber base should first be weighed and marked before planting the Wax models tree.
② Insert the wax core into the round hole on the rubber base and fix it with a small amount of wax liquid; lift the rubber base and place it at an angle, adjust the temperature of the electric soldering iron, first weld the radial horizontal runner onto the wax core, then sequentially weld the wax mold sprues vertically onto the radial horizontal runner, leaving a 3 mm gap between the wax molds, as shown in Figure 4-21.
③ Weld the wax molds layer by layer onto the horizontal runner until the entire wax tree is completed, ultimately obtaining a tree-shaped wax mold assembly, as shown in Figure 4-22.
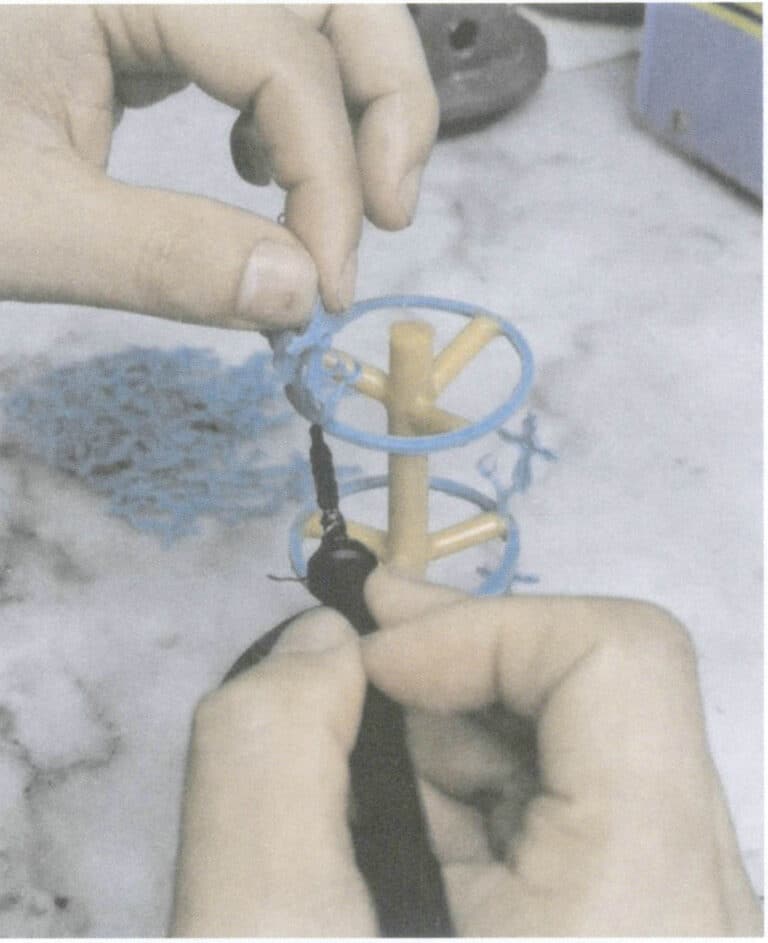
Figure 4-21 Welding the wax mold onto the radial horizontal runner

Figure 4-22 Layer by layer welding the wax mold onto the horizontal runner
(3) Checking the Quality of the Wax models Tree
After planting the Wax models tree, you can check whether the wax molds are securely welded by gently shaking or vibrating the Wax models tree. If they are not securely welded, it is easy for the wax molds to fall off during the gypsum pouring, affecting the casting quality. Finally, check whether there is enough gap between the wax molds. If the wax molds are stuck together, they should be separated; wax drips on the Wax models tree should be trimmed with a blade.
(4) Secondary Weighing
Weigh the entire Wax models tree again, and by subtracting the results of the two weighings, you can obtain the mass of the Wax models tree. Then, according to the density ratio of the Wax models tree to the casting metal, convert it into the mass of the metal, which allows you to estimate how much metal is needed for pouring.
Section III Wax models Tree Production for Platinum Jewelry
1. Background Knowledge
1.1 Casting Properties of Platinum
1.2 Casting Methods for Platinum
The existing platinum casting process mainly uses the following casting methods:
(1) Method of Setting a Large Direct Pouring Channel
This method uses a technique similar to casting gold and silver jewelry when making wax trees, with the inner pouring channel forming an angle of 45° with the direct pouring channel. The pouring channel is very long, as shown in Figure 4-23. This causes the molten platinum to quickly rush to the end of the mold under the action of centrifugal force during pouring and then fold back to fill the cavity, which easily leads to severe turbulence, resulting in incomplete filling of the casting. The strong centrifugal force also poses a risk of explosion at the top of the mold. In addition, this method has a low process yield.
(2) The Method of Directly Connecting the Casting to the Pouring Cup
This method does not have a direct pouring channel but connects the casting directly to the pouring cup, with each casting having an independent inner pouring channel, as shown in Figure 4-24. Although this method can improve the process yield, the number of castings produced per mold is very small. In production, to increase the number of castings, the distance between the inner pouring channels of the castings is reduced, making it easy for the mold walls between the inner pouring channels to be washed away and break during pouring, leading to defects such as sand holes or inclusions in the mold, which affect the quality of the castings.
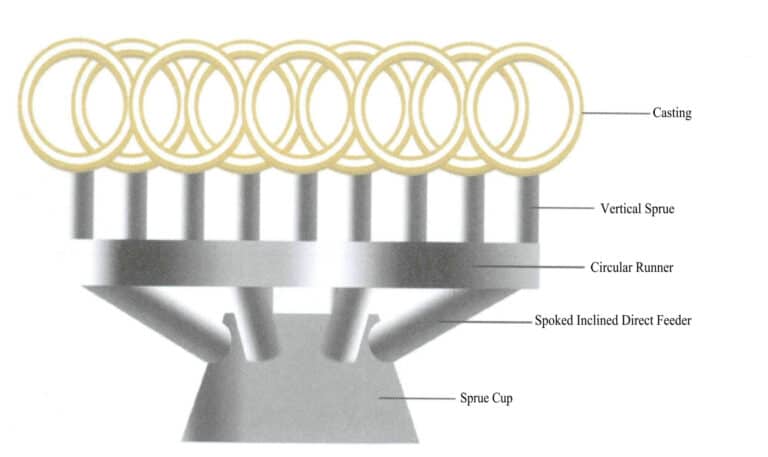
(3) The Method of Setting up a Radial Pouring System
This method sets up funnel-shaped sprue cups, straight sprue, and cross sprue, forming a spoke-shaped ring-shaped sprue, and several jewelry castings are connected vertically to the ring-shaped cross sprue through the inner sprue, as shown in Figure 4-25. This way is conducive to the direction of the liquid metal into the cavity, reducing turbulence, reducing the impact of the liquid metal on the casting, increasing the number of castings. Figure 4-24 Direct connection of the casting to the sprue cup.
2. Task Implementation
This task uses wax models of rings with setting openings, electric soldering irons, absorbent paper, steel flasks, etc., to make wax trees for platinum jewelry.
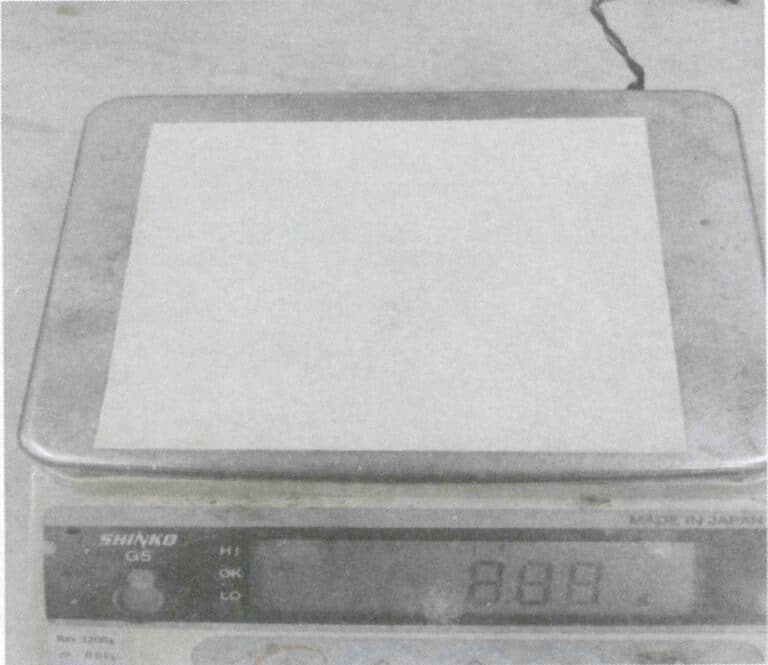
(1) Preparation Work
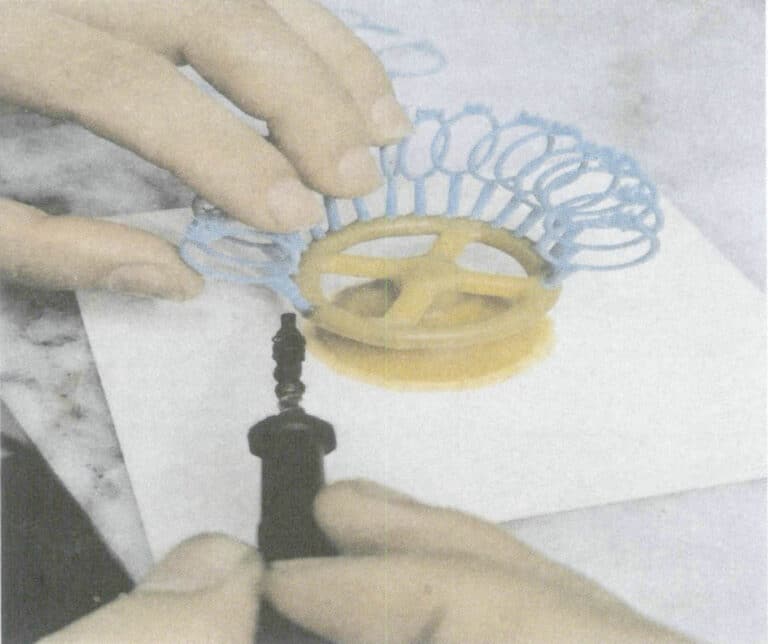
First, weigh the quality of the absorbent paper using an electronic scale and make a record, as shown in Figure 4-26. Weld the prepared wax model pouring cup to the center of the absorbent paper with an electric soldering iron, sealing along the outer edge of the pouring cup without leaving any gaps.
(2) Welding the Radial Horizontal Pouring Channel
Weld the radial horizontal runner at the center of the pouring cup, ensuring a smooth transition at the joint without sharp corners.
(3) Welding the Wax Model
Seal the wax model with a small amount of wax liquid on the annular runner, position the wax model upright at an angle, adjust the temperature of the soldering iron, and then sequentially weld the sprue of the wax model onto the radial horizontal runner, ensuring the wax models are arranged neatly in a circle with a 3 mm gap between them, as shown in Figure 4-27.
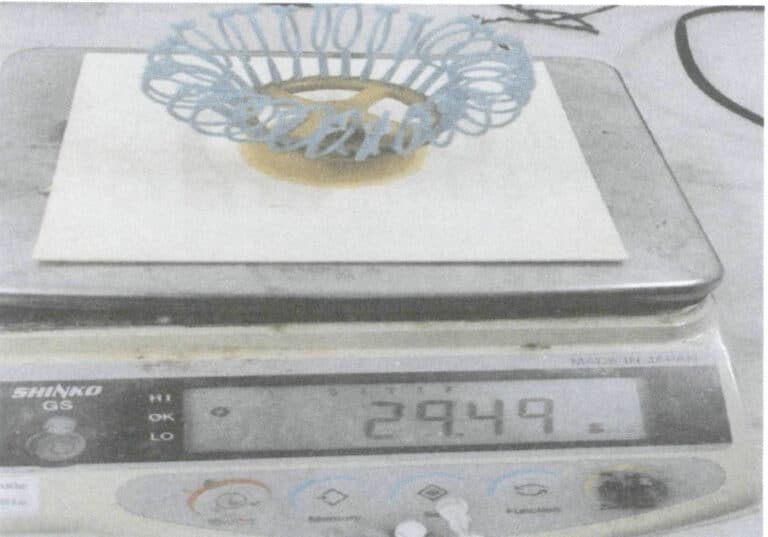
(4)Weighing the Wax models Tree
After all the wax molds are planted, weigh them; subtract the weight of the absorbent paper from the final weight to obtain the weight of the wax mold. Then, the metal weight was calculated according to the density ratio of the Wax models tree to platinum, as shown in Figure 4-28.


One Response
I’m looking to walk my class through the process of creating jewelry. We have a solidscape printer and looking for some input.