How to DIY Knot Jewelry? Steps, skills and materials
Menguasai Teknik Simpul dan Manik-manik Tradisional Tiongkok untuk Pembuat Perhiasan
Simpul dekoratif tradisional Tiongkok, juga dikenal sebagai "simpul Tiongkok". Simpul Tiongkok memiliki sejarah lebih dari dua ribu tahun, berevolusi dari pakaian tradisional, ornamen keberuntungan, artefak religius, dan banyak lagi. Sejak zaman kuno, simpul Cina telah menjadi simbol keberuntungan dan keberuntungan. Sebuah simpul kecil tidak hanya mewujudkan kebijaksanaan bangsa Tionghoa, tetapi juga makna dan harapan yang indah. Simpul ini tidak hanya berbentuk unik dan berwarna indah, tetapi juga dipenuhi dengan warisan budaya dan esensi yang kaya. Mereka melambangkan keberuntungan dan berkah dalam budaya rakyat, menyampaikan harapan dan keberuntungan sekaligus mencerminkan budaya tradisional yang unik dari bangsa Tionghoa.
Simpul Cina dibuat dengan menenun untaian tunggal, ganda, atau ganda, menggunakan variasi tenun paralel atau terpisah untuk menciptakan simpul atau kelompok simpul yang berwarna-warni dan beragam. Pada saat yang sama, dengan memperpanjang untaian tenun dan penutup telinga serta menggunakan pengait, berbagai simpul dapat digabungkan secara fleksibel untuk melengkapi kelompok dekorasi simpul yang selalu berubah. Simpul Cina dapat dibagi menjadi tiga kategori utama: dasar, variasi, dan kombinasi. Bab ini berfokus pada pengetahuan yang relevan tentang dua jenis simpul yang pertama.
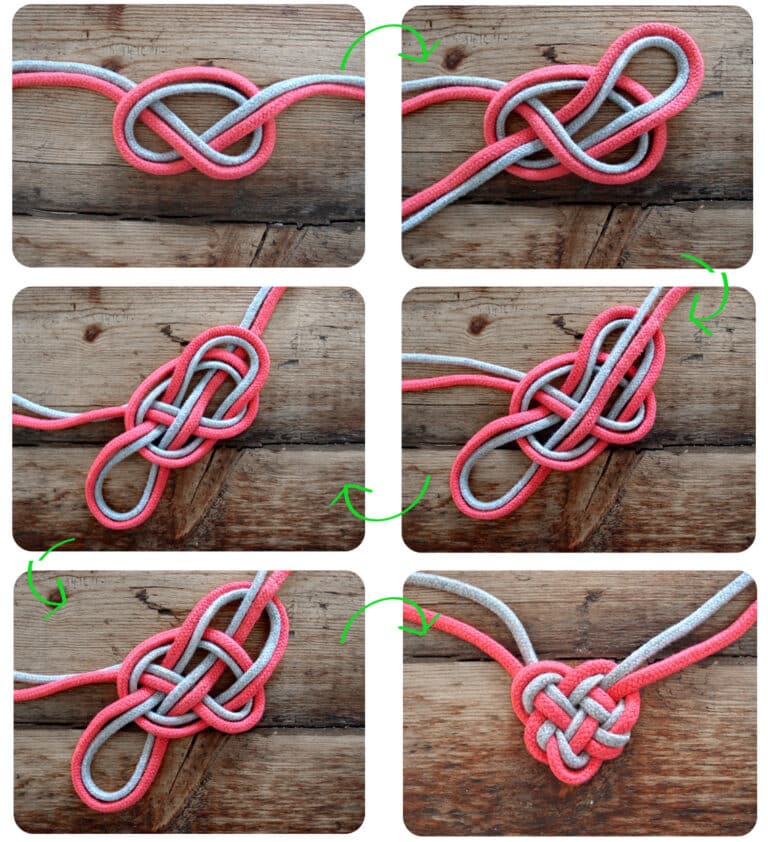
perhiasan simpul diy
Daftar Isi
Bagian I Teknik Simpul Dasar
1. Simpul kancing
(1) Karakteristik Gaya
Simpul kancing berbentuk seperti berlian, juga dikenal sebagai simpul berlian. Simpul kancing pada awalnya digunakan pada pakaian Tiongkok kuno. Ini adalah gaya simpul yang praktis dan dekoratif. "Kancing" mengacu ke tempat pita berpotongan, sedangkan "Simpul" adalah jenis simpul yang dapat dikaitkan; oleh karena itu, kancing harus berpasangan, dapat dilepaskan dan dikaitkan. Mereka bisa membentuk pasangan kancing yang indah apabila dipasangkan dengan simpul dekoratif lainnya. Simpul kancing sering digunakan di awal atau akhir kalung dan gelang yang dikepang untuk menyambungkan ujung-ujungnya, seperti yang terlihat pada Gambar 2-1.

(2) Metode Produksi
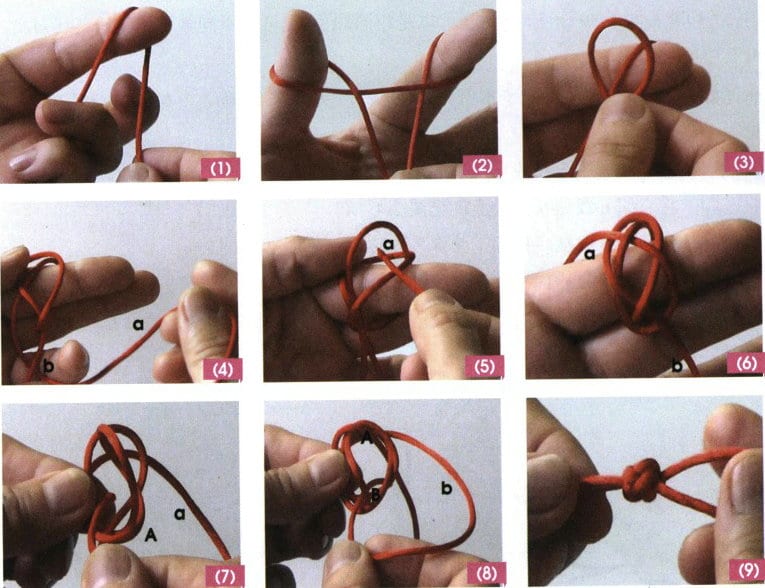
① Siapkan garis No. 5 sepanjang 80 cm, mulai menenun dari titik tengah, lilitkan garis dari atas ke bawah di sekitar jari telunjuk; lihat Gambar 2-2 (1).
② Kemudian lilitkan ibu jari dari atas ke bawah; lihat Gambar 2-2 (2).
③ Tempatkan lingkaran yang terbentuk pada ibu jari ke jari telunjuk dan tekan lingkaran pada jari telunjuk; lihat Gambar 2-2 (3).
④ Bawa garis ekstensi a dari bawah lingkaran jari telunjuk ke atas dari belakang garis ekstensi b di bawah lingkaran ibu jari; lihat Gambar 2-2 (4).
⑤ Kemudian masukkan melalui lingkaran jari telunjuk untuk membentuk bentuk yang menyerupai angka delapan (disebut sebagai bagian bawah bingkai); lihat Gambar 2-2 (5).
⑥ Lingkaran kawat pada ibu jari seperti strip penguat; lepaskan dan balikkan ke atas, lihat Gambar 2-2 (6).
⑦ Kawat a, seperti yang ditunjukkan pada Gambar 2-2 (7), dililitkan searah jarum jam di sekeliling strip penguat A dan melewati lubang tengah.
⑧ Garis B, seperti yang ditunjukkan pada Gambar 2-2 (8), membungkus tulangan strip B searah jarum jam dan melewati lubang yang sama di tengah dari atas ke bawah.
⑨ Kencangkan strip penguat dan a dan b ke atas dan ke bawah dan atur simpulnya secara merata; lihat Gambar 2-2 (9).
2. Simpul Persegi
(1) Karakteristik Gaya
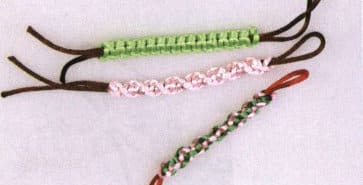
Simpul persegi adalah salah satu jenis simpul tertua, paling umum, dan paling praktis. Dinamakan demikian karena bentuknya yang datar dan teratur setelah dibentuk, seperti yang terlihat pada Gambar 2-3. Simpul persegi berasal dari kapal-kapal layar awal; para pelaut akan mengikat bagian layar dengan tali untuk mengurangi area layar ketika angin bertiup kencang. Simpul ini, yang melingkari tiang layar untuk mengamankan layar, disebut simpul persegi. Simpul ini memberikan rasa stabilitas, pengekangan, ketenangan, dan moderasi. Simpul persegi dibagi menjadi simpul searah dan dua arah berdasarkan metode menenun: bentuk simpul persegi searah dipelintir dan spiral; bentuk simpul persegi dua arah datar dan lurus, sering digunakan untuk menenun kalung, gelang, dan penutup.
(2) Metode Produksi
1) Simpul Persegi Searah
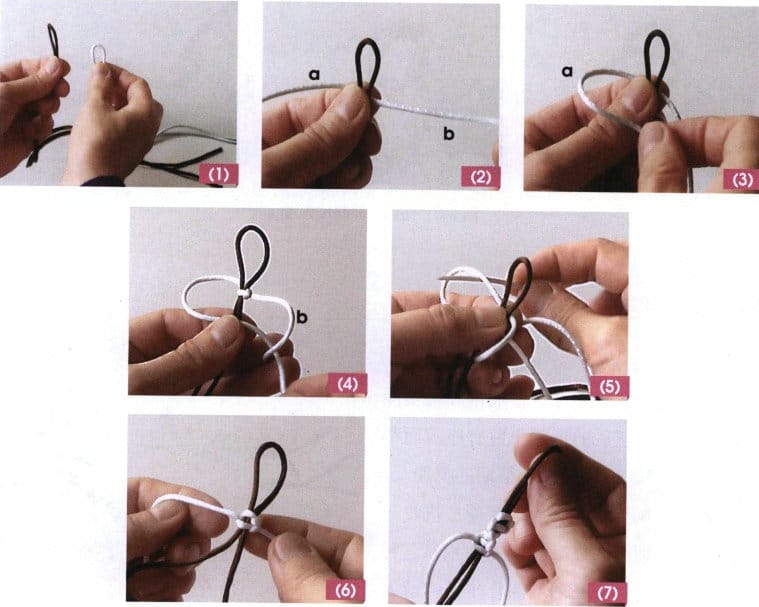
① Siapkan dua garis No.5 sepanjang 80cm (yang bisa berwarna sama atau berbeda warna), lipat kedua garis menjadi dua, dan ambil titik tengahnya, lihat Gambar 2-4(1).
② Ambil satu garis sebagai pasak (dalam hal ini, garis coklat) dan garis lainnya untuk mengepang (dalam hal ini, garis biru muda); lihat Gambar 2-4(2).
③ Tekan garis kiri ke pasak untuk membentuk lingkaran samping kiri; lihat Gambar 2-4 (3).
④ Tekan garis kanan b ke garis a; lihat Gambar 2-4 (4).
⑤ Kemudian lewati garis b melalui lingkaran kiri dari bawah pasak; lihat Gambar 2-4 (5).
⑥ Tarik tali dengan kencang dan atur simpulnya secara merata; lihat Gambar 2-4 (6).
⑦ Ulangi cara mengepang di atas (selalu letakkan garis kiri pada pasak), membentuk bentuk spiral; lihat Gambar 2-4 (7).
2) Simpul Persegi Dua Arah
Tiga langkah pertama dari simpul persegi dua arah sama dengan simpul persegi searah, jadi akan dihilangkan.
① Tempatkan kabel kanan di atas pasak, lihat Gambar 2-5 (1).
② Garis kiri menekan garis kanan; lihat Gambar 2-5 (2).
③ kabel kanan melintas dari bawah sumbu ke loop kanan; lihat Gambar 2-5 (3).
④ Kencangkan garis kiri dan kanan dan atur simpul secara merata; lihat Gambar 2-5 (4).
⑤ Ulangi metode mengepang dengan bergantian garis kiri dan kanan yang ditempatkan pada sumbu, membentuk struktur seperti tangga; lihat Gambar 2-5 (5).
3. Simpul ular
(1) Karakteristik Gaya
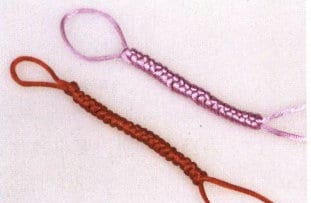
Simpul ular menyerupai kerangka ular; simpulnya elastis dan dapat berputar ke kiri dan ke kanan, dan susunan simpulnya rapi, sederhana, dan elegan, seperti yang ditunjukkan pada Gambar 2-6.
(2) Metode Produksi
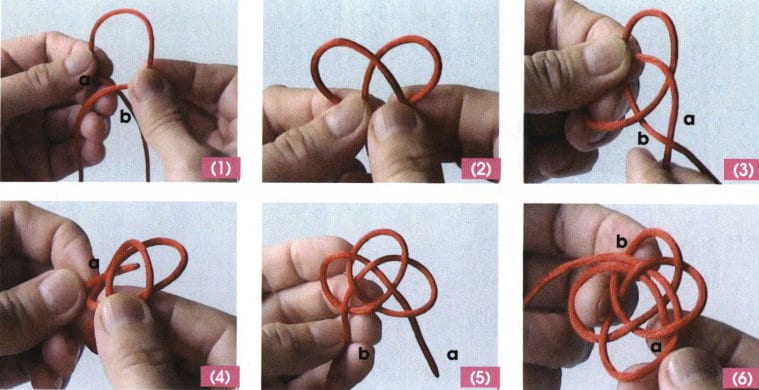
① Lipat benang menjadi dua, pegang lingkaran yang terlipat dengan tangan kiri Anda; lihat Gambar 2-7 (1).
② Buatlah lingkaran dengan garis a (garis yang lebih dekat dengan Anda) dan kemudian pegang garis tersebut di antara ibu jari dan jari telunjuk Anda; lihat Gambar 2-7 (2).
③ Keluarkan kabel dari bawah kawat, lihat Gambar 2-7 (3).
④ Lewati lingkaran yang dibentuk oleh garis a; lihat Gambar 2-7 (4).
⑤ Kencangkan kedua garis, sesuaikan agar simpulnya seragam; lihat Gambar 2-7 (5).
⑥ Ulangi cara membuat simpul di atas, membentuk simpul-simpul yang saling terkait yang disusun rapi dalam bentuk seperti ular; lihat Gambar 2-7 (6).

4. Simpul Vajra
(1) Karakteristik Gaya
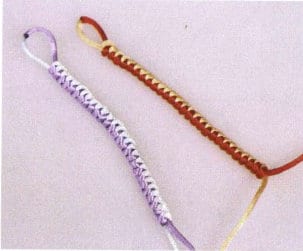
The Vajra knot represents wealth, prosperity, peace, and good fortune. Its shape is similar to that of a snake knot, but the snake knot is prone to swaying and loosening, while the Vajra knot is more secure and stable, as shown in Figure 2-8.
(2) Metode Produksi
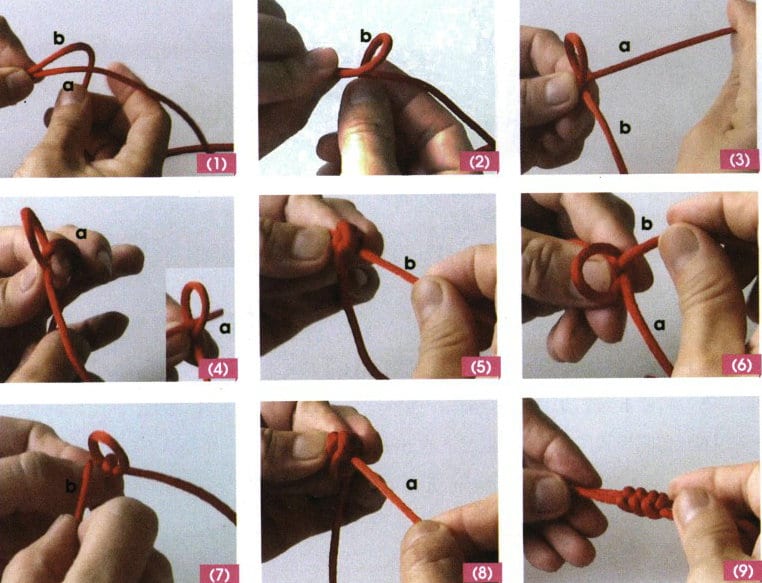
① Fold the knot line in half, holding the b line with the right hand from underneath the line; see Figure 2-9 (1).
② Rotate the left hand inward to form a loop and press it down with the right hand; see Figure 2-9 (2).
③ For ease of operation, it should be moved to the left hand; at this point, you will see line A moving forward and line b moving to the right, as shown in Figure 2-9(3).
④ Wrap the thread around the index finger, then pass it through the loop; see Figure 2-9 (4).
⑤ Tighten the b line to complete the production of a single unit of the Vajra knot, see Figure 2-9 (5).
⑥ Hold down the line, remove the loop of the line on the index finger, and flip it outward to the top; see Figure 2-9 (6).
⑦ Wrap the b line around the index finger, then pass it through the loop; see Figure 2-9 (7).
⑧ Tighten line a to form a double unit Vajra knot; see Figure 2-9 (8).
⑨ Repeat steps (6) to (8) to weave the required length. The knots form a tightly twisted and neatly arranged snake shape; see Figure 2-9 (9).
5. Crown Knot
(1) Karakteristik Gaya
The crown knot is a common basic knot, symbolizing joy and a cheerful mood. Its knot style is simple and is often used to connect or secure threads between knots and ornaments or as an outer circle for ornaments, as shown in Figure 2-10.
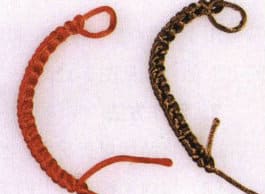
(2) Metode Produksi
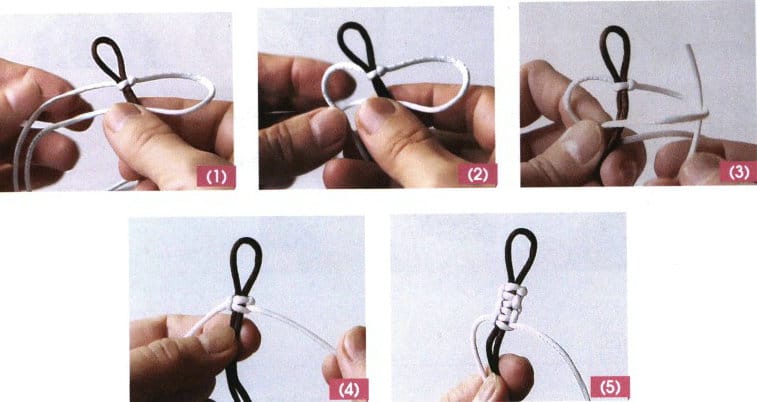
① For convenience of operation, one end of the thread can be tied to a heavy object; see Figure 2-11 (1).
② Fold the thread in half to create a double line, with the short line as the axis and the long line as the weaving line. Wrap the line around the axis from top to bottom; see Figure 2-11 (2).
③ Pull the b line tight and press down on the formed knot with your left hand; see Figure 2-11 (3).
④ Wrap the wire around the axis from bottom to top; see Figure 2-11 (4).
⑤ Tighten the b line to form a pair of knots, adjusting the tightness of the knots; see Figure 2-11 (5).
⑥ Repeat the braiding method from steps (2) to (5) (note that one wraps around the axis from bottom to top, while the other wraps from top to bottom), ensuring that the knots form a tightly coupled linear structure in pairs, as shown in Figure 2-11 (6).

6. Double Connection Knot
(1) Karakteristik Gaya
The double connection knot, also known as the double knot, is a means of linking, combining, and continuity. The double connection knot is formed by linking two single knots, hence the double connection. Its structure is compact and not easily loosened, and it is often used at the beginning and end of knot decorations to secure the upper and lower parts of the main knot, as shown in Figure 2-12.
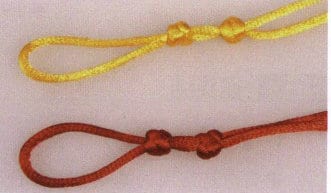
(2) Metode Produksi
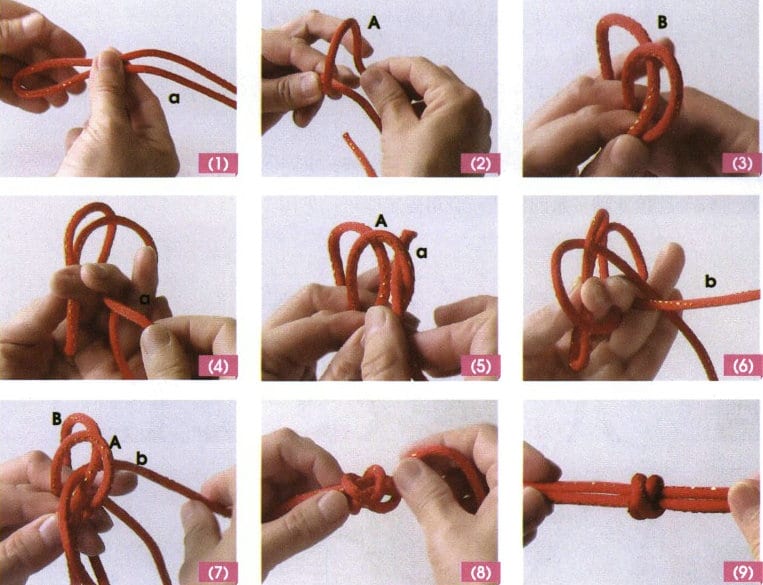
① Fold the knot line in half at the center, holding the loop part in the left hand; see Figure 7-13 (1).
② Make a loop A with the inner line A from top to bottom, pinched between the index and middle fingers; see Figure 7-13 (2).
③ Make a loop B with the outer line b from top to bottom, placing it between the middle finger and the ring finger; see Figure 7-13 (2)(3).
④ Pass line A through loop A; see Figure 7-13 (4), (5).
⑤ Pass line b through both loop A and loop B at the same time; see Figure 7-13 (6), (7).
⑥ Tighten the line a and the line b, see Figure 7-13 (8).
⑦ Organize the knot style to form a cross-shaped X on both sides; see Figure 7-13 (9).
7. Phoenix Tail Knot
(1) Karakteristik Gaya
The phoenix tail knot, also known as the pipa knot, is named for its resemblance to the tail of a phoenix. It is generally used at the end of a braided line for decorative purposes. It symbolizes the auspiciousness of the dragon and phoenix, prosperous career, and abundant wealth, as shown in Figure 2-14.
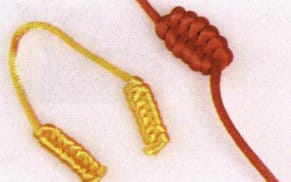
(2) Metode Produksi
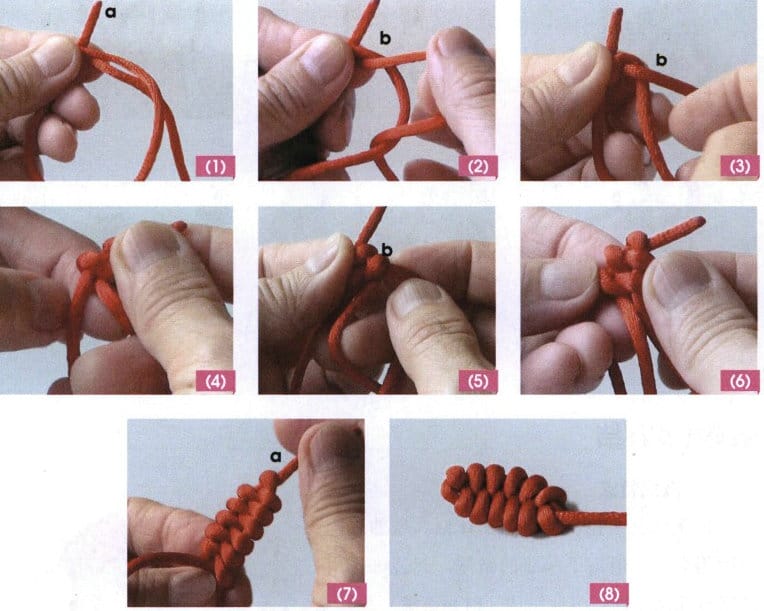
① Wrap a line into a loop, using the two sides of the loop as the left and right axes (designated as axis a and axis b) axis a is shorter. The knot line presses down and wraps around the axis a; see Figure 2-15 (1).
② The thread passes through the b-axis; see Figure 2-15 (2).
③ Then rotate around the b-axis from bottom to top for one circle; see Figure 2-15 (3).
④ Then turn to the a-axis and circle from bottom to top; see Figure 2-15 (4).
⑤ Then turn to the b-axis and completely turn from bottom to top; see Figure 2-15 (5).
⑥ Repeat steps (4) and (5), alternating the winding around the left and right axes, ensuring that the tension of the knots is appropriate; see Figure 2-15 (6).
⑦ Pull the a-axis upwards after knitting to the required length; see Figure 2-15 (7).
⑧ Cut off the excess wiring on the b-axis, melt, and fix it; see Figure 2-15 (8).
8. Double Coin Knot
(1) Karakteristik Gaya
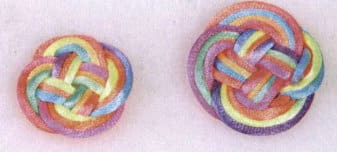
The double coin or money knot resembles two ancient coins connected, symbolizing “good things come in pairs,” as shown in Figure 2-16. In ancient times, money was also called “spring,” which sounds the same as “whole,” implying completeness. The double coin knot has a circular shape, and its structure is elegant. Beautiful patterns can be created by combining several double coin knots, such as clouds and the complete perfection knot.
(2) Metode Produksi
① Press wire a against wire b to form a loop 1, see Figure 2-17(1).
② Make another loop 2 with wire a clockwise and place it on loop 1, see Figure 2-17(2).
③ Press line a with line b (i.e., line b is on top and line a is on the bottom), see Fig. 2-17(3).
④ Line a is pressed and picked one by one clockwise along the line formed by loop 2 and loop 1, see Fig. 2-17(4).
⑤ Line a continues to press a pick one by one to the end of loop 1, see Figure 2-17(5)
⑥ After line b presses line a, thread it counterclockwise along the path of line a, and keep the same method of threading as line a picking and pressing, see Figure 2-17(6).
⑦ Thread b continues to thread the 2 petals of the second loop along thread a, see Figure 2-17(7).
⑧ Line b continues along line a to begin the third loop, see Figure 2-17(8).
⑨ After completing the fourth round with line b, adjust the knot, cut off the ends of lines a and b, and melt and bond them together, see Figure 2-17 (9).

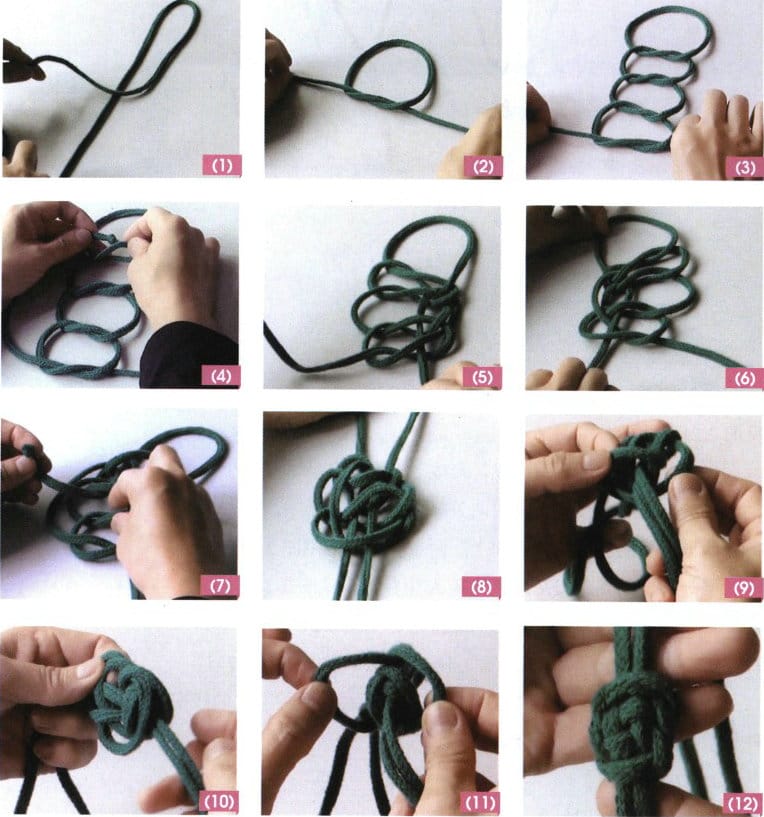
9. Caisson Knot
(1) Karakteristik Gaya
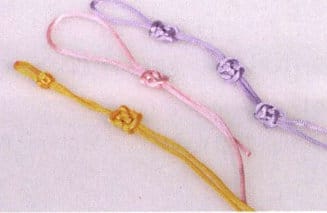
The center of the caisson is like a the character “井”, surrounded by symmetrical diagonal patterns. In Chinese palace-style architecture, the painted and decorated ceilings are called “caisson” or “ornate caisson.” It is a decorative pattern, and there are many caisson patterns in Dunhuang murals, which are orderly and dazzling. The caisson knot has a simple shape, is not easy to loosen, and can be continuously woven into several pieces to make bracelets and necklaces, which are very beautiful, see Figure 2-18.
(2) Metode Produksi
① Fold the thread in half to find its center; see Figure 2-19 (1).
② Tie a loose knot with the left and right lines; see Figure 2-19 (2).
③ Continuously tie the same three knots below (the direction of the left and right lines should be consistent); see Figure 2-19 (3).
④ The left thread passes through the middle of the first knot above; see Figure 2-19 (4).
⑤ Then pass through the remaining three knots in order; see Figure 2-19 (5).
⑥ Flip the knot, moving the original right line to the left side; see Figure 2-19 (6).
⑦ Similarly, thread down from the middle of the four knots, forming a state where two lines pass through the same hole in parallel, see Figure 2-19 (7).
⑧ Slightly tighten the lines above and below; see Figure 2-19 (8).
⑨ Use the two lines below as axes, and flip the left and right lines of the bottom knot upwards to the first knot above, as shown in Figure 2-19 (9).
⑩ Organize the two wire loops on top; see Figure 2-19 (10).
⑪ Still using the two lines below as the axis, flip the left and right loops of the bottom knot upwards in the same way as in step 8; see Figure 2-19 (11).
⑫ Gradually tighten the knot, adjusting evenly; see Figure 2-19 (12).
Copywrite @ Sobling.Jewelry - Produsen perhiasan khusus, pabrik perhiasan OEM dan ODM
10. Corn Knot
(1) Karakteristik Gaya
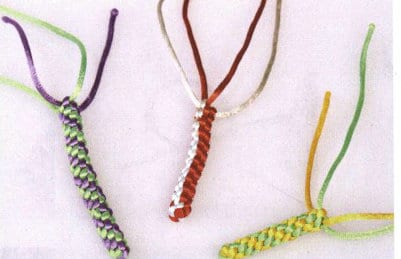
The corn knot resembles corn, and because its cross-section is shaped like a “十” character after being woven, it is also called the “cross knot.” The arrangement of the knots is neat, tight, and uniform, with distinctions between round and square shapes commonly used in three-dimensional knot decorations, such as firecrackers, crosses, etc., as shown in Figure 2-20.
(2) Metode Produksi
1) Round Corn Knot
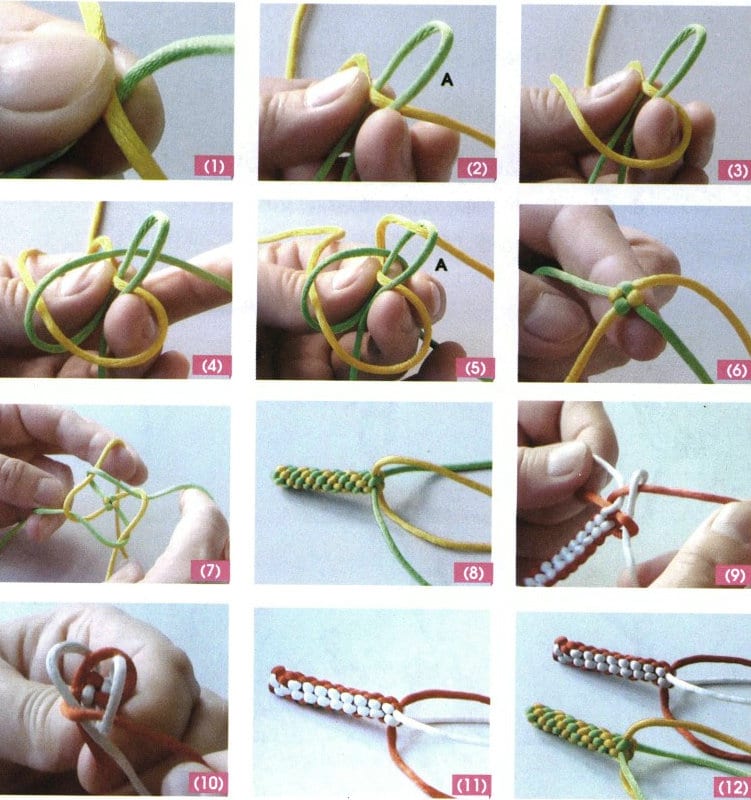
① Take two lines (in this example, yellow and green) and cross them at the center in a cross shape, with the yellow line on top of the green line, as shown in Figure 2-21 (1).
② The green line presses down on the yellow line, forming a green line loop A, see Figure 2-21 (2).
③ The yellow line on the right presses two green lines clockwise; see Figure 2-21 (3).
④ The green line below presses two yellow lines from bottom to top; see Figure 2-21 (4).
⑤ The yellow line on the right comes from the green line loop A; see Figure 2-21 (5).
⑥ Pull the lines in the four directions of up, down, left, and right tight; see Figure 2-21 (6).
⑦ Repeat the steps from (2) to (6), see Figure 2-21 (7).
⑧ Continue braiding to a suitable length; it is not difficult to see that the two colors of thread alternate and twist, appearing cylindrical, see Figure 2-21 (8)
2) Square Corn Knot
① Each line is pressed clockwise; see Figure 2-21 (9).
② Each line is pressed counterclockwise; see Figure 2-21 (10).
③ Weave alternately in the direction of the line’s tension, and the lines of the same color extend in one direction, with clear edges, as shown in Figure 2-21(11).
Comparing the two types of corn knots, one is round and spiral; the other is square and angular, as shown in Figure 2-21 (12).
11. Paracord Watch Knot
(1) Karakteristik Gaya
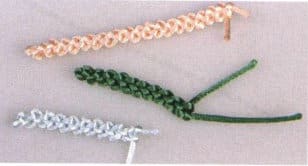
The shape of the paracord watch knot is very similar to that of traditional metal watch bands, with one loop fitting into another, creating a locking effect. The texture of the watch strap knot is clear, elastic, and aesthetically pleasing, as shown in Figure 2-22.
(2) Metode Produksi
① Fold the rope in half to find its center, press the right line over the left line, and wrap it to the back to form loop A; see Figure 2-23 (1).
② Then pass the thread through the loop on loop A to tie a knot, leaving the loop B above; see Figure 2-23 (2).
③ Use one of the unmovable knot lines to make a loop C; see Figure 2-23 (3).
④ The loop C is threaded through loop B, pulling tight one of the movable knot lines; see Figure 2-23 (4).
⑤ Repeat steps (3) to (4) to form the second unit knot; see Figure 2-23 (5).
⑥ Repeat the braiding method above, see Figure 2-23 (6).

12. Braid Knot
(1) Two strands Braid
The two-strand braid knot, also known as the twist knot, is the simplest and most commonly used knot in the braided knot family, often used in the braided sections of necklaces and bracelets, as shown in Figure 2-24.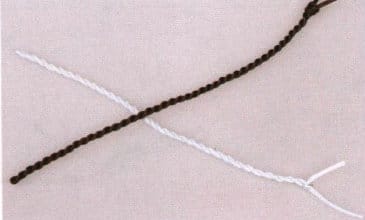
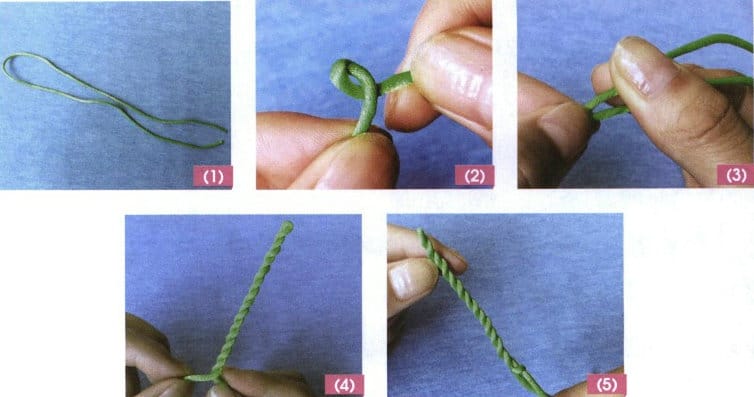
① Take a line and fold it in half at the center; see Figure 2-25 (1).
② Both hands’ index finger and thumb pinch their respective strands while twisting them in opposite directions. Each strand is given a twist, which naturally causes them to intertwine, as shown in Figure 2-25 (2).
③ Alternatively, use both hands’ index finger and thumb to pinch these two strands while twisting them in the same direction, like rolling hemp rope, to twist the two strands together, see Figure 2-25 (3).
④ Adjust the knots to achieve uniformity with consistent concavity and convexity; see Figure 2-25 (4).
⑤Tie a knot with one of the lines at the end to lock it onto the other line; see Figure 2-25 (5).
(2) Four-strand Braid
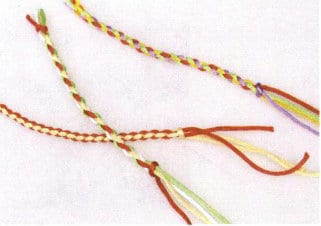
Four-strand braids are formed by crossing and intertwining the left and right strands, commonly used for the braided parts of necklaces and bracelets. Four-strand braids are richer in effect than two-strand ones, as shown in Figure 2-26.
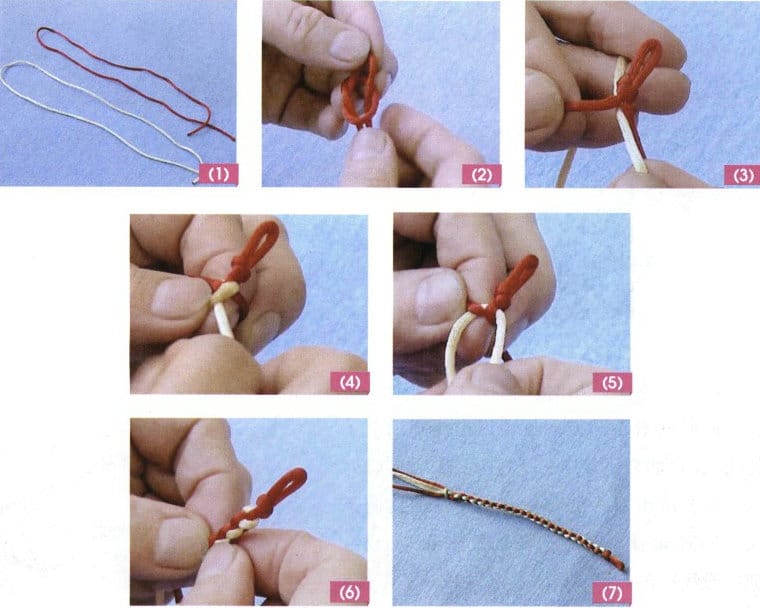
① Prepare two strands of thread, a and b (in this example, red and yellow threads), fold them in half to make four strands, or directly prepare four strands, see Figure 2-27 (1).
② Make a single knot at the center of the red thread, leaving the desired length of the loop, which can generally be determined by the size of the beads or button knots, see Figure 2-27 (2).
③ Insert the center of the yellow thread below the knot of the red thread; see Figure 2-27 (3).
④ The red line crosses under the yellow line and tightens the red line; see Figure 2-27 (4).
⑤ The yellow line crosses under the red line and tightens the yellow line; see Figure 2-27 (5).
⑥ Following the method of steps (3) to (4), continue braiding to the desired length, see Figure 2-27 (6).
⑦ Use one of the lines to wrap around the remaining lines and tie a single knot to secure it; see Figure 2-27 (7).
13. Diagonal Clove Hitch Knot
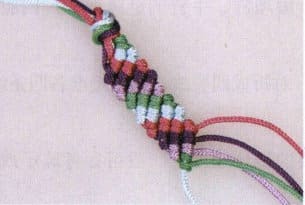
① Take five strands of different colored threads; you can tie a knot first to temporarily secure the five strands; see Figure 2-29 (1).
② The first line in the upper right is the axis line (purple line), starting to weave from the adjacent line (green line). Wrap around the axis line from above and then pass through the formed loop; see Figure 2-29 (2).
③ Braid the second one in the same way, pulling the braided thread tightly to complete a diagonal clove hitch knot, see Figure 2-29(3).
④ Each line is braided in the same way to form a diagonal knot until the last line is completed, creating the first combination line of diagonal knots; see Figure 2-29 (4).
⑤ Then, using the first line in the upper right as the axis (green line), begin to weave the nearby line (light blue line) into a diagonal clove hitch knot until the last line is completed, forming a combination of two diagonal clove hitch knot lines, see Figure 2-29 (5).
⑥ Using the method from steps (2) to (4), weave multiple combinations of diagonal clove hitch knots, and the colorful effect will appear before your eyes; see Figure 2-29 (6).

Section II Changing Knotting Techniques
1. Round Brocade Knot
(1) Karakteristik Gaya
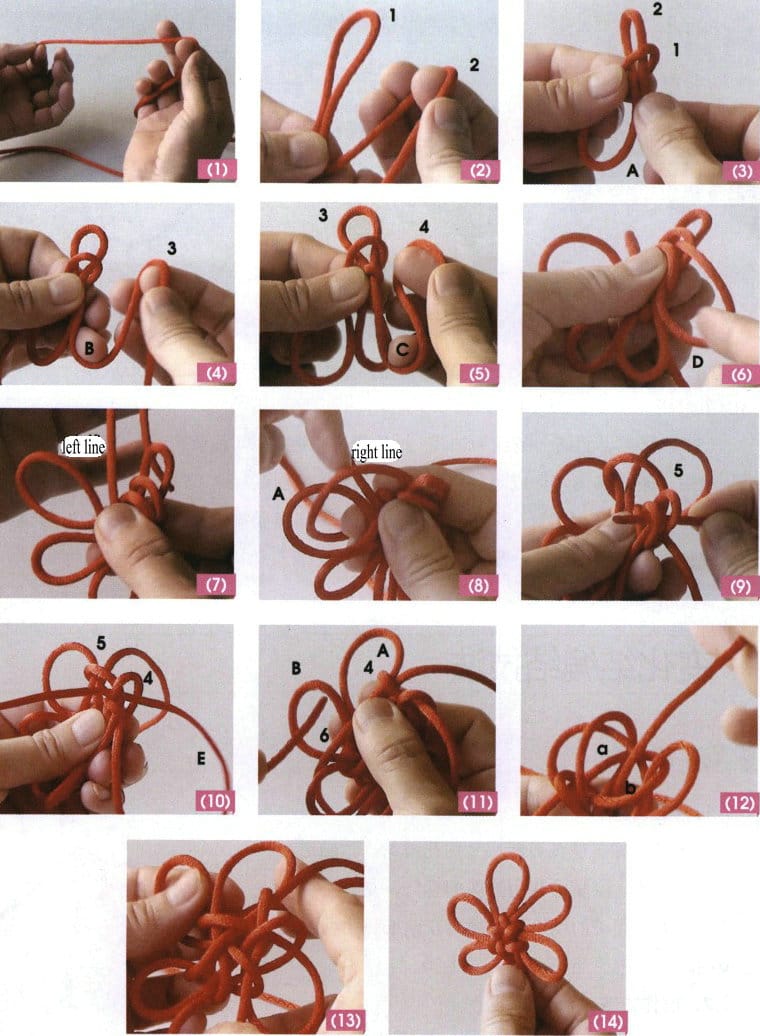
The ears of the round brocade knot are petal-shaped, also known as the petal knot. This knot has a beautiful and natural shape, exuding the joyful atmosphere of a floral arrangement. It is a festive and auspicious decorative knot, and if a gemstone or similar ornament is set in the center of the knot, it will appear even more luxurious, as shown in Figure 2-30.

(2) Metode Produksi
① Leave a wire about 10 cm long at the left end; see Figure 2-31 (1)
② Make wire loops 1 and 2 at the other end, also known as inner loops 1 and 2; see Figure 2-31(2).
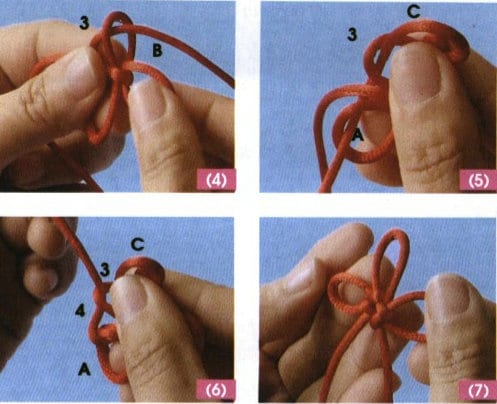
③ Insert inner loop two into inner loop 1 to form outer loop A; see Figure 2-31 (3).
④ Continue to make the inner loop 3 with the right thread while threading it through inner loops 1 and 2 to form the outer loop B; see Figure 2-31 (4).
⑤ Continue to make the inner loop 4 with the right thread while threading it through inner loops 2 and 3 to form the outer loop C; see Figure 2-31 (5).
⑥ Pass the right wire through inner loop 3 and inner loop 4 at the same time, forming outer loop D, see Figure 2-31 (6).
⑦ To facilitate operation, move the left wire to the top; see Figure 2-31 (7).
⑧ Pass the right line through the outer loop A from below the left line; the left line presses the right line, see Figure 2-31 (8).
⑨ Return along the same route (i.e., passing through Inner Loop 3 and Inner Loop 4); the returning line forms Inner Loop 5, which is equivalent to the line loop formed by the right line enclosing the left line, see Figure 2-31 (9).
⑩ The right line passes through the inner loop 4 and inner loop 5, forming the outer loop E; see Figure 2-31 (10).
⑪ The right line presses the left line, then passes through the outer loop B, forming the line loop as the inner loop 6; see Figure 2-31 (11).
⑫ Flip the knot over and thread it through the adjacent loops a and b on both sides of the left line. See Figure 2-31 (12).
⑬ Form the knot’s shape by pulling the outer loops A, B, C, D, and E (i.e., the five ears), and the inner loops 1 to 6 form a central flower shape, see Figure 2-31 (13).
⑭ Adjust the ears, tighten the inner loop (also known as the inner ear), and tidy up the knot to complete the production; see Figure 2-31 (14).
2. Auspicious Knot
(1) Karakteristik Gaya
The auspicious knot, also known as the four-eared knot, has four ears and resembles a multi-petaled auspicious flower. It often appears in monks’ clothing and temple decorations in China. It is an ancient ornament considered to be auspicious. “Auspicious” implies good fortune and beauty. Adding the auspicious knot can symbolize good luck, peace, health, and well-being in the combination of ornaments. The ears of the auspicious knot are exactly seven. Hence, it is also called the “seven-circle knot,” as Figure 2-32 shows.

(2) Metode Produksi
① Prepare an 80 cm long thread, fold it in half to form a loop at the center, which will be the upper ear, and create a line loop on the right side that is equal in length to the upper ear, which will be the right ear, see Figure 2-33 (1).
② Create equal wire loops on the left side for the left ear; see Figure 2-33 (2).
③ Press the double line part upwards against the right ear to form a double line loop a; see Figure 2-33 (3).
④ Press the right ear counterclockwise onto the upper ear; see Figure 2-33 (4).
⑤ The upper ear flap is pressed on the left ear flap; see Figure 2-33 (5).
⑥ The left ear passes through the double-line loop a; see Figure 2-33 (6).
⑦ Then tighten the knot to complete the first layer of production; see Figure 2-33 (7).
⑧ Recycle again, pressing the double line section below upwards towards the right ear to form a double line loop b; see Figure 2-33 (8).
⑨ Repeat steps (4) to (6) to form the second layer; see Figure 2-33 (9).
⑩ Tighten the knot and adjust evenly; see Figure 2-33 (10).
⑪ Pull the four side ears to a suitable size; see Figure 2-33 (11).
⑫ Organize the knot structure and complete the production; see Figure 2-33 (12).

3. Shamrock Knot
(1) Karakteristik Gaya
The appearance of a shamrock knot consists of three interlocking loops (also known as ears), resembling the petals of a clover flower, hence the name. Its knot shape is beautiful, easy to match, and carries connotations of luck and auspiciousness. It can also evolve into various decorative variations and be woven into different ear forms such as four ears, five ears, etc., as shown in Figure 2-34.

(2) Metode Produksi
① Make two loops with the right wire (Loop 1 and Loop 2); see Figure 2-35 (1).
② Insert loop 2 into loop 1, forming the outer loop A; see Figure 2-35 (2).
③ Make another loop 3 with the right wire; see Figure 2-35 (3).
④ Insert loop 3 into loop 2, simultaneously forming outer loop B; see Figure 2-35 (4).
⑤ The right wire passes through loop 3, then goes under the left wire to enter the outer loop A. At this point, do not pull the right wire tight, leaving enough for the outer loop C; see Figure 2-35 (5).
⑥ The right thread continues to pass through loop 3 from above the left thread, forming loop 4 with the upper thread; see Figure 2-35 (6).
⑦ Finally, tighten the outer loop to form three ears, and loops 1 to 4 will form a central cross-flower shape; tidy up the knot and complete the production; see Figure 2-35 (7).

