How to DIY Knot Jewelry? Steps, skills and materials
Mastering Traditional Chinese Knots and Beading Techniques for Jewelry Makers
Chinese traditional decorative knots, also known as “Chinese knots.” Chinese knots have over two thousand years of history, evolving from traditional clothing, auspicious ornaments, religious artifacts, and more. Since ancient times, Chinese knots have been symbols of good fortune and auspiciousness. A small knot embodies not only the wisdom of the Chinese nation but also beautiful meanings and wishes. They are not only uniquely shaped and beautifully colored but also permeated with rich cultural heritage and essence. They symbolize good luck and blessings in folk culture, conveying wishes and auspiciousness while also reflecting the unique traditional culture of the Chinese nation.
Chinese knots are made by weaving single, double, or multiple strands, using parallel or separated weaving variations to create colorful and diverse knots or knot groups. At the same time, by extending the woven strands and ear flaps and using hooks, various knots can be flexibly combined to complete groups of ever-changing knot decorations. Chinese knots can be divided into three main categories: basic, variation, and combination. This chapter focuses on the relevant knowledge of the first two types of knots.
diy solmu koruja
Sisällysluettelo
Section I Basic Knotting Techniques
1. Button knot
(1) Tyylin ominaisuudet
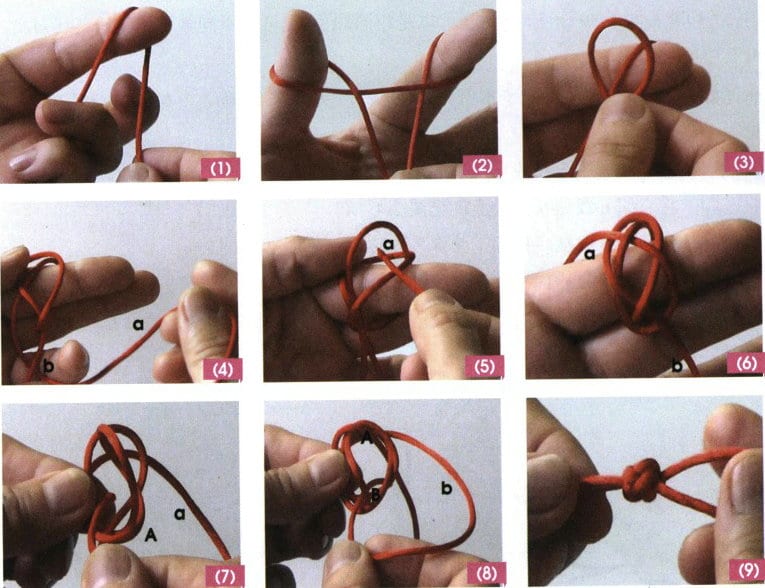
The button knot is shaped like a diamond, also known as the diamond knot. The button knot was originally used in ancient Chinese clothing. It is a practical and decorative knotting style. “Button” refers to where the ribbons intersect, while “Knot” is a type of knot that can be hooked; therefore, buttons should be in pairs, able to be untied and hooked. They can form beautiful pairs of buttons when paired with other decorative knots. Button knots are often used at the beginning or end of braided necklaces and bracelets to connect the ends, as seen in Figure 2-1.

(2) Production Methods
① Prepare an 80 cm long No. 5 line, starting to weave from the midpoint, wrapping the line from top to bottom around the index finger; see Figure 2-2 (1).
② Then wrap around the thumb from top to bottom; see Figure 2-2 (2).
③ Place the loop formed on the thumb onto the index finger and press down on the loop on the index finger; see Figure 2-2 (3).
④ Bring the extension line a from under the index finger loop over from behind the extension line b under the thumb loop; see Figure 2-2 (4).
⑤ Then thread it through the index finger loop to form a shape resembling the number eight (referred to as the frame bottom); see Figure 2-2 (5).
⑥ The wire loop on the thumb is like a reinforcement strip; take it off and flip it up, see Figure 2-2 (6).
⑦ The wire a, as shown in Figure 2-2 (7), is wound clockwise around the reinforcement strip A and passes through the middle hole.
⑧ Line B, as shown in Figure 2-2 (8), wraps around reinforcement strip B clockwise and passes through the same hole in the middle from top to bottom.
⑨ Tighten the reinforcement strip and a and b up and down and arrange the knot evenly; see Figure 2-2 (9).
2. Square Knot
(1) Tyylin ominaisuudet
The square knot is one of the oldest, most common, and most practical types. It is named for its flat and orderly shape after formation, as seen in Figure 2-3. The square knot originated on early sailing ships; sailors would tie up part of the sail with a rope to reduce the sail area when the wind was strong. This knot, which wraps around the mast to secure the sail, is called the square knot. It gives a sense of stability, restraint, calmness, and moderation. The square knot is divided into unidirectional and bidirectional based on the weaving method: the shape of the unidirectional square knot is twisted and spiral; the shape of the bidirectional square knot is flat and straight, often used for weaving necklaces, bracelets, and closures.
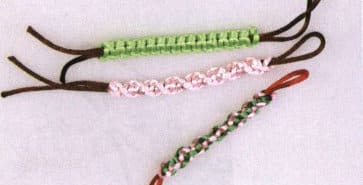
(2) Production Methods
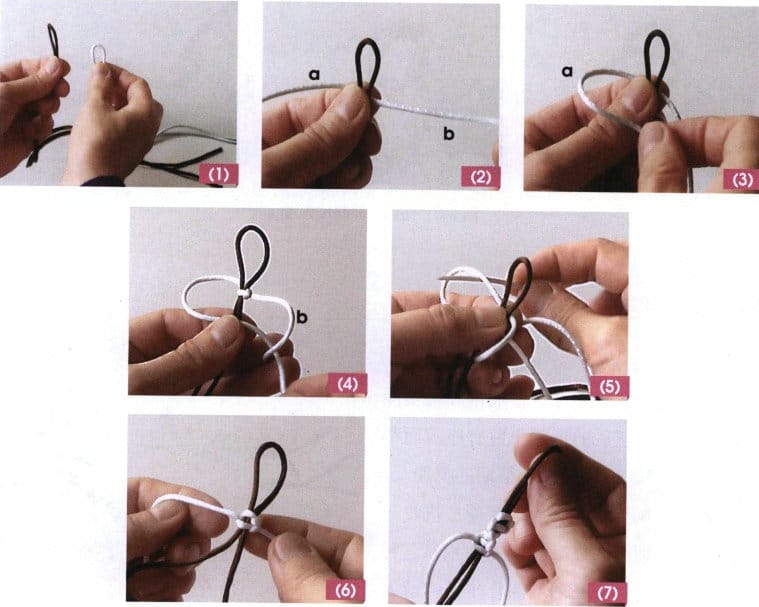
1) Unidirectional Square Knot
① Prepare two 80cm long No.5 lines (which can be the same color or different colors), fold the two lines in half, and take their center point, see Figure 2-4(1).
② Take one line as the peg (in this case, brown line) and the other line for braiding (in this case, light blue line); see Figure 2-4(2).
③ Press the left line onto the peg to form the left sideline loop; see Figure 2-4 (3).
④ Press the right line b onto line a; see Figure 2-4 (4).
⑤ Then pass line b through the left loop from below the peg; see Figure 2-4 (5).
⑥ Pull the line tight and arrange the knot evenly; see Figure 2-4 (6).
⑦ Repeat the braiding method above (always place the left line on the peg ), forming a spiral shape; see Figure 2-4 (7).
2) Bidirectional Square Knot
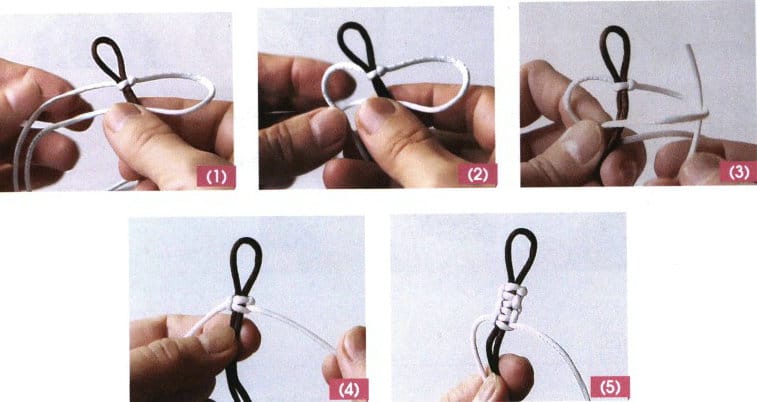
The first three steps of the bidirectional square knot are the same as those of the unidirectional square knot, so they will be omitted.
① Place the right wire above the peg, see Figure 2-5 (1).
② The left line presses the right line; see Figure 2-5 (2).
③ the right wire passes from below the axis into the right loop; see Figure 2-5 (3).
④ Tighten the left and right lines and arrange the knot evenly; see Figure 2-5 (4).
⑤ Repeat the braiding method by alternating the left and right lines placed on the axis, forming a ladder-like structure; see Figure 2-5 (5).
3. Snake knot
(1) Tyylin ominaisuudet
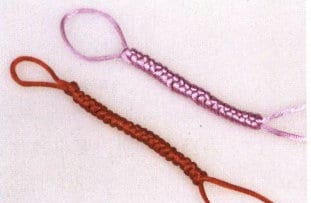
The snake knot resembles a snake’s skeleton; the knot is elastic and can rotate left and right, and the arrangement of the knots is neat, simple, and elegant, as shown in Figure 2-6.
(2) Production Methods
① Fold the thread in half, holding the folded loop with your left hand; see Figure 2-7 (1).
② Make a loop with line a (the one closer to you) and then hold the line between your thumb and index finger; see Figure 2-7 (2).
③ Take the wire out from under the wire, see Figure 2-7 (3).
④ Pass through the loop formed by line a; see Figure 2-7 (4).
⑤ Tighten the two lines, adjusting to make the knot uniform; see Figure 2-7 (5).
⑥ Repeat the knotting method above, forming intertwined knots arranged neatly in a snake-like shape; see Figure 2-7 (6).

4. Vajra Knots
(1) Tyylin ominaisuudet
The Vajra knot represents wealth, prosperity, peace, and good fortune. Its shape is similar to that of a snake knot, but the snake knot is prone to swaying and loosening, while the Vajra knot is more secure and stable, as shown in Figure 2-8.
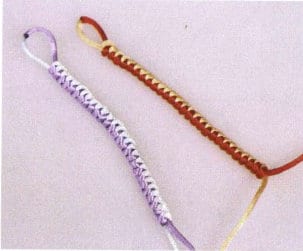
(2) Production Methods
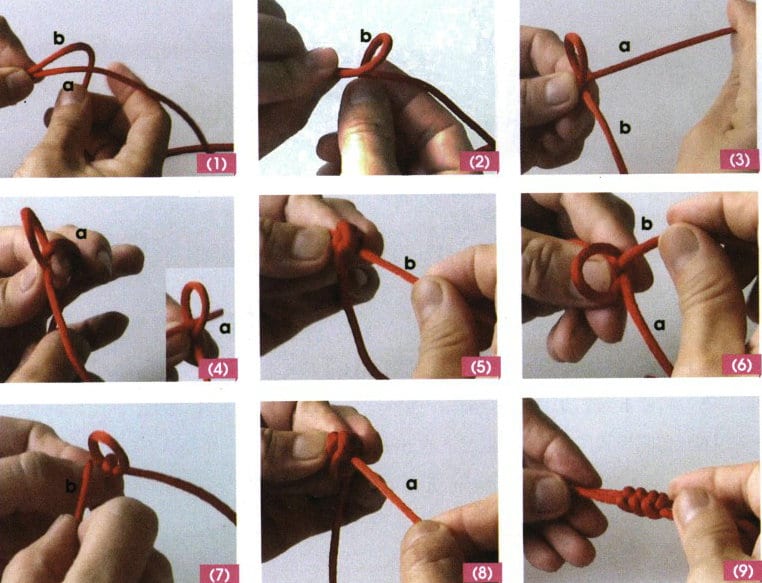
① Fold the knot line in half, holding the b line with the right hand from underneath the line; see Figure 2-9 (1).
② Rotate the left hand inward to form a loop and press it down with the right hand; see Figure 2-9 (2).
③ For ease of operation, it should be moved to the left hand; at this point, you will see line A moving forward and line b moving to the right, as shown in Figure 2-9(3).
④ Wrap the thread around the index finger, then pass it through the loop; see Figure 2-9 (4).
⑤ Tighten the b line to complete the production of a single unit of the Vajra knot, see Figure 2-9 (5).
⑥ Hold down the line, remove the loop of the line on the index finger, and flip it outward to the top; see Figure 2-9 (6).
⑦ Wrap the b line around the index finger, then pass it through the loop; see Figure 2-9 (7).
⑧ Tighten line a to form a double unit Vajra knot; see Figure 2-9 (8).
⑨ Repeat steps (6) to (8) to weave the required length. The knots form a tightly twisted and neatly arranged snake shape; see Figure 2-9 (9).
5. Crown Knot
(1) Tyylin ominaisuudet
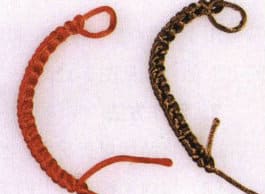
The crown knot is a common basic knot, symbolizing joy and a cheerful mood. Its knot style is simple and is often used to connect or secure threads between knots and ornaments or as an outer circle for ornaments, as shown in Figure 2-10.
(2) Production Methods
① For convenience of operation, one end of the thread can be tied to a heavy object; see Figure 2-11 (1).
② Fold the thread in half to create a double line, with the short line as the axis and the long line as the weaving line. Wrap the line around the axis from top to bottom; see Figure 2-11 (2).
③ Pull the b line tight and press down on the formed knot with your left hand; see Figure 2-11 (3).
④ Wrap the wire around the axis from bottom to top; see Figure 2-11 (4).
⑤ Tighten the b line to form a pair of knots, adjusting the tightness of the knots; see Figure 2-11 (5).
⑥ Repeat the braiding method from steps (2) to (5) (note that one wraps around the axis from bottom to top, while the other wraps from top to bottom), ensuring that the knots form a tightly coupled linear structure in pairs, as shown in Figure 2-11 (6).

6. Double Connection Knot
(1) Tyylin ominaisuudet
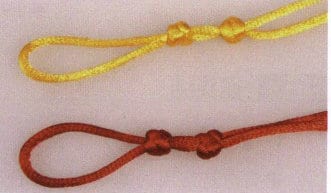
The double connection knot, also known as the double knot, is a means of linking, combining, and continuity. The double connection knot is formed by linking two single knots, hence the double connection. Its structure is compact and not easily loosened, and it is often used at the beginning and end of knot decorations to secure the upper and lower parts of the main knot, as shown in Figure 2-12.
(2) Production Methods
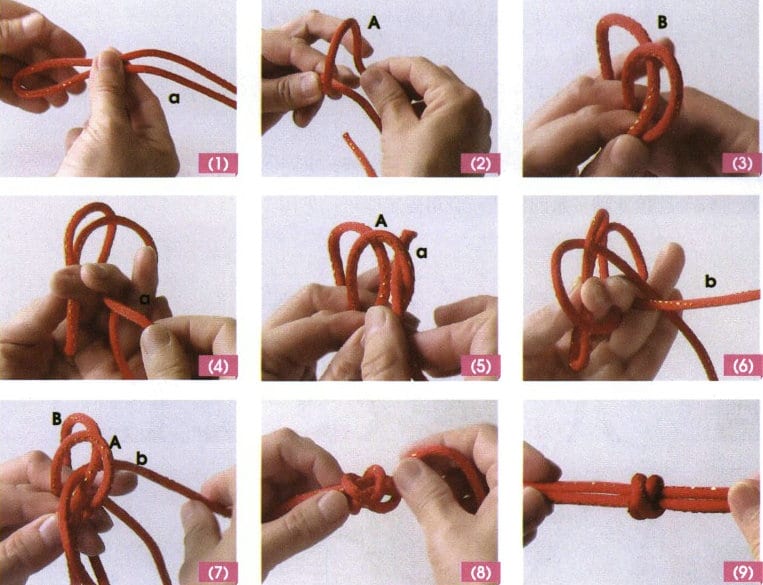
① Fold the knot line in half at the center, holding the loop part in the left hand; see Figure 7-13 (1).
② Make a loop A with the inner line A from top to bottom, pinched between the index and middle fingers; see Figure 7-13 (2).
③ Make a loop B with the outer line b from top to bottom, placing it between the middle finger and the ring finger; see Figure 7-13 (2)(3).
④ Pass line A through loop A; see Figure 7-13 (4), (5).
⑤ Pass line b through both loop A and loop B at the same time; see Figure 7-13 (6), (7).
⑥ Tighten the line a and the line b, see Figure 7-13 (8).
⑦ Organize the knot style to form a cross-shaped X on both sides; see Figure 7-13 (9).
7. Phoenix Tail Knot
(1) Tyylin ominaisuudet
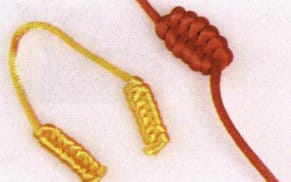
The phoenix tail knot, also known as the pipa knot, is named for its resemblance to the tail of a phoenix. It is generally used at the end of a braided line for decorative purposes. It symbolizes the auspiciousness of the dragon and phoenix, prosperous career, and abundant wealth, as shown in Figure 2-14.
(2) Production Methods
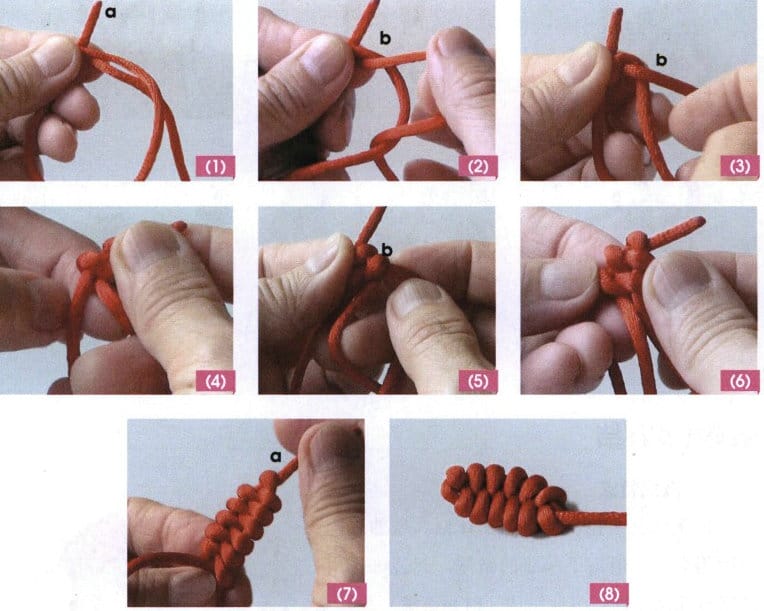
① Wrap a line into a loop, using the two sides of the loop as the left and right axes (designated as axis a and axis b) axis a is shorter. The knot line presses down and wraps around the axis a; see Figure 2-15 (1).
② The thread passes through the b-axis; see Figure 2-15 (2).
③ Then rotate around the b-axis from bottom to top for one circle; see Figure 2-15 (3).
④ Then turn to the a-axis and circle from bottom to top; see Figure 2-15 (4).
⑤ Then turn to the b-axis and completely turn from bottom to top; see Figure 2-15 (5).
⑥ Repeat steps (4) and (5), alternating the winding around the left and right axes, ensuring that the tension of the knots is appropriate; see Figure 2-15 (6).
⑦ Pull the a-axis upwards after knitting to the required length; see Figure 2-15 (7).
⑧ Cut off the excess wiring on the b-axis, melt, and fix it; see Figure 2-15 (8).
8. Double Coin Knot
(1) Tyylin ominaisuudet
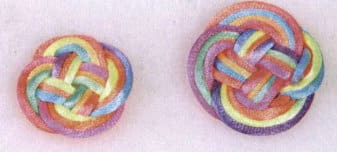
The double coin or money knot resembles two ancient coins connected, symbolizing “good things come in pairs,” as shown in Figure 2-16. In ancient times, money was also called “spring,” which sounds the same as “whole,” implying completeness. The double coin knot has a circular shape, and its structure is elegant. Beautiful patterns can be created by combining several double coin knots, such as clouds and the complete perfection knot.
(2) Production Methods
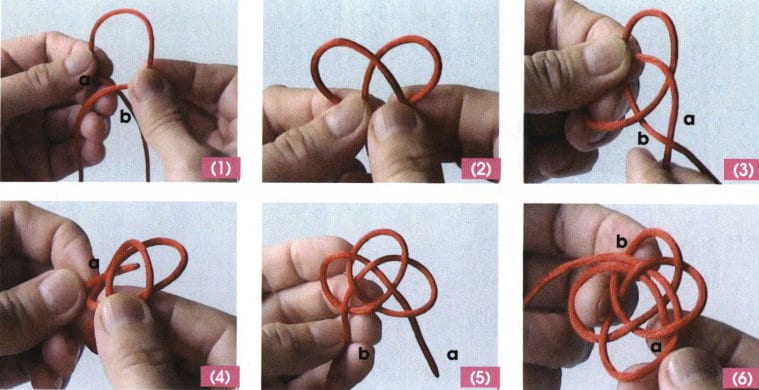
① Press wire a against wire b to form a loop 1, see Figure 2-17(1).
② Make another loop 2 with wire a clockwise and place it on loop 1, see Figure 2-17(2).
③ Press line a with line b (i.e., line b is on top and line a is on the bottom), see Fig. 2-17(3).
④ Line a is pressed and picked one by one clockwise along the line formed by loop 2 and loop 1, see Fig. 2-17(4).
⑤ Line a continues to press a pick one by one to the end of loop 1, see Figure 2-17(5)
⑥ After line b presses line a, thread it counterclockwise along the path of line a, and keep the same method of threading as line a picking and pressing, see Figure 2-17(6).
⑦ Thread b continues to thread the 2 petals of the second loop along thread a, see Figure 2-17(7).
⑧ Line b continues along line a to begin the third loop, see Figure 2-17(8).
⑨ After completing the fourth round with line b, adjust the knot, cut off the ends of lines a and b, and melt and bond them together, see Figure 2-17 (9).

9. Caisson Knot
(1) Tyylin ominaisuudet
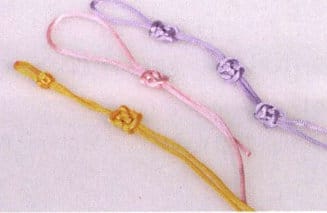
The center of the caisson is like a the character “井”, surrounded by symmetrical diagonal patterns. In Chinese palace-style architecture, the painted and decorated ceilings are called “caisson” or “ornate caisson.” It is a decorative pattern, and there are many caisson patterns in Dunhuang murals, which are orderly and dazzling. The caisson knot has a simple shape, is not easy to loosen, and can be continuously woven into several pieces to make bracelets and necklaces, which are very beautiful, see Figure 2-18.
(2) Production Methods
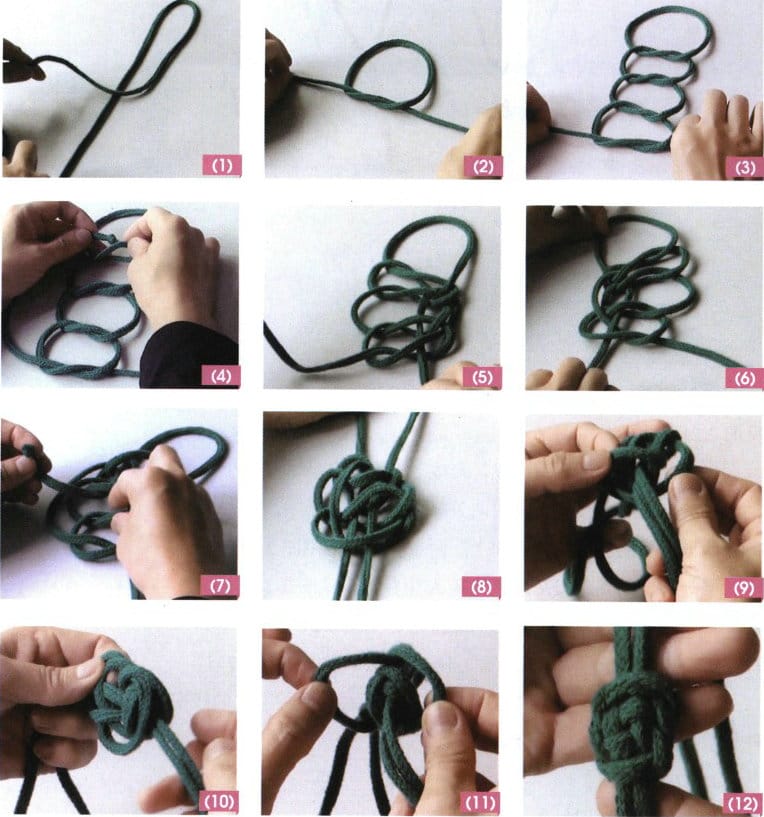
① Fold the thread in half to find its center; see Figure 2-19 (1).
② Tie a loose knot with the left and right lines; see Figure 2-19 (2).
③ Continuously tie the same three knots below (the direction of the left and right lines should be consistent); see Figure 2-19 (3).
④ The left thread passes through the middle of the first knot above; see Figure 2-19 (4).
⑤ Then pass through the remaining three knots in order; see Figure 2-19 (5).
⑥ Flip the knot, moving the original right line to the left side; see Figure 2-19 (6).
⑦ Similarly, thread down from the middle of the four knots, forming a state where two lines pass through the same hole in parallel, see Figure 2-19 (7).
⑧ Slightly tighten the lines above and below; see Figure 2-19 (8).
⑨ Use the two lines below as axes, and flip the left and right lines of the bottom knot upwards to the first knot above, as shown in Figure 2-19 (9).
⑩ Organize the two wire loops on top; see Figure 2-19 (10).
⑪ Still using the two lines below as the axis, flip the left and right loops of the bottom knot upwards in the same way as in step 8; see Figure 2-19 (11).
⑫ Gradually tighten the knot, adjusting evenly; see Figure 2-19 (12).
Copywrite @ Sobling.Jewelry - Custom korujen valmistaja, OEM ja ODM korut tehdas
10. Corn Knot
(1) Tyylin ominaisuudet
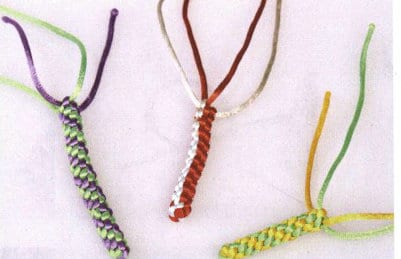
The corn knot resembles corn, and because its cross-section is shaped like a “十” character after being woven, it is also called the “cross knot.” The arrangement of the knots is neat, tight, and uniform, with distinctions between round and square shapes commonly used in three-dimensional knot decorations, such as firecrackers, crosses, etc., as shown in Figure 2-20.
(2) Production Methods
1) Round Corn Knot
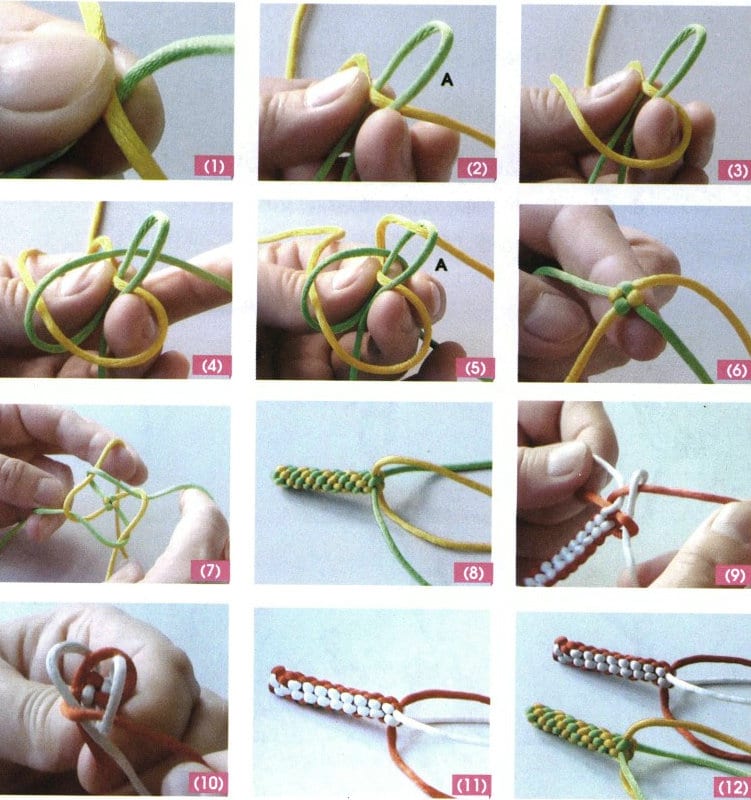
① Take two lines (in this example, yellow and green) and cross them at the center in a cross shape, with the yellow line on top of the green line, as shown in Figure 2-21 (1).
② The green line presses down on the yellow line, forming a green line loop A, see Figure 2-21 (2).
③ The yellow line on the right presses two green lines clockwise; see Figure 2-21 (3).
④ The green line below presses two yellow lines from bottom to top; see Figure 2-21 (4).
⑤ The yellow line on the right comes from the green line loop A; see Figure 2-21 (5).
⑥ Pull the lines in the four directions of up, down, left, and right tight; see Figure 2-21 (6).
⑦ Repeat the steps from (2) to (6), see Figure 2-21 (7).
⑧ Continue braiding to a suitable length; it is not difficult to see that the two colors of thread alternate and twist, appearing cylindrical, see Figure 2-21 (8)
2) Square Corn Knot
① Each line is pressed clockwise; see Figure 2-21 (9).
② Each line is pressed counterclockwise; see Figure 2-21 (10).
③ Weave alternately in the direction of the line’s tension, and the lines of the same color extend in one direction, with clear edges, as shown in Figure 2-21(11).
Comparing the two types of corn knots, one is round and spiral; the other is square and angular, as shown in Figure 2-21 (12).
11. Paracord Watch Knot
(1) Tyylin ominaisuudet
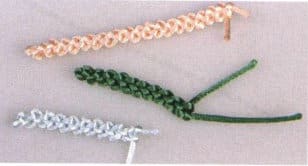
The shape of the paracord watch knot is very similar to that of traditional metal watch bands, with one loop fitting into another, creating a locking effect. The texture of the watch strap knot is clear, elastic, and aesthetically pleasing, as shown in Figure 2-22.
(2) Production Methods
① Fold the rope in half to find its center, press the right line over the left line, and wrap it to the back to form loop A; see Figure 2-23 (1).
② Then pass the thread through the loop on loop A to tie a knot, leaving the loop B above; see Figure 2-23 (2).
③ Use one of the unmovable knot lines to make a loop C; see Figure 2-23 (3).
④ The loop C is threaded through loop B, pulling tight one of the movable knot lines; see Figure 2-23 (4).
⑤ Repeat steps (3) to (4) to form the second unit knot; see Figure 2-23 (5).
⑥ Repeat the braiding method above, see Figure 2-23 (6).

12. Braid Knot
(1) Two strands Braid
The two-strand braid knot, also known as the twist knot, is the simplest and most commonly used knot in the braided knot family, often used in the braided sections of necklaces and bracelets, as shown in Figure 2-24.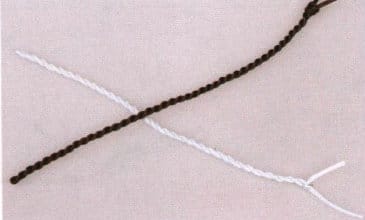
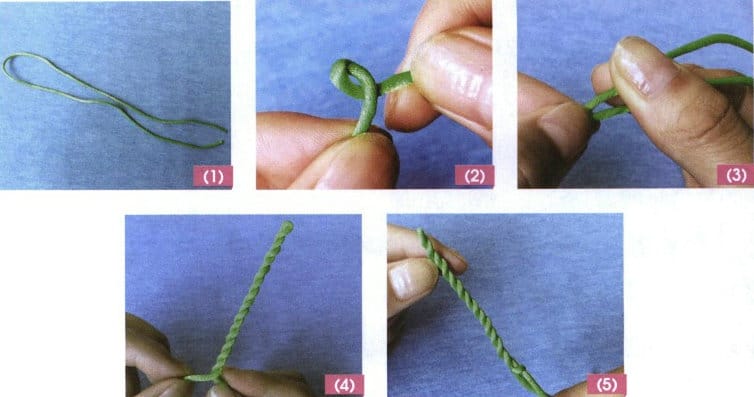
① Take a line and fold it in half at the center; see Figure 2-25 (1).
② Both hands’ index finger and thumb pinch their respective strands while twisting them in opposite directions. Each strand is given a twist, which naturally causes them to intertwine, as shown in Figure 2-25 (2).
③ Alternatively, use both hands’ index finger and thumb to pinch these two strands while twisting them in the same direction, like rolling hemp rope, to twist the two strands together, see Figure 2-25 (3).
④ Adjust the knots to achieve uniformity with consistent concavity and convexity; see Figure 2-25 (4).
⑤Tie a knot with one of the lines at the end to lock it onto the other line; see Figure 2-25 (5).
(2) Four-strand Braid
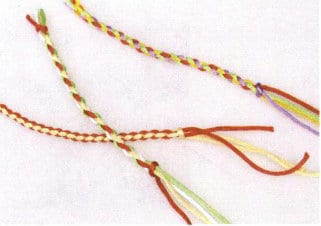
Four-strand braids are formed by crossing and intertwining the left and right strands, commonly used for the braided parts of necklaces and bracelets. Four-strand braids are richer in effect than two-strand ones, as shown in Figure 2-26.
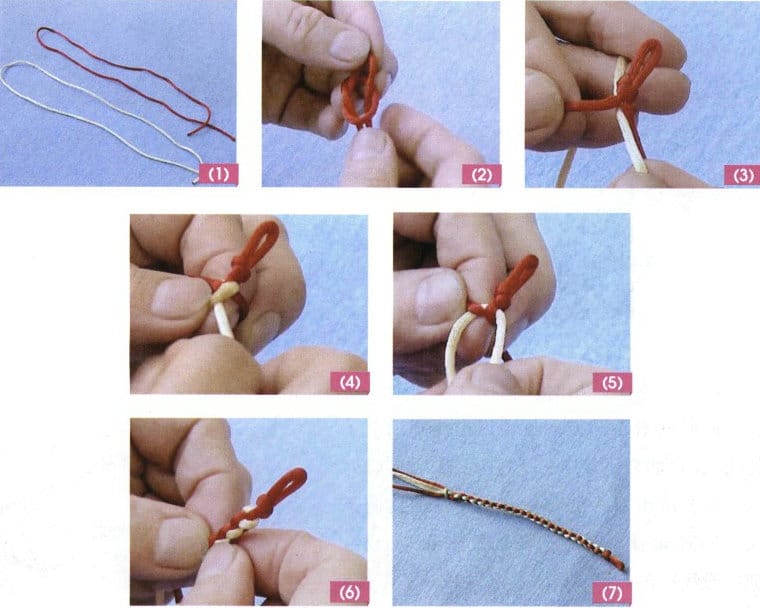
① Prepare two strands of thread, a and b (in this example, red and yellow threads), fold them in half to make four strands, or directly prepare four strands, see Figure 2-27 (1).
② Make a single knot at the center of the red thread, leaving the desired length of the loop, which can generally be determined by the size of the beads or button knots, see Figure 2-27 (2).
③ Insert the center of the yellow thread below the knot of the red thread; see Figure 2-27 (3).
④ The red line crosses under the yellow line and tightens the red line; see Figure 2-27 (4).
⑤ The yellow line crosses under the red line and tightens the yellow line; see Figure 2-27 (5).
⑥ Following the method of steps (3) to (4), continue braiding to the desired length, see Figure 2-27 (6).
⑦ Use one of the lines to wrap around the remaining lines and tie a single knot to secure it; see Figure 2-27 (7).
13. Diagonal Clove Hitch Knot
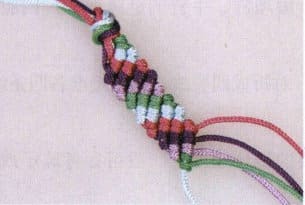
① Take five strands of different colored threads; you can tie a knot first to temporarily secure the five strands; see Figure 2-29 (1).
② The first line in the upper right is the axis line (purple line), starting to weave from the adjacent line (green line). Wrap around the axis line from above and then pass through the formed loop; see Figure 2-29 (2).
③ Braid the second one in the same way, pulling the braided thread tightly to complete a diagonal clove hitch knot, see Figure 2-29(3).
④ Each line is braided in the same way to form a diagonal knot until the last line is completed, creating the first combination line of diagonal knots; see Figure 2-29 (4).
⑤ Then, using the first line in the upper right as the axis (green line), begin to weave the nearby line (light blue line) into a diagonal clove hitch knot until the last line is completed, forming a combination of two diagonal clove hitch knot lines, see Figure 2-29 (5).
⑥ Using the method from steps (2) to (4), weave multiple combinations of diagonal clove hitch knots, and the colorful effect will appear before your eyes; see Figure 2-29 (6).

Section II Changing Knotting Techniques
1. Round Brocade Knot
(1) Tyylin ominaisuudet
The ears of the round brocade knot are petal-shaped, also known as the petal knot. This knot has a beautiful and natural shape, exuding the joyful atmosphere of a floral arrangement. It is a festive and auspicious decorative knot, and if a gemstone or similar ornament is set in the center of the knot, it will appear even more luxurious, as shown in Figure 2-30.

(2) Production Methods
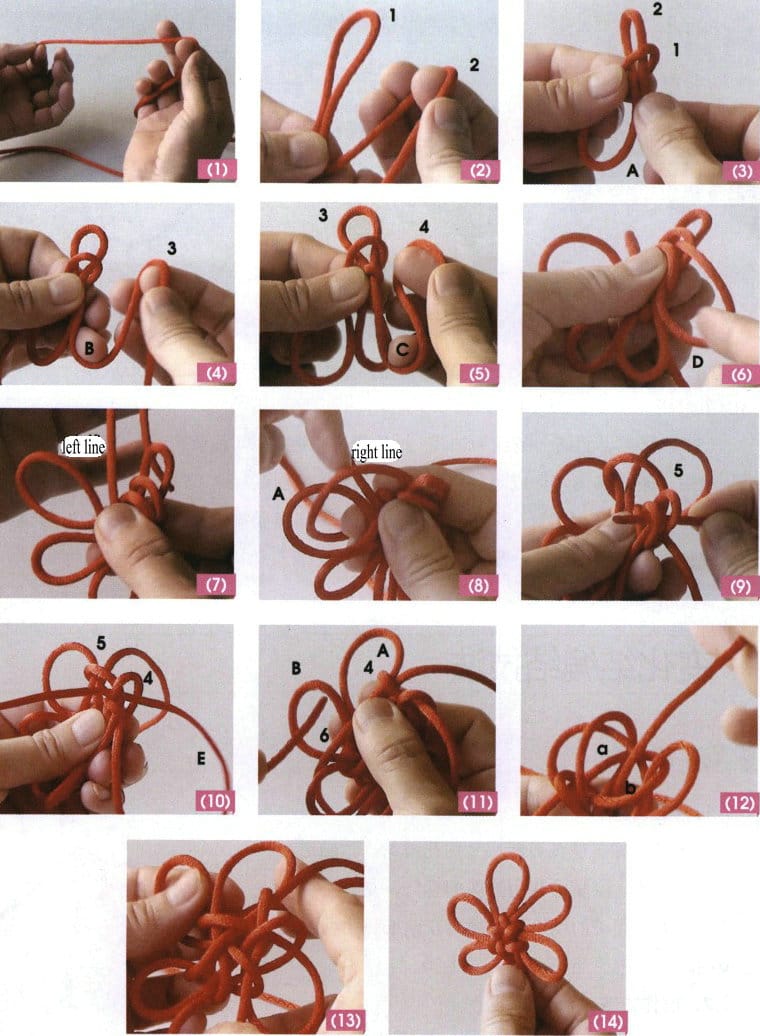
① Leave a wire about 10 cm long at the left end; see Figure 2-31 (1)
② Make wire loops 1 and 2 at the other end, also known as inner loops 1 and 2; see Figure 2-31(2).
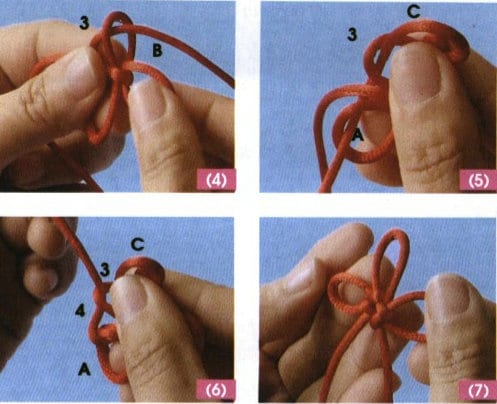
③ Insert inner loop two into inner loop 1 to form outer loop A; see Figure 2-31 (3).
④ Continue to make the inner loop 3 with the right thread while threading it through inner loops 1 and 2 to form the outer loop B; see Figure 2-31 (4).
⑤ Continue to make the inner loop 4 with the right thread while threading it through inner loops 2 and 3 to form the outer loop C; see Figure 2-31 (5).
⑥ Pass the right wire through inner loop 3 and inner loop 4 at the same time, forming outer loop D, see Figure 2-31 (6).
⑦ To facilitate operation, move the left wire to the top; see Figure 2-31 (7).
⑧ Pass the right line through the outer loop A from below the left line; the left line presses the right line, see Figure 2-31 (8).
⑨ Return along the same route (i.e., passing through Inner Loop 3 and Inner Loop 4); the returning line forms Inner Loop 5, which is equivalent to the line loop formed by the right line enclosing the left line, see Figure 2-31 (9).
⑩ The right line passes through the inner loop 4 and inner loop 5, forming the outer loop E; see Figure 2-31 (10).
⑪ The right line presses the left line, then passes through the outer loop B, forming the line loop as the inner loop 6; see Figure 2-31 (11).
⑫ Flip the knot over and thread it through the adjacent loops a and b on both sides of the left line. See Figure 2-31 (12).
⑬ Form the knot’s shape by pulling the outer loops A, B, C, D, and E (i.e., the five ears), and the inner loops 1 to 6 form a central flower shape, see Figure 2-31 (13).
⑭ Adjust the ears, tighten the inner loop (also known as the inner ear), and tidy up the knot to complete the production; see Figure 2-31 (14).
2. Auspicious Knot
(1) Tyylin ominaisuudet
The auspicious knot, also known as the four-eared knot, has four ears and resembles a multi-petaled auspicious flower. It often appears in monks’ clothing and temple decorations in China. It is an ancient ornament considered to be auspicious. “Auspicious” implies good fortune and beauty. Adding the auspicious knot can symbolize good luck, peace, health, and well-being in the combination of ornaments. The ears of the auspicious knot are exactly seven. Hence, it is also called the “seven-circle knot,” as Figure 2-32 shows.

(2) Production Methods
① Prepare an 80 cm long thread, fold it in half to form a loop at the center, which will be the upper ear, and create a line loop on the right side that is equal in length to the upper ear, which will be the right ear, see Figure 2-33 (1).
② Create equal wire loops on the left side for the left ear; see Figure 2-33 (2).
③ Press the double line part upwards against the right ear to form a double line loop a; see Figure 2-33 (3).
④ Press the right ear counterclockwise onto the upper ear; see Figure 2-33 (4).
⑤ The upper ear flap is pressed on the left ear flap; see Figure 2-33 (5).
⑥ The left ear passes through the double-line loop a; see Figure 2-33 (6).
⑦ Then tighten the knot to complete the first layer of production; see Figure 2-33 (7).
⑧ Recycle again, pressing the double line section below upwards towards the right ear to form a double line loop b; see Figure 2-33 (8).
⑨ Repeat steps (4) to (6) to form the second layer; see Figure 2-33 (9).
⑩ Tighten the knot and adjust evenly; see Figure 2-33 (10).
⑪ Pull the four side ears to a suitable size; see Figure 2-33 (11).
⑫ Organize the knot structure and complete the production; see Figure 2-33 (12).

3. Shamrock Knot
(1) Tyylin ominaisuudet
The appearance of a shamrock knot consists of three interlocking loops (also known as ears), resembling the petals of a clover flower, hence the name. Its knot shape is beautiful, easy to match, and carries connotations of luck and auspiciousness. It can also evolve into various decorative variations and be woven into different ear forms such as four ears, five ears, etc., as shown in Figure 2-34.

(2) Production Methods
① Make two loops with the right wire (Loop 1 and Loop 2); see Figure 2-35 (1).
② Insert loop 2 into loop 1, forming the outer loop A; see Figure 2-35 (2).
③ Make another loop 3 with the right wire; see Figure 2-35 (3).
④ Insert loop 3 into loop 2, simultaneously forming outer loop B; see Figure 2-35 (4).
⑤ The right wire passes through loop 3, then goes under the left wire to enter the outer loop A. At this point, do not pull the right wire tight, leaving enough for the outer loop C; see Figure 2-35 (5).
⑥ The right thread continues to pass through loop 3 from above the left thread, forming loop 4 with the upper thread; see Figure 2-35 (6).
⑦ Finally, tighten the outer loop to form three ears, and loops 1 to 4 will form a central cross-flower shape; tidy up the knot and complete the production; see Figure 2-35 (7).

