What's the Secret to Crafting Beautiful Necklaces and Head Accessories?
Ultimate Guide to Necklace & Head Accessories Design and Production
Inledning:
Are you looking to create stunning jewelry and accessories? This guide covers everything you need to know about designing and making necklaces, earrings, and hair accessories. Learn how to choose the right materials, match them with clothing, and create unique designs. Whether you’re a jewelry designer, a retailer, or someone looking for custom-made pieces, this guide provides detailed instructions and practical tips to help you craft beautiful and stylish jewelry.
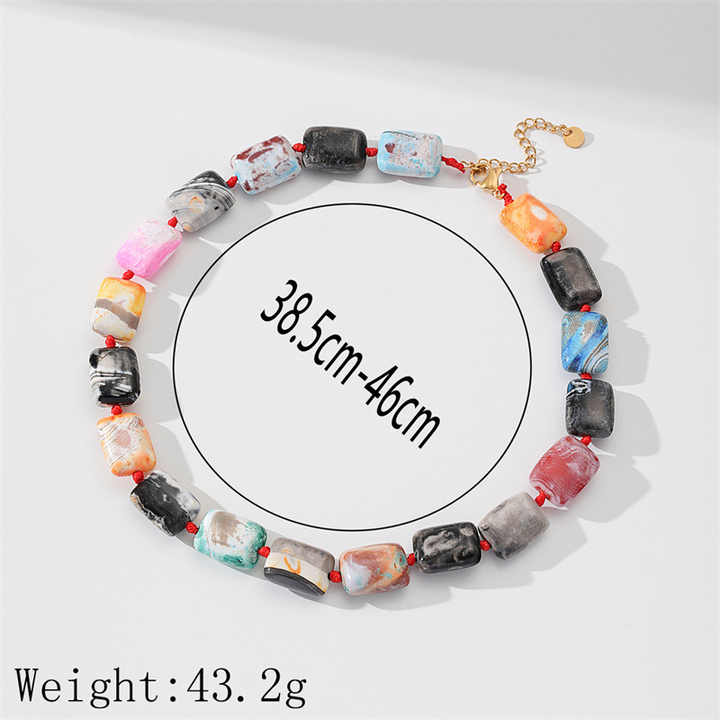
Style diagram of the entwined orb necklace
Innehållsförteckning
Section I Necklace Design and Production
1. Necklaces and its Matching
(1) The Significance of Necklaces
Necklaces, which refer to neck ornaments, are adornments for the human body and are among the earliest types of jewelry. In addition to their decorative function, some necklaces have special display purposes, such as the cross chains worn by Catholics and the prayer beads used by Buddhists. Throughout history, people have created various styles, characteristics, and designs of necklaces to beautify the human body, catering to the needs of individuals with different skin tones, ethnicities, and aesthetic views. Jewelry necklaces have a stronger decorative effect than gold and silver necklaces, with richer color variations, especially favored by young and middle-aged people. Modern fashion necklaces are also popular, mostly made from non-precious materials, such as gold-plated necklaces, and those made from plastic, leather, glass, silk, wood, and low-melting alloys, primarily to match fashion, emphasizing novelty, uniqueness, beauty, and accessibility.
(2) Necklace Matching
There are many types of necklaces with rich shapes and strong decorative qualities. Choosing and wearing necklaces appropriately can enhance the wearer’s strengths while downplaying their weaknesses. When wearing a necklace, attention should be paid to the following aspects:
① Necklace and Clothing. The necklace should harmonize and resonate with the clothing. For example, wearing a soft, flowing silk dress with a delicate and fine necklace will look more graceful and charming. If the collar of the top is in a bow tie style, it is best not to wear a necklace, as it may create a cumbersome feeling.
② The necklace’s color should complement the clothing’s color, creating a striking contrast. For solid or plain clothing, wearing a brightly colored necklace can make the jewelry more eye-catching, and under the embellishment of the jewelry, the clothing colors appear richer. For brightly colored clothing, wearing a simple and plain necklace will not be overshadowed by the vibrant colors of the outfit and can help balance the colors of the clothing.
③ Jewelry should coordinate with each other. Necklaces should be paired with earrings or bracelets of the same color and material to achieve the best effect. When wearing a necklace, it is also important to note that some necklaces have a switch called a jump ring, which contains a wire coil spring. Do not apply too much force when adjusting it to avoid breaking the spring.
④ Matching necklaces with collars.
- V-neck This is a clever style; the lines of such a neckline are very simple and clear, suitable for wearing more modern and fashionable necklaces. The pendant should hang in the middle of the neck and neckline. Be careful not to let the pendant be covered by clothing or pressed tightly against the throat.
- Turtleneck Wearing a necklace over a high collar may seem overly extravagant for high-neck garments. However, adding a round necklace around the collar can create a harmonious and unified look for a fitted collar that closely hugs the neck.
- Notched lapel collar When wearing a small collar shirt, if the necklace is too short, it can make the already small opening feel even more cramped; if the necklace is too long, it will be hidden by the clothing. Therefore, choosing a necklace length that hangs to the middle of the collar opening is advisable.
- Boat neck A slightly loose collar looks better with a simple necklace. Choosing a necklace that intersects with the neckline is best, as it will look beautiful. If the necklace is too long, it will not correspond with the collar, thus losing its intended effect.
- Statement collar When wearing clothing with a complex collar structure, it is important to choose a necklace with some weight to achieve a balance with the exposed skin. The neck will appear empty if the chosen necklace is too thin and lacks substance.
- Crew neck A small round neck can be paired with a slightly longer necklace, allowing the pendant to hang below the collar. At this time, if the color of the necklace contrasts more with the color of the clothing, it can highlight the focal point.
2. Necklace Design and Production Examples
2.1 Entwined Orb Necklace
(1) Style Characteristics
This necklace is primarily made of pearls, with seed beads strung into small balls, accompanying larger pearls. The colors are harmonious, sweet, and warm, creating an elegant and gentle atmosphere and a refreshing and cozy effect, as shown in Figure 5-1.
(2) Key Learning Points
Learn the connection methods for balls and beads, the connection methods for chains and the main part, and the extension chain.
(3) Material preparation (see Figure 5-2)
Pearls: 6mmx10 pieces;
Pearl seed beads:2mmx9 pieces x7 groups;
Metal chain:20cm(L)x3mm(W),1 piece.
Fishing line:0.3mm(W)x80cm(L), 1 piece;
Lobster clasp:10mm, 1 piece;
Extension Chain:50mm, 1 piece.
Eye pin:40mm,14 pieces;
Jump ring:6mm, 2 pieces.

Figur 5-1 Stildiagram över halsbandet med sammanflätade klot
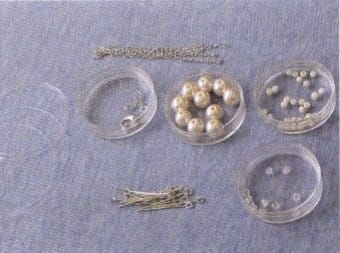
Figure 5-2 Material preparation for the entwined orb necklace
(4) Production Method
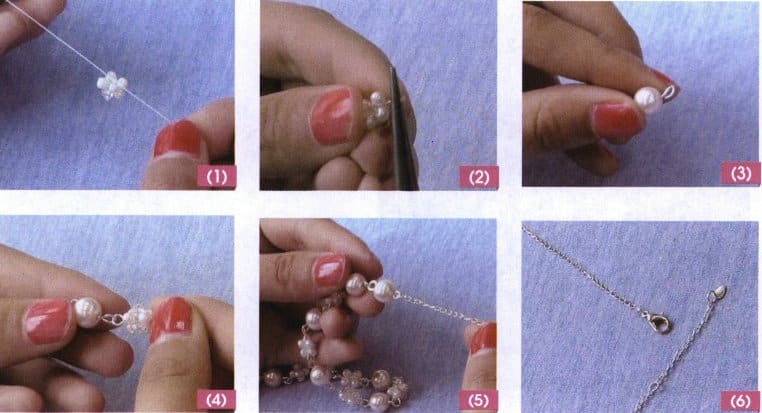
① Select 9 pearl seed beads and use the fishing line to create a triangular ball shape, referring to the four-sided ball method on page 52 of this textbook, making a total of 7 sets; see Figure 5-3 (1).
② Use a eye pin to come out from the middle of the triangular ball shape, bend it into a 9-shaped ring, and make accessory A, a total of 7 sets; as shown in Figure 5-3 (2).
③ Use a eye pin to pass through the pearls, bend it into a 9-shaped ring, and make accessory B, a total of 10 sets; see Figure 5-3 (3).
④ Alternate connecting accessories A and B, noting that using a newly bent 9-shaped ring is best to connect the built-in 9-shaped ring; see Figure 5-3 (4).
⑤ Following the step method (4), connect 7 groups of A and B combinations, connecting the ball beads. Finally, connect 2 accessories B at both ends, see Figure 5-3 (5).
⑥ Both ends are completed with metal chains, extension chains, jump rings, and lobster clasps; see Figure 5-3 (6).
2.2 Dazzling Pearl and Diamond Necklace
(1) Style Characteristics
This necklace is a short choker, primarily in Chinese red, with champagne as an accent color. The exaggerated red agate and diamond-encrusted lucky beads symbolize good fortune and continuous luck and exude a charming elegance, as shown in Figure 5-4.
(2) Key Learning Points
Learning color matching, pairing beads with diamond-encrusted beads, and methods for connecting clasps with chains.
(3) Material Preparation (Figure 5-5)
Crystal beads: 12mm, 6 pieces;
Red agate stone: 20mmx15mm, 4 pieces;
Diamond-encrusted beads: 8mm, 2 pieces;
Diamond Beads: 4mm,7 pieces;
Crystal teardrop beads: 6mm, 6 pieces;
Red faceted flat beads: 2mm, several pieces;
Small golden ball: 4mm, 2 pieces;
Extension chain: 4mmx50 mm;
Lobster clasp:6 mmx10 mm;
Bead tip: 6mm, 2 pieces;
Metal wire: 0.8mmx40cm, 1pieces;
Positioning beads: 2mm,2 pieces.
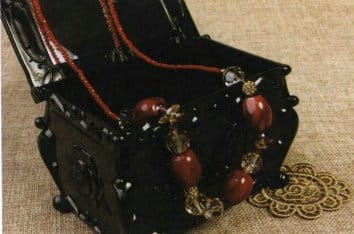
Figure 5-4 Style diagram of the dazzling pearl and diamond necklace
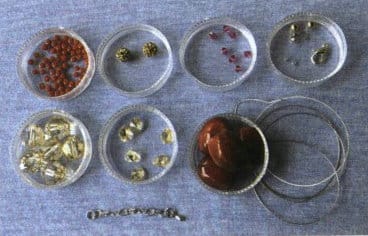
Figure 5-5 Materials preparation for the dazzling pearl and diamond necklace
(4) Production Method
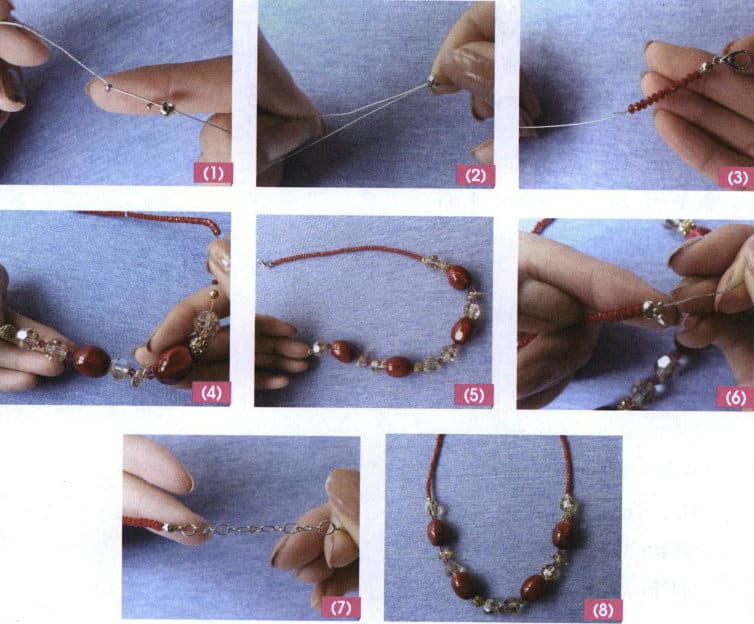
① Use metal wire to thread 1 positioning bead. To make it sturdy, thread it again and then attach the bead tip, see Figure 5-6 (1).
② The end of the metal wire can be left a bit longer; flatten the positioning bead and close the clasp, see Figure 5-6 (2).
③ Thread the lobster clasp onto the bead tip. Start by threading 30 red faceted flat beads, and you can thread the reserved wire ends together at the beginning; see Figure 5-6 (3).
④ Then, sequentially thread small golden balls, crystal beads, diamond-encrusted beads, red agate stones, diamond-shaped beads, 3 crystal teardrop beads, diamond-shaped beads, crystal beads, red specialized stones, diamond-shaped beads, crystal beads, diamond-shaped beads, crystal beads, diamond-encrusted beads, see Figure 5-6 (4).
⑤ Continue threading red agate stones, crystal beads, diamond-shaped beads, 3 crystal teardrop beads, diamond-shaped beads, red agate stones, diamond-shaped beads, crystal beads, and small golden balls; see Figure 5-6 (5).
⑥ Finally, thread 30 red faceted flat beads to make it symmetrical on both sides. Thread the bead tip and positioning beads; you can repeat threading the positioning beads once, cut off the excess wire, flatten the positioning beads, and close the bead tip, see Figure 5-6 (6).
⑦ Extension chain with a bead tip connection, see Figure 5-6 (7).
⑧ Overall effect see Figure 5-6 (8).
2.3 Dancing Floral Bead Necklace
(1) Style Characteristics
This long necklace is also known as a sweater chain, featuring a classic combination of red and black, vibrant and festive. It uses materials such as vermilion carved lacquer rose and flower-shaped Bodhi root bead, with the flower beads complementing each other and the tassels dancing, showcasing a strong ethnic characteristic, see Figures 5-7.
(2) Key Learning Points
I learned the combination of various materials (flowers, beads), how to make tassels, and how to combine and apply decorative rings.
(3) Material preparation (Figures 5-8)
Vermilion carved lacquer rose:30 mm, 1 piece.
Flower-shaped Bodhi root bead: 15 mm, 4 pieces;
Vermilion carved lacquer bead A:10 mm, 4 pieces;
Vermilion carved lacquer bead B: 8mm, 12 pieces;
Vermilion carved lacquer bead C: 6 mm, 16 pieces;
Vermilion carved lacquer bead D: 4 mm, 92 pieces;
Black bead A:4mm, 18 pieces;
Black bead B: 2mm, 136 pieces;
Elastic thread: 0.3mmx50cm, 1 pieces;
Silk thread:1mmx60cm,1 pieces.
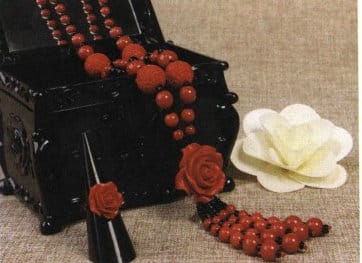
Figure 5-7 Style diagram of the dancing floral bead necklace
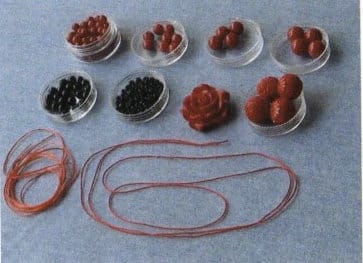
Figure 5-8 Preparation of materials for the dancing floral bead necklace
(4) Production Method
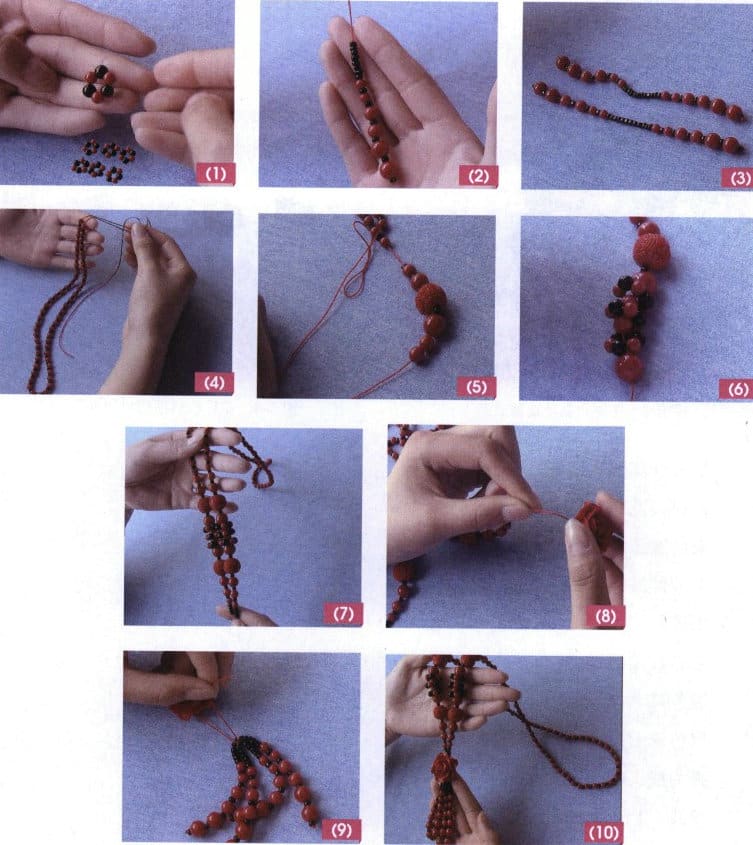
① Decorative ring part: Use an elastic line to string 3 pieces of vermilion carved lacquer beads D, 3 pieces of black beads A, alternating colors, a total of 6 groups; see Figure 5-9 (1).
② For the tassel part: Use silk thread to string black bead B, 2 pieces of vermilion carved lacquer bead B, 2 pieces of vermilion carved lacquer bead C, and 2 pieces of vermilion carved lacquer bead D, with black bead B spaced between each bead. Then string 6 black beads B, and tie a knot at the end to secure it. Symmetrically string the other side; see Figure 5-9 (2).
③ There are 2 groups of tassels; see Figure 5-9 (3).
④ For the chain part: First string the auxiliary part, alternating between vermilion carved lacquer bead D and black bead B, repeating 64 times; as shown in Figure 5-9 (4).
⑤ Decorative part: On one side, string black bead B, vermilion carved lacquer bead C, black bead B, vermilion carved lacquer bead B, black bead B, bodhi root flower bead, black bead B, vermilion carved lacquer bead A, 2 vermilion carved lacquer beads C, see Figure 5-9(5).
⑥ Next, insert the 3 decorative rings that have been strung in such a way that they fit snugly inside the vermilion lacquer carved bead A and the 2 vermilion lacquer carved beads C, then string the vermilion lacquer carved bead A to block the decorative rings, see Figure 5-9(6).
⑦ Next, string black bead B, bodhi root flower bead, black bead B, vermilion carved lacquer bead B, black bead B, vermilion carved lacquer bead C, black bead B, vermilion carved lacquer bead D, and 4 black beads B; symmetrically string the other side of the main decorative part, see Figure 5-9(7).
⑧ Connection combination: String the vermilion carved lacquer rose on one side of the necklace; see Figure 5-9(8).
⑨ Pass through the center of the two tassels, return to thread the vermilion carved lacquer rose, then tie it together with the line on the other side, knot it, melt it, and fix it, see Figure 5-9 (9).
⑩ The overall effect after completion is shown in Figure 5-9 (10).
2.4 Green and White Romance Necklace
(1) Style Characteristics
This necklace is made of white glass beads and green agate beads, with white flowers paired with green tassel beads and green agate beads embedded in brown thread. The colors are bright, with green and white complementing each other, warm and jade-like, fragrant and eye-catching, see Figure 5-10.
(2) Key Learning Points
Learn how to make the main part of the necklace and how to connect the main part to the necklace.
(3) Material preparation (Figures 5-11)
White glass blades: 15mmx12mm, 5 pieces;
Green agate beads A:10 mm, 6 pieces;
Green agate beads B: 8mm, 3 pieces;
Green agate beads C: 6mm, 9 pieces;
Green seed beads: 2mm, 3 pieces;
White agate beads: 6mm, 9 pieces;
White seed beads:2mm,3 pieces;
Coffee-colored thread: 2mmx2m,1 piece;
Fishing line: 0.3mmx30cm,1 piece;
Metal wire: 0.3mmx20cm, 1 piece;
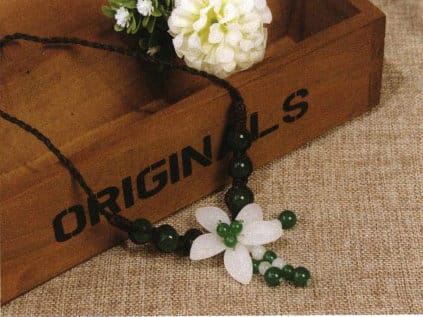
Figure 5-10 Style diagram of the Green and White Romance necklace
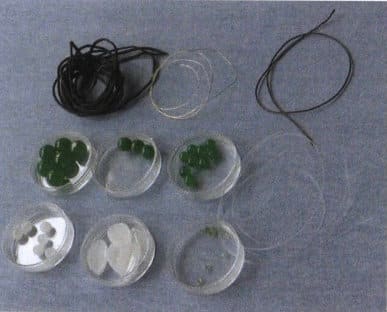
Figure 5-11 Preparation of materials for the Green and White Romance Necklace
(4) Production Method
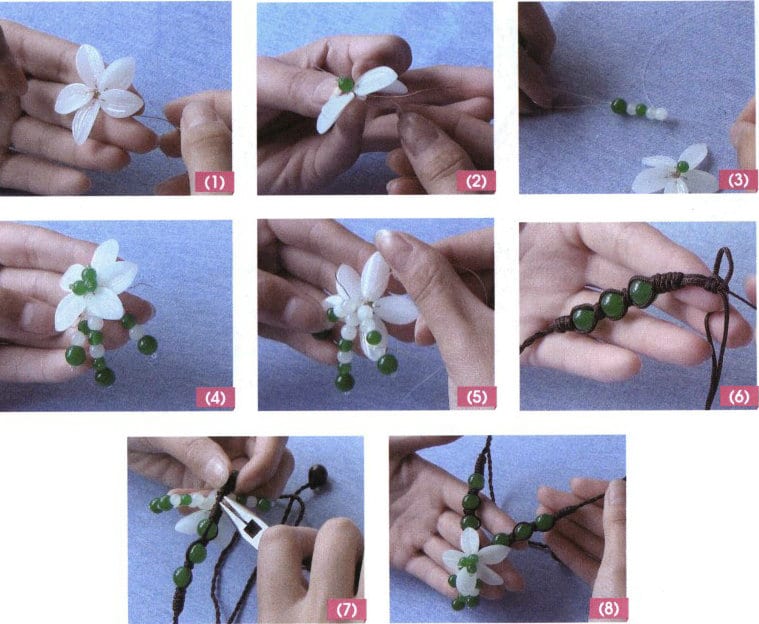
① Use metal wire to connect five white glass leaf pieces, twist tightly, and secure each to form a flower shape. Leave 5 cm of metal wire at the back of the petals to connect the chain; see Figure 5-12 (1).
② Make the flower center: Use fishing line to pass from the back to the front, then thread through green agate bead A, green rice bead, and back through green bead A, returning to the back through the gap in the metal wire, see Figure 5-12 (2).
③ Make the tassel: Thread two white agate beads, green bead C, white agate bead, green bead B, and white seed bead in order. Except for the seed bead, thread the others back once, bringing the fishing line back to the flower center, and pull the fishing line tight, see Figure 5-12 (3).
④ Use the same method as in steps (2) to (3) to thread 2 flower centers and 2 tassels. You can wrap the fishing line a few more times to secure each thread so that the petals, flower centers, and tassels form a whole, see Figure 5-12 (4).
⑤ Cut the fishing line at the back of the pendant, tie a knot, melt it, and secure it; see Figure 5-12 (5).
⑥ Making the chain: The chain is mainly composed of two strands: a vajra knot, beads, a vajra knot, two strands, and a end bead. It can be designed by yourself. Due to the small bead holes, an additional thin thread for threading beads is required, which should be hidden inside, see Figure 5-12 (6).
⑦ Installing the pendant: Connect the pendant to the middle of the chain, secure it with metal wire, and hide the ends of the metal wire properly, taking care to prevent scratches, see Figure 5-12 (7).
⑧ The overall effect of the finished product is shown in Figure 5-12 (8).
2.5 Red and Black Passion Necklace
(1) Style Characteristics
This necklace is a long sweater chain, cleverly combining the diagonal clove hitch knot and the crown knot, with wooden beads and threading cords. The classic red and black color combination, accented with light blue bodhi root beads, is a perfect match. The overall shape of the necklace is fan-like, simple, and elegant, with a strong Chinese ethnic color, see Figure 5-13.
(2) Key Learning Points
Familiarize yourself with the weaving method of the diagonal clove hitch knot; master the design concept of the fan shape.
(3) Material Preparation (Figure 5-14)
Red wooden beads: 6mm,42 pieces;
Light blue bodhi root beads:12mm, 1 piece;
Black thread: 10mmx160cm,1 piece; 10mmx200cm, 1 piece; 10mmx20 cm, 6 pieces.
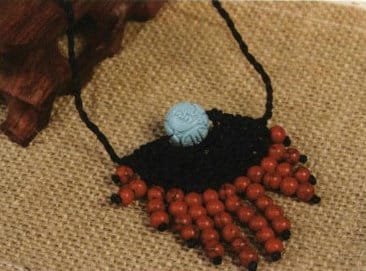
Figure 5-13 Red and black passion necklace style diagram
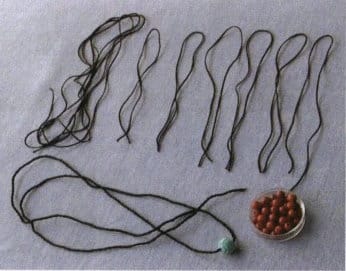
Figure 5-14 Red and black passion necklace material preparation
(4) Production Method
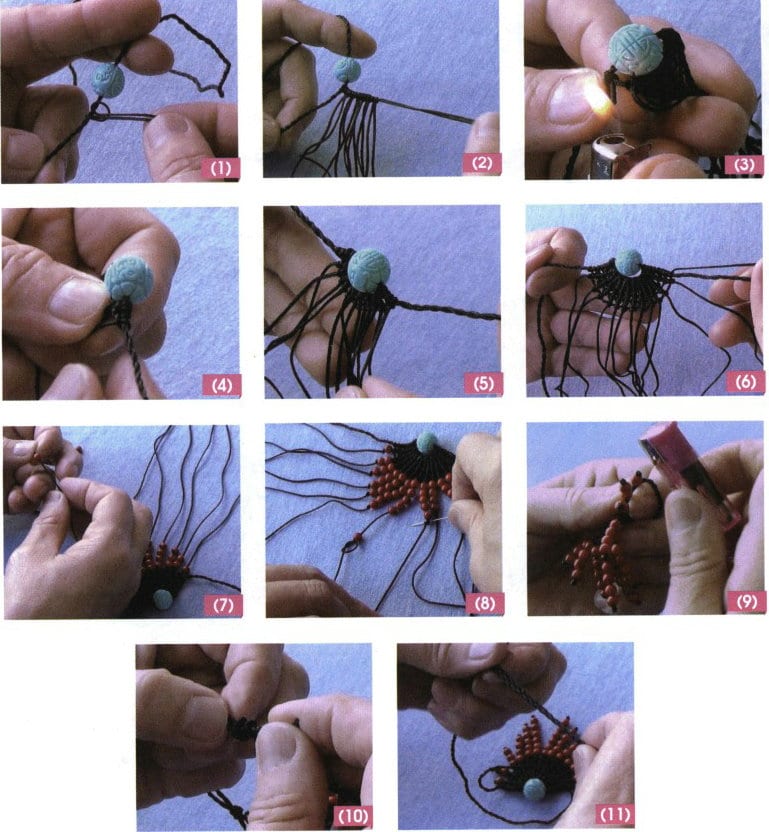
① Fold a 160 cm black thread in half and twist it into two strands, referred to as line A, then thread 1 light blue bodhi root bead in the center. At the left end of line A, use another 200 cm long black thread B to tie a crown knot; see Figure 5-15 (1).
② Tie crown knots on line B with 6 pieces of 20 cm long threads, resulting in 6 groups of 12 threads hanging on line B, see Figure 5-15 (2).
③ After tying a crown knot with line B at the right end of line A, cut one of the strands and melt it to secure it; see Figure 5-15 (3).
④ Use the other strand of line B to tie a crown knot on line A, making sure it is tightly connected to the previous crown knot, see Figure 5-15 (4).
⑤ Use line B to weave a diagonal roll knot on the 12 lines, and when reaching the left side of line A, tie a bird’s head knot, see Figure 5-15 (5).
⑥ A total of 5 groups are woven, following step (5) to weave the diagonal clove hitch knot back and forth five times, forming a fan shape, see Figure 5-15 (6).
⑦ Thread red wooden beads onto the 12 lines, with more in the middle and fewer on the sides; see Figure 5-15 (7).
⑧ Tie a knot to secure after the last bead on each line, and you can use a sewing needle to insert into the knot to make it sit under the bead; as shown in Figure 5-15 (8).
⑨ Cut off the excess thread and use a lighter to melt and secure it; see Figure 5-15 (9).
⑩ The two ends of line A cross and overlap, tie a knot to secure it on the other line, cut off the excess thread, melt, and secure it, see Figure 5-15 (10).
⑪ This section of the crossed line can adjust the tightness and length of line A to meet the wearer’s needs; see Figure 5-15 (11).
2.6 Double Lock Auspicious Necklace
(1) Style Characteristics
This necklace is primarily made of gold locks, jade locks, auspicious jade knots, and jade beads, complemented by green stones, garnets, pearls, etc. It is a traditional style necklace, overall subtle and elegant, with a vibrant beauty; the dual locks of jade and gold and the auspicious jade knot bestow conveys the beautiful meanings of peace, longevity, and good fortune, as seen in Figure 5-16.
(2) Key Learning Points
Learn the basic structure of this necklace; understand the expressive effects of materials such as jade locks, jade knots, and gold locks.
(3) Material Preparation
Red agate beads A: 8mm, 2 pieces;
Red agate beads B: 4mm, 7 pieces;
Tri-color phoenix stone A: 10 mm, 1 piece;
Tri-color phoenix stone B: 6mm, 4 pieces;
Pink crystal beads A: 6 mm, 6 pieces;
Pink crystal beads B: 4mm,4 pieces;
Jade beads A:8 mm, 4 pieces;
Jade bead B: 4mm, 42 pieces;
Pearls: 4mm, 62 pieces;
Jade peace lock: 55mm(L)x4mm(W), 1 piece;
Jade auspicious knot: 25mm(L)x2mm(W), 1 piece;
Red agate teardrop beads: 8mm(L)x6mm(W), 3 pieces;
Yellow barrel beads: 8mm(L)x4mm(D), 1 piece;
Teardrop shell beads: 15mm(L)x5mm(D), 2 pieces;
Golden peace lock: 18mmx12mm, 2 pieces;
Golden flower base: 8mm, 3 pieces;
Necklace: 1 piece (self-made).
Golden head pin: 4cm, 8 pieces; 2cm, 3 pieces;
Eye pin: 3cm, 2 pieces;
Fishing line: 0.3 mmx50 cm.
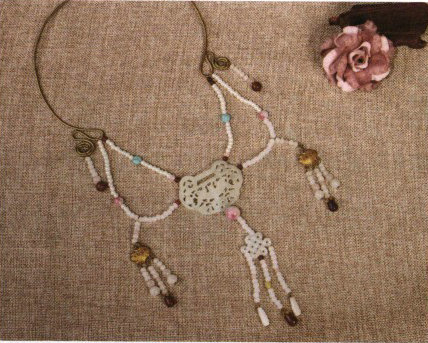
Figure 5-16 The style diagram of the double lock auspicious necklace
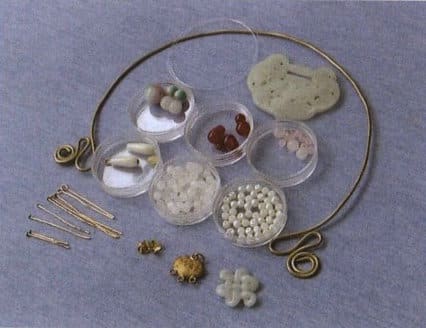
Figure 5-17 Materials preparation for the double lock auspicious necklace
(4) Production Method
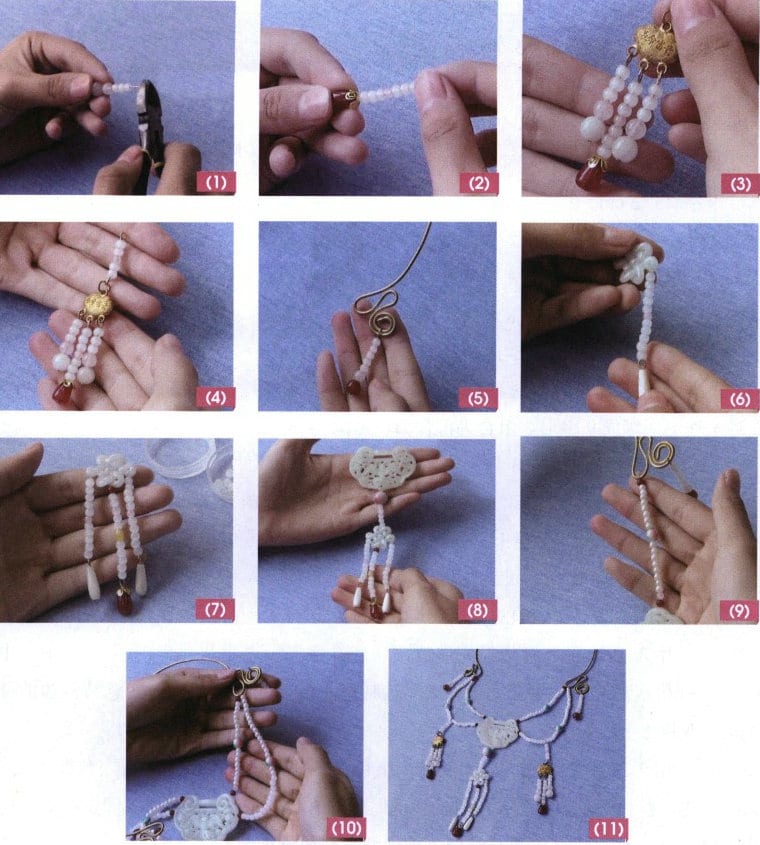
① Use head pin to thread jade bead A, pink crystal bead A, and 3 jade beads B in turn, bend them into a 9-shape, and combine them into part A. Make two sets, see Figure 5-18(1).
② Use head pin to pass through red agate teardrop bead, small golden flower base, 3 jade beads B, pink crystal bead B, 3 jade beads B in turn, bend into a 9-shape, and combine into part B, see Figure 5-18(2).
③ Connect part A and part B with the gold peace lock to form part C, see Figure 5-18(3).
④ Thread 2 Jade Beads B, Pink Crystal Bead B, and 2 Jade Beads B with a eye pin in sequence, and connect them with Gold Part C to form Part D, see Figure 5-18(4).
⑤ Use head pin to pass through red agate bead A, pink crystal bead A, and 5 jade beads B in turn, and fix the made parts to one end of the collar (the collar can be made of metal wire or copper wire), see Figure 5-18(5).
⑥ Use a head pin to thread a teardrop-shaped shell bead, then bend it into a 9 shape. Next, string 10 jade beads B with a pink crystal bead B in the middle, forming component E. After making two sets, connect them to the hollow part on the side of the jade auspicious knot, see Figure 5-18 (6).
⑦ Use a head pin to thread red agate teardrop beads and golden small flower settings, and bend them into a 9 shape. Then, use fishing line to connect 5 jade beads B, yellow barrel beads, 5 jade beads B, and red agate beads B to form component F, which is fixed in the hollow part of the auspicious knot in the middle and combined with the two sets of component E to form component G; the effect is shown in Figure 5-18 (7).
⑧ Continue to thread 5 jade beads B onto the fishing line at the top of component G, followed by the tricolor phoenix stone A, and connect it to the hollow part below the jade safety lock, making sure to secure it; see Figure 5-18 (8).
⑨ On both sides of the safety lock, thread two rows of beads. The first: thread red agate beads B, 8 pearls, tricolor phoenix stone B, 8 pearls, red agate beads B onto the fishing line in order, and connect it to the necklace, see Figure 5-18 (9). The second: thread red agate beads B, 15 jade beads B, tricolor phoenix stone B, 15 pearls onto the fishing line, and connect it to the necklace to enhance its completeness, see Figure 5-18 (10).
⑩ The method for the other side is the same; the completed effect can be seen in Figure 5-18 (11).
Section II Head Accessories Design and Production
1. Earring Design and Production
1.1 Floral Extravaganza Earrings
(1) Style Characteristics
This pair of earrings comprises a diagonal clove hitch knot and a crown knot adorned with green beads. Its shape resembles a fresh and elegant flower, full of emotion, which can highlight a woman’s gentle and charming nature. It can be described as beautiful without being gaudy, elegant without being vulgar, see Figure 6-1.
(2) Key Learning Points
Learn the method of weaving the crown knot and be able to expand ideas to apply it to other jewelry designs.
(3) Material Preparation
Figure 6-2 shows the materials for a single earring.
Jade beads: 4mm, 3 pieces;
Green agate beads: 10mm, 1 piece;
Brown waxed thread: 60cm, 3 pieces;
Ear hooks: 1 piece.
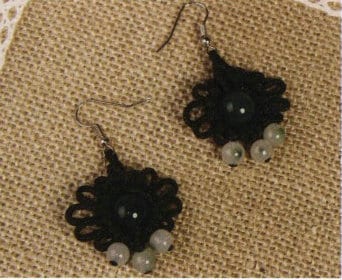
Figure 6-1 Floral Extravaganza Earring Style Diagram

Figure 6-2 Preparation of materials for floral extravaganza earrings
(4) Production Method
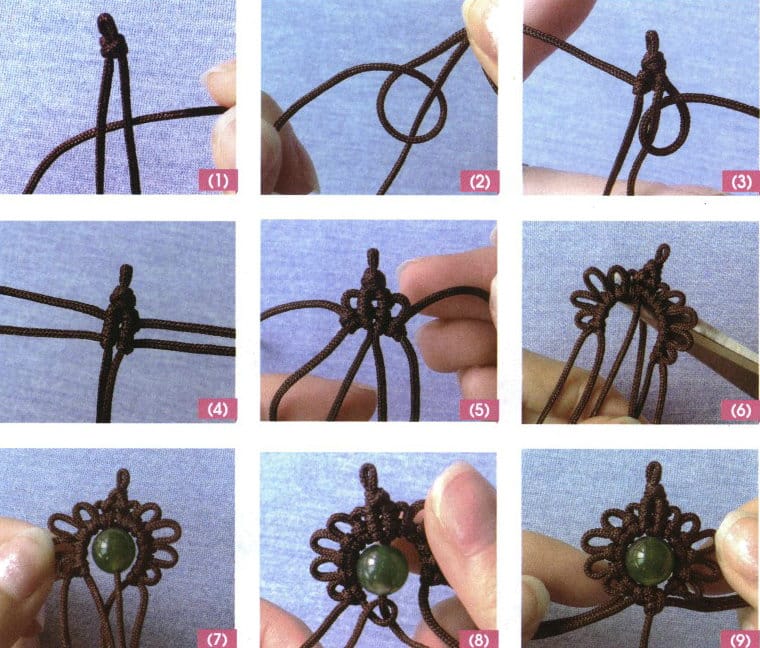
① Take a piece of waxed thread and fold it in half at the center, double knot 0.5 cm from the tip, then add another piece of thread to start braiding at the center; see Figure 6-3 (1).
② The left wire makes two diagonal clove hitch knots on the left axis line; see Figure 6-3 (2).
③ The right wire makes two diagonal clove hitch knots on the right axis line; see Figure 6-3 (3).
④ Add another wire, and similarly, using the two axis lines, make two diagonal clove hitch knots on each side, see Figure 6-3 (4).
⑤ The first line on the left is tied into a crown knot on the second line, pulling out a loop; hence, it is called a crown knot; similarly, the first line on the right is tied into a crown knot on the second line. Note that the left and right loops should be the same size; see Figure 6-3(5).
⑥ Next, tie four more sets of crown knots on each side, with the loops in the middle being larger and the ones on the sides smaller. The two central lines are used to thread beads. Since the hole of the green agate bead is slightly small, one axis line needs to be cut off; when the bead hole is larger, there is no need to cut it, see Figure 6-3(6).
⑦ Thread the green agate bead onto the axis line, see Figure 6-3(7).
⑧ Tie a half crown knot with the left line on the axis line; see Figure 6-3(8).
⑨ Tie a crown knot on the axis line on the right side and tighten the weaving; see Figure 6-3 (9).
⑩ Cut off the weaving on both sides of the axis line, melt, and bond; see Figure 6-3 (10).
⑪ Thread a jade bead onto the remaining three lines, tie a knot to bond, and leave the middle weaving slightly longer; see Figure 6-3 (11).
⑫ Connect the ear hook at the top of the knot; see the overall effect in Figure 6-3 (12).

1.2 Blossom-in-Bud Earrings
(1) Style Characteristics
This pair of earrings combines button knots with metal accessories, with colorful button knots embedded in trumpet-shaped charm, resembling a flower about to bloom, intriguing and thought-provoking; at the same time, the subtle effect adds a touch of mystery, reflecting the perfect blend of tradition and fashion, see Figure 6-4.
(2) Key Learning Points
Please familiarize yourself with button knots and their applications; master the design of combinations with metal accessories.
(3) Materials Preparation
Figure 6-5 shows the materials for a single earring.
Light blue seed beads: 2mm, 3 pieces;
Green seed beads: 2mm, 4 pieces;
Silver hollow flower base: 20 mm (length) ×12mm (width), 1 piece;
Colorful button knot: 12mm, 1 piece;
Eye pin: 40mm, 1 piece;
Ear hooks: 1 piece.
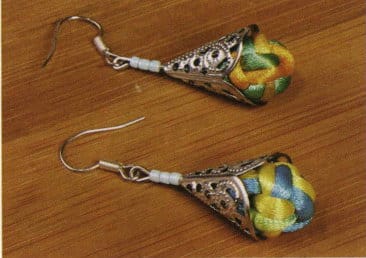
Figure 6-4 shows the design of a blossom-in-bud earrings
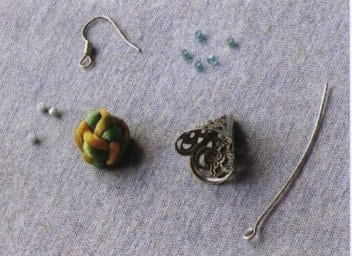
Figure 6-5 Preparation of materials for the blossom-in-bud earrings
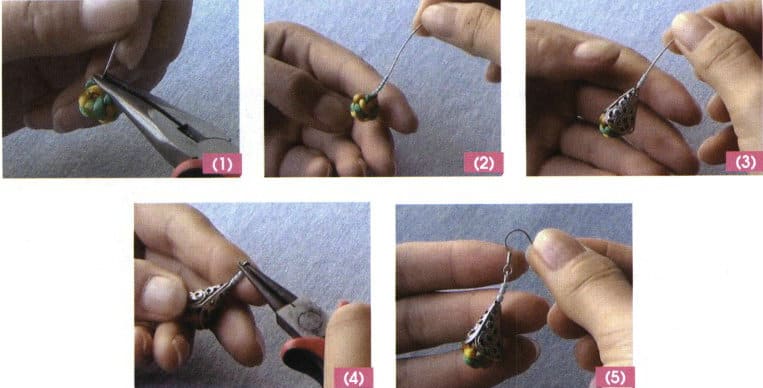
(4) Production Method
① Open one end of the eye pin ring, hook the colored button knot, and close it to secure it; see Figure 6-6 (1).
② First, thread 4 green seed beads onto the other end of the eye pin, which is mainly used to support the hollow flower base, exposing the bottom of the button knot; see Figure 6-6 (2).
③ Then thread 1 silver hollow flower base and 3 light blue seed beads; see Figure 6-6 (3).
④ Reserve the amount for the eye pin to make a loop, cut off the excess material, and bend a loop; see Figure 6-6 (4).
⑤ Finally, connect the ear hook; the overall effect is shown in Figure 6-6 (5).
⑥ Use the same method to make another earring.
1.3 Turquoise Unfolding Earrings
(1) Style Characteristics
This earring features turquoise as the main material, with chains as auxiliary materials. Red is the primary color, while green serves as an accent color. The unique texture and fresh style of turquoise provide a pleasant yet simple feeling, as shown in Figure 6-7.
(2) Learning Points
Learn to use the method of threading a eye pin through a metal chain; learn how to use a bead tip.
(3) Material Preparation
Figures 6-8 show the materials for a single earring.
Chain: 6 cm (length) ×3mm (width), 4 pieces;
Red turquoise A: 6 mm, 8 pieces;
Red turquoise B: 4 mm, 4 pieces;
Green seed beads: 2 mm, 12 pieces;
Eye pin: 40mm, 2 pieces;
Head pin: 30mm, 4 pieces;
Jump ring: 4mm, 2 pieces;
Positioning beads and bead tip: 2 sets;
Fishing line: 60mm×0.3mm, 1 piece;
Ear hook: 1 piece.
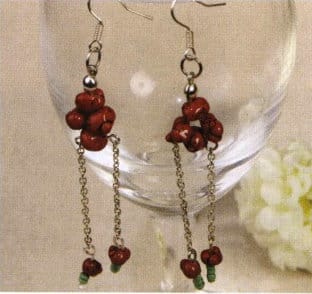
Figure 6-7 Turquoise unfolding earrings style diagram
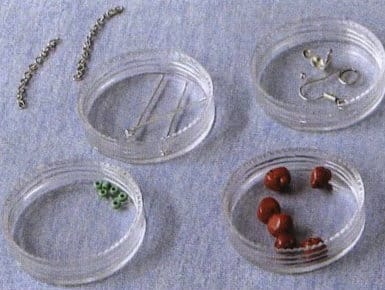
Figure 6-8 Turquoise unfolding earrings material preparation
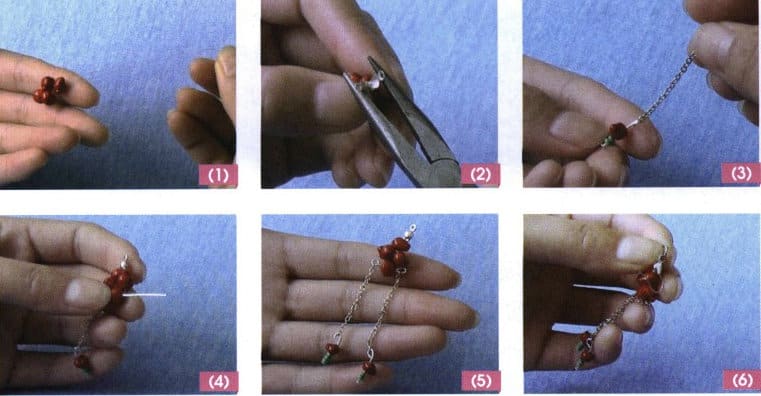
(4) Production Method
① Use a fishing line to string 3 beads, and pass through 1 piece of red, turquoise A; see Figure 6-9 (1).
② Simultaneously thread a bead tip with both fishing lines, secure it with a positioning bead, cut off the excess line, and tighten it (see Figure 6-9 (2).
③ Use a head pin to string 3 green seed beads and 1 piece of red, turquoise B, then connect it to one end of the chain to form accessory A, and make 2 sets; see Figure 6-9 (3).
④ After connecting accessory A with a eye pin, thread through the bottommost red, turquoise A and bend it into a loop; see Figure 6-9(4).
⑤ Hang another set of accessory A into the loop and secure the eye pin; see Figure 6-9(5).
⑥ Finally, connect the ear hook with a jump ring and wrap it; see Figure 6-9(6).
⑦ Use the same method to make another earring.
1.4 Phoenix Amethyst Silhouette Earrings
(1) Style Characteristics
This pair of earrings features a combination of long purple crystal beads and white crystal balls, with a simple and elegant design that is noble and generous. The purple crystal is exquisite and dazzling, exuding infinite charm, as shown in Figure 6-10.
(2) Key Learning Points
Familiarity and understanding of crystal materials; familiarity with the weaving method of four-sided beads; mastery of the use and effects of flower bases.
(3) Material Preparation
Figure 6-11 shows the materials for a single earring.
Metal flower base: 8 mm (length) ×5mm (width), 2 pieces;
Purple crystal long bead: 30 mm (length) ×10mm (width), 2 pieces;
Purple crystal bead: 8mm, 2 pieces;
White crystal bead: 4mm, 24 pieces;
Purple seed beads: 2 mm, 6 pieces;
Jump ring: 4mm, 2 pieces;
Eye pin: 35mm, 2 pieces;
Ear hooks: 1 piece.
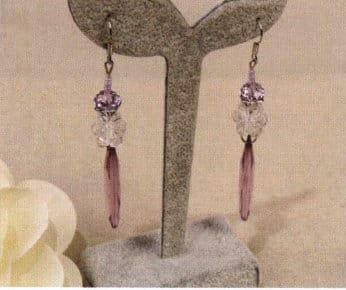
Figure 6-10 Style diagram of the phoenix amethyst silhouette earrings
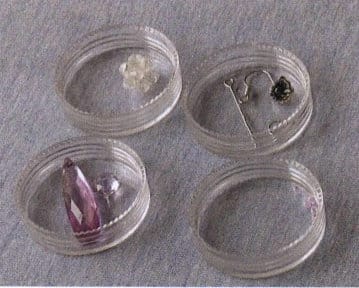
Figure 6-11 Material preparation for the phoenix amethyst silhouette earrings
(4) Production Method
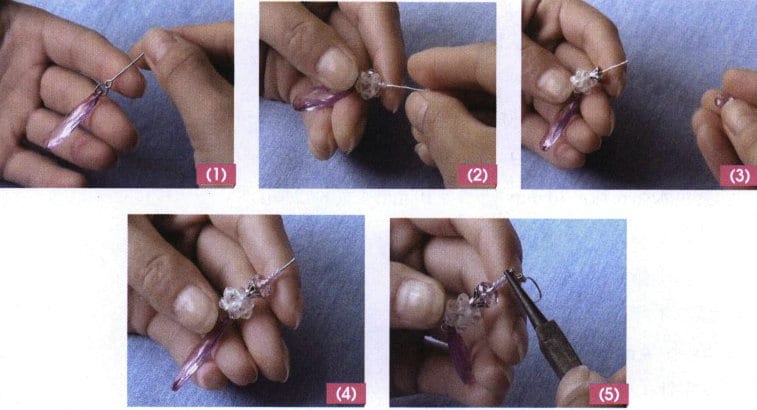
① Use a jump ring to thread 1 purple crystal long bead and hang it on a eye pin; see Figure 6-12 (1).
② Thread a white crystal bead onto the eye pin, then thread 3 purple seed beads into the crystal bead so that the seed beads are embedded in the middle of the crystal bead (due to the slightly larger gap in the sphere), see Figure 6-12 (2).
③ Next, thread in the metal flower base, paying attention to the direction of the flower base’s opening, see Figure 6-12 (3).
④ Continue to thread in a purple crystal bead and 3 purple seed beads; see Figure 6-12 (4).
⑤ Finally, connect the ear hook and secure the circular ring of the eye pin; see Figure 6-12 (5).
⑥ Make another earring using the same method.
1.5 Cerulean Whisper Earrings
(1) Style Characteristics
This pair of earrings features blue as the main color and is made from glass tube materials and crystal beads. Blue is a pure color that evokes thoughts of the blue sea and sky. The streamlined and tubular tassel design showcases individuality, ethereality, and carefree elegance, as seen in images 6-13.
(2) Key Learning Points
Learn how to bend a eye pin into various arc shapes; master the ideas and methods of using horizontal chains to hang tassels.
(3) Material Preparation
Figure 6-14 shows the materials for a single earring.
Light blue diamond-shaped crystal beads: 3 mm, 14 pieces;
Dark blue diamond beads: 8mm, 2 pieces;
Lake blue round beads: 4mm, 4 pieces;
Pink round beads: 4mm, 2 pieces;
Blue crystal tubes: 4mm, 12 pieces;
Black crystal tube: 6mm, 2 pieces;
Bead head pin: 30mm, 10 pieces;
Eye pin: 60mm, 2 pieces; 30mm, 4 pieces;
Chain: 60 mm (length) ×3mm (width), 2 pieces;
Ear hooks: 1 piece.
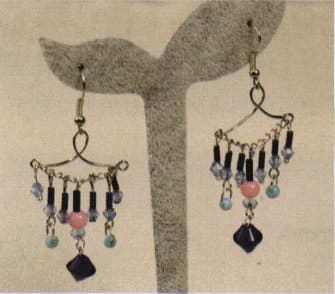
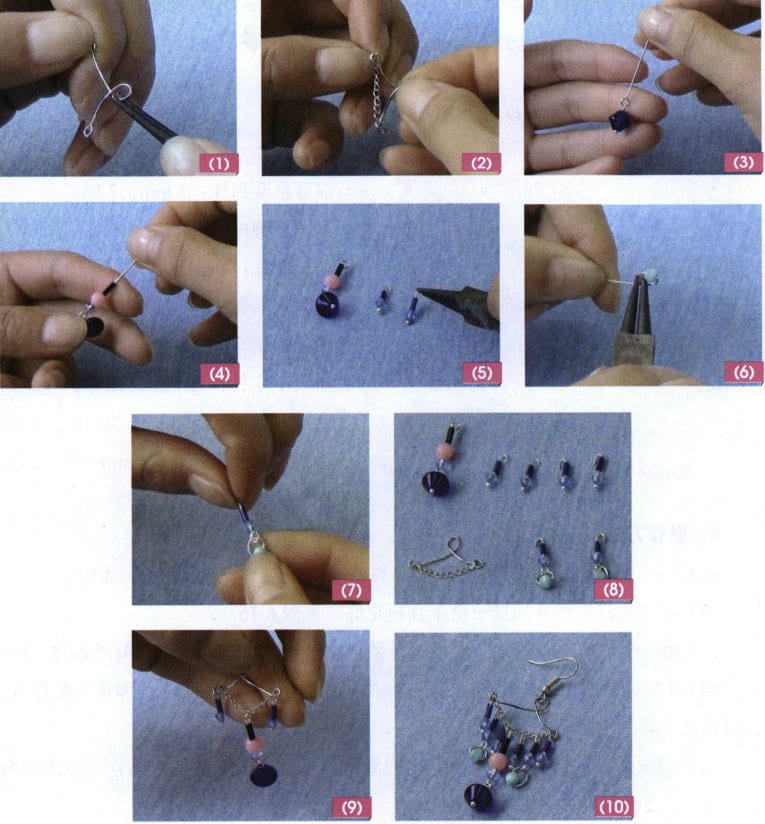
Figure 6-13 Design drawing of the Cerulean Whisper Earrings
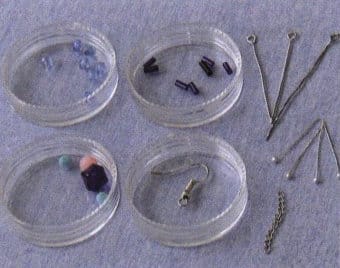
Figure 6-14 Preparation of materials for the Cerulean Whisper Earrings
(4) Production Method
① Bend a eye pin into a “water drop” shape, ensuring it is symmetrical on both sides; see Figure 6-15 (1).
② Hang a chain on both ends of the “water drop” shape and secure it; see Figure 6-15 (2).
③ Use a bead head pin to thread one light blue diamond-shaped crystal bead and hang it on the eye pin; see Figure 6-15 (3).
④ Thread one pink round bead and one black crystal tube onto the eye pin in sequence, then bend it into a circular shape; the whole piece is referred to as accessory A; see Figure 6-15 (4).
⑤ Use a head pin with a bead head to thread 1 light blue diamond-shaped crystal bead and 1 blue crystal tube, collectively referred to as accessory B, and make 4 sets; see Figure 6-15 (5).
⑥ Cut off the loop of the eye pin to make it straight, then thread 1 lake blue round bead and bend it into a loop (since the round bead is small and cannot use a jump ring, this method is used as a substitute), collectively referred to as accessory C, see Figure 6-15 (6).
⑦ Connect accessory B with accessory C, and make 2 sets, see Figure 6-15 (7).
⑧ The completed accessories A, B, and C and their quantities are shown in Figure 6-15 (8).
⑨ Thread accessory A in the middle of the chain and accessory B at both ends; see Figure 6-15 (9).
⑩ Hang the remaining accessory B on the chain, keeping them symmetrical and evenly spaced. Finally, attach the ear hooks; see Figure 6-15 (10).
⑪ Use the same method to make another earring.
Copywrite @ Sobling.smycken - Anpassad smyckestillverkare, OEM och ODM smyckesfabrik
1.6 Liquid Rhythm Earrings
(1) Style Characteristics
These earrings are designed based on the original shape of the metal accessories, featuring a metal chain tassel designed on the circular part below the accessory, adorned with black agate, see Figure 6-16.
(2) Key Learning Points
Learn to design jewelry using the shapes of metal accessories; master the methods and techniques for matching bead chains.
(3) Prepare Materials
Figure 6-17 shows the materials for a single earring.
Chain: 45 mm (length) ×2mm (width); each earring has four different lengths of chain, with three pairs of equal lengths, totaling 7 chains per earring;
Black agate beads A: 6mm, 4 pieces;
Black agate beads B: 4 mm, 12 pieces;
Seven-hole metal fittings: 2 pieces;
Silver ear hooks: 1 pair;
Eye pin: 30mm,2 pieces;
Head pin: 30mm, 14 pieces;
Jump ring: 4mm, 14 pieces.
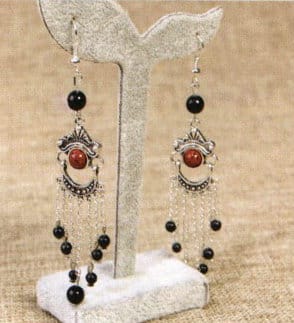
Figure 6-16 Liquid rhythm earrings style diagram
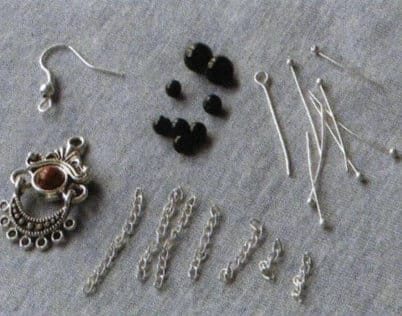
Figure 6-17 Preparation of liquid rhythm earrings materials
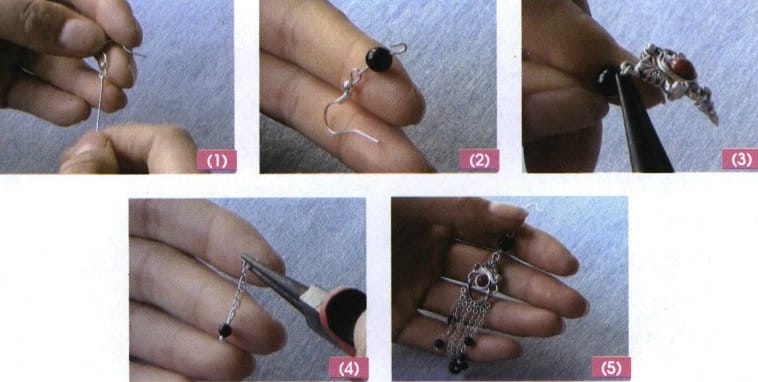
(4) Production Method
① Use a eye pin to connect the silver ear hooks; see Figure 6-18 (1).
② Use a eye pin to thread the black agate bead A, bending it into a ring shape; see Figure 6-18 (2).
③ Connect the seven-hole metal fittings to form accessory B, see Figure 6-18 (3).
④ Use a head pin to thread 1 black agate bead A, connecting it to a chain to form accessory C; use a head pin to thread 1 black agate bead B, then connect it to a chain to form accessory D, and use the same method to make the remaining 6 sets of accessory D, see Figure 6-18 (4).
⑤ Connect accessory B to 1 set of accessory C and 6 sets of accessory D, hang accessory C on the ring in the middle of the seven-hole metal fitting, and hang the shortest chain of accessory D on the outermost ring of the seven-hole metal fitting, connecting the remaining 5 chains in order of length to create a beautiful fan shape, see Figure 6-18 (5).
⑥ Use the same method to make another earring.
1.7 Dragonfly Waltz Earrings
(1) Style Characteristics
This pair of earrings is made from shell and rhinestone materials, featuring vibrant and clear colors that are dazzling and eye-catching. The design resembles a gracefully dancing dragonfly, light and elegant, unrestrained, perfectly highlighting a beautiful and romantic style, as shown in Figure 6-19.
(2) Learning Points
Familiarize yourself with materials such as shells and rhinestones; learn to increase volume and layers using the jump ring through the loop method.
(3) Preparing Materials
Figure 6-20 shows the materials for a single earring.
Teardrop-shaped shell: 8mm, 8 pieces;
Round rhinestone: 6mm, 14 pieces;
Gold en jump ring: 4mm, 14 pieces;
Gold chain: 5 cm (length) × 2mm (width), 1 piece;
Ear hooks: 1 piece.
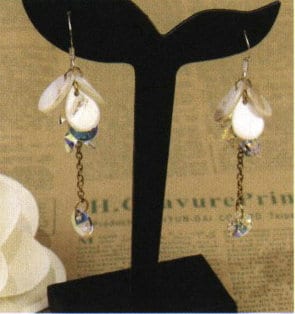
Figure 6-19 Style diagram of the dragonfly waltz earrings
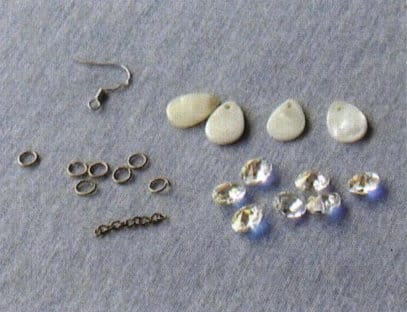
Figure 6-20 Materials preparation for the dragonfly waltz earrings
(4) Production Method
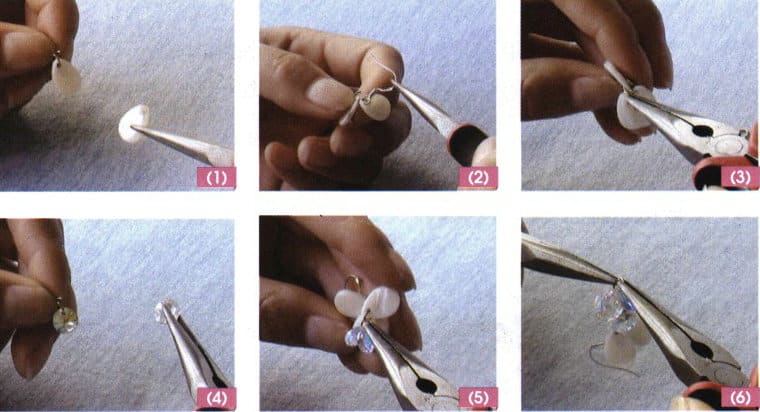
① Use a golden jump ring to thread 2 pieces of teardrop-shaped shells to form accessory A; see Figure 6-21 (1).
② Connect accessory A to the ear hook and secure the jump ring closure; see Figure 6-21 (2).
③ Use 1 jump ring to thread 2 pieces of teardrop-shaped shells (same as accessory A) and connect to the first jump ring; see Figure 6-21 (3).
④ Use 1 jump ring to thread two round rhinestones to form accessory B; see Figure 6-21 (4).
⑤ Accessory B is connected to the second jump ring; see Figure 6-21 (5).
⑥ Repeat making two sets of accessory B, connecting them sequentially with jump rings; see Figure 6-21 (6).
⑦ Cut the gold chain into 2.5 cm lengths, connecting one end to a jump ring, and attach a round rhinestone to the jump ring, see Figure 6-21 (7).
⑧ Connect the other chain end to the last jump ring using another jump ring; see Figure 6-21 (8).
⑨ The completed effect is shown in Figure 6-21 (9).
⑩ Use the same method to make another earring.

2. Hair Accessory Design and Production
2.1 Butterfly Waltz Crystal Glow Hairpin
(1) Style Characteristics
This hairpin is made from ribbons, diamonds, beads, and metal leaves. Its shape is elegant and unique, resembling a fluttering butterfly. Under the reflection of diamonds, beads, and metal accessories, it is both particularly dazzling and complementary, as shown in Figure 6-22.
(2) Key Learning Points
Learn to combine ribbon and bead materials; master using various decorative materials to enhance the appearance of jewelry.
(3) Prepare Materials
See Figure 6-23.
Teardrop-shaped pink diamond: 30 mm (length) ×22mm (width), 1 piece;
Metal leaf: 25 mm (length) × 22mm (width), 1 piece;
Spring clip: 80 mm (length) × 7mm (width), 1 piece;
Pink Non-woven Fabric: 80mm (length) x 50mm (width), 1 piece;
Dual-tone Ribbon: 400mm (length) x 28mm (width), 1 unit;
Pink Wheel Beads: 5mm, 4 pieces;
Green Wheel Beads: 5mm, 8 pieces;
Purple Wheel Beads: 5mm, 3 pieces;
Pink Faceted Beads: 8mm, 3 pieces;
Champagne Seed Beads: 3mm, 12 pieces;
Seed Bead Cord: 150mm (length) x 5mm (width), 1 piece;
Craft Wire: 130mm (length) x 2mm (Diameter), 1 piece;
Copper wire:1mm×200mm;
Tools: glue gun, scissors, copper wire, elastic jewelry cord (a material for making silk flowers, also known as elastic line, which has the characteristic of breaking directly without needing to tie knots and will not unravel).
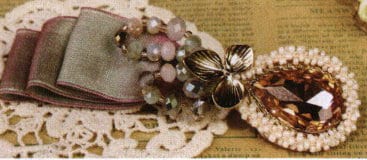
Figure 6-22 Style Diagram of the Butterfly Waltz Crystal Glow Hairpin
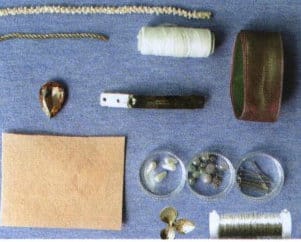
Figure 6-23 Butterfly Waltz Crystal Glow Hairpin Material Preparation
(4) Production Method
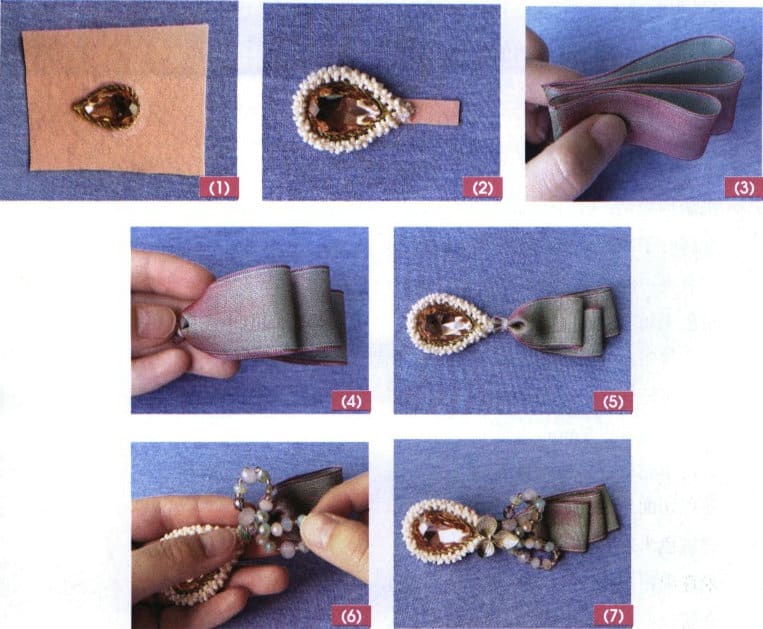
① Stick the teardrop-shaped powder diamond onto the non-woven fabric and glue metal wire around the edges; see Figure 6-24 (1).
② Glue a circle of rice bead rope around the outer metal wire, then cut off the excess non-woven fabric along the outline, leaving a rectangular piece of non-woven fabric at the end; see Figure 6-24 (2).
③ Fold the two-color ribbon back and forth into an S shape, with the first layer measuring 5 cm. One end should be slightly larger than the previous layer, while the other should be even, as shown in Figure 6-24 (3).
④ Tightly wrap one side of the two-color ribbon that is even with elastic jewelry cord, as shown in Figure 6-24 (4).
⑤ Adhere the corresponding teardrop-shaped pink diamond to the reserved position on the non-woven fabric, as shown in Figure 6-24 (5).
⑥ Thread copper wire through pink, green, and purple wheel beads, alternating with champagne-colored seed beads, bending it into two loops, one large and one small, and wrap it securely at the center of the teardrop-shaped pink diamond and the two-color ribbon, as shown in Figure 6-24 (6).
⑦ Use hot melt glue to attach the metal leaves and secure the knot to the spring clip. After organizing, see Figure 6-24 (7).
2.2 Butterfly Serenade Hairpin
(1) Style Characteristics
This hairpin is made primarily of woolen ribbon and faceted colored diamonds. The texture of the woolen material is delicate, while the uniquely shaped faceted colored diamonds play a pivotal role, making the overall appearance resemble a butterfly fluttering among flowers. The butterfly and flowers accompany each other, echoing beautifully, giving it an elegant and distinctive look, see Figure 6-25.
(2) Key Learning Points
Familiarize yourself with various decorative materials; learn the methods for making hairpins; improve the ability to combine different materials.
(3) Prepare Materials
See Figure 6-26.
Gray woolen ribbon: 450 mm (length) ×40mm (width);
Pink woolen flower pieces: 60 mm (diameter), 5 pieces;
Golden flower stems: about 15 stems;
Fancy-shaped faceted colored diamond: 35 mm (length) ×5mm (width), 3 pieces (2 pink, 1 purple);
Fancy-shaped faceted colored diamond: 25 mm (length) ×15mm (width), 1 piece (red);
Fancy-shaped faceted colored diamond: 15 mm (length) ×10mm (width), 1 piece (champagne);
Fancy-shaped faceted colored diamond: 14 mm (length) ×12mm (width), 1 piece;
Golden leaves: 45 mm (length) ×18mm (width), 1 piece;
Hairpin: 80 mm (length) ×10mm (width), 1 piece;
Tools: glue gun, scissors, elastic jewelry cord.
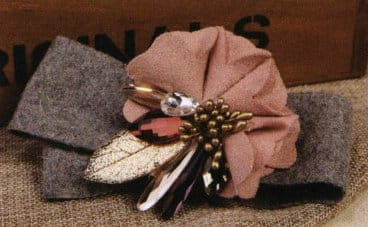
Figure 6-25 Butterfly Serenade Hairpin Style Diagram
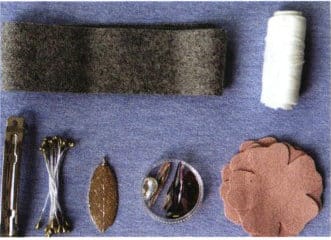
Figure 6-26 Preparation of Materials for the Butterfly Serenade Hairpin
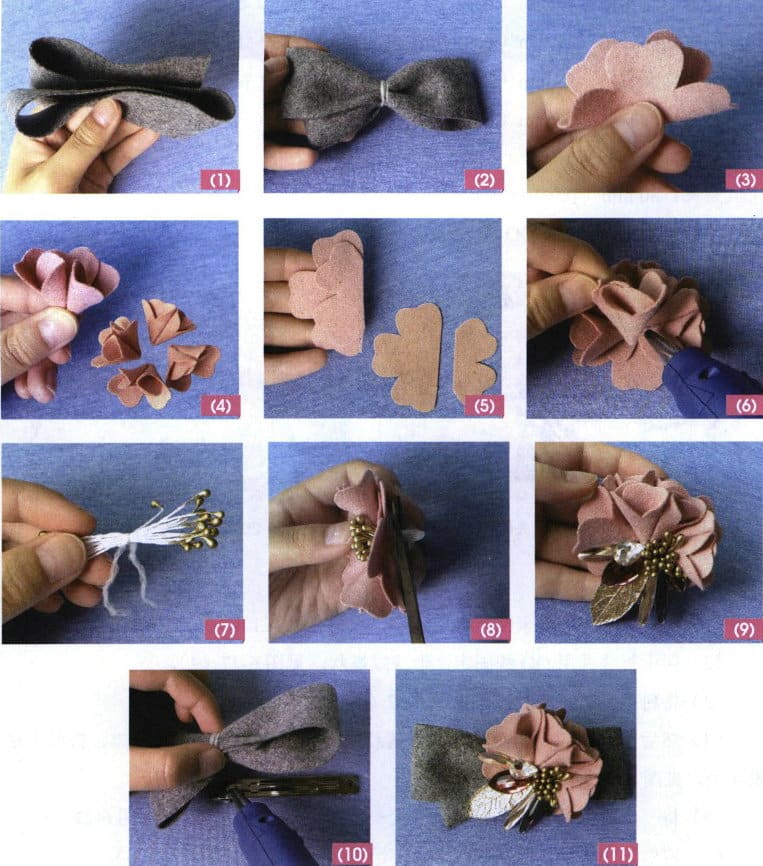
(4) Production Method
① Fold the gray woolen ribbon back and forth into four layers; see Figure 6-27 (1).
② Fold it in the center and secure it with elastic jewelry cord to form a butterfly shape; see Figure 6-27 (2).
③ Fold the pink wool felt flower piece in half; see Figure 6-27 (3).
④ Then fold both sides towards the center, and use hot melt glue to secure the folded parts as petals. Make 4 using the same method; see Figure 6-27 (4).
⑤ Cut one pink wool felt flower piece into one large and one small piece, then glue them together; see Figure 6-27 (5).
⑥ Glue the 4 completed petals onto the flower piece to form a large flower; see Figure 6-27 (6).
⑦ Center the golden flower core and tie it with a thread. After securing it, fold it in half; see Figure 6-27 (7).
⑧ Cut a hole in the center of the flower petal, pass the base of the golden flower stem through the hole, and trim off the excess stem. Secure it with hot melt glue; see Figure 6-27 (8).
⑨ At the base of the petals, use hot melt glue to secure the golden leaves and 6 irregularly shaped faceted colored diamonds, see Figure 6-27 (9).
⑩ Use hot melt glue to attach the finished bow to the hairpin; see Figure 6-27 (10).
⑪ Stick on the finished flower and organize it to complete; see Figure 6-27 (11).
2.3 Butterfly and Pearl Embrace Hairpin
(1) Style Characteristics
This hairpin is made of pleated fabric strips combined with various beads, featuring multiple layers of bows paired with warm-colored beads, giving an overall feeling of elegance and simplicity, exuding a sweet and refreshing aura, see Figure 6-28.
(2) Key Learning Points
Learn to use ribbons to make bows; learn methods for decorating spring clips and techniques for combining beads.
(3) Materials Preparation
See Figure 6-29.
Green pleated fabric ribbon: 480 mm (length), 50 mm (width);
Pink satin ribbon: 130 mm (length), 5 mm (width);
Bean paste color resin flower: 7 mm, 5 pieces;
Bean paste color faceted water-drop beads: 6mm, 5 pieces;
Champagne color faceted crystal beads: 8mm, 5 pieces;
Champagne color twisted beads: 6mm, 5 pieces;
White rice-shaped pearls: 6mm, 5 pieces;
Champagne-colored pearls A: 6 mm, 5 pieces;
Champagne-colored pearls B: 8 mm, 5 pieces;
Flower medallion: 20 mm (diameter), 1 piece;
Hairpin: 80 mm (length) × 8mm (width), 1 piece;
Head pin: 25mm, 20 pieces;
Fishing line: 800 mm (length) ×0.3mm (diameter);
Tools: glue gun, scissors, needle, thread.
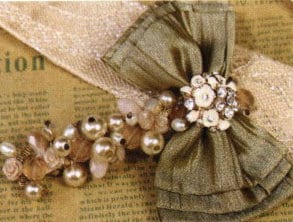
Figure 6-28 Butterfly and Pearl Embrace Hairpin Style Diagram
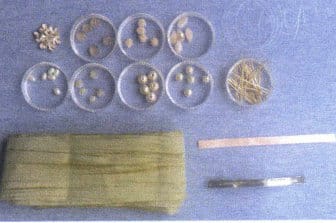
Figure 6-29 Preparation of Materials for the Butterfly and Pearl Embrace Hairpin
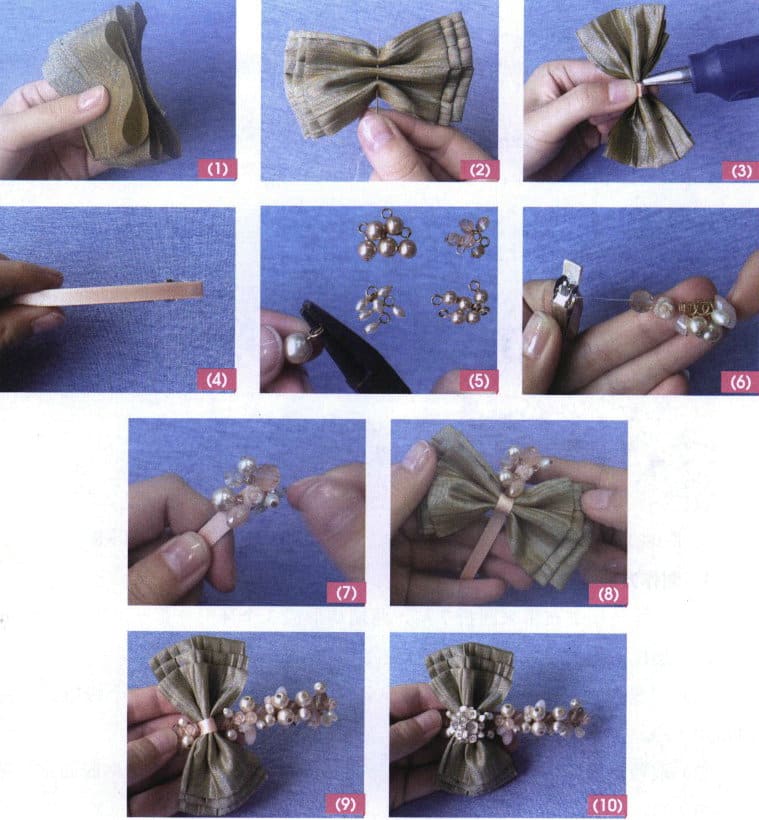
(4) Production Method
① Fold the green pleated ribbon back and forth in 7 layers, forming 3 circular loops at both ends. The first layer of the loop is about 6 cm long, with each layer larger than the previous one, see Figure 6-30 (1).
② Use a needle to sew pleats in the middle of the green pleated ribbon and tighten it to form a bow; see Figure 6-30 (2).
③ Take the pink satin ribbon, wrap it around the middle of the bow, and tighten it, securing the end with hot melt glue; see Figure 6-30 (3).
④ Use hot melt glue to attach a 5 mm wide pink ribbon to the surface of the hairpin, folding the ends to the back of the hairpin securely, see Figure 6-30 (4).
⑤ Thread the champagne-colored twisted beads, white rice-shaped pearls, champagne-colored pearl A, and champagne-colored pearl B through the head pin and use round-nose pliers to make 5 loops; see Figure 6-30 (5).
⑥ Tie the fishing line to one end of the hairpin and sequentially thread in a set of beads; see Figure 6-30 (6).
⑦ Wrap the first group of beads around the hairpin and secure it; see Figure 6-30 (7).
⑧ Attach the completed bow horizontally next to the first group of beads; see Figure 6-30 (8).
⑨ After threading and securing the other 4 groups of beads in order, tie a knot to secure, see Figure 6-30 (9).
⑩ Finally, glue the flower medallion in the middle of the bow; see Figure 6-30 (10).
2.4 Layered Whispers Butterfly Hair Clip
(1) Style Characteristics
This hairpin is made of South Korean velvet, coarse burlap, and lace as the main materials, with a color scheme of gray and orange. It features three layers of butterfly bows stacked together, cleverly paired with white lace, creating a harmonious, soft, elegant, and fashionable look, as shown in Figure 6-31.
(2) Key Learning Points
Learn color matching; learn the ideas for making hair accessories through mixing various fabrics; learn the techniques for decorating hair clips.
(3) Prepare Materials
See Figure 6-32.
Orange burlap strips: 240mm (Length) x 40mm (Width), 1 strip; 200mm (Length) x 40mm (Width), 1 strip; 65mm (Length) x 40mm (Width), 1 strip;
Orange Korean velvet: 380mm (L) x 25mm (W), 1 band; 150mm (L) x 12.5mm (W), 1 band; 70mm (L) x 12.5mm (W), 1 band;
White lace panel: 80mm (L) x 55mm (W), 1 unit;
Black adhesive tape: 20mm (L) x 15mm (W), 2 pieces;
Hair hoop base: 370mm (L) x 7mm (W), 1 unit;
Tools required: Needle, thread, hot glue gun, and double-sided tape.
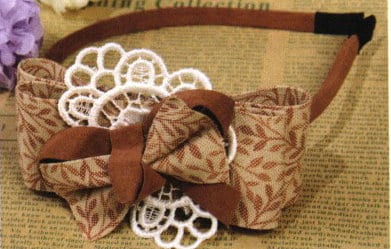
Figure 6-31 Butterfly-in-Butterfly hair clip style diagram
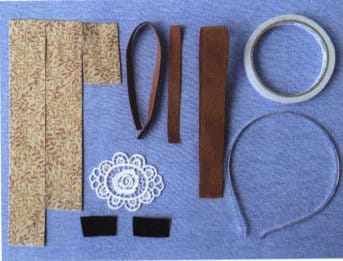
Figure 6-32 Preparation of materials for the butterfly hairpin
(4) Production Method
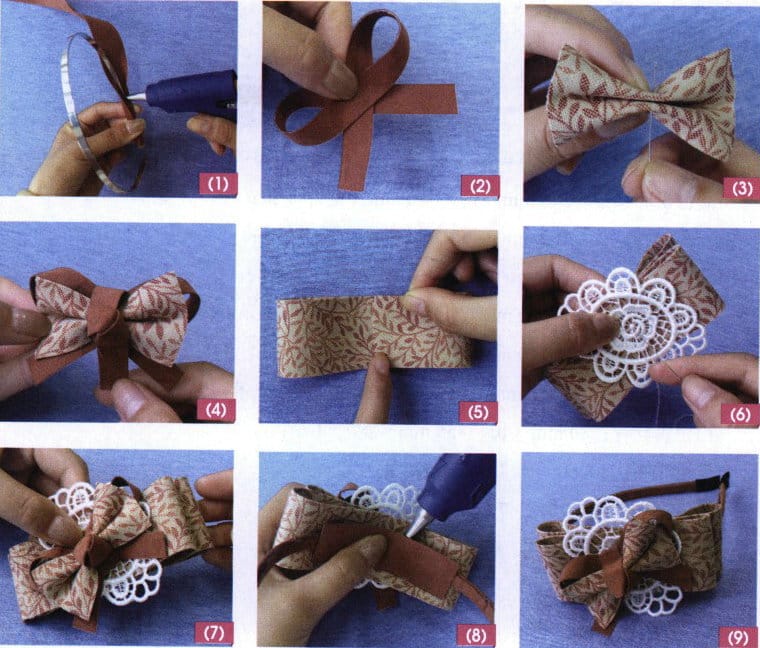
① Take a 38 cm long orange South Korean velvet ribbon to wrap around a metal hair comb, fix it with hot melt glue, and stick black tape on both ends; see Figure 6-33 (1).
② Fold a 150 mm long orange South Korean velvet ribbon into a bow and secure it with needle and thread; see Figure 6-33 (2).
③ Fold a 65 mm long orange burlap ribbon horizontally into a bow and secure it with needle and thread; see Figure 6-33 (3).
④ Stack the two completed bows and tie them together in the middle with a 12.5 mm wide South Korean velvet ribbon, see Figure 6-33 (4).
⑤ Apply double-sided tape to the center of the orange burlap ribbon that is 240mm and 200mm long, and fold it left and right to stick together, making sure not to overlap, to create one 120 mm long and one 100 mm long loop; see Figure 6-33 (5).
⑥ Place the longer folded burlap ribbon underneath and the shorter one on top, then tilt the white lace piece and use needle and thread to secure all three together, see Figure 6-33 (6).
⑦ Tilt and stick the completed double bows onto the lace flower piece; see Figure 6-33 (7).
⑧ Place the completed flower decoration on the side of the hairpin at one-third of the way, with a piece of orange South Korean fabric attached to the inner side, fixed with hot melt glue, see Figure 6-33 (8).
⑨ The completed effect is shown in Figure 6-33 (9).
2.5 Oriole’s Bloom Hairpin
(1) Style Characteristics
This hairpin is primarily made of a ribbon and a decorative flower clasp featuring milky white, pink, and light blue colors. Its shape resembles a peacock spreading its tail and also resembles a blooming flower, making it grand and eye-catching, with an irresistible allure, see Figure 6-34.
(2) Key Learning Points
Learn the design and production of decorative flowers; learn color matching; learn the techniques for making hairpins.
(3) Prepare Materials
See Figure 6-35.
Pink satin ribbon: 120mm×4mm, 7 pieces;
Light blue satin ribbon: 120mm×4mm, 7 pieces;
Milky white satin ribbon: 70mm× 3mm, 7 pieces;
Five-pointed star pearl decorative buckle: 25mm, 1 piece;
Pink non-woven fabric: 30mm, 3 pieces;
Pearls: 3 mm, 7 pieces;
Pink wheel beads: 6mm, 7 pieces;
Green wheel beads: 6mm, 7 pieces;
Teardrop-shaped pearl: 12mm×15mm, 2 pieces;
Eye pin: 3 cm, several;
Metal flower base: 4mm, 2 pieces;
Hairpin: 130 mm (length), 1 piece;
Jump ring: 4mm, 2 pieces;
Tools: glue gun, scissors, needle, thread, round-nose pliers.
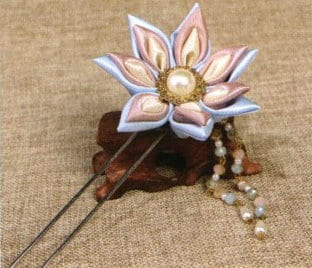
Figure 6-34 Style Diagram of the Oriole’s Bloom Hairpin
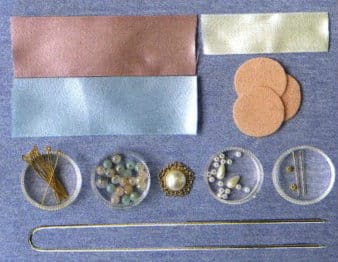
Figure 6-35 Preparation of Materials for the Oriole’s Bloom Hairpin
(4) Production Method
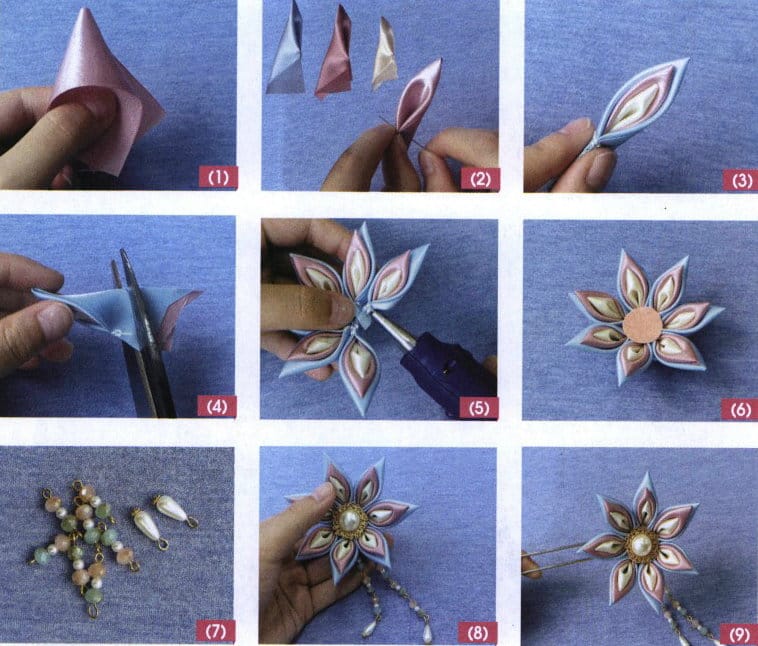
① Fold both sides of a pink satin ribbon inward to form a triangle; see Figure 6-36 (1).
② Fold the two base angles of the triangle inward and secure them with a rough stitch while making 21 strips of satin ribbon into petal shapes using this method; see Figure 6-36 (2).
③ From the outside, layer the petals in blue, pink, and white to form a large petal; see Figure 6-36 (3).
④ Then, cut diagonally 35 mm down from the tip of the petal, preventing the rough stitch from loosening during the cut. The cut section determines the height of the flower, so extra care is needed; see Figure 6-36 (4).
⑤ Use hot melt glue to attach the sides of each petal, connecting the seven petals to form a large flower; see Figure 6-36 (5).
⑥ Paste the pink non-woven fabric onto the center of the flower, which covers the underlying stitching and secures the five-pointed star pearl decoration on top; see Figure 6-36 (6).
⑦ Use a eye pin to string the green wheel beads, pearls, and pink wheel beads in that order, twisting the end into a 9 shape, for a total of 7 sets; use a head pin to string the metal flower base and teardrop-shaped pearls, twisting the end into a 9 shape, for a total of 2 sets, see Figure 6-36 (7).
⑧ Connect the threaded eye pin, attaching teardrop-shaped pearls at the end, to create two tassels of different lengths (one 90 mm, one 75 mm), connect the tops with a jump ring, and sew the jump ring to the back of the flower, see Figure 6-36 (8).
⑨ Stick the pink non-woven fabric to the back of the flower and attach another piece to the hairpin, thus sandwiching it between the two pieces of non-woven fabric.
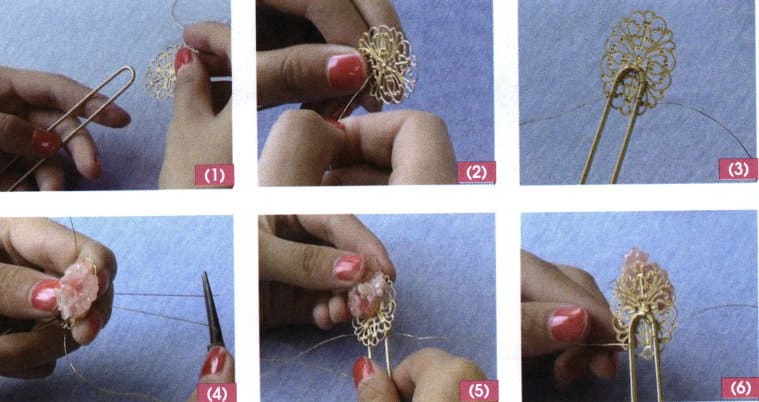
2.6 Plum-Rose Melody Hairpin
(1) Style Characteristics
This hairpin is made of pink resin flowers, with metal flower pieces as the main material, embellished with red, blue, and green beads. The shape is decorated with plum blossoms and roses, which is exquisite and chic. Loosely pull up the long hair and insert this hairpin. With an elegant long dress, the wearer can instantly become a classical beauty that will make people’s eyes shine; see Figure 6-37.
(2) Key Learning Points
Learn to use materials such as metal flowers, resin flowers, and beads to design and make hairpins; understand the ideas and methods to make hairpins exhibit a three-dimensional effect.
(3) Material Preparation
See Figure 6-38.
Pink resin flower: 25 mm (diameter), 1 piece;
Red petal: 10 mm (diameter), 1 piece;
Metal six-petal flower piece A: 25 mm (diameter), 1 piece;
Metal six-petal flower piece B: 20 mm (diameter), 1 piece;
Metal plum blossom piece C: 15 mm (diameter), 1 piece;
Metal six-petal flower piece D: 15mm (diameter), 1 piece;
Blue bead: 8 mm, 1 piece;
Green bead: pieces;
Pearl: 6 mm, 1 piece;
U-shaped hairpin: 130 mm (length), 1 piece;
Copper wire: 0.3mm×600mm
Oval metal hollow flower piece: 28 mm (length) ×25mm (width), 1 piece.
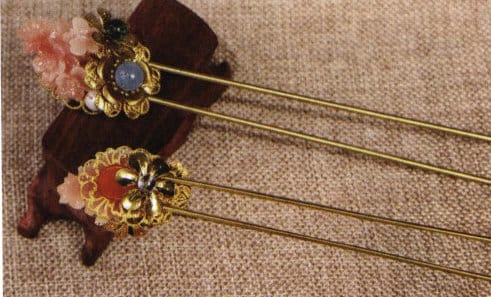
Figure 6-37 Plum-Rose Melody Hairpin Style Diagram
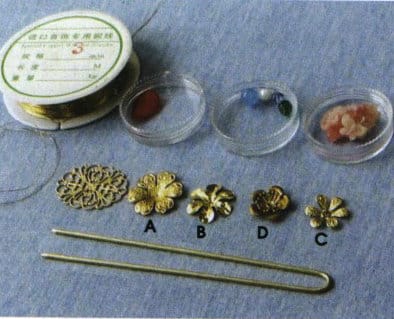
Figure 6-38 Material Preparation for Plum-Rose Melody Hairpin
(4) Production Method
① Prepare the U-shaped hairpin and the oval metal hollow flower piece; see Figure 6-39 (1).
② Take a 300 mm long copper wire and wrap the oval metal hollow flower piece (the base flower piece) around the hairpin to secure it; see Figure 6-39 (2).
③ The copper wire should be evenly wrapped at the junction of the base flower piece and the U-shaped hairpin when securing. Wrap several more turns for reinforcement, and do not cut the remaining long copper wire; see Figure 6-39 (3).
④ Then take a 150 mm long copper wire, and through the hole in the pink resin flower and the hollow of the base flower piece, wrap the pink resin flower with the copper wire to secure it to the base flower piece, see Figure 6-39 (4).
⑤ When winding, apply even force, see Figure 6-39 (5).
⑥ After securing the pink resin flower, wrap the excess copper wire around the base flower piece for about 3 turns to reinforces it; see Figure 6-39 (6).
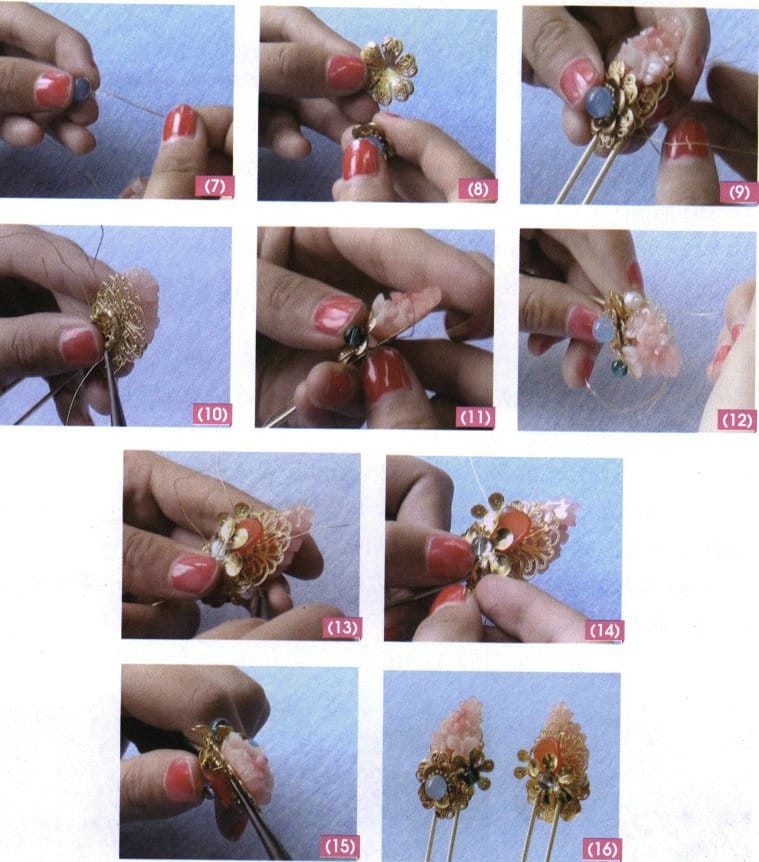
⑦ Take a blue bead and thread it with a 10 cm long copper wire, ensuring both sides of the wire are of equal length; fold it and twist it into a spiral shape to secure the blue bead; see Figure 6-39 (7).
⑧ Pass the copper wire with the blue bead through the prepared metal plum blossom piece C and the center hole of the metal six-petal flower piece A. Using two flower pieces can enhance the sense of layering, forming component A; see Figure 6-39 (8).
⑨ Fix component A onto the base flower piece; see Figure 6-39 (9).
⑩ Wrap evenly with copper wire; the wrapping on the back is shown in Figure 6-39 (10).
⑪ Take 1 green bead and pass it through a 10 cm long copper wire, ensuring both sides of the wire are of equal length. Fold and twist it into a spiral shape to secure the green bead, and fix the bead and the metal six-petal flower piece D on the right side of the hairpin body to make it fuller (see Figure 6-39 (11).
⑫ Add 1 pearl in the gap on the left side of the hairpin to enhance its completeness; see Figure 6-39 (12).
⑬ Fix the green beads, the metal six-petal flower piece B, and the red petals on the back of the hairpin. This step can refer to steps (7) and (8), serving to cover the copper wire and enhance aesthetics, see Figure 6-39 (13).
⑭ The copper wire should pass through the base flower piece and then back through, pressing over the metal six-petal flower piece B, repeatedly going back through to secure the six-petal flower piece B and the red petals; see Figure 6-39 (14).
⑮ Hide the excess copper wire ends by wrapping them around the base flower piece three times for reinforcement, then cut off the excess wire and tidy it up; see Figure 6-39 (15).
⑯ The final effect of the hairpin is shown in Figure 6-39 (16).
