
Summer Jungle, Pure silver 999, Engraved


1. Design transfer: After designing the pattern, we need to transfer it onto the metal; for flatter metal pieces, we generally use tracing paper to draw or directly draw the pattern and then stick it onto the metal piece with paste.

2. Use a chisel and hammer to locate the drilling position.

3. Use a hanging grinder drill burs to make the hole.

4. Hollow out: Insert the jigsaw blade through the hole and install it, then cut out the shape from the inside.

5. After annealing, use a wooden stick to shape the hollowed part into an arch.

6. Fill in the enamel.

7. Please place it in the enameling furnace and fire it for about 1 minute in an environment of approximately 750℃.

8. Different colors of enamel can be added and fired multiple times according to the color of the pomegranate.

9. The air-dried pomegranate is now complete.


1. Materials needed: 925 silver sheets, silver wire, baroque pearls.

2. Cutting the board, size is 5 cm x 1.4 cm.

3. Annealing the silver piece.

1. Use flat-nose pliers to symmetrically bend the metal sheet at both ends 90°Bend.

2. Zegnij oba końce w zamknięte półkole.

3. Coat the joints with borax.

4. Cut a suitable amount of soldering flux and place it on the welded part.

5. Welding with a welding gun to melt the solder.

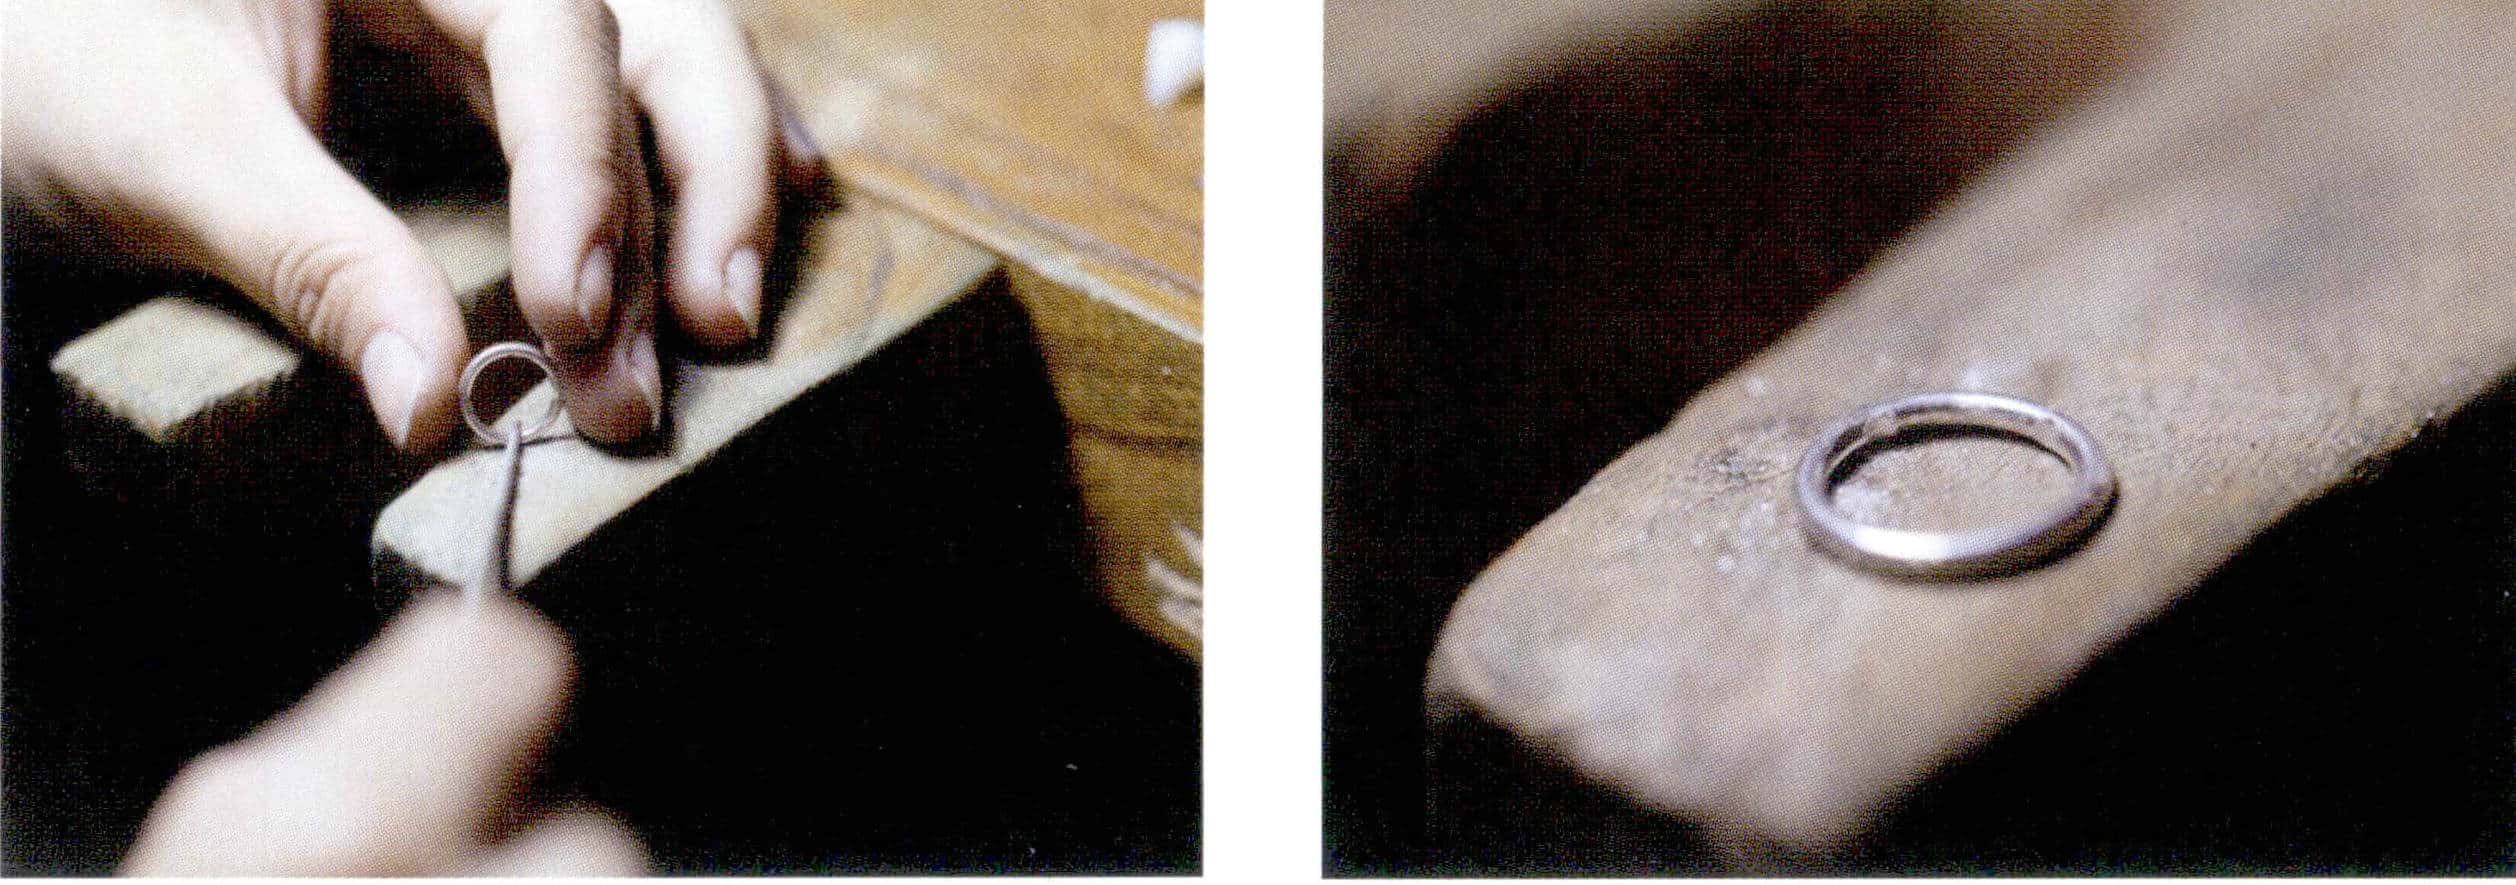
1. Shape it with a ring stick and wooden mallet after welding is complete.

2. Use a caliper to evenly divide and position the metal ring.

3. Cut the metal ring evenly to prepare for making a pair of symmetrical earrings.

1. Measure the corresponding U-shaped structure length of the claw setting base according to the size of the diamond-shaped pearl; a 0.8 mm diameter metal wire can be used to make the U-shaped structure, and a 1 mm diameter metal wire can be used to make a ring.

2. Use a round file to grind a slot below the bottom of a u shape for welding.
3. Grind grooves at the average 4-point position on the inner side of the ring with a round file for welding.

1. First, weld the two U-shaped metal wires.

2. Then, weld the ring onto the welded-shaped metal.

3. Finally, the finished claw setting will be welded to the ring, and the ear pin will be welded to the back side of the ring.

1. The metal setting is pickled, polished, and securely installed with diamond-shaped pearls.

2. Completed.

Filling the interior of metal vessels with lead

Choose the appropriate chisel

Hammering the uneven texture with a hammer and chisel

Directly hammering the hammered texture

Changing the shape of the metal can with a hammer

Trimming the edge of the metal bowl

The metal must be annealed before each imprint operation.

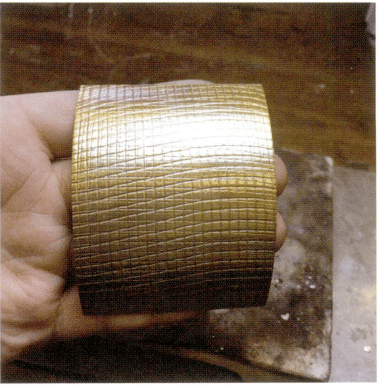
Large copper mesh imprinting effect
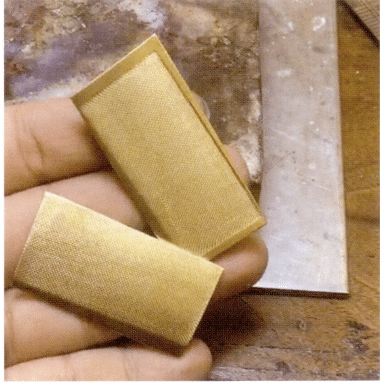
Fine wire copper mesh imprinting effect
Multiple copper mesh imprinting effect

Xiebai, diamond-patterned chocolate, earring series, brass, baroque pearls

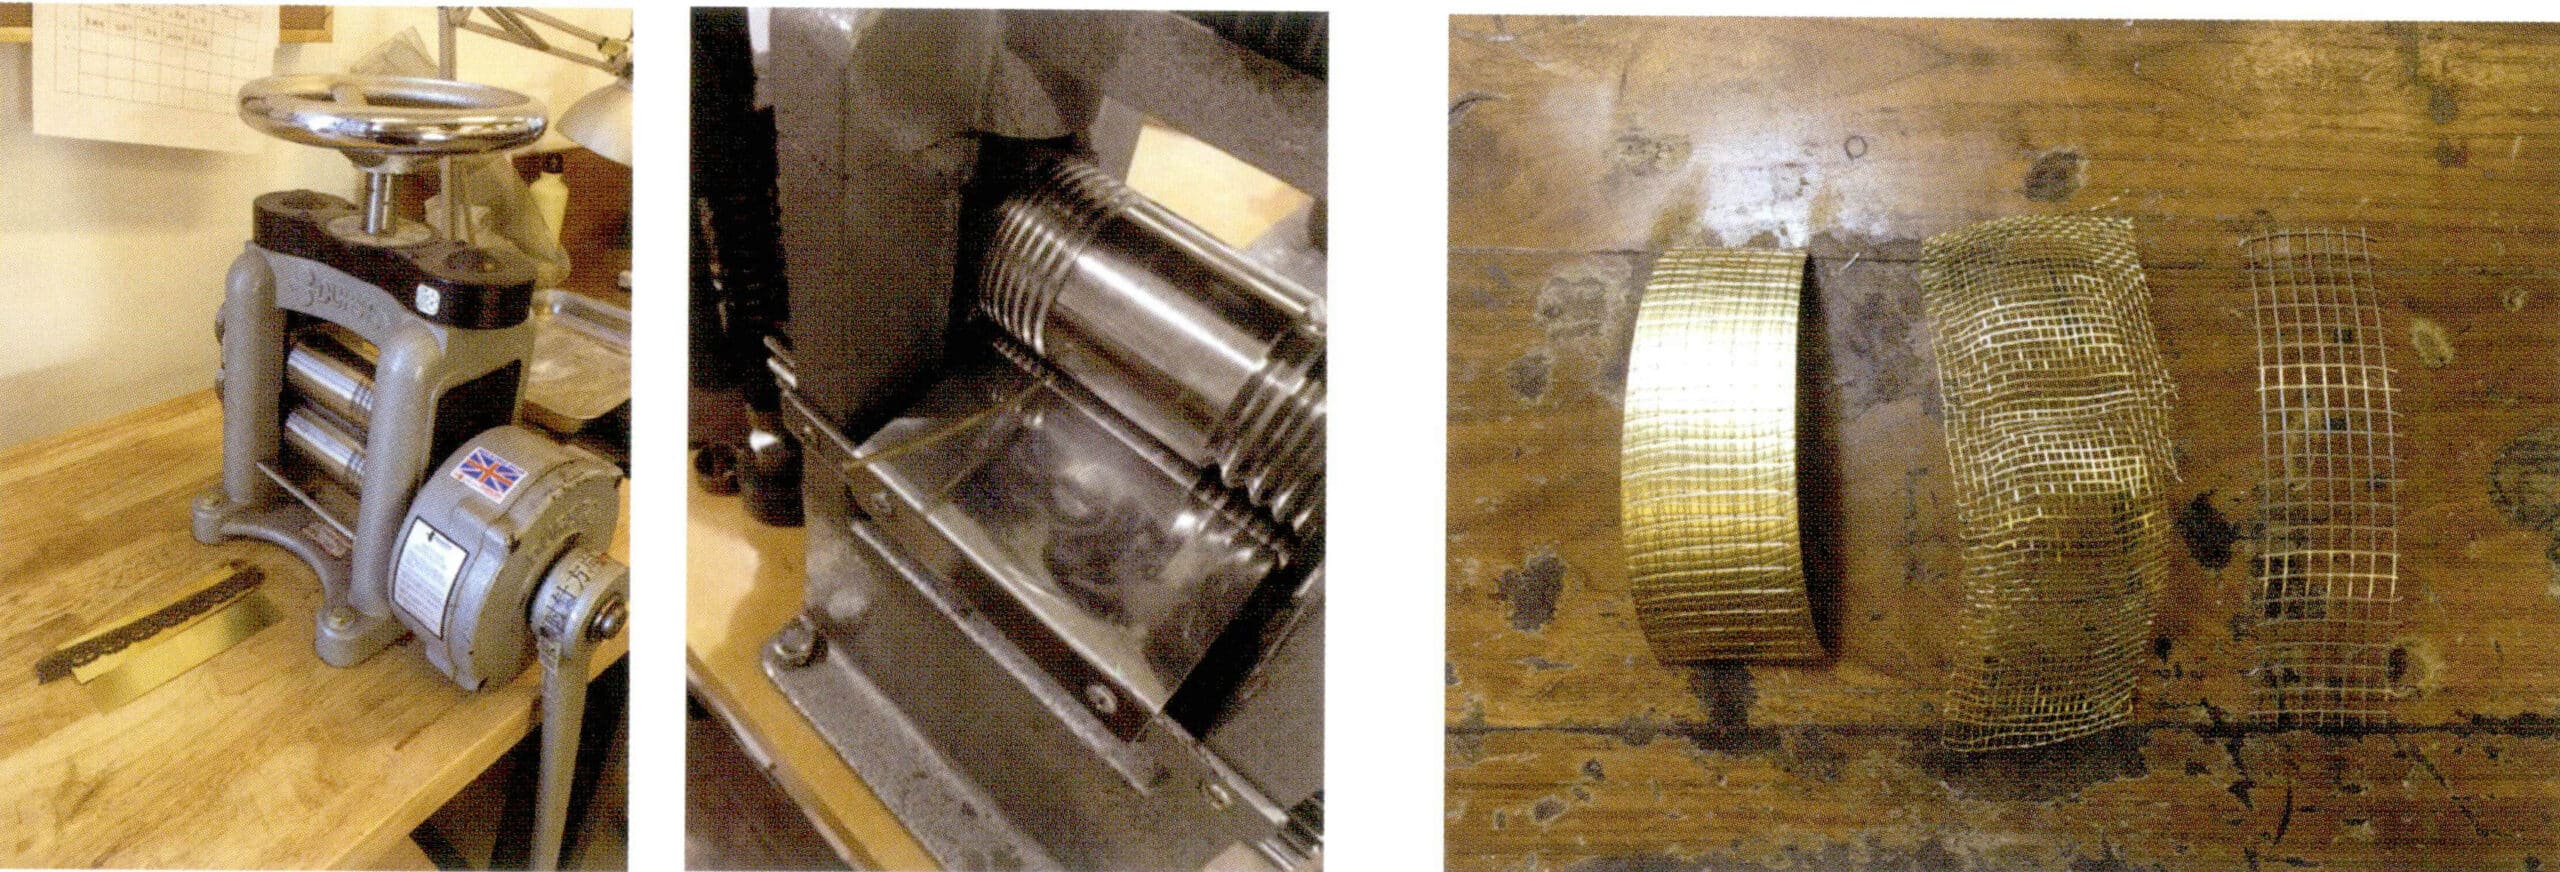
1. Place the annealed brass sheet and copper mesh into the press machine for texture creation, cut the patterned metal sheets as needed, and weld the brass pins.

2. Acid washing followed by polishing and grinding.

3. Secure the pearls firmly with 502 glue.

4. Completion of production.

Xiebai, pansy, brooch, purple copper, brass, baroque pearl

1. Using dome craft to hammer the prepared textured metal piece into a 1/4 arc before welding.

2. Polishing after acid washing , if you want the metal gloss to have a sense of layering, you can use an agate burnisher knife to burnish the protruding metal parts.

The production of metal brooches is divided into two types: one is the 9-type safety pin, and the other is the spring pin

Cold Mountain 1, earrings, brass

Effect after polishing and grinding

Rich textures require multiple pressings to form

Natural drying

Cold Mountain 2, earrings, brass, Baroque pearls

Xiebai, wrinkling technique jewelry series, Flowing Golden Years, brass, Baroque pearls

Xiebai, Wrinkling Technique Jewelry Series, fluid in liquid, brass, baroque pearls

Xiebai, Dream's Wind Sail Earrings, Brass, Baroque Pearls

1. Heat the cut brass metal pieces using a large and soft flame to heat all around. Once the brass gradually turns red, adjust the flame to a hard fire for localized heating, allowing that area to gradually reach a melting effect, adjusting the heating area as needed.

2. After the wrinkling is complete, quench the brass piece, then place it in alum water for heating and cleaning.

3. After rinsing with clean water and drying, choose suitable polishing tools for grinding and polishing, such as a hanging grinder copper brush, magnetic tumbler, or agate burnisher knife. The texture of works made with the wrinkling technique strongly describes layering.

4. After polishing, perform ultrasonic cleaning, and finally attach the pearls, completing the production; this pair of earrings can be made into studs or clips as needed.

Xiebai, Eternal Time Earrings, brass, baroque pearls

1. Heat the metal with fire to complete the wrinkling, and wait for the red color of the metal to fade before proceeding with quenching and alum cleaning.

2. Weld the pearl and ear needles onto the metal that has completed the wrinkling.

3. After cleaning, polishing, and inlaying pearls, the production is complete.

Xiebai, gold pod earrings, brass, baroque pearls

1. Take a 0.5 mm thick brass sheet, anneal it, and bend it into a pod shape.

2. Use the wrinkling technique to melt the metal edge for a naturally flowing effect, and after acid washing, use a file to smooth the rough edges.

3. After polishing in a magnetic tumbler, fix the ear hooks into the metal gaps.

4. Leave an appropriate space to insert three baroque pearls, and use pliers to clamp and secure them. Use an agate burnisher knife to burnisher the protruding part of the pod to the desired height, completing the process.

Xiebai, golden bamboo shoot pendant, brass

1. After annealing the brass sheet, use a hammer, a pit iron, and an iron rod to shape it into an arc.

2. Use a marker to outline the general shape of the bamboo shoot, and cut out the outline with scissors.

3. Use a file to slightly trim the metal edge burrs, and bend one side of the pointed part with pliers to create a necklace hole.

4. Use the wrinkling technique to achieve the desired effect.

5. Polish after cleaning with alum.

6. The golden bamboo shoot pendant is now complete.

Xiebai, Ancient and Modern Coin Pendant, Brass


Museum Fantasy Night series jewelry, brass, vintage doll wood pieces, baroque pearls, ceramics, sea bamboo coral, etc.

1. Cut the brass pieces according to the size of the wood pieces, and use pliers to create a relaxed silhouette shape.

2. Use the burning and wrinkling technique to melt the edges of the copper sheet, creating a natural flowing frame effect; clean with alum and then polish the metal in a magnetic tumbler.

3. Soak the metal in the antiquing solution for about 5 minutes (Note: specific duration should refer to the instructions of each brand's aging solution).

4. Remove the metal for natural air drying, and finally, use a hanging grinder, a copper wire brush, and a fine sandpaper roll to perform localized polishing, giving the metal a vintage effect with a dark sheen. Manual polishing can be done with the finest polishing sponge stick/block if a smoother touch is desired.

5. Drill holes near the metal edge, install accessories such as pearls and sea bamboo coral, and secure the Vintage doll wooden pieces with metal AB glue, completing the production.

Illustration of the process of making wave earrings.

Xiebai, the Worry-relieving Powder series jewelry, brass, vintage medicine bottle wood pieces, sea bamboo coral, shell pearl

Illustration of the Worry-relieving Powder earring-making process

Metal antiquing process earrings

Engraving Workshop (Yunnan)

Silver material with a silver content of 990‰ or higher

Ołówek

Sealing wax ball

Rosin board

All kinds of hammers
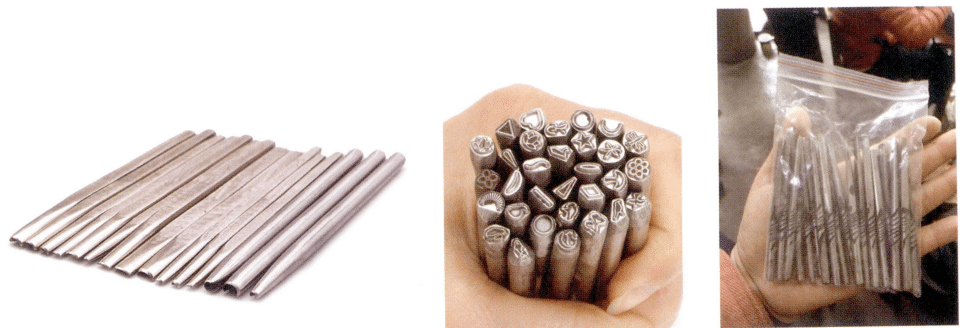
All kinds of chisels

All kinds of iron hooks

Other tools and materials

Xiebai, Fantasy Fungus, Purple Copper, Engraving

1. Shears Cutting Purple Copper Plate.

2. Annealing and leveling metal.

3. Use an oil-based marker to draw the engraving sketch.
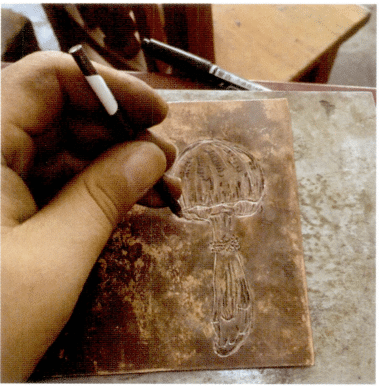
4. Tap the line grooves along the pattern with the alignment chisel and chisel hammer, and trace the lines with the chisel as if drawing a picture.
5. Pay attention to engraving for a period of time. It should be annealed to avoid metal hardening and brittleness.

6. Replace different patterned chisels to further enrich the design.

7. After polishing, please place it in an ultrasonic tumbler for cleaning, which completes the production.
Xiebai, Summer Jungle, Pure silver 999, Engraved

1. Prepare pure silver 999 plate and anneal it.

2. Sketch the pattern with a pencil on a silver plate.

3. Sketch the pattern outline on the silver plate with alignment chisel and chisel hammer.

4. Deepen the alignment engraving.

5. Use a wooden paddle or a round-headed hammer to tap out a semicircle on the back of the silver plate, placing a lead block underneath to avoid damaging the silver plate.

6. After completing the semicircular arc, select a smaller hammer to perform local concave and convex shapes, allowing the cactus pattern to rhythmically present a concave and convex effect from the front.

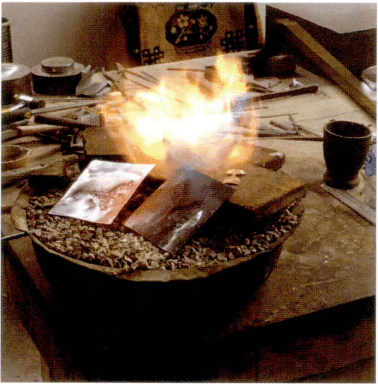
7. Protect the silver plate by wrapping it in lime water.

8. Heating the silver plate wrapped in lime water with a blowtorch can quickly dry the lime water and also anneal the silver plate.

9. The fire melted the lead.

10. Dig out appropriately sized squares of sand. first, place the silver sheet into the sand pit with the front facing the sand, then pour melted lead into the silver sheet and the sand pit. After it solidifies and cools down, the embedded silver sheet can be removed.

11. Use a marker to clearly outline the pattern, use a lead block as a base, and carve with different chisels with a hammer.

12. After the engraving is completed, remove the silver piece and use a copper wire brush to remove the attached lime powder on the surface.

13. The spiny part of the cactus must be engraved from the back of the silver piece. Heat and melt the rosin pot, then place the silver piece in the pot to secure it.

14. After the engraving is completed from the back, melt the rosin and remove the silver piece.

15. After cleaning and polishing, the curved surface engraving work is completed.

16. This method can create a series of curved surface engraving works.

Xiebai, Dance of the Waves, Ocean Jade, Pure Silver 999 , Engraved

1. Stick the drawn sketch onto the annealed pure silver 999 plate with milky glue or paste.

2. Use a line chisel and hammer for edge chiseling.

3. Perform annealing, burn the paper, and clean the surface with a copper wire brush.

4. Re-anneal.

5. Melt the rosin pot and place the silver sheet face up in the rosin pot to secure it.

6. After knocking out the insect wings and flower parts, remove the silver plate, secure the back with rosin, face up, and knock out the grooves for the gemstone inlay.

7. Shape the silver sheet into a circle, tightly wrap it with steel wire, and place it into a paste-like solder for welding, turning it into a cylindrical.

8. After soaking in lime water, pour lead into the silver cylinder.

9. Use the lead block as a base for detailed engraving.

10. Umieść go w kamieniu szlachetnym, nadając mu kształt.

11. Use a flat-head chisel to create a subtle hammer texture on the main part of the bracelet, then use a fine chisel to engrave the name and date.

12. After the engraving, the lead is melted away, and the silver bracelet is removed. At this point, some lead marks may be left on the silver bracelet, which can be soaked in dilute nitric acid and washed clean with water. Cut off the excess silver, and finally polish and buff it; the bracelet is finished.

The engraved necklace worn by Zhou Xun's character in the movie "The Poetry Eye Weary of the Horizon," made of 999 sterling silver, natural gemstones, and plated with pure gold

Enamel glaze

Color samples of enamel glaze after firing

1. Bend the four corners of the copper plate to form a tabletop, and prepare the pattern and tweezers.

2. Use tweezers to create a lotus pattern with copper wire, dip it in white glue, and stick it to the copper plate.

3. Evenly sprinkle welding powder.

4. Heat the lotus part with a blowtorch to weld the copper wire onto the plate.

5. Perform acid washing to clean the dirt attached to the surface.

6. First, fill the lotus pattern with white copper glaze as a base.
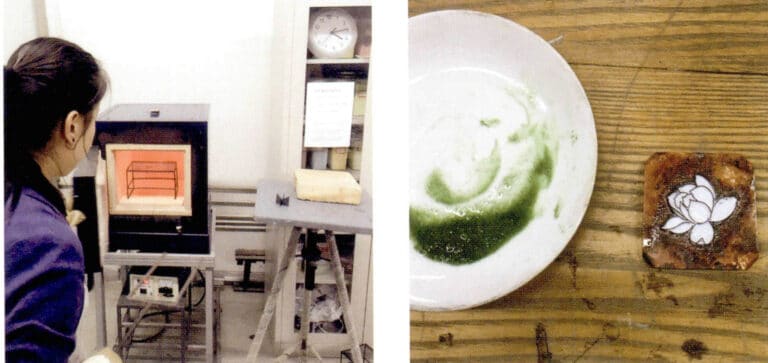
7. Place it in the electric furnace and fire for 1 minute under approximately 800℃ conditions.

8. Remove the lotus with the white glaze, add green, yellow, and other transitional glazes, and fire repeatedly.

9. The gradient wire-inlaid enamel lotus is now complete.

Xiebai, Martial Arts Dream, Pencil Drawing Enamel Craft

1. Add finely ground white glaze to clean water and evenly apply it to the copper sheet.

2. Place the dried white glaze into a basket and evenly sprinkle it onto the moist copper sheet.

3. Put it into the electric furnace for heating.

4. The white base glaze must be fired multiple times to achieve an even state.

5. After each firing, the surface of the glaze must be polished flat with a diamond sanding file, and then the white glaze is sprinkled on again for firing.

6. Once the white glaze base is fired and polished to a matte finish, patterns can be drawn using a 2B or a 4B pencil; since the pencil color will slightly fade during the firing process, we can deepen the color appropriately while painting.

7. Please place it in the electric kiln for about 1 minute; firing too long will cause the color to fade excessively.

8. Sometimes, unexpected effects may occur during the making process, such as the back of the metal showing colorful retro hues.

Completed pencil drawing enamel work

9. The same method can create a series of pencil drawing enamel works.

Metamorphosis Series #6, Necklace, Silver filament, Glass

Harvest Brooch, 18K gold, Diamonds, Filament, Casting, Inlay Craftsmanship

Picking Up Fun, Headwear, Silver Filament

Sea Breeze, Earrings, Filigree Craft

0.3 mm Silver Wire

1. Preparation tools and materials: tweezers, scissors, solder, soldering gun, soldering bricks, pure silver 999 wire.

2. After overlapping 0.3 mm silver wire, twist it into a spiral shape; then use a wooden board to tighten the spiral wire.

3. Annealing

4. The plain wire frame after annealing.

5. Complete the shaping of the water droplet-shaped frame.

6. Weld the frame.

7. Fill in filament, the filling filament is slightly thinner than the filament at the border.

8. Adjust the overall shape.

9. Complete the wire twisting and prepare for welding.

10. Heat the borax water.

11. Coat the filament completely with borax water.

12. Evenly sprinkle the welding flux.

13. Overall welding.

14. Weld the lifting ring.

15. Making ear hooks.

16. Welding ear hooks.

17. Pickling

18. Cleaning earrings with a copper wire brush.

19. Completed flat filament earrings.

20. Use the ring stick to rotate and adjust the shape, creating a three-dimensional effect.

21. Clean with a magnetic tumbler (only suitable for tightly structured and securely welded filament works).

22. Carefully Cleaning.

23. Completed.

Metamorphosis Series #1, Necklace, Silver filament


