How to DIY Beads Jewelry?
Master Beading Techniques: From Basic to Advanced for Jewelry Creators
Introduction :
This document provides a comprehensive guide to basic beading techniques. It covers essential methods for threading beads using fishing line, beading cord, and elastic cord. Additionally, it offers detailed instructions on how to use metal accessories such as head pins, eye pins, positioning beads, bead tips, and jump rings. Whether you are a jewelry store owner, jewelry designer, or an e-commerce seller, this guide will help you master the fundamental techniques to create beautiful and durable beaded jewelry.
Single threading
Table des matières
Section I Fishing Line Beading Technique
1. Single Threading
The single threading method, also known as the adding bead method, directly threads the fishing line through the bead hole. It is the simplest and most basic beading method for adding beads. Note that the bead hole size should match the thickness of the line; if the line is too thin, the beads will be unstable, and if the line is too thick, threading will not be smooth.
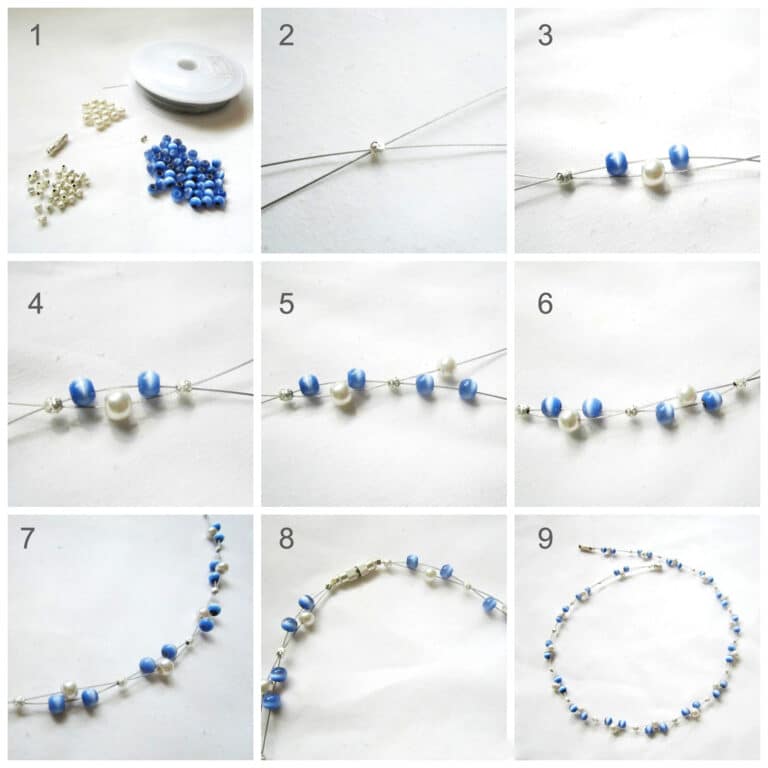
(1) Thread the fishing line through the bead hole, see Figure 3-1 (1).
(2) Pass the fishing line through the bead hole and repeat until the desired length is reached; see Figure 3-1 (2).
(3) The effect of multiple beads strung together is shown in Figure 3-1(3).

2. Cross Threading
The cross threading method refers to the two strands of thread entering the same bead hole from two directions, often used to complete one unit and start the next unit.
(1) The right thread comes out from the left side of the bead hole, and the left thread comes out from the right side of the bead hole; see Figure 3-2 (1).
(2) Forming a cross shape on both sides of the bead hole, see Figure 3-2 (2).
(3) Pull the left and right fishing lines tight; see Figure 3-2 (3).

3. Reverse Threading
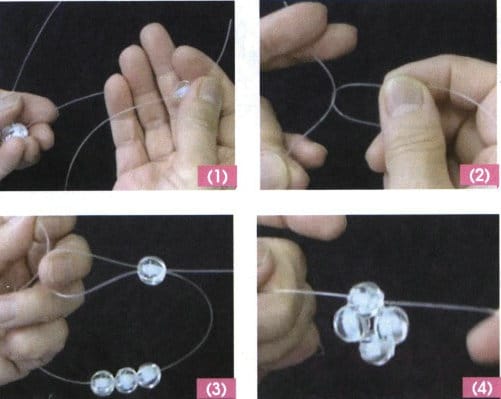
Back threading, also known as backstitch threading, refers to forming an interlocking cross of left and right threads within the bead hole, implying that it is caught in the bead hole and used to reinforce the stability of the beads.
(1) Thread a bead onto the right line, see Figure 3-3 (1).
(2) After wrapping the left line, return to the same bead hole; see Figure 3-3 (2).
(3) Note to use the left hand to hook the return thread loop, gradually tighten the fishing line, and pull the knot into the bead’s hole; see Figure 3-3 (3).
(4) The effect after reverse threading is, on the surface, no different from cross threading method normally, but in reality, the beads are much more stable due to being “stuck,” as seen in Figure 3-3 (4).
4. Forward Threading
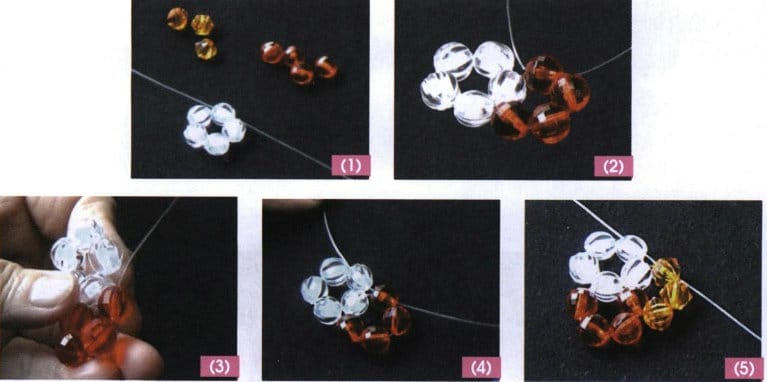
The forward threading involves threading the fishing line through the bead twice, making beads the medium, or connecting the upper and lower parts. The beads threaded in this way are both members of the original unit and members of the new unit. Taking the five-petal flower bead as an example, steps (1) and (2) are fundamental.
(1) Make a five-petal flower bead: Use a five-petal flower bead as base (white beads); see Figure 3-4 (1).
(2) Formation of the second five-petal flower bead: Single threading the right line through 3 red beads, then cross threading 1 red bead, see Figure 3-4 (2).
(3) Preparation for forward threading: To form the third five-petal flower bead, it is necessary to start forward threading beads at this time, preparing the left line of the red beads, see Figure 3-4(3).
(4) Forward threading: The left threads forward one base white bead, which is then threaded through the bead a second time with the fishing line, aiming to use it to form a new petal. There are already two beads between the left and right threads; see Figure 3-4 (4).
(5) Formation of the third five-petal flower bead: Thread straight the right line through 2 yellow beads, then cross thread 1 yellow bead to form the third five-petal flower bead. If continuing to start the next flower, it is also necessary to add one white bead, and so on; see Figure 3-4 (5).
5. Bead Return Threading
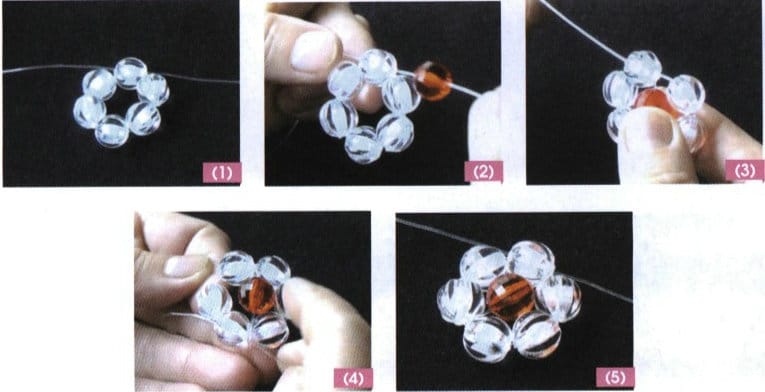
The bead return method refers to designing crossed beads at the center of petals or flower shapes, resembling the effect of flower cores, to enhance decoration and aesthetics. Below, the return bead of a six-petal flower bead is used as an example for bead return method.
(1) Make a six-petal flower bead: Straight thread 5 beads alone, then cross thread one bead through, which forms a six-petal flower base; see Figure 3-5 (1).
(2) String the center bead: the right thread strings one red bead as the center bead A; see Figure 3-5 (2).
(3) Place the center bead: Place bead A at the center intersection, making sure to determine the direction of the intersection with the left line; see Figure 3-5(3).
(4) Forward threading: The right thread passes through 3 white beads in a crossing direction; see Figure 3-5 (4).
(5) Forming effect: After the return bead, the red bead fills the gap in the center of the six-petal flower bead. Due to its protrusion, it has a three-dimensional effect; see Figure 3-5 (5).
6. Single-Line Bead Addition
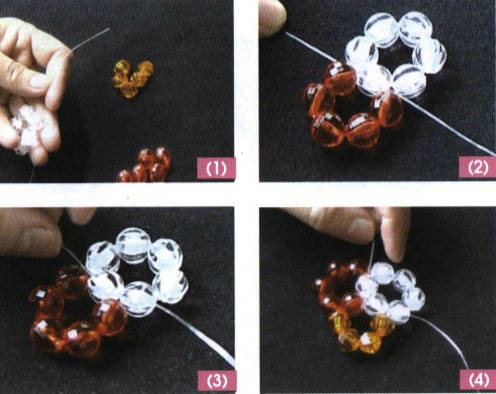
Since it is a thread with bead addition, it can only be added in one direction, so it often requires a method of adding beads to achieve the goal. The following uses six-petal flower beads as an example for explanation.
(1) Make a six-petal flower bead: Using a six-petal flower bead as the base, the right bead addition method is used, so the length of the left line can be reserved shorter; see Figure 3-6 (1).
(2) Adding beads: Thread 5 red beads onto the right line, then add one white bead, forming the second six-petal flower bead; see Figure 3-6 (2).
(3) Forward threading: Thread 1 white bead onto the right wire; see Figure 3-6 (3).
(4) Forming effect: Adding four yellow beads to the existing white bead and one red bead forms the third six-petal flower beads; see Figure 3-6(4).
7. Double-Line Bead Addition
Double-line bead addition is relatively simple; both threads can pass through the beads simultaneously. Below, the four-petal flower bead will be used as an example for explanation.
(1) Make a four-petal flower bead: Use a four-petal flower bead as the base; see Figure 3-7 (1).
(2) Adding beads: Thread 1 bead onto each left and right line; see Figure 3-7 (2).
(3) Cross threading: The beads added for fixation must be threaded cross; see Figure 3-7 (3).

8. Knotting Method
After completing the beading process, it is necessary to tie a knot to secure the thread at the end.
(1) The left line is on top, and the right line is on the bottom; after crossing, the right line wraps around the left line, pulling the left and right lines tight, see Figure 3-8 (1).
(2) The directions are exactly opposite, with the right line on top and the left line on the bottom crossing over, then the left line wraps around the right line, see Figure 3-8 (2).
(3) Tighten the left and right lines. If reinforcement is needed, you can repeat the above action; see Figure 3-8 (3).

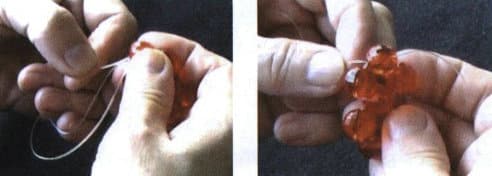
9. Knot Hiding Method
(1) After tying the knot, take one of the threads and pass it through a nearby bead hole; see Figure 3-9 (1).
(2) Pull the line tight and bring the knot into the hole of the bead, hiding the knot to make the surface smooth and tidy; see Figure 3-9 (2).
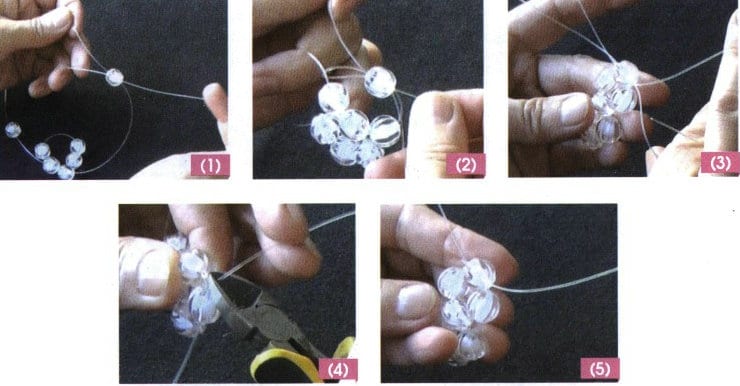
10. Single Bead Line Joining
During the beading process, there are times when the fishing line is not long enough, and if an additional fishing line is needed, the splicing method is used. Since the splicing process is completed within a single bead, it is called the single bead line joining.
(1) Adding a new line: Thread a new line through a bead that has an old line; see Figure 3-10 (1).
(2) Reverse threading the old line: Re-thread the old line through the bead (that is, the right line wraps around the left line and then returns to the bead hole); see Figure 3-10 (2).
(3) Alternation of old and new: Two old threads and one new thread are simultaneously threaded through the same bead hole; see Figure 3-10 (3).
(4) Cutting: Use pliers to cut two old wires; see Figure 3-10 (4).
(5) Completion: The new line has officially become a part of the line; see Figure 3-10 (5).
11. Multi-Bead Line Joining
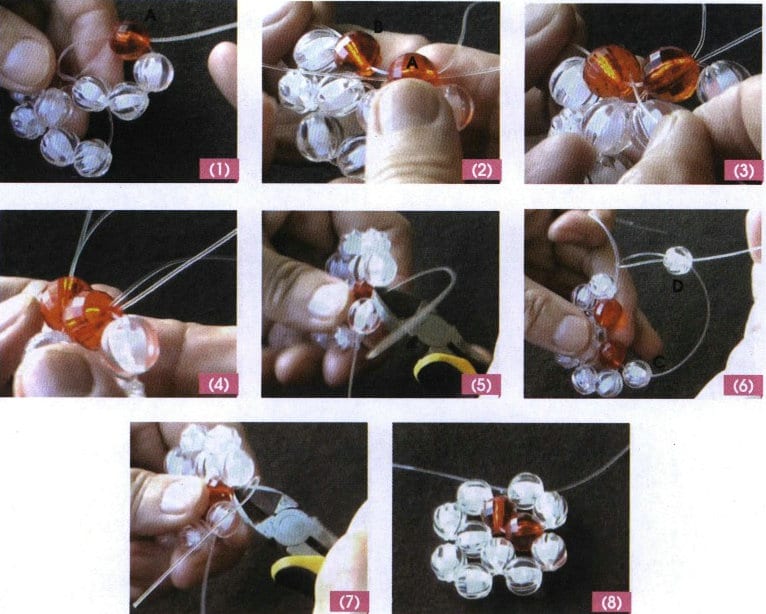
The multi-bead line joining method completes the wiring within multiple beads to make the old wire less likely to loosen, ensuring that the new wire is securely and naturally connected and that the appearance is neat without visible joints. Below, a four-petal flower bead is used as an example for illustration.
(1) Start the re-threading from the last red bead A of the four-petal flower bead in the three units. After tightening the re-threading, the old thread will be trapped inside bead A; see Figure 3-11 (1).
(2) Add a new line to bead A while passing through bead B; see Figure 3-11 (2).
(3) Thread the old line on the left side of bead A through B; see Figure 3-11 (3).
(4) At this time, you will see A and B beads simultaneously threaded onto a new line and an old line; see Figure 3-11 (4).
(5) For convenience, the old thread next to bead A can be cut first; see Figure 3-11 (5).
(6) Straight thread 2 white beads C and D and two red beads A and B to form a new four-petal flower bead. The new thread passing through the last white bead D, also wraps around the two threads of bead B and goes back through the white bead, see Figure 3-11 (6).
(7) After tightening, cut off the other old thread, and the thread will be tightly stuck in the hole of the white bead D, see Figure 3-11 (7).
(8) The line joining is complete; see Figure 3-11 (8).
12. Bead-weaving Flat Stitch
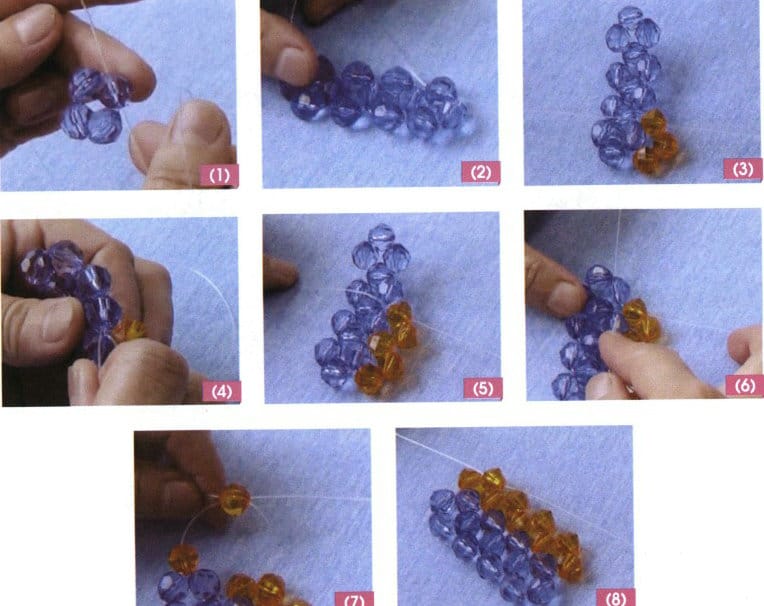
The bead-weaving flat stitch method arranges beads into a flat shape, and this form of beading differs mainly in the way it is threaded at the corners. The following uses the arrangement of a four-petal flower bead as an example for explanation.
(1) Start stringing beads based on the four-petal flower bead; see Figure 3-12 (1).
(2) Thread to the required length; the last group consists of threading sriaght two beads with the right line and then thread cross through 1 bead so that the positions of the left and right fishing lines move to one side; see Figure 3-12 (2).
(3) Thread straight 3 beads onto the right line and pass the last bead through the opposite way; see Figure 3-12 (3).
(4) Thread forward the left line through 1 blue bead, see Figure 3-12 (4).
(5) The right thread straight through 2 beads, and the last bead is threaded through from both sides; see Figure 3-12 (5).
(6) Use this method to the edge of this line; see Figure 3-12 (6).
(7) After thread forward 1 blue bead with the left thread, thread straight two beads, and finally thread 1 bead from both sides, see Figure 3-12 (7).
(8) To turn the left and right fishing lines to the side, you can start a new row of beading; see Figure 3-12 (8).
13. Four-Sided Spherical Beading
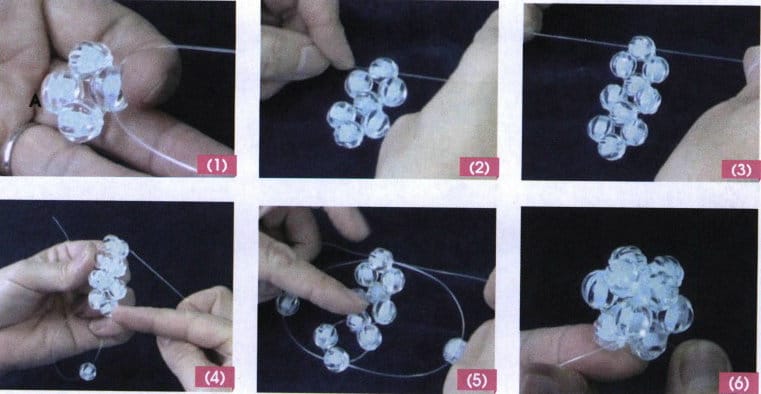
The four-sided spherical beading is a shape that looks like a four-petal flower bead from all four sides, and its overall shape resembles a sphere. Hence, it is called a four-sided spherical shape, consisting of 12 beads.
(1) Single thread 4 beads, with the last bead passing through from the opposite direction, forming the first four-petal flower bead, and the bead corresponding to the cross-threading bead is designated as bead A, see Figure 3-13 (1).
(2) Thread one bead on each left and right line, then thread one through from the opposite direction to form the second four-petal flower bead, as shown in Figure 3-13 (2).
(3) Repeat step (2) to form the third four-petal flower bead; see Figure 3-13 (3).
(4) Continue to thread one bead on each left and right line, then find the A bead of the first four-petal flower bead A; see Figure 3-13 (4).
(5) Cross thread bead A, see Figure 3-13 (5).
(6) Tighten the fishing line to form a four-sided sphere; see Figure 3-13 (6).
14. Beaded Sphere Beading
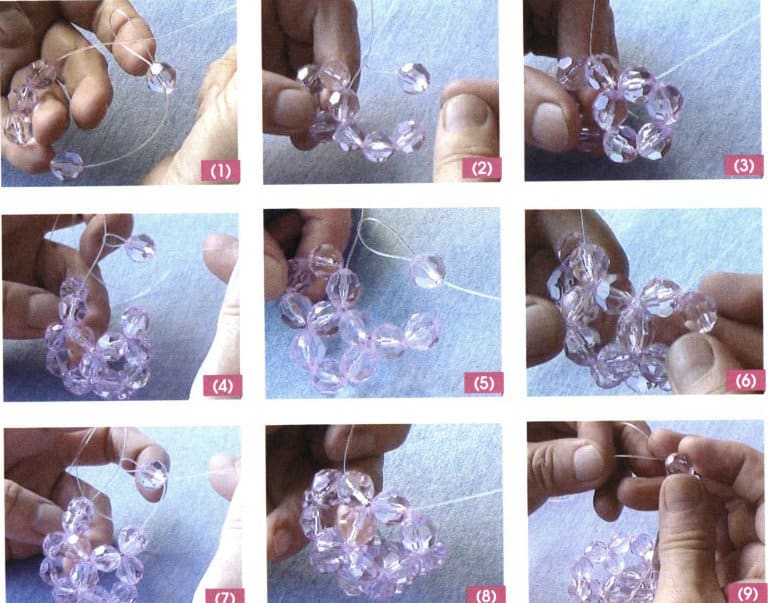
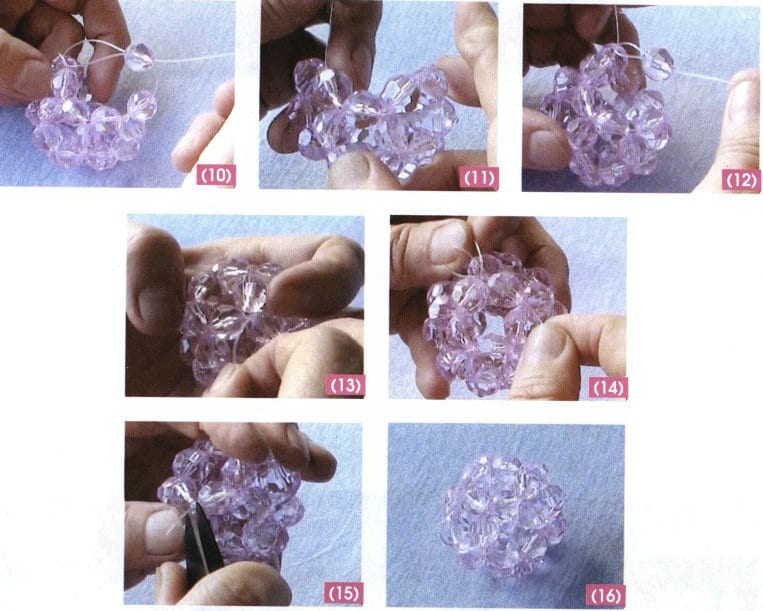
The beaded sphere beading is a typical five-petal flower bead structure widely used and can be extended to lanterns, earrings, pendants, and other ornaments. Four layers of beads need to be strung, with the first and fourth layers each having one five-petal flower bead and the second and third layers having five five-petal flower beads, requiring 30 beads.
(1) First layer base: String 5 beads, with the last bead threading through from the opposite direction, forming the five-petal flower bead of the first layer; see Figure 3-14 (1).
(2) Second layer spherical forming: In the first five-petal flower bead, the right thread thread through 4 beads, with the last bead cross threading or reverse threading through; see Figure 3-14 (2).
(3) The second five-petal flower bead: the left thread forward through 1 bead, see Figure 3-14 (3).
(4) The right thread passes through 3 beads, and the last bead is threaded through from both sides; see Figure 3-14 (4).
(5) Third and the fourth five-petal flower beads: Repeat steps (3) and (4) twice, see Figure 3-14 (5).
(6) Fifth five-petal flower bead: Thread the left line through 2 beads, see Figure 3-14 (6).
(7) The right thread threads 2 beads, and the last bead is threaded from both sides; see Figure 3-14 (7).
(8) Second layer finishing: Thread the left line through 1 bead and pull the fishing line tight to form a half-spherical shape; see Figure 3-14 (8).
(9) Third layer spherical contraction: The number of beads passed through increases while the number of added beads decreases. The first five-petal flower bead: The right thread passes through 2 beads, and finally, one bead is passed through oppositely, forming the first five-petal flower bead, see Figure 3-14 (9).
(10) The second five-petal flower bead: the left thread passes through 2 beads, the right thread passes through 2 beads individually, with the last bead passing through both sides; see Figure 3-14 (10).
(11) Third, the four five-petal flower beads: repeat step (9) twice; see Figure 3-14 (11).
(12) Three-layer finishing: After the left thread passes through 3 beads, pass through 1 bead again to form the fifth five-petal flower bead; see Figure 3-14 (12).
(13) Fourth layer fixing: After threading the top 5 beads again, secure them; see Figure 3-14 (13).
(14) Sealing: The fishing line is threaded through reversely and hidden inside the beads; see Figure 3-14 (14).
(15) Organize: Cut off the excess thread, see Figure 3-14 (15).
(16) Effect: Forming a complete spherical shape, see Figure 3-14 (16).
Copywrite @ Sobling.Jewelry - Fabricant de bijoux sur mesure, usine de bijoux OEM et ODM
Section II Beading Cord, Elastic Cord Beading Techniques
1. Handling of Thread Ends
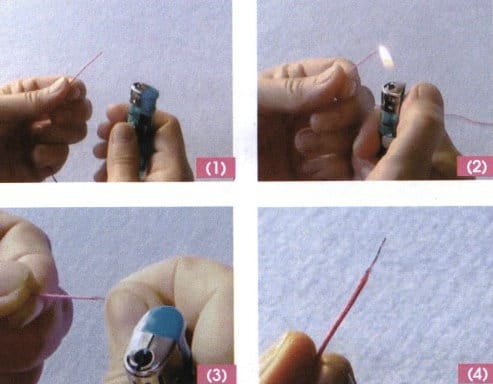
(1) Prepare a piece of beading cord and a lighter; see Figure 3-15 (1).
(2) Ignite the lighter to heat and melt the beading cord, but do not burn it through or scorch it; see Figure 3-15 (2).
(3) Use your hand to pull the thread out into a hard wire, careful not to burn your fingers; see Figure 3-15 (3).
(4) The fired beading cord is fine and stiff, making it easy to string beads, see Figure 3-15 (4).
2. Sealing Method
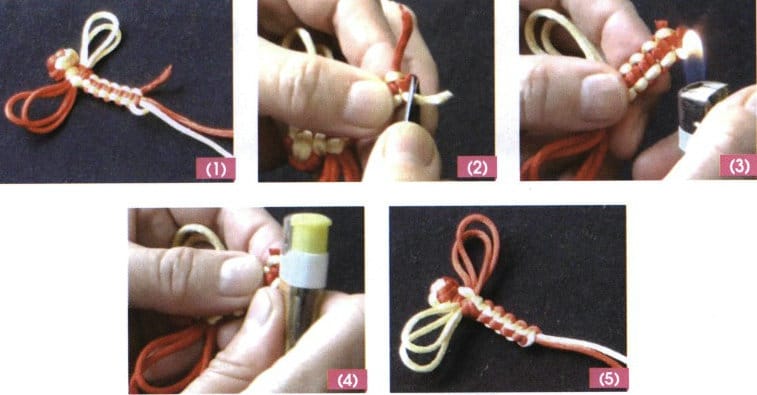
When finishing the knotting, the most commonly used method to secure excess or unused threads to prevent unraveling is the heat fusion method. The following will illustrate this using the finishing of a dragonfly knot as an example.
(1) When the weaving reaches the desired length, the next step is to deal with the excess thread; see Figure 3-16 (1).
(2) Use scissors to leave a 0.3 cm tail and cut the thread; see Figure 3-16 (2).
(3) Use a lighter to melt the wire ends, careful not to burn them black or char them; see Figure 3-16(3).
(4) A lighter can be used to press and fix the melted thread end onto the knot; generally, do not use your hands to press the knot to avoid injuring your fingers, see Figure 3-16 (4).
(5) The final structure is clean, tidy, and stable, as shown in Figure 3-16 (5).
3. Seed Beading Methods
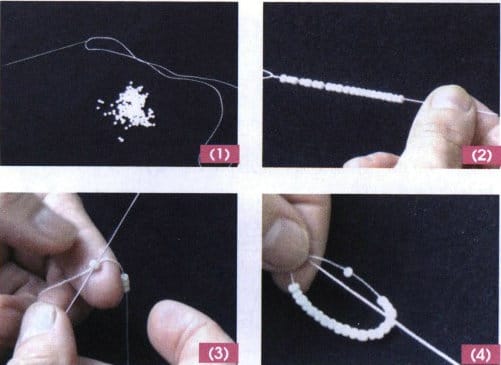
Seed beads are very small, some with a diameter of only 0.1 cm, so they are usually strung using a beading needle (or a fishing line instead of a beading needle).
(1) Straight Threading
① Thread the needle using a long and thin needle. The thickness of the thread should match the size of the bead hole, and the thread should be strong, see Figure 3-17 (1).
② Thread the beads onto the long needle, see Figure 3-17 (2).
③ If you want to string a ring, you can pass through the first bead; see Figure 3-17 (3).
④ Tighten the knotting line, see Figure 3-17 (4).
(2) Row Threading
This method is suitable for flat beading, and the following uses two color beads for illustration.
(1) First, thread the pink and then the blue beads; see Figure 3-18 (1).
(2) Then thread all the pink beads, passing the thread through the bead holes twice; see Figure 3-18 (2).
(3) Tighten the weaving thread; see Figure 3-18 (3). You can repeat the above method until the desired width is achieved.

4. Elastic Cord Beading
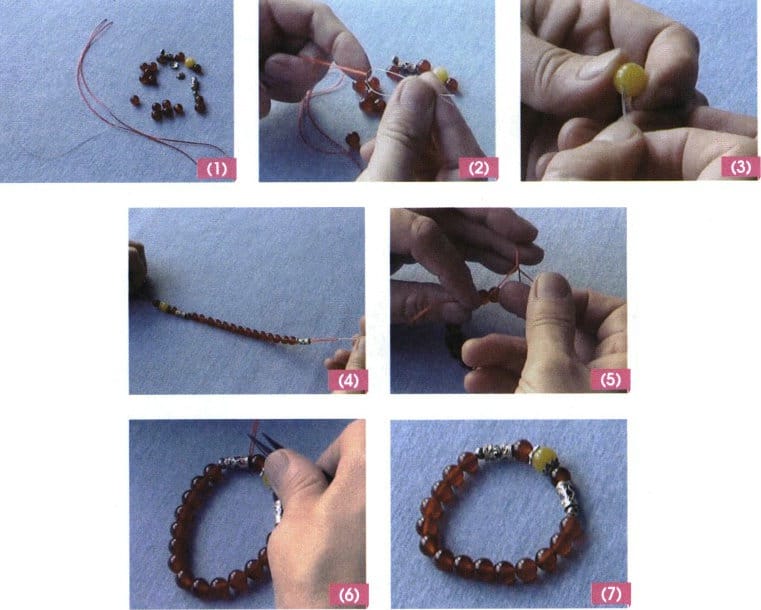
The biggest feature of elastic cord for stringing beads is its good elasticity, which can meet the length requirements. Therefore, there is no need to consider how to seal the ends.
(1) Prepare elastic cord, beads, fishing line, metal accessories, etc.; see Figure 3-19 (1).
(2) Fold the elastic and fishing lines in half, using the fishing line as the lead line; see Figure 3-19 (2).
(3) Thread the beads and accessories according to the design; see Figure 3-19 (3).
(4) Thread to the required length, see Figure 3-19 (4).
(5) Thread any strand of the tail end of the elastic cord through the elastic cord loop that has been folded in half, pull tight, and tie a knot to secure it; see Figure 3-19 (5).
(6) Cut off the excess elastic cord and hide the ends inside the bead hole; see Figure 3-19 (6).
(7) The forming state is shown in Figure 3-19 (7).
Section III Instructions for Metal Accessories
1. Instructions for Using Head Pins
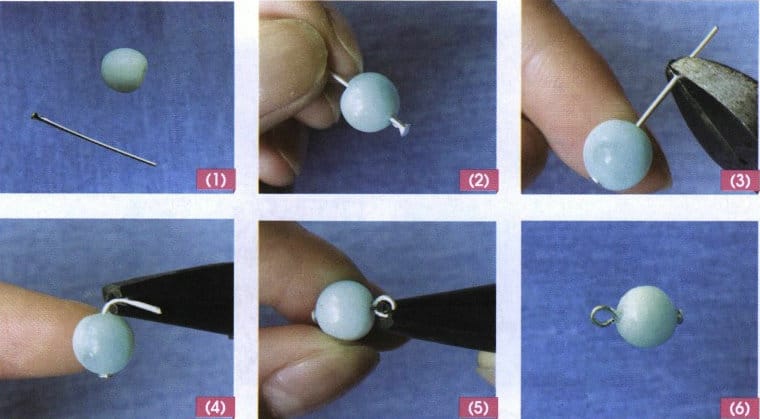
One end of the head pin serves a fixing function, while the other serves a connecting function, having the dual function of fixing and connecting.
(1) Preparation: Prepare 1 head pin and one bead, see Figure 3-20 (1).
(2) Threading the head pin: Insert the head pin into the bead hole, making the head end closely touch the bottom of the bead hole; see Figure 3-20 (2).
(3) Reserved length: Use cutting pliers to cut off the excess part of the head pin to the required length; see Figure 2-20 (3).
(4) Bend to a right angle: Use round-nose pliers to press against the bead and first bend the head pin to a right angle; see Figure 2-20 (4).
(5) Bend into a ring: Then bend the head pin into a ring shape; see Figure 2-20 (5).
(6) Forming effect: see Figure 3-20 (6).
2. Instructions for Using Eye Pins
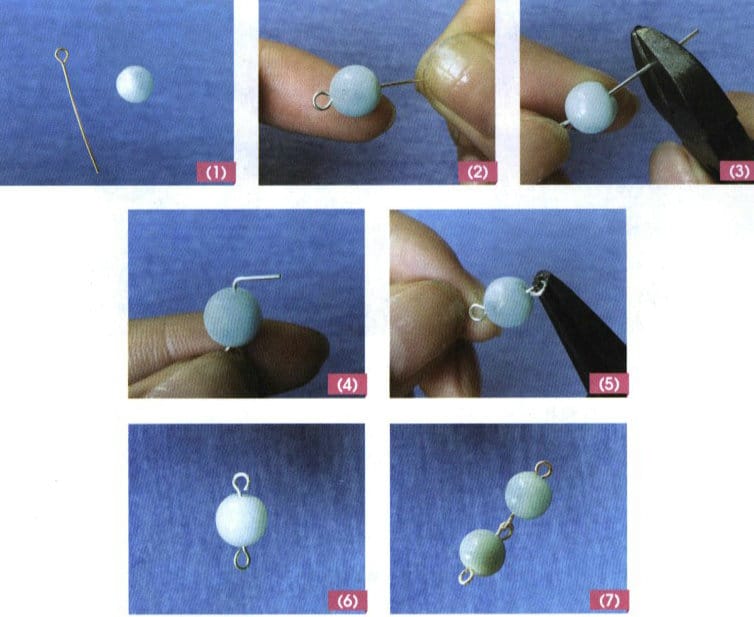
The two ends of the eye pins serve a connecting function.
(1) Preparation: Prepare 1 eye pin and one bead; see Figure 3-21 (1).
(2) Thread the eye pin: Insert the eye pin into the bead hole, making the head end closely touch the bottom; see Figure 3-21 (2).
(3) Reserved length: Use a needle to cut off the excess part of the eye pin to the required length; see Figure 3-21(3).
(4) Bend to a right angle: Use round-nose pliers to bend the eye pin to a right angle; see Figure 3-21 (4).
(5) Bend into a ring: Bend into a ring shape again; see Figure 3-21 (5).
(6) The forming effect is shown in Figure 3-21 (6).
(7) The connection effect is shown in Figure 3-21 (7).
3. Instructions for Applying Positioning Beads and Bead Tips
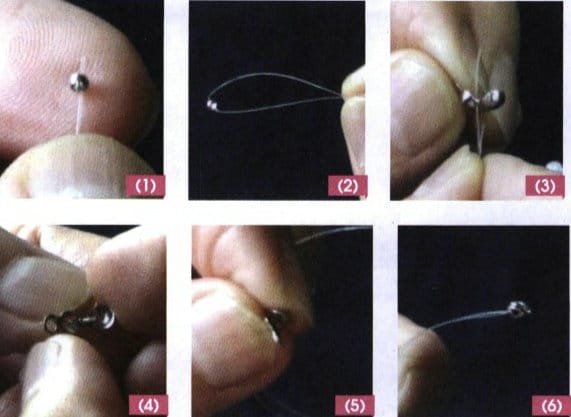
The main function of the positioning bead is to prevent the beads from slipping off, and it can also prevent the thread from unraveling. The bead tip is mainly used to contain the positioning bead, and the two are used together, which can also be combined with adjustable chains, fishing lines, etc.
(1) Thread the positioning bead: First, thread the positioning bead with the fishing line; see Figure 3-22 (1).
(2) Move the positioning bead: Move the positioning bead to the middle of the fishing line; see Figure 3-22 (2).
(3) Thread the bead tip: Thread the fishing line through the bead tip with double strands; see Figure 3-22 (3).
(4) Flatten the positioning bead: Pull the fishing line tight so that the positioning bead moves exactly into the bead tip, then flatten the positioning bead; see Figure 3-22 (4).
(5) Close bead tip: Close the bead tip, see Figure 3-22 (5).
(6) Forming effect: The fishing line naturally emerges from the bead tip, and you can start stringing the beads; see Figure 3-22 (6).
4. Finishing Methods for Positioning Beads and Bead Tips
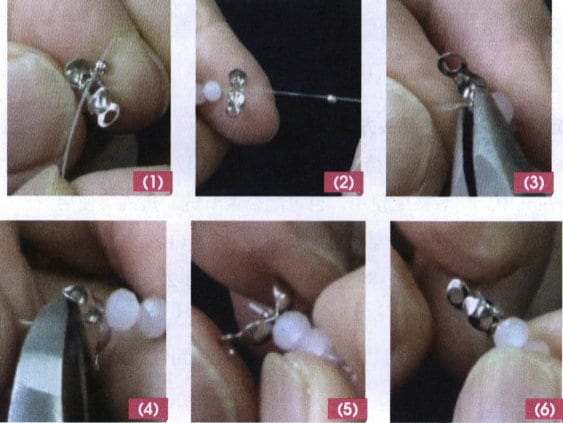
After threading the beads to a certain length, you must finish it. How can you secure the fishing line? You can use a positioning bead and bead tip to finish it off.
(1) Thread the bead tip: The fishing line is threaded through the bottom of the bead tip; see Figure 3-23 (1).
(2) String the positioning bead: String one more positioning bead, see Figure 3-23 (2).
(3) Flatten positioning bead: After flattening the positioning bead, tie a knot in the fishing line; see Figure 3-23 (3).
(4) Cut the fishing line: Cut off the excess fishing line, see Figure 3-23 (4).
(5) Close bead tip: Close the bead tip to encase the positioning bead, see Figure 3-23 (5).
(6) Forming effect: Hide both the fishing line and the positioning bead inside the bead tip, making the exterior clean and seamless; see Figure 3-23 (6).
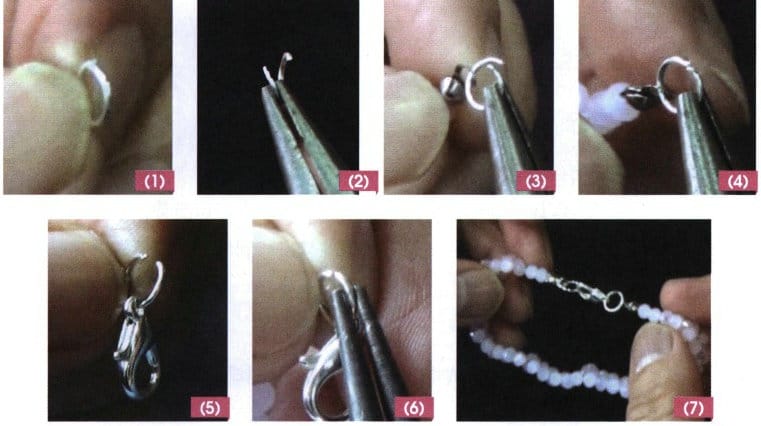
5. Instructions for Using Jump Rings
The jump ring connects and can be directly threaded onto beads or used with head pins, eye pins, adjustable chains, etc.
(1) Prepare one jump ring; see Figure 3-24 (1).
(2) Separate the front and back of the jump ring closure to avoid deformation; see Figure 3-24 (2).
(3) Pass through the completed bead tip loop, see Figure 3-24 (3).
(4) Then align the jump rings; see Figure 3-24 (4).
(5) The lobster clasp can be threaded similarly; see Figure 3-24 (5).
(6) Then align the jump sing; see Figure 3-24 (6).
(7) The lobster clasp connects the jump ring at both ends, the jump ring connects to the end caps, and the bead tips connect to the main part of the bracelet, forming a completely closed bracelet. It is not difficult to see that the jump ring is a bridge link; see Figure 3-24 (7).
