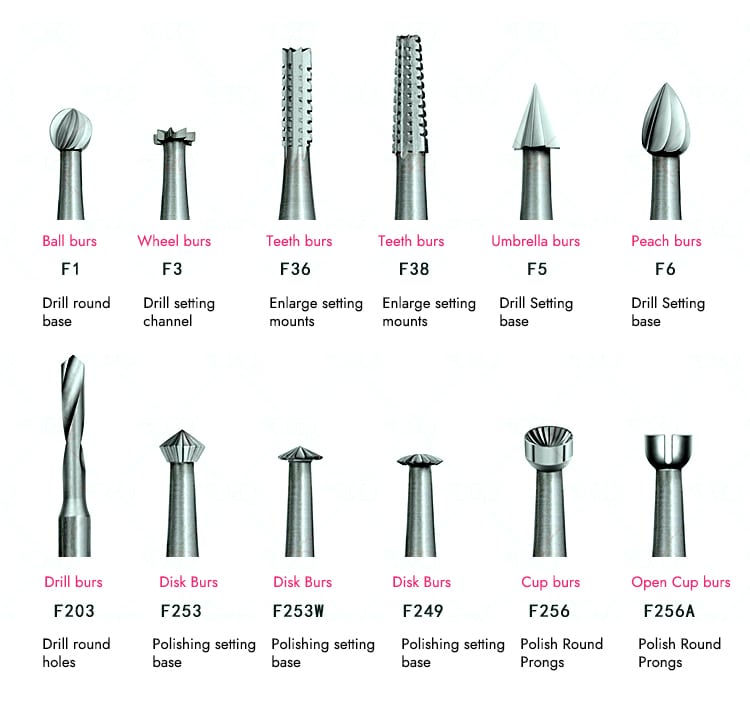
How to make wax mold for jewelry?
Uncover the secrets of jewelry wax modeling process
Delve into the intricate world of jewelry craftsmanship through the art of wax modeling. This process involves taking a block of wax and transforming it into a detailed jewelry design, which is then cast into metal. It’s a blend of technical skill and creative expression.
The guide will cover various types of waxes, each with unique characteristics suitable for different jewelry-making techniques. It will explore the use of traditional carving tools and the integration of 3D printing technology to craft wax molds with precision and artistry.
From basic shaping to detailed texturing, the journey from wax to metal is a testament to the skill and patience required in jewelry making. The guide provides insights into each step of the wax modeling process, highlighting the importance of craftsmanship in creating timeless pieces of jewelry. It’s a comprehensive resource for both beginners and experienced artisans looking to enhance their jewelry-making skills.
Obsah
Section I Types and Characteristics of Wax for Jewelry
1. Common Electroplating Defects in Various Types of Jewelry
There are many types of wax for jewelry, each with corresponding characteristics and suitable production techniques. Below are some commonly used waxes for jewelry making.
1.1 Special Jewelry Carving Wax
The wax used for hand carving is usually hard, flexible, and refined in texture, allowing for more detailed expression during carving. The color of the wax is primarily dark green, which can better relieve the carver’s visual fatigue compared to other colors. There are many shapes and types of carving wax; common styles include wax bricks, wax sheets, wax pillars, hollow ring wax, etc.; suitable shapes of carving wax can be selected based on the size, thickness, and style of the jewelry work, making material cutting more convenient and saving raw materials.
1.2 Precision casting spherical wax
Precision casting wax is commonly used in rubber, silicone mold injection wax molding, and 3D printing wax spraying; it is a spherical granular wax. The main components of this material are paraffin wax, synthetic resin, etc., with a casting temperature of about 75℃. This series of wax is further divided into K gold wax, steel mold wax, micro-inlaid wax, hard gold wax, inlaid wax, etc.; suitable spherical wax can be selected based on different seasonal temperatures, wax mold processes, casting metals, etc. This type of casting wax must meet the following conditions: high hardness, high strength, strong toughness, high melting point, not easily deformed, easy to weld, minimal component changes when heated, low expansion coefficient, low ash residue after combustion, and due to extensive usage, the price is relatively low.
Usually, manufacturers use colors to distinguish the series of casting waxes, such as sky blue and lake blue for micro inlay wax, red for steel mold wax, green for hard gold wax, etc. The color proportions of casting waxes vary among different brands.
1.3 Soft Wax
Soft wax has low hardness and melting point. It can usually be heated and softened by hand temperature, hot water, or a hair dryer for shaping. Some soft waxes can even be bent or folded without heating. Because soft wax is easy to deform, it is also very easy to trim. It can be placed on a smooth glass plate and rolled flat with a rolling pin to form a horizontal surface. Soft wax is more suitable for making relatively free, abstract, and dynamic jewelry shapes, such as flowing waves, flower and leaf vines, etc. Soft wax can also be combined with various embossing molds to create multiple textures. It can also be used in weaving crafts to create shapes. We can use it as wax clay for crafting, making it a convenient material for jewelry shaping.
Soft wax is usually divided into the following categories:
(1). Soft Wax wire
Soft wax wire of various thicknesses and specifications is often used for shaping and making sprues in jewelry casting.
(2). Soft wax sheet
This soft wax type is a sheet-like soft wax with various thickness specifications; commonly used thicknesses for soft wax sheets include 0.5 mm, 0.6 mm, and 0.8 mm.
(3). Hand-molded beeswax
This type of soft wax is made of natural beeswax, microcrystalline wax, turpentine, and other materials, forming a block wax with excellent flexibility and a low melting point, which can be molded by hand heating.
Section II Traditional Wax Carving Craft
Wax carving is one of jewelry’s most essential and commonly used molding techniques. Skilled artisans meticulously carve jewelry-specific wax blocks and sheets with various carving and polishing tools to create jewelry wax models, which are then cast into metal jewelry using metal casting techniques. Therefore, wax carving is a craft that extensively tests artisans’ aesthetic accomplishments and manual skills. It is also an art of jewelry molding that is worth studying and practicing for a long time.
Rapid prototyping, namely 3D printing technology, is increasingly perfected with the development of technology. Many commercial jewelry designs use 3D software for design modeling and connect to 3D wax printers for wax model production, eliminating the manual wax carving steps. More advanced 3D printing technology can directly print the modeled jewelry design into metal products. This kind of technology has a particular impact on the manual wax carving industry, but manual wax carving is an artistic creation technique with humanistic and warm qualities. Many detailed aspects of depiction cannot be replaced by 3D modeling, such as biomimetic animals and plants, figures, etc., which require skilled wax carvers to complete. Exceptional texture carvings, such as tree bark, crack patterns, and water ripples, also need to be done by hand to demonstrate the artwork’s agility and freedom. Therefore, traditional manual wax carving techniques have always been used in high-end jewelry customization and artist work creation.
1 Basic Tools for Wax Carving Craft
There are many tools for wax carving, but the basic operation methods are mainly sawing, filing, carving, scraping, welding, turning-milling, drilling, polishing, and other significant projects. Due to the low hardness of the wax, any tool that can change its shape can be used in wax carving production. Everyone can also use their imagination to make their tools.
Jewelry carving special wax is mostly dark green in blocks, sheets, strips, rings, and other shapes, which can be selected according to the size and shape of the design drawing. See Section I 1.1 for details.
(1) Wax saw blade:
a spiral-toothed blade mainly used for wax block cutting.
(2) Wax file:
commonly used for shaping the overall form of wax molds.
Wax saw blade
Wax File
(3) Carving Knife Category:
Rich carving knife styles are often used for carving details, and many old artisans will also make unique carving knife heads according to their operating habits.
(4) Scraper Category:
Mainly used for trimming steps in the wax carving process, it can smooth the inside and outside of the mold.
(5) Hanging Flexible Shaft Motor, series of milling cutters:
Hanging Flexible Shaft Motor combined with different shapes of milling cutters can quickly carve wax molds, achieving twice the result with half the effort, and is also one of the most commonly used tools in wax carving.
Hanging Flexible Shaft Motor
Series milling cutter
(6) Wax welding machine, wax carving electric soldering iron:
When using a wax carving electric soldering iron for production, several different sizes of fine copper wires need to be wound around the metal head of the soldering iron. Copper wires with diameters of 1 mm, 0.5 mm, and 0.3 mm can be selected. Wind the thick copper wire near the handle and the thin wire near the soldering iron head in sequence. After winding the thin copper wire, leave a length 2 mm longer than the soldering iron head, and finally cut off the excess part. Copper wire has good thermal conductivity, transferring to the fine copper wire head after the electric soldering iron is heated. It can be used to spot weld and decorate wax blocks with the delicate copper wire part.
Soldering wax machine
Wax Carving Electric Soldering Iron
Measuring tools include vernier calipers, rulers, inside calipers, compasses, etc.
Grinding tools include sandpaper, copper brushes, and grinding and polishing crane heads.
2 Basic Process of Wax Carving
2.1 case: Annual ring wax carving
1. Cut a suitable size of ring wax according to the style and size designed for the work
2. Use a wax file to polish the two sections of the ring flat
3. Use tools such as rulers and compasses to mark the size and general shape of the ring wax.
4. Cut off the excess part with a wax saw.
5. Use a wax file to trim burrs
6. Use a wax file to trim the entire shape further, and remove the corners around the wax ring
7. Try on the ring, prepare to adjust the ring size
8. Insert the special ring sizing tool into the wax ring and gently rotate it. The blade on the tool can evenly remove excess wax, enlarging the inner side of the ring
9. After further trimming with a wax file, the basic shape of the wax ring is made
10. Use a Hanging Flexible Shaft Motor crane with the appropriate milling cutter head to shape the ring surface, remove excess wax
11. Hollow out the inside of the ring to remove excess wax, making the ring more agile, and also reducing the amount of metal used during casting; this step can first remove most of the wax with a milling cutter, and then use engraving knives, scrapers, and other tools for detailed scraping
12. Use a Hanging Flexible Shaft Motor crane with a delicate dental needle head to carve the bark texture on the surface of the ring, and then use engraving knives for detailed processing; at this time, we can find some natural bark or pictures for reference, to express the work more vividly and accurately
13. After carving, perform a series of casting operations such as welding sprues and planting wax trees, and finally cast the work into metal material
2.2 case: Rattlesnake wax carving
1.Take an appropriate amount of wax column, use a carving knife for overall shaping, and carve the direction of the main parts
2. Use a wax welding machine or soldering iron to refine the details of the sculpture and adjust the volume and shape
3. Use a flat carving knife for detailed carving, and the overall shape of the sculpture will be created

4. Use different function carving knives to finely carve the scales and textures on the animal's body
5. Remove the wax crumbs, and the work is completed
2.3 case: Wax carving of the helmet of the Ming Dynasty
1. Apply wax material according to the size of the work, refine the shape with a wax spatula, and then use a wax welding machine or soldering iron to adjust the details
2. Further refined with various carving knives and scrapers
3. When making, constantly observe the various angles of the carved pieces, and no detail can be ignored.
4. Adjust the details; the work is finished.
2.4 case: Large Ming gun Camp arquebusier wax carving
1. Cut with a wax saw
2. Carve the head according to the design drawings
3. When carving complex works, they can be divided into multiple parts for separate carving and then connected by welding at joint points. This not only saves wax materials but also reduces a lot of dewaxing work; in this case, the upper body, lower body, and gun barrel of the soldier are carved separately and then welded together
4. After filing and rasping with a wax file, the overall shape of the entire sculpture is completed.
5. Various carving knives and tools, such as wax welding machines, are used to handle the details of the sculpture. For some delicate and relatively independent areas, such as the decorative part on the soldier's hat, we generally weld them after the overall carving is basically completed and then carve them separately to avoid accidentally breaking them during subsequent carving processes
6. After observing the carving from every angle, once the desired effect is achieved, the wax carving part of the work is completed
Section III Wax melting and water molding process
In creating jewelry modeling, we can expand our ideas, analyze the characteristics of wax materials, and use some attractive and natural experimental methods for modeling creation. For example, the principle that wax is insoluble in water can be used for wax melting and water molding experiments. Through this method, special effects that traditional wax carving techniques cannot achieve can be obtained, and each shape is unique, making the process full of artistic exploration and fun.
1. Basic materials and tools for wax-water molding
Precision casting spherical wax: The hardness of the casting spherical wax is high and easy to store after molding; ordinary paraffin can also be used instead.
Clearwater
Alcohol lamp experiment set: including alcohol lamp, stand, fire-resistant asbestos mesh. Two sets can be prepared, one for wax melting and one for adjusting water temperature.
Graduated beaker or heated metal bowl: Prepare a set of beakers of different sizes.
Beaker stirring rod: A glass stirring rod is usually optional.
Tweezers: Used to pick up metal bowls.
Heat-insulating gloves: Wear them when taking the beaker.
Industrial thermometer: Used to record the temperature of wax and water during the experiment, an infrared handheld remote temperature measuring device can be selected, and the measurement range of such thermometers is -32℃ ~ 950℃, which fully meets the requirements of the wax encountering water experiment.
The alcohol lamp experiment set
Industrial thermometer
2 Experimental process of wax molding in contact with water
Take an appropriate amount of precision cast wax balls and place them in a beaker or metal bowl, heat and melt with an alcohol lamp, then pour into the water for molding experiments. The shape formed after the wax enters the water is related to the temperature of the wax and water. Multiple temperature control experiments can be conducted to record water temperature, wax temperature, specific gravity, etc., providing more references for controlling the wax mold forming process.
The temperature of the wax and water has a significant relationship. Multiple temperature control experiments can be conducted to record water temperature, wax temperature, specific gravity, etc., providing more references for controlling the wax mold forming process.

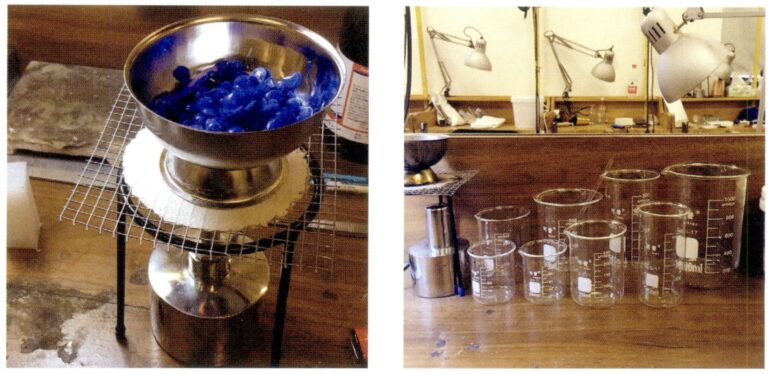
1. Place an appropriate amount of casting wax in a heated metal bowl or graduated beaker and heat it with an alcohol lamp
2. After melting the wax, pour it into the prepared water to start the molding experiment.
3. The temperature of the wax and water, as well as the speed and method of pouring into the water, will affect the molding effect. We can use a far infrared industrial thermometer to record the temperature data of the material for each experiment, which is convenient for future summary and research
4. If the wax temperature is high, the water temperature is low, and the wax is quickly poured into the water, it will generally solidify into a wax block; at this time, the surface of the wax has solidified, but the interior is still liquid. If you want to change its shape, you can quickly remove it and perform kneading and other operations.
5. If there is not much temperature difference between the wax and water, and the wax is poured into the water slowly, the wax will generally form a skin floating on the water surface. At this time, if you want to change its shape, you need to quickly wrap the wax skin that has not completely cooled in the water with a glass stirring rod to obtain a molded wax body.
6. There are many experimental methods to obtain various forms of wax molds with natural textures, such as wrinkled wax molds and bubble wax molds. These can all be applied to future artistic creations, with fun and exploratory experimental characteristics
Section IV Soft Wax Molding Process
Soft wax molding is a fun mixed craft. Due to its soft and malleable material, we can incorporate sculpting, weaving, paper cutting, carving, pottery techniques, etc., into the soft wax molding process, opening up imaginative ideas for creation. The works produced through this molding process have diverse styles, a creative method frequently used by many artists.
Orak, Rite of Passage, Ring, 22k gold, diamond, enamel
Orak, Satyr, Ring, 22k gold, turquoise, sapphire
Orak, Chanteuse of Songs of Life and Death, Ring, 22k Gold, Black Diamond
1. Basic Materials and Tools for Soft Wax Modeling
Soft Wax Thread: Soft wax in various thicknesses can be shaped by weaving, kneading, and other techniques. See Chapter 1.3 for details.
Soft Wax Sheet: Soft wax in various thicknesses can be shaped by cutting and weaving. See Chapter 1.3 for details.
Hand-Molded Beeswax: Extremely flexible, with a low melting point, can be shaped by hand heating, is primarily made of natural beeswax, and functions like clay for modeling. See Chapter 1.3 for details.
Talcum powder/body powder: Prevents soft wax from sticking to tools and other surfaces.
Wax welding machine / soldering iron: Used for spot welding, shaping, bonding, etc. See Chapter 2.1 for details.
Heating tools: If a temperature higher than body temperature is needed during soft wax-making, heating tools such as hot water bags, hair dryers, and alcohol lamps can be used.
502 glue: After the soft wax model is made, a layer of 502 glue can be applied to increase the hardness of the soft wax, making it less prone to deformation.
Carving knife: Wax carving knives, modeling wooden knives, etc.
Small rolling pin.
Measuring tools: ruler, triangle ruler, French curve, compass, etc.
Various types of scissors, such as regular and decorative edge scissors, are acceptable.
Cutting tools: utility knife, surgical knife.
Puncher: regular puncher, decorative puncher.
Wax carving knife, modeling wood knife. See Section II 2.1 for details.
2 Basic Techniques of Soft Wax Modeling
2.1 Cutting and Trimming
Using various cutting tools such as scissors, art knives, surgical knives, etc., to cut and shape wax threads, pieces, and hand-molded wax.
Cutting soft wax pieces with a steel ruler and art knife
Cutting soft wax pieces with various scissors
Use a steel needle to draw a profound mark on the soft wax sheet and cut out the shape along the mark
2.2 Roll and knead
Use a small rolling pin or a smooth cylindrical object to roll the soft wax to the desired thickness. Note that some talcum powder or body powder should be sprinkled on the wax sheet or hand-kneaded wax first to prevent the wax from sticking to the rolling pin.
1. Prepare talcum powder, plastic sheet and appropriate amount of soft wax
2. Sprinkle talcum powder on the plastic sheet, soft wax, and rolling pin, then roll to prevent objects from sticking to the soft wax
3. Textured items can also be used for rolling to present various patterns and textures on the soft wax
2.3 Sculpting
Handmade kneading can also use sculpting tools such as wooden knives to shape the soft wax; the operation and matching techniques can be experimented with according to personal characteristics. This technique is most suitable for kneading wax by hand; we can imagine kneading wax as shaping clay. If the hand temperature is low in winter, you can use a hot water bottle, hairdryer, or warm water for shaping.
2.4 Fusion Bonding
Using a wax welding machine, soldering iron, heated steel needle, and other tools to melt the wax for connection, dot wax beads, and perform other craft operations.
1 Electric soldering iron welding soft wax
2 Electric soldering iron wax beads
2.5 Folding creases
Soft wax is folded, and other process operations are performed. Thinner soft wax sheets are often selected. If a smooth and symmetrical crease is desired, an art knife, scalpel, or steel needle can cut lines on the soft wax sheet first and then fold along the lines.
1. Use an art knife to lightly scratch the soft wax sheet according to the design needs; never scratch too deeply or break it.
2. Gently fold along the direction of the incision
2.6 Punching and cutting flowers
Curved plates, steel needles, and other tools can be used to cut shapes on soft wax sheets, and existing punching and cutting tools can be used for cutting.
2.7 Twist and bend
Soft wax threads can be bent and shaped according to the desired pattern, or two or more soft wax threads can be twisted into a twist shape for other styling.
1. Like twisting a rope, twist two soft wax threads into a twist shape
2. Take a single soft wax thread and wrap it around the previously made twisted soft wax thread
3. Remove excess wax, solder the receiving end with an electric soldering iron, and a soft wax wire ring is done
2.8 Intertwined weaving
Multiple soft wax threads or cut soft wax pieces can be woven and shaped. Use craft ideas such as straw weaving, rope weaving, and knitting to create, which is a unique effect of soft wax craftsmanship that cannot be replaced by hard wax.
1 Weaving using the three-strand braid method
2 Weaving with the three-strand braid rope method
3 Wrap the woven soft wax around the ring mandrel for shaping, and trim off the excess part
4 Solder the joints with a soldering iron, and the braided soft wax ring is ready!
2.9 Rubbing embossing
After selecting an excellent embossing item, you can use a round rubber to emboss the pattern on the soft wax. Note that talcum powder or body powder should be applied to the soft wax first to prevent the wax from sticking to the item. Usually, we choose to hand-knead the wax for embossing and embossing.
1. Prepare embossing items, soft wax, and evenly apply body powder to the items and soft wax
2. Place the soft wax sheet on the item to be embossed, use rubber to evenly press, and transfer the pattern to the soft wax
3. After the rubbing is done, gently lift the soft wax to avoid pulling and deforming
4. Using the rubbing method, many relief patterns and items can be transferred to soft wax, making it easier to replicate patterns and items.
2.10 Fixed storage
Because the soft wax is soft, it needs to be “reinforced” after being made to avoid deformation. Water-based 502 glue can be evenly applied to the back of the soft wax model to avoid glue marks on the front and reduce the possibility of unevenness on the front after casting into metal. If reinforcement is needed on the front, it should be applied as thin and evenly as possible. When too much glue is used, it can be gently absorbed with a cotton swab. After the glue is completely dry, store it in a container. If the container is large, fill it with some tissues or cotton balls to prevent shock; if the weather is hot or metal casting is not temporarily carried out, the soft wax model can also be stored in the refrigerator or a container of cold water. It should be noted that the soft wax model should never be placed in the fridge’s freezer, as this will make the soft wax brittle and fragile.
1. Apply quick-drying liquid water-based 502 glue evenly on the surface of the finished soft wax jewelry. After natural air drying, the hardness of the soft wax can be enhanced, and the shape can be maintained.
2. While waiting for the metal to be poured, wrap the soft wax in a shock-proof object such as a napkin or cotton ball and place it in a container for storage to avoid damage to the soft wax jewelry.
2.11 Casting metal
Soft wax models can be cast into different metal models using the lost wax casting method and polished to create beautiful jewelry.
