How to Design and DIY amazing Jewelry sets
Complete Guide to Jewelry set Design and DIY Steps
Введение:
Wondering how to create a cohesive series of jewelry designs? This guide dives into the world of series jewelry, exploring design principles like shape, color, and material combinations. Learn how to craft beautiful sets of earrings, necklaces, and bracelets using various techniques and materials. Whether you’re a jewelry designer, a jewelry store owner, or an e-commerce seller, this article provides detailed steps and practical tips to help you produce stunning jewelry collections.
Набор для изготовления украшений из бисера
Оглавление
Section I Series Jewelry Design
1. Series design
2. Series Jewelry Design
3. Basic Characteristics of Series Jewelry Design
(1) Quantity Factor
A series of jewelry must consist of several individual pieces. Quantity is the basic condition for forming a series; a series of jewelry can have as few as two pieces and as many as desired, allowing for multiple combinations.
(2) Common Requirements
Commonality is necessary for forming a series; without commonality, there is no series. Commonality refers to the shared factors present in each piece within a series. Only when there are common points among the individual pieces of the series can the entire series be connected. Under a unified design concept and techniques, a sense of continuity and unity in visuals can be achieved by pursuing similar shapes, a unified color scheme, shared materials, and consistent craftsmanship methods.
(3) Personal Requirements
To truly design a jewelry series, it is essential to emphasize each piece’s characteristics, focusing on each item’s uniqueness and distinctiveness. This should be reflected in aspects such as style, material combinations, and color matching, showing differences to varying degrees. These differences are based on the relationships between the pieces, following the principle of “seeking differences while maintaining similarities,” pursuing variations and individual characteristics while preserving commonalities or similarities.
4. Elements of Series Jewelry Design
(1) Shape Design Elements
The constituent elements in jewelry design are points, lines, and surfaces, and the modeling forms are plants, animals, auspicious patterns, and geometric shapes. In the series of jewelry designs, choose a certain shape as the theme through arrangement, combination, addition and subtraction, exaggeration, and other techniques so that the series of jewelry contrasts, rhythm, rhythm, proportion, balance, unity, emphasis, and other changes to achieve a series of modeling of the wholeness, harmony, and perfection. Zambia’s “emerald elephant” fine jewelry series is an example (see Figure 8-1). This series of elephant emeralds as the theme, the Indian wild elephant side shape as material, combined with drop-shaped emeralds and small diamonds, modeling unity and coordination; the intention is to protect the wild elephants. DOLCE & GABBANA 2012 Spring/Summer jewelry collection takes vegetables, fruits, and other food shapes as the main design elements; tomatoes, spaghetti, chili peppers, and garlic are all integrated into the design of the jewelry, in addition to gold and jewels, which show the essence of its luxury, see Figure 8-2.
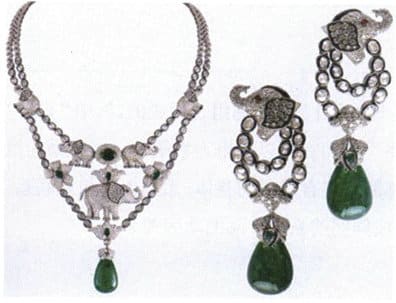
Рисунок 8-1 Серия ювелирных изделий высшего класса "Изумрудный слон" из Замбии
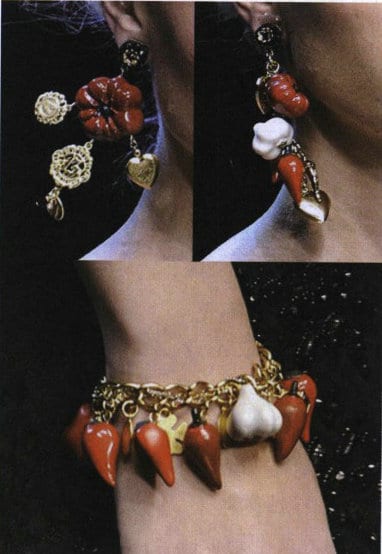
Figure 8-2 DOLCE & GABBANA Fruit and Vegetable Jewelry Collection
(2) Color Design Elements
In a series of jewelry designs, a group of colors is generally chosen to form a color scheme, where the main color often appears in each individual piece of jewelry. In contrast, the auxiliary colors can be interspersed and alternated, creating unity and variation. These different colors reflect the relationship of “you within me, I within you”; otherwise, it can easily lead to color chaos, affecting the overall effect of the series. Taking the new legendary jewelry series of the BVLGARI MVSA Muse goddess as an example (see Figure 8-3), the work is inspired by the ancient Greek goddess, using violet as the main color to represent its mystery and nobility, paired with blue, red, and rose gold. The bold color combination highlights elegant and rounded tones, composing a harmonious melody for the gemstones, freely expressing the beauty of art. Designer Ivanka Trump drew inspiration from the 2011 film “Snow Flower and the Secret Fan” and designed this beautiful “Old Friends” series of high-end jewelry (see Figure 8-4). “Old Friends” is an ancient Chinese phrase between two girls who vow to be lifelong friends. The designer conveys the symbolic meaning of the fan through the bright Colombian emerald and celebrates the friendship between women.
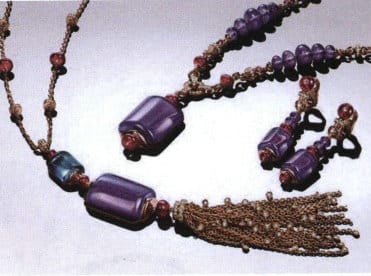
Figure 8-3 BVLGARI MVSA Muse Goddess New Legend

Figure 8-4 "Old Friends" Jewelry Collection
(3) Material Design Elements
In designing a jewelry series, using materials with different textures and qualities for comparison and combination is an important design technique. It is essential to carefully select the materials used, fully utilizing the relationships that arise between them, whether they are thin or thick, soft or firm, shiny or dull, to achieve a contrasting beauty through certain combinations of shapes. The unity and resonance among the individual materials create a sense of overall coherence for the series. The new Bamboo series jewelry launched by Gucci’s creative director Frida Giannini is made from natural bamboo segments and pure silver. The signature bamboo wood is cut and polished into shape, with elegant, slender, and delicate pure silver tassels adorning the ends of the bamboo segments. The collision and combination of different materials create a unified response within the series, evoking a natural and dynamic effect, as seen in Figure 8-5. Designer Maria collects colored pencil tips, selects different color combinations, cuts them into suitable shapes, and then polishes them to reveal the colored pencil cores just right, showcasing creative colored pencil jewelry that blooms like wildflowers, as seen in Figure 8-6.
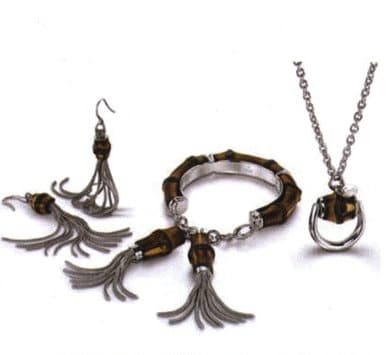
Figure 8-5 Gucci's new Bamboo series jewelry

Figure 8-6 Maria's colored pencil series jewelry
Section II Series Jewelry Making
1. Bead Affection Collection
(1) Style Characteristics
This jewelry series features a design combining red ceramic beads with a metal chain, reflecting a theme of simplicity and fashion. The combination of red and silver gives it a beautiful and charming color, making it irresistible, as shown in Figure 8-7.
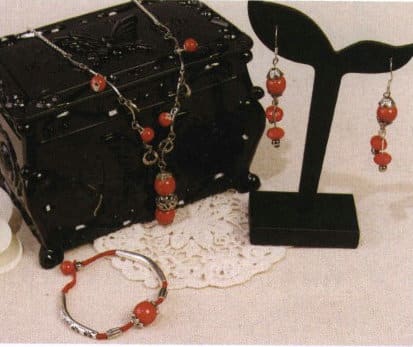
(2) Key Learning Points
Learn how to express concepts that have both commonality and individuality and bring out the uniqueness of each item; learn about the selection and use of metal accessories.
(3) Material preparation (see Figure 8-8)
① Earring materials (the materials for making one earring are shown in the Figure)
Red ceramic beads: 8mm, 2 pieces;
Red wheel beads: 7mm ×4mm, 4 pieces;
Metal flower base: 6mm, 4 pieces;
Metal balls: 4mm, 4 pieces;
Eye pin: 4mm, 2 pieces;
Head pins: 3mm, 4 pieces;
Ear hooks: 1 pair.
② Necklace Materials
Red Ceramic Bead A: 10mm, 2 pieces;
Red Ceramic Bead B: 6mm, 4 pieces;
Hollow Metal Ball: 12mm, 1 piece;
Metal flower base: 8mm, 2 pieces;
Metal ring chain: 160 mm;
Metal chain: 2mm, 14cm;
Extension chain: 4mm, 5cm;
Jump ring: 5mm, 2 pieces;
Lobster clasp: 10mm, 1 piece;
Head pin: 40mm, 1 piece, 25mm, 4 pieces.
③ Bracelet Materials
Red ceramic beads A: 10mm, 1 piece;
Red ceramic beads B: 6mm, 1 piece;
Metal curved tube: 35 mm (length), 2 pieces;
Metal barrel beads: 7mm×3mm, 2 pieces;
Metal flower base: 6mm, 2 pieces;
Red thread: 50cm×1mm, 1 piece.

Figure 8-8 Material preparation of Bead Affection Collection
(4) Production Method
Earring Production:
① Use a eye pin to sequentially thread the metal flower base, red ceramic bead, and metal flower base, cut off the excess material, and bend it into a 9 shape to form component A, see Figure 8-9 (1).
② Use a head pin to thread the metal ball and red wheel bead, making 2 pieces to form component B; see Figure 8-9 (2).
③ Shape components A and B properly, noting that for component B, one head pin should be left longer and the other shorter; see Figure 8-9 (3).
④ Combination: Combine component A with component B, then attach the ear hook, making the earring length about 5 cm; see Figure 8-9 (4).
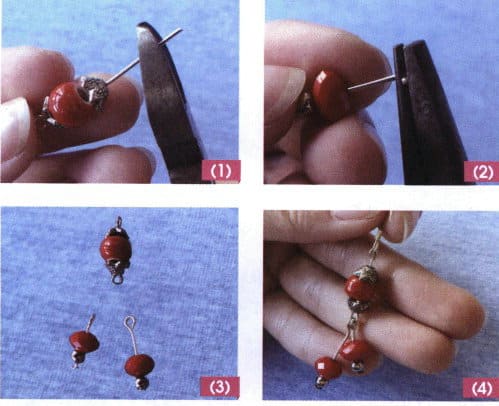
Necklace Production:
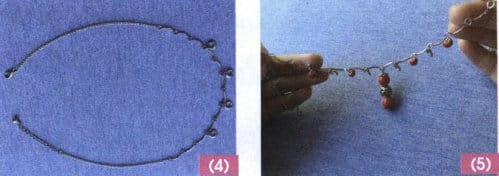
① Making the pendant: Use a head pin to thread the metal flower base, red ceramic bead A, hollow metal ball, red ceramic bead A, metal flower base, and bend it into a 9 shape at the end to make the pendant, see Figure 8-10 (1).
② Use a head pin to thread the red ceramic bead B, cut off the excess material, bend it into a 9 shape, and make 4 sets; see Figure 8-10 (2).
③ Making the necklace: Open the jump ring at both ends of the metal ring chain and connect it to the metal chain; see Figure 8-10 (3).
④ At one end of the chain, connect an extension chain with a jump ring, and at the other end, connect a lobster clasp with a jump ring. The necklace length is about 39 cm, see Figure 8-10 (4).
⑤ Hang the pendant and the four small beads made in step (2) onto the necklace, ensuring they are symmetrical on both sides; see Figure 8-10 (5).

Bracelet Production:
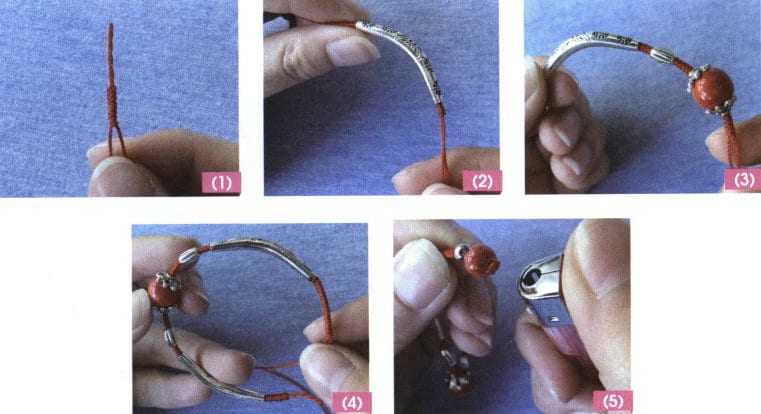
① Fold the red thread in half at the center. First, braid two strands to start, about 2 cm long, which can serve as a loop. Then, braid a snake knot of 2 cm in length; see Figure 8-11 (1).
② Thread a metal arc tube, then weave a snake knot of 1 cm length; see Figure 8-11 (2).
③ Thread a metal barrel bead, weave a snake knot of 2 cm in length, then thread a metal flower base, red ceramic bead A, metal flower base, and continue to weave a snake knot of 2 cm in length; see Figure 8-11 (3).
④ Use the same method to weave the other half of the bracelet, with a circumference of about 16 cm; see Figure 8-11 (4).
⑤ At the end of the bracelet, use double strands to thread a metal barrel bead, red ceramic bead B, tie a knot, melt, and seal to fix; see Figure 8-11 (5).
2. Colorful Wooden Bead Collection
(1) Style Characteristics
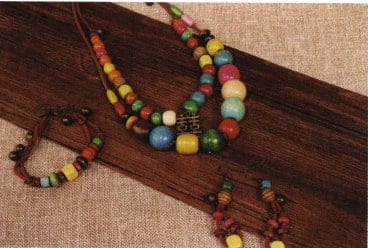
This jewelry series combines leather cords and wooden beads with metal accessories as embellishments. The leather cord is soft, sturdy, and comfortable in style; the wooden beads are brightly colored and have a gentle texture; the small accessories add interest, creating a unique visual effect with the mix of three materials, both soft and hard, rugged and natural, as seen in Figure 8-12.
(2) Key Learning Points
Learn the techniques of overall design and matching; learn how to use leather cords and metal clips.
(3) Material Preparation (see Figure 8-13)
① Earring Materials
Yellow square beads: 10 mm, 2 pieces;
Wine red spacers: 6 mm, 4 pieces;
Rose red spacers: 6 mm, 4 pieces;
Brown spiral beads: 12 mm, 2 pieces;
Green square beads: 4 mm, 2 pieces;
Metal bells: 4 mm, 2 pieces;
Eye pins: 35 mm, 2 pieces;
Jump rings: 8 mm, 2 pieces;
Ear hooks: 1 pair;
Metal clamps: 6 mm, 2 pieces;
Leather cord: 120 mm (length) × 3 mm (width).
② Bracelet Materials
Yellow square bead: 10 mm, 1 piece;
Blue square bead: 8 mm, 1 piece;
Wine red spacer: 6 mm, 3 pieces;
Rose red spacer: 6 mm, 1 piece;
Brown flat wooden bead: 12 mm, 1 piece;
Red spiral bead: 6 mm, 1 piece;
Green square bead: 4 mm, 1 piece;
Green flat wooden bead: 8 mm, 1 piece;
Green square bead: 6 mm, 1 piece;
Bell: 6 mm, 5 pieces;
Violin pendant: 20 mm, 1 piece;
Large jump ring: 8 mm, 2 pieces;
Small jump ring: 4 mm, 5 pieces;
Metal clamp: 6 mm, 2 pieces;
Red leather cord: 3 mm (width) × 12 cm (length), 1 piece;
Brown leather cord: 3 mm (width) × 18 cm (length), 1 piece.
③ Necklace Materials
Wooden beads: Assorted shapes and colors (square beads, round beads, barrel beads, diamond-shaped beads, spiral beads, spacers, etc.), with sizes ranging from: Largest round bead: 1.8 cm (diameter); Smallest round bead: 0.8 cm (diameter); Barrel bead 1.5 cm (length) × 0.5 cm (width); Square bead 0.8 cm (side length);
Brown leather cord: 550 mm (length) × 3 mm (width), 1 piece; 460 mm (length) × 3 mm (width), 1 piece;
Bells: 8 mm (diameter), 3 pieces;
Chinese character “Xi” (happiness) metal pendant: 250 mm (length) × 2 cm (width), 1 piece;
Bead tip: 4 mm × 4 mm, 2 pieces;
Jump rings: 3 mm (diameter), 6 pieces;
Lobster clasp: 8 mm (length) × 5 mm (width), 1 piece;
Extension chain: 50 mm (length) × 3 mm (width), 1 piece.

(4) Production Method
Earring Production:
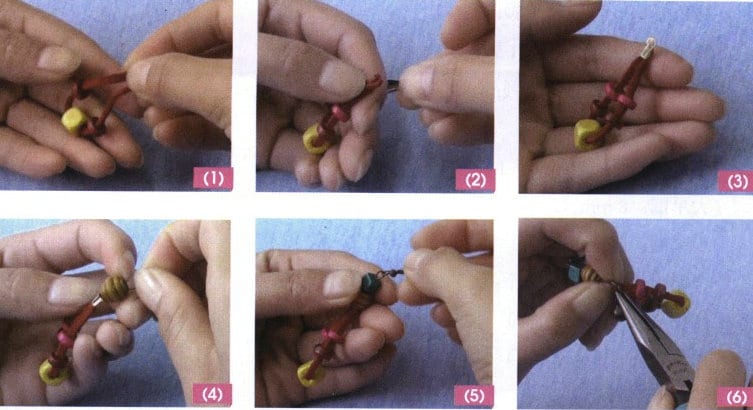
① Use a leather cord to thread a yellow square bead with a wine-red spacer on each end; see Figure 8-14 (1).
② Thread a magenta spacer on each end of the leather cord; see Figure 8-14 (2).
③ Use metal clips to secure both ends of the leather cord; see Figure 8-14 (3).
④ Use a eye pin to hook the secured metal clips, thread 1 brown spiral bead and 1 green square bead; see Figure 8-14 (4).
⑤ Bend the eye pin into a circle and attach the ear hook; see Figure 8-14 (5).
⑥ Use a jump ring to thread 1 metal bell and secure it to two leather cords; see Figure 8-14 (6).
⑦ Make another earring using the same method.
Bracelet Production:
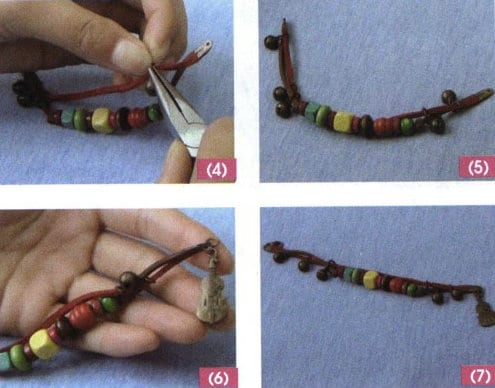
① Take a brown leather cord, leave a 5 cm length, and tie a knot; see Figure 8-15 (1).
② String the green square beads, burgundy spacers, red spiral beads, brown flat wooden beads, fuchsia spacers, yellow square beads, burgundy spacers, green flat wooden beads, blue square beads, and burgundy spacers onto the leather cord in order, then tie a knot, see Figure 8-15 (2).
③ Clamp a red leather cord at both ends with the brown leather cord using leather end clips; see Figure 8-15 (3).
④ Use a small jump ring to thread a bell onto the red leather cord; see Figure 8-15 (4).
⑤ Use two large jump rings to secure the two leather cords near the knot; see Figure 8-15 (5).
⑥ Attach a small violin pendant to one end of the bracelet with a jump ring; see Figure 8-15 (6).
⑦ Attach a lobster clasp to the other end with a jump ring; see Figure 8-15 (7).

Necklace Production:
① Stringing the Upper Layer Necklace: Take a 46 cm long brown leather cord and string 26 wooden beads with a length of 24.5 cm, making it slightly smaller, mixing various colors; see Figure 8-16 (1).
② Wear the lower layer necklace: Take a 55 cm long leather cord and string 18 wooden beads onto it, approximately 26 cm in length, making it larger overall with a mix of various colors, see Figure 8-16 (2).
③ Connect the jump ring to the metal “double happiness” accessory and hang it at the center of the lower layer necklace; at the same time, connect a bell with the jump ring and hang it in the ring above the “double happiness” accessory, see Figure 8-16 (3).
④ Use a bead tip to secure the leather cords of the upper and lower layer necklaces at the endpoints, see Figure 8-16 (4).
⑤ Hang bells on the left and right leather cords; see Figure 8-16 (5).
⑥ Connect the lobster clasp and extension line on the left and right bead tips, completing the overall design; see Figure 8-16 (6).


3. Turquoise Fantasy Collection
(1) Style Characteristics
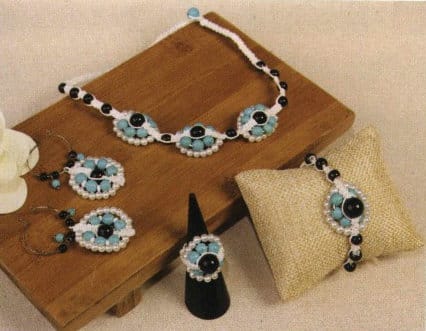
This jewelry series is made from waxed thread, turquoise, agate, and pearls, with green and white as the main colors and black as an accent. The design features a prominent three-dimensional round shape with a bright and simple overall color scheme, symbolizing completeness and harmony, as shown in Figures 8-17.
(2) Key Learning Points
Learn to use the square knot to add lines and beads; learn techniques to replace button beads for finishing; improve color matching and overall coordination skills.
(3) Material Preparation (see Figure 8-18)
① Earring Materials
Black agate beads A: 8mm, 2 pieces;
Black agate beads B: 4 mm, 8 pieces;
Blue turquoise A: 6mm, 12 pieces;
Blue turquoise B: 2mm, 4 pieces;
Imitation pearls: 4mm, 20 pieces;
White spacers: 2mm×1mm, 8 pieces;
Ear hoops: 1 pair;
Bead head pins: 40mm, 2 pieces;
White waxed thread: 25cm, 2 strands; 50cm, 1 strand.
② Bracelet Materials
Black agate beads A: 10mm, 1 piece;
Black agate beads B: 6mm, 6 pieces;
Turquoise A: 8 mm, 1 piece;
Turquoise B: 6mm, 6 pieces;
Imitation pearl: 4mm, 16 pieces;
White waxed thread: 120cm, 1 strand; 45cm, 1 strand; 35cm, 2 strands.
③ Necklace materials
Black agate beads A: 6mm, 10 pieces;
Black agate beads B: 8mm, 3 pieces;
Turquoise A: 6 mm, 18 pieces;
Turquoise B: 8mm, 1 piece;
White waxed thread: 400cm, 1 strand; 50cm, 1 strand; 30cm, 6 strands.

(4) Production Method
Earring Production:
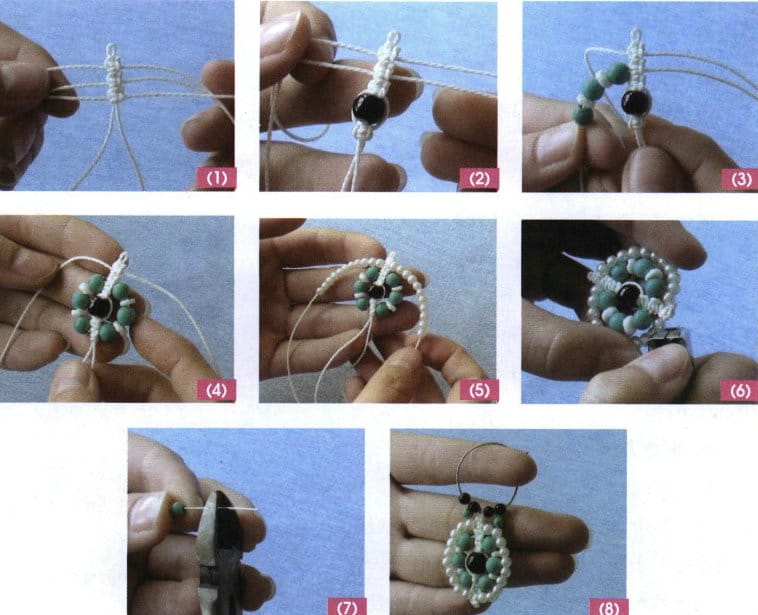
① Take 50cm white waxed thread centered folded for the axis of the upper end of a small hole reserved, with a 25cm waxed thread braided 3 square knots plus 25cm line braided 3 flat knots, and repeat once, so that the left and right of each left 1, 2, 3 wax line, to avoid stringing beads difficult, the middle of the two lines can be cut off a, see Figure 8-19 (1).
② Thread a black agate bead A onto the axis, and use the 3rd strands on the left and right to tie 3 square knots below the agate bead. Cut off the 3rd strands of waxed thread on both sides and melt to secure; see Figure 8-19 (2).
③ Use the 2nd waxed thread on the left to thread blue turquoise A, white spacer, blue turquoise A, white spacer, and blue turquoise A; see Figure 8-19 (3).
④ The second waxed thread on the right repeats the threading method of the left waxed thread, then tie 3 square knots on the axis line, cut the second waxed threads on both sides and melt to fix; see Figure 8-19 (4).
⑤ Use the first waxed threads on both sides to thread 10 imitation pearls; see Figure 8-19 (5).
⑥ Tie 3 square knots on the axis line, cut the first waxed threads on both sides, and melt to fix, forming component A; see Figure 8-19 (6).
⑦ Use a bead head pin to connect the blue turquoise B to form component B, making 2 sets; see Figure 8-19 (7).
⑧ Thread the black agate bead B onto the ear hoop, component B, black agate bead B, then thread component A, black bead B, component B, black bead B, and complete the assembly; see Figure 8-19 (8).
Bracelet Production:
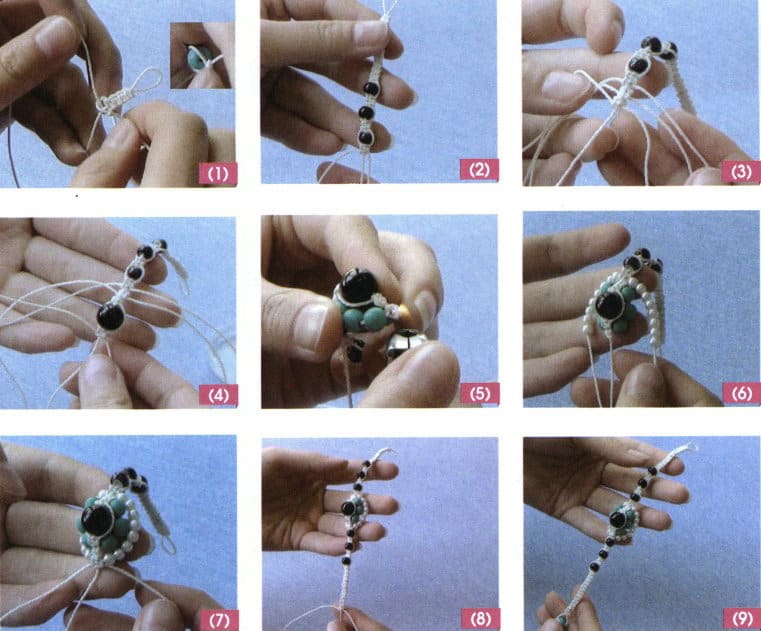
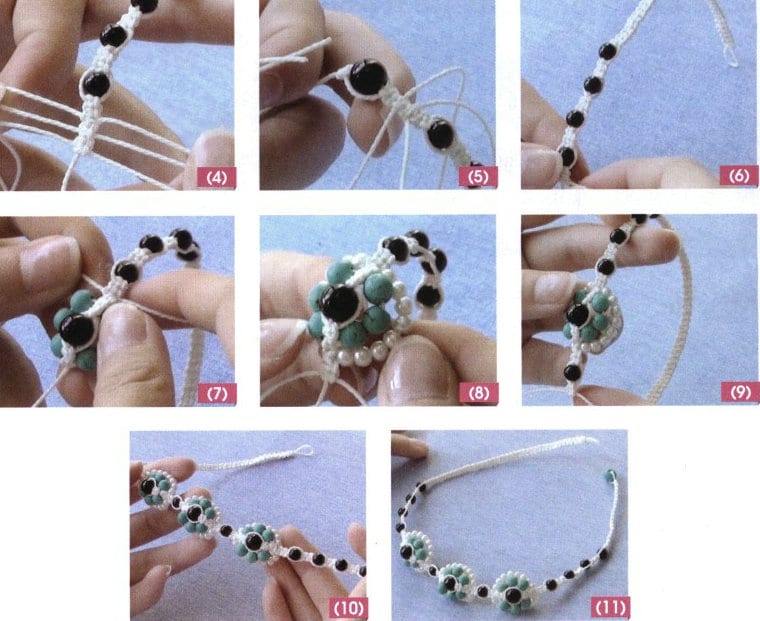
① Fold a 45 cm long wax line as the axis (after folding, one axis is 5 cm long, and the other axis is 40 cm long; due to the size of the bead hole, one axis needs to be cut off), use a 120 cm wax line to tie 3 square knots on the axis, making sure to leave a loop the size of a button at the top, cut off the shorter axis, and melt to secure. Continue to tie a 3.5 cm long square knot; see Figure 8-20 (1).
② Thread a black agate bead B onto the axis, tie 3 square knots with the left and right waxed threads, add a black agate bead A, and then tie 3 more square knots, repeating this twice to thread a total of 3 black agate beads B, see Figure 8-20 (2).
③ Add a 35 cm long waxed thread to tie 3 square knots, repeat once, and add two strands of waxed thread on each side, forming 1, 2, and 3 strands of waxed thread at each end, see Figure 8-20 (3).
④ Thread a black agate bead A onto the axis, and use the left and right 3rd waxed threads to tie 3 square knots below the agate bead; see Figure 8-20 (4).
⑤ Use the left and right 2nd waxed threads to thread 3 turquoise beads B, respectively, then tie 3 square knots on the axis, cut the left and right 2nd waxed threads, and melt the ends to secure, see Figure 8-20 (5).
⑥ Use the left and right first waxed threads to string 8 imitation pearls; see Figure 8-20 (6).
⑦ Then tie 3 square knots on the axis line, cut the first waxed threads left and right, and melt them to fix them; see Figure 8-20 (7).
⑧ Use the same method to braid the other side of the bracelet, tying square knots for about 2 cm; see Figure 8-20 (8).
⑨ Thread the blue turquoise A along the axis and fold back, leaving about 1.5 cm (the square knot part of the bracelet should be symmetrical on both sides). This forms two axes, continues to braid the square knot near the beads, cuts the left and right waxed threads and the axis, and melts to fix it. The production is complete; see Figure 8-20 (9).
Necklace Production:
① Fold a 50 cm long waxed thread as the axis (note that after folding, one side should be longer than the other), and fold a 400 cm waxed thread in the center to braid a square knot, ensuring to leave a loop on the axis that can fit an 8 mm bead, see Figure 8-21 (1).
② Because two threads cannot pass through the bead hole, after tying 5 square knots, cut one of the shorter threads and melt it to secure. Continue tying square knots for about 9 cm; see Figure 8-21 (2).
③ Thread a black agate bead B onto the main line, see Figure 8-21 (3).
④ Tie 5 square knots with the left and right waxed threads, then thread a black agate bead B, and continue until 4 black agate beads B are threaded; as shown in Figure 8-21 (4).
⑤ After the last black agate bead B, tie 3 square knots, then add a 30 cm thread and tie 3 square knots, repeating the addition of the second thread; see Figure 8-21 (5).
⑥ Thread a black agate bead B onto the axis, and tie 3 square knots with the left and right 3rd wax threads. Cut the left and right 3rd waxed threads and melt them to secure them; see Figure 8-21 (6).
⑦ Thread 3 blue turquoise A beads onto the left and right 2nd waxed threads, and tie 3 square knots on the axis. Cut the left and right 2nd waxed threads and melt them to secure them; see Figure 8-21 (7).
⑧ Thread 8 imitation pearls onto the left and right 1st waxed threads, and tie 3 square knots on the axis. Cut the left and right 1st waxed threads, and melt to secure; see Figure 8-21 (8).
⑨ Thread a black agate bead B onto the axis and tie 3 square knots; see Figure 8-21 (9).
⑩ Repeat steps (5) to (9) twice, weave 5 square knots, then thread a black agate bead B, and so on, for a total of 4 black agate beads B, see Figure 8-21 (10).
⑪ Weave square knots for about 7 cm, thread the blue turquoise A through the axis, and fold back. At this point, use the left and right waxed threads to weave square knots for 2 cm near the blue turquoise A (the square knot part of the necklace should be symmetrical on both sides), cut off the left and right waxed threads from the axis, and melt to fix, see Figure 8-21 (11).

Копирайт @ Sobling.Jewelry - Пользовательские ювелирные изделия производителя, OEM и ODM ювелирный завод
4. Plum Blossom Elegance Collection
(1) Style Characteristics
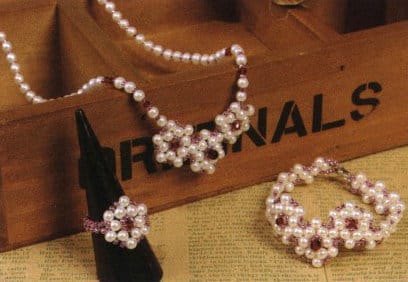
This jewelry series primarily uses pearls and oil-gloss seed beads as main materials, with white and purple as the main color tones and red as an accent color. The three plum blossom shapes reflect a pure and exquisite combination, showcasing a unique style of elegance and grace, as seen in Figure 8-22.
(2) Key Learning Points
Learn the basic composition of plum blossoms and the methods for changing the angles of each plum blossom; learn the matching of pearl materials and the expression of effects.
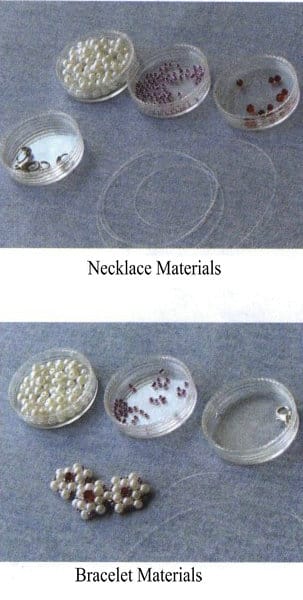
(3) Material Preparation (see Figure 8-23)
① Necklace Materials
Pearls: 4mm, 220 pieces;
Purple oil-gloss seed beads: 2 mm, several;
Red faceted diamond beads A: 2mm, 8 pieces;
Red faceted diamond beads B: 4mm, 6 pieces;
Bead tip: 10 mm (length), 2 pieces;
Positioning beads: 2mm, 2 pieces;
Lobster clasp: 6mm, 2 pieces;
Fishing line: 1.5m×0.3mm.
② Bracelet Materials
Pearls: 4 mm, 82 pieces;
Red faceted diamond-shaped bead A: 2 mm, 3 pieces;
Purple glossy round beads: 2 mm, 110 pieces;
Lobster clasp: 6 mm, 1 piece;
Fishing line: 0.3 mm × 1.1 m, 1 piece;
(4) Production Method
Necklace Production:
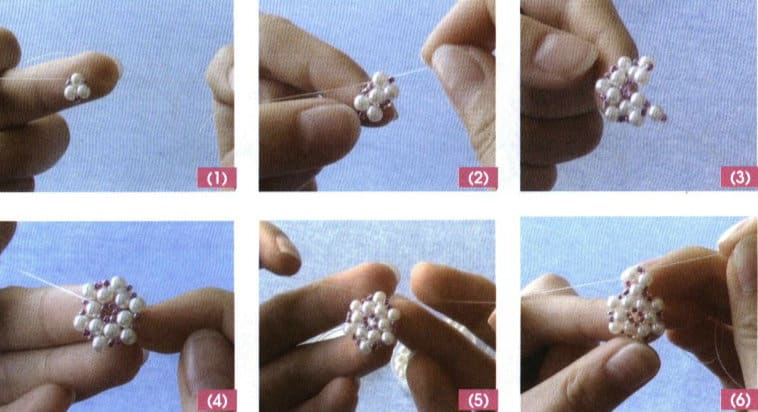
(① String the first flower: Use fishing line to string purple oil-gloss seed beads (purple seed beads), pearls, purple seed beads, pearls, purple seed beads, and finally pass through a pearl; see Figure 8-24 (1).
② Right thread: sequentially string purple seed beads, pearls, and purple seed beads; left thread strings purple seed beads, then cross through pearls; see Figure 8-24 (2).
③ Repeat step ② three times, then the right thread strings purple seed beads, pearls, and purple seed beads; see Figure 8-24 (3).
④ The left thread strings the first purple seed bead and crosses through the first pearl. After completing a circle of the flower, close it up; see Figure 8-24 (4).
⑤ The right thread can pass through the combination in Figure 8-24 (1) to meet the left thread and then tie a knot. Pass through the entire flower body to stabilize it, and finally, the fishing line should be on both sides of the outermost pearl, see Figure 8-24 (5).
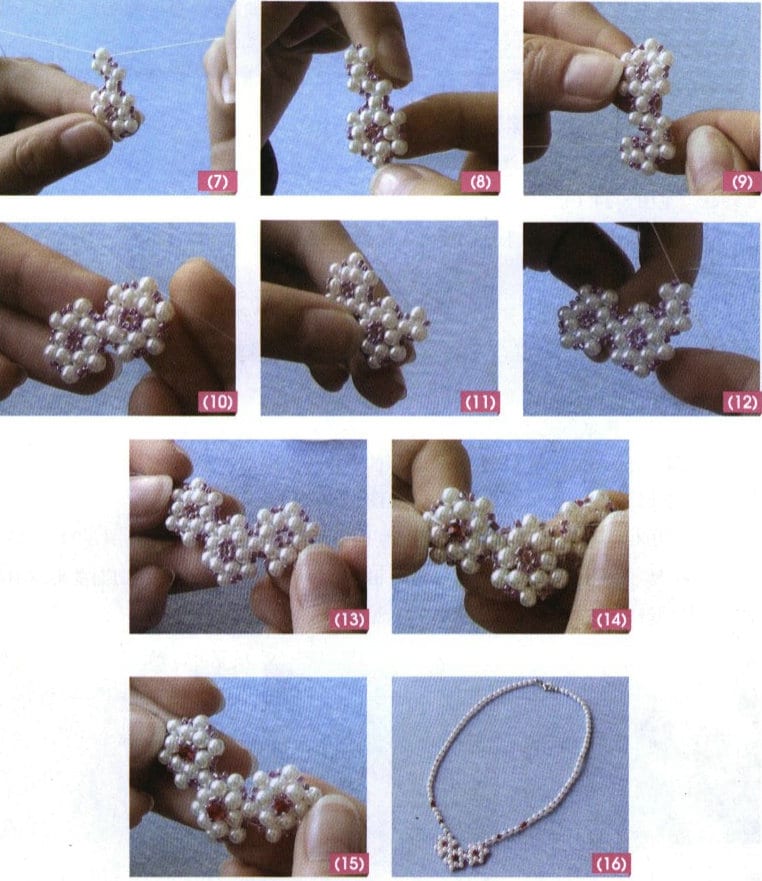
⑥ Thread the second flower: the right thread goes through the purple seed beads, pearl, and purple seed beads in sequence; the left thread goes through the purple seed bead, then goes through the pearl in the opposite direction, see Figure 8-24 (6).
⑦ Left thread: thread the purple seed beads, pearl, and purple seed beads in sequence; the right thread goes through the purple seed bead, then through the pearl in the opposite direction, see Figure 8-24 (7).
⑧ Repeat step ⑦ three times; then, the left thread goes through the purple seed beads, pearl, and purple seed beads, and the right thread goes through the purple seed bead, see Figure 8-24 (8).
⑨ Finally, go through the pearl that started the second flower to complete the second round of closure; repeat step ⑤; see Figure 8-24 (9).
⑩ Adjust the fishing line to the position of the second pearl on the outer circle of the second flower (counting clockwise from the shared pearl with the first flower), with the fishing line on both sides of this pearl, see Figure 8-24 (10).
⑪ String the third flower. Right line: sequentially string purple seed beads, pearls, and purple seed beads; left line string purple seed beads, then pass through the pearl; see Figure 8-24 (11).
⑫ Left line: sequentially string purple seed beads, pearls, and purple seed beads; right line string purple seed beads, then pass through the pearl, see Figure 8-24 (12).
⑬ Repeat step ⑫ three times, then thread the left line through the purple seed bead, pearl, and purple seed bead; thread the right line through the purple seed bead and the pearl that starts the third flower, completing the closure of the third flower. Repeat step ⑤, and finally cut off the excess line; see Figure 8-24 (13).
⑭ Inlay the flower center with a red bead: Use fishing line to pass through one of the purple seed beads in the flower center, split the left and right lines, thread the left line through the red faceted diamond bead A, and then pass from right to left through the opposite purple rice bead (skipping 2 purple seed beads). To stabilize the red bead, you can pass through the seed beads several times and tie a knot to secure it, see Figure 8-24 (14).
⑮ Use the same method to inlay the other two red faceted diamond beads A, tie a hidden knot, see Figure 8-24 (15).
⑯ The chain part should alternate between purple seed beads and pearls, paying attention to symmetry by adding red faceted diamond beads B and installing bead tips and jump rings with lobster clasps at both ends; see Figure 8-24 (16).
Bracelet Production
The method for making the three plum blossoms at the bracelet’s center is the same as that for the necklace, so it will be omitted.
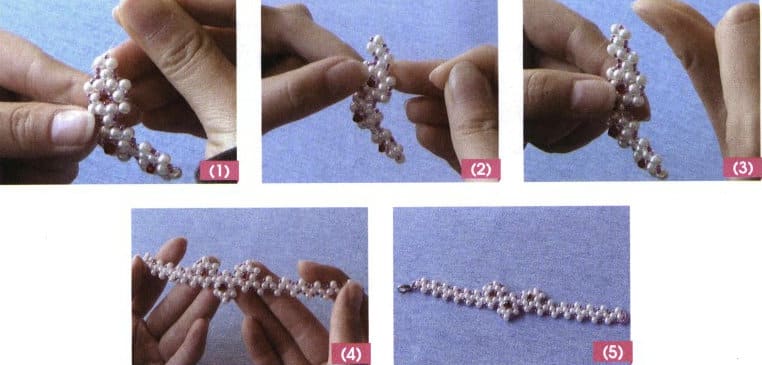
① Chain part: Use fishing line to first thread a pearl from one end of the flower; the left line threads a purple rice bead, the right line threads a purple seed bead, a pearl, a purple seed bead in sequence, and then thread a pearl from the opposite side, see Figure 8-25 (1).
② The left line threads a purple seed bead, a pearl, a purple seed bead, the right line threads a purple seed bead, and then thread a pearl from the opposite side; see Figure 8-25 (2).
③ The right line threads a purple seed bead, a pearl, a purple seed bead, the left line threads a purple seed bead, and then thread a pearl from the opposite side; see Figure 8-25 (3).
④ The left and right lines alternately proceed according to steps (3) to (4), using the same method to thread the other end until the appropriate length is reached; see Figure 8-25 (4).
⑤ One side is finished with a lobster clasp, while the other is threaded with purple seed beads to form a small loop, tied and hidden, see Figure 8-25 (5).
5. Blue and White Harmony Jewelry Collection
(1) Style Characteristics
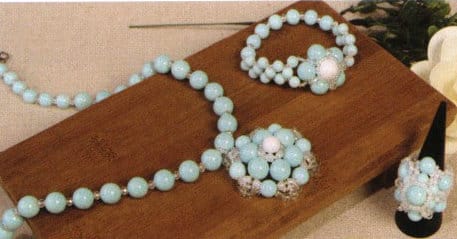
This jewelry series is primarily green, with white as an auxiliary color, and is made by interweaving beads of the two colors. The combination of green and white is elegant, fresh, pure, and harmonious. The round pendant is particularly eye-catching, appearing three-dimensional and exquisite and creating a beautiful and tranquil atmosphere of deep spring (see Figure 8-26).
(2) Key Learning Points
Learn the production techniques for the main part of the pendant, the threading methods and matching techniques for different sizes of seed beads, and the addition of the middle beads in the main part of the bracelet.
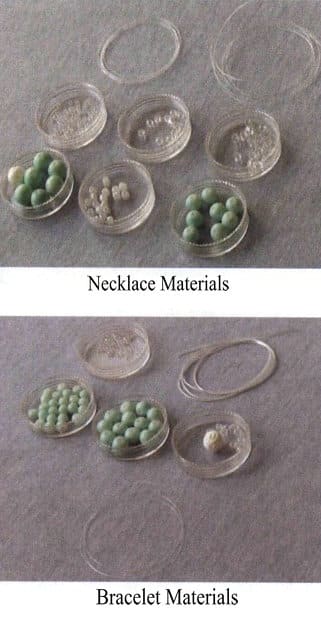
(3) Material Preparation (see Figure 8-27)
Necklace Materials:
① Pendant Materials
Green Bead A: 10mm, 6 pieces;
Green Bead B: 8mm, 7 pieces;
White Agate Bead: 10mm, 1 piece;
Transparent Faceted Bead: 4mm, 6 pieces;
White Seed Bead: 4mm, 18 pieces;
Transparent Seed Bead A: 4mm, 24 pieces;
Transparent Seed Bead B: 2mm, quantity as needed;
Fishing Line: 0.5mm × 100cm, 1 spool; 0.3mm × 100cm, 1 spool.
② Chain Materials
Green Bead A: 10 mm, 14 pieces;
Green Bead B: 8 mm, 12 pieces;
Transparent Faceted Bead: 4 mm, 35 pieces;
Fishing Line: 0.3 mm (diameter) × 50 cm (length), 1 spool;
Lobster Clasp: 8 mm, 1 piece;
Positioning Bead: 2 mm, 2 pieces;
Jump Rings: 6 mm, 2 pieces;
Bead Tips: 8 mm, 2 pieces.
Bracelet Materials:
Green beads B: 8mm, 12 pieces;
Green beads C: 4mm, 24 pieces;
White jade carved beads: 10mm, 1 piece;
Transparent faceted beads: 4mm, 11 pieces;
Transparent seed beads: 2 mm, several;
Elastic line: 0.8 mm (diameter) ×30cm (length), 1 piece;
Fishing line: 0.3 mm (diameter) ×60cm (length), 1 piece.
(4) Production Method
Necklace Production:
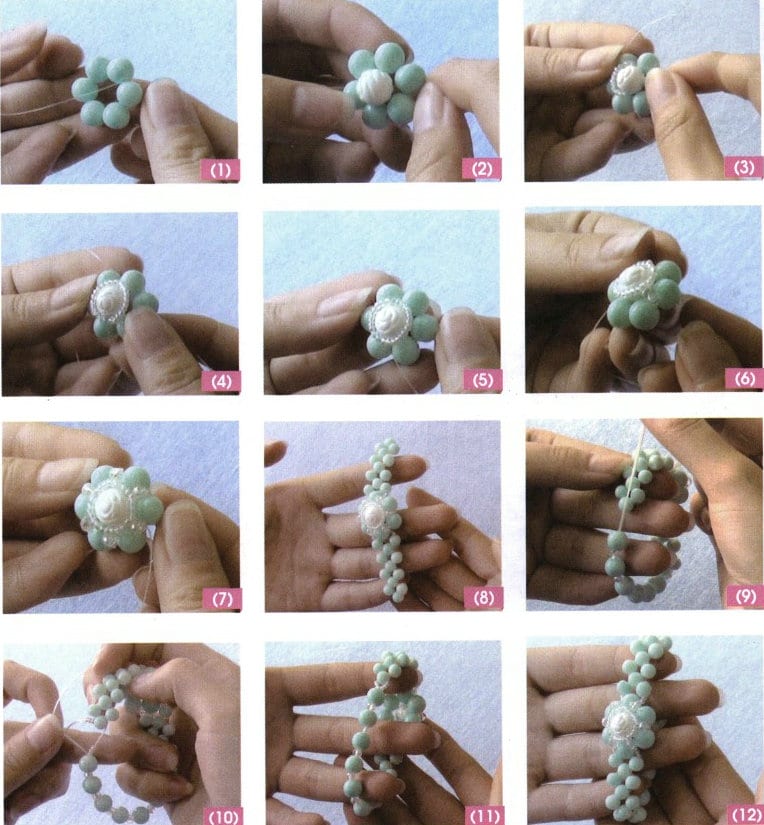
1) Main part of the pendant
① Use fishing line to string white seed beads, green bead A, white seed beads, green bead B, white seed beads, green bead A, Finally, pass the green bead A back through and pull the fishing line tight to move it to the center, forming a triangle shape, see Figure 8-28 (1).
② The right line passes through a white seed bead, green bead B, white seed bead, green bead A, the left line passes through a white rice bead, and then goes back through the last green bead A, pull the fishing line tight, see Figure 8-28 (2).
③ Using the method from step ②, repeat the threading 4 times; see Figure 8-28 (3).
④ Finishing: the right line passes through a white seed bead, green bead B, and white seed bead A; see Figure 8-28 (4).
⑤ Thread a white seed bead on the left line, green bead A (the first one), pass back through the white seed bead a, and tighten the fishing line, as shown in Figure 8-28 (5).
⑥ When the main shape of the pendant is done, it forms a three-dimensional flower composed of different layers of white flower center, green bead A, and green bead B combined with white seed beads, see Figure 8-28 (6).
2) Pendant peripheral part
To make the necklace full and delicate, add some rice beads to the periphery of the necklace flower to set it off.
① The first circle: the left line is threaded with 1 transparent seed bead B, forming the effect of threading 1 transparent rice bead between 2 white seed beads, see Figure 8-28 (7).
② Along the counterclockwise direction, such as step ⑦ through the periphery of the beads, until the starting point, one is to play the role of adding beads but also play a reinforcing effect, see Figure 8-28 (8).
③ the second circle: single through the 4 transparent seed beads A, then wear the flower periphery of the green beads B, so repeat until the starting point. Form a small petal shape at the periphery of the flower, see Figure 8-28 (9).
④ Third circle: Thread 2 clear seed beads B, 1 clear faceted bead, 2 clear seed beads B, and then thread the green bead B on the periphery of the flower, and so on until the starting point. This fills the gap in the middle of the small petals on the periphery, making it more three dimensional and fuller, as shown in Figure 8-28 (10).
⑤ Tie the knot and cut the remaining threads to give the flower a fuller, three-dimensional effect, see Figure 8-28 (11).
3) The flower core part of the pendant
① Use a fishing line to thread 1 white agate bead, with the left and right lines passing through the white seed beads in the center of the flower, then pull the fishing line tight, see Figure 8-28 (12).
② Add a transparent seed bead B between the white rice beads at the center of the flower until a full circle is formed, making the center of the flower tighter with no gaps, see Figure 8-28 (13).
③ After threading several transparent seed beads B with the fishing line, thread it through the outer end of the petal to form a small loop for connecting to the necklace. The number of transparent seed beads relates to the loop size; see Figure 8-28 (14).
4) Chain and combination
Using a method alternating between a green bead A and a transparent bead, string 11 green beads A: then use a method alternating between a green bead B and a transparent bead to string 12 green beads A: then connect the left and right bead tips with a lobster clasp, the total length of the chain is 46 cm. Fix the pendant to the chain, tie a knot, cut off the excess thread, and complete the production, see Figure 8-28 (15).

Bracelet Production:
1) The flower part
① Use the fishing line to string 6 green beads A, then tie a knot to secure it; see Figure 8-29 (1).
② Use one of the fishing lines to string a white carved bead, then skip 2 beads and string the 3rd green bead A to secure the carved bead; as shown in Figure 8-29 (2).
③ Then, string several transparent seed beads (the length of half a circle of the carved bead) and pass them back through the carved bead to secure them. See Figure 8-29 (3).
④ Use the same method to make another half circle of transparent seed beads; see Figure 8-29 (4).
⑤ A fishing line is threaded back through a transparent seed bead to the other end of the carved bead, then another transparent seed bead is added to fill the gap in the carved bead, and the other line is threaded in the same way. The flower center can be embedded; see Figure 8-29 (5).
⑥ Thread back through 4 seed beads so the fishing line is positioned between two green beads B, then thread 1 transparent faceted bead, followed by 1 seed bead, and thread back through the adjacent green bead B. Complete the other green beads B threading similarly; see Figure 8-29 (6).
⑦ Secure the fishing line, the completed effect can be seen in Figure 8-29 (7).
2) Chain body part
① Starting from one end of the flower, thread 4 groups of four-petal flower beads and secure them. Use a new fishing line at the flower’s other end and make it the same way; see Figure 8-29 (8).
② An elastic line threading method can accommodate variations in wrist thickness. Here, a design is created using green beads B interspersed with faceted beads; see Figure 8-29 (9).
③ The connection part can thread seed beads with left and right lines; see Figure 8-29 (10).
④ Thread to a length of about 20 cm, tie a knot, and hide the knot. The front and back effects of the bracelet are shown in Figures 8-29 (11) and (12).
6. Floral Iridescent Collection
(1) Style Characteristics
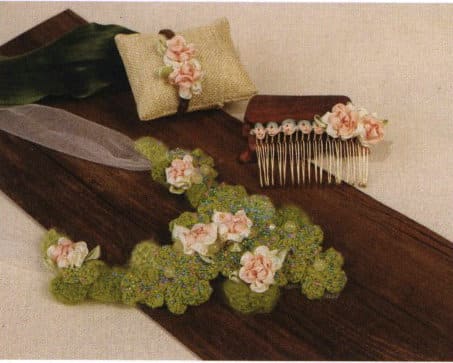
This jewelry series is designed using ribbon flowers, knitted flowers, non-woven fabric, and beads. Its fresh and sweet style evoking the beauty of nature, as if one is in a flower garden surrounded by a sweet fragrance, reflecting a warm and rich pastoral charm and a unique fresh appeal, see Figure 8-30.
(2) Key Learning Points
Learn to use ribbon and knitted flowers to design and create accessories that reflect a pastoral theme; use leather cords to weave bracelets; use floral ribbons to make hair combs, and apply these methods to other accessories.
(3) Material Preparation (see Figure 8-31)
① Necklace Materials
Yellow jade beads: 6mm, 9 pieces;
Pink, blue, yellow, green seed beads: 1 mm, several;
Pearl: 6 mm, 1 piece;
White gauze: 25cm×60mm, 2 strips;
Knitted four-leaf flowers: 50mm, 14 pieces;
Knitted light-colored leaves: 20mm, 4 pieces;
Knitted dark-colored leaves: 20mm, 6 pieces;
Non-woven fabric: 25 cm (length) ×20cm (width).
② Hair Comb Materials
Ribbon flower: 20mm, 2 pieces;
Hair comb: 75mm, 1 piece;
Fishing line: 30 cm (length) ×1mm (diameter), 1 piece;
Decorative ribbon: 90mm, 1 piece.
③ Bracelet Materials
Leather cord: 20 cm (length) ×2.5mm (width), 3 pieces;
Satin ribbon flower: 20mm, 3 pieces;
Metal clasp: 8mm, 2 pieces;
Jump ring: 4mm, 2 pieces;
Lobster clasp: 10mm, 1 piece.

(4) Production Method
Necklace Production:
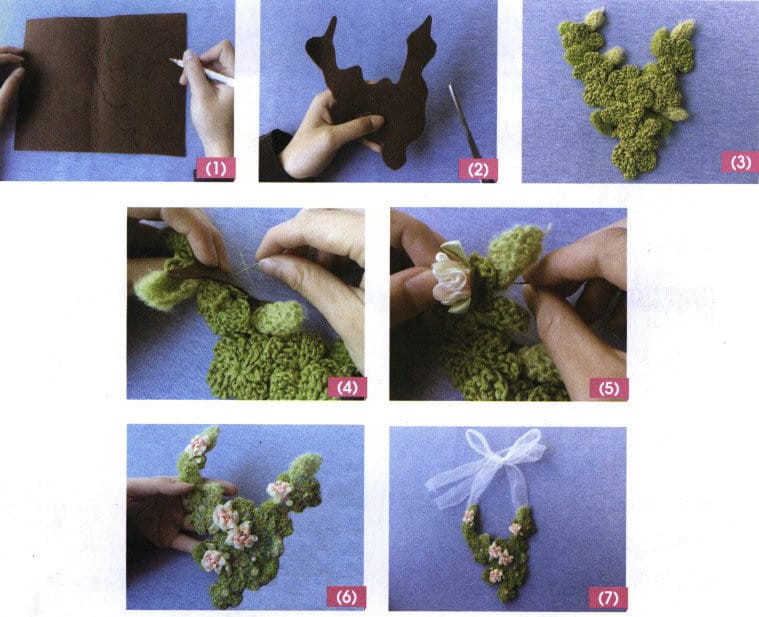
① Design the outline of the necklace on non-woven fabric; see Figure 8-32 (1).
② Cut out the outline according to the design line. Since the lace will extend outward, you can cut slightly smaller than the outline line; see Figure 8-32 (2).
③ Layer the knitted four-leaf flowers and arrange the dark and light leaves in color within the outline of the non-woven fabric; see Figure 8-32 (3).
④ Start sewing with the fishing line according to the arranged state, making sure to sew it together with the non-woven fabric to reinforce its strength; as shown in Figure 8-32 (4).
⑤ Sew on four satin ribbon flowers for embellishment, see Figure 8-32 (5).
⑥ Finally, use the fishing line to sew pink, blue, yellow, and green seed beads, yellow jade beads, and pearls for decoration; see Figure 8-32 (6).
⑦ Sew white gauze to the top left and right using sewing thread; see Figure 8-32 (7).
Hair Comb Production:
① Use 2 strands of fishing line to wrap the floral decoration around the hair comb and secure it; see Figure 8-33 (1).
② Sew the satin ribbon flower at one end of the hair comb; see Figure 8-33 (2).
③ The two layers of satin ribbon flowers should be sewn tightly; see Figure 8-33 (3).

Bracelet Production:
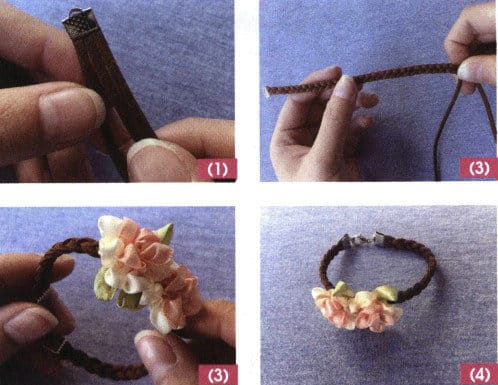
① Use a metal clip to secure three leather cords; see Figure 8-34 (1).
② Braid the three leather cords tightly and evenly until reaching the desired length for the bracelet; see Figure 8-34 (2).
③ Sew two satin ribbon flowers in the middle of the leather cord, hiding the stitches as much as possible; see Figure 8-34 (3).
④ One end of the bracelet is connected to a lobster clasp with a jump ring, and the other is connected with a jump ring, see Figure 8-34 (4).
Копирайт @ Sobling.Jewelry - Пользовательские ювелирные изделия производителя, OEM и ODM ювелирный завод


