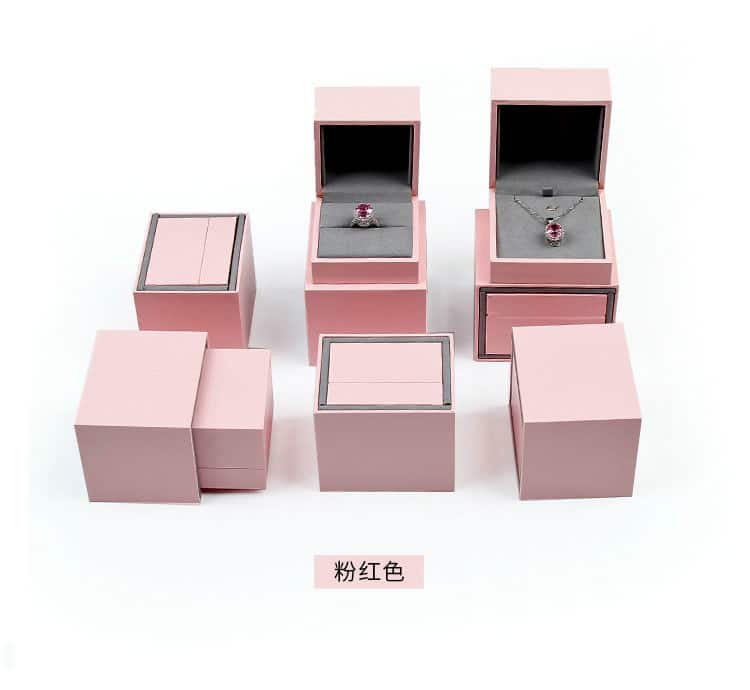
What Equipment Do You Need To Master Enamel Jewelry Making, And What Are The Basic Techniques?
Essential Enamel Tools & 7 Basic Techniques for Jewelry Making
Giriş:
Enamel crafting is a beautiful fusion of metalwork and artistry, but where do you begin? This comprehensive guide covers the essential equipment and fundamental techniques you need to create stunning enamel jewelry and decorative objects.
First, we explore the core tools of the trade. The enamel kiln is the heart of the studio, and we discuss how to choose the right one based on power, insulation, and features like an observation port. We then look at indispensable auxiliary tools, including various firing racks (flat-support, three-point, and custom shapes), spatulas for handling pieces, and safety gear. The guide also details equipment for critical preparatory steps, such as preparing acid solutions for cleaning metal substrates and the tools needed for safe application.
Beyond tools, we introduce the seven basic classifications of enamel techniques. From the foundational Flat-Laid Enamel to the intricate wirework of Cloisonné, the carved depths of Champlevé, the translucent beauty of Plique-à-jour, and the painterly detail of Painted and Grisaille Enamel, this overview provides a clear roadmap for understanding the diverse styles and effects possible in enamel art.
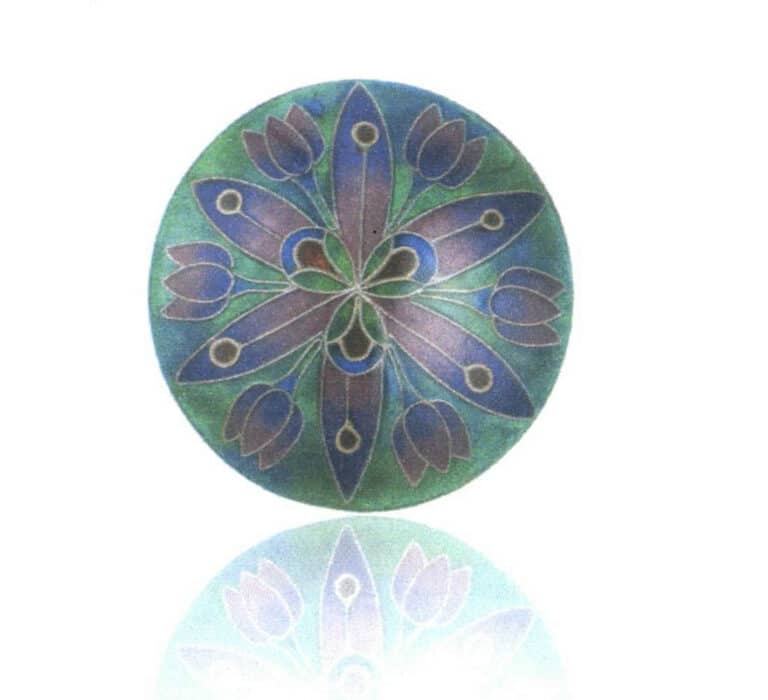
Cloisonné work "Variations of Aquatic Flowers"
İçindekiler
Section I Basic Equipment and Tools for Enamel Making
1. Tools Used During Firing
1.1 Enamel Kiln
In a proper enamelling studio, a user-friendly enamel kiln is the most basic piece of equipment.
So, how do you choose an enamel kiln that suits you? Because enamel kilns are generally expensive and are not consumable items that need frequent replacement in the short term, everyone hopes to choose a kiln suitable for long-term use with a high cost-performance ratio.
The criteria for choosing an enamelling kiln are the following.
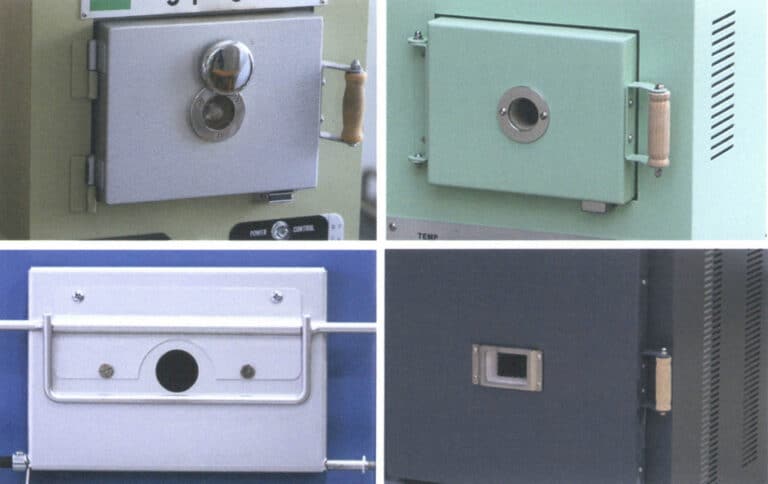
First, look at the kiln’s power. Generally speaking, the higher the power, the faster the heating. If the studio’s electrical circuit allows it, a higher-power kiln will take less time to reach the set temperature. Usually, the kiln’s rated power is labelled on the back of the unit; as shown in Figure 2-1, the label shows this kiln’s rated power is 2000 watts.
Second, check whether the kiln’s insulation layer can efficiently prevent heat loss. If the insulation is inadequate, every time the door is opened to remove or place work, the kiln temperature will drop significantly, which not only wastes time but can also affect the firing results to some extent. Figure 2-2 shows a kiln with its door open; from the edge of the firing chamber to the outermost edge of the body is the insulation layer.

Figure 2-1 Rated power of the enamel kiln
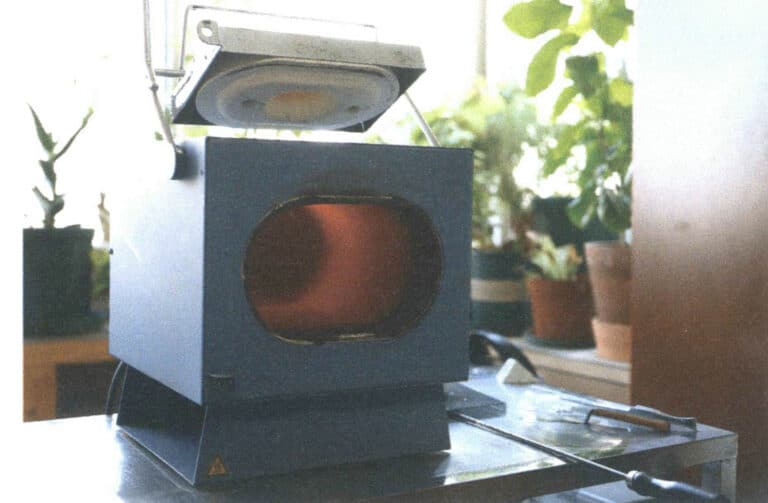
Figure 2-2 Enamel kiln with the door open
Besides the important criteria mentioned above, the kiln’s appearance and dimensions, the size of the interior chamber, and the ease of opening and closing the kiln door are all conditions to consider when choosing an enamel kiln. However, these factors do not have fixed standards and can be decided based on personal preference and the needs of the studio.
The enamel kilns commonly seen on the jewellery tools market in our country are mainly of the following types.
(1) Enamel kilns made in Germany. They have a blue exterior and a white interior, and come in five sizes from large to small. Power ratings are 1200 W, 2000 W, and 2500 W. The inner chamber dimensions and viewing port sizes differ among the models. These kilns are mainly suitable for firing small jewellery pieces. Their characteristics are compact and attractive appearance, lightweight, convenient operation; the door flips upward, with the viewing port located in the centre of the door; they have stable performance, fast heating, and long continuous working time. A notable advantage of the German-made kilns is that no fine metal oxide particles are produced inside the chamber during firing. Their drawbacks are a higher price and the need for an additional thermostat to adjust and control the temperature. Figure 2-4 shows a German-made enamel kiln with a power of 2000 W; its maximum temperature can reach 1100°C. The craft production examples in this book were all completed using this kiln.
Before using a German-made enamel kiln for the first time, it is best to brush a layer of ochre powder onto the inner walls of the chamber as a protective coating; doing so helps protect the chamber and extend its service life. Ochre is a natural mineral; Figure 2-5 shows ochre powder, and kaolin can also be used as a substitute.
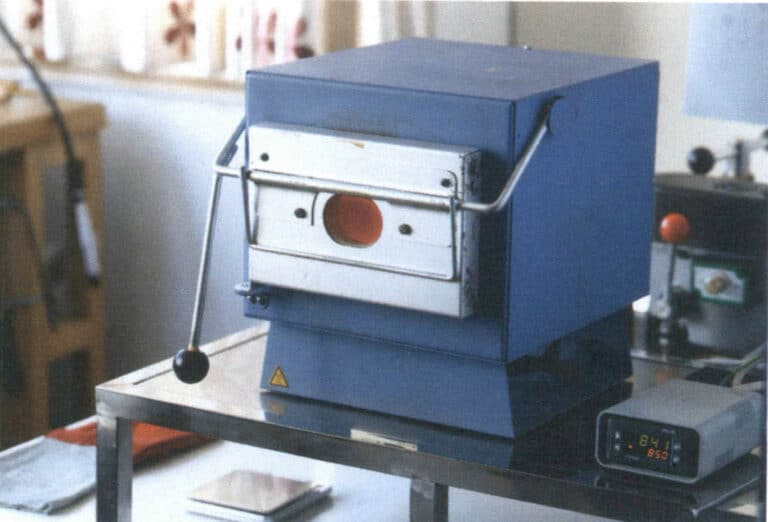
Figure 2-4 Enamel kilns made in Germany
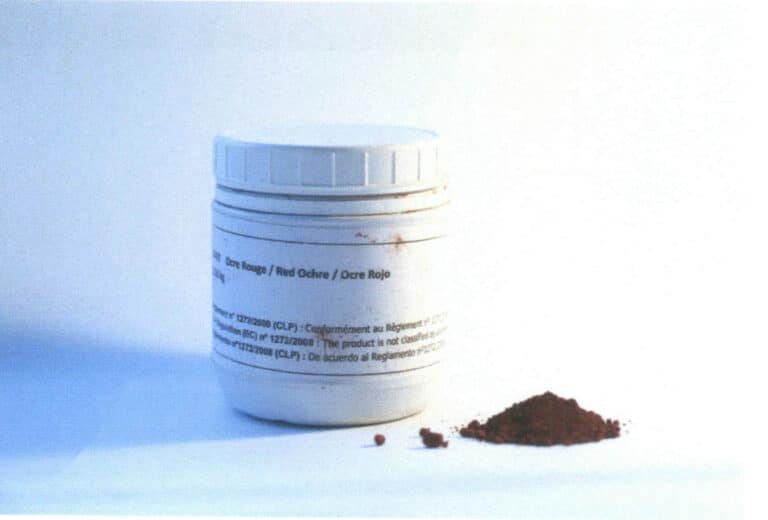
Figure 2-5 Ochre powder
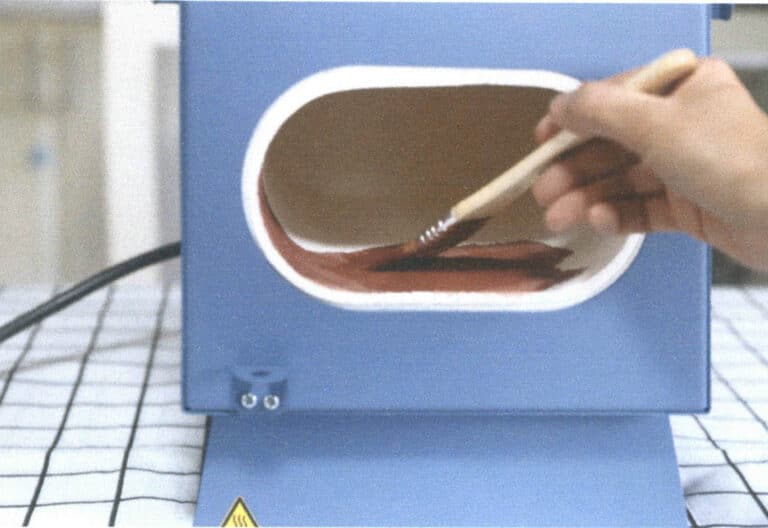
Figure 2–6 Brushing ochre powder

Figure 2–7 Finished brushing
(2) Domestic enamel kilns. For a long time, domestically produced enamel kilns were retrofitted from electric furnaces used for casting and were not entirely suitable for firing enamel. These types of enamel kilns typically consume a lot of electricity and heat up very slowly; they are large, bulky in appearance, and inconvenient to operate. In recent years, as enamel techniques have become more popular domestically, the demand for enamel kilns among local enamel makers has gradually increased. Imported-brand enamel kilns are not only more expensive, but purchasers also face transportation and customs clearance issues, so some domestic brands have begun independently developing enamel kilns specifically for firing enamel. For example, an enamel kiln improved and developed by the Jewellery Workshop of the Academy of Arts & Design, Tsinghua University and manufactured by Beijing ShengYihang Jewellery Equipment comes in two sizes for large studios and personal studios, respectively, with power ratings of 2000 watts and 800 watts. Compared with traditional domestic enamel kilns, this kiln is smaller and heats up faster; compared with imported enamel kilns, its kiln body and temperature controller are integrated, its interior size is relatively large—suitable for firing relatively large works—and its price is also reasonable. Figure 2–8 shows the enamel kiln produced by Beijing ShengYihang Jewellery Equipment.
(3) Japanese-made cloisonné enamel kiln. This Japanese cloisonné enamel kiln is characterised by a compact, attractive appearance, convenient operation, and a relatively low price. It is small in size, with a side-opening door, and the kiln body and temperature controller are integrated. However, its temperature controller is rather special: it does not adjust by temperature directly. Still, it is divided into six settings, each controlling a different temperature, so adjusting the temperature is not very convenient—this is the biggest shortcoming of this brand’s kiln. In addition, its kiln chamber is relatively small, and it heats up slowly. Figure 2–9 shows a Japanese-made cloisonné enamel kiln.

Figure 2–8 Domestic enamel kiln

Figure 2–9 Japanese-made cloisonné enamel kiln
1.2 Auxiliary Tools for Enamel Firing
In addition to the enamel kiln, some auxiliary small tools are also indispensable during the enamel firing process.
The purpose of the firing rack is to hold the piece with the applied glaze, making it easier to place into the kiln for firing. Firing racks can be homemade or purchased at jewellery tool shops or stores that specialise in selling enamel supplies. They are generally made of high-quality stainless steel, and titanium can also be used. Firing racks are broadly divided into flat support, pointed corner, and irregular shapes.
(1) Flat-support type. The flat-firing rack consists of a square panel and two support legs that extend vertically downward on either side. The height of the support legs is generally in 3~5 centimetres, while the square panel comes in different sizes to be chosen according to the size of the piece, as shown in Figure 2–10. During firing, a long shovel is inserted between the two support legs under the rack to lift the rack and the piece on it into the kiln for firing, as shown in Figure 2–11. Common flat-firing racks come in mesh and plate types. Mesh racks are made of steel mesh or titanium mesh, while plate racks are made of steel plate or titanium plate, with many closely spaced holes punched on the surface to reduce the rack’s mass and avoid absorbing excessive heat during firing. The advantage of mesh racks is that they are lightweight, easy to handle, absorb less heat, and do not affect the firing of the enamel; the disadvantage is that they have a shorter service life, generally deforming after about a year, and their surfaces begin to form black metal oxides, the oxide flakes of which may even adhere to the enamel surface during firing. The advantage of plate racks is their high strength, providing more stable support for pieces and resisting deformation; the disadvantage is their heavier weight, making them harder to handle and inconvenient to place and remove. Additionally, plate racks absorb a lot of heat during firing, which relatively prolongs the firing time.
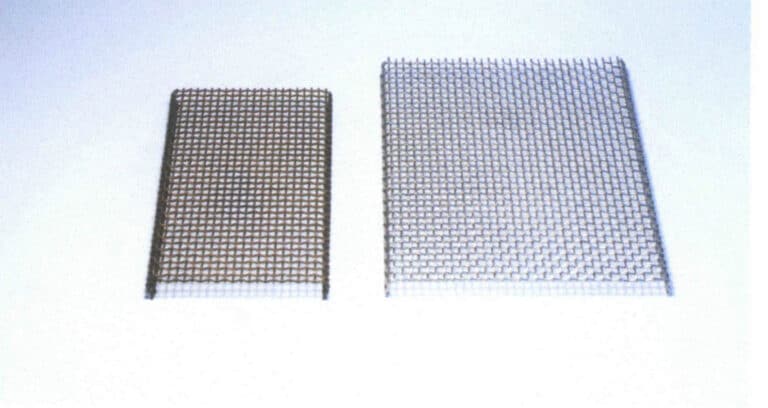
Figure 2–10 Flat-firing racks of different models
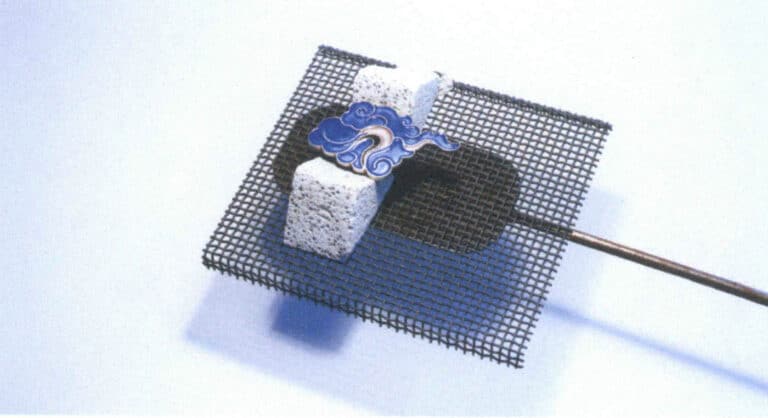
Figure 2–11 Rack supporting a piece
(2) Three point type. The three point trivet consists of a base and several (3~4) upward-pointing spikes, made of stainless steel or titanium, and is available in various sizes to match the size of the enamel piece. Figure 2–12 shows steel three point trivets of different sizes; overall, they are more suitable for smaller pieces. During firing, the piece is laid flat between several spikes, and the inner inclined sides of the spikes securely support the piece. Because the inner sides of the spikes incline outward from bottom to top, they accommodate pieces of various shapes, as shown in Figure 2–13. The advantage of the three point trivet is its light weight and suitability for pieces of various shapes; in addition to regular geometric shapes, it also works for pieces with irregular bases. The disadvantage is that when both sides of a piece are glazed, the glaze on the reverse side can easily stick to the slanted edges of the supporting spikes, leaving marks on the reverse glazed surface, and in severe cases, the piece may even adhere to the rack and cannot be removed.
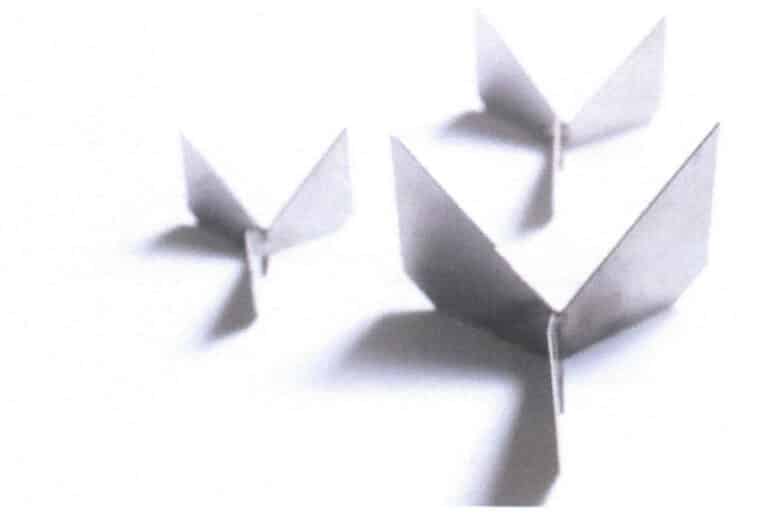
Figure 2-12 Three point trivet in different sizes
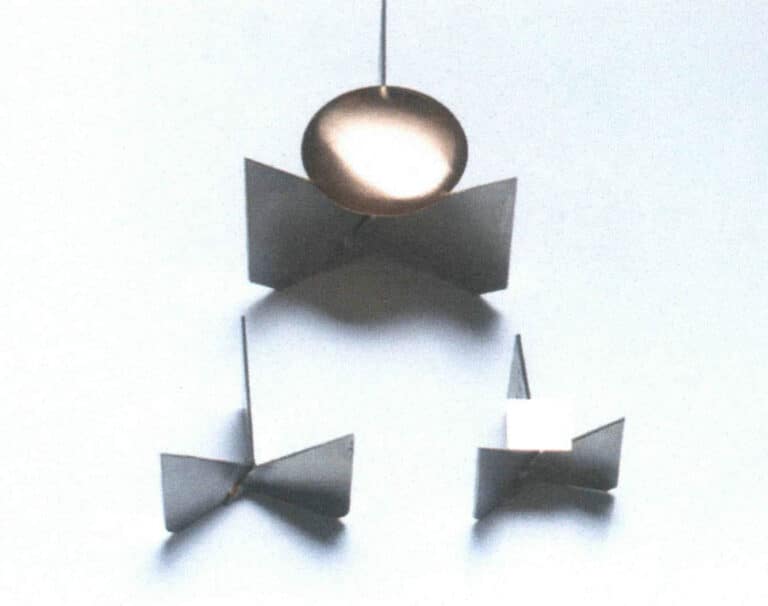
Figure 2-13 Three point trivet suitable for works of various shapes
(3) Special-shaped firing racks. Special-shaped s refer to metal brackets used to works of special shapes during firing. These s are generally made according to the shape of the piece and are made of stainless steel or titanium. Some ready-made special-shaped s can be purchased at shops that sell enamelling tools, or they can be made by hand. There is no fixed rule for the shape of these s; as long as they can stably the piece and the points do not touch the glazed surface, they are acceptable. Figure 2-14 shows a dedicated firing rack for firing rings sold at an enamelling tools shop, and Figure 2-15 shows a steel, special-shaped that an artist made specifically to fire a work they created.
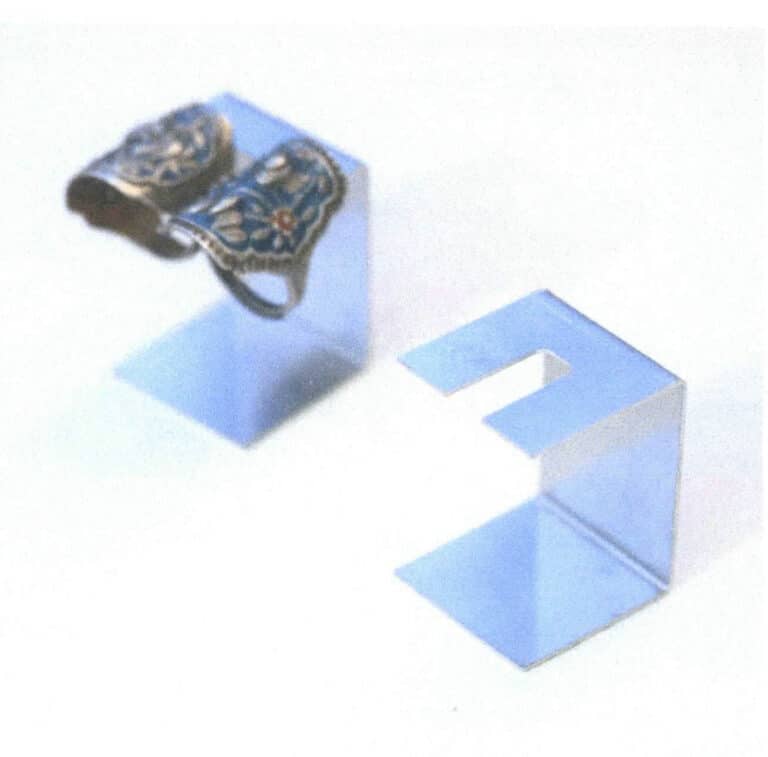
Figure 2-14 Dedicated firing rack for firing rings
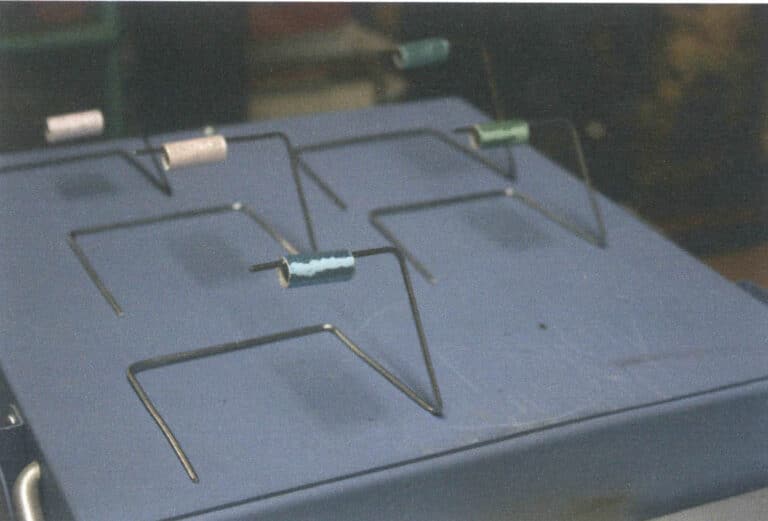
Figure 2-15 The custom-made steel-shaped firing rack for a work with an irregular shape
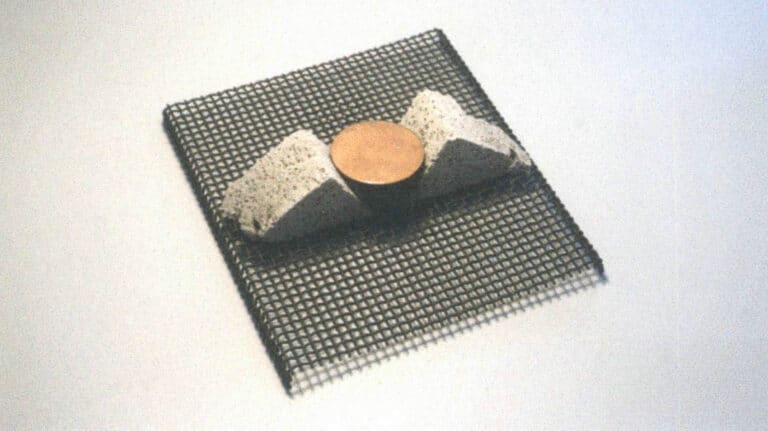
Figure 2-16 Work placed on a refractory brick rack
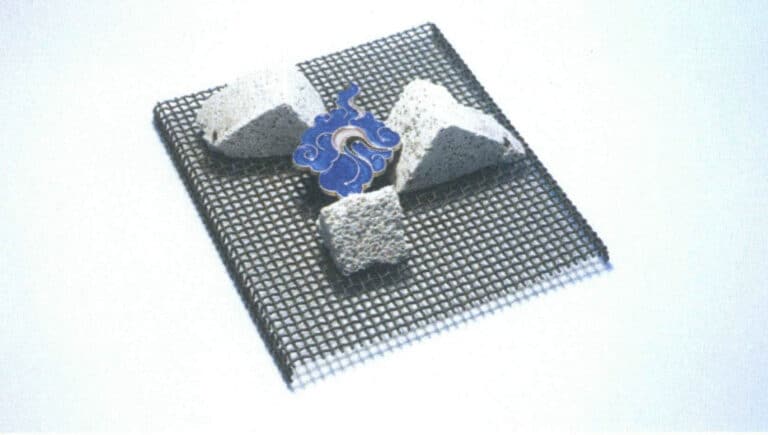
Figure 2-17 Refractory brick rack suitable for works of any shape
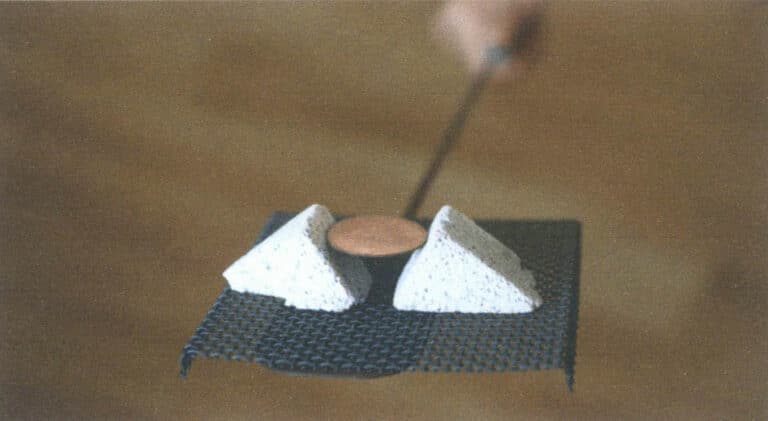
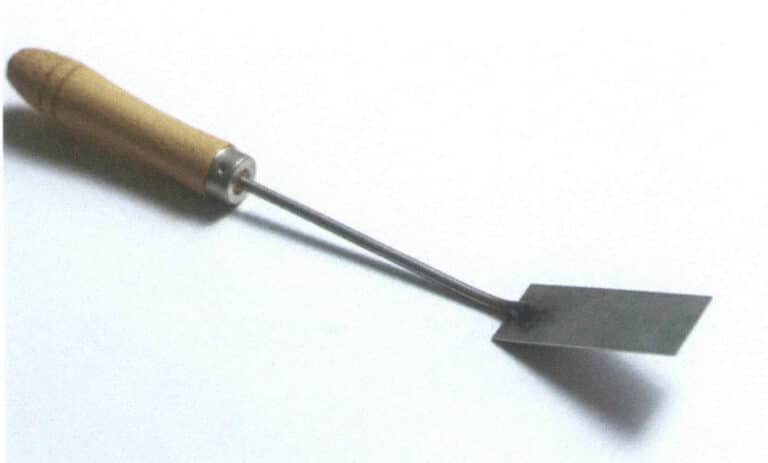
Figure 2-19 Domestic firing spatula
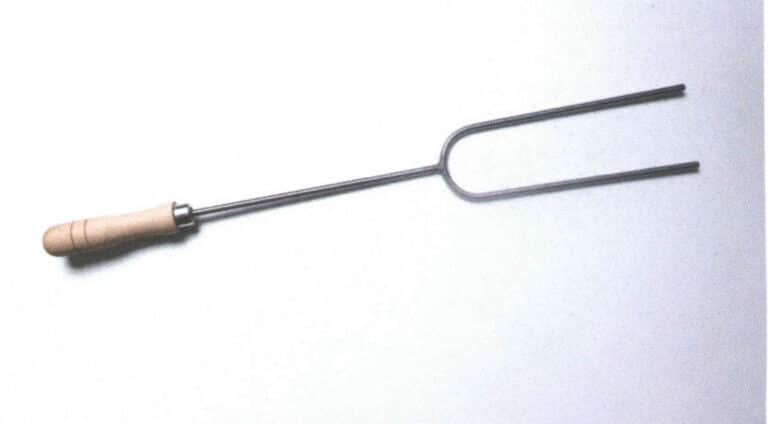
Figure 2-20 Domestic enameling fork
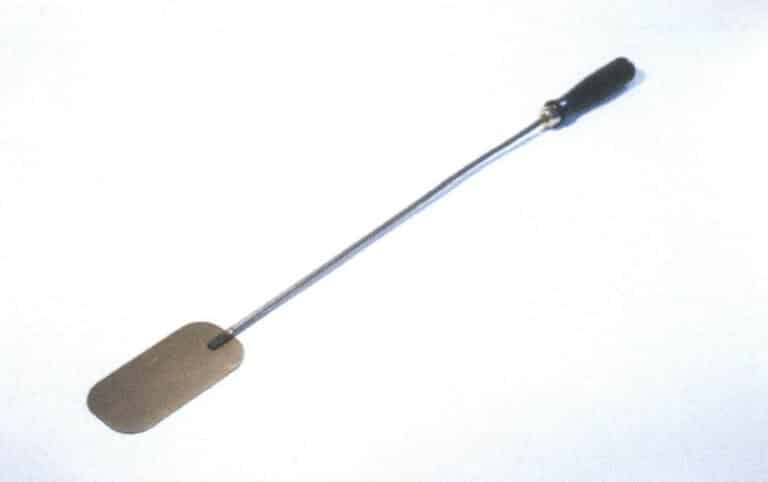
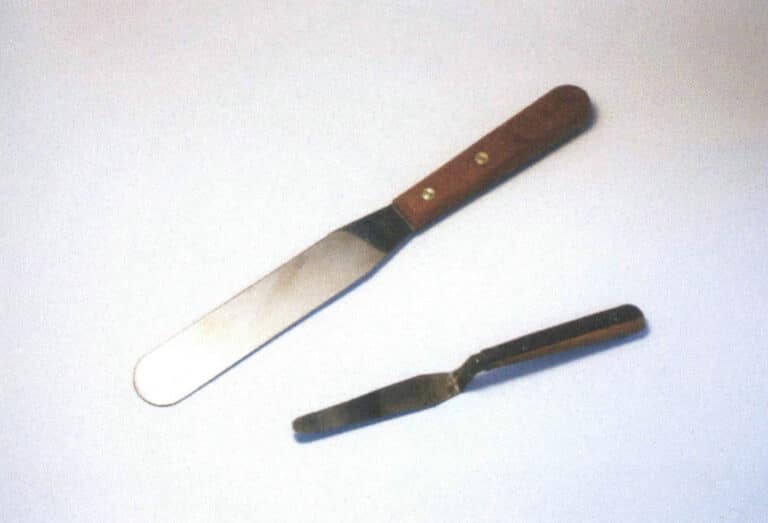
Figure 2-22 Cake spatulas and palette knives are suitable for transferring works
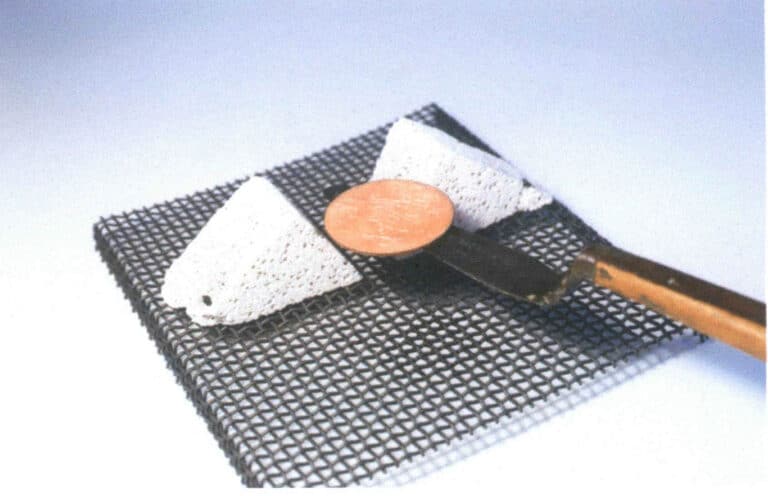
Figure 2-23 Lifting a work with a palette knife
Because kiln temperatures reach 700~900°C during the firing of enamel, heat-resistant fireproof gloves may be needed during operation. Figure 2-24 shows a leather fireproof glove.
The heat-resistant long tweezers and honeycomb soldering board shown in Figure 2-25 are commonly used tools during enamel firing: the long tweezers are used to grasp freshly fired works, and the honeycomb soldering board is used to place works that have not yet cooled.
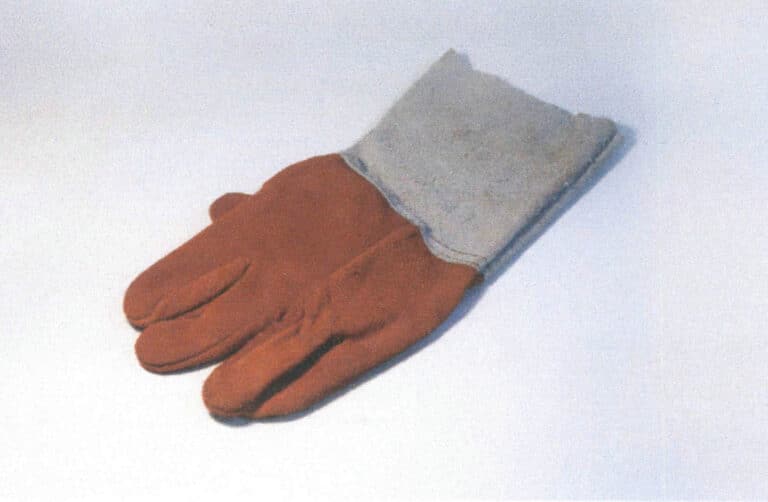
Figure 2–24 Fireproof gloves
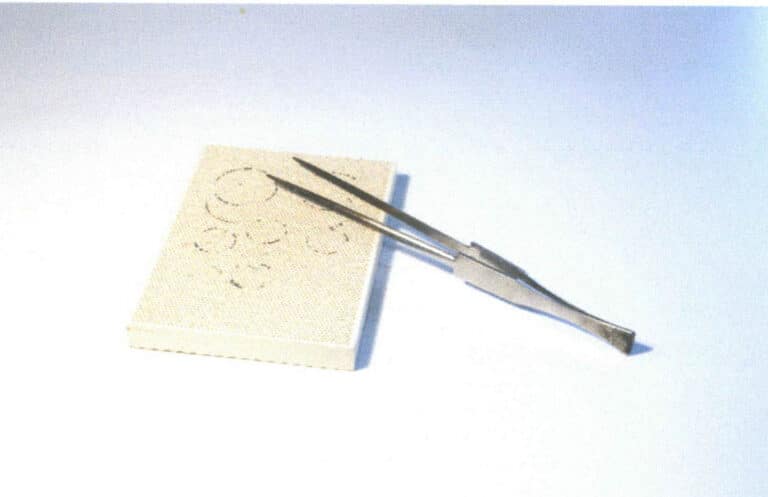
Figure 2–25 Heat-resistant long tweezers and honeycomb soldering board
2. Required Equipment and Tools for Cleaning Metal and Cleaning Enamel Works
2.1 Preparation of Acid Solution and Substitutes
Before firing, to thoroughly remove oil and oxides from the metal base plate, the plate needs to be soaked in a dilute sulfuric acid solution for about 15 minutes. The required concentration of the sulfuric acid solution here must reach or exceed 30%. Figure 2–26 shows the concentrated sulfuric acid stock solution, a beaker, and 200 millilitres of distilled water prepared for making the dilute sulfuric acid solution; a mask and rubber gloves should be worn during preparation. Taking 200 millilitres of distilled water as an example, if you want to prepare a 40% sulfuric acid solution, you need to add approximately 80 millilitres of concentrated sulfuric acid stock solution to the distilled water. The specific preparation method is as follows.
(1) Pour 200 millilitres of distilled water into the beaker, as shown in Figure 2–27.

Figure 2-26 Concentrated sulfuric acid, a beaker, and 200 mL of distilled water
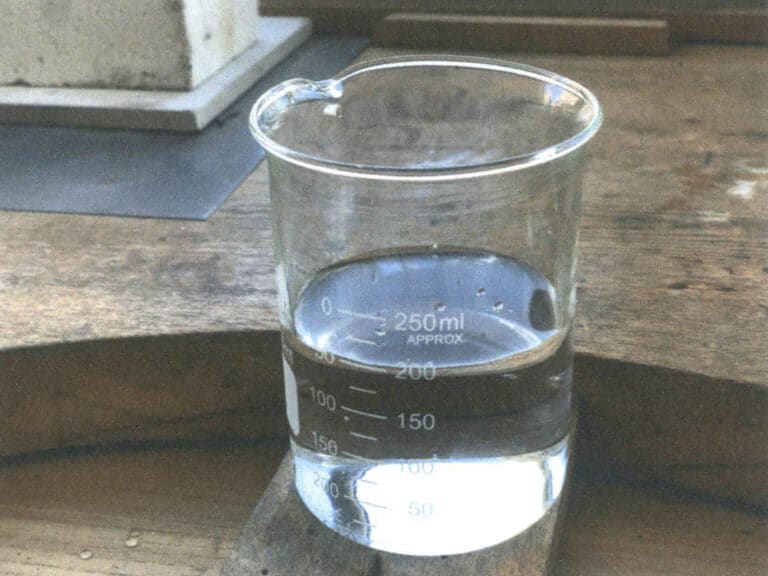
Figure 2-27 Pouring 200 mL of distilled water into the beaker
(2) Measure 80 mL of concentrated sulfuric acid with a measuring cup, as shown in Fig. 2-28.
(3) Slowly pour the concentrated sulfuric acid from the measuring cup into the distilled water along a tilted glass rod, as shown in Fig. 2–29.
(4) Stir the liquid in the beaker slowly with a glass rod to fully mix the sulfuric acid with the water. A dilute sulfuric acid solution with a concentration of approximately 40% is thus prepared, as shown in Figure 2-30.

Figure 2-28 Measuring 80 millilitres of concentrated sulfuric acid
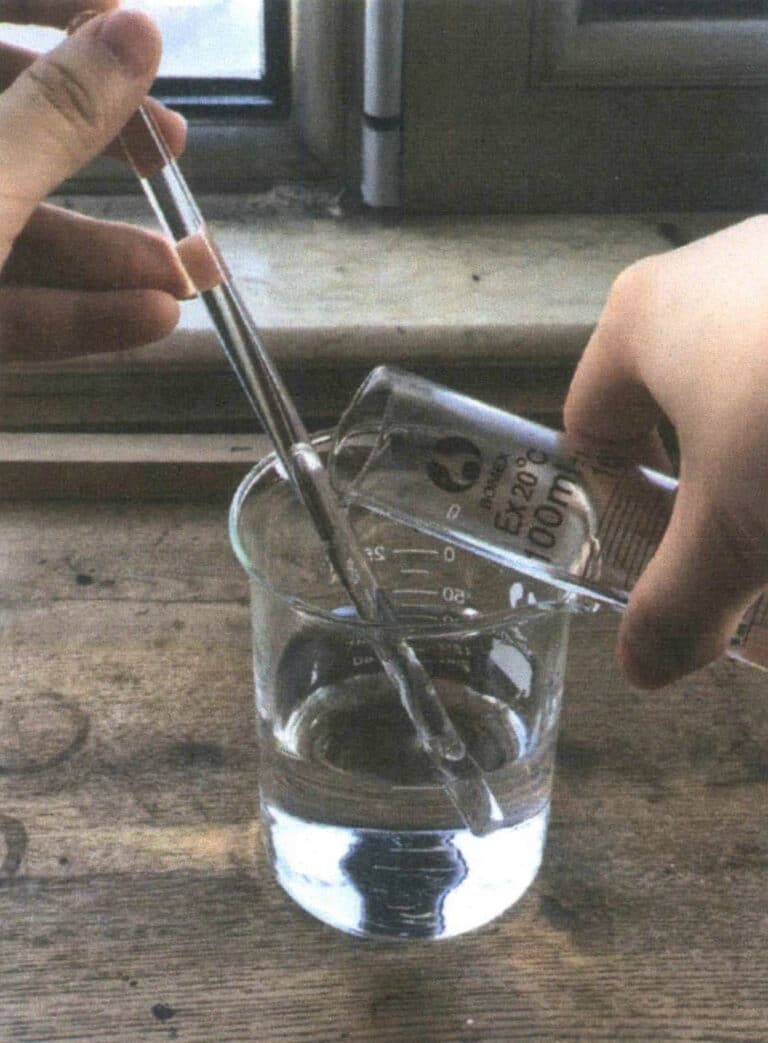
Figure 2-29 Slowly pouring sulfuric acid into distilled water
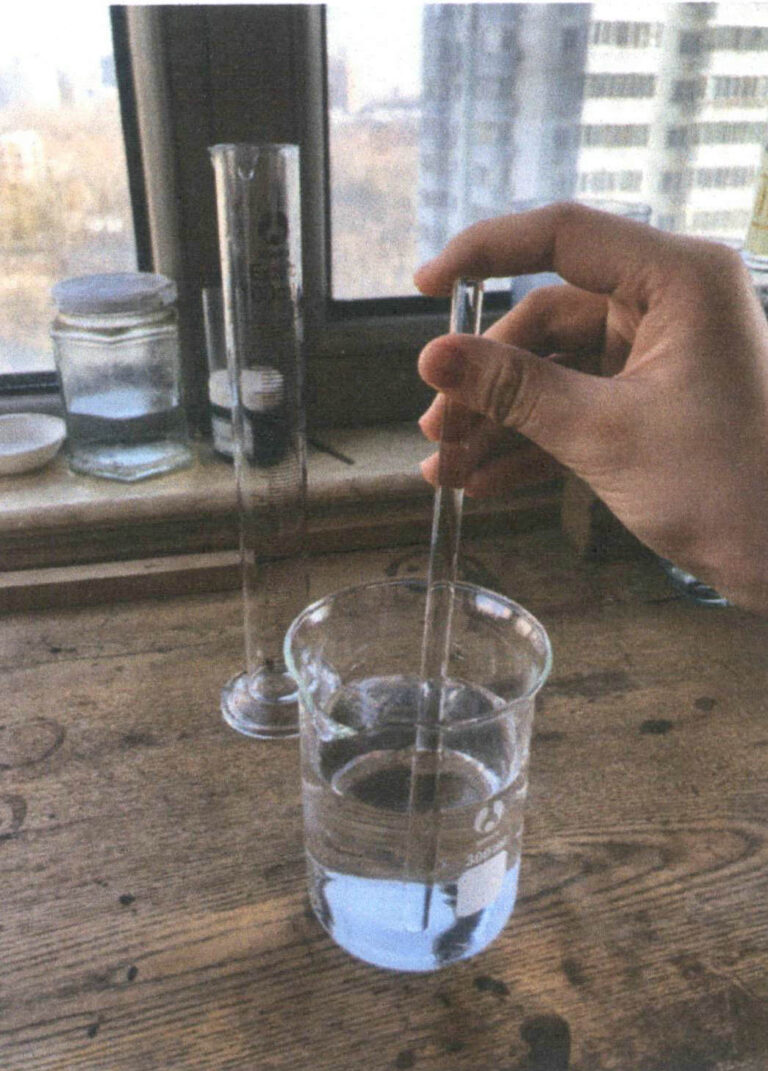
Figure 2-30 Stirring evenly with a glass rod
It is important to note that when preparing a dilute sulfuric acid solution, sulfuric acid must only be added to water; under no circumstances should water be added to concentrated sulfuric acid, as this can cause the acid to splash.
Currently, in China, you need documentation from the relevant authorities to purchase sulfuric acid. The highest concentration available for laboratory dilute sulfuric acid is about 60%, which can be adjusted by yourself to around 40% for use.
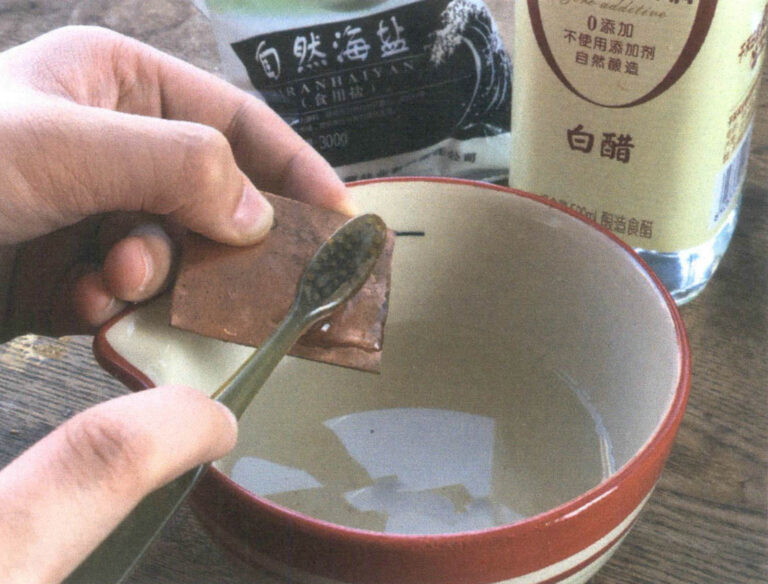
Besides sulfuric acid, white vinegar and salt can also be used to clean metal plates. Although it takes more time, the procedure is not dangerous and has no adverse environmental impact. The method is: dissolve salt in white vinegar, continuously adding salt until the vinegar is saturated, then anneal the metal sheet and, while still hot, immerse it in the salted vinegar; after soaking for a sufficient time, remove the metal sheet and rinse it clean with running water. Figure 2–31 shows a red copper base plate cleaned using this method.
2.2 Equipment and Tools for Cleaning Metal Substrates
The following equipment and tools are used in the process of cleaning metal substrates with acid.
(1) During the acid cleaning of metal substrates, a lidded glass container for holding dilute sulfuric acid is needed, and preferably the container should be sealable to prevent acid vapours from escaping into the air. A sealed glass food storage box sold in supermarkets is a good option. In addition, a plastic tweezer is needed to pick up metal pieces from the acid; note that any tweezers made of metal must not come into contact with the acid, so plastic tweezers or bamboo tweezers must be used, and chopsticks can serve as a substitute. Figure 2-32 shows a plastic tweezer and a sealed container holding acid; the container holds a dilute sulfuric acid solution with a concentration of 40%.
(2) Sometimes the surface of the metal substrate is still not smooth after acid soaking; in that case, sandpaper, steel wool, or scouring pads can be used for cleaning. If there are obvious scratches on the metal substrate, you can sand it smooth with sandpaper before acid soaking; if, after soaking, there are oxides on the substrate that cannot be removed, take it out of the acid, rinse with clean water, then scrub with a brass brush or scouring pad, as shown in Figure 2-33, and then soak it again in the acid.
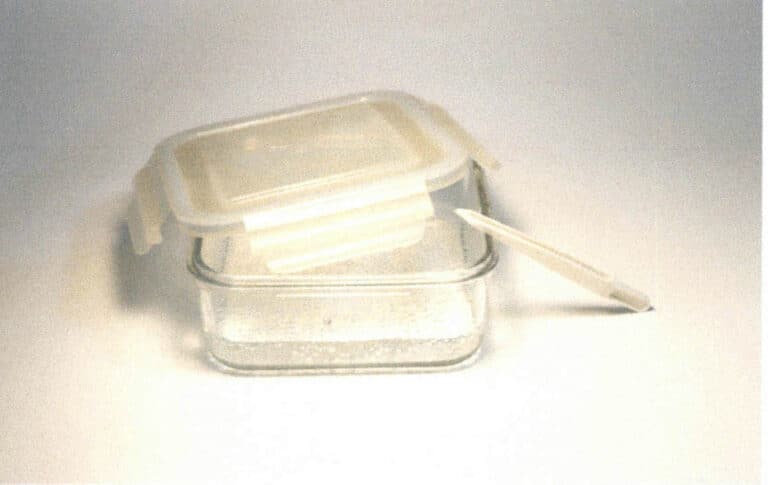
Figure 2–32 Sealed box for holding acidic solution and plastic tweezers
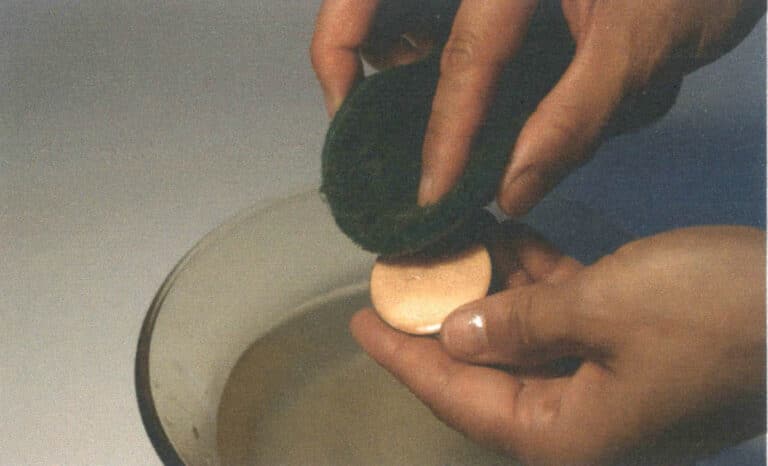
Figure 2–33 Cleaning a metal surface with a scouring pad
(3) The wastewater from cleaning enamel glaze is mildly acidic and can be kept in a container to be used specifically for removing grease or dirt from metal or enamel surfaces. When cleaning, use your hand to spread the glaze powder suspended in the wastewater onto the glazed surface and gently rub, as shown in Fig. 2–34.
Precautions: The container holding the acidic solution must be kept sealed at all times and stored in a well-ventilated location, preferably in a restroom or by a sink equipped with an exhaust system.

3. Tools for Applying Enamel
3.1 Glaze Spatula
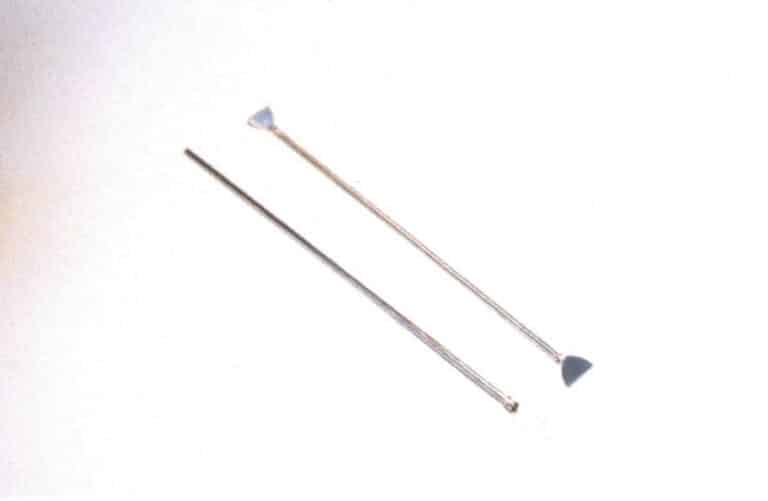
Figure 2-35 Two glaze spatulas of different sizes
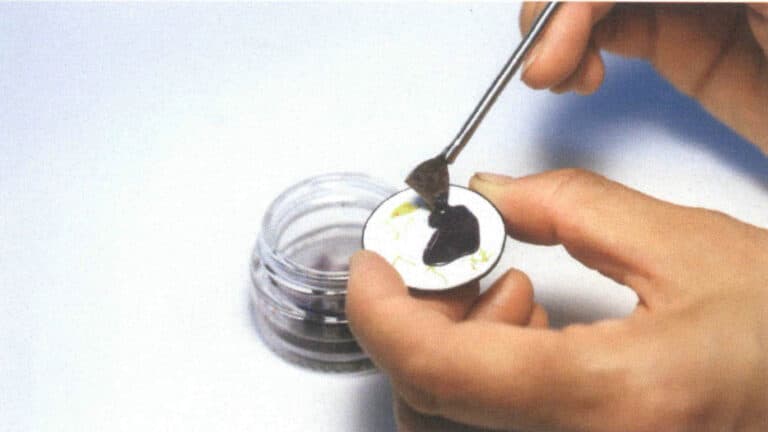
Figure 2-36 Applying glaze with a glaze spatula
Besides buying one from a tool shop, a glaze spatula can also be made yourself according to your preferences and needs. The specific steps are as follows (using brass wire as an example).
STEP 01
Select a brass wire with a diameter of 2 mm and cut a 15 cm length, as shown in Figure 2–37.
STEP 02
Anneal one end of the brass wire, flatten one end with a press machine, as shown in Figure 2–38, then file the tip into a suitable shape.
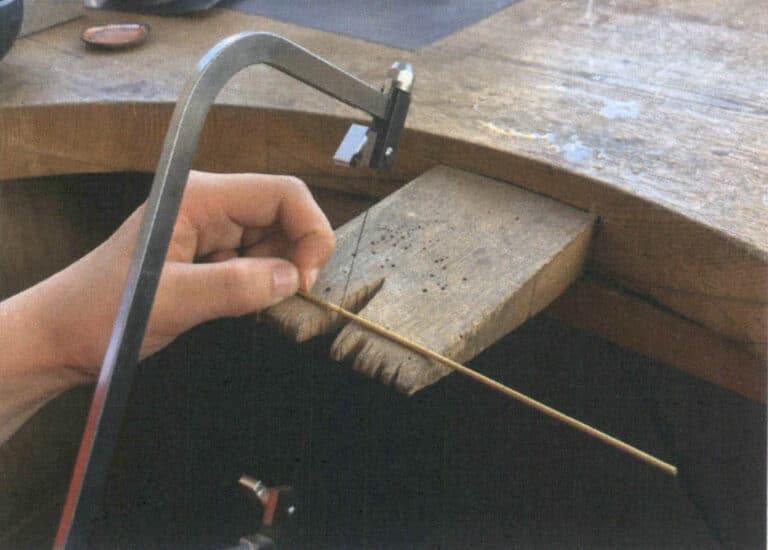
Figure 2–37 Cut approximately 15 cm of brass wire
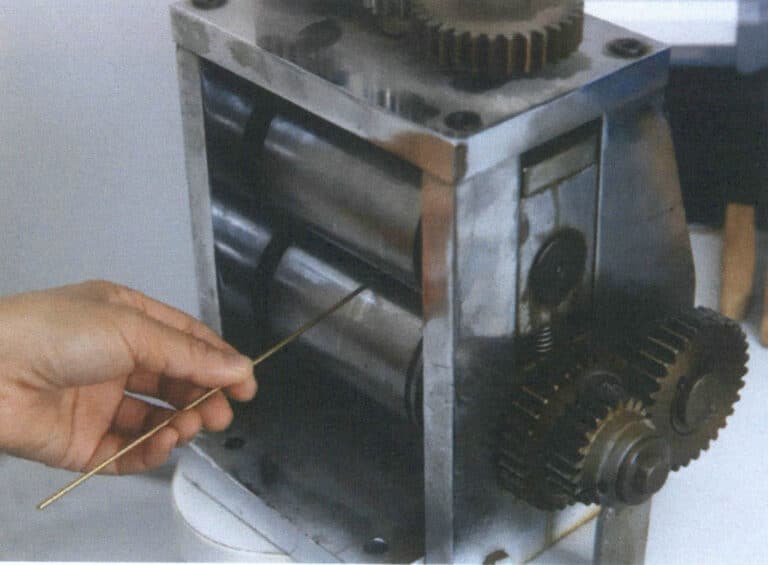
Figure 2–38 Flattening one end of a brass wire with a press machine
STEP 03
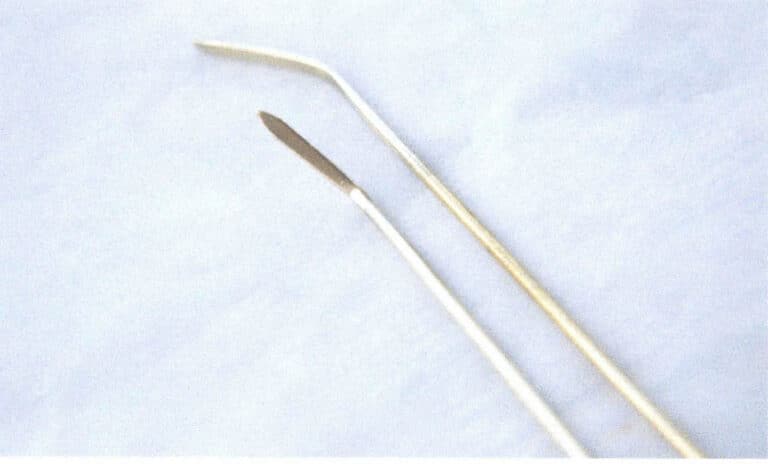
File and polish the shaped end smooth, and bend it inward to a 120° angle. Fig. 2–39 shows the two completed brass glaze spatulas.
Glaze spatulas can also be made from qin. Qin does not oxidise or rust, has very high hardness, and is not easily deformed, making it a very suitable material. Fig. 2–40 shows a glaze spatula made from sodium, with a twisted pattern worked into the middle of the handle for easier gripping.
In the traditional Japanese process of making cloisonné, bamboo glaze spatulas are used; their shapes vary slightly, but the method of use is the same. Figure 2-41 shows three sizes of bamboo glaze spatulas from large to small. Bamboo glaze spatulas are made from non-metal materials, which ensures that no metal particles are mixed into the glaze—this is their advantage.
The length and width of glaze spatulas can be adjusted according to one’s needs; there is no fixed rule. Larger works use larger spatulas, while smaller works or fine-detail parts use spatulas with narrower, sharper tips. The maker can decide the handle length of the spatula based on the size of their hand and determine the shape and size of the spatula tip according to the dimensions of the piece. It is best to keep 2~3 spatulas with different tip shapes and sizes on hand so they can be swapped as needed during use.
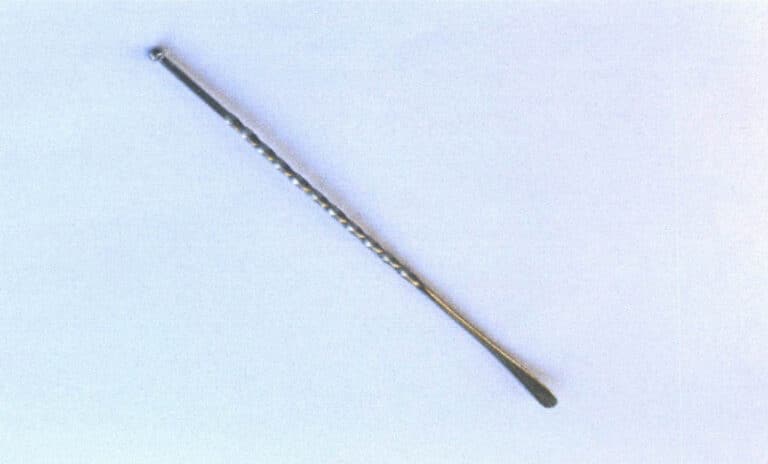
Figure 2-40 Titanium glaze spatula
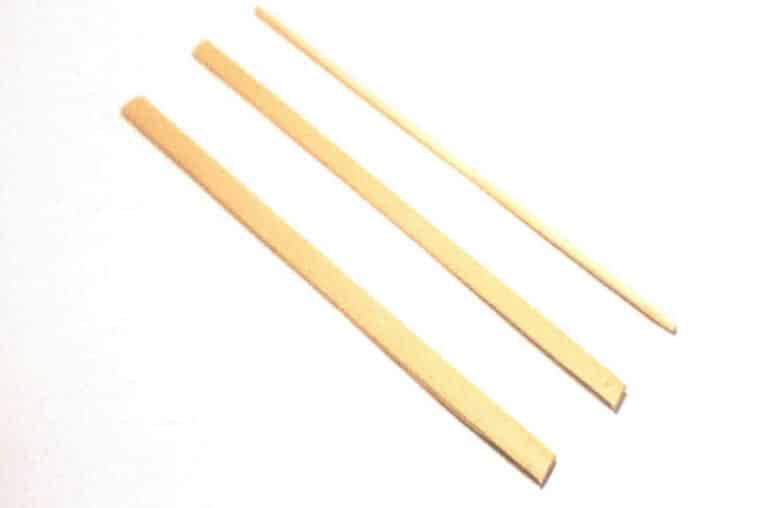
Figure 2-41 Three sizes of bamboo glaze spatulas
3.2 Other Tools for Applying Glaze
In addition to homemade glaze spatulas, we can also use other tools to apply glaze, such as the sieve used in the dry sifting method, small brushes and water-dip pens for applying glaze to tiny localised areas, etc.
(1) Sieve. When applying glaze with the dry sifting method, a round stainless steel sieve is required to sift the glaze. Depending on the requirements of different works, you can choose a stainless steel sieve of 80~100 mesh; sieves of different diameters can be selected according to the area where the glaze needs to be applied. Stainless steel sieves can be purchased at enamel tool stores. Figure 2-42 shows a sieve with a diameter of 5 cm and a mesh size of 80, which is a commonly used sieve.


Figure 2–43 Homemade sieve using pantyhose
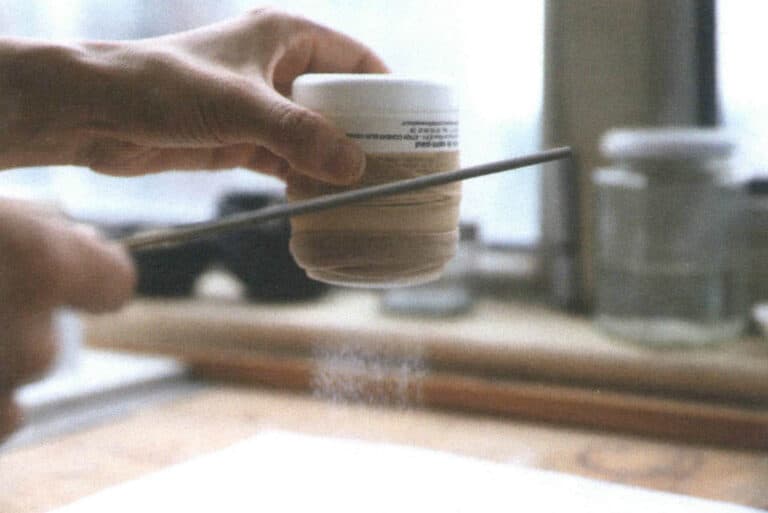
Figure 2-44 Sifting enamel with a pantyhose sieve
(2) Small brushes. Small brushes are very suitable for applying glaze to smaller areas as a filling tool. You can choose very fine watercolour liner brushes, for example, in size 3/0 or 4.0. For general flat glazing use size 3/0 brushes; if filling fine details of cloisonné designs or filling voids when making openwork enamels, you will need a 4/0 brush (the finest). The advantage of using small brushes to apply glaze is that they more easily hold an appropriate amount of moisture, making them easier for beginners to handle. Figure 2–45 shows filling with a 4/0 brush. Note that it is essential to purchase high-quality brushes, as poor-quality brushes may shed hairs, affecting the purity of the glaze.
(3) Dip pen. A steel-nib dip pen, often used for drawing comics or writing with a hard-tip pen, can be used to fill very small areas with glaze. For example, in the process of cloisonné enamelling, when two wires are very close together and the smallest brush cannot pick up wet glaze to place between them, the tip of a dip pen is needed to lift a tiny amount of glaze and fill the gap. Dip pens are also frequently used in the production of openwork enamel, where the glaze must be applied as thinly as possible; the tip of a dip pen can pick up and place only a minute amount of glaze each time. Figure 2-46 shows the situation of using a dip pen to fill openwork enamel.
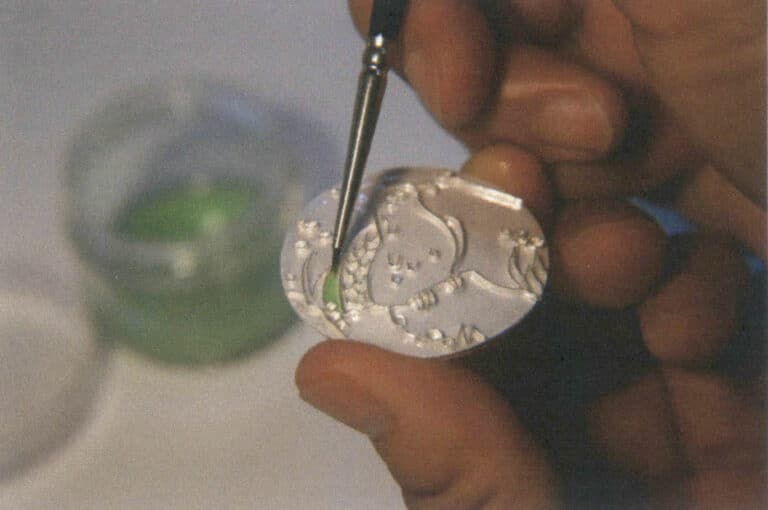
Figure 2-45 Filling with a 4/0 brush

Figure 2-46 Filling openwork enamel with a dip pen
4. Polishing Tools
In many enamel techniques, the final polishing process is extremely important. No matter how well the preceding steps are done, if the polishing is not thorough enough or problems occur during polishing, all previous efforts can be ruined.
The polishing tools for enamel products include polishing oil stones, sandpaper, and diamond grinding burs.
Oil stone is a material made by sintering a natural mineral at high temperature; it is tough and dense and can be made into abrasives. Its main component is green silicon carbide. Oil stone bars come in flat-rectangular, round, semi-circular, and other shapes, allowing one to polish works of different shapes and different parts of a piece. The grit designation of an oil stone indicates the coarseness of its particles, that is, the mesh size. Common oil stone bars range from 220 to 1200 grits; the higher the mesh number, the finer the particles. Figure 2–47 shows polishing oil stone of different shapes and grit.
After the enamel glaze surface is smoothed with polishing oil stone, it needs to be further sanded with sandpaper to remove the marks left by the polishing oil stone; generally, 600-grit sandpaper is used. Figure 2–48 shows 600-grit sandpaper; when using it, cut the sandpaper into small pieces and wet them with water before sanding the glaze surface.
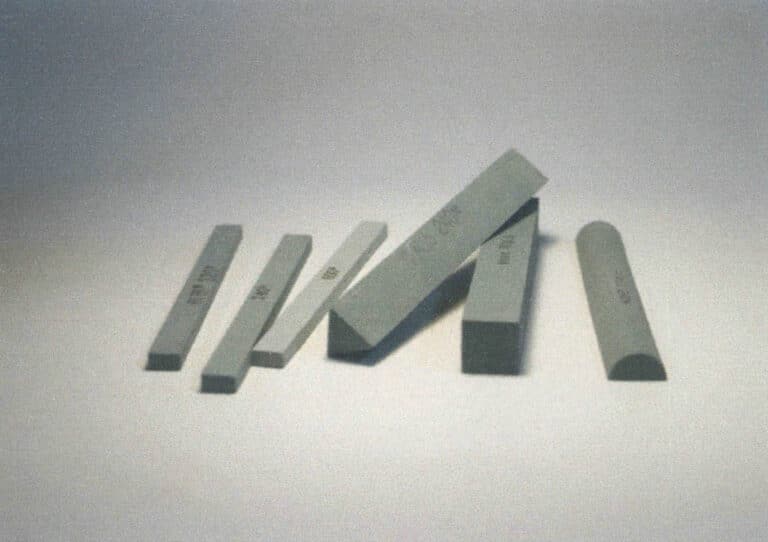
Figure 2-47 Different shapes and grit counts of oilstone strips

Figure 2-48 600-grit sandpaper
Copywrite @ Sobling.Jewelry - Özel takı üreticisi, OEM ve ODM takı fabrikası
Section II Basic Classification of Enamel Techniques
1. Flat-Laid Enamel Technique
Flat-laid enamel is one of the most basic and frequently used techniques among enameling methods. In fact, this technique has no formal name; neither in Chinese nor in the industry’s common French terminology is there a specific term that refers exclusively to this process. The name “flat-laid” is used here merely for convenience in this book, chosen based on the characteristics of the technique.
As the name suggests, the flat-laid enamel technique involves laying the enamel glaze flat on the metal surface and firing it. It has two technical features: first, the work’s surface is covered entirely with glaze, with no metal visible; second, after firing, the piece is not polished, so it is presented exactly as it comes out of the kiln. Because the glazed surface area is larger compared with other techniques, the enamel layer in flat-laid enamel cannot be too thick, otherwise there is a risk of cracking. Since the piece is not polished after firing, the application of the glaze must be even and smooth—”even” means the glaze thickness must be uniform across all areas, with no thick or thin spots; “smooth” means the glaze must be applied very flatly. Whether the glaze is applied smoothly will directly affect the surface evenness of the piece, and if the surface is not sufficiently flat, the presentation quality will be greatly diminished. Figure 3-1 shows the state of a flat-laid enamel piece when the glaze has been laid halfway; you can see the glaze thickness is very uniform.
Because in flat-laid enamel, there are no separators between different colors, moisture-rich glazes of different colors connect closely to one another, so the boundaries between colors cannot form very clear, neat lines. This technique is generally suited to representing large color blocks and relatively simple patterns, and is not appropriate for overly intricate or fussy designs. However, suppose the maker is very familiar with the properties of enamel glazes and highly skilled in the technique. In that case, it is also possible to achieve complex, richly layered images with this method, producing effects comparable to painting.
In modern jewelry or traditional ornament making, flat-laid enamel is often used to add color to metal surfaces. Beyond the simple effect of laying glaze flat, artists frequently exploit special effects for creative purposes. Examples include layering and blending different colors, special effects produced by reactions between glaze and metal, and unique interactions among glazes with different melting temperatures when exposed to high heat. In later chapters, we will provide detailed descriptions of how to achieve these special effects. Below are some examples of the application of flat-laid enamel in jewelry and decorative paintings.
In the jewelry piece shown in Figure 3-2, both the orange leaves and the orange peel sections use flat-laid enamel techniques. The orange leaves feature subtle gradients created with several different transparent green glazes. In contrast, the orange peel section vividly reproduces the color and texture of orange skin with several opaque orange and yellow glazes applied over a textured metal base plate.
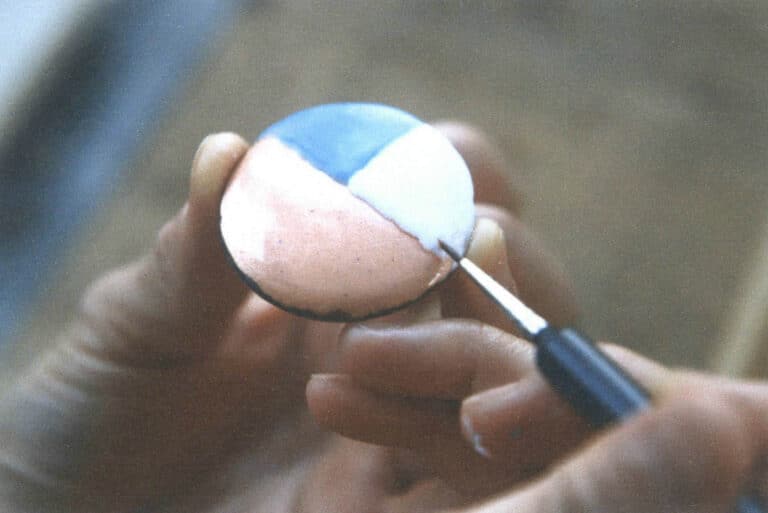
Figure 3-1 Glaze application process for a flat-laid enamel piece
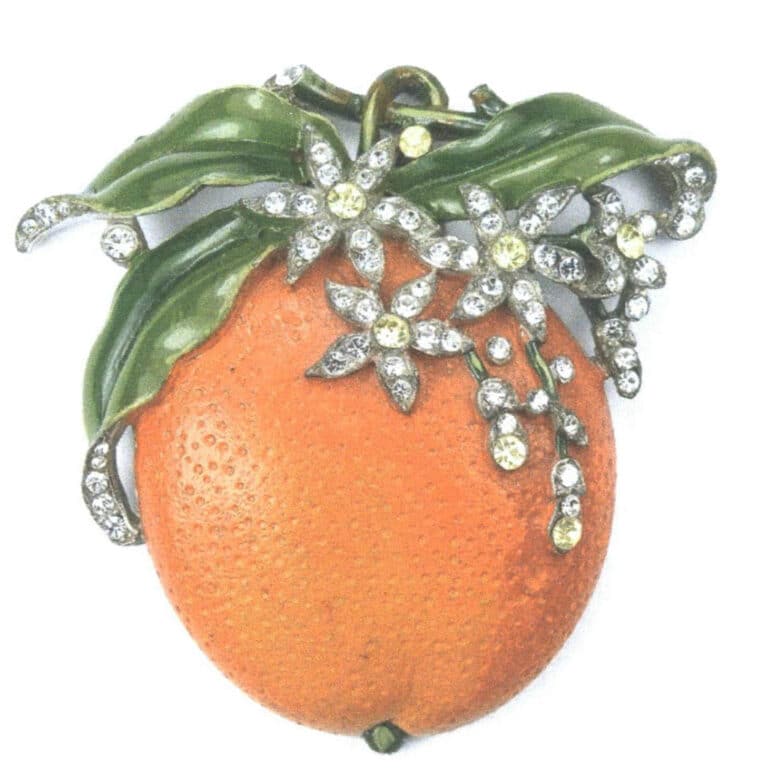
Figure 3-2 Jewelry piece made using flat-laid enamel technique
Figure 3-3 shows an antique brooch that also employs the flat-laid enamel technique. The base is gold; the leaves create a gradient effect with transparent yellow and transparent light green glazes, and the flower portion uses opaque red glaze to simulate the soft texture of petals. The overall coloration is fresh, and the style is brilliant.
The antique pendant shown in Fig. 3–4 uses a similar decorative technique. The petals and leaves of the pendant have a thin layer of enamel applied over a slightly textured metal surface, serving as color accents for the entire piece. This is the most typical and common application of the flat-laid enamel technique in jewelry.
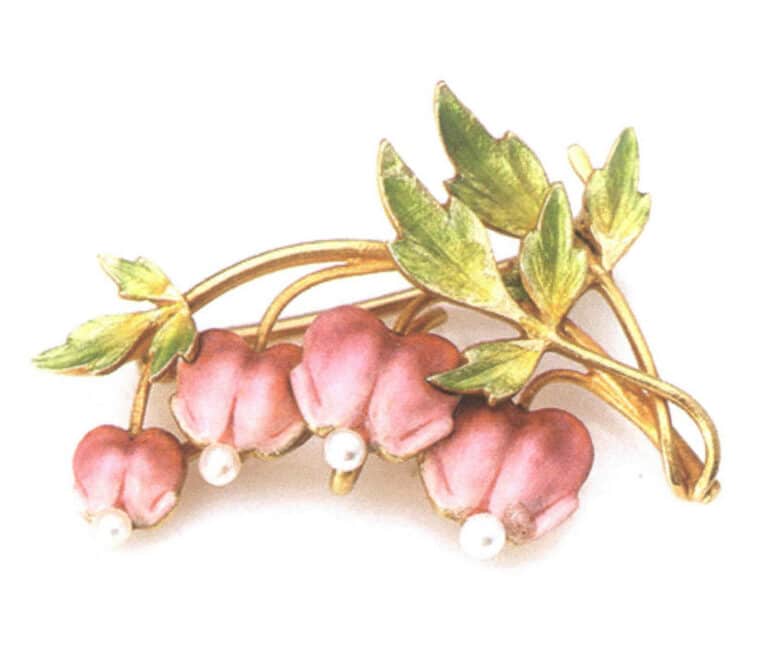
Figure 3–3 Antique Brooch
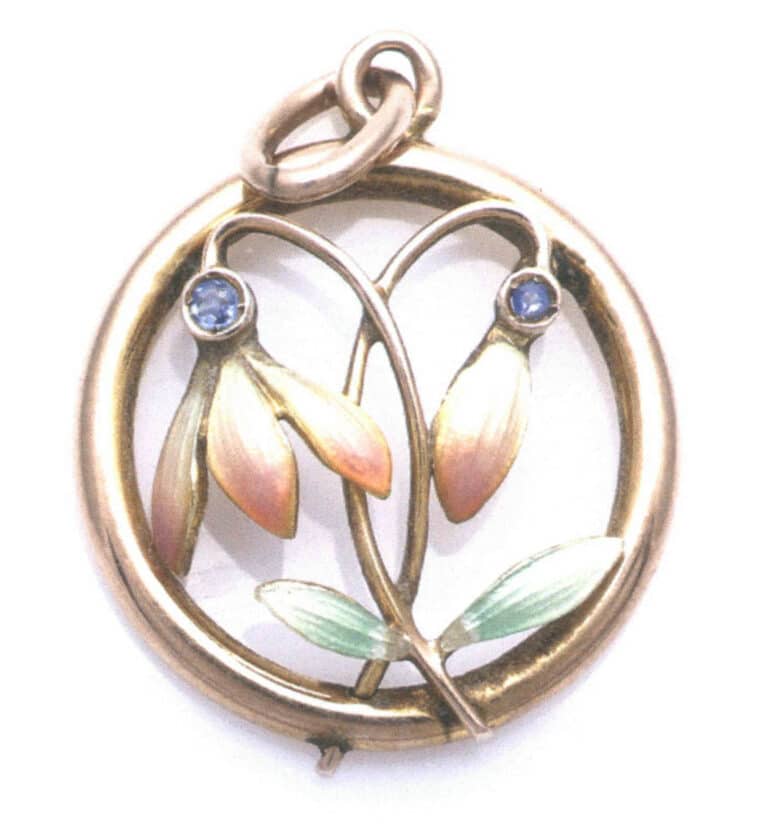
Figure 3–4 Antique Pendant

Figure 3–5 A young girl wearing a skirt and a pullover

Figure 3–6 Tanak landscape
2. Cloisonné Enamel Technique
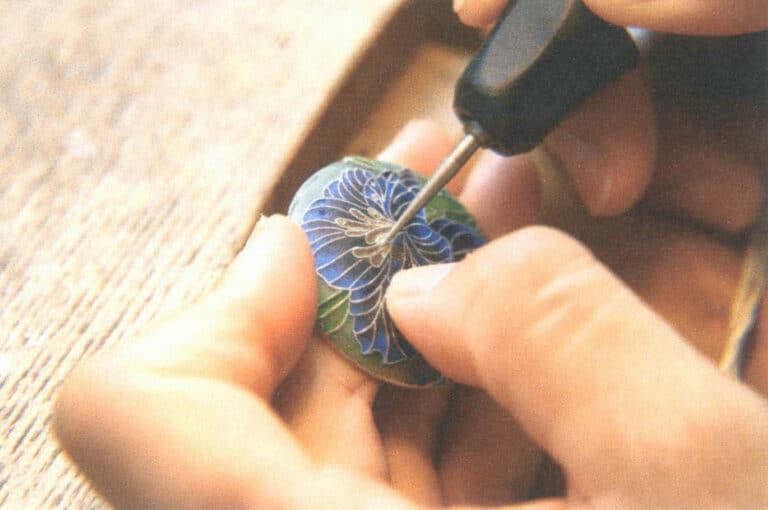
The French name for the cloisonné enamel technique is “cloisonné,” meaning “partitioned” or “separated.” The method of making cloisonné enamel is: bend very fine flat metal wires into various patterns according to the design, place them on a metal base plate to form many separated regions of different sizes, and repeatedly fill these regions with enamel glazes for firing. Figure 3-7 shows a cloisonné piece being filled with different colored glazes during its production.
After firing, cloisonné enamel works still need to be ground and polished to achieve a smooth, glossy finish.
The cloisonné enamel technique is characterized by multiple, relatively complex steps, but it offers strong controllability and a low failure rate, enabling the design intent to be realized to the greatest extent. In addition, because the metal base plate, metal wires, and enamel glazes are tightly bonded together, the strength of the piece is increased. The brilliant colors of the enamel combined with the fine, flowing lines of the metal wires create a highly decorative effect, well-suited to expressing intricate, dense patterns and themes. They can produce very rich and delicate color effects. Figure 3-8 shows a cloisonné work in which the regular, symmetrical patterned design makes full use of the decorative effect of the silver wires in the composition; various arc lines of differing lengths together form a unique rhythm and cadence.
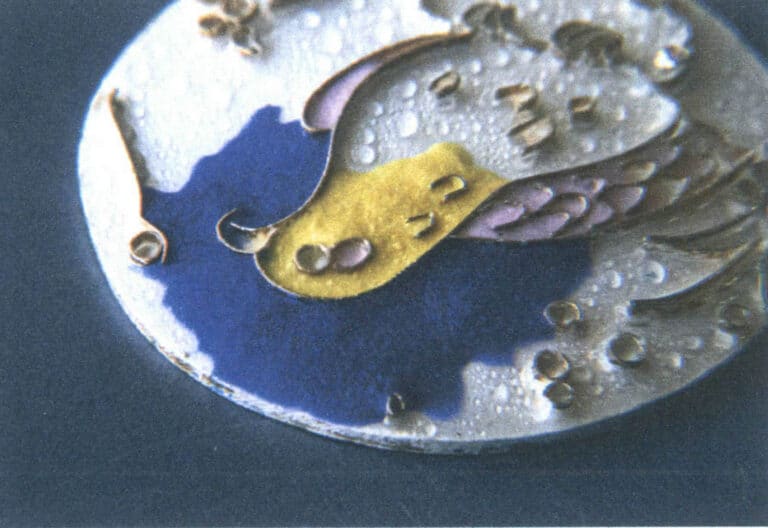
Figure 3–7 Filling process of cloisonné enamel technique
Şekil 3-8 "Su Çiçeklerinin Çeşitlemeleri" adlı emaye işi
Cloisonné is the oldest among enamel techniques. Besides its place of origin—Europe—it also has a long history of development in China, Russia, and Japan. Below, represented by two artists, is a brief introduction to China’s cloisonné technique, Russia’s filigree enamel, and Japan’s “yūsen shippō” technique.
China’s famous traditional craft, China’s cloisonné, is representative of the cloisonné enamel technique. The common view holds that cloisonné technology came from the West to China during the Yuan dynasty, matured in the Ming dynasty during the Xuande period, and only acquired the name “Jingtailan” after the late Ming and early Qing. Although called Jingtailan, it did not originate in the Jingtai years, nor did its peak of craftsmanship occur then. China’s cloisonné pieces are mostly large copper-bodied vessels; the wires used for cloisoning are mostly copper wire, which becomes gilded after firing. Most glazes used in China’s cloisonné are opaque, though a few works have gold or silver bodies, in which case transparent glazes are generally used. As mentioned above, in the making of China’s cloisonné, the metal wires are typically soldered onto the body first, and then the compartments are filled and fired.
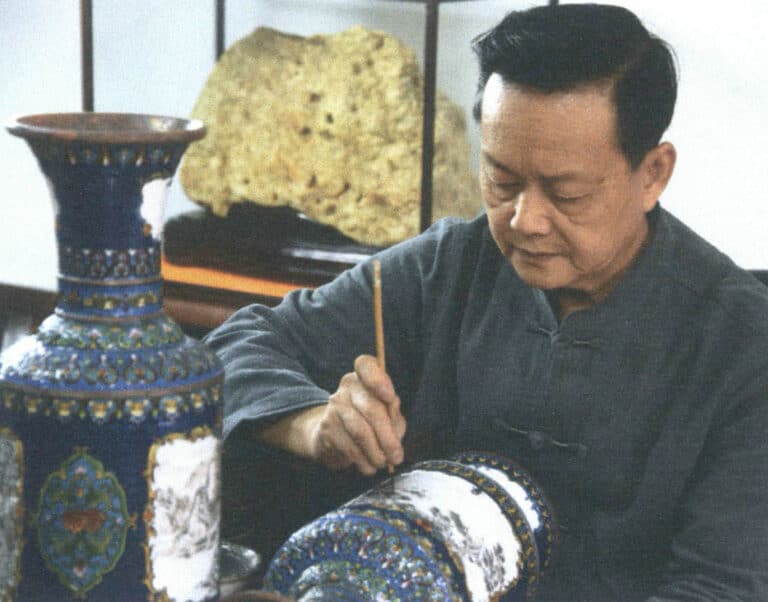
Master craftsman Liu Yongseng is the third-generation inheritor of the “Laotianli” China’s cloisonné workshop established after the Qing imperial manufacture opened to the public. He excels in cultural relic restoration and the production of antique-style China’s cloisonné. Mr. Liu’s works follow the courtly style of Beijing’s cloisonné, emphasizing “qiaose” (filling each area separated by metal wires with a single distinct glaze color) with “yunse” as a supplement (“yunse” means filling each area with different glazes to create gradient and blending effects). His works feature bright, splendid coloring, neat and delicate wire patterns, and stable, dignified vessel shapes; decorative motifs are mainly auspicious patterns such as dragons, phoenixes, cranes, deer, ruyi, fu, and shou. The vessel shown in Figure 3–10 was designed and made for former King Norodom Sihanouk of Cambodia: a water ewer using the imperial-specific bright yellow ground, with lotus patterns filled in various shades of purple glaze. By using differing luminances, the contrasting colors of yellow and purple achieve a comfortable harmony—luxurious without being gaudy.
The imitation Ming “Three Cranes” censer shown in Figure 3–11 was newly designed on the basis of the Ming and Qing court tribute China’s cloisonné Three Cranes censer, adding decorative elements of jade carving. Three cranes encircle the body of the censer, their legs standing on lotus leaves to form the feet; the body is decorated with stylized crane-link patterns as auspicious motifs. Simple and sumptuous, it exemplifies the typical courtly aesthetic.
Figure 3–10 The water vessel in the China's cloisonné style
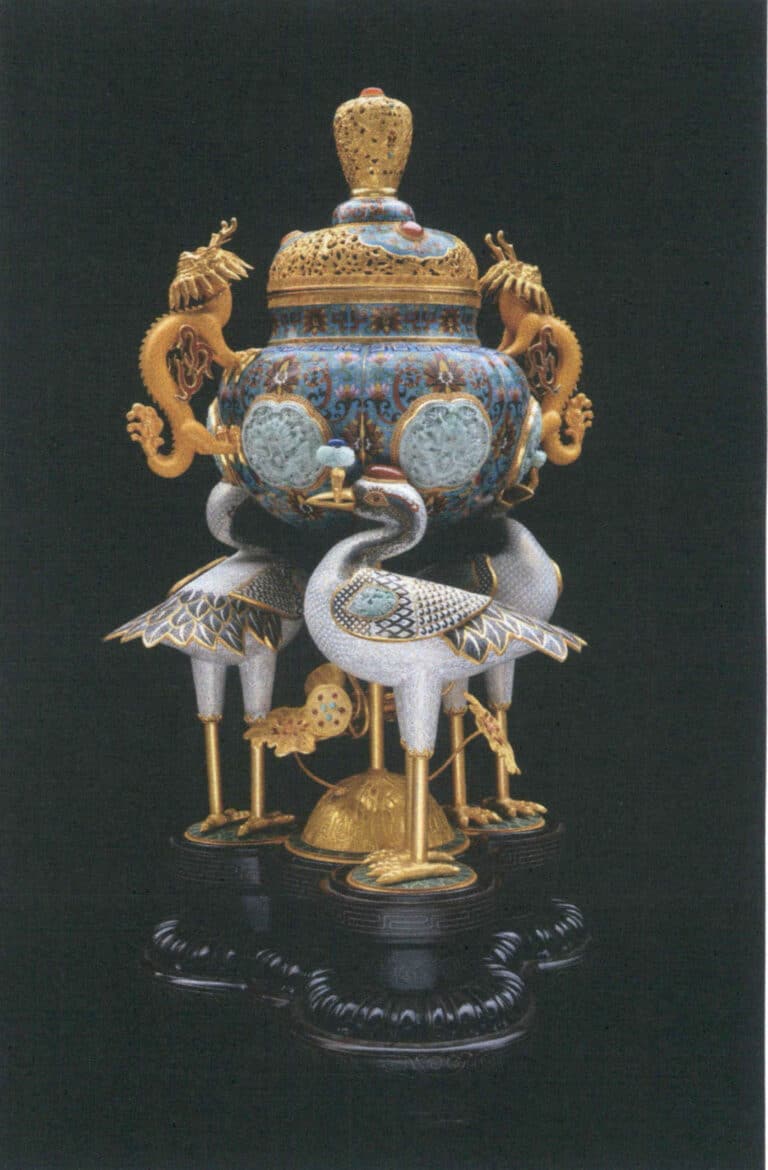
Figure 3–11 Ming-style three-crane brazier replica
The Russian traditional filigree enamel technique, called “enamel on filigree” in English. This technique was introduced to Russia from Italy in the 16th century. In cloisonné techniques, the wires are generally flat, plain wires, whereas the traditional Russian and Ukrainian cloisonné use flower-wire, made by twisting two thin, round wires into a rope-like form and then flattening it. Each wire’s side shows a rope-like texture, hence the name “enamel on filigree.” Because flower-wire is used, after the glaze filling and firing are completed, the final polishing step is generally omitted so as not to damage the side pattern of the wires. For China’s cloisonné, Japanese wired cloisonné, or cloisonné from other regions, the final polishing step is very important and indispensable. Due to its own technical characteristics, Russian enamel on filigree, once finished, has the glaze in each wire-enclosed cell slightly recessed, producing a small reflective point. This gives it a distinctive appearance: under light, the rope-like pattern on each wire reflects light, and the glaze within the wires also reflects, making the piece particularly sparkling and resplendent.
Martin Koval is a traditional Ukrainian enamel on filigree artist living in Kyiv; his family has produced enamel on filigree for three generations. His works are very traditional in form, mostly icon frames, conch cups, ewers, or egg-shaped jewelry boxes. Figure 3–12 shows a enamel on filigree icon frame he made; the central icon comes from an early 19th-century painted porcelain piece, and around the icon are realistic white lilies and various geometric decorative patterns. The filigree used is gold wire, and the glaze used include opaque white, blue, green, and red, with several color gradients applied to the lilies. On this icon frame, one can see a combination of the ancient techniques of filigree, enamel on filigree, and granulation, and small gemstones are inlaid, giving it a highly decorative appearance. Figure 3–13 shows a work by Martin Koval’s grandfather, Nikolai Koval: a conch cup decorated with enamel on filigree, featuring elegant patterns and simple colors typical of traditional Ukrainian decorative style. Figure 3–14 shows a work by Martin Koval’s father, Dmitry Koval: a wooden cross decorated with enamel on silver filigree .

Figure 3–12 Enamel on filigree icon frame

Figure 3–13 Enamel on filigree conch cup
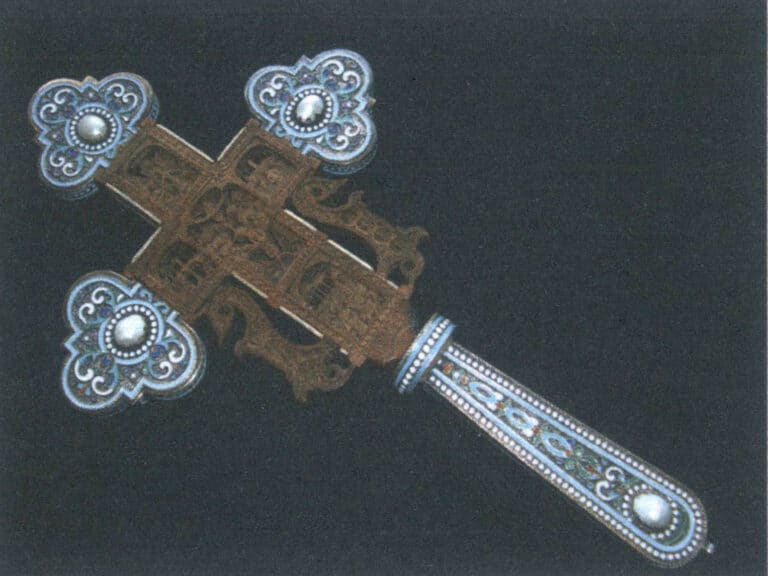
In the production of wired cloisonné, a layer of enamel used as an undercoat is usually fully fired on the copper body, and silver wires are then glued onto this layer of glaze with alginate (seaweed glue) for firing. When the glaze melts, the silver wires are adhered to the body by that enamel layer, thereby avoiding the effects of solder on the glaze. This method makes the glaze colors of cloisonné very pure and delicate, and it also allows for the extensive use of transparent glazes. Traditional Japanese wired cloisonné products are mostly small vessels, with soft colors, elegant and harmonious palettes; decorative subjects are often flowering branches and birds, and the decorative motifs show distinct characteristics of Japanese culture. Figure 3–16 shows a Meiji-period Owari cloisonné vase from Mr. Zhou Jie’s collection. Owari, located in Aichi Prefecture, was the center of traditional cloisonné manufacturing, and the Meiji period was a time of full development for cloisonné techniques, so this piece offers a glimpse of the peak era of wired cloisonné.
This vase features a base of nasukon (a traditional Japanese color referring to that of an eggplant fruit – a very deep, lustrous purple). Upon this nasukon background, a white peony and a mountain finch perched on its branch are depicted. Figure 3-17 shows a detailed section of the vase. From this image, we can clearly appreciate the gradation of the enamel color on the petals; the transition from the very pale, faint green at the flower’s center to the white at the petal edges is exquisitely subtle.
What is astonishing is not only the even, delicate application of the base glaze and the soft, hazy color gradients, but also the richly varied silver wires. Figure 3-18 shows a comparison between the branch section and the finch’s head on the vase. Unlike the common cloisonné technique which typically uses wire of a uniform size throughout a piece, this work employs silver wires of multiple different thicknesses according to the needs of the subject’s depiction. Thicker wires outline the branches, while the bird’s feathers are rendered using extremely fine wires densely arranged. Furthermore, the thickness of a single line can even vary, as seen in the lines depicting the finch’s shoulder feathers. This unimaginably refined craftsmanship results in an effect that is rich, delicate, and highly expressive, reminiscent of a superb gongbi style bird-and-flower painting.
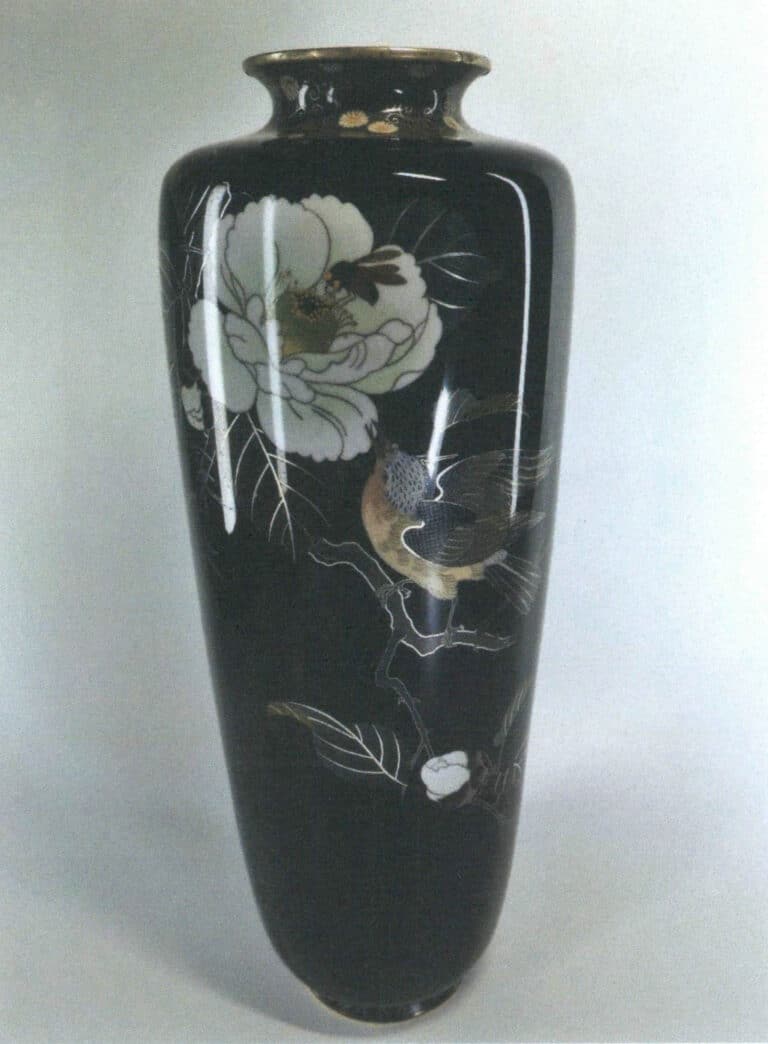
Figure 3–16 An Owari cloisonné vase from the Meiji period
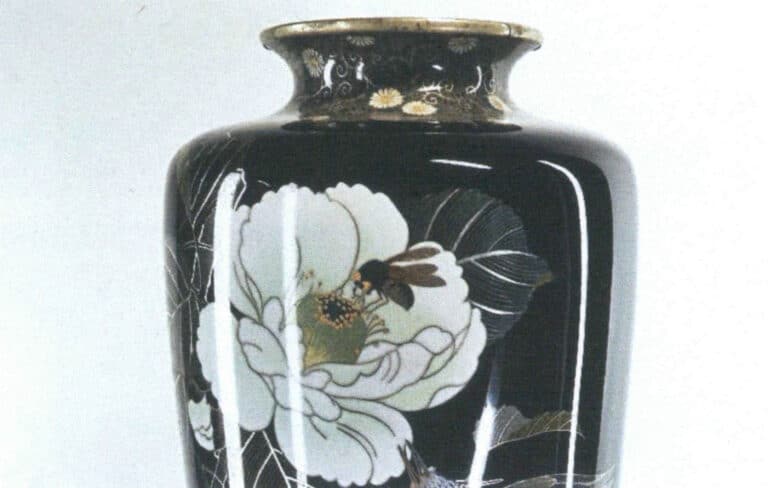
Figure 3–17 Gradation treatment of glaze colors
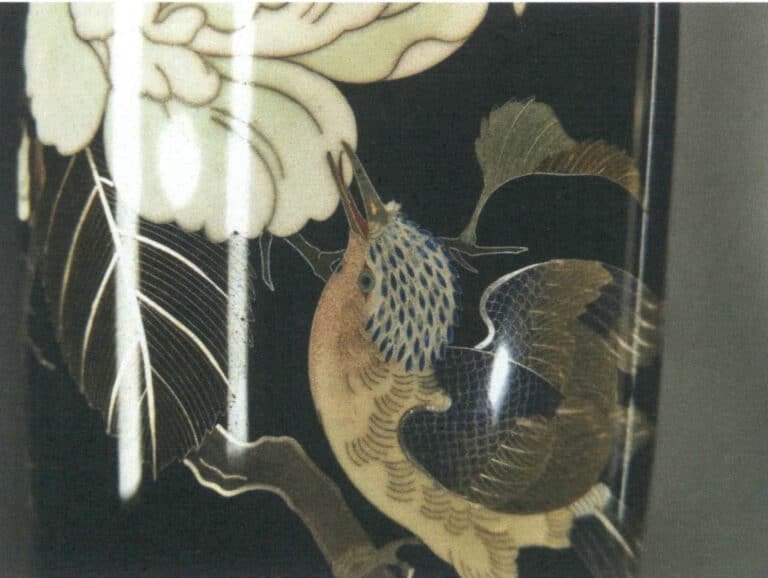
Figure 3–18 Rich variations of silver wire on an Owari cloisonné vase

Figure 3-20 shows work by Canadian jewelry artist Aurelie Guillaume. All of her pieces are made using cloisonné, with bright color schemes, lively imagery, and very high recognizability. They are playful jewelry works, full of whimsical ideas. The pendant in the image is one piece from a series; its title is “Friend, do you know I love you?” When the titles of each piece in the series are arranged in the correct order, they form a little poem about friendship.
Figure 3-21 shows a piece by Georgian jewelry artist Miranda Tsertsvadze. Mucha’s paintings inspire this work; both its lines and colors are full of dreamlike and aesthetic charm. It fully exploits the advantages of the cloisonné technique, using variations in the thickness of silver wires to express relatively stronger contour lines as well as delicate, graceful detail lines.
From these works, it can be seen that the neatness and fineness of cloisonné make it very suitable for the decorative demands of jewelry, bringing rich colors and a unique texture to jewelry that other techniques cannot achieve.
Figure 3-20 Pendant "Friend, do you know I love you?"
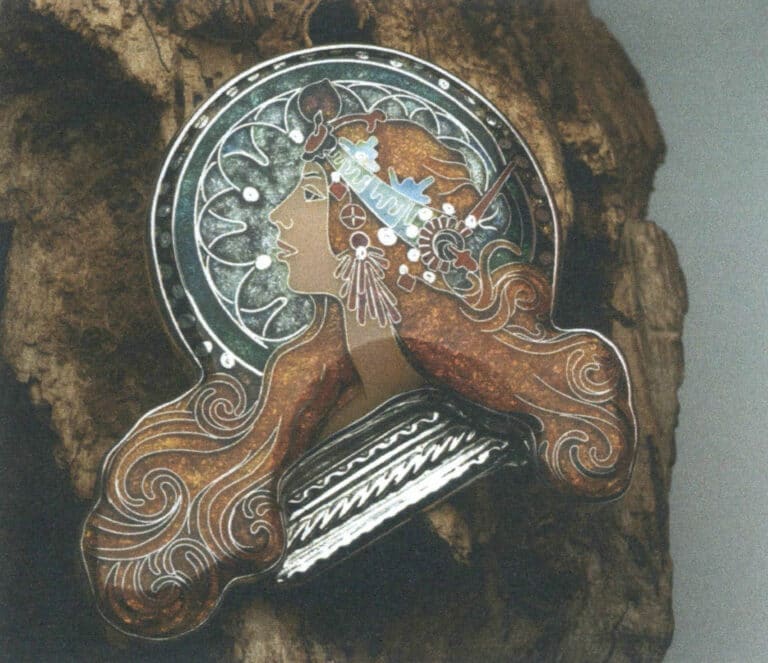
Figure 3-21 Tavtmaqala
3. Champlevé Enamel Technique
The champlevé enamel is also one of the earlier enamel methods to appear in the history of cloisonné enamel craftsmanship. Still, the name “champlevé enamel” is not entirely accurate, because almost all enamel techniques involve filling enamel glaze into areas bordered by metal; “inlaid” does not precisely reflect the characteristics of this technique. The French term “champlevé” literally means “carved out” and refers to the practice in printmaking of removing parts of a metal plate. That description is closer to the actual process. This technique relies on casting, chasing, or using acids to etch depressions so that some areas of the metal surface sit lower than others; enamel paste is then applied into the lowered areas and fired, and the piece is finally polished.
The champlevé technique is suitable for vessels, jewelry, or enamel plaques, and is also well-suited to creating relatively large works. Compared with cloisonné, its decorative style feels somewhat more rugged and produces a stronger visual impact.
Many of the surviving early enamel artworks are champlevé pieces, which shows that this was a frequently used method in the early development of enamel making. Among the methods for creating metal substrates, the etching technique is relatively easy to execute, so many champlevé works were produced using etching.
The specific etching procedure is: coat the metal plate or three-dimensional metal form with a resist according to the design, then immerse it in an acid bath; the areas covered by the resist retain the original metal surface, while the unprotected areas are corroded to form depressions; once the depressions reach the required depth, remove the metal from the acid to stop the etching; refine and clean the etched pattern so the edges are clearer; then apply enamel glaze into the depressions and fire. Throughout the process, the etching step is crucial. Whether the edges of the etched pattern are crisp and whether the depressions are deep enough will greatly affect the subsequent enamel-firing results.
Figures 3-22 and 3-23 show collections from the Musée des Beaux-Arts de Limoges in France. Figure 3-22 is a 12th-century copper champlevé-style enamel piece measuring 3cm×6cm; it was likely a decorative panel on a box. Figure 3-23 is a 13th-century work, also made with champlevé enamel technique, serving as a decorative panel inset on a reliquary box.
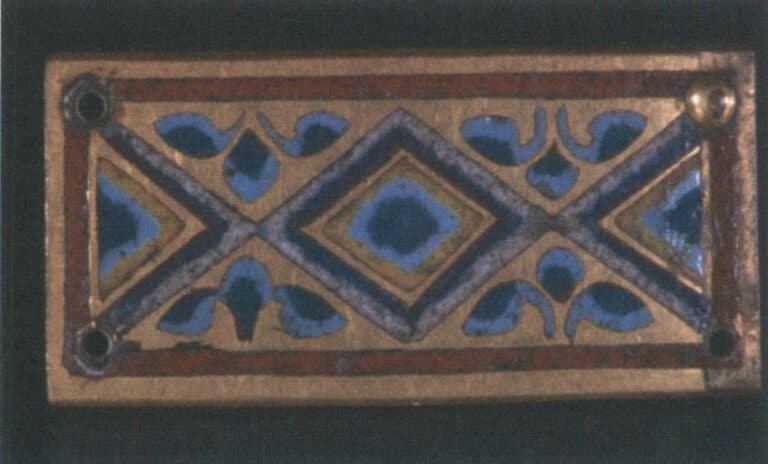
Figure 3-22 Copper base decorative panel made with champlevé enamel technique

Figure 3-23 Decorative panel made with champlevé enamel technique

Figure 3–25 Pendant made using the champlevé enamel technique
Figure 3–26 Brooch made using the champlevé enamel technique
4. Basse-Taille Enamel Technique
The basse-taille enamel technique began in the Renaissance, when transparent enamel glazes appeared in Italy. Light can pass through the transparent enamel layer, project onto the metal surface beneath, and reflect, producing a very bright color effect. It was precisely the emergence of transparent glazes that gave rise to the gilded enamel technique. In the history of basse-taille enamel development, advances in technique have always been built on progress in materials and tools.
What is called “basse-taille enamel,” also referred to by some as “pierced enamel,” is called “Basse-taille” in French. The specific method involves first engraving fine, regular underlying patterns on the metal base by metal carving methods, often intricate, neatly arranged curves. After carving the base patterns, a thin layer of transparent enamel glaze is applied on top and fired.
Because the glaze is transparent, the patterns engraved on the metal base plate appear clearly. The intricate patterns create complex and varied diffuse reflections of light, and when seen through pure, translucent glaze colors, the entire piece presents a rich, shimmering effect. The central blue part of the antique pendant shown in Figure 3-27 was made using the guilloché enamel technique. Basse-taille enamel was frequently used in antique jewelry from the 1920s to the 1930s, indicating that it was a popular technique during that period.
Figure 3-28 shows an antique pocket watch with finely engraved patterns on a silver base plate, covered with a transparent pink enamel.
Today, basse-taille enamel is found only in haute couture jewelry. Figure 3-29 shows a pendant by the Russian high jewelry brand Ilgiz Fazulzyanov: the clown holding an opal wears a hat and jacket with checkered patterns made using the basse-taille enamel technique.
The advantage of the basse-taille enamel technique is that as long as the patterns on the metal base are treated with sufficient delicacy and the glaze color is pure and clear, the final presentation of the piece is unlikely to have problems. This, to some extent, reduces the difficulty and chance of failure during the enameling firing process and increases the controllability of the production process.
Engraving patterns on metal was originally done by hand using specialized metal engraving tools; later, with improvements in technical equipment, semi-manual metal engraving devices appeared. Now, multiple methods can replace hand engraving. For example, lost-wax casting, laser engraving, and 3D printing can all achieve effects on metal plates similar to metal engraving, greatly reducing technical difficulty and cost.
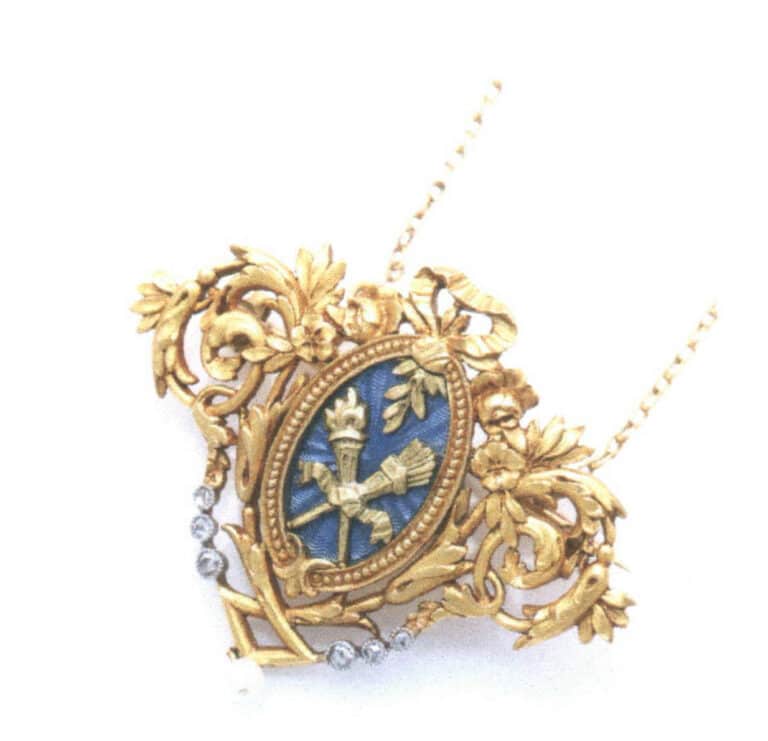
Figure 3-27 Antique pendant
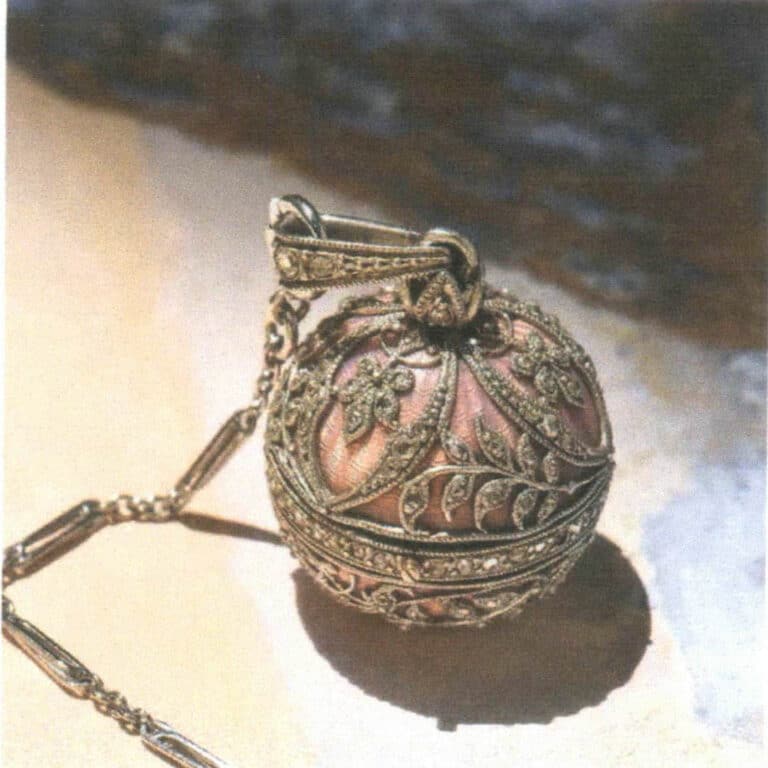
Figure 3-28 French antique pocket watch
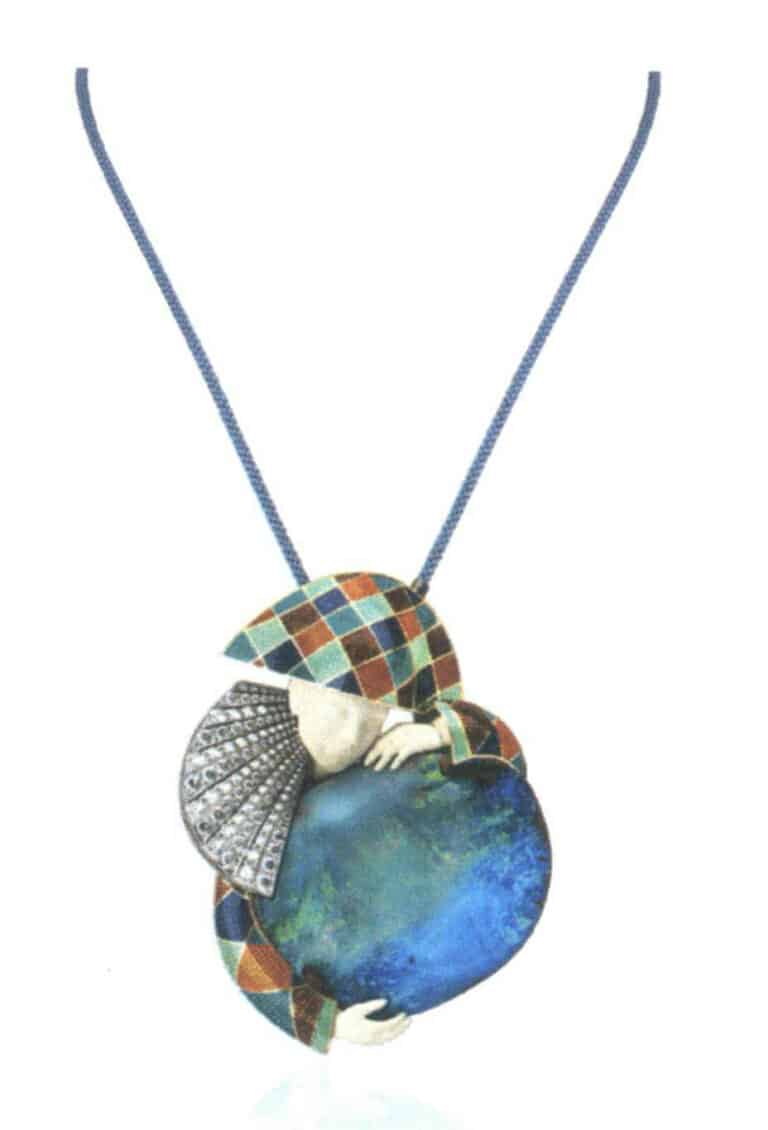
Figure 3-29 Clown
5. Plique-à-jour Enamel Technique

Because of its special structure, the plique-à-jour enamel technique requires strict temperature control during firing. Therefore, this technique only truly matured once enamel kilns capable of stable temperature control appeared. The inventions, technological advances, and innovations of the European Industrial Revolution brought a leap forward in jewelry craftsmanship during the Art Nouveau period; the plique-à-jour enamel technique began to be widely used in jewelry design from that period onward. Many representative enamel jewelry pieces from the Art Nouveau era used plique-à-jour enamel. Figure 3–31 shows plique-à-jour enamel pendants from around 1900, during the Art Nouveau period.
There are several firing methods for openwork enamel. The most common is to lay the prepared metal frame flat and place a natural mica sheet underneath. Then the enamel glaze is placed into the metal frame’s cavities for firing. Because mica and enamel glaze are not adhesive, after firing, the piece can be removed from the mica sheet to yield an plique-à-jour enamel piece. The advantage of this method is that the piece is fired while lying flat, so the temperature control requirements are not very strict and the firing is less difficult; the downside is that the enamel layer is relatively thick after firing, which affects translucency. The openwork enamel test piece shown in Figure 3–32 exhibits problems of an overly thick plique-à-jour enamel layer and poor light transmission.
Figure 3-31 Antique pendant
Figure 3-32 Plique-à-jour enamel test piece with an excessively thick enamel layer
Another method, called vertical firing, involves standing the metal frame upright and applying the enamel glaze along the cavity edges in concentric layers from outside to inside until the cavity is filled. This method is generally used for small enamel jewelry pieces; the plique-à-jour enamel firing in the craft examples in this book uses this method. Its advantages are that the enamel layer is very thin and highly translucent when finished, and because the enamel does not come into direct contact with other materials during firing, the enamel remains pure and free of impurities. However, this firing method demands very precise temperature control, as well as careful management of the moisture, timing, and technique when applying the enamel. Slight carelessness can cause various problems during firing. The plique-à-jour enamel earrings shown in Figure 3–33 were made with this vertical firing method, and you can see that the enamel layers are very thin and translucent.
The third method is the Japanese traditional technique for hollowed plique-à-jour enamel, mainly used for making vessels. What we call hollowed plique-à-jour enamel is referred to in Japan as shōtai shippō-yaki (also called detai shippō-yaki). The traditional process is to create patterns on a copper substrate with silver wires and enamel paste in the same way as cloisonné; after firing in a kiln the surface is ground, then an acid is poured into the interior of the substrate and, after a series of treatments, the metal substrate is corroded away to produce an enamel vessel without a substrate and with a hollowed effect. Figure 3-34 shows a piece of Japanese traditional shōtai shippō work. The advantages of this method are that large areas of the enamel can transmit light, the patterns can be made extremely fine with the wires, the piece can be designed at a relatively large scale, and the finished work has a gorgeous, graceful visual effect. The disadvantages are that the process is complex, production time is long, the corrosion process is difficult to control, and it has a high failure rate; Furthermore, the areas of transparent enamel without a metal backing are typically quite extensive in such pieces. If the structural design of the base form is unreasonable, the conflicting stresses between the enamel and the silver wires can make the enamel sections prone to cracking.
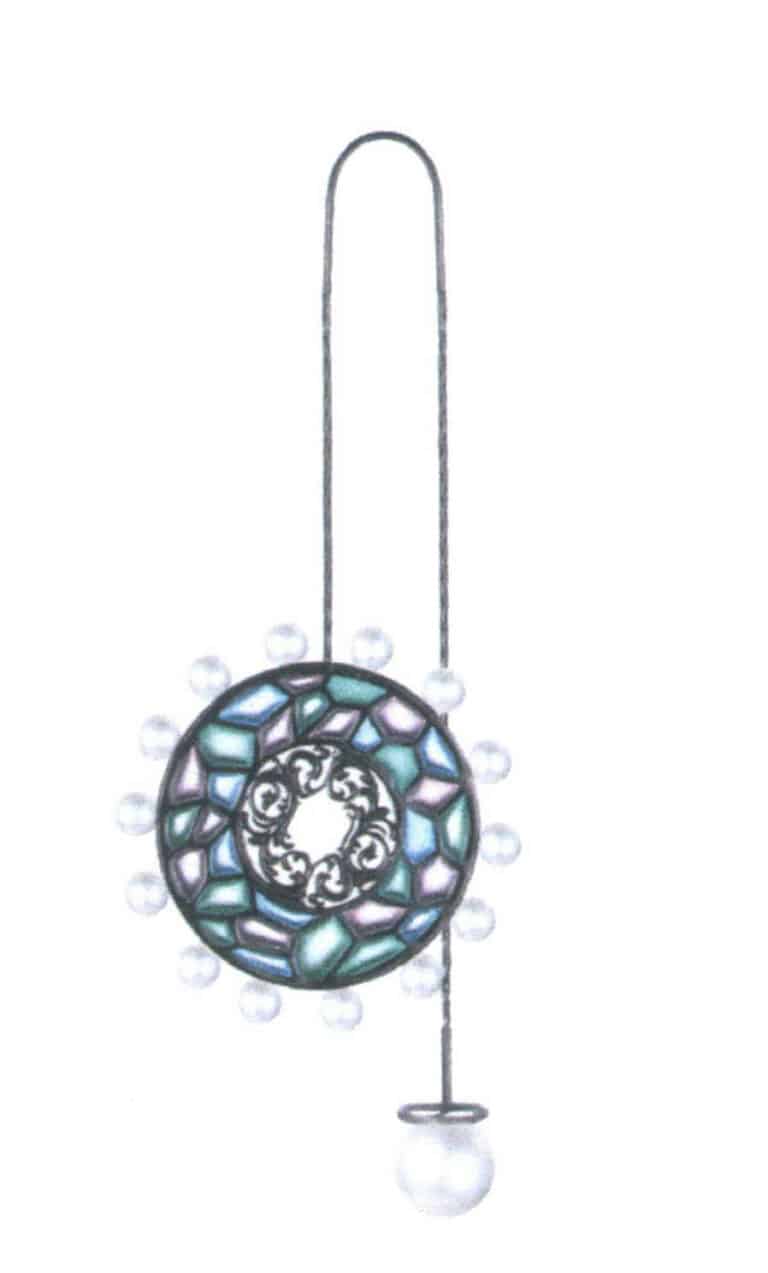
Figure 3-33 Plique-à-jour enamel earrings fired by the solid-firing method
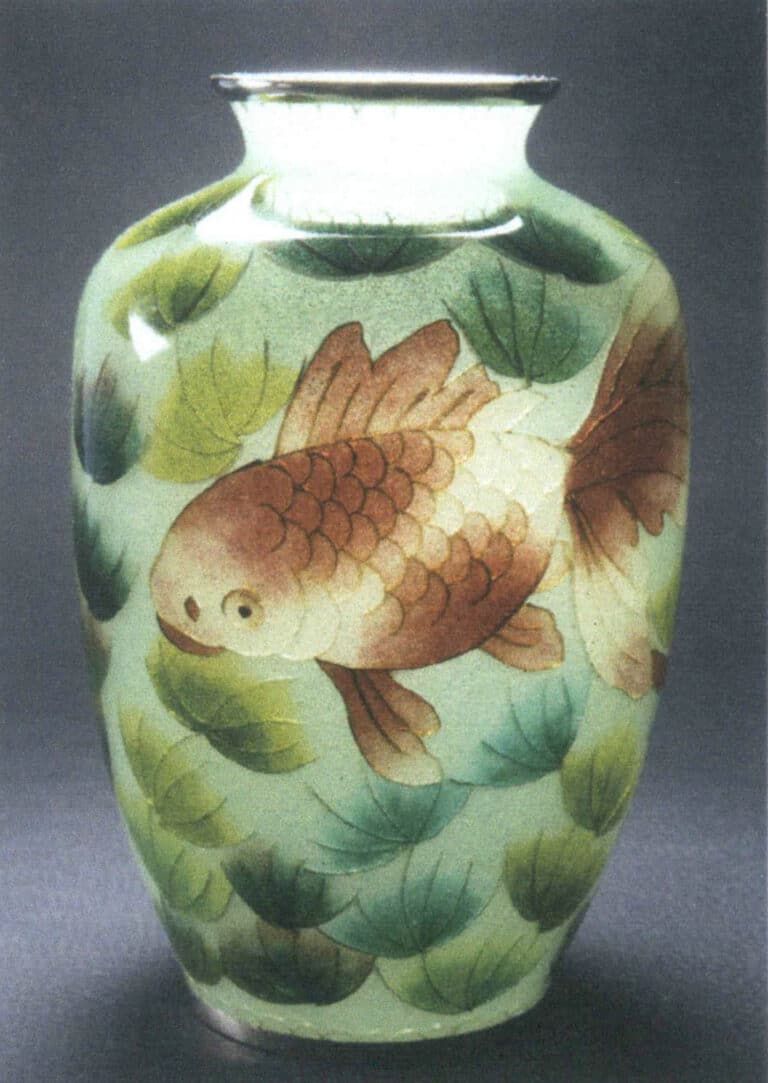
Figure 3-34 Japanese shōtai shippō vase
6. Painted Enamel Technique
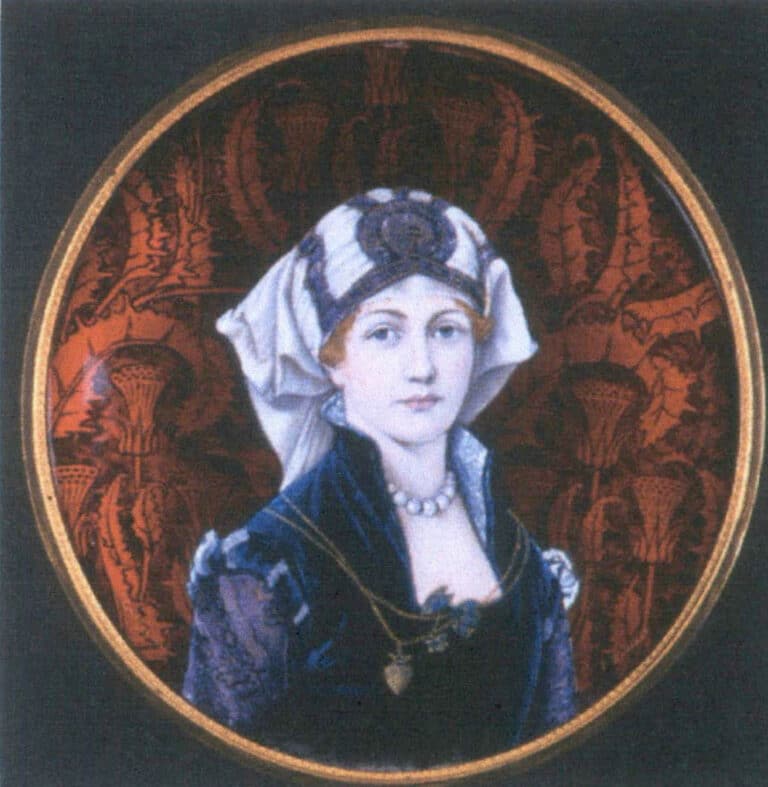
It is worth noting that the painted enamel technique was once fully developed in the Guangzhou region of China. In the 23rd year of Kangxi’s reign (1684), the Qing government opened four coastal ports—Guangzhou, Xiamen, Ningbo, and Songjiang —and established the Yue, Min, Zhe, and Jiang customs to manage overseas trade. Three years later, at the invitation of Emperor Kangxi, King Louis XIV of France sent a mission of six missionaries with various knowledge and skills to China, bringing painted enamel objects as gifts. From that time on, the painted enamel technique was favored by the Qing court. During the Kangxi period, the court established the “Inner Court Enamel Workshop,” dedicated to research on the painted enamel technique and the development of enamel pigments. Historical records indicate that the Inner Court Enamel Workshop repeatedly invited French and Guangdong painted enamel artisans to Beijing to create painted enamel works. During the Yongzheng and Qianlong reigns, large quantities of painted enamel products were produced in the Guangzhou area, with increasingly refined craftsmanship; by the late Qianlong period, mass production had been achieved, and products were even exported to Europe and Islamic regions. In the second half of the 20th century, the “Tanbu Special Craft Qing-firing Production Cooperative” was established in Tanbu Town, Huadu District, Guangzhou; in 1981, it was renamed “Huaxian Enamel Factory,” and in 1986, the “Huadu District Enamel Factory” was founded. Its products were mainly painted enamel items produced for export to earn foreign exchange. To this day, craftsmen descended from that lineage continue to practice painted enamel production in Huadu District, Guangzhou. Guangzhou painted enamel has a distinctive decorative style and technical characteristics—East-West fusion—its themes are mainly Chinese floral patterns, and traditional auspicious motifs are often combined with Western figures.
Figure 3-36 shows a painted enamel dish from the mid-Qing period, decorated with the traditional Chinese pattern symbolizing official rank and wealth. The design includes a crowing rooster, which signifies “gong ming” (success in the imperial examinations, a homophone for “public crowing”). The dish mainly employs Western painting techniques; the difference from European painted enamel lies in the outlining, which clearly uses the line-drawing brushwork of traditional Chinese gongbi painting. Figure 3-37 shows a detail of a painted enamel dish from Guangzhou dating to the Yongzheng reign of the Qing. From this piece, one can more clearly see the traditional gongbi outlining technique.
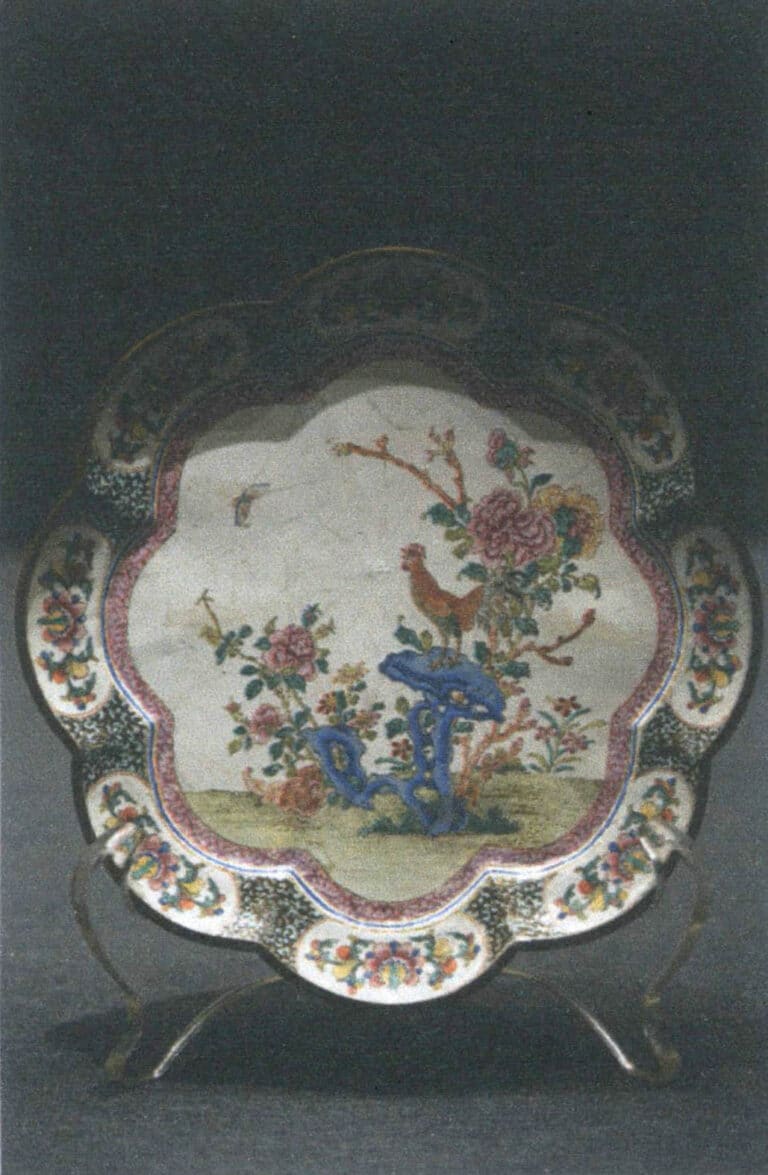
Figure 3-36 Mid-Qing "Official Rank and Wealth" patterned flower-rim dish
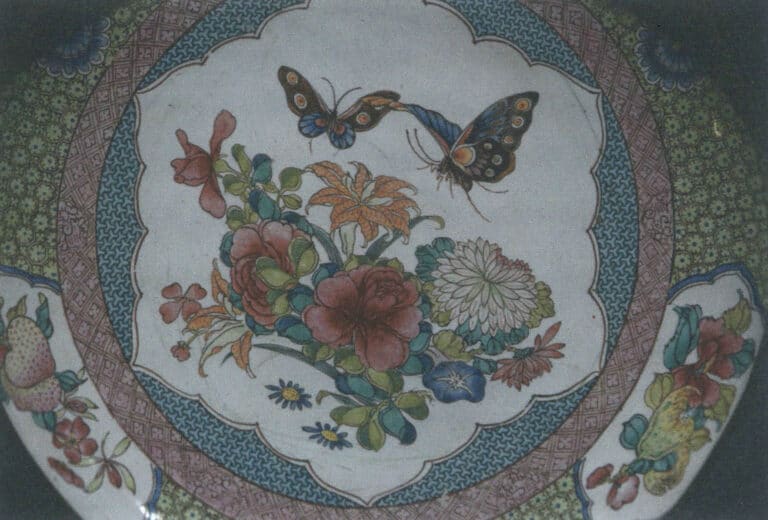
Figure 3-37 Detail of a painted enamel dish from the Yongzheng period, Qing
Compared with other enamel techniques, painted enamel differs in the fineness of the enamel glaze powder, the methods for preparing the enamel glaze, the ways the enamel glaze is applied, and even the firing temperature, so it is a very special enamel craft.
The enamel glaze powder for painted enamel is much finer than ordinary enamel glaze particles; it cannot be washed or ground with water and must be mixed using vegetable essential oils and neutral oils. The glazing method uses an extremely fine brush to pick up enamel and paint the design, so the painting technique is closer to painting. The firing temperature is also much lower than that of other enamel techniques, and must be controlled below 760°C.
The painted enamel technique allows for very detailed rendering as well as spontaneous color experimentation; it can achieve effects like watercolor or like oil painting. It demands strong painting skills from the maker, though the firing difficulty is relatively lower than that of other enamel techniques. Because of its delicate and rich expressive capability, it is popular in both modern art jewelry and commercial jewelry design. In modern art jewelry creation, painted enamel is mostly used to realize small-scale imagery or combined with other enamel techniques; in commercial jewelry, it is often used to decorate the dials of high-end watches.
The characteristic of painted enamel is that it can achieve rich and delicate pictorial effects on very small works; makers even need to use microscopes to assist in painting, so it is also called “miniature painted enamel.”
Hungarian artist Pál Tóth was once an illustrator; he began creating enamel works in 1981. His works, which often used cloisonné and champlevé techniques, gradually shifted toward painted enamel. Pál Tóth has focused on painted enamel for 20 years. As a professional enameling artist, he has produced a large number of painted enamel works, most of which are made on copper substrates. His painted enamel works won the Hungarian Artists’ Association Grand Prize in 2010, and he is frequently invited to exhibit or teach across Europe, with engagements in the UK, the Czech Republic, the Netherlands, Germany, and other places. The subjects of Pál Tóth’s works often come from the outdoors, including animals, plants, and landscapes. Figure 3-39 shows a painted enamel dial he made depicting a heron among reeds; Figure 3-40 shows a landscape-themed dial he made; Figure 3-41 shows another of his painted enamel dials, depicting colorful hot-air balloons in the sky. These works reveal Pál Tóth’s delicate brushwork and his love of nature.
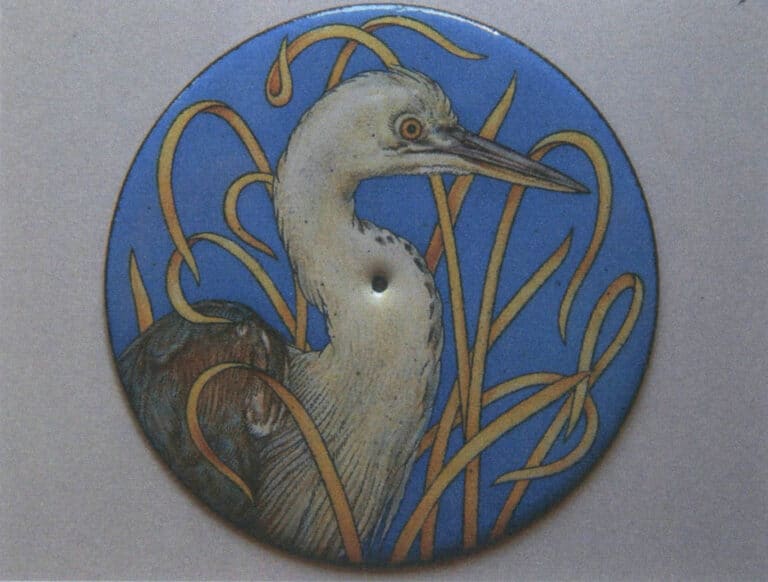
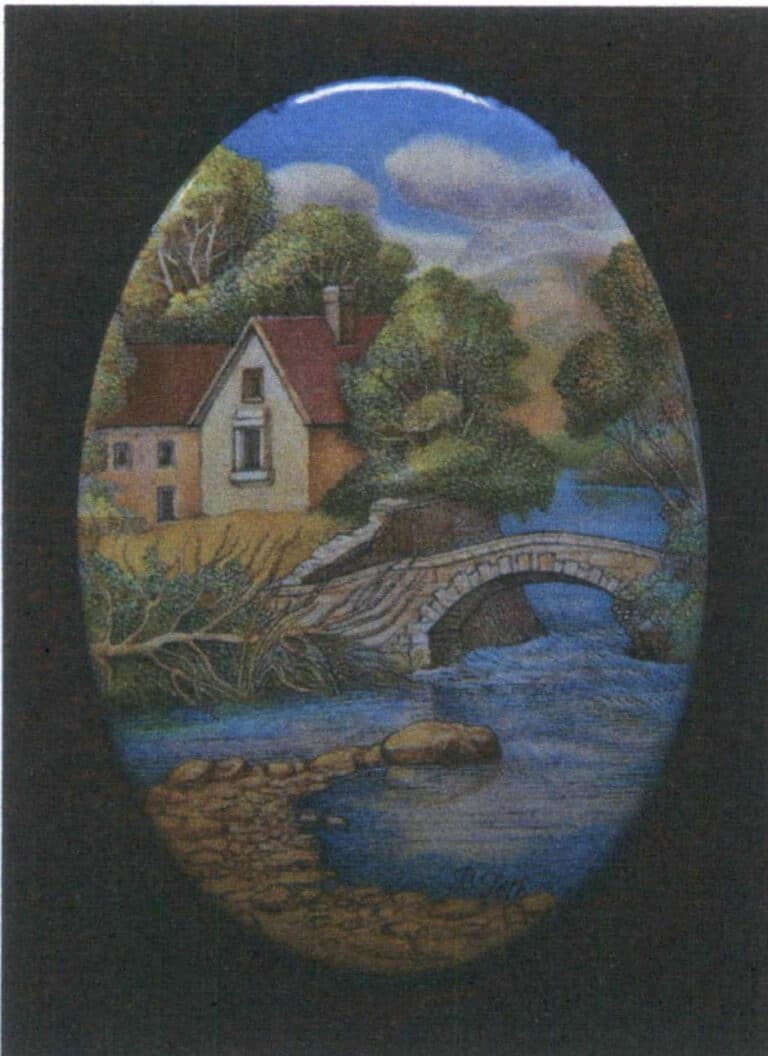
Figure 3-40 Painted Enamel Dial 2
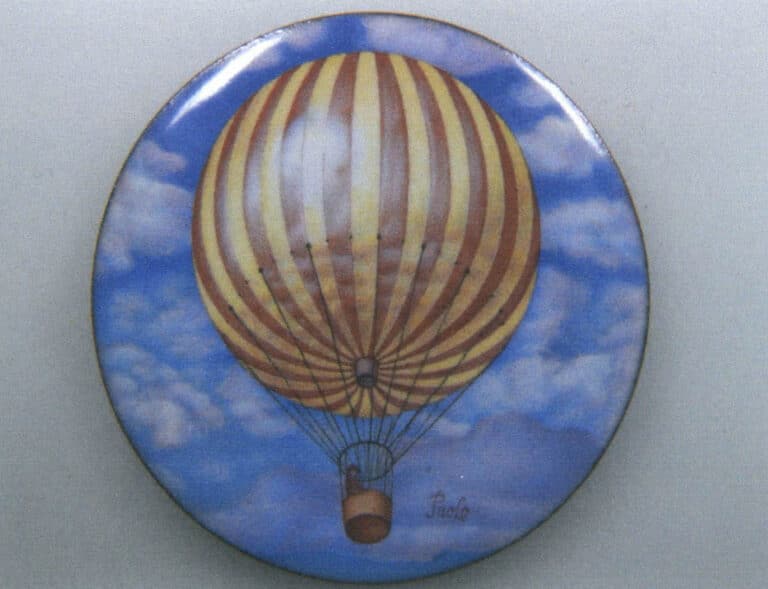
Figure 3-41 Painted Enamel Dial 3
7. Grisaille Enamel Technique
Grisaille means a monochrome gray painting with a relief-like effect. Unlike polychrome painted enamel, a grisaille piece is composed of black, white, and various shades of gray, producing an effect similar to a monochrome chalk drawing or a low-relief.
From the development history of enamel techniques, grisaille was used more often than polychrome painted enamel in the early stages of painted enamel’s development. The French town of Limoges is famous for its enamel work; the Limoges Fine Arts Museum in the town center houses a large collection of enamel pieces from the Middle Ages to the modern era, many of which are grisaille enamels. Figure 3–42 shows one such 16th-century grisaille work.

The techniques for painting and firing grisaille enamel and polychrome enamel are broadly similar. The difference is that grisaille is painted with a white enamel over a dark enamel ground, the ground usually being black or deep blue. The white enamel used in grisaille is called “Limoges blanc” in French; we can refer to it as “Limoges white,” and it is produced in Limoges, France. The emergence of “Limoges white” is closely linked with the development of the grisaille technique. This white enamel is characterized by strong coverage even when applied thinly and by its ability to withstand repeated firings, which makes it possible to achieve the monochrome, richly layered relief effects seen in grisaille works.
Traditional grisaille work often takes religious narratives or portraiture as its subject, rendered in a realistic style with finely detailed depiction of the figures’ faces, postures, and costumes. Figure 3-43 shows a mid-16th-century grisaille piece depicting the Annunciation to the Virgin; the drapery of the Virgin’s garments and the curtain behind her are both depicted vividly.
Possibly due to the limitations of color, landscapes and architecture also frequently appear in grisaille enamel, but usually only as background elements to support the main figures, as in Figure 3-44, which shows urban buildings used as a backdrop.
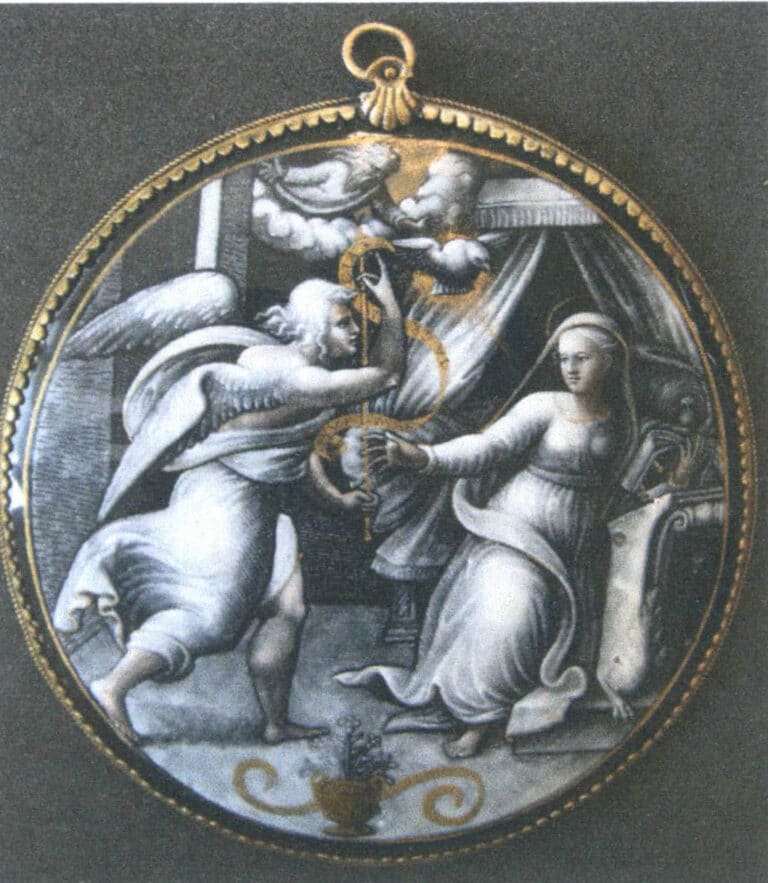
Figure 3-43 The Annunciation (mid-16th century)

Figure 3-44 Saint Michael Slaying the Dragon (1550)