Co to jest Flush Setting, Gypsy Setting, Tension Setting, Channel Setting i Invisible Setting dla biżuterii?
Learn the Making Methods and setting skills in the Jewelry production
Wprowadzenie:
This article delves into the world of jewelry setting, showcasing five key settings: Flush, Gypsy, Tension, Channel, and Invisible. It covers their overview, production methods, and applications in jewelry design, providing a must-read for industry pros looking to master these techniques.
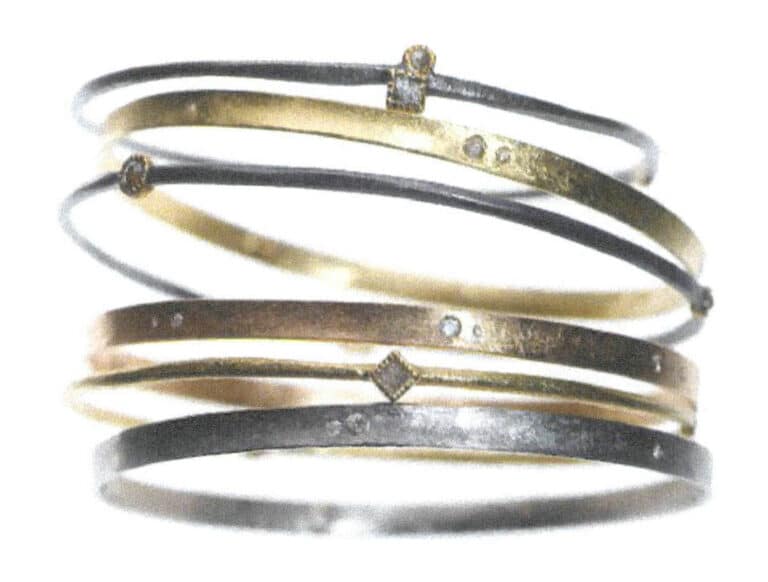
Flush Setting Bracelet
Spis treści
Section I Flush Setting and Gypsy Setting
The flush setting and gypsy setting is made by subtracting metal from an existing metal structure to create a stone setting base without adding additional structure. For example, a groove is made in the ring to hold the stone, similar to a prong setting or micro-pave setting. Still, the flush setting and gypsy setting are more integrated with the metal because the stone is held in place by a circle around the edge of the stone rather than by point fixation.
1. Overview of Flush Setting and Gypsy Setting
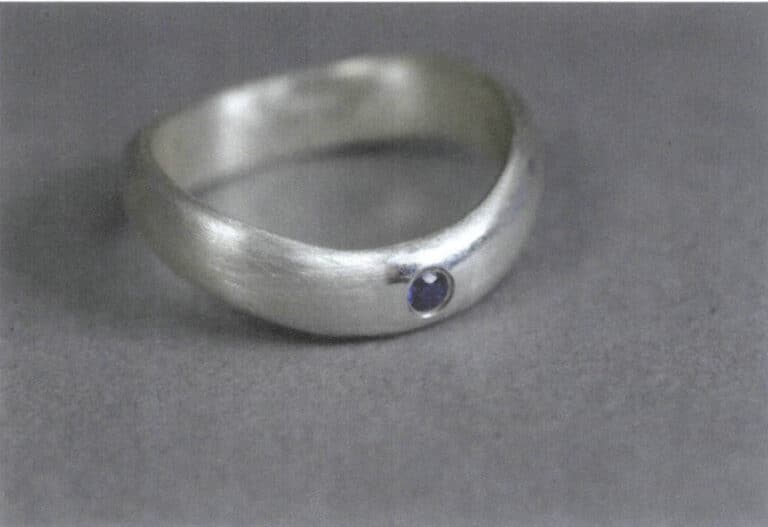
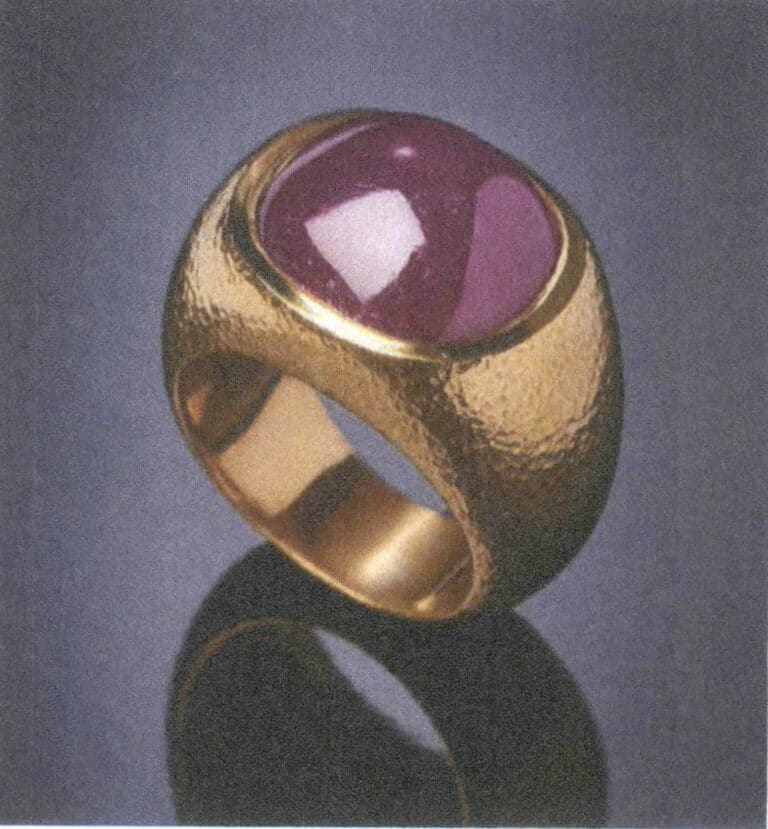
Flush setting and gypsy setting are very similar in many of today’s designs in terms of their appearance and are often referred to collectively as flush setting because they are both settings in which holes are punched into the metal surface to form sunken setting positions. Then, the metal surrounding the stone is extruded to hold it in place without adding an extra metal structure. Although they appear to be similar, there are some differences in the type of stone they are used for and how they are made, with gypsy settings being used for larger stones and larger pieces of jewelry and flush settings being used for smaller faceted stones. Therefore, the effect of the two types of settings is also very different, gypsy setting in the stone is more prominent, giving people a feeling of exuberance and exaggeration, while flush setting of the stone and the metal is almost in the same plane, and is therefore also called flat setting, the setting effect of simplicity and introverted. In many cases, the flush setting is an embellishment to complement the main body of the piece. Figures 6-1 and 6-2 illustrate the two types of rings, respectively.
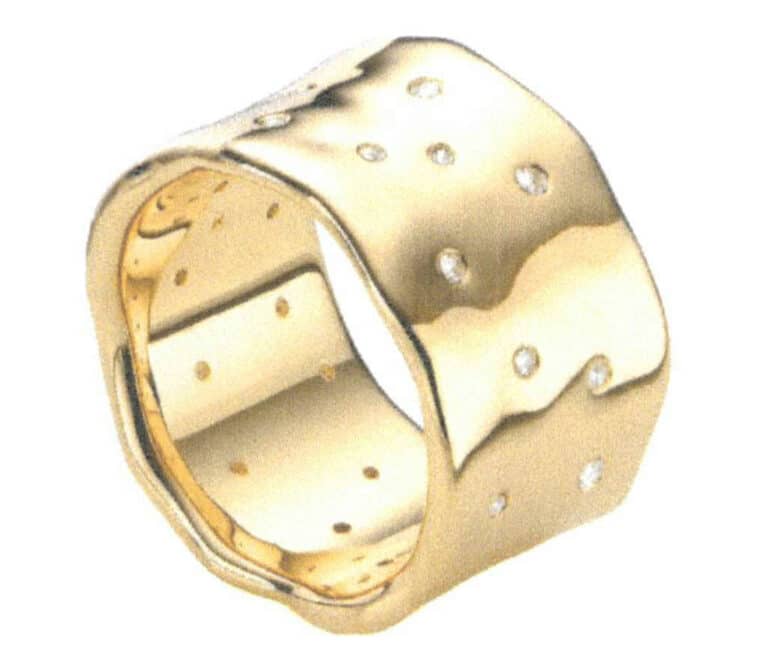
Figure 6-1 Flush Setting Ring
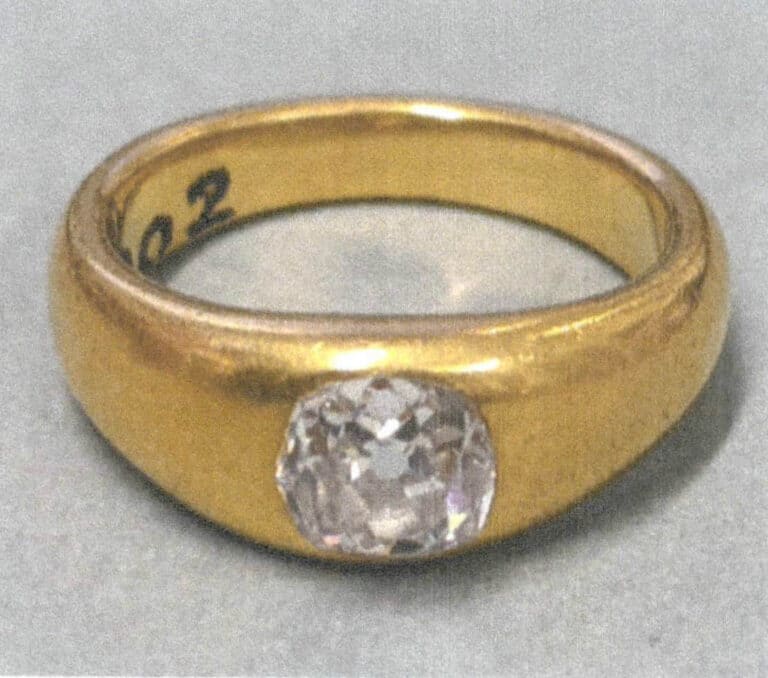
Figure 6-2 Gypsy Setting Ring (V&A Museum Collection)
2. The Method of Making Flush Setting
Flush setting, also known as flat setting, is characterized by the appearance where the top surface of the gemstone is level with the metal, meaning the height of the gemstone is less than the thickness of the metal, as shown in Figure 6-3. Therefore, its material selection is more limited compared to gypsy setting, and the limitation of effects makes the flush setting mostly use smaller round brilliance cut gemstones. In the flush setting, the metal has a stronger sense of wrapping around the gemstone, creating a seamless effect. Compared to the ruggedness of gypsy settings, the delicate simplicity of flush settings has been particularly favored in recent jewelry designs.
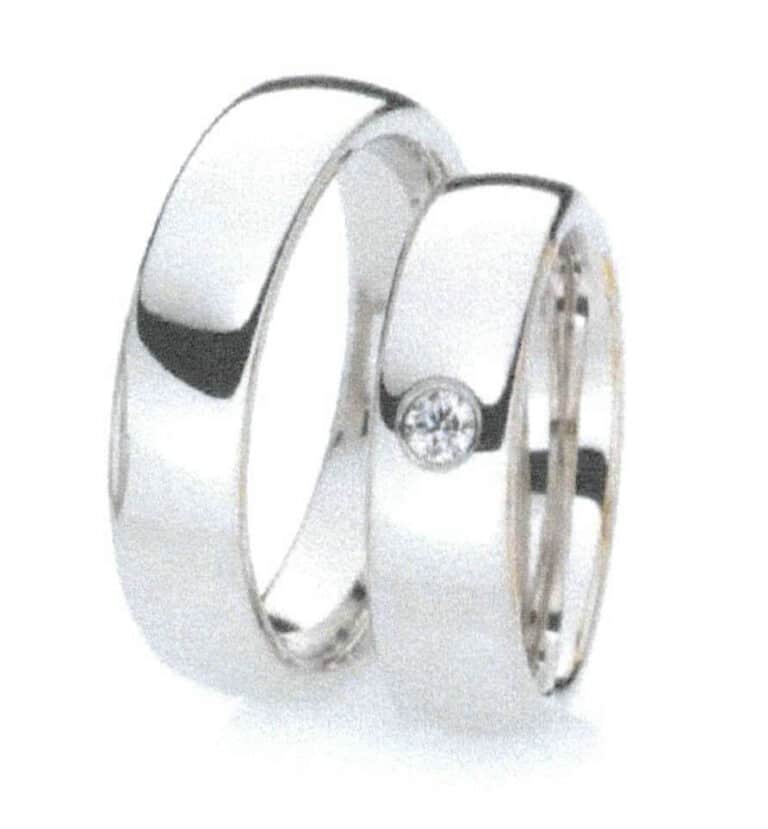
Kroki for Making Flush Setting
(1) Przygotowanie materiału
In this case, the gem does not use a round brilliance cut gem with a diameter of 1.5 mm and a height of about 1.1 mm. I refer to a wall thickness of 1.5 mm and a width of 4 mm. The wall thickness of the ring is greater than the thickness of the gem, as shown in Figure 6-4. Note that a preliminary finish should be made for the ring at this stage.
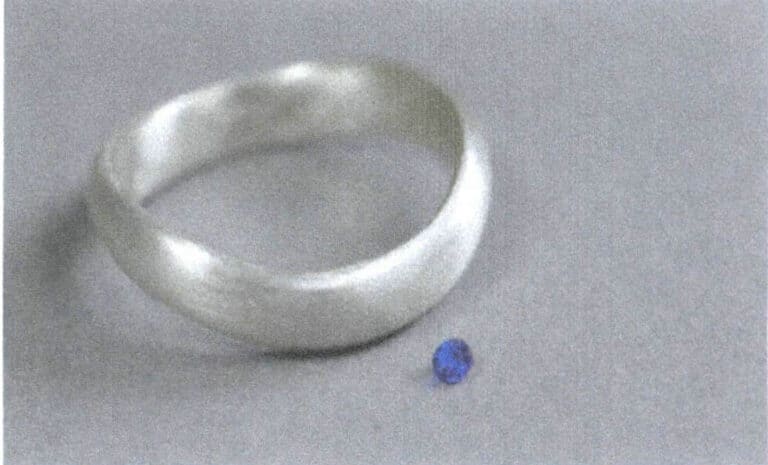
(2) Increase Metal Thickness
The thickness of the metal must ensure that the gem does not show the base. If the metal thickness is insufficient, a metal piece or metal ring can be added at the stone setting position to solve the problem. The added metal piece or ring used to increase thickness must be larger than the gem’s diameter. The three methods of increasing metal thickness are shown in Figure 6-5; the first two are welding metal pieces, and the third is a method of welding metal rings. However, if doing a flush setting on the ring, it is best to ensure that the ring thickness is sufficient to set the gem and not to use spacers, as spacers can affect aesthetics. This is very different from gypsy setting, where the metal is generally prepared according to the gem, while the flush setting is more often based on the thickness of the metal to match the gem.

(3) Drilling
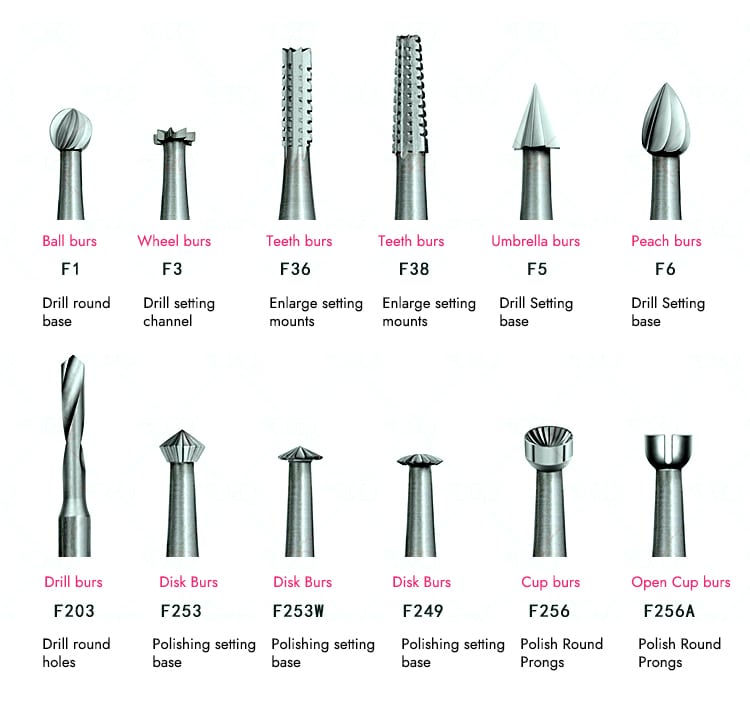
First, drill a hole at the center of the setting position with a drill bur of about 0.8 mm, as shown in Figure 6-6.
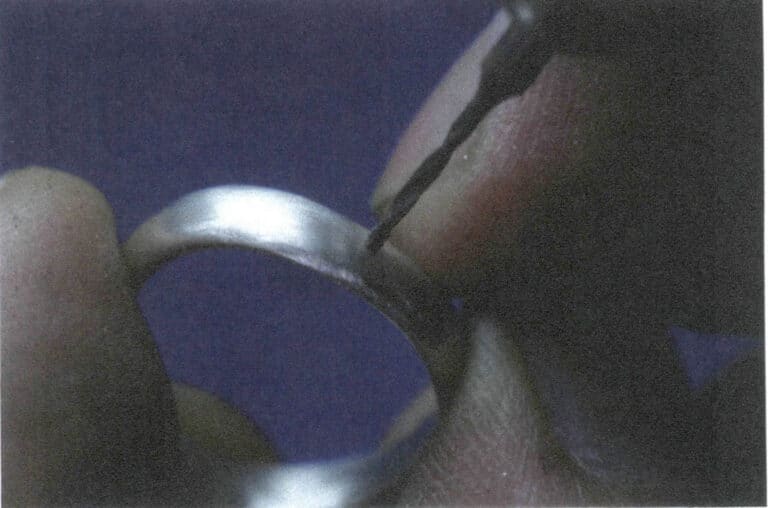
(4) Expanding the Setting Position
Use a ball-shaped or pear-shaped bur to expand the setting position at the hole, as shown in Figure 6-7. The bur size should follow the principle of using smaller to larger. When using a bur that matches the diameter of the gemstone, the bur size must not be larger than the gemstone diameter. It is very important for the setting position to be in close contact with the gemstone’s girdle during flush setting; otherwise, it may result in the gemstone not being securely set. The drilling depth of the ball-shaped bur is generally a little more than half the diameter of the ball-shaped bur, and the depth of the setting position should ensure that the top surface of the gemstone is basically in the same plane as the metal, as being too high will not allow for secure setting, and being too low will obscure the gemstone’s brilliance. The appropriateness of the depth can be verified by placing the gemstone into the setting position; if the depth is insufficient, it can be modified, so the setting position should be drilled at a time. The cross-section of the setting position is shown in Figure 6-8.
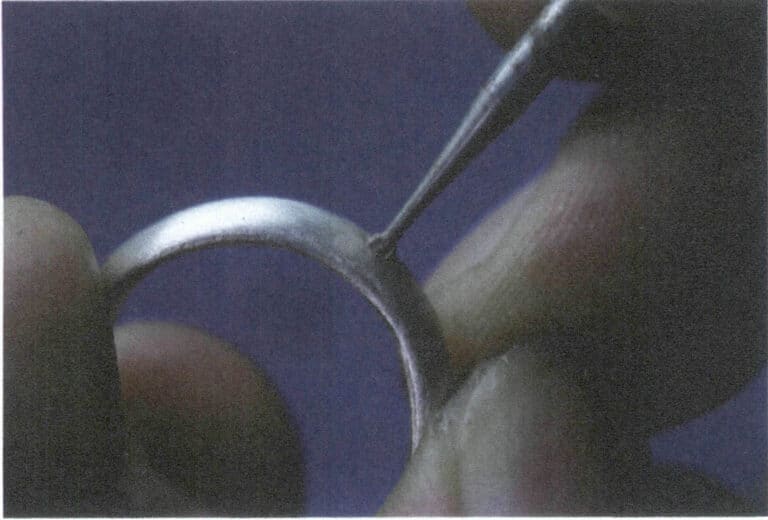
Figure 6-7 Expanding the setting position with a ball-shaped bur
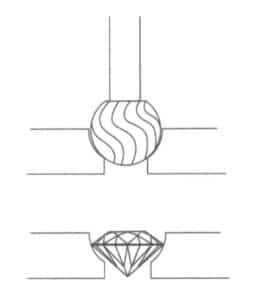
Figure 6-8 Cross-section of the setting position
(5) Fixing the Metal
Expand the setting position and secure the metal to the ring stone setting base, as shown in Figure 6-9.
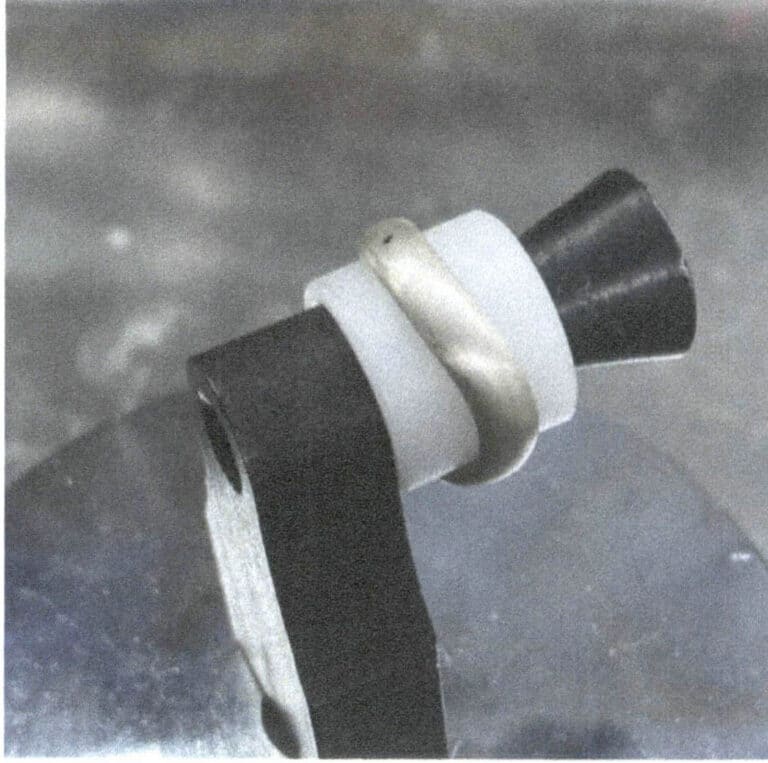
(6) Grooving with a 45 Degree Disc Bur
After the ball-shaped bur is not positioned, a 45 degree hart bur with a diameter slightly larger than the gemstone diameter can be used to grind a downward slope above the hole made by the ball-shaped bur, making it easier to press the metal during setting, as shown in Figures 6-10 and 6-11. This step can be omitted in the flush setting process, and the method of using the bur is not unique; besides the method used in the case, one can also use only the ball-shaped bur or use a pear-shaped bur in conjunction with the ball-shaped bur, or use a diamond-shaped bur, to form a smooth step that can support the gemstone and a stone setting position with a metal pressing surface .
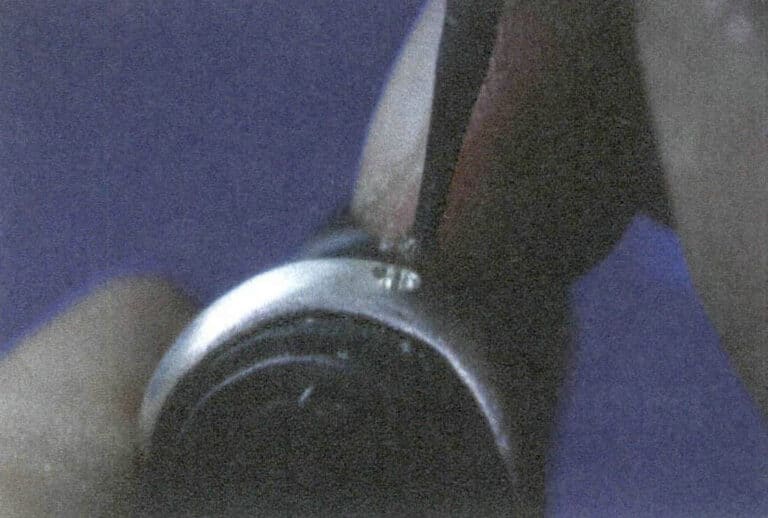
Figure 6-10 Grooving with a 45 Degree Hart Bur
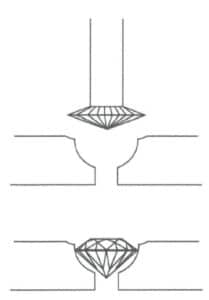
Figure 6-11 Cross-section of a 45 Degree Hart Bur Grooving
(7) Placing the Stone
The principle of placing the stone is that the top surface of the stone is parallel to the metal surface, i.e., the top surface of the stone is almost in the same plane as the metal surface. Since the stones in a flush setting are small in size, a small flat-headed bur can be sharpened and the tip dipped in a harmless grease such as olive oil to stick the stone to place, as shown in Figure 6-12.
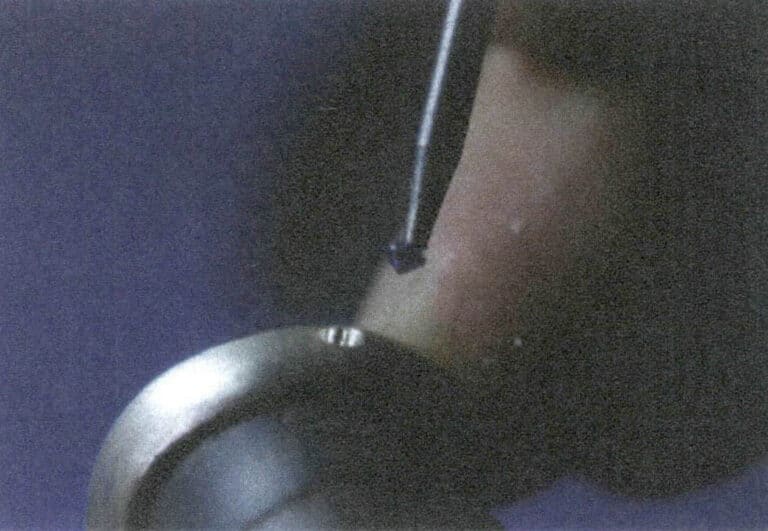
(8) Observing the Stone
Observe the stone after placing it to make sure it is horizontal, and the stone is at the proper depth, as shown in Figure 6-13. If the stone is placed crookedly, the stone will be set crookedly and will not look good; if the setting position is too deep, the stone will hide the beauty of the stone and is likely to leak; if the setting position is too shallow, the amount of metal used to squeeze the stone is not enough, and the stone may not be set properly or may not be able to be set. The correct and incorrect ways to place a stone are shown in Figure 6-14.
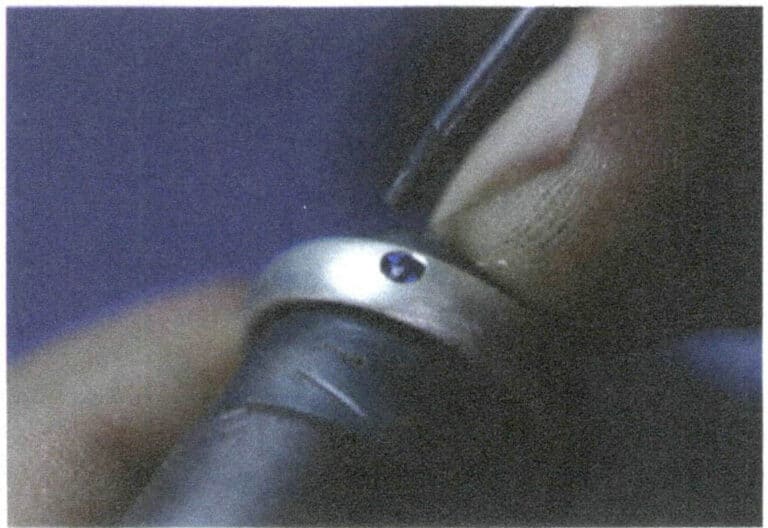
Figure 6-13 Observe whether the gem is flat after placing the stone.
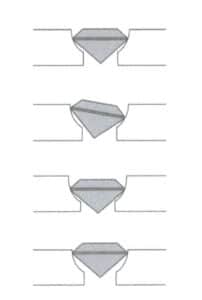
Figure 6-14 Correct stone placing, tilted stone placing, setting position too deep, setting position too shallow
(9) Preparing Stone-setting Tnarzędzia
The burs used for setting stones need to be polished by yourself. Old steel needles are very suitable in size. Use a grinding machine and file to shape them as needed, then use sandpaper rolls and polishing wheels to polish them layer by layer until smooth. Finally, fix the polished burs onto a wooden handle or lockjaw for easy grip and force application. The style of the flush setting bur is shown in Figure 6-15.
(10) Setting the Stone
Use a steel bur to apply force in a circular motion along the inner edge of the bezel at an angle of approximately 45 degrees to press the metal against the upper part of the gemstone’s waist. While rotating and pressing, the steel bur gradually changes from inclined to vertical, as shown in Figures 6-16 to 6-18. The metal grooved without using a 45 degree hart bur pressing method follows this angle and sequence.
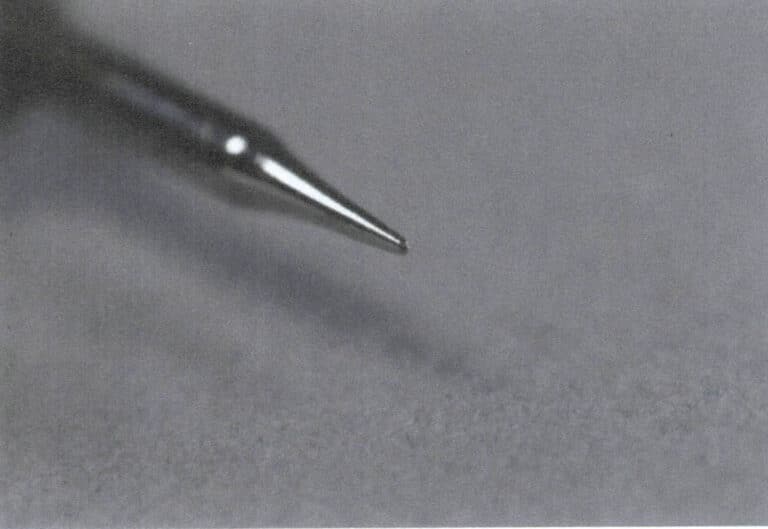
Figure 6-15 Style of Flush Setting Bur Tool
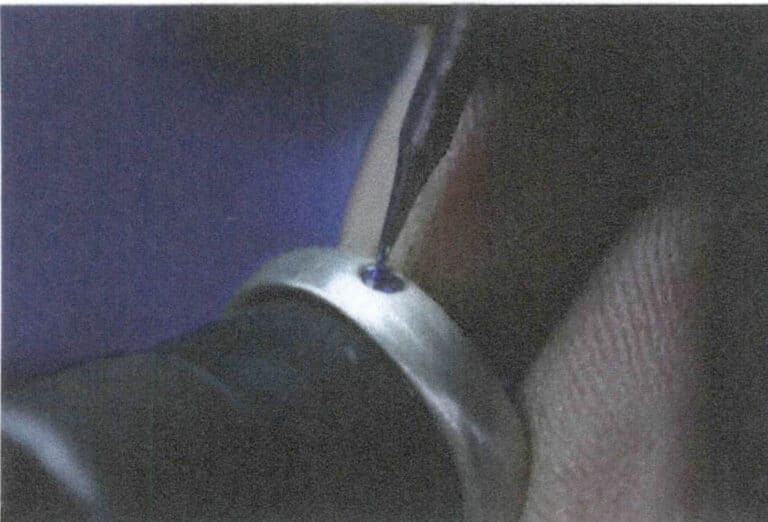
Figure 6-16 Setting the Stone
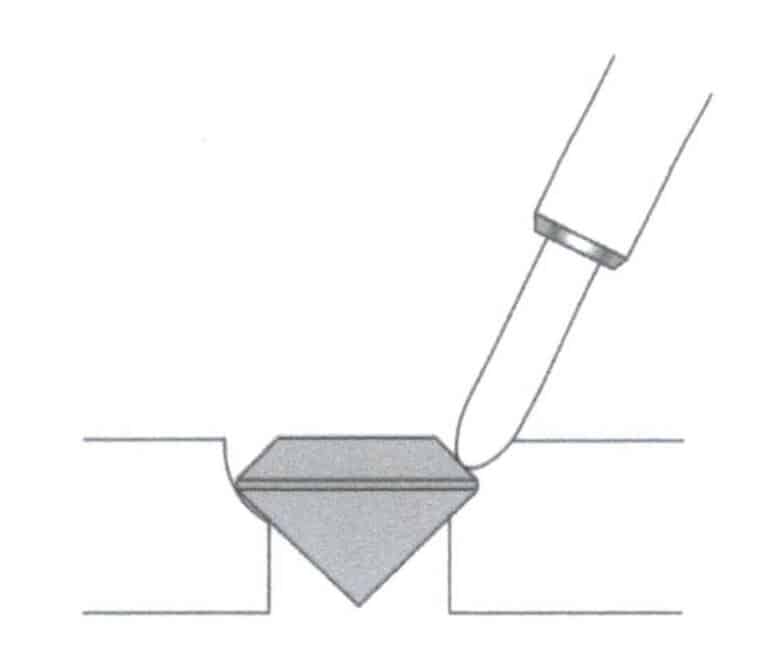
Figure 6-17 Steel Bur Pressing at an Inclined Angle
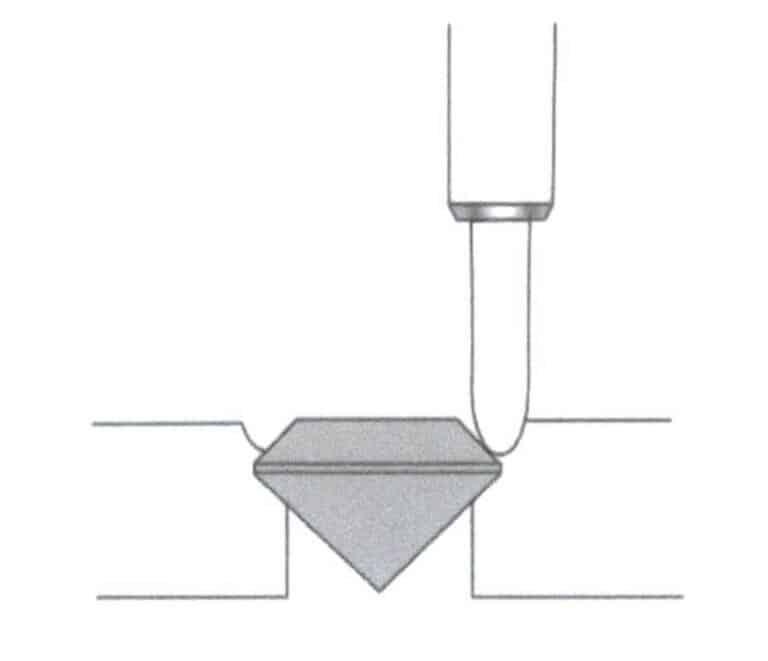
Figure 6-18 Steel Bur Pressing at a Vertical Angle
(11) Completing the Flush Setting Ring
The finishing work of flush setting is mostly completed before the stone is set, so what remains after setting the stone is mainly the finishing and cleaning of the edges of the stone setting, as shown in Figure 6-19.
3. The Production Method of Gypsy Setting
When it comes to Gypsy setting, we cannot help but appreciate its bold and rugged beauty through the ethnic characteristics of the Gypsies. This setting method is often used in men’s rings. The true Gypsy setting is fixed by striking. In traditional Gypsy settings, the styles generally feature larger pieces of metal, such as wide rings. This setting can accommodate almost any style of gemstone, even irregularly shaped ones, and the gemstones are often larger, with the edges of the metal smoothed after being pressed, as if the gem were cast into the metal itself, as shown in Figure 6-20. For larger or irregular gemstones, it is more suitable to use a method of casting metal after sculpting wax. Creating a precise mold using 3D modeling is easier if the gemstone shape is irregular. Therefore, the following case introduces the Gypsy setting method through a process of hand-sculpted wax followed by casting and setting.
Kroki dla Making Gypsy Setting
(1) Materiał Pzadośćuczynienie
Gypsy setting generally focuses on larger cabochon gemstones, but faceted gemstones are also acceptable. Here, we will introduce the setting of an oval-shaped cabochon gemstone of 12mm×8mm as an example.
For the setting of such large gemstones, it is recommended to use wax with flat surfaces for the ring, as shown in Figure 6-21. Adjust the thickness of the wax for the stone setting position according to the size of the gemstone, which is the overall thickness of the stone setting base, as shown in Figure 6-22. In this case, the depth of the gemstone sinking is about 2~2.5mm, and the metal thickness must ensure sufficient depth for the stone setting base, while the width must provide enough edge and area for pressing outside the gemstone. If using casting wax, first create the stone setting base for the gemstone and then cast the other parts of the ring based on this, which can better ensure the dimensions of the stone setting position.
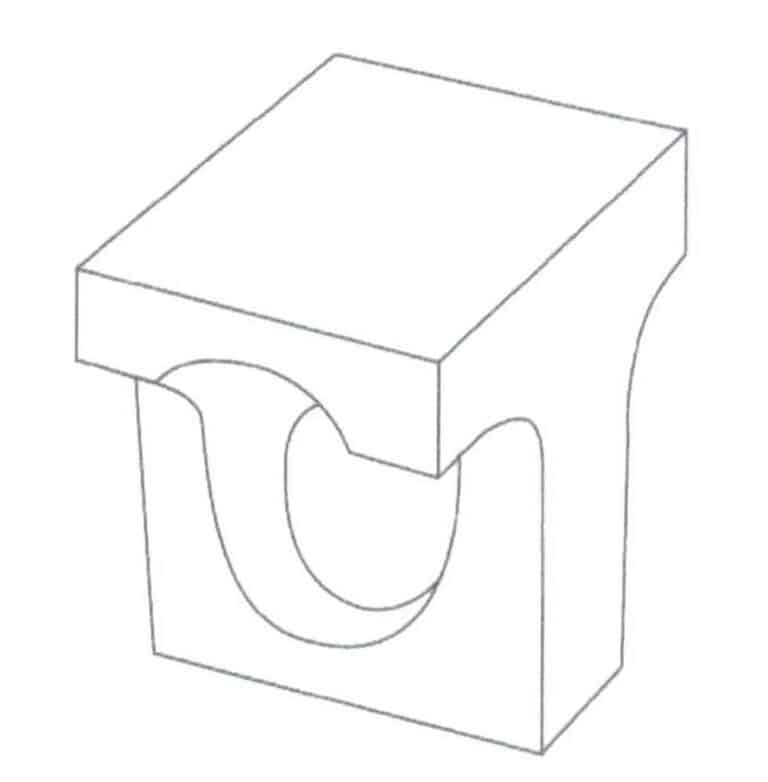
Figure 6-21 Prepare the casting block
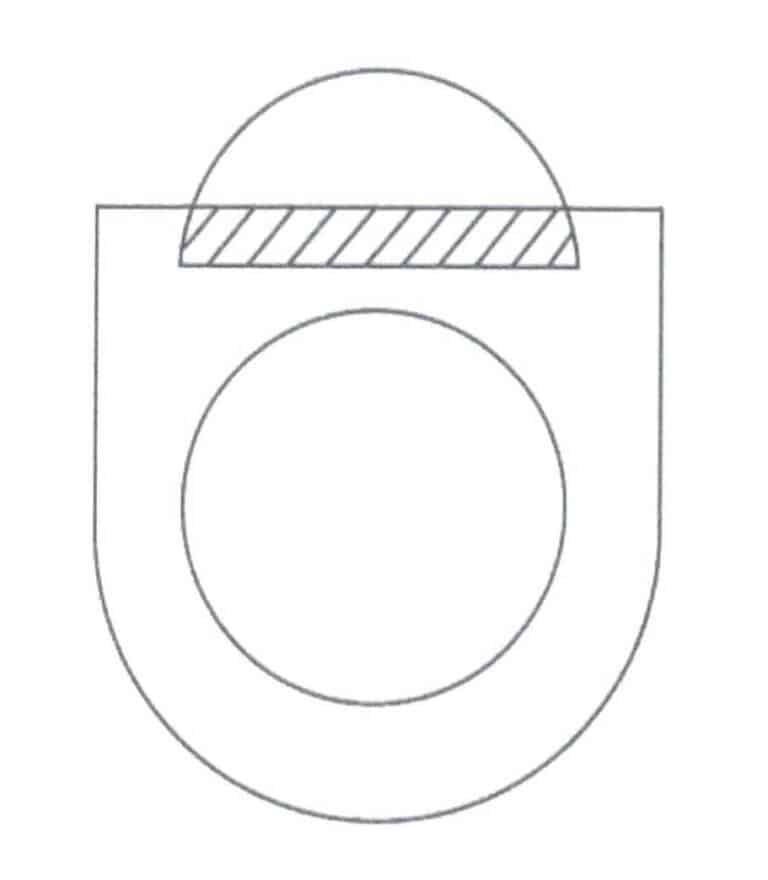
Figure 6-22 Determine the thickness of the wax for the stone setting position
(2) Determining w Position of the Stone Setting Base
First, outline the contour of the gemstone on the wax surface: use a steel bur to make a mark, and based on this contour line, shrink inward by 1-2mm according to the size of the gemstone to draw a proportionally reduced outline, which serves as the support for the base of the gemstone, as shown in Figure 6-23. The edges of the stone setting base should fit very closely with the gemstone.
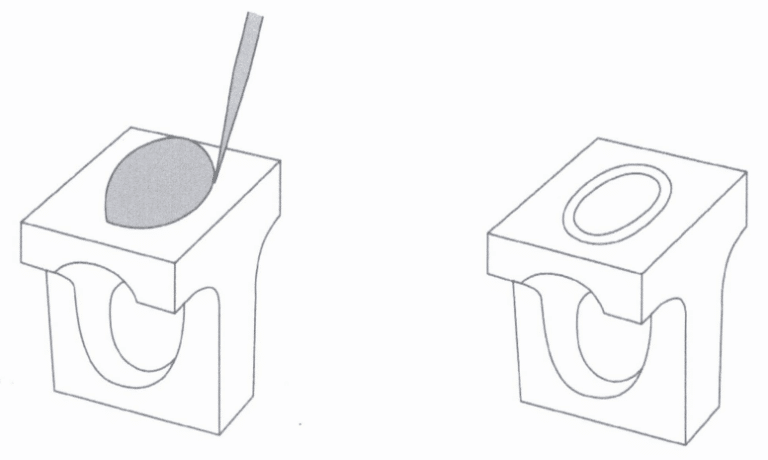
(3) Carving the Setting Position
First, use a drill bur to penetrate the stone setting position from top to bottom, then use a cylindrical bur to wax along the marked inner contour line, ensuring to maintain a vertical position at all times, as shown in the left image of Figure 6-24. Next, wax vertically along the outer contour line, ensuring consistent depth and a level bottom surface and leaving about 1 mm thickness at the bottom, as shown in the right image of Figure 6-24. If the bottom surface is a conical brilliance cut gemstone, it should be shaped to an appropriate conical slope based on the gemstone, which can also be refined on the cast metal with sufficient thickness. The difference between the bottom surfaces of the stone setting positions of cabochon gemstones and faceted gemstones is shown in Figure 6-25.
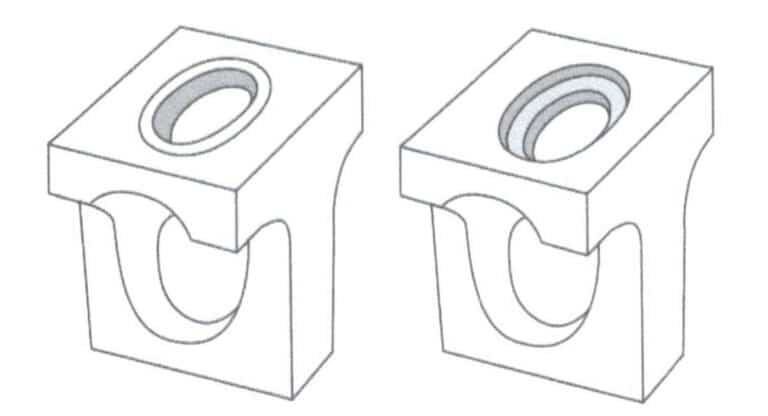
Figure 6-24 Carving the setting position
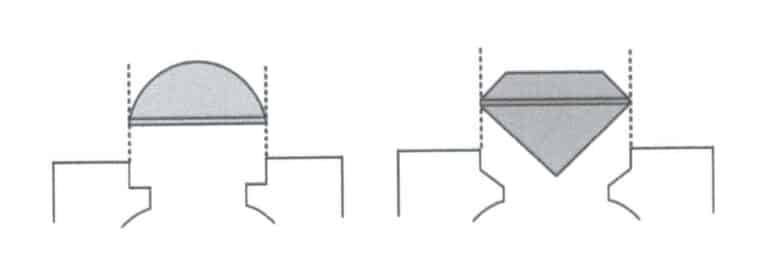
Figure 6-25 The difference between the bottom surfaces of the stone setting positions of cabochon gemstones and faceted gemstones
(4) Overall Completion of Woś Carving and Casting
After determining the setting position, carve away the excess wax and place the gemstone into the wax model’s setting position to test whether the edges of the setting position fit tightly with the edges of the gemstone, as shown in Figure 6-26. Once the wax model is confirmed, cast it into metal, and the cast metal must undergo a preliminary finishing process.
(5) Testing w Setting Mount oraz Cleaning w Setting Position
First, place the gemstone into the setting position of the cast metal piece and test the setting position again to determine if it is suitable. Due to the shrinkage rate of casting, the setting position is likely too small; at this point, it is necessary to use tools or a die head to adjust the setting position, paying special attention to the position of the bottom edge, removing excess metal to ensure that the gemstone can be placed flatly in the setting position, as shown in Figure 6-27.
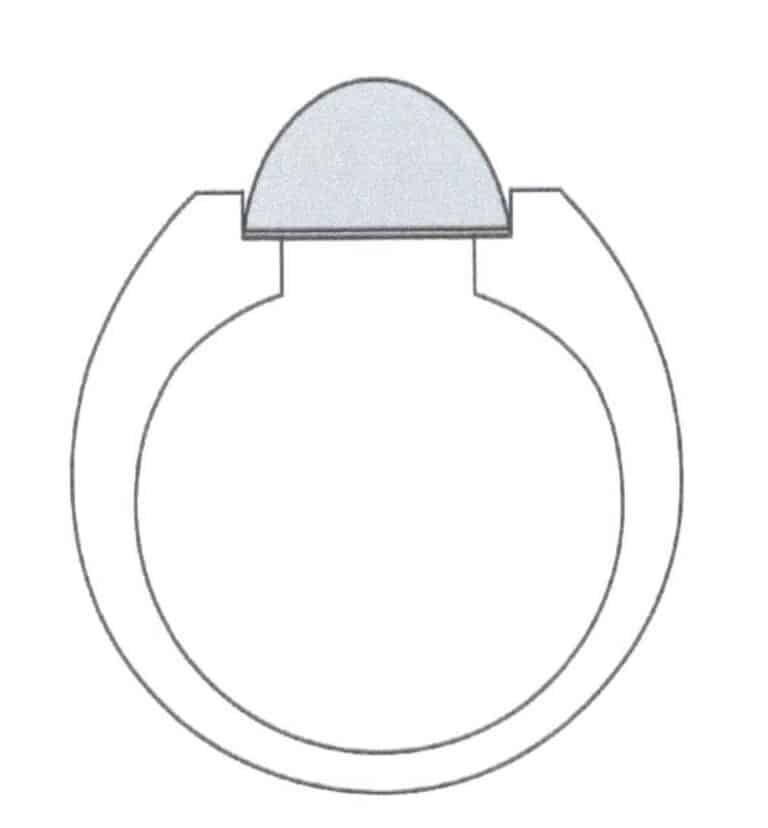
Figure 6-26 Cross-section of the gemstone placed in the wax model's setting position
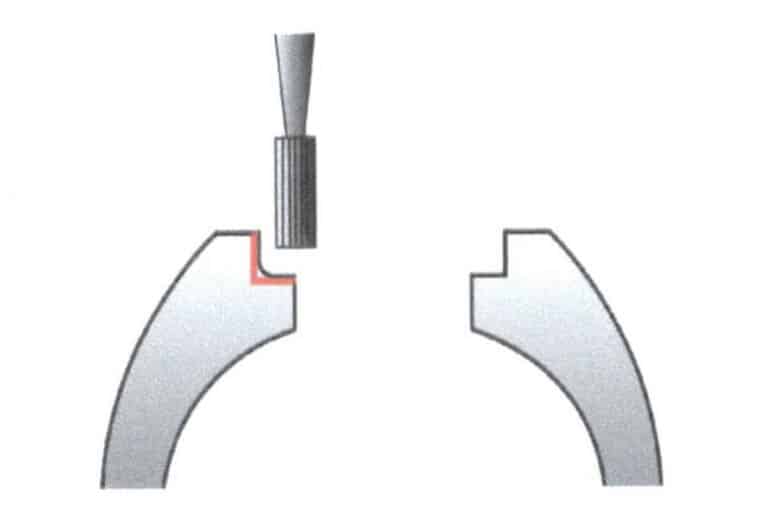
Figure 6-27 Cleaning the setting position
(6) Creating a Groove on the Outer Edge of the Ston Setting Position
Use a ball-shaped bur to grind a groove on the metal at the outer edge of the stone setting position, facilitating the chisel to press the metal. The cross-section of the groove position is shown in Figure 6-28, with the red dot indicating the groove position.
(7) Setting the Ston
There are generally two methods for setting stones. One method is to use a flat-tipped chisel, tilting the flat surface of the flat-tipped chisel at an angle that is parallel to the arc surface of the gemstone. Using the force of a hammer, the metal is initially fixed around the gemstone from four directions and then pressed circularly. This method is similar to the process of bezel setting, where the angle difference between the flat-headed chisel and the gemstone should not be too large, ensuring that the metal fits closely to the gemstone’s surface, as shown in Figure 6-29.
The other method is to use a curved chisel, the style of which is shown in Figure 6-30. The method involves pressing the metal around the gemstone from an angle of about 60 degrees relative to the horizontal plane to the vertical, similar to the process of setting stones in a flush setting but still using a hammer for striking, as shown in Figure 6-31.
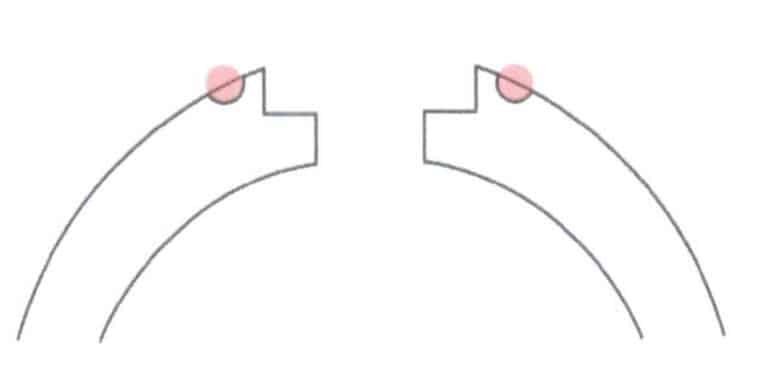
Figure 6-28 Cross-section of the groove position
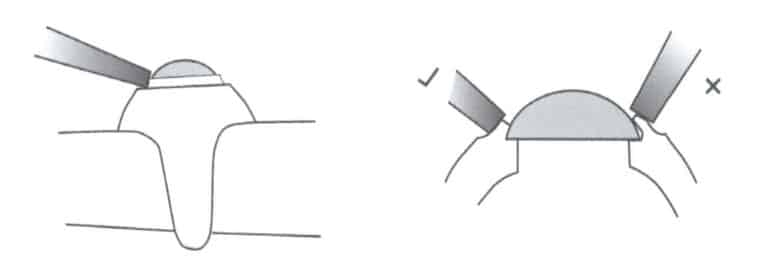
Figure 6-29 Angle of Flat-tipped Chisel
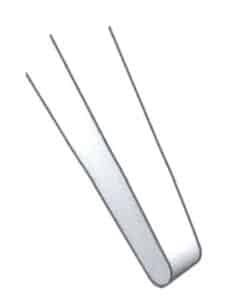
Figure 6-30 Curved Chisel

Figure 6-31 Chisel Pressing Metal
(8) Finishing oraz Completing the Gypsy Setting
After securing the stones, polish the metal around the gems to make it smooth. You can also use a pusher to trim the edges of the setting. Finally, finish and complete the production of the gypsy setting, as shown in Figure 6-32.

4. The Application of Flush Setting and Gypsy Setting in Jewelry Design
From the perspective of the historical development of jewelry craftsmanship, the gypsy setting emerged during a stage when the cutting of gemstones was not yet fully developed, adapting to various cabochon and irregularly shaped gemstones. Only with the emergence of round brilliance cuts did the flush setting technique for smaller faceted stones, especially round brilliance cut gems flush setting, gradually develop. Therefore, in antique jewelry, we see more of the gypsy setting, as shown in Figure 6-33, which depicts the setting method of two imperfectly cut rubies in a ring from 1450.
The technique of Gypsy setting has undergone certain changes in today’s production compared to traditional methods. Due to the high consumption of metal materials and the heavy weight of genuine Gypsy setting, it is more common to retain the rough visual feel of Gypsy setting in the design but to replace it with more easily implemented setting methods such as bezel or prong settings, or to integrate it with the flush setting, adding richness in color and shape of the gemstones in the design. Here, we take a few works by jewelry artist Alan Craxford as examples, as shown in Figures 6-34 to 6-36, where we can see the production method that blends Gypsy setting and flush setting, which applies the craft more flexibly to different gemstone presentations.
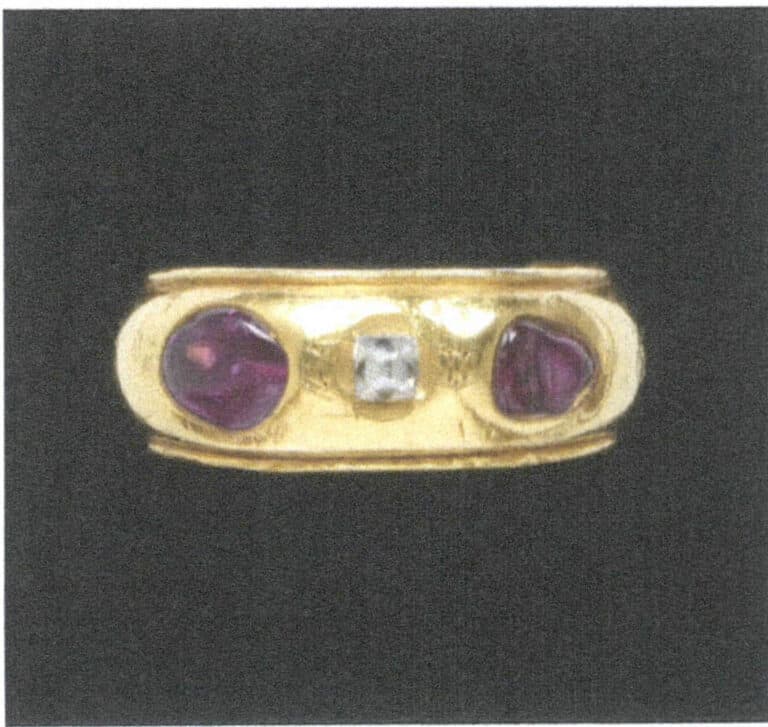
Figure 6-33 Diamond Ruby Ring (V&A Museum Collection)
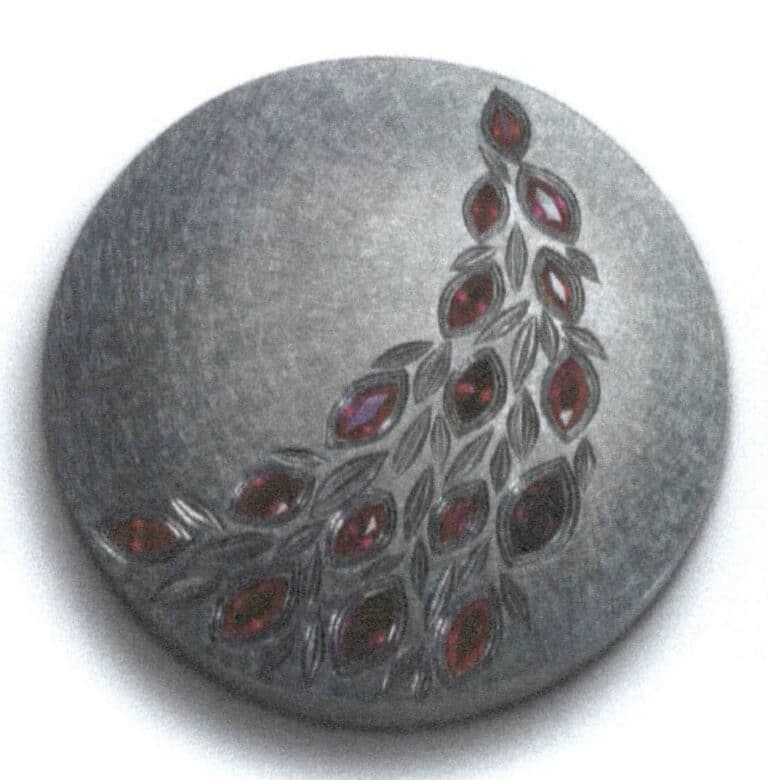
Figure 6-34 Alan Craxford's Work (-)
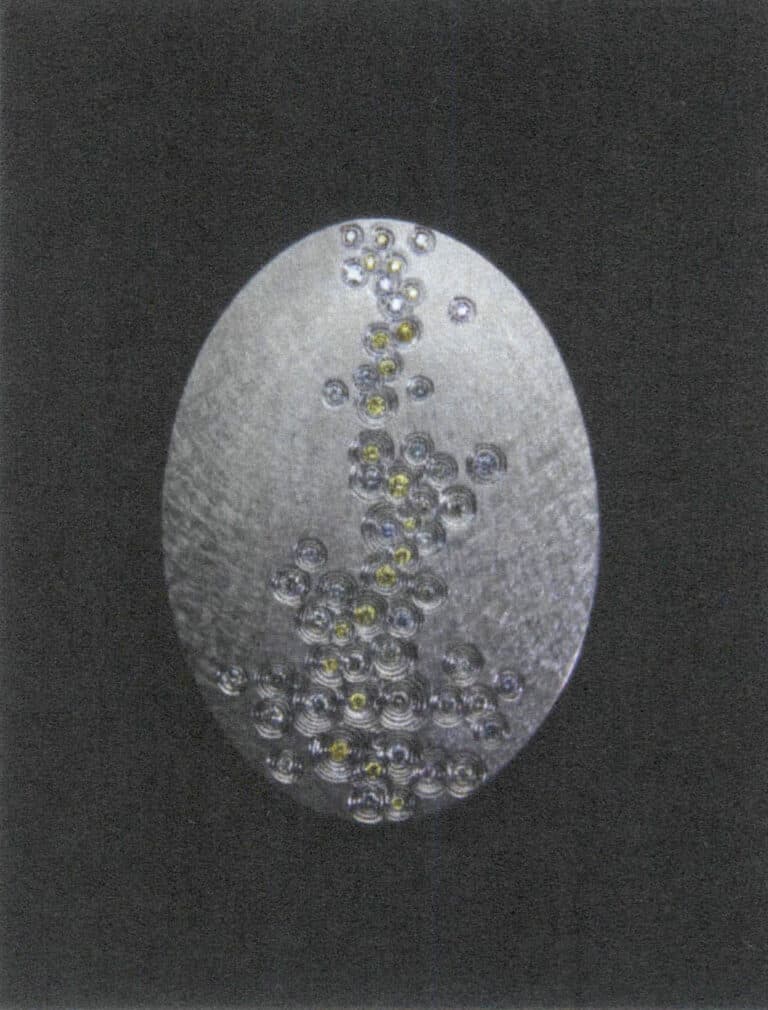
Figure 6-35 Alan Craxford's Work (Two)
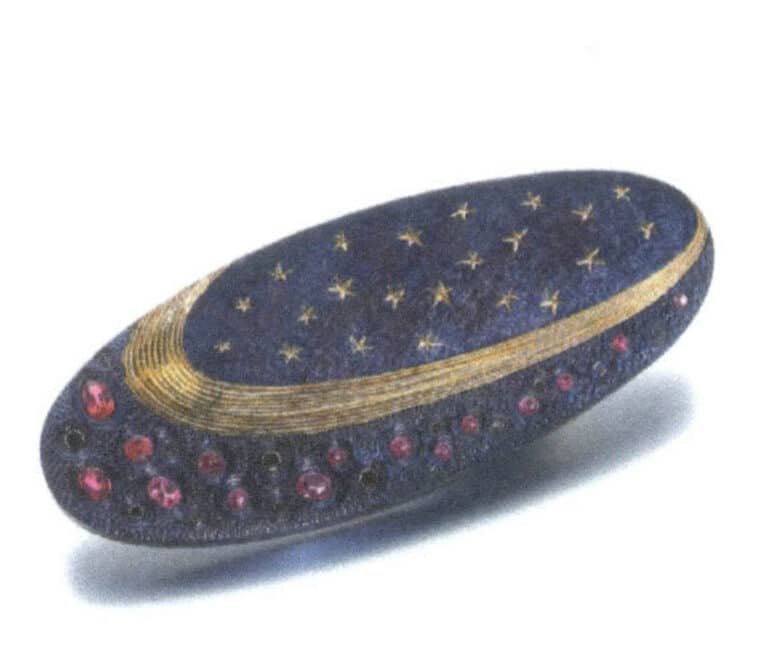
Figure 6-36 Alan Craxford's Work (Three)
The minimalist style presented by the flush setting technique aligns well with contemporary aesthetic tastes for decoration, which is why it has gained increasing favor among some jewelry brands in recent decades. For example, the German jewelry brand NIESSING inherits the minimalist design style of Germany, integrating innovative craftsmanship materials with design as its main feature. Under this brand ethos, NIESSING’s designs strive to minimize decoration and unnecessary structures, achieving a visual effect where gemstones and metals blend seamlessly. We can feel the flexible application of flush setting in the designs of this brand’s SOLARIS COLOR RINGS and SPHERES SOLARIS ARCHITECTURE collections.
The application of flush setting can often be seen in some artistic young jewelry brands, such as the independent jewelry design brand Langmu’s “Dune” collection, where the rustic surface treatment of the metal, combined with the flush setting technique, makes the gemstones appear half-buried beneath the dunes, pursuing a natural relationship between metal and gemstones, as shown in Figures 6-37 and 6-38. We can also see the application of flush setting in some common minimalist and understated styles, where it serves as a highlight in the sleek design of the entire piece of jewelry, as illustrated in Figures 6-39 to 6-41.
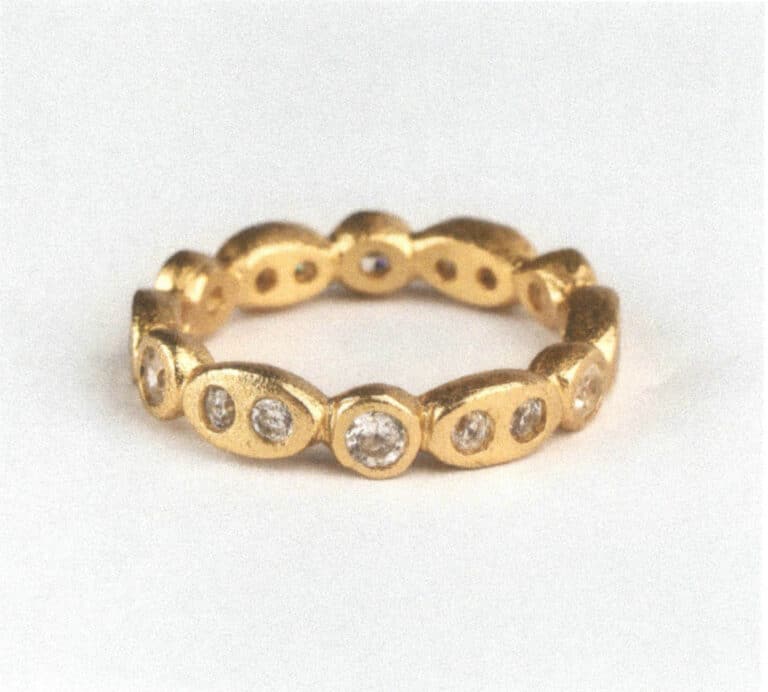
Figure 6-37 Larmo brand jewelry (1)
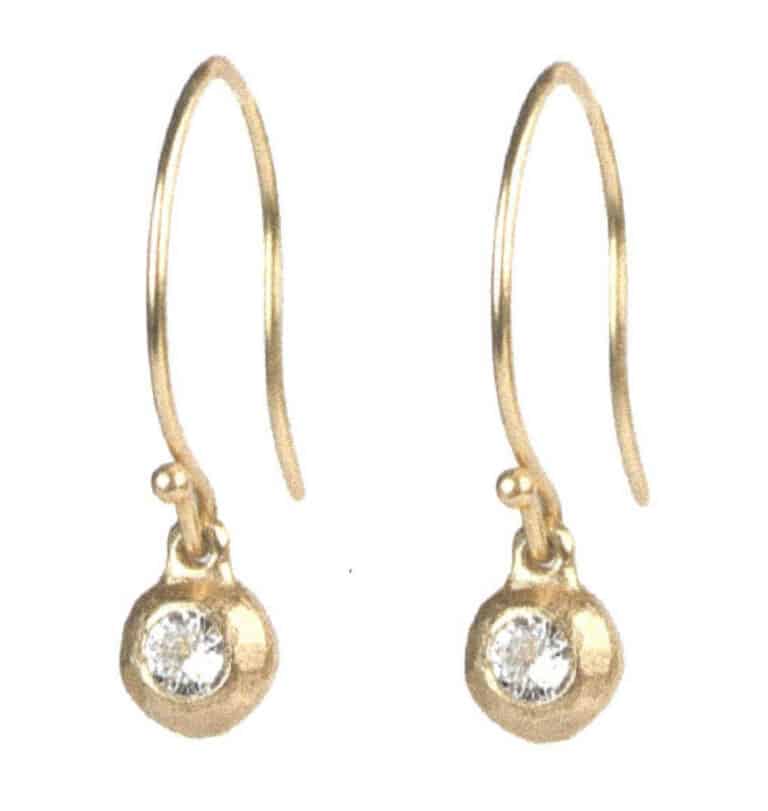
Figure 6-38 Larmo brand jewelry (2)

Figure 6-39 Flush Setting Bracelet
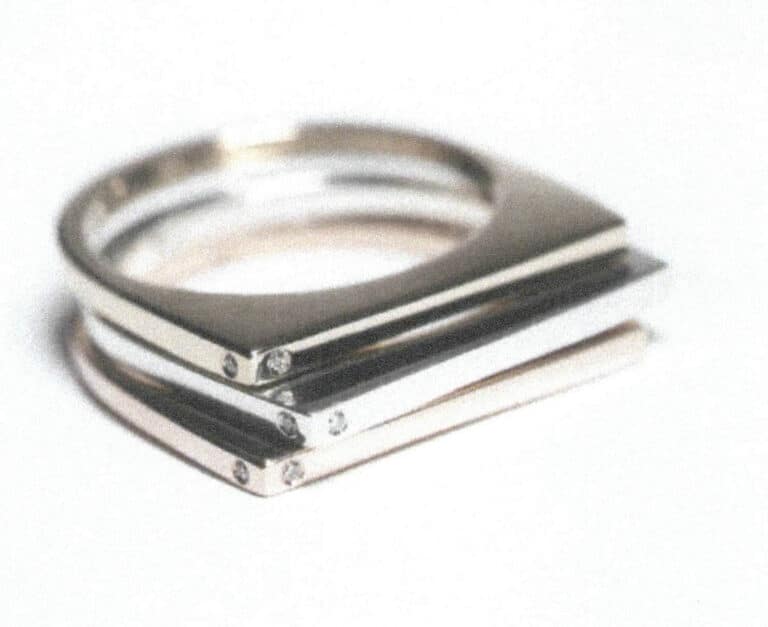
Figure 6-40 Flush Setting Ring
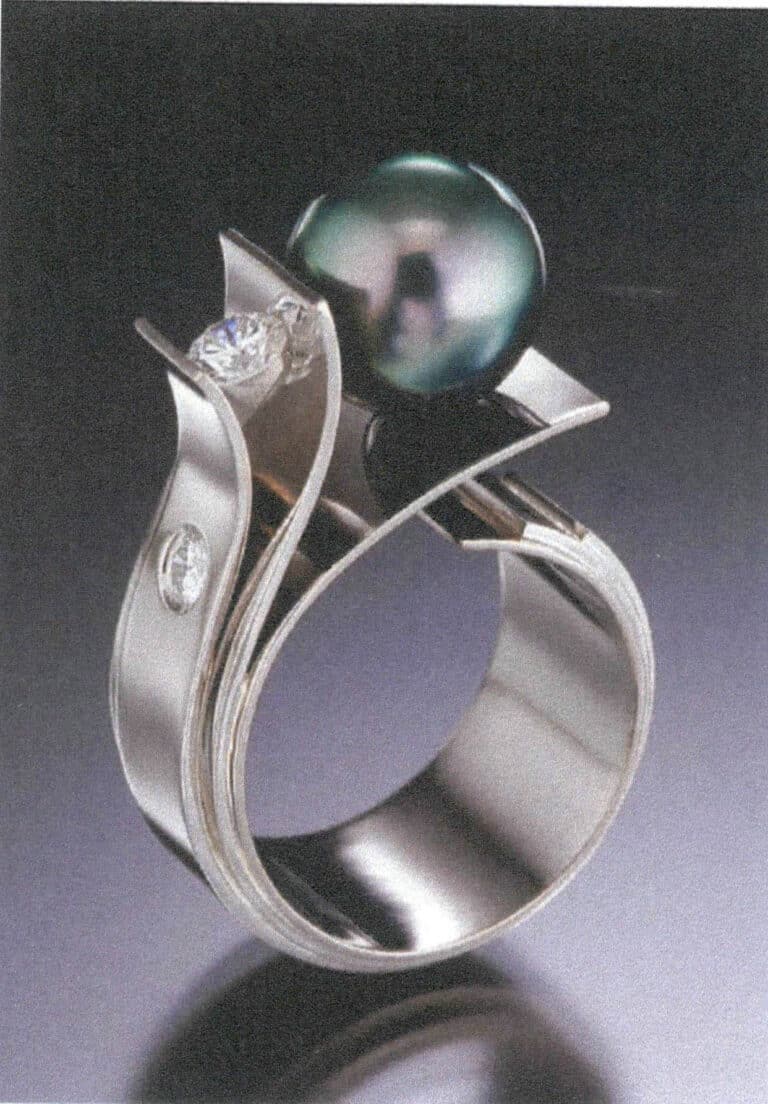
From the above design cases, the design characteristics of the inlay and gypsy setting can be summarized as visually integrating with the metal with a simple and cohesive shape. Especially in the case of inlay, the design is generally not intended to highlight the gemstone itself but rather to enhance the overall design, allowing for addition after the metal has been completed, which provides randomness and flexibility. Therefore, it is a setting method that can be applied more freely and flexibly in jewelry design.
Section II Tension Setting
Tension settings is a term used to refer to tension setting and settings that have an effect similar to that of tension setting. Tension setting is a very creative way of setting and is a kind of extreme challenge to the relationship between the setting; it is also the more difficult of the many ways of setting, so it can bring a very provocative visual aesthetics.
1. Overview of Tension Settings
For tension settings, the understanding in China differs somewhat from that in Europe and America. In many domestic jewelry products, any setting method that clamps the gemstone’s girdle from both sides with metal or partially encloses the gemstone’s girdle can be referred to as a tension setting. Often, it needs to be clarified with prong setting, bezel setting, and other setting methods, with no clear category boundaries between them. The term “Tension Setting” used in Europe and America is more accurately translated as “Zhang li Xiang,” which utilizes the tension of the metal to apply a centripetal compressive force to the girdle of the gemstone from two directions to secure it. In addition to the two tension points, other support structures or bases derived from this method are called semi-tension settings.
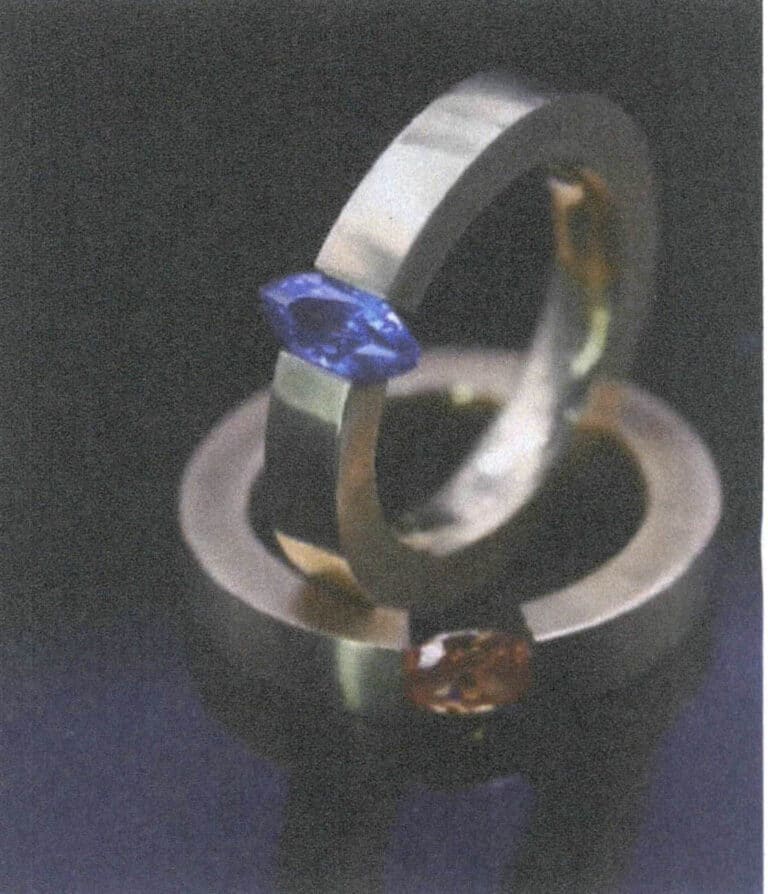
A tension settings is a more difficult type of setting. This method has a short history of use and has gradually developed under the promotion of two brands, NIESSING from Germany and STEVEN KRETCHMER from the United States. The reason these brands have been able to master the technology of tension settings well is due to certain achievements in the research and development of corresponding high-hardness alloy technology. Beginners cannot learn the technical details in this area. Still, they can understand the principles and production processes of tension settings and practice more practically with single pieces or small batches. In the production case, we will start from its most typical style, hoping to help beginners understand the difficulties and key points of tension settings. The tension setting ring is shown in Figure 7-1.
2. The Production Method of Tension Settings
The demonstration of the production steps of tension settings will be divided into the introduction of tension setting, semi-tension setting, and grid-shaped tension setting. Although semi-tension setting and grid-shaped tension setting are not typical tension settings, as mentioned earlier, they are derived from the principles of tension setting. However, the semi-tension setting is influenced by tension, and the grid-shaped tension setting is closely related to the semi-tension setting in the structure. Therefore, these three types of settings are categorized under tension settings. Below, the principles and production methods of these three setting methods will be introduced separately.
2.1 Tension Setting
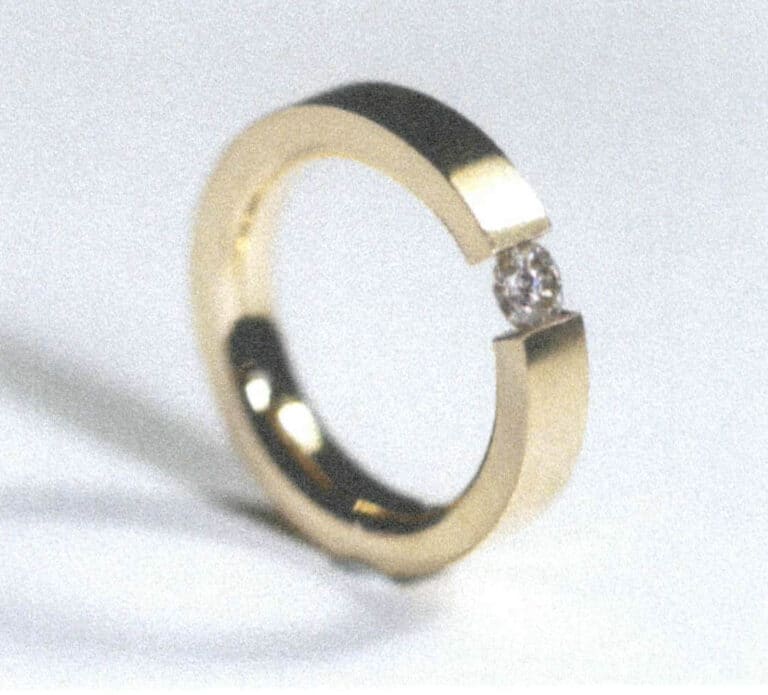
Tension setting is a method of setting gemstones that relies solely on two tension points in the metal to hold the stone in place. The preparation of materials for tension setting in mass production and single-piece production is completely different. The difference lies in that for mass production, the metal is made from alloys with a suitable hardness ratio and tension, which are then cut into metal plates for use. This is especially common in the application of rings. However, a method of forging and hardening individual profiles can be used for single-piece and small-batch production. This case demonstrates the method of making tension settings by forging and hardening the metal. The tension setting ring is shown in Figure 7-2.
Kroki for Making Tension Setting
(1) Choosing a Gkamień
Tension setting requires a high hardness for gemstones. Due to the significant pressure applied to the gemstone, only hard gemstones like diamonds, rubies, and sapphires are suitable for use. Additionally, if the gemstone has cracks, it will likely encounter problems during the setting process. A natural zircon, which also has a high hardness, is used in this demonstration case. It is also important to pay attention to the size of the gemstone, ensuring that the height of the gemstone is less than the thickness of the metal, meaning it cannot be exposed at the bottom. Generally, the thickness of a tension-setting ring is about 3 mm, so the thickness of the gemstone should be less than 3 mm. The case uses an oval lead stone of 4mm × 3mm, as shown in Figure 7-3.
(2) Preparing Metals
The metals chosen for tension setting are generally alloys of gold, platinum, or iron, which can ensure high hardness and durability, making them less likely to loosen. If casting methods are used, the hardness of 18K and 14K gold can be utilized to create tension settings while ensuring the thickness of the metal. Additionally, ready-made metal materials can be hardened for single or small-batch production. In this case study, brass is used with a hardening process, first welding a closed metal ring from approximately 3.5 mm brass wire, as shown in Figure 7-4.
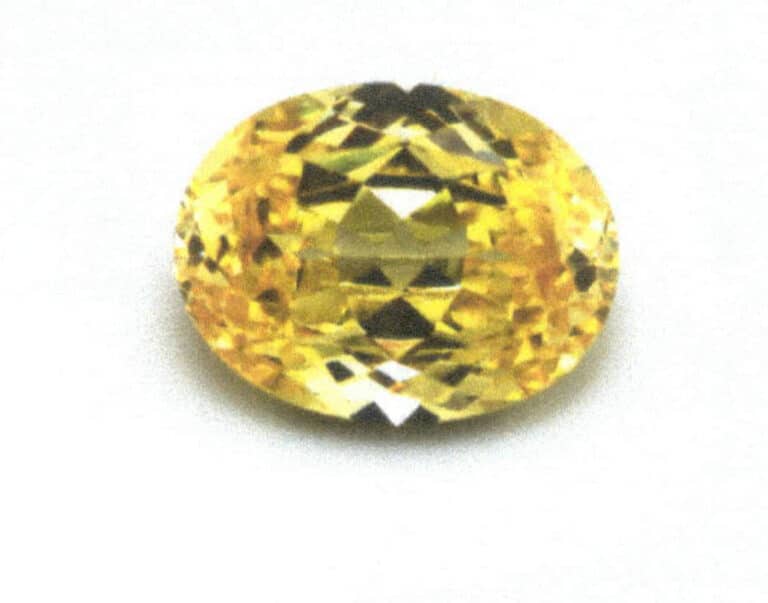
Figure 7-3 Preparing Gemstones (Zircon)
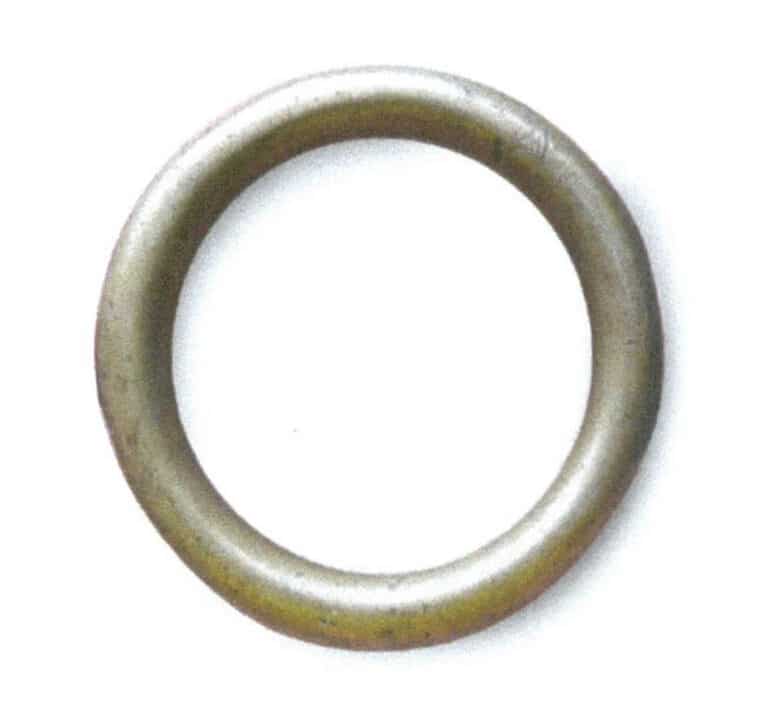
Figure 7-4 Preparing Metals (Brass)
(3) Hardening Metals
The difficulty of tension setting in production is more about controlling the hardness and elasticity of the metal materials, thereby using suitable metal tension to set the gemstones. Without special metal ratio technology, the lower the purity of the metal ratio, the higher the hardness due to metal hardening, so pure gold and pure silver cannot be used for production. In addition, while considering hardness in the ratio, the elasticity of the metal must also be taken into account; if the hardness of the metal is too high and it loses elasticity, it is also detrimental to production. The metal hardening, after later processing, under the application of external forces such as hammering and pressing, will increase the metal’s hardness while maintaining a certain degree of elasticity.
It is important to note that the metal used for tension setting needs to have a certain thickness in terms of material size and the style applied; even if the thin and fine metal is hardened, it cannot achieve the strength required for tension setting. If the metal is thick enough, it may retain its aesthetic appeal. Therefore, a diameter of 3 mm is more suitable for a ring band. Tension setting is more applicable to rings because the small circumference of the ring can create the elasticity to press the gemstone under appropriate hardness, and it also has a greater visual impact.
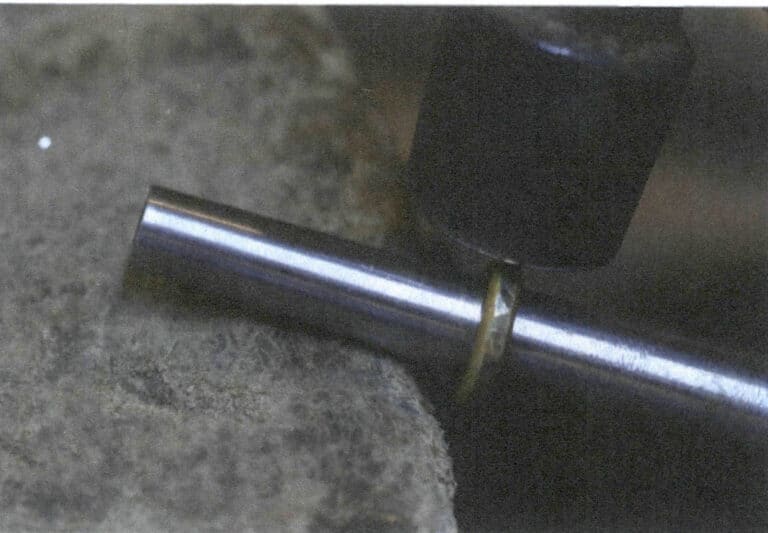
In metalworking, the main methods for hardening metal are forging and extrusion, both of which make the metal’s internal structure denser, thus hardening the metal. This case uses the forging method. During the forging process, the metal will extend, and the overall thickness will become slightly thinner from round wire to square wire. Therefore, the volume of the prepared metal ring should be 20% thicker than the ring being made by an overall amount to account for the deformation and polishing loss during forging. The forging method uses a goldsmith’s hammer to strike evenly to ensure the metal structure is dense and uniform, as shown in Figure 7-5.
(4) Filing the Ring
File the wrought metal ring neatly; some metal loss will occur here, as shown in Figure 7-6 and Figure 7-7.
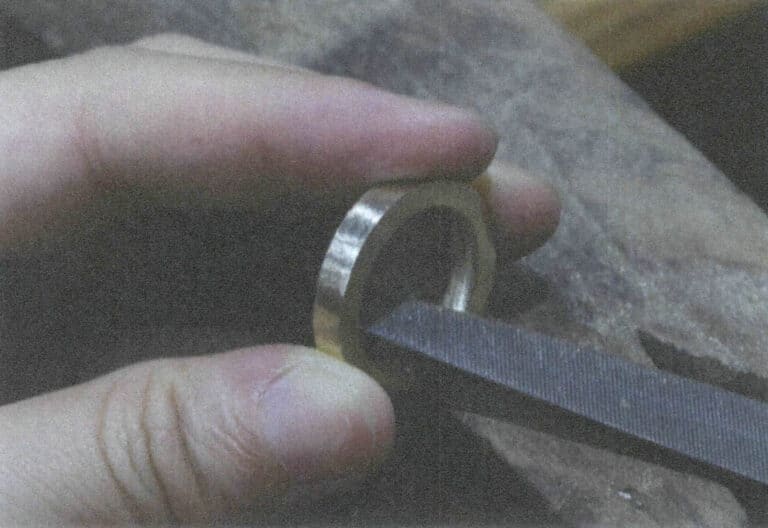
Figure 7-6 Filing the ring (1)
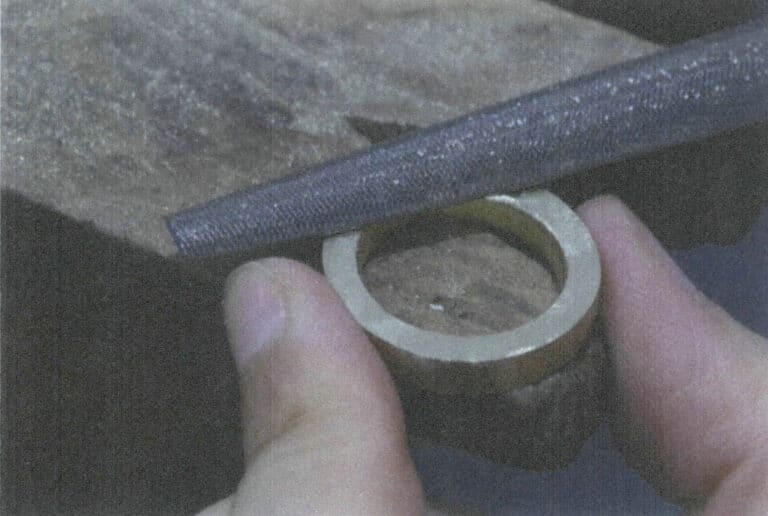
Figure 7-7 Filing the ring (2)
(5) Sawing out w Opening
Saw out the opening in the ring for setting the gemstone, as shown in Figure 7-8. The two opposite surfaces should be filed flat, and the width of the opening should be 0.6~1 mm smaller than the diameter of the gemstone. The depth of the slots on both sides is 0.3~0.5 mm. In this case, the diameter of the oval gemstone is 4 mm, and the depth of the gemstone fitting into the slots on both sides is approximately 0.3 mm each. Therefore, the width of the notch should be approximately 3.4 mm. When sawing the opening, consider the wear from polishing.
(6) Naprawing the Metal
Fix the ring to the ring setter, as Figure 7-9 shows.
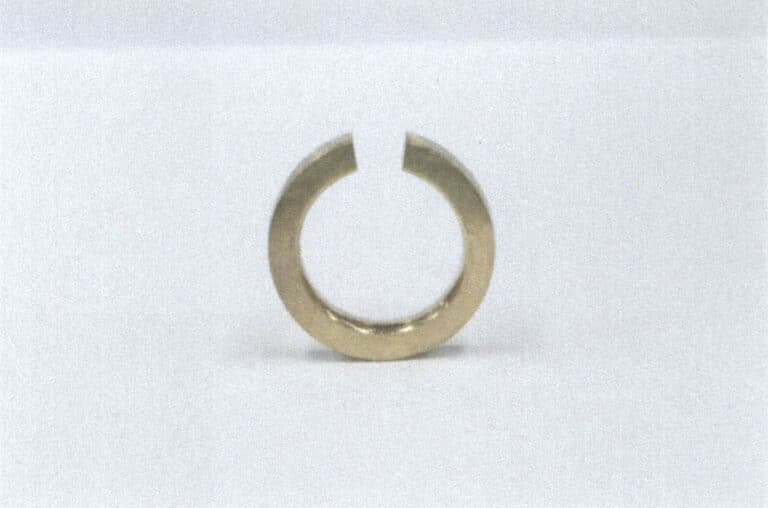
Figure 7-8 Sawing out the opening
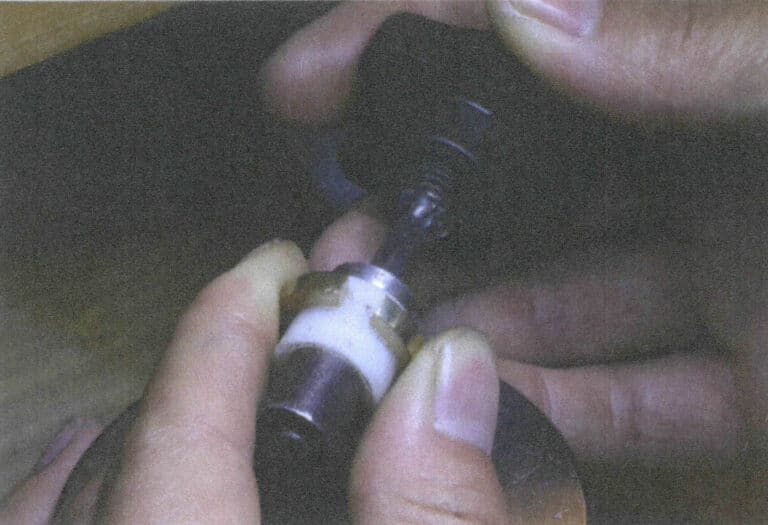
Figure 7-9 Fixing the Metal
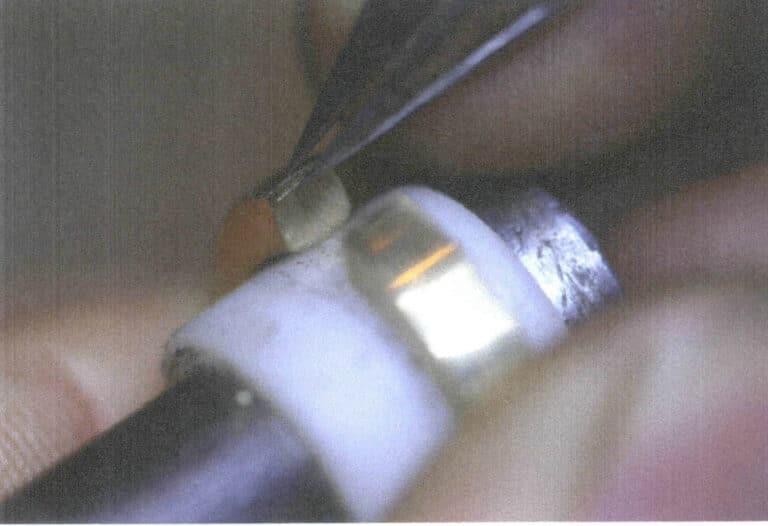
(7) Marking w Slot Position
Mark the position grooved with a compass according to the height of the fixed stone’s girdle, ensuring symmetry on both sides, as shown in Figure 7-10.
(8) Slotting
Use a disc bur to slot the two parallel surfaces at the opening, ensuring that the positions of the opposing slots are symmetrical, with a slot depth of about 0.3 mm on both sides, as shown in Figures 7-11 and 7-12.
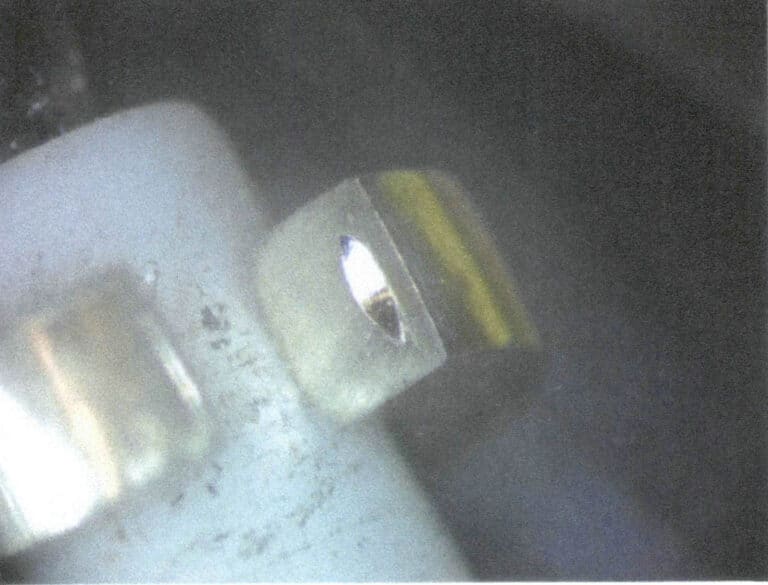
Figure 7-11 Slotting
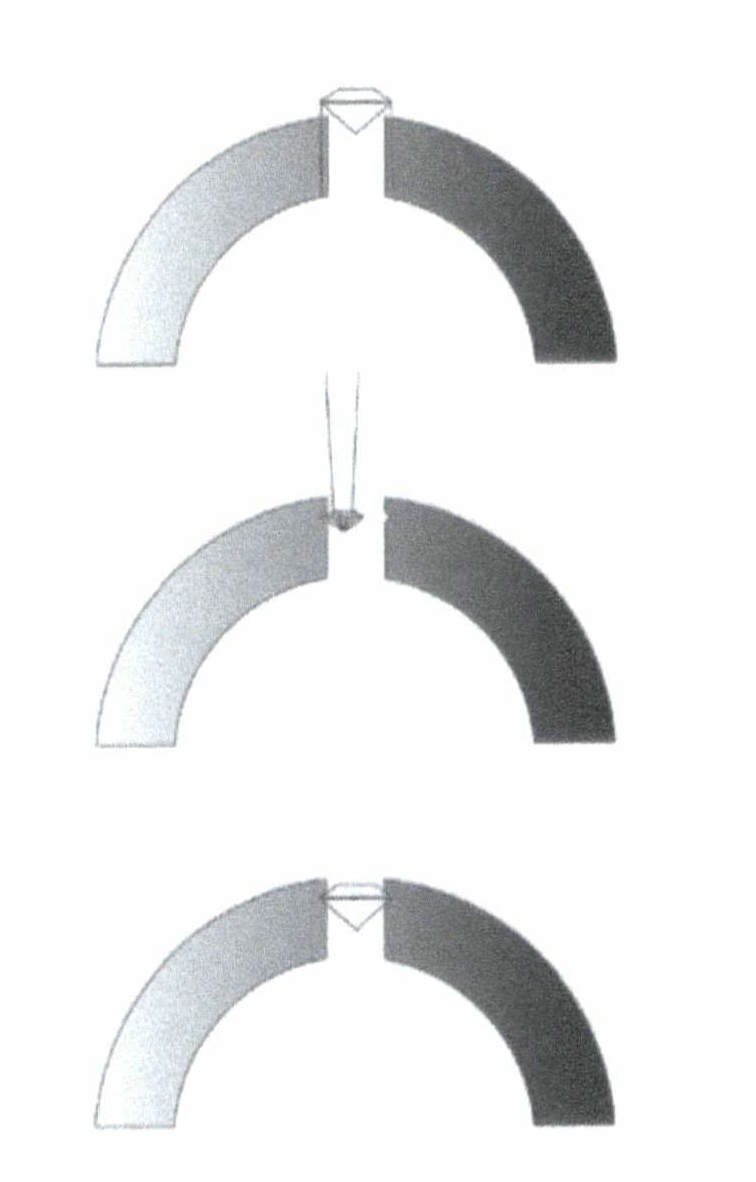
Figure 7-12 Schematic of the slotting
(9) Setting the Gemstone
First, insert one side of the gemstone’s girdle into the slot. Then, slightly open the ring band using the support of the ring setter or expander. Once the other end of the gemstone slides into the slot, relax the support to clamp it tight, as shown in Figures 7-13 and 7-14.
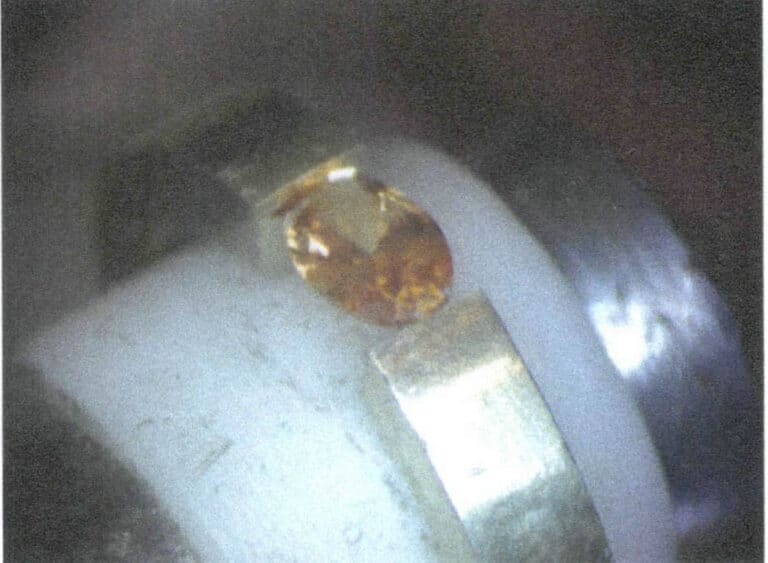
Figure 7-13 Gemstone clamped in the slot on one side
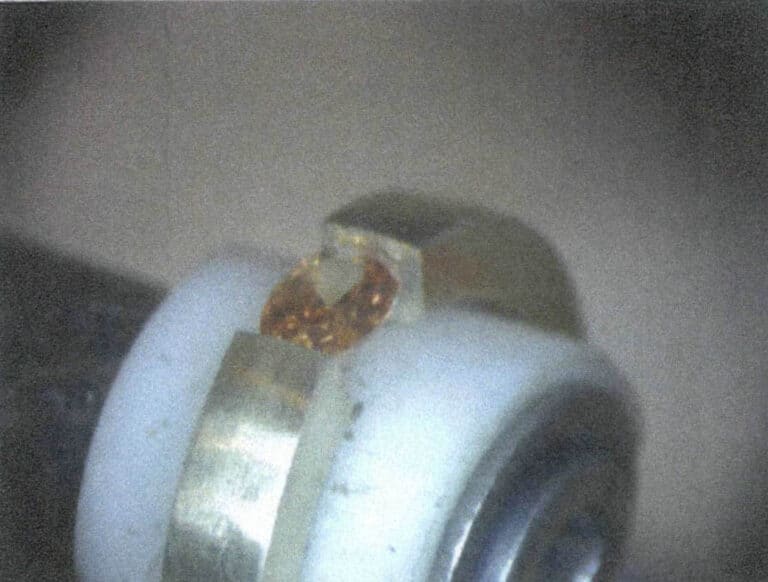
Figure 7-14 Gemstone clamped in the slot on both sides
(10) Completing w Ustawienie napięcia
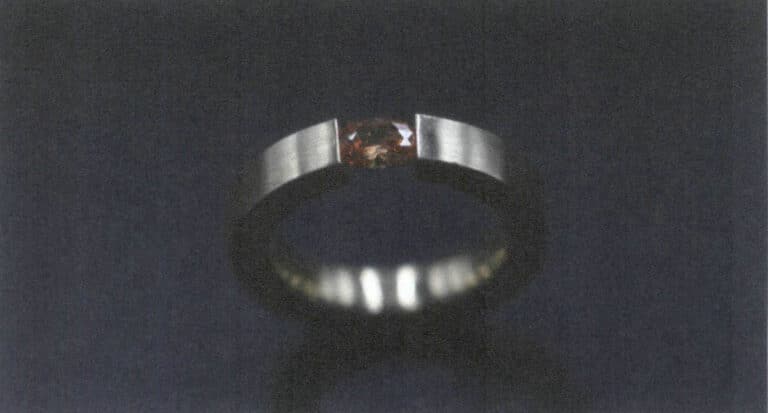
The completed tension setting is shown in Figure 7-15.
2.2 Semi-Tension Setting
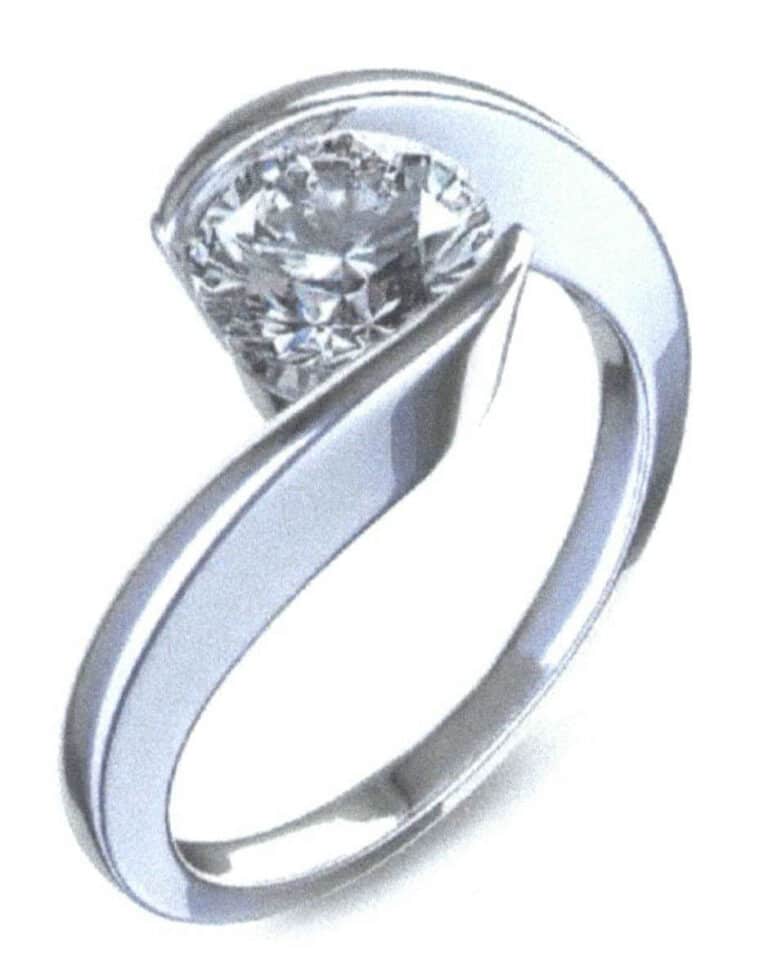
Semi-tension setting refers to a setting method with additional supporting structures such as a base, metal prongs, or half frames outside the two tension points. Its principle is similar to a prong setting. Semi-tension setting mimics tension setting, achieving a similar aesthetic effect, but without the difficulty of production and the risks associated with after-sales of tension setting. Therefore, more brands prefer to use semi-tension setting to create similar styles. A semi-tension setting ring is shown in Figure 7-16.
Copywrite @ Sobling.Jewelry - Producent biżuterii na zamówienie, fabryka biżuterii OEM i ODM
Steps for Making the Semi-Tension Setting
(1) Materiał Pzadośćuczynienie
In this case, the gemstone is a faceted hollow stone with a diameter of 2 mm, and the bezel width is 1.7 mm, which is the diameter of the gemstone minus 0.3 mm. The style of the ring appears similar to tension settings from a top view, but there is a support base under the gemstone that connects at the opening, making the ring a closed loop. Another special feature is that two raised areas are reserved above both ends of the metal bezel. This reflects a significant difference between this setting method and tension settings that use tension to hold the gemstone. The gemstone is not pressed inward by forces from both sides but by downward pressure from the raised areas, creating a counteracting pressure against the support base to secure the gemstone. The raised areas are designed to prevent the metal from thinning due to downward pressure. The material preparation is shown in Figure 7-17.
(2) Slotting
Like tension settings, semi-tension settings also require marking the positions on the gemstone’s girdle first and then using a thin disc bur to create a slot approximately 0.15 mm deep at the marked positions on both sides, as shown in Figure 7-18. Since the gemstone is relatively small and has a support base in this setting, the slot is shallower than that of tension settings.
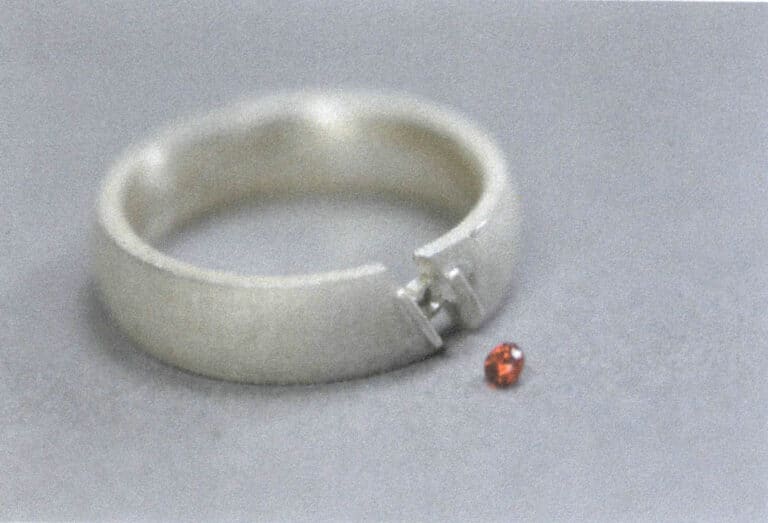
Figure 7-17 Material Preparation
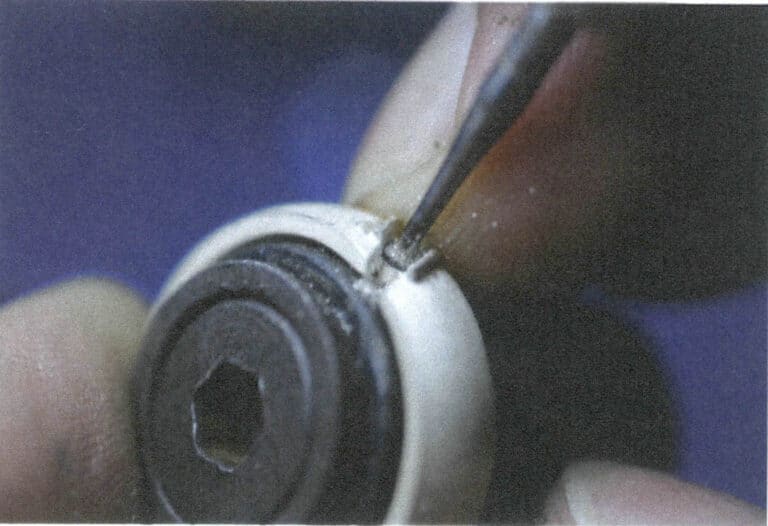
Figure 7-18 Slotting
(3) Placing the Stone
First, insert one side of the gem’s girdle into the slot, then gently press to push the other side into the slot. This pressing process does not require force. If one side is inserted into the slot with insufficient space or the other side is difficult to enter, it may be necessary to continue adjusting the slot depth. The lower stone is shown in Figure 7-19.
(4) Setting the Stone
At this time, the gem is unstable after being placed in the slot; if there is vibration, it is very likely to fall. Therefore, oil mud can cover the gem, providing temporary stability. Next, a flat-headed chisel should be used with a hammer to press down on the raised metal on both sides of the stone, as shown in Figure 7-20. Once the gem is stable, the oil mud can be removed. After several repeated downward strikes, the slot and the gem will fit together sufficiently through the strikes, forming a stable compressive force at the girdle, thus completing the inlay, as shown in Figure 7-21.
(5) Finishing – Edge Trimming
After the gemstone is securely set, because the metal on both sides of the bezel is not flat against the cut surface of the gemstone, a graver should be used to trim the cross-section of the metal on both sides of the stone setting position, as shown in Figure 7-22.
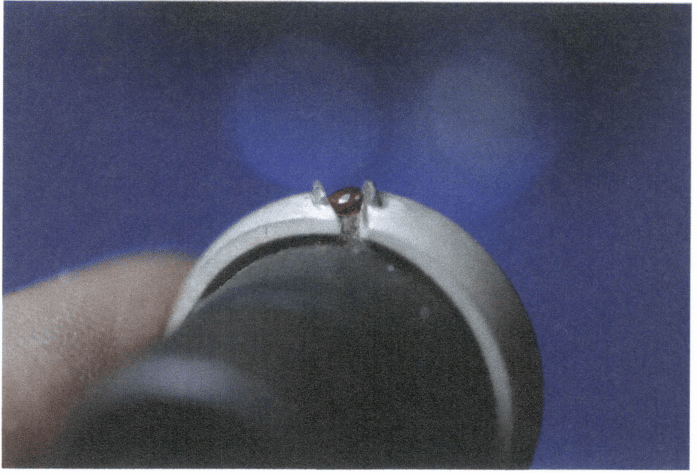
Figure 7-19 Placing the Stone
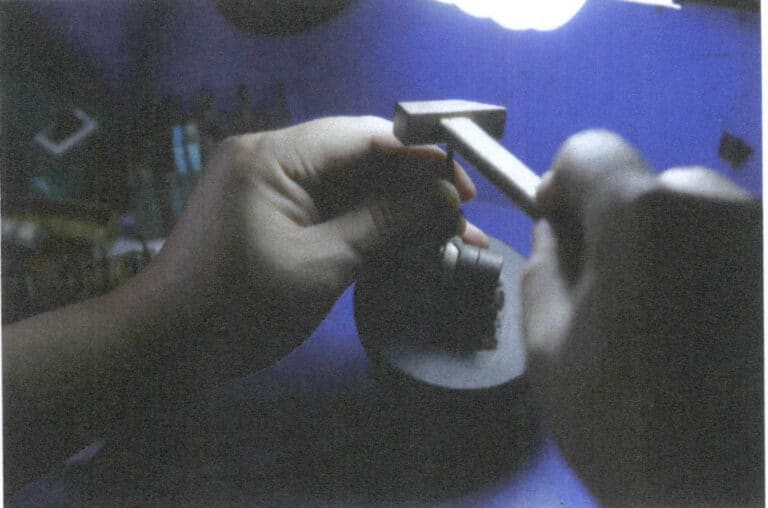
Figure 7-20 Setting the Stone (1)
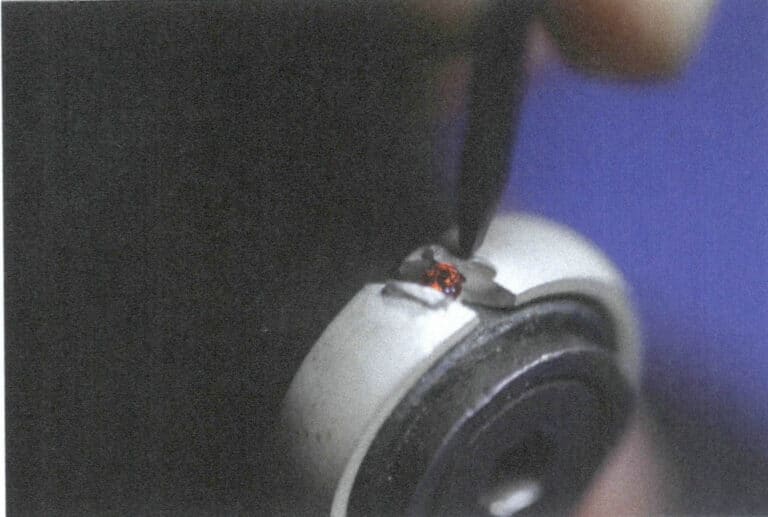
Figure 7-21 Setting the Stone (2)
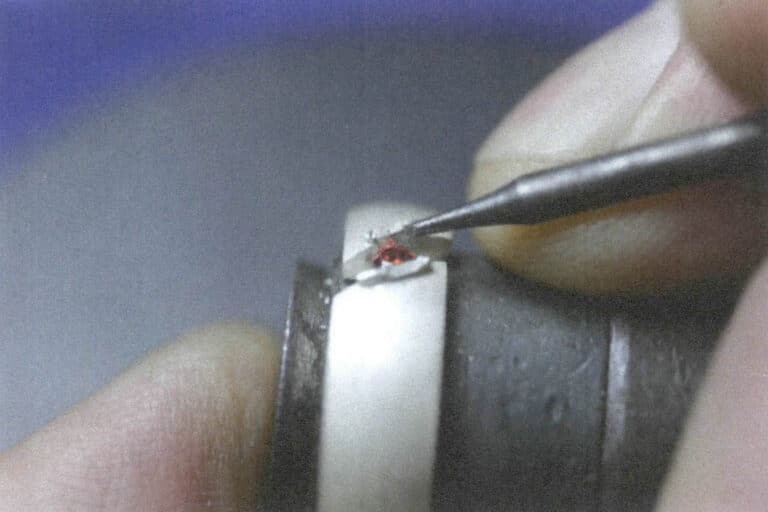
Figure 7-22 Trimming the Edge
(6) Finishing – Polishing
Use a file to remove excess metal from the extrusion area, and then smooth it with sandpaper rolls and polishing wheels, as shown in Figures 7-23 and 7-24.
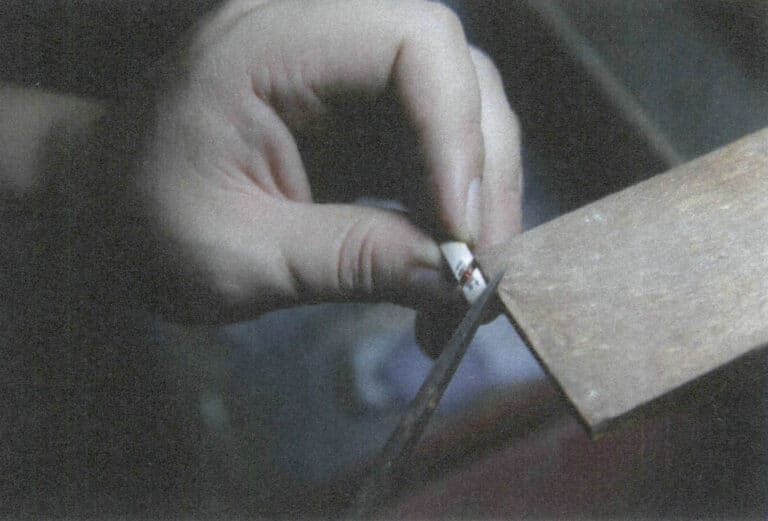
Figure 7-23 Finishing(1)
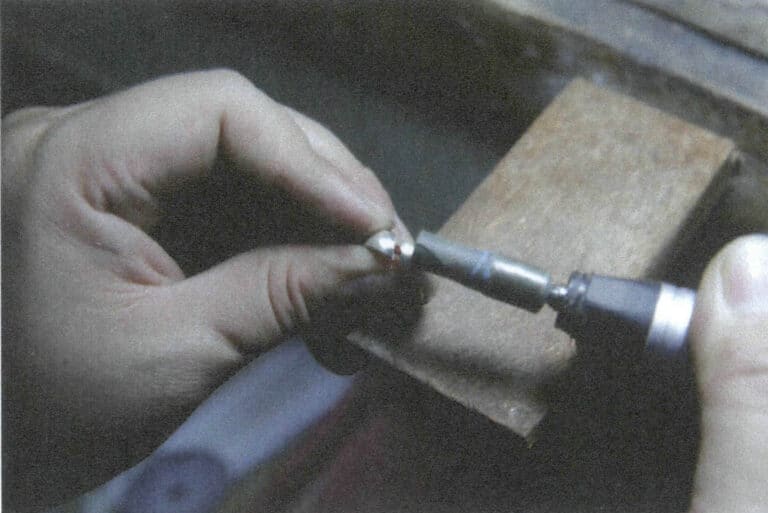
Figure 7-24 Finishing(2)
(7) Completing the Semi-Tension Setting Ring
The completed semi-tension setting ring is shown in Figure 7-25.
2.3 Grid-Shaped Tension Setting
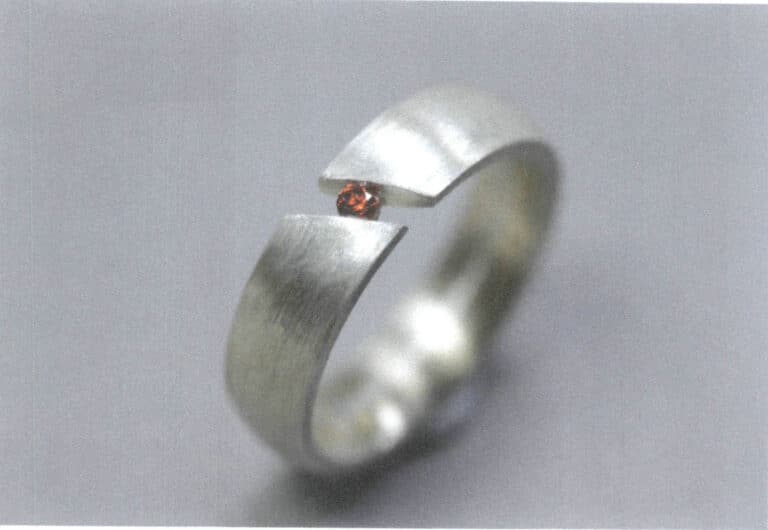
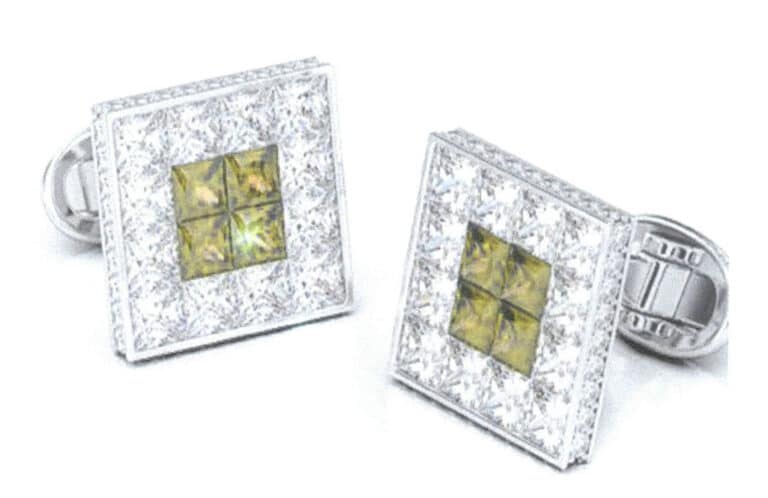
Grid-shaped tension setting represents a fixed inlay pattern, where four princess-cut gemstones are arranged in a grid shape to form a larger square. In the square formed by the four gemstones, only the outer edge has metal edges pressed in, while the inner side does not show any metal, creating the visual illusion of a large square faceted gemstone. The visual effect of the four gemstones arranged in a grid pattern has similarities with the invisible setting. Still, from the perspective of production principles, the gemstones do not have the grooves typical of invisible setting. Each gemstone’s metal structure requires a supporting base and two adjacent girdles to be pressed by the metal edges for invisible setting, making this structure closer to semi-tension setting. Therefore, based on the characteristics of the structure, it is classified under the category of tension setting. The grid-shaped tension setting ring is shown in Figure 7-26.
Kroki dla Making Grid-Shaped Tension Setting
(1) Materiał Pzadośćuczynienie
In this case, the gemstones are four square brilliance cut gemstones with a side length of 2 mm, and the metal is in the shape of a square box, with the lower part of the metal being a conical stone setting position where the four gemstones are recessed, as shown in Figure 7-27. The modeling reserved slots for setting the gemstones, making it convenient for subsequent slotting with a wheel bur.
(2) Slotting
A wheel bur is used to slot around the upper part of the stone position, and then a small wave bur is used to create slots at the four corners, as shown in Figure 7-28.
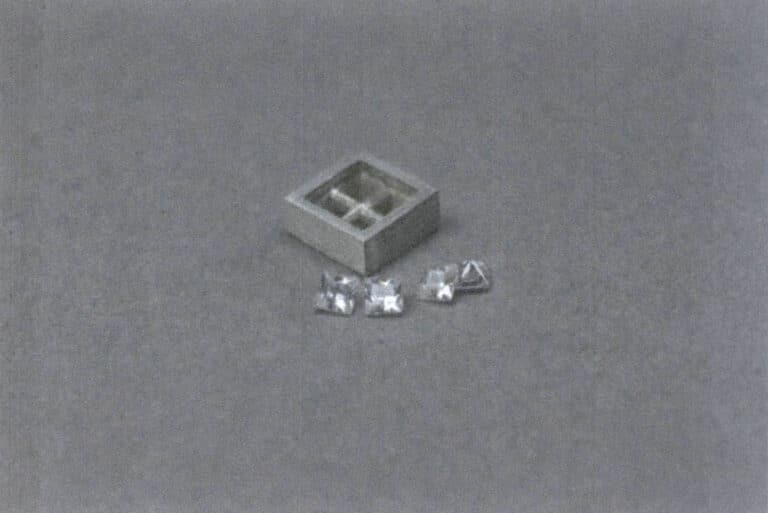
Figure 7-27 Material preparation
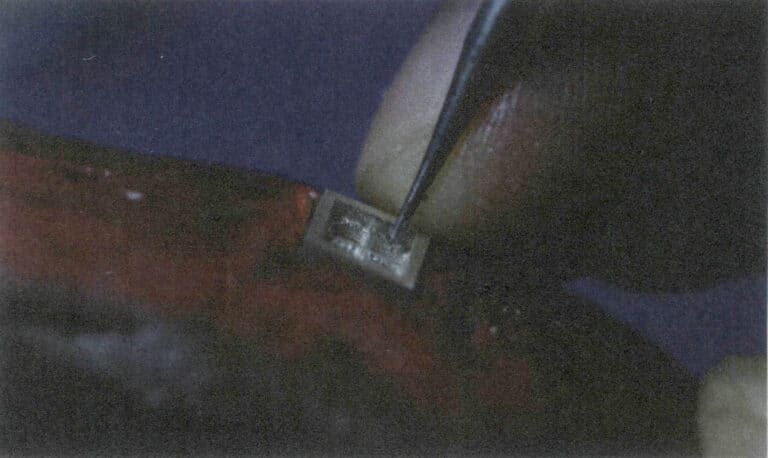
Figure 7-28 Slotting
(3) Trimming Slots
After opening the slots with a wheel bur, it is necessary to use a graver to trim the slots, as shown in Figure 7-29. The slots must be flat so the four gemstones can be evenly placed on the stone below.
(4) Placing the Stones
Place the four stones into the stone setting position in sequence; each stone has only two sides stuck in the slot, the other two sides are held up by the metal below the girdle of the stone, and the girdle of the neighboring stones do not fit perfectly. Still, there is a gap of about 0.15mm, as shown in Figure 7-30.
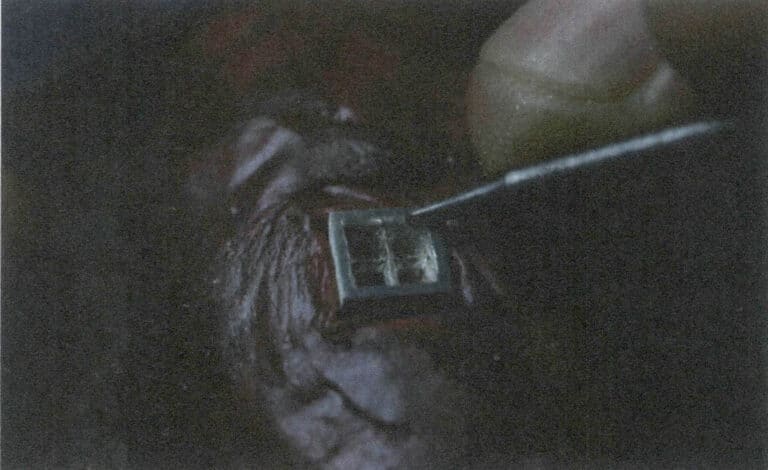
Figure 7-29 Trimming Slots
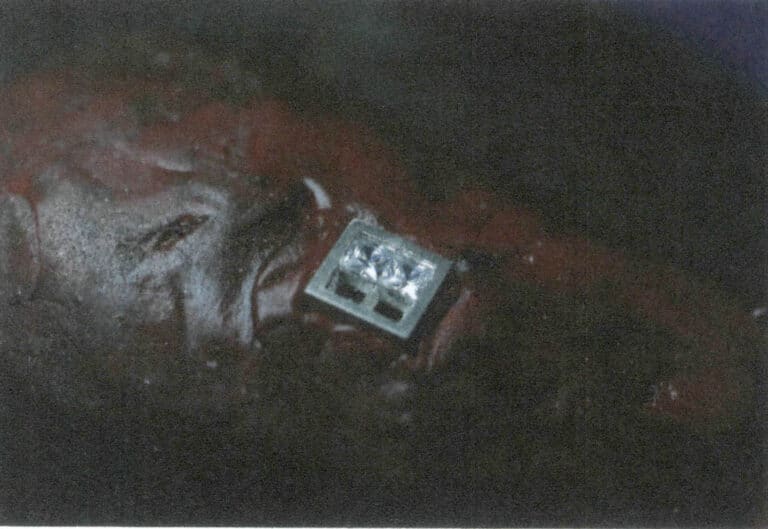
Figure 7-30 Placing the Stones
(5) Setting the Stone
A flat-headed chisel is used with the aid of a hammer to hold the stone in place at a point and then strike the top of the metal edge in a circular pattern, causing the metal in the slot to squeeze the stone and fit it perfectly, which is the same principle as the semi-tension setting. The changes in the slots before and after setting are shown in Figure 7-31.
(6) Finishing oraz Completing the Grid-Shaped Tension Setting
After setting the stone, use tools such as files, sandpaper rolls, and polishing wheels to finish and complete the grid-shaped tension setting, as shown in Figure 7-32.
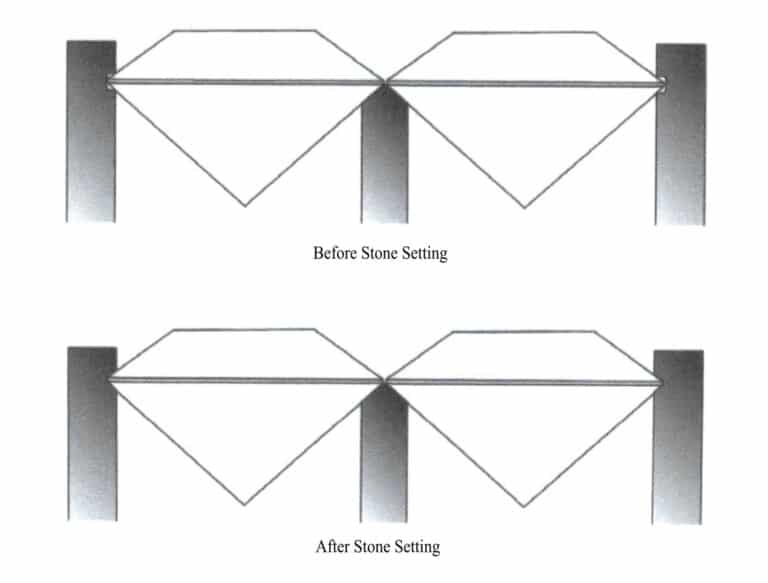
Figure 7-31 Changes in the slots before and after stone setting
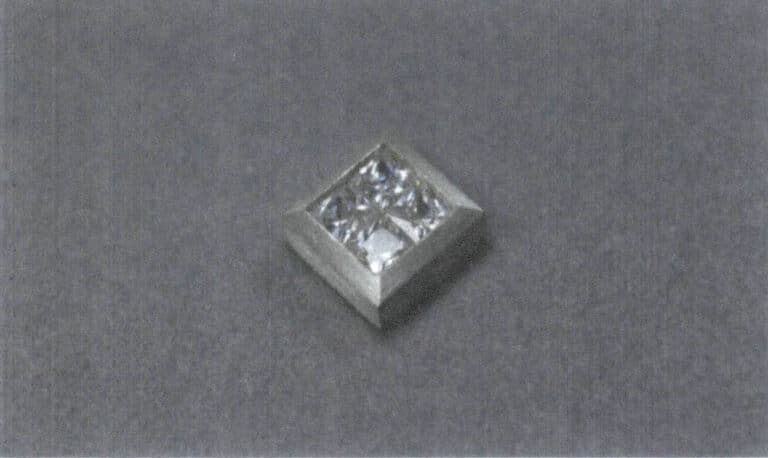
Figure 7-32 Completing the Grid-Shaped Tension Setting
3. The Application of Tension Settings in Jewelry Design
Regarding the use of tension settings in jewelry, the difficulty of creating tension settings is well-known, and its beauty comes from the craftsmanship that exceeds the “comfort zone” of traditional settings. This clever use of mechanical principles in the setting is a modern invention, and its creator is a former aerospace professional, Friedrich Becker. Figure 7-33 shows the tension setting brooch he designed. However, the predecessor of tension setting, which we call semi-tension setting or bezel setting, has been commonly used in the history of jewelry, such as in the brooch from the early 17th century produced in Prague, shown in Figure 7-34, where the surrounding rubies and diamonds are held in place by metal on both sides, but due to the tight arrangement, it is difficult for the metal to deform, and the gemstones are relatively stable. In the pendant from 1560 shown in Figure 7-35, the setting of diamonds in the cross pattern is similar to the grid-shaped tension setting. There are many similarities between them, and the metal structure at its base should also provide similar support for the gemstones. This type of setting is often seen in the letter-splicing settings of European antique jewelry.
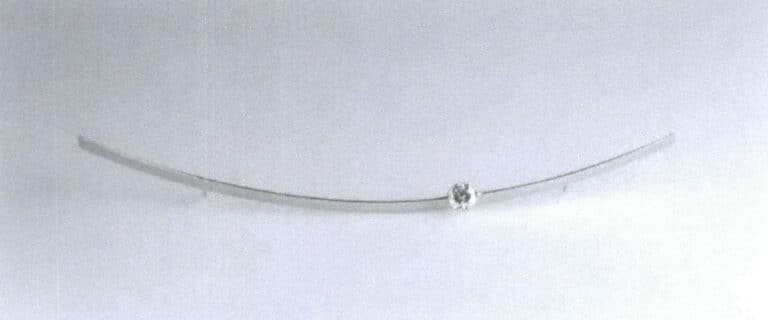
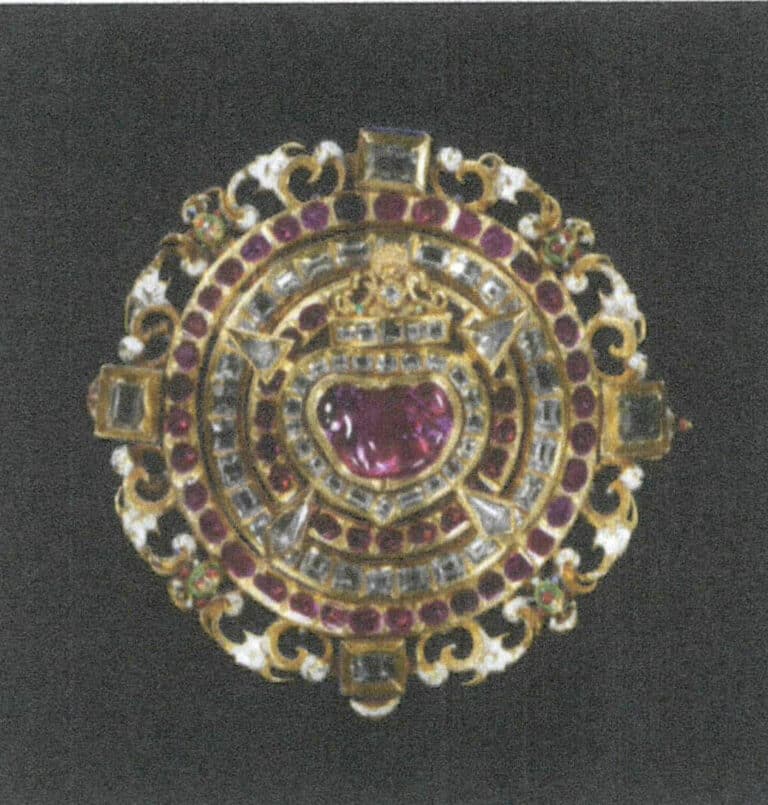
Figure 7-34 Brooch (V&A Museum Collection)
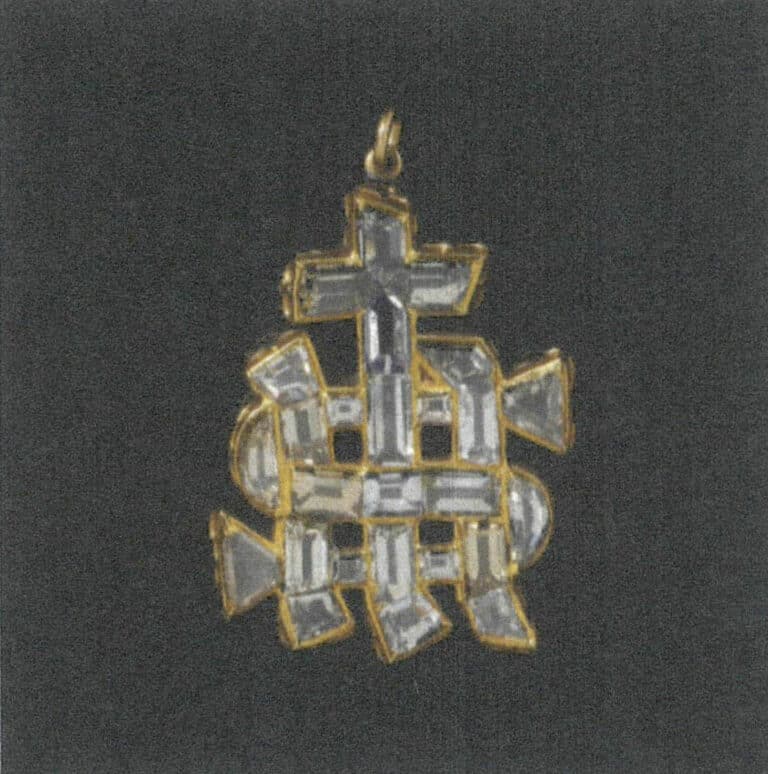
Figure 7-35 Diamond pendant (V&A Museum Collection)
The German brand NIESSING was founded in 1873. Influenced by the era and national background during its development, NIESSING simplifies the design philosophy of Bauhaus, approaching craftsmanship with an attitude of inspiration and heritage. NIESSING’s unique temperament is a deeper exploration of the beauty of materials and craftsmanship, presenting creativity calmly and continuously deepening this brand temperament.
STEVEN KRETCHMER was founded in 1991 in Los Angeles, USA, by Steven Kretchmer, his wife, and their daughter. Although the scale is small, the brand holds patents for the 18K gold and platinum treatment specifically used for tension settings. The superior hardness and tension allow it to better showcase tension settings’ charm. The precious metal alloys of STEVEN KRETCHMER are also more durable than standard jewelry alloys, thus maintaining their luster for longer. It is precisely due to the mature mastery of tension setting technology and the wide range of metal techniques that STEVEN KRETCHMER can flexibly apply and transform the effects of tension settings in jewelry, often combining with other setting methods such as pave setting and flush setting, and also integrating with metal treatments like wood grain gold, resulting in exquisite craftsmanship and designs that often surprise.
Only a few brands dare to attempt this tension setting. If strict control over materials and craftsmanship cannot be achieved, there is a high possibility of after-sales issues. This brings us back to the German jewelry brand NIESSING and the American STEVEN KRETCHMER jewelry studio, which are the most representative pioneers in tension settings. NIESSING and STEVEN KRETCHMER have metal craftsmanship and material patents as foundational support for tension settings, but the temperament exhibited by these two brands is distinctively unique.
In addition to the two classic jewelry brands that create tension settings mentioned above, many designers utilize the principles of tension settings and semi-tension settings to create refreshing jewelry pieces. For example, in the design shown in Figure 7-36, titanium metal is used for the setting, which has greater hardness, and the spiral design of the ring arm structure increases elasticity and aesthetics. The ring shown in Figure 7-37 cleverly amplifies the tension setting principle. Still, due to the pointed ends of its main gemstone’s olive shape, it can easily get stuck in holes, making the setting process relatively easier while increasing stability, which is an effect of the special shape. The ring shown in Figure 7-38 appears to trap the gemstone in the middle of the metal like a tension setting, but it does not rely on the tension of the metal, so from the perspective of setting craftsmanship, it is not considered a tension setting. However, the combined relationship between the metal modules still forms a “tense” visual effect.
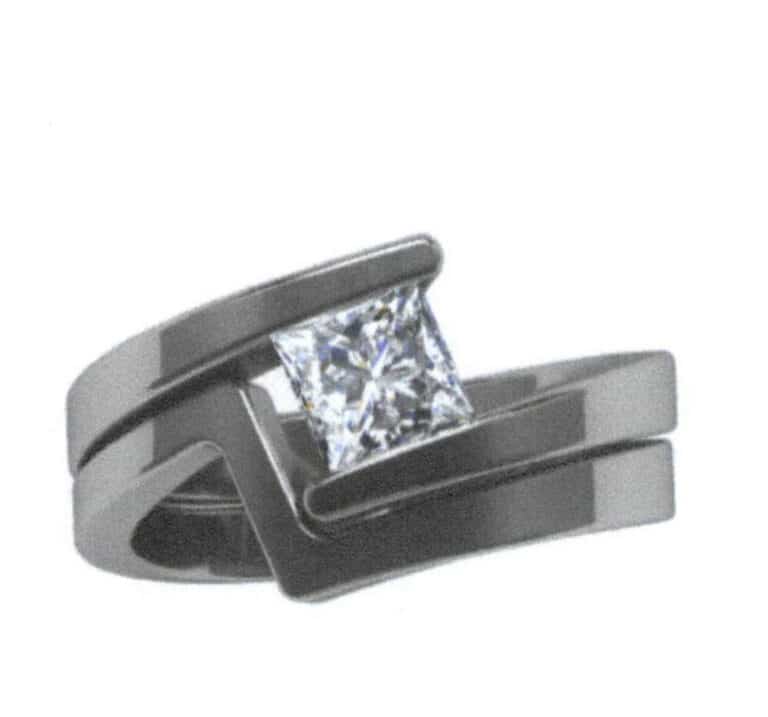
Figure 7-36 Tension Setting Ring
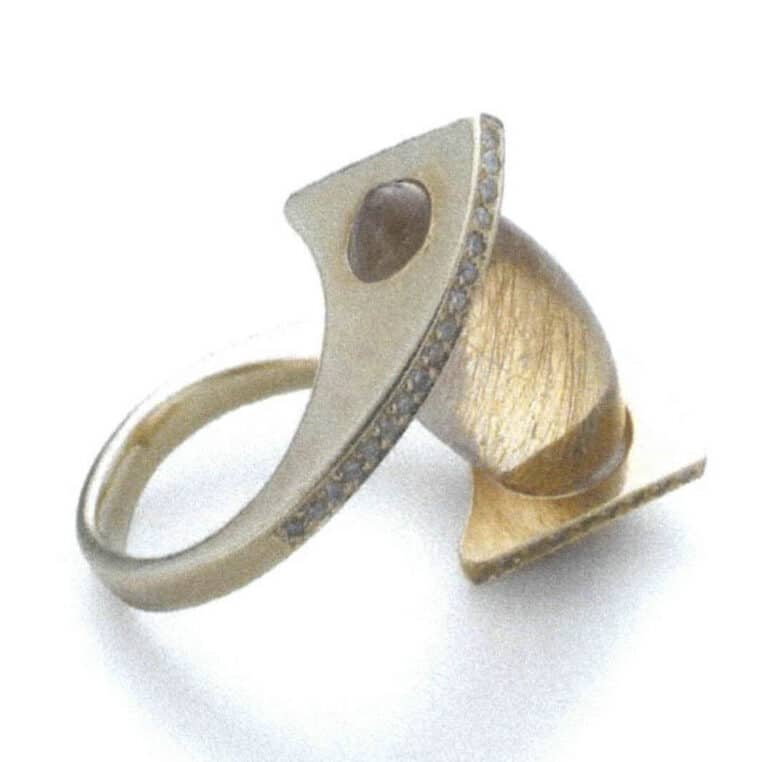
Figure 7-37 Creative Tension Setting Ring
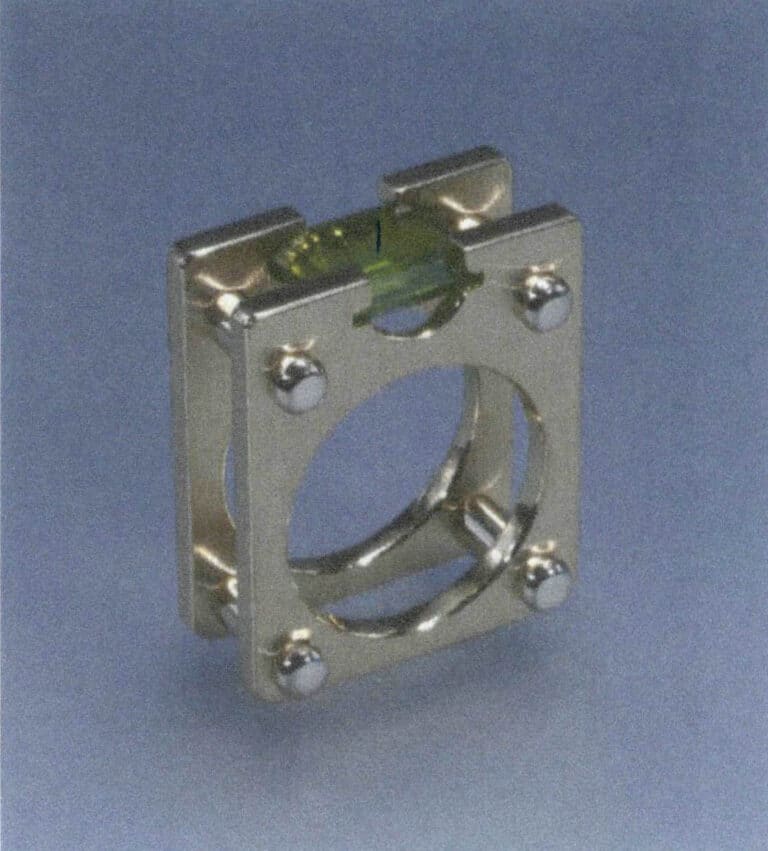
Whether it is NIESSING and STEVEN KRETCHMER, two brands dedicated to the research of tension setting techniques, or other creative applications of tension settings, or designs similar to tension settings, we can see from the design of tension setting an extreme challenge to the relationship between metal and gemstones. There must be a technology that has required a lot of effort from the pioneers, and it is precisely because of this that the aesthetic brought by the tension-setting method often surpasses people’s attention to the gemstones being set. For a beginner, in addition to learning the production of tension settings, it is more important to learn the valuable spirit of innovation in craftsmanship and the exploration of material properties.
Section III Channel Setting
The channel setting is one of the more difficult settings but also one of the most distinctive. The stones are arranged in ribbons in a channel setting, and no metal is between them. It expands the expressive power of jewelry, making the ribbon arrangement of imagery such as “ribbons” in jewelry more dynamic and neat.
1. Overview of Channel Setting
Channel setting refers to a method of setting gemstones along a metal track or groove that is fixed on both sides of the gemstone’s girdle, with no metal structure separating or supporting the gemstones other than the channel or groove, visually creating the appearance of a gemstone strip. The appearance of the channel setting is very creative. The reduced presence of metal allows bright gemstones to be arranged smoothly into lines, and they are often designed to have variations in width and curvature, depending on the flexibility of the gemstone design and the accuracy of the dimensions. Channel setting rings, and Van Cleef & Arpels high jewelry are shown in Figures 8-1 and 8-2, respectively. Due to the aesthetic appeal, difficulty, and high-end feel of the lines in channel setting, it is often used in high-end jewelry design. Of course, channel setting also has limitations; gemstones should be manageable, especially in cabochon arrangements, generally using faceted gemstones with a diameter not exceeding 5 mm.
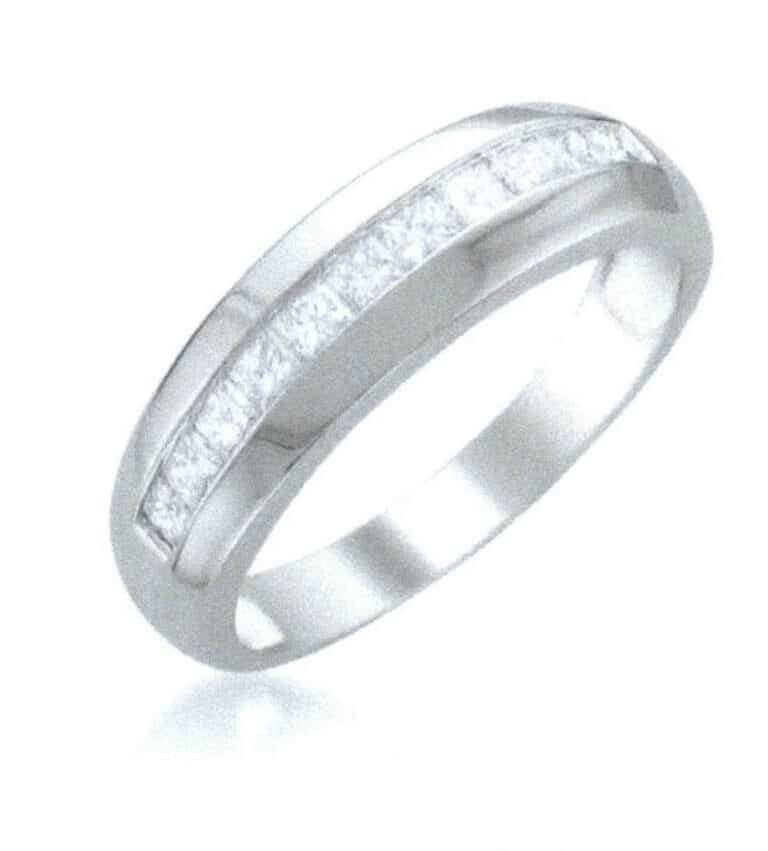
Figure 8-1 Channel setting ring
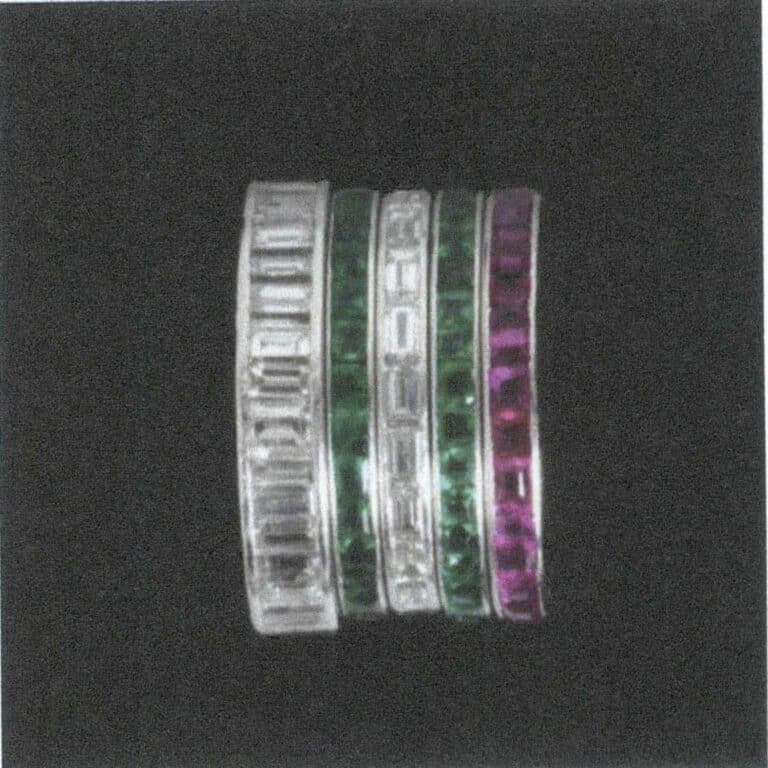
Figure 8-2 Channel setting ring (V&A Museum Collection)
2. The Method of Making Channel Setting
2.1 The Principle of Making Channel Setting
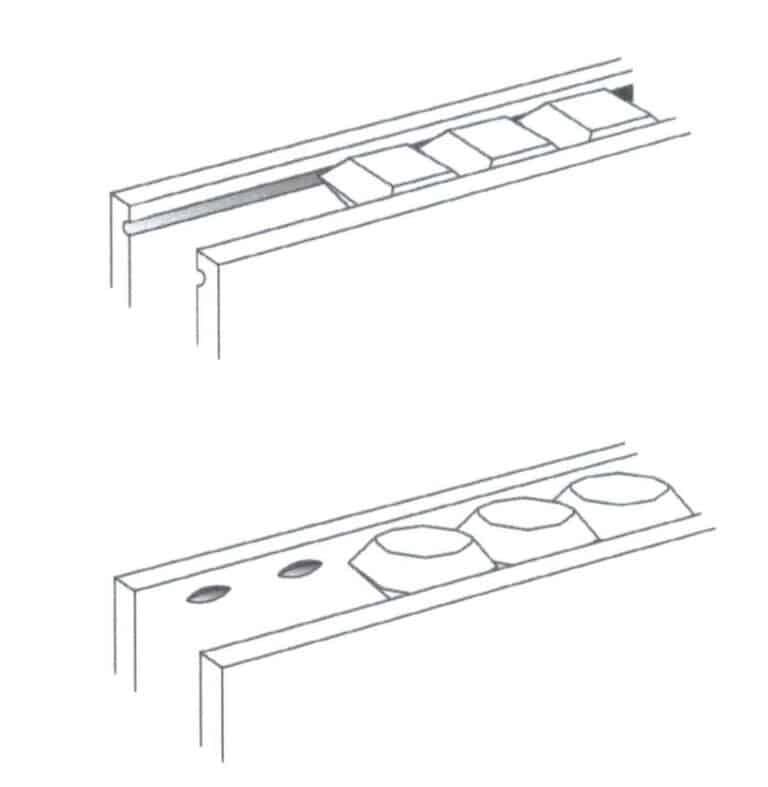
Before making, let’s first understand the principles of channel setting. The structure of the channel setting differs for square and round gemstones. Generally, the channel referred to in channel setting structures is for square or straight-edged gemstones, while round gemstones are often set by creating a curved groove on both sides of the girdle to hold the round gemstone in place. However, the final effect presented by both is a strip-like arrangement of gemstones with no metal spacers between them. Figure 8-3 shows the structure of channel settings for square brilliance cut gemstones and round brilliance cut gemstones.
2.2 Channel Setting Production Steps
(1) Przygotowanie materiału
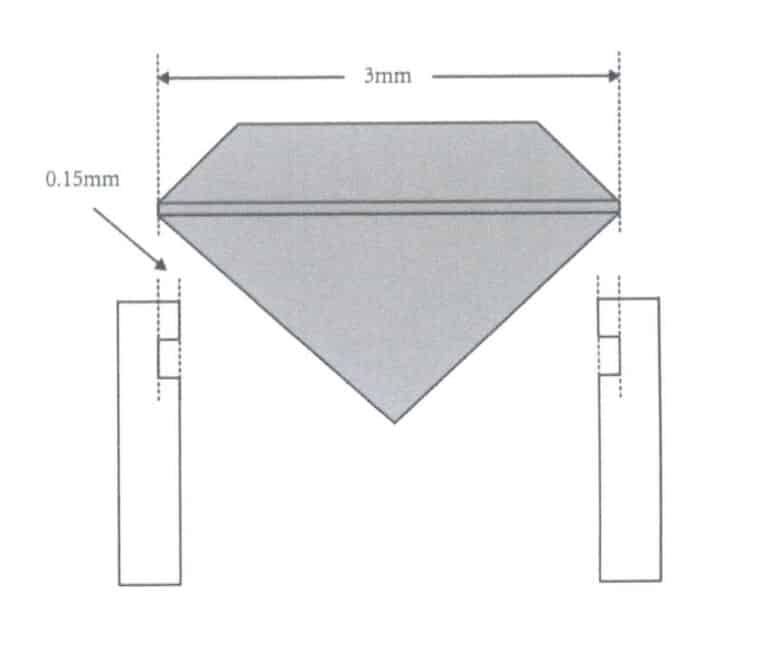
This case uses a square brilliance cut gemstone with a side length of 3 mm; a 3D model is created for the stone setting, taking into account the 0.15 mm deep channel and the 0.15 mm spacing between the groove and the gemstone, as shown in Figure 8-4. This case is designed based on the standard gemstone size for the stone setting and calculates its dimensions. In practice, the gemstone cutting is often made according to the size of the stone setting in the design. Although the channel setting appears as a continuous line of gemstones from the top view, each has a stone setting position on the bottom. Note that the stone setting position is wider at the top and narrower at the bottom to prevent the stone from being exposed during the setting process, as shown in Figure 8-5.
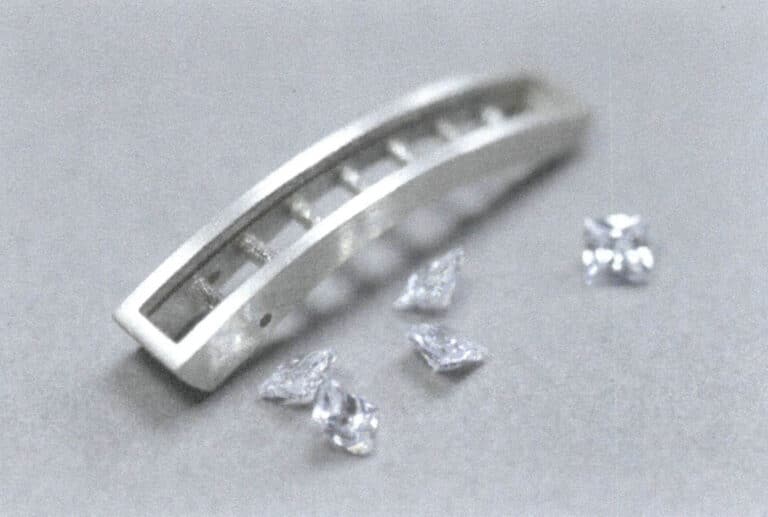
Rysunek 8-4 Przygotowanie materiału
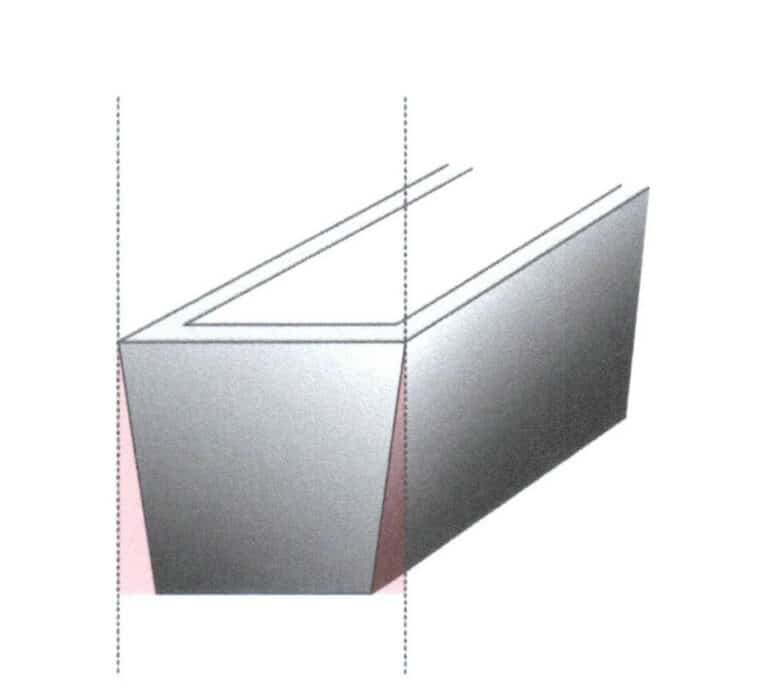
Figure 8-5 Wide at the top and narrow at the bottom of the stone setting position
(2) Slotting
The slotting of the channel setting is a relatively important step, and the slot positions must be consistent in width and depth. Generally, during modeling, slot lines can be reserved at the slotting positions, and then the slots can be made on the metal piece using a wheel bur along the existing slot lines, which is more standardized, with a slot depth of about 0.15 mm. During the slotting process, the positions of the turning angles should be marked with a small ball bur to create a noticeable depth to avoid insufficient slotting at the angle positions that would hinder the gemstones from being properly placed, as shown in Figure 8-6 to 8-8.
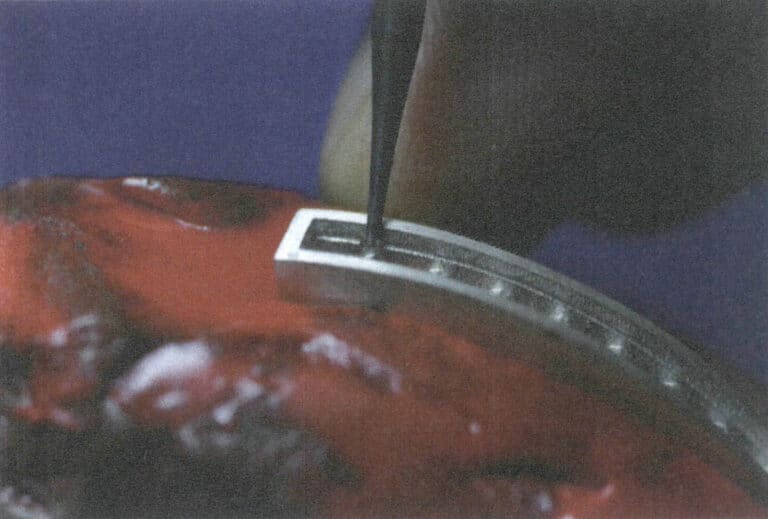
Figure 8-6 Slotting with a wheel bur
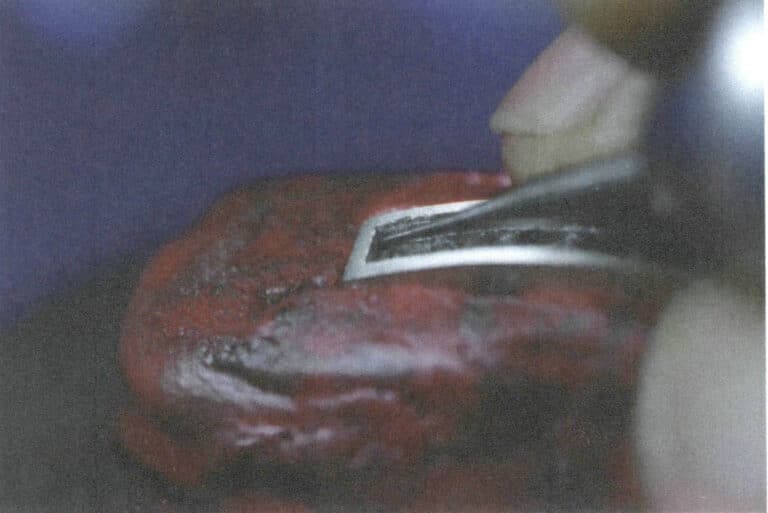
Figure 8-7 Slotting the angle position with a small ball bur
(3) Testing the Stone Mount
A gemstone can be used to test whether the slotting depth is appropriate. First, insert one edge of a square brilliance cut gemstone into one side of the track, then press down on the other end of the gemstone with your fingernail. If it can be pressed in relatively easily, it is appropriate. If it is difficult to press into the slot, it indicates that the metal slot is not deep enough and needs further adjustment. However, it is important to note that if the gemstone can enter the slot without being pressed, it is also not acceptable, as this means the channel is not providing initial stability for the gemstone, as shown in Figures 8-9 and 8-10.
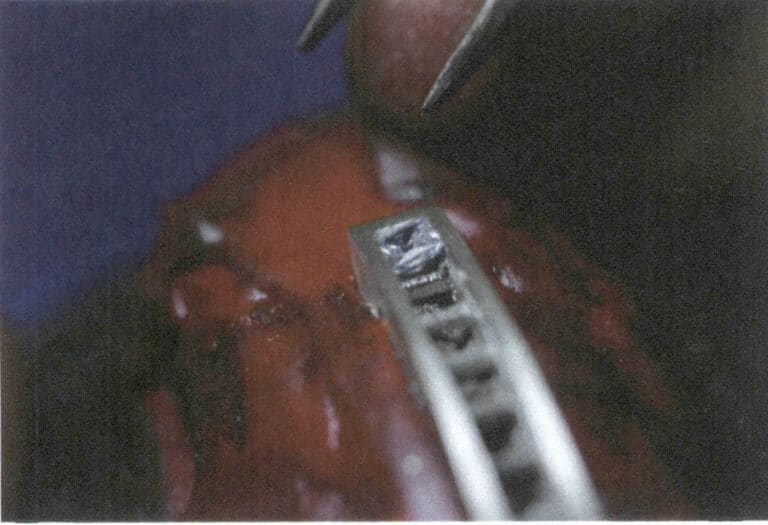
Figure 8-9 Gem is inserted into the slot on one side.
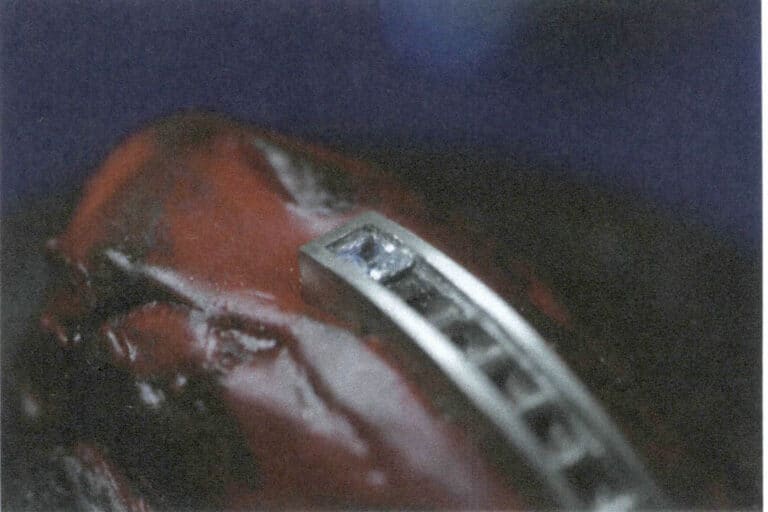
Figure 8-10 Gem is fully inserted into the slot
(4) Umieszczenie w Ston
After determining that the slot position is suitable through the trial stone, sequentially place the gems into the slots using the stone mount testing method, as shown in Figures 8-11 and 8-12.
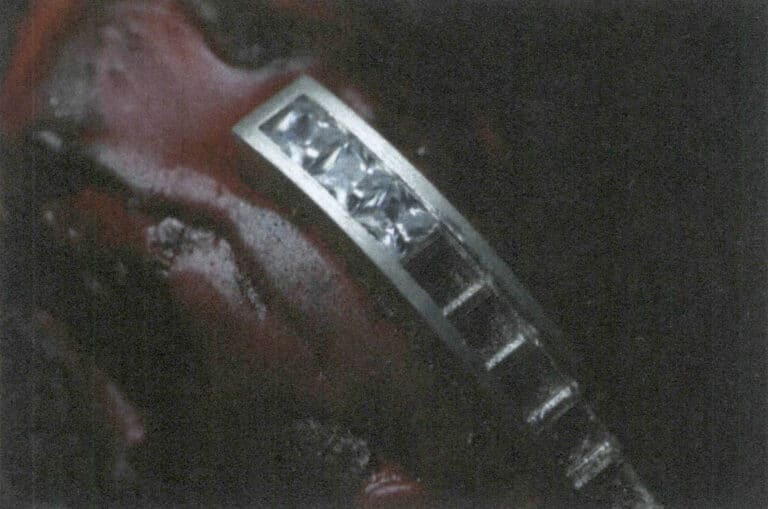
Figure 8-11 Placing the stone (1)
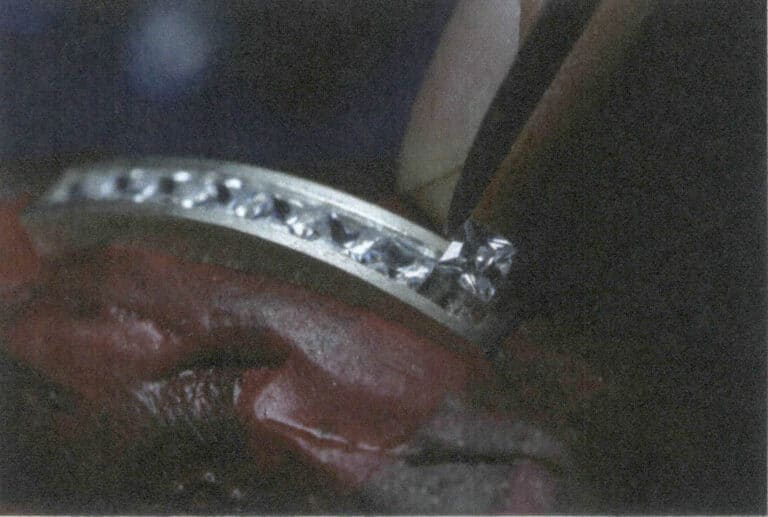
Figure 8-12 Placing the stone (2)
(5) Adjusting Gem Spacing
The gems in the channel setting are not tightly fitted together; there is approximately a 0.15 mm gap between them. Therefore, when calculating the size of the stone setting position, the spacing between the gems must be considered. After placing the stones, you can gently move the gems with tweezers to adjust the spacing to be roughly even, then secure one side with modeling clay and adjust from the other side, as shown in Figures 8-13 and 8-14.
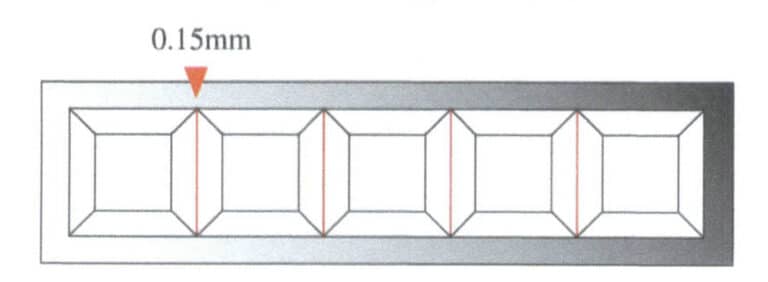
Figure 8-13 Gem Spacing
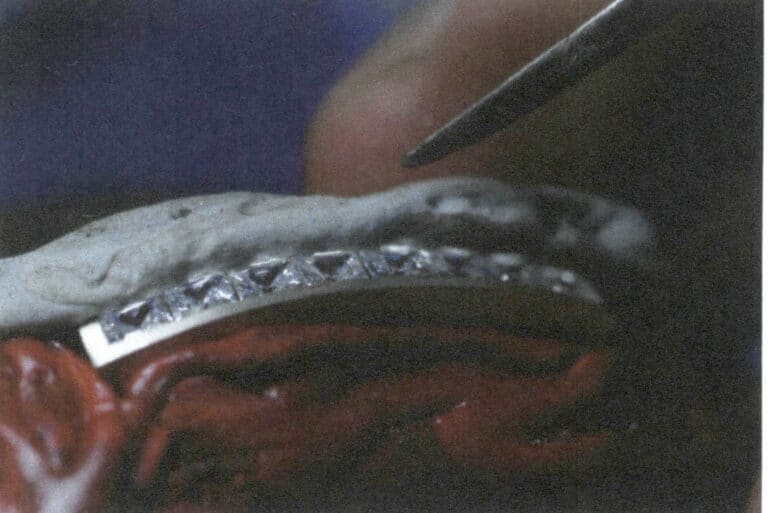
Figure 8-14 Adjusting Gem Spacing
(6) Setting Stones – Point Fixation
Once the spacing of the gems is uniform, fix them from one side using modeling clay, then gently strike the top of the slot wall from the other side with a small flat-headed steel bur or chisel. First, make point impacts on each gem’s top to fix their positions. If the spacing of the gems becomes uneven during the process, you can slightly adjust the position of the gems using the pressure from the strikes, as shown in Figures 8-15 and 8-16. The method, on the other side, is the same.
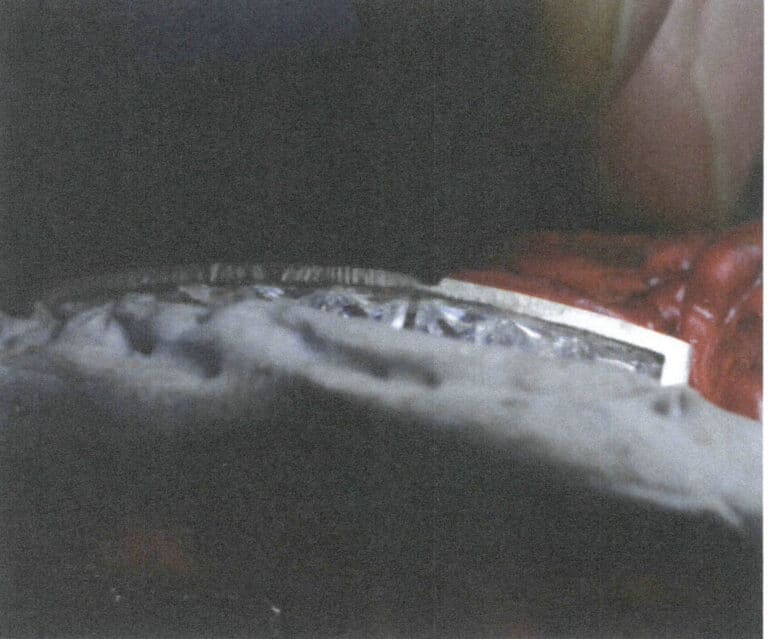
Figure 8-15 Point Fixation

Figure 8-16 Point Fixation Schematic
(7) Setting Stones – Uniform Fixation
After striking the gem from both sides to prevent it from being fixed in position, use a flat-headed chisel with a hammer to make uniform impacts, pressing down the edges of the slot wall as flat as possible, as shown in Figure 8-17.
(8) Finishing – Regulacja
After the enemy’s strike, the treasure cannot be fixed, and the metal edges will be uneven. Therefore, on the one hand, it is necessary to use a flat-headed graver to smooth the inner side of the slot wall, and on the other hand, a file is needed to level the top and side surfaces of the metal edges, as shown in Figures 8-18 and 8-19.
(9) Finishing – Polishing
Use sandpaper rolls, polishing wheels, etc., to polish the top edge of the slot wall to a shine, as shown in Figure 8-20.
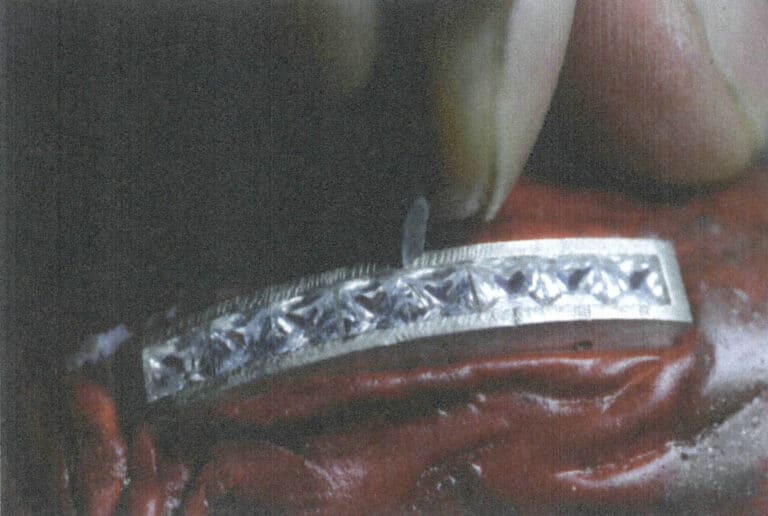
Figure 8-17 Uniform Fixation
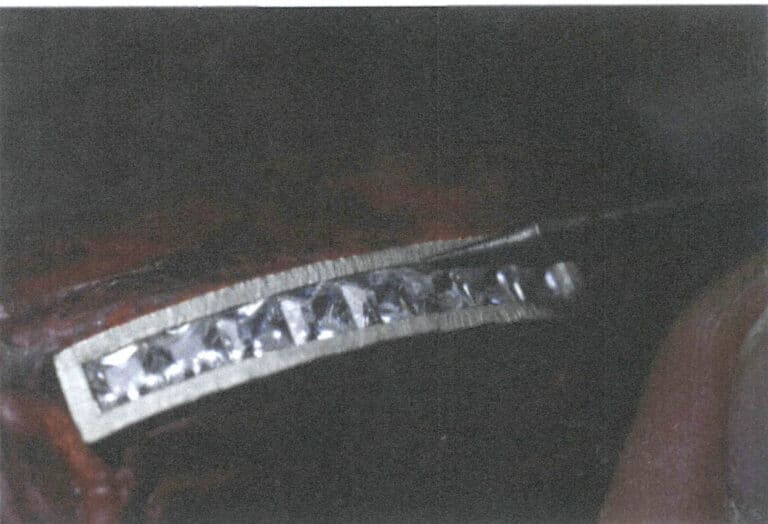
Figure 8-18 Edge Smoothing
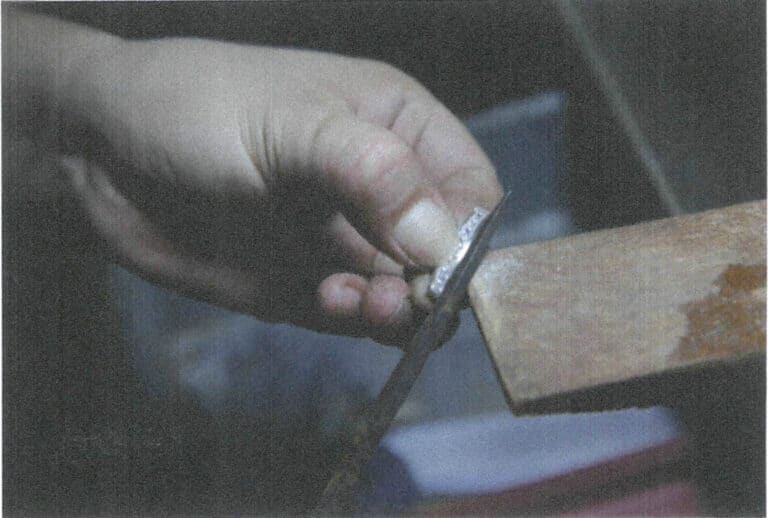
Figure 8-19 Edge Trimming
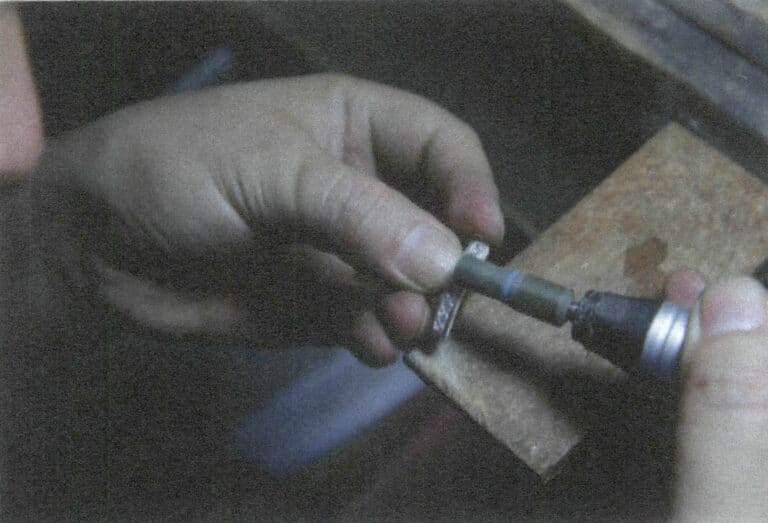
Figure 8-20 Polishing
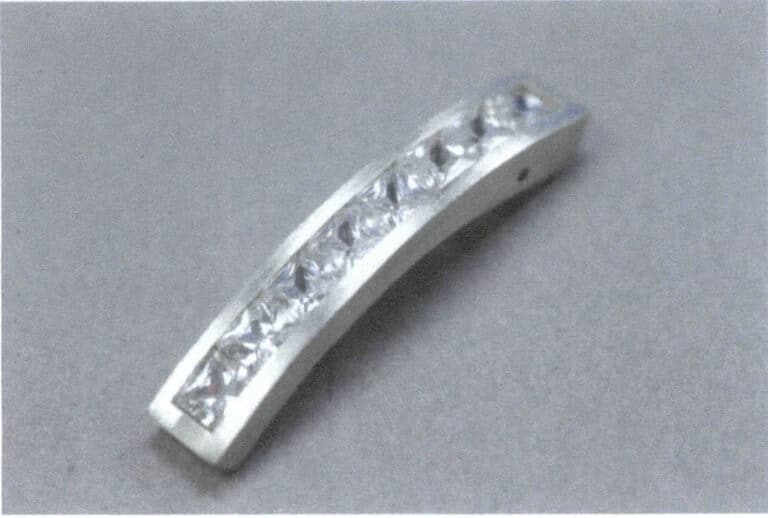
(10) Completing the Channel Setting
The completed channel setting is shown in Figure 8-21.
3. The Application of Channel Setting in Jewelry Design
The channel setting was widely used in jewelry design during the 1920s and 1930s, but its history in jewelry is much older. Figure 8-22 shows this crown jewel, made in 1755, features a row of banded emeralds set using the technically challenging channel setting. Although the overall gem cutting could be better, with varying sizes of cabochon gems and unclear facets of the emerald, efforts were made to polish the emeralds to showcase a gradient arrangement, and the high-difficulty setting was completed using the channel setting technique.
One brand that must be mentioned regarding channel settings is Van Cleef & Arpels. Although Van Cleef & Arpels’ greatest contribution to setting is the creation of the invisible setting, it is undeniable that channel setting and invisible setting share similarities, especially in visually allowing gems to be arranged in a natural curve or surface, which is very suitable for expressing organic forms. Van Cleef & Arpels is one of the few top jewelry brands that can freely express organic forms in design, such as the daisy brooch from the Flowers collection and the Zip Couture Nœud Émeraude necklace from the Zip collection, both of which are classic examples of channel setting. As shown in Figure 8-23, a representative work collected by the V&A Museum in 1930 employs channel setting among various other setting techniques.
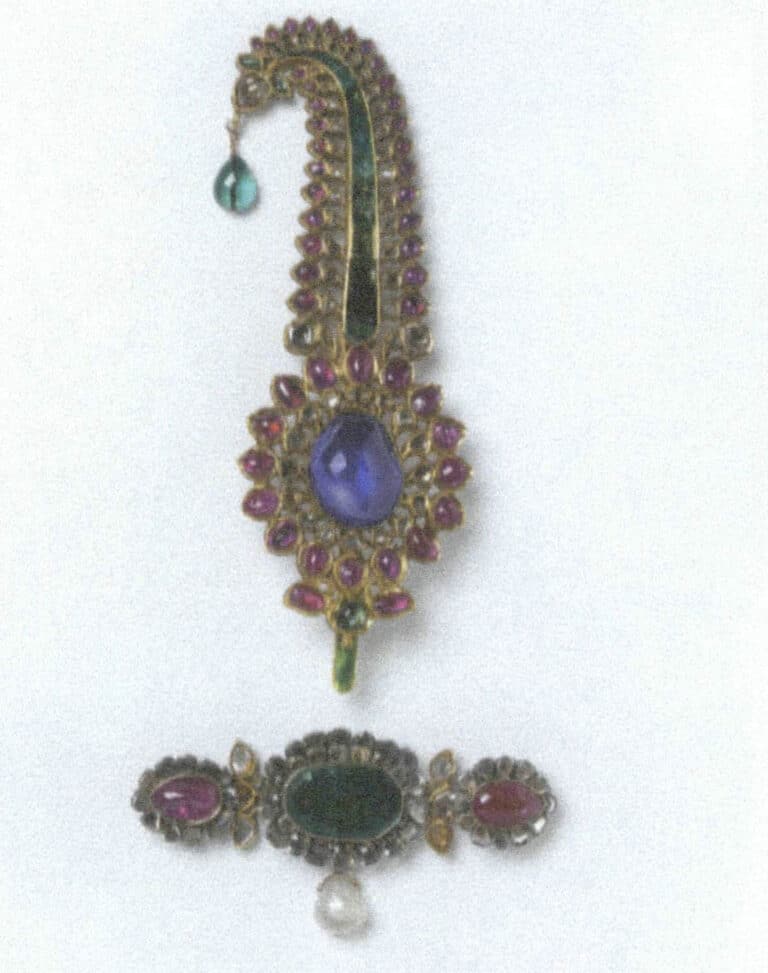
Figure 8-22 Crown jewel (V&A Museum Collection)
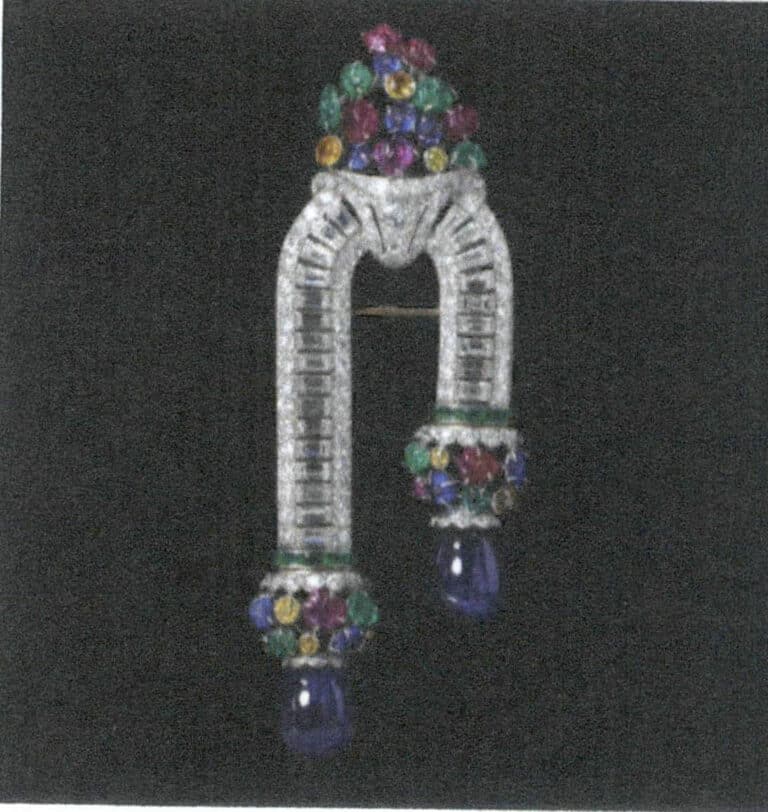
Figure 8-23 Van Cleef & Arpels brooch (V&A Museum Collection)
In the 1920s, the Art Deco style began to flourish in Europe, and jewelry from the same period was also influenced by this style. The decorative techniques filled with geometric shapes and straight lines made the channel setting particularly popular among jewelry designers, as it allowed gemstones to form a coherent band effect. In the distinctive Art Deco jewelry, the channel setting is often an indispensable setting technique, as shown in Figures 8-24 to 8-28.
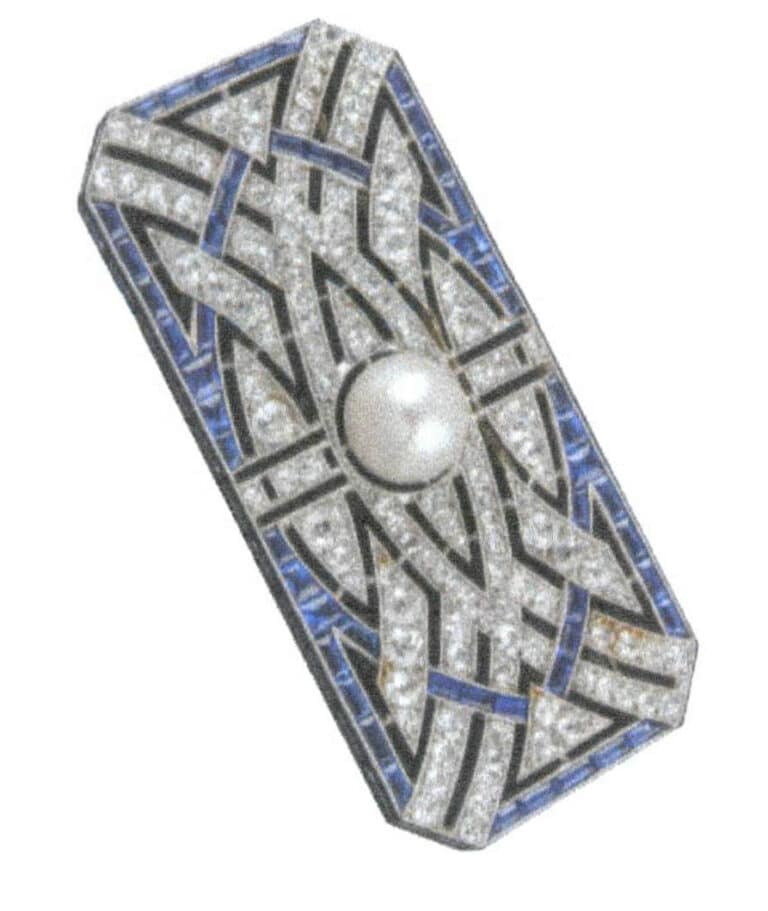
Figure 8-24 Art Deco style jewelry (1)
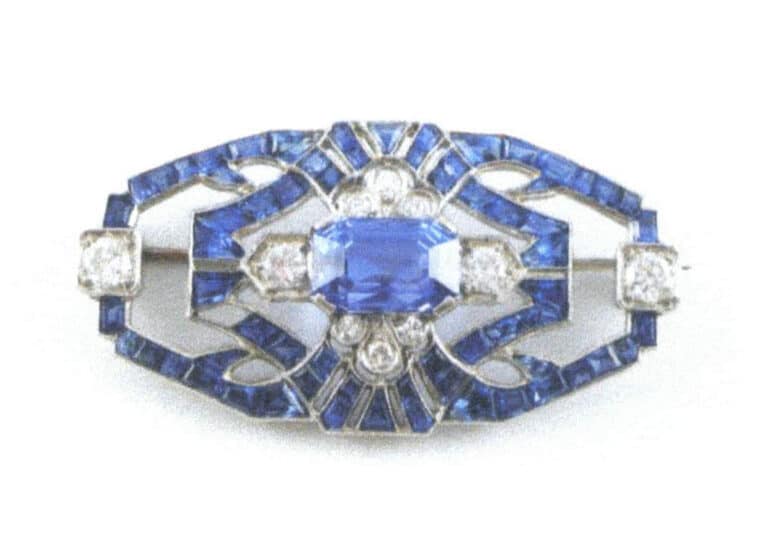
Figure 8-25 Art Deco style jewelry (2)
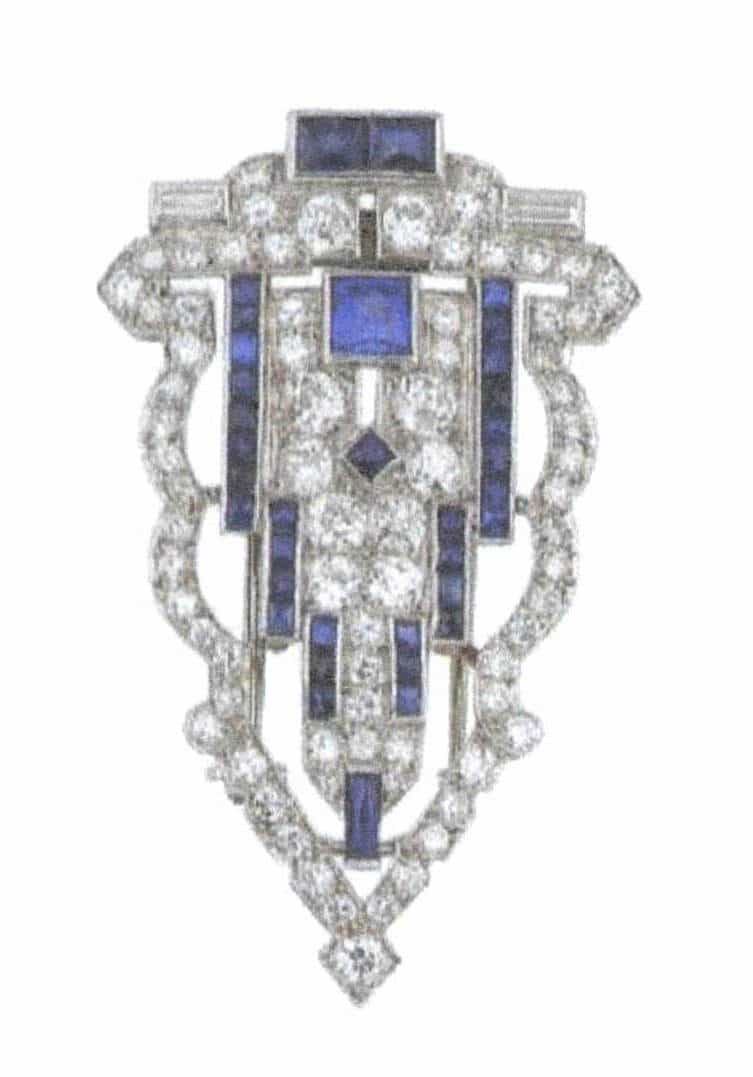
Figure 8-26 Art Deco style jewelry (3)
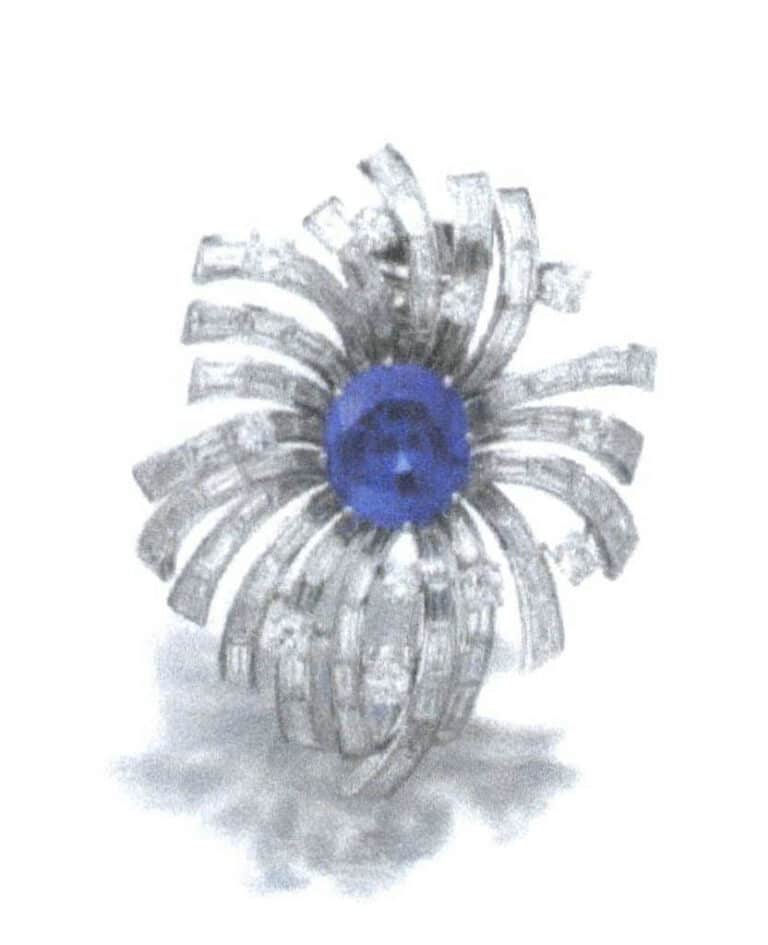
Figure 8-27 Channel setting jewelry
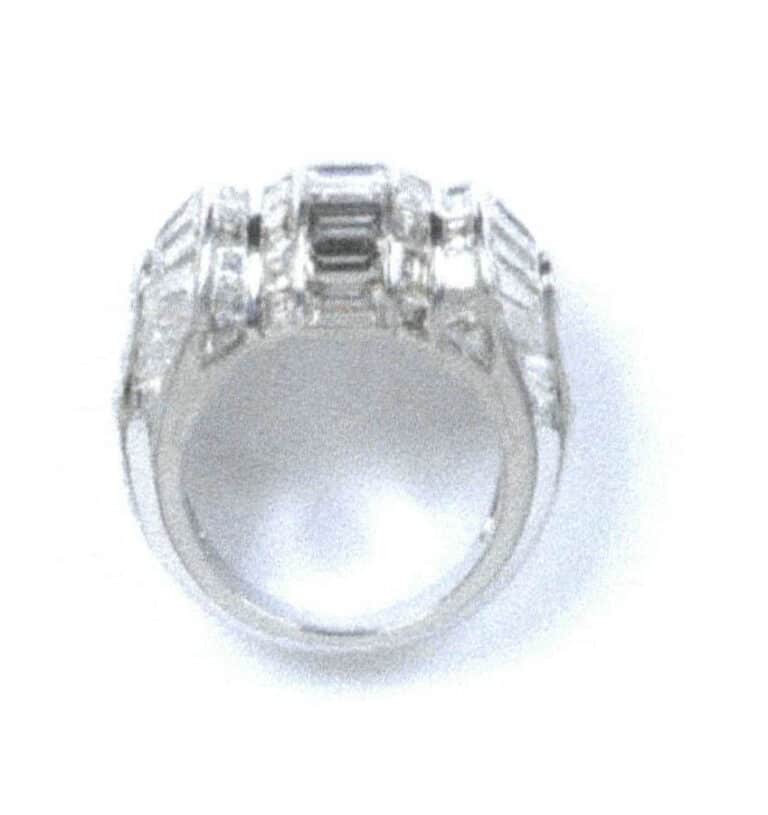
Today, in addition to high-end jewelry utilizing channel setting, many jewelry brands flexibly use the rich color experience and organic beauty brought by channel setting. From the channel setting, we can see the breakthrough in the field of gemstone setting regarding “gemstone lines.” The emergence of this line feeling adds another tool to the design of freedom, making the design increasingly less constrained by craftsmanship and enriching the expression of the beauty of gemstones.
Section IV Invisible Setting
The invisible setting is a very difficult type of setting in the mosaic craft, which has high requirements for the standard of gemstone cutting, the standard of the metal structure, and the craftsmanship ability of the maker. Invisible setting is very innovative in gemstone setting, which opens up a whole new field for the expression of jewelry and represents the spirit of craftsmanship innovation.
1. Overview of Invisible Setting
Invisible setting was created by the French jewelry brand Van Cleef & Arpels, established in 1906 in 1933. It is a setting method that tightly arranges multiple gemstones together, and after setting, there is no visible metal structure spacing between the gemstones. Although this setting method is patented by Van Cleef & Arpels, it has since become a height many strive to challenge in the setting craft, and craftsmen have gradually unveiled its secrets. The mystery of the invisible setting lies in the grooves opened at the girdle of the gemstones, using the relationship between the metal structure and the gemstone groove to replace the fixation on the gemstone’s girdle, as shown in Figure 9-1.
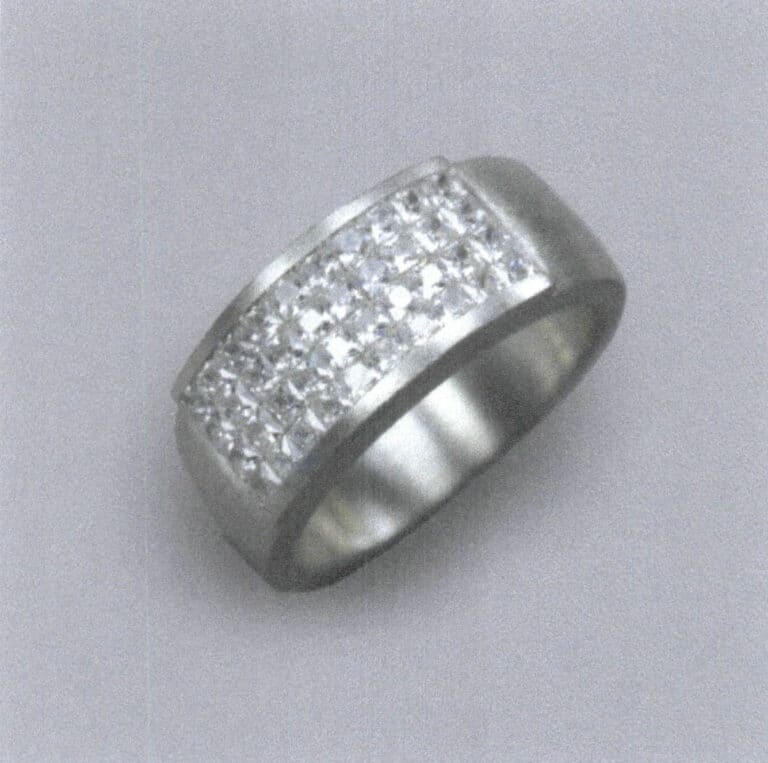
If the channel setting allows gemstones to form a coherent band, the invisible setting allows gemstones to form a “surface.” Here, the surface refers to small gemstones closely arranged to form a whole, with no metal appearing in between. This setting method greatly enhances the overall sense of densely arranged small gemstones; without the “interference” of metal, the gems’ beauty becomes purer and the colors more vibrant. Suppose the difficulty of the craftsmanship is further increased. In that case, the invisible setting can also create a sense of undulation on the surface, interpreting organic forms in jewelry more accurately. The invisible setting firmly occupies the high ground of high-end jewelry due to its production difficulty and higher production costs. Below, we will explore the secrets behind the invisible setting through specific cases.
2. The Production Method of the Invisible Setting
2.1 The Principle of the Invisible Setting
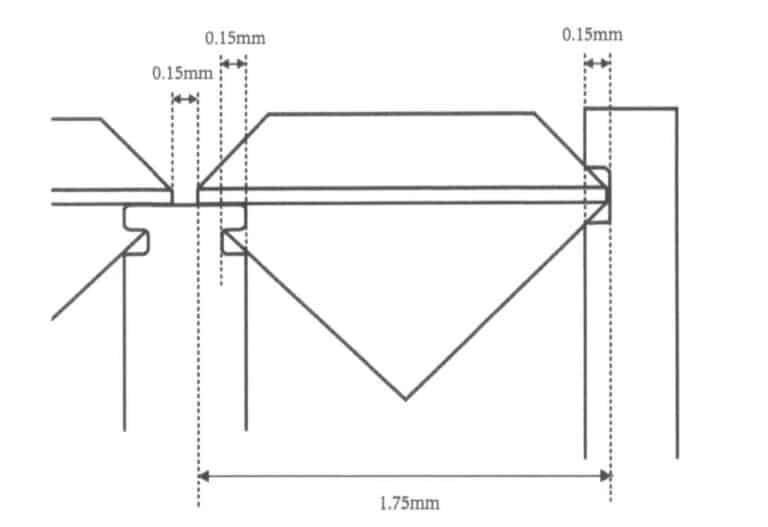
From the top view, the invisible setting appears as a continuous piece of gemstones. Since there is no metal to hold the girdle of the gemstones, what kind of structure allows the gemstones to be stable? The secret lies in the changes behind the gemstones. The gemstones in the invisible setting look no different from ordinary faceted gemstones from the top, but there is another mystery below the girdle, as shown in Figure 9-2. There are slots under the girdle of the gemstones; these grooves aim to create an interlocking structure with the metal hidden beneath the girdle of the gemstones, as illustrated in Figure 9-3. This structure is extremely challenging, testing the imagination for innovative craftsmanship, the skills of the setting artisans, and the gemstone cutting techniques. Utilizing this delicate and intricate interlocking structure, the gemstones are neatly arranged and locked into their setting positions. Then, the metal is pressed or struck at the edges to fill the grooves of the gemstones as much as possible. This is the principle of the invisible setting.
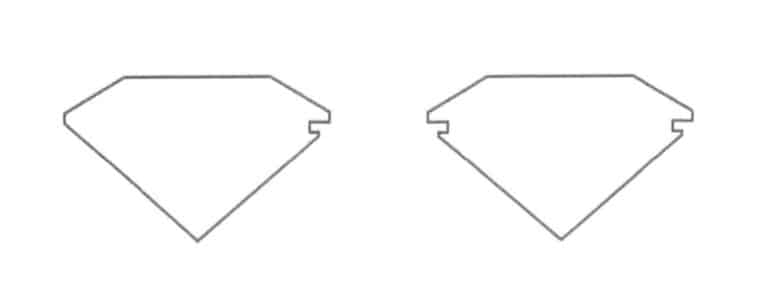
Figure 9-2 Cross-section of a invisible setting gemstone slotting
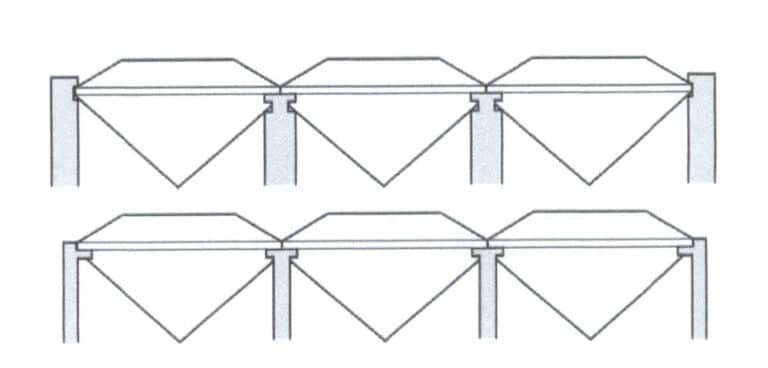
Figure 9-3 Cross-sectional diagram of two structural principles of invisible settings
2.2 Steps For Making Invisible Setting
(1) Calculating Dimensions
First, based on the shape dimensions provided by the design, calculate the arrangement of the gemstones and the required sizes of the gemstones. The main consideration here is the size of the slots and the gaps between the gemstones. For gemstones of different sizes, the depth of the slots may vary slightly, with the usual slot depth being 0.1~0.15 mm. After calculation, model and cast the metal parts as needed, as shown in Figure 9-4.
(2) Przygotowanieing w Metal
Create a hidden setting stone setting with 3D modeling, and reserve the positions of the tracks that interlock with the gemstone slots, as shown in Figures 9-5 and 9-6.
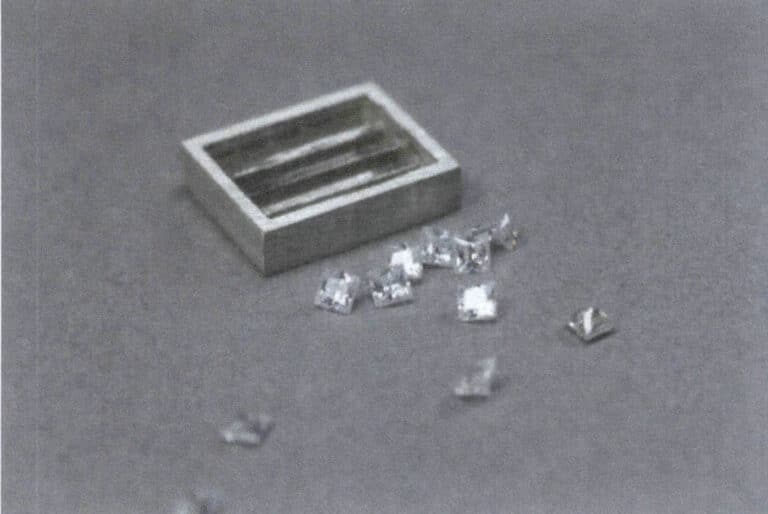
Figure 9-5 Stone setting and gemstones

Figure 9-6 Metal Structure Section View
(3) Przygotowanieing w Gkamienie
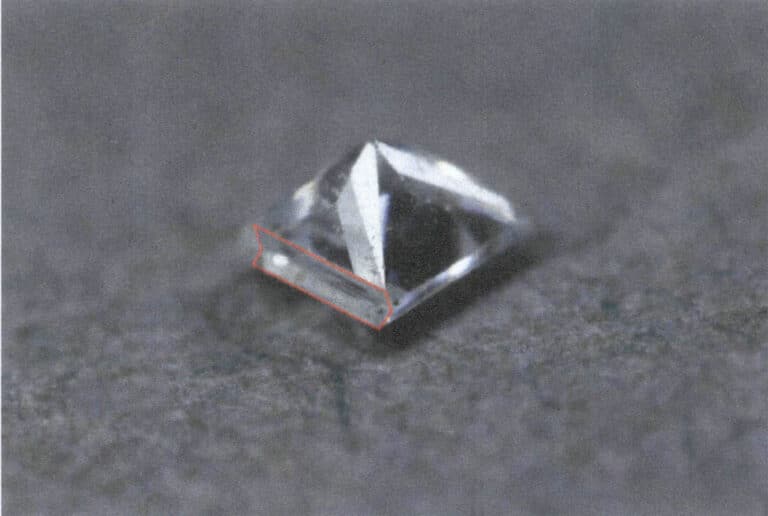
Invisible settings often require specially crafted gemstone cuts based on the shape to fill a design with an irregular structure. In this case, a regular rectangle can be satisfied with square brilliance cut gemstones with a side length of 1.75 mm. Next, check and confirm the standards of the gemstone scraping slots, as shown in figure 9-7
(4) Slotting
Slotting on the stone setting is also a very important step. Before slotting, use a flat-headed graver to smooth the metal corners and a wheel bur to create the slots. Similar to channel setting, when modeling the metal in the early stages, leave the slots reserved to ensure that the subsequent slotting with the wheel bur is more standardized. The fit between the gemstone and metal slots is key to the invisible setting, as shown in Figures 9-8 and 9-9. Note that there is no rush to perfect the slots in one go; during the gemstone setting process, the slot positions can continue to be adjusted. After setting one row, the slot positions for the next row can still be adjusted.
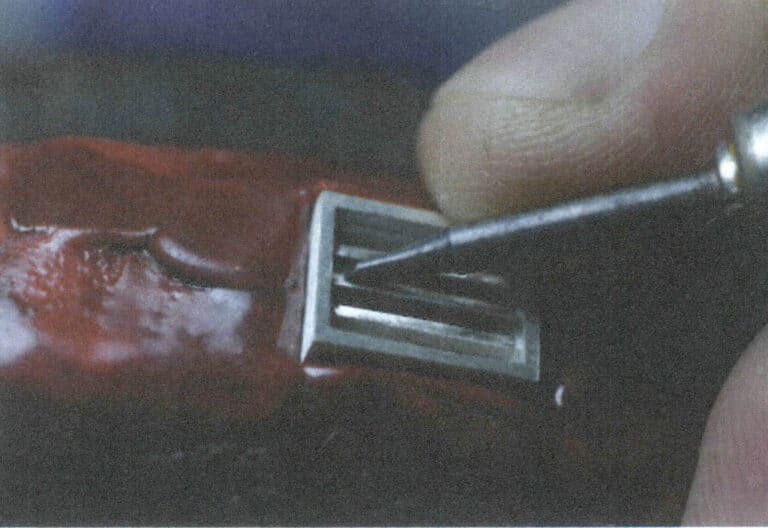
Figure 9-8 Using a flat-headed graver to create a groove
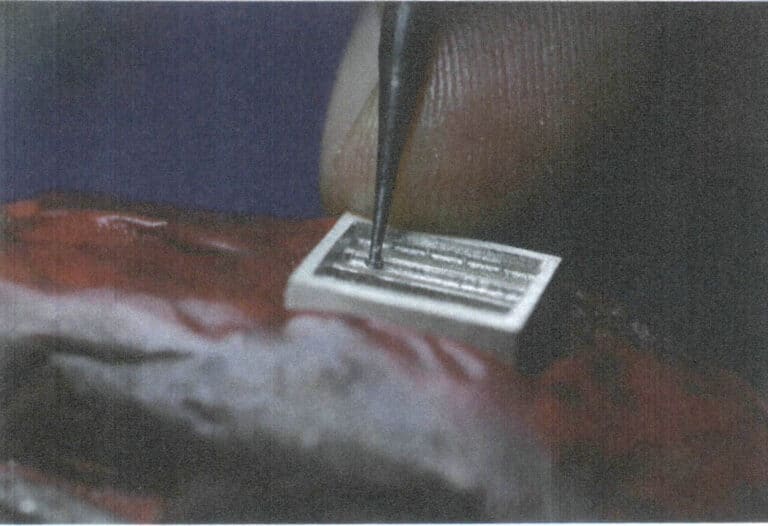
Figure 9-9 Using a wheel bur to create a groove
(5) Testing the Ston Mount
First, insert one end of the gemstone into the slot, then gently press down with your fingernail to make the other end fit into the slot. If the gemstone can enter the slot without pressure, it indicates that it is too large and cannot hold it; if the gemstone cannot be pressed in, the slot needs to be deepened, so do not make the slot too deep at once. The stone mount testing is shown in Figure 9-10.
(6) Placing Stones
Placing the stone in the same way as the testing the stone mount, the stone placing can start from the middle of the structure. After the stone is stuck into the slot, it can be slid on the track to one end, and then the stone, in turn, will be full of a row, as shown in Figure 9-11.
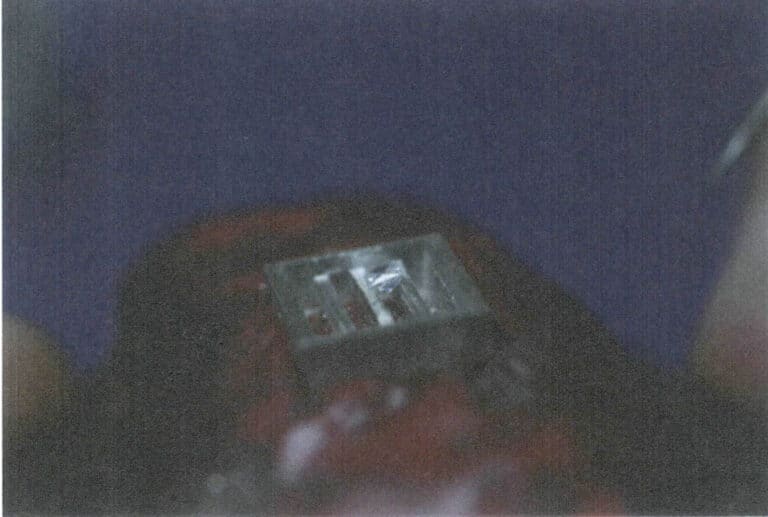
Figure 9-10 Testing the Stone Mount
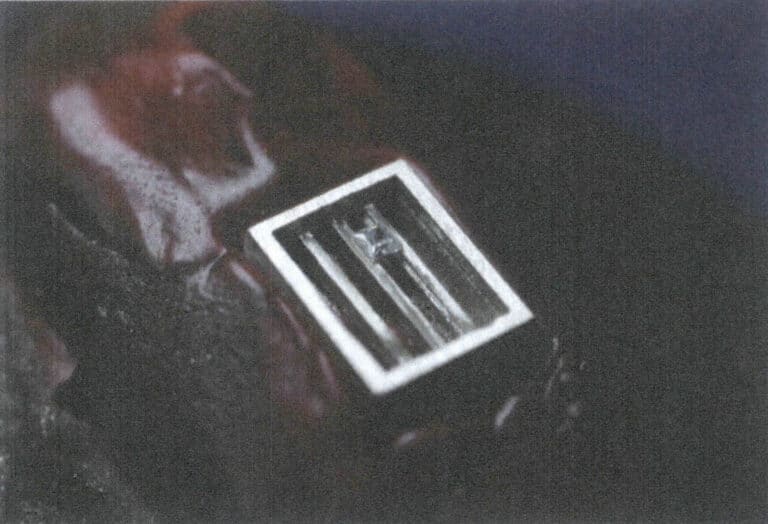
Figure 9-11 Placing the Stones
(7) Setting Stones
After placing a row of gems, gently pinch the metal on both sides of this row of gems with tweezers. Then, adjust the slots for the next row of gems and continue to place the stones row by row similarly. Once all the stones are placed, gently tap a few circles from the top of the frame to secure them, using the principle of compression consistent with the channel setting. The setting of the stones is shown in Figure 9-12.
(8) Finishing
Use a file to smooth the metal edges, then polish with sandpaper rolls, polishing wheels, etc., as shown in Figure 9-13.
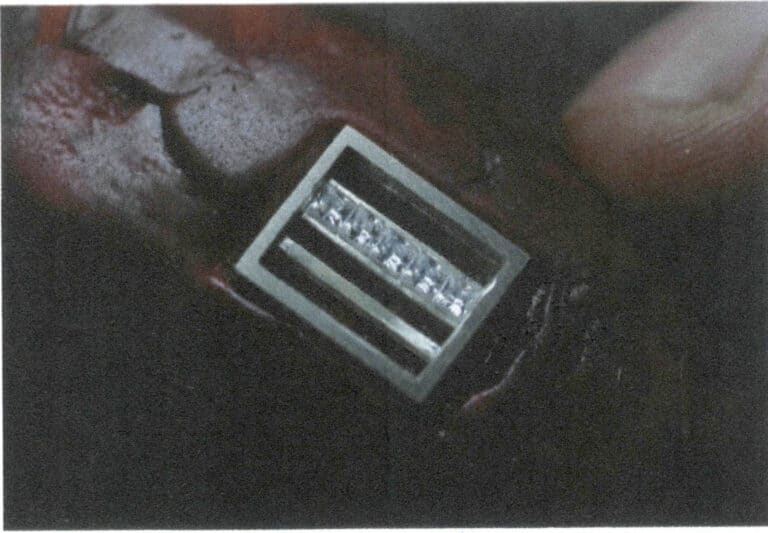
Figure 9-12 Setting Stones
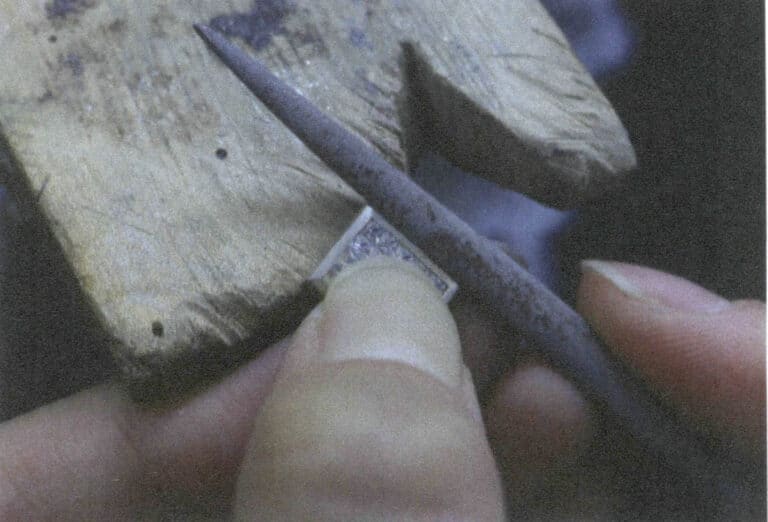
Figure 9-13 Finishing
(9) Completing w Invisible Setting
This case involves a flat invisible setting, and the same principle applies to curved surfaces, as shown in Figure 9-14.
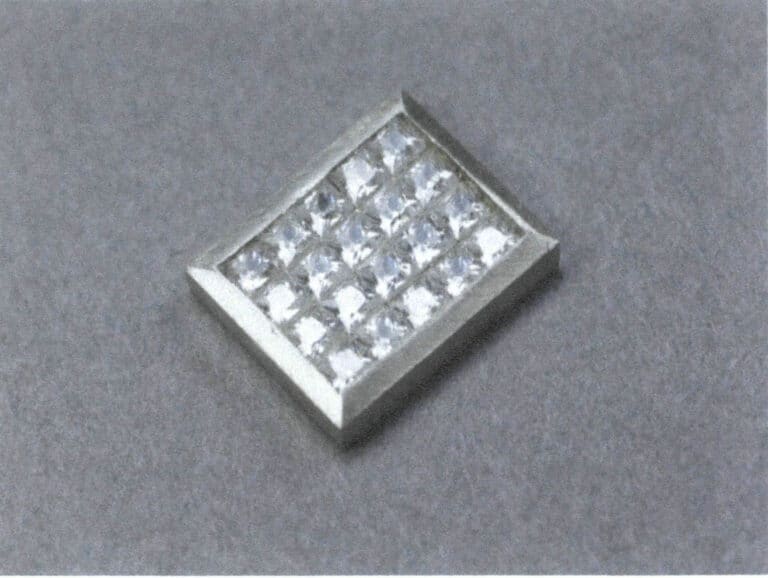
3. The Application of Invisible Setting in Jewelry Design
The French luxury jewelry brand Van Cleef & Arpels must know the invisible setting to get noticed. Van Cleef & Arpels has always been committed to innovation in craftsmanship. The invisible setting was invented in 1929 by jeweler Jacques-Albert Algier, and Van Cleef & Arpels obtained the patent for the invisible setting in 1933, marking a groundbreaking achievement in the jewelry manufacturing industry, which also elevated Van Cleef & Arpels’ jewelry to an exemplary standard. The Minaudiere treasure box was launched in the same year, and the Ludo bracelet was released the following year, fully utilizing the advantages of the invisible setting. Although we can generally reveal the secrets of invisible settings today, achieving the craftsmanship quality of Van Cleef & Arpels is still quite challenging, as it requires substantial manpower, resources, and exquisite skills as support. Figures 9-15 to 9-18 show the jewelry by Van Cleef & Arpels that employs a invisible setting.

Figure 9-15 Van Cleef & Arpels invisible setting jewelry (1)
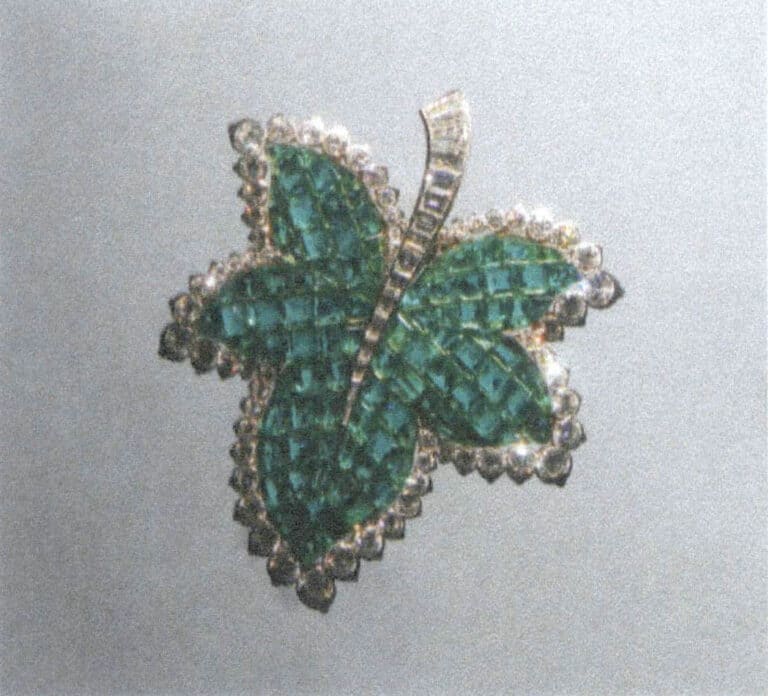
Figure 9-16 Van Cleef & Arpels invisible setting jewelry (2)
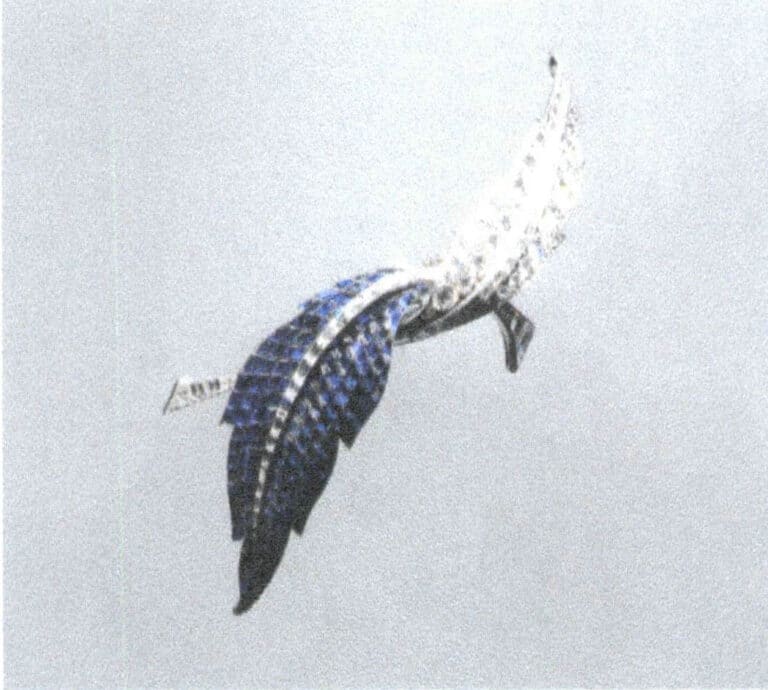
Figure 9-17 Van Cleef & Arpels invisible setting jewelry (3)
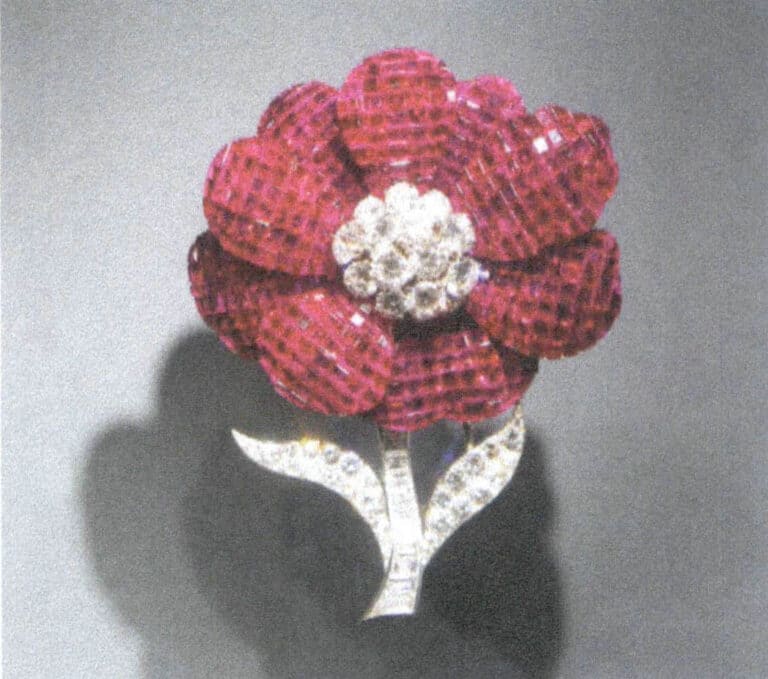
Figure 9-18 Van Cleef & Arpels' invisible setting jewelry (4)
After the great success of the invisible setting, Van Cleef & Arpels did not stop exploring and enhancing exquisite craftsmanship. Subsequently, the pointed cabochon and painted glass invisible setting methods were developed. For example, the Pomme de Pin brooch and Panache mystérieux brooch are representative works of these two invisible setting techniques, which caused a sensation upon their release. Although the heights of Van Cleef & Arpels are difficult to reach, many brands are still learning and imitating the invisible setting. The technique of invisible setting, exquisite craftsmanship, and the beauty of the setting are all worth the challenge. Figures 9-19 and 9-20 show jewelry designs utilizing invisible setting techniques.
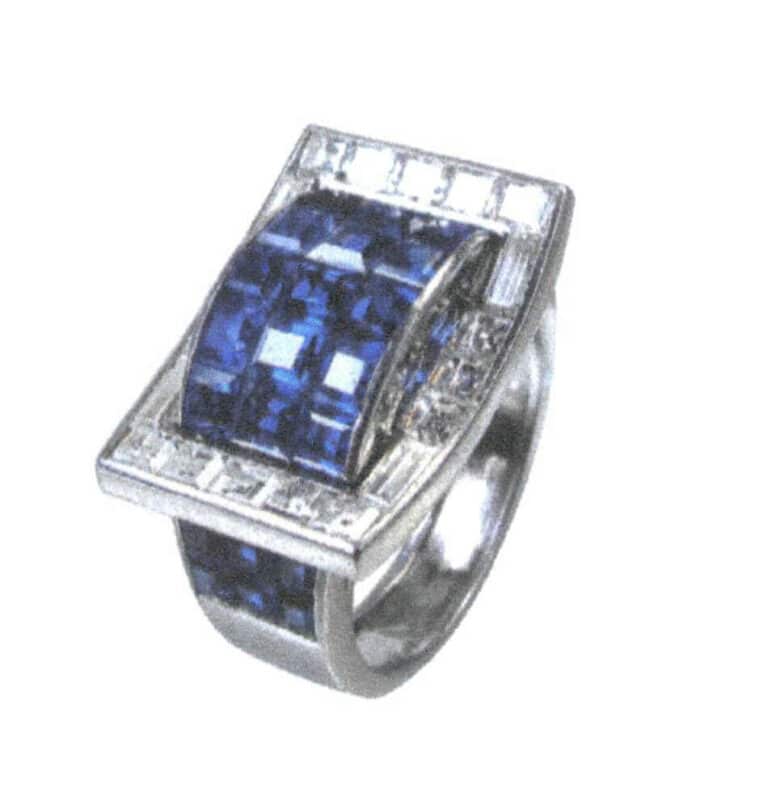
Figure 9-19 Invisible setting jewelry (1)
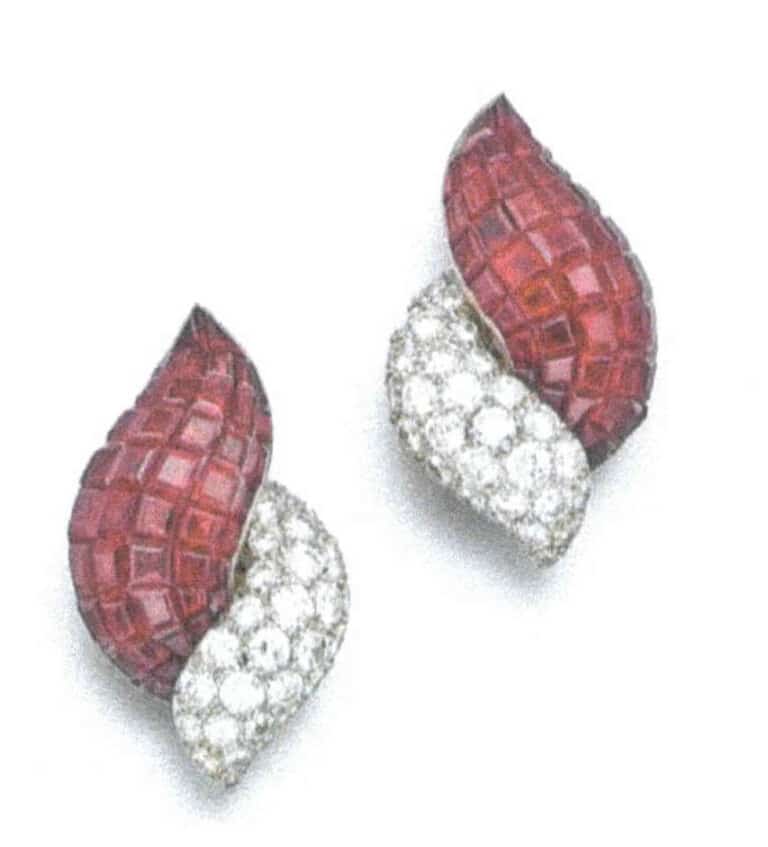
Figure 9-20 Invisible setting jewelry (2)
Van Cleef & Arpels’ contribution to the art of setting is to offer new possibilities in creating jewelry and to demonstrate the ultimate in High Jewelry. In these jewels, each gemstone has its position, and the size and shape of the gemstone have very high requirements for precision to master this technique, with craftsmen being few and far between. What is more valuable is that the invisible edge setting shows a brand’s spirit of innovation to achieve the brand’s jewelry to achieve the effect of the quality of the innovations made by the brand’s jewelry to greatly enhance the artistry of the brand’s jewelry and also for the history of the jewelry to paint a heavy ink and color! This innovation is very valuable to the industry.


