Hogyan készítsünk gumiformákat és fémötvözet formákat ékszeröntéshez?
5 tipikus feladat alapelvei és működési készségei
Amint az ékszer eredeti modellje rendelkezésre áll, a tömeggyártáshoz öntőformát lehet készíteni. Az anyagok lágysági és keménységi jellemzői alapján a formák lágy és kemény formákra oszthatók.
A puha öntőformák általában rugalmas gumiból készülnek, és a gumi anyag tulajdonságai befolyásolják a gumi öntőforma minőségét. A piacon számos gumitípus létezik, beleértve a természetes gumit és a különböző adalékanyagokat használó módosított gumit. A különböző módosított gumik közül a szilikongumit széles körben használják az ékszeröntésben a jó hőállóság, a mechanikai tulajdonságok, az eredeti modell replikációs teljesítménye és az öntésből való kivonási teljesítménye miatt. A szilikongumit vulkanizálni kell a gumimolekulák keresztkötésének befejezéséhez, a lineáris szerkezetű makromolekulákat háromdimenziós hálózati szerkezetű makromolekulákká alakítva, így olyan tulajdonságokkal rendelkezik, mint a rugalmasság, a tapadásmentesség, a hőállóság és az oldhatatlanság. A vulkanizálás módszere alapján két fő kategóriára osztható: magas hőmérsékleten vulkanizált szilikon gumi és szobahőmérsékleten vulkanizált szilikon gumi. A szilikongumiban lévő adalékanyagok típusai és mennyiségei eltérőek, ami bizonyos teljesítménybeli különbségeket eredményez. Egyes szilikongumik tartósak és rugalmasak, így nehezen repednek vagy deformálódnak a viaszforma eltávolításakor; egyes szilikongumik keményebbek és jobb replikációs teljesítményt nyújtanak, de kevésbé tartósak és hajlamosabbak a repedésre; egyes szilikongumiknak nagyon alacsony a zsugorodási rátájuk, ami előnyösebb a méretpontosság biztosítása szempontjából. A gyártás során a tényleges igények alapján lehet választani.
A kemény penészanyagok közé tartoznak az alacsony hőmérsékletű ötvözetek, alumíniumötvözetek stb., amelyeket CNC-feldolgozással alakítanak ki, vagy kagylókká alakítanak, majd alacsony olvadáspontú ötvözetekkel öntik őket, hogy ékszerformákat kapjanak. Az ilyen típusú öntőforma fő jellemzője, hogy a viaszforma gyártása során nem megy át rugalmas deformáción, ami hatékonyan biztosítja a viaszforma méretpontosságát és stabilitását.
A szilikon gumi szerkezete
Tartalomjegyzék
I. szakasz Egy egyszerű, magas hőmérsékleten vulkanizált szilikon gumiból készült gyűrűs ezüst modell formájának elkészítése
1. Háttérismeretek
1.1 Szilikon gumi és típusai
A természetes gumi jó rugalmassággal és erős szakadásállósággal rendelkezik. Mégis, a fő láncszerkezetében lévő nagyszámú kettős kötés miatt az ózon könnyen károsítja, ami lebomláshoz vagy térhálósodáshoz vezet. Ezért közvetlenül nem használható fel, és általában szintetikus módszerekkel nyerik ki dien-, akrilát-, poliuretán-, poliszulfid- és sziloxángumi előállítására.
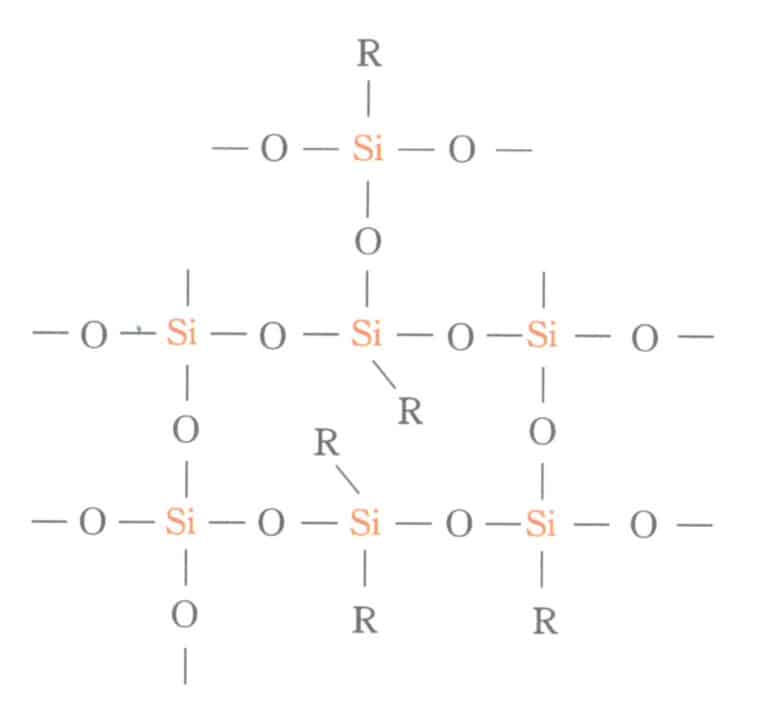
A szilikongumi olyan gumi, amelynek fő láncát felváltva szilícium- és oxigénatomok alkotják, és a szilíciumatomokhoz általában két szerves csoport kapcsolódik. A közönséges szilikongumi a sziloxángumi kategóriába tartozik, főként metil és kis mennyiségű vinil tartalmú sziloxán szegmensekből áll, amint azt a 2-1. ábra mutatja. A fenilcsoportok bevezetésével javítható a szilikongumi magas és alacsony hőmérsékletű ellenállása, míg a trifluor-propil- és cianocsoportok bevezetésével a hőmérséklet- és olajállósága. A szilikongumi jó alacsony hőmérsékleti teljesítménnyel rendelkezik, és -55 ℃ alatt is működőképes. A fenil bevezetése után -73 ℃-on is ellenáll. A szilikongumi hőállósága 180 ℃ alatt is kiemelkedő, mivel 200 ℃ feletti hőmérsékleten is hosszú ideig működőképes és több hétig vagy hosszabb ideig megőrzi rugalmasságát, és ellenáll a 300 ℃ feletti pillanatnyi magas hőmérsékletnek. Jól megfelel a követelményeknek. A lábékszer modellek felhasználási követelményeit széles körben használják az ékszeriparban.
1.2 Magas hőmérsékletű vulkanizált szilikongumi
A hővel vulkanizált szilikongumit használják fel a legnagyobb mértékben. Megosztható metil-szilikon gumi, metil-vinil-szilikon gumi (a legtöbb felhasználással és termékmárkaszámmal) és metil-vinilfenil-szilikon gumi (alacsony hőmérsékletnek és sugárzásnak ellenálló). Más típusok közé tartozik a nitril szilikon gumi, fluor szilikon gumi stb. A szilikongumi erősítőanyaga a szilícium-dioxid (SiO2-nH2O), amelyek az előállítási módszer alapján három típusra oszthatók: füstölt szilícium-dioxid, kicsapott szilícium-dioxid és egyéb szilícium-dioxid formák, amelyek mindegyike az átlagos szemcseméret alapján többféle osztályba sorolható. A nyers szilikongumi szilárdsága nagyon gyenge, de megfelelő mennyiségű szilícium-dioxid hozzáadásával a szilárdsága több mint 10-szeresére növelhető. A különböző oldalcsoportoktól függően különböző típusú gumikat kaphatunk. Általában a magas hőmérsékleten vulkanizált szilikongumit felhasználás és teljesítmény alapján általános célú, alacsony nyomású állandó deformációjú típusba, alacsony zsugorodású típusba, lángálló típusba, oldószerálló típusba, magas hőmérsékletű típusba stb. sorolják.
A magas hőmérsékleten vulkanizált szilikongumi lineáris, nagy polimer ( 5000~10 000 szilikon-oxigén láncszegmens) polisziloxánból, mint nyersgumiból készül, erősítő töltőanyagok, kiegészítő töltőanyagok, szerkezetszabályozó szerek és teljesítményjavító adalékanyagok hozzáadásával, hogy elkészítsék a gumi anyagot, amelyet ezután melegítik és vulkanizálnak, hogy elasztomert képezzenek. A következő tulajdonságokkal rendelkezik: ① Magas és alacsony hőmérsékletnek egyaránt ellenáll, és széles hőmérséklet-tartományban használható; ② Más polimeranyagoknál jobb hőstabilitással, sugárzásállósággal és időjárásállósággal rendelkezik; ③ A vulkanizált szilikongumi nem mérgező, szagtalan, nem ragad az emberi szövetekhez, és nem hajlamos az öregedésre vagy a tárolás során történő keményedésre.
1.3 Magas hőmérsékletű vulkanizált szilikon gumi ékszerekhez
A szilikongumi jó replikációs teljesítményt, kiváló rugalmasságot és bizonyos szilárdságot biztosít. Amikor formák készítésére használják, a viasz befecskendezése után a forma rugalmassága lehetővé teszi a viaszforma könnyű eltávolítását, ezért széles körben használják az ékszerformázásban.
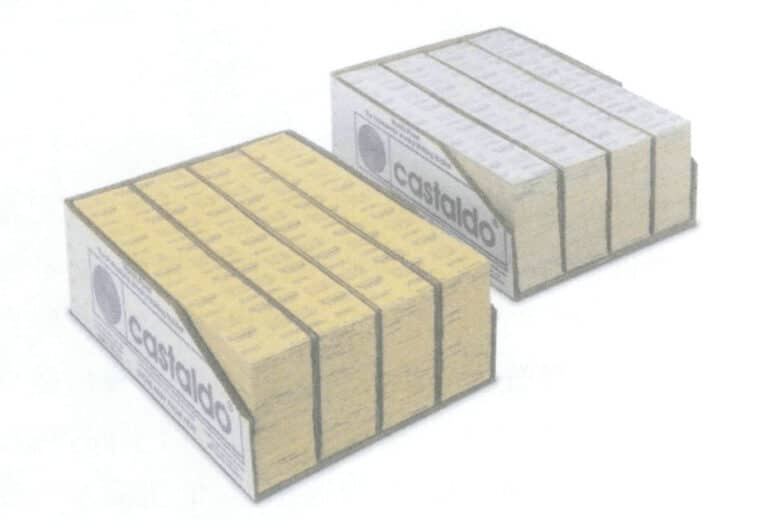
Jelenleg a Castaldo a leggyakrabban használt magas hőmérsékleten vulkanizált szilikongumi lemez márka az ékszeröntő iparban, amint azt a 2-2. ábra mutatja. Bizonyos mennyiségű módosított természetes gumit tartalmaz, jó rugalmassággal és bizonyos szakítószilárdsággal, hosszú élettartammal és jó replikációs hatással rendelkezik. A hazai gumi főleg diklórszilánból áll, amely rugalmas molekulalánccal rendelkezik és hőálló. Ennek ellenére van néhány hátránya is, mint például a nagyobb keménység, nagyobb nehézségek a formakiválasztásban és alacsonyabb szakítószilárdság. A tényleges gyártásban az élettartama viszonylag rövid, és az összköltsége magas.
A szilikongumi a vulkanizálás során zsugorodik, ezért a zsugorodást figyelembe kell venni az eredeti méretek kialakításakor. A szilikongumi nem légáteresztő, ami akadályozhatja a gázok távozását a viasz befecskendezése során. Ezt úgy lehet megoldani, hogy a szerszámban szellőzővonalakat vagy lyukakat alakítunk ki. A modellt használat közben nagyon tisztán kell tartani, mivel az idegen anyagok (pl. talkum, por stb.) növelhetik a viaszformában a felületi hibákat, amelyek később átkerülnek az öntvényekre.
1.4 Fő berendezések és eszközök a magas hőmérsékletű vulkanizált szilikongumi formák gyártásához
A magas hőmérsékleten vulkanizált szilikongumi formák készítéséhez használt általános szerszámok közé tartozik a vulkanizáló, az alumíniumötvözetből készült formakeret, a gumilemezek, az alumínium alaplemezek, a szike, az olló, a kétfejű fogó, a csipesz és az olajalapú tollak.
A gumiszerszám elnyomására szolgáló eszköz egy (vulkanizáló) vulkanizáló, amely a nyers szilikongumit bizonyos hőmérsékleten és nyomáson vulkanizálja, és kemény és rugalmas vulkanizált gumivá alakítja.
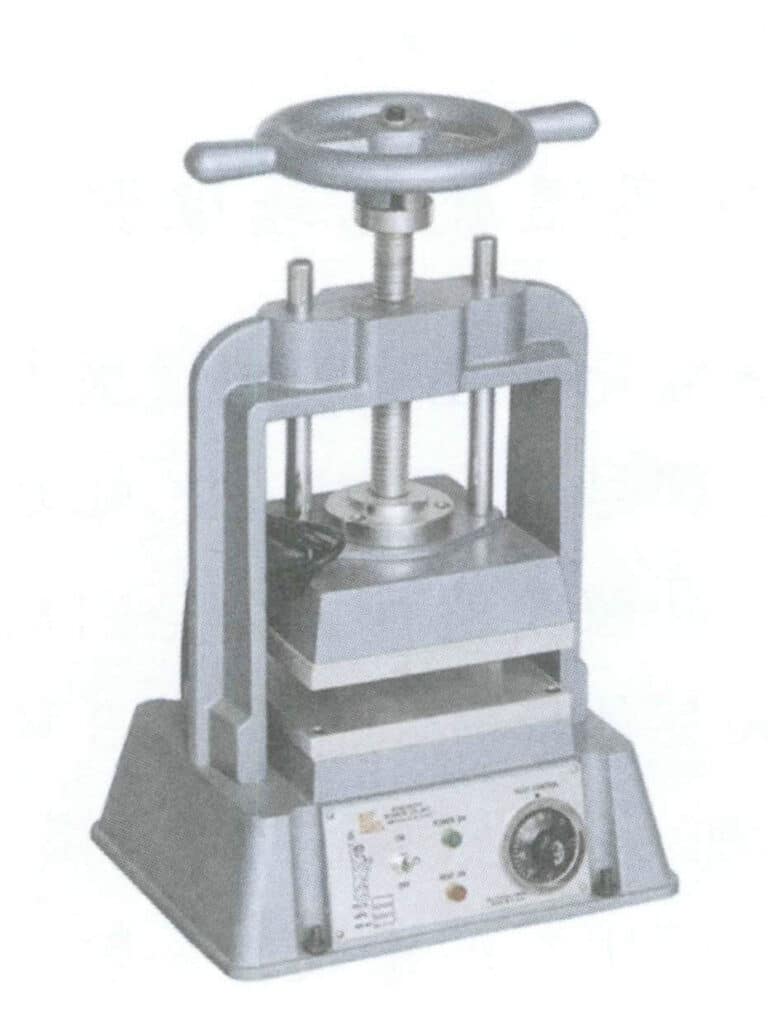
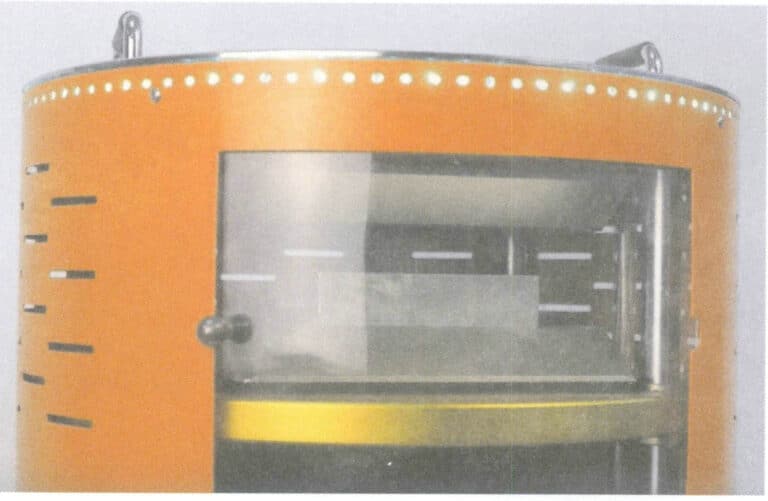
A hagyományos vulkanizáló a 2-3. ábrán látható, fő alkotóelemei a portálkeret, az alap, az emelőcsavar, a forgó fogantyú, az ellenálláshuzallal és hőmérséklet-érzékelővel ellátott fűtőlemez, valamint a hőmérséklet-szabályozó. Ezt a berendezéstípust főként kézzel működtetik és vezérlik, viszonylag olcsó, és képes kielégíteni a magas hőmérsékleten vulkanizált szilikongumi formák sürgető igényeit, de viszonylag vékony, közönséges alumíniumlemezeket használ, ami néha az egyenetlen fűtés problémájához vezet, ami a szilikon elégtelen és egyenetlen vulkanizációjához vezethet; a vezérlés tekintetében közönséges gombokat és gombokat használ, amelyek hajlamosak a sérülésre és a hibás működésre; továbbá nincsenek hűtőventilátorok vagy védőberendezések, ami a géptestet használat közben túlmelegedésre hajlamossá teszi.
A technológia fejlődésével a vulkanizáló új változásokon ment keresztül a szerkezet, a funkció és a vezérlési módszerek terén, ami új stílusok megjelenéséhez vezetett, mint például a digitális kijelzős vulkanizáló és az intelligens pneumatikus vulkanizáló.
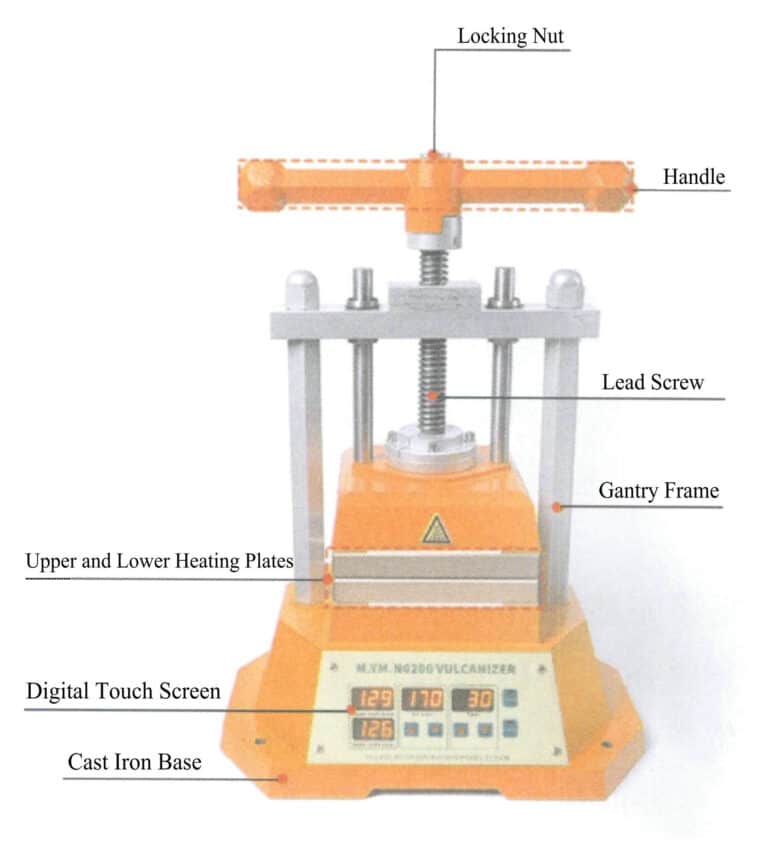
A 2-4. ábra egy tipikus digitális kijelzős vulkanizálót mutat. A következő jellemzőkkel rendelkezik: Az öntött alumínium fűtőlapot használ, amely jó szilárdsággal, merevséggel és hővezető képességgel rendelkezik; a munkaterület felületét homokfúvással kezelik, hogy biztosítsák az egyenletesebb fűtést, a kisebb energiaveszteséget és a hosszabb élettartamot; a géptest hátulján hűtőventilátor van felszerelve, az alap nem nedves, ami megvédi a belső áramköröket a magas hőmérséklettől, valamint zúgóval és védőberendezésekkel is fel van szerelve.
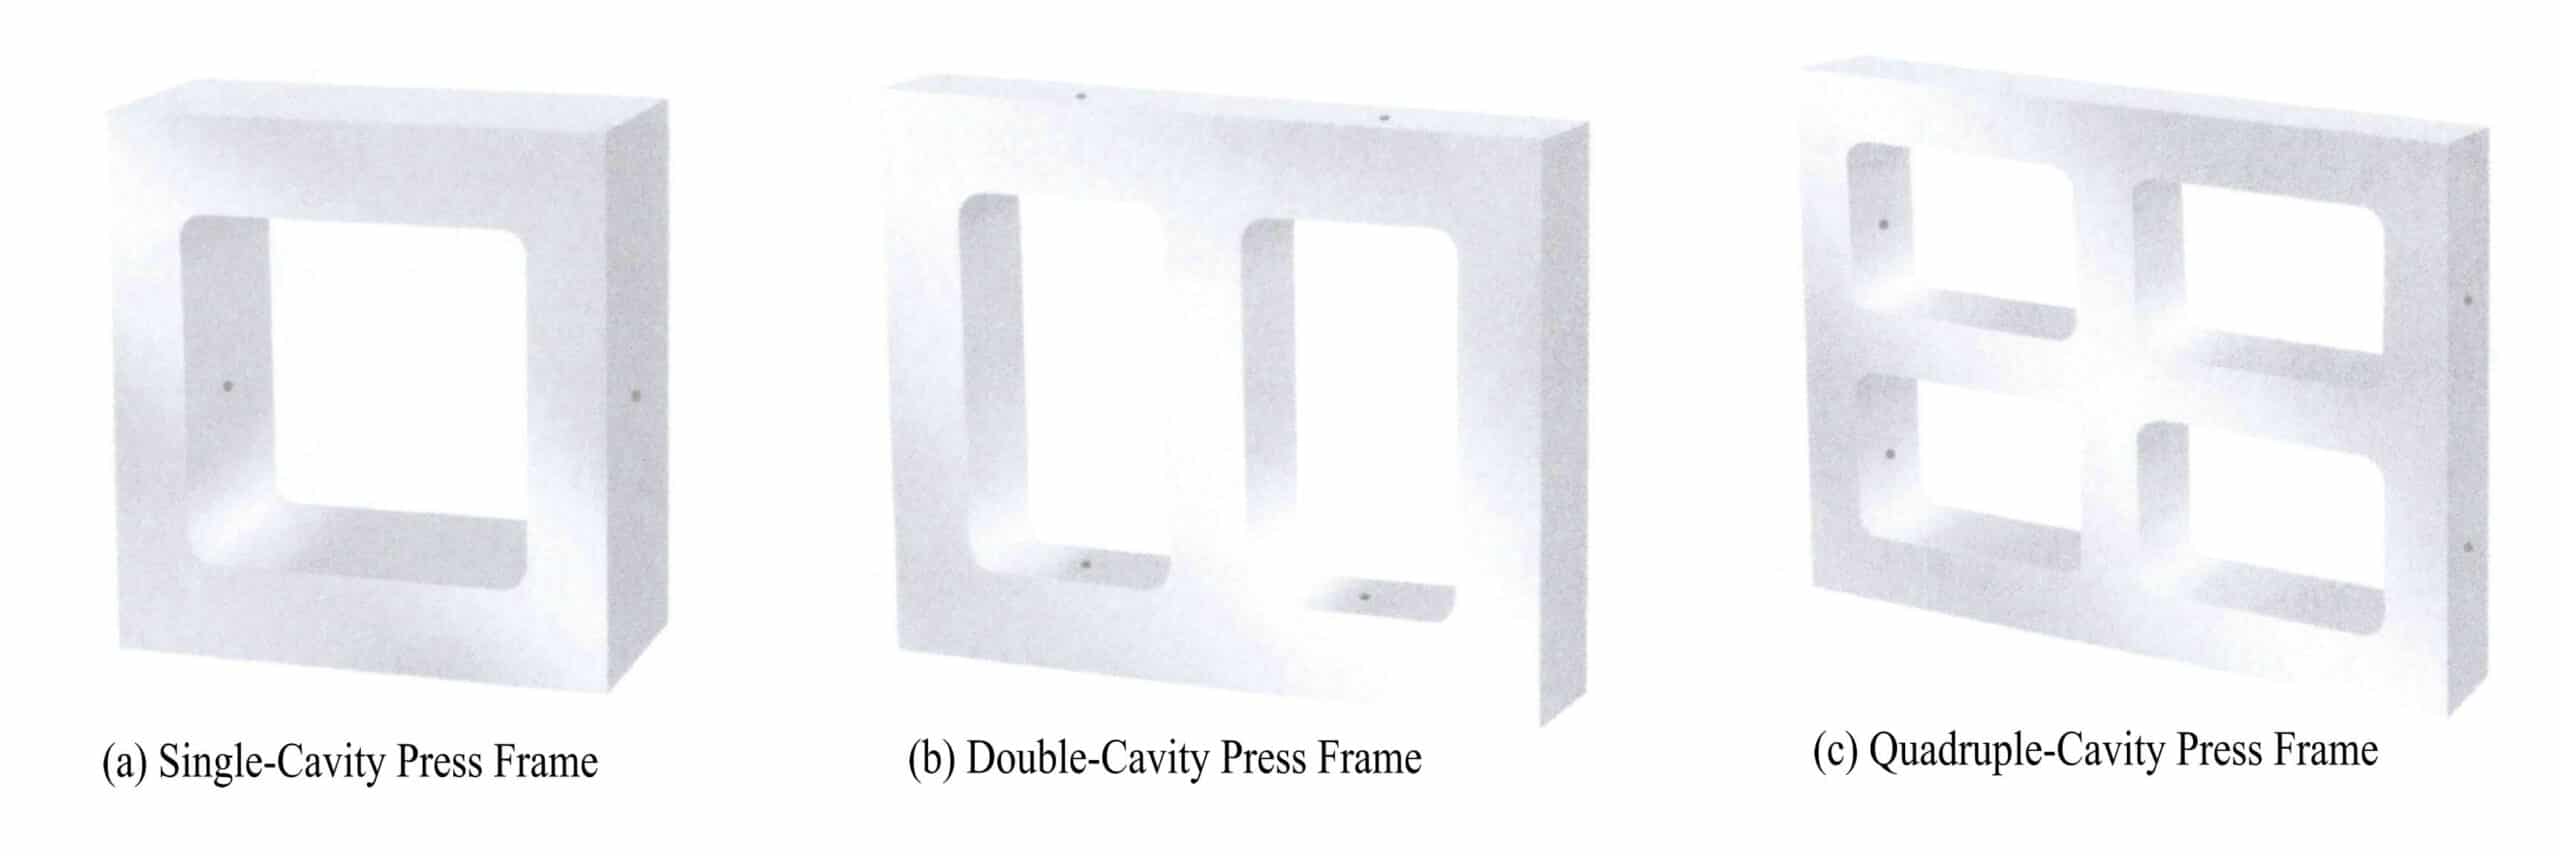
Az öntőkeretet a vulkanizálóval együtt használják. Az egyszerre préselt formák számától függően a formázókeret egylyukú, kétlyukú és négylyukú formákra osztható, amint azt a 2-6. ábra mutatja. Az öntőkeret gyártásához használt anyag általában alumíniumötvözet, a fő paraméterek a belső keret hossza, szélessége és vastagsága.
A belső keret szélessége általában 47 mm vagy 48 mm, hossza pedig 73 mm vagy 74 mm. Nagyobb eredeti modellek préselésekor a belső keret szélessége 64~70 mm, a hossza pedig 90 mm vagy 95 mm. Kisebb eredeti modellek esetén 40 mm szélesség és 60 mm hosszúság kombinációja használható. A préskeretek általánosan használt specifikációin kívül a termékjellemzőknek megfelelően egyedi hosszúságú és szélességű speciális préskeretek is testre szabhatók.
1.5 A magas hőmérsékleten vulkanizált szilikongumi formák minőségét befolyásoló tényezők
A magas hőmérsékleten vulkanizált szilikongumit sajtolással alakítják ki, és gyártási módszere főként három kulcsfontosságú folyamatot foglal magában - a nyers gumi feltöltése és préselése, vulkanizálás és szerszámnyitás. Ezért a magas hőmérsékleten vulkanizált szilikongumi szerszámok minőségét befolyásoló tényezők közé tartozik többek között a nyersgumi töltésének minősége, a vulkanizálási folyamat és a szerszámnyitás minősége. Az ezeket a gyártási folyamatokat befolyásoló tényezőket is meg kell jegyezni.
(1) Nyersgumi töltése és préselése
① A nyers gumi feltöltése és préselése előtt az eredeti modell felületét meg kell tisztítani. A tiszta felület teljes mértékben érintkezhet a gumival, megkönnyítve az eredeti modell morfológiájának teljes és pontos másolását, ami kiváló minőségű gumiformákat eredményez. A szennyezett eredeti modell felülete rossz szerszámminőséghez vezethet, ami befolyásolja a felhasználást; ugyanakkor a szennyeződések morfológiáját is lemásolhatja, ami gondot okozhat a későbbi munkáknál.
② Rajzolja meg a választóvonalat az eredeti modell profiljának szélén. Az úgynevezett elválasztó vonal a referencia vonal a forma elválasztásakor kialakuló helyzethez. A választóvonal meghatározásának elve a forma könnyű eltávolíthatósága.
③ A nyers gumi feltöltésekor és préselésekor biztosítani kell, hogy a nyers gumi a vulkanizálás előtt teljesen körülölelje az eredeti modellt. Ezért ki kell választani egy megfelelő méretű formakeretet az eredeti modell méretei alapján, az eredeti modellt a megfelelő helyre kell helyezni a gumilapra, és olyan módszerekkel, mint a kiásás, dugaszolás, részletezés, töltés és foltozás, az eredeti modell homorú területeit, üreges területeit és kőbeálló területeit gumival kell kitölteni, amint az a 2-7. ábrán látható, biztosítva, hogy az eredeti modell és a gumilap között ne legyenek rések. A nyers gumi feltöltésekor is ugyanabban az irányban kell végezni, hogy a formázott gumi ne legyen túl kemény, ami befolyásolja a szerszámnyílást és a későbbi használatot. Annak érdekében, hogy az eredeti modell a gumilap középső rétegében legyen, és hogy a szerszám élettartama garantált legyen, a tömörítő szerszámhoz általában legalább négy réteg gumilapra van szükség. A nyers gumi töltése és préselése során fontos, hogy a gumilapot, a szerszámokat és a kezelő kezét tisztán tartsa, hogy elkerülje a lapok közötti szennyeződést, amely a vulkanizálás után delaminációhoz vezethet. A vulkanizálás előtt, miután a nyersgumit a formakeretbe préselte, a nyersguminak körülbelül 2 mm-rel magasabbnak kell lennie a keretnél, ahogy a 2-8. ábrán látható, hogy a vulkanizálás után biztosítsa a forma sűrűségét. A nyers gumi kitöltésekor és préselésekor egy kerek sprue viaszfúvóka-formát, más néven kapusapkát kell beágyazni, amely összekapcsolódik az eredeti modell sprue-jával, és végül a gumiforma viaszfúvókájává válik.
2-7. ábra Töltőgumi

2-8. ábra A nyers gumi 2 mm-rel a formakeret fölött van.
④ Jelenleg a piacon a nyers gumi töltésére szolgáló azonos típusú fólia használata mellett kétféle gumi is kombinálható. Az alkalmazott két gumitípus a sárga magbefóliázó gumi (2-9. ábra) és a magenta gumi (2-10. ábra), ahol a sárga magbefóliázó gumit az ékszerek belső szerkezetére használják, a magenta gumi pedig szerkezeti gumiként szolgál.
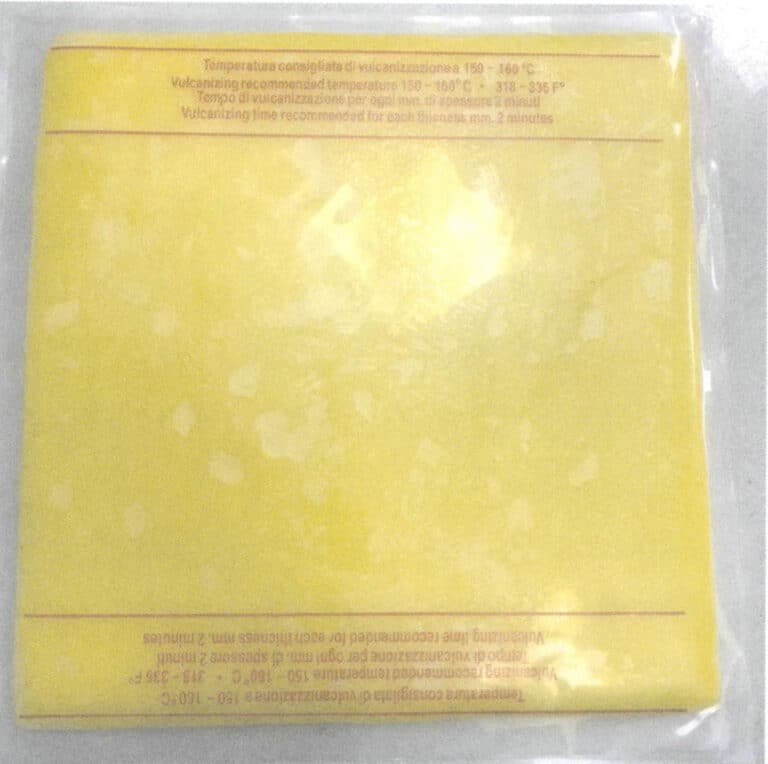
2-9. ábra Sárga magcsomagoló gumi
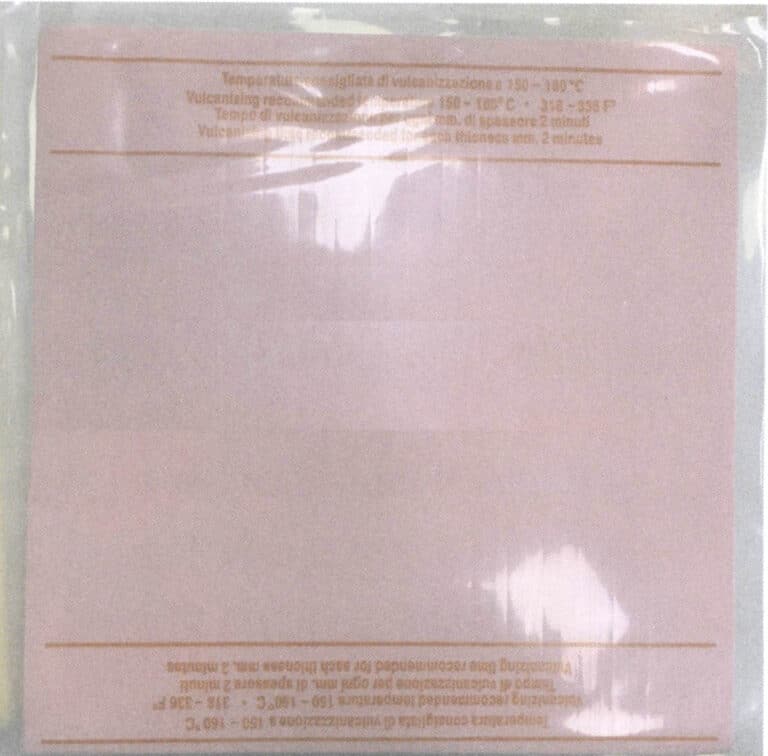
2-10. ábra Magenta gumi
(2) Kénezés
A kénezési folyamat három fő paramétere a nyomás, a hőmérséklet és az idő.
① Nyomás. A magas hőmérsékletű kénezési folyamat során a nyomást nyomásként fejezik ki. A nyomás alkalmazása feszültséget hoz létre, amely tömörítheti a gumilap és az eredeti modell közötti rést, lehetővé téve a nyers gumi teljes érintkezését és összekapcsolódását, miközben elszigeteli a levegőt, hogy megakadályozza a buborékok kialakulását a formában. Az ajánlott nyomástartomány 5~20Mpa. Az optimális nyomás viszonylag rögzített munkakörülmények mellett a tényleges helyzetek és a munkatapasztalat alapján vizsgálható. A gumi változásai miatt a kénezési folyamat során dinamikusan kell beállítani az alkalmazott nyomást.
② Hőmérséklet. A kénezés során a nyers gumi a formakeretben magas hőmérsékleten keresztkötődik, hogy érett gumivá váljon. Ha a hőmérséklet túl alacsony, az elégtelen kénezést eredményezhet; ha túl magas, az a szerszám deformációját okozhatja. A kénezési hőmérséklet a különböző márkájú gumilapok között változik, és minden gumitípusnak van egy optimális kénezési hőmérséklete a megfelelő vastagságnál, a 143~173 ℃ elfogadható maximális hőmérséklettartomány és a 150 ℃ tipikus kénezési hőmérséklet, amelyet a gumiszállító ajánlásai szerint lehet beállítani. Az elfogadható maximális hőmérséklettartomány és a jellemző kénezési hőmérséklet a gumiszállító ajánlásainak megfelelően állítható be.
③ Idő. A vulkanizációs sebesség közvetlenül tükrözi a vulkanizációs folyamathoz szükséges időt, az idő és a hőmérséklet pedig összefügg egymással. A vulkanizációs hőmérséklet beállítása után a vulkanizációs idő a modell vastagságától függ, például 12 mm-es vastagság esetén 30 perc, 18 mm-es vastagság esetén 45 perc, 36 mm-es vastagság esetén 75 perc (a modell maximálisan ajánlott vastagsága 36 mm). Fix modellvastagság esetén a vulkanizálási hőmérséklet alsó és felső határértékének elérése után gyakran minden 10 ℃-os csökkenés esetén a vulkanizálási időt 30 perccel meg kell hosszabbítani.
A gumi rossz hővezető, és a hőnek hosszú időbe telik, mire a modell magjába jut. A vulkanizálási nyomást a hőmérsékletnek megfelelően időszakosan kell beállítani, hogy a modell minden egyes részének hőmérséklete egyenletes és teljesen vulkanizált legyen. A vulkanizálás befejezése után gyorsan távolítsa el a gumimintát, és hagyja természetes módon lehűlni, majd a forma kinyitható.
(3) Az öntőforma megnyitása
Az úgynevezett öntőforma megnyitása a gumiszerszámnak az öntőcső és az eredeti modell elválasztó vonala mentén a vulkanizálás után több megfelelő részre történő vágásának folyamatára utal, az eredeti modell alakjának összetettsége szerint, az eredeti változat eltávolítása és a viaszinjekciós csatorna és üreg megszerzése. A forma kinyitásának célja annak biztosítása, hogy a viaszforma zökkenőmentesen eltávolítható legyen, miután a viaszt befecskendezték a gumiformába. Az ékszergyárakban a szerszám kinyitása rendkívül technikai feladat. Ha nem megfelelően végezzük, akkor a viaszbefecskendezés során a viaszformán a viaszfelület elválasztó felületénél görcsök keletkezhetnek, vagy a formavágás során megsérülhet az eredeti modell. A nyitás minősége közvetlenül befolyásolja a viaszforma minőségét, a formakiválasztási művelet nehézségét és a gumiforma élettartamát.
Miután a gumiszerszámot több részre osztottuk, újra össze kell szerelni az egésszé, ami könnyen vezethet elhajláshoz. Ha a gumiszerszám anyaga viszonylag lágy, az elhajlás valószínűsége még nagyobb. A vágási felületen pozícionáló szerkezeteket kell beállítani, hogy az eredeti szerkezetet pontosan újra össze lehessen állítani, és a viaszbefecskendezés során biztosítani lehessen a felső és alsó szerszámok pontos összehangolását. Általában kétféle pozicionálási módszer létezik: az egyik egy világosan meghatározott hullámvonal kivágása, más néven hullámvonal-pozicionálás, ahogy a 2-11. ábrán látható; a másik egy homorú-konvex pozicionáló szerkezet kivágása a gumiszerszám négy sarkánál, más néven sarokpozicionálás, ahogy a 2-12. ábrán látható.
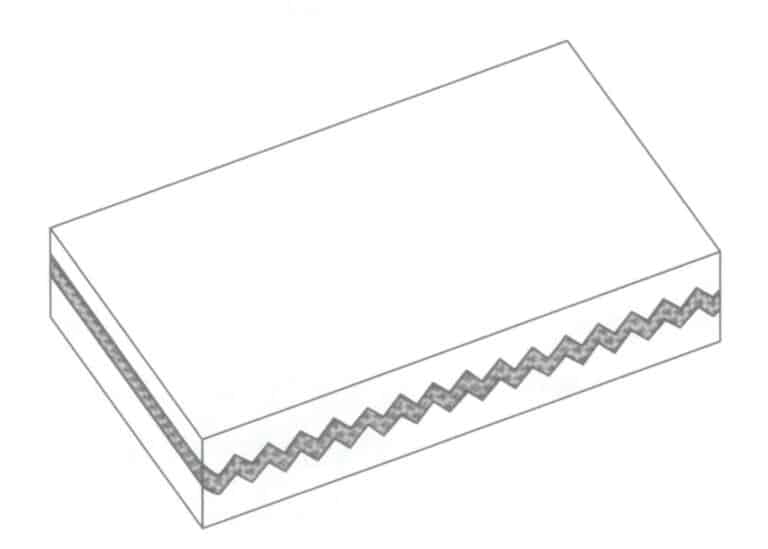
2-11. ábra A gumiszerszám hullámvonalának elhelyezésének sematikus ábrája
2-12. ábra A szerszám négy sarkos elhelyezése
A modell vágása magas szintű technikai felkészültséget igényel. A magasan képzett formakészítők által készített formák a viaszbefecskendezés után alig vagy egyáltalán nem mutatnak deformációt, törést vagy villanást, és általában nincs szükség viaszjavításra vagy hegesztésre, ami jelentős mennyiségű befejezési időt takaríthat meg és javíthatja a gyártás hatékonyságát.
Bizonyos esetekben, ha az eredeti modellnek alulvágott részei vannak, például egy "C" alakú, süllyesztett keresztmetszetű gyűrű (2-13. ábra), a forma felnyitásakor két darabra vágás módszerének alkalmazása két problémát okoz: az egyik az oldal mentén történő vágás, ami azt jelenti, hogy az eredeti be van ágyazva a formába. A viasz utólagos befecskendezésekor és a viaszforma eltávolításakor a kivonáshoz a gumiforma jelentős deformációjára van szükség. A viaszforma ilyenkor jelentős igénybevételnek van kitéve, ami hajlamossá teszi a deformációra vagy akár a törésre is. Egy másik módszer a maximális külső kontúr mentén történő vágást jelenti, ahol a betéten a választóvonal van. Ez könnyen vezethet a viaszbefecskendezés során kialakuló villanásképződéshez, ami növeli a viaszjavítás költségeit. Ezenkívül a viaszforma eltávolításakor a homorú alkatrészek továbbra is jelentős erőt gyakorolnak a viaszformára, ami továbbra is a törés és a deformáció kockázatát jelenti.
2. Feladat végrehajtása
A feladat egy magas hőmérsékleten vulkanizált szilikongumi öntőforma készítése egy egyszerű gyűrűs ezüstmodellhez.
(1) Eredeti modell előfeldolgozása
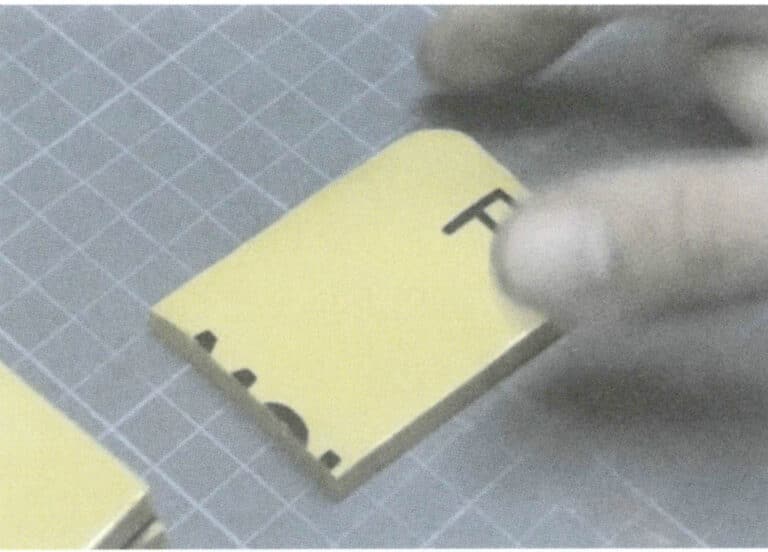
Először tisztítsa meg a gyűrű eredeti modellfelületét vízmentes etanollal és szöszmentes papírral, majd olajos tollal rajzoljon egy választóvonalat a gyűrű külső szélének sima felületére, ahogyan az a 2-15. ábrán látható.
(2) A gumi töltésének előkészítése
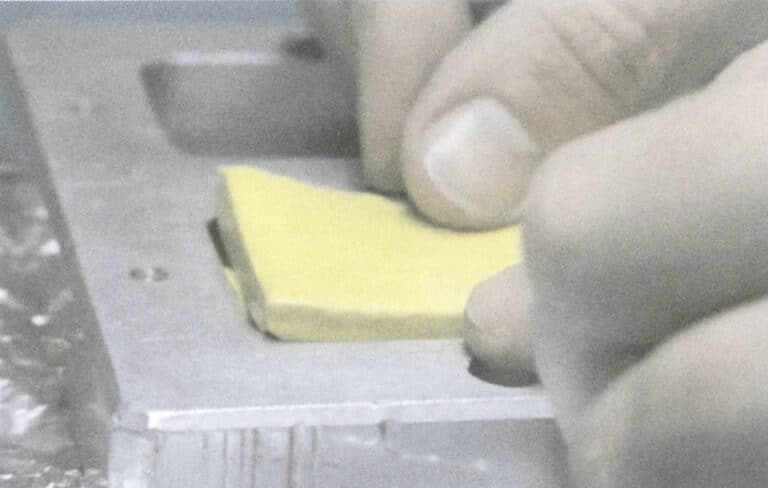
Válassza ki a kétlyukú formakeretet, és vágja a nyers gumilapot egyenlő méretű gumitömbökre a formakeret belső keretének hossz- és szélességi méretei szerint, ahogyan az a 2-16. ábrán látható.

2-15. ábra Az osztóvonal megrajzolása
2-16. ábra Nyers gumilap levágott darabjai
(3) Nyersgumi töltése és tömörítése
Tépje le a nyers gumilapról a védőfóliát, rakjon egymásra két nyers gumilapot, és helyezze a gyűrű eredeti modelljét a lapok közepére. Helyezzen egy öntvénysapkát az eredeti modell öntvényének végére, ügyelve arra, hogy az szorosan illeszkedjen az öntvénykeret oldalához, ahogyan az a 2-17. ábrán látható. Töltse ki az eredeti modell körüli hézagokat egy vékony ragasztócsíkkal. Ezután fedje be a felületet egy nyersgumilappal, ügyelve arra, hogy az eredeti modell a nyersgumilapok közé szoruljon, és győződjön meg arról, hogy a nyersgumilap kb. 2 mm-rel magasabb, mint az öntőforma kerete, ahogyan a 2-18. ábrán látható.
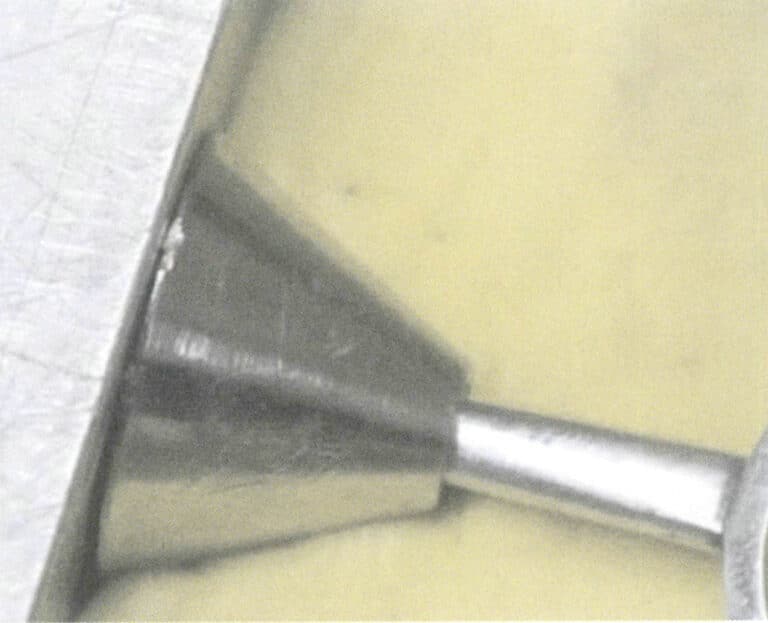
2-17. ábra A dugósapka behelyezése
2-18. ábra Nyersgumi töltése és préselése
(4) Vulkanizálás
Csatlakoztassa a kézi vulkanizálót a tápegységhez, állítsa a fűtési hőmérsékletet 175 ℃-ra, és kapcsolja be a kapcsolót, hogy 30 percig előmelegedjen. Az előmelegítés után helyezze a nyers gumilapokkal töltött formakeretet a felső és alsó fűtőlapok közé, ahogyan az a 2-19. ábrán látható. Működtesse a forgatható fogantyút, hogy a fűtőlemezeket szorosan a formakerethez nyomja, és időzítse 30 percig. Néhány perccel a vulkanizálás megkezdése után forgassa el a fogantyút, hogy a vulkanizálás megkezdése által okozott kioldóerő azonnal kompenzálható legyen.

(5) A gumiszerszám kinyitása
A vulkanizálás befejezése után vegye ki a formakeretet a vulkanizálóból, és vegye ki a gumiformát a formakeretből. Készüljön fel a gumiszerszám felnyitására.
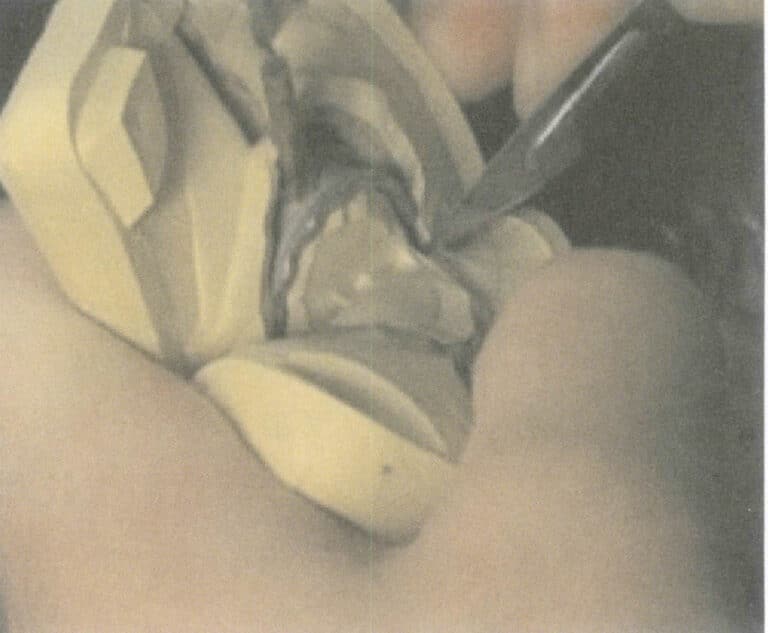
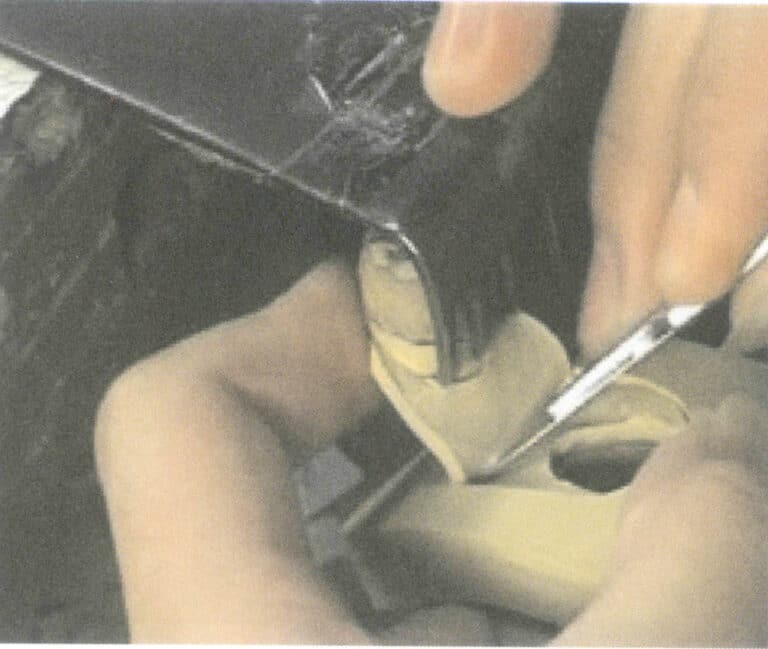
① Hűtse le a préselt gumiszerű formát, amíg nem lesz már nem forró, vágja le a villanást ollóval, távolítsa el az öntőcső sapkáját tűfogóval, és tépje le az elszenesedett héjat.
② Állítsa a szilikonformát függőlegesen, az öntőcsővel felfelé, és egy szikével vágja végig a szilikonforma négy szélének középvonalát az öntőcső egyik oldalától 3~5 mm mélységig (a szilikonforma méretének megfelelően beállítható), a szilikonforma négy szélét felnyitva.
③ Vágja le az első sarkot az első bemetszésnél. Először vágja fel a két egyenes széleket mélységig (a szilikonforma méretének megfelelően állítható), majd a levágott egyenes széleket erővel húzza szét, és 45° mentén vágja le, hogy ferde széleket hozzon létre, így egy kiálló szerkezetet képezve, amely egy derékszögű háromszöggel kezdődik. Ekkor a szilikonforma két felének a vágásnál megfelelő homorú és domború háromszögeknek kell egymáshoz illeszkedniük, ahogyan a 2-20. ábrán látható.
④ Az előző lépéseket követve vágja ki egymás után a maradék három sarkot.
⑤ Húzza fel az első vágás sarkát, és a pengével vágjon egyenletesen a középvonal mentén befelé (ha íves vágási módszert használ, a pengének egy bizonyos ívben kell lengenie, hogy halpikkelyt vagy hullámos vágási felületet hozzon létre). Vágás közben húzza kifelé a gumiformát. Amikor megközelíti a sprue pozícióját, legyen óvatos, és óvatosan emelje meg a kés hegyével a gumiformát, hogy láthatóvá váljon a vízvonal. Ezután vágja fel a gyűrű külső körének egyik végfelületét.
⑥ Távolítsa el a gyűrű eredeti modelljét, figyelve, hogy az eredeti modell és a gumiforma között nem tapadnak-e ragasztószálak. Ha van ragacs, azt le kell vágni. Ha az eredeti modell eltávolításakor jelentős ellenállás tapasztalható, a gumimintát a helyzet alapján fel kell vágni.
(6) Szellőzővezetékek létrehozása
Miután a gumiszerszámot felvágták, a szellőzés fokozása érdekében szellőzővonalakat kell húzni a gumiszerszámra. Figyelje meg az eredeti modell által kialakított üreg jellemzőit, elemezze azokat a lehetséges területeket, ahol levegő gyűlhet össze, és a viasz áramlásának irányát követve szikével rajzoljon több vonalat, amelyek segítik a levegő kiáramlását az üregből, hogy a viaszbefecskendezés során teljes viaszformát kapjon.
(7) Utófeldolgozás
A szilikonforma kivágása után tisztítsa meg a forma üregét, permetezze be leválasztószerrel, szerelje vissza, és írja fel a szilikonforma felületére a forma számát.
II. szakasz Magas hőmérsékleten vulkanizált szilikon gumiból készült forma gyártása homorú gyűrűs ezüst modellhez
1. Háttérismeretek
1.1 Az ékszerek minőségellenőrzése
A hagyományos ékszereknek értékmegőrző és felértékelő funkciói, dekoratív szépítő és szimbolikus megemlékezési funkciói vannak. Egyes fogyasztók szemében az ékszer viselése a viselője anyagi erejét mutatja, ezért az arany ékszerek túlzó formái, például a túlméretezett aranyláncok és gyűrűk egykor nagy keresletnek örvendtek. Az ékszerek azonban az emberi civilizációval együtt fejlődtek, és szorosan kapcsolódnak a társadalmi trendekhez és a kulturális légkörhöz. Annak érdekében, hogy az ékszerek elérhetőbbek legyenek a fogyasztók számára és könnyebben viselhetőek legyenek, a minőség korlátozása vált a fő irányvonallá. A részletes elemzés a következő okokat tárja fel.
(1) Az ékszerek könnyűségének követelménye
A Ming-dinasztia idején Zhang Cunshen "Felülvizsgált és kibővített elegáns és népszerű mondások" című művében rögzítette: "Az ősi időkben a férfiak által viselt koronát ékszernek tekintették". Más szóval, eredetileg az ékszer a fejen viselt tárgyakra vonatkozott, amelyek természetesen nem lehettek túl nehezek. Sőt, az idő előrehaladtával az emberek rájöttek, hogy az ékszereknek illeszkedniük kell a viselt ruházathoz, és a könnyű ékszerek dekoratív díszítésként szolgálhatnak anélkül, hogy újabb gondokat okoznának viselőjüknek. A könnyű textúra kiemelheti az ékszerek finomságát, ami miatt az emberek szeretik őket.
(2) A fogyasztói csoportok egységár-kereslete
Az emberi társadalom korai szakaszában az ékszerek birtoklása a nemesség kiváltsága és státuszszimbólum volt. Ezek az egyének jelentős vagyonnal rendelkeztek, és természetesen nem fordítottak nagy figyelmet az ékszerek árára. Ahogy azonban az ékszerek egyre népszerűbbé és elérhetőbbé váltak, a fogyasztók egyre érzékenyebbé váltak az árakra. Az ékszerek többnyire nemesfémből készülnek, az árukat karátonként határozzák meg, és az ékszerek minőségének ellenőrzésével közvetlenebbül lehet kezelni a költségeket, így a fogyasztók könnyebben elfogadják azokat.
(3) Az ékszergyártó vállalkozások szükségessége a termelés szabványosítására
A nemesfém ékszerek szabványosított gyártási folyamata javíthatja a termékminőséget és ellenőrizheti a működési költségeket. Az ékszerek minőségének korlátozása lehetővé teszi a felhasznált anyagok pontosabb becslését, és segít fenntartani az egyenletes minőséget a különböző ékszertermék-tételek között, megelőzve a különböző kezelők miatti jelentős minőségi eltéréseket.
1.2 Az ékszerek súlyának korlátozásának módjai
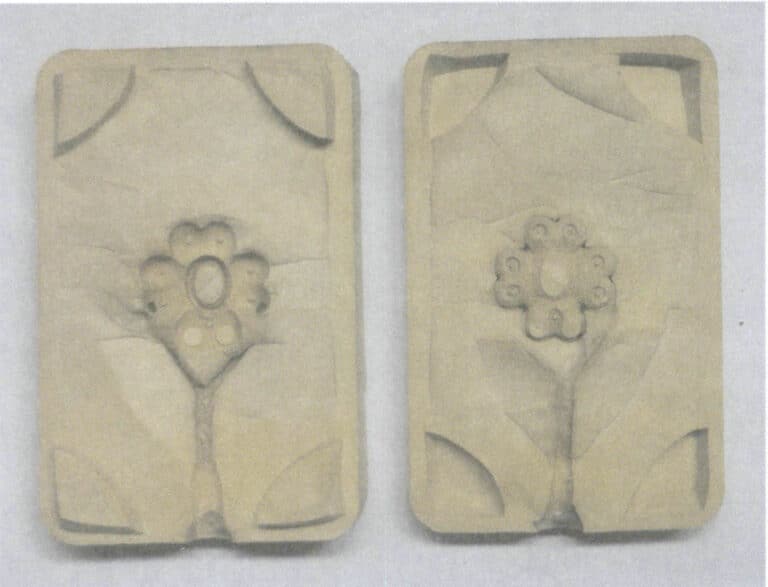
Az ékszertervezés diverzifikációjával egyre nagyobb igény mutatkozik a díszítések háromdimenziós hatására. Egyre több ékszertervezés tartalmaz hullámzó struktúrákat a kívánt háromdimenziós hatás elérése érdekében, növelve az anyagméreteket és az ékszerek minőségét. Annak érdekében, hogy az ékszerek szerkezetileg minél változatosabbak legyenek anélkül, hogy a minőségi korlátokat túllépnék, az ékszertervezők és kézművesek elősegítették a homorú szerkezetek fejlesztését az ékszerekben. Ha a homorú mélység jelentős, akkor túlzott mélyedést hozhat létre; ezen a ponton egy hálós alapkialakítás hozzáadása csökkentheti a mélyedés vizuális érzékelését és javíthatja az esztétikát. Ezenkívül a hálós alap növelése hatékonyan védheti a drágaköveket, így azok kevésbé hajlamosak a sérülésre vagy elvesztésre, amint azt a 2-21. ábra mutatja.
Homorú szerkezetű ékszerek vagy hálós alappal rendelkező szerkezetek esetében a sima kioldás biztosítása érdekében a ragasztóforma préselése során a ragasztóforma kioldásakor az alsó nyílás kezelésére van szükség. A hálós alapokkal rendelkező szerkezetek esetében a hálós alaprészt el kell választani az ékszer fő testétől a formakészítéshez. A különböző alkatrészek külön-külön történő előállítása után a hálós alapot a befejezési folyamat során vissza kell hegeszteni a hálós alapszerkezet helyreállítása érdekében.
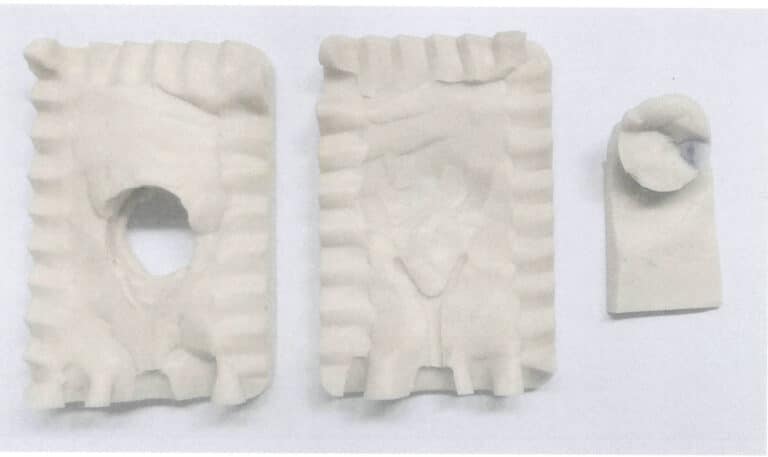
A modell préselése után, hogy a viaszforma ne legyen folyamatosan viaszos a későbbi viaszkivonás során, szükség lehet egy alsó nyitókezelés elvégzésére. Az ún. fenéknyitás során a ragasztóforma felszabadításakor az ékszer belső köre mentén a teljes kerületet mélyen bevágják, az alsó felülethez közel, átvágás nélkül. A gumiformát megfordítva és a vágás felé hajlítva mindkét oldalon ujjakkal, megfigyelhető a belső kör kerületi vágása, valamint a lünetta és a fejrészeken a vágásnyomok (mivel nem vágják át, a maradék gumi megnyúlik, így kissé mélyített, sekély nyomok keletkeznek). Vágjon ezen jelek mentén a megfelelő öntőcső pozíciójáig, majd vágjon egy csíkot az öntőcsővel párhuzamosan, a szélesség és a hossz közelébe. Ezen a ponton az alja egy gombához hasonló alakot képez, így a gyűrű belső része kihúzható a kivágott aljából, így egy mozgatható blokkot képez. Ezt a műveletet nevezzük a gumiszerszám mozgatható blokk vágásának, amint azt a 2-22. ábra mutatja. Egy ilyen gumiszerszámból csak viasz befecskendezése után lehet sikeresen kihúzni a viaszformát. Egyes összetettebb szerkezeteknél szükség lehet a lehúzási módszer alkalmazására is a forma kivonásához és az eredeti modell kinyeréséhez. Egyes szerkezeteknél az is előfordulhat, hogy a mozgatható darabot több darabra kell osztani; a gumiszerszámból kívülről kihúzott mozgatható tömböt általában külső mozgatható tömbnek, míg a gumiszerszám belsejébe szorított mozgatható tömböt belső mozgatható tömbnek nevezik.
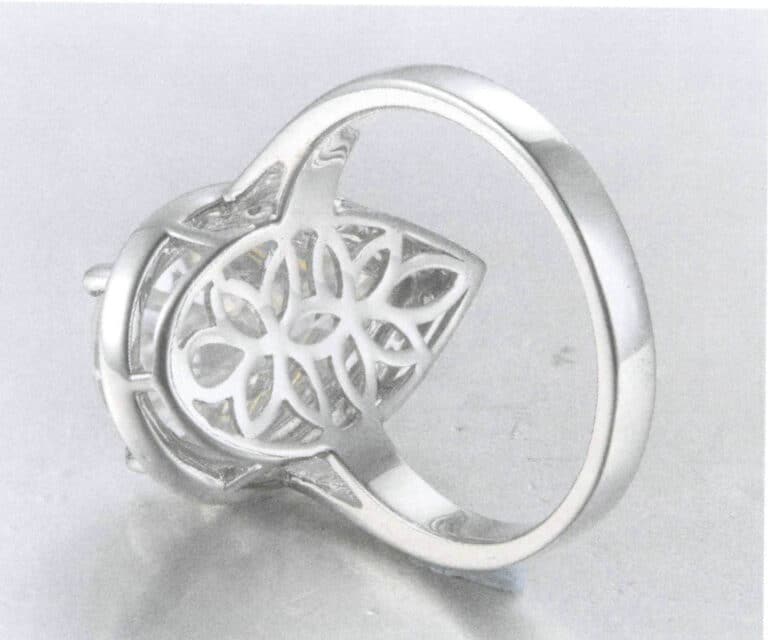
2-21. ábra Gyémántgyűrű hálós hátlappal
2-22. ábra Vágott gumiszerszám mozgatható darab
Copywrite @ Sobling.Jewelry - Egyedi ékszergyártó, OEM és ODM ékszergyár
2. Feladat végrehajtása
Ez a feladat a homorú gyűrű ezüst modelljének magas hőmérsékleten vulkanizált szilikon gumiból készült formájának elkészítése.
(1) Eredeti modell előfeldolgozása
Tisztítsa meg az eredeti homorú gyűrűs modellt (2-23. ábra) vízmentes etanollal és szöszmentes papírral, és rajzoljon egy elválasztó vonalat a kontúr egyik oldalának szélére.
(2) A gumi töltésének előkészítése
Válassza ki a dupla lyukú szerszámkeretet, és vágja a nyers gumilapot a szerszám belső keretének hossz- és szélességi méretei alapján egyforma méretű gumitömbökre.
(3) Nyersgumi töltése és tömörítése
Nyomja az eredeti homorú gyűrűs modellt a gumilap közepére, vágjon ki kis gumicsíkokat, és töltse ki a hézagokat. Használja az öntvénysapkát átmenetként az öntvénykeret és az eredeti gyűrűmodell öntvénye között. A művelet megegyezik a 2.1.3. pont 3. lépésével.
(4) Vulkanizálás
A gumiszerszám préselésére automata vulkanizálót használnak. Előzetesen melegítse elő a berendezést, majd az előmelegítés után helyezze a formakeretet a vulkanizálóba (2-24. ábra), állítsa be a felső és alsó forma fűtési hőmérsékletét 175 ℃-ra, és fokozatosan növelje a nyomást 550 kPa-ig a berendezés fűtési sebességének megfelelően. Tartsa ezt a nyomást 40 percig, ahogyan a 2-25. ábra mutatja.
2-24. ábra Helyezze a formakeretet a vulkanizálóba
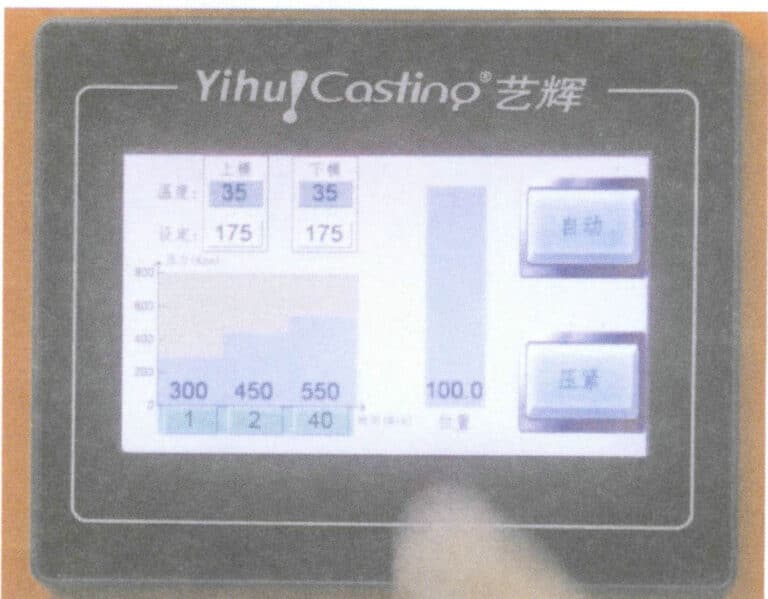
2-25. ábra Paraméterek beállítása
(5) Az öntőforma kinyitása
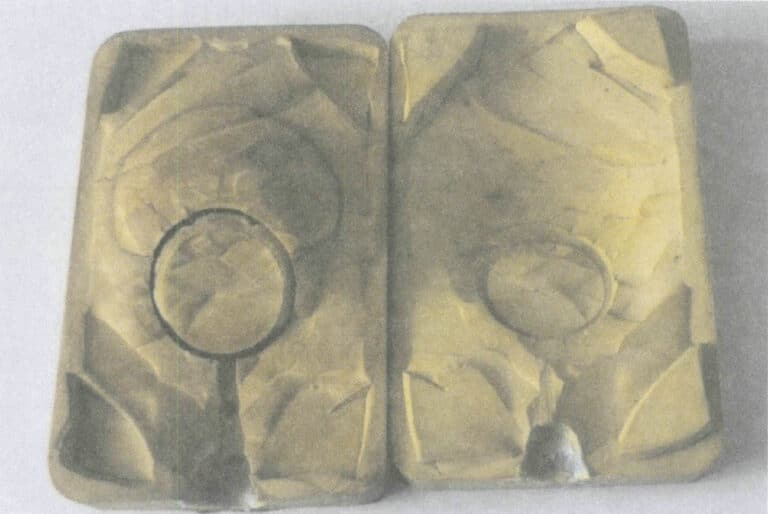
A teljes vulkanizálás után vegye ki a formakeretet a vulkanizálóból, és távolítsa el a gumiformát a keretből. Először vágja le ollóval a felesleges villanófényt a gumiforma szélei körül. Szikével vágjon ki négy sarkot a gumiszerszám széle mentén, majd a 2-26. ábrán látható módon válassza ketté a gumiszerszámot a választóvonal mentén. Az öntőforma felnyitásával kapcsolatos konkrét műveleteket lásd a 2.1.3. szakasz 5. lépésében.
(6) A mozgatható darab kinyitása
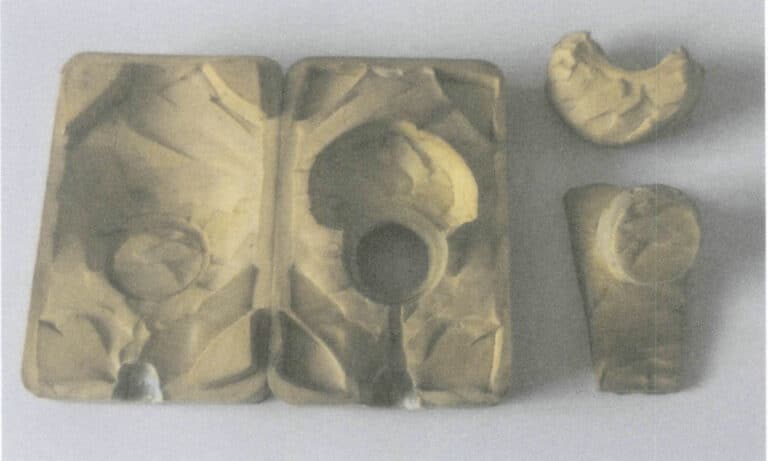
A C-alakú belső homorú rész nem távolítható el közvetlenül, ezért egy mozgatható darabot kell kinyitni. A belső gyűrű teljes kerülete mentén mélyen vágjon, a bemetszést az alsó felülethez közel végezze. Fordítsa meg a gumiformát, és ujjaival hajlítsa meg a gumiforma mindkét oldalát a bemetszés irányába. Megfigyelheti a belső gyűrű kerületi bemetszését, valamint a keret és a fejrész bemetszésének nyomait. Vágjon ezen nyomok mentén a megfelelő öntőcső pozícióba. Vágjon ki egy darabot a lünetta részből, mint belső mozgatható darabot, majd vágjon ki egy darabot a homorú gyűrű belső gyűrűs részéből, mint külső mozgatható darabot (2-27. ábra).
(7) A szellőzővezeték megnyitása
A gumiminta kivágása után egy szikével rajzolja meg a szellőzővonalat a gumimintán. A részletekért lásd a 2.1.3. szakasz 6. lépését.
(8) Utófeldolgozás
Tisztítsa meg a forma üregét, permetezze be oldószerrel, szerelje össze, és írja fel a formaszámot a forma felületére.
III. szakasz Magas hőmérsékleten vulkanizált gumiformák gyártása kis perforált láncszemekhez Ezüst modell
1. Háttérismeretek
(1) Lánc ékszerek
A lánc ékszer egy fontos ékszertípus, amely általában egy vagy több láncból áll, amelyek több alapegység ismételt kombinálásával jönnek létre, hogy egy bizonyos hosszúságot hozzanak létre. A díszítés helyétől függően a láncékszerek nyakláncokra, karkötőkre, derékláncokra, bokaláncokra, brossokra stb. oszthatók. Az alapegységeket láncszemeknek is nevezik. A láncszemek változatos kialakítása lehetővé teszi a láncékszerek különböző bemutatását. A láncékszerek fontos jellemzője, hogy a viselési helyzet alakjának megfelelően természetesen hajlanak, és ez a funkcionalitás a láncszerkezetben a láncszemek közötti szabadságfokok kialakításán alapul. A leggyakoribb szerkezetek közé tartozik az egymásba nyíló szerkezet (2-28. ábra), a nyelvrugós és keresztgerendás egymásba nyíló szerkezet (2-29. ábra) és a csuklós szerkezet (2-30. ábra).
2-29. ábra A nyelvrugó és a keresztgerendás reteszelés felépítése
2-30. ábra Csuklószerkezet
(2) A csuklószerkezeti modell jellemzői
A sorozatgyártás a láncszemek gyűrűinek létrehozásával valósítható meg, egymásba kapcsolódó szerkezetekkel. A nyelvrugós és keresztgerendás reteszelésű láncszemek esetében a sokszorosítás és a sorozatgyártás szintén megvalósítható gumiformák préselésével. Hasonlóképpen remélhető, hogy a csuklószerkezetet a gyártási hatékonyság javítása érdekében a sorozatgyártás céljából meg lehet sokszorozni. A csuklószerkezet magában foglalja a csuklót és a csuklóhordót. A zsanér megfelelő méretben készíthető el huzalok húzásával, míg a zsanérhordónak üreges szerkezetet kell kialakítania a gumiforma préselése során, amit nehéz elérni. A fő kihívások itt kettősek: ① a szilikongumit nehéz kitölteni a Hinge barrelbe, ami a vulkanizálás után hiányos szerkezetet eredményez; ② még ha a szilikongumit meg is töltik a Hinge barrelbe, a gumiforma felvágása után a kis szilikongumi csapok nem tudnak visszatérni eredeti helyzetükbe, és amikor a viaszfolyadékot befecskendezik, a viaszfolyadék elmozdítja őket, így a viaszolás után lehetetlen az eredeti modell reprodukálása.
E két kihívás megoldására gyakori módszer a kivehető acélcsapok előzetes beszerelése a csuklóhordó belsejébe, miközben a gumiformát préselik. A gumiforma felvágása után az előretelepített acélcsapok elfoglalják az üreges pozíciót. A viasz befecskendezése után az acélcsapok eltávolíthatók, lehetővé téve az üreges Hinge barrel szerkezetű viaszforma teljes kihúzását.
2. Feladat végrehajtása
Ez a feladat magas hőmérsékleten vulkanizált szilikongumi formák gyártása ezüst láncszemek modelljéhez, kis esztergálási lyukakkal.
(1) Eredeti modell előfeldolgozása
Tisztítsa meg a láncszem eredeti modelljét a kis esztergálási lyukakkal (2-31. ábra) vízmentes etanol és szöszmentes papír segítségével, majd olajos tollal rajzolja meg a kontúrszegély mentén a választóvonalat.
(2) A gumi töltésének előkészítése
Válasszon egy négylyukú öntőforma-keretet, és vágja a nyers gumilapot egyforma méretű gumitömbökre a forma belső keretének hossz- és szélességméretei szerint.
(3) A csap behelyezése a csuklócsőbe
Helyezze be a nagyfejű csapot a csuklócsőbe, ügyelve arra, hogy az áthaladjon a teljes csuklócsövön, és a csap fejvégét hagyja a gumiszerszám széléhez közel, ahogy a 2-32. ábrán látható.
(4) Nyersgumi töltése és préselése
Helyezze az eredeti modellt a gumilap közepére, vágjon ki kis gumicsíkokat, és töltse meg a sprue sapkákat. Használd a sprue sapkát formakeretként és az eredeti modell lánc sprue átmenetét.
(5) Vulkanizálás
A gumiszerszám préselésére automata vulkanizálót használnak. Előzetesen nyissa ki a berendezést az előmelegítéshez, és az előmelegítés befejezése után helyezze a formakeretet a vulkanizálóba.
(6) A gumiszerszám kinyitása
A vulkanizálás befejezése után vegye ki a formakeretet a vulkanizálóból, és vegye le a gumiformát a formakeretről. Először vágja le ollóval a felesleges villanófényt a gumiforma széle körül. Szikével vágjon ki négy sarkot a gumiforma széle mentén, majd a választóvonal mentén ossza két részre. A gumiforma felnyitására vonatkozóan olvassa el a 2.1.3. szakasz 5. lépését. A gumiszerszám levágása után keresse meg a nagy fejű csap helyét, és vágjon egy bevágást a gumiszerszámba, hogy a nagy fejű csap egyik vége szabadon maradjon a könnyű behelyezés és eltávolítás érdekében, amint azt a 2-33. ábra mutatja. Miután a gumiformát kinyitotta, húzza ki a nagy fejtüskét, és távolítsa el az eredeti modellt. Ha az eredeti modell eltávolításakor akadályok merülnek fel, a gumimintát az aktuális helyzet alapján kell felvágni.

(7) A szellőzővezeték megnyitása
A gumiszerű forma kivágása után rajzolja meg a szellőzővonalat a gumiszerű formán. A részletekért lásd a 2.1.3. szakasz 6. lépését.
(8) Utófeldolgozás
A 2-34. ábrán látható módon tisztítsa meg a forma üregét, permetezze be oldószerrel, szerelje össze, és írja fel a forma számát a forma felületére.
IV. szakasz Szobahőmérsékleten vulkanizált szilikon gumiminta készítése 3D nyomtatott gyanta modellhez
1. Háttérismeretek
(1) A 3D nyomtatott gyanta modell jellemzői
A 3D nyomtatási gyanta változatokhoz használt anyag a fotopolimerizálható gyors prototípusgyártó fényérzékeny gyanta, amely főként prepolimerekből, reaktív hígítókból, fotoiniciátorokból stb. áll.
A prepolimerek a fényérzékeny gyanták központi összetevői, amelyek a kikeményített vázszerkezetként szolgálnak, molekulatömegük jellemzően 1000~5000 között van. Ezek reaktív funkciós csoportokkal rendelkező vegyületek, amelyek főként több típust tartalmaznak, mint például az akrilát-modifikált epoxigyanták, telítetlen poliészterek, poliuretánok és tiol/alkén fotopolimerizálható gyantarendszerek, mint például etoxilált biszfenol-A-diacrilát, trimetilénglikol-dietilénglikoléter és 3,4-epoxi-ciklohexil-metil-3',4'-ciklohexil-metakrilát stb. (metakrilát) akrilátok gyorsan polimerizálódnak és nagy szilárdsággal rendelkeznek, és széles körben használják; a vinil-éterek, mint telítetlen monomer, nagy reaktivitással rendelkeznek, és képesek szabadgyökös polimerizációra, kationos polimerizációra és töltésátviteli komplex váltakozó kopolimerizációra, miközben olyan jellemzőkkel is rendelkeznek, mint a nagy reaktivitás, alacsony toxicitás, alacsony szag és nagy viszkozitás; az epoxi monomerek fény hatására kationos gyűrűnyílásos polimerizációra képesek, a (metakrilát) akrilát alapú gyantáknál alacsonyabb polimerizációs zsugorodási sebességgel.
A reaktív hígítószerek két fő funkciót látnak el: először is, hígítják a nagy viszkozitású prepolimereket, másodszor pedig részt vesznek a prepolimerekkel való térhálósító reakcióban. A reaktív hígítók közötti különbségek befolyásolhatják a gyanta fotopolimerizációs sebességét és a keményítési teljesítményt. Ezek általában kettős kötésű C=C vagy epoxi csoportokat tartalmaznak. Az oxirán egy ciklikus éter-monomer, amely kettős kötéseket és epoxicsoportokat is tartalmaz, és fény hatására kationos gyűrűnyíló polimerizációra képes, ezért általában reaktív hígítóként használják.
A fotoiniciátorok, más néven fotoszenzibilizátorok vagy fotopolimerizációs szerek a vegyületek egy olyan osztályát alkotják, amelyek az ultraibolya tartományban (250 ~ 420 nm) vagy a látható fény tartományában (400 ~ 800 nm) bizonyos hullámhosszon energiát képesek elnyelni, szabad gyököket, kationokat stb. generálva, elindítva a monomer polimerizációját és a térhálósító keményedést. A fotoiniciátorok hatásmechanizmusa főként háromféle: energiaátvitel, hidrogén-eltávolítás és töltésátviteli komplexképződés. Az iniciációs mechanizmustól függően szabad gyökös fotoiniciátorokra és kationos fotoiniciátorokra oszthatók. A szabad gyökös fotoiniciátorok többnyire benzoin és származékai, benzoil és származékai, acetofenon és származékai, benzil-keton vagy heterociklikus aromás ketonvegyületek stb.; a kationos fotoiniciátorok közé tartoznak többek között az aril-diazónium-sók, tejjódonium-sók, triaril-szulfonium-sók és aril-ferrocén-sók.
Jelenleg a DLP nyomtatási technológiával készült eredeti változat gyakran alacsony viszkozitású folyékony fotopolimer gyantát használ, amely gyors kikeményedési sebességgel, nagy pontossággal, nagy keménységgel, alacsony hamutartalommal, maradék nélkül és jó veszett viasz öntési hatással rendelkezik, lehetővé téve a hosszú folyamatos nyomtatást anélkül, hogy az aljához tapadna. Összetételének beállításával alkalmazkodni tud a különböző alkalmazási forgatókönyvekhez. Például az önthető viasz 40% gyanta viasz töltőanyaggal és az önthető viasz gyanta 20% viasz töltőanyaggal az égetés után kevesebb, mint 0,1% hamutartalommal rendelkezik, ami alkalmassá teszi őket gipszformák közvetlen öntésére. Ezzel szemben a Form labs High Temp gyanta szakító modulusa 0,75GPa és hajlító modulusa 0,7GPa. Ásványolajban és más közegben történő 24 órás áztatás után a duzzadás mértéke kisebb, mint 1%, így alkalmas összetett formák préselésére szobahőmérsékletű vulkanizált szilikon gumiformákkal.
(2) Szobahőmérsékleten vulkanizált szilikongumi (RTV)
A szobahőmérsékleten vulkanizált szilikongumi olyan szilikongumit jelent, amely szobahőmérsékleten vulkanizálható. Jellemzően a molekulaláncai mindkét végén aktív csoportokkal, például hidroxil és vinil csoportokkal rendelkeznek, és viszonylag alacsony molekulatömeggel rendelkeznek. Két típusa az egykomponensű szobahőmérsékleten vulkanizált szilikongumi (RTV-1) és a kétkomponensű szobahőmérsékleten vulkanizált szilikongumi (RTV-2).
Az ékszeripari présformákhoz használt anyagok jellemzően az RTV-2 anyagcsoportba tartoznak, amelyeket hosszú megmunkálási idő, jó folyékonyság és alacsony viszkozitás jellemez a kikeményedés előtt. A ragasztóanyag folyékony folyadékként jelenik meg, amely két komponensre, A-ra és B-re oszlik. Az A és B ragasztót az 1:1 tömegaránynak megfelelően keverje össze és egyenletesen keverje össze, majd öntse az előkészített ékszerformakeretbe, szobahőmérsékleten vagy hővel keményítve. A kikeményített öntőforma bizonyos szilárdsággal és szakítószilárdsággal rendelkezik, megfelel az ékszeröntőformák teljesítménykövetelményeinek, de van egy bizonyos különbség a magas hőmérsékleten kikeményített szilikongumihoz képest, amint azt a 2-7. táblázat mutatja.
2-7. táblázat A szobahőmérsékleten vulkanizált szilikongumi és a magas hőmérsékleten vulkanizált szilikongumi tulajdonságainak összehasonlítása
| Szilikon gumi típus | Vulkanizációs idő / perc | Működési idő | Vulkanizálási hőmérséklet | Szakítószilárdság /(kN , m-1) | Szakítószilárdság | Vonali zsugorodási arány /% | Tárolási időtartam /év |
|---|---|---|---|---|---|---|---|
| Szobahőmérsékleten vulkanizált szilikongumi | >240 | A gumi összekeverését követő 30 percen belül | A szobahőmérséklet, ha fűtött, nem haladhatja meg a 130 ℃-ot. | 20 〜 35 | 6 〜 8 | 0.1 | 5 |
| Magas hőmérsékletű vulkanizált szilikon gumi | 30 〜 75 | Nincs időkorlát | 143 〜 173℃ | 40 〜 55 | 10 〜 12.5 | 0.1 | 10 |
2. Feladat végrehajtása
Ez a feladat szobahőmérsékleten vulkanizált szilikongumit használ a 3D-nyomtatott műgyanta eredeti modell öntőformájának elkészítéséhez.
(1) Eredeti modell előfeldolgozása
Tisztítsa meg az eredeti gyantamodell felületét vízmentes etanollal és szöszmentes papírral, majd olajos tollal rajzolja meg a választóvonalat a maximális körvonalának sima felületén.
(2) A formakeret és a folyékony szilikon gumi előkészítése
Válasszon ki egy megfelelő öntőkeretet a műgyanta eredetimodell mérete alapján, rögzítse az eredetimodell öntőkapszulájára az öntőkapszula végét, és forró olvadékragasztóval rögzítse az öntőkapszulát az öntőkeret széléhez, ahogy a 2-35. ábrán látható, ügyelve arra, hogy az eredetimodell körüli rések nagyjából egyenlőek legyenek. Függessze fel a formakeret közepén. Ezzel egyidejűleg forró olvadékragasztóval rögzítse az alsó fóliát a formakeret alsó széléhez, teljesen lezárva azt. Becsülje meg a szilikongumi mennyiségét a formakeret mérete alapján, és egy elektronikus mérleg segítségével mérjen le egyenlő mennyiségű A és B gumit.
(3) A gumi keverése
Öntse az A gumit és a B gumit felváltva egy rozsdamentes acéltartályba, és egy üvegrúddal folyamatosan keverje a gélt egy irányba, hogy biztosítsa az egyenletes keveredést, ahogyan a 2-36. ábrán látható.
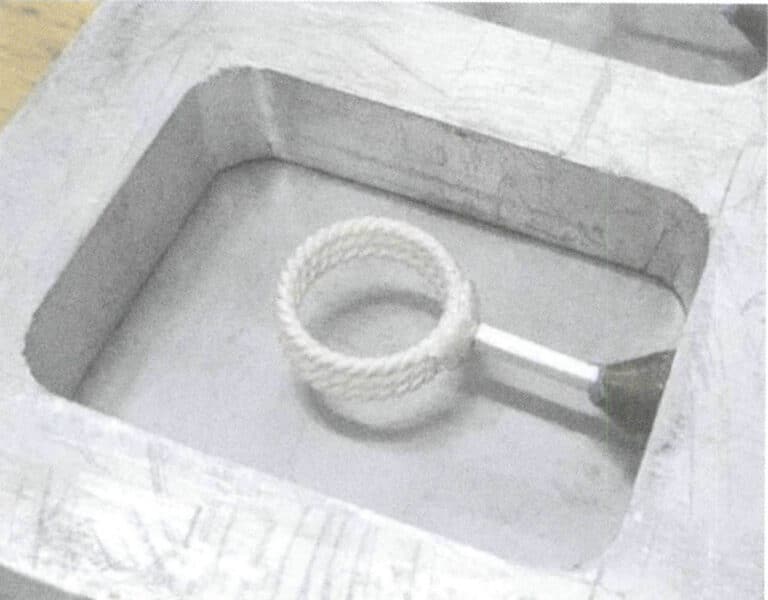
2-35. ábra Az eredeti modell rögzítése
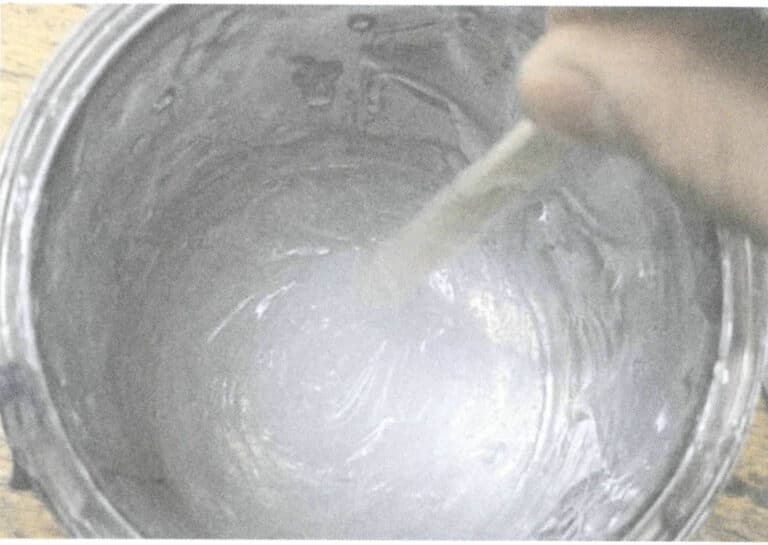
2-36. ábra Keverő kolloid
(4) Vákuumos extrakció
Keverés után helyezze a gélfolyadékot a vákuumgépbe (2-37. ábra). Kezdetben sok buborék fog keletkezni; gondosan szabályozza a vákuumszintet, hogy a gélfolyadék ne folyjon túl a tartályon. Amikor a gélfolyadékból származó buborékok száma jelentősen csökken, leállíthatja a vákuumos kivonást.
(5) Gumi befecskendezése
Öntse a vákuumozott folyékony szilikongumit a formakeretbe, teljesen befedve az eredeti modellt a 2-38. ábrán látható módon, és ellenőrizze, hogy az eredeti gyantamodell nem mozdult-e el. Ezután a formakeret visszahelyezhető a vákuumgépbe a további vákuumos kivonáshoz. A befejezés után a szilikongumi mennyiségétől függően szükség szerint adjon hozzá szilikongumit. Ha buborékok jelennek meg a felületen, azokat tűvel ki lehet szúrni.

2-37. ábra Porszívógép porvédett fedéllel
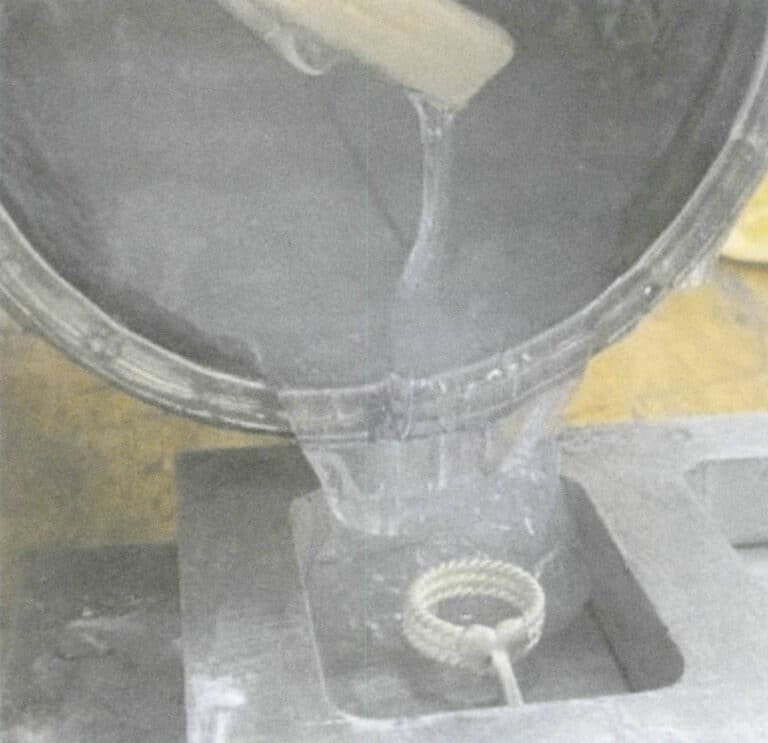
2-38. ábra Gumi befecskendezése
(6) Vulkanizálás
Helyezze a formakeretet a befecskendezett gumival a platformra, és hagyja állni 4 órán át a vulkanizáláshoz. A vulkanizálási idő a tényleges körülmények alapján 6~12 órára is meghosszabbítható.
(7) A szerszám kinyitása
A formát a folyékony szilikongumi teljes kikeményedése után lehet eltávolítani. A művelet megegyezik az (5) lépéssel a következő pontban leírtakkal 2. fejezet az I. szakasz
(8) Opening the Vent Line
For details on the operation, see step (6) in 2. fejezet az I. szakasz
(9) Post-Processing
For details on trimming the mold, see step (7) in 2. fejezet az I. szakasz
Section V Production of Alloy Molds for Thin-Walled Large Smooth Surface Pendant Wax Model
1. Háttérismeretek
1.1 Thin-Walled Large Smooth Surface Jewelry
Thin-walled large smooth surface jewelry is often encountered in jewelry products. For this type of product, mass production also requires the creation of molds. However, high-temperature vulcanized silicone rubber molds and room-temperature vulcanized silicone rubber molds are suitable for making models of this type of jewelry, mainly for the following reasons.
(1) Silicone rubber molds are flexible molds that will deform to a certain extent during use. For small-sized jewelry, slight deformation does not produce a noticeable visual effect. However, the larger smooth surface area accumulates deformation for large polished jewelry, leading to a significant deviation from the original, which cannot meet production requirements.
(2) Thin-walled large smooth surface jewelry, due to its large and thin surface, can cause the wax to solidify prematurely during the wax injection process, preventing it from filling the cavity. This results in incomplete wax models. To address this, it is common to increase the wax injection pressure to speed up the filling process. However, the large flat cavities in the rubber mold are difficult to seal at the edges under high pressure, causing the injected wax to easily seep out along the edges, forming a flash.
For the above reasons, flexible molds cannot meet the production quality requirements for this type of jewelry. At this point, rigid molds can effectively solve the two issues mentioned above, providing significant advantages when creating models for this type of jewelry, as detailed below.
(1) It is not easily deformed Once the rigid mold is completed. A qualified wax model can be obtained as long as the wax can fill the cavity.
(2) Rigid molds have a stronger ability to withstand air pressure. Suppose the wax injection pressure is increased to ensure the filling of the wax liquid. In that case, such molds can evenly distribute the pressure, thereby avoiding the generation of flash in localized areas.
Currently, the materials that can be used to make rigid molds for jewelry mainly include aluminum alloys and low-temperature alloys, which compensate for the shortcomings of traditional rubber mold wax injection technology, such as easy deformation, unstable quality, inconsistent thickness, easy shrinkage, insufficient brightness, and the tendency to produce flash layers and incomplete claws.
1.2 Aluminum Alloy
Aluminum alloys are widely used in the production of molds or the main structures of molds, which is related to the advantages of aluminum alloy molds, as detailed below.
(1) The density of aluminum alloys usually is 2.63~2.85g/cm3, makes the molds lighter after production, which is convenient for operators and reduces labor intensity.
(2) The surface of the processed aluminum alloy is flat and smooth, with guaranteed dimensional accuracy, ensuring the quality of the produced wax molds.
(3) The aluminum alloy has excellent corrosion resistance, making it less susceptible to oxidation and corrosion in the working environment, thus ensuring the stability of the mold quality.
(4) The aluminum alloy has good plasticity and distributes stress evenly, allowing for uniform dispersion of wax injection pressure when making wax molds.
(5) The aluminum alloy has good thermal conductivity, which helps the wax liquid to cool quickly after injection, resulting in better performance of the wax model.
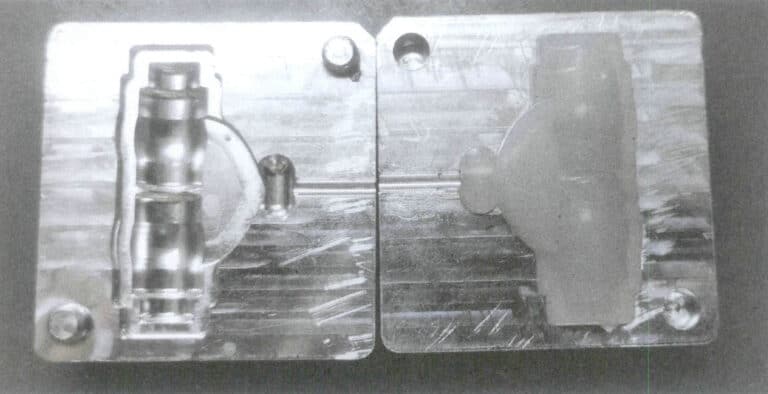
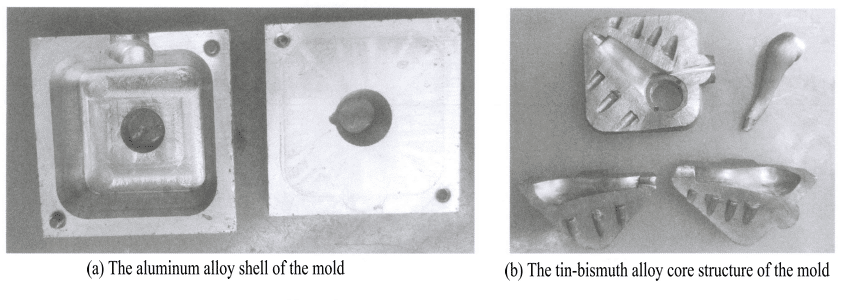
Aluminum alloy molds can achieve full aluminum alloy block assembly through structural design and use an aluminum alloy shell with a core structure. The core structure can use either low-temperature alloys or silicone rubber. Aluminum alloy molds with silicone rubber core structures (Figure 2-39) fully utilize silicone rubber’s excellent shaping performance while ensuring the mold’s rigidity.
1.3 Low-Temperature Alloys
Low-temperature alloys, also known as low-melting or fusible, are binary or multi-element alloys primarily composed of metals such as lead, cadmium, zinc, tin, and bismuth. A bluish-gray or silver-white color, low melting points, ease of melting and casting, soft texture, and ease of carving characterize them. Jewelry metal molds made from low-temperature alloys have several advantages, including quick wax injection, clear angles, smooth surfaces, and clear lettering and patterns.
For health reasons, the production and processing stages no longer use alloys containing toxic metal elements such as lead and cadmium. Currently, tin-bismuth alloy is mainly used, which has a melting point that can be adjusted over a wide range, can be easily molded, has a simple molding process, has a short cycle, and requires less processing time. However, low-temperature alloys have low hardness and poor wear resistance, affecting their service life and effectiveness, and the material cost is also relatively high. Therefore, it is often used as a core structural material paired with aluminum alloy shells. Figure 2-40 shows a rigid mold for a decorative piece, which uses aluminum alloy as the shell and tin-bismuth alloy as the core structural material.
2. Feladat végrehajtása
This task uses alloy molds to complete the mold making of thin-walled large smooth pendants.
(1) Analyzing the Original Model Structure
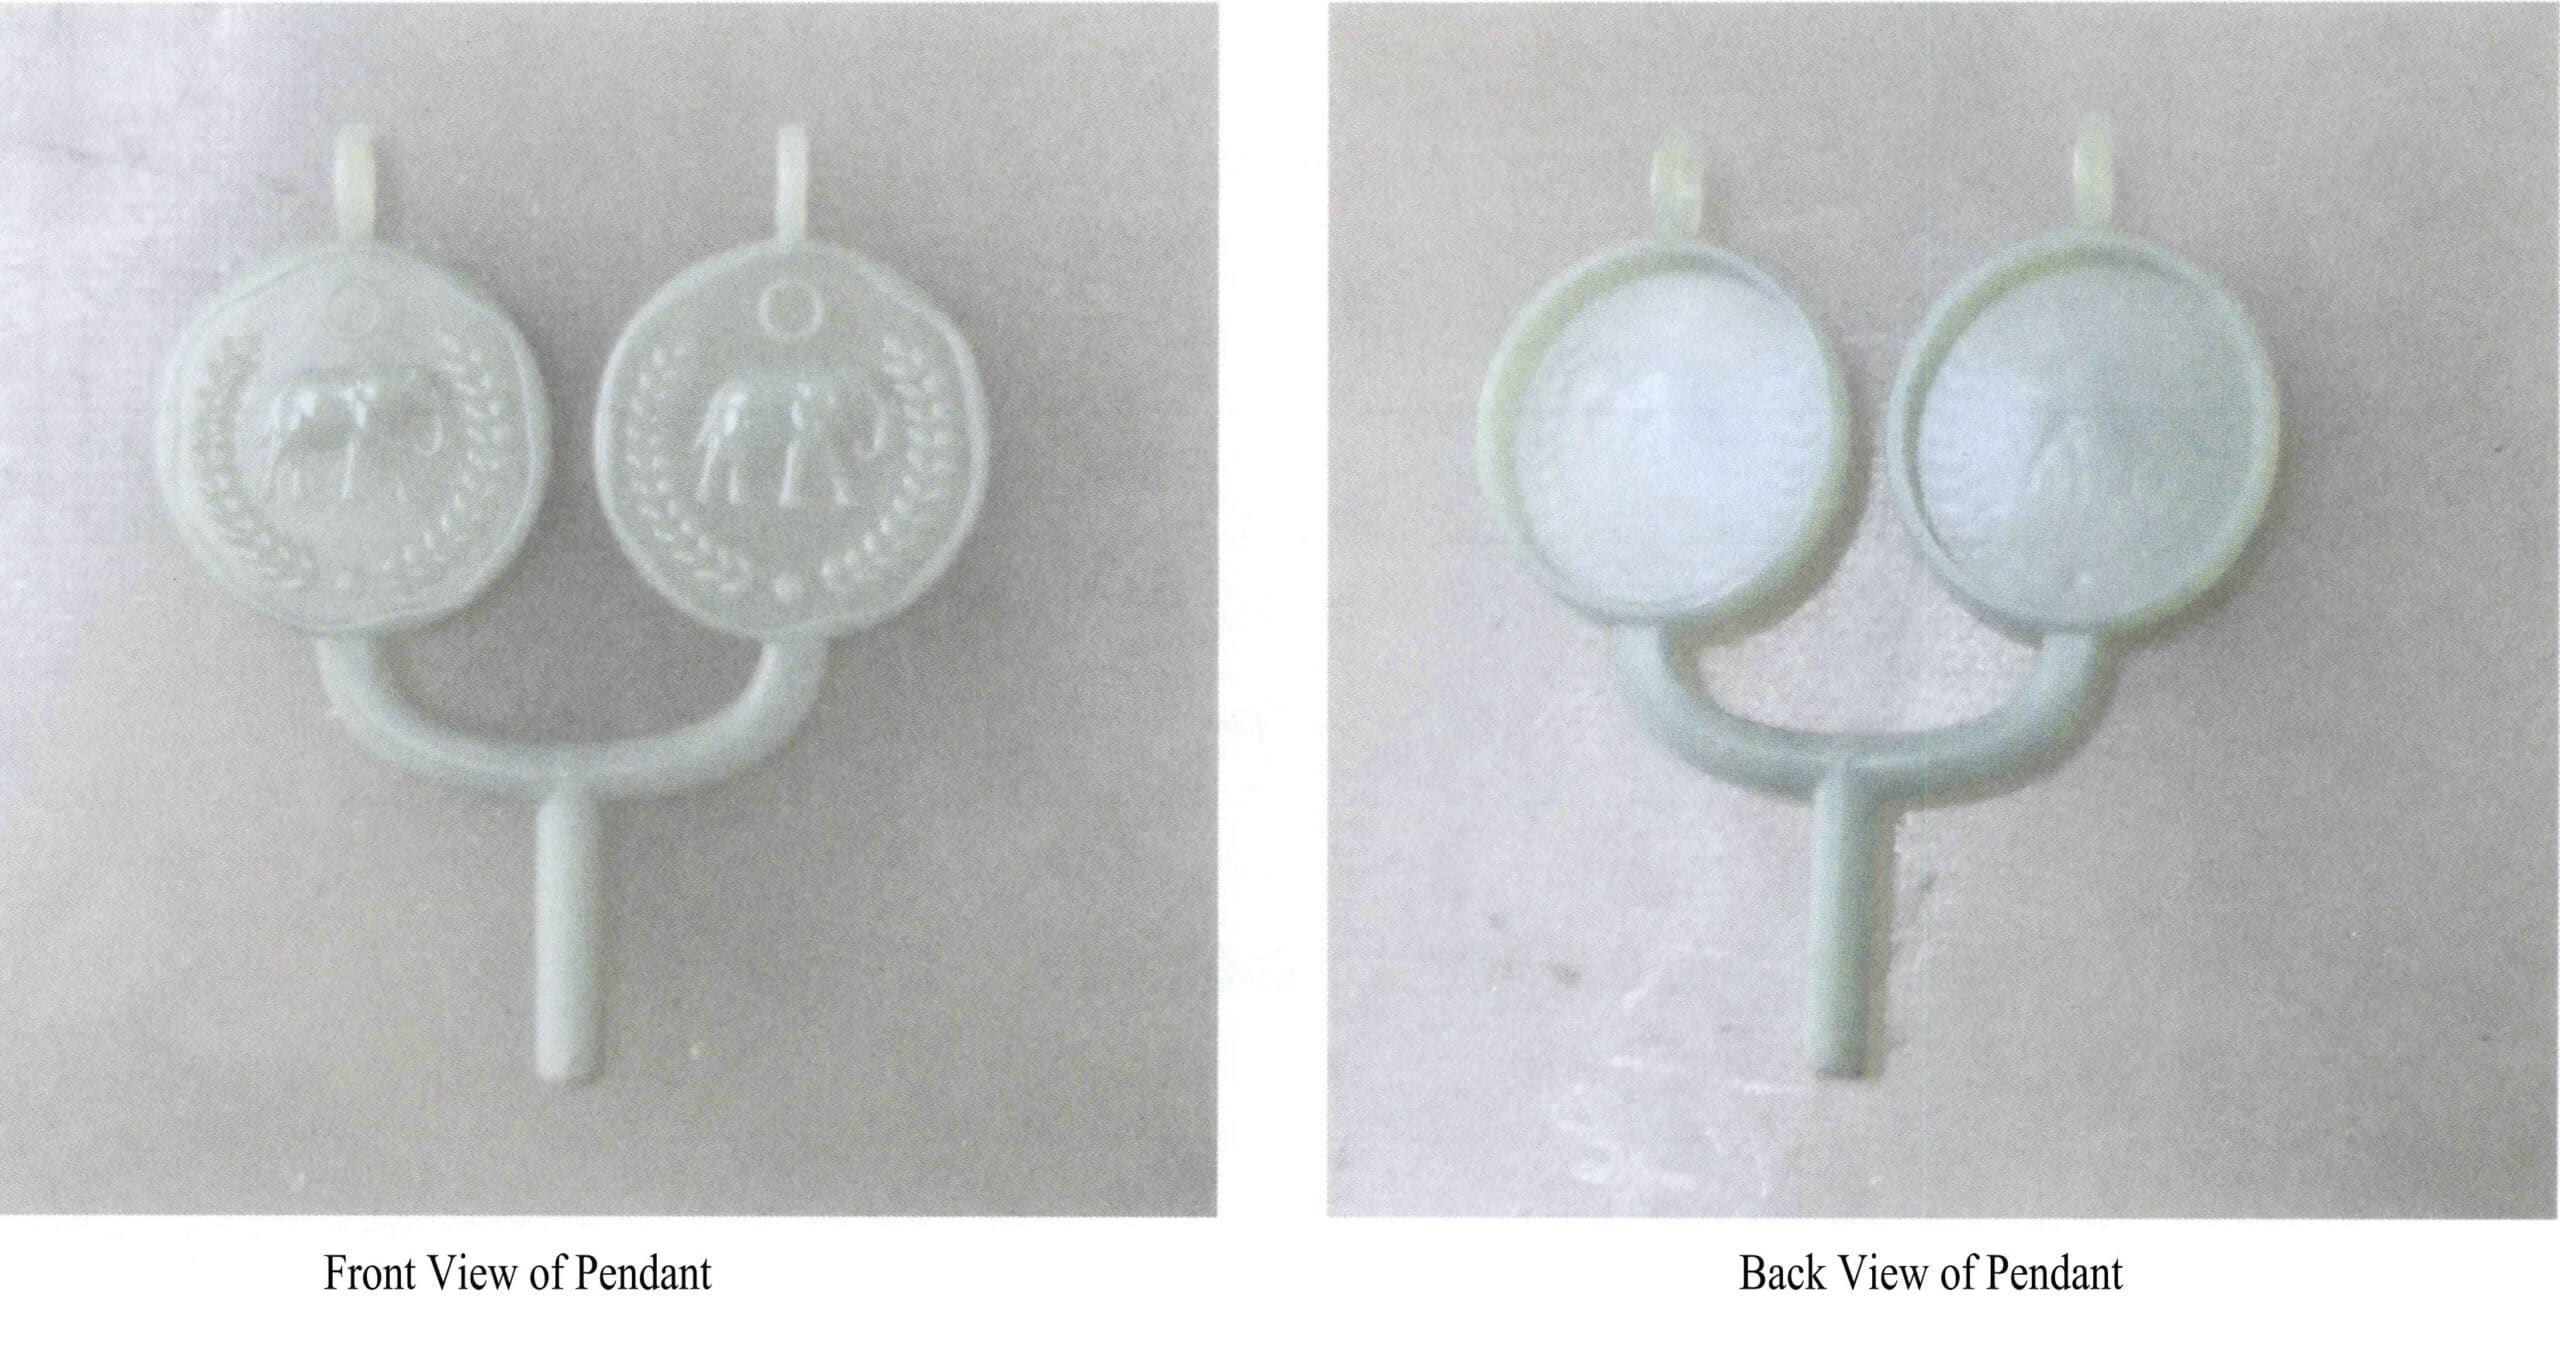
As shown in Figure 2-41, the original model of the thin-walled large smooth pendant has an irregular, circular, flat structure, with a pattern on the front and a concave pattern on the back.
(2) Cutting Material
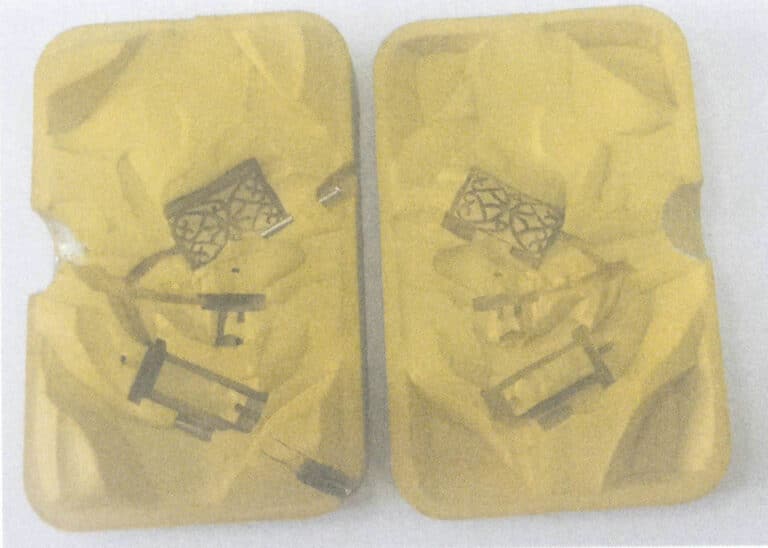
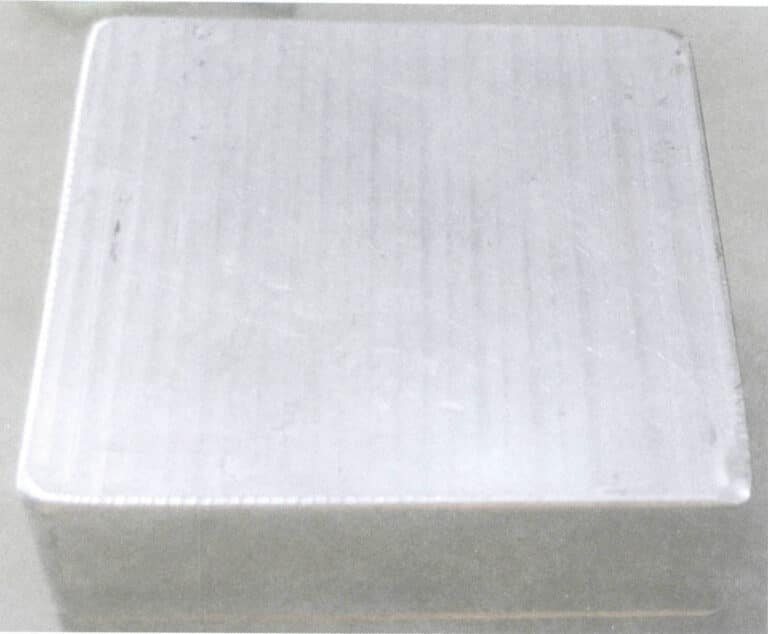
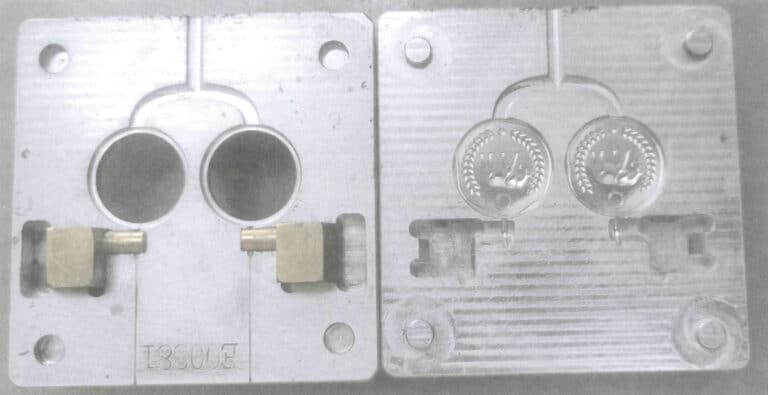
According to the size of the pendant, two suitable-sized aluminum alloy blocks are to be made, as shown in Figure 2-42, for the upper and lower molds.
(3) Processing Molds
According to the processing drawings corresponding to the original physical object, compile processing data, and based on the actual situation of the original model, prepare processing data for the front and back of the original model. It is important to note that the pattern information on the mold corresponds to the original pattern in relief. Based on the pendant’s structure, preset the accessory module’s position, as shown in Figure 2-43.
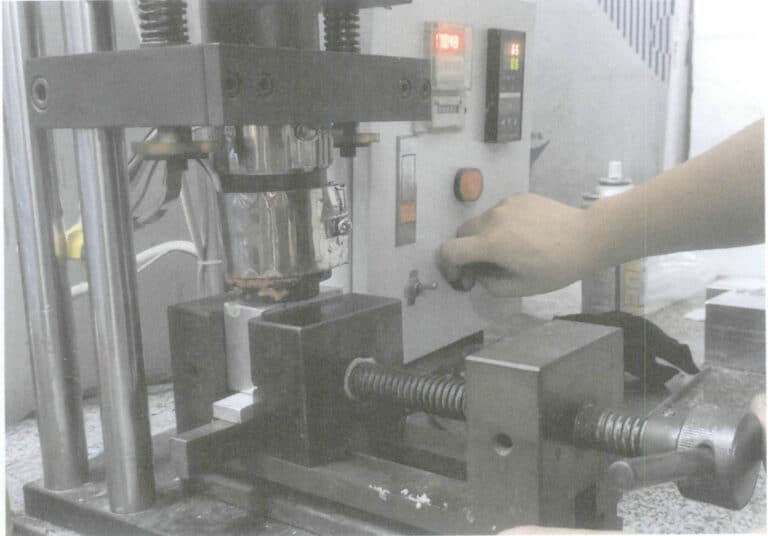
(4) Wax Injection Testing Mold
Use the wax injection machine, adjust the pressure to 6 atmospheres, and inject the wax into the mold, as shown in Figure 2-44. Observe the quality of the wax mold; if there are no abnormalities, the mold is completed.
(5) Post-Processing
Check for any defects in the mold; if so, make immediate adjustments. For areas that need sanding, use sandpaper to smooth them out. Then, use an oil-based pen to write relevant information about the mold on the shell for easy identification later.