How to Design and Make Beautiful Bracelets and Rings: A Detailed Guide?
Handcrafted Bracelet and Ring Designs: Step-by-Step Guide for Jewelry Makers
Einleitung:
Wondering how to create stunning jewelry pieces? This guide explores the world of bracelet and ring design, offering step-by-step instructions for various styles. Learn to craft intricate knotting and braiding bracelets, beaded designs, and metal accents. Discover how to make unique rings with different materials and techniques. Whether you’re a jewelry maker, designer, or looking for custom pieces, this guide has everything you need to create beautiful jewelry.
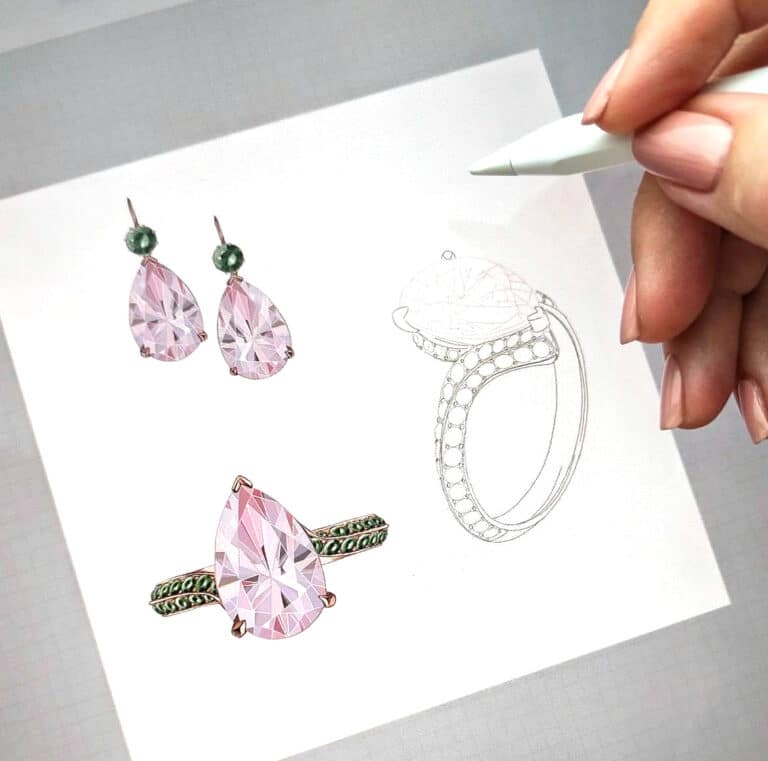
Design drawing of the crimson jade dream ring
Inhaltsübersicht
Section I Bracelet Design and Production
1. Knotting and Braiding Bracelet Design and Production
1.1 Button Knot Bracelet (two styles)
(1) Stilmerkmale
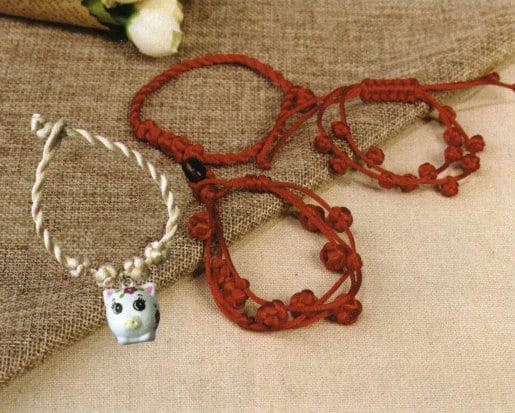
This bracelet is primarily based on the traditional button knot. Style one combines the button knot with a braid knot and a bell; style two treats the button knot as a “bead,” combining it with multiple strands to create a combination of button knots (equivalent to the combination of line and “bead”). The knot decoration is classic, beautiful, lively, and generous, as shown in Figure 4-1.
(2) Wichtige Lernpunkte
Learn the method of weaving button knots and the combinations and applications of button knots.
(3) Preparation of the First Material
Pink thread: 25 mm (diameter) × 90 cm (length), one piece;
Bell: 25 mm (length) × 20 cm (width), one piece;
Jump ring: 6mm, one piece
(4) Preparation of the Second Material
Red thread: 25 mm (diameter) × 90 cm (length), one piece;
Wooden bead: 10 mm, one piece
(5) Method for Making the First Bracelet
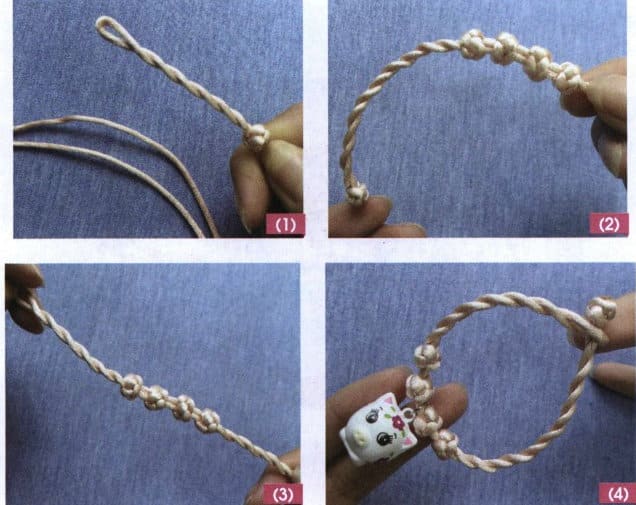
① Fold the pink thread in half to find the center, first braid two strands of 7~8cm, then tie a button knot, see Figure 4-2(1).
② A total of 4 button knots are tied, each knot spaced about 0.8 cm apart; see Figure 4-2(2).
③ Continue braiding two strands, tie a button knot at the end, cut off the excess thread, and melt the ends to bond. Pay attention to evenly distribute the distance between the two strands and the button knot to ensure symmetry; see Figure 4-2(3).
④ Use a jump ring to connect a bell, then hang it at the center of the button knot as decoration; the final effect is shown in Figure 4-2(4).
(6) Method for Making the Second Bracelet
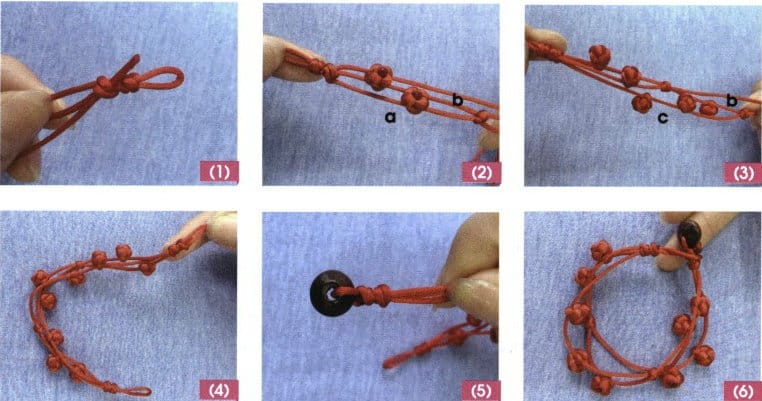
① Reserve the buttonhole ring according to the size of the wooden beads, and use red thread to weave two double knots, setting the weaving thread as a and b. Insert a line c (additional line) into the double connection knot, melt, and fix it; see Figure 4-3 (1).
② Weave a button knot separately on a and b line and fix these two lines with a double knot; see Figure 4-3 (2).
③ Tie two button knots on line c, tie one button knot on line b, and secure the line b and c with a double knot. See Figure 4-3 (3).
④ Braid two button knots on line a, and one button knot on each of lines b and c. After braiding two double connection knots to fix them, cut off one line and burnish fuse it to fix it, see Figure 4-3 (4).
⑤ Use one line to pass through the button, and then tie a knot with another line to fix it, and burnish the line to fuse it together, see Fig. 4-3 (5).
⑥ Adjust the position of each button knot to make a beautiful arrangement, see Figure 4-3 (6).
1.2 Double Coin Knot Combination Bracelet
(1) Stilmerkmale
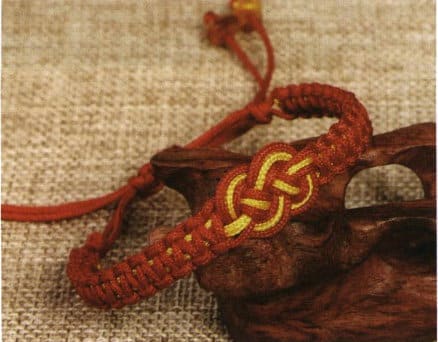
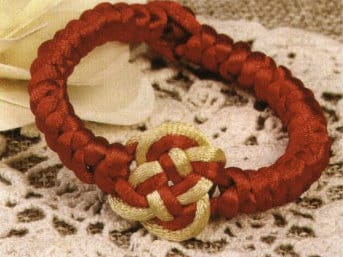
This bracelet features a double coin knot design at the center (resembling two ancient coins connected), with yellow thread added for decoration. The chain part is paired with flat knots, symbolizing peace, auspiciousness, and abundant wealth, as shown in Figure 4-4.
(2) Wichtige Lernpunkte
Familiarize yourself with the method of weaving flat knots; learn the combination of flat knots and double coin knots and the matching of colored threads.
Figure 4-4 Double Coin Knot Combination Bracelet Style Diagram
(3) Materialvorbereitung
Red thread: 15mm×90mm, 2 pieces; 15mm×25mm, 3 pieces;
Yellow thread: 15mm×70mm, 1 piece;
Yellow shell beads: 6mm, 4 pieces.
(4) Produktionsverfahren
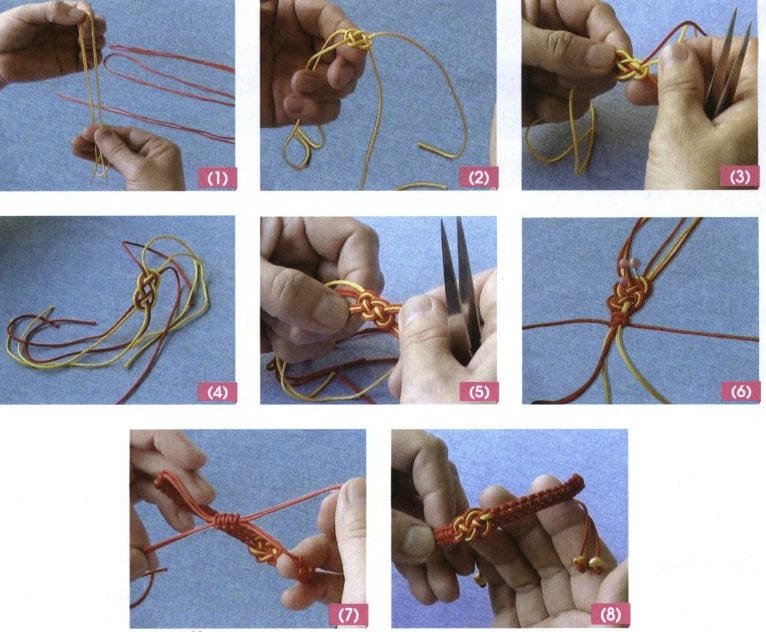
① Fold the yellow thread in half once, then fold it again, determining the quarter point; see Figure 4-5 (1).
② You can tie a double coin knot with double threads or tie the 8-shaped part of a button knot at the quarter point (the bottom part of the frame), then cut the reinforcement hoop to form two strands of double coin knots on each side, see Figure 4-5 (2).
③ Take a 25 cm long red thread, and along the path of the yellow thread, weave half of the “8” part; see Figure 4-5 (3).
④ Take another 25 cm long red thread and weave the other half of the “8” shape along the other side of the yellow thread, completing a full circle on the inner left and right sides; see Figure 4-5(4).
⑤ Take two 90 cm long red threads and use the methods described in (3) and (4) to weave a complete circle on the outside of the yellow thread, adjusting the size of the knots, pulling the threads tight, and arranging them neatly; if it is difficult to weave, you can use tweezers for assistance, see Figure 4-5(5).
⑥ Take the two outermost red threads and weave flat knots from the middle towards both ends, wrapping four threads (equivalent to four axis lines). For convenience, you can fix it on a foam board while weaving flat knots; see Figure 4-5(6).
⑦ After weaving to the appropriate length, cut off the middle axis line, glue it, and cross the two tail lines using a 25 cm red thread to weave a flat knot to seal it; see Figure 4-5(7).
⑧ Thread 2 yellow shell beads onto each end, tie a knot, and melt to secure; see Figure 4-5 (8).
1.3 Snake Knot Combination Bracelet
(1) Stilmerkmale
This bracelet features a horizontal double coin knot at the center, breaking the monotony of the snake knot structure. The use of yellow and red two-color threads enhances the decorative aspect of the main part, as shown in Figure 4-6.
(2) Wichtige Lernpunkte
Familiarize yourself with the production method of the snake knot, the design, and the techniques of combining the double coin knot with the snake knot.
(3) Materialvorbereitung
Red line: 2.5mm×120cm, 1 piece;
Yellow line: 2.5mm×20cm, 1 piece.
(4) Produktionsverfahren
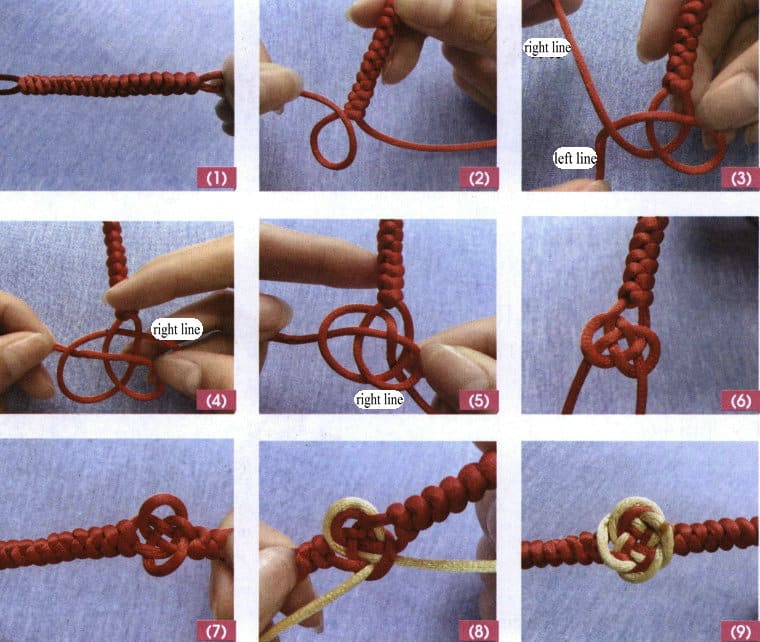
① Reserve a buttonhole with red thread and braid a snake knot about 7 cm long; the tension of the thread should be appropriate; see Figure 4-7(1).
② Start braiding a double coin knot from the center, with the left thread wrapping counterclockwise around a loop; see Figure 4-7(2).
③ Pull the right thread from underneath the loop to the left while pressing down on the left thread; see Figure 4-7(3).
④ Pass the right thread through the upper loop from behind; see Figure 4-7(4).
⑤ Then pass through the adjacent loop from top to bottom; see Figure 4-7 (5).
⑥ Finally, pass from bottom to top through the right loop, which is a press and pull, and adjust the tightness of the double coin knot, see Figure 4-7 (6).
⑦ Next, continue to weave a snake knot with red thread for about 7 cm, and tie a button knot at the end, see Figure 4-7 (7).
⑧ Use yellow thread to start weaving along the path of one red thread in the double coin knot; see Figure 4-7 (8).
⑨ After completing the double coin knot, adjust it to a suitable tightness, cut off the thread ends, and melt and bond them on the back to finish the overall production, see Figure 4-7 (9).
1.4 Identifying the Braid Knot Combination Bracelet
(1) Stilmerkmale
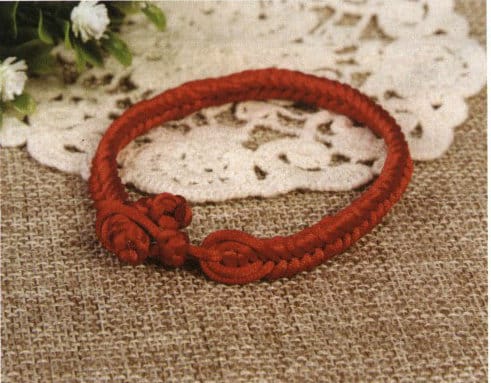
This piece is woven from a button and a braid knot. Due to the two axes supporting the knot within the braid knot, the structure is firm and dense. The button knot is like a love knot; wearing this love knot symbolizes a deep connection with a beloved person, never to be separated. See Figure 4-8.
(2) Wichtige Lernpunkte
Familiarize yourself with the weaving method of the special knot; learn the methods for adding and removing lines.
(3) Materialvorbereitung
Red thread: 2mm× 70cm, 3 pieces; 2mm× 60cm, 1 piece.
(4) Produktionsverfahren
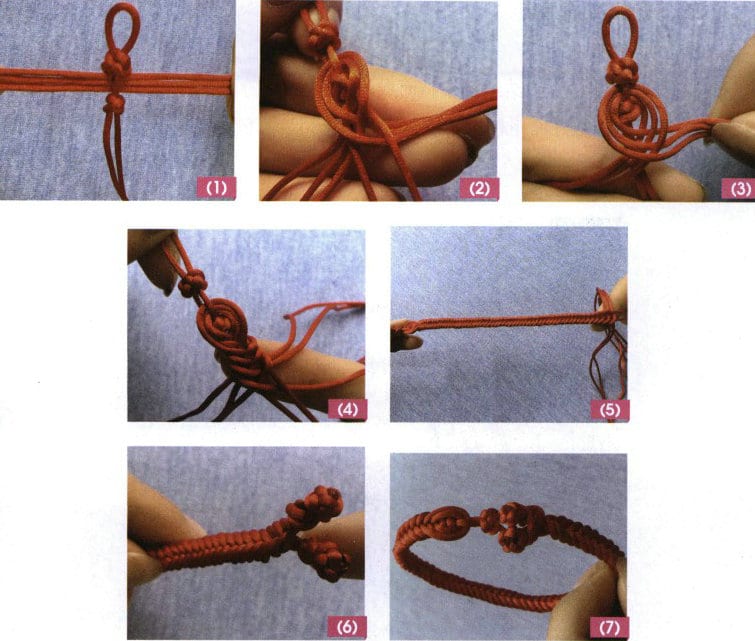
① Fold a 60 cm long red thread in half and tie a button knot, leaving a loop at the top (the size should be similar to that of a button knot). Set the two strands below the button knot as the axis. Place the other three strands between the axis strands and tie a double connection knot below to secure it in a cross shape; see Figure 4-9 (1).
② Use three strands of thread on each side to braid a three-strand braid, forming an overlapping cross shape; see Figure 4-9 (2).
③ Bring the left and right axis lines above the three strands of thread on each side; see Figure 4-9 (3).
④ Press the left and right lines over the axis line closest to you, then pass over the other axis line; see Figure 4-9 (4).
⑤ The lines cross between the axes, tightening them like braiding. The weaving should be tight and loose, with the lines pulled evenly; see Figure 4-9 (5).
⑥ Cut the two lines and melt the ends after weaving to the appropriate length. Tie a double connection knot and a button knot on the axis; see Figure 4-9 (6).
⑦ Then tie a button knot with the remaining two lines; see Figure 4-9 (7).
1.5 Dynamic Triple Braid Bracelet
(1) Stilmerkmale
This design is based on the three-strand braid as the prototype, woven into a band with strands, creating a regular texture variation. It cleverly uses trumpet-shaped metal accessories to conceal multiple thread ends, resulting in a clean and elegant surface for the knot, as shown in Figure 4-10.
(2) Wichtige Lernpunkte
Learn to compose single strands into a braid and apply the strands to present variations in knots; understand how trumpet-shaped accessories are used.
(3) Material Preparation (Figures 4-11)
Red thread: 1.5mm×80cm, 2 pieces;
Bell-shaped end cap: 12 mm (length) ×6mm (width), 2 pieces;
Lobster clasp: 10 mm (length) ×7mm (width), one piece;
Ösenstift: 35 mm, 2 Stück;
Jump ring: 6mm, 1 piece.
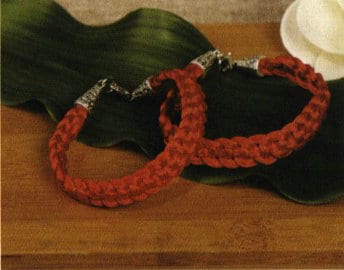
Figure 4-10 Dynamic Triple Braid Bracelet
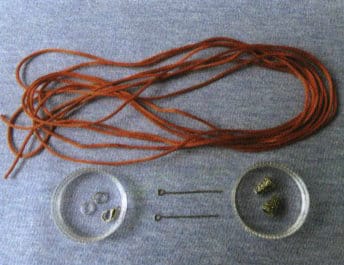
Figure 4-11 Material Preparation for Dynamic Triple Braid Bracelet
(4) Produktionsverfahren
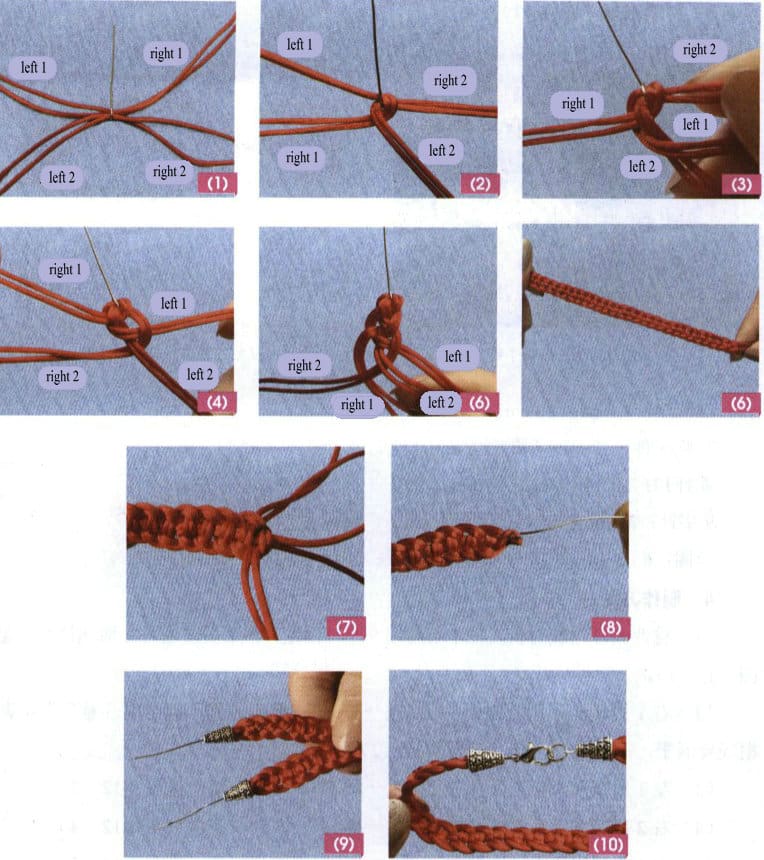
① Fold two red threads in half, fix them at the center with a eye pin, then separate 2 strands to the left and right, as shown in Figure 4-12(1).
② Press down the right strand 1 and lift the right strand 2 to the left 2 (press one, lift one), weaving to the left side. When weaving, make sure that the two threads of each strand are flat and not overlapping, as shown in Figure 4-12(2).
③ Lift the left strand 1 and press down the right strand 1, lifting the left strand 2 (lift one, press one), weaving to the right side, as shown in Figure 4-12(3).
④ Press the right 2 strands down and pick the left 1, press the left 2 (one press, one pick), and weave to the left side, see Figure 4-12 (4).
⑤ Pick the right strand 1 down and press the right 2, press the left 2 (one pick, one press), and weave to the right side; see Figure 4-12 (5).
⑥ Following this pattern, the 2 left strands always remain in the position of the axis, providing support, while the other 3 strands are woven in a three-strand braid centered around the axis, see Figure 4-12 (6).
⑦ Finishing: Cut the two strands, melt, and bond them; see Figure 4-12 (7).
⑧ Cut the other wires separately and melt them to fix, preferably forming a gradually tapering shape so the bell-shaped end caps can cover the joint. Open the eye pin to catch the gap at the end of the wire, and then use pliers to close the eye pin, see Figure 4-12 (8).
⑨ The eye pin passes through the bell-shaped end cap and is bent into a ring shape; see Figure 4-12 (9).
⑩ Hang a lobster clasp on one side and a jump ring on the other; see Figure 4-12 (10).
1.6 Crown Knot Bracelet
(1) Style Characteristics
This design features interwoven crown knots on the surface, alternating between left and right crown knots. The two axial lines in the middle of the knot provide support, making the structure symmetrical and dense, presenting a good three-dimensional effect, see Figure 4-13.
(2) Key Learning Characteristics
Familiarize yourself with the method of making a crown knot; master the generation of a new style through the variations of the bird’s head knot.
(3) Material Preparation (see Figure 4-14)
Dark blue threading cord: 1.5mm×80cm, 1 piece;
Light blue threading cord: 1.5mm×80cm, 1 piece;
Jade bead: 8 mm, one piece.
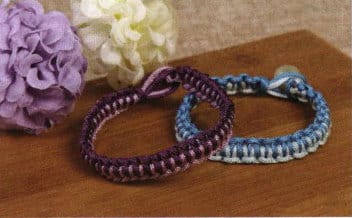
Figure 4-13 Crown knot bracelet style diagram

Figure 4-14 Crown knot bracelet material preparation
(4) Production Steps
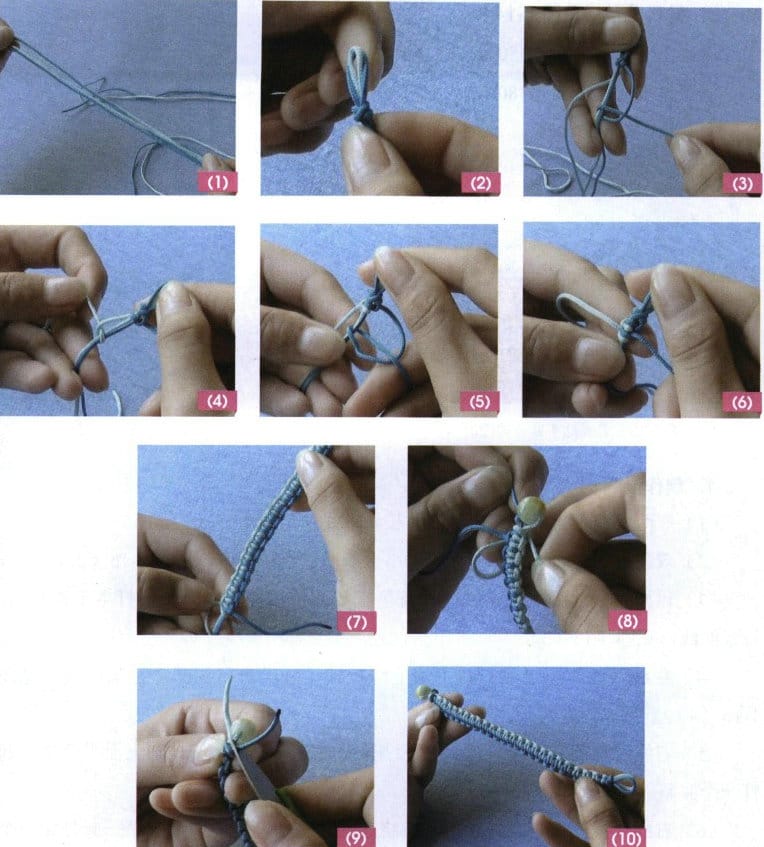
① Fold two strands of wire in half, leaving one end 20 cm long to serve as the axis; see Figure 4-15 (1).
② Tie a double connection knot with the double strands and adjust the loops’ size so they can pass through a button; see Figure 4-15 (2)
③ Using two short strands as the axis, wrap the right strand (dark blue beading cord) from below to above around the axis to tie half of a crown knot and pull the knot tight; see Figure 4-15 (3).
④ Wrap the left strand (light blue beading cord) from below to above around the axis to tie half of a crown knot, and pull the knot tight; see Figure 4-15 (4).
⑤ The right line (dark blue beading cord) wraps around the axis from top to bottom to tie a half crown knot, together with the half knot above, a complete crown knot forms; see Figure 4-15 (5).
⑥ The right line (light blue beading cord) wraps around the axis from top to bottom and pulls tight, completing a crown knot together with the half knot above; see Figure 4-15 (6).
⑦ The left and right lines follow steps (3) to (6) to weave a crown knot to the desired length (generally 18~20cm); see Figure 4-15 (7).
⑧ Take any line from the axis to thread a jade bead and tie it securely with the other axis line; see Figure 4-15 (8).
⑨ Use the left and right threads to make a double knot under the jade bead, cut off all excess threads, and melt to secure, making the connection button tighter; see Figure 4-15 (9).
⑩ Overall effect see Figure 4-15 (10).
1.7 Double Snake Knot Bracelet
(1) Stilmerkmale
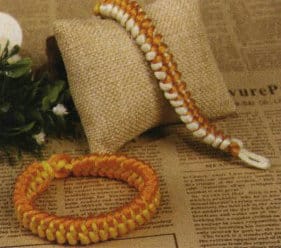
This double snake knot, also known as the paracord knot, has a wide and thick structure, tightly woven with a strong texture effect, resembling two snakes intertwined. It is one of the very beautiful and three-dimensional knot decorations. If woven with two different thread colors, it becomes even more eye-catching. This section is more suitable for male wearers; see Figure 4-16.
(2) Wichtige Lernpunkte
Learn the ideas and methods to combine single knots into double knots; master pulling the knot line tight and evenly.
(3) Materialvorbereitung
Beige thread: 2.5mm×150cm, 1 piece;
Yellow thread: 2.5mm×150cm, 1 piece.
(4) Produktionsverfahren
① Fold two thread colors in half, designating one color as the axis (for example, the beige thread as the axis). Note that you should leave a loop with a diameter of about 1 cm above the axis; see Figure 4-17 (1).
② Cross the left and right threads (yellow) over the axis, see Figure 4-17 (2).
③ The axis simultaneously passes through the loop reserved on the axis and the loop formed by the yellow thread; see Figure 4-17 (3).
④ The shape after tightening all the lines is shown in Figure 4-17(4).
⑤ The right line wraps downwards around the right line axis to form a loop designated as Loop A, as shown in Figure 4-17(5).
⑥ The right axis line passes through Loop A from outside Loop A and the right line, as shown in Figure 4-17(6).
⑦ The left line presses down on the left axis line from above and passes through Loop A, as shown in Figure 4-17(7).
⑧ The left line is pulled back from behind to form loop B; see Figure 4-17 (8).
⑨ The left axis line passes through loop B from the outer side of the left line; see Figure 4-17 (9).
⑩ Tighten all lines to complete a knot, see Figure 4-17 (10).
⑪ Repeat the braiding from step (5) to step (10), see Figure 4-17 (11).
⑫ After braiding to a length suitable for the wrist, tie a button knot to finish; see Figure 4-17 (12).
⑬ Cut off the thread end, burn, and bond it to secure it; see Figure 4-17 (13).
⑭ You can see the bracelet alternating between two colors, tightly woven, resembling two intertwined snakes, with different colors and effects on both sides; see Figure 4-17 (14).


2. Beaded and Braided Bracelets Design and Production
2.1 Wooden Bead Bracelet
(1) Stilmerkmale
This piece primarily uses wooden beads as the main material, paired with metal accessories. The contrast between the antique bronze metal and colorful wooden beads creates a striking effect; the cubic shape, three-dimensional pendants, and flat butterfly-like objects are mixed, showcasing a natural, rugged, and harmonious beauty, as seen in Figure 4-18.
(2) Wichtige Lernpunkte
Learn about color and material matching knowledge to enhance the ability to combine and apply wooden beads and metal accessories.
(3) Material Preparation (Figure 4-19)
Red Wooden Beads: 10mm, 7 pieces;
Blue wooden beads: 10mm, 3 pieces;
Butterfly charm: 12mm, 3 pieces;
Metal pendant: 20 mm (length) ×10mm (width), 1 piece;
Lobster clasp: 10 mm (length) ×7mm (width), 1 piece;
Eye pin: 28mm, 9 pieces;
Jump ring: 5mm, 16 pieces.
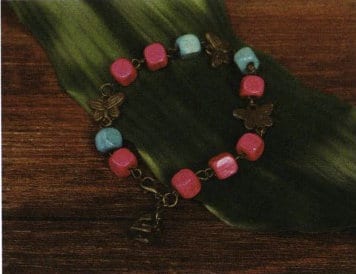
Figure 4-18 Wooden Bead Bracelet Style Diagram
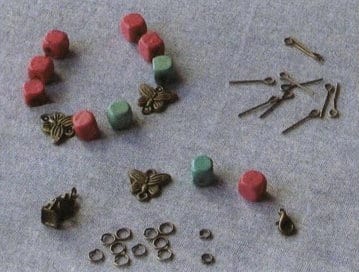
Figure 4-19 Wooden Bead Bracelet Material Preparation
(4) Produktionsverfahren
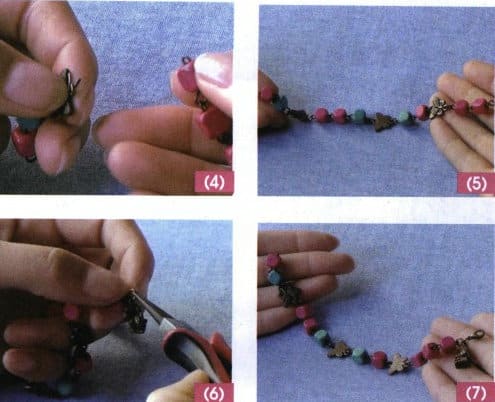
① Connect the jump ring with the eye pin, thread 1 red wooden bead onto the eye pin, and bend it into a nine shape; see Figure 4-20 (1).
② Connect the eye pin, thread 1 blue wooden bead, and bend it into a nine shape. The eye pin should be appropriate, neither too long nor too short. See Figure 4-20(2).
③ Use a jump ring to connect the butterfly charm and securely close the jump ring. See Figure 4-20(3).
④ Use a jump ring to connect each bead according to Figure 4-20 (1), and then connect it to the butterfly charm, see Figure 4-20 (4).
⑤ The connected shape is shown in Figure 4-20 (5).
⑥ Connect the metal pendant to the jump ring as a decoration; see Figure 4-20 (6).
⑦ Connect the jump ring to the lobster clasp while connecting it to the starting jump ring, making it connect end to end; see Figure 4-20 (7).

2.2 Metal Accent Bracelet
(1) Stilmerkmale
This piece primarily uses metal accessories, combining thickness, color (metallic luster and bead color), and different textures (the fine details of the arc column and the ruggedness after combining floral pieces), enhancing this bracelet’s vitality. Coupled with the embellishment of small pendants, it is simple, elegant, lively, and casual, as shown in Figure 4-21.
(2) Wichtige Lernpunkte
Learn the pairing ideas focused on metal accessories, such as combining small pieces into a whole, various shape combinations, selecting bead colors, etc.
(3) Material Preparation (Figure 4-22)
Green beads: 10mm, 2 pieces;
Metal flower spacer: 8mm, 4 pieces;
Metal plum blossom disc: 8mm, 18 pieces;
Metal fish charm: 15 mm (length) × 10 mm (width), 2 pieces;
Metal barrel spacer: 50 mm (length) × 5 mm (width), 2 pieces;
Metal three-way connector: 1 piece;
Metal ball A: 5mm, 2 pieces;
Metal ball B: 3mm, 2 pieces;
Metal gourd charm: 15 mm (length) × 5mm (width), 1 piece;
Metal coin: 15mm, 1 piece;
White transparent elastic line: 1mm, 25cm.
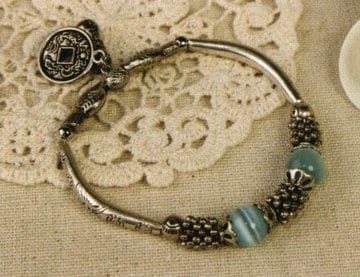
Figure 4-21 Metal accent bracelet style diagram
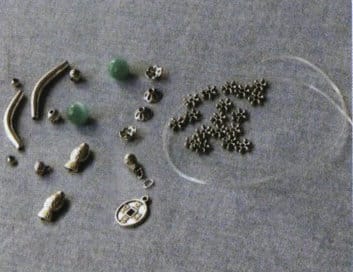
Figure 4-22 Metal accent bracelet materials
(4) Produktionsverfahren
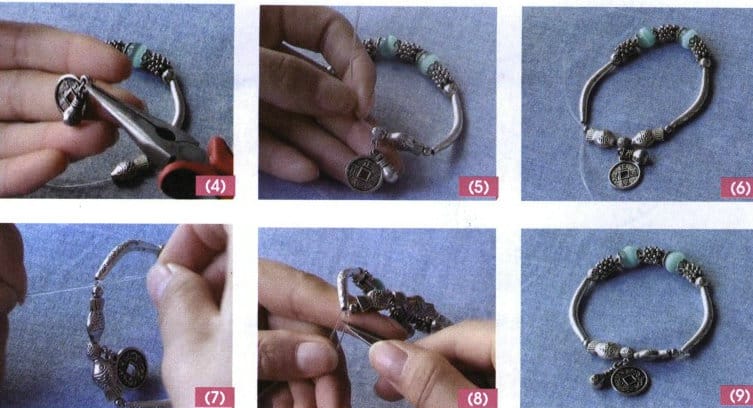
① First, thread six metal flower pieces using the white transparent elastic line; see Figure 4-23 (1).
② Sequentially thread the metal flower spacer, green beads, metal flower spacer, 6 plum blossom disc, metal flower spacer, green beads, and metal flower spacer; see Figure 4-23 (2).
③ Thread metal ball A and metal barrel spacer on each side, see Figure 4-23 (3).
④ On one side, thread metal ball B and metal fish charm in sequence; connect metal coins and gourd charm with a jump ring to form component A; as shown in Figure 4-23 (4).
⑤ Use a metal three-way connector to hang component A on the bracelet; see Figure 4-23 (5).
⑥ On the other side, thread metal fish charm and metal ball B to make it symmetrical; see Figure 4-23 (6).
⑦ Tie a knot to secure it, cut off the excess thread, and hide the knot; the production is complete; see Figure 4-23 (7), (8), (9).

2.3 Alloy Bracelet with Colored Stones
(1) Stilmerkmale
This bracelet combines green agate and vintage-style antique bronze metal accessories. The colors are retro, the textures are beautiful, and the patterns highlight an ethnic charm. Overall, it is understated, showcasing women’s intellectual elegance and delicate beauty, as seen in Figure 4-24.
(2) Wichtige Lernpunkte
Learn about the color selection of retro-style accessories and master the methods for expressing the aesthetics of the pendant section.
(3) Material Preparation (Figure 4-25)
Green variegated stone bead A: 8mm, 2 pieces;
Green variegated stone bead B: 4 mm, 36 pieces;
Antique bronze openwork bead A: 16 mm, one piece;
Antique bronze openwork bead B: 14 mm, one piece;
Antique bronze alloy: 12mm×8mm, 9 pieces;
Brown thread: 1mm ×60cm, 1 piece.
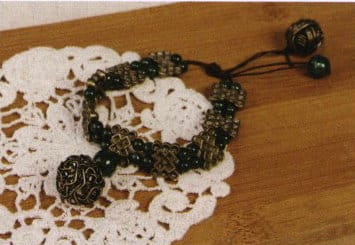
Figure 4-24 Style Diagram of Alloy Bracelet with Colored Stones
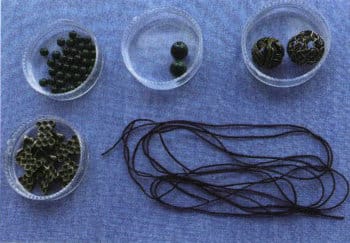
Figure 4-25 Material Preparation for Alloy Bracelet with Colored Stones
(4) Produktionsverfahren
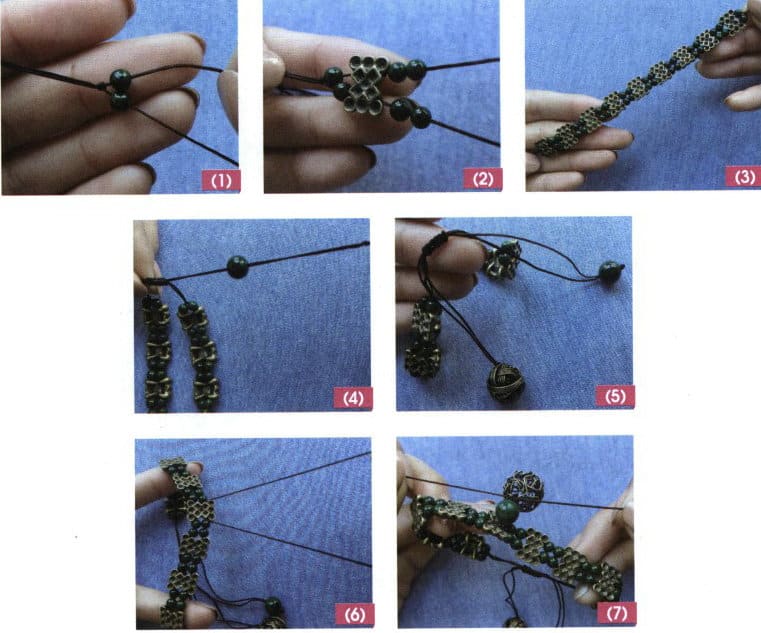
① Fold the brown thread in half, leaving 10 cm, and make a double connection knot. Thread one green variegated stone bead B onto each upper and lower thread; see Figure 4-26 (1).
② Thread the upper and lower threads alternately through the antique bronze alloy and 2 green variegated stone beads B, see Figure 4-26 (2).
③ Repeat step (2), threading a total of 9 antique bronze alloy beads, and finally thread 1 green variegated stone bead B on each end (a total of 36 green variegated stone beads B), finish with a double connection knot to complete the chain, see Figure 4-26 (3).
④ After crossing the tail thread, tie a flat knot, thread one line through a green variegated stone bead B, and then tie a knot and melt it to secure it; as shown in Figure 4-26 (4).
⑤ Thread the other line through an antique bronze openwork bead B, tie a knot, and melt it to secure; see Figure 4-26 (5).
⑥ Thread a brown thread through the fifth antique bronze alloy bead, see Figure 4-26 (6).
⑦ After tying the money knot, thread green variegated stone bead A, then thread antique bronze openwork bead A, and tie a knot to secure it, as shown in Figure 4-26 (7).
2.4 Crown Knot Beaded Bracelet
(1) Stilmerkmale
This bracelet is cleverly adorned with pearls using a crown knot, resembling undulating colorful clouds. The bright pearls leap up and down on it, vivid and charming, as shown in Figure 4-27.
(2) Wichtige Lernpunkte
I learned how to match threads and beads in color and the ideas and methods for applying the crown knot.
(3) Material Preparation (Figure 4-28)
Purple thread: 90cm×1mm, 1 piece; 30cm×1mm, 1piece;
Light blue thread: 90cm×1mm, 1 piece; 30cm×1mm, 1 piece;
Imitation Pearl A: 8cm, 4 piece;
Imitation Pearl B: 4cm, 4mm.
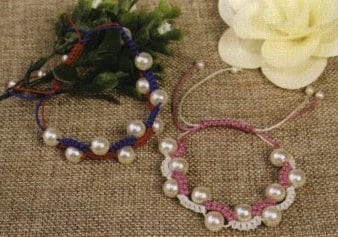
Figure 4-27 Crown Knot Beaded Bracelet Style Diagram
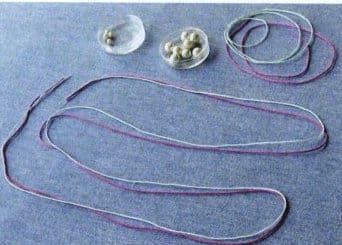
Figure 4-28 Materials Preparation for Crown Knot Beaded Bracelet
(4) Produktionsverfahren
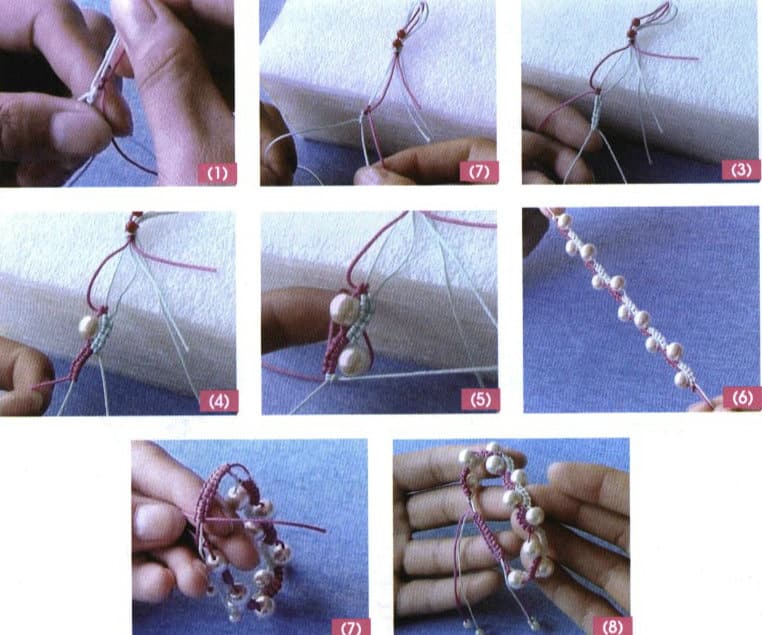
① Take a 30 cm long light blue thread as the axis, and tie a crown knot with a 90 cm long purple thread on the axis, with the crown knots facing each other. Leave 10 cm long at the top of the 3 threads for later use; see Figure 4-29 (1).
② To avoid affecting the operations below, tie a knot with the reserved thread above and fix it to the foam pad; see Figure 4-29 (2).
③ Use light blue thread to tie 6 crown knots, ensuring the knots are uniform; see Figure 4-29 (3).
④ Use purple thread to string 1 imitation pearl A, then continue to tie 6 crown knots on the axis in the opposite direction to the crown knots tied with the light blue thread; see Figure 4-29 (4).
⑤ Use light blue thread to string 1 imitation pearl A, and continue to tie 6 crown knots on the axis; see Figure 4-29 (5).
⑥ Following the method of steps (4) to (5), alternate weaving with 2 colors of thread to create 10 imitation pearls A; see Figure 4-29 (6).
(⑦ Align the left and right tail threads and trim the excess. Cross and overlap them to serve as the axis, then take a 30 cm long purple thread to tie a flat knot for fixation, see Figure 4-29 (7).
⑧ Thread imitation pearls B onto the ends of the 4 tail threads and tie knots to secure them; see Figure 4-29 (8).
Copywrite @ Sobling.Jewelry - Hersteller von kundenspezifischem Schmuck, OEM- und ODM-Schmuckfabrik
2.5 Barrel Knot Beaded Bracelet
(1) Stilmerkmale
This bracelet showcases the smooth and intricate characteristics of the barrel knot, complemented by the embellishment of white pearl seed beads. This creates variations and contrasts in volume and adds vitality and novelty to the entire bracelet, symbolizing completeness and harmony, as seen in Figure 4-30.
(2) Wichtige Lernpunkte
Familiarize yourself with making a barrel knot; master the ideas and matching techniques of combining knots and beads.
(3) Material Preparation (see Figure 4-30)
Brown thread: 110cm×1mm, 2 pieces; 20cm×1mm, 1 piece;
Pearl seed beads: 3mm, 80 pieces (a total of 18 groups, 4 pieces + 8 pieces at the end).
Figure 4-30 Style diagram of barrel knot beaded bracelet
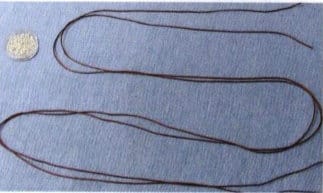
Figure 4-31 Materials preparation for barrel knot beaded bracelet
(4) Produktionsverfahren
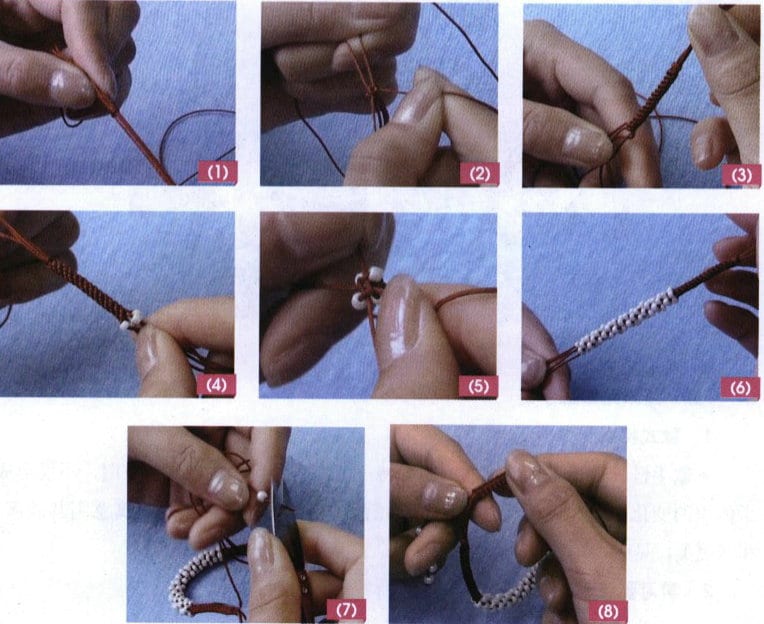
① Fold the 110 cm long brown thread in half and leave length of 10~12cm to make a double connection knot; see Figure 4-32 (1).
② Cross another thread to make a barrel knot; see Figure 4-32 (2).
③ The length of the barrel knot should be about 3.5 cm, so make sure to pull the thread evenly and tightly. See Figure 4-32 (3).
④ Start stringing the pearls, with 1 pearl seed bead on each of the 4 strands; see Figure 4-32 (4).
⑤ Then tie a barrel knot to secure these 4 pearl seed beads; see Figure 4-32 (5).
⑥ Follow step (4)~(5) and continue to braid to about 5.5 cm long (i.e., 18 groups) as the decorative part; see Figure 4-32 (6).
⑦ Continue to braid about 3.5 cm (i.e., symmetrically) with barrel knots, then tie a double connection knot. Leave 12 cm of the 8 strands on both sides, string 1 pearl seed bead at the end of the strands, and tie a knot to secure it; see Figure 4-32 (7).
⑧ 4 groups of lines cross on each side, and another 20 cm long brown thread is used to tie a flat knot for fixation. Trim the excess thread and tie a knot to secure it; see Figure 4-32 (8).
2.6 Coiled Bead Bracelet
(1) Stilmerkmale
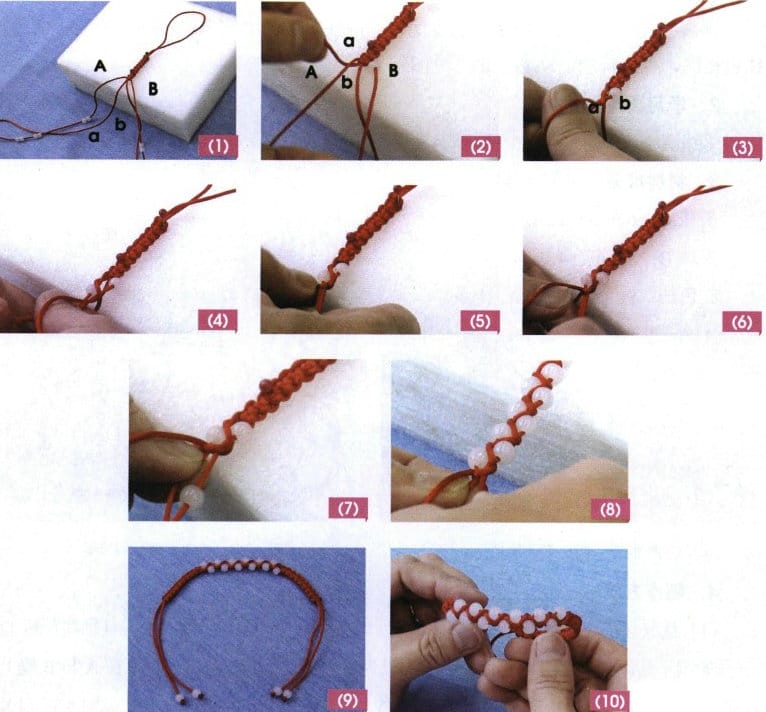
This bracelet uses wrapping thread around jade beads, creating beautiful wavy lines among the arranged beads. The red and white colors are bright and vivid, full of dynamism, see Figure 4-33.
(2) Wichtige Lernpunkte
The method of winding threads around beads is rare, yet it has a great effect and strong decorative qualities aimed at broadening the ideas and methods of expression.
(3) Material Preparation (see Figure 4-34)
Jade Bead A: 6mm, 12 pieces;
Jade beads B: 4 mm, 4 pieces;
Red thread: 90cm×1.5mm, 1 piece.
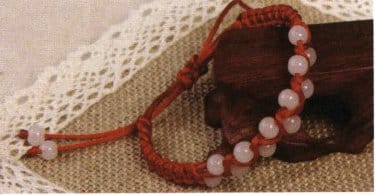
Figure 4-33 Coiled bead bracelet style
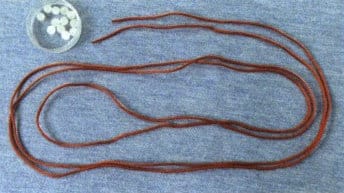
Figure 4-34 Materials preparation for a coiled bead bracelet
(4) Produktionsverfahren
① Cut a half 45 cm long red thread to serve as the axis lines a and b. Another red thread will be used for weaving, and reserve 12 cm at the beginning of the axis line to start weaving a flat knot, which is about 4 cm long. The left and right weaving threads are designated as A and B. For convenience, you can thread 6 jade beads onto lines A and B. To prevent the jade beads from falling off, you can temporarily tie a knot at the ends of lines A and B, see Figure 4-35 (1).
② Move the first jade bead on line B to the line’s base, with the left hand pressing axis line a with line A, as shown in Figure 4-35 (2).
③ Pull axis line b from underneath line B to the right side, and pull line A from underneath the jade bead on line B to the right side. Cross lines a and b, with line b on top and line a underneath, and tighten all lines, as shown in Figure 4-35 (3).
④ Move a jade bead on line A with the left hand to the root of the line; see Figure 4-35 (4).
⑤ Line B is pulled from above and under the jade bead on line A to the left, and line a is pulled from below and under the jade bead on line A to the left, tightening each line, see Figure 4-35 (5).
⑥ Line a and Line b cross on the left side, with Line a on top and Line b on the bottom, tightening each line; see Figure 4-35 (6).
⑦ Move the second jade bead on line B to the top and the root of the line; see Figure 4-35 (7).
⑧ Repeat steps (5) to (6) to finish weaving all the jade beads on both sides; see Figure 4-35 (8).
⑨ Continue to weave a flat knot equal to the initial flat knot length, thread one jade bead B onto each end of the line, and tie a knot to secure it; as shown in Figure 4-35 (9).
⑩ After crossing the left and right tail lines, weave a flat knot of about 2 cm, cut off the excess line, and melt to secure; see Figure 4-35 (10).
2.7 Fabric Rosette Bracelet
(1) Stilmerkmale
This bracelet features a floral motif crafted from fabric rosettes, utilizing black and red agate beads for pairing. It has strong ethnic characteristics in color and style, being grand and unique, as shown in Figure 4-36.
(2) Wichtige Lernpunkte
Learn to use fabric materials instead of wire materials, enhancing effects from the perspective of changing materials.
(3) Material Preparation (see Figure 4-37)
Red cotton fabric: 27 cm (length) ×2.1 cm (width), 6 pieces; 30 cm (length) ×2.1 cm(width), 1 piece (for making buttons); be sure to use twill; Red barrel beads: 12 mm (length) ×8 mm (width), 18 pieces;
Red agate beads A: 8mm, 1 piece;
Red agate beads B: 4mm, 16 pieces;
Red agate beads C: 2mm, 24 pieces;
Black agate beads A: 8mm, 5 pieces;
Black agate beads B: 6mm, 12 pieces;
Black agate beads C: 4mm, 16 pieces;
Black agate beads D: 2mm, 46 pieces;
Red silk thread: 100cm×1mm, 1 piece.
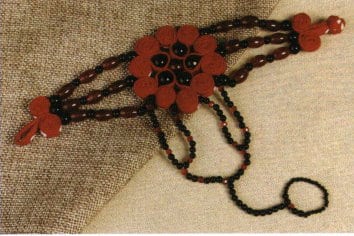
Figure 4-36 Style diagram of fabric rosette bracelet
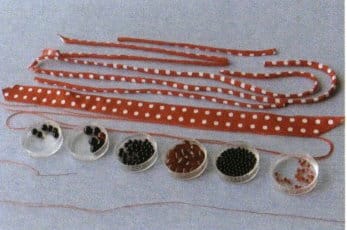
Figure 4-37 Material preparation for fabric rosette bracelet
(4) Produktionsverfahren
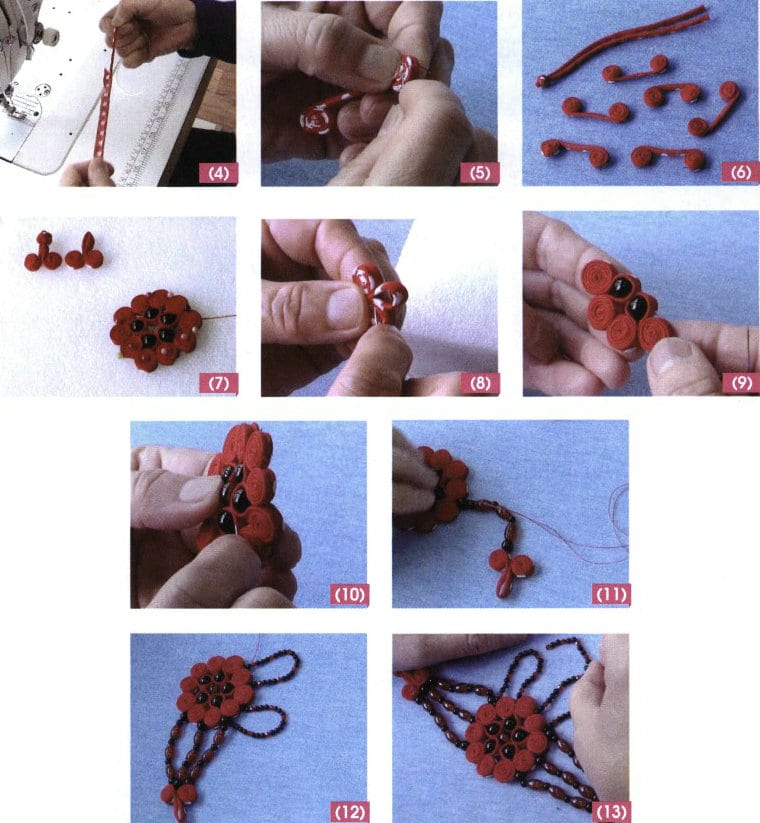
① Making the bias strip: To facilitate the turning out the bias strip, fix a sewing thread at one end of the auspicious strip fabric with a needle; as shown in Figure 4-38 (1).
② Clamp the sewing thread inside the bias strip, and after sewing, pull the bias strip to turn it to the front side for use; see Figure 4-38 (2).
③ Fold the bias strip in half with the right sides facing each other, sew a 4 mm wide seam from the fold line, ensure the stitches are even, and be careful not to sew the thread onto the fabric, see Figure 4-38 (3).
④ Pull the thread to turn the right side of the bias strip out; see Figure 4-38 (4).
⑤ Making the petals: Cut the prepared strips into 5 pieces, each 27 cm long, and mark the midpoint to ensure symmetry. Then, starting from one end of the bias strip, roll towards the center while sewing to secure it. Use the same method to make the other end, ensuring to leave about 2 cm for the buttonhole in the middle section without rolling the edge; see Figure 4-38(5).
⑥ A total of 6 pieces are made, of which 5 are needed for the flower petals and 1 each for the buttonhole ring and button at the end of the bracelet (1 pair); see Figure 4-38 (6).
⑦ Arrange the completed components together to see if they fit. The overall diameter of the flower shape is generally controlled between 4~5cm; as shown in Figure 4-38 (7).
⑧ Fix the two ends of the rolled bias strip together. Generally, it is better to fix it on the back side and avoid exposing the thread on the front side; as shown in Figure 4-38 (8).
⑨ Then connect the petals and sew on black agate beads A as embellishments; see Figure 4-38 (9).
⑩ Finally, sew one red agate bead A in the center of the flower; see Figure 4-38 (10).
⑪ Threading the chain: First, thread the left chain, starting from one end of the buttonhole with red silk thread to string the beads, in the order of black agate bead B, (red barrel bead, black agate bead C) ×3 times, black agate bead B, and then sew it to the flower body, see Figure 4-38 (11).
⑫ Pass through a petal, continue through the middle chain, and connect to the buttonhole ring; then pass through the right chain and return to the petal; next, combine black agate bead D with red agate bead C, threading two sets of rings, ensuring that there is one petal between the two sets of rings. The method for the other side is the same, and the tail is connected to the button knot, see Figure 4-38 (12).
⑬ Finally, thread an arc-shaped chain over the two sets of rings, with the length just reaching the middle finger, making the bracelet very stable when worn, see Figure 4-38 (13).

Section II Ring Design and Production
1. Five Gemstones in Bloom Ring
(1) Stilmerkmale
This ring comprises five crystal beads of different sizes and shapes, with yellow seed beads forming the ring part. It clusters the beads beautifully and creates a stunning effect of five beads competing for attention, as shown in Figure 4-39.
(2) Wichtige Lernpunkte
Learn the methods of connecting clustered beads; learn the ideas and methods for matching and combining crystal beads of different colors and shapes.
(3) Material Preparation (see Figure 4-40)
Red Faceted Crystal Beads: 8mm, 1 piece;
Purple Crystal Square Beads: 6 mm, 1 piece;
Brown Crystal Square Beads: 6mm, 1 piece;
Blue diamond beads: 6mm, 1 piece;
Green diamond beads: 6mm, 1 piece;
Yellow seed beads: 2mm, 36 pieces;
Bead head pins: 20mm, 5 pieces;
Fishing line: 3cm ×20cm, 1 strand.
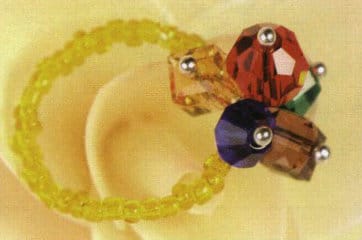
Figure 4-39 Five Gemstones in Bloom Ring Style Diagram
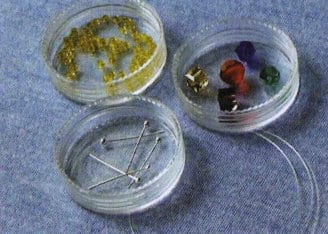
Figure 4-40 Five Gemstones in Bloom Ring Material Preparation
(4) Produktionsverfahren
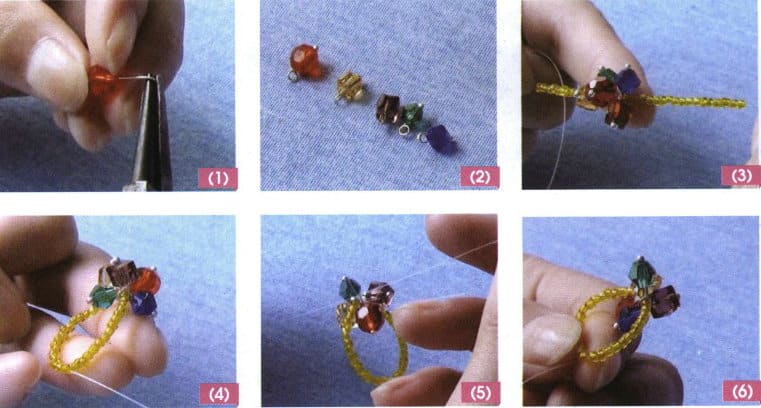
① Thread the red faceted crystal bead onto the heapin, bending the other end into a figure-nine shape; see Figure 4-41 (1).
② Using the same method, thread 1 purple and 1 brown crystal square bead and 1 blue and 1 green diamond-shaped bead; see Figure 4-41 (2).
③ Use the fishing line to thread 3 yellow seed beads, then thread the figure-nine ring made of the 5 types of beads mentioned above; continue threading yellow seed beads, with the length referring to the circumference of the finger, see Figure 4-41 (3).
④ Throw the last yellow seed bead through, see Figure 4-41 (4).
⑤ Pass the fishing line through the yellow seed bead once, tie a knot at the group of 5 beads, and hide the knot; see Figure 4-41 (5).
⑥ The effect of the completed ring is shown in Figure 4-41 (6).
2. Crimson Jade Dream Ring
(1) Stilmerkmale
This ring is composed of painted beads and garnet. The painted beads have a fine texture, a smooth shape, and a soft luster, accompanied by gold-edged painted spacers, resembling a dreamy red jade, with unique connotations that highlight a noble and elegant temperament, as seen in Figure 4-42.
(2) Wichtige Lernpunkte
Familiarize yourself with the methods of stringing beads with elastic thread, tying knots, and hiding knots; master the recognition and use of materials such as painted beads and spacers.
(3) Material Preparation (see Figure 4-43)
Painted beads: 10mm, 1 piece;
Garnet beads: 3mm, 16 pieces;
Flower base: 4mm, 2 pieces;
Painted spacer: 6mm (diameter)×3mm (thickness), 2 pieces;
Metal beads: 3mm, 2 pieces;
White elastic line: 1mm×10cm, 1 piece.

Figure 4-42 Design drawing of the crimson jade dream ring
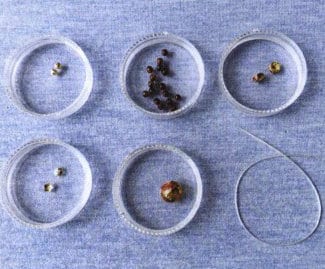
Figure 4-43 Preparation of materials for the crimson jade dream ring
(4) Produktionsverfahren
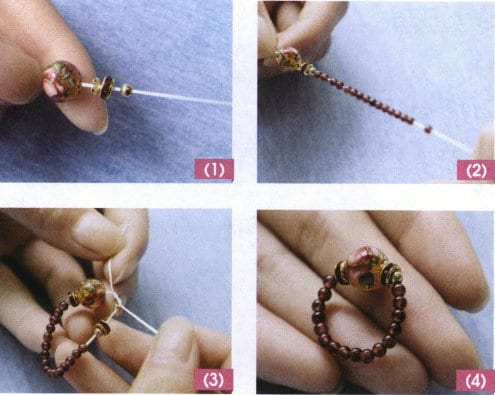
① Use white elastic thread to string 1 painted bead, flower base, painted spacer, and metal bead in sequence; see Figure 4-44 (1).
② String 16 garnet beads to make the circumference about 6 cm, see Figure 4-44 (2).
③ Continue to string the metal beads, painted spacers, and flower bases, then tie a knot here to hide it inside the large bead hole; see Figure 4-44 (3).
④ Cut off the excess thread and shape it, see Figure 4-44 (4).
3. Velvet Rose Quartz Ring
(1) Stilmerkmale
This ring is surrounded by a cluster of pink diamond-shaped crystal beads and features a large grass-green crystal bead in the center, with a ring of white pearl rice beads. The overall look is soft and round, reminiscent of a tender crystal romance that captivates and lingers in the memory, as seen in Figure 4-45.
(2) Wichtige Lernpunkte
Familiarize yourself with threading beads to achieve a three-dimensional and prominent effect; master the combination of beads and colors.
(3) Material Preparation (Figure 4-46)
Strawberry quartz bead: 10 mm, 1 piece;
Pink diamond crystal bead: 4mm, 22 pieces;
Pearl seed bead: 2 mm, 40 pieces;
Fishing line: 50cm×3mm, 1 strand.
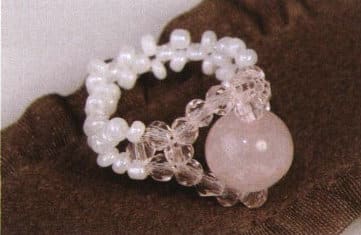
Figure 4-45 Velvet rose quartz ring style diagram
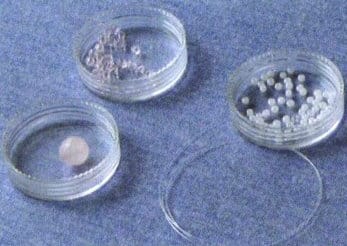
Figure 4-46 Preparation of materials for the velvet rose quartz ring
(4) Produktionsverfahren
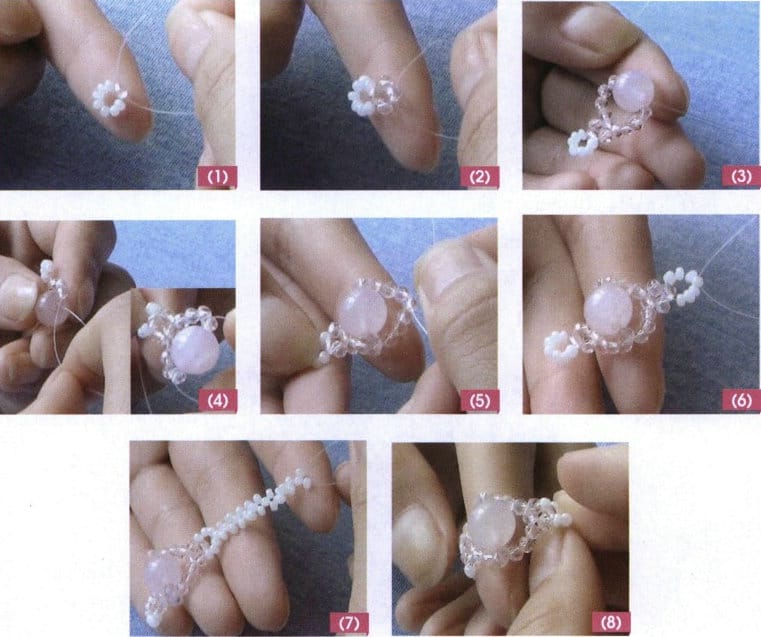
① Main part: Use the fishing line to string 7 pearl seed beads, setting the 4th bead as the connecting A bead, and string 1 pink diamond-shaped crystal bead; see Figure 4-47 (1).
② The left and right threads each pass through 1 diamond-shaped crystal bead and thread 1 diamond-shaped crystal bead together from both sides; as shown in Figure 4-47 (2).
③ The left and right threads continue to pass through 4 crystal diamond beads and 1 strawberry quartz bead together; see Figure 4-47 (3).
④ The left and right threads each pass through 1 diamond-shaped crystal bead to enhance its three-dimensional effect; see Figure 4-47 (4).
⑤ The left and right threads pass through 3 diamond-shaped crystal beads and one diamond-shaped crystal bead together; see Figure 4-47 (5).
⑥ String 1 diamond-shaped crystal bead on each side and string 1 diamond-shaped crystal bead through the middle; then string 3 pearl seed beads on each side and 1 seed rice bead through the middle (see Figure 4-47 (6).
⑦ For the chain part, use the four-petal flower bead threading method until the desired length is reached; see Figure 4-47 (7).
⑧ Finally, cross thread the A beads together to form a ring, use the fishing line to string a few pearl seed beads back through, tie a knot, and hide the knot, see Figure 4-47 (8).
4. Plum Blossom Variations Ring
(1) Stilmerkmale
This ring features three plum blossoms as the main design, surrounded by light blue seed beads forming the band, giving it a fresh and elegant overall appearance with a radiant fragrance. It resembles the three variations of the piece “Plum Blossom Variations,” harmonious and melodious. Also, it reflects the continuous story of “Plum Blossom Variations,” symbolizing a beautiful love story, see Figure 4-48.
(2) Wichtige Lernpunkte
Learn the ideas and methods of interspersing and complementing small and large beads.
(3) Material Preparation (Figure 4-49)
Red diamond crystal beads: 5mm, 4 pieces;
Brown diamond crystal beads: 5mm, 4 pieces;
Blue diamond crystal beads: 5mm, 4 pieces;
Blue seed beads: 2mm, 44 pieces;
Yellow seed beads: 2mm, 3 pieces;
Fishing line: 2mm×50cm, 1 strand.
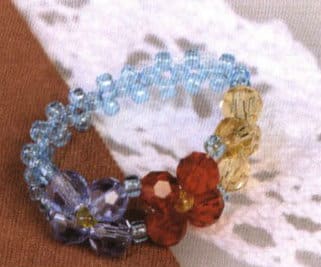
Figure 4-48 Design of the Plum Blossom Variations Ring
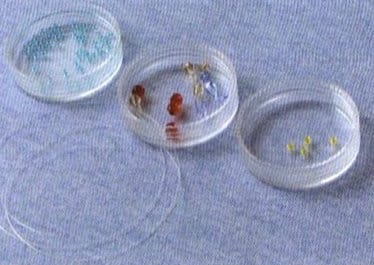
Figure 4-49 Materials Preparation for the Plum Blossom Variations Ring
(4) Produktionsverfahren
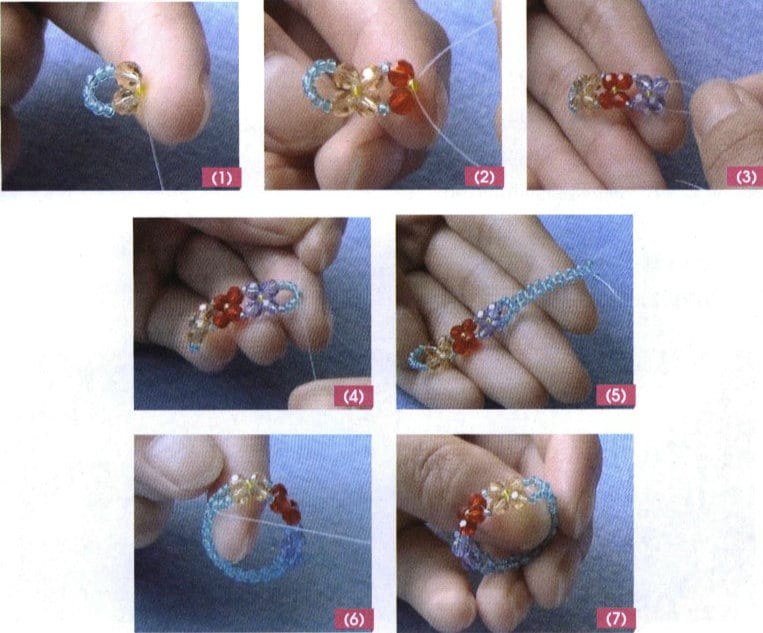
① Main Part: After folding the fishing line in half, first thread 7 blue seed beads, setting the 4th bead as Connector Bead A, then thread one brown diamond-shaped crystal bead on each side, and thread yellow seed beads through, see Figure 4-50 (1).
② Thread the brown diamond-shaped crystal beads, blue seed beads, and red diamond-shaped crystal beads onto the left and right threads in sequence, then pass through the yellow seed beads, see Figure 4-50 (2).
③ Thread the red crystal beads, blue seed beads, and blue diamond-shaped crystal beads onto the left and right threads in sequence, then pass through the yellow seed beads; then thread the blue diamond-shaped crystal beads again onto the left and right threads, see Figure 4-50 (3).
④ Thread 3 blue seed beads onto the left and right threads in sequence, then pass through the blue seed bead, see Figure 4-50 (4).
⑤ Use the four-petal flower bead threading method for the strap part until the desired length is achieved; see Figure 4-50 (5).
⑥ Finally, thread the A beads together to form a ring shape, then use the fishing line to thread a few seed beads again, tie a knot, and hide the knot, see Figure 4-50 (6).
⑦ The effect of the finished ring is shown in Figure 4-50 (7).
5. Scarlet Plum Blossom Ring
(1) Stilmerkmale
This ring features yellow seed beads as the flower center, red crystal beads as the petals, and white transparent seed beads embedded along the outer edge of the petals, showcasing a bright plum blossom effect with a strong fragrance and a crystal-clear appearance. The overall combination is harmonious, as seen in Figure 4-51.
(2) Wichtige Lernpunkte
Learn the methods of combining and connecting petals; try the effects of multi-color matching.
(3) Material Preparation (Figure 4-52)
Red diamond beads: 6mm, 6 pieces;
Transparent diamond beads: 3 mm, 6 pieces;
Yellow seed beads: 2mm, 12 pieces;
Transparent seed beads: 2mm, 70 pieces approximately;
Fishing line: 3mm×80cm, 1 strand.
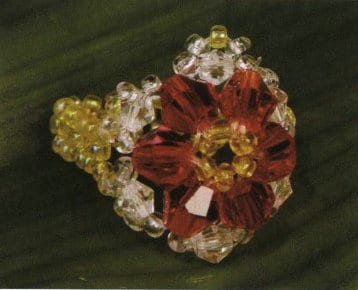
Figure 4-51 Scarlet plum blossom ring style diagram
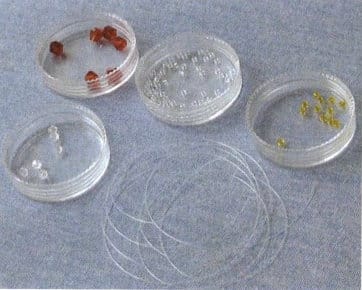
Figure 4-52 Scarlet plum blossom ring material preparation
(4) Produktionsverfahren
① Main part: Use the fishing line to string 5 yellow seed beads and pass through 1 yellow seed bead as the flower center; see Figure 4-53 (1).
② Petal 1: The right line strings a red diamond bead, a transparent seed bead, a transparent diamond bead, a transparent seed bead, a yellow seed bead, and a transparent seed bead in order, then goes back through the transparent diamond bead, see Figure 4-53 (2).
③ Petal 2: The right line strings a transparent seed bead, the left line passes through a yellow seed bead, and both lines pass through a red diamond bead, see Figure 4-53 (3).
④ Thread a transparent rice bead, a transparent diamond bead, a transparent rice bead, a yellow rice bead, and a transparent rice bead again, then go back through the transparent diamond bead; see Figure 4-53 (4).
⑤ Repeat steps (3) and (4), threading from petal 3 to petal 6, see Figure 4-53 (5).
⑥ Finishing the petals: thread a core seed bead with the left line, going through the red diamond bead of petal 1; see Figure 4-53 (6).
⑦ To secure the left and right fishing lines, repeat going back through a circle to keep the flower body flat and not curled. Finally, bring the left and right lines back to the outer edges of the two petals; see Figure 4-53 (7).
⑧ Finger ring part: the use of left and right lines were single-threaded 2 yellow seed beads and then pierced against the method of 1 yellow seed bead until the length of the finger meets the circumference of the length of the finger, see Figure 4-53 (8).
⑨ Butt the two petals symmetrically on the other side, see Figure 4-53 (9).
⑩ After threading a few more seed beads with a fishing line, tie and hide the knot, finishing the shape, see Figure 4-53 (10).
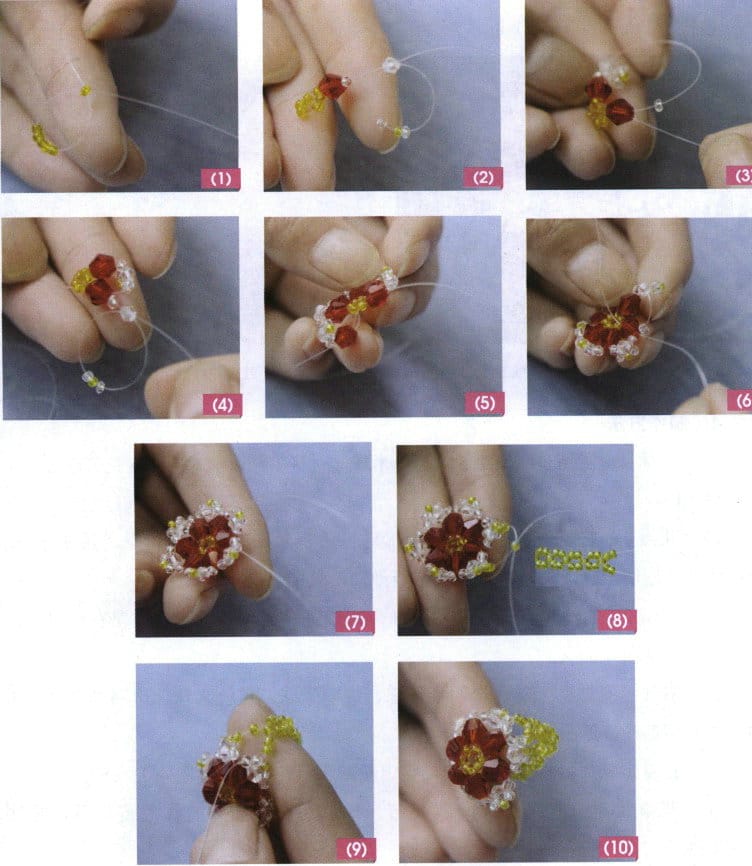
6. Rainbow Waltz Ring
(1) Stilmerkmale
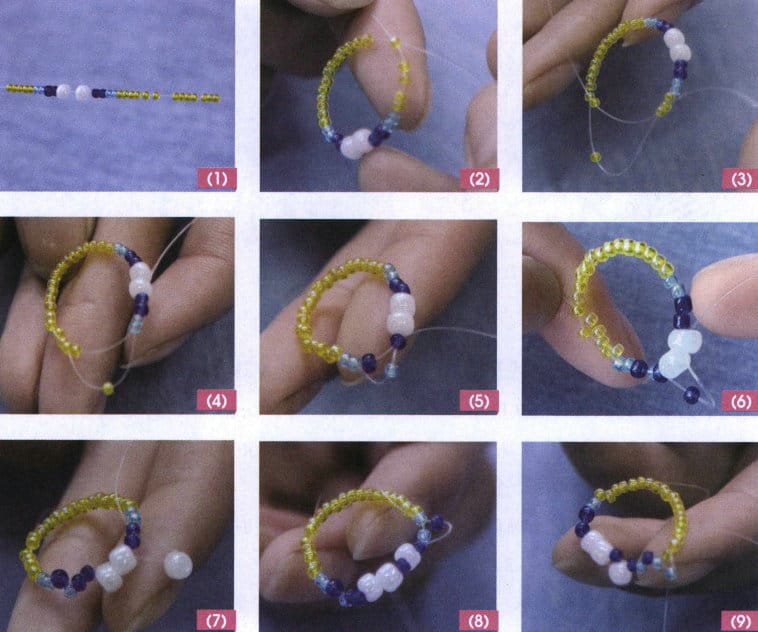
This ring is composed of four colors: light blue, dark blue, white, and yellow, forming multi-layered wavy curves that resemble a rainbow dancing gracefully while possessing a touch of gentleness and elegance, see Figure 4-54.
(2) Wichtige Lernpunkte
Learn the methods and ideas for diagonal bead threading and adding beads, and master the combination of bead colors and sizes.
(3) Material Preparation (Figure 4-55)
Pearls: 4mm, 7 pieces;
Light blue seed beads: 2 mm, 14 pieces;
Dark blue seed beads: 1mm, 14 pieces;
Yellow seed beads: 2 mm, several;
Fishing line: 0.3mm×160cm, 1 strand.
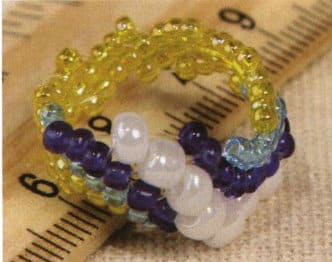
Figure 4-54 Rainbow Waltz Ring Style Diagram
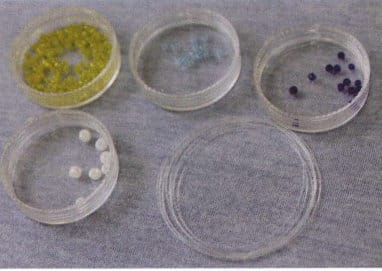
Figure 4-55 Rainbow Waltz Ring Material Preparation
(4) Produktionsverfahren
① First round: Leave 10 cm of fishing line on the left, and thread beads with the right line. String 5 yellow seed beads, designating the first bead as Bead A. Then string 2 light blue seed beads, 2 dark blue seed beads, 2 pearls, 2 dark blue seed beads, 2 light blue seed beads, and 13 yellow seed beads, see Figure 4-56(1).
② Pass through Bead A to form a circular ring; see Figure 4-56(2).
③ Second round: String 1 yellow seed bead, designating it as Bead B, then counterclockwise skip 2 yellow seed beads and pass through 1 yellow seed bead, see Figure 4-56(3).
④ String 1 yellow seed bead, then skip two beads (yellow, light blue) and pass through 1 light blue seed bead; see Figure 4-56(4).
⑤ String 1 light blue seed bead, skip one dark blue seed bead, and string 1 dark blue seed bead; see Figure 4-56 (5).
⑥ String 1 dark blue seed bead, skip 1 pearl, and string 1 pearl; see Figure 4-56 (6).
⑦ String 1 pearl, skip 1 dark blue seed bead, and string 1 dark blue seed bead; see Figure 4-56 (7).
⑧ String 1 dark blue seed bead, skip 1 dark blue seed bead, and string 1 light blue seed bead; see Figure 4-56 (8).
⑨ String 1 light blue seed bead, skip 1 yellow seed bead, and string 2 yellow seed beads; see Figure 4-56 (9).
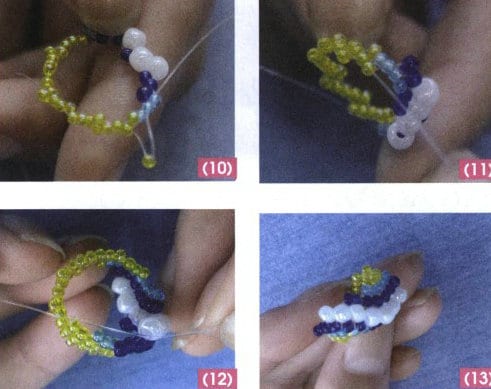
⑩ String 1 yellow seed bead, then skip 1 yellow seed bead, string 2 light blue seed beads, and so on, until reaching bead B. The pattern is that the yellow seed bead section is skip 1, string 2; the other sections are skip 1, string 1, see Figure 4-56 (10).
⑪ Third round: Repeat the steps from the second round (5) to (10), the shaping state is shown in Figure 4-56 (11).
⑫ After completing six rounds, tie a knot, then pass through a few beads before cutting off the thread; see Figure 4-56 (12).
⑬ The overall shaping effect is shown in Figure 4-56 (13).
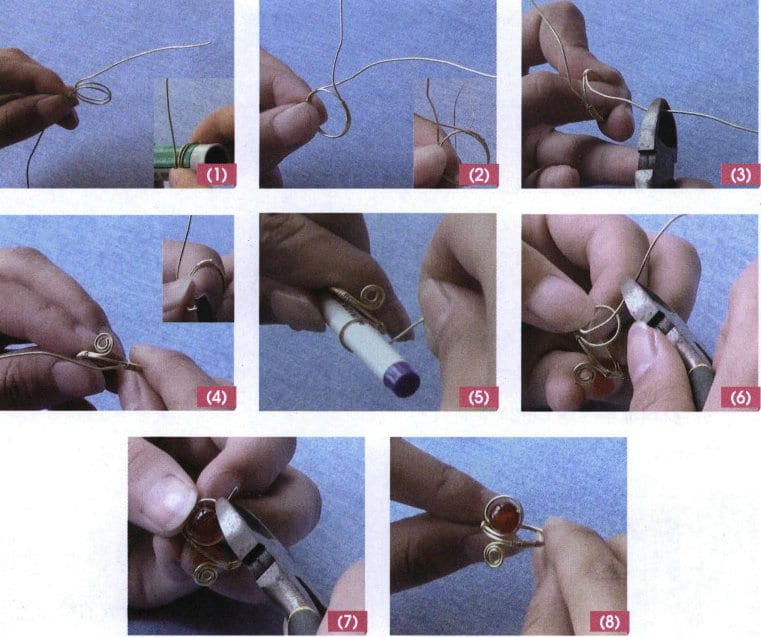
7. Golden Filigree Pearl Ring
(1) Stilmerkmale
This ring is made of metal wire inlaid with agate beads, which are gentle and romantic, giving an unusual feeling to a simple design, see Figure 4-57.
(2) Wichtige Lernpunkte
Learn to use metal wire to form various shapes and design combinations with other materials.
(3) Material Preparation (Figure 4-58)
Copper Wire A: 8mm×25cm;
Copper wire B: 3mm×40cm;
Red agate beads: 8mm, 1 piece.
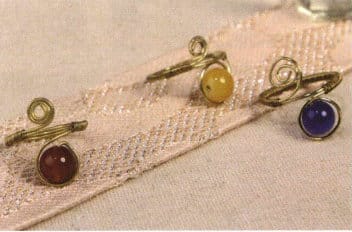
Figure 4-57 Design of a Gold Wire Inlaid Bead Ring
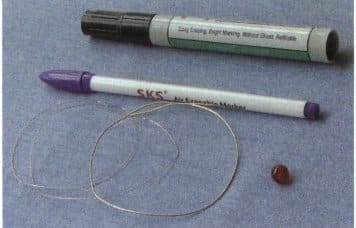
Figure 4-58 Material Preparation for Golden Filigree Pearl Ring
(4) Produktionsverfahren
① Use copper wire A to wrap around a drawing pen with a diameter of 2 cm (or a cylinder the thickness of a finger) two times to form a ring shape with a circumference equal to the size of the finger, see Figure 4-59(1).
② Wrap copper wire B around the ring on one hand to make it becomes a whole and, on the other hand, increases the decorative effect. It can be wrapped around both sides of the interface or in a circle; see Figure 4-59 (2).
③ Reserve about 4 cm of copper wire A on one side of the ring’s end and cut off the excess; see Figure 4-59 (3).
④ Use wire looping pliers to gradually roll from one end outward, forming a spiral shape; see Figure 4-59 (4).
⑤ Start rolling copper wire A on the other side of the ring’s end from the position next to the agate bead, preferably using a pen with a diameter of 0.8 cm to wrap two circles; the size of the diameter mainly depends on the size of the agate bead, see Figure 4-59 (5).
⑥ Bend the copper wire of the inner circle inward and cut the wire; see Figure 4-59 (6).
⑦ Thread the agate bead and cut off the excess material according to the diameter of the agate bead; the agate bead will be held in place by the outer copper wire and will not fall out; see Figure 4-59 (7).
⑧ Shape the ring, see Figure 4-59 (8).
