Hur man gör 3D-smyckenmodeller med JewelCAD?
Förstå JewelCAD, representera grundläggande materialeffekter och smyckeseffekter
Inledning:
Vad krävs för att skapa fantastiska smyckesdesigner med JewelCAD? Den här guiden täcker allt från att förstå programvaran till att bemästra materialeffekter och skapa detaljerade smyckesmodeller. Lär dig hur du förverkligar dina idéer med steg-för-steg-instruktioner för att designa ringar, hängen och mycket mer. Upptäck varför JewelCAD är ett måste för smyckesdesigners, studior och varumärken som vill förbättra sitt hantverk.
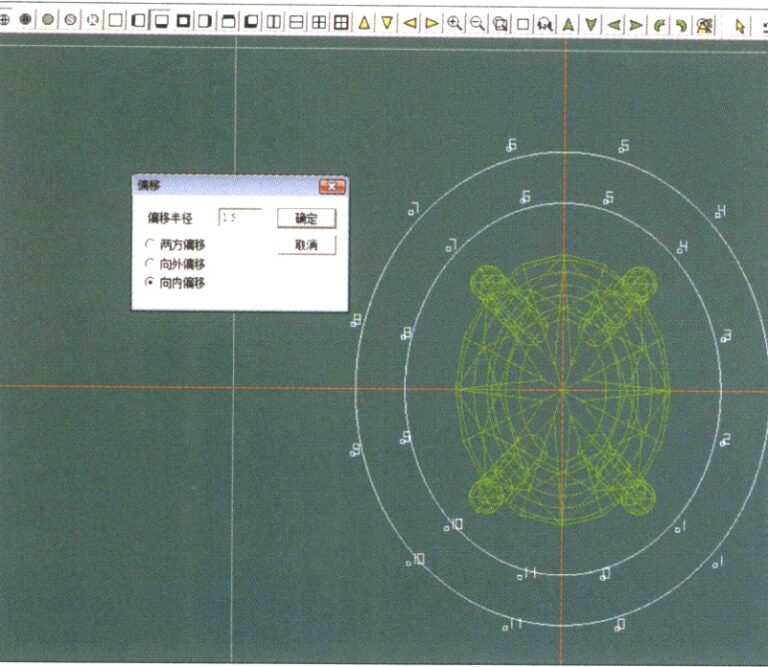
Diamantsvarvad infattningsring
Innehållsförteckning
Avsnitt I Förstå JewelCAD
JewelCAD är en programvara för datorstödd design specifikt för smycken som framgångsrikt utvecklades av ett CAD / CAM-företag i Hong Kong 1990. Efter över ett decennium av utveckling och förbättring har JewelCAD utvecklats från en ritprogramvara med begränsad funktion till en kraftfull, stabil, högspecialiserad och effektiv, professionell smyckedesign / tillverkningsprogramvara som allmänt antagits i stora smyckenproduktionsområden i Europa, Amerika och Asien.
Medan automatiseringen av produktion och bearbetning i smyckesindustrin har förbättrat effektiviteten avsevärt, matchar JewelCAD modern smyckedesign och har spridits i stor utsträckning i nuvarande kommersiella applikationer. Dess unika modelleringskoncept och verktyg gör det möjligt för smyckesdesigners att enkelt skapa tredimensionella smyckesobjekt, och det integreras också perfekt med CNC och RP snabb prototyping, vilket gör det till en modern smyckedesignprogramvara med breda utvecklingsmöjligheter. Som en professionell programvara för smyckedesign har JewelCAD tydliga fördelar jämfört med annan 3D-programvara när det gäller att skapa tredimensionella modeller av smycken, vilket återspeglas i följande fördelar.
(1) Lätt att använda, enkel och lätt att lära sig.
(2) Den har flexibla ritverktyg, som är mycket praktiska för att rita kurvor och komplexa former.
(3) Den har kraftfulla ytmodelleringsverktyg som flexibelt skapar eller modifierar komplexa konstruktioner.
(4) Renderingshastigheten är snabb; du kan också jämföra olika designeffektbilder. Kvaliteten på effektbilderna är hög och simuleringen är stark. Det är engör det möjligt att rotera för att observera den tredimensionella effekten, vilket intuitivt återspeglar den slutliga produkteffekten.
(5) Dess funktion är mycket effektiv och lämplig för att ändra smyckesstilar.
(6) En rik professionell databas och olika redigeringsverktyg underlättar kombinationen och omformningen av smycken, vilket gör verksamheten mer bekväm och effektiv.
(7) Genom att tillämpa principerna för booleska operationer i programvara kan man enkelt förena ytor som befinner sig i ett fritt tillstånd.
(8) I konstruktionen kan guldets vikt, mängd och storlek beräknas direkt.
(9) Kan bygga upp en databas för att visualisera designidéer och förbättra effektiviteten.
(10) Grafiken som ritas med JewelCAD är tydligare och mer konsekvent, vilket minskar sannolikheten för fel som orsakas av otydlig skrivning eller dålig ritningskvalitet. Det kan direkt mata ut papperslösa bilder, vilket sparar tid, ansträngning och pengar.
Avsnitt II Använda JewelCAD för att representera grundläggande materialeffekter
1. Sandblästring Finish Effekt
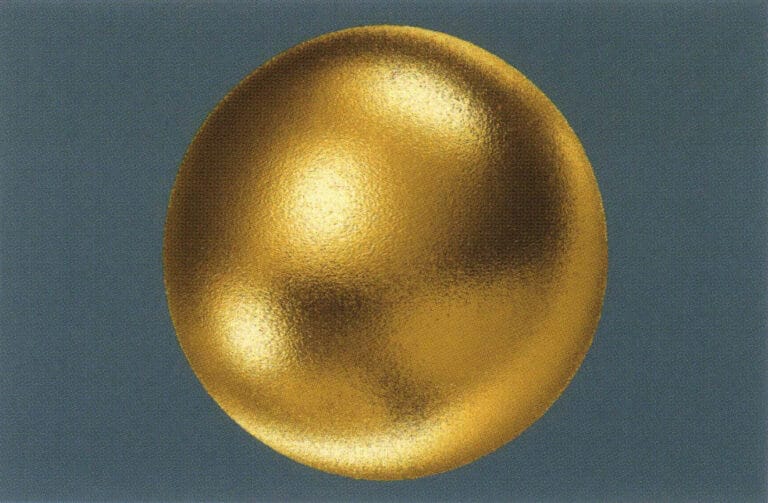
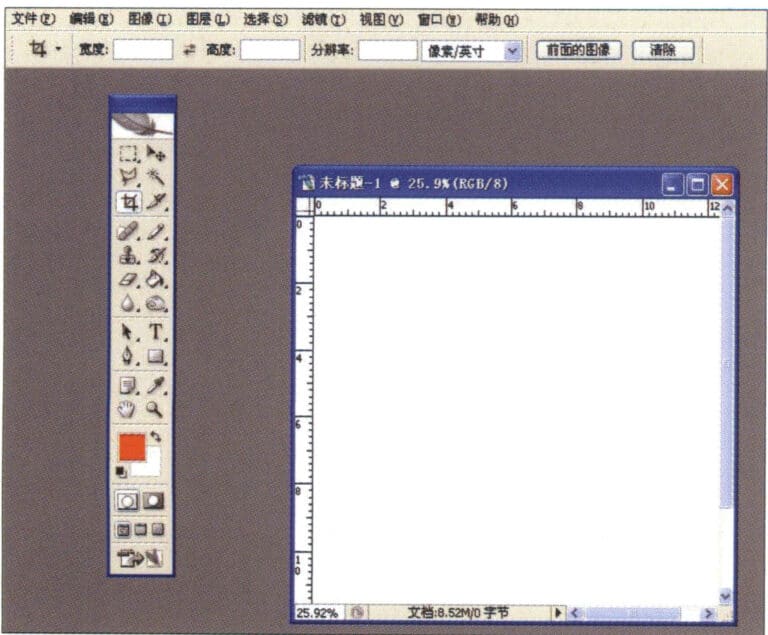
1. Skapa en ny fil i Photoshop med en upplösning på 300 pixlar/inch
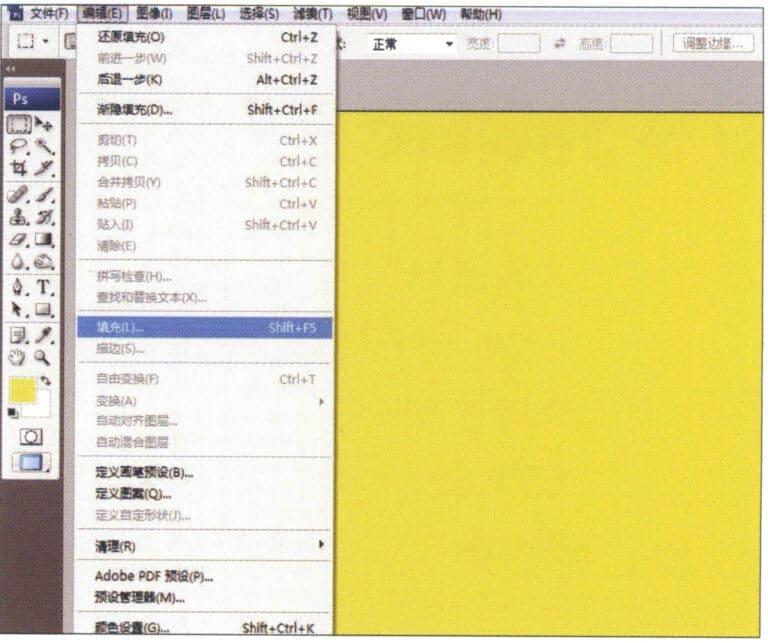
2. Select "Edit" > "Fill" from the menu bar, and set the foreground color to yellow

3. Select "Filter" from the menu bar > "Mottled" > "Add Mottled"
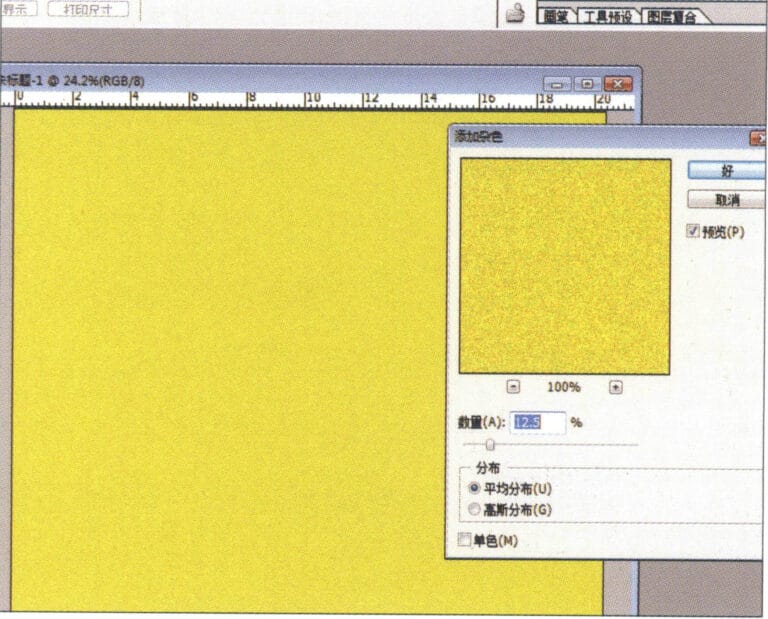
4. Öppna dialogrutan "Add Mottled", mata in relevanta värden och bekräfta
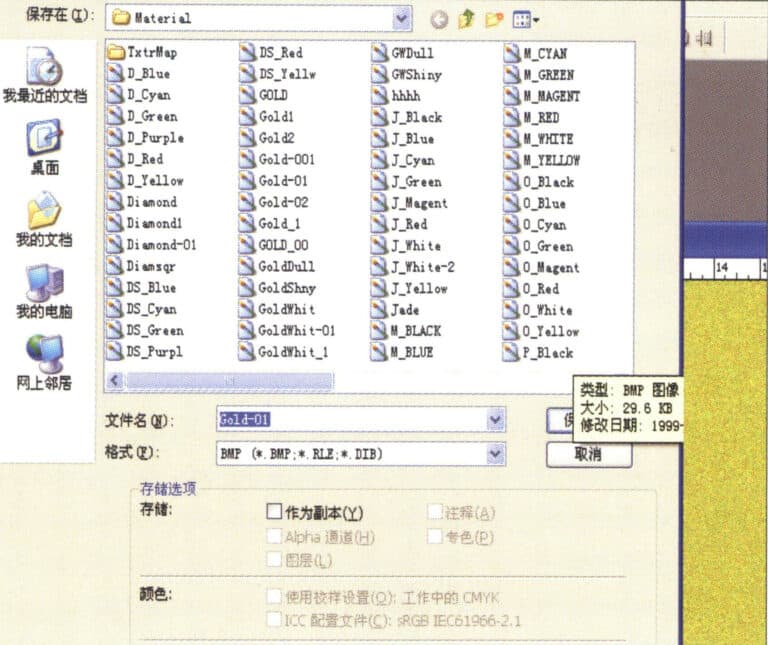
5. Store the document in the "JewelCAD" > "Material" folder, saved in "BMP" format

6. Create a new file in JewelCAD, select "Surface" > "Spherical Surface" from the menu bar
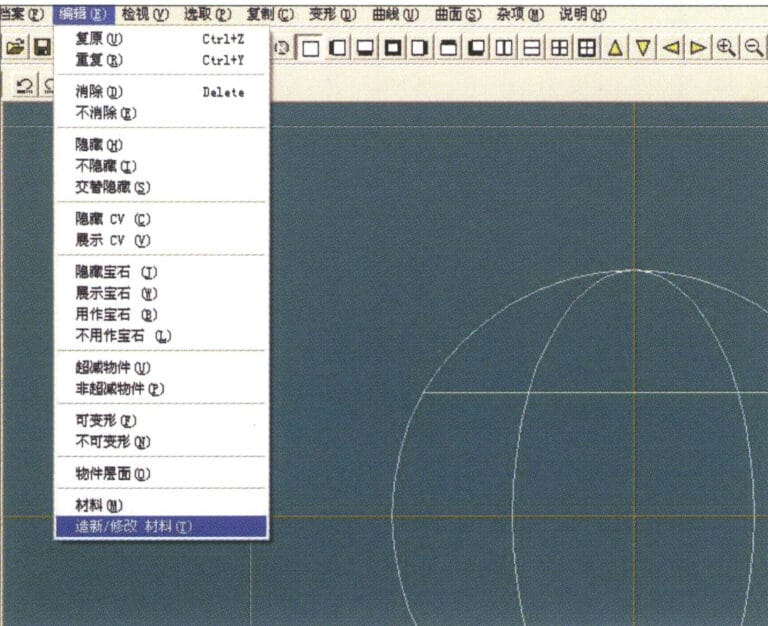
7. Select "Edit" > "Create/Modify Material" from the menu bar
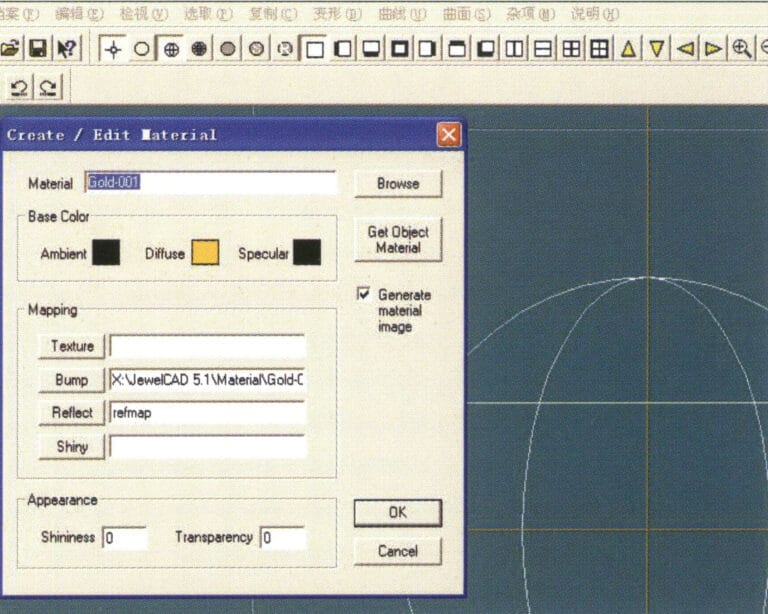
8. Öppna dialogrutan "Create/Modify Material", mata in relevanta värden och bekräfta
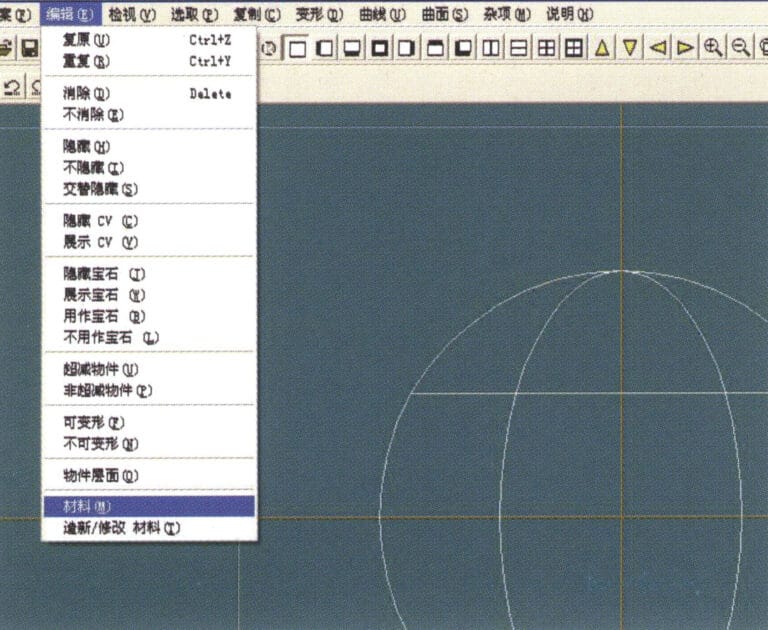
9. Select "Edit" > "Materials" from the menu bar
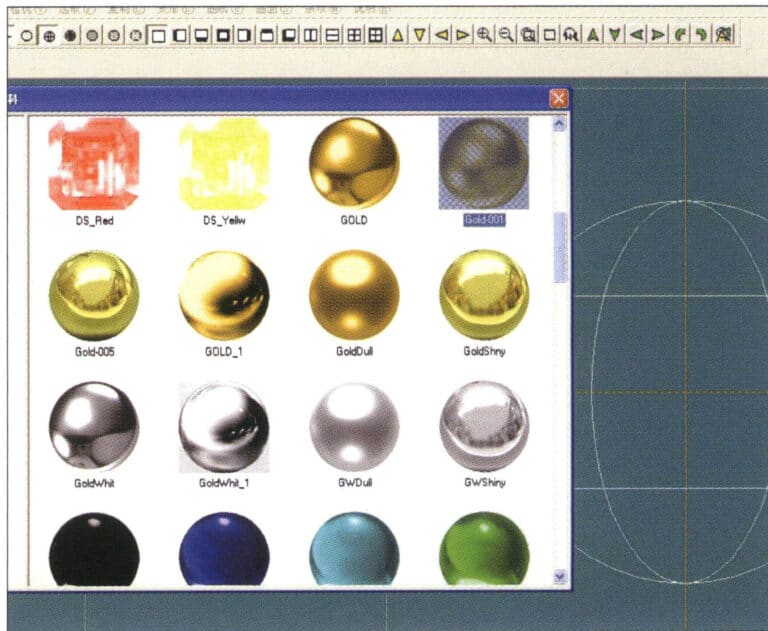
10. Öppna dialogrutan "Material", välj material och bekräfta
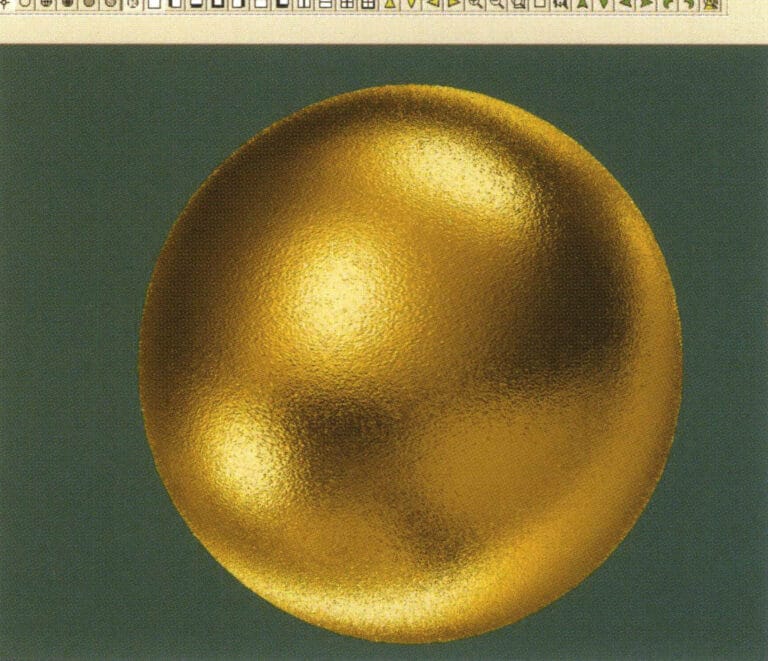
11. Select "View" > "Shadow Map" from the menu bar to inspect the shadow effects.
12. Select "File" > "Save File" from the menu bar to save the document
2. Borsteffekt
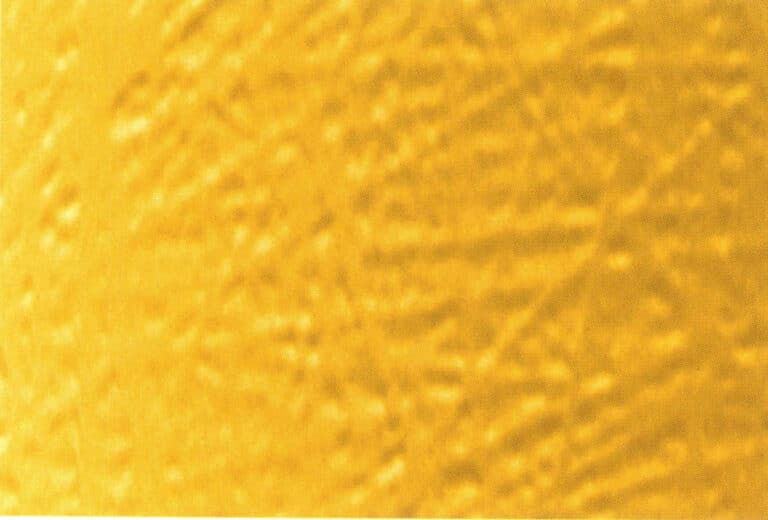

1. Scan a texture file in Photoshop with a resolution of 300 pixels/inch, and select "Filter" > "Blur" > "Motion Blur" from the menu bar to apply the blur effect
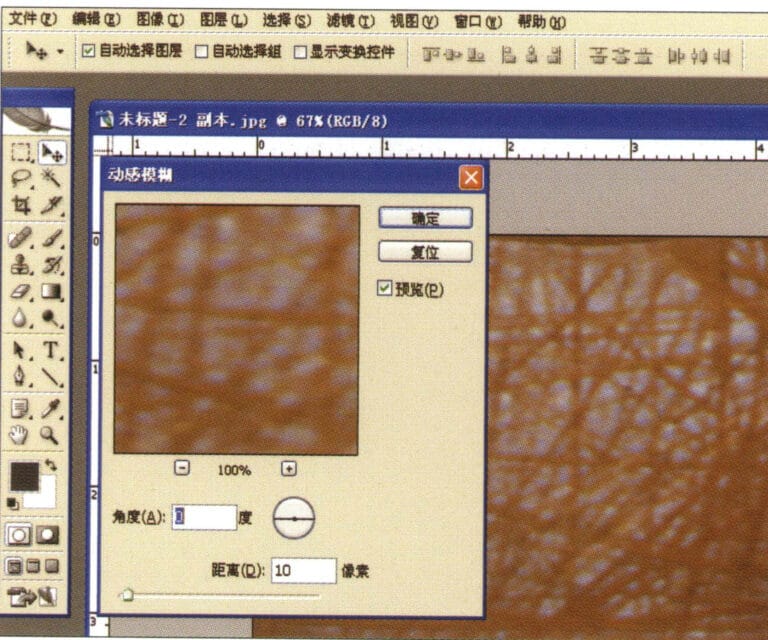
2. Öppna dialogrutan "Motion Blur", mata in relevanta värden och bekräfta
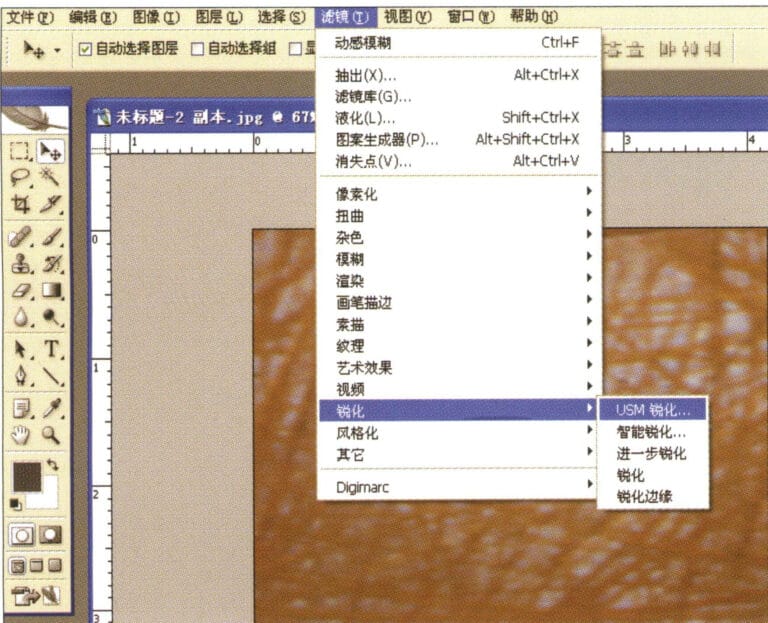
3. Select "Filter" > "Sharpen" > "USM Sharpening" from the menu bar
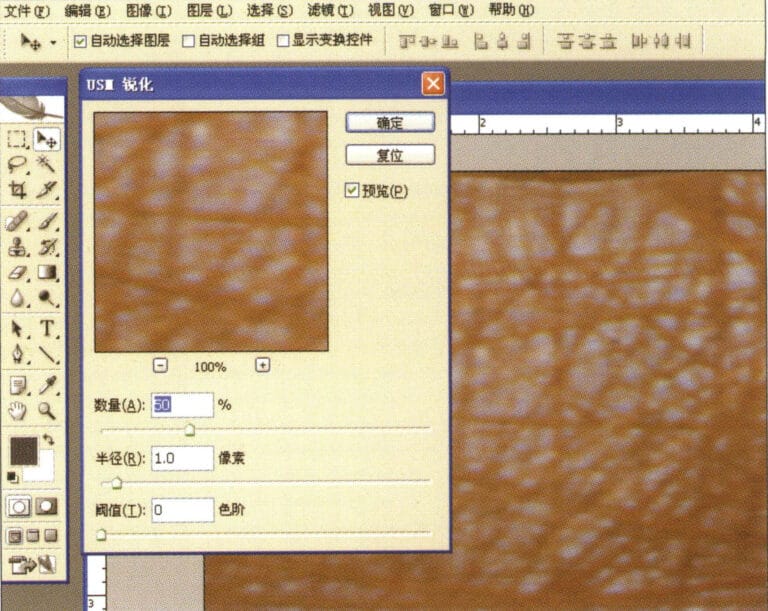
4. Öppna dialogrutan "USM Sharpening", mata in relevanta värden och bekräfta
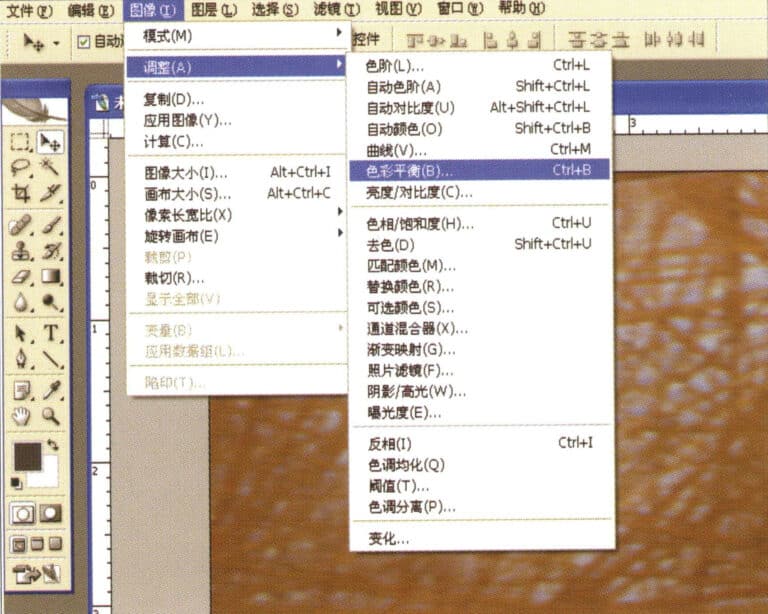
5. Select "Image" > "Adjustments" > "Color Balance" from the menu bar
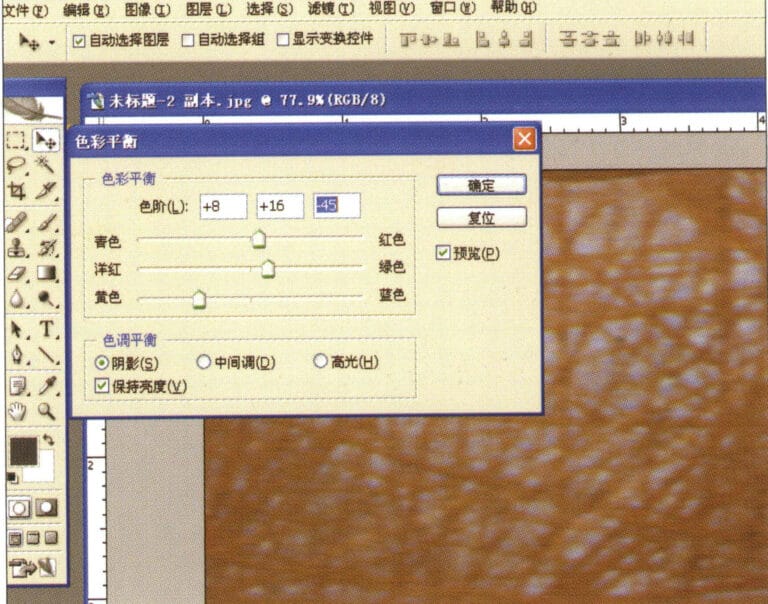
6. Öppna dialogrutan "Color Balance", mata in relevanta värden och bekräfta
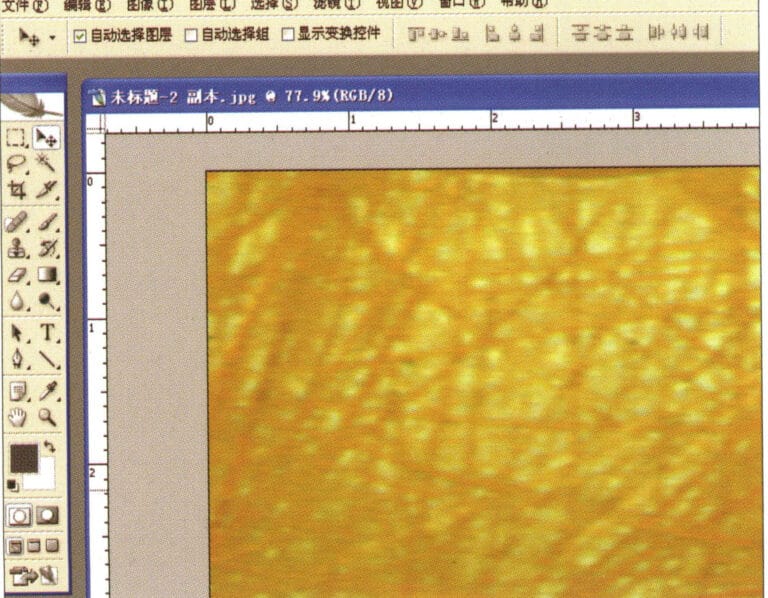
7. Effektdiagram efter visning av färgbalans
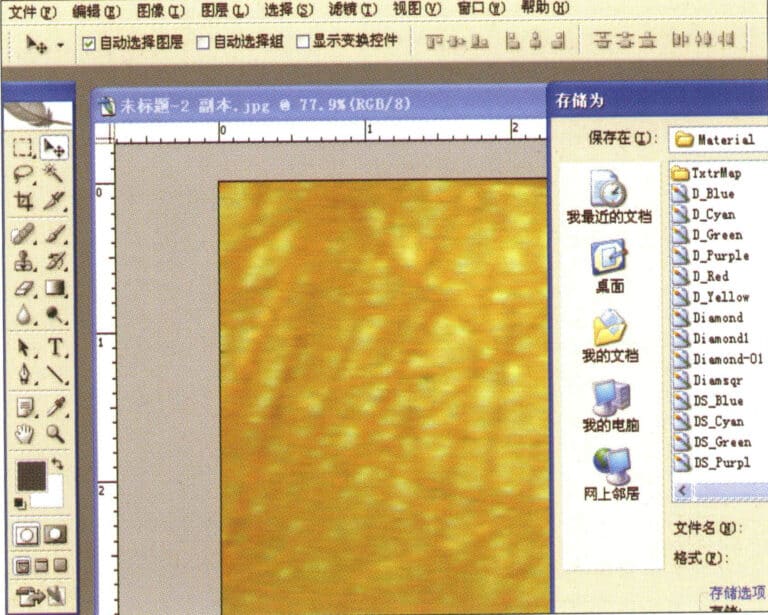
8. Store the document in the "JewelCAD" > "Material" folder, saved in "BMP" format
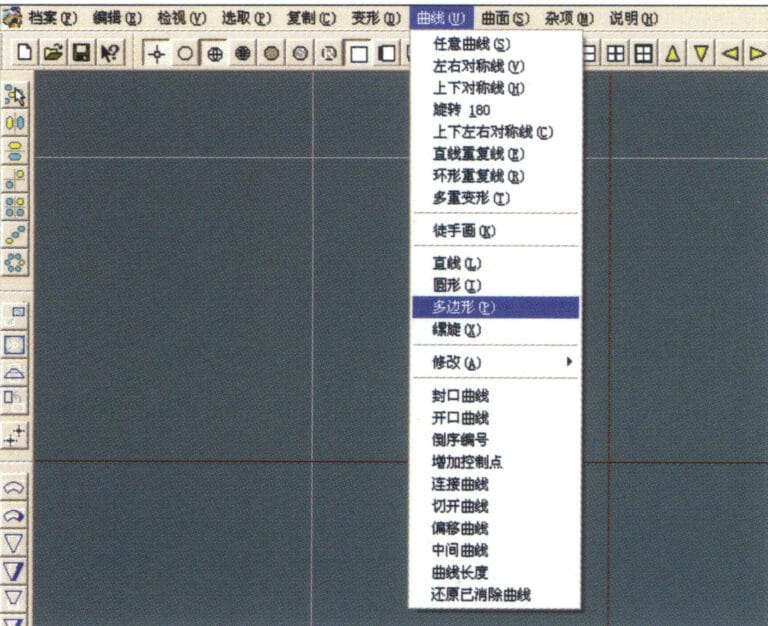
9. In JewelCAD, create a new file, select "Curve" > "Polygon" from the menu bar
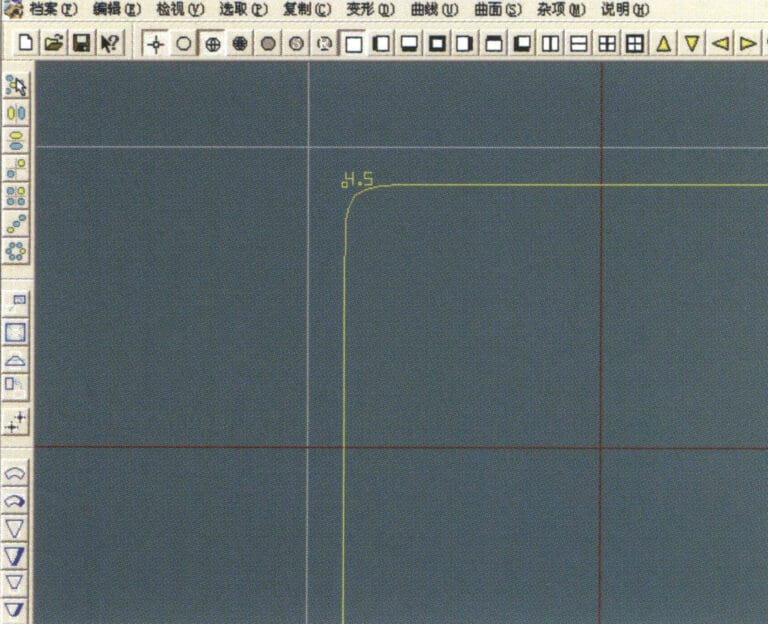
10. Använd "polygon" för att rita en kvadrat
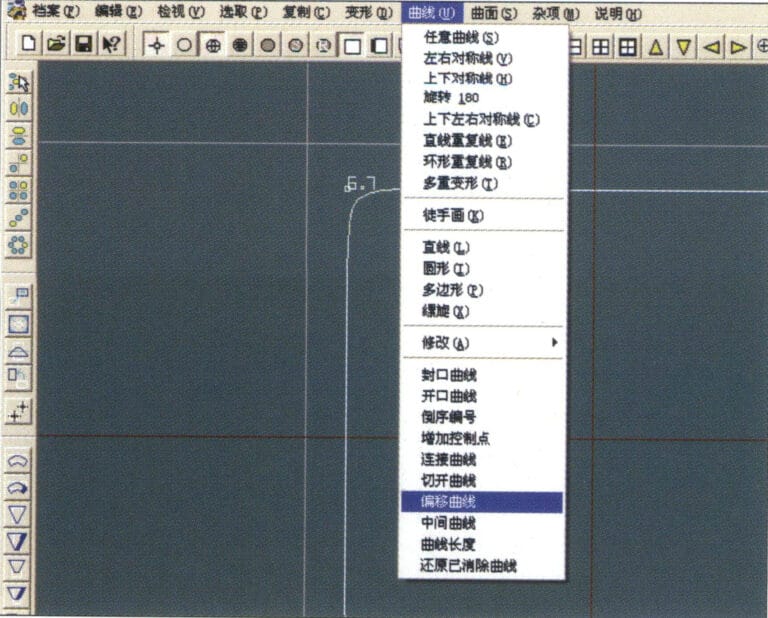
11. Select "Curve" > "Offset Curve" from the menu bar
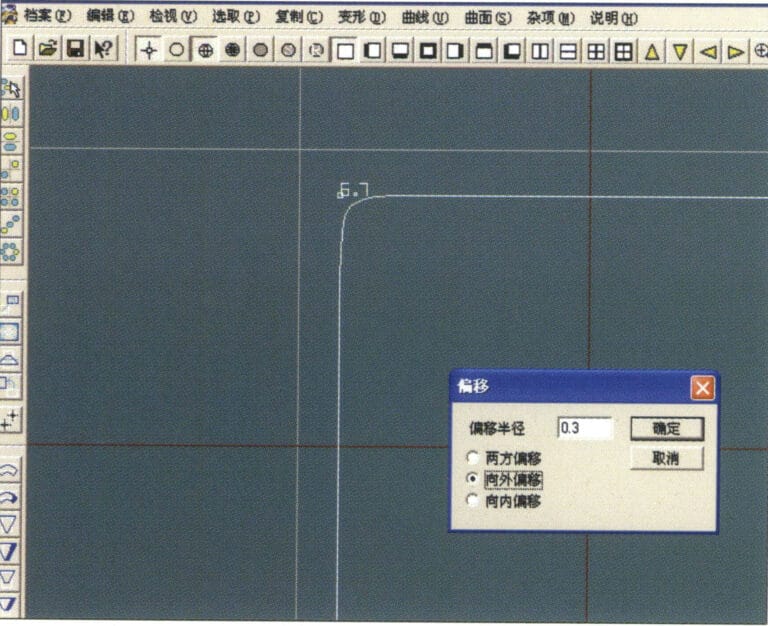
12. Öppna dialogrutan "Offset Curve", mata in relevanta värden och bekräfta
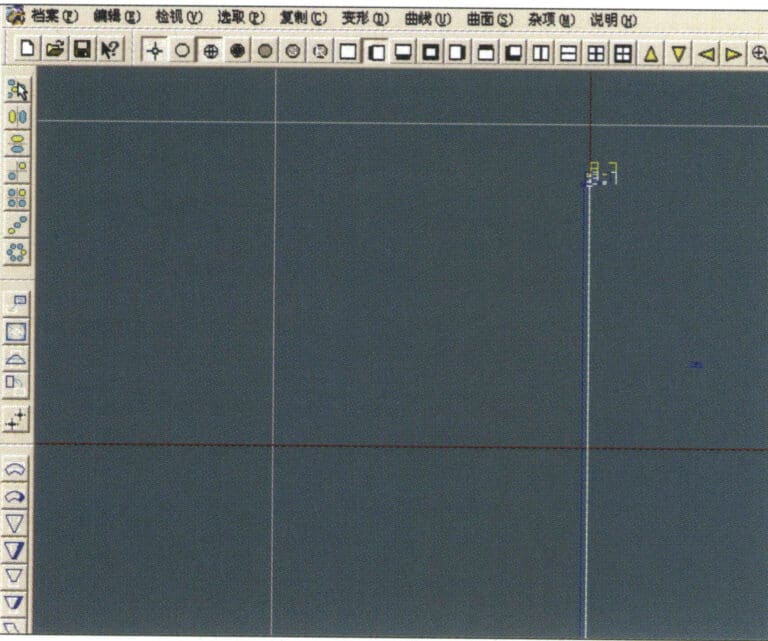
13. Effektdiagram efter visning av offsetkurvan
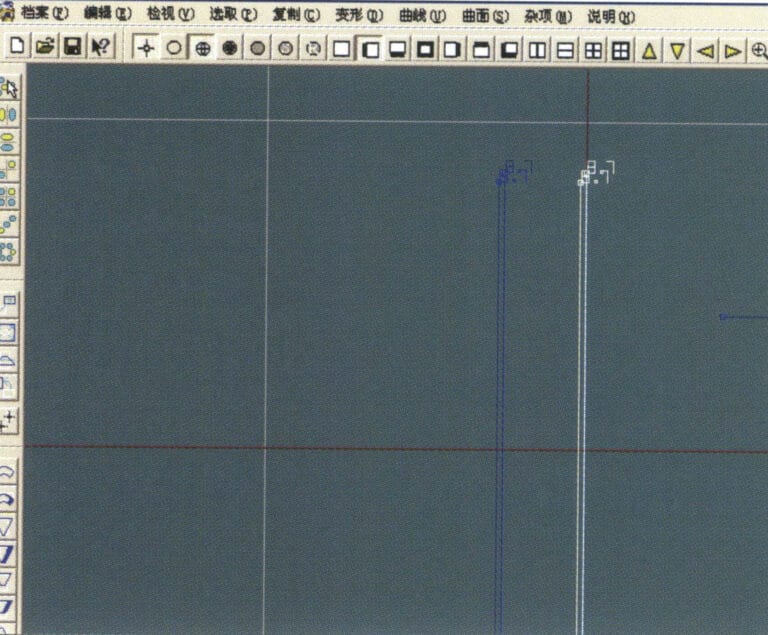
14. Select "Deformation" > "Move" from the menu bar to move the selected curve
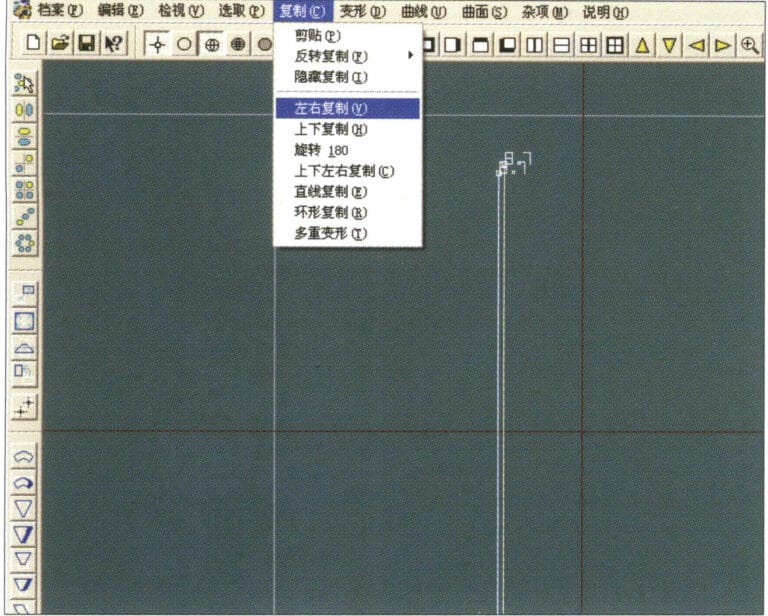
15. Select "Copy" > "Copy Left and Right" from the menu bar to copy the selected curve to the left and right
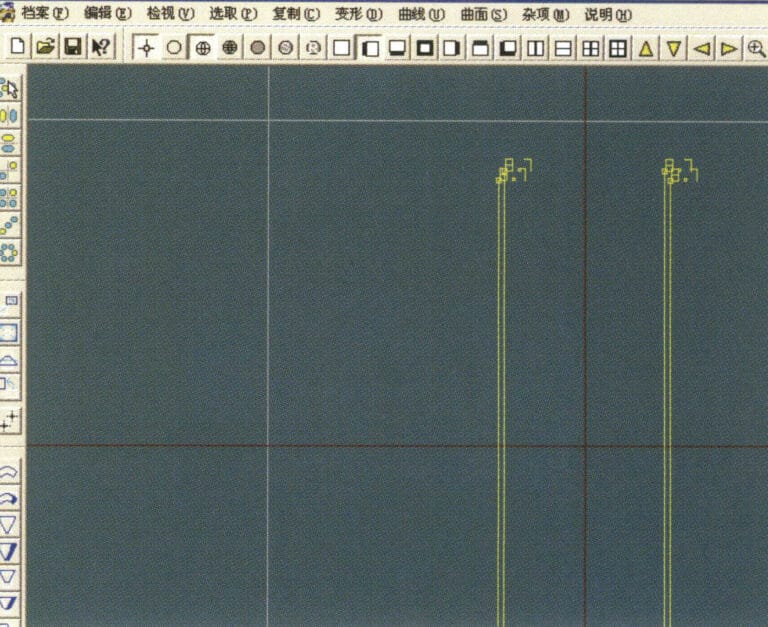
16. Visa effektbilderna efter vänster- och högerdubblering
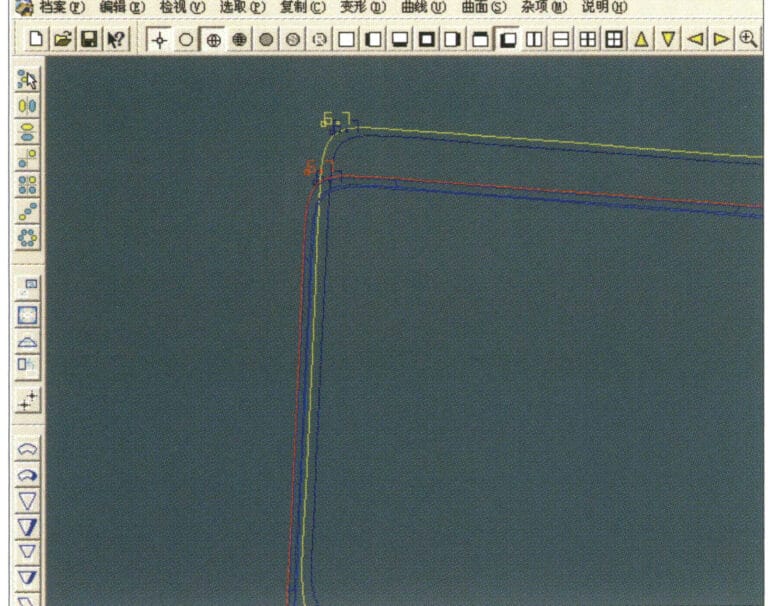
17. Select "Surface" > "Curve Surface Connection" from the menu bar, and double-click the first and second curves/surfaces in a clockwise direction with the left mouse button to create a curve surface connection
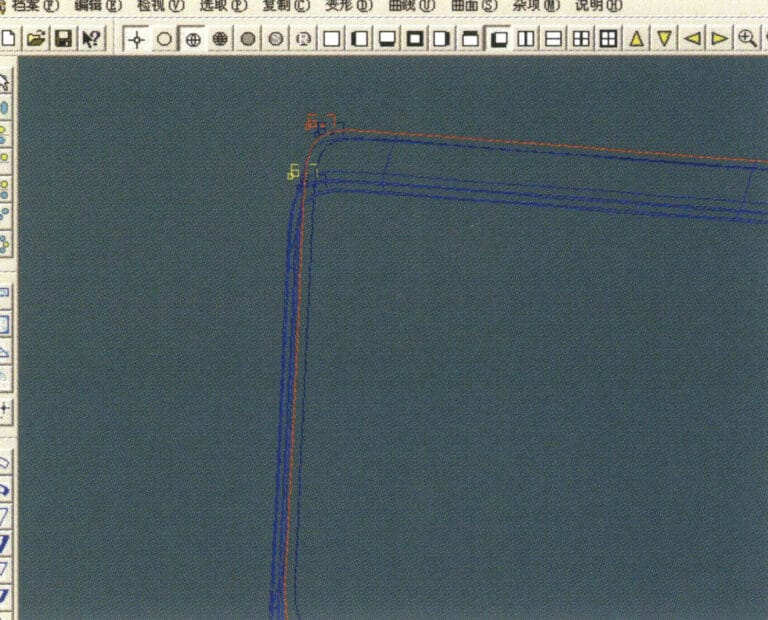
18. Dubbelklicka på den tredje kurvan/ytan med vänster musknapp i medurs riktning för att skapa en linje/yta-anslutning
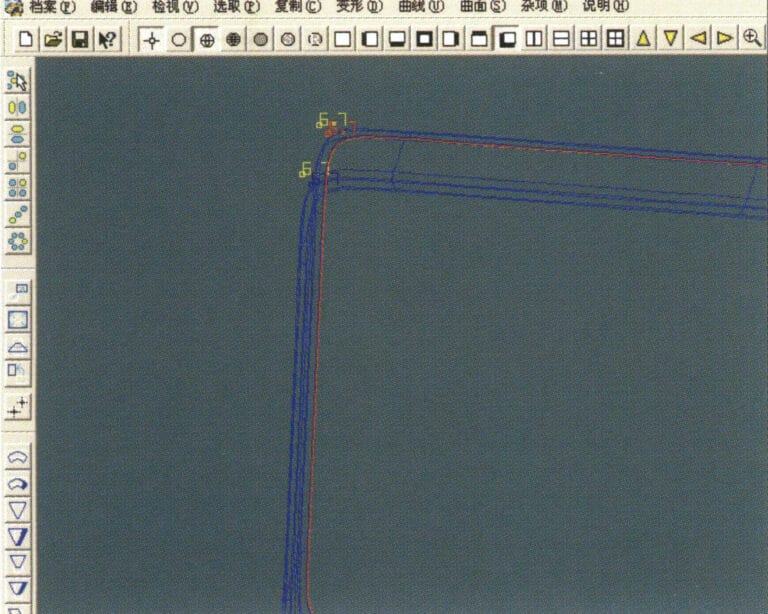
19. Fortsätt medsols; dubbelklicka på den fjärde kurvan/ytan med vänster musknapp för att skapa en linje/yta-förbindelse

20. Select "View" > "Shadow Map" from the menu bar to inspect the shadow effects
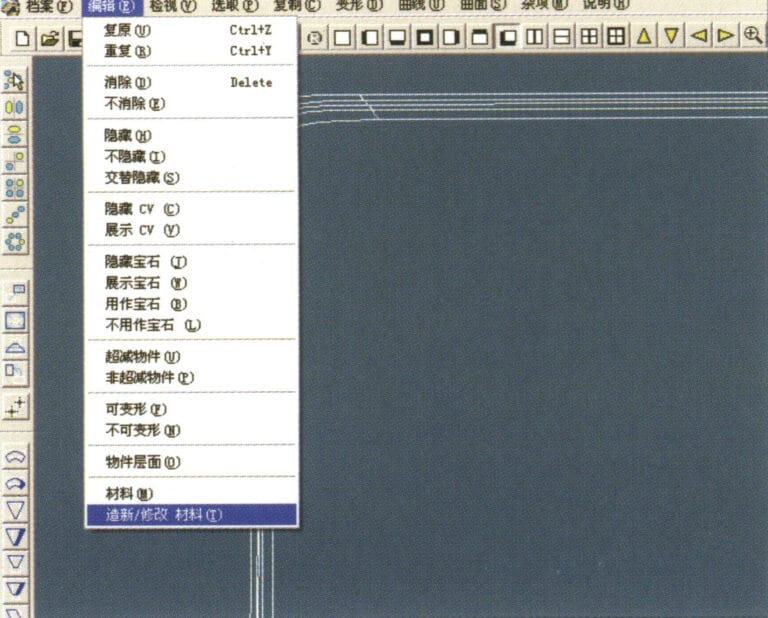
21. Select "Edit" > "Create/Modify Material" from the menu bar
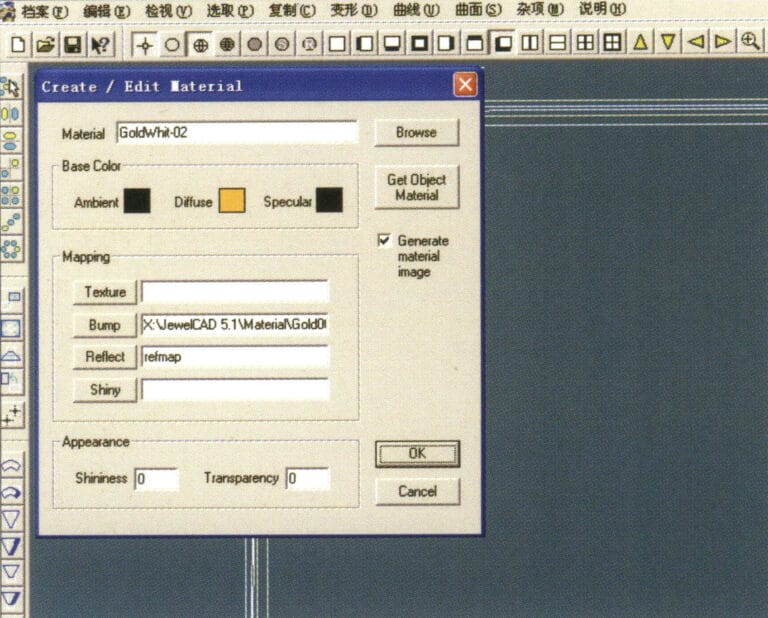
22. Öppna dialogrutan "Create/Modify Material", mata in relevanta värden och bekräfta
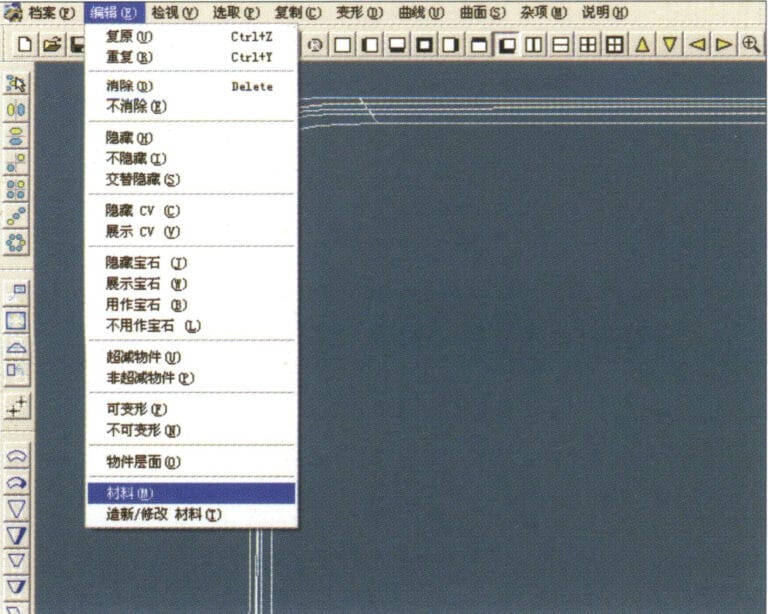
23. Select "Edit" > "Materials" from the menu bar
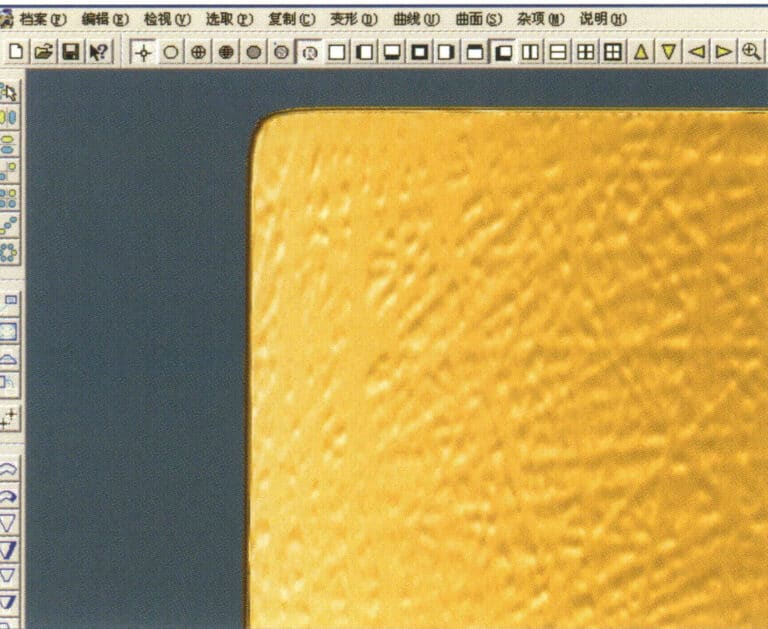
24. Select "View" > "Shadow Map" on the menu bar to view the light and shadow effects 25. Select "File" > "Save File" on the menu bar to save the file
3. Finish med barktextur
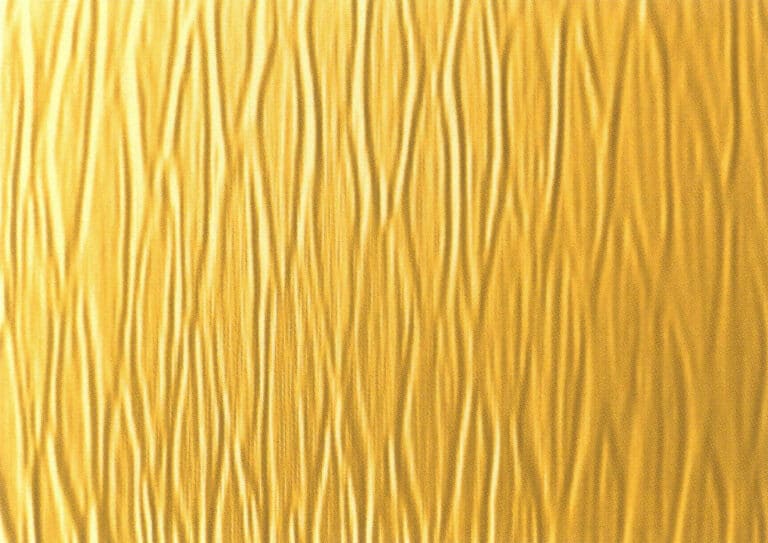

1. Skanna en texturfil till Photoshop med en upplösning på 300 pixlar/inch
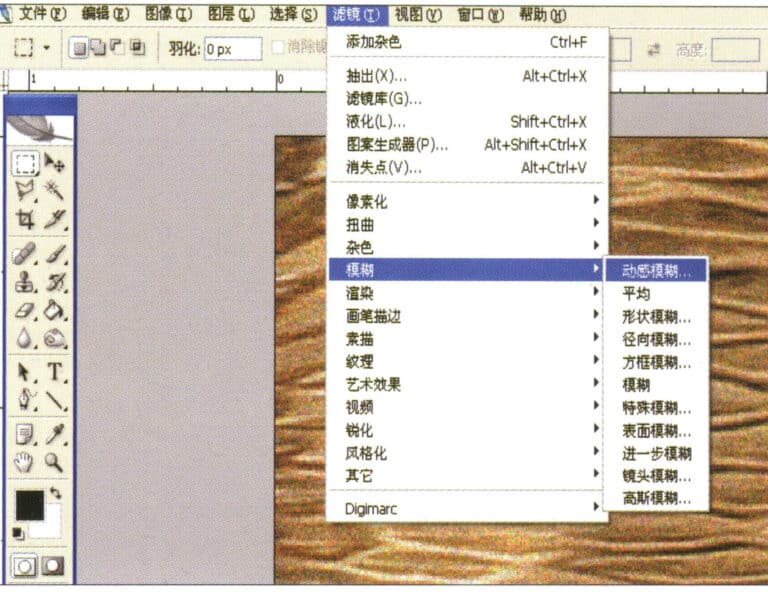
2. Select "Filter" > "Blur" > "Motion Blur" from the menu bar
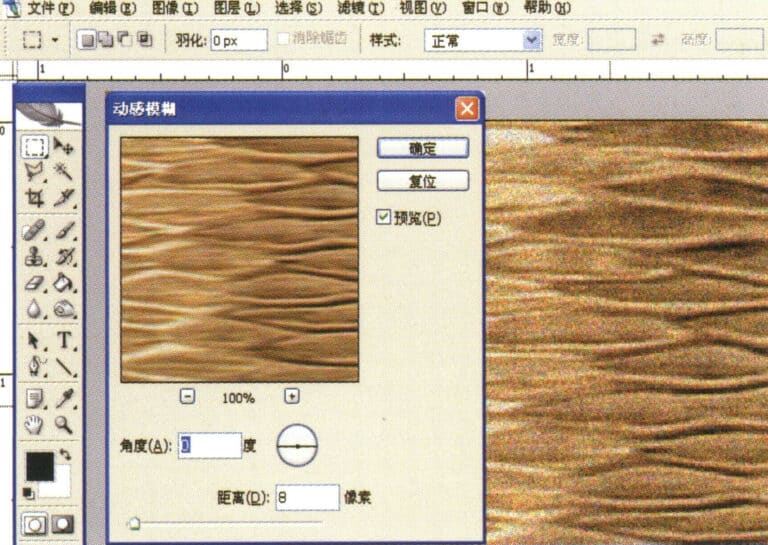
3. Öppna dialogrutan "Motion Blur", mata in relevanta värden och bekräfta
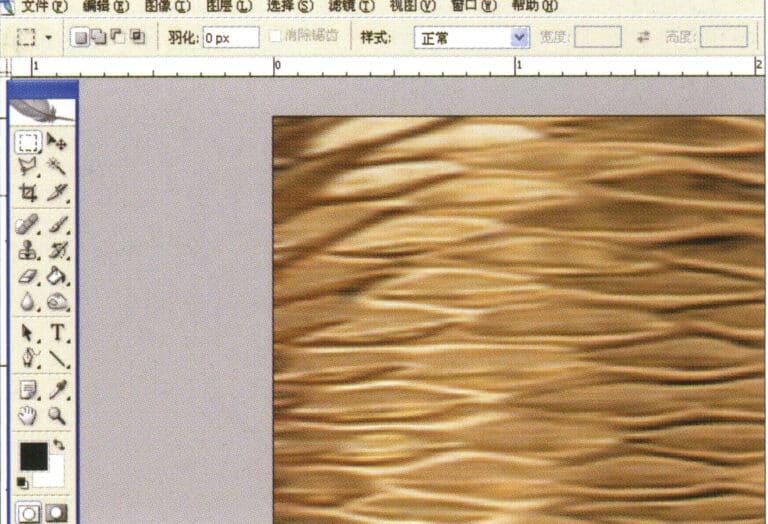
4. Visa effektbilden efter rörelseoskärpa
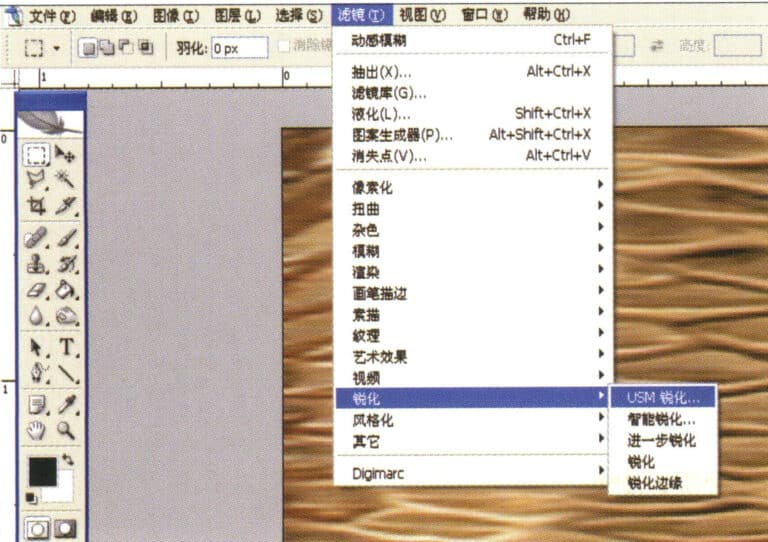
5. Select "Filter" > "Sharpen" > "USM Sharpening" from the menu bar
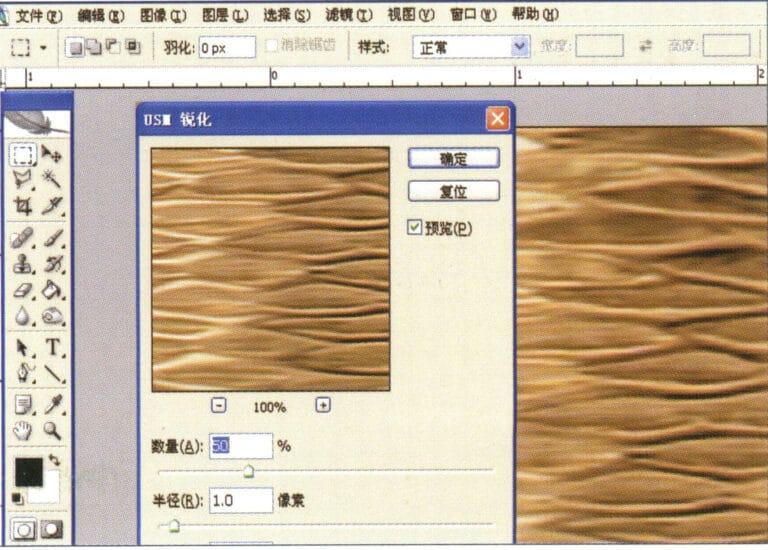
6. Öppna dialogrutan "USM Sharpening", mata in relevanta värden och bekräfta
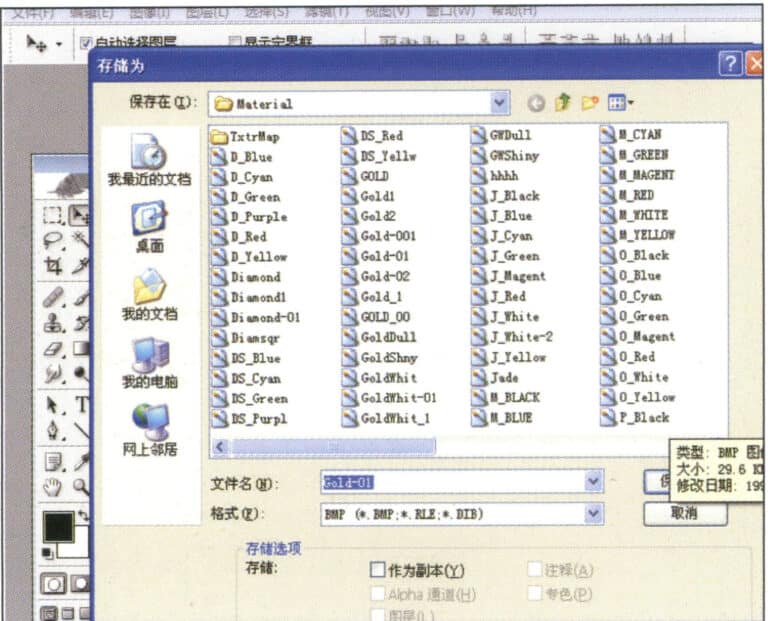
7. Store the document in the "JewelCAD" > "Material" folder and save it in "BMP" format
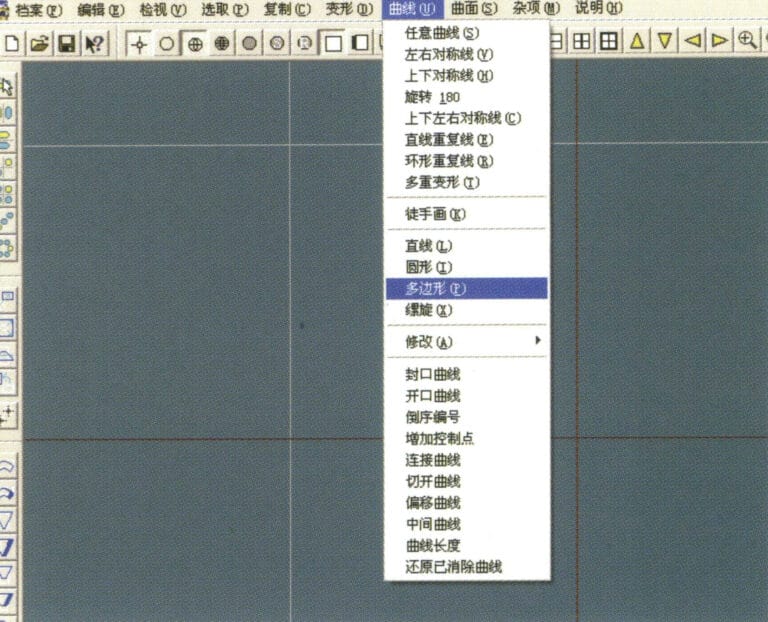
8. In JewelCAD, create a new file, select "Curve" > "Polygon" from the menu bar
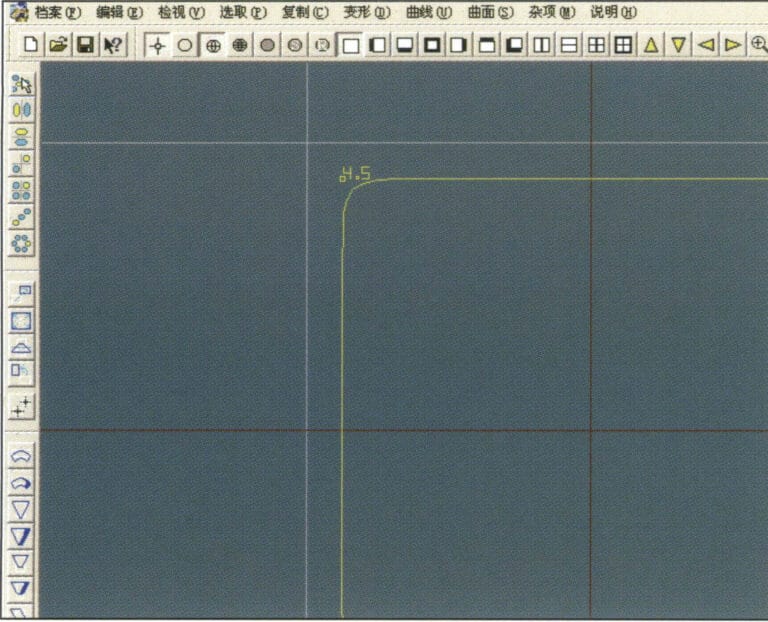
9. Använd "polygon" för att rita en kvadrat
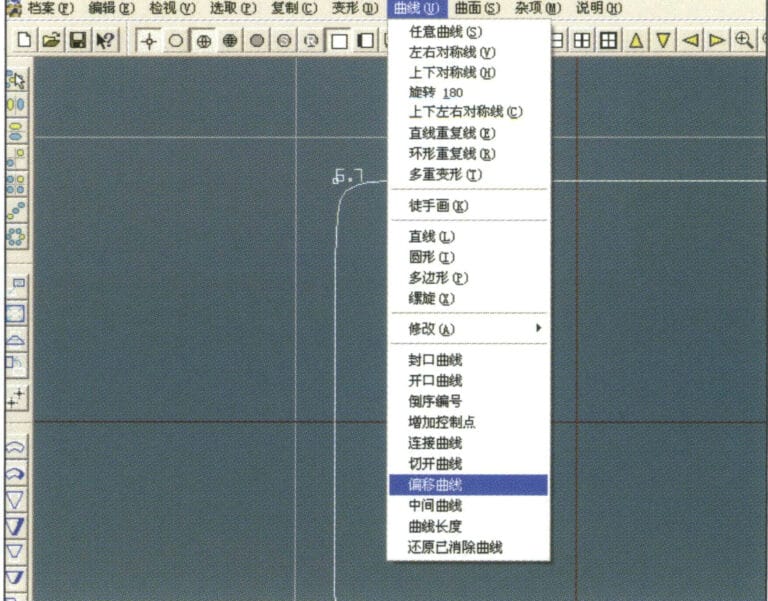
10. Select "Curve" > "Offset Curve" from the menu bar
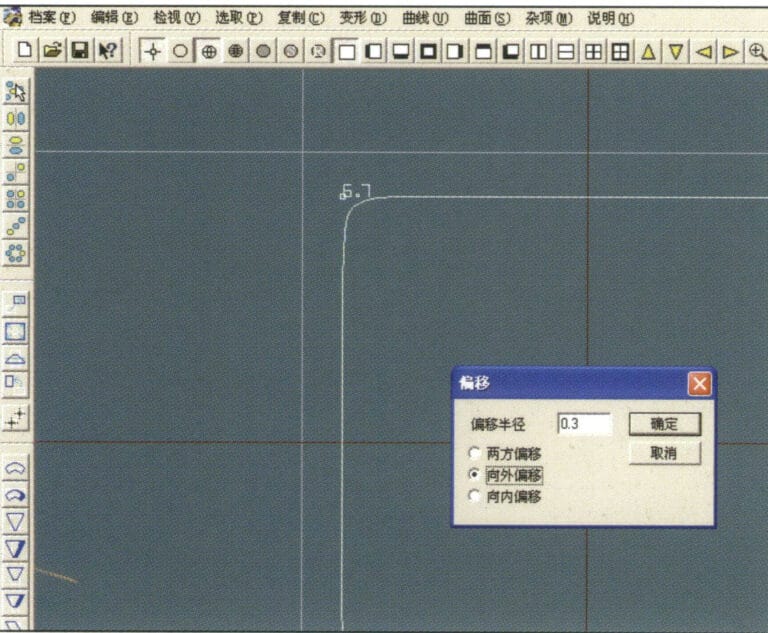
11. Öppna dialogrutan "Offset Curve", mata in relevanta värden och bekräfta
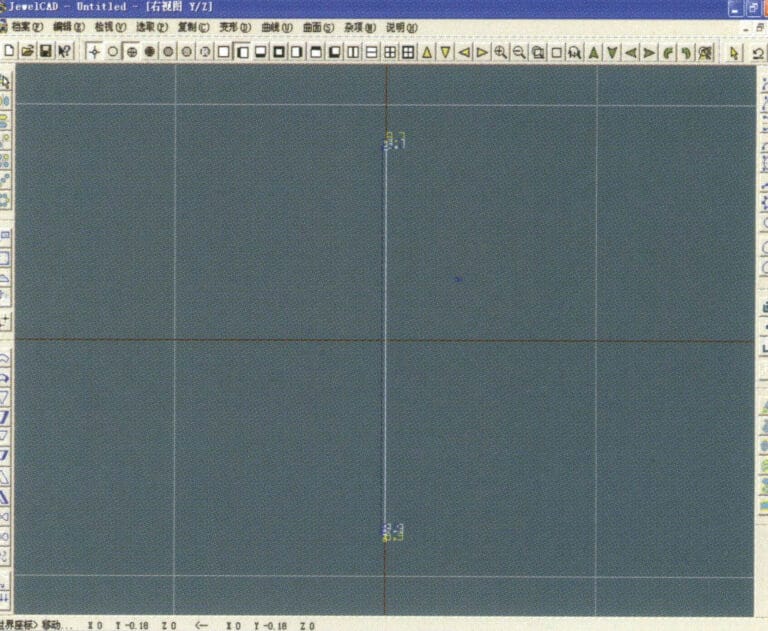
12. Effektdiagram efter visning av offsetkurvan
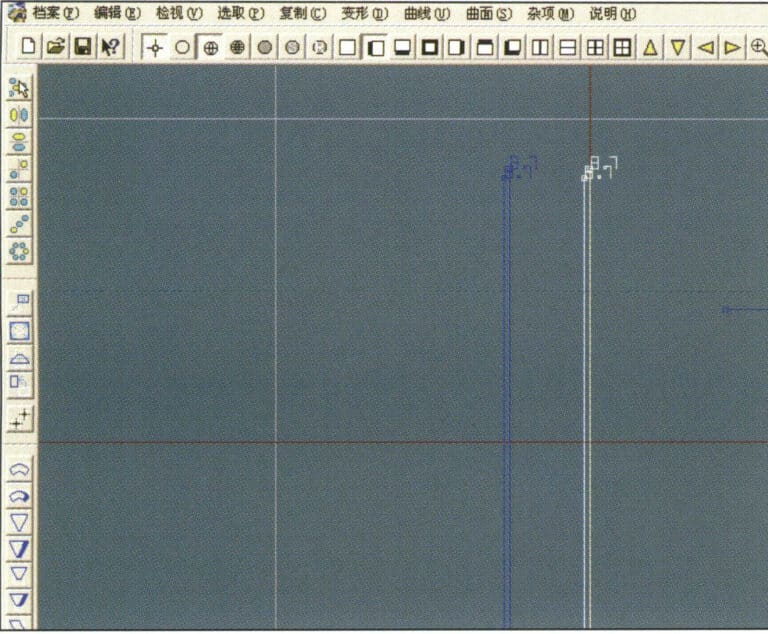
13. Select "Deformation" > "Move" from the menu bar to move the selected curve
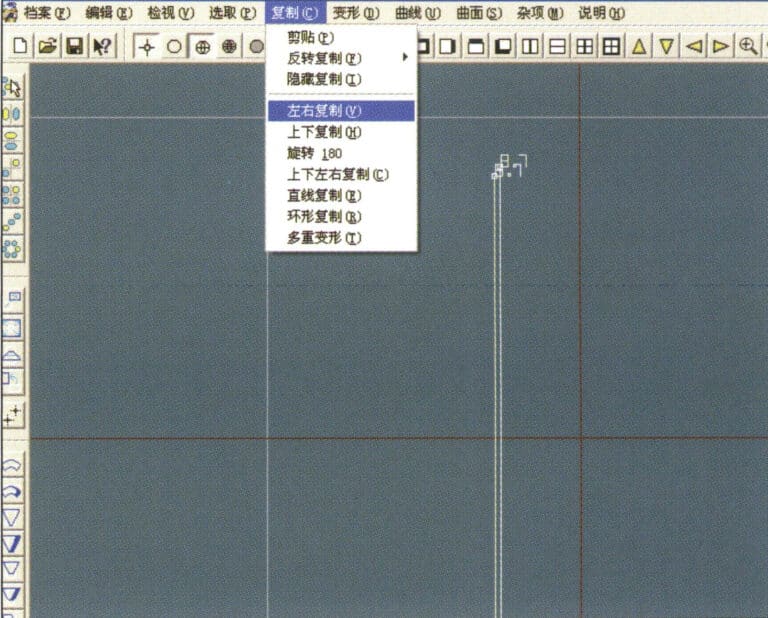
14. Select "Copy" > "Copy Left and Right" from the menu bar to copy the selected curve to the left and right
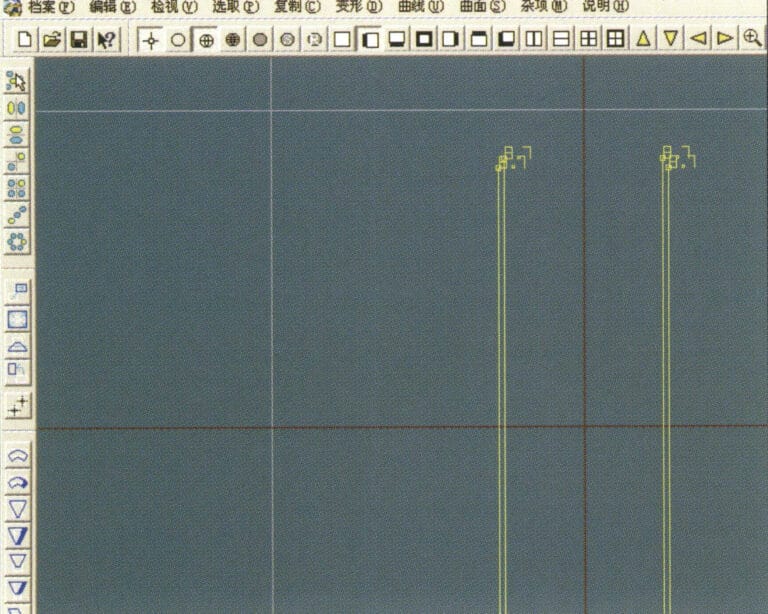
15. Visa effektbilderna efter kopiering av vänster och höger
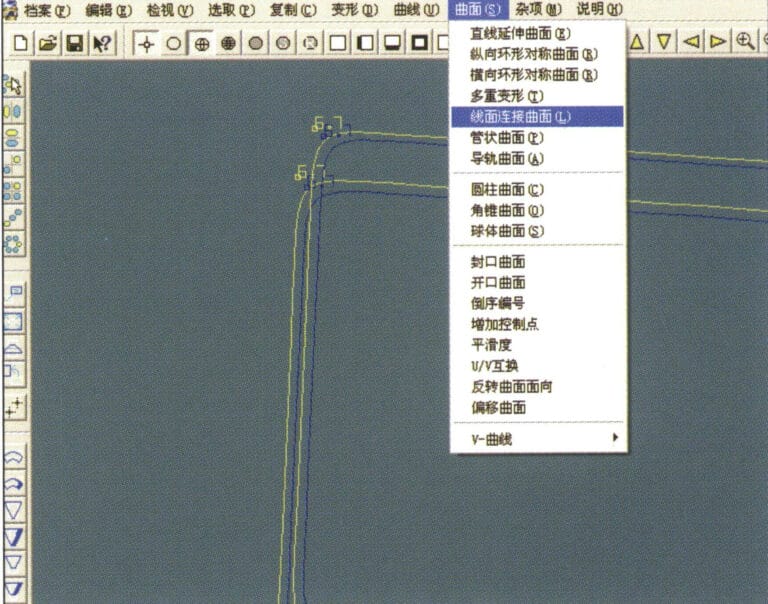
16. Select "Surface" > "Line-Surface Connection Surface" from the menu bar, and select the curve/surface to create a line-surface connection surface
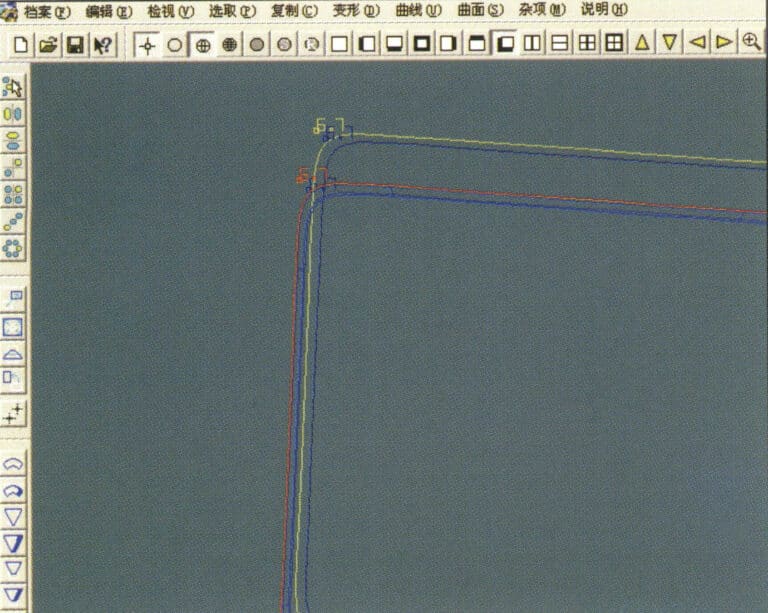
17. Select the menu bar "Surface" > "Curve Surface Connection," and double-click the first and second curves/surfaces with the left mouse button in a clockwise direction to create a curve surface connection
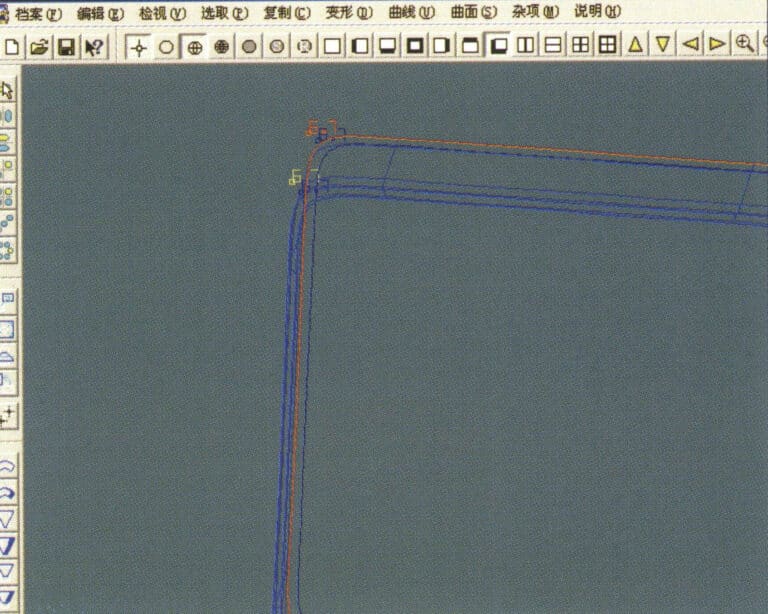
18. Dubbelklicka på den tredje kurvan/ytan med vänster musknapp i medurs riktning för att skapa en linje/yta-anslutning
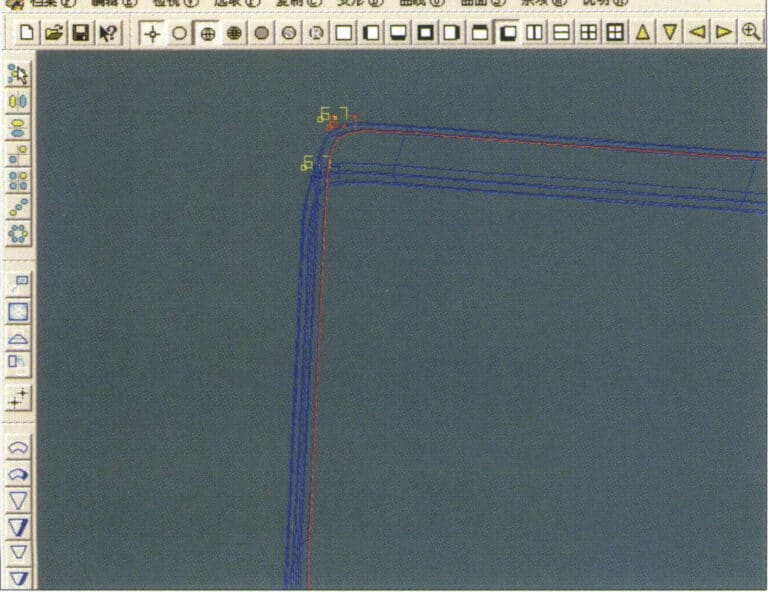
19. Fortsätt medsols; dubbelklicka på den fjärde kurvan/ytan med vänster musknapp för att skapa en linje/yta-förbindelse
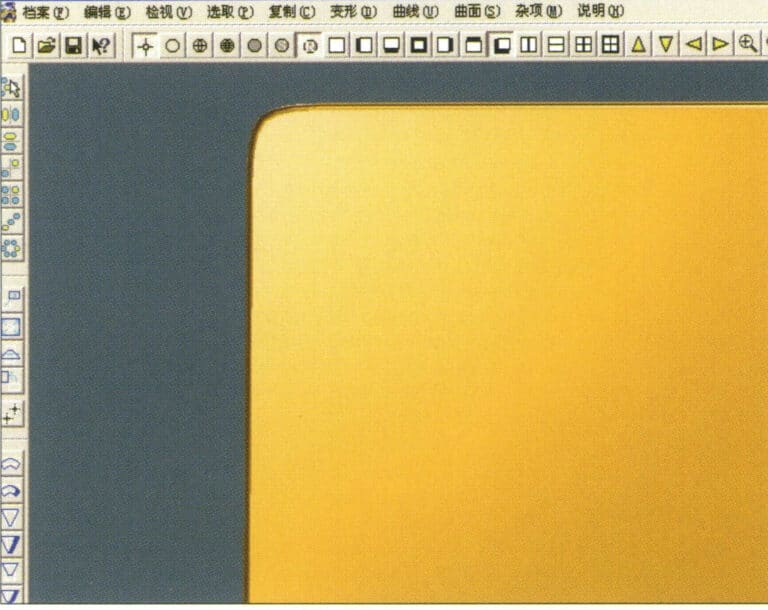
20. Select "View" > "Shadow Map" from the menu bar to inspect the shadow effects
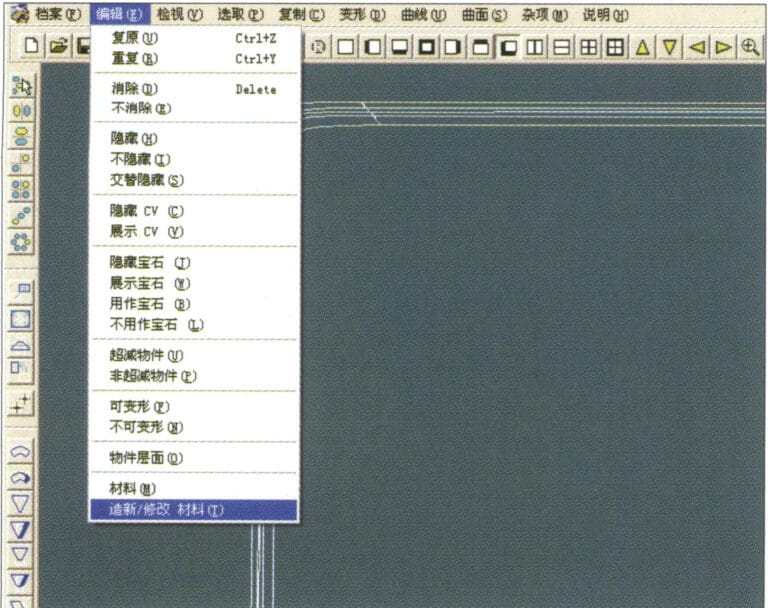
21. Select "Edit" > "Create/Modify Material" from the menu bar
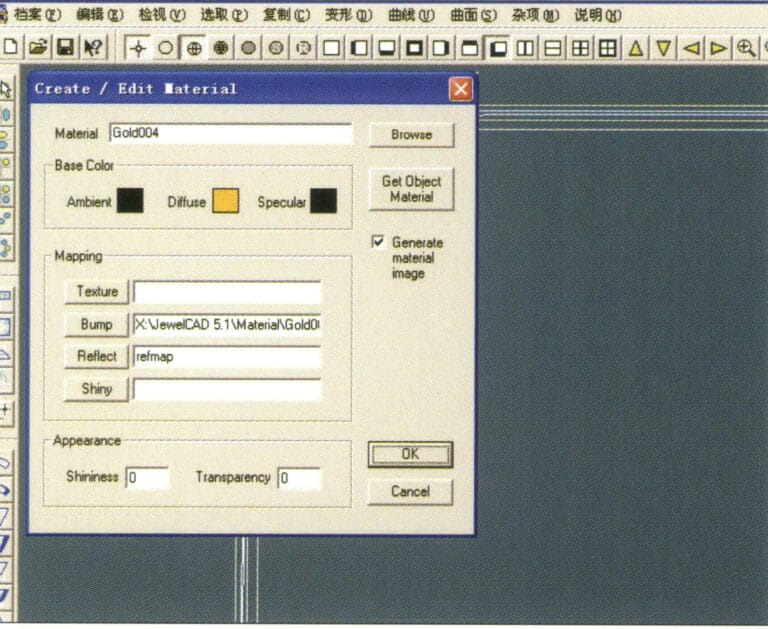
22. Öppna dialogrutan "Create/Modify Material", mata in relevanta värden och bekräfta
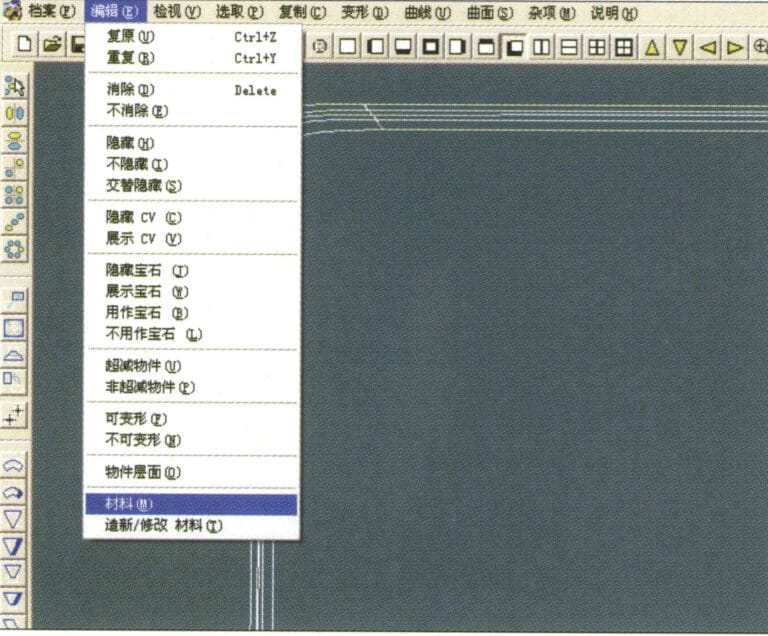
23. Select “Edit” > “Material” in the menu bar
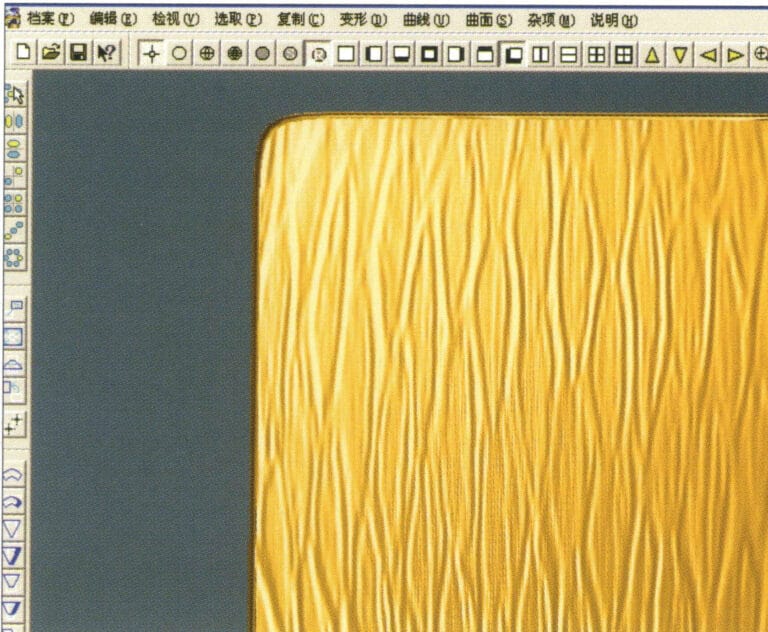
24. Select "View" > "Shadow Map" from the menu bar to examine the shadow effects
25. Select "File" > "Save As" from the menu bar to save the file
4. Maskinsvarvad yta
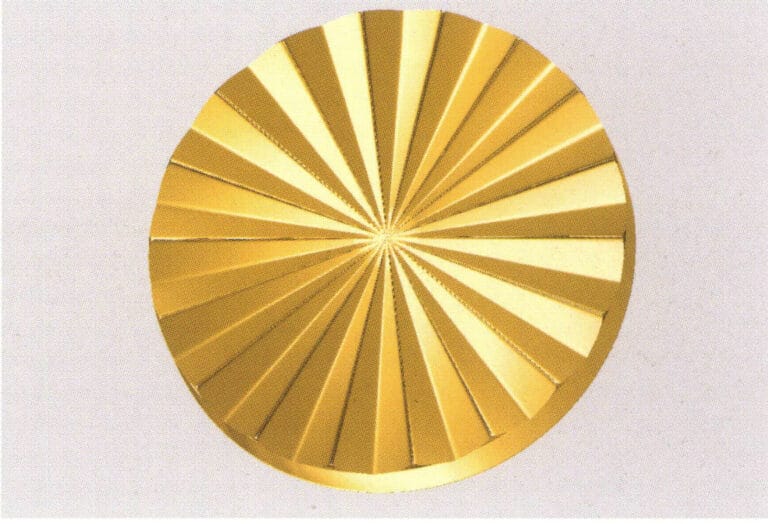

1. Create a new file in JewelCAD, select "Curve" > "Circular Curve" from the menu bar, enter the relevant values in the "Circular Curve" dialog box, and confirm
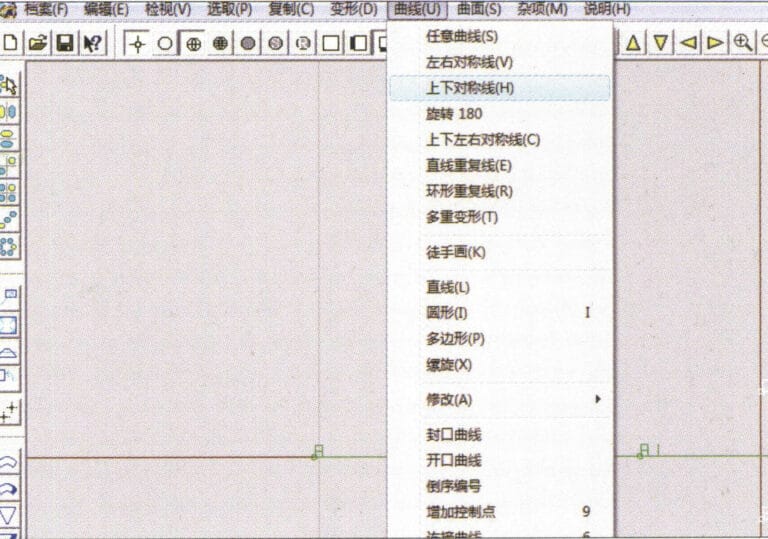
2. Select "Curve" > "Left-Right Symmetry Line" from the menu bar to draw a section
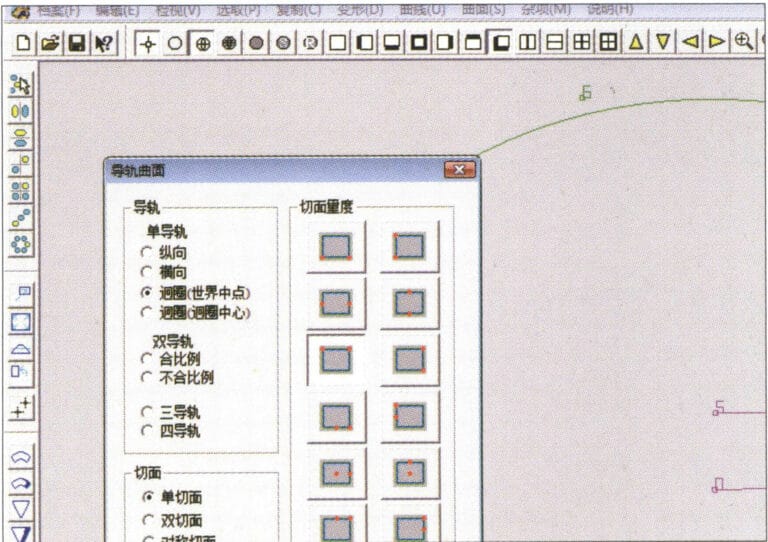
3. Select "Surface" > "Rail Surface" from the menu bar, enter "Rail Surface," select the relevant options and confirm; left-click on a curve as the section of the rail surface; left-click on another curve as the "Rail" > "Finish."

4. Select “View” > “Shadow Map” on the menu bar to view the light and shadow effects
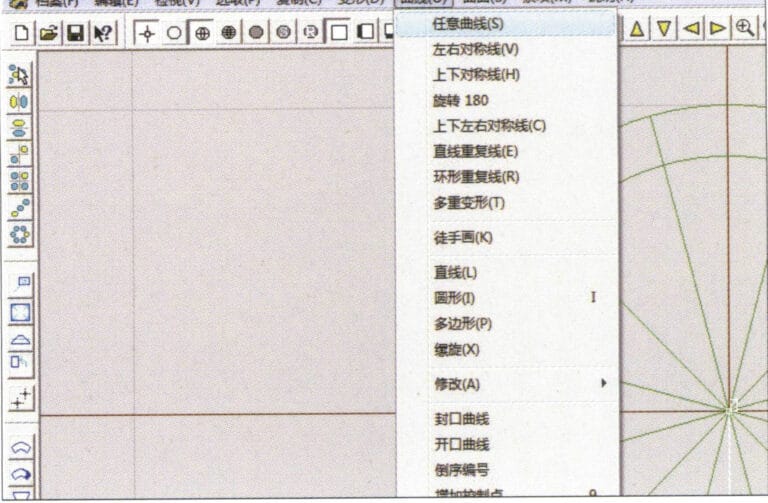
5. Select "Curve" > "Freefrom Curve" from the menu bar
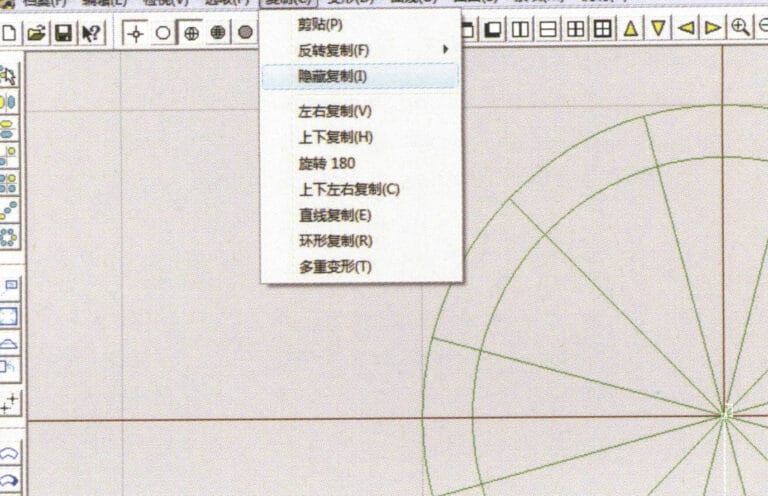
6. Select "Copy" > "Hide Copy" from the menu bar
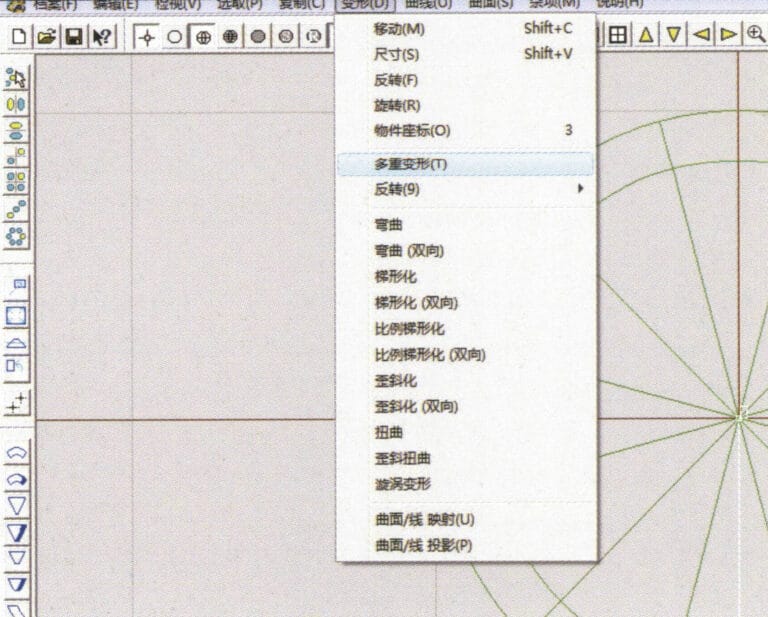
7. Select "Deformation" > "Multiple Deformation" from the menu bar
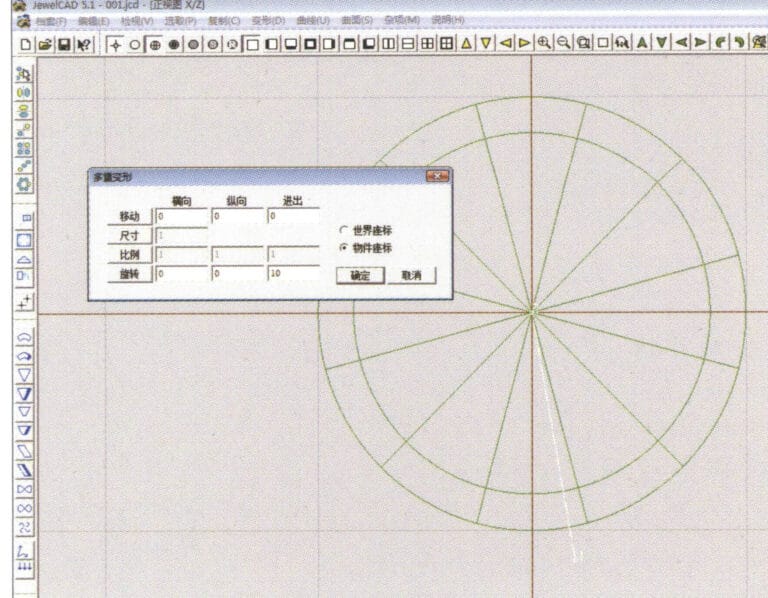
8. Öppna dialogrutan "Multiple Deformation" och mata in relevanta värden
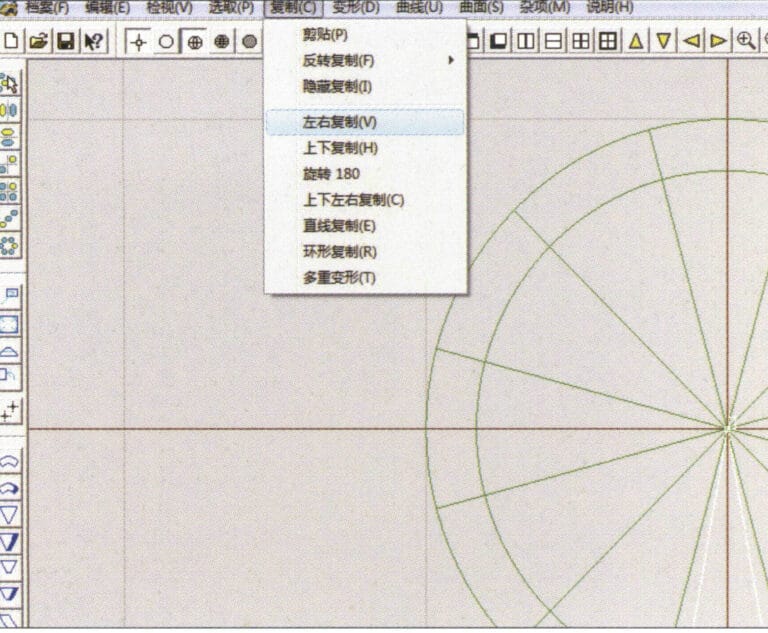
9. Select “Copy” > “Left/Right Copy” on the menu bar
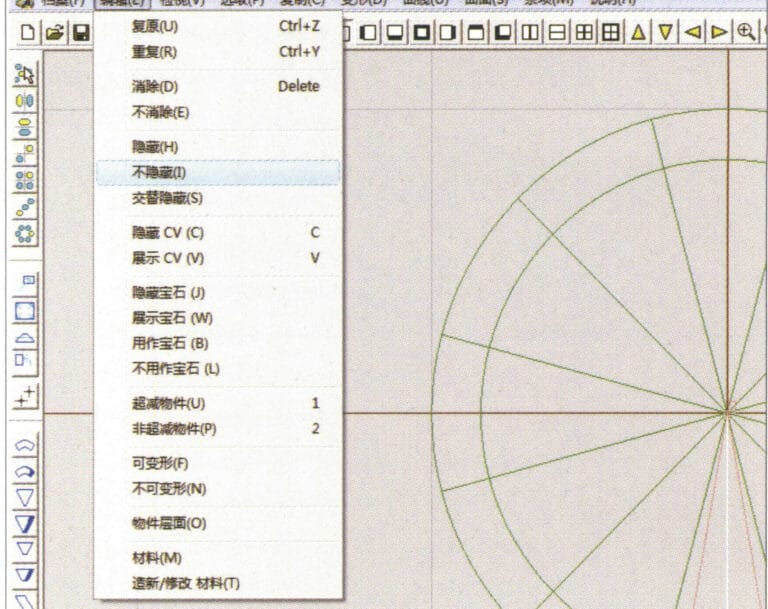
10. Select "Edit" > "Unhide" from the menu bar to display the hidden curves
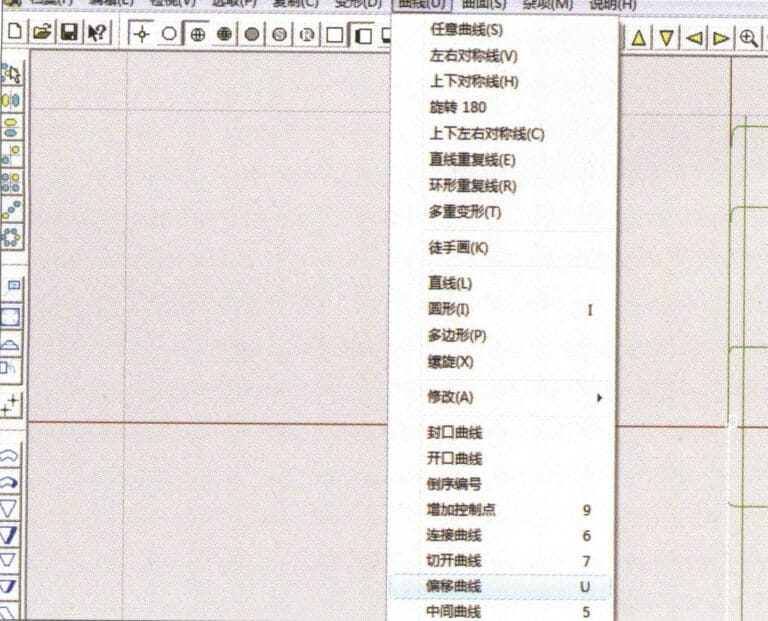
11. Select "Curve" > "Offset Curve" from the menu bar
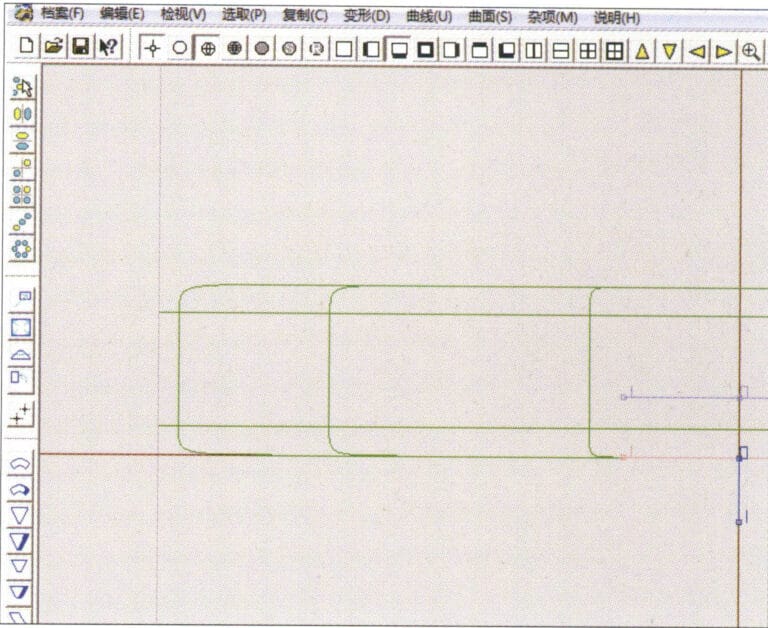
12. Select "Deformation" > "Move" from the menu bar to move the selected curve
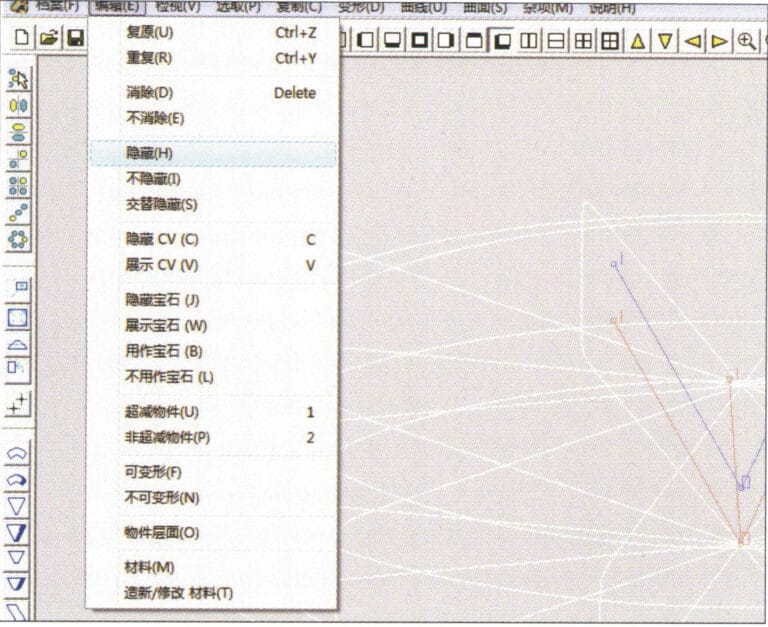
13. Select "Edit" > "Hide" from the menu bar to hide the circular surface
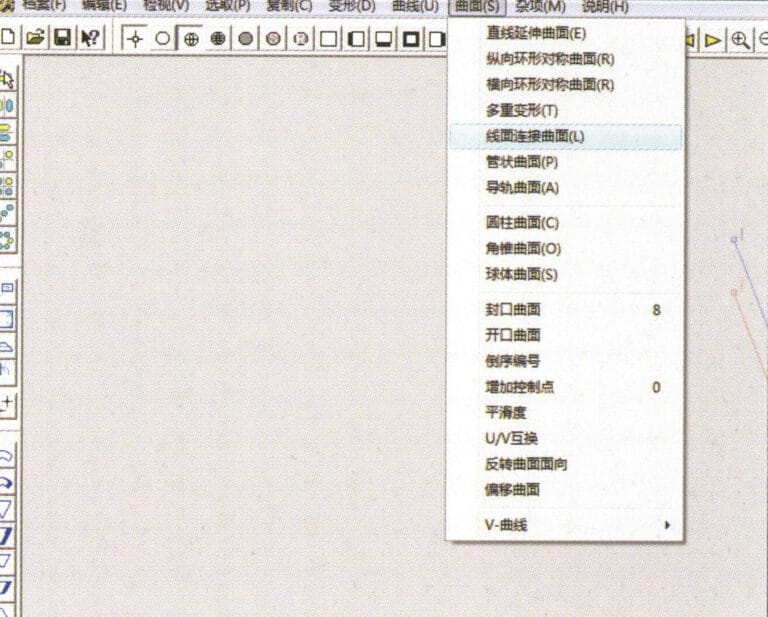
14. Select "Surface" > "Line Surface Connection Surface" from the menu bar

15. Välj kurvor/ytor i medurs riktning för att skapa anslutningar mellan linjer och ytor och välj sedan från menyraden
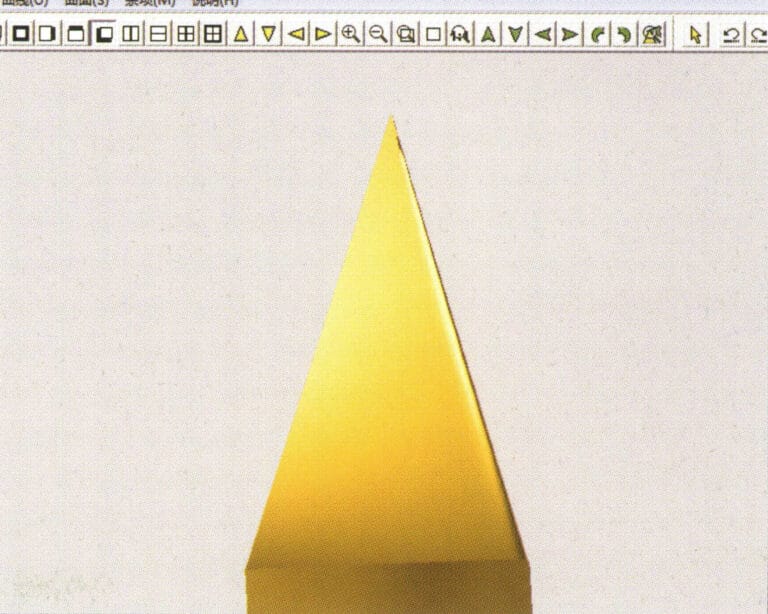
16. Select "View" > "Shadow Map" from the menu bar to inspect the shadow effects
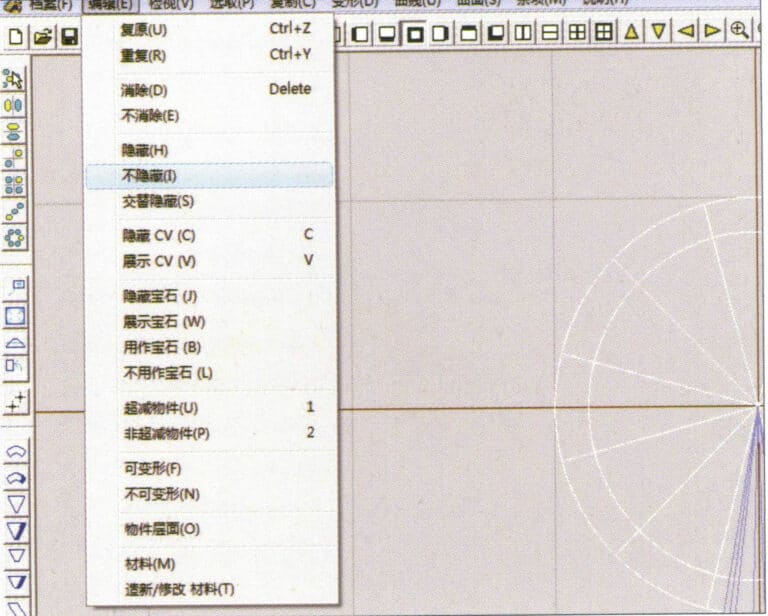
17. Select "Edit" > "Unhide" from the menu bar to display the hidden circular surfaces
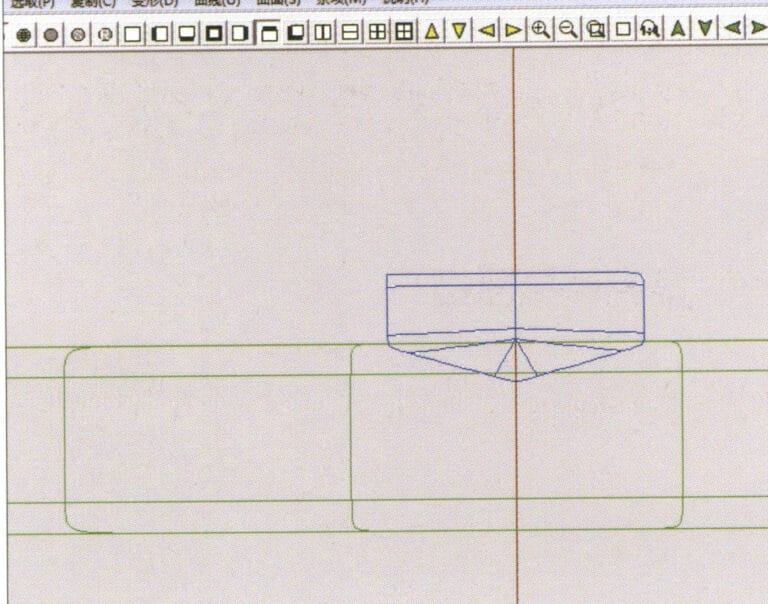
18. Select "Deformation" > "Move" from the menu bar to move the selected surface
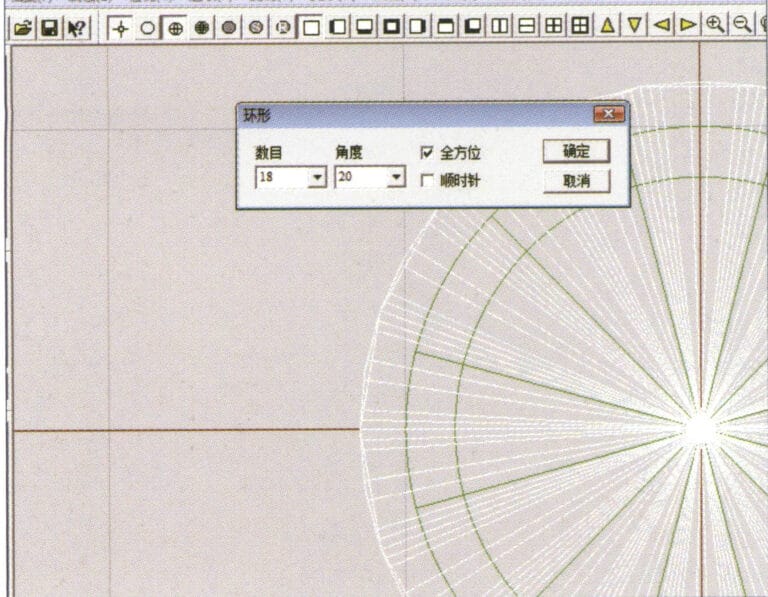
19. Select "Copy" > "Circular Copy" from the menu bar, enter the relevant values and confirm

20. Select “Miscellaneous” > “Boolean” > “Integrate” on the menu bar to integrate the selected surfaces.
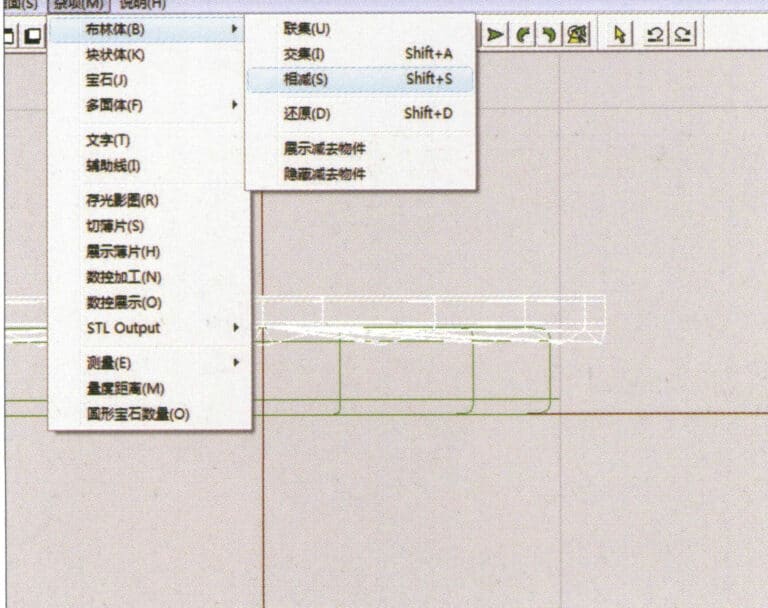
21. Select "Miscellaneous" > "Boolean" > "Subtract" from the menu bar to subtract the selected surface from the already united surface
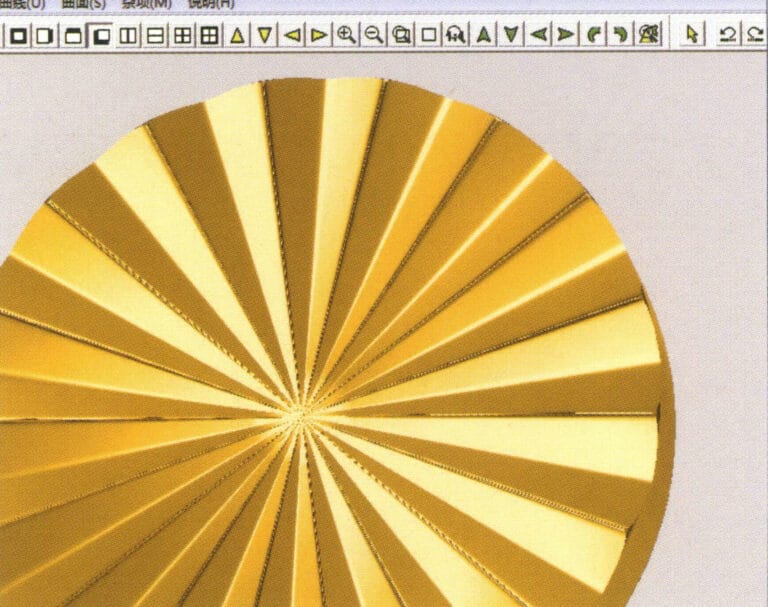
22. Select "View" > "Shadow Map" from the menu bar to inspect the shadow effects.
23. Select "File" > "Save File" from the menu bar to save the document
Avsnitt III Använda JewelCAD för att skapa smyckeseffekter
1. Diamantsvarvad infattningsring
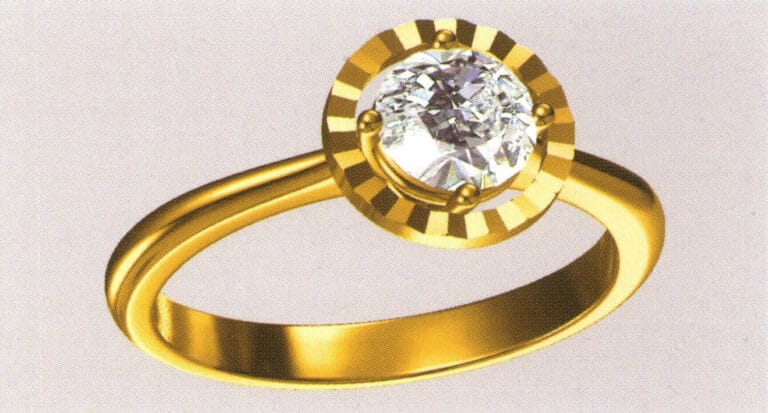
Produktionsstegen är som följer:
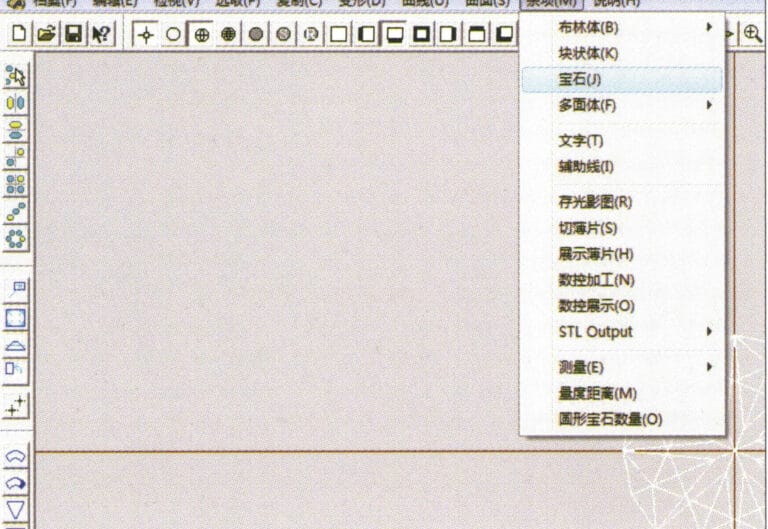
1. Create a new file in JewelCAD, select "Miscellaneous" > "Gem" from the menu bar

2. Select "Deformation" > "Multiple Deformation" from the menu bar
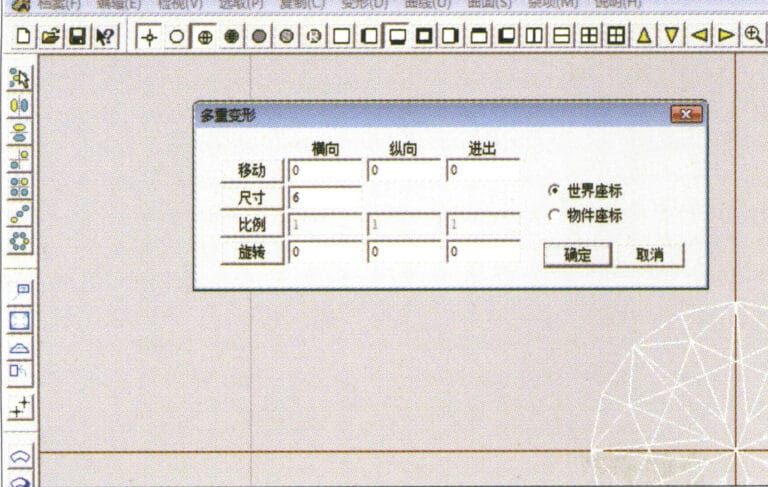
3. Öppna dialogrutan "Multiple Deformation", mata in relevanta värden och bekräfta
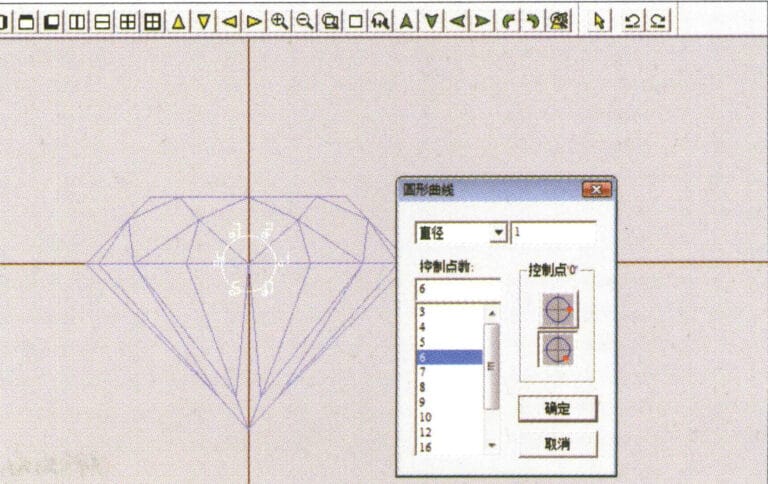
4. Select “Curve” > “Circular Curve” in the menu bar to enter the “Circular Curve” dialog box, enter the relevant values and confirm
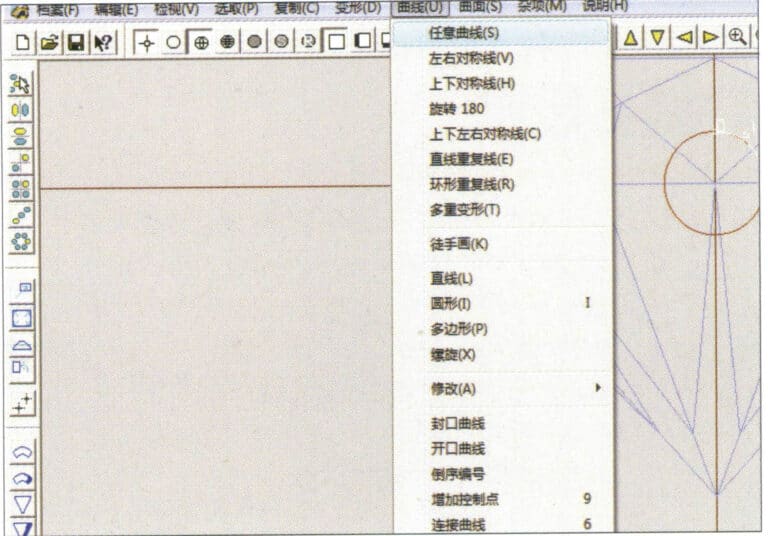
5. Select "Curve" > "Freeform Curve" from the menu bar to draw a claw-shaped guideline
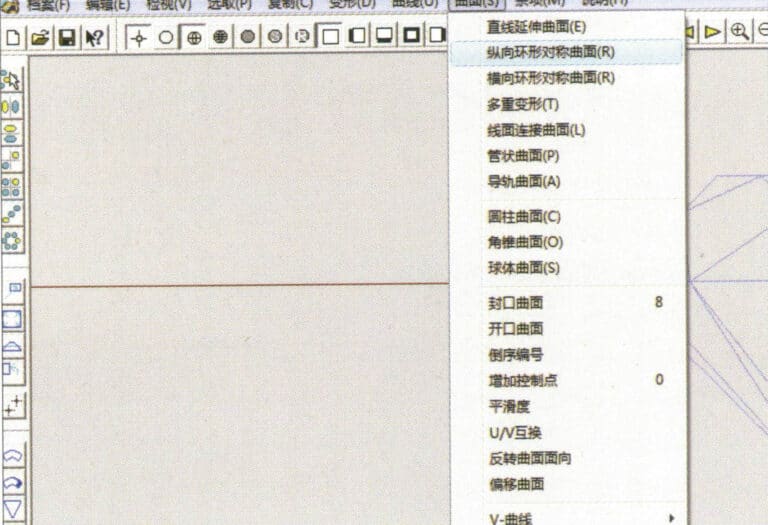
6. Select "Surface" > "Longitudinal Annular Symmetrical Surface" from the menu bar, and draw a claw shape
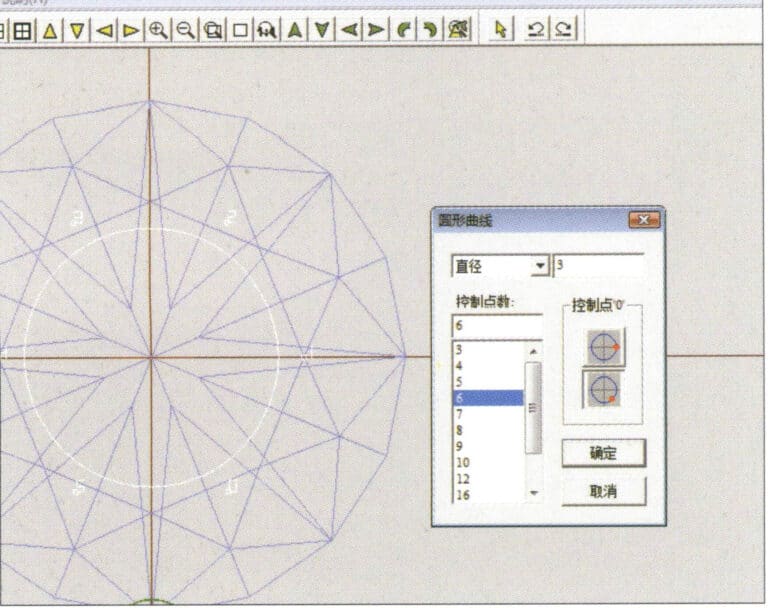
7. Select "Curve" > "Circular Curve" from the menu bar, enter the relevant values in the "Circular Curve" dialog box and confirm
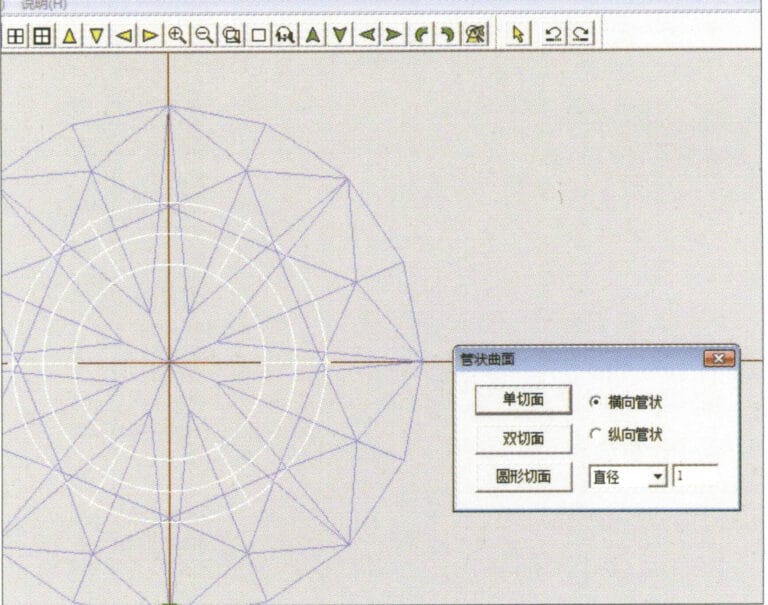
8. Select "Surface" > "Tubular Surface" from the menu bar, enter the relevant values and confirm
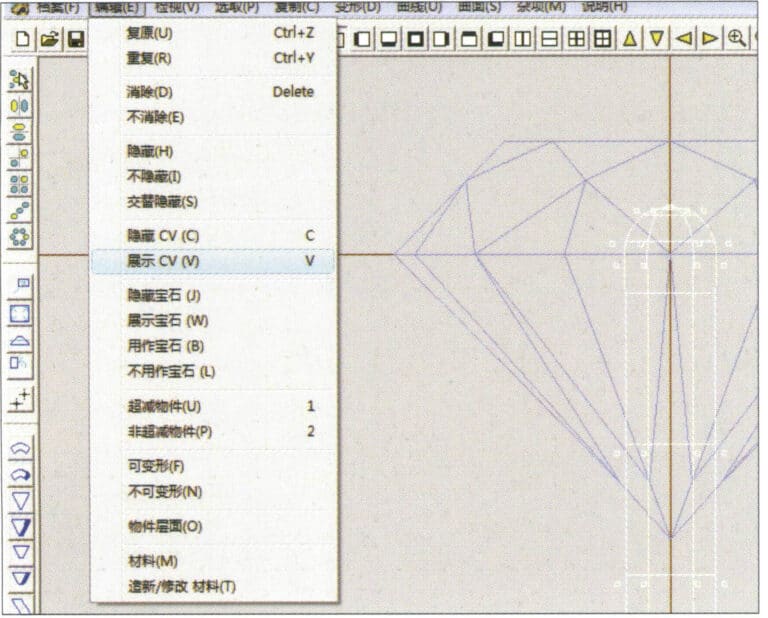
9. Select “Edit” > “Show CV” in the menu bar
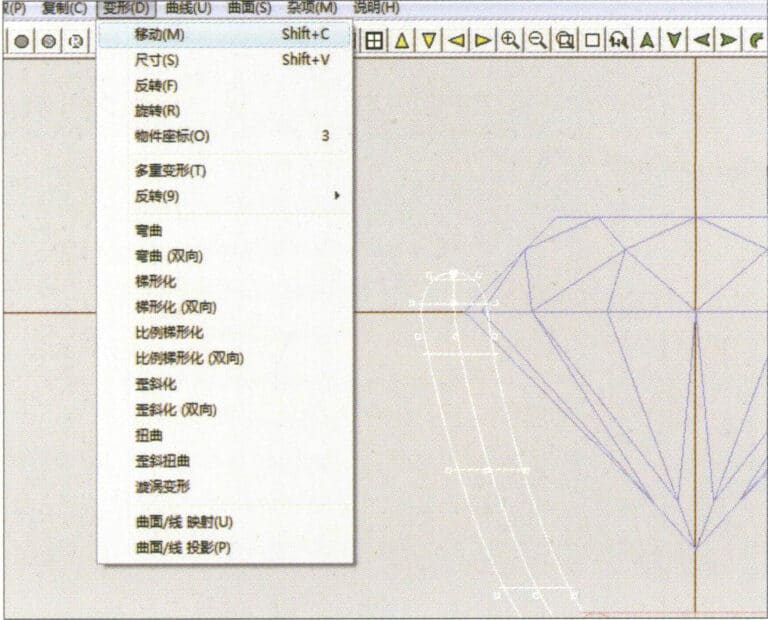
10. Select “Deformation” > “Move” in the menu bar to move the CV
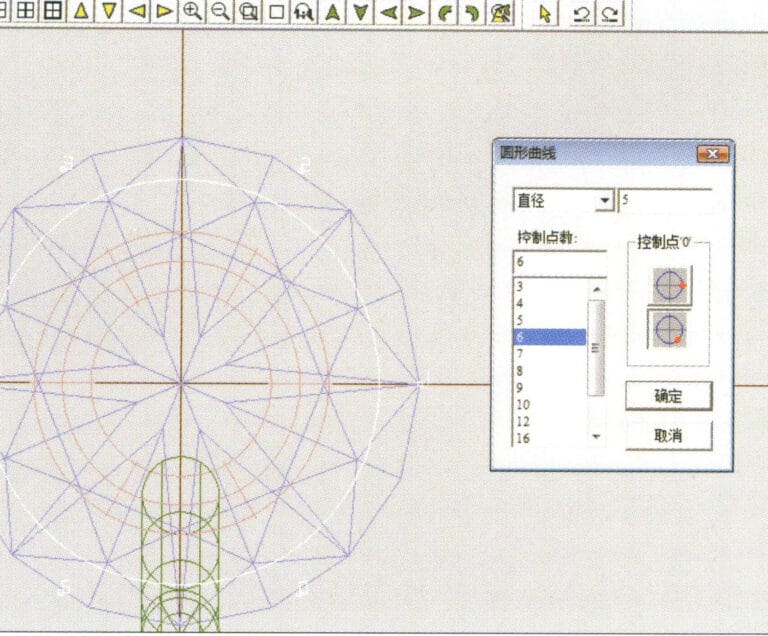
11. Select "Curve" > "Circular Curve" from the menu bar, enter the relevant values in the "Circular Curve" dialog box and confirm
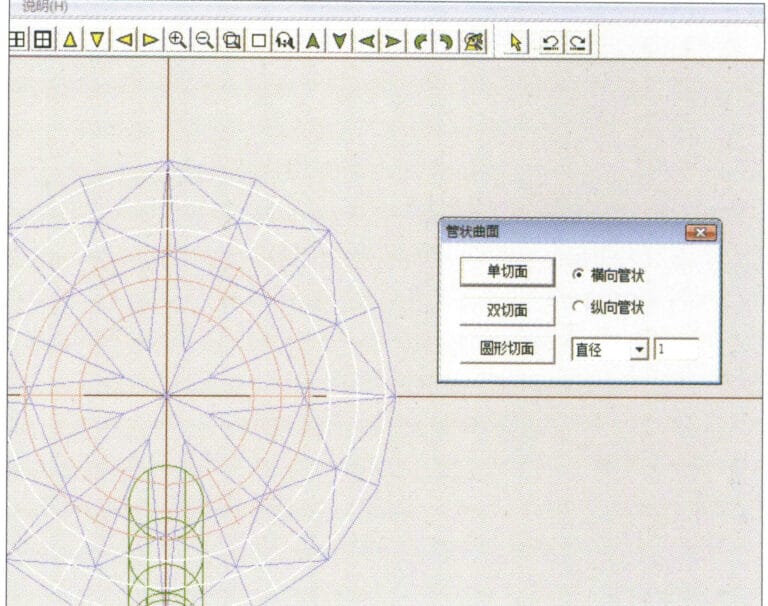
12. Select "Surface" > "Tubular Surface" from the menu bar, enter the relevant values and confirm
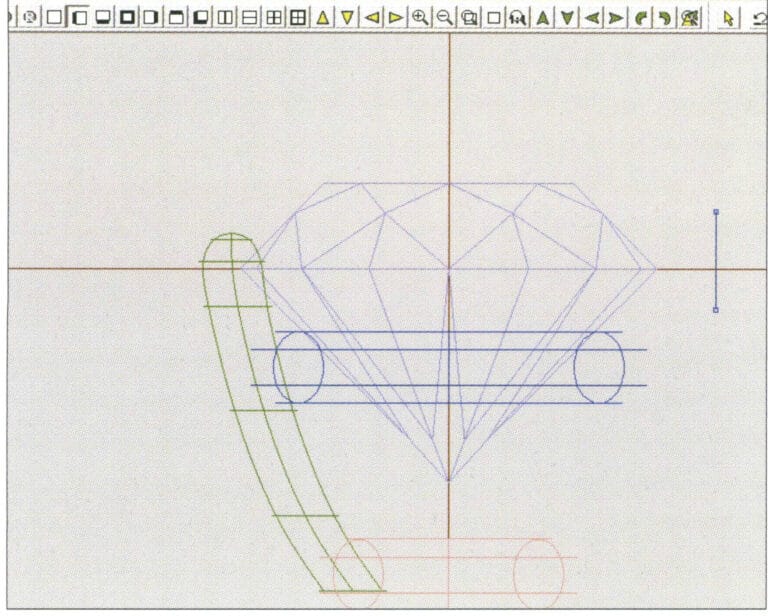
13. Select the menu bar "Edit" > "Move" to move the selected graphic

14. Select the completed claw shape, choose "Copy" > "Circular Copy" from the menu, enter the relevant values in the "Circular Copy" dialog box and confirm
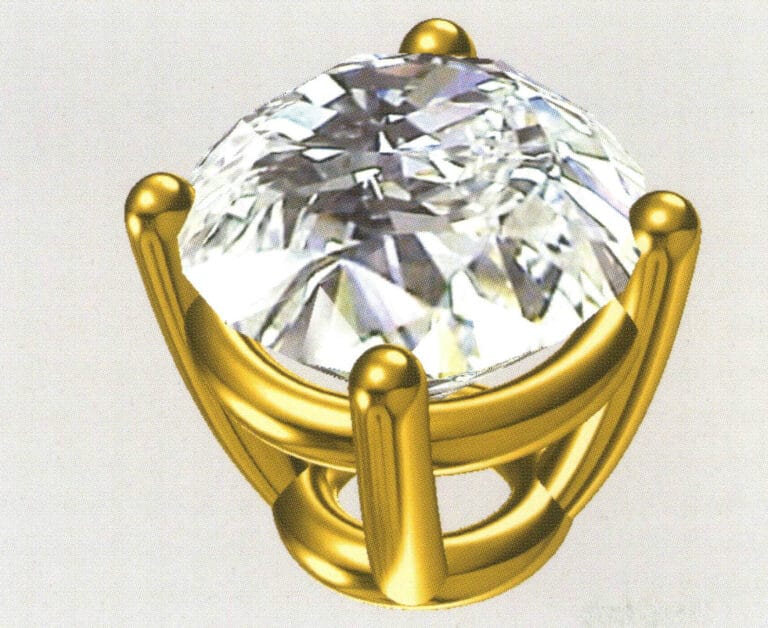
15. Select "View" > "Shadow Map" from the menu bar to inspect the shadow effects
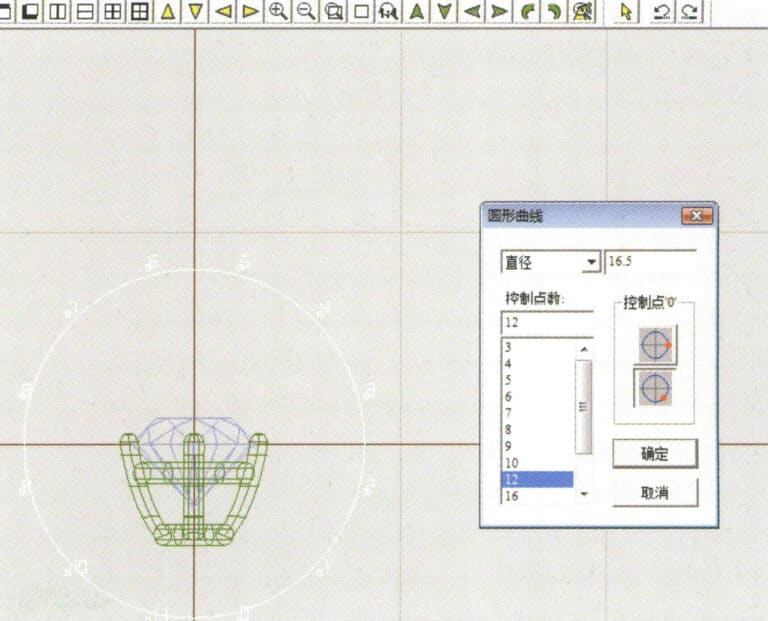
16. Select "Curve" > "Circular Curve" from the menu bar, enter the "Circular Curve" dialog box, and input the relevant values as the inner diameter of the ring shank
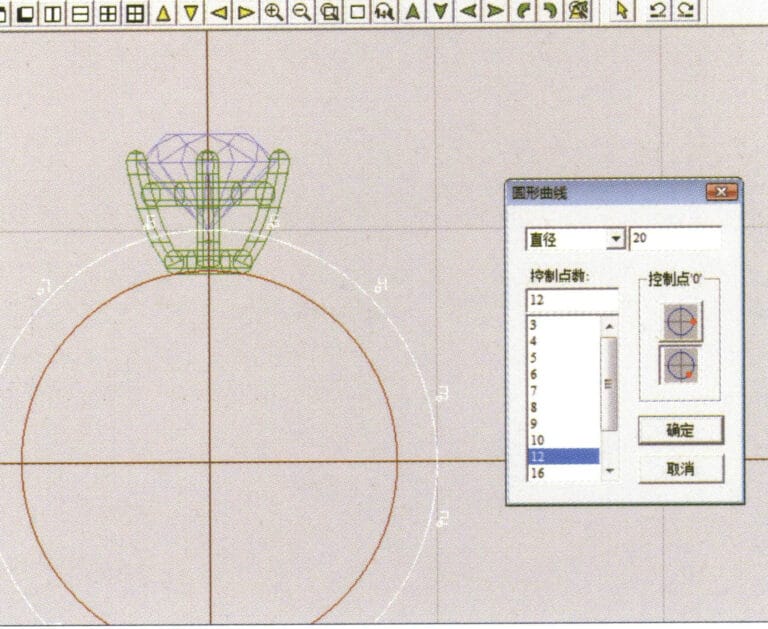
17. Select "Curve" > "Circular Curve" from the menu bar, enter the "Circular Curve" dialog box, and input the relevant values as the outer diameter of the ring shank

18. Select "Curve" > "Circular Curve" from the menu bar, enter the "Circular Curve" dialog box, and input the relevant values as the outer diameter of the engine-turned band
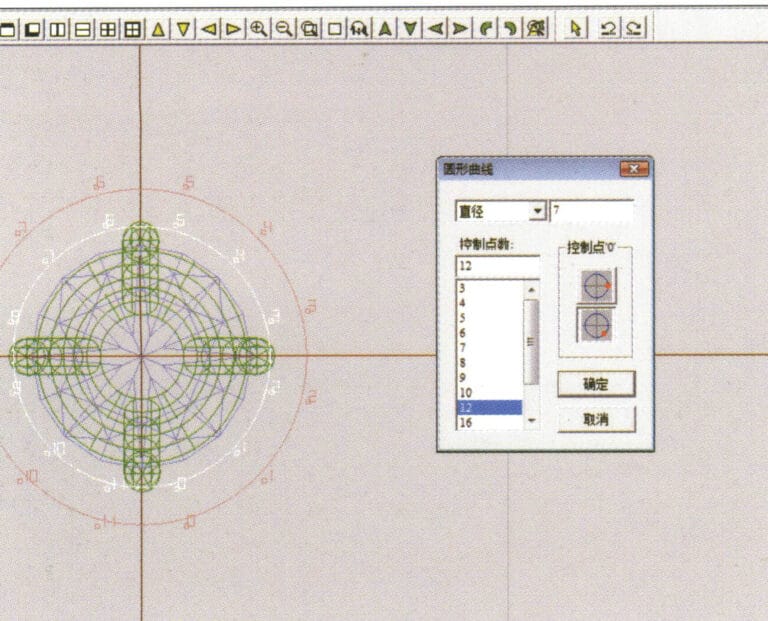
19. Select "Curve" > "Circular Curve" from the menu bar, enter the "Circular Curve" dialog box, and input the relevant values as the inner diameter of the engine-turned band
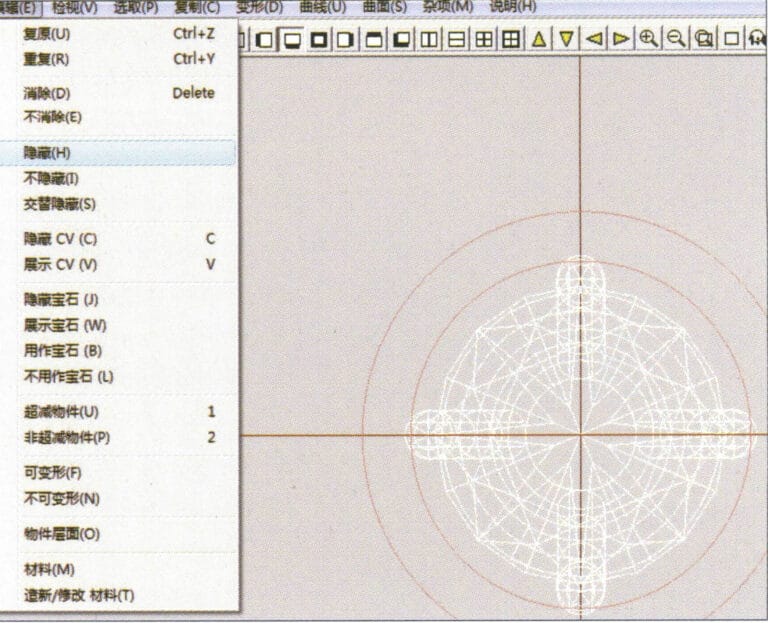
20. Select "Edit" > "Hide" from the menu bar to hide the completed gemstone inlay
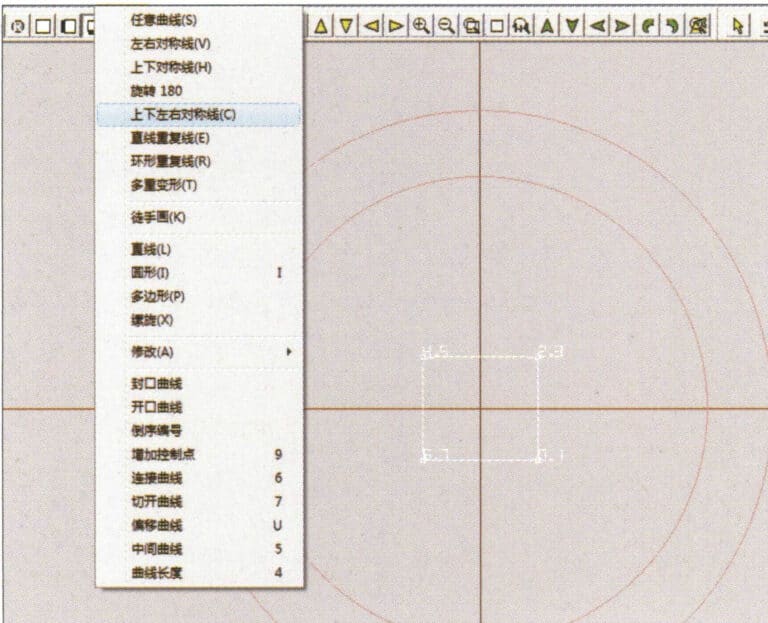
21. Select "Curve" > "Vertical and Horizontal Symmetry Line" from the menu bar
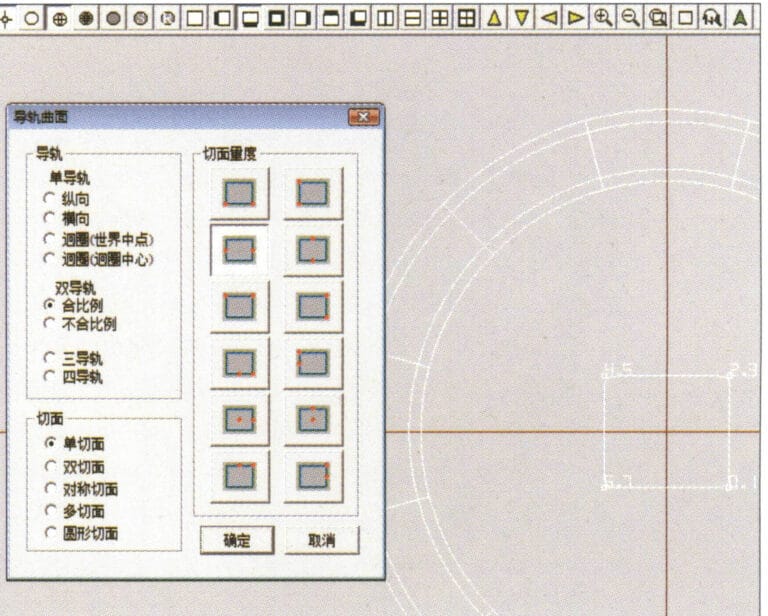
22. Select "Surface" > "Rail Surface" from the menu bar to enter the "Rail Surface" dialog box, select the relevant options and confirm
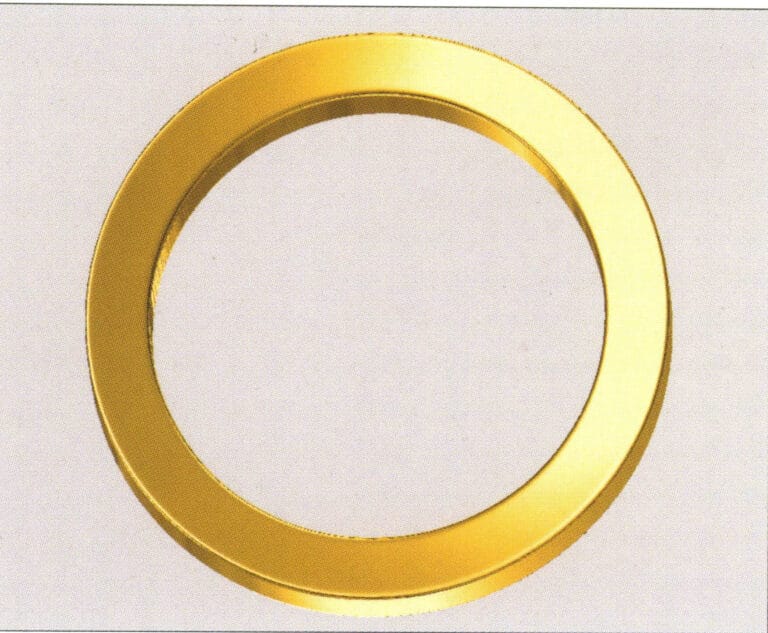
23. Select "View" > "Shadow Map" from the menu bar to inspect the shadow effects
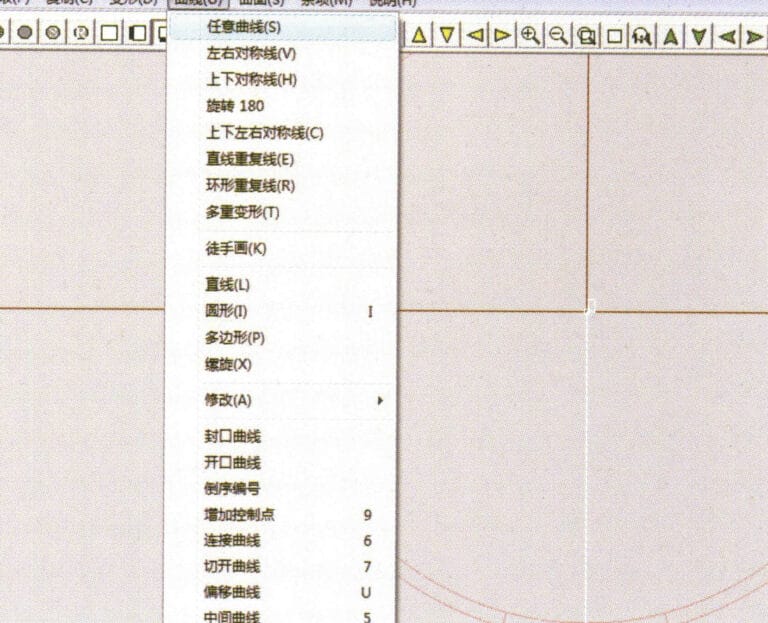
24. Select "Curve" > "Freeform Curve" from the menu bar to draw a guideline

25. Select "Copy" > "Hide Copy" from the menu bar to copy the already drawn auxiliary lines
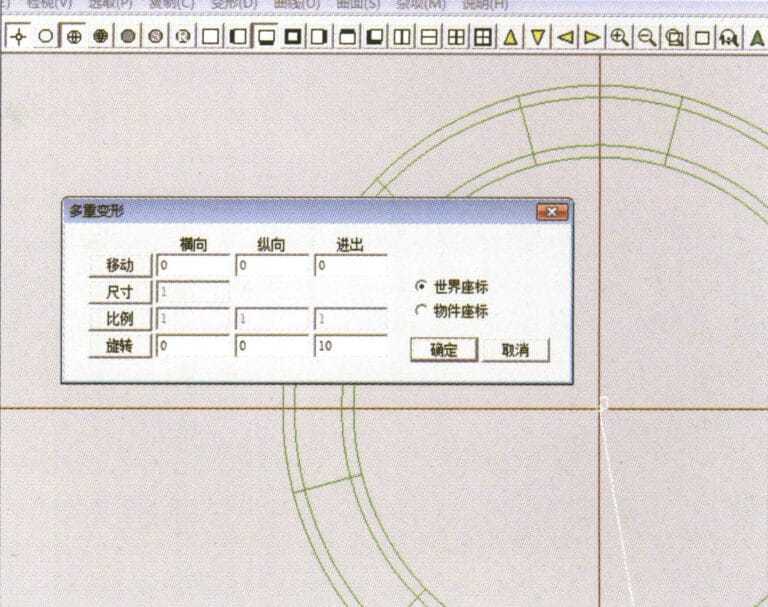
26. Select “Deformation” > “Multiple Deformation” in the menu bar to enter the “Multiple Deformation” dialog box, enter the relevant values and confirm
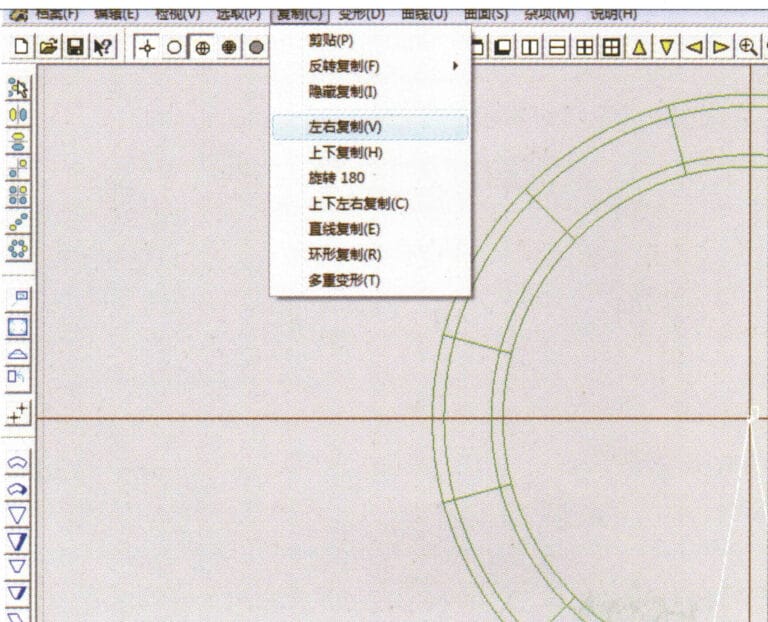
27. Select “Copy” > “Copy Up and Down” in the menu bar to copy the drawn auxiliary lines
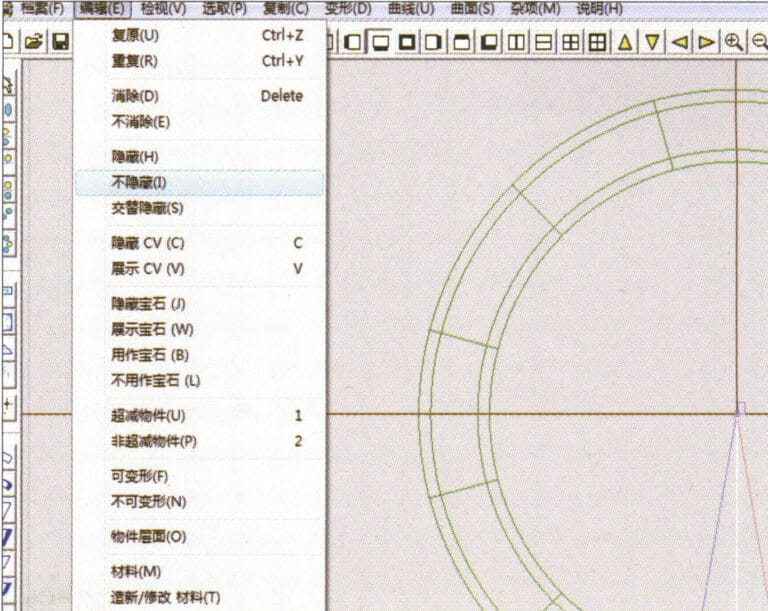
28. Select "Edit" > "Unhide" from the menu to display the hidden curves
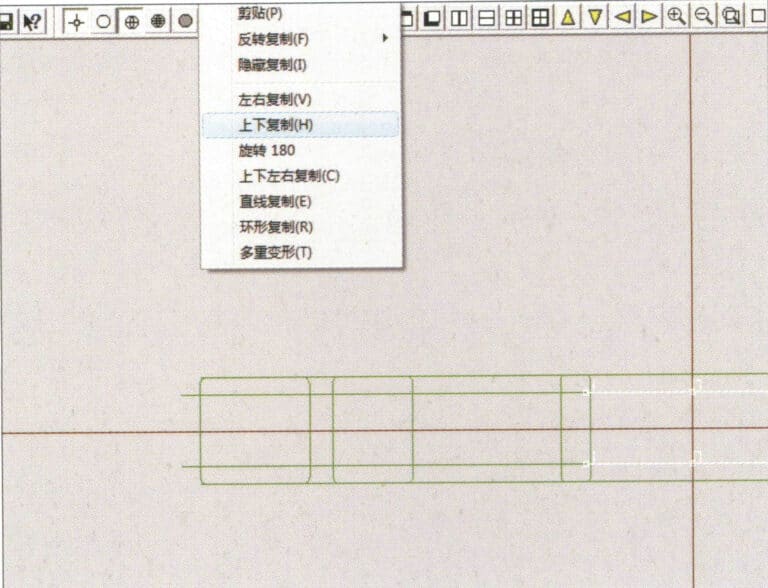
29. Select "Copy" > "Copy Up and Down" from the menu bar to copy the selected curve
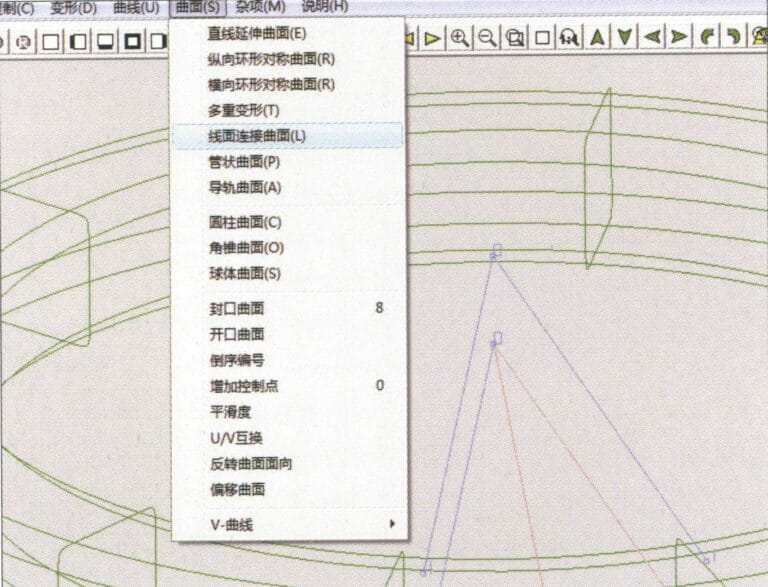
30. Select curves/surfaces in a clockwise direction to create line-surface connections, then select "Surface" > "Cap Surface" from the menu bar
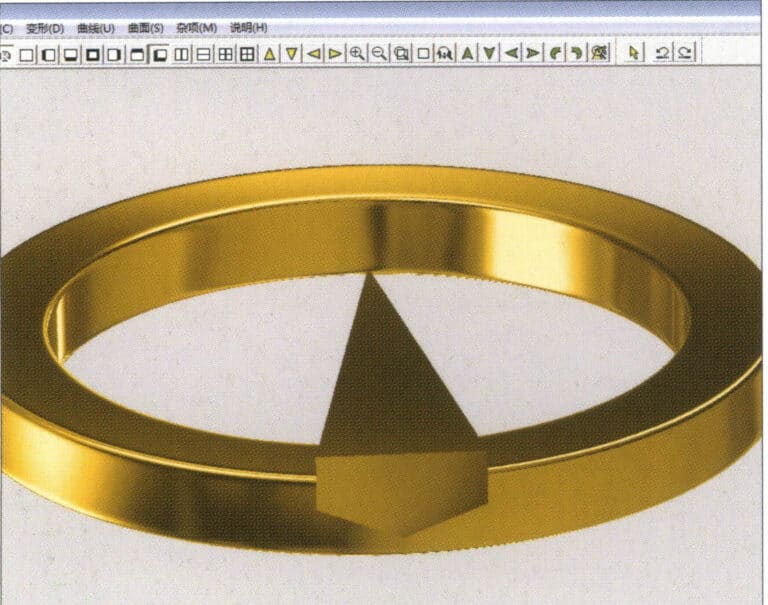
31. Select "View" > "Shadow Map" from the menu bar to inspect the shadow effects
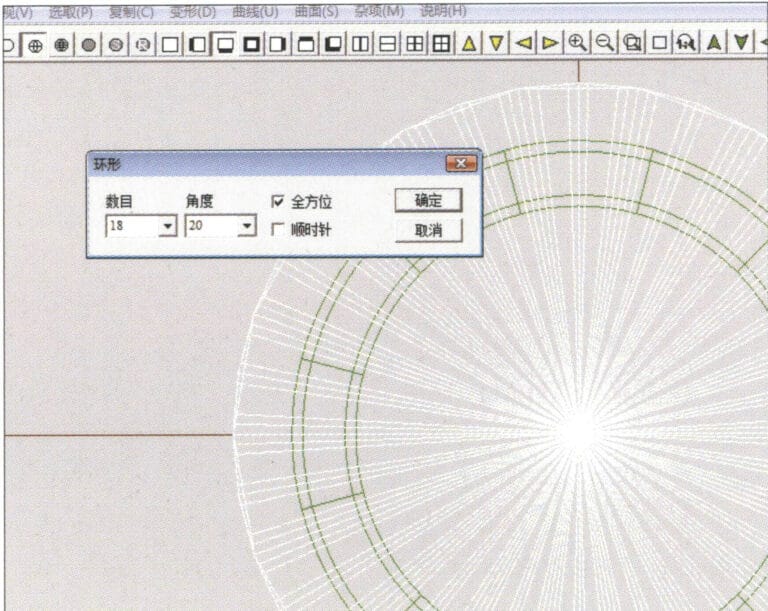
32. Select "Copy" > "Circular Copy" from the menu bar, enter the relevant values and confirm
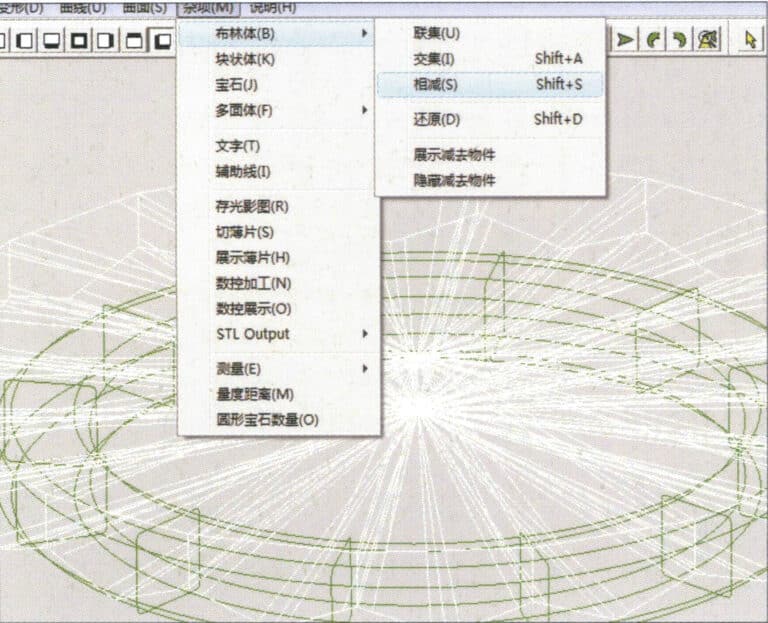
33. Select "Miscellaneous" > "Boolean" > "Subtract" from the menu bar to subtract the selected surface from the already united surface
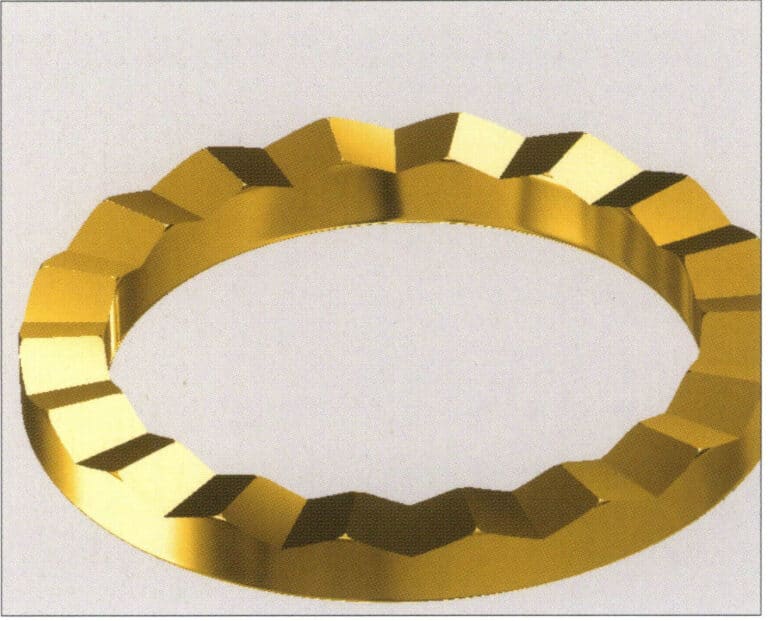
34. Select "View" > "Shadow Map" from the menu bar to inspect the shadow effects
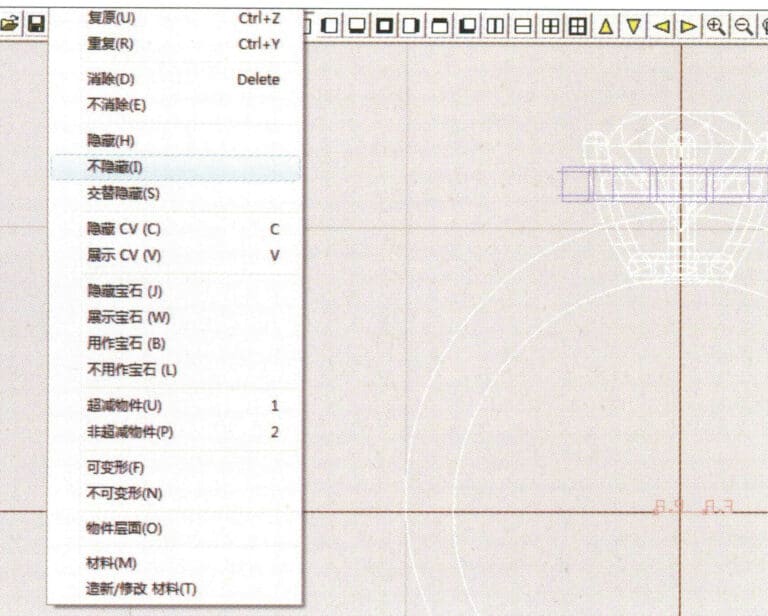
35. Select "Edit" > "Unhide" from the menu bar to display the hidden objects
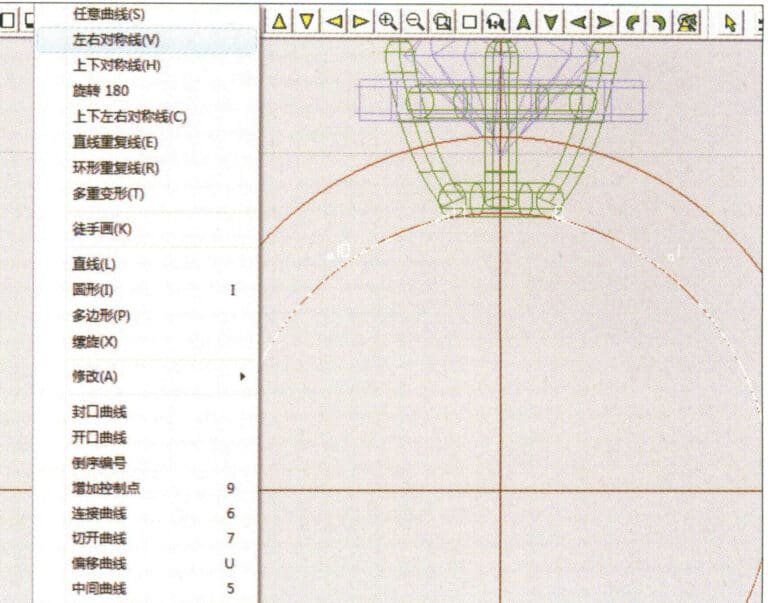
36. Select "Curve" > "Left-Right Symmetry Line" from the menu bar to draw the inner diameter of the ring wall
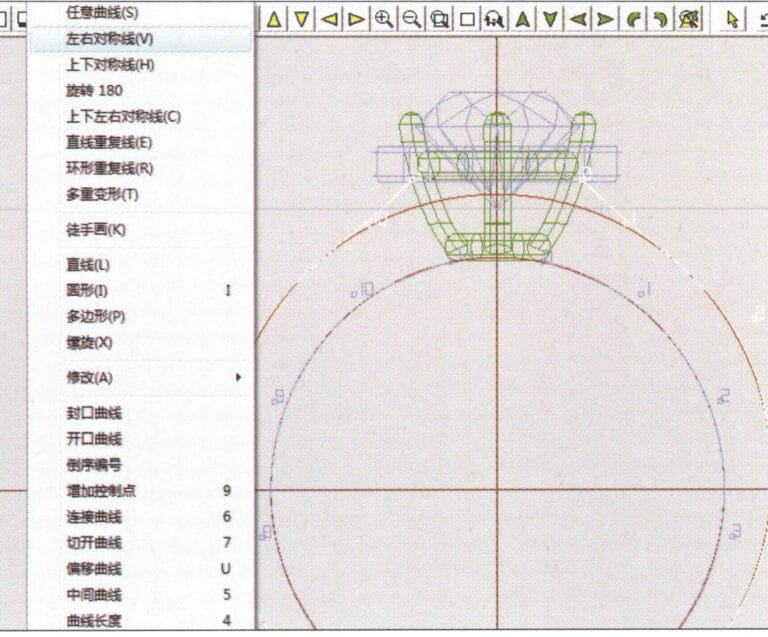
37. Select "Curve" > "Left-Right Symmetry Line" from the menu bar to draw the outer diameter of the ring wall
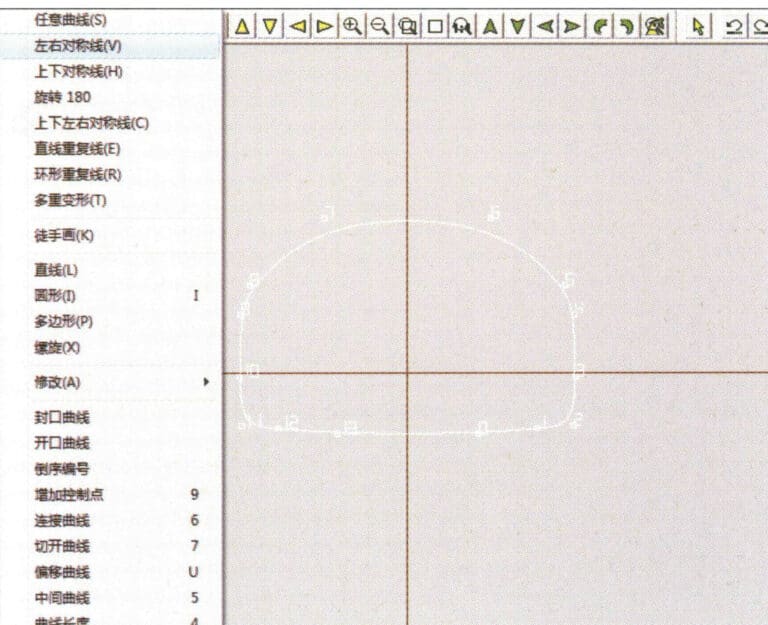
38. Select “Curve” > “Left-Right Symmetry Line” in the menu bar to draw a cutout of the ring shank
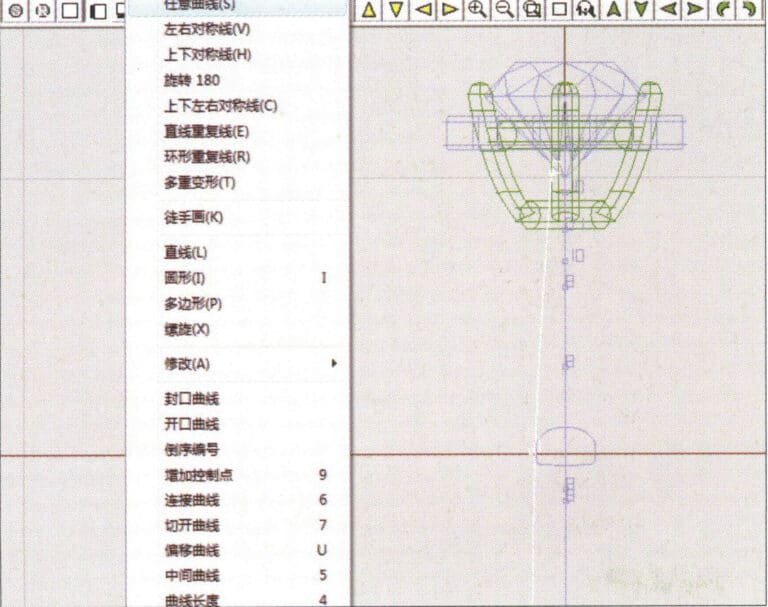
39. Select "Curve" > "Freeform Curve" from the menu bar to draw a guideline
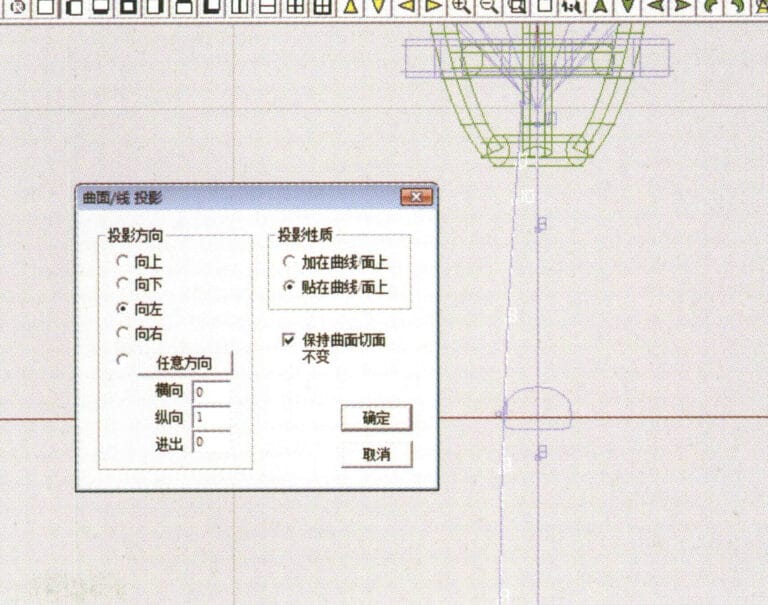
40. Select "Deformation" > "Surface/Line Projection" from the menu bar to enter the "Surface/Line Projection" dialog box, input the relevant values and confirm
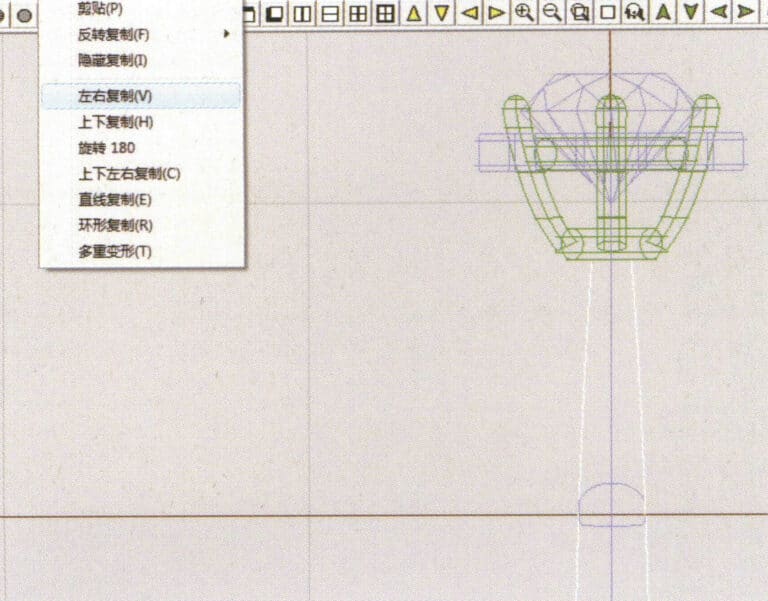
41. Select "Copy" > "Copy Left and Right" from the menu bar to copy the inner diameter of the ring shank
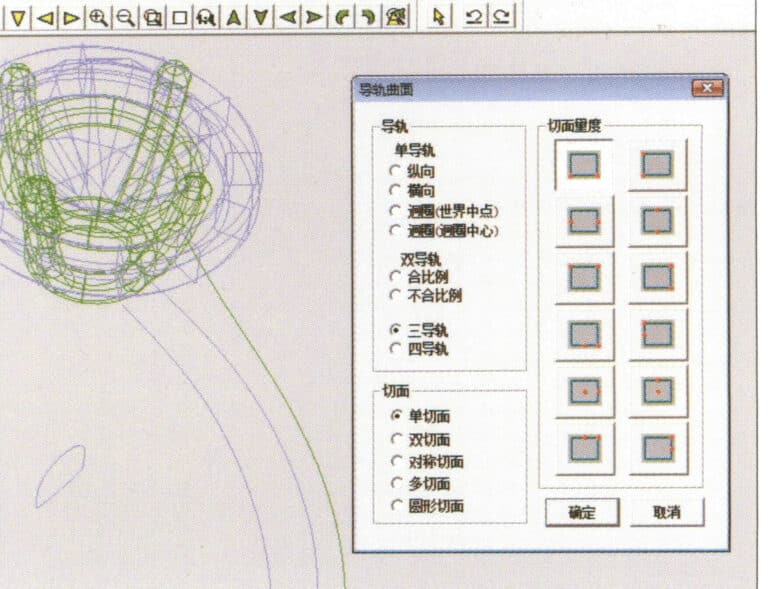
42. Select "Surface" > "Rail Surface" from the menu bar to enter the "Rail Surface" dialog box, select the relevant options and confirm
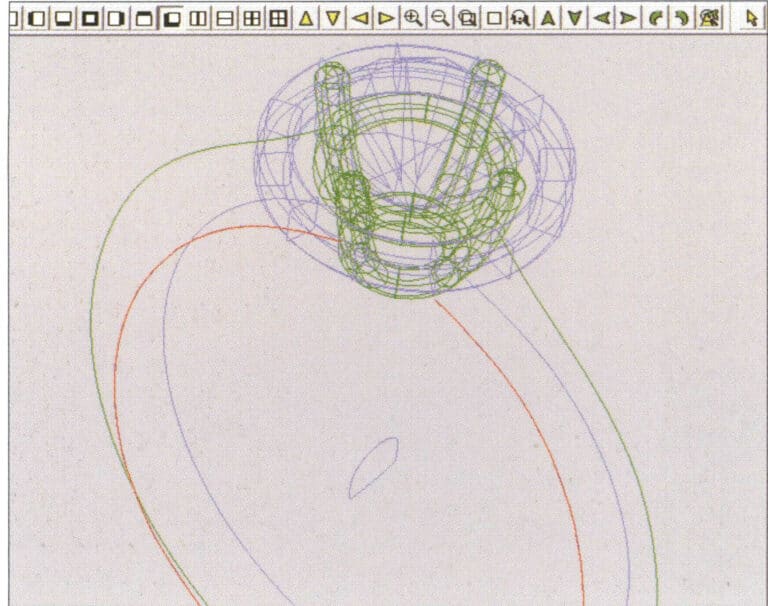
43. Välj en kurva som vänster styrskena och välj sedan en kurva som höger styrskena

44. Välj en kurva som övre styrskena
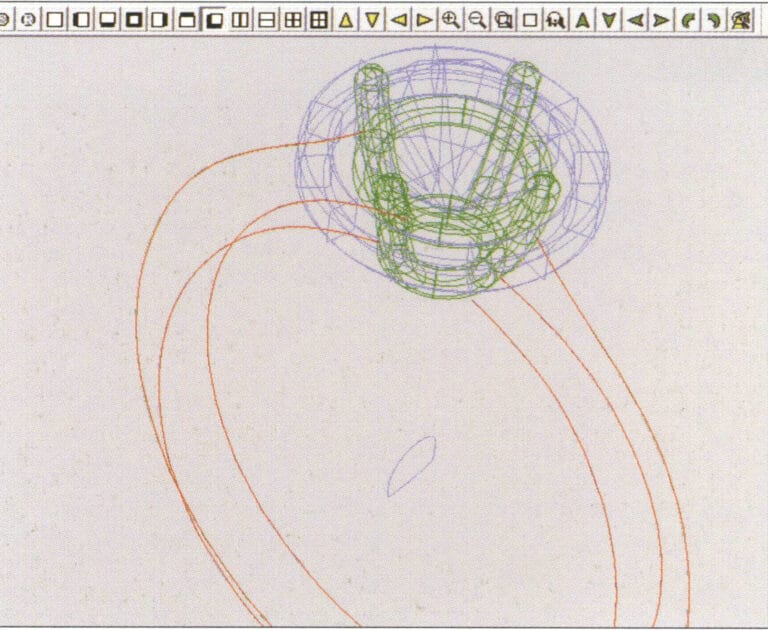
45. Välj en kurva som tvärsnitt för styrytan.
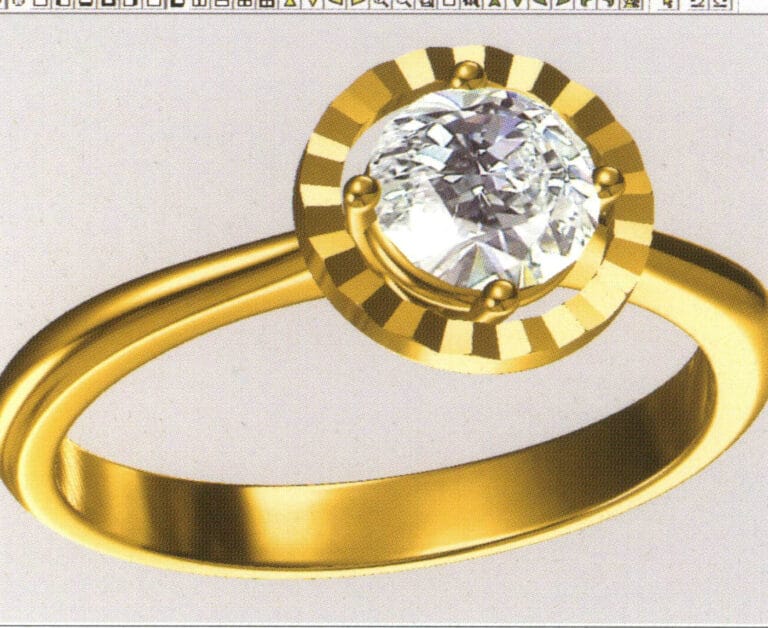
46. Select "View" > "Light and Shadow Map" from the menu bar to examine the light and shadow effects
47. Select "File" > "Save As" from the menu bar to save the file
Copywrite @ Sobling.smycken - Anpassad smyckestillverkare, OEM och ODM smyckesfabrik
2. Pärlring

Produktionsstegen är som följer:
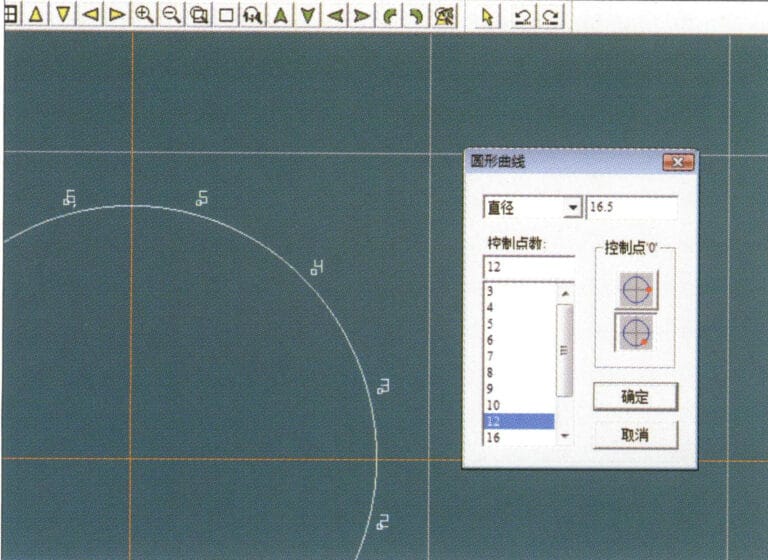
1. Create a new file in JewelCAD, select "Curve" > "Circular Curve" from the menu bar, enter the relevant values in the "Circular Curve" dialog box as the outer curve of the ring, and confirm
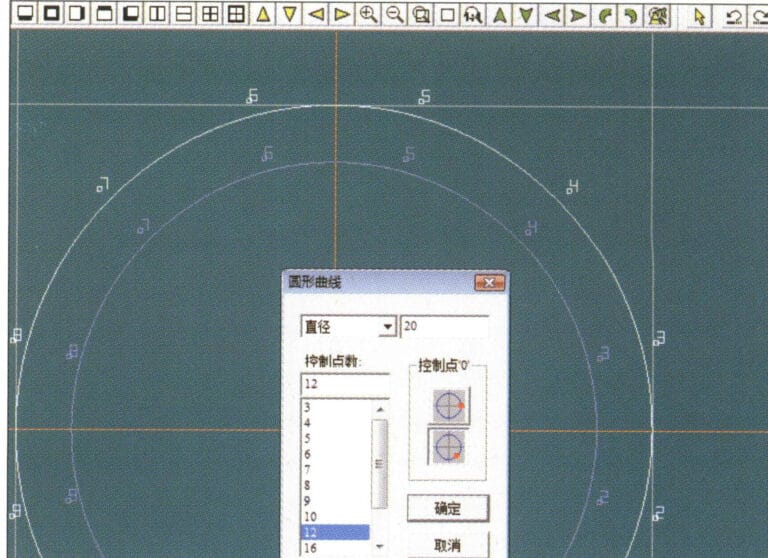
2. Select "Curve" > "Circular Curve" from the menu bar, enter the relevant values in the "Circular Curve" dialog box to set the inner curve of the ring, and confirm
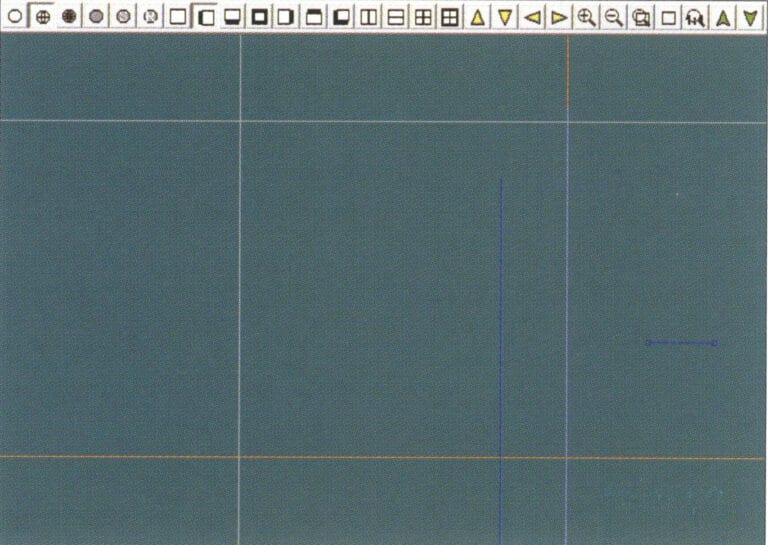
3. Select "Edit" > "Move" from the menu bar to move the selected inner curve of the ring
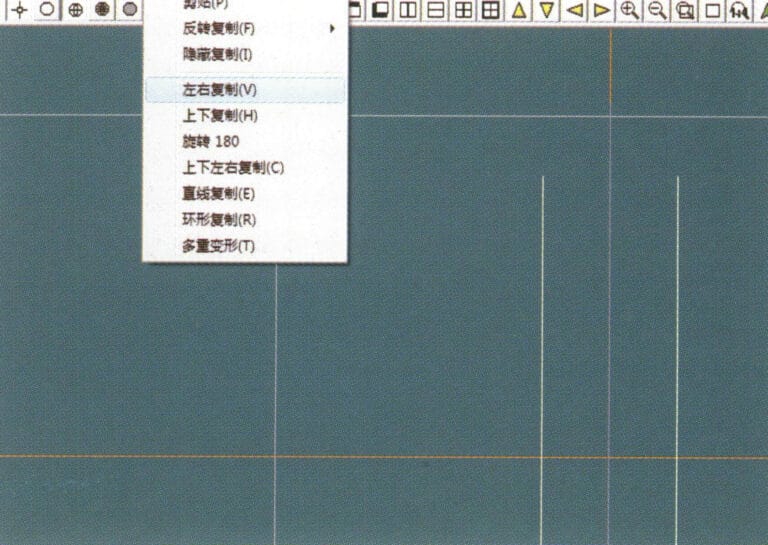
4. Select "Copy" > "Copy Left and Right" from the menu bar to copy the curve of the inner circle of the ring
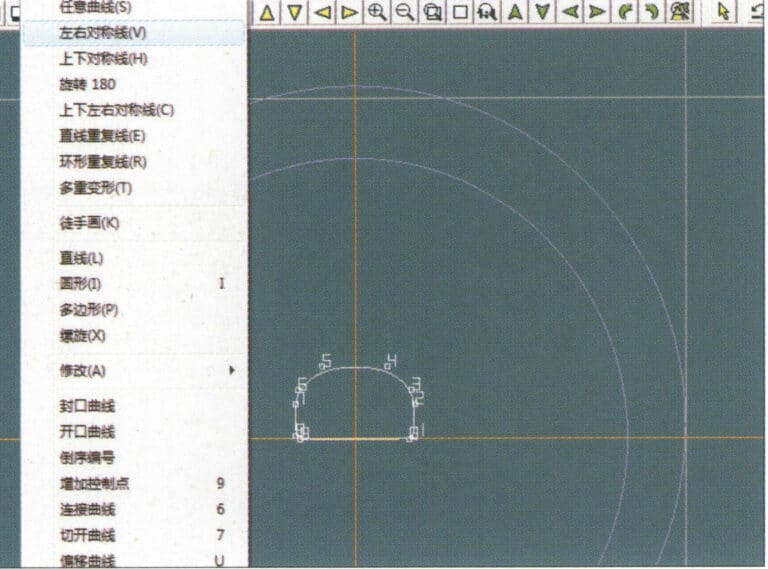
5. Select "Curve" > "Left-Right Symmetry Line" from the menu bar as the cross-section of the ring band
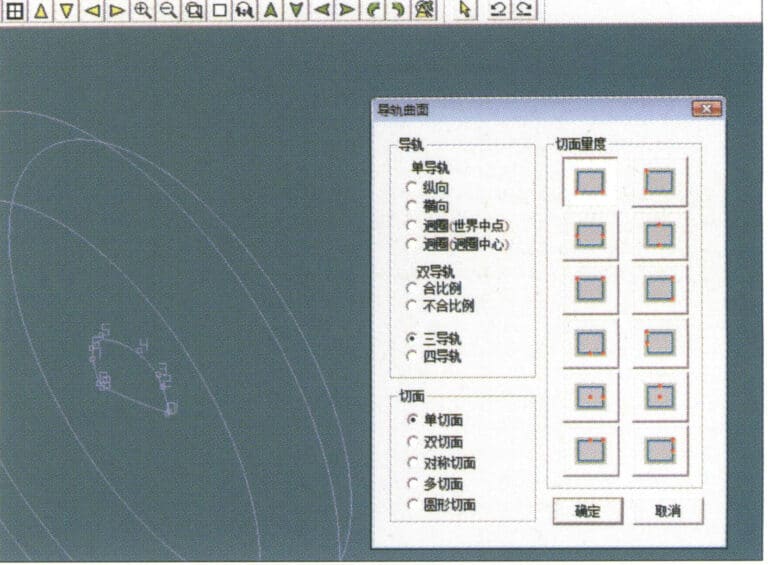
6. Select "Curved Surface" > "Guide Rail Surface" from the menu bar, enter the "Guide Rail Surface" dialog box, select the relevant options and confirm
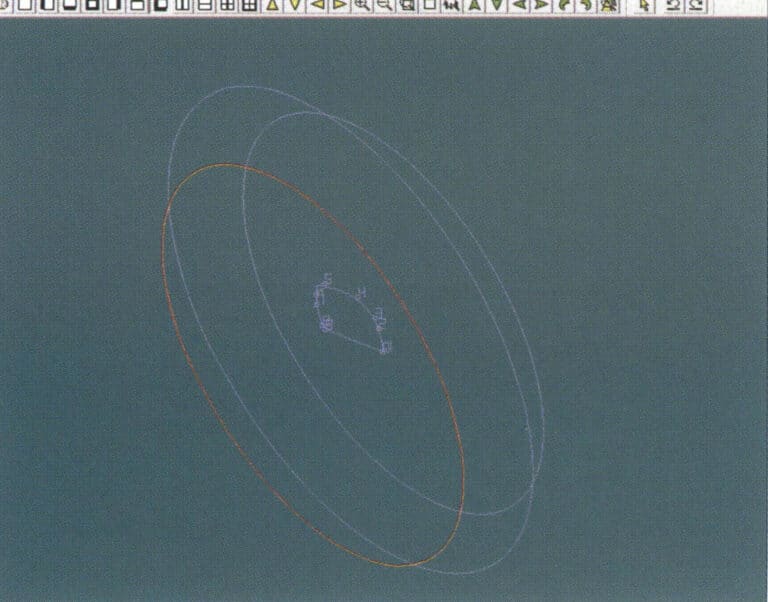
7. Välj en kurva som rätt styrskena
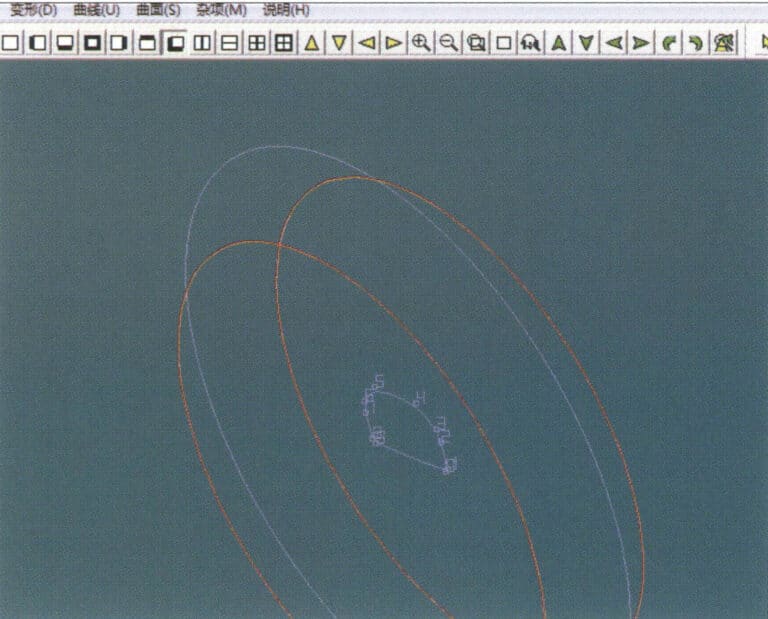
8. Välj en kurva som övre styrskena
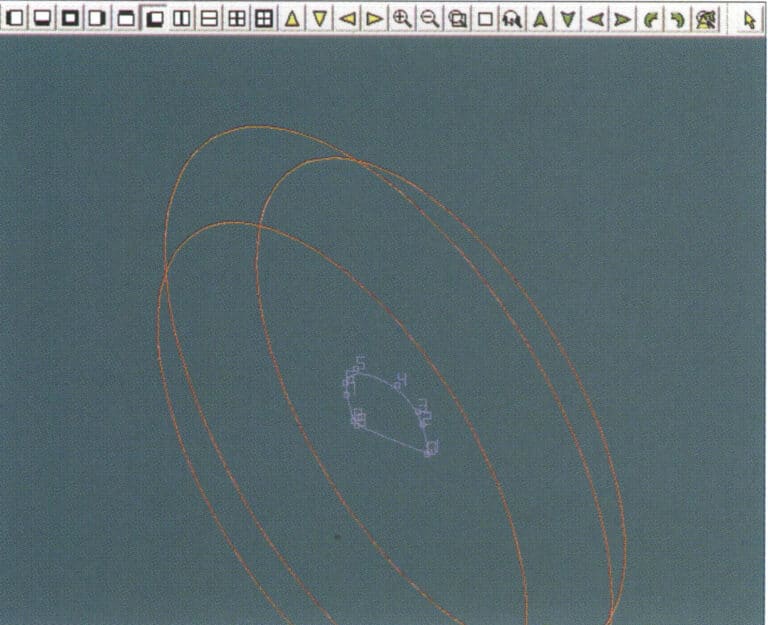
9. Välj ringbandets tvärsnitt som tvärsnitt för styrkurvans yta
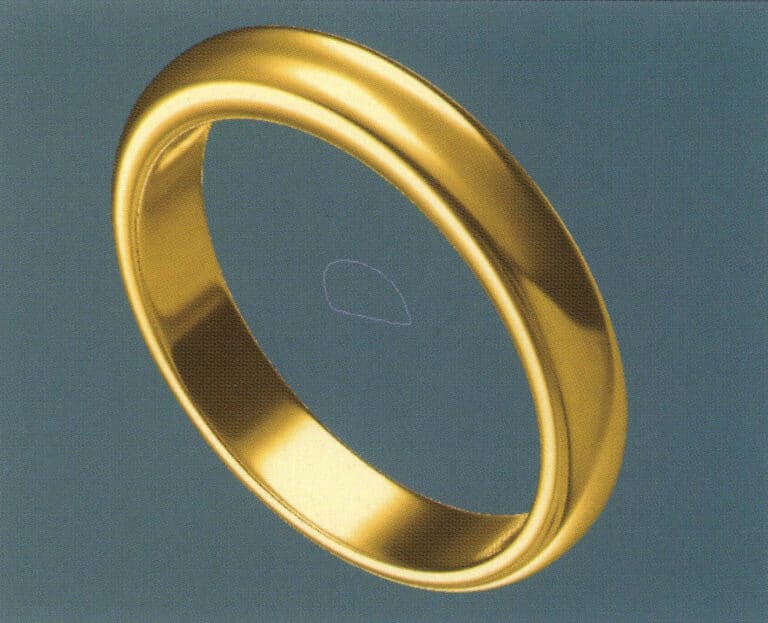
10. Select "View" > "Shadow Map" from the menu bar to inspect the shadow effects
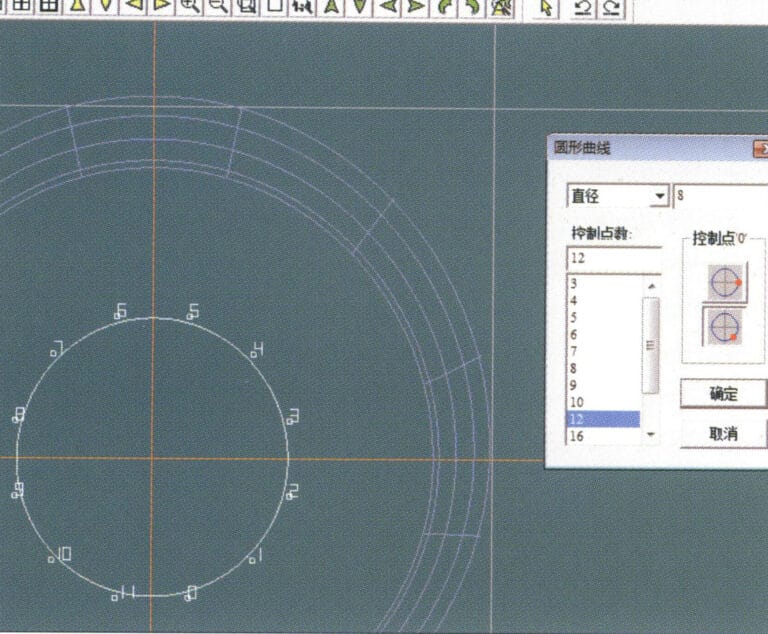
11. Select "Curve" > "Circular Curve" from the menu bar, enter the relevant values in the "Circular Curve" dialog box as auxiliary lines, and confirm
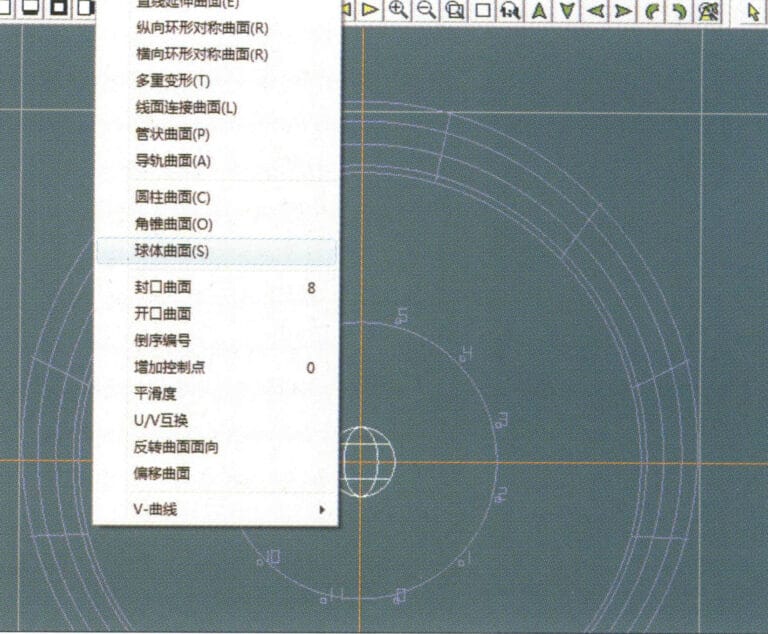
12. Select "Surface" > "Spherical Surface" from the menu bar
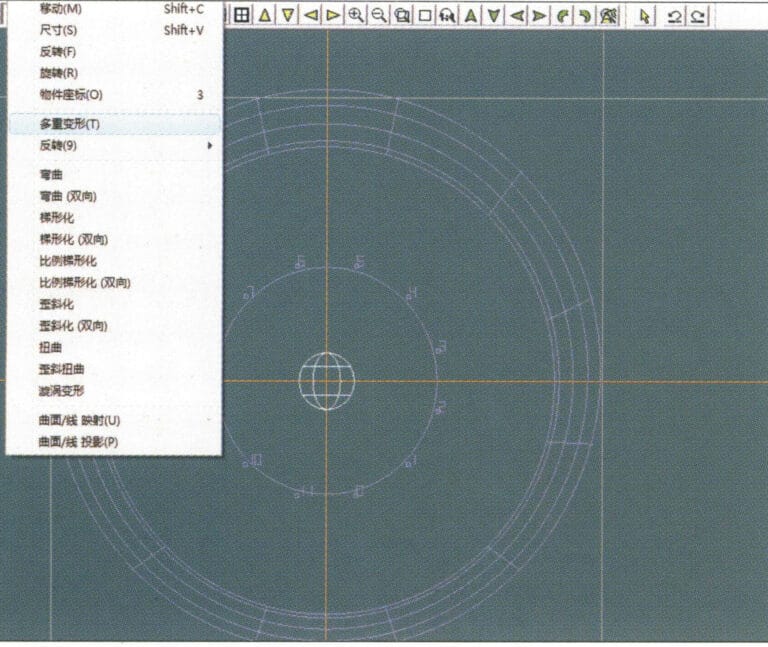
13. Select "Deformation" > "Multiple Deformation" from the menu bar to enlarge the sphere
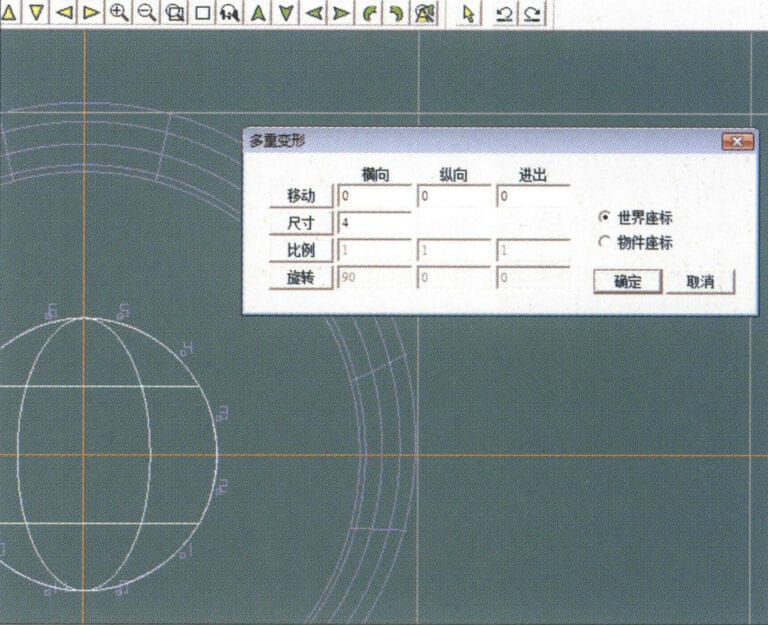
14. Öppna dialogrutan "Multiple Deformation", mata in motsvarande värden för att förstora sfären till riktlinjernas bredd och bekräfta
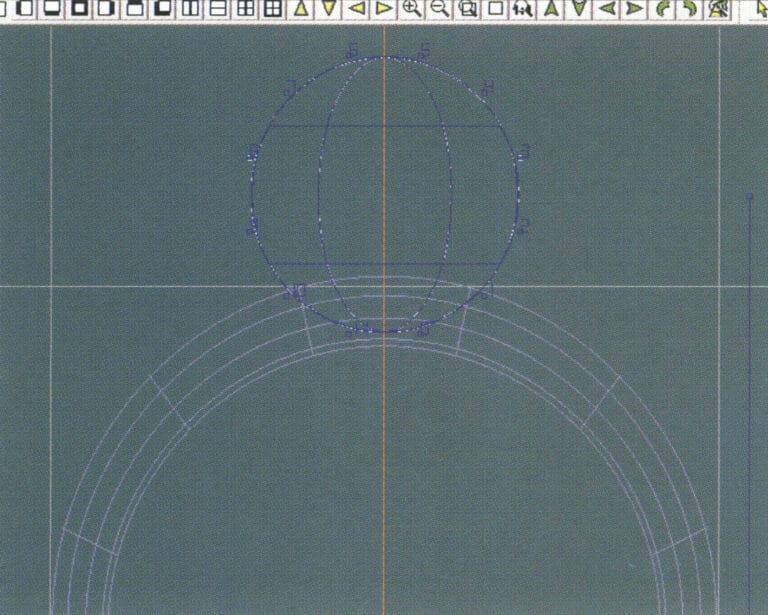
15. Select "Edit" > "Move" from the menu bar to move both the sphere and the auxiliary line simultaneously
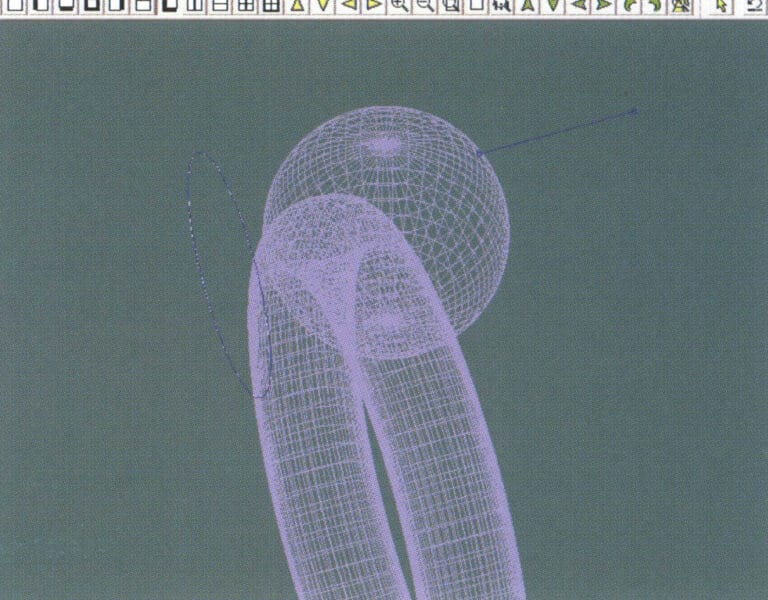
16. Select "Edit" > "Move" from the menu bar to remove the guidelines
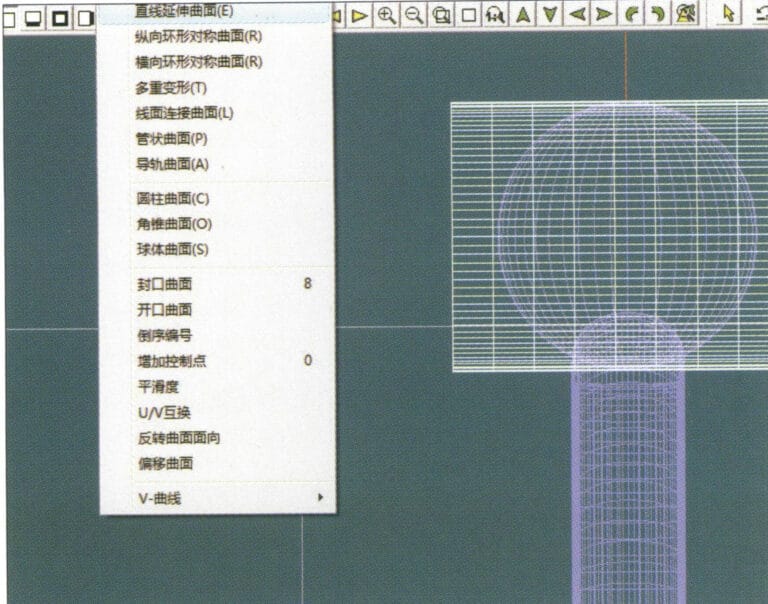
17. Select "Surface" > "Straight Line Extend Surface" from the menu bar to extend the auxiliary line into an auxiliary surface
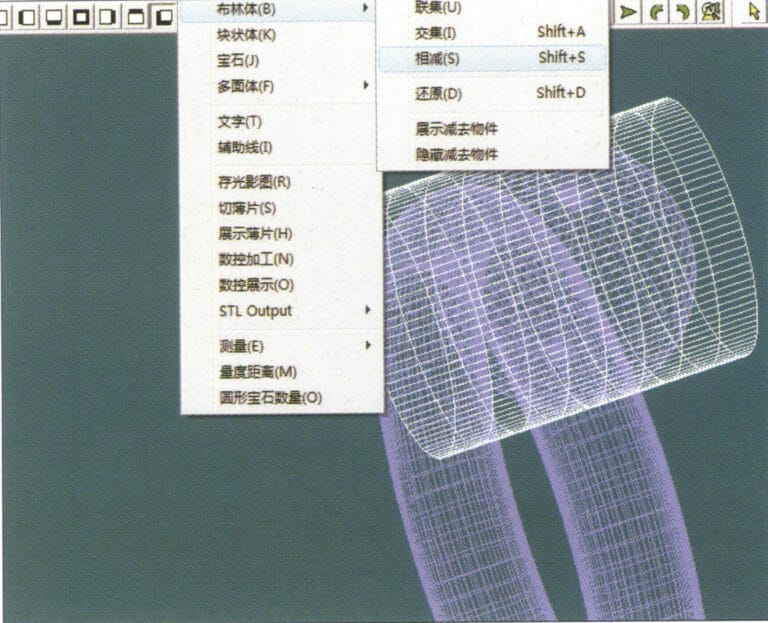
18. Select "Miscellaneous" > "Boolean" > "Subtract" from the menu bar to subtract the corresponding parts of the auxiliary surface ring
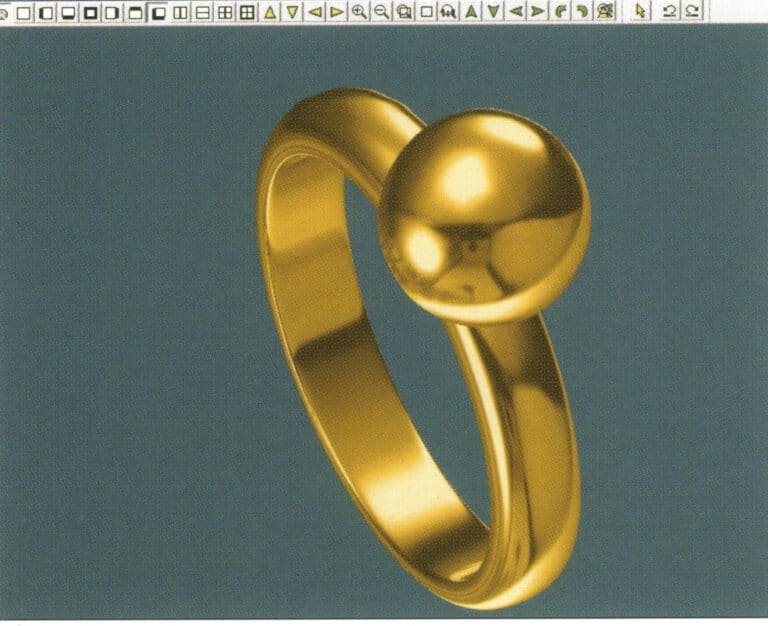
19. Select "View" > "Shadow Map" from the menu bar to inspect the shadow effects
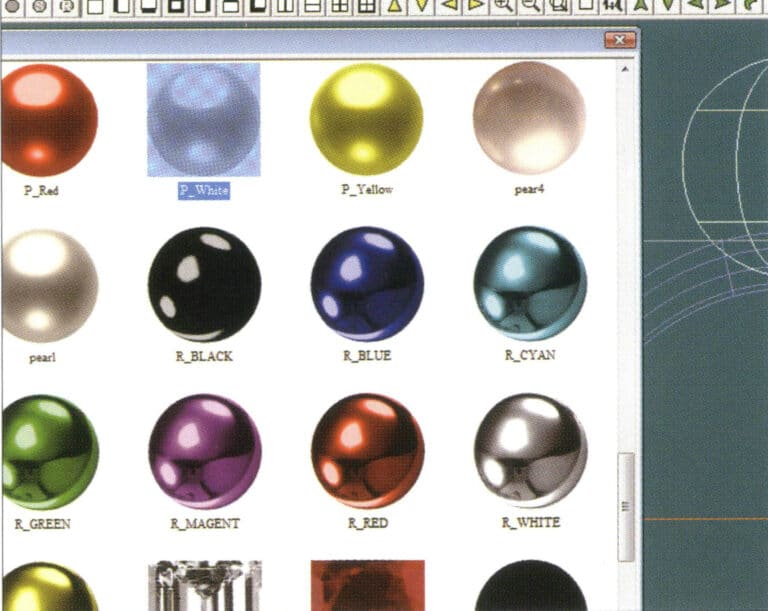
20. Select the sphere, go to the menu bar and choose "Edit" > "Materials", enter the "Materials" dialog box, select the white pearl material and confirm
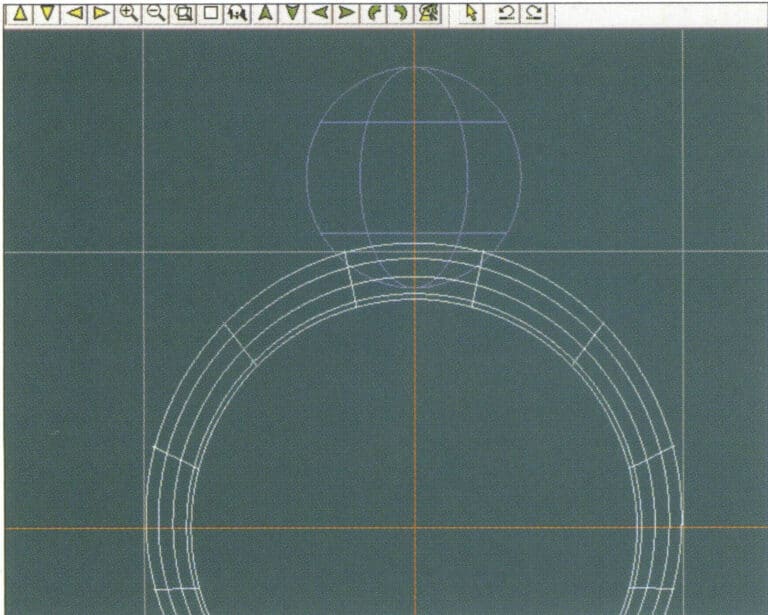
21. Select the ring band, then choose "Edit" > "Materials" from the menu bar
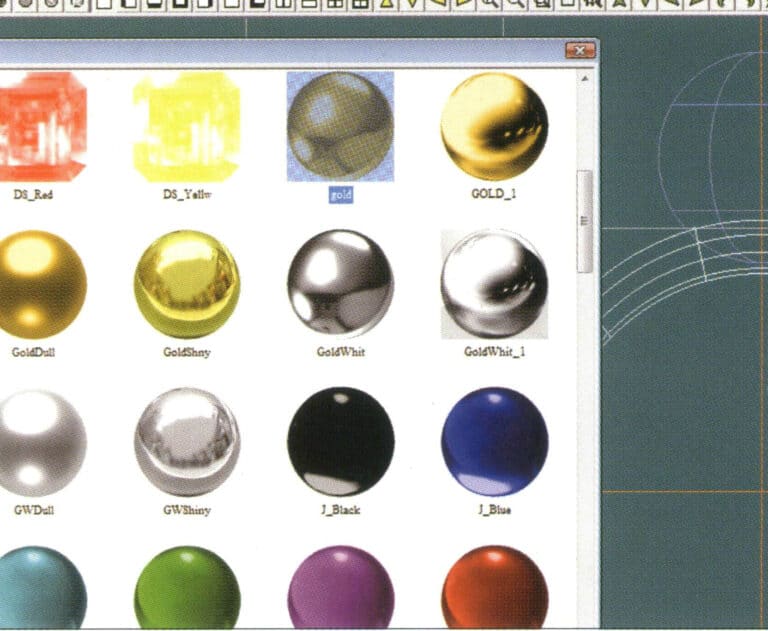
22. Öppna dialogrutan "Material", välj lämpligt material och bekräfta
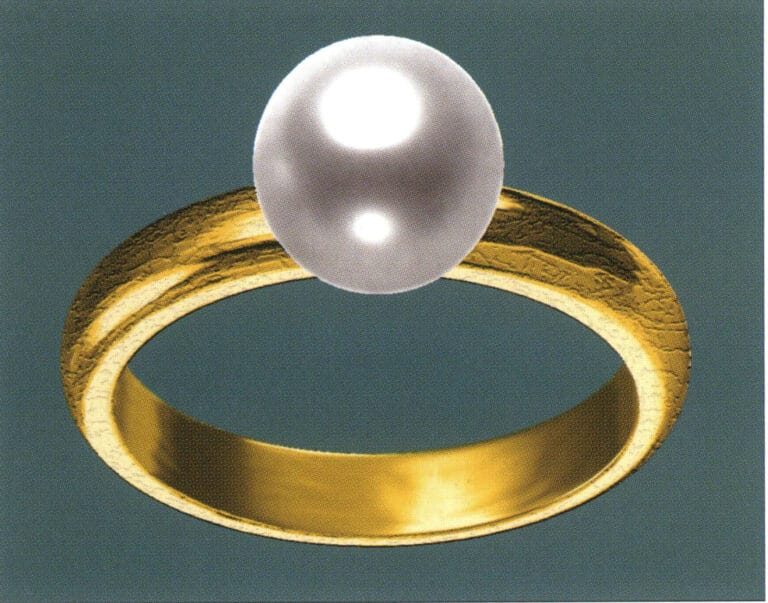
23. Select "View" > "Shadow Map" from the menu bar to examine the light and shadow effects
24. Select "File" > "Save As" from the menu bar to save the file
3. Hänge i svart guld med diamantaccenter

Produktionsstegen är som följer:
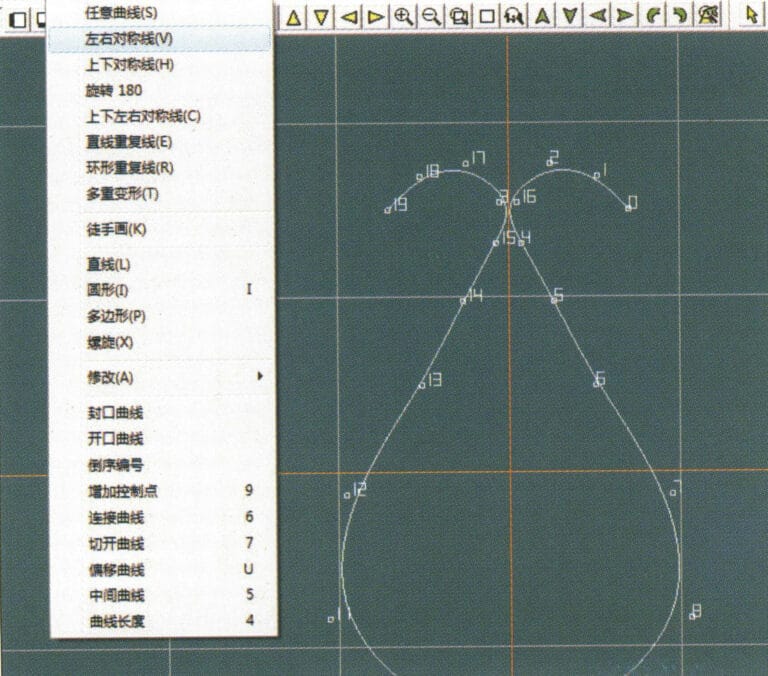
1. Create a new file in JewelCAD, select "Curve" > "Left-Right Symmetrical Line" from the menu bar, and draw the inner contour line of the pendant
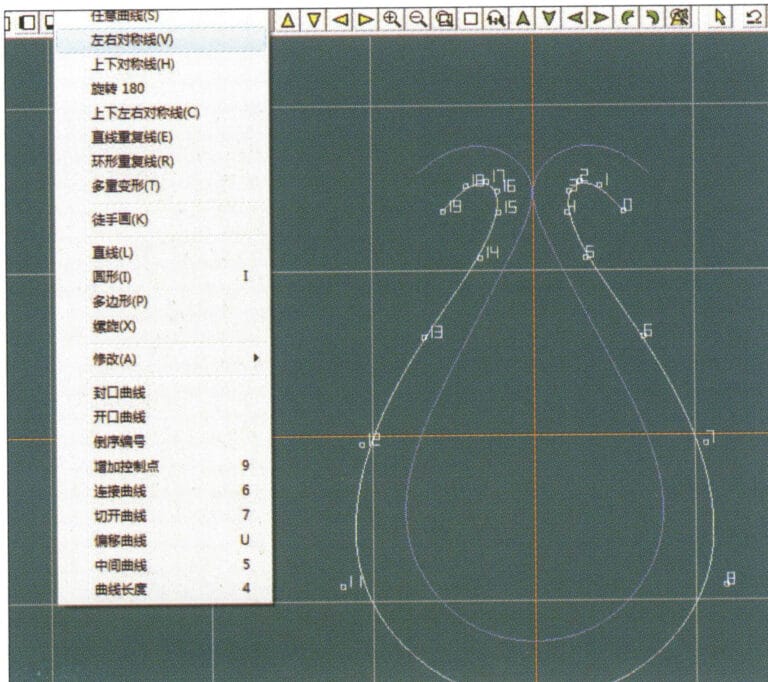
2. Select "Curve" > "Left-Right Symmetrical Line" from the menu bar to draw the outer contour line of the pendant (note that the control points of the inner contour line and the outer contour line should have the same direction and quantity).
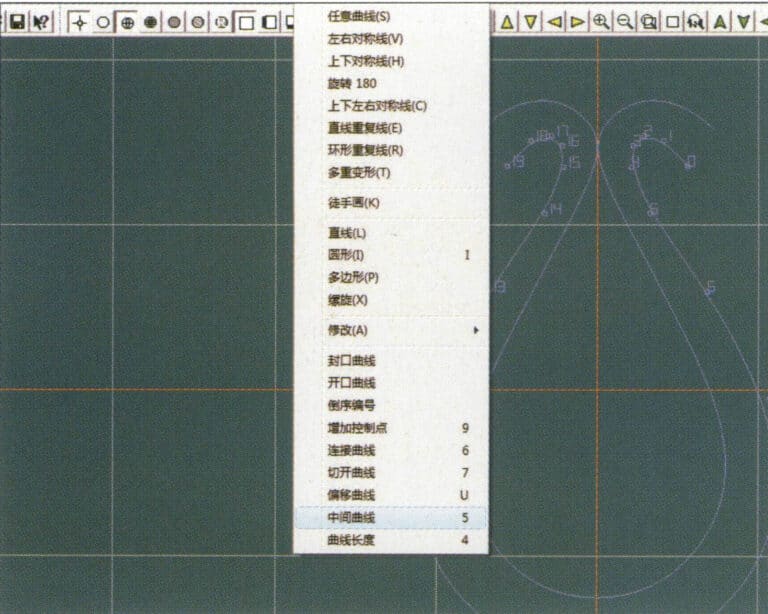
3. Select "Curve" > "Middle Curve" from the menu bar
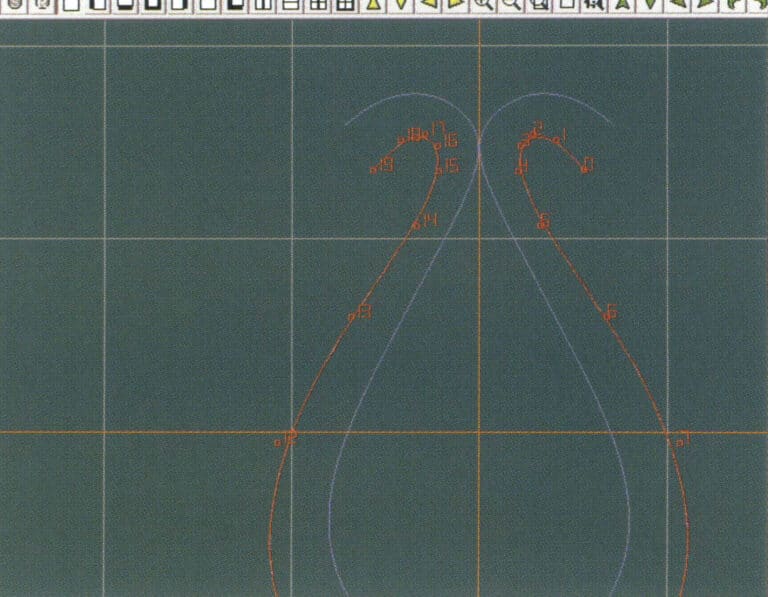
4. Välj två kurvor för att skapa den mellersta kurvan. Välj först den yttre konturlinjen
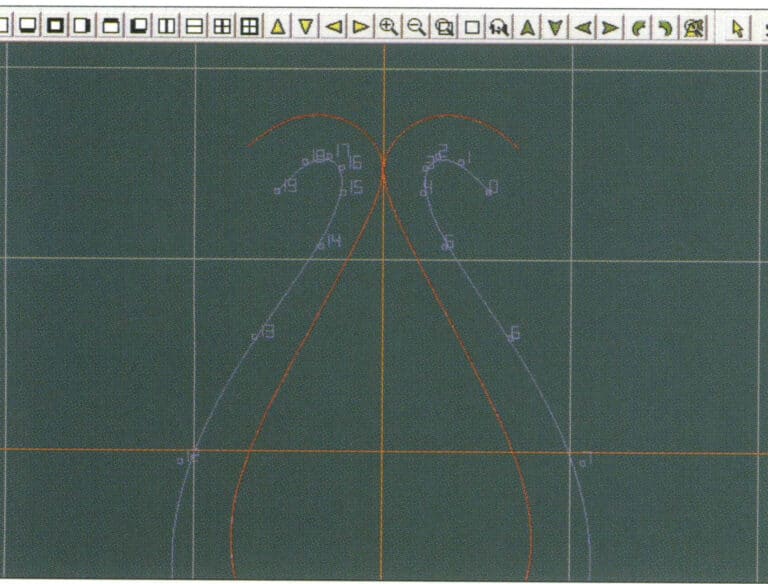
5. Välj två kurvor för att skapa den mellersta kurvan och välj sedan den inre konturlinjen
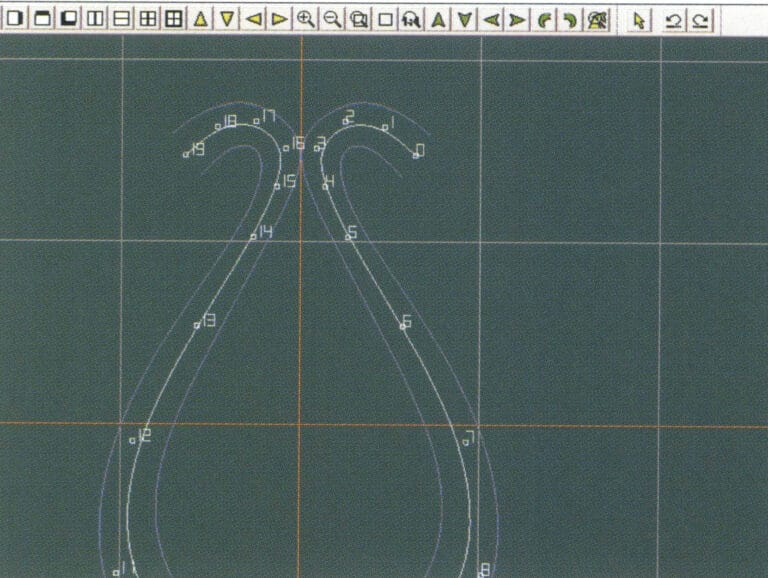
6. Visa de redan skapade intermediära kurvorna
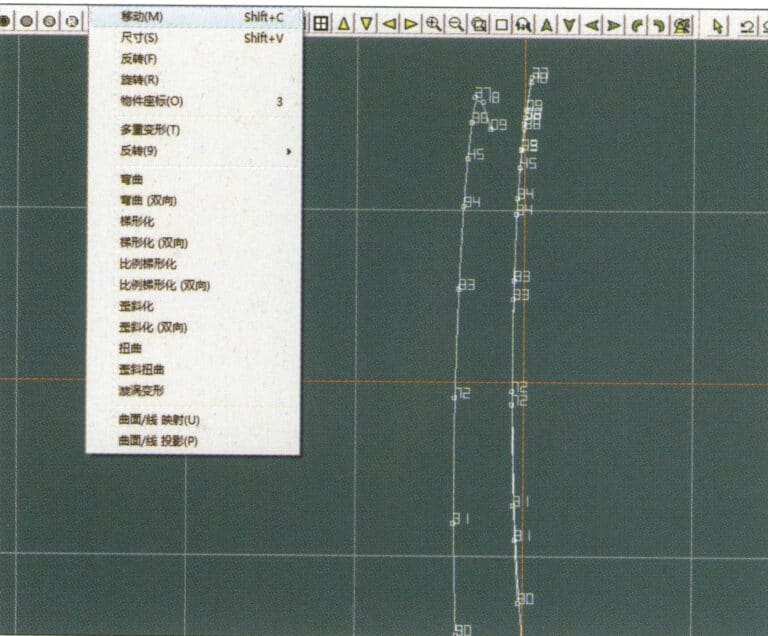
7. Select "Deformation" > "Move" from the menu bar to move the CV and the CV of the contour line
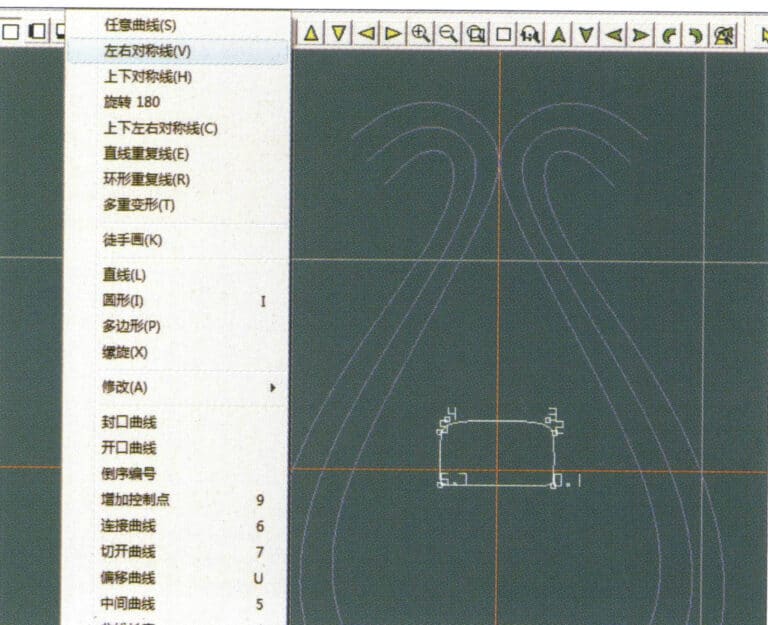
8. Select "Curve" > "Left-Right Symmetry Line" from the menu bar to create a cross-section
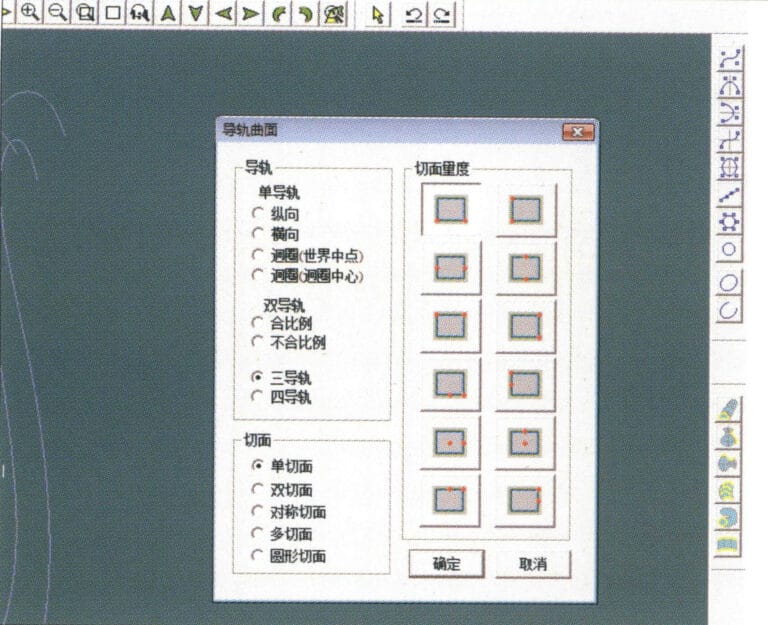
9. Select "Surface" > "Rail Surface" from the menu bar, enter the "Rail Surface" dialog box to select the relevant options, and confirm; select a curve as the left curve, starting from the left curve in a clockwise direction, left-click on the curve as the rail, and then select another curve as the section of the rail surface
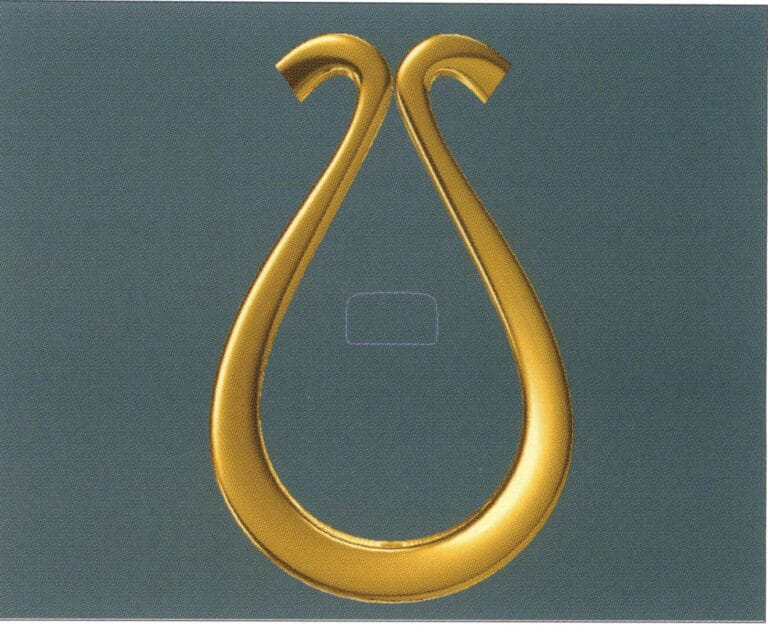
10. Select "View" > "Shadow Map" from the menu bar to inspect the shadow effects
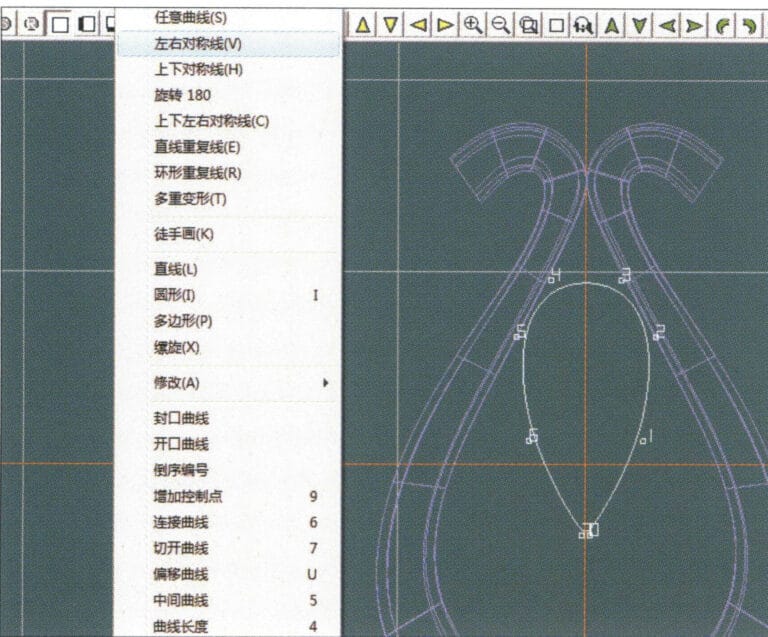
11. Select "Curve" > "Left-Right Symmetry Line" from the menu bar to draw the outer contour line of the seed-shaped toggle
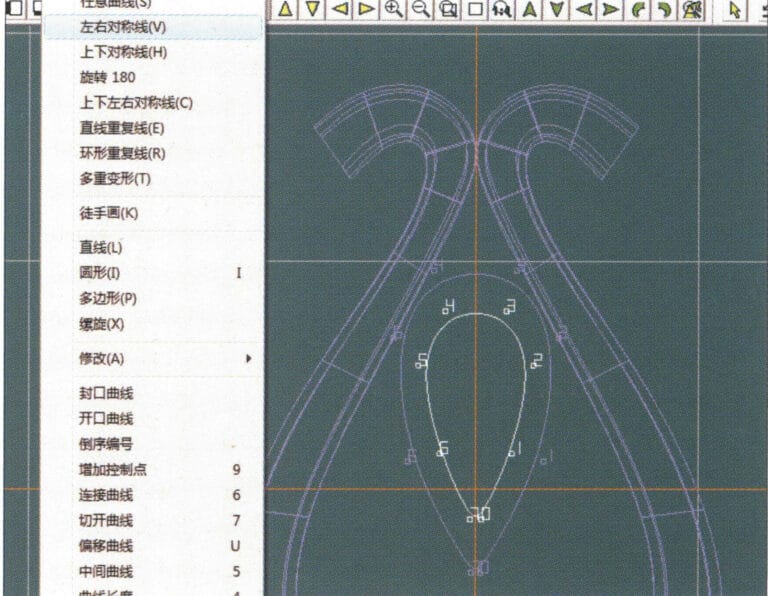
12. Select "Curve" > "Left-Right Symmetry Line" from the menu bar to draw the inner contour line of the seed-shaped toggle
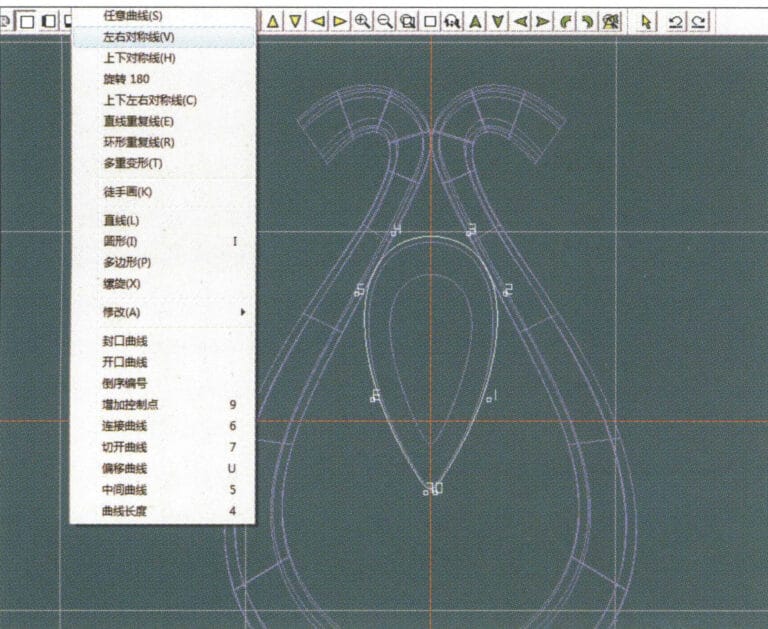
13. Select "Curve" > "Left-Right Symmetry Line" from the menu bar, and draw the lower dark line of the center of the seed-shaped toggle
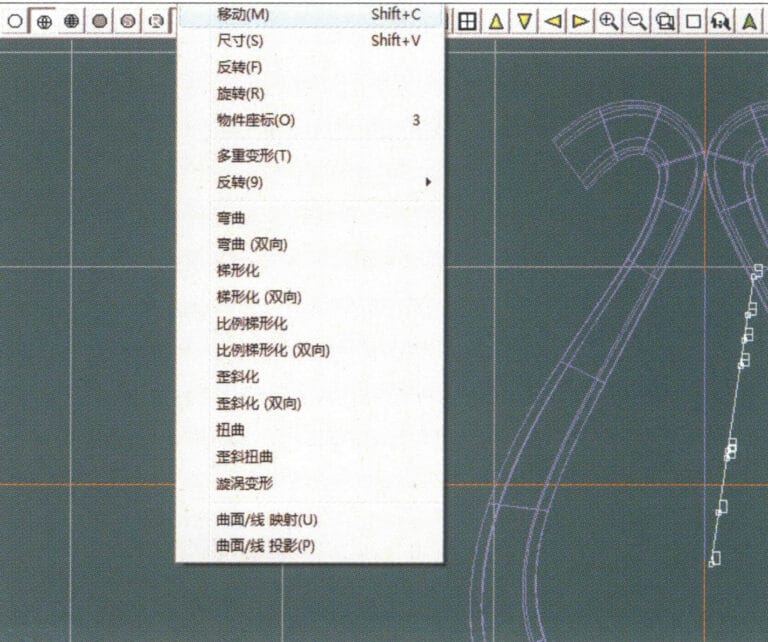
14. Select "Deformation" > "Move" from the menu bar to move the seed-shaped toggle CV
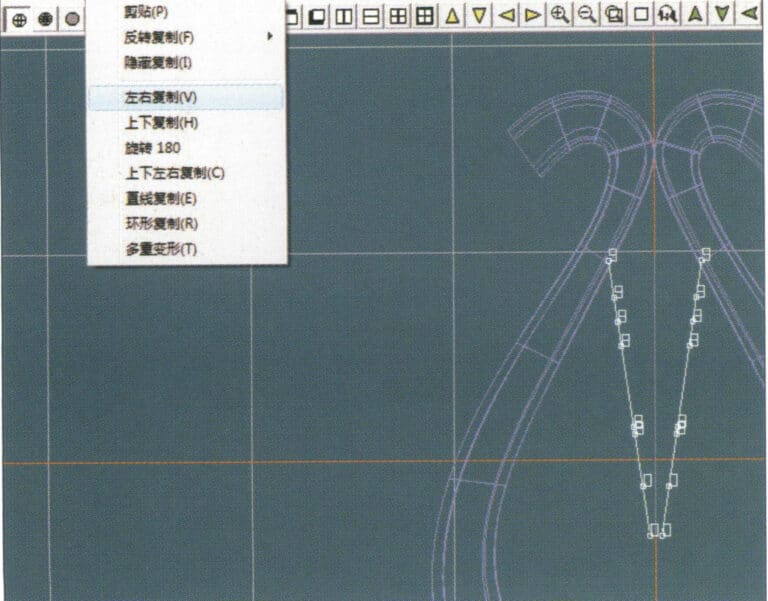
15. Select "Copy" > "Copy Left and Right" from the menu bar to copy the curve of the seed-shaped toggle
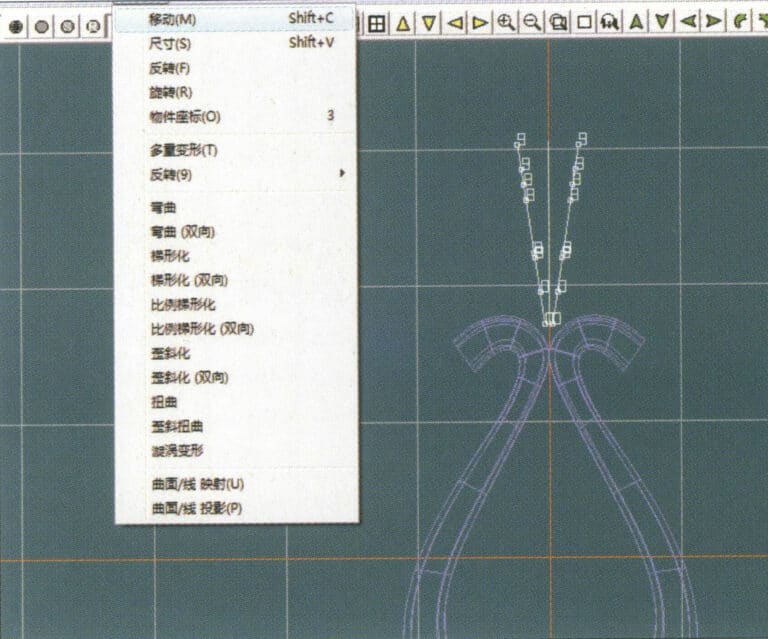
16. Select "Deformation" > "Move" from the menu bar to move the melon seed buckle curve
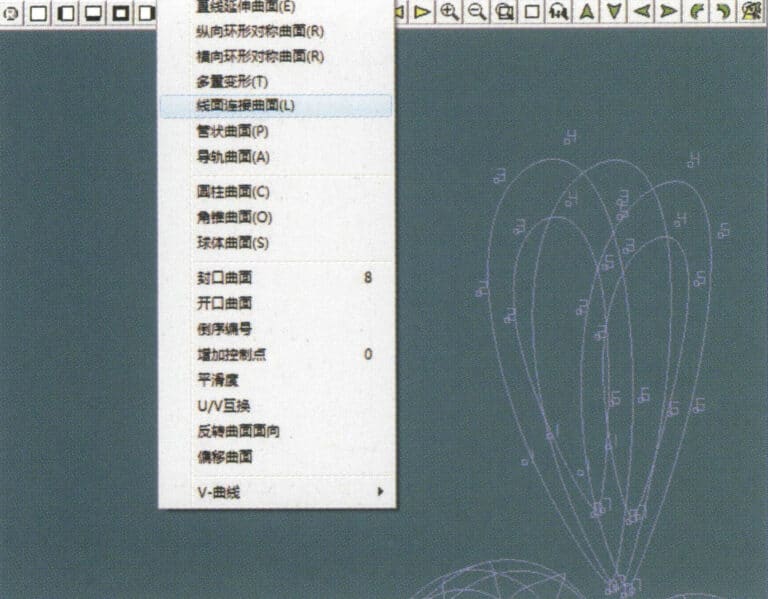
17. Select "Surface" > "Line-Surface Connection Surface" from the menu bar, and select the curve/surface in a clockwise direction to create a line-surface connection surface, then select "Curve" > "Closed Surface" from the menu bar
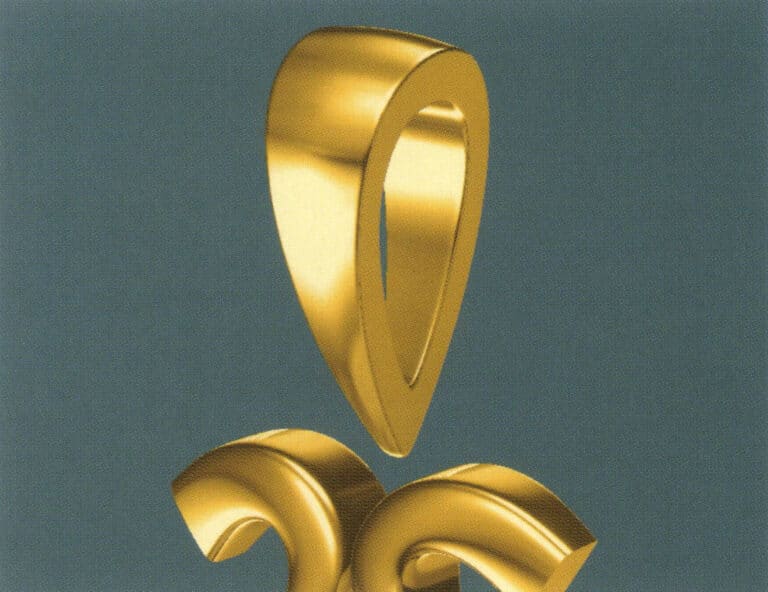
18. Select "View" > "Shadow Map" from the menu bar to examine the shadow effects
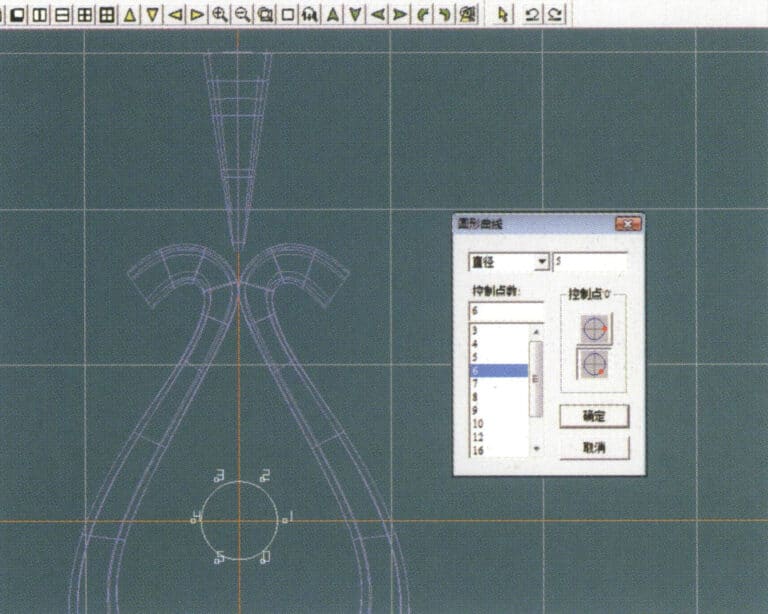
19. Select "Curve" > "Circular Curve" from the menu bar, enter the relevant values and confirm

20. Select "Surface" > "Tubular Surface" from the menu bar
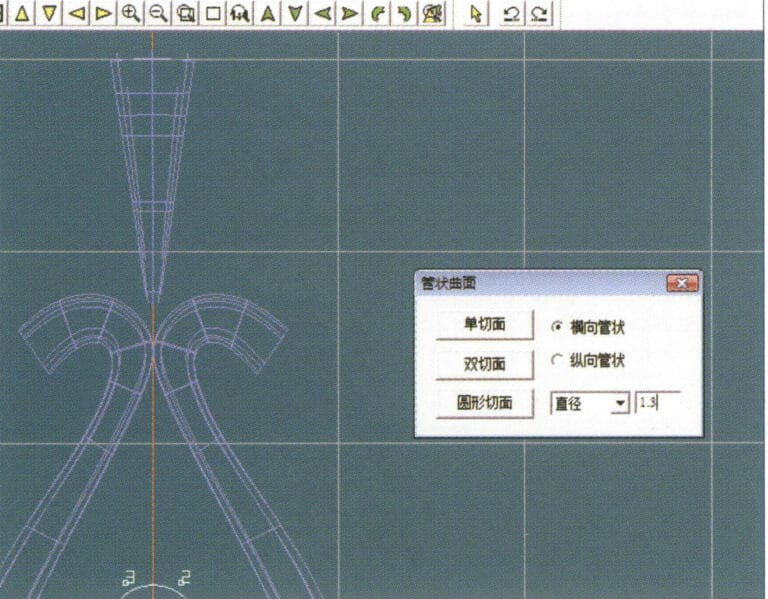
21. Öppna dialogrutan "Tubular Surface", mata in relevanta värden, klicka på den cirkulära sektionen och bekräfta
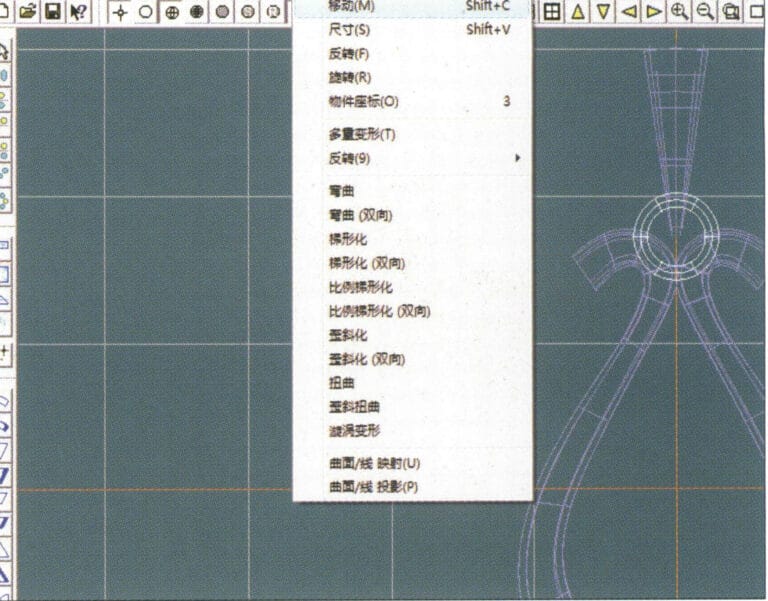
22. Select "Deformation" > "Move" from the menu bar to move the ring buckle

23. Select "File" > "Insert File" from the menu bar
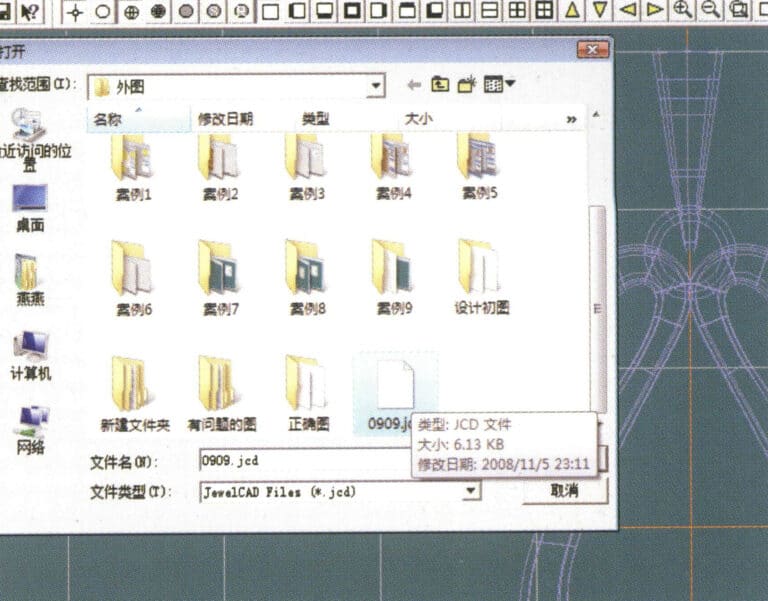
24. Öppna dialogrutan "Insert File", välj önskat dokument och bekräfta
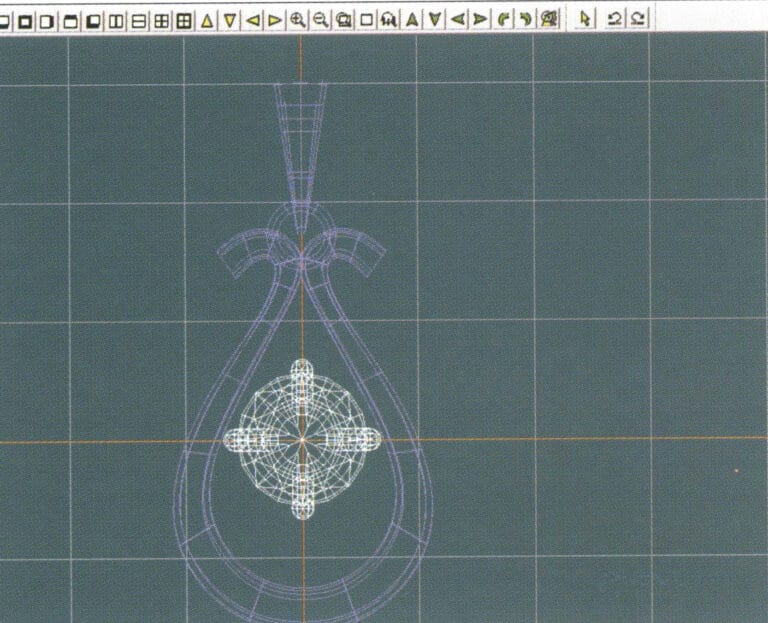
25. Visa den infogade filen - Gemstone
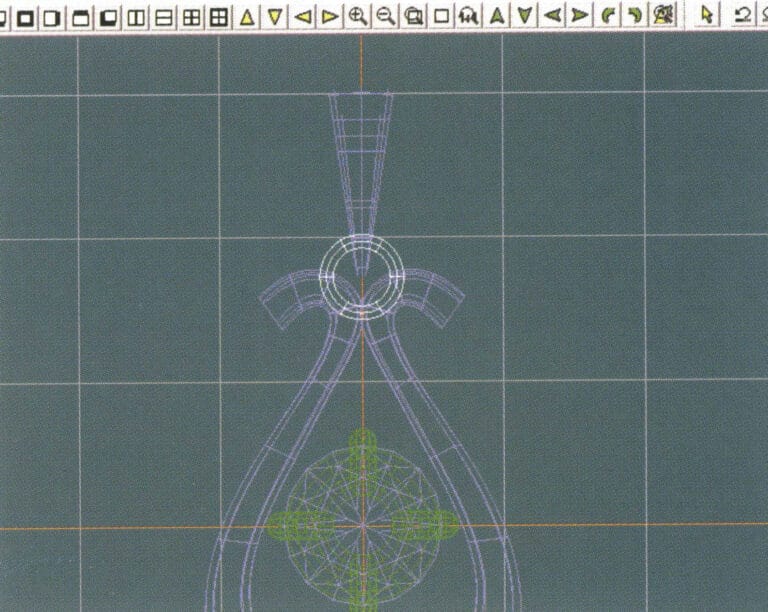
26. Select "Copy" > "Copy Up and Down" from the menu bar to copy the selected toggle
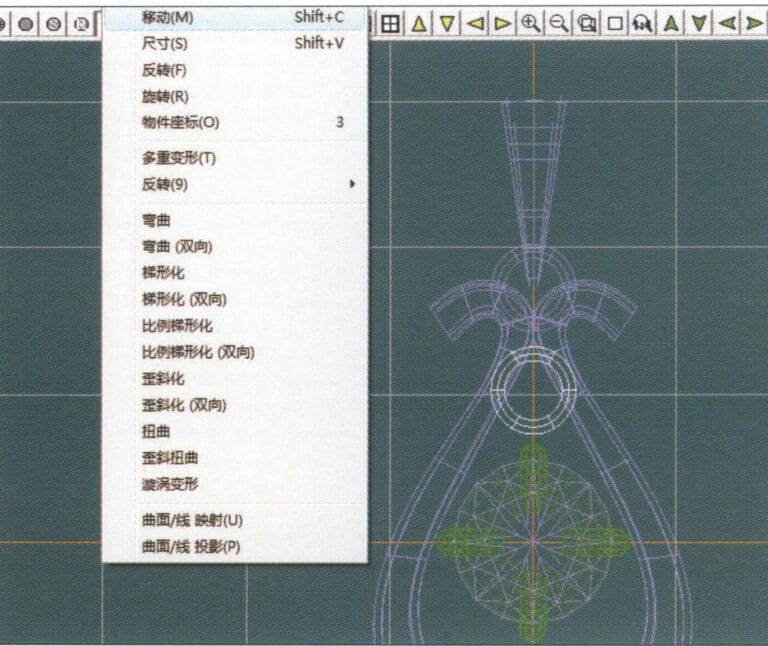
27. Select "Deformation" > "Move" from the menu bar to move the horizontal ring toggle
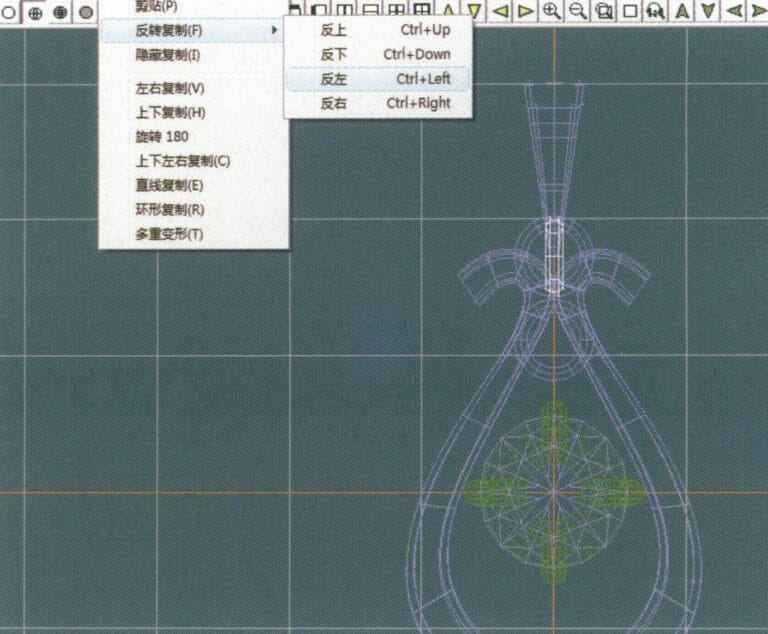
28. Select "Copy" > "Reverse Copy" > "Reverse Left" from the menu bar to create a vertical ring toggle
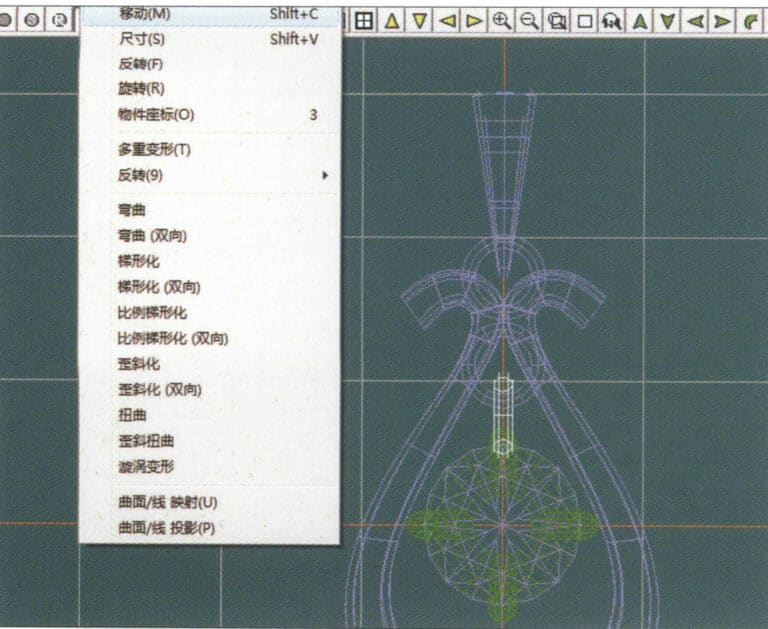
29. Select "Deformation" > "Move" from the menu bar to move the horizontal ring toggle
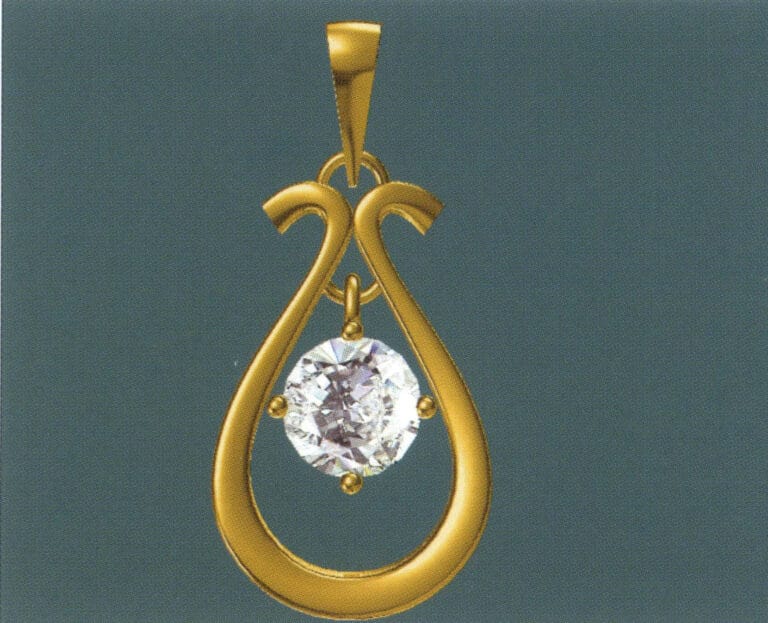
30. Select "View" > "Shadow Map" from the menu bar to examine the light and shadow effects
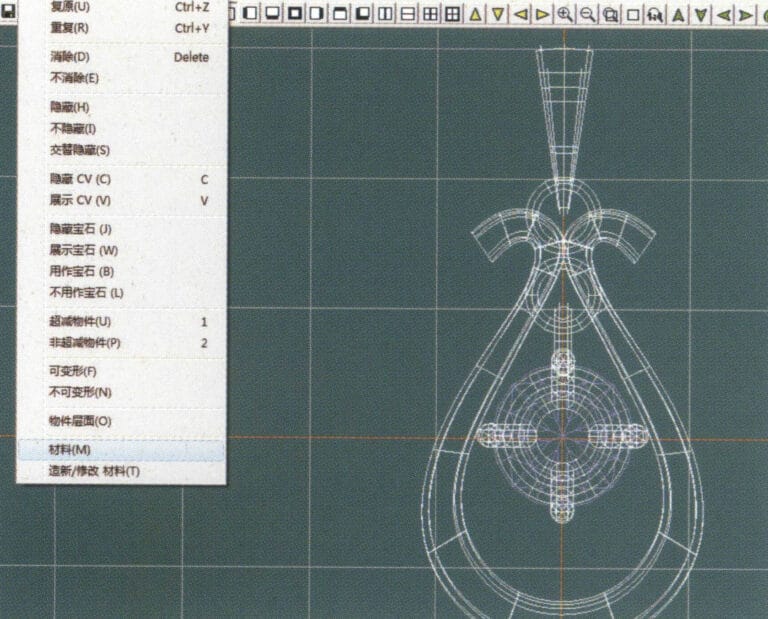
31. Select "Edit" > "Materials" from the menu bar to modify the materials of the selected object
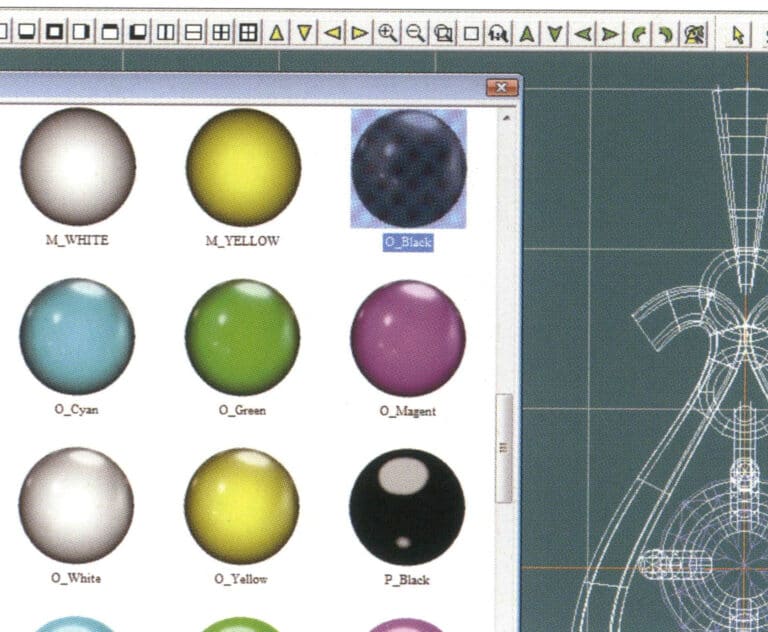
32. Öppna dialogrutan "Material", välj svartguld och bekräfta
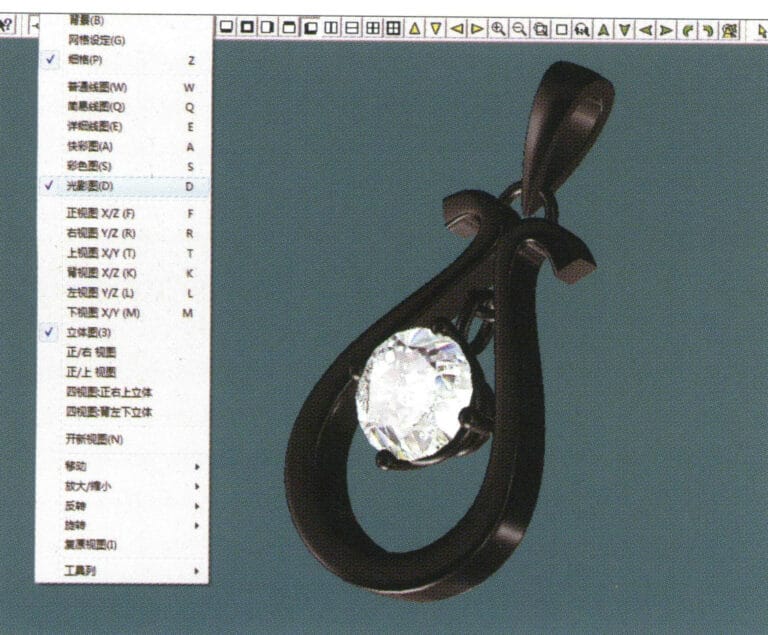
33. Select "View" > "Shadow Map" from the menu bar to inspect the shadow effects
34. Select "File" > "Save As" from the menu bar to save the file
4. Rubinhänge
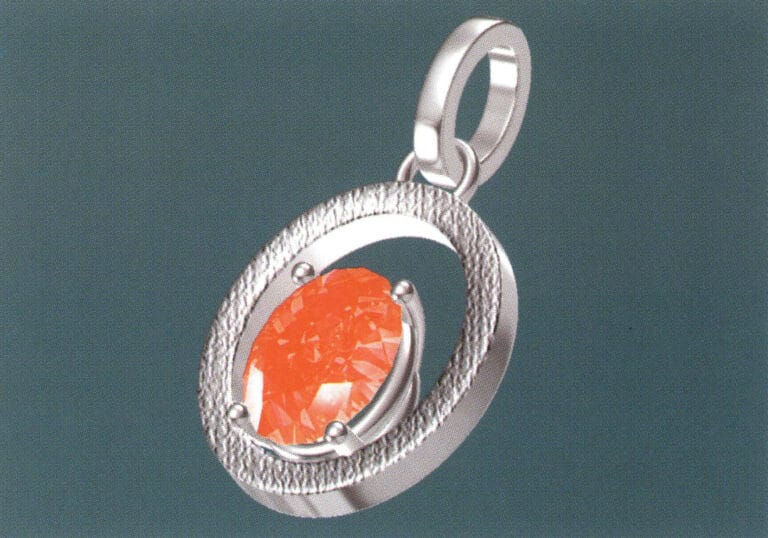
Produktionsstegen är som följer:
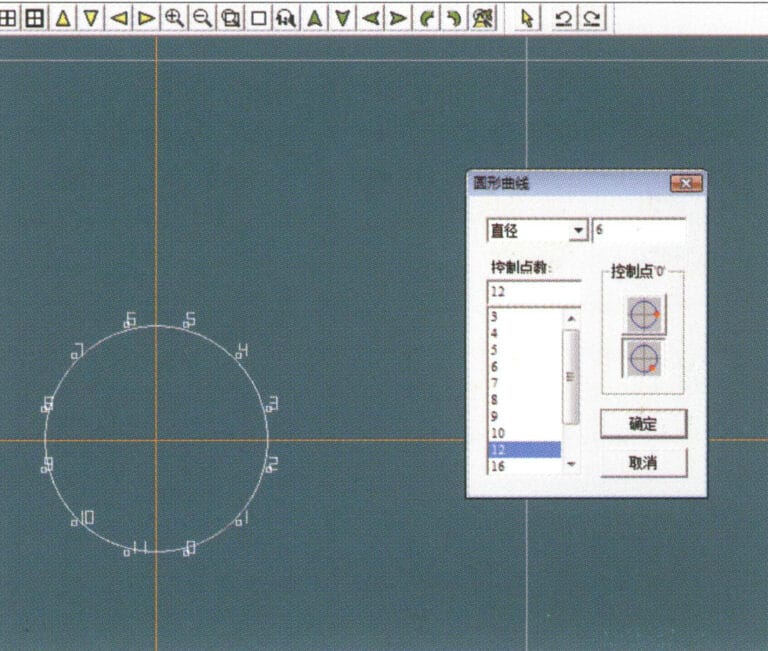
1. Create a new file in JewelCAD, select "Curve" > "Circular Curve" from the menu bar, enter the relevant values in the "Circular Curve" dialog box as the inner auxiliary line, and confirm

2. Select "Curve" > "Circular Curve" from the menu bar, enter the relevant values in the "Circular Curve" dialog box as the external auxiliary line, and confirm
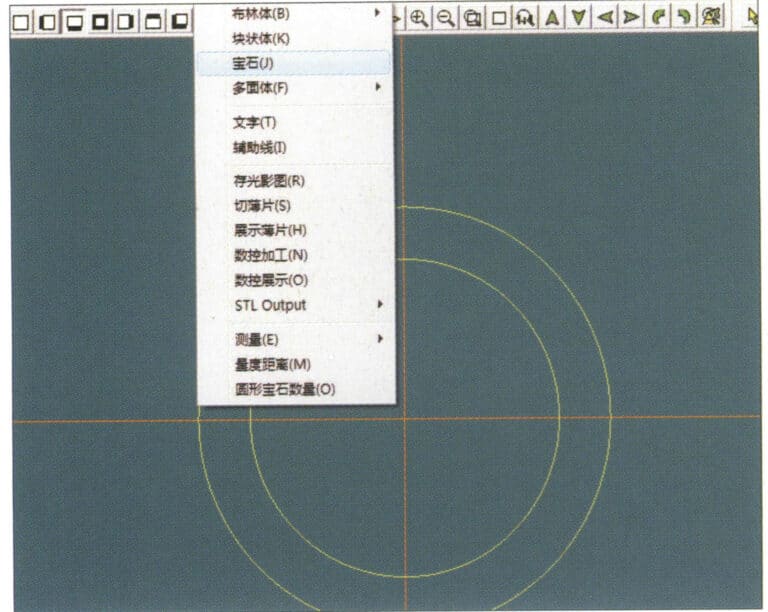
3. Select "Miscellaneous" > "Gemstones" from the menu bar
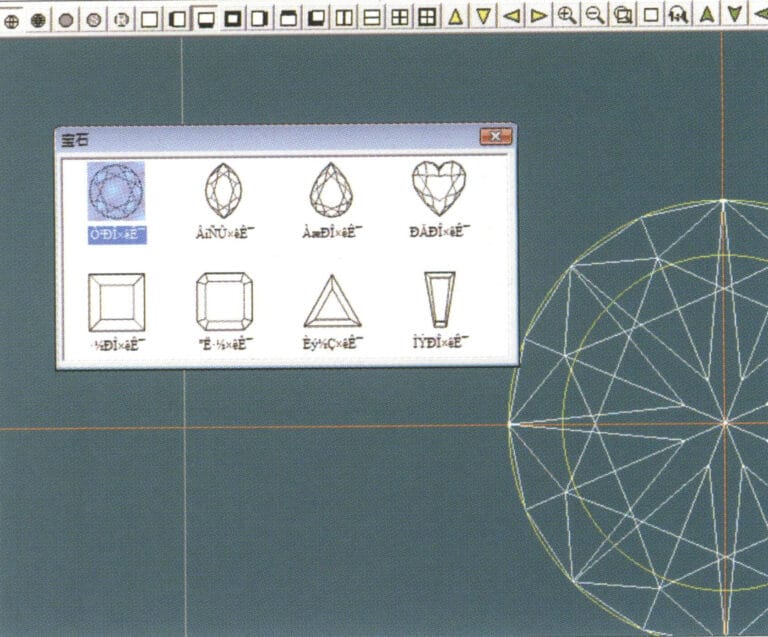
4. Öppna dialogrutan "Gem", välj relevanta ädelstenar och bekräfta
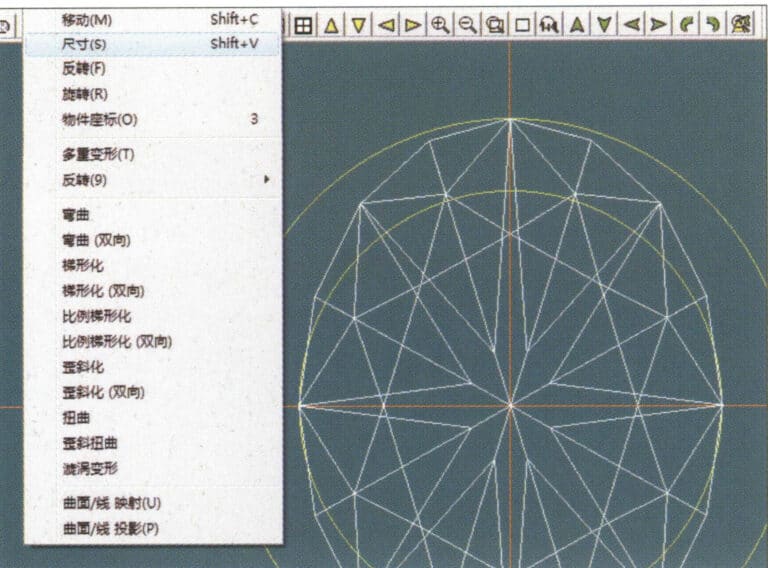
5. Select "Deformation" > "Size" from the menu bar to change the round gemstone into an oval gemstone
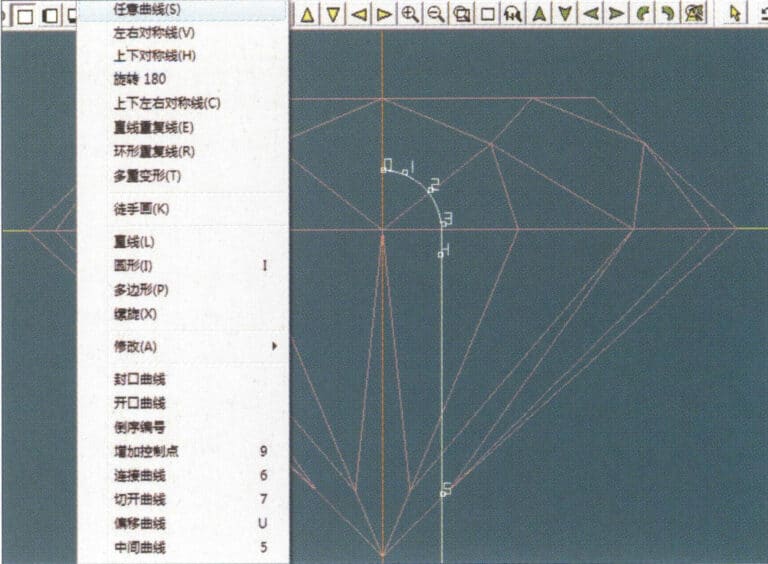
6. Select "Curve" > "Freeform Curve" from the menu bar to draw a claw-shaped guideline
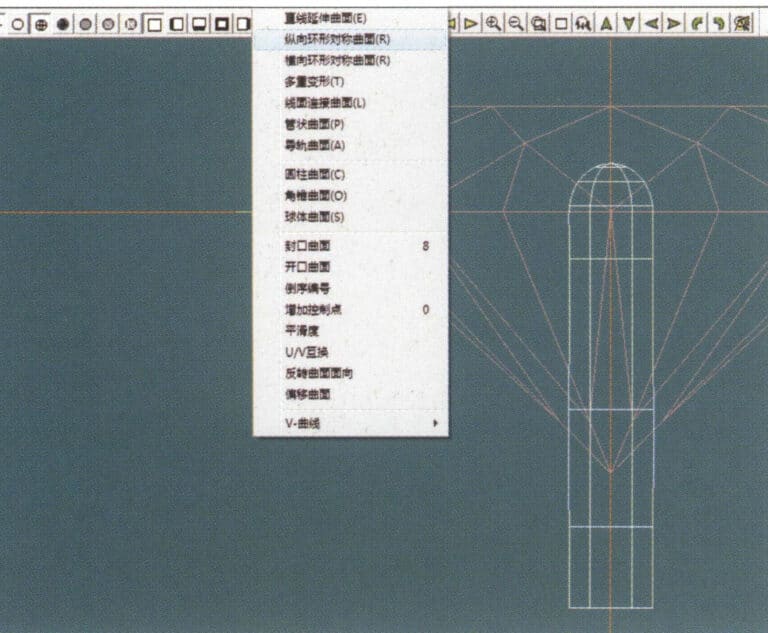
7. Select "Surface" > "Longitudinal Circular Symmetrical Surface" from the menu bar, and draw a claw shape
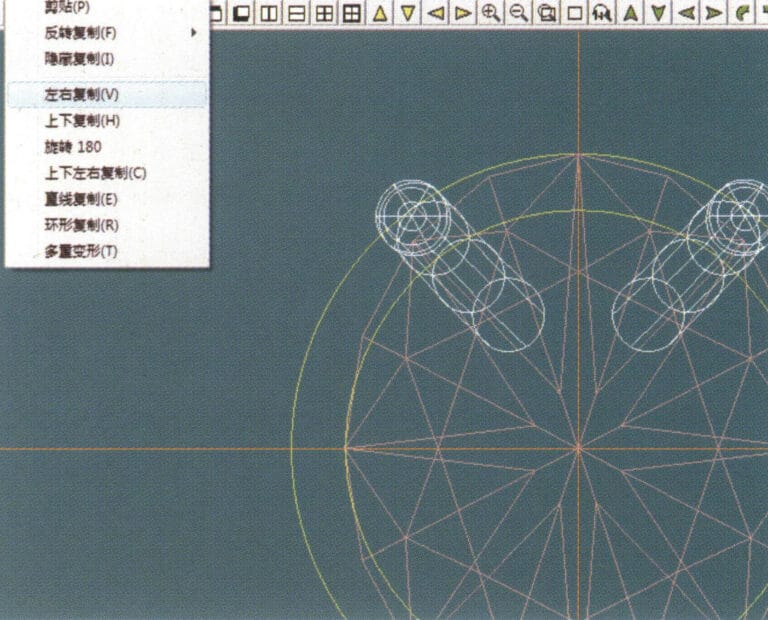
8. Select "Copy" > "Copy Left and Right" from the menu bar to copy the claw shape
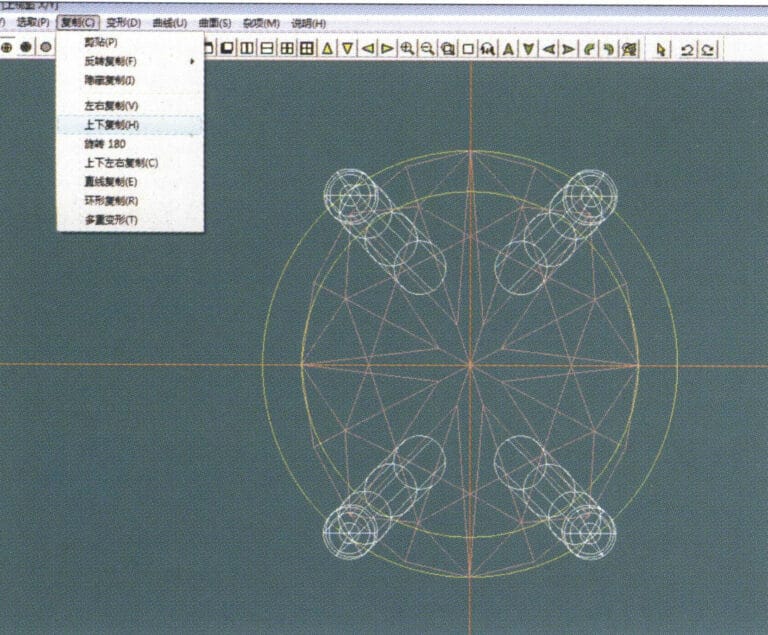
9. Select "Copy" > "Copy Up and Down" from the menu bar to copy the claw shape again
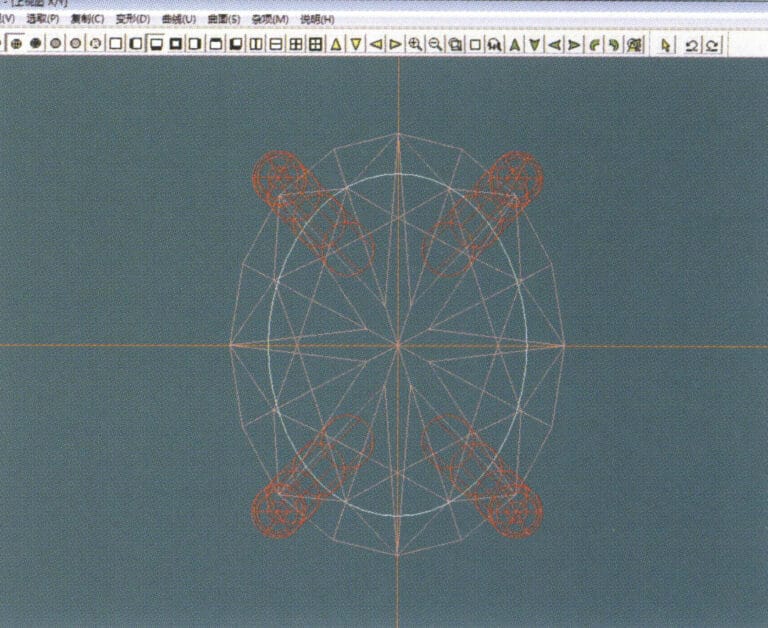
10. Select "Deformation" > "Size" from the menu bar to change the circular guideline to an elliptical guideline
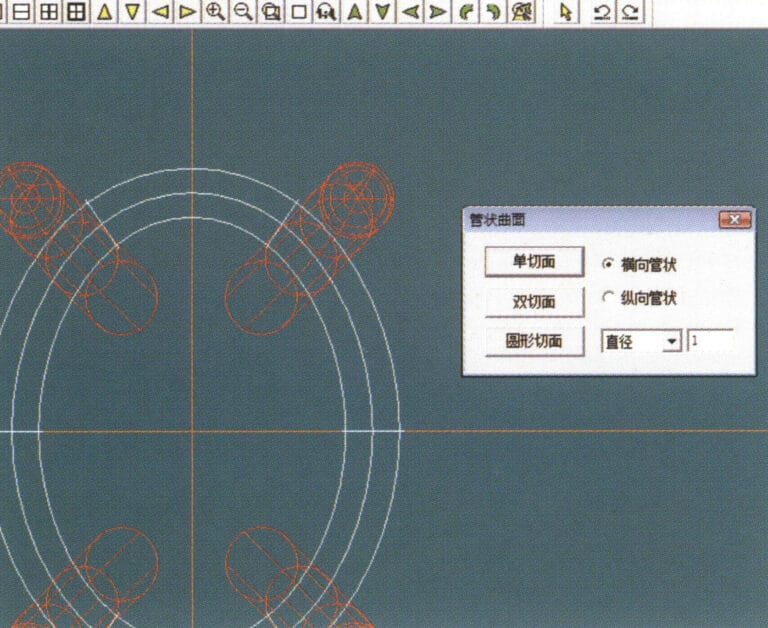
11. Select "Curved Surface" > "Tubular Surface" from the menu bar, enter the relevant values in the "Tubular Surface" dialog box and confirm
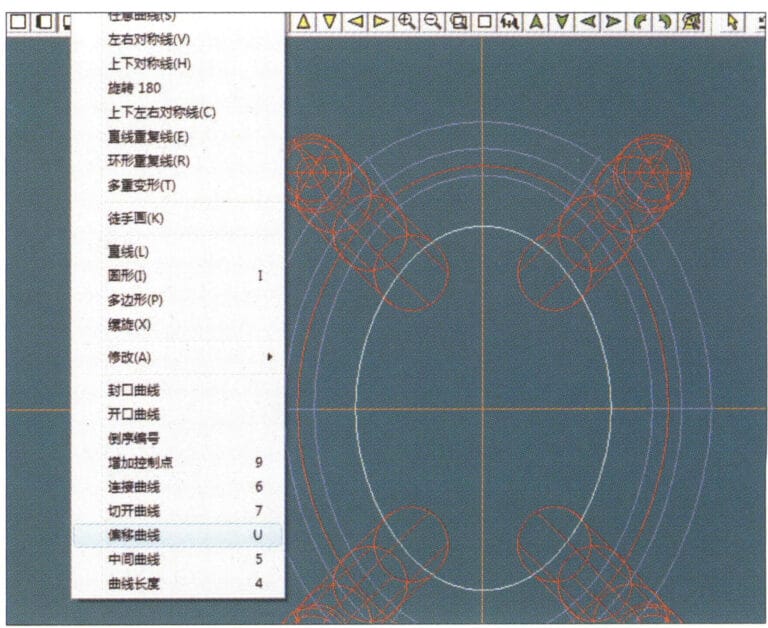
12. Select "Curve" > "Offset Curve" from the menu bar
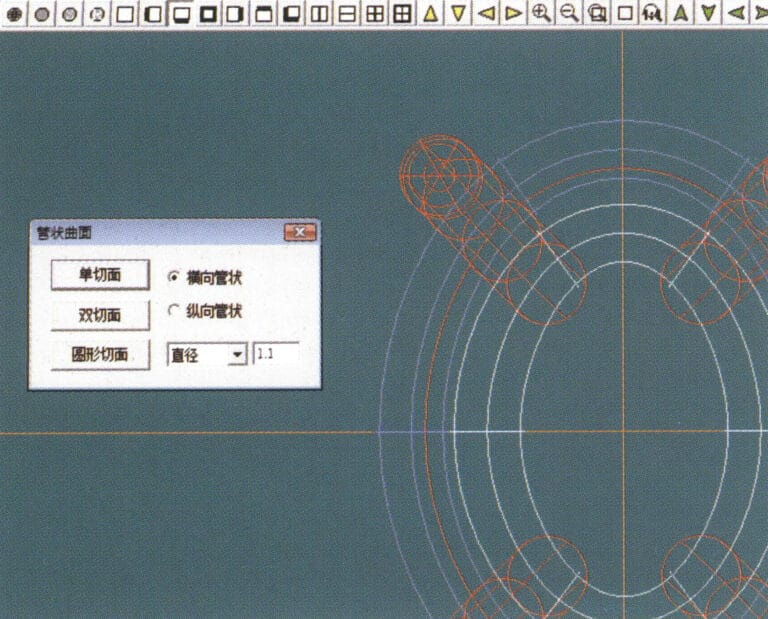
13. Select "Surface" > "Tubular Surface" from the menu bar, enter the relevant values and confirm
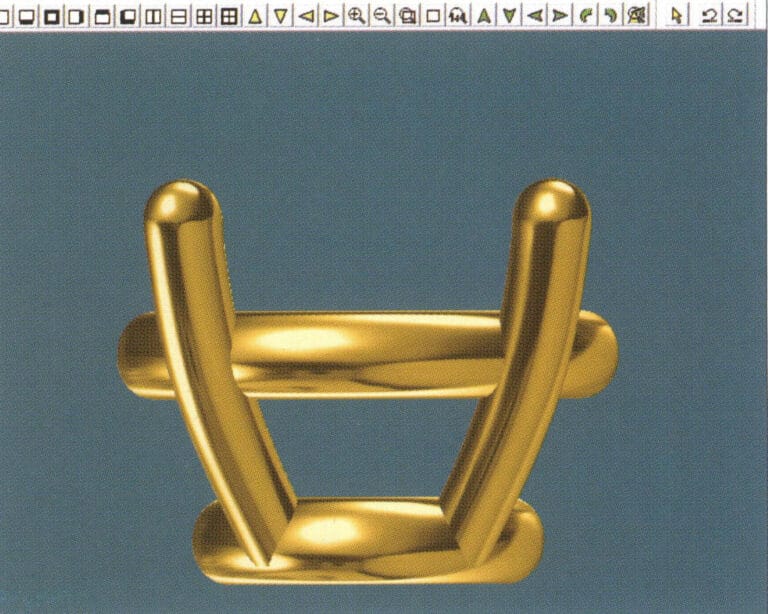
14. Select "View" > "Shadow Map" from the menu bar to examine the shadow effects and inspect the setting
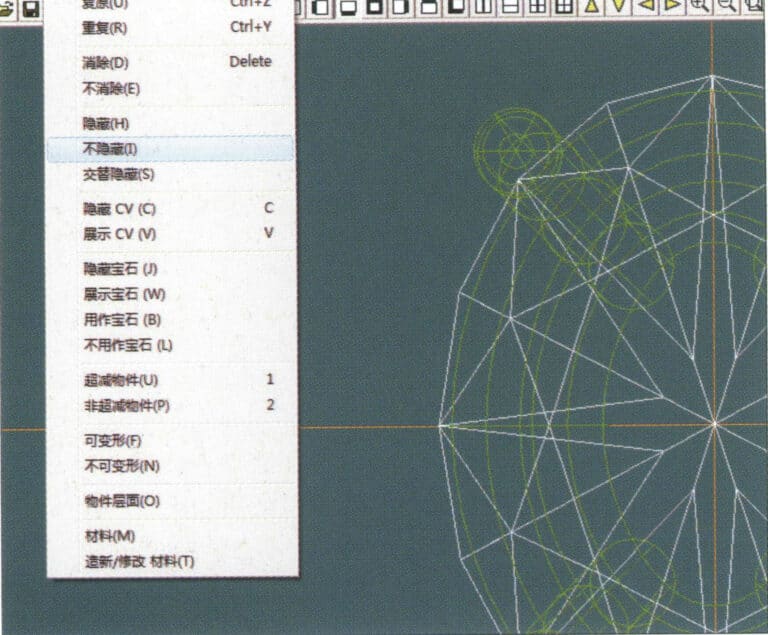
15. Select "Edit" > "Unhide" from the menu bar to display the hidden gems
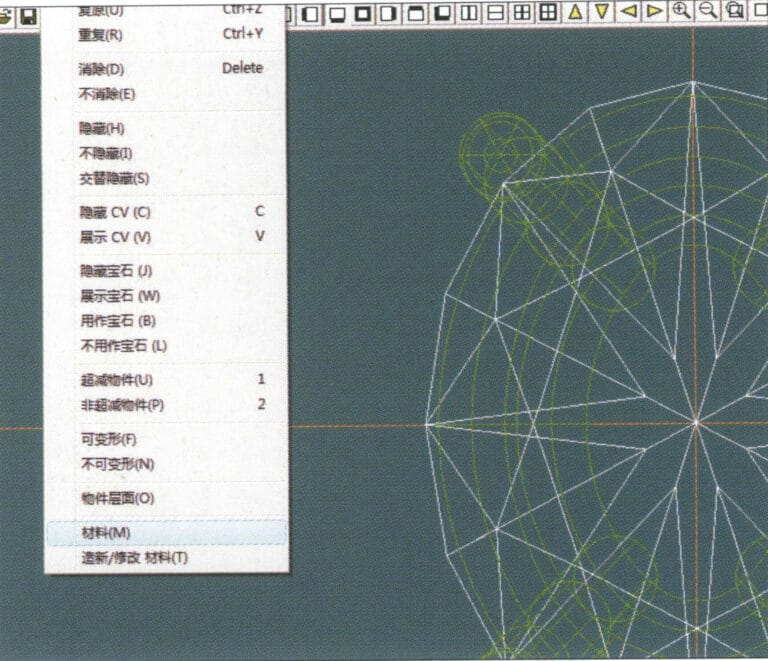
16. Select "Edit" > "Materials" from the menu bar
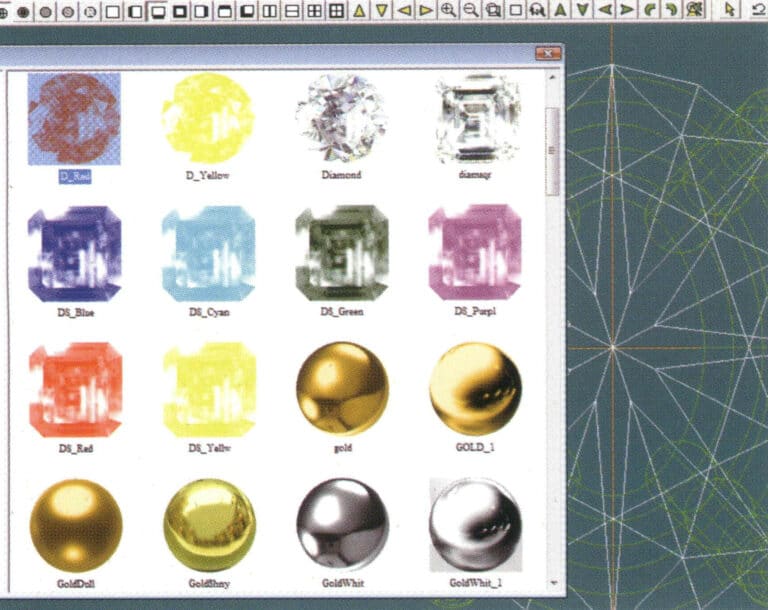
17. Öppna dialogrutan "Materials", välj ruby och bekräfta
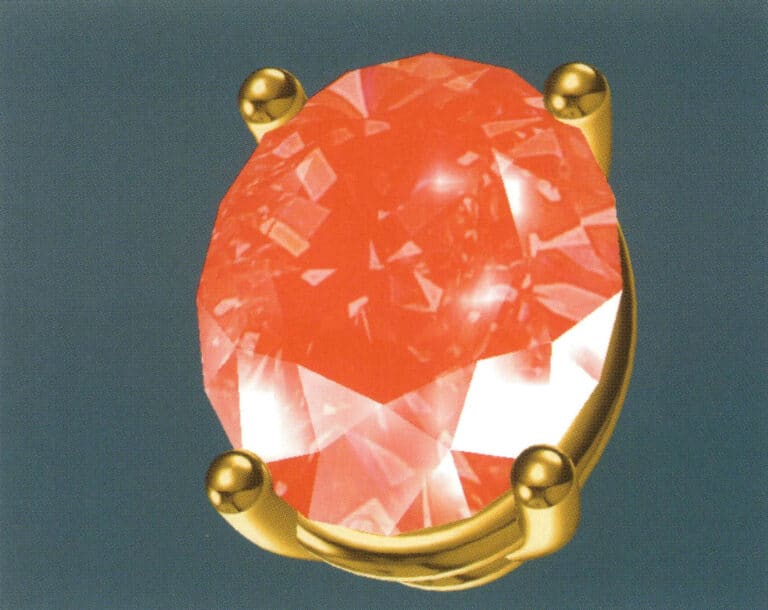
18. Select "View" > "Shadow Map" from the menu bar to examine the shadow effects
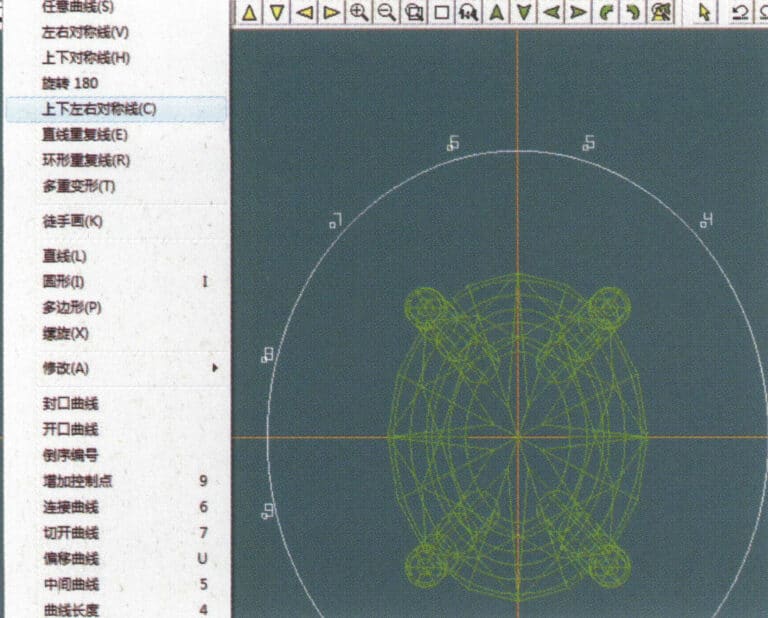
19. Select "Curve" > "Vertical and Horizontal Symmetry Line" from the menu bar as the auxiliary line for the outer circle
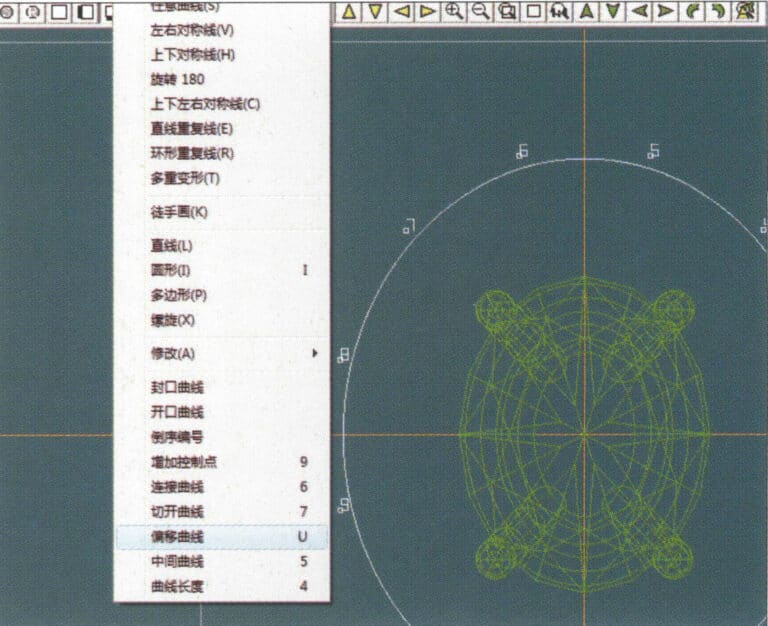
20. Select "Curve" > "Offset Curve" from the menu bar

21. Öppna dialogrutan "Offset Curve", mata in relevanta värden som hjälplinjer för den inre cirkeln och bekräfta
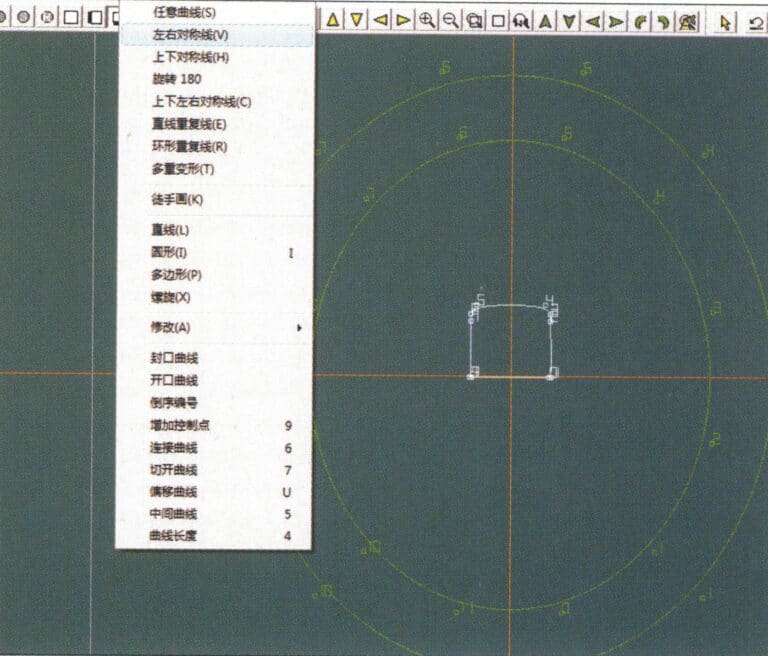
22. Select "Curve" > "Left-Right Symmetrical Line" from the menu bar as the cross-section of the coil
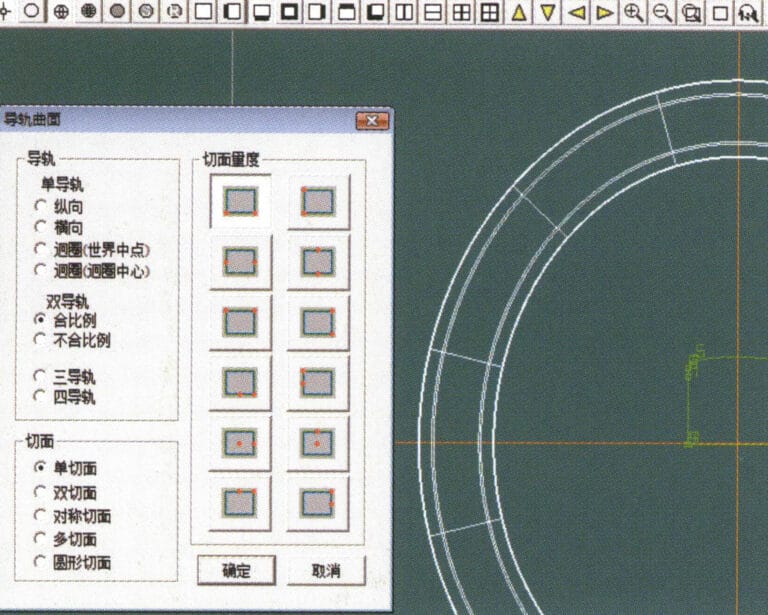
23. Select "Curved Surface" > "Rail Surface" from the menu bar to enter the "Rail Surface" dialog box, select the relevant options and confirm
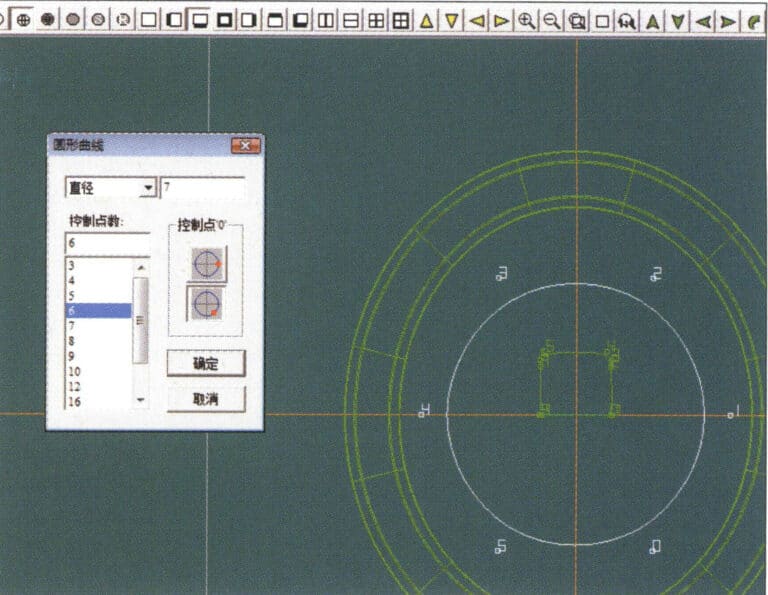
24. Select "Curve" > "Circular Curve" from the menu bar, enter the relevant values in the "Circular Curve" dialog box, and confirm; left-click on one curve as the left guide curve, click on another curve as the right guide rail, and then select the coil cross-section as the cross-section of the guide rail surface; once completed, it serves as the auxiliary line for the outer circle of the chain threading position
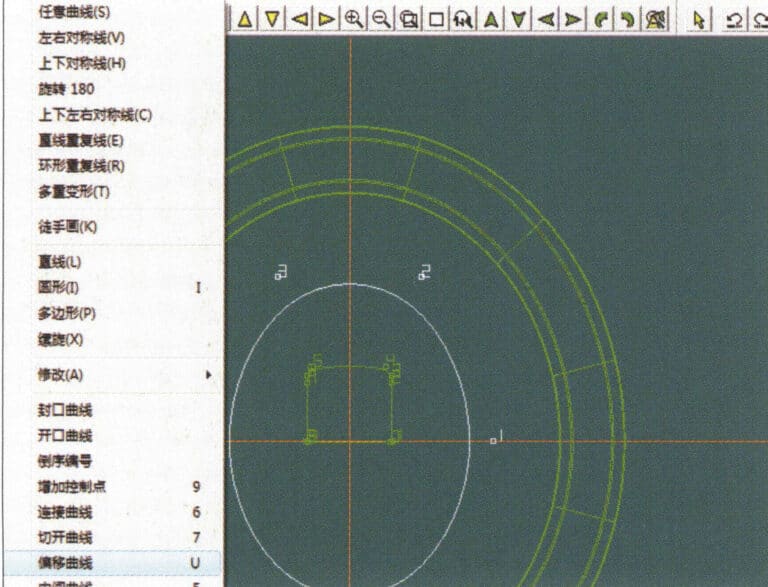
25. After completing the outer auxiliary lines for the chain position, select "Curve" > "Offset Curve" from the menu bar
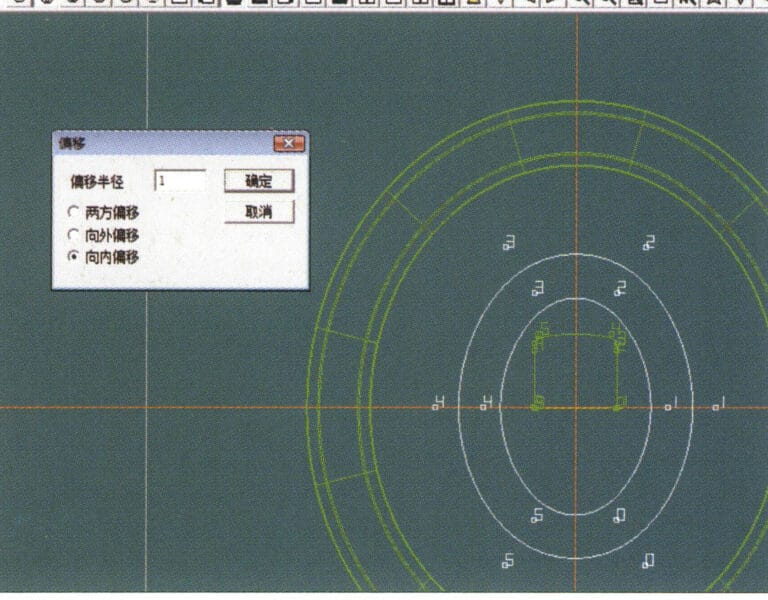
26. Öppna dialogrutan "Offset Curve", mata in relevanta värden och bekräfta
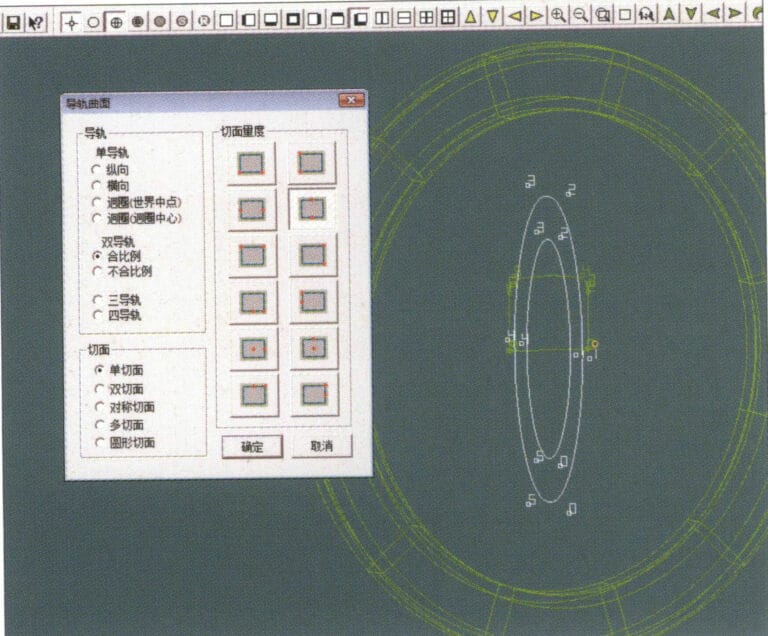
27. Select "Surface" > "Rail Surface" from the menu bar to enter the "Rail Surface" dialog box, select the relevant options and confirm, left-click on a curve to set it as the left rail curve, click on another curve to set it as the right rail, and then select the coil cross-section as the cross-section of the rail surface
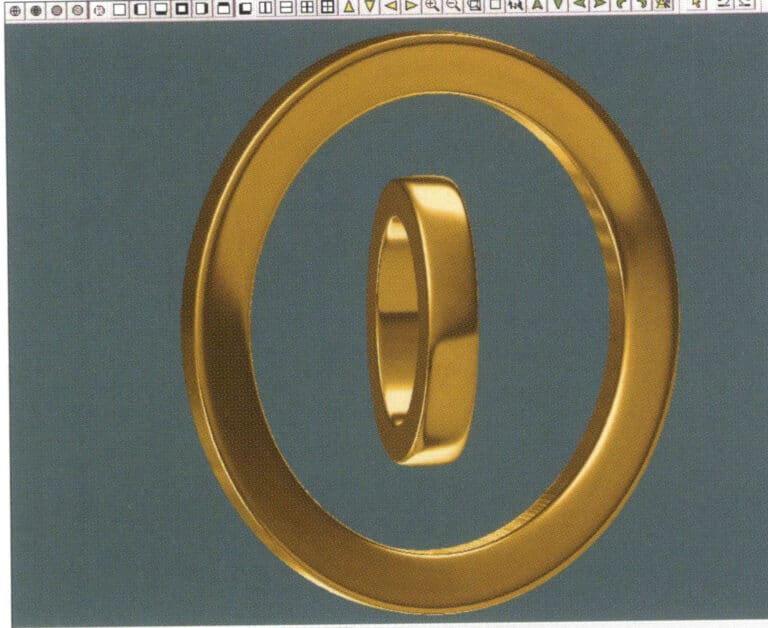
28. Select "View" > "Shadow Map" from the menu bar to inspect the shadow effects
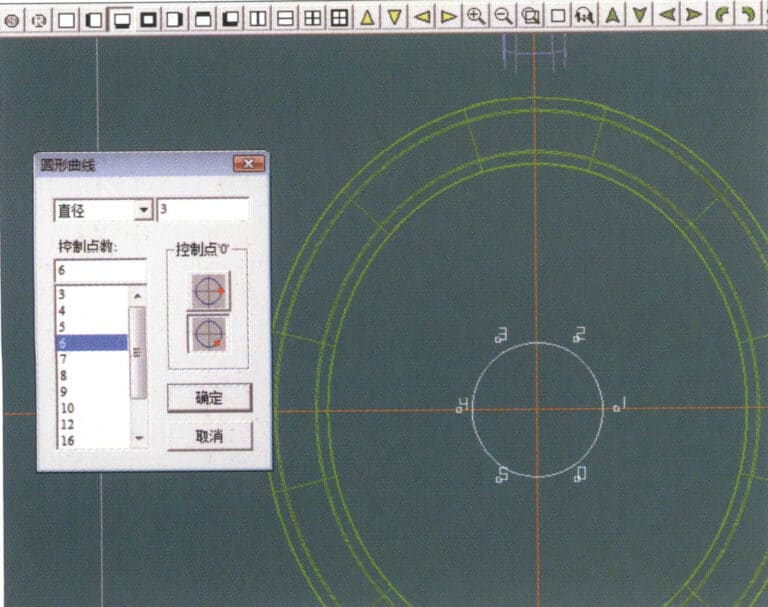
29. Select "Curve" > "Circular Curve" from the menu bar, enter the relevant values and confirm
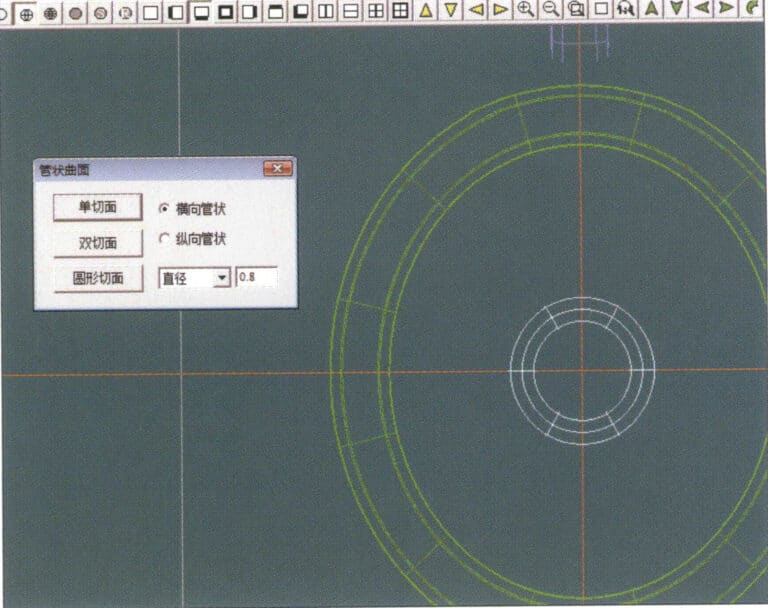
30. Select "Curved Surface" > "Tubular Surface" from the menu bar, enter the relevant values and confirm
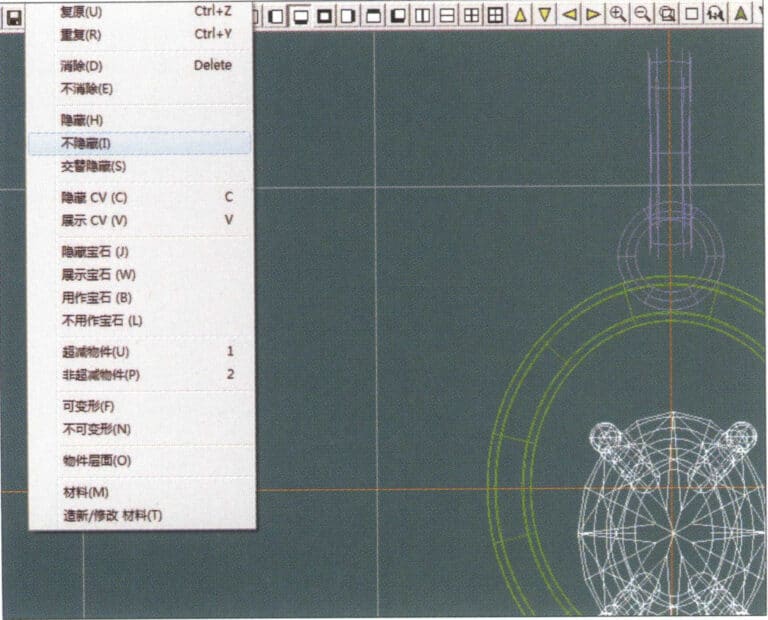
31. Select "Edit" > "Unhide" from the menu bar to display the hidden objects
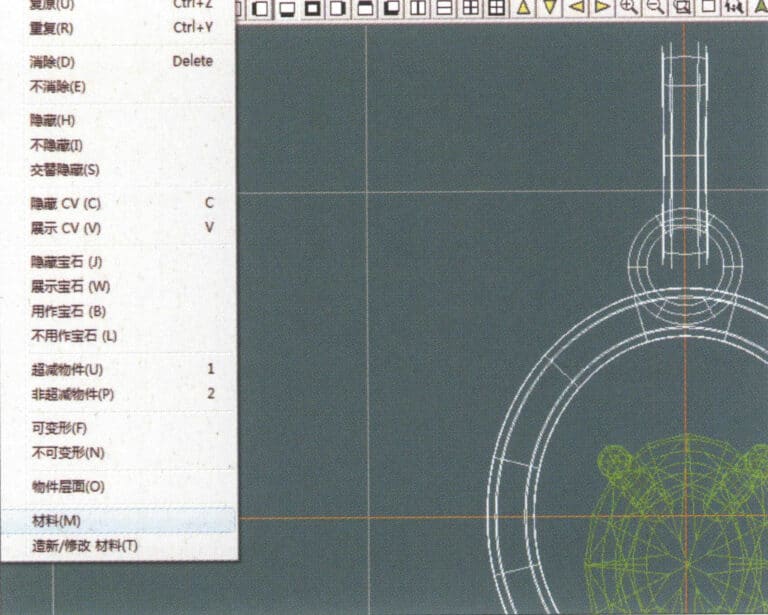
32. Select "Edit" > "Materials" from the menu bar
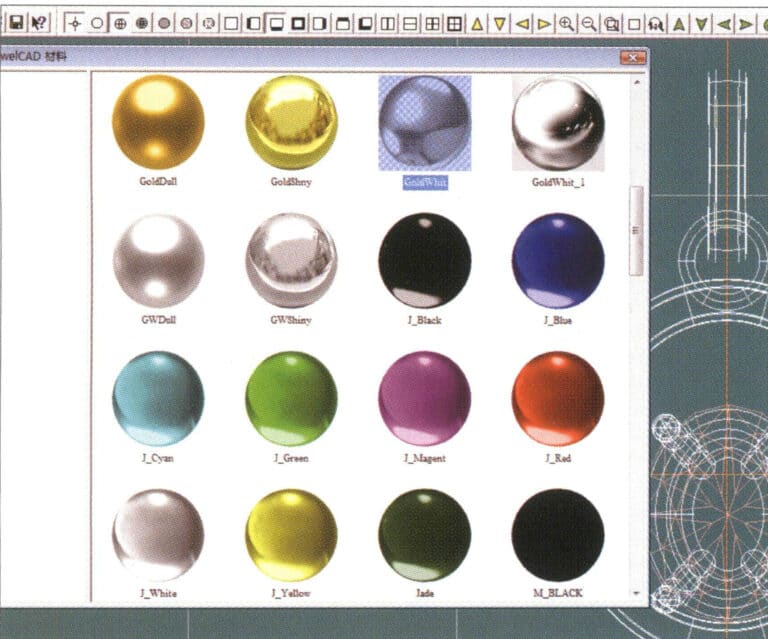
33. Öppna dialogrutan "Materials", välj relevanta material och bekräfta
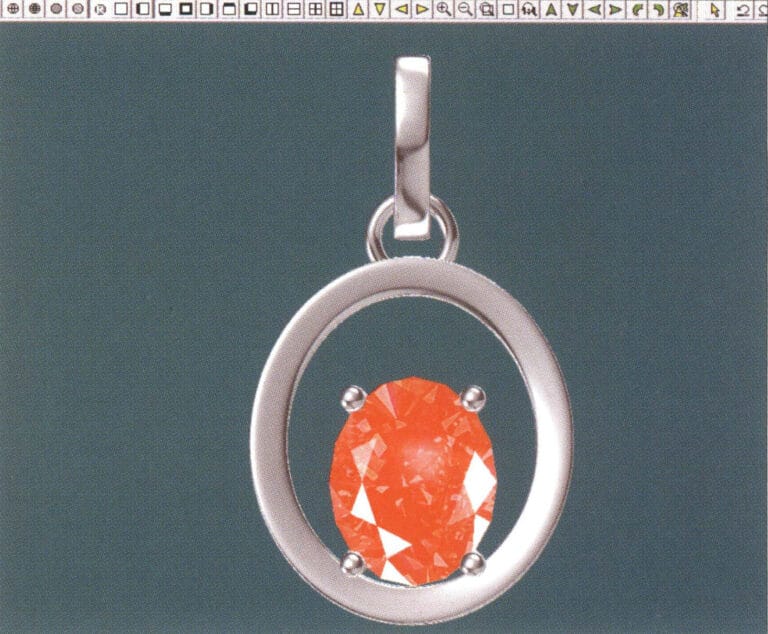
34. Select "View" > "Shadow Map" from the menu bar to inspect the shadow effects
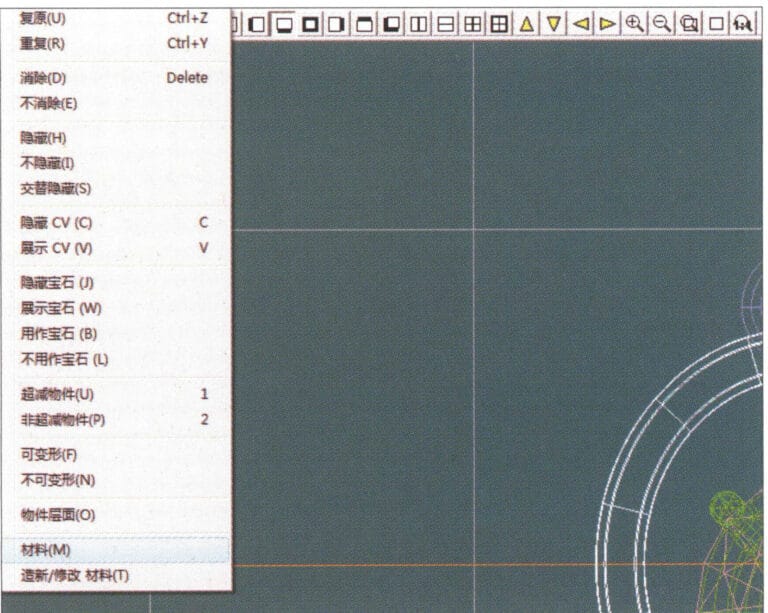
35. Select "Edit" > "Materials" from the menu bar
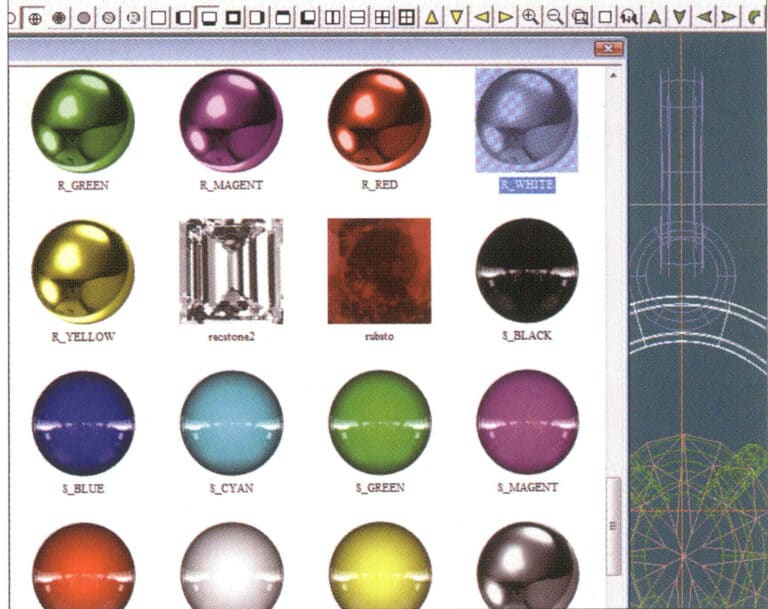
36. Öppna dialogrutan "Materials", välj relevanta texturmaterial och bekräfta
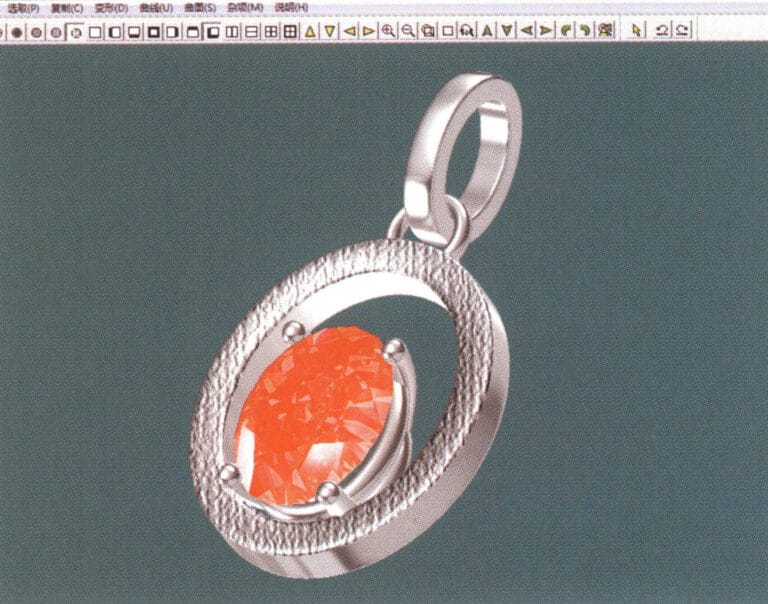
37. Select "View" > "Shadow Map" from the menu bar to inspect the shadow effects
38. Select "File" > "Save As" from the menu bar to save the file


