How to DIY Beads Jewelry?
Menguasai Teknik Manik-manik: Dari Tingkat Dasar hingga Mahir untuk Para Pencipta Perhiasan
Pendahuluan:
Dokumen ini memberikan panduan komprehensif untuk teknik dasar pembuatan manik-manik. Dokumen ini mencakup metode penting untuk memasang manik-manik menggunakan tali pancing, tali manik-manik, dan tali elastis. Selain itu, panduan ini juga memberikan petunjuk terperinci tentang cara menggunakan aksesori logam seperti peniti kepala, peniti mata, manik-manik pemosisian, ujung manik-manik, dan cincin lompat. Baik Anda pemilik toko perhiasan, perancang perhiasan, atau penjual e-commerce, panduan ini akan membantu Anda menguasai teknik dasar untuk membuat perhiasan manik-manik yang indah dan tahan lama.
Penguliran tunggal
Daftar Isi
Bagian I Teknik Manik-manik Pancing
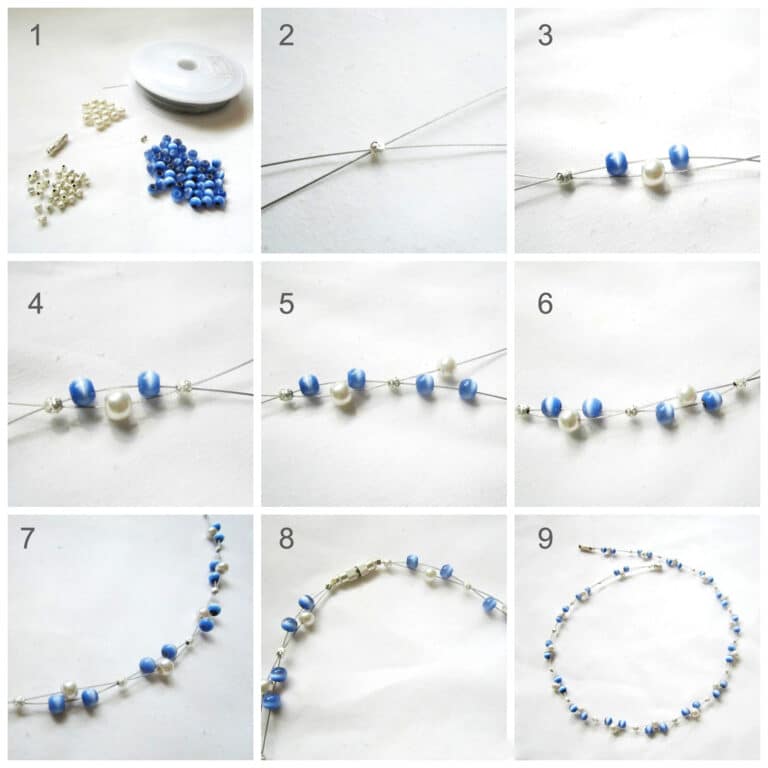
1. Penguliran Tunggal
Metode penguliran tunggal, juga dikenal sebagai metode penambahan manik-manik, secara langsung memasukkan tali pancing melalui lubang manik-manik. Ini adalah metode manik-manik yang paling sederhana dan paling dasar untuk menambahkan manik-manik. Perhatikan bahwa ukuran lubang manik-manik harus sesuai dengan ketebalan tali; jika tali terlalu tipis, manik-manik tidak akan stabil, dan jika tali terlalu tebal, penguliran tidak akan mulus.
(1) Masukkan tali pancing melalui lubang manik-manik, lihat Gambar 3-1 (1).
(2) Masukkan tali pancing melalui lubang manik-manik dan ulangi hingga panjang yang diinginkan tercapai; lihat Gambar 3-1 (2).
(3) Efek beberapa manik-manik yang dirangkai bersama ditunjukkan dalam Gambar 3-1(3).

2. Penguliran Silang
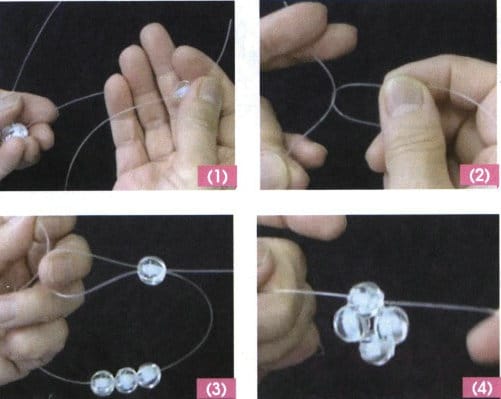
Metode penguliran silang mengacu pada dua helai benang yang memasuki lubang manik-manik yang sama dari dua arah, sering kali digunakan untuk menyelesaikan satu unit dan memulai unit berikutnya.
(1) Benang kanan keluar dari sisi kiri lubang manik, dan benang kiri keluar dari sisi kanan lubang manik; lihat Gambar 3-2 (1).
(2) Membentuk bentuk silang pada kedua sisi lubang manik-manik, lihat Gambar 3-2 (2).
(3) Tarik tali pancing kiri dan kanan dengan kencang; lihat Gambar 3-2 (3).

3. Penguliran Terbalik
Back threading, juga dikenal sebagai backstitch threading, mengacu pada pembentukan silang yang saling mengunci antara benang kiri dan kanan di dalam lubang manik-manik, yang menyiratkan bahwa benang tersebut terperangkap di dalam lubang manik-manik dan digunakan untuk memperkuat kestabilan manik-manik.
(1) Masukkan manik-manik ke garis kanan, lihat Gambar 3-3 (1).
(2) Setelah membungkus garis kiri, kembali ke lubang manik yang sama; lihat Gambar 3-3 (2).
(3) Perhatikan untuk menggunakan tangan kiri untuk mengaitkan simpul benang balik, kencangkan tali pancing secara bertahap, dan tarik simpul ke dalam lubang manik-manik; lihat Gambar 3-3 (3).
(4) Efek setelah penguliran terbalik, pada permukaannya, tidak berbeda dengan metode penguliran silang pada umumnya, tetapi pada kenyataannya, manik-manik jauh lebih stabil karena "tersangkut", seperti terlihat pada Gambar 3-3 (4).
4. Penguliran Maju
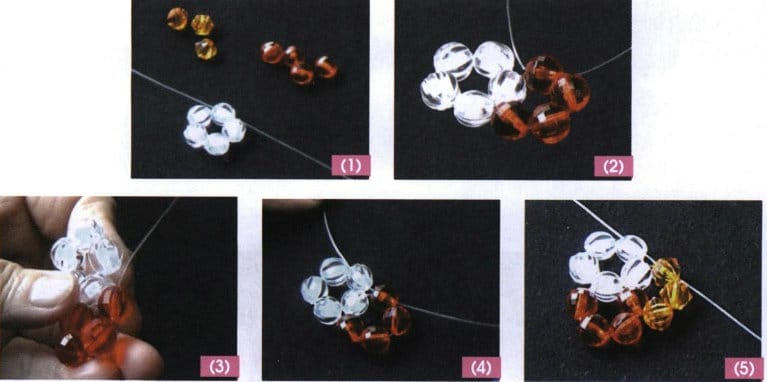
Penguliran ke depan melibatkan penguliran tali pancing melalui manik-manik sebanyak dua kali, menjadikan manik-manik sebagai media, atau menghubungkan bagian atas dan bagian bawah. Manik-manik yang diulirkan dengan cara ini adalah anggota unit asli dan anggota unit baru. Mengambil manik-manik bunga lima kelopak sebagai contoh, langkah (1) dan (2) adalah hal yang mendasar.
(1) Buatlah manik-manik bunga dengan lima kelopak: Gunakan manik-manik bunga lima kelopak sebagai dasar (manik-manik putih); lihat Gambar 3-4 (1).
(2) Pembentukan manik-manik bunga lima kelopak kedua: Masukkan benang tunggal pada garis kanan melalui 3 manik merah, kemudian masukkan benang silang 1 manik merah, lihat Gambar 3-4 (2).
(3) Persiapan untuk penguliran ke depan: Untuk membentuk manik-manik bunga lima kelopak ketiga, pada saat ini Anda harus mulai memasang manik-manik ke depan, siapkan garis kiri manik-manik merah, lihat Gambar 3-4(3).
(4) Mengulur ke depan: Benang kiri meneruskan satu manik putih dasar, yang kemudian dimasukkan melalui manik untuk kedua kalinya dengan tali pancing, dengan tujuan menggunakannya untuk membentuk kelopak baru. Sudah ada dua manik di antara benang kiri dan kanan; lihat Gambar 3-4 (4).
(5) Pembentukan manik-manik bunga lima kelopak ketiga: Masukkan benang lurus pada garis kanan melalui 2 manik kuning, kemudian masukkan benang silang 1 manik kuning untuk membentuk manik bunga lima kelopak ketiga. Jika melanjutkan untuk memulai bunga berikutnya, Anda juga perlu menambahkan satu manik putih, dan seterusnya; lihat Gambar 3-4 (5).
5. Penguliran Kembali Manik-manik
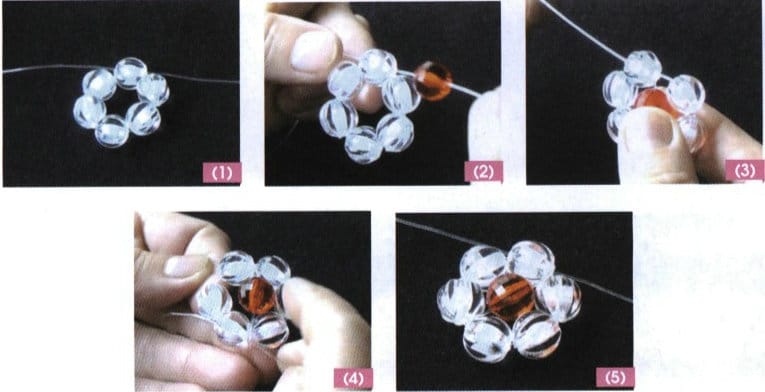
Metode pengembalian manik mengacu pada desain manik-manik yang disilangkan di tengah kelopak atau bentuk bunga, menyerupai efek inti bunga, untuk meningkatkan dekorasi dan estetika. Di bawah ini, manik balik dari manik-manik bunga enam kelopak digunakan sebagai contoh untuk metode pengembalian manik.
(1) Buatlah manik-manik bunga enam kelopak: Benang lurus 5 manik-manik saja, kemudian benang silang satu manik melalui, yang membentuk dasar bunga enam kelopak; lihat Gambar 3-5 (1).
(2) Rangkai manik tengah: benang kanan merangkai satu manik merah sebagai manik tengah A; lihat Gambar 3-5 (2).
(3) Tempatkan manik tengah: Tempatkan manik A di persimpangan tengah, pastikan untuk menentukan arah persimpangan dengan garis kiri; lihat Gambar 3-5(3).
(4) Memasang benang ke depan: Benang kanan melewati 3 manik-manik putih dengan arah menyilang; lihat Gambar 3-5 (4).
(5) Efek pembentukan: Setelah manik yang kembali, manik merah mengisi celah di bagian tengah manik bunga enam kelopak. Karena tonjolannya, manik-manik ini memiliki efek tiga dimensi; lihat Gambar 3-5 (5).
6. Penambahan Manik-manik Satu Baris
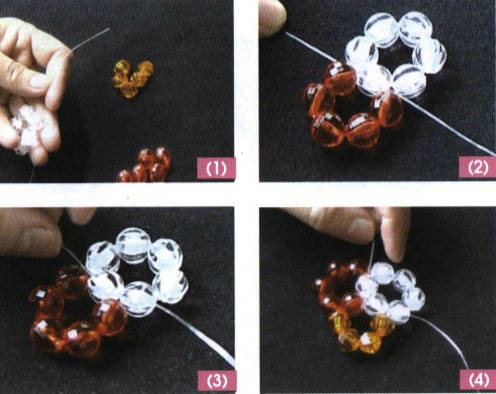
Karena ini adalah benang dengan penambahan manik-manik, maka, hanya dapat ditambahkan pada satu arah, sehingga sering memerlukan metode penambahan manik-manik untuk mencapai tujuan. Berikut ini menggunakan manik-manik bunga enam kelopak sebagai contoh untuk penjelasan.
(1) Buatlah manik-manik bunga enam kelopak: Dengan menggunakan manik bunga enam kelopak sebagai dasar, metode penambahan manik kanan digunakan, sehingga panjang garis kiri dapat dibuat lebih pendek; lihat Gambar 3-6 (1).
(2) Menambahkan manik-manik: Masukkan 5 manik-manik merah ke garis kanan, lalu tambahkan satu manik-manik putih, membentuk manik-manik bunga enam kelopak kedua; lihat Gambar 3-6 (2).
(3) Memajukan penguliran: Masukkan 1 manik putih ke kabel kanan; lihat Gambar 3-6 (3).
(4) Efek pembentukan: Menambahkan empat manik-manik kuning ke manik-manik putih yang sudah ada dan satu manik-manik merah akan membentuk manik-manik bunga enam kelopak ketiga; lihat Gambar 3-6(4).
7. Penambahan Manik-manik Garis Ganda
Penambahan manik-manik garis ganda relatif sederhana; kedua benang dapat melewati manik-manik secara bersamaan. Di bawah ini, manik-manik bunga empat kelopak akan digunakan sebagai contoh untuk penjelasan.
(1) Buatlah manik-manik bunga empat kelopak: Gunakan manik-manik bunga empat kelopak sebagai alasnya; lihat Gambar 3-7 (1).
(2) Menambahkan manik-manik: Masukkan 1 manik pada setiap garis kiri dan kanan; lihat Gambar 3-7 (2).
(3) Cross threading: The beads added for fixation must be threaded cross; see Figure 3-7 (3).

8. Knotting Method
After completing the beading process, it is necessary to tie a knot to secure the thread at the end.
(1) The left line is on top, and the right line is on the bottom; after crossing, the right line wraps around the left line, pulling the left and right lines tight, see Figure 3-8 (1).
(2) The directions are exactly opposite, with the right line on top and the left line on the bottom crossing over, then the left line wraps around the right line, see Figure 3-8 (2).
(3) Tighten the left and right lines. If reinforcement is needed, you can repeat the above action; see Figure 3-8 (3).

9. Knot Hiding Method
(1) After tying the knot, take one of the threads and pass it through a nearby bead hole; see Figure 3-9 (1).
(2) Pull the line tight and bring the knot into the hole of the bead, hiding the knot to make the surface smooth and tidy; see Figure 3-9 (2).
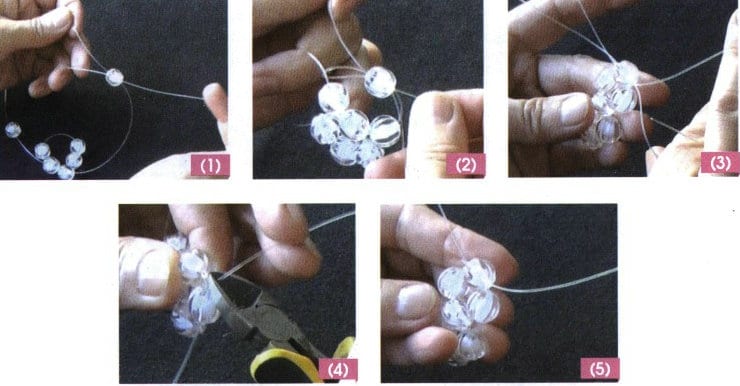
10. Single Bead Line Joining
During the beading process, there are times when the fishing line is not long enough, and if an additional fishing line is needed, the splicing method is used. Since the splicing process is completed within a single bead, it is called the single bead line joining.
(1) Adding a new line: Thread a new line through a bead that has an old line; see Figure 3-10 (1).
(2) Reverse threading the old line: Re-thread the old line through the bead (that is, the right line wraps around the left line and then returns to the bead hole); see Figure 3-10 (2).
(3) Alternation of old and new: Two old threads and one new thread are simultaneously threaded through the same bead hole; see Figure 3-10 (3).
(4) Cutting: Use pliers to cut two old wires; see Figure 3-10 (4).
(5) Completion: The new line has officially become a part of the line; see Figure 3-10 (5).
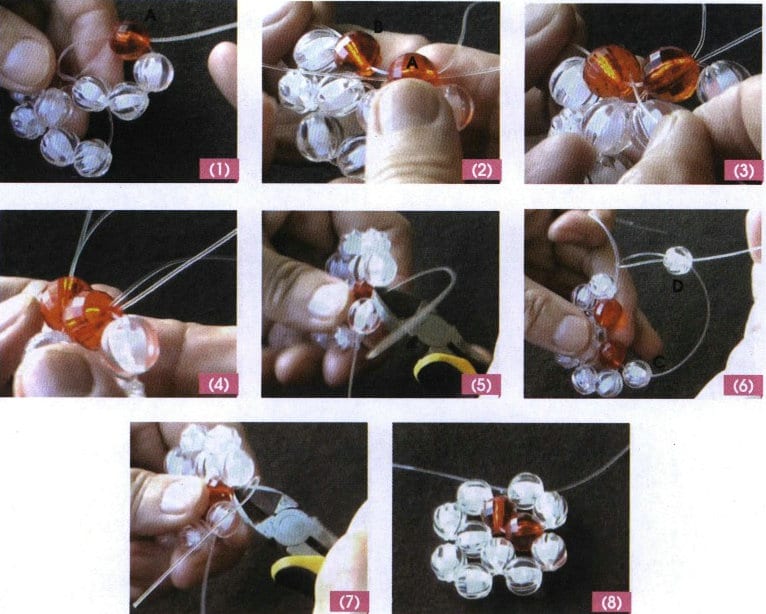
11. Multi-Bead Line Joining
The multi-bead line joining method completes the wiring within multiple beads to make the old wire less likely to loosen, ensuring that the new wire is securely and naturally connected and that the appearance is neat without visible joints. Below, a four-petal flower bead is used as an example for illustration.
(1) Start the re-threading from the last red bead A of the four-petal flower bead in the three units. After tightening the re-threading, the old thread will be trapped inside bead A; see Figure 3-11 (1).
(2) Add a new line to bead A while passing through bead B; see Figure 3-11 (2).
(3) Thread the old line on the left side of bead A through B; see Figure 3-11 (3).
(4) At this time, you will see A and B beads simultaneously threaded onto a new line and an old line; see Figure 3-11 (4).
(5) For convenience, the old thread next to bead A can be cut first; see Figure 3-11 (5).
(6) Straight thread 2 white beads C and D and two red beads A and B to form a new four-petal flower bead. The new thread passing through the last white bead D, also wraps around the two threads of bead B and goes back through the white bead, see Figure 3-11 (6).
(7) After tightening, cut off the other old thread, and the thread will be tightly stuck in the hole of the white bead D, see Figure 3-11 (7).
(8) The line joining is complete; see Figure 3-11 (8).
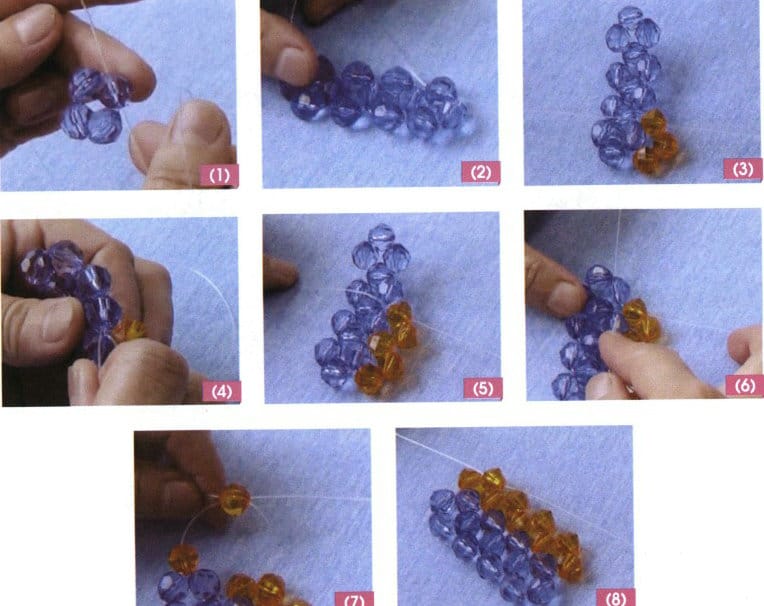
12. Bead-weaving Flat Stitch
The bead-weaving flat stitch method arranges beads into a flat shape, and this form of beading differs mainly in the way it is threaded at the corners. The following uses the arrangement of a four-petal flower bead as an example for explanation.
(1) Start stringing beads based on the four-petal flower bead; see Figure 3-12 (1).
(2) Thread to the required length; the last group consists of threading sriaght two beads with the right line and then thread cross through 1 bead so that the positions of the left and right fishing lines move to one side; see Figure 3-12 (2).
(3) Thread straight 3 beads onto the right line and pass the last bead through the opposite way; see Figure 3-12 (3).
(4) Thread forward the left line through 1 blue bead, see Figure 3-12 (4).
(5) The right thread straight through 2 beads, and the last bead is threaded through from both sides; see Figure 3-12 (5).
(6) Use this method to the edge of this line; see Figure 3-12 (6).
(7) After thread forward 1 blue bead with the left thread, thread straight two beads, and finally thread 1 bead from both sides, see Figure 3-12 (7).
(8) To turn the left and right fishing lines to the side, you can start a new row of beading; see Figure 3-12 (8).
13. Four-Sided Spherical Beading
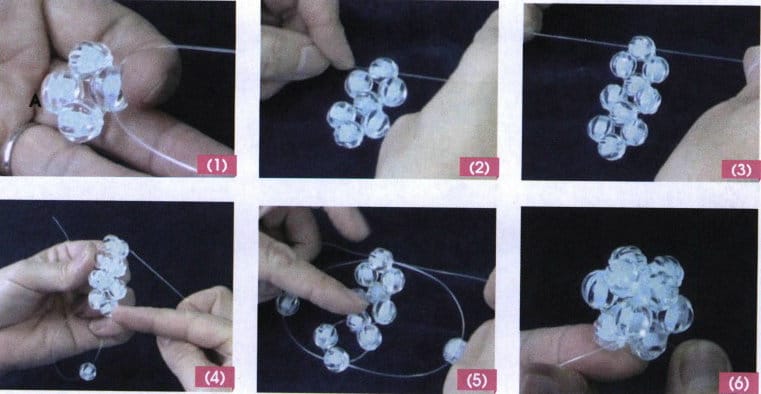
The four-sided spherical beading is a shape that looks like a four-petal flower bead from all four sides, and its overall shape resembles a sphere. Hence, it is called a four-sided spherical shape, consisting of 12 beads.
(1) Single thread 4 beads, with the last bead passing through from the opposite direction, forming the first four-petal flower bead, and the bead corresponding to the cross-threading bead is designated as bead A, see Figure 3-13 (1).
(2) Thread one bead on each left and right line, then thread one through from the opposite direction to form the second four-petal flower bead, as shown in Figure 3-13 (2).
(3) Repeat step (2) to form the third four-petal flower bead; see Figure 3-13 (3).
(4) Continue to thread one bead on each left and right line, then find the A bead of the first four-petal flower bead A; see Figure 3-13 (4).
(5) Cross thread bead A, see Figure 3-13 (5).
(6) Tighten the fishing line to form a four-sided sphere; see Figure 3-13 (6).
14. Beaded Sphere Beading
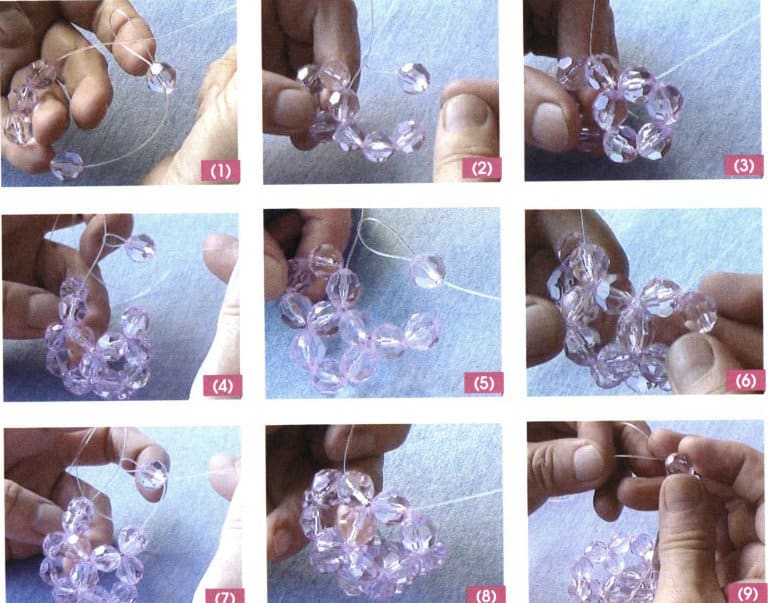
The beaded sphere beading is a typical five-petal flower bead structure widely used and can be extended to lanterns, earrings, pendants, and other ornaments. Four layers of beads need to be strung, with the first and fourth layers each having one five-petal flower bead and the second and third layers having five five-petal flower beads, requiring 30 beads.
(1) First layer base: String 5 beads, with the last bead threading through from the opposite direction, forming the five-petal flower bead of the first layer; see Figure 3-14 (1).
(2) Second layer spherical forming: In the first five-petal flower bead, the right thread thread through 4 beads, with the last bead cross threading or reverse threading through; see Figure 3-14 (2).
(3) The second five-petal flower bead: the left thread forward through 1 bead, see Figure 3-14 (3).
(4) The right thread passes through 3 beads, and the last bead is threaded through from both sides; see Figure 3-14 (4).
(5) Third and the fourth five-petal flower beads: Repeat steps (3) and (4) twice, see Figure 3-14 (5).
(6) Fifth five-petal flower bead: Thread the left line through 2 beads, see Figure 3-14 (6).
(7) The right thread threads 2 beads, and the last bead is threaded from both sides; see Figure 3-14 (7).
(8) Second layer finishing: Thread the left line through 1 bead and pull the fishing line tight to form a half-spherical shape; see Figure 3-14 (8).
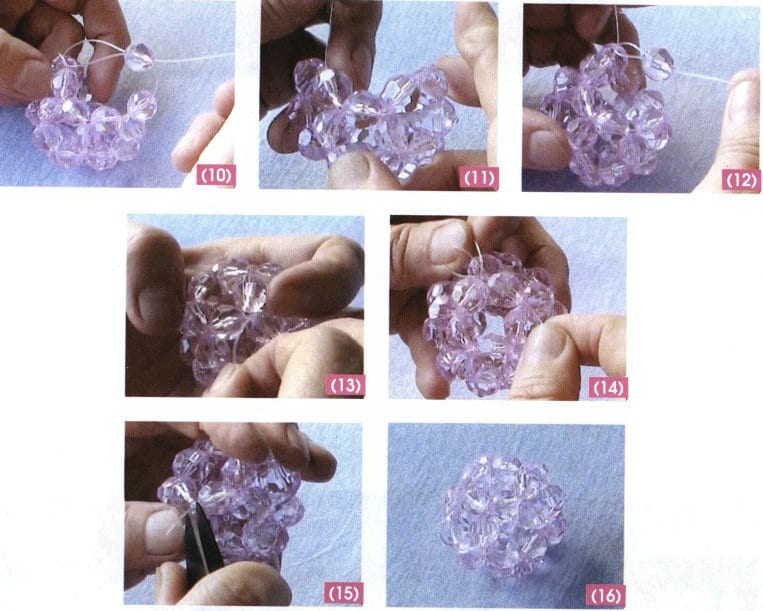
(9) Third layer spherical contraction: The number of beads passed through increases while the number of added beads decreases. The first five-petal flower bead: The right thread passes through 2 beads, and finally, one bead is passed through oppositely, forming the first five-petal flower bead, see Figure 3-14 (9).
(10) The second five-petal flower bead: the left thread passes through 2 beads, the right thread passes through 2 beads individually, with the last bead passing through both sides; see Figure 3-14 (10).
(11) Third, the four five-petal flower beads: repeat step (9) twice; see Figure 3-14 (11).
(12) Three-layer finishing: After the left thread passes through 3 beads, pass through 1 bead again to form the fifth five-petal flower bead; see Figure 3-14 (12).
(13) Fourth layer fixing: After threading the top 5 beads again, secure them; see Figure 3-14 (13).
(14) Sealing: The fishing line is threaded through reversely and hidden inside the beads; see Figure 3-14 (14).
(15) Organize: Cut off the excess thread, see Figure 3-14 (15).
(16) Effect: Forming a complete spherical shape, see Figure 3-14 (16).
Copywrite @ Sobling.Jewelry - Produsen perhiasan khusus, pabrik perhiasan OEM dan ODM
Section II Beading Cord, Elastic Cord Beading Techniques
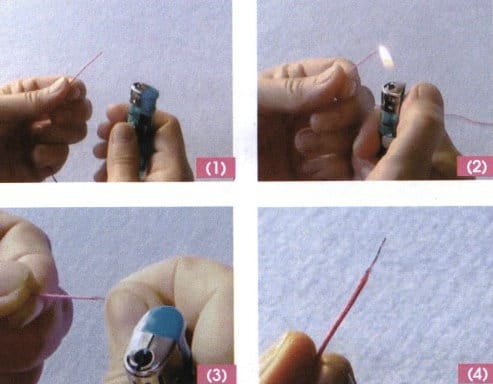
1. Handling of Thread Ends
(1) Prepare a piece of beading cord and a lighter; see Figure 3-15 (1).
(2) Ignite the lighter to heat and melt the beading cord, but do not burn it through or scorch it; see Figure 3-15 (2).
(3) Use your hand to pull the thread out into a hard wire, careful not to burn your fingers; see Figure 3-15 (3).
(4) The fired beading cord is fine and stiff, making it easy to string beads, see Figure 3-15 (4).
2. Sealing Method
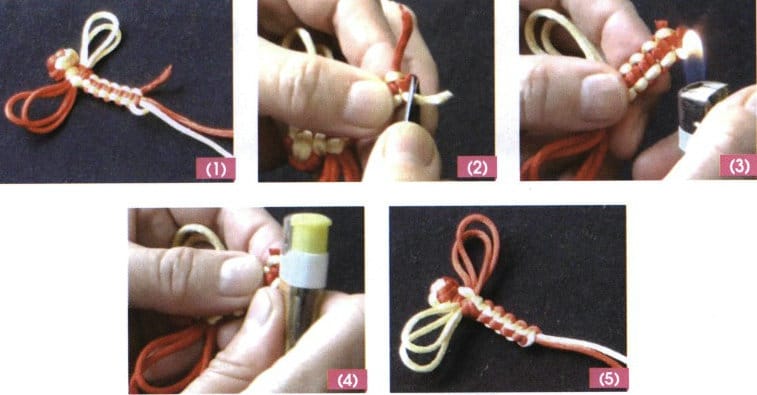
When finishing the knotting, the most commonly used method to secure excess or unused threads to prevent unraveling is the heat fusion method. The following will illustrate this using the finishing of a dragonfly knot as an example.
(1) When the weaving reaches the desired length, the next step is to deal with the excess thread; see Figure 3-16 (1).
(2) Use scissors to leave a 0.3 cm tail and cut the thread; see Figure 3-16 (2).
(3) Use a lighter to melt the wire ends, careful not to burn them black or char them; see Figure 3-16(3).
(4) A lighter can be used to press and fix the melted thread end onto the knot; generally, do not use your hands to press the knot to avoid injuring your fingers, see Figure 3-16 (4).
(5) The final structure is clean, tidy, and stable, as shown in Figure 3-16 (5).
3. Seed Beading Methods
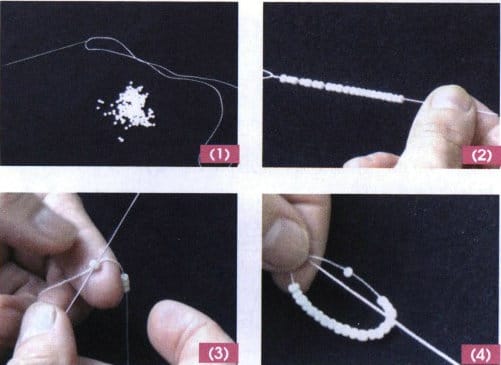
Seed beads are very small, some with a diameter of only 0.1 cm, so they are usually strung using a beading needle (or a fishing line instead of a beading needle).
(1) Straight Threading
① Thread the needle using a long and thin needle. The thickness of the thread should match the size of the bead hole, and the thread should be strong, see Figure 3-17 (1).
② Thread the beads onto the long needle, see Figure 3-17 (2).
③ If you want to string a ring, you can pass through the first bead; see Figure 3-17 (3).
④ Tighten the knotting line, see Figure 3-17 (4).
(2) Row Threading
This method is suitable for flat beading, and the following uses two color beads for illustration.
(1) First, thread the pink and then the blue beads; see Figure 3-18 (1).
(2) Then thread all the pink beads, passing the thread through the bead holes twice; see Figure 3-18 (2).
(3) Tighten the weaving thread; see Figure 3-18 (3). You can repeat the above method until the desired width is achieved.

4. Elastic Cord Beading
The biggest feature of elastic cord for stringing beads is its good elasticity, which can meet the length requirements. Therefore, there is no need to consider how to seal the ends.
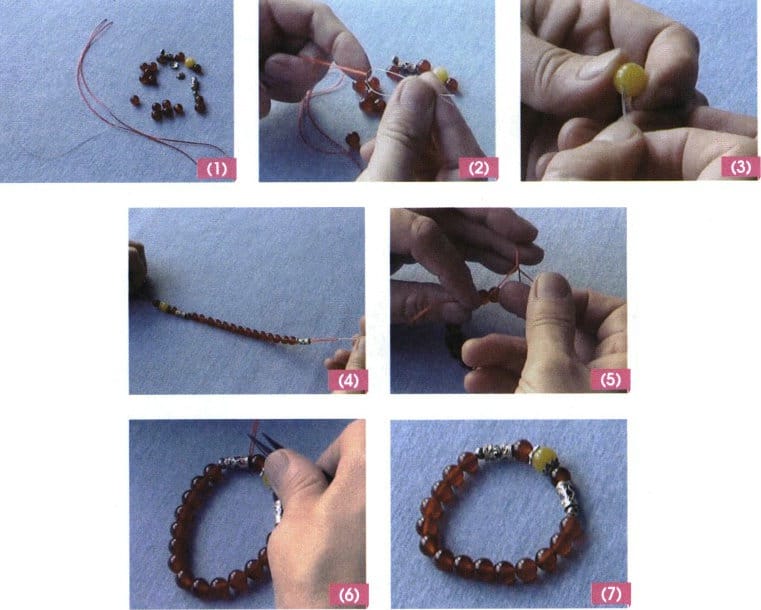
(1) Prepare elastic cord, beads, fishing line, metal accessories, etc.; see Figure 3-19 (1).
(2) Fold the elastic and fishing lines in half, using the fishing line as the lead line; see Figure 3-19 (2).
(3) Thread the beads and accessories according to the design; see Figure 3-19 (3).
(4) Thread to the required length, see Figure 3-19 (4).
(5) Thread any strand of the tail end of the elastic cord through the elastic cord loop that has been folded in half, pull tight, and tie a knot to secure it; see Figure 3-19 (5).
(6) Cut off the excess elastic cord and hide the ends inside the bead hole; see Figure 3-19 (6).
(7) The forming state is shown in Figure 3-19 (7).
Section III Instructions for Metal Accessories
1. Instructions for Using Head Pins
One end of the head pin serves a fixing function, while the other serves a connecting function, having the dual function of fixing and connecting.
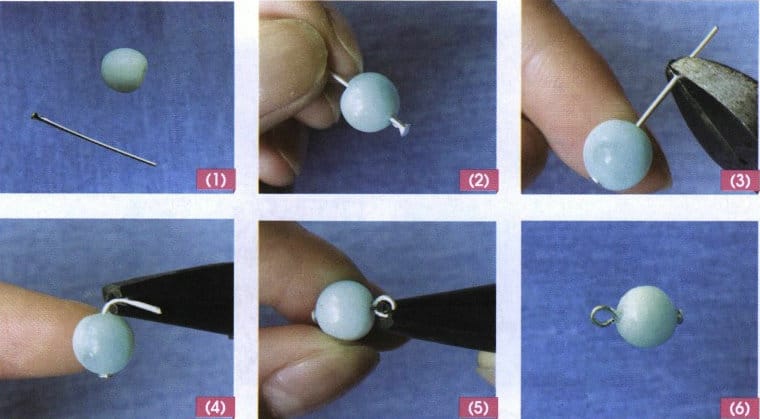
(1) Preparation: Prepare 1 head pin and one bead, see Figure 3-20 (1).
(2) Threading the head pin: Insert the head pin into the bead hole, making the head end closely touch the bottom of the bead hole; see Figure 3-20 (2).
(3) Reserved length: Use cutting pliers to cut off the excess part of the head pin to the required length; see Figure 2-20 (3).
(4) Bend to a right angle: Use round-nose pliers to press against the bead and first bend the head pin to a right angle; see Figure 2-20 (4).
(5) Bend into a ring: Then bend the head pin into a ring shape; see Figure 2-20 (5).
(6) Forming effect: see Figure 3-20 (6).
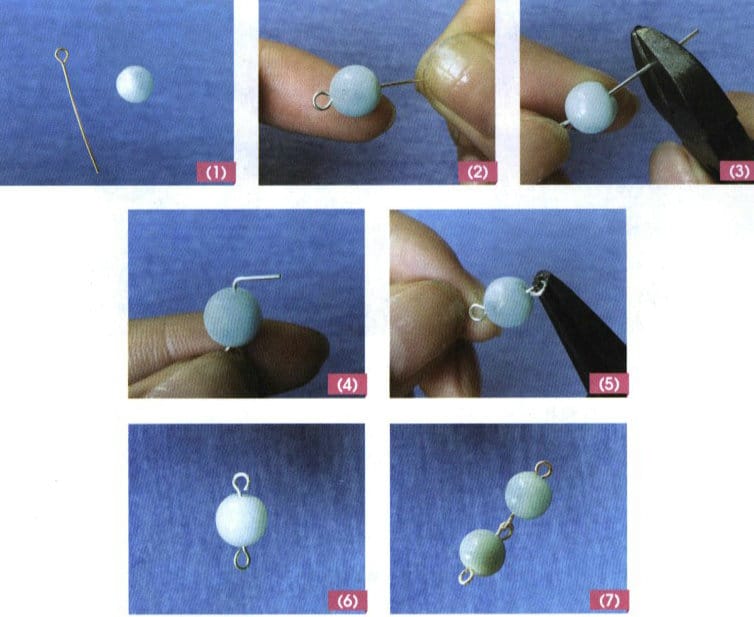
2. Instructions for Using Eye Pins
The two ends of the eye pins serve a connecting function.
(1) Preparation: Prepare 1 eye pin and one bead; see Figure 3-21 (1).
(2) Thread the eye pin: Insert the eye pin into the bead hole, making the head end closely touch the bottom; see Figure 3-21 (2).
(3) Reserved length: Use a needle to cut off the excess part of the eye pin to the required length; see Figure 3-21(3).
(4) Bend to a right angle: Use round-nose pliers to bend the eye pin to a right angle; see Figure 3-21 (4).
(5) Bend into a ring: Bend into a ring shape again; see Figure 3-21 (5).
(6) The forming effect is shown in Figure 3-21 (6).
(7) The connection effect is shown in Figure 3-21 (7).
3. Instructions for Applying Positioning Beads and Bead Tips
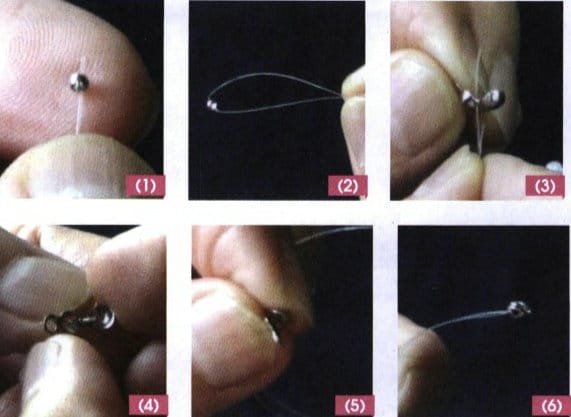
The main function of the positioning bead is to prevent the beads from slipping off, and it can also prevent the thread from unraveling. The bead tip is mainly used to contain the positioning bead, and the two are used together, which can also be combined with adjustable chains, fishing lines, etc.
(1) Thread the positioning bead: First, thread the positioning bead with the fishing line; see Figure 3-22 (1).
(2) Move the positioning bead: Move the positioning bead to the middle of the fishing line; see Figure 3-22 (2).
(3) Thread the bead tip: Thread the fishing line through the bead tip with double strands; see Figure 3-22 (3).
(4) Flatten the positioning bead: Pull the fishing line tight so that the positioning bead moves exactly into the bead tip, then flatten the positioning bead; see Figure 3-22 (4).
(5) Close bead tip: Close the bead tip, see Figure 3-22 (5).
(6) Forming effect: The fishing line naturally emerges from the bead tip, and you can start stringing the beads; see Figure 3-22 (6).
4. Finishing Methods for Positioning Beads and Bead Tips
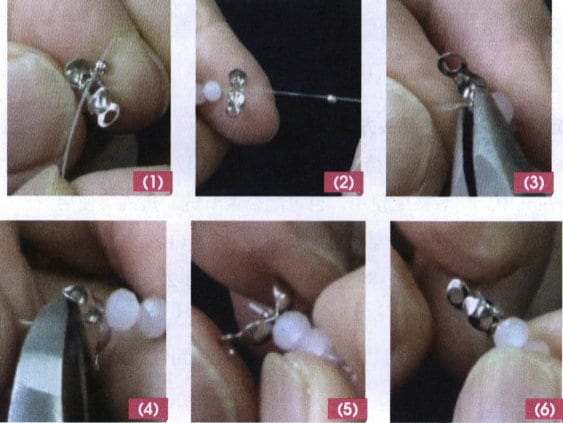
After threading the beads to a certain length, you must finish it. How can you secure the fishing line? You can use a positioning bead and bead tip to finish it off.
(1) Thread the bead tip: The fishing line is threaded through the bottom of the bead tip; see Figure 3-23 (1).
(2) String the positioning bead: String one more positioning bead, see Figure 3-23 (2).
(3) Flatten positioning bead: After flattening the positioning bead, tie a knot in the fishing line; see Figure 3-23 (3).
(4) Cut the fishing line: Cut off the excess fishing line, see Figure 3-23 (4).
(5) Close bead tip: Close the bead tip to encase the positioning bead, see Figure 3-23 (5).
(6) Forming effect: Hide both the fishing line and the positioning bead inside the bead tip, making the exterior clean and seamless; see Figure 3-23 (6).
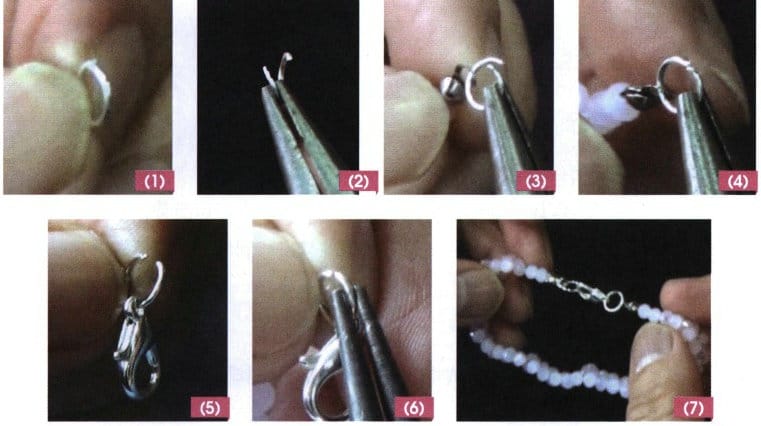
5. Instructions for Using Jump Rings
The jump ring connects and can be directly threaded onto beads or used with head pins, eye pins, adjustable chains, etc.
(1) Prepare one jump ring; see Figure 3-24 (1).
(2) Separate the front and back of the jump ring closure to avoid deformation; see Figure 3-24 (2).
(3) Pass through the completed bead tip loop, see Figure 3-24 (3).
(4) Then align the jump rings; see Figure 3-24 (4).
(5) The lobster clasp can be threaded similarly; see Figure 3-24 (5).
(6) Then align the jump sing; see Figure 3-24 (6).
(7) The lobster clasp connects the jump ring at both ends, the jump ring connects to the end caps, and the bead tips connect to the main part of the bracelet, forming a completely closed bracelet. It is not difficult to see that the jump ring is a bridge link; see Figure 3-24 (7).
