Hogyan tervezzünk és hozzunk létre lenyűgöző brossokat és medálokat?
Brooches & Pendants Design: Step-by-Step Guide for Jewelry Makers
Bevezetés:
Wondering how to create beautiful brooches and pendants? This guide takes you through the design and production process of these popular accessories. Learn about different styles like the Luminous Pearl Harmony Brooch and the Auspicious Phoenix Knot Pendant. Discover key techniques such as weaving, beading, and knotting, and find out how to prepare materials and follow production methods to make stunning pieces. Whether you’re a jewelry designer, retailer, or e-commerce seller, this guide has everything you need to craft unique and attractive brooches and pendants.
Design of the Luminous Pearl Harmony Brooch
Tartalomjegyzék
Section I Design and Production of Brooch
1. Luminous Pearl Harmony Brooch
(1) Stílusjellemzők
This brooch is primarily made of pearls and jade, with white as the main color and green as the accent color, presenting a classic triangular shape (for the pearl part). The green teardrop jade beads are paired with leaf-shaped flower pieces, fresh and fashionable, and unique in style, see Figure 7-1.
(2) A legfontosabb tanulási pontok
Learn to weave a triangle using a fishing line or metal wire; master the connection between the brooch base and the object.
(3) Material Preparation (Figure 7-2)
Green teardrop jade bead: 12 mm (length)×8mm (width), 1 piece;
Leaf-shaped flower petal: 28 mm (length)×2.5cm (width), 1 piece;
Metal wire: 300mm×0.3mm, 1 piece;
White Pearl: 4mm, 15 pieces;
Golden multi-faceted beads: 4mm, 2 pieces;
Green beads: 4 mm, 1 piece;
Golden flower base: 6mm, 1 piece;
Brooch base: 25mm, 1 piece;
Bead head pin: 40mm, 1 piece.
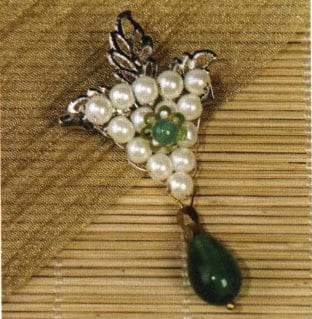
Figure 7-1 Design of the Luminous Pearl Harmony Brooch
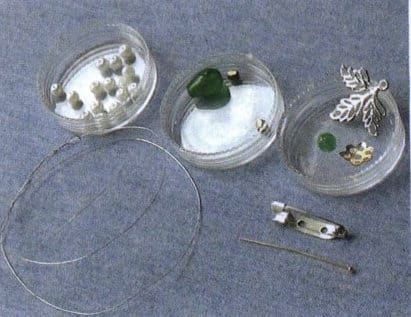
Figure 7-2 Materials Preparation for the Luminous Pearl Harmony Brooch
(4) Termelési módszer
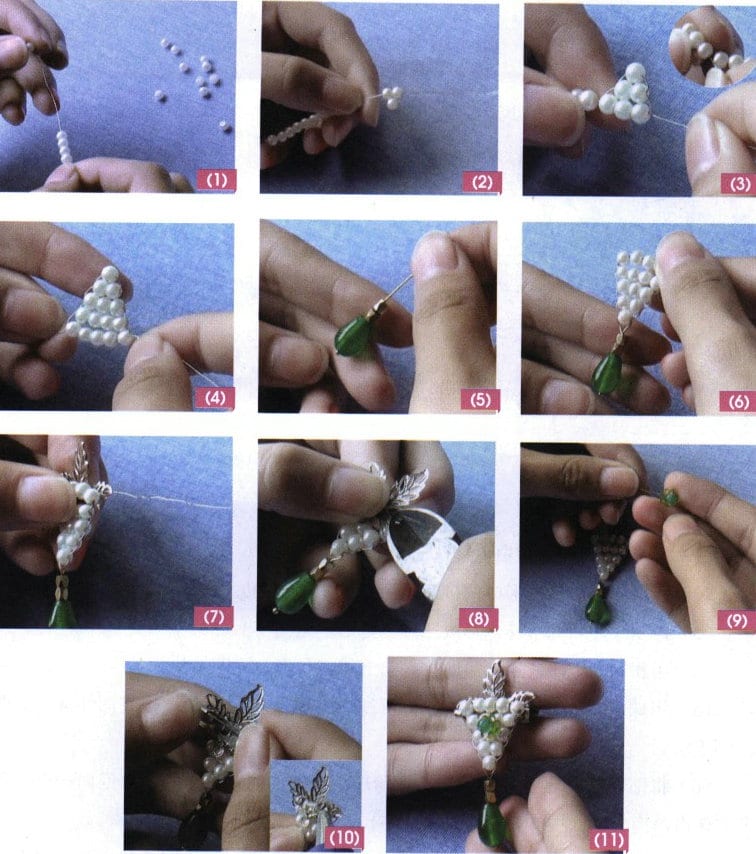
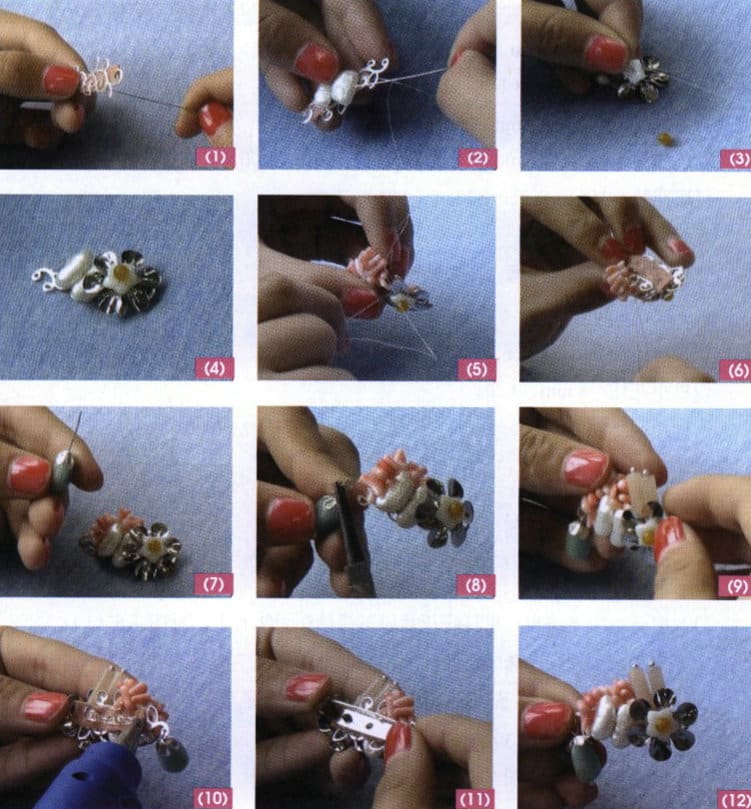
① Use metal wire to thread 15 white pearls, see Figure 7-3 (1).
② Pass through 3 pearls to form two rows of triangles; see Figure 7-3 (2).
③ Then pass through 3 more pearls to form three rows of triangles; see Figure 7-3 (3).
④ Using the same method, create the fourth and fifth rows of triangles; see Figure 7-3 (4).
⑤ Use a bead head pin to sequentially thread green teardrop jade beads and 2 golden faceted beads to form component A; see the figure 7-3 (5).
⑥ Connect part A to the first pearl of the inverted triangle, making sure to thread the head pin back through the same golden faceted bead to form the main body B of the brooch; see Figure 7-3 (6).
⑦ Place the leaf-shaped flower piece underneath the main body B and secure it with metal wire, threading through multiple times from different points; see Figure 7-3 (7).
⑧ Cut off the excess wire at the back and hide the ends; see Figure 7-3 (8).
⑨ Use metal wire to thread the golden flower base and green beads, twisting a few circles at the back to secure them together. Then, fix it at the center of the main body B, see Figure 7-3 (9).
⑩ Use a glue gun to stick the brooch base on the back of main body B and arrange the brooch properly; see Figure 7-3 (10).
⑪ Arrange the shape properly, the effect is shown in Figure 7-3 (11).
2. Jade and Floral Rêverie Brooch
(1) Stílusjellemzők
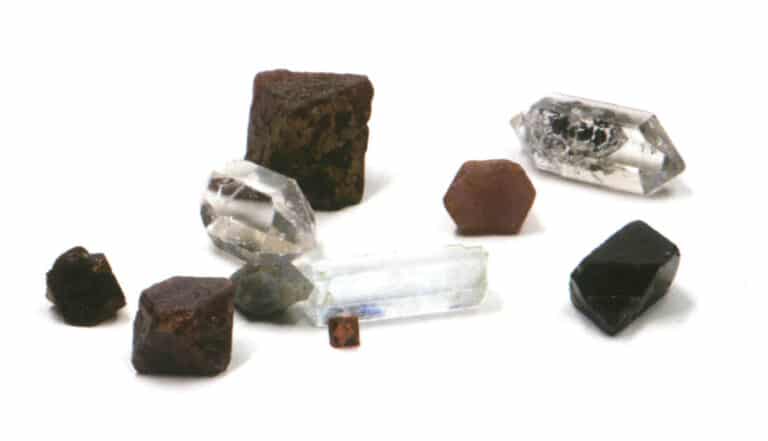
This brooch is primarily made of coral fragments, pearls, amazonite, shells, etc., with pink and white as the main colors and green as an accent color. The combination of irregular shapes and orderly arrangement expresses a natural, staggered, and harmonious charm, fully showcasing its vivid, three-dimensional, distinct, and beautiful character, as seen in Figure 7-4.
(2) A legfontosabb tanulási pontok
Master the characteristics of various stones, combinations of different shapes and materials, and the use of multiple colors.
(3) Material Preparation (Figure 7-5)
Pink coral chips: approximately 10 mm (length) × approximately 2mm (width), several;
Irregular pearls: 13 mm (length) ×8mm (width), 2 pieces;
Pink cylindrical amazonite: 15 mm (length) ×2mm (width), 2 pieces;
Green cylindrical amazonite: 15 mm (length) ×10mm (width), 1 piece;
Base floral filigree: 35 mm (length) ×20mm (width), 1 piece;
Fishing line: 0.3mm×30cm;
Yellow small beads: 4 mm, 1 piece;
Shell flower: 8mm, 1 piece;
Silver flower pieces: 25mm, 1 piece;
Silver small flower base: 8mm, 1 piece;
Brooch base: 35 mm (length);
Bead head pins: 40mm, 3 pieces;
Non-woven fabric: 30 mm (length) ×10mm (width), 1 piece;
Beading needle: 1 piece.
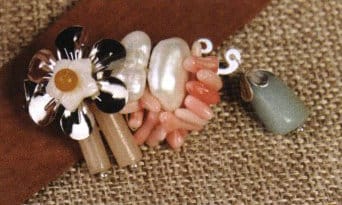
Figure 7-4 Style Diagram of the Jade and Floral Rêverie Brooch
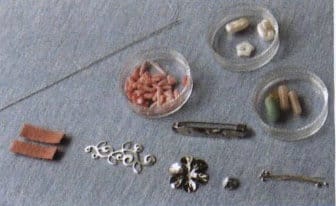
Figure 7-5 Materials Preparation for the Jade and Floral Rêverie Brooch
(4) Termelési módszer
① Take a small piece of non-woven fabric and sew the base flower piece onto the non-woven fabric with a fishing line; see Figure 7-6 (1).
② Sew 2 irregular pearls onto the left side of the flower piece; see Figure 7-6 (2).
③ Fix the small yellow beads, shell flowers, and silver flower pieces from top to bottom on the right side of the irregular pearls using a beading needle and fishing line; see Figure 7-6 (3).
④ The effect after fixing is shown in Figure 7-6 (4).
⑤ Thread pink coral chips with the fishing line and fix them above the irregular pearls; see Figure 7-6 (5).
⑥ The amount of coral chips depends on the overall effect and needs to be fixed several times, see Figure 7-6 (6).
⑦ Use a bead head pin to sequentially thread through the green columnar amazonite and the silver flower base to form component A; see Figure 7-6 (7).
⑧ Bend component A into a 9 shape and fix it onto the hollow small holes of the base flower piece; see Figure 7-6 (8).
⑨ Use a spherical head pin to thread 2 pink columnar amazonite, bend them into a 9 shape, and fix them behind the silver flower piece, see Figure 7-6 (9).
⑩ After heating the glue gun, squeeze an appropriate amount of glue onto the non-woven fabric, see Figure 7-6 (10).
⑪ Press the brooch base onto the glue and wait for the glue to naturally solidify; see Figure 7-6 (11).
⑫ Organize the shape, the effect is shown in Figure 7-6 (12)
3. Scented Plum Fan Motif Brooch
(1) Stílusjellemzők
This brooch is made of cat’s eye stone, cicada silk ribbon, shell flower, jade beads, and other materials, with green and pink as the main colors and white as an accent. The main part is composed of a diamond shape formed by plum blossoms, jade beads, and pearls, complemented by a pleated silk ribbon fan, showcasing rich colors and layers. It appears harmonious, three-dimensional, grand, and extraordinary (see Figure 7-7).
(2) A legfontosabb tanulási pontok
Learn to use the hollow floral medallion and combine and match materials such as beads, ribbons, and metal chains.
(3) Prepare Materials (Figure 7-8)
Figure 7-8 Preparation of Materials for the Scented Plum Fan Motif Brooch
Pink cat’s eye stone: 18 mm (diameter), 1 piece;
Diamond-shaped golden floral medallion: 55 mm (length) ×40mm (width), 1 piece;
Green iridescent cicada silk ribbon: 350 mm (length) ×300mm (width);
Metal leaf: 13 mm (length) ×10mm (width), 1 piece;
Rice-shaped pearl: 6 mm (length) ×3mm (width) ×8 pieces;
Shell flower: 20mm, 1 piece;
Metal flower base: 10mm, 2 pieces;
Green jade beads: 6mm, 3 pieces;
Red round beads: 2mm, 15 pieces;
Bead head pins: 30mm, 20 pieces;
Copper wire: 3mm×200mm;
Jump ring: 5mm, 2 pieces;
Combination brooch base: 1 piece;
Metal chain: 130mm, 1 piece; 85mm, 1 piece;
Tools: hot glue gun, scissors, copper wire, needle, thread.
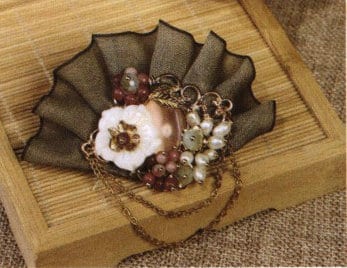
Figure 7-7 Style Diagram of the Scented Plum Fan Motif Brooch

Figure 7-8 Preparation of Materials for the Scented Plum Fan Motif Brooch
(4) Termelési módszer
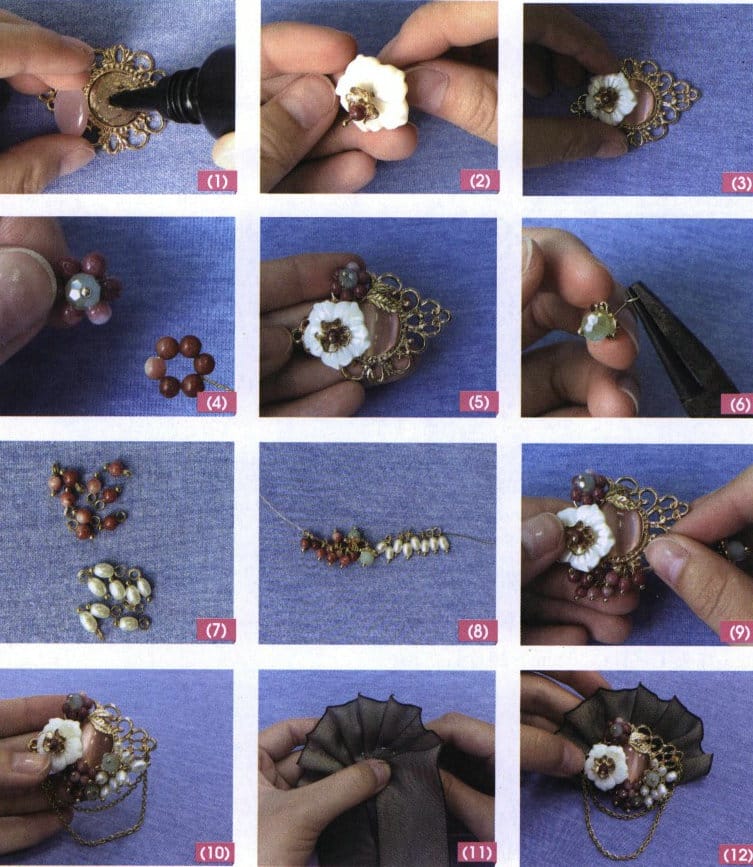
① Use hot melt glue to attach the pink cat’s eye stone to the diamond-shaped golden floral medallion; see Figure 7-9 (1).
② Use a bead head pin to thread the round red beads, metal flower base, and shell flowers, with the excess part of the head pin wound into a circle at the back; see Figure 7-9 (2).
③ Apply hot melt glue to the back of the shell flower and stick it to the left side of the diamond-shaped combined flower tray; see Figure 7-9 (3).
④ Take a piece of copper wire, thread 6 red round beads onto it, and twist it into a six-petal flower bead. Glue a green jade bead, threaded through a head pin, in the center of the flower, and trim off the excess copper wire, see Figure 7-9 (4).
⑤ First, glue the metal leaves above the shell flower, then glue the completed six-oetal flower bead on top; see Figure 7-9 (5).
⑥ Use a head pin to thread green jade beads and wrap them around the metal flower base to form a circle, making 2 pieces; see Figure 7-9 (6).
⑦ Thread 9 round red beads and 8 rice-shaped pearls onto a head pin and wrap them into a circle; see Figure 7-9 (7).
⑧ Use copper wire to thread red round beads, green jade beads, and rice-shaped pearls together in order; see Figure 7-9 (8).
⑨ Then thread both ends of the copper wire through the back of the combined floral medallion, pull tight to secure, and adjust the position of the beads, see Figure 7-9 (9).
⑩ Connect a jump ring on both sides of the flower plate with 2 metal chains, with the second loop being slightly longer than the first; see Figure 7-9 (10).
⑪ Sew the green iridescent ribbon into a fan shape on non-woven fabric; see Figure 7-9 (11).
⑫ Glue the floral medallion to the non-woven fabric’s center, then glue it to the combination brooch base at the back, finishing the arrangement, as shown in Figure 7-9 (12).
Section II Design and Production of Pendants
1. Examples of Knotted Pendants
1.1 Auspicious Phoenix Knot Pendant
(1) Stílusjellemzők
This pendant features an auspicious knot paired with decorative beads, emphasizing festivity and good fortune, symbolizing the idea of good people receiving good fortune and auspiciousness, reflecting people’s beautiful wishes for truth, goodness, and beauty, as shown in Figures 7-10.
(2) A legfontosabb tanulási pontok
Master the methods for tying auspicious and phoenix tail knots; understand the methods and rules for combining pendants.
(3) Material preparation (Figures 7-11)
Knotting: 2mm×800mm;
Wooden bead: 12mm, 1 piece;
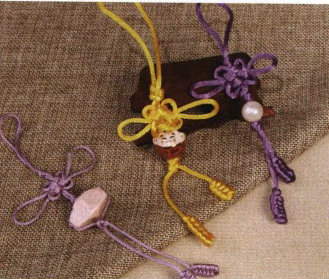
Figure 7-10 Style Diagram of Auspicious Phoenix Knot Pendant
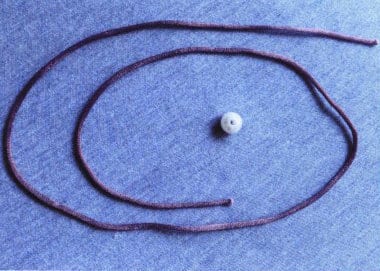
Figure 7-11 Preparation of Materials for Auspicious Phoenix Knot Pendant
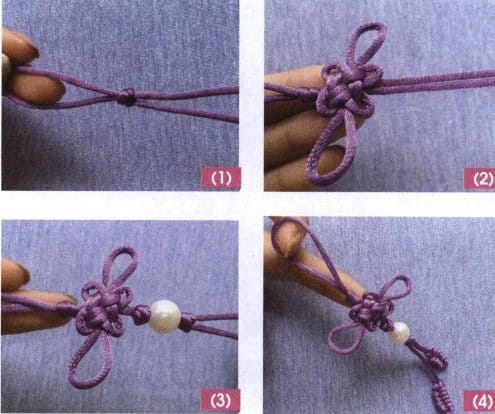
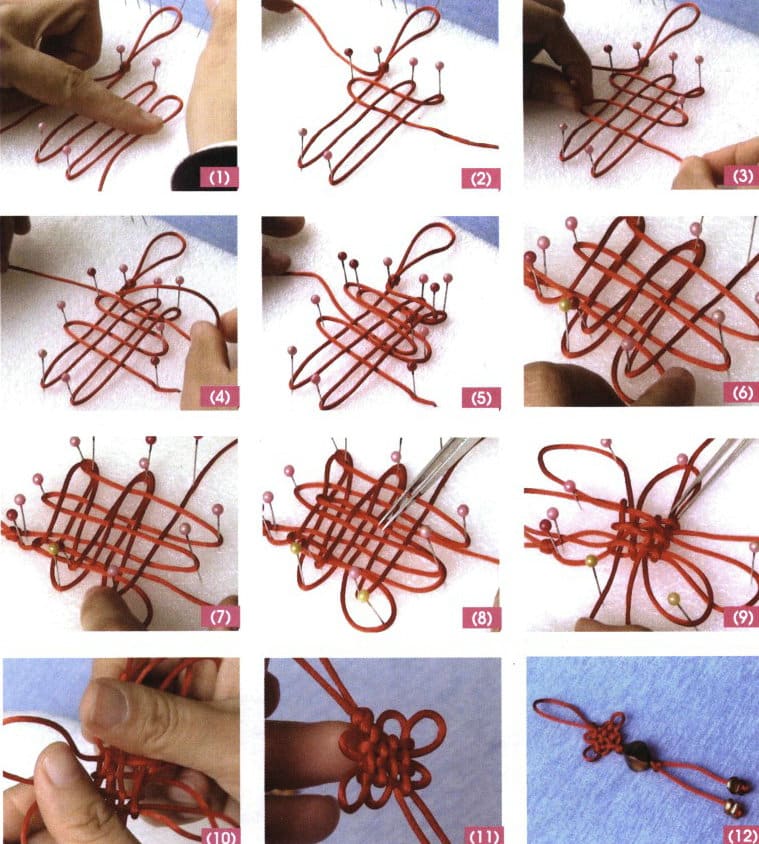
(4) Termelési módszer
① Fold the line in half to find the center, leaving about 50 mm of length to make a double connection knot; see Figure 7-12 (1).
② Make an auspicious knot, see Figure 7-12 (2).
③ Next, make a double connection knot, string the wooden beads, and then make another double connection knot, see Figure 7-12 (3).
④ At the end of the line, tie a phoenix tail knot with each of the two lines, and the production is complete; see Figure 7-12 (4).
1.2 Floral Extravaganza Silk Tassel
(1) Stílusjellemzők
This pendant is a round brocade knot connected with decorative beads, resembling a cluster of flowers, with a lively and enticing shape that embodies a dreamlike romantic color, see Figure 7-13.
(2) A legfontosabb tanulási pontok
Master the weaving method of the round brocade knot; grasp the skills to make pendants using the round brocade knot.
(3) Material Preparation (see Figure 7-14)
Green thread: 2mm×800mm;
Wooden bead: 10 mm, 1 piece.
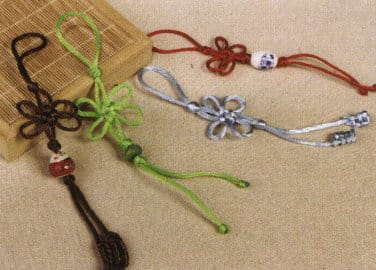
Figure 7-13 Style Diagram of Floral Extravaganza Silk Tassel

Figure 7-14 Preparation of Materials for Floral Extravaganza Silk Tassel
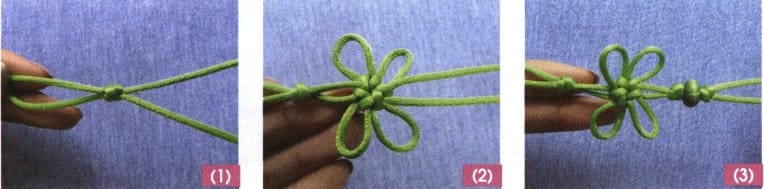
(4) Termelési módszer
① Fold the green thread in half, leaving about 5 cm of length to make a double connectino knot; see Figure 7-15 (1).
② Weave a round brocade knot, see Figure 7-15 (2).
③ Next, weave a double connection knot, thread a wooden bead, and then weave another double connection knot, see Figure 7-15 (3).
④ At the end of the line, tie a knot on each line and melt the ends to secure them.
Copywrite @ Sobling.Jewelry - Egyedi ékszergyártó, OEM és ODM ékszergyár
1.3 Fortune's Eternal Knot Charm
(1) Stílusjellemzők
This pendant is made by connecting shell beads with Pan Chang knots. Giving it to friends and family conveys your heartfelt blessings and good wishes. See Figure 7-16.
(2) A legfontosabb tanulási pontok
Master the method of weaving the Pan Chang knot proficiently; understand the ideas and steps for its application.
(3) Material Preparation (Figure 7-17)
Red thread: 2mm× 1.5m, 1 piece;
Diamond-shaped shell bead: 15 mm (length) ×12mm (width), 1 piece;
Shell bead: 6mm, 2 pieces;
Foam pad: 200 mm (length) ×200mm (width), 1 piece.
Tool: Beading needle.

Figure 7-16 Design of the Fortune's Eternal Knot Charm
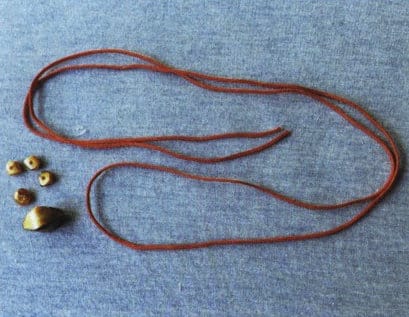
Figure 7-17 Preparation of Materials for the Fortune's Eternal Knot Charm
(4) Termelési módszer
① Fold the red thread in half, create a double knot, and fix the position of the double connection knot with a beading needle, starting to weave from the right thread. Direction: Make two loops with the right thread, fixing them with a beading needle; see Figure 7-18 (1).
② Horizontal 1: Use the right double line to do a pick one, press one, and fix it at the end of the ring; see Figure 7-18 (2).
③ Horizontal 2: Follow the method in step ②, continue with the double line to do a pick one, press one, press one, press one, and fix it at the end of the ring; see Figure 7-18 (3).
④ The left line goes over the first horizontal ring once completely up and down, and the line is fixed with a bead needle; see Figure 7-18 (4).
⑤ Following the step method ④, go up and down once more below the second horizontal ring; see Figure 7-18 (5).
⑥ Continue using the left thread, pick one from bottom to top, press three, pick one, and press three out; see Figure 7-18 (6).
⑦ On the way back, still pick two from the same ring, press one, pick three, and pick one out; see Figure 7-18 (7).
⑧ Imitate the methods in steps ⑥ and ⑦ to do it once more in the right column, completing the left thread; see Figure 7-18 (8).
⑨ First, remove the middle bead needle, pull the thread outward, and tighten the middle knot, see Figure 7-18 (9).
⑩ Remove the knot and adjust the ear wings; see Figure 7-18 (10).
⑪ The adjusted state, see Figure 7-18 (11).
⑫ Make a double connection knot at the bottom, thread both lines through the diamond-shaped shell beads, thread the two tail lines through 2 shell beads, respectively, and tie a knot to finish; see Figure 7-18 (12).
1.4 Heritage Filigree Knotwork
(1) Stílusjellemzők
This pendant is in a coffee color tone, featuring a six-ear auspicious knot in the center, surrounded by clover knots on all four sides. The knot structure is diamond-shaped, connected at the bottom with wooden beads, exquisite and unique, with an antique charm, embodying auspicious meanings of wealth and good fortune, as shown in Figure 7-19.
(2) A legfontosabb tanulási pontok
Mastering the weaving methods of double connection knots, auspicious knots, and clover knots, utilizing the characteristics of each knot type to combine them into more diverse and vivid accessories.
(3) Material Preparation (Figure 7-20)
Brown thread: 2mm×1.5m;
Wooden barrel beads: 20mm×10mm, 1 piece;
Round wooden beads: 8mm, 2 pieces.

Figure 7-19 Heritage Filigree Knotwork Design Illustration
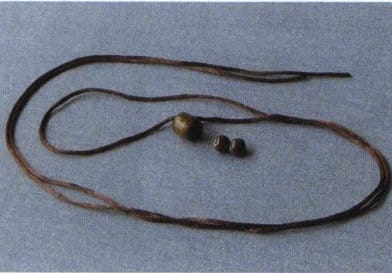
Figure 7-20 Preparation of Heritage Filigree Knotwork
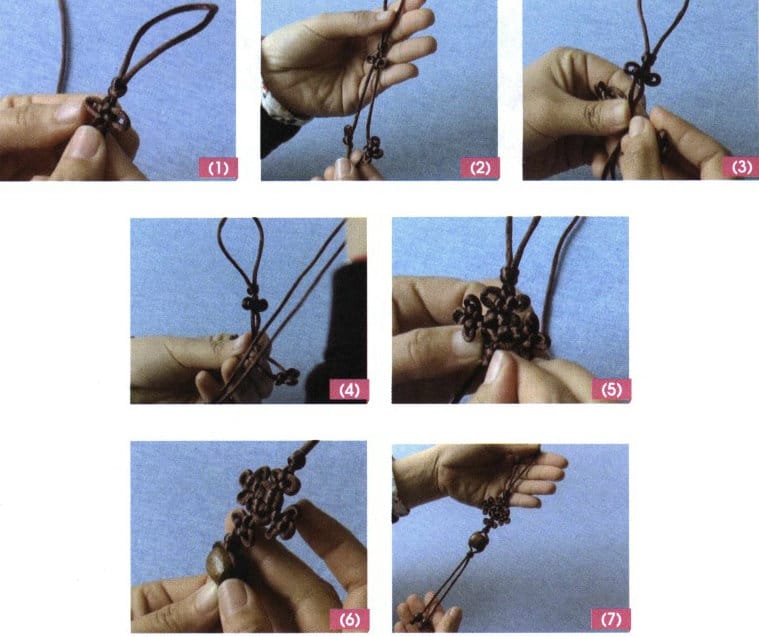
(4) Termelési módszer
① Fold the brown thread in half, leaving a 3 cm loop, and tie a double connection knot; then tie a clover knot, see Figure 7-21 (1).
② Leave about 6 cm of thread on each side, and tie a clover knot on each; see Figure 7-21 (2).
③ Using 3 clover knots as the base, cross the lines to form a “十” shape; see Figure 7-21 (3).
④ Tie a six-ear auspicious knot, pulling and pressing the lines in four directions counterclockwise; see Figure 7-21 (4).
⑤ Below the auspicious knot, sequentially tie clover and double connection knots, see Figure 7-21 (5).
⑥ Pass through 1 wooden barrel bead and then tie 1 double connection knot; the upper and lower double connection knots serve to fix and decorate; see Figure 7-21 (6).
⑦ Finally, thread a round wooden bead at the end to finish and tie a knot to secure it, see Figure 7-21 (7).
2. Beaded Pendant Examples
2.1 Celestial Bead Cluster Pendant
(1) Stílusjellemzők
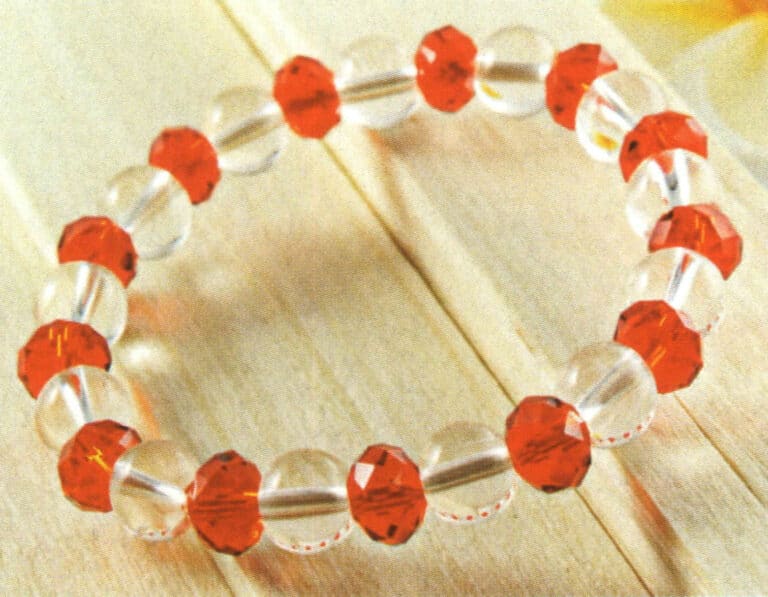
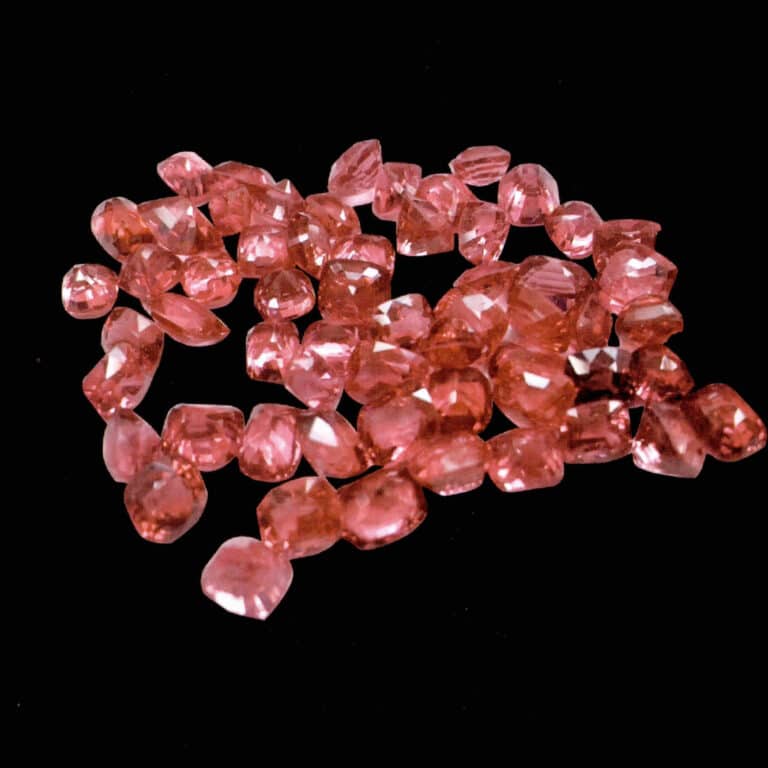
This pendant is composed of alternating red and white colors and is shaped like a five-pointed star overall. The red round faceted beads are eye-catching, while the white transparent seed beads form a cluster of ten, sparkling like stars, exuding a strong sense of aesthetic form, as seen in Figure 7-22.
(2) A legfontosabb tanulási pontok
Learn the methods and steps for beading a five-pointed star; master how to combine them into pendants.
(3) Material Preparation (Figure 7-23)
Red oval faceted bead: 6mm, 17 pieces;
White round seed bead: 2mm, 40 pieces;
Eye pin: 30mm, 1 piece;
Lobster clasp: 8mm, 1 piece;
Pendant cord: 1 piece;
Jump ring: 6mm, 1 piece;
Fishing line:0.3mm×60cm, 1 piece.

Figure 7-22 Style Diagram of the Celestial Bead Cluster Pendant
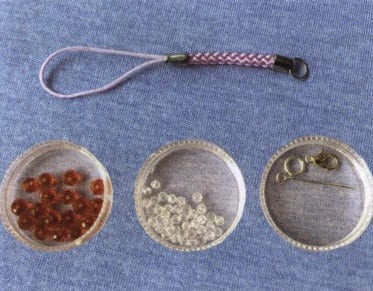
Figure 7-23 Material Preparation for Celestial Bead Cluster Pendant
(4) Termelési módszer
① First star point: Use fishing line to string 3 white round seed beads (seed beads) individually and pass through 1 seed bead to form a four-petal flower bead; see Figure 7-24 (1).
② The right line strings red oval faceted beads (red beads), seed beads, and red beads in sequence; the left line strings red beads and finally passes through the seed bead. Each star consists of 4 seed beads and 3 red beads; see Figure 7-24 (2).
③ Connecting the snowflake group: Both lines string seed beads individually, then pass through seed beads to form a four-petal flower shape, serving to connect each star point, see Figure 7-24 (3).
④ The second star point: thread 1 red bead and 4 seed beads in sequence on the left line; see Figure 7-24 (4).
⑤ Then re-thread through the 1st seed bead of the 4 seed beads, forming a four-petal flower shape, see Figure 7-24 (5).
⑥ Thread the red beads on the left and right lines and pass through the seed beads to complete the second star; see Figure 7-24 (6).
⑦ Repeat steps ③ to ⑥ twice to form the third and fourth star points; see Figure 7-21 (7).
⑧ The last left and right line passes through the seed bead, and the tail line passes through the large beads, aiming for firmness and stability, as shown in Figure 7-24 (8).
⑨ The part of the eye pin loop is first hung on the pentagram, then 2 red beads are threaded, leaving a length 7~8mm to cut off, and bent into a 9-shaped ring, see Figure 7-24 (9).
⑩ Connect the pendant cord to the lobster clasp with a jump ring to form component A; see Figure 7-24 (10).
⑪ Combine component A with the pentagram, see Figure 7-24 (11).

2.2 Joyous Melody Bead Strand
(1) Stílusjellemzők
This pendant is based on the four-sided ball, and by using seed beads to create a net on the outside of the ball, decorative flowers are embedded into the bead body to form colorful beads, making the monotonous ball instantly rich and colorful, exquisite, and pleasing to the eye. This is the charm of detailed decoration; see Figure 7-25.
(2) A legfontosabb tanulási pontok
Master the weaving method of the four-sided ball, learn the technique of pulling the net on the outside of the ball, and grasp the color matching of the beads.
(3) Material Preparation (Figure 7-26)
Pink acrylic beads: 8mm, 12 pieces;
Flower decorative beads: 6 mm, 6 pieces;
Pink seed beads: 2mm, 40 pieces;
Head pins: 3mm, 1 piece;
Jump ring: 6mm, 1 piece;
Lobster clasps: 6mm, 1 piece;
Fishing line: 60cm×0.3mm, 1 strand;
Pendant cord: 1 piece.
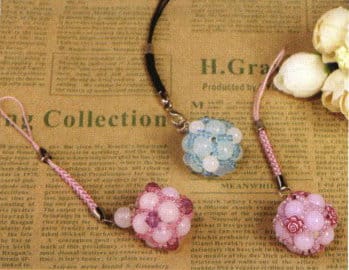
Figure 7-25 Style Diagram of the Joyous Melody Bead Strand
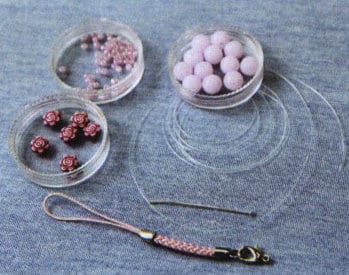
Figure 7-26 Material Preparation for the Joyous Melody Bead Strand
(4) Termelési módszer
① Use pink acrylic beads to string 4 four-petal flower bead, where the last bead of the last group is strung differently, and set the outermost bead of the first group of four-petal flower beads as bead A, see Figure 7-27 (1).
② After stringing the last group of beads on the left and right, string bead A, see Figure 7-27 (2).
③ String 3 pink rice beads on each side, and string 1 decorative bead in the middle; see Figure 7-27 (3).
④ Then string 3 pink rice beads on each side again, and string 1 bead diagonally opposite bead A so that the decorative bead is in the center of the four-petal flower bead, see Figure 7-27 (4).
⑤ Use the methods from step ③ and step ④ to thread the decorative beads in one direction; see Figure 7-27 (5).
⑥ Continue threading until you have threaded 4 decorative beads in this direction; see Figure 7-27 (6).
⑦ Pass the fishing line to the other side, and using the same method, thread 1 decorative bead on each side, then thread a few pink seed beads, tie a knot, cut off the excess line, and hide the knot, see Figure 7-27 (7).
⑧ Use a head pin to come out from the bottom, then twist it into a figure-nine shape; see Figure 7-27 (8).
⑨ Thread a jump ring with a lobster clasp onto the pendant cord and hang it onto the 9-shaped loop; see Figure 7-27 (9).