Miten tehdä koruja vaha injektio ja tehdä koruja vaha valu mallit?
The basic principles and operational skills for 5 typical tasks
In the process of jewelry lost-wax casting, the quality of the wax mold directly affects the quality of the jewelry castings. To obtain high-quality wax molds, the wax material should have a moderate melting point, low shrinkage rate, certain strength and toughness, and minimal residual ash. The methods for making wax molds include vacuum wax injection, automatic wax injection, fully automatic production line wax injection, and metal mold wax injection. The quality of a wax mold is generally evaluated from four aspects: shape and size, appearance quality, internal quality, and mechanical properties. Ensuring the quality of the wax mold is crucial, and using unqualified wax molds to grow wax pattern trees is strictly prohibited, as this can reduce unnecessary production processing costs and precious metal losses. The main factors affecting the quality of the wax mold include the quality of the rubber mold, the quality of the wax material, the temperature of the wax liquid, the wax injection air pressure, and the techniques for clamping and removing the mold.
This project enables students to master the basic principles and operational skills of vacuum wax injection, automatic wax injection, fully automatic production line wax injection, metal mold wax injection, and wax mold finishing through five typical tasks and after-class extension exercises.

Wax beads of different colors
Sisällysluettelo
Section I Vacuum Wax Injection
1. Taustatiedot
1.1 Wax for Jewelry Lost-Wax Casting
In the jewelry casting process, the quality of the wax mold directly affects the quality of the jewelry blank. To obtain a good jewelry wax mold, the wax mold material should have the following properties.
(1) The melting point of the wax mold material should be moderate, with a certain melting temperature range, appropriate fluidity after melting, not easily softened or deformed, and easy to weld.
(2) To ensure the dimensional accuracy of the jewelry wax mold, the shrinkage rate of the wax mold material should be small, generally less than 1%.
(3) The wax mold material should have sufficient surface hardness at room temperature to ensure no surface wear during lost-wax casting processes.
(4) To ensure that the wax mold can be removed from the rubber mold without bending and breaking and can automatically return to its original shape after removal, the wax mold material should have good strength, flexibility, and elasticity, with a bending strength greater than 8MPa.
(5) There should be little change in composition during heating and minimal ash residue during combustion.
The basic components of the wax mold material include wax, grease, natural resins, synthetic resins, and other additives. Among them, wax serves as the matrix, a small amount of grease acts as a lubricant, and adding various resins can toughen the wax mold and make it elastic while improving its surface gloss. Adding resin to paraffin can hinder the growth of paraffin crystals, thereby refining the grain and increasing strength.
Currently, the more popular types of wax for jewelry come in various shapes, such as beads, sheets, tubes, wires, and blocks. The wax materials used for making wax molds are most commonly in bead and sheet forms, with colors including blue, green, red, and others, as shown in Figures 3-1 and 3-2. The wax’s melting temperature is around 60℃, and the injection wax temperature is 70~75℃. When selecting wax for the central runner and wax for the mold, they should be as different as possible. The melting point of the wax for the central runner should be slightly lower than that of the wax for the mold to avoid expansion of the wax liquid in the casting during dewaxing, which could lead to cracks.
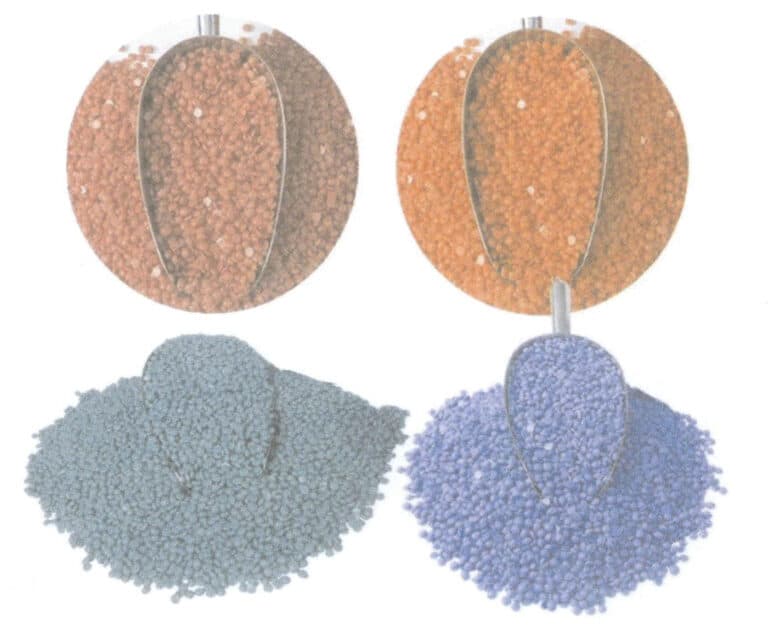
Figure 3-1 Wax beads of different colors
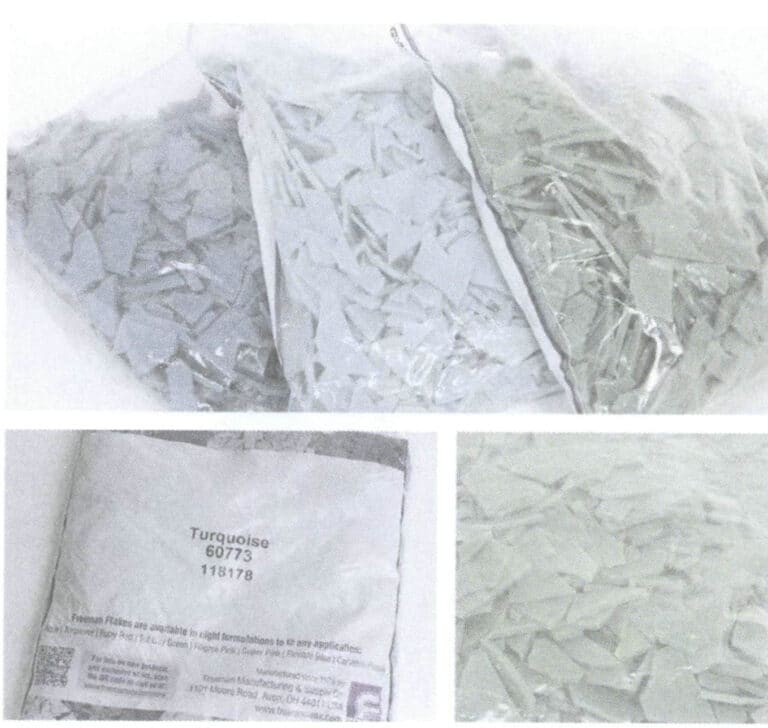
Figure 3-2 Wax sheets of different colors
1.2 Main Equipment and Tools for Making Wax Molds
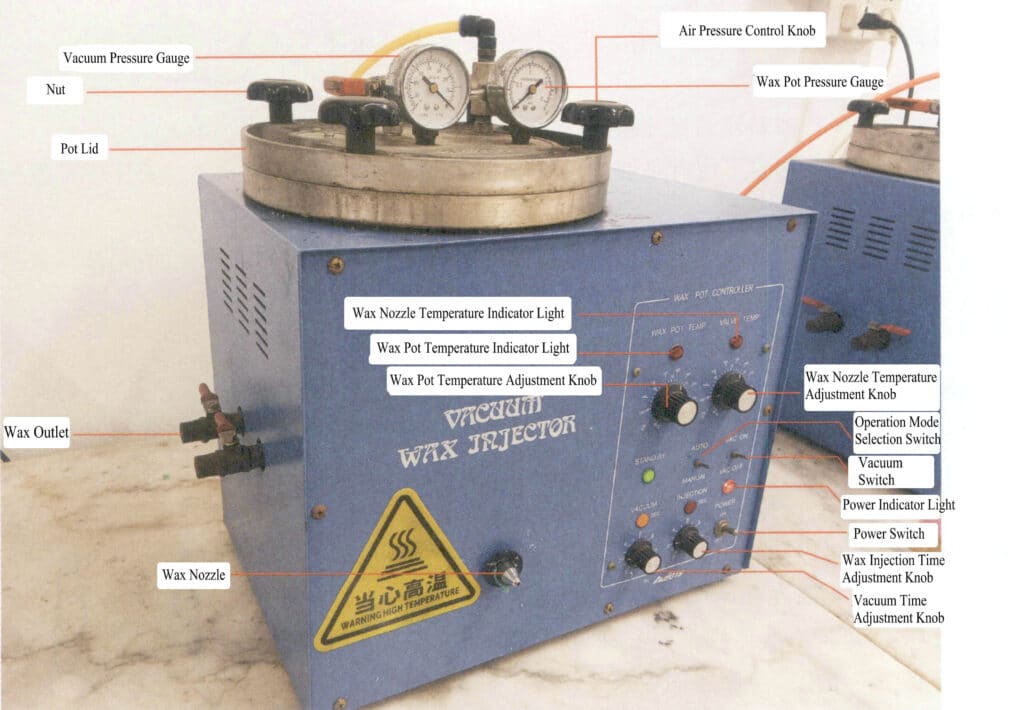
Table 3-1 Wax Injection Parameters for Different Structures
| Wax Structure | Temperature /℃ | Wax Injection Time /s | Wax Injection Pressure /kPa |
|---|---|---|---|
| More flat surfaces, simple structure | 70 〜 73 | 2 | 50 〜 80 |
| The walls are thin, there are many stone setting positions, and the gaps are narrow. | 73 〜 75 | 2 | 100 〜 150 |
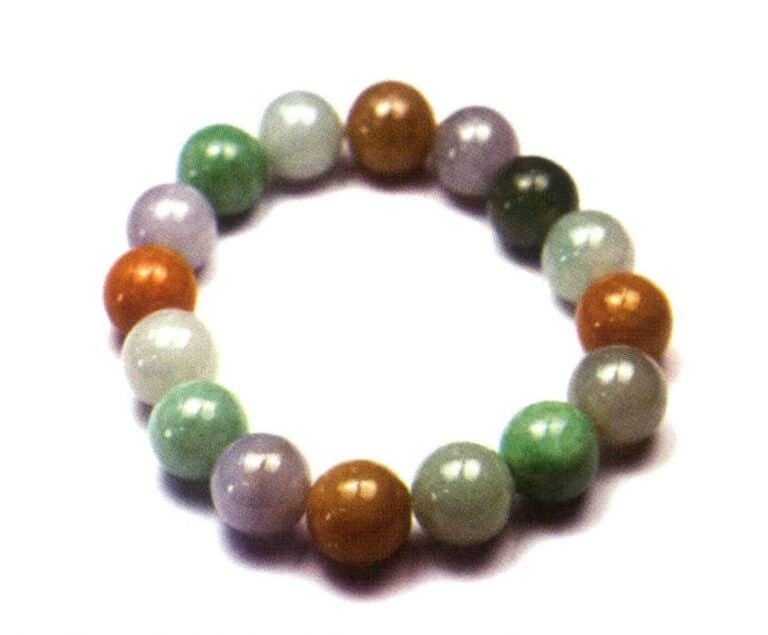
| Rannekoru | 73 〜 75 | 4 | 60 ~ 100 |
1.3 Wax Injection
The wax injection is done using a machine that heats and pressurizes the melted wax into the mold. The equipment commonly used now is a vacuum wax injector. Its working principle is to evacuate the air from the mold before injecting the wax, using air pressure to inject the molten wax into the mold. The advantage of vacuum wax injection is that it has good filling properties, allowing even thin wax molds to be filled, and it reduces the occurrence of air bubbles in the wax mold.
The wax material placed in the wax tank must be kept clean. If the wax contains dust or has impurities on its surface, it can easily clog the valve, leading to continuous wax leakage from the injection nozzle. Therefore, if there is suspicion of foreign debris in the wax or recycled wax is used, it must be heated to an appropriate temperature, allowed to melt, and filtered through several layers of gauze before use. The heater and temperature controller in the wax injector can ensure that the wax liquid reaches and maintains a certain temperature. Typically, the temperature of the wax injector should be kept between 70~75 °C, which ensures that the wax liquid has sufficient fluidity. If the temperature is too low, the wax liquid will not fill the mold cavity properly, resulting in incomplete wax molds; conversely, if the wax liquid temperature is too high, it may overflow from the seams of the mold or the injection port, easily forming flash or injuring fingers.
1.4 Ring Size of the Ring Wax Mold
“Ring size” is a professional term in the jewelry industry, referring to the size of a ring based on the inner diameter and inner circumference of the ring, classified into different ring size numbers. It is a dimensionless number and cannot be directly equated to specific measurements. The ring size numbering systems used in different countries vary (Table 3-2), with commonly used systems including Hong Kong size, American size, and Japanese size, each corresponding to different diameters and circumferences.
Table 3-2 Comparison of Ring Size Numbers in Different Countries
| Kiina | Yhdysvallat | Yhdistynyt kuningaskunta | Japan | Saksa | France | Switzerland |
|---|---|---|---|---|---|---|
| 9 | 5 | J1/2 | 9 | 15.75 | 49 | 9 |
| 12 | 6 | L1/2 | 12 | 16.5 | 51.5 | 11.5 |
| 14 | 7 | 0 | 14 | 17.25 | 54 | 14 |
| 16 | 8 | Q | 16 | 18 | 56.5 | 16.5 |
| 18 | 9 | S | 18 | 19 | 59 | 19 |
| 20 | 10 | T1/2 | 20 | 20 | 61.5 | 21.5 |
| 23 | 11 | V1/2 | 23 | 20.75 | 64 | 24 |
| 25 | 12 | T | 25 | 21.25 | 66.5 | 27.5 |
Measuring ring size involves two aspects: measuring the finger’s circumference where the ring is worn to determine the ring size. The methods and standards for indicating ring sizes vary by country or region, with an allowable tolerance range of ±0.5mm. The common methods for measuring ring size are: ①Directly wearing the ring: By trying on different rings to find the one that fits best, measure its inner diameter or inner circumference, and compare it with the ring size chart to confirm the size. ②Using a ring sizer: A ring sizer is a professional tool for measuring ring size, which can help determine the size by trying it on. ③Using a cotton thread or paper strip to wrap around the finger, determine the length and then compare it with the ring size chart to confirm the size.
The other is to measure the hand size for the ring wax mold, which can be measured using a ring sizer. The ring sizer is conical and has corresponding ring-size numbers, as shown in Figure 3-4.

1.5 Quality Evaluation of Wax Molds
The production of wax molds is a key link in jewelry casting, and the quality of the wax mold significantly impacts jewelry products. Ensuring the quality of the wax mold is crucial, and using unqualified wax molds for wax pattern trees is strictly prohibited, as this can reduce unnecessary production processing costs and precious metal losses.
The quality of a wax mold is generally evaluated from the following four aspects.
(1) Shape and size. The wax mold should accurately reflect the shape of the original model, with no obvious deformation, meet the size requirements, be resistant to softening and deformation, and be easy to weld.
(2) Appearance quality. The surface of the wax mold should be smooth, fine, and clean, with no obvious surface shrinkage, cracks, peeling, bulges, or other defects.
(3) Internal quality. The wax mold should be dense, with no obvious bubbles inside and minimal ash residue when burned.
(4) Mechanical properties. The wax mold should have good strength, flexibility, and elasticity, with sufficient surface hardness at room temperature to prevent surface wear during other processes of lost-wax casting; when removed from the rubber mold, the wax mold should be able to bend without breaking, and return to its original shape afterward. When wax pattern trees are planted, the wax mold should be firmly welded to the core and not easily fall off.
2. Tehtävän toteuttaminen
This task uses an internal ring mold with embedded moveable pieces and a vacuum wax injector to produce wax molds, with the internal structure of the mold shown in Figure 3-5.
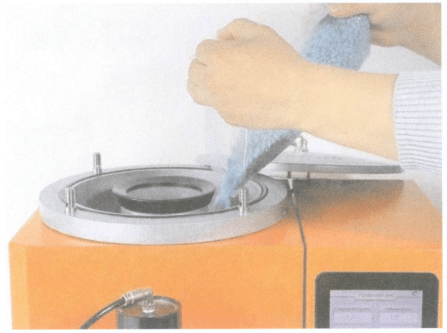
(1) Preparing the Wax Material
Turn on the vacuum wax injector switch, set the temperature of the wax tank and injection nozzle to maximum, then unscrew the four black knobs on the top cover of the injector, and add wax beads to the wax tank, as shown in Figure 3-6. The amount added should be above the minimum capacity line in the tank. Once all the wax beads have melted, cover the top and tighten the four knobs diagonally.
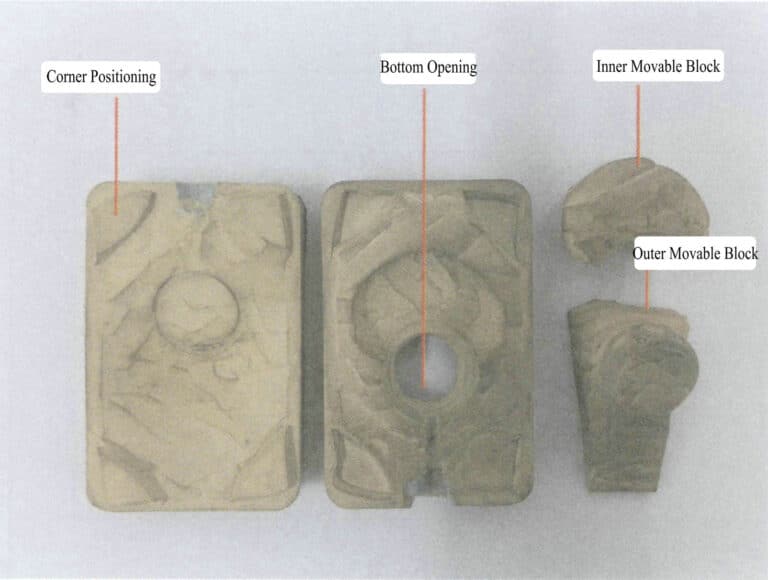
Figure 3-5 Internal Structure of the Ring Mold
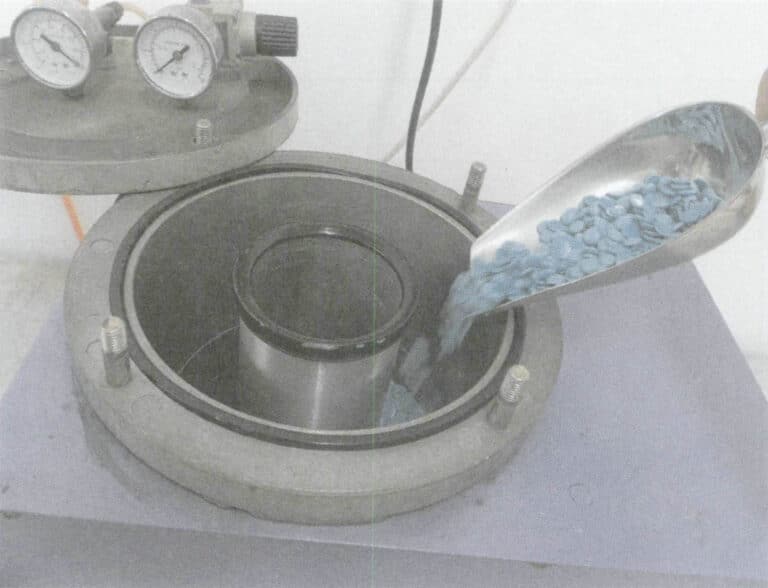
Figure 3-6 Preparing the Wax Material
(2) Setting Parameters
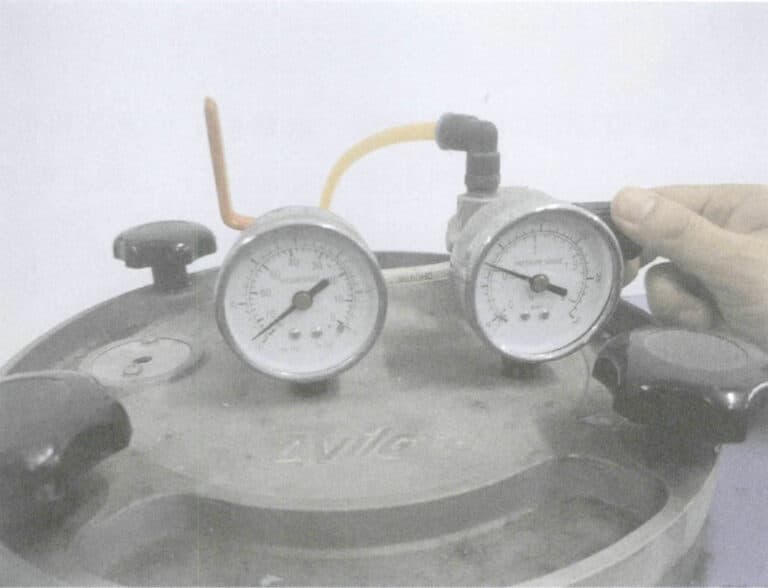
Set the temperature of the wax tank and injection nozzle to 73℃ (keep warm for 10 min), and set the vacuum and injection time to 2s respectively, activate the air compressor and vacuum pump, rotate the pressure valve clockwise to 0.6kg/cm2 (red reading) , and open the vacuum valve, as shown in Figure 3-7.
(3) Wax Injection
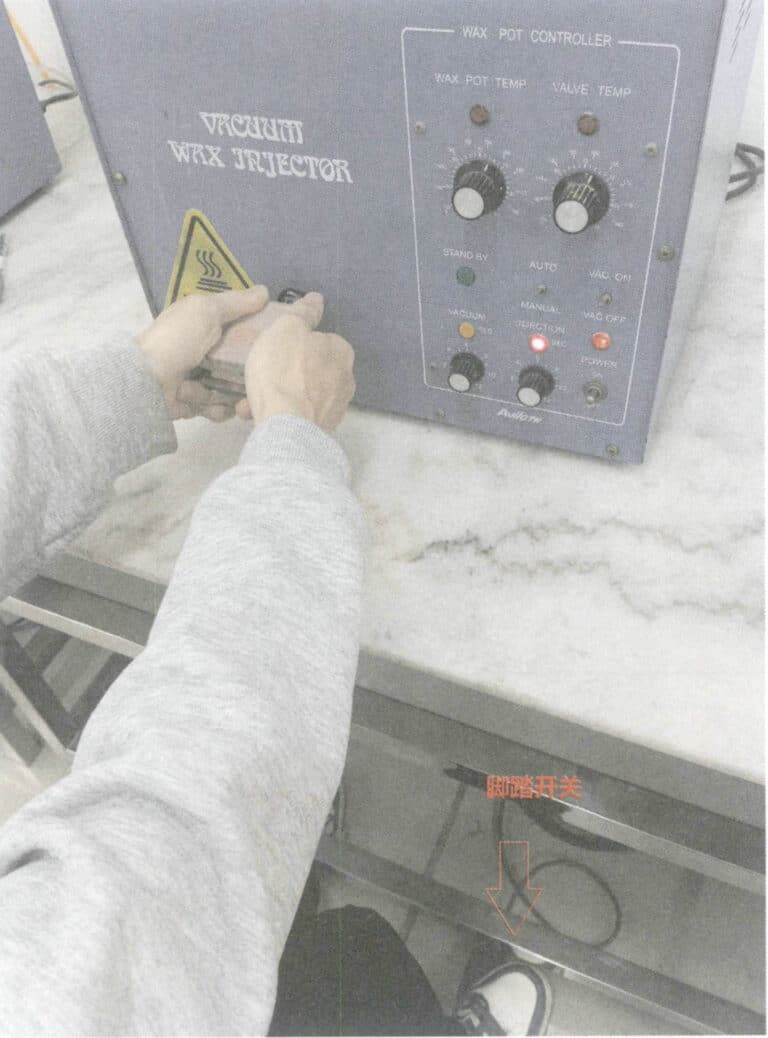
Before injecting wax, open the mold, check its integrity and cleanliness, and use an air gun to remove any residue in the cavity. Clean the wax shavings thoroughly. Spray a small amount of release agent (or sprinkle a little talcum powder) in the mold’s smaller, more complex areas to facilitate the removal of the wax mold. Then, use acrylic clamps to tightly secure the mold, ensuring that the distribution of your fingers applies even pressure to the mold. Align the sprue of the mold with the wax injection nozzle and push firmly in the horizontal direction to hold it steady, as shown in Figure 3-8. Gently step on the foot switch of the wax injector, then release it. When the indicator light of the wax injector changes from yellow to red and then from red to green, it indicates that the wax injection process is complete (the time is 3~4s). At this point, the mold can be moved away from the wax injection nozzle and placed in order on the table to cool.
(4) Removing the Wax Mold
After continuously injecting 6~8 molds, the wax mold can be removed. Before taking out the wax mold, first, remove the outer moveable piece, then take out the inner moveable piece, gently bend the mold to loosen the small parts such as the bezel and the head, and then gently take off the wax mold, as shown in Figure 3-9. When taking the mold, be careful with your technique to avoid excessive force that could cause the wax mold to break or deform.
Section II Automatic Wax Injection
1. Taustatiedot
(1) Automatic Vacuum Wax Injector
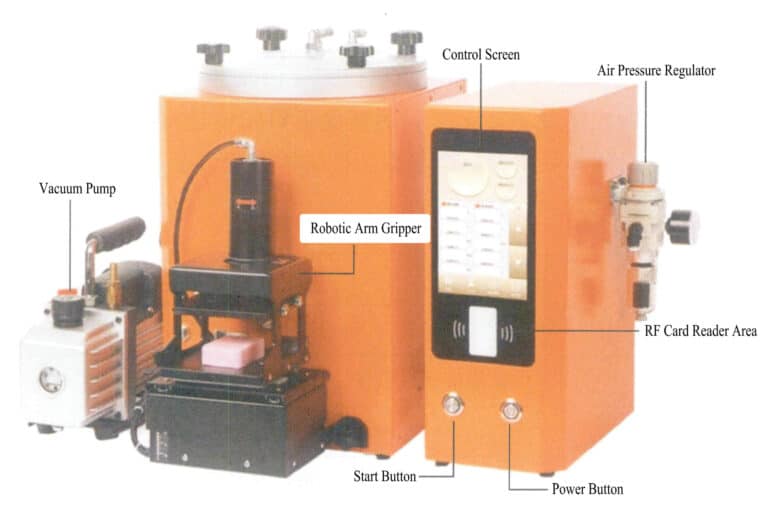
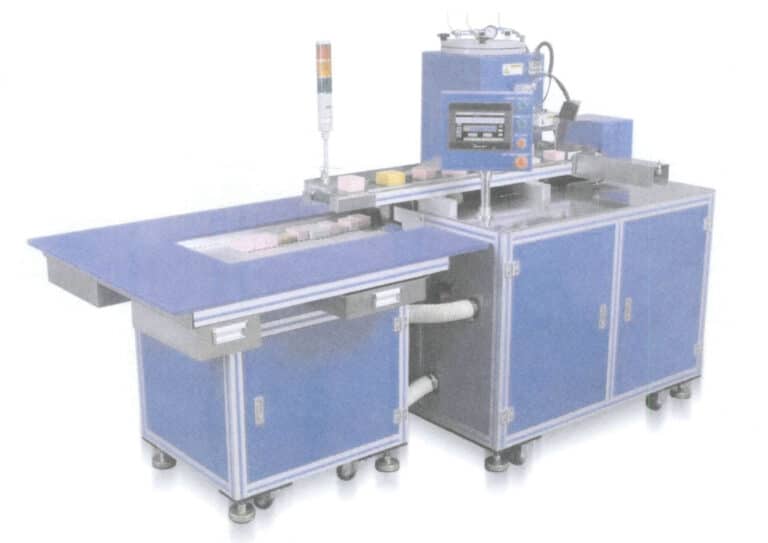
In wax injection production, operators usually set parameters manually, and wax injection is completed with handheld molds. This method has low automation and efficiency and cannot achieve production automation. The automatic wax injector is developed based on traditional wax injectors. The automatic wax injector has robotic grippers, touch display screens, and RFID (radio frequency identification) sensing devices compared to traditional machines. An RF card reading area is set on the control panel, and ID cards are on the molds. The wax injection data for each mold is stored in the machine’s chip. Simply placing the mold’s ID card on the card reading area during injection allows for automatic data reading. The injection parameters are directly displayed on the touch screen, eliminating the need for manual input or parameter selection each time and no need to record on the mold, making it accurate and intuitive, as shown in Figure 3-10. Operators do not need to hold the gripper; the machine can automatically align the wax injection nozzle, resulting in better stability of the wax mold quality and higher production efficiency.
(2) The Principle of Secondary Wax Injection
Secondary wax injection aims to reduce shrinkage-related defects in the wax mold. Generally, the pressure for secondary wax injection should be greater than that for primary wax injection, allowing the wax liquid to compensate for shrinkage in the wax mold before it completely solidifies. The parameters for secondary wax injection, such as injection time, mold pressure, and mold holding time, should be set according to the structure of the silicone mold, as shown in Table 3-6.
Table 3-6 Setting of Wax Injection Parameters
| Parameter | Setting requirements |
|---|---|
| Wax tank temperature/℃ | Used for melting wax material, the melting point is 5〜8℃ higher than that of wax. |
| Wax injection nozzle temperature /℃ | To ensure the wax liquid flows smoothly out of the tank, the temperature should generally be 2〜3℃ higher than that of the wax tank. |
| External gas supply pressure/kPa | The Fixed value is generally 400 kPa; no adjustment is needed. |
| Vacuum extraction time/s | Remove the air from the mold cavity and adjust it according to the mold structure, such as 2〜4s. |
| First wax injection pressure/kPa | Linearly related to wax output flow, 0〜200kPa. |
| First wax injection time/s | Adjust according to the required wax amount, such as 2〜4s. |
| Second wax injection pressure/kPa | Generally, it should be greater than the first wax injection pressure. |
| Second wax injection time/s | Adjust according to the actual situation, such as 2~4s, paying attention to the wax solidification time. |
| Molding pressure/kPa | The greater the pressure, the better the air tightness, and the easier the rubber mold deforms; conversely, the smaller the pressure, the worse the air tightness, and the easier the wax mold produces flash. The range for setting the molding pressure is 30〜235kPa. |
| Injection and push mold pressure/kPa | Generally, it should be smaller than the molding pressure. |
| Molding holding time/s | After the wax injection is completed, the robotic arm's molding holding time is 2〜4s. |
2. Tehtävän toteuttaminen
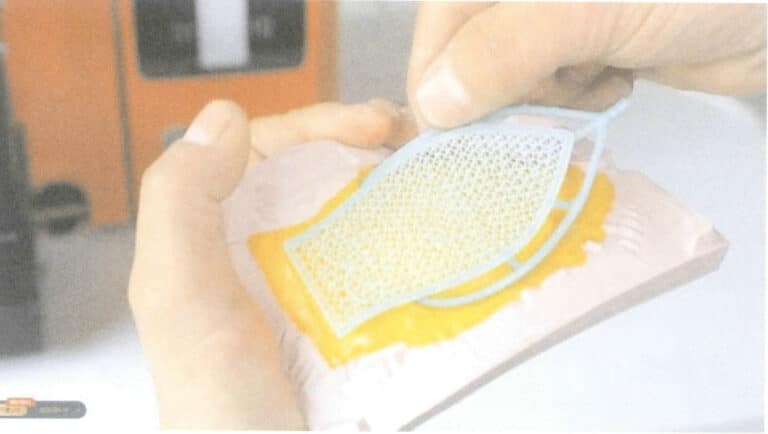
This task involves using a filigree hollow mold and an automatic wax injector produce wax molds.
(1) Setting System Parameters
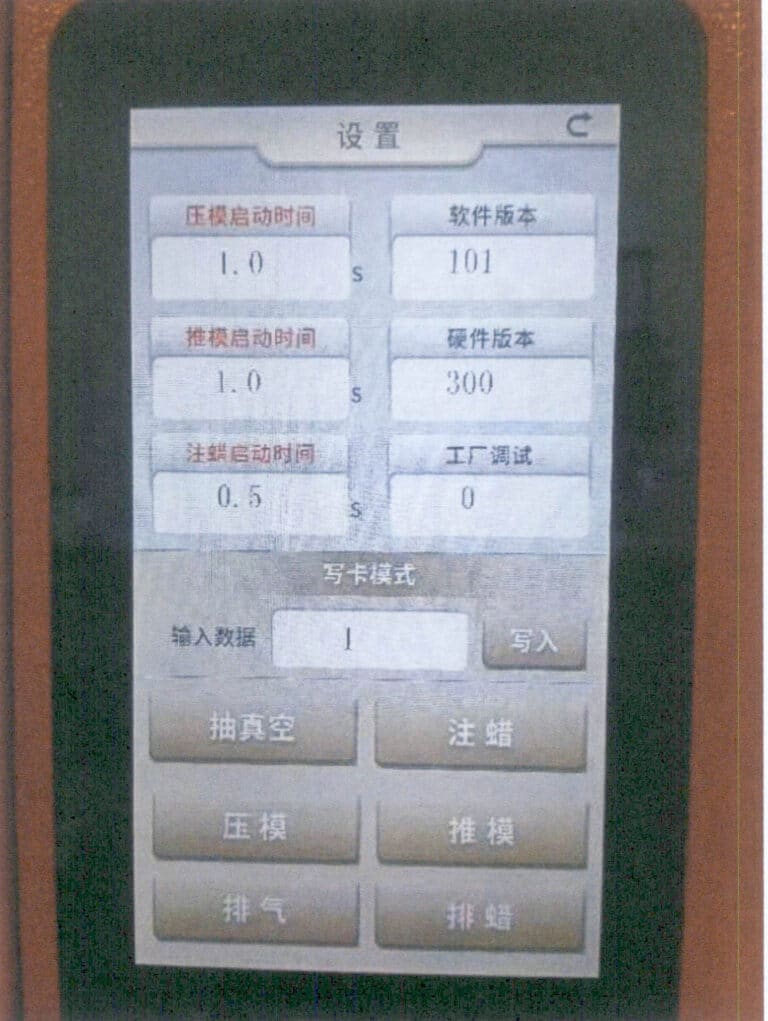
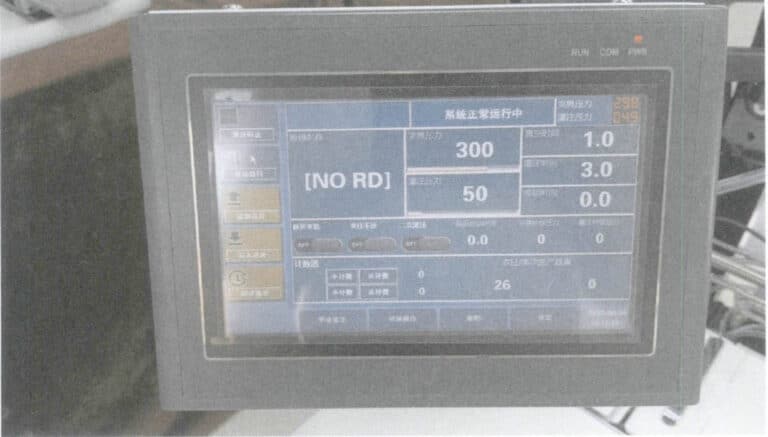
First, start the air compressor and vacuum pump, then turn on the wax injector switch, and set the system parameters on the LCD screen—mold start time is 1.0 s, push mold start time is 1.0 s, wax injection start time is 0.5 s, as shown in Figure 3-12.
(2) Setting Program Parameters
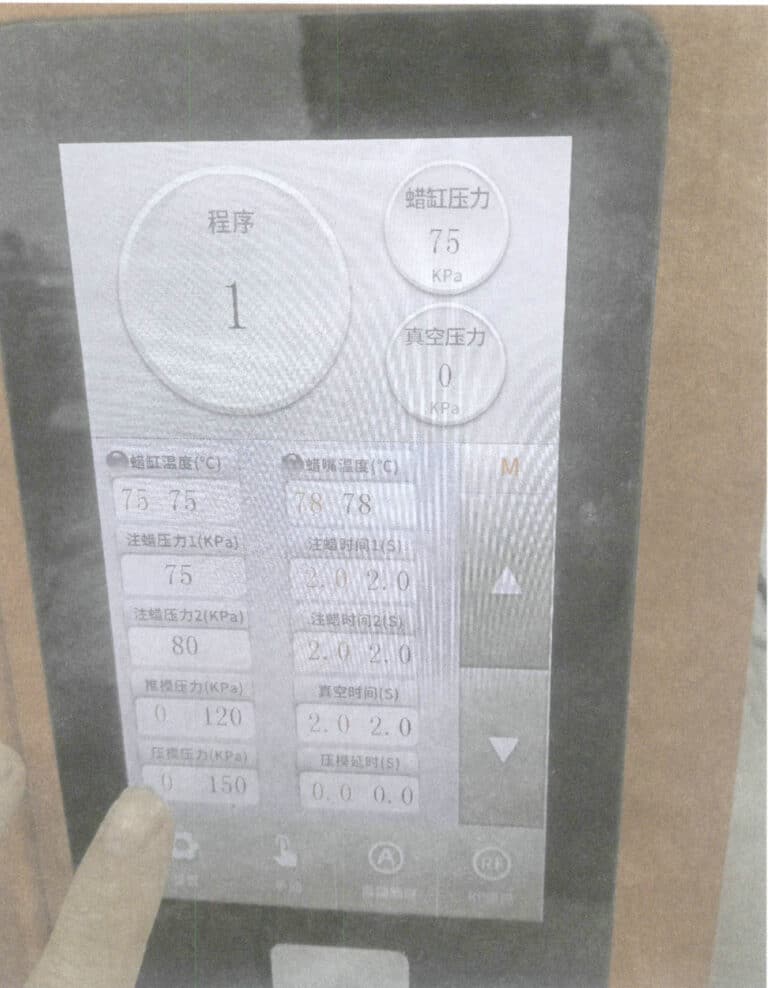
Set program parameters according to the internal structure of the mold: wax nozzle temperature is 78℃, wax tank temperature is 75℃, vacuum time is 2.0 s, wax injection time is 2.0 s, mold pressure is 150kPa, push mold pressure is 120kPa, first wax injection pressure is 75kPa, second wax injection pressure is 80kPa, as shown in Figure 3-13.
(3) Adding Wax Material
First, unscrew the four black knobs on the top cover of the wax injector diagonally, and add wax beads to the wax tank, as shown in Figure 3-14. The amount added should be above the minimum capacity line in the tank. Once all the wax beads have melted, cover the top and tighten the four knobs diagonally.
(4) RF Parameter Inputting
After entering the data (corresponding to the wax mold program parameters) in the touch screen area, click the “Input” button. When the inputting is successful, the system will emit a prompt sound.
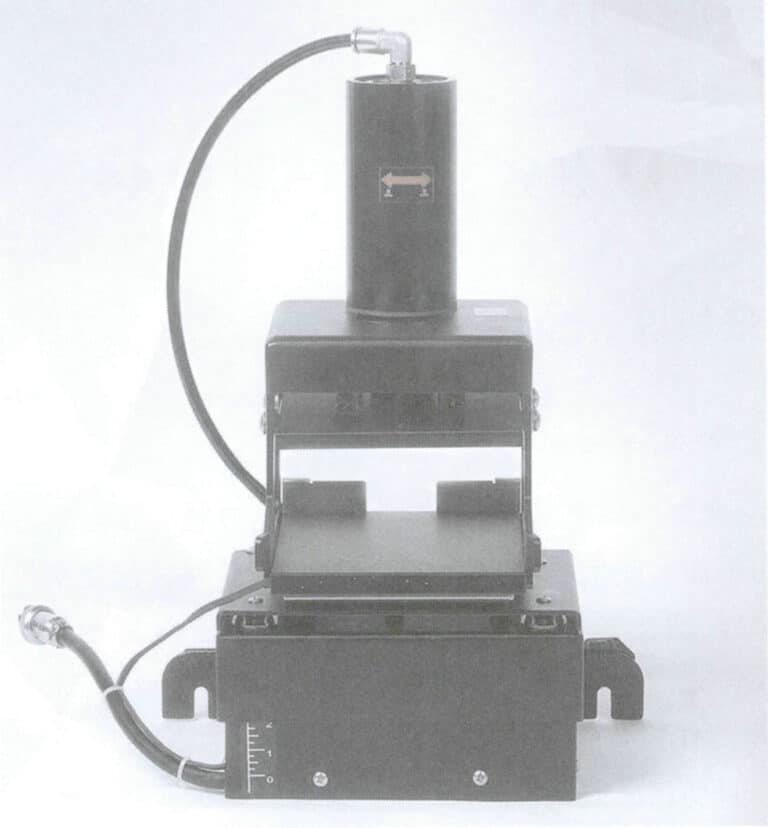
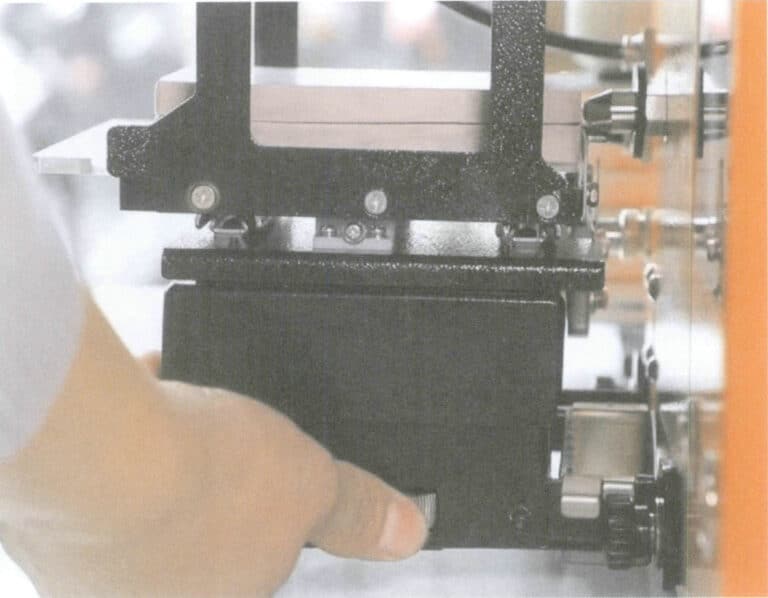
(5) Adjusting the Height of the Robotic Arm Fixture
A toggle dial is below the right side of the robotic arm fixture. Turning the dial counterclockwise raises the robotic arm; turning it clockwise lowers the robotic arm. Observe whether the wax injection nozzle is aligned with the mold opening. If not aligned, the height of the mold can be adjusted by turning the dial, as shown in Figure 3-15.
(6) Wax Injection
Before injecting wax, open the mold, check its integrity and cleanliness, and clean out any wax residue left in the cavity. Adjust the height of the robotic arm’s clamp, select the automatic sensing wax injection mode, place the mold ID card on the RF card reading area, and retrieve the pre-stored wax injection parameters, as shown in Figure 3-16. Then, the mold is placed into the clamp of the robotic arm, as shown in Figure 3-17.
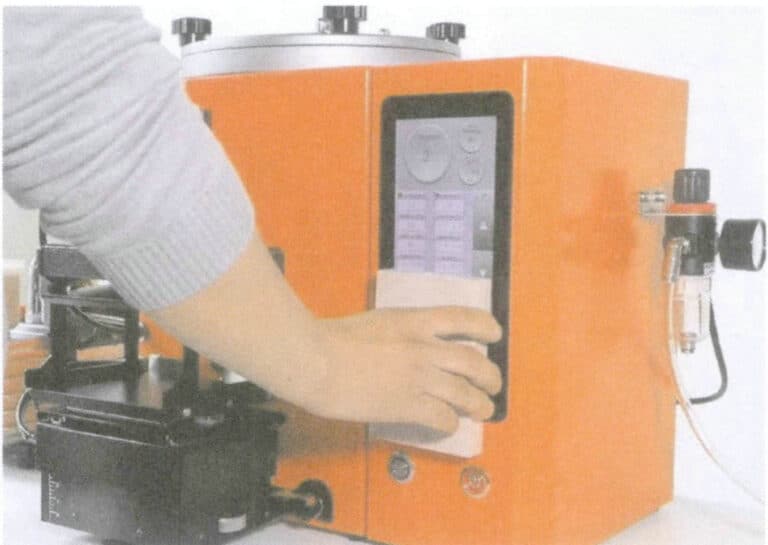
Figure 3-16 RF card reading wax injection parameters
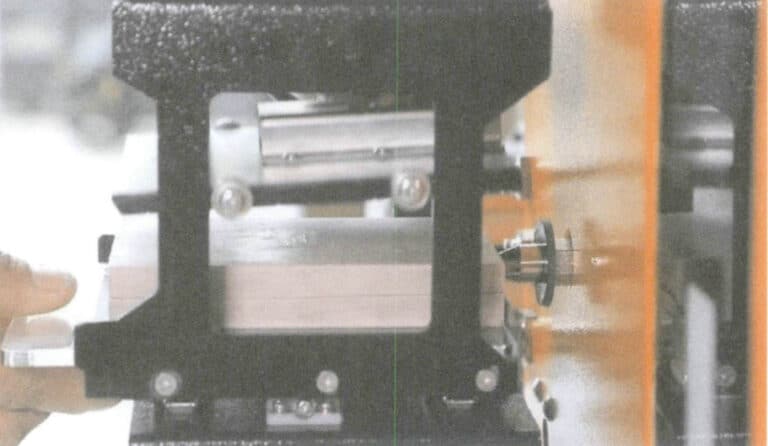
Figure 3-17 Place the mold into the robotic arm's clamp
(7) Removing the Wax Mold
Before removing the wax mold, open it, gently bend it to loosen small parts, such as the bezel and the head, and gently remove the wax mold, as shown in Figure 3-18. When taking the mold, be careful with your technique to avoid excessive force that could lead to the wax mold-breaking or deforming. After removing the wax mold, it should be carefully inspected.
Section III Fully Automatic Wax Injection Production Line
1. Taustatiedot
2. Tehtävän toteuttaminen
This task uses a fully automated wax injection production line and ten different styles of open-bottom molds to create wax molds.
(1) Setting the Wax Injection Parameters Through the Touchscreen
Turn on the power, adjust the height of the robotic arm’s clamp, check if the conveyor belt and cooling system are functioning properly, and set up the parameters related to wax injection through the touchscreen, as shown in Figure 3-20.
(2) Placing the Rubber Mold with the Barcode Affixed Onto the Conveyor Belt
Affix the corresponding barcodes to 10 different styles of rubber molds and then place them on the conveyor belt at a certain distance, as shown in Figure 3-21.
(3) Starting the Automatic Wax Injection Program
Start the automatic mode; the specific wax injection process is as follows.
① The scanner will automatically scan the barcode on the mold to obtain the corresponding wax injection parameters, as shown in Figure 3-22.
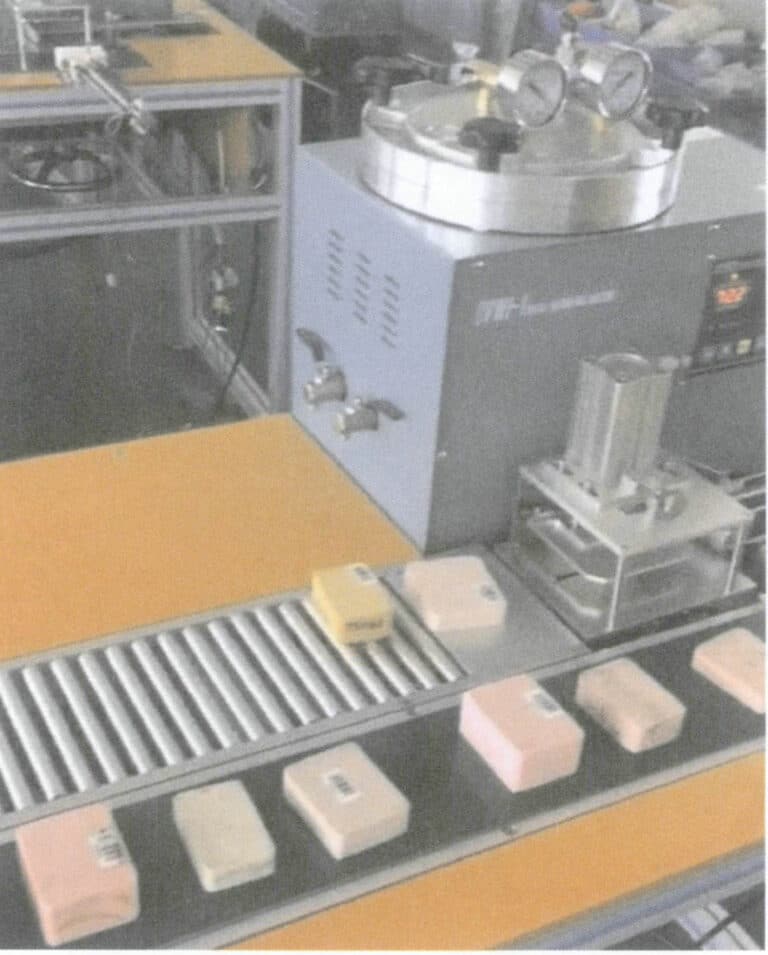
Figure 3-21 Place the mold on the mold conveyor belt

Figure 3-22 Scanning the barcode
② Automatically send the mold to the fixture; the push cylinder on the robotic arm will push the mold to the centering fixture, centering the mold, as shown in Figure 3-23.

③ Automatically adjust the wax injection parameters based on the barcode parameters.
④ Start the wax injection; the downward pressure cylinder on the injection fixture presses the mold, the push cylinder moves the mold to the wax injection position, and after the vacuum is completed, the wax injection begins, as shown in Figure 3-24.
⑤ After the wax injection, the push cylinder automatically retracts, the downward pressure cylinder retracts, and the fixture is released. In contrast, the cylinder on the fixture pushes the rubber mold onto the releasing mold device, the releasing mold device descends, and the rubber mold automatically exits the conveyor belt and is forcibly cooled, as shown in Figures 3-25 and 3-26.
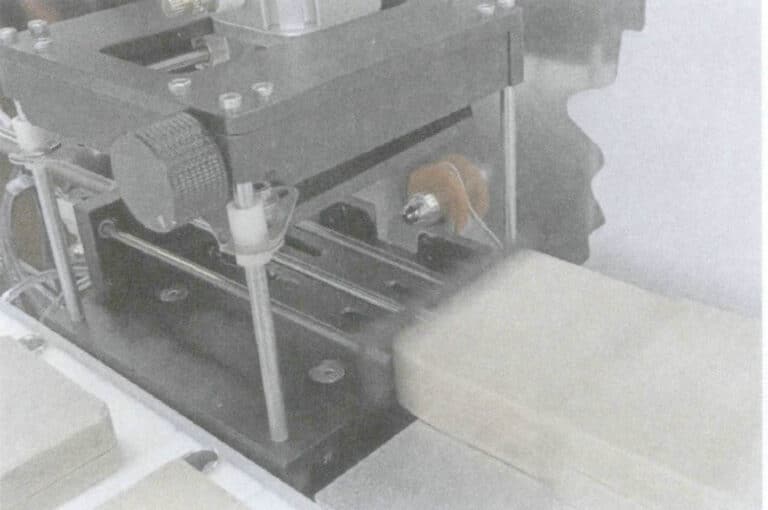
Figure 3-25 Molds Exit Conveyor Belt Automatically

Figure 3-26 Mold Cooling
(4) Removing the Wax Mold
Before removing the wax mold, the rubber mold should first be opened at the bottom, or the moveable pieces should be pulled out. Gently bend the rubber mold to loosen small parts, such as the bezel and the head, and then carefully remove the wax mold. When removing the mold, pay attention to the technique to avoid excessive force that could break or deform the wax mold. After removing the wax mold, it should be carefully inspected. After demolding, the extracted moveable pieces and the bottom opening should be returned to their original positions in the rubber mold, ensuring accurate alignment without deviation. Then, align the four corners of the two halves of the rubber mold and place them back on the conveyor belt in preparation for the next wax injection.
Copywrite @ Sobling.Jewelry - Custom korujen valmistaja, OEM ja ODM korut tehdas
Section IV Metal Mold Wax Injection
1. Taustatiedot
1.1 Advantages and Disadvantages of Rubber Molds
1.2 Characteristics of Metal Mold Wax Injection
1.3 Metal Mold Wax Injector

1.4 Jewelry Metal Molds
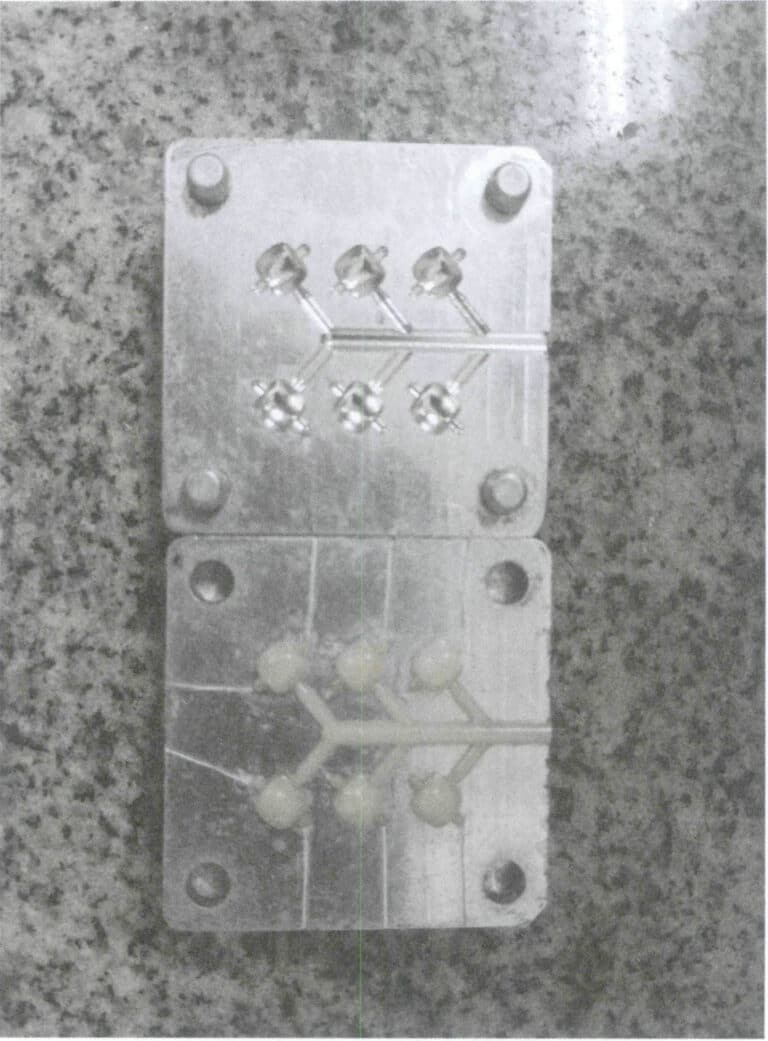
Jewelry metal molds are usually categorized by material into aluminum alloy molds, aluminum alloy embedded low-temperature alloy molds, water-soluble wax hollow jewelry steel molds, and aluminum alloy lined silicone rubber jewelry molds. According to the design drawings, the molds are processed using a CNC (computer numerical control) engraving machine, generally processed into male and female molds, with positioning pins left at the four corners for easy alignment and separation of the molds.
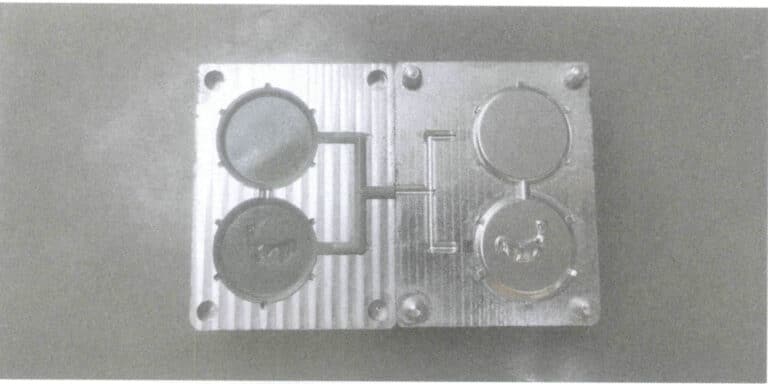
(1) Aluminum Alloy Mold
This type of mold is made of aluminum alloy, and the wax injection cavity, wax injection channel, positioning pins, and positioning holes are processed through CNC, as shown in Figure 3-28.
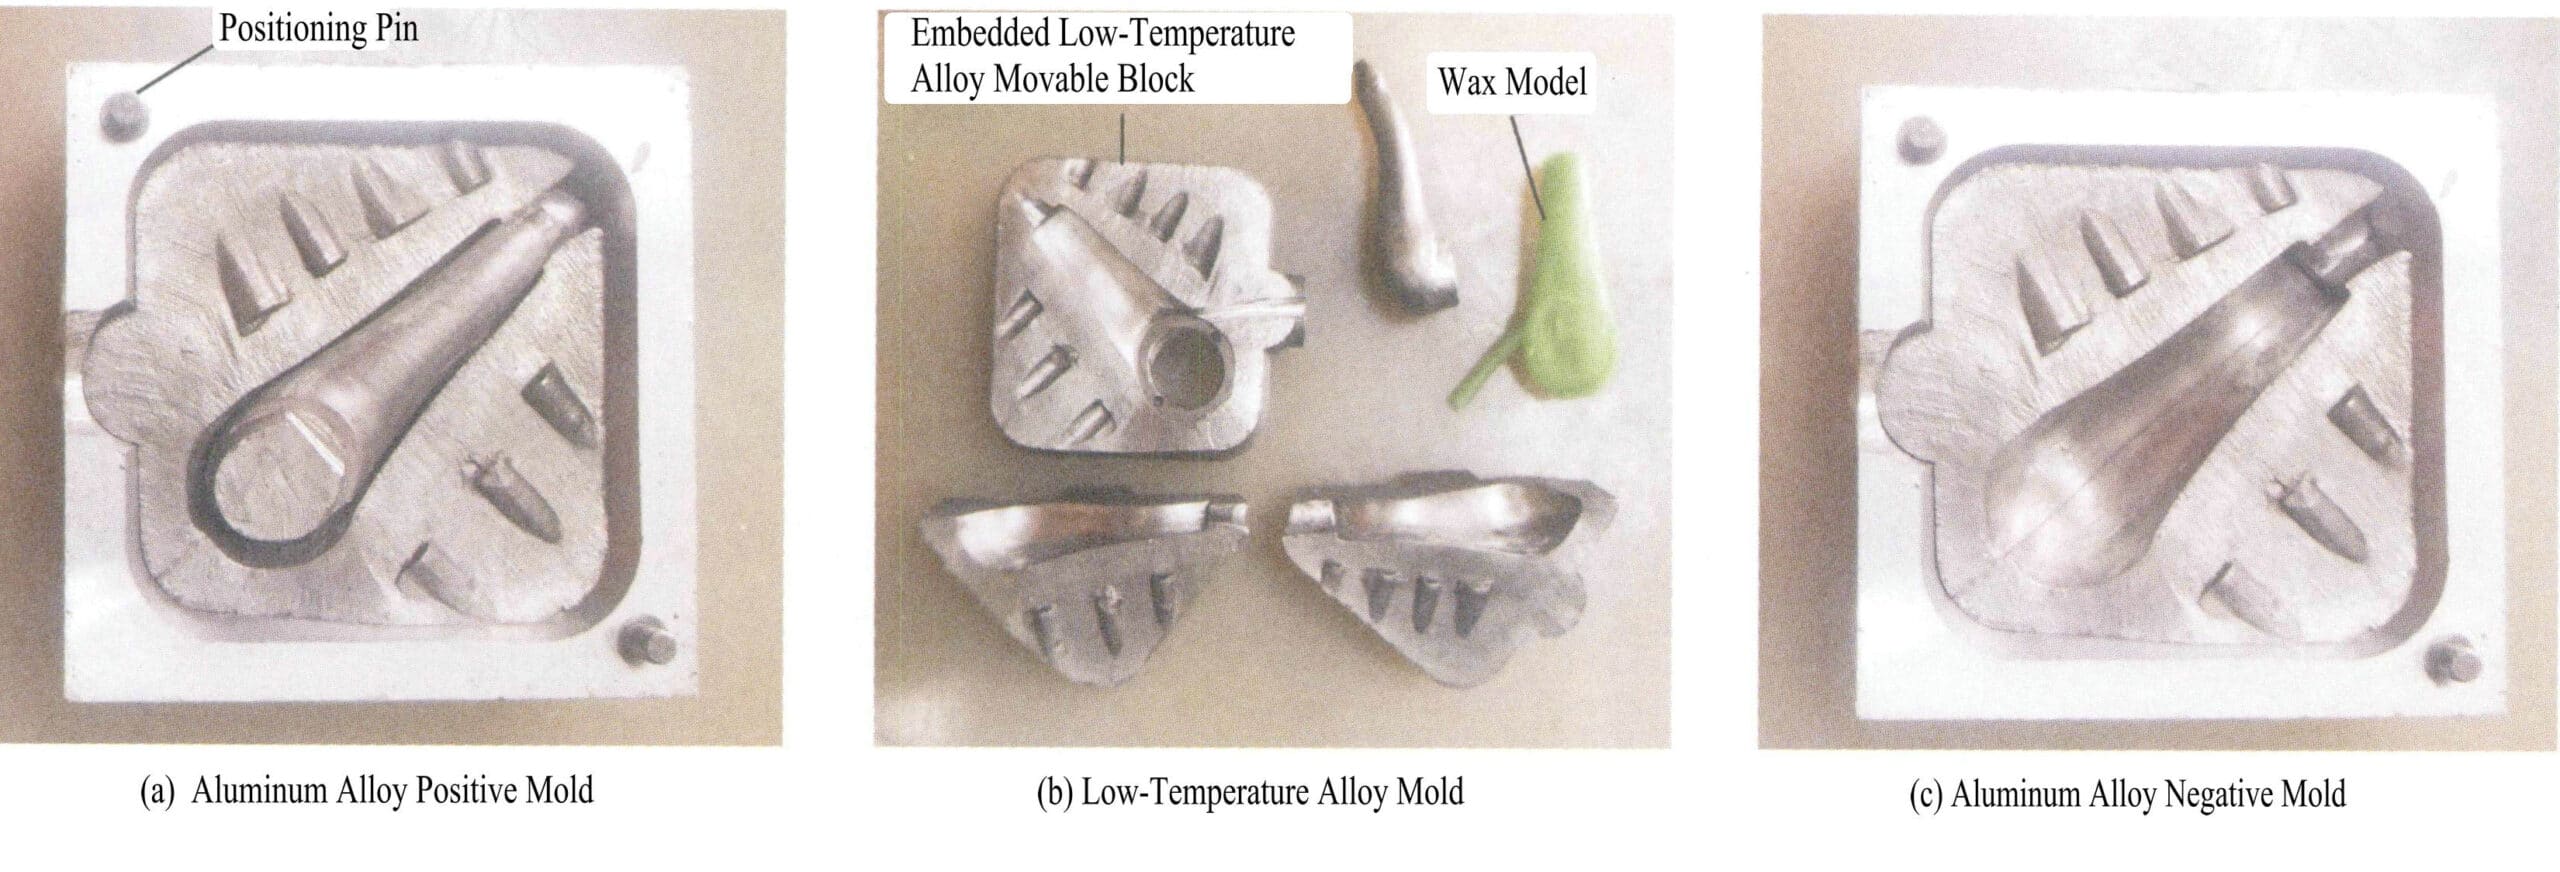
(2) Aluminum Alloy Embedded Low-Temperature Alloy Mold
This type of mold uses an aluminum alloy to make the mold frame and a low-temperature alloy to create the forming module, which is embedded in the aluminum alloy mold frame, as shown in Figure 3-29.
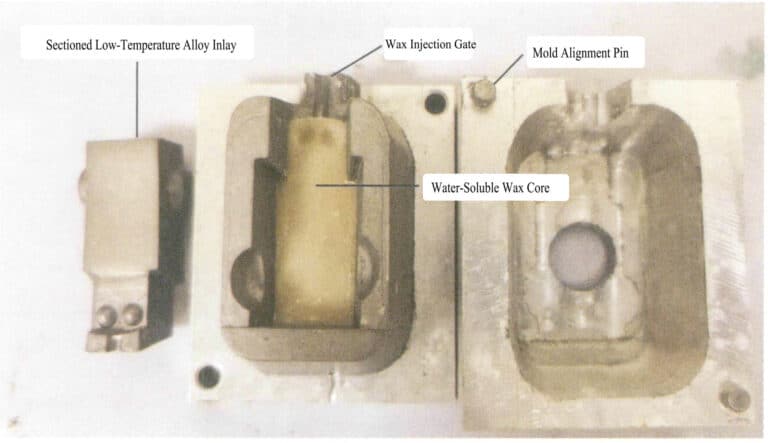
(3) Water-Soluble Wax Hollow Jewelry Steel Mold
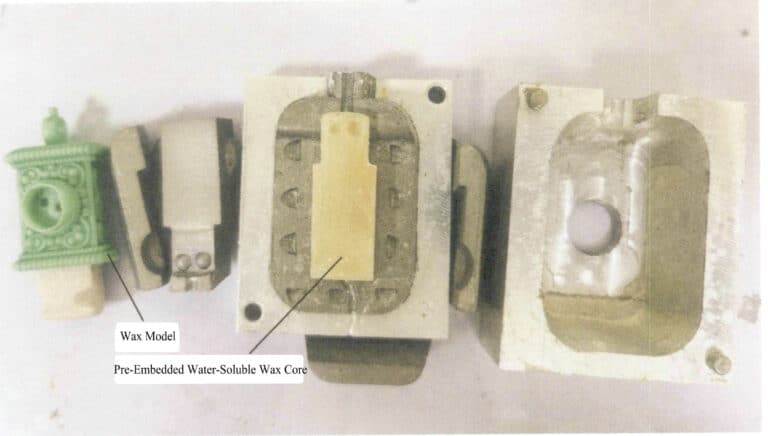
Some jewelry accessory products have intricate hollow designs and mesh structures that require three-dimensional carving. If traditional steel molds are used for segmented assembly and then welded during the wax mold production, the wax mold will inevitably have seams, weld points, and positioning marks, which directly affect the appearance of the jewelry. Additionally, the wax mold is prone to deformation, making it difficult to ensure the quality of the accessories. By using water-soluble wax hollow jewelry steel molds, a water-soluble wax core can be embedded in the hollow areas before wax injection. After the wax is injected, the wax mold completely envelops the water-soluble wax core (Figures 3-30, 3-31). The wax mold is then soaked in an acidic aqueous solution, and once the water-soluble wax core is completely dissolved, a complete hollow wax mold can be obtained.
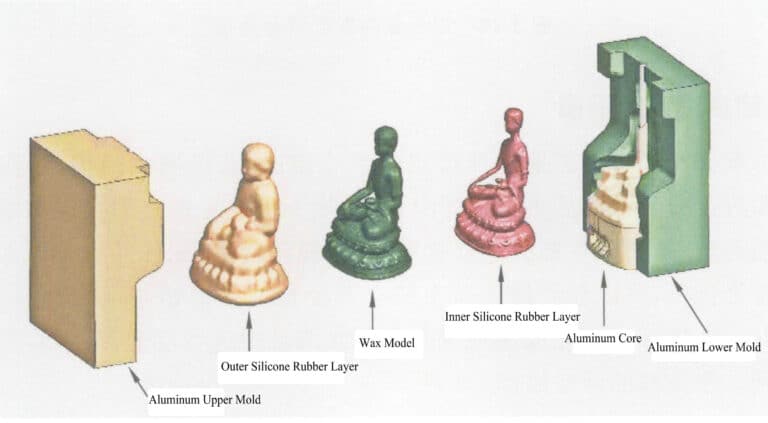
(4) Aluminum Alloy Inner lining Silicone Rubber Jewelry Mold
The silicone rubber material is sometimes added inside the metal mold for some thin-walled, easily deformed, and complex wax pieces that require a complete mold, such as Buddha statues and hollow jewelry accessories. The entire mold set is divided into an aluminum upper mold, an outer silicone rubber layer, a wax model, an inner silicone rubber layer, an aluminum core, and an aluminum lower mold, as shown in Figure 3-32. This ensures that the mold components are not complicated, making it easy to disassemble and reduce the mold seam lines. Since the silicone rubber used is quite special, the wax model produced will shrink less than that made with silicone rubber molds.
2. Tehtävän toteuttaminen
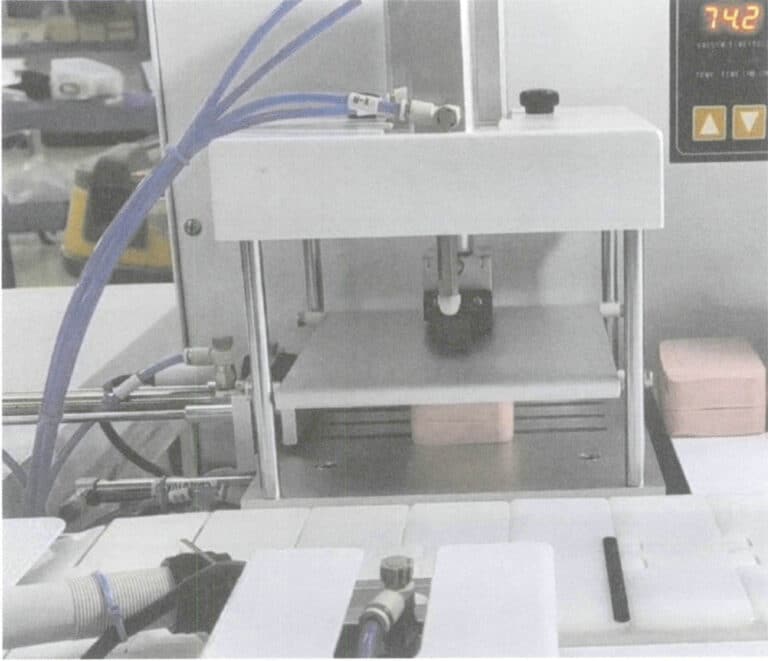
To make wax molds, this task uses water-soluble wax hollow jewelry steel molds and metal wax injectors.
(1) Valmistelutyö
① First, turn on the wax injection system switch and set the injection time to 6 seconds (the time generally needs to be set according to the internal structure of the mold).
Operating method: Turn on the wax injection system switch (at this time, the wax injection rod will press down once; be careful not to let any foreign objects fall into the hopper).
② Turn on the heating system switch, adjust the temperature to 75℃, add wax beads, preheat for 30 minutes, and only proceed with wax injection after the wax beads completely melt.
Operating method: First, press the SET key; the temperature can be adjusted when the PV digital display is flashing. To the right of the temperature controller are the temperature setting numeric keys and the “increase, decrease, left, right” keys.
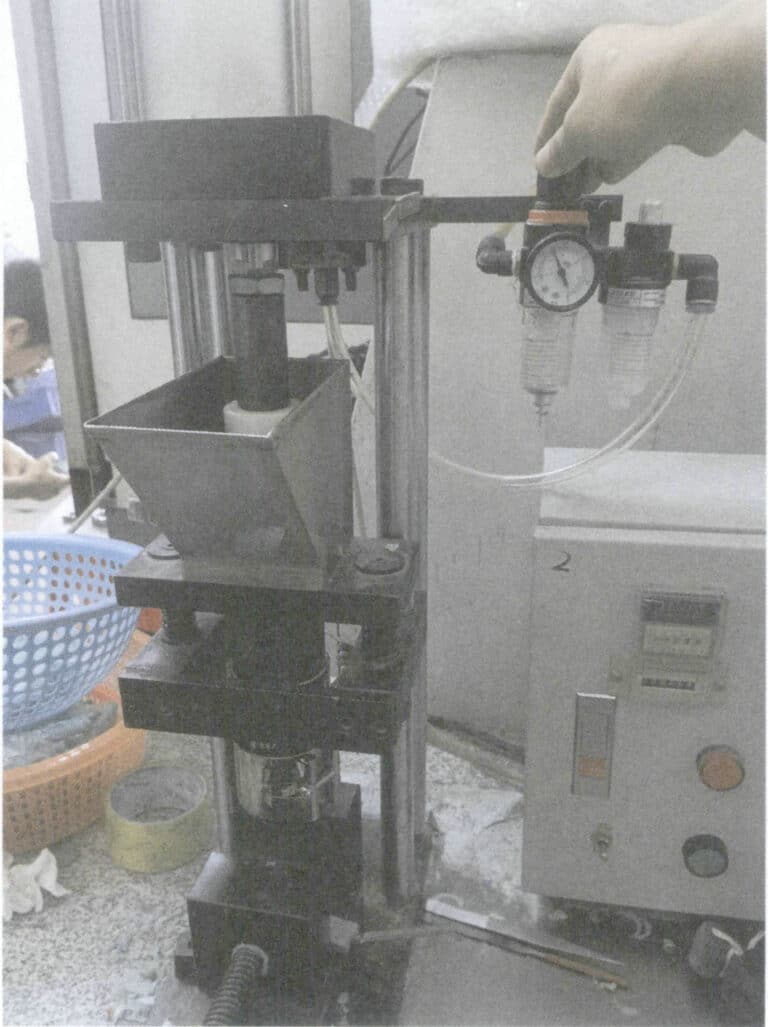
③ Pressure Regulating Valve: Used to adjust air pressure during wax injection.
Operating Method: Gently pull up the rotating cover; turning it to the left increases air pressure, and turning it to the right decreases air pressure, as shown in Figure 3-33. It is recommended that the air pressure be adjusted to 0.4~0.6Mpa. Different sizes of metal molds require different air pressures.
(2) Production of Water-Soluble Wax Cores
Traditional water-soluble wax cores are made from urea, which has a certain odor and corrosiveness. The main component of the current water-soluble wax core material is polymer, which does not contain urea, is environmentally friendly, non-corrosive to the skin of production workers, and has no odor. The method for producing water-soluble wax cores is to inject melted water-soluble wax into the mold. After the water-soluble wax cools and solidifies, the mold is opened to remove the solid water-soluble wax core, as shown in Figure 3-34.
(3) Checking the Mold
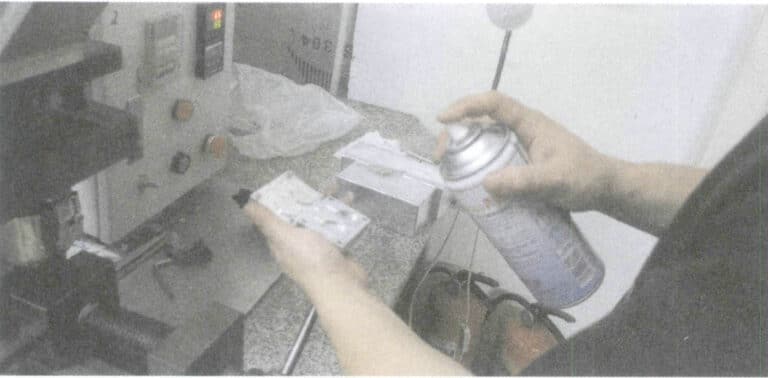
First, open the metal mold and check for wax shavings or dust. After blowing it clean with an air gun, spray it with a release agent, as shown in Figure 3-35.
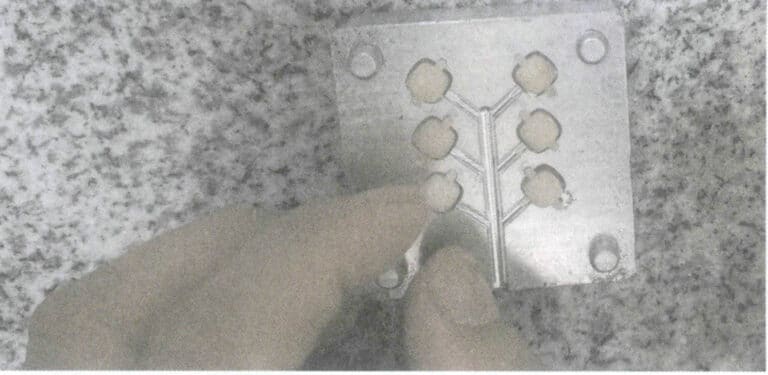
(4) Embedding the Water-Soluble Wax Core
Place the water-soluble wax core on the positioning slot inside the metal mold (Figure 3-36) and close it after properly positioning it.
(5) Fixing the Mold
Clamp the metal mold in the flat jaw of the vise, loosen the wax injection height adjustment screw, adjust the height of the wax injection barrel so that the wax injection nozzle is 5~10mm from the upper edge of the mold, then tighten it. Next, loosen the vise fixing screw, move the vise back and forth to align the wax inlet of the mold with the wax injection nozzle, as shown in Figure 3-37.

(6) Wax Injection and Removal of Wax Mold
Press the wax injection switch to start the injection. After the wax mold cools and solidifies, gently tap both sides to loosen it, then remove the wax mold, as shown in Figure 3-38. If the wax does not fill the mold properly, adjust the heating temperature, injection time, and air pressure to suitable parameters based on the filling condition of the wax mold.
(7) Dissolving Water-Soluble Wax Core
Soak the wax mold in an acidic aqueous solution to dissolve the water-soluble wax core (Figure 3-39). Wait until the water-soluble wax core is completely dissolved. After dissolving, clean the wax mold.

Figure 3-38 Remove the wax mold

Figure 3-39 Dissolve the water-soluble wax core
Section V Wax Mold Trimming
1. Taustatiedot
1.1 Methods for Trimming Wax Molds
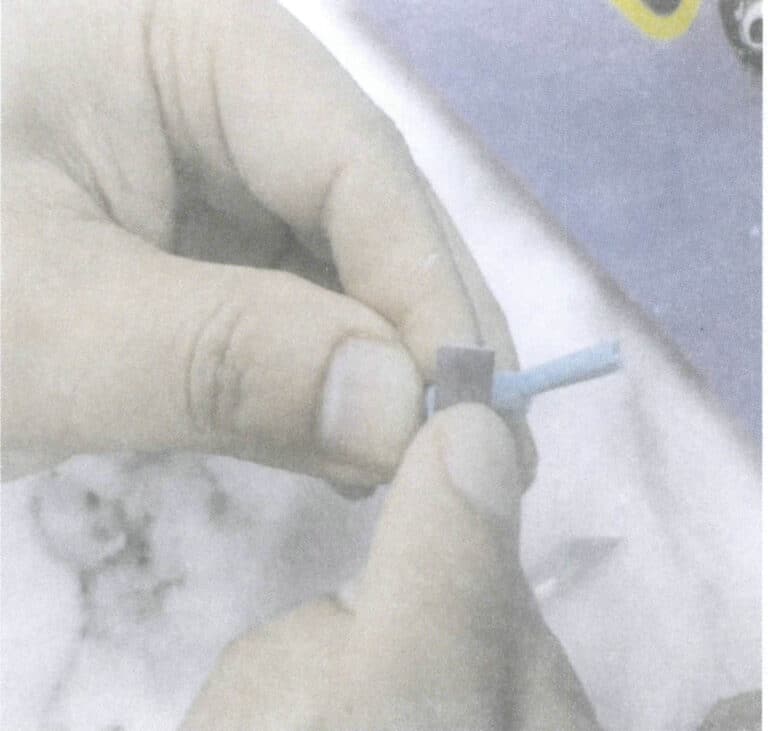
Figure 3-40 Polished Wax Mold
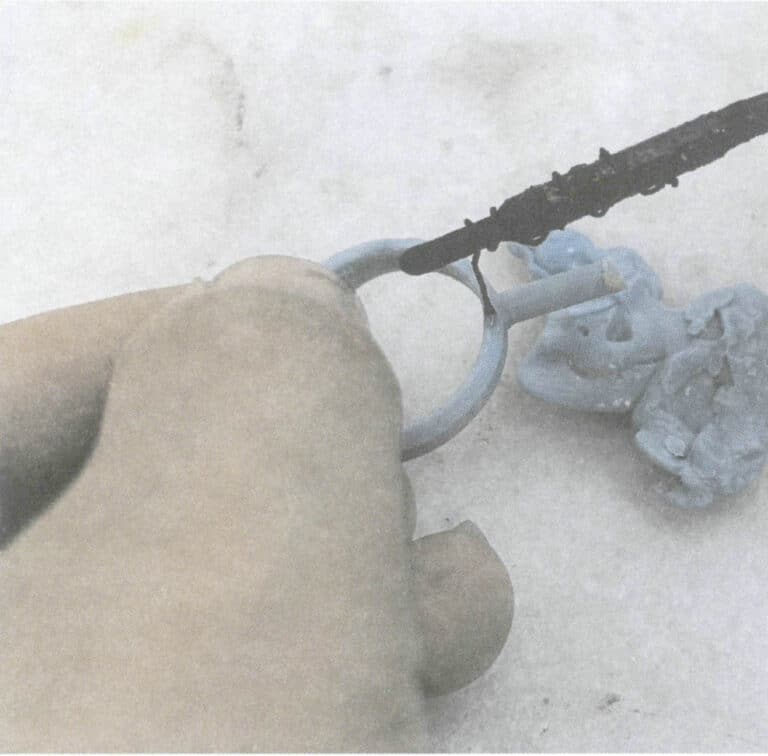
Figure 3-41 Welded Wax Mold
1.2 Common Defects in Jewelry Wax Molds
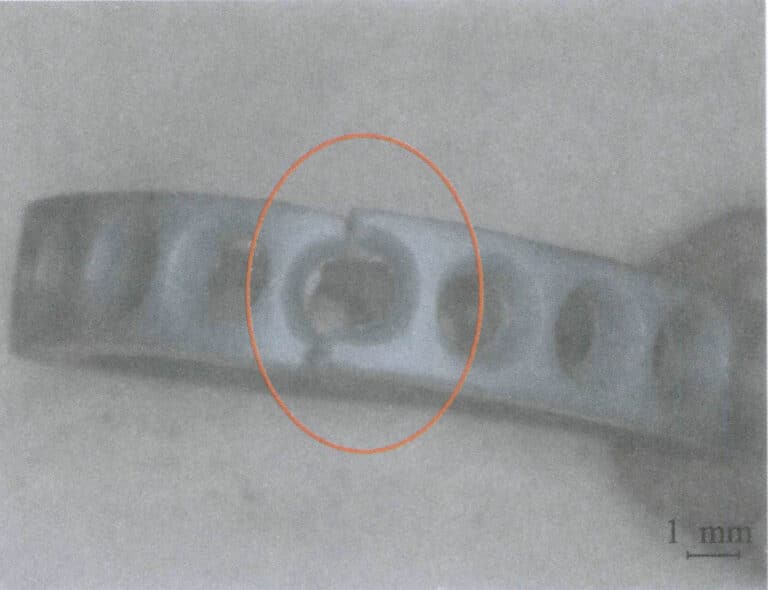
(1) Formation of Flash (Figure 3-42)
Vian kuvaus: Excess wax thin edges or burrs appear on the wax piece. If not removed, it will increase the cleaning workload of casting blanks, the likelihood of cracking in the blank, and the loss of precious metal. This leads to the formation of a flash in the wax mold. The causes may include the following aspects.
① The air pressure of the wax injector is too high. Jewelry pieces are relatively delicate and require compressed air pressure to inject the wax liquid into the mold cavity. The injection pressure of the wax liquid depends on the air pressure; if the air pressure is too high, it may cause the rubber mold to open at the parting line, leading to a flash.
② The temperature of the wax liquid is too high. The fluidity of the wax liquid is closely related to its viscosity, which largely depends on the temperature. The higher the temperature of the wax liquid, the lower the viscosity, the better the fluidity, and the easier it is for the wax liquid to penetrate the mold grooves, leading to the formation of flash.
③ The clamping force on both sides of the mold is too small. The mold comprises two halves or multiple parts, assembled during wax injection and clamped tightly on the top and bottom to form a closed cavity. If the clamping force is insufficient, the wax liquid can easily push the mold apart under external air pressure, resulting in a flash.
④ The mold is not cut properly, the mold is deformed, or the mold has high elasticity. When the various parts of the mold do not close tightly, a flash will occur.
Therefore, appropriate solutions should be taken.
① Lower the air pressure of the wax injector. Generally, wax samples with many flat surfaces and simple shapes use air pressure between 50~80kPa; wax samples with thin walls, many stone setting positions, and narrow gaps use air pressure between 100~150kPa.
② Appropriately lower the temperature of the wax liquid. For common workpieces, controlling the temperature of the wax liquid between 70~75℃ can ensure its fluidity.
③ Increase the clamping force on both sides of the mold. Pay attention to the technique during operation; use both hands to tightly clamp the mold in the fixture, ensuring that the distribution of fingers applies pressure evenly to the mold. The wax injection process should keep the mold tightly clamped and not loose.
④ Check the quality of the mold cutting and the deformation status of the mold. Use high-quality rubber to press the mold, as they have good aging resistance and can maintain softness and elasticity for a long time. When pressing the mold, reasonably adjust the process parameters, and do not set excessively high pressing pressure, pressing temperature, or overly long vulcanization time.
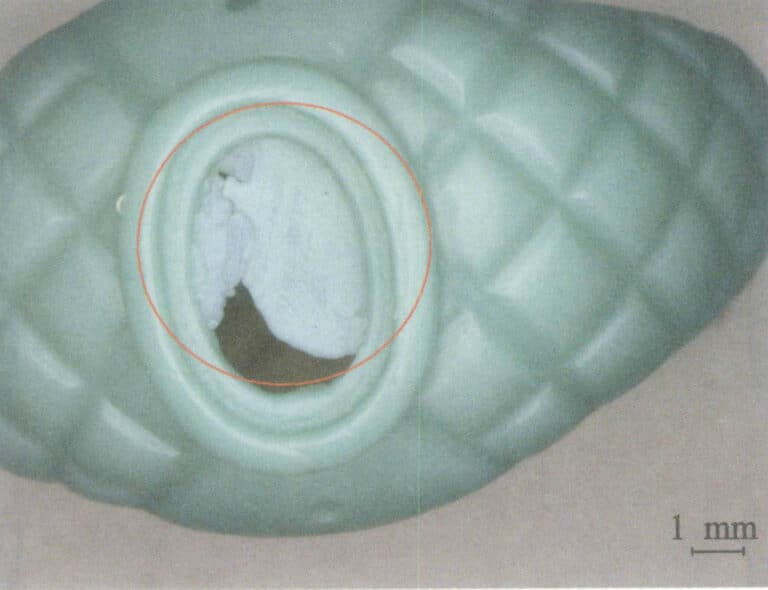
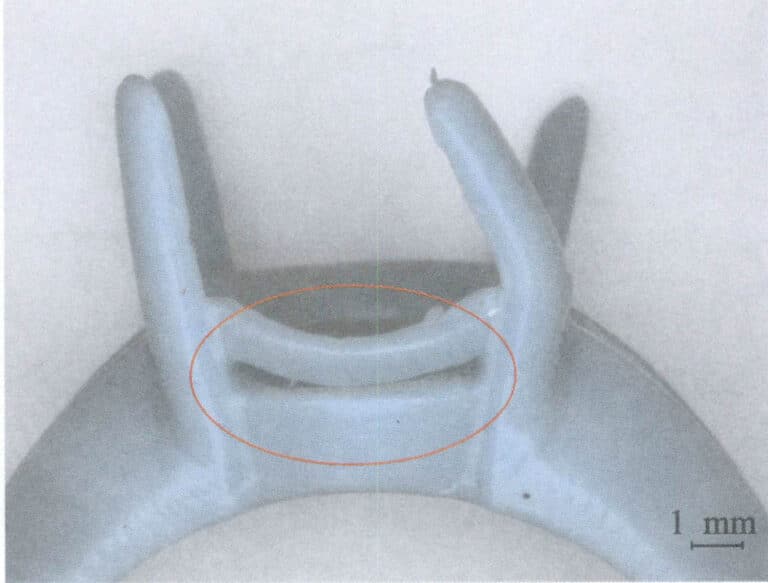
(2) Wax Mold Defects (Figure 3-43)
Vian kuvaus: Certain parts of the wax mold are not fully formed, or there are cold shut lines, flow marks, delamination, etc. The possible causes of wax mold defects can be categorized into six aspects.
① Low air pressure in the wax injector. Due to insufficient external driving force, the flow of wax is obstructed, leading to slow filling. When the wax cannot merge, defects will occur.
② Low temperature of the wax. There is not enough heat to maintain the flow of the wax.
③ The rubber mold is clamped too tightly. For some thin-walled workpieces, excessive clamping force on the rubber mold will reduce the wall thickness of the mold cavity, increasing the difficulty of filling and forming.
④ The wax injection nozzle of the wax injector is blocked. At this time, the amount of wax liquid ejected is small, prolonging the time for the wax liquid to fill the mold cavity.
⑤ There is a problem with the mold. Internal gases cannot escape, forming a filling back pressure that hinders the smooth filling of the wax liquid.
⑥ The mold temperature is too low, causing it to absorb a large amount of heat from the wax liquid, making the incoming wax liquid quickly lose its fluidity.
The corresponding solutions are as follows.
① Increase the air pressure of the wax injector; this is the most widely used method and is quite effective for complex and delicate workpieces.
② Increase the temperature of the wax liquid. Raising the temperature of the wax liquid, without affecting its quality, will improve its fluidity and allow it to remain in a liquid state for a longer time.
③ Appropriately reduce the pressure on both sides of the mold. The mold is relatively soft and elastic, so the clamping force should be manageable to avoid deformation of the mold cavity.
④ Clear the wax injection nozzle. The wax injection nozzle is a small channel that can easily become blocked if the wax material is unclean or contains foreign impurities. Recycled wax material must be filtered to remove impurities before use.
⑤ Open vent lines in the dead corners inside the rubber mold to allow gas to escape smoothly and avoid generating filling back pressure.
⑥ When the weather is too cold, preheat the rubber mold first to ensure it reaches a certain temperature before injecting wax.
(3) Bubbles Appearing in the Wax Mold (Figure 3-44)
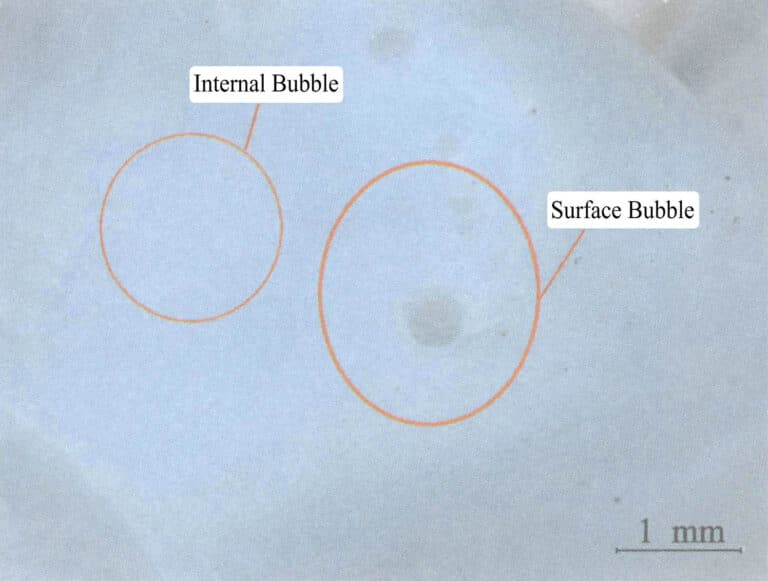
Vian kuvaus: There are bubbles on the surface or inside the wax piece, and the color of the bubble area is noticeably lighter than the surrounding area under light. Whether the bubbles in the wax mold will affect the casting depends on the structure of the casting and the position of the bubbles. If the bubbles are exposed on the surface of the wax mold, they will undoubtedly cause holes in the casting at that location; if the bubbles are below the surface of the wax mold, there is a possibility of bubble rupture during the vacuum process of the gypsum mold, in which case the bubbles will have no impact on the quality of the casting. The reasons for the appearance of bubbles in the wax mold may include the following five aspects.
① The air pressure of the wax injector is too high. During the wax injection process, the wax liquid fills the mold cavity turbulently, which may trap air and produce bubbles.
② The amount of wax in the wax injector needs to be higher. When the wax liquid surface is level with or even below the wax outlet, the gas in the wax tank will be injected into the mold cavity along with the wax liquid.
③ The temperature of the wax liquid is too high. At this time, the wax liquid absorbs a large amount of gas, which condenses to form bubbles.
④ The wax inlet of the rubber mold is not aligned with the wax nozzle of the wax injector. During injection, air enters the rubber mold from the side along with the wax liquid.
⑤ The rubber mold does not have vent lines, or the vent lines are blocked. When the rubber mold cavity gas cannot be smoothly discharged, it will be trapped in the wax liquid or remain in dead corners, forming bubbles.
The corresponding solutions are as follows.
① Adjust the air pressure of the wax injector to ensure that the wax liquid fills smoothly without needing to be too high.
② Increase the amount of wax in the wax injector, ensuring that the volume of the wax liquid is above 2/1 of the machine’s capacity.
③ Control the temperature of the wax liquid within the correct range.
④ Align the wax inlet of the silicone mold with the wax injection nozzle of the wax injector and press tightly, leaving no gaps.
⑤ Create vent lines on the silicone mold and regularly check the vent lines to keep them clear.
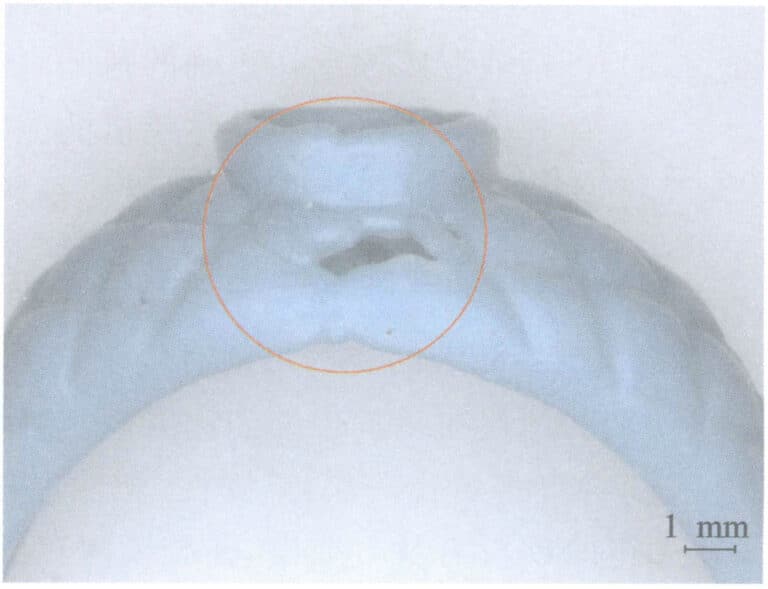
(4) Certain Areas of the Wax Mold May Develop Cracks or Completely Break (Figure 3-45)
The reasons for the wax mold-breaking may include the following five aspects.
① The proportion of reused wax in the wax material must be lowered. The wax material consists of paraffin, stearic acid, and various additives. Each time it is melted and injected, its performance deteriorates, and its elasticity and plasticity also decrease, increasing brittleness.
② The wax mold was not removed in time and was stored in the rubber mold for too long. The brittleness of the wax mold is related to temperature. If the mold is taken out after an appropriate interval post-wax injection, the wax mold retains residual heat and has better flexibility; if it is left in the rubber mold for too long, the temperature of the wax mold becomes too low, increasing brittleness and making it prone to breakage.
③ Using poor quality wax or overly hard wax results in low toughness, making it easy to break under stress.
④ Improper cutting of the rubber mold makes it difficult to take the mold.
⑤ The wax mold removal method is simple and rough.
The corresponding solutions are as follows.
① Reduce the use of recycled wax, ensuring that new wax accounts for more than 60% of the total wax in the machine.
② Remove the wax mold promptly after injection to avoid increased brittleness and potential breakage due to prolonged storage.
③ Switch to high-quality wax or softer wax.
④ Improve the cutting method of the rubber mold, and further cut the obstructed areas if necessary.
⑤ Be careful during the mold removal operation.
(5) Wax Mold Deformation (Figure 3-46)
The causes of wax mold deformation may include the following four aspects.
① Removing the wax mold from the rubber mold too early after waxing, at which point the wax mold’s resistance to deformation is low and it is easily deformed.
② The wax material used is too soft. The deformation resistance of soft wax is low, especially at high temperatures, making it prone to deformation.
③ The rubber mold is not properly aligned, causing misalignment and deformation after wax injection.
④ The structure of the wax mold is unreasonable, lacking effective support, making it easy to deform during mold removal.
The corresponding solutions are as follows.
① After wax injection, the wax mold should be allowed to cool in the rubber mold for a certain period before removal. The wax mold should be left for 1 minute after injection before removal for general jewelry pieces. For thick-walled pieces, to shorten the mold removal time, the rubber mold can be immersed in cold water to speed up the solidification and cooling of the wax mold.
② Choose harder wax materials. The temperature varies in different regions and seasons. During high-temperature seasons, you can choose wax materials with better resistance to softening and deformation.
③ Set up effective positioning devices and ensure the position of the mold is correct when injecting wax.
④ For delicate and hollow workpieces, support points should be added to the original model to improve the wax mold’s resistance to deformation.
(6) Rough Surface of the Wax Mold (Figure 3-47)
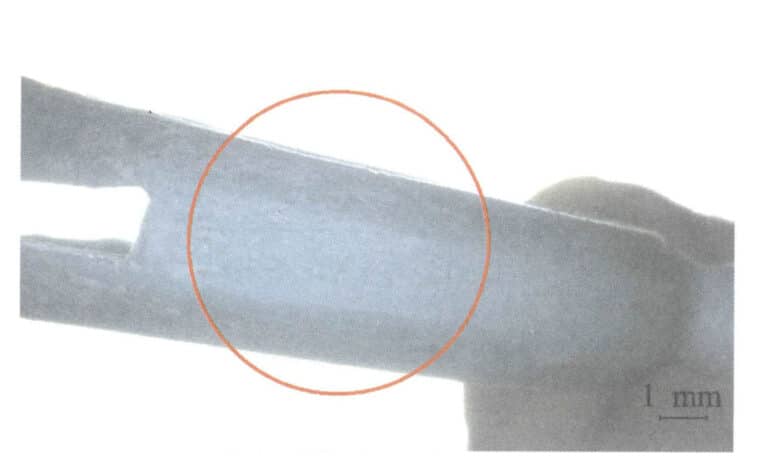
The possible reasons for the rough surface of the wax mold are the following four aspects.
① Before wax injection, too much talcum powder or release agent was used on the rubber mold. If the rubber mold is not cleaned regularly, these impurities will gradually accumulate, leading to a rough surface on the wax mold.
② Using unclean recycled wax. When particulate matter is mixed into the recycled wax material, it will also be injected into the wax mold, forming dispersed rough areas. When these particles transfer to the surface of the casting, the result is even worse.
③ The environment where the wax mold is placed needs to be cleaner, and it has been left for too long, resulting in a large accumulation of dust on the surface.
④ After wax trimming, wax residue remains on the surface of the wax piece.
The corresponding solutions are as follows.
① Using mold release agents or talcum powder should be appropriate to avoid using talcum powder and release agents simultaneously when applying wax. When using the silicone mold, it is important to check regularly and clean the inner cavity walls.
② Ensure the quality of the wax material; when using recycled wax, it must be cleaned first.
③ Ensure the cleanliness of the workplace; when dust or residual wax chips accumulate on the surface of the wax mold, it must be cleaned first. A neutral cleaning solution with a concentration of 0.2~0.3% can be prepared to wash the wax mold in soapy water, using a soft brush to remove surface grease and dust, and then rinsing it with clean water.
2. Tehtävän toteuttaminen
This task involves using tools such as electric soldering iron, surgical knife, and ring sizer to trim and modify wax molds with defects such as flashes, bubbles, deformation, and small holes.
(1) Valmistelutyö
Turn on the power and adjust the temperature of the electric soldering iron. Fill a 100 ml glass cup with hot water of 40~50℃, and prepare the ring gauge, surgical knife, and 1200 # sandpaper.
(2) Trimming the Wax Mold
① Use a surgical knife or scraper to remove the wax flash and other defects. Be careful with the force and technique while cutting along the surface of the wax mold to avoid damaging it, and smooth the surface before polishing it with sandpaper.
② Use an electric soldering iron dipped in wax to repair the sand holes, bubbles, and defects on the wax sample’s surface, then polish it with sandpaper.
③ For wax pieces with small holes that are blocked, you can use a steel needle or electric soldering iron to pierce the holes.
④ You can correct deformed wax molds in hot water of 40~50℃.
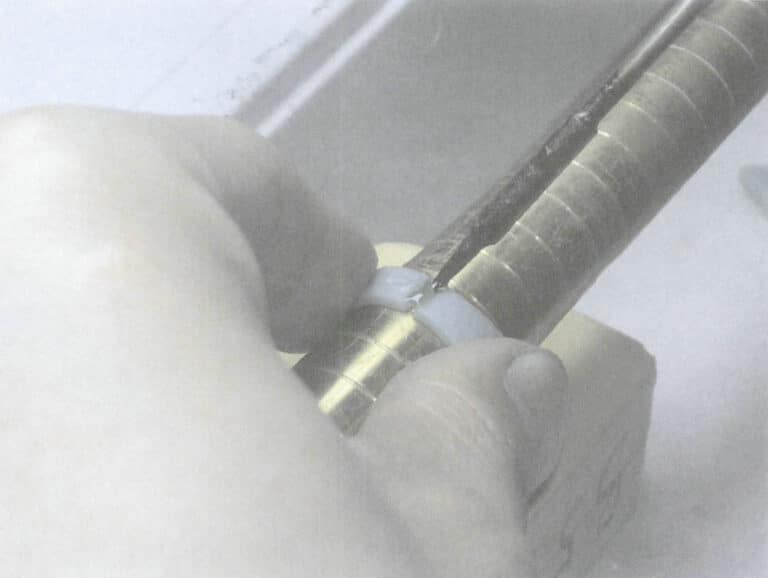
(3) Modifying the Ring Wax Mold’s Ring Size
Insert the ring wax sample into the corresponding ring sizer and cut it open from the middle. If you need to increase the ring size, use an electric soldering iron to add wax at the position where the ring meets the required ring size, and then smooth it with a scalpel (Figure 3-48); if you need to decrease the ring size, cut off the excess part of the ring shank at the position where it meets the required ring size, weld it with an electric soldering iron, and then adjust the shape with a scalpel to match the ring body.