كيف تصمم وتصنع دبابيس وتعليقات مذهلة
تصميم الدبابيس والمعلقات: دليل خطوة بخطوة لصانعي المجوهرات
مقدمة:
هل تتساءل عن كيفية صنع دبابيس وتعليقات جميلة؟ يأخذك هذا الدليل إلى عملية تصميم وإنتاج هذه الإكسسوارات الشهيرة. تعرّف على أنماط مختلفة مثل بروش التناغم اللؤلؤ المضيء وقلادة عقدة العنقاء الميمونة. اكتشف التقنيات الرئيسية مثل الحياكة والخرز والعقد، وتعرّف على كيفية تحضير المواد واتباع طرق الإنتاج لصنع قطع مذهلة. سواءً كنت مصمم مجوهرات أو بائع تجزئة أو بائع تجارة إلكترونية، يحتوي هذا الدليل على كل ما تحتاجه لصنع دبابيس وقلادات فريدة وجذابة.
تصميم بروش التناغم اللؤلؤ المضيء من اللؤلؤة المضيئة
جدول المحتويات
القسم الأول تصميم وإنتاج البروش
1. بروش التناغم اللؤلؤ المضيء
(1) خصائص النمط (1)
صُنع هذا البروش في المقام الأول من اللؤلؤ واليشم، مع اللون الأبيض كلون رئيسي والأخضر كلون مميز، مما يقدم شكلاً مثلثاً كلاسيكياً (بالنسبة للجزء الخاص باللؤلؤ). وتقترن حبات اليشم الأخضر على شكل دمعة مع قطع زهور على شكل أوراق الشجر، وهي جديدة وعصرية وفريدة من نوعها في الأسلوب، انظر الشكل 7-1.
(2) نقاط التعلم الرئيسية
تعلّم نسج مثلث باستخدام خيط صيد أو سلك معدني؛ وأتقن الربط بين قاعدة البروش والقطعة.
(3) إعداد المواد (الشكل 7-2)
خرزة اليشم على شكل دمعة خضراء: 12 مم (الطول) × 8 مم (العرض)، قطعة واحدة;
بتلة زهرة على شكل ورقة: 28 مم (طول) × 2.5 سم (عرض)، قطعة واحدة;
سلك معدني 300 مم × 0.3 مم، 1 قطعة;
لؤلؤة بيضاء: 4 ملم، 15 قطعة;
خرز ذهبي متعدد الأوجه: 4 مم، 2 قطعة
خرز أخضر: 4 مم، قطعة واحدة 4 مم
قاعدة زهرة ذهبية: 6 ملم، 1 قطعة واحدة
قاعدة البروش: 25 مم، 1 قطعة واحدة;
دبوس رأس خرزة: 40 ملم، 1 قطعة واحدة
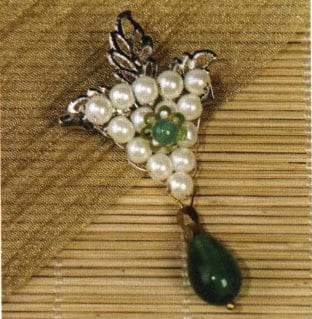
الشكل 7-1 تصميم بروش التناغم اللؤلؤي المضيء
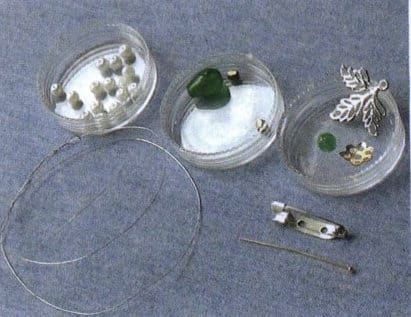
الشكل 7-2 تحضير المواد اللازمة لبروش التناغم اللؤلؤي المضيء
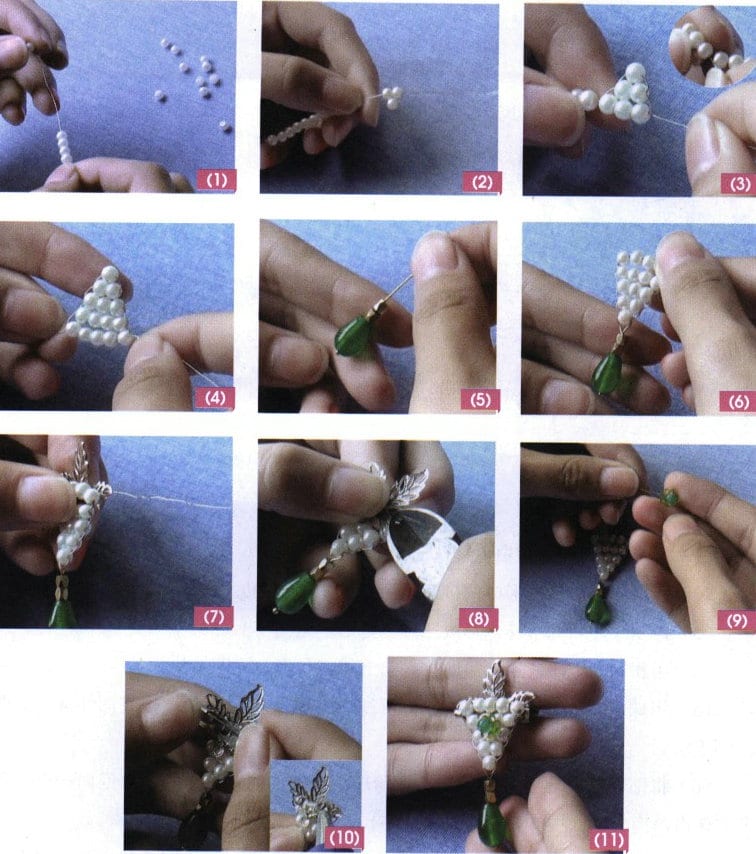
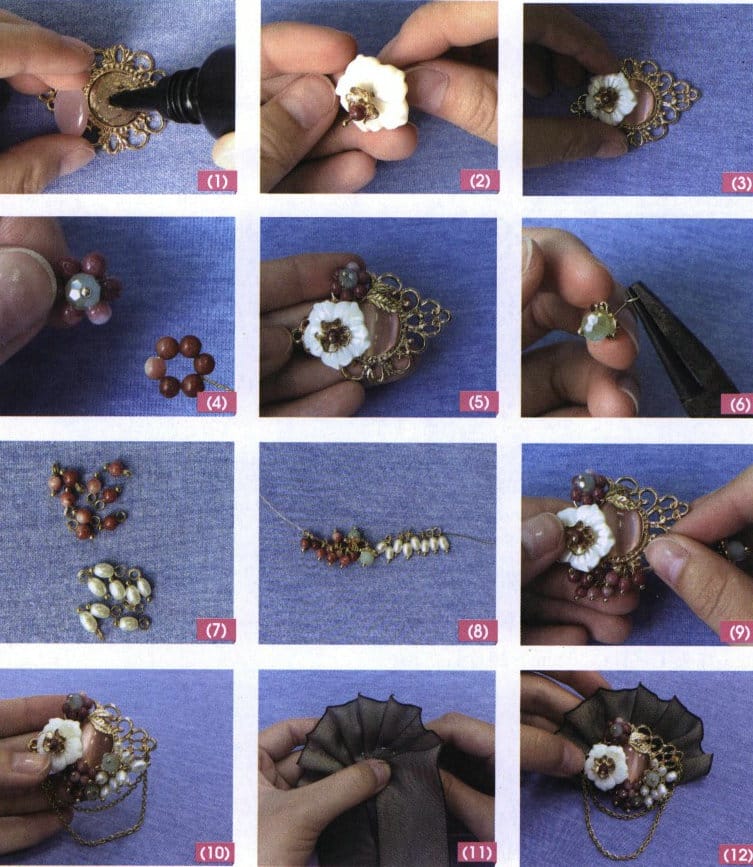
(4) طريقة الإنتاج
① استخدم سلك معدني لربط 15 لؤلؤة بيضاء، انظر الشكل 7-3 (1).
② مرر 3 لآلئ لتشكيل صفين من المثلثات؛ انظر الشكل 7-3 (2).
③ ثم مرر 3 لآلئ أخرى لتشكيل ثلاثة صفوف من المثلثات؛ انظر الشكل 7-3 (3).
④ باستخدام نفس الطريقة، قم بإنشاء الصفين الرابع والخامس من المثلثات؛ انظر الشكل 7-3 (4).
⑤ استخدم دبوس رأس خرز لربط خرزات اليشم على شكل دمعة خضراء وخرزتين ذهبيتين ذات أوجه لتشكيل المكون A؛ انظر الشكل 7-3 (5).
⑥ قم بتوصيل الجزء (أ) باللؤلؤة الأولى من المثلث المقلوب، مع التأكد من تمرير دبوس الرأس مرة أخرى من خلال نفس الخرزة ذات الأوجه الذهبية لتشكيل الجسم الرئيسي B من البروش؛ انظر الشكل 7-3 (6).
⑦ ضع قطعة الزهرة على شكل ورقة تحت الجسم الرئيسي B وثبتها بسلك معدني، مع تمريرها عدة مرات من نقاط مختلفة؛ انظر الشكل 7-3 (7).
⑧ اقطع السلك الزائد من الخلف وأخفِ الأطراف؛ انظر الشكل 7-3 (8).
⑨ استخدم سلكًا معدنيًا لربط قاعدة الزهرة الذهبية والخرز الأخضر، مع لف بعض الدوائر في الخلف لتثبيتها معًا. ثم، قم بتثبيتها في وسط الجسم الرئيسي B، انظر الشكل 7-3 (9).
⑩ استخدم مسدس الغراء لإلصاق قاعدة البروش على الجزء الخلفي من الجسم الرئيسي B وترتيب البروش بشكل صحيح؛ انظر الشكل 7-3 (10).
⑪ ترتيب الشكل بشكل صحيح، يظهر التأثير في الشكل 7-3 (11).
2. بروش من اليشم والأزهار الزهرية
(1) خصائص النمط (1)
هذا البروش مصنوع في المقام الأول من شظايا المرجان واللؤلؤ والأمازونيت والأصداف وغيرها، مع اللونين الوردي والأبيض كلونين رئيسيين والأخضر كلون مميز. ويعبر الجمع بين الأشكال غير المنتظمة والترتيب المنظم عن سحر طبيعي متدرج ومتناغم، مما يُظهر بشكل كامل طابعه الحيوي ثلاثي الأبعاد والمتميز والجميل، كما هو موضح في الشكل 7-4.
(2) نقاط التعلم الرئيسية
إتقان خصائص الأحجار المختلفة ومجموعات الأشكال والمواد المختلفة واستخدام ألوان متعددة.
(3) إعداد المواد (الشكل 7-5)
رقائق المرجان الوردي: 10 مم تقريباً (الطول) × 2 مم تقريباً (العرض)، عدة;
لآلئ غير منتظمة: 13 مم (الطول) × 8 مم (العرض)، قطعتان;
أمازونايت أسطواني وردي اللون: 15 مم (طول) × 2 مم (عرض)، قطعتان;
أمازونايت أسطواني أخضر: 15 مم (طول) × 10 مم (عرض)، قطعة واحدة;
قاعدة مزخرفة بالزهور: 35 مم (الطول) × 20 مم (العرض)، قطعة واحدة;
خيط الصيد: 0.3 مم × 30 سم;
خرز أصفر صغير: 4 ملم، 1 قطعة
زهرة الصدف: 8 مم، 1 قطعة واحدة;
قطع الزهور الفضية: 25 ملم، 1 قطعة واحدة;
قاعدة زهرة صغيرة فضية اللون: 8 ملم، 1 قطعة
قاعدة البروش: 35 مم (الطول);
دبابيس رأس الخرزة: 40 مم، 3 قطع، 3 قطع;
قماش غير منسوج: 30 مم (طول) × 10 مم (عرض)، 1 قطعة;
إبرة الخرز: 1 قطعة واحدة.
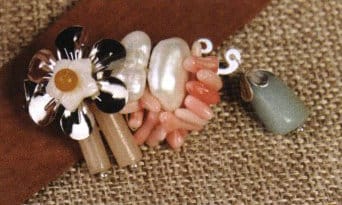
الشكل 7-4 رسم تخطيطي لنمط بروش اليشم والزهور
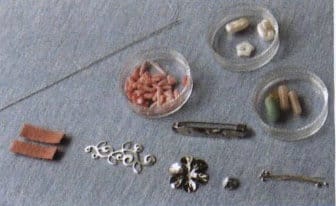
الشكل 7-5 تجهيز المواد المستخدمة في تحضير بروش اليشم والزهور
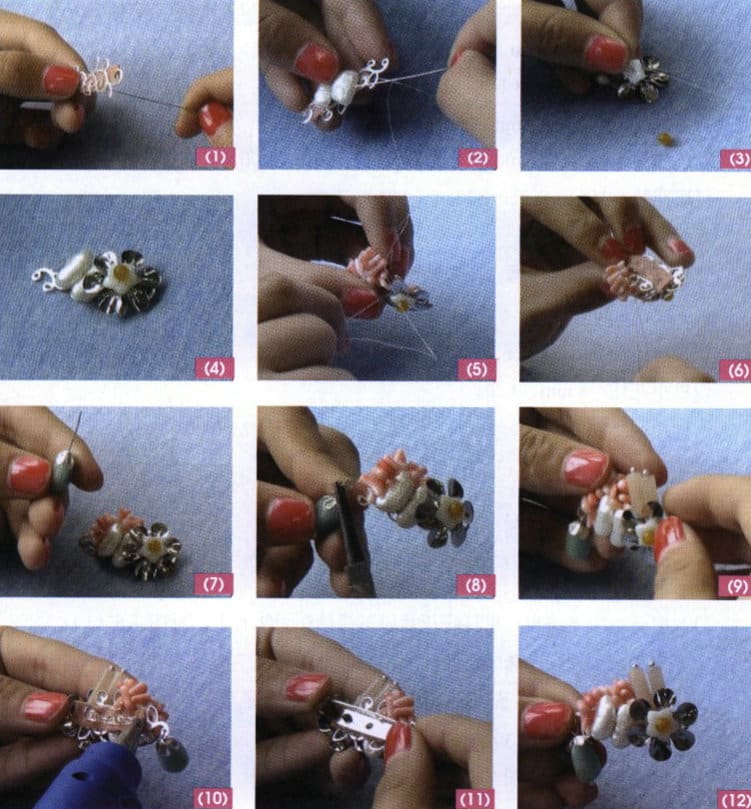
(4) طريقة الإنتاج
① خذ قطعة صغيرة من القماش غير المنسوج وخيط قطعة الزهرة الأساسية على القماش غير المنسوج بخيط صيد؛ انظر الشكل 7-6 (1).
② قم بخياطة لؤلؤتين غير منتظمتين على الجانب الأيسر من قطعة الزهرة؛ انظر الشكل 7-6 (2).
③ ثبِّت الخرز الأصفر الصغير، والزهور الصدفية، وقطع الزهور الفضية من أعلى إلى أسفل على الجانب الأيمن من اللآلئ غير المنتظمة باستخدام إبرة الخرز وخيط الصيد، انظر الشكل 7-6 (3).
④ يظهر التأثير بعد التثبيت في الشكل 7-6 (4).
⑤ اربط رقائق المرجان الوردي بخيط الصيد وثبتها فوق اللآلئ غير المنتظمة؛ انظر الشكل 7-6 (5).
⑥ كمية رقائق المرجان تعتمد على التأثير الكلي وتحتاج إلى إصلاح عدة مرات، انظر الشكل 7-6 (6).
⑦ استخدم دبوس رأس خرزة لربط الخيط بالتتابع من خلال الأمازونايت العمودي الأخضر وقاعدة الزهرة الفضية لتشكيل المكون A؛ انظر الشكل 7-6 (7).
⑧ ثني المكوّن A على شكل 9 وتثبيته على الفتحات الصغيرة المجوفة لقطعة الزهرة الأساسية؛ انظر الشكل 7-6 (8).
⑨ استخدم دبوساً برأس كروي لربط 2 من الأمازونايت العمودي الوردي اللون وثنيهما على شكل 9 وتثبيتهما خلف قطعة الزهرة الفضية، انظر الشكل 7-6 (9).
⑩ بعد تسخين مسدس الغراء، اعصر كمية مناسبة من الغراء على القماش غير المنسوج، انظر الشكل 7-6 (10).
⑪ اضغط على قاعدة البروش على الصمغ وانتظر حتى يتماسك الصمغ بشكل طبيعي؛ انظر الشكل 7-6 (11).
⑫ تنظيم الشكل، يظهر التأثير في الشكل 7-6 (12)
3. بروش مروحة معطرة بنقشة البرقوق
(1) خصائص النمط (1)
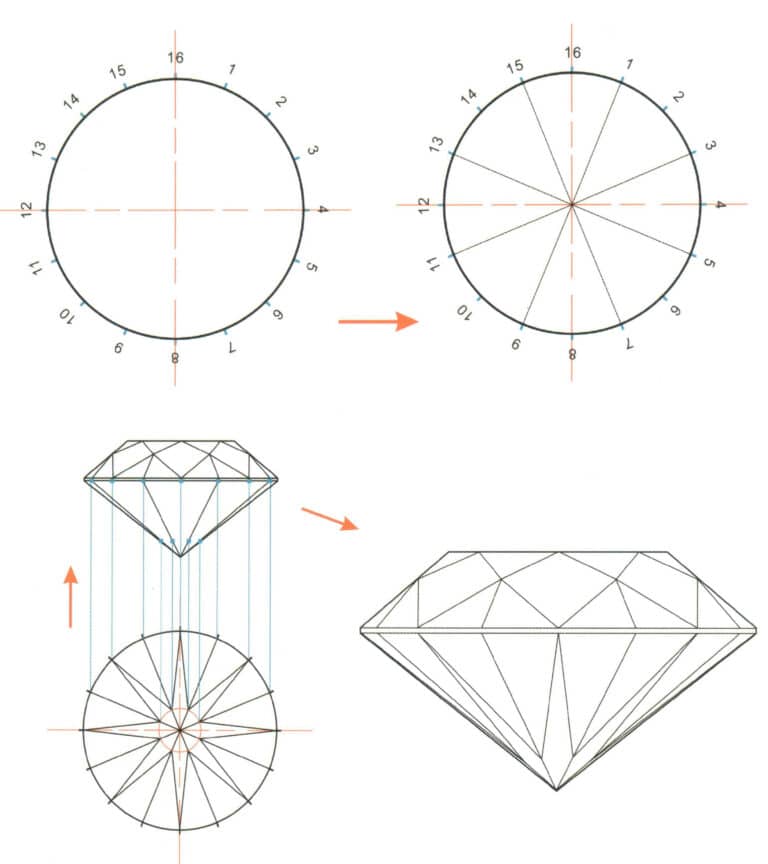
صُنع هذا البروش من حجر عين القط وشريط حرير السيكادا وزهرة الصدف وخرز اليشم ومواد أخرى، مع اللونين الأخضر والوردي كألوان رئيسية والأبيض كلكنة. يتألف الجزء الرئيسي من شكل ماسي مكون من أزهار البرقوق وخرز اليشم واللؤلؤ، وتكمله مروحة من شريط حريري مطوي على شكل مروحة حريرية، مما يُظهر ألواناً وطبقات غنية. تبدو متناغمة وثلاثية الأبعاد وفخمة واستثنائية (انظر الشكل 7-7).
(2) نقاط التعلم الرئيسية
تعلّم استخدام ميدالية الزهور المجوفة ودمج وتنسيق المواد مثل الخرز والشرائط والسلاسل المعدنية.
(3) تحضير المواد (الشكل 7-8)
الشكل 7-8 تحضير المواد اللازمة لبروش مروحة مروحة البرقوق المعطرة
حجر عين القطة الوردي: 18 مم (قطر)، قطعة واحدة;
ميدالية زهرية ذهبية على شكل ماسة: 55 مم (طول) × 40 مم (عرض)، قطعة واحدة;
شريط حرير قزحي اللون أخضر قزحي اللون: 350 مم (طول) × 300 مم (عرض);
ورقة معدنية: 13 مم (طول) × 10 مم (عرض)، 1 قطعة;
لؤلؤة على شكل أرز: 6 مم (الطول) × 3 مم (العرض) × 8 قطع;
زهرة الصدفة: 20 مم، 1 قطعة واحدة;
قاعدة زهرة معدنية: 10 ملم، 2 قطعة;
خرز اليشم الأخضر: 6 ملم، 3 قطع
خرز أحمر مستدير: 2 ملم، 15 قطعة
دبابيس رأس الخرزة: 30 ملم، 20 قطعة;
سلك نحاسي 3 مم × 200 مم;
حلقة قفزة 5 مم، قطعتان 5 مم
قاعدة بروش مدمجة: 1 قطعة واحدة;
السلسلة المعدنية: 130 ملم، 1 قطعة؛ 85 ملم، 1 قطعةe;
الأدوات: مسدس غراء ساخن، مقص، سلك نحاسي، إبرة، خيط.
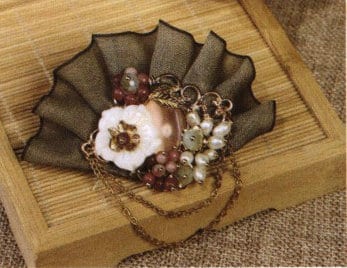
الشكل 7-7 رسم تخطيطي لنمط بروش مروحة البرقوق المعطرة

الشكل 7-8 تحضير المواد اللازمة لبروش مروحة مروحة البرقوق المعطرة
(4) طريقة الإنتاج
① استخدم الغراء الساخن الذائب لإرفاق حجر عين القطة الوردي بميدالية الزهور الذهبية على شكل ماسة؛ انظر الشكل 7-9 (1).
② استخدم دبوس رأس خرز لربط الخرز الأحمر المستدير وقاعدة الزهرة المعدنية والزهور الصدفية، مع لف الجزء الزائد من دبوس الرأس في دائرة في الخلف؛ انظر الشكل 7-9 (2).
③ ضع الصمغ الذائب الساخن على الجزء الخلفي من الزهرة الصدفية وألصقها على الجانب الأيسر من صينية الزهرة المدمجة على شكل ماسة؛ انظر الشكل 7-9 (3).
④ خذ قطعة من الأسلاك النحاسية، وخيط عليها 6 خرزات دائرية حمراء، ثم قم بلفها على شكل زهرة بست بتلات. الصق خرزة من اليشم الأخضر، مروراً بدبوس رأس، في وسط الزهرة، وقص السلك النحاسي الزائد، انظر الشكل 7-9 (4).
⑤ أولاً، قم أولاً بلصق الأوراق المعدنية فوق الزهرة الصدفية، ثم قم بلصق حبة الزهرة السداسية المعدنية المكتملة في الأعلى؛ انظر الشكل 7-9 (5).
⑥ استخدم دبوس رأس لربط خرز اليشم الأخضر ولفه حول قاعدة الزهرة المعدنية لتشكيل دائرة، مما يجعلها قطعتين، انظر الشكل 7-9 (6).
⑦ قم بربط 9 خرزات حمراء مستديرة و8 لآلئ على شكل أرز على دبوس رأس ولفها في دائرة؛ انظر الشكل 7-9 (7).
⑧ استخدم الأسلاك النحاسية لربط الخرز الأحمر المستدير وخرز اليشم الأخضر واللؤلؤ على شكل أرز معًا بالترتيب؛ انظر الشكل 7-9 (8).
⑨ ثم قم بربط طرفي السلك النحاسي من خلال الجزء الخلفي من الرصيعة الزهرية المدمجة واسحبها بإحكام لتثبيتها وضبط موضع الخرز، انظر الشكل 7-9 (9).
⑩ قم بتوصيل حلقة قفز على جانبي صفيحة الزهرة بسلسلتين معدنيتين، على أن تكون الحلقة الثانية أطول قليلاً من الأولى؛ انظر الشكل 7-9 (10).
⑪ قم بخياطة الشريط القزحي الأخضر على شكل مروحة على قماش غير منسوج؛ انظر الشكل 7-9 (11).
⑫ ألصق الرصيعة الزهرية في وسط القماش غير المنسوج، ثم ألصقها بقاعدة البروش المركب في الخلف، مع إنهاء الترتيب، كما هو موضح في الشكل 7-9 (12).
القسم الثاني تصميم وإنتاج المعلقات
1. أمثلة على المعلقات المعقودة
1.1 قلادة عقدة العنقاء الميمونة
(1) خصائص النمط (1)
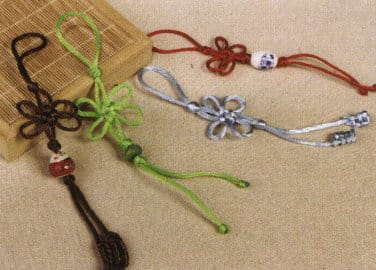
تحتوي هذه القلادة على عقدة ميمونة مقترنة بخرز مزخرف يبرز البهجة والفأل الحسن، وترمز إلى فكرة حصول أهل الخير على الحظ السعيد والفأل الحسن، مما يعكس أمنيات الناس الجميلة في الحق والخير والجمال، كما هو موضح في الأشكال من 7 إلى 10.
(2) نقاط التعلم الرئيسية
إتقان طرق ربط عقدة الذيل الميمون وعقدة ذيل العنقاء؛ وفهم طرق وقواعد الجمع بين القلائد.
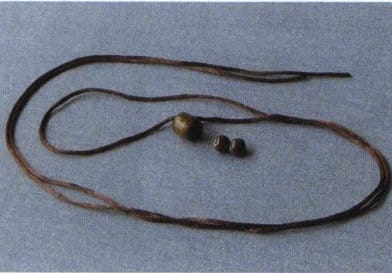
(3) تحضير المواد (الأشكال 7-11)
العقدة: 2 مم × 800 مم;
خرزة خشبية: 12 مم، 1 قطعة واحدة;
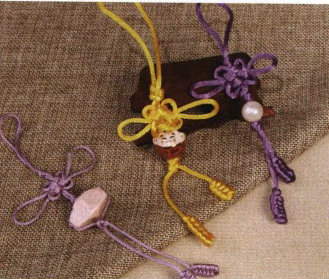
الشكل 7-10 رسم تخطيطي لنمط قلادة عقدة العنقاء الميمونة
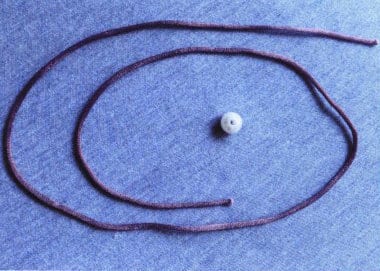
الشكل 7-11 إعداد مواد قلادة عقدة العنقاء الميمونة
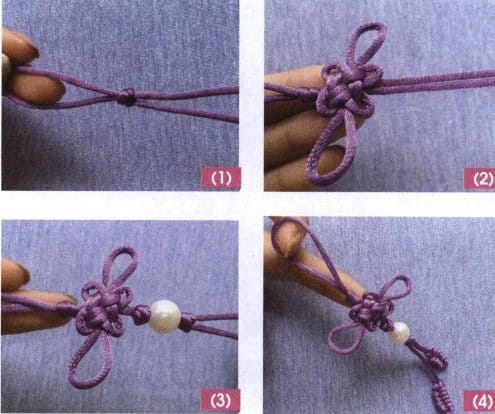
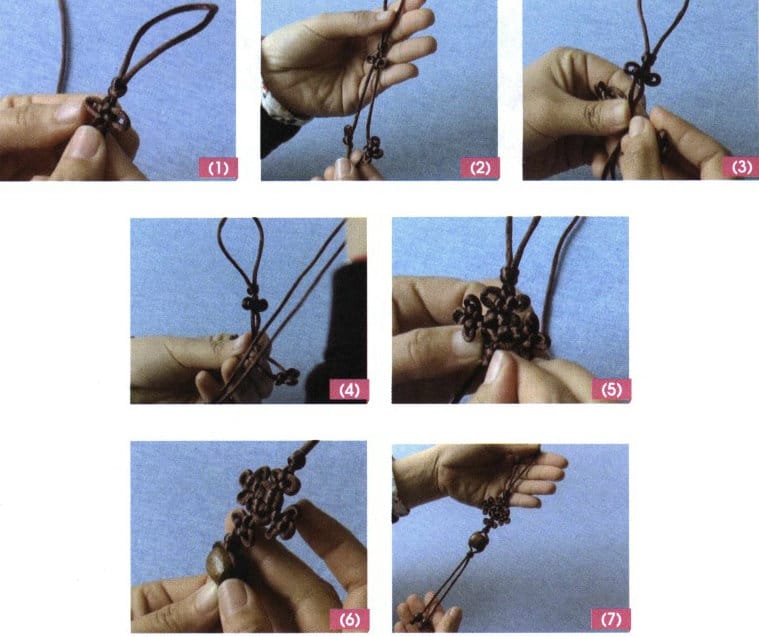
(4) طريقة الإنتاج
① اطوِ الخط من المنتصف لإيجاد المركز، مع ترك حوالي 50 مم من الطول لعمل عقدة توصيل مزدوجة؛ انظر الشكل 7-12 (1).
② اصنع عقدة ميمونة، انظر الشكل 7-12 (2).
③ بعد ذلك، اصنع عقدة توصيل مزدوجة، ثم قم بعمل عقدة توصيل مزدوجة أخرى، انظر الشكل 7-12 (3).
④ في نهاية الخط، اربط عقدة ذيل طائر الفينيق مع كل من الخطين، ويكتمل الإنتاج؛ انظر الشكل 7-12 (4).
1.2 شرابة حريرية زهرية رائعة 1.2 شرابة حريرية رائعة
(1) خصائص النمط (1)
هذه القلادة عبارة عن عقدة مستديرة من الديباج متصلة بخرز مزخرف يشبه عنقوداً من الزهور، ذات شكل حيوي ومغري يجسد لوناً رومانسياً حالماً، انظر الشكل 7-13.
(2) نقاط التعلم الرئيسية
إتقان طريقة نسج عقدة الديباج المستديرة؛ وإتقان مهارات صنع المعلقات باستخدام عقدة الديباج المستديرة.
(3) إعداد المواد (انظر الشكل 7-14)
الخيط الأخضر: 2 مم × 800 مم;
خرزة خشبية: 10 مم، 1 قطعة واحدة.
الشكل 7-13 رسم تخطيطي لنمط شرابة الحرير الزهرية الرائعة

الشكل 7-14 تحضير المواد اللازمة لشرابة الحرير الزهرية الرائعة
(4) طريقة الإنتاج
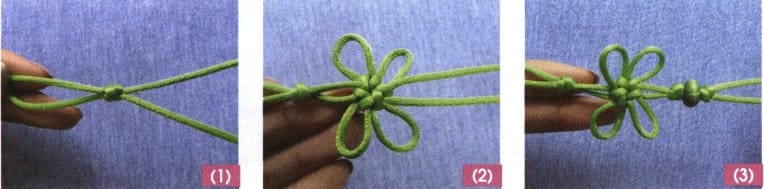
① اطوِ الخيط الأخضر من المنتصف، مع ترك حوالي 5 سم من الطول لعمل عقدة كونيكتينو مزدوجة؛ انظر الشكل 7-15 (1).
② نسج عقدة ديباج مستديرة، انظر الشكل 7-15 (2).
③ بعد ذلك، قم بحياكة عقدة توصيل مزدوجة، ثم قم بحياكة عقدة توصيل مزدوجة أخرى، انظر الشكل 7-15 (3).
④ في نهاية الخيط، اربطي عقدة على كل خيط وأذيبي الأطراف لتثبيتها.
نسخ الكتابة على مجوهرات سوبلينج - مصنع مجوهرات حسب الطلب، مصنع مجوهرات OEM و ODM
1.3 تميمة عقدة الحظ الأبدية 1.3 عقدة الحظ الأبدية
(1) خصائص النمط (1)
صُنعت هذه القلادة من خلال ربط خرز الصدف بعقدة بان تشانغ. وإعطاؤها للأصدقاء والعائلة ينقل بركاتك القلبية وتمنياتك الطيبة. انظر الشكل 7-16.
(2) نقاط التعلم الرئيسية
إتقان طريقة حياكة عقدة بان تشانغ بإتقان؛ وفهم أفكار وخطوات تطبيقها.
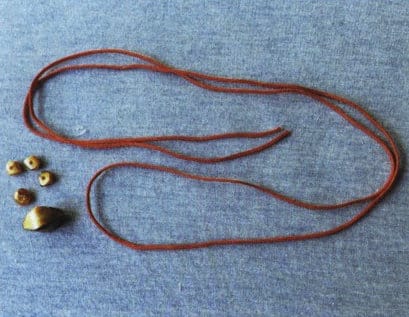
(3) إعداد المواد (الشكل 7-17)
خيط أحمر: 2 مم × 1.5 متر، 1 قطعة;
خرزة صدفية ماسية الشكل: 15 مم (طول) × 12 مم (عرض)، قطعة واحدة;
حبة الصدفة: 6 مم، 2 قطعة;
وسادة إسفنجية: 200 مم (طول) × 200 مم (عرض)، قطعة واحدة.
الأداة: إبرة الخرز.

الشكل 7-16 تصميم عقدة الحظ الأبدية الساحرة
الشكل 7-17 تحضير مواد عقدة الحظ الخالدة
(4) طريقة الإنتاج
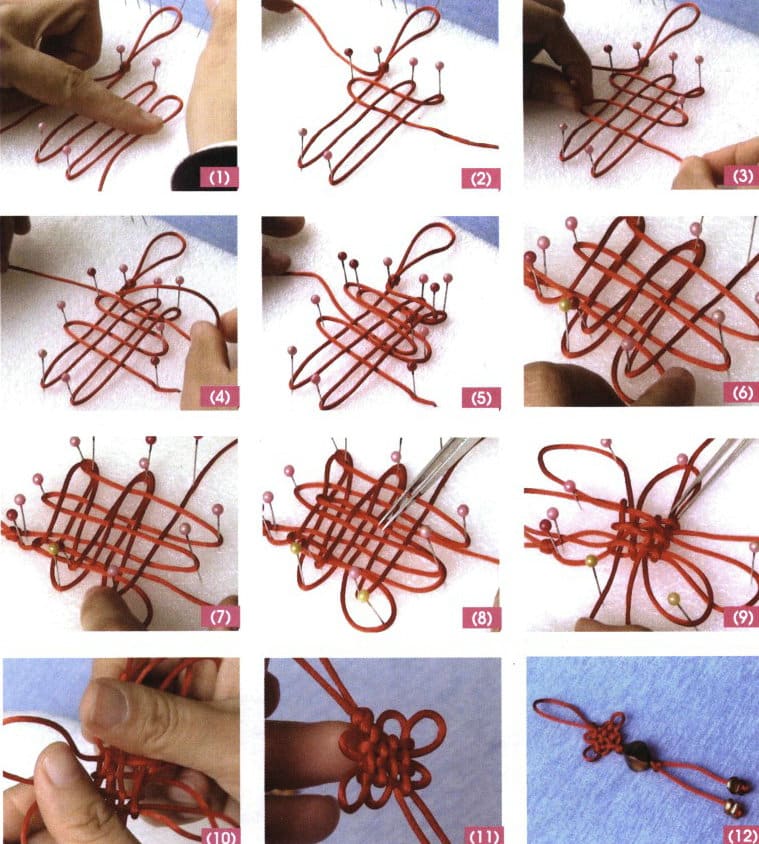
① اطوِ الخيط الأحمر من المنتصف، وأنشئ عقدة مزدوجة، وثبّت موضع عقدة التوصيل المزدوجة بإبرة الخرز مع البدء في النسج من الخيط الأيمن. الاتجاه: اصنع حلقتين بالخيط الأيمن، وثبتهما بإبرة الخرز؛ انظر الشكل 7-18 (1).
② أفقي 1: استخدم الخط المزدوج الأيمن للقيام باختيار واحد، اضغط على واحد، وثبته في نهاية الحلقة؛ انظر الشكل 7-18 (2).
③ أفقي 2: اتبع الطريقة الواردة في الخطوة ②، استمر في الخط المزدوج للقيام باختيار واحد، اضغط على واحد، اضغط على واحد، اضغط على واحد، اضغط على واحد، اضغط على واحد، ثم قم بتثبيته في نهاية الحلقة؛ انظر الشكل 7-18 (3).
④ يمر الخط الأيسر فوق الحلقة الأفقية الأولى مرة واحدة تماماً لأعلى ولأسفل، ويتم تثبيت الخط بإبرة خرز؛ انظر الشكل 7-18 (4).
⑤ اتباع طريقة الخطوة خطوة خطوة ④لأعلى ولأسفل مرة أخرى أسفل الحلقة الأفقية الثانية؛ انظر الشكل 7-18 (5).
⑥ استمر في استخدام الخيط الأيسر، اختر واحدًا من الأسفل إلى الأعلى، واضغط ثلاثة، ثم اختر واحدًا، ثم اضغط ثلاثة للخارج؛ انظر الشكل 7-18 (6).
⑦ في طريق العودة، لا تزال تختار اثنين من نفس الحلقة، وتضغط على واحد، وتختار ثلاثة، وتختار واحدًا؛ انظر الشكل 7-18 (7).
⑧ تقليد الطرق الواردة في الخطوتين ⑥ و ⑦ للقيام بذلك مرة أخرى في العمود الأيمن، وإكمال الخيط الأيسر؛ انظر الشكل 7-18 (8).
⑨ أولاً، قم بإزالة إبرة الخرزة الوسطى واسحب الخيط للخارج وشد العقدة الوسطى، انظر الشكل 7-18 (9).
⑩ قم بإزالة العقدة وضبط أجنحة الأذن؛ انظر الشكل 7-18 (10).
⑪ الحالة المعدلة، انظر الشكل 7-18 (11).
⑫ اصنع عقدة توصيل مزدوجة في الأسفل، ثم مرر كلا الخطين خلال خرزات الصدفة على شكل ماسة، ومرر خطي الذيل خلال خرزتين من الصدفة على التوالي، واربط عقدة للانتهاء؛ انظر الشكل 7-18 (12).
1.4 عقدة الزخرفة التراثية 1.4 عقدة الزخرفة التراثية
(1) خصائص النمط (1)
تأتي هذه القلادة بلون القهوة، وتتميز بعقدة ميمونة سداسية الأذنين في المنتصف، وتحيط بها عقدة البرسيم من الجوانب الأربعة. هيكل العقدة ماسي الشكل، متصل في الأسفل بخرز خشبي رائع وفريد من نوعه، مع سحر عتيق، يجسد المعاني الميمونة للثروة والحظ السعيد، كما هو موضح في الشكل 7-19.
(2) نقاط التعلم الرئيسية
إتقان طرق نسج عقدة الربط المزدوجة والعقدة الميمونة وعقدة البرسيم، والاستفادة من خصائص كل نوع من أنواع العقد لدمجها في إكسسوارات أكثر تنوعاً وحيوية.
(3) إعداد المواد (الشكل 7-20)
الخيط البني: 2 مم × 1.5 متر;
خرزات أسطوانية خشبية: 20 مم × 10 مم، 1 قطعة
خرز خشبي مستدير: 8 ملم، 2 قطعة.

الشكل 7-19 رسم توضيحي لتصميم عقدة الصغر التراثية
الشكل 7-20 إعداد عقدة الصغر التراثية
(4) طريقة الإنتاج
① اطوِ الخيط البني من المنتصف، مع ترك حلقة طولها 3 سم، واربط عقدة توصيل مزدوجة؛ ثم اربط عقدة البرسيم، انظر الشكل 7-21 (1).
② اترك حوالي 6 سم من الخيط على كل جانب، واربط عقدة برسيم على كل جانب؛ انظر الشكل 7-21 (2).
③ باستخدام 3 عقدة برسيم كقاعدة، اعبر الخطوط لتشكيل شكل "十"؛ انظر الشكل 7-21 (3).
④ اربط عقدة ميمونة سداسية الأذن، مع سحب الخطوط والضغط عليها في أربعة اتجاهات عكس اتجاه عقارب الساعة؛ انظر الشكل 7-21 (4).
⑤ أسفل العقدة الميمونة، اربط عقدة البرسيم وعقدة الربط المزدوجة بالتتابع، انظر الشكل 7-21 (5).
⑥ مرر من خلال حبة أسطوانية خشبية واحدة ثم اربط عقدة توصيل مزدوجة واحدة؛ تعمل عقدة التوصيل المزدوجة العلوية والسفلية على التثبيت والتزيين؛ انظر الشكل 7-21 (6).
⑦ أخيرًا، قم بربط خرزة خشبية مستديرة في النهاية لإنهاء وربط عقدة لتثبيتها، انظر الشكل 7-21 (7).
2. أمثلة على قلادة الخرز
2.1 قلادة عنقود الخرز السماوية
(1) خصائص النمط (1)
تتألف هذه القلادة من اللونين الأحمر والأبيض بالتناوب وهي على شكل نجمة خماسية بشكل عام. وتلفت الخرزات الحمراء المستديرة ذات الأوجه المستديرة الأنظار، بينما تشكل الخرزات البيضاء الشفافة الشفافة مجموعة من عشر خرزات تتلألأ كالنجوم، وتضفي إحساساً قوياً بالشكل الجمالي، كما هو موضح في الشكل 7-22.
(2) نقاط التعلم الرئيسية
تعلّم طرق وخطوات تطريز النجمة الخماسية؛ وأتقن كيفية دمجها في المعلقات.
(3) إعداد المواد (الشكل 7-23)
خرزة بيضاوية حمراء ذات أوجه بيضاوية: 6 مم، 17 قطعة;
خرزة بذرة بيضاء مستديرة مستديرة: 2 مم، 40 قطعة;
دبوس العين: 30 مم، 1 قطعة 1 مم;
مشبك لوبستر: 8 مم، 1 قطعة واحدة;
سلك القلادة: 1 قطعة واحدة;
حلقة قفزة 6 ملم، 1 قطعة
خيط صيد السمك: 0.3 مم × 60 سم، 1 قطعة.

الشكل 7-22 مخطط نمط قلادة العنقود السماوي من الخرز السماوي
الشكل 7-23 إعداد المواد لقلادة مجموعة الخرز السماوية
(4) طريقة الإنتاج
① نقطة النجمة الأولى: استخدم خيط الصيد لربط 3 خرزات بذرة بيضاء مستديرة (حبات بذرة) بشكل فردي وتمريرها من خلال حبة بذرة واحدة لتشكيل حبة زهرة رباعية البتلات؛ انظر الشكل 7-24 (1).
② يقوم الخط الأيمن بربط الخرز الأحمر البيضاوي الشكل (الخرز الأحمر) وحبات البذور والخرز الأحمر بالتتابع؛ ويقوم الخط الأيسر بربط الخرز الأحمر ويمر في النهاية بخرز البذور. تتكون كل نجمة من 4 خرزات بذرة و3 خرزات حمراء؛ انظر الشكل 7-24 (2).
③ توصيل مجموعة ندفة الثلج: يقوم كلا الخطين بربط خرزات البذور كل على حدة، ثم تمر عبر خرزات البذور لتكوين شكل زهرة رباعية البتلات، تعمل على ربط كل نقطة نجمية، انظر الشكل 7-24 (3).
④ النقطة النجمية الثانية: خيط خرزة حمراء واحدة و4 خرزات بذرة بالتتابع على الخط الأيسر؛ انظر الشكل 7-24 (4).
⑤ ثم أعد الخيط من خلال حبة البذرة الأولى من الخرزات الأربع، لتشكل شكل زهرة رباعية البذور، انظر الشكل 7-24 (5).
⑥ قم بربط الخرز الأحمر على الخطين الأيسر والأيمن ومرر الخرزات الأولية لإكمال النجمة الثانية؛ انظر الشكل 7-24 (6).
⑦ كرر الخطوات من ③ إلى ⑥ مرتين لتشكيل النقطتين النجميتين الثالثة والرابعة؛ انظر الشكل 7-21 (7).
⑧ يمر الخط الأخير الأيمن والأيسر من خلال خرزة البذور، ويمر خط الذيل من خلال الخرزات الكبيرة، بهدف الثبات والاستقرار، كما هو موضح في الشكل 7-24 (8).
⑨ يعلق الجزء من حلقة دبوس العين أولاً على النجمة الخماسية، ثم يتم ربط خرزتين حمراوين، ويترك طول 7 ~ 8 مم لقطعها، وتثنى على شكل حلقة على شكل 9، انظر الشكل 7-24 (9).
⑩ قم بتوصيل الحبل المتدلي بمشبك جراد البحر بحلقة قفز لتشكيل المكون A؛ انظر الشكل 7-24 (10).
⑪ ادمج المكوِّن A مع الخماسي، انظر الشكل 7-24 (11).

2.2 حبلا من خرز اللحن البهيج
(1) خصائص النمط (1)
ترتكز هذه القلادة على الكرة ذات الجوانب الأربعة، وباستخدام خرز البذور لإنشاء شبكة على السطح الخارجي للكرة، يتم دمج الزهور المزخرفة في جسم الخرز لتكوين خرز ملون، مما يجعل الكرة الرتيبة غنية وملونة ورائعة وممتعة للعين على الفور. هذا هو سحر الزخرفة التفصيلية؛ انظر الشكل 7-25.
(2) نقاط التعلم الرئيسية
أتقن طريقة نسج الكرة رباعية الجوانب، وتعلم تقنية سحب الشبكة من خارج الكرة، وأدرك طريقة مطابقة ألوان الخرز.
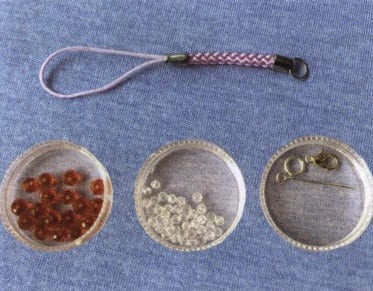
(3) إعداد المواد (الشكل 7-26)
خرز أكريليك وردي: 8 ملم، 12 قطعة
خرز الزينة الزهرية: 6 مم، 6 قطع، 6 قطع;
خرز بذور زهري اللون: 2 ملم، 40 قطعة
دبابيس الرأس: 3 مم، قطعة واحدة 3 مم
حلقة قفزة 6 ملم، 1 قطعة
مشابك لوبستر: 6 مم، قطعة واحدة;
خيط صيد السمك: 60 سم × 0.3 مم، 1 خيط;
سلك القلادة: 1 قطعة واحدة.
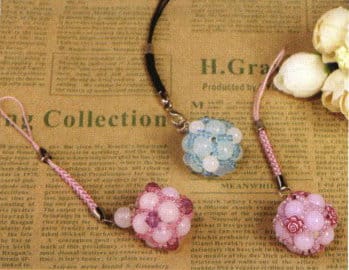
الشكل 7-25 رسم تخطيطي لنمط حبلا اللحن المبهج
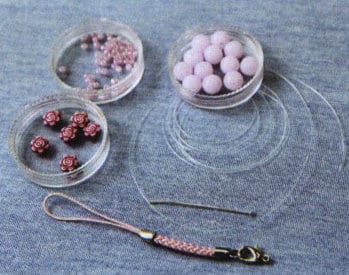
الشكل 7-26 إعداد المواد لجدائل خرزة اللحن المبهجة
(4) طريقة الإنتاج
① استخدم خرز الأكريليك الوردي لربط 4 خرزات من خرزات الزهور رباعية البتلات، حيث يتم ربط الخرزة الأخيرة من المجموعة الأخيرة بشكل مختلف، ووضع الخرزة الخارجية للمجموعة الأولى من خرزات الزهور رباعية البتلات، على أنها الخرزة A، انظر الشكل 7-27 (1).
② بعد توتير آخر مجموعة من الخرزات على اليسار واليمين، قم بربط الخرزة A، انظر الشكل 7-27 (2).
③ خيط 3 حبات أرز وردية اللون على كل جانب، وخيط حبة زينة واحدة في المنتصف؛ انظر الشكل 7-27 (3).
④ ثم خيط 3 خرزات أرز وردية على كل جانب مرة أخرى، وخيط خرزة واحدة بشكل مائل مقابل الخرزة A بحيث تكون الخرزة المزخرفة في وسط خرزة الزهرة ذات الأربع بتلات، انظر الشكل 7-27 (4).
⑤ استخدم الطرق الواردة في الخطوة ③ والخطوة ④ لربط الخرز المزخرف في اتجاه واحد؛ انظر الشكل 7-27 (5).
⑥ استمر في الخيوط حتى تنتهي من خيوط 4 خرزات زخرفية في هذا الاتجاه؛ انظر الشكل 7-27 (6).
⑦ مرر خيط الصيد إلى الجانب الآخر، وباستخدام نفس الطريقة، قم بربط خرزة زخرفية واحدة على كل جانب، ثم قم بربط بعض خرزات البذور الوردية وربط عقدة وقطع الخيط الزائد وإخفاء العقدة، انظر الشكل 7-27 (7).
⑧ استخدم دبوسًا رأسيًا ليخرج من الأسفل، ثم قم بلفه على شكل شكل تسعة، انظر الشكل 7-27 (8).
⑨ قم بربط حلقة قفزة بمشبك لوبستر على حبل القلادة وعلقها على الحلقة التي على شكل 9؛ انظر الشكل 7-27 (9).